Introduction
Apache Spark is an open-source framework that processes large volumes of stream data from multiple sources. Spark is used in distributed computing with machine learning applications, data analytics, and graph-parallel processing.
This guide will show you how to install Apache Spark on Windows 10 and test the installation.

Prerequisites
- A system running Windows 10
- A user account with administrator privileges (required to install software, modify file permissions, and modify system PATH)
- Command Prompt or Powershell
- A tool to extract .tar files, such as 7-Zip
Installing Apache Spark on Windows 10 may seem complicated to novice users, but this simple tutorial will have you up and running. If you already have Java 8 and Python 3 installed, you can skip the first two steps.
Step 1: Install Java 8
Apache Spark requires Java 8. You can check to see if Java is installed using the command prompt.
Open the command line by clicking Start > type cmd > click Command Prompt.
Type the following command in the command prompt:
java -versionIf Java is installed, it will respond with the following output:
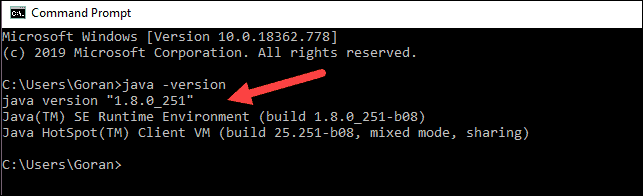
Your version may be different. The second digit is the Java version – in this case, Java 8.
If you don’t have Java installed:
1. Open a browser window, and navigate to https://java.com/en/download/.
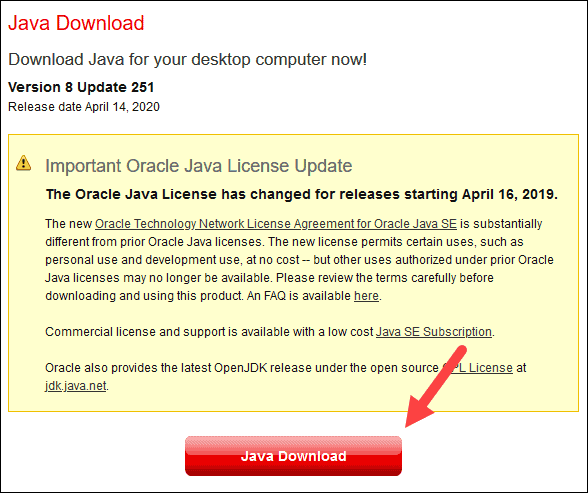
2. Click the Java Download button and save the file to a location of your choice.
3. Once the download finishes double-click the file to install Java.
Note: At the time this article was written, the latest Java version is 1.8.0_251. Installing a later version will still work. This process only needs the Java Runtime Environment (JRE) – the full Development Kit (JDK) is not required. The download link to JDK is https://www.oracle.com/java/technologies/javase-downloads.html.
Step 2: Install Python
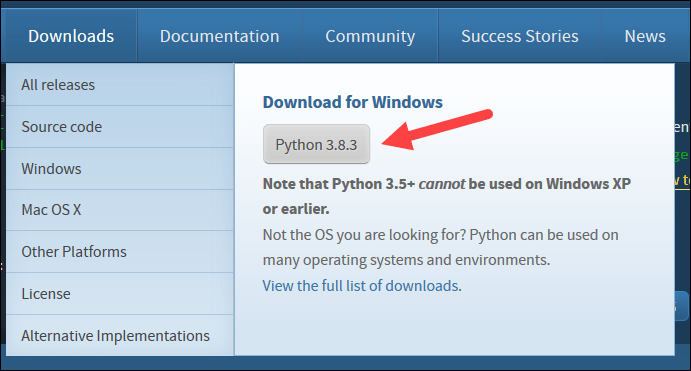
1. To install the Python package manager, navigate to https://www.python.org/ in your web browser.
2. Mouse over the Download menu option and click Python 3.8.3. 3.8.3 is the latest version at the time of writing the article.
3. Once the download finishes, run the file.
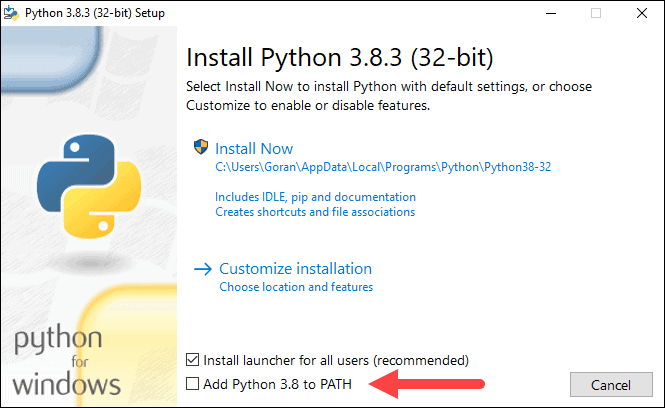
4. Near the bottom of the first setup dialog box, check off Add Python 3.8 to PATH. Leave the other box checked.
5. Next, click Customize installation.
6. You can leave all boxes checked at this step, or you can uncheck the options you do not want.
7. Click Next.
8. Select the box Install for all users and leave other boxes as they are.
9. Under Customize install location, click Browse and navigate to the C drive. Add a new folder and name it Python.
10. Select that folder and click OK.

11. Click Install, and let the installation complete.
12. When the installation completes, click the Disable path length limit option at the bottom and then click Close.
13. If you have a command prompt open, restart it. Verify the installation by checking the version of Python:
python --versionThe output should print Python 3.8.3.
Note: For detailed instructions on how to install Python 3 on Windows or how to troubleshoot potential issues, refer to our Install Python 3 on Windows guide.
Step 3: Download Apache Spark
1. Open a browser and navigate to https://spark.apache.org/downloads.html.
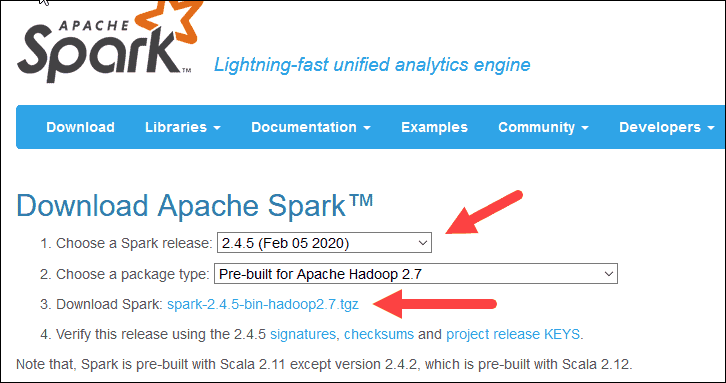
2. Under the Download Apache Spark heading, there are two drop-down menus. Use the current non-preview version.
- In our case, in Choose a Spark release drop-down menu select 2.4.5 (Feb 05 2020).
- In the second drop-down Choose a package type, leave the selection Pre-built for Apache Hadoop 2.7.
3. Click the spark-2.4.5-bin-hadoop2.7.tgz link.
4. A page with a list of mirrors loads where you can see different servers to download from. Pick any from the list and save the file to your Downloads folder.
Step 4: Verify Spark Software File
1. Verify the integrity of your download by checking the checksum of the file. This ensures you are working with unaltered, uncorrupted software.
2. Navigate back to the Spark Download page and open the Checksum link, preferably in a new tab.
3. Next, open a command line and enter the following command:
certutil -hashfile c:\users\username\Downloads\spark-2.4.5-bin-hadoop2.7.tgz SHA5124. Change the username to your username. The system displays a long alphanumeric code, along with the message Certutil: -hashfile completed successfully.
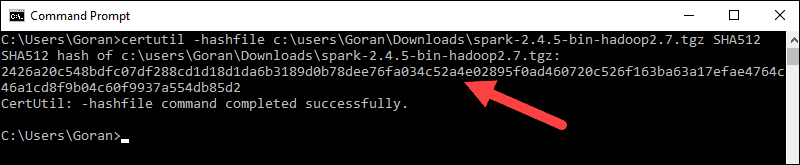
5. Compare the code to the one you opened in a new browser tab. If they match, your download file is uncorrupted.
Step 5: Install Apache Spark
Installing Apache Spark involves extracting the downloaded file to the desired location.
1. Create a new folder named Spark in the root of your C: drive. From a command line, enter the following:
cd \

mkdir Spark
2. In Explorer, locate the Spark file you downloaded.
3. Right-click the file and extract it to C:\Spark using the tool you have on your system (e.g., 7-Zip).
4. Now, your C:\Spark folder has a new folder spark-2.4.5-bin-hadoop2.7 with the necessary files inside.
Step 6: Add winutils.exe File
Download the winutils.exe file for the underlying Hadoop version for the Spark installation you downloaded.
1. Navigate to this URL https://github.com/cdarlint/winutils and inside the bin folder, locate winutils.exe, and click it.
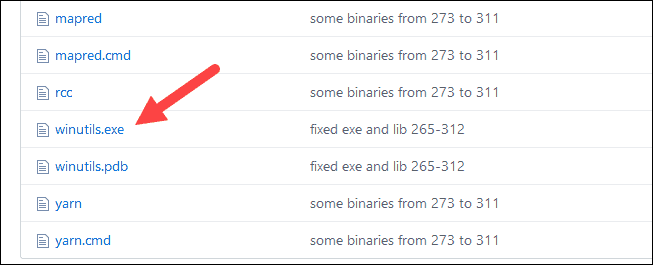
2. Find the Download button on the right side to download the file.
3. Now, create new folders Hadoop and bin on C: using Windows Explorer or the Command Prompt.
4. Copy the winutils.exe file from the Downloads folder to C:\hadoop\bin.
Step 7: Configure Environment Variables
Configuring environment variables in Windows adds the Spark and Hadoop locations to your system PATH. It allows you to run the Spark shell directly from a command prompt window.
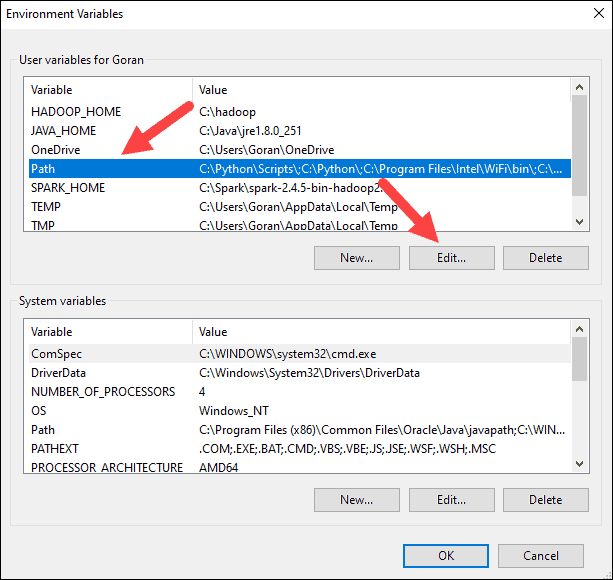
1. Click Start and type environment.
2. Select the result labeled Edit the system environment variables.
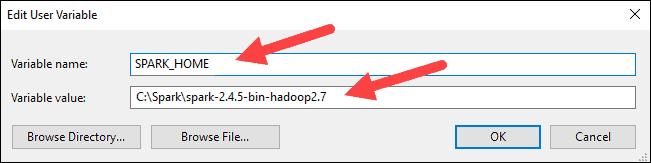
3. A System Properties dialog box appears. In the lower-right corner, click Environment Variables and then click New in the next window.

4. For Variable Name type SPARK_HOME.
5. For Variable Value type C:\Spark\spark-2.4.5-bin-hadoop2.7 and click OK. If you changed the folder path, use that one instead.
6. In the top box, click the Path entry, then click Edit. Be careful with editing the system path. Avoid deleting any entries already on the list.
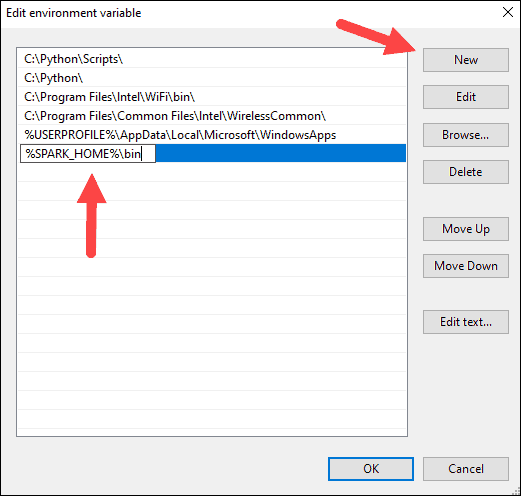
7. You should see a box with entries on the left. On the right, click New.
8. The system highlights a new line. Enter the path to the Spark folder C:\Spark\spark-2.4.5-bin-hadoop2.7\bin. We recommend using %SPARK_HOME%\bin to avoid possible issues with the path.
9. Repeat this process for Hadoop and Java.
- For Hadoop, the variable name is HADOOP_HOME and for the value use the path of the folder you created earlier: C:\hadoop. Add C:\hadoop\bin to the Path variable field, but we recommend using %HADOOP_HOME%\bin.
- For Java, the variable name is JAVA_HOME and for the value use the path to your Java JDK directory (in our case it’s C:\Program Files\Java\jdk1.8.0_251).
10. Click OK to close all open windows.
Note: Star by restarting the Command Prompt to apply changes. If that doesn’t work, you will need to reboot the system.
Step 8: Launch Spark
1. Open a new command-prompt window using the right-click and Run as administrator:
2. To start Spark, enter:
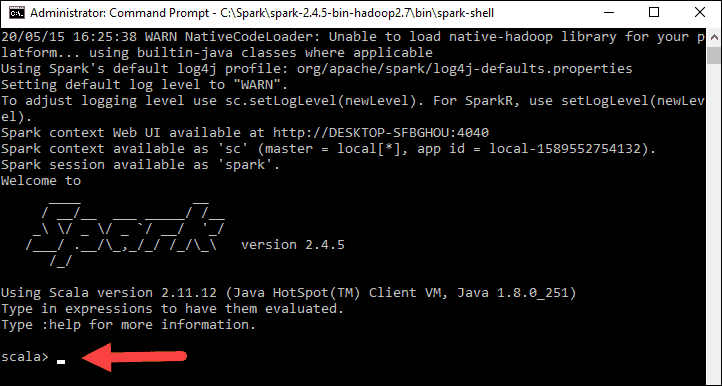
C:\Spark\spark-2.4.5-bin-hadoop2.7\bin\spark-shellIf you set the environment path correctly, you can type spark-shell to launch Spark.
3. The system should display several lines indicating the status of the application. You may get a Java pop-up. Select Allow access to continue.
Finally, the Spark logo appears, and the prompt displays the Scala shell.
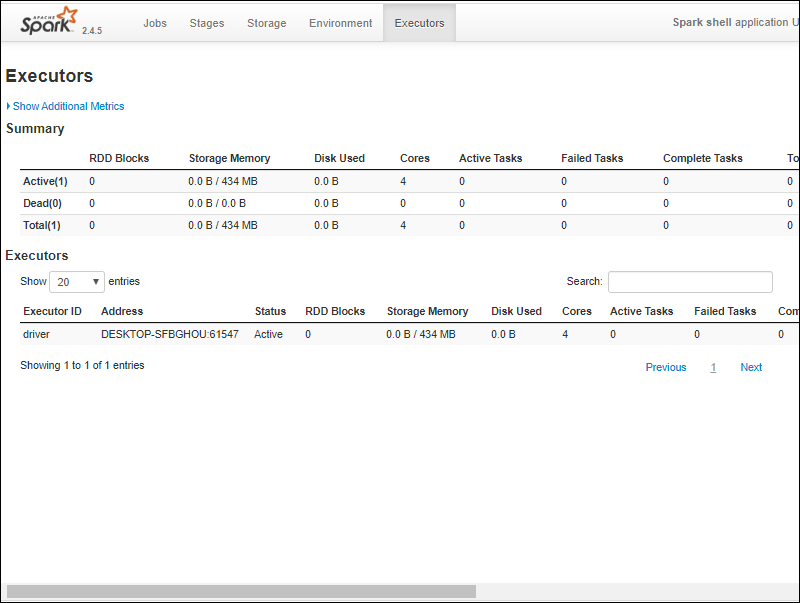
4., Open a web browser and navigate to http://localhost:4040/.
5. You can replace localhost with the name of your system.
6. You should see an Apache Spark shell Web UI. The example below shows the Executors page.
7. To exit Spark and close the Scala shell, press ctrl-d in the command-prompt window.
Note: If you installed Python, you can run Spark using Python with this command:
pysparkExit using quit().
Test Spark
In this example, we will launch the Spark shell and use Scala to read the contents of a file. You can use an existing file, such as the README file in the Spark directory, or you can create your own. We created pnaptest with some text.
1. Open a command-prompt window and navigate to the folder with the file you want to use and launch the Spark shell.
2. First, state a variable to use in the Spark context with the name of the file. Remember to add the file extension if there is any.
val x =sc.textFile("pnaptest")3. The output shows an RDD is created. Then, we can view the file contents by using this command to call an action:
x.take(11).foreach(println)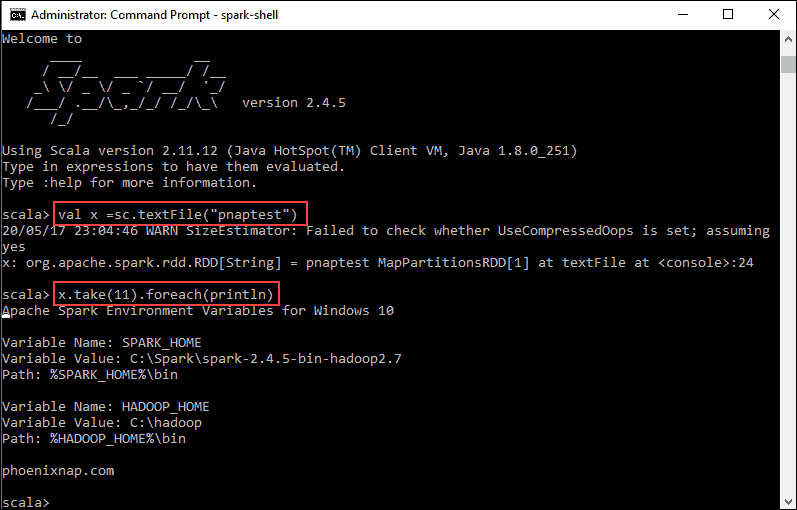
This command instructs Spark to print 11 lines from the file you specified. To perform an action on this file (value x), add another value y, and do a map transformation.
4. For example, you can print the characters in reverse with this command:
val y = x.map(_.reverse)5. The system creates a child RDD in relation to the first one. Then, specify how many lines you want to print from the value y:
y.take(11).foreach(println)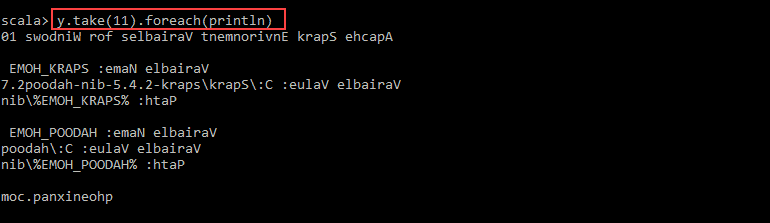
The output prints 11 lines of the pnaptest file in the reverse order.
When done, exit the shell using ctrl-d.
Conclusion
You should now have a working installation of Apache Spark on Windows 10 with all dependencies installed. Get started running an instance of Spark in your Windows environment.
Our suggestion is to also learn more about what Spark DataFrame is, the features, and how to use Spark DataFrame when collecting data.
In this article, I will explain step-by-step how to do Apache Spark Installation on windows os 7, 10, and the latest version and also explain how to start a history server and monitor your jobs using Web UI.
Related:
- Spark Install Latest Version on Mac
- PySpark Install on Windows
Install Java 8 or Later
To install Apache Spark on windows, you would need Java 8 or the latest version hence download the Java version from Oracle and install it on your system. If you wanted OpenJDK you can download it from here.
After download, double click on the downloaded .exe (jdk-8u201-windows-x64.exe) file in order to install it on your windows system. Choose any custom directory or keep the default location.
Note: This article explains Installing Apache Spark on Java 8, same steps will also work for Java 11 and 13 versions.
Apache Spark comes in a compressed tar/zip files hence installation on windows is not much of a deal as you just need to download and untar the file. Download Apache spark by accessing the Spark Download page and select the link from “Download Spark (point 3 from below screenshot)”.
If you wanted to use a different version of Spark & Hadoop, select the one you wanted from the drop-down; the link on point 3 changes to the selected version and provides you with an updated link to download.

After download, untar the binary using 7zip or any zip utility to extract the zip file and copy the extracted directory spark-3.0.0-bin-hadoop2.7 to c:\apps\opt\spark-3.0.0-bin-hadoop2.7
Spark Environment Variables
Post Java and Apache Spark installation on windows, set JAVA_HOME, SPARK_HOME, HADOOP_HOME and PATH environment variables. If you know how to set the environment variable on windows, add the following.
JAVA_HOME = C:\Program Files\Java\jdk1.8.0_201
PATH = %PATH%;%JAVA_HOME%

SPARK_HOME  = C:\apps\opt\spark-3.0.0-bin-hadoop2.7
HADOOP_HOME = C:\apps\opt\spark-3.0.0-bin-hadoop2.7
PATH=%PATH%;%SPARK_HOME%
Follow the below steps if you are not aware of how to add or edit environment variables on windows.
- Open System Environment Variables window and select Environment Variables.

2. On the following Environment variable screen, add SPARK_HOME, HADOOP_HOME, JAVA_HOME by selecting the New option.

3. This opens up the New User Variables window where you can enter the variable name and value.
4. Now Edit the PATH variable

5. Add Spark, Java, and Hadoop bin location by selecting New option.

Spark with winutils.exe on Windows
Many beginners think Apache Spark needs a Hadoop cluster installed to run but that’s not true, Spark can run on AWS by using S3, Azure by using blob storage without Hadoop and HDFSe.t.c.
To run Apache Spark on windows, you need winutils.exe as it uses POSIX like file access operations in windows using windows API.
winutils.exe enables Spark to use Windows-specific services including running shell commands on a windows environment.
Download winutils.exe for Hadoop 2.7 and copy it to %SPARK_HOME%\bin folder. Winutils are different for each Hadoop version hence download the right version based on your Spark vs Hadoop distribution from https://github.com/steveloughran/winutils
Apache Spark shell
spark-shell is a CLI utility that comes with Apache Spark distribution, open command prompt, go to cd %SPARK_HOME%/bin and type spark-shell command to run Apache Spark shell. You should see something like below (ignore the error you see at the end). Sometimes it may take a minute or two for your Spark instance to initialize to get to the below screen.

Spark-shell also creates a Spark context web UI and by default, it can access from http://localhost:4041.
On spark-shell command line, you can run any Spark statements like creating an RDD, getting Spark version e.t.c
scala> spark.version
res2: String = 3.0.0

scala> val rdd = sc.parallelize(Array(1,2,3,4,5,6,7,8,9,10))
rdd: org.apache.spark.rdd.RDD[Int] = ParallelCollectionRDD[0] at parallelize at console:24

scala>
This completes the installation of Apache Spark on Windows 7, 10, and any latest.
Where to go Next?
You can continue following the below document to see how you can debug the logs using Spark Web UI and enable the Spark history server or follow the links as next steps
- Spark RDD Tutorial
- Spark Hello World Example in IntelliJ IDEA
Web UI on Windows
Apache Spark provides a suite of Web UIs (Jobs, Stages, Tasks, Storage, Environment, Executors, and SQL) to monitor the status of your Spark application, resource consumption of Spark cluster, and Spark configurations. On Spark Web UI, you can see how the operations are executed.

History Server
History server keeps a log of all Spark applications you submit by spark-submit, spark-shell. You can enable Spark to collect the logs by adding the below configs to spark-defaults.conf file, conf file is located at %SPARK_HOME%/conf directory.
spark.eventLog.enabled true
spark.history.fs.logDirectory file:///c:/logs/path
After setting the above properties, start the history server by starting the below command.
$SPARK_HOME/bin/spark-class.cmd org.apache.spark.deploy.history.HistoryServer
By default History server listens at 18080 port and you can access it from browser using http://localhost:18080/

By clicking on each App ID, you will get the details of the application in Spark web UI.
Conclusion
In summary, you have learned how to install Apache Spark on windows and run sample statements in spark-shell, and learned how to start spark web-UI and history server.
If you have any issues, setting up, please message me in the comments section, I will try to respond with the solution.
Happy Learning !!
Related Articles
- Apache Spark Installation on Linux
- What is Apache Spark Driver?
- Apache Spark 3.x Install on Mac
- Install Apache Spark Latest Version on Mac
- How to Check Spark Version
- What does setMaster(local[*]) mean in Spark
- Spark Start History Server
- Spark with Scala setup on IntelliJ
Apache Spark is a fast and general-purpose cluster computing system. It provides high-level APIs in Java, Scala, Python, and R and an optimized engine that supports general execution graphs. It also supports a rich set of higher-level tools, including Spark SQL for SQL and structured data processing, MLlib for machine learning, GraphX for graph processing, and Spark Streaming.
In this document, we will cover the installation procedure of Apache Spark on the Windows 10 operating system.

Prerequisites
This guide assumes that you are using Windows 10 and the user has admin permissions.
System requirements:
- Windows 10 OS
- At least 4 GB RAM
- Free space of at least 20 GB
Installation Procedure
Step 1: Go to Apache Spark’s official download page and choose the latest release. For the package type, choose ‘Pre-built for Apache Hadoop’.
The page will look like the one below.

Step 2: Once the download is completed, unzip the file, unzip the file using WinZip or WinRAR, or 7-ZIP.
Step 3: Create a folder called Spark under your user Directory like below and copy and paste the content from the unzipped file.
C:\Users\<USER>\Spark
It looks like the below after copy-pasting into the Spark directory.

Step 4: Go to the conf folder and open the log file called log4j.properties. template. Change INFO to WARN (It can be an ERROR to reduce the log). This and the next steps are optional.

Remove. template so that Spark can read the file.
Before removing. template all files look like below.

After removing. template extension, files will look like below

Step 5: Now, we need to configure the path.
Go to Control Panel -> System and Security -> System -> Advanced Settings -> Environment Variables
Add below new user variable (or System variable) (To add a new user variable, click on the New button under User variable for <USER>)

Click OK.
Add %SPARK_HOME%\bin to the path variable.

Click OK.
Step 6: Spark needs a piece of Hadoop to run. For Hadoop 2.7, you need to install winutils.exe.
You can find winutils.exe on this page. You can download it for your ease.
Step 7: Create a folder called winutils in C drive and create a folder called bin inside. Then, move the downloaded winutils file to the bin folder.
C:\winutils\bin

Add the user (or system) variable %HADOOP_HOME% like SPARK_HOME.


Click OK.
Step 8: To install Apache Spark, Java should be installed on your computer. If you don’t have java installed on your system. Please follow the below process
Java Installation Steps
1. Go to the official Java site mentioned below the page.
Accept Licence Agreement for Java SE Development Kit 8u201
2. Download jdk-8u201-windows-x64.exe file
3. Double Click on the Downloaded .exe file, and you will see the window is shown below.

4. Click Next.
5. Then below window will be displayed.

6. Click Next.
7. Below window will be displayed after some process.

8. Click Close.
Test Java Installation
Open Command Line and type java -version, then it should display the installed version of Java

You should also check JAVA_HOME and the path of %JAVA_HOME%\bin included in user variables (or system variables)
1. In the end, the environment variables have 3 new paths (if you need to add a Java path, otherwise SPARK_HOME and HADOOP_HOME).


2. Create c:\tmp\hive directory. This step is not necessary for later versions of Spark. When you first start Spark, it creates the folder by itself. However, it is the best practice to create a folder.
C:\tmp\hive
Test Installation
Open the command line and type spark-shell, and you will get the result below.

We have completed the spark installation on the Windows system. Let’s create RDD and Data frame
We create one RDD and Data frame; then we will end up.
1. We can create RDD in 3 ways; we will use one way to create RDD.
Define any list, then parallelize it. It will create RDD. Below is the code, and copy and paste it one by one on the command line.
val list = Array(1,2,3,4,5)
val rdd = sc.parallelize(list)
The above will create RDD.
2. Now, we will create a Data frame from RDD. Follow the below steps to create Dataframe.
import spark.implicits._
val df = rdd.toDF("id")
The above code will create Dataframe with id as a column.
To display the data in Dataframe, use the below command.
Df.show()
It will display the below output.

How to uninstall Spark from Windows 10 System
Please follow the below steps to uninstall spark on Windows 10.
- Remove the below System/User variables from the system.
- SPARK_HOME
- HADOOP_HOME
To remove System/User variables, please follow the below steps:
Go to Control Panel -> System and Security -> System -> Advanced Settings -> Environment Variables, then find SPARK_HOME and HADOOP_HOME then, select them, and press the DELETE button.
Find Path variable Edit -> Select %SPARK_HOME%\bin -> Press DELETE Button
Select % HADOOP_HOME%\bin -> Press DELETE Button -> OK Button
Open Command Prompt, type spark-shell, then enter, and now we get an error. Now we can confirm that Spark is successfully uninstalled from the System.
Unleash your data superpowers with our advanced data science courses. Dive deep into the world of analytics and gain the skills to unlock valuable insights. Join us today and become a data wizard!
Conclusion
Java 8 or a more recent version is required to install Apache Spark on Windows, so obtain and install it by visiting Oracle. You may download OpenJDK from this page if you’d like.
Double-click the downloaded.exe (jdk-8u201-windows-x64.exe) file to install it on your Windows machine when it has finished downloading. Alternatively, you may stick with the default directory. The article provides all the details on setting up your Apache Spark from Scratch.
Once you have covered all the steps mentioned in this article, Apache Spark should operate perfectly on Windows 10. Start off by launching a Spark instance in your Windows environment. If you are facing any problems, let us know in the comments.
Мы уже знаем, что нам нужен Hadoop для хранения как структурированных, так и неструктурированных данных, которые настолько велики, что их обычное хранение на диске не будет хорошим выбором, но что с ними делать потом? вот тут-то и появляется Apache Spark. Согласно их официальному сайту, Apache Spark™ — это многоязычный движок для выполнения инженерии данных, науки о данных и машинного обучения на одноузловых машинах или кластерах. Следовательно, вы можете разобраться в больших кластерах данных, которые вы собрали.
Установка и настройка Apache Spark
Прежде всего, перейдите по ссылке https://spark.apache.org/downloads.html и загрузите подходящую вам версию Spark вместе с соответствующим пакетом Hadoop.

Теперь запомните версию пакета Hadoop, которую вы загружаете, она пригодится позже, ссылка приведет вас к официальному Apache, где присутствует новая сгенерированная ссылка, которую вы можете скачать.

Разархивируйте загруженный файл на диск C, чтобы указанный путь выглядел так: C:\Apache Spark Extracted Folder.
Теперь нам нужно скачать winutils по этой ссылке, которая соответствует версии вашего пакета Hadoop. Таким образом, если вы загрузили пакет 3.2, вы загрузите winutils.exe версии 3.2.0, нажав кнопку загрузки, как показано на рисунке.

Теперь создайте новую папку с именем Hadoop и внутри нее создайте еще одну папку с именем bin и поместите в нее файл winutils.exe, поэтому каталог должен выглядеть так: C:\Users (имя пользователя)\Desktop\Hadoop\bin\winutils .EXE.
Когда мы закончим с этим, нам нужно настроить переменные среды для этих файлов (Apache Spark и winutils), которые мы разместили. Перейдите в строку поиска, введите «среда» и нажмите на показанную ниже опцию.


Нажмите «Переменные среды», а затем нажмите «Создать», после чего создайте новую переменную, как показано ниже, которая содержит имя переменной и каталог, в котором она находится.


Теперь, когда мы закончили с этим, мы готовы использовать Spark в Windows в локальном режиме, перейдите в командную строку, а оттуда перейдите в каталог Spark -> папка bin и выполните следующую команду «spark-shell», если все пошел правильно, вы должны увидеть следующий экран.

Искра тестирования
После завершения установки мы можем протестировать нашу установку Spark в среде Google Collab.
import findspark
findspark.init()

from pyspark.sql import SparkSession

spark = SparkSession.builder.master("local[*]").getOrCreate()
# Test the spark
df = spark.createDataFrame([{"hello": "world"} for x in range(1000)])

df.show(3, False)/content/spark-3.1.2-bin-hadoop3.2/python/pyspark/sql/session.py:381: UserWarning: inferring schema from dict is deprecated,please use pyspark.sql.Row instead
  warnings.warn("inferring schema from dict is deprecated,"


+-----+
|hello|
+-----+
|world|
|world|
|world|
+-----+
only showing top 3 rows
# make sure the version of pyspark
import pyspark
print(pyspark.__version__)
3.1.2
Алгоритмы классификации со Spark
Теперь, когда мы закончили тестирование версии Spark, мы можем попробовать пример того, как с ним выполняется машинное обучение, то есть с использованием контролируемого алгоритма кластеризации в наборе данных радужной оболочки, выполните следующую команду, чтобы загрузить его с github.
# Downloading the clustering data
!wget -q "https://raw.githubusercontent.com/amjadraza/blogs-data/master/spark_ml/iris.csv"
df = pd.read_csv("https://raw.githubusercontent.com/amjadraza/blogs-data/master/spark_ml/iris.csv", header=None)
df.head()
После запуска df.head() вы должны увидеть следующий вывод

теперь мы создадим кадры данных в соответствии с имеющимися у нас столбцами.
spark.createDataFrame(df, columns)
DataFrame[c_0: double, c_1: double, c_2: double, c_3: double, c4 : string]
Предварительная обработка
Теперь мы применяем предварительную обработку, чтобы понять набор данных радужной оболочки, чтобы получить наилучший результат при применении алгоритма ML.
from pyspark.sql.functions import *
from pyspark.ml.feature import VectorAssembler
from pyspark.ml.feature import  StringIndexer# Read the iris data
df_iris = pd.read_csv("https://raw.githubusercontent.com/amjadraza/blogs-data/master/spark_ml/iris.csv", header=None)
iris_df = spark.createDataFrame(df_iris)iris_df.show(5, False)
+------------+-----------+------------+-----------+-----------+
|sepal_length|sepal_width|petal_length|petal_width|species    |
+------------+-----------+------------+-----------+-----------+
|5.1         |3.5        |1.4         |0.2        |Iris-setosa|
|4.9         |3.0        |1.4         |0.2        |Iris-setosa|
|4.7         |3.2        |1.3         |0.2        |Iris-setosa|
|4.6         |3.1        |1.5         |0.2        |Iris-setosa|
|5.0         |3.6        |1.4         |0.2        |Iris-setosa|
+------------+-----------+------------+-----------+-----------+
only showing top 5 rows# Rename the columns
iris_df = iris_df.select(col("0").alias("sepal_length"),
                         col("1").alias("sepal_width"),
                         col("2").alias("petal_length"),
                         col("3").alias("petal_width"),
                         col("4").alias("species"),
                        )# Converting the columns into features
vectorAssembler = VectorAssembler(inputCols = ["sepal_length", "sepal_width", "petal_length", "petal_width"],
                                  outputCol = "features")
viris_df = vectorAssembler.transform(iris_df)viris_df.show(5, False)
+------------+-----------+------------+-----------+-----------+-----------------+
|sepal_length|sepal_width|petal_length|petal_width|species    |features         |
+------------+-----------+------------+-----------+-----------+-----------------+
|5.1         |3.5        |1.4         |0.2        |Iris-setosa|[5.1,3.5,1.4,0.2]|
|4.9         |3.0        |1.4         |0.2        |Iris-setosa|[4.9,3.0,1.4,0.2]|
|4.7         |3.2        |1.3         |0.2        |Iris-setosa|[4.7,3.2,1.3,0.2]|
|4.6         |3.1        |1.5         |0.2        |Iris-setosa|[4.6,3.1,1.5,0.2]|
|5.0         |3.6        |1.4         |0.2        |Iris-setosa|[5.0,3.6,1.4,0.2]|
+------------+-----------+------------+-----------+-----------+-----------------+
only showing top 5 rowsindexer = StringIndexer(inputCol="species", outputCol = "label")
iviris_df = indexer.fit(viris_df).transform(viris_df)iviris_df.show(2, False)
+------------+-----------+------------+-----------+-----------+-----------------+-----+
|sepal_length|sepal_width|petal_length|petal_width|species    |features         |label|
+------------+-----------+------------+-----------+-----------+-----------------+-----+
|5.1         |3.5        |1.4         |0.2        |Iris-setosa|[5.1,3.5,1.4,0.2]|0.0  |
|4.9         |3.0        |1.4         |0.2        |Iris-setosa|[4.9,3.0,1.4,0.2]|0.0  |
+------------+-----------+------------+-----------+-----------+-----------------+-----+
only showing top 2 rows
как только наши данные будут подготовлены, мы можем применить наш алгоритм классификации, т. е. наивный байесовский классификатор.
from pyspark.ml.classification import NaiveBayes
from pyspark.ml.evaluation import MulticlassClassificationEvaluator
#Create the traing and test splits
splits = iviris_df.randomSplit([0.6,0.4], 1)
train_df = splits[0]
test_df = splits[1]
#Apply the Naive bayes classifier
nb = NaiveBayes(modelType="multinomial")
nbmodel = nb.fit(train_df)
predictions_df = nbmodel.transform(test_df)predictions_df.show(1, False)
+------------+-----------+------------+-----------+-----------+-----------------+-----+------------------------------------------------------------+------------------------------------------------------------+----------+
|sepal_length|sepal_width|petal_length|petal_width|species    |features         |label|rawPrediction                                               |probability                                                 |prediction|
+------------+-----------+------------+-----------+-----------+-----------------+-----+------------------------------------------------------------+------------------------------------------------------------+----------+
|4.3         |3.0        |1.1         |0.1        |Iris-setosa|[4.3,3.0,1.1,0.1]|0.0  |[-9.966434726497221,-11.294595492758821,-11.956012812323921]|[0.7134106367667451,0.18902823898426235,0.09756112424899269]|0.0       |
+------------+-----------+------------+-----------+-----------+-----------------+-----+------------------------------------------------------------+------------------------------------------------------------+----------+
only showing top 1 row
Другим распространенным примером классификации может быть классификация дерева решений.
from pyspark.ml.classification import DecisionTreeClassifier
#Define the DT Classifier
dt = DecisionTreeClassifier(labelCol="label", featuresCol="features")
dt_model = dt.fit(train_df)
dt_predictions = dt_model.transform(test_df)
#Evaluate the DT Classifier
dt_evaluator = MulticlassClassificationEvaluator(labelCol="label", predictionCol="prediction", metricName="accuracy")
dt_accuracy = dt_evaluator.evaluate(dt_predictions)
dt_accuracy
0.9827586206896551
Использование регрессии со Spark
Теперь мы исследуем модель регрессии машинного обучения, чтобы протестировать набор данных электростанции с комбинированным циклом.
Загрузите модель по ссылке github, запустив приведенный ниже код.
from pyspark.ml.regression import LinearRegression
from pyspark.ml.feature import VectorAssembler
#Read the dataset
df_ccpp = pd.read_csv("https://raw.githubusercontent.com/amjadraza/blogs-data/master/spark_ml/ccpp.csv")
pp_df = spark.createDataFrame(df_ccpp)pp_df.show(2, False)
+-----+-----+-------+-----+------+
|AT   |V    |AP     |RH   |PE    |
+-----+-----+-------+-----+------+
|14.96|41.76|1024.07|73.17|463.26|
|25.18|62.96|1020.04|59.08|444.37|
+-----+-----+-------+-----+------+
only showing top 2 rows
#Create the feature column using VectorAssembler class
vectorAssembler = VectorAssembler(inputCols =["AT", "V", "AP", "RH"], outputCol = "features")
vpp_df = vectorAssembler.transform(pp_df)
vpp_df.show(2, False)
+-----+-----+-------+-----+------+---------------------------+
|AT   |V    |AP     |RH   |PE    |features                   |
+-----+-----+-------+-----+------+---------------------------+
|14.96|41.76|1024.07|73.17|463.26|[14.96,41.76,1024.07,73.17]|
|25.18|62.96|1020.04|59.08|444.37|[25.18,62.96,1020.04,59.08]|
+-----+-----+-------+-----+------+---------------------------+
only showing top 2 rows
Теперь мы можем опробовать этот набор данных на простой модели линейной регрессии.
#Define and fit Linear Regression
lr = LinearRegression(featuresCol="features", labelCol="PE")
lr_model = lr.fit(vpp_df)
#Print and save the Model output
lr_model.coefficients
lr_model.intercept
lr_model.summary.rootMeanSquaredError4.557126016749486
#lr_model.save()
Вывод
Мы увидели, как мы можем установить Spark в Windows и использовать его с несколькими алгоритмами машинного обучения. Spark превосходит MapReduce, поскольку он собирает данные в параллелизме на одном узле с гораздо более эффективной обработкой, поэтому он широко используется для анализа больших данных.
использованная литература
It is possible to install Spark on a standalone machine. Whilst you won’t get the benefits of parallel processing associated with running Spark on a cluster, installing it on a standalone machine does provide a nice testing environment to test new code.
This blog explains how to install Spark on a standalone Windows 10 machine. The blog uses Jupyter Notebooks installed through Anaconda, to provide an IDE for Python development. Other IDEs for Python development are available. Installing Spark consists of the following stages:
- Install Java jdk
- Install Scala
- Download Winutils
- Install Anaconda – as an IDE for Python development
- Install Spark
Installing Spark requires adding a number of environment variables so there is a small section at the beginning explaining how to add an environment variable
Create Environment Variables
To install Spark you need to add a number of environment variables. The following shows how to create an environment variable in Windows 10:
Right click on the Start button and choose Control Panel:

In Control Panel, click on System and Security:

In the next pane, click on System:

In the system pane, click on Advanced system settings:

In system Properties, click on Environment Variables…

Install Java jdk
Make sure you have the latest version of Java installed; if you do, you should have the latest version of the Java jdk. If not, download the jdk from the following link:
http://www.oracle.com/technetwork/java/javase/downloads/index.html
Once downloaded, copy the jdk folder to C:\Program files\Java:

Create an environment variable called JAVA_HOME and set the value to the folder with the jdk in it (e.g. C:\Program Files\Java\jdk1.8.0_121):

Install Scala
Install Scala from this location:
http://www.scala-lang.org/download/2.10.5.html
Download the msi and run it on the machine.
Create an environment variable called SCALA_HOME and point it to the directory where Scala has been installed:

Download Winutils
Download the winutils.exe binary from this location:
https://github.com/steveloughran/winutils/blob/master/hadoop-2.6.0/bin/winutils.exe
Create the following folder and save winutils.exe to it:
c:\hadoop\bin

Create an environment variable called HADOOP_HOME and give it the value C:\hadoop:

Edit the PATH environment variable to include %HADOOP_HOME%\bin:

Create tmp\hive directory
Create a folder called hive in the following location:
C:\tmp\hive
Run the following line in Command Prompt to put permissions onto the hive directory:
winutils.exe chmod -R 777 C:\tmp\hive
You can check permissions with the following command:
winutils.exe ls \tmp\hive
Install Anaconda
At the moment (February 2017), Spark does not work with Python 3.6. Download a version of Anaconda that uses Python 3.5 or less from the following link (I downloaded Anaconda3-4.2.0):
https://repo.continuum.io/archive/index.html
If possible, make sure Anaconda is saved to the following folder:
C:\Program Files\Anaconda3
Add an environment variable called PYTHONPATH and give it the value of where Anaconda is saved to:

Download Spark:
Download the latest version of Spark from the following link. Make sure the package type says pre-built for Hadoop 2.7 and later.
http://spark.apache.org/downloads.html

As of writing this post (February 2017) the machine learning add-ins didn’t work in Spark 2.0. If you want to use the machine learning utilities, you need to download Spark 1.6.
Once downloaded, change the extension of the file from tar to zip, so that the file name reads spark-2.1.0-bin-hadoop2.7.zip. Extract the file using winrar or winzip.

Within the extracted folder is a file without an extension. Add a zip extension to the file and extract again.

Create a folder at C:\Spark and copy the contents of the second extracted folder to it.

Change log4j.properties file
Go to the folder C:\Spark\conf and open the file log4j.properties.template using WordPad.
Find the log4j.rootCategory setting and change it from INFO to WARN.

Save the changes to the file.
Remove the template extension from the file name so that the file name becomes log4j.properties

Add Spark Environment Variables
Add an environment variable called SPARK_HOME and give it the value of the folder where Spark was downloaded to (C:\Spark):

Add to the PATH Environment variable the following value:
%SPARK_HOME%\bin

Add Environment Variables to open Spark with Jupyter notebook
Add the following variables if you want the default program that opens with Spark to be Jupyter Notebooks.
Add the environment variable PYSPARK_DRIVER_PYTHON and give it the value jupyter.

Add the environment variable PYSPARK_DRIVER_PYTHON_OPTS and give it the value notebook.

Open Spark
To use Spark, open command prompt, then type in the following two commands:
CD C:\Spark\bin
pyspark
Jupyter notebooks should open up.

Check Spark is running
Once Jupyter Notebooks has opened, type the following code (the notice file should be part of the Spark download):
file = sc.textFile("C:/Spark/Notice")
words = file.flatMap(lambda line: line.split(" "))
words.count()

Hopefully, you should now have a version of Spark running locally on your machine.