SNMP (
Simple Network Management Protocol
) — это классический протокол для мониторинга и сбора информации о сетевых устройствах (сервера, сетевое оборудование, рабочие станции, принтеры и т.д.). Протокол SNMP довольно легкий, быстрый, для передачи данных использует UDP порты 161 и 162. В этой статье мы рассмотрим, как установить и настроить службу SNMP в Windows Server 2022/2019 и Windows 10/11.
Содержание:
- Установка службы SNMP в Windows Server 2022/2019
- Установка SNMP агента в Windows Server Core
- Установка службы SNMP в Windows 10/11
- Настройка службы SNMP в Windows Server и Windows 10/11
Установка службы SNMP в Windows Server 2022/2019
В Windows Server службу SNMP можно установить с помощью Server Manager.
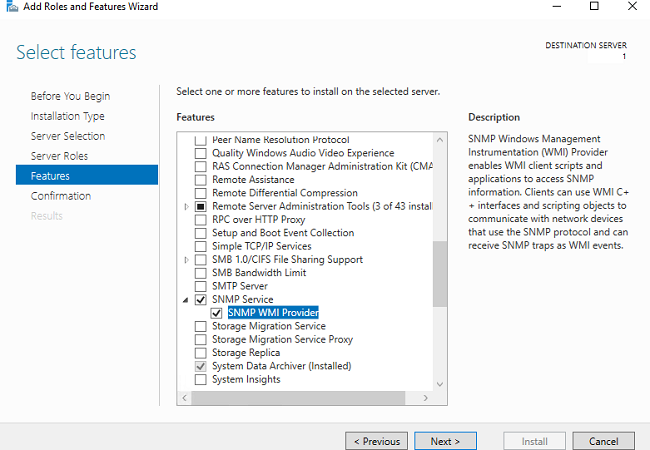
Выберите Add roles and features -> Features. Выберите SNMP Service (если нужно отметьте также SNMP WMI Providers).
Служба SNMP WMI Provider позволяет опрашивать SNMP устройство через WMI.
Нажмите Next -> Install и дождитесь окончания установки.
Установка SNMP агента в Windows Server Core
В Windows Server Core можно установить SNMP с помощью веб-интерфеса Windows Admin Center и PowerShell.
Если вы используете Windows Admin Center, подключитесь к хосту Windows Server, выберите Roles and Features -> SNMP Service.
Т.к. в Windows Server Core отсутствует графический интерфейс, а для его управления используется командная строка, вы можете установить службу SNMP из командной строки PowerShell.
Для установки ролей в Windows Server из PowerShell используется командлет Install-WindowsFeature.
Проверьте, что служба SNMP не установлена:
Get-WindowsFeature SNMP*
Установите роль SNMP и WMI провайдер:
Install-WindowsFeature SNMP-Service,SNMP-WMI-Provider -IncludeManagementTools
Проверьте, что службы SNMP запущены:
Get-Service SNMP*
В нашем примере SNMP служба запущена, а SNMPTRAP остановлена.
Установка службы SNMP в Windows 10/11
Вы можете использовать службу SNMP не только в Windows Server, но и в десктопных редакциях Windows 10 и 11.
В Windows 10/11 служба SNMP, вынесена в отдельный компонент Feature On Demand (как RSAT и OpenSSH).
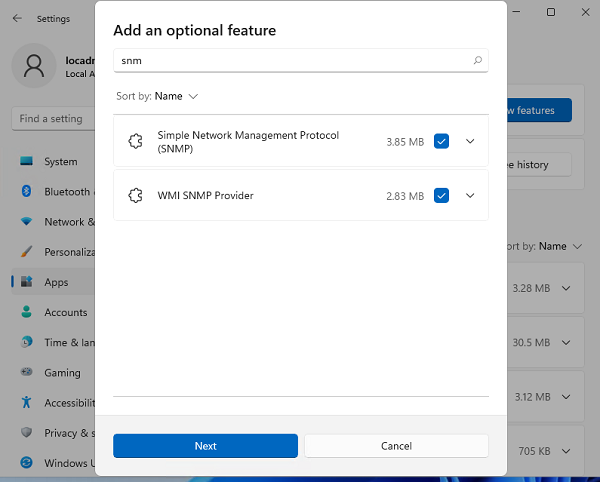
Вы можете установить SNMP через панель Settings. Перейдите в Apps -> Optional features -> Add an optional feature -> View features.
В списке доступных компонентов выберите Simple Network Management Protocol (SNMP) и WMI SNMP Provider. Для начала установки нажмите Next (понадобится интернет подключение к серверам Microsoft).
Для установки службы SNMP через PowerShell, используйте команду:
Add-WindowsCapability -Online -Name SNMP.Client~~~~0.0.1.0
Для установки службы SNMP без подключения к интернету, вам понадобится скачать ISO образ Windows 10/11 Features on Demand из личного кабинета на сайте лицензирования Volume Licensing Service Center (VLSC).
Для офлайн установки службы SNMP с такого ISO образа используется команда:
Add-WindowsCapability -Online -Name SNMP.Client~~~~0.0.1.0 -LimitAccess -Source \\msk-fs01\Distr\Windows-FOD\Win11\
Настройка службы SNMP в Windows Server и Windows 10/11
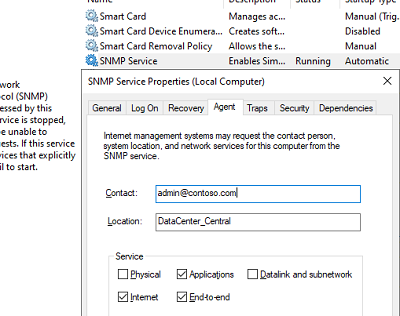
Вы можете настроить параметры службы SNMP в консоли services.msc. Найдите службу SNMP Services в списке и откройте ее свойства.
Обратите внимание, что у службы SNMP есть несколько дополнительных вкладок:
- Agent
- Traps
- Security
На вкладке Agent указывается базовая информация об устройстве (контакты администратора, местоположение). Здесь же можно указать тип информации, который может отправлять данное устройство при SNMP опросе.
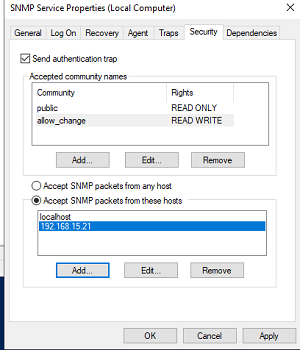
В старых версиях протокола SNMP (SNMP v.1 и SNMP v.2) для авторизации пользователя используется строка сообщества (community string). На вкладке Security можно создать несколько строк подключения.
Можно выбрать один из пяти уровней доступа для сообщества:
- READ ONLY — позволяет получать данные с устройства;
- READ WRITE — позволяет получать данные и изменять конфигурацию устройства;
- NOTIFY — позволяет получать SNMP ловушки;
- READ CREATE – позволяет читать данные, изменять и создавать объекты;
- NONE
Вы можете создать несколько community string. Для этого нужно задать имя и выбрать права/ Для мониторинга состояние сервера достаточно выбрать READ ONLY.
В списке Accept SNMP packets from these hosts можно указать имена/IP адреса серверов, которым разрешено опрашивать данное устройство. Если вы не хотите ограничивать список разрешенных устройств, оставьте здесь Accept SNMP packets from any hosts.
На вкладке Traps указываются адрес серверов, на который SNMP агент должен отправлять SNMP-ловушка (SNMP trap). SNMP Trap это широковещательный USP пакет, используемый для асинхронного уведомления менеджера (например, сообщение о критическом событии).
Не забудьте открыть в Windows Defender Firewall правила, разрешающие входящий и исходящий трафик для SNMP запросов и ловушек (TRAP). Нужные правила фаейрвола можно включить с помощью PowerShell.
В Windows Firewall есть несколько готовых правил для SNMP трафика:
Get-NetFirewallrule -DisplayName *snmp* |ft
- SNMPTRAP-In-UDP
- SNMPTRAP-In-UDP-NoScope
- SNMP-Out-UDP
- SNMP-In-UDP-NoScope
- SNMP-Out-UDP-NoScope
- SNMP-In-UDP
Можно включить все правила, или только определенное:
Get-NetFirewallrule -DisplayName *snmp* | Enable-NetFirewallRule
Get-NetFirewallrule SNMP-Out-UDP | Disable-NetFirewallRule
В списке служб Windows есть еще одна служба SNMP Trap. Она используется для получения сообщений от других SNMP агентов и пересылки на SNMP сервера (обычно это система мониторинга, опрашивающая устройства по SNMP, например PRTG или Zabbix).
Если вы настраиваете SNMP на Windows Server Core, вы не сможете использовать графический интерфейс службы SNMP для настройки ее параметров. Вместо этого придется вносить изменения в реестр с помощью PowerShell. Настройки службы SNMP хранятся в ветке реестра HKEY_LOCAL_MACHINE\SYSTEM\CurrentControlSet\Services\SNMP\Parameters.
Следующие команды зададут описание агента:
New-ItemProperty -Path "HKLM:\SYSTEM\CurrentControlSet\services\SNMP\Parameters\RFC1156Agent" -Name "sysContact" -Value "[email protected]" -PropertyType REG_SZ
New-ItemProperty -Path "HKLM:\SYSTEM\CurrentControlSet\services\SNMP\Parameters\RFC1156Agent" -Name "sysLocation" -Value "MSK_Datacenter1" -PropertyType REG_SZ
Для каждой ловушки SNMP придется создать отдельный ключ в HKLM\SYSTEM\CurrentControlSet\services\SNMP\Parameters\TrapConfiguration с именем community.
New-Item -Path "HKLM:\SYSTEM\CurrentControlSet\services\SNMP\Parameters\TrapConfiguration\public1"
Укажите разрешения для community:
New-ItemProperty -Path "HKLM:\SYSTEM\CurrentControlSet\Services\SNMP\Parameters\ValidCommunities" -Name "public1" -Value 4 -PropertyType DWord
Возможные значения:
- 1 — NONE
- 2 — NOTIFY
- 4 — READ ONLY
- 8 — READ WRITE
- 16 — READ CREATE
Для каждого community можно указать список серверов, с которых разрешено принимать запросы:
New-ItemProperty -Path "HKLM:\SYSTEM\CurrentControlSet\Services\SNMP\Parameters\PermittedManagers" -Name "1" -Value "server1.winitpro.ru" -PropertyType REG_SZ
Перезапустите службу SNMP для применения новых настроек из реестра:
Get-Service SNMP|Restart Service
Если нужно распространить эти SNMP настройки на множество компьютеров/серверов Windows в домене, используйте возможности внесения изменений в реестр через GPO.
Проверить работу службы SNMP можно с помощью утилиты snmpwalk (доступна в любом Linux дистрибутиве):
# snmpwalk -v 2c -c public1 -O e 192.168.13.122
В этом примере мы опросили наш Windows хост через версию протокола SNMPv2.
Утилита вернула базовыую информацию о хосте (syscontact, sysname, syslocation) и довольно большое количество информации о состоянии сервера Windows.
Протокол Simple Network Management Protocol (SNMP) используется для мониторинга, оповещения о событиях и управления устройствами в сети. Протокол состоит из набора стандартов по управления сетью, в том числе протокол прикладного уровня (Application Layer protocol), схемы базы данных и набор объектов данных. SNMP может получать различную информацию (время аптайма, счетчики производительности, параметры устройств и т.д.) от любых сетевых устройств: коммутаторов, серверов, маршрутизаторов или простых компьютеров, на которых установлен агент SNMP.
В Windows 10 служба SNMP доступна в виде отдельного компонента Windows и по умолчанию не устанавливается. Рассмотрим, как установить и настроить SNMP в Windows 10.
- Установка службы SNMP в WIndows 10
- Настройка службы SNMP в Windows 10
Содержание:
Установка службы SNMP в WIndows 10
Вы можете проверить, установлена ли в вашей системе служба SNMP с помощью PowerShell командлета Get-Service:
Get-Service -Name snmp*
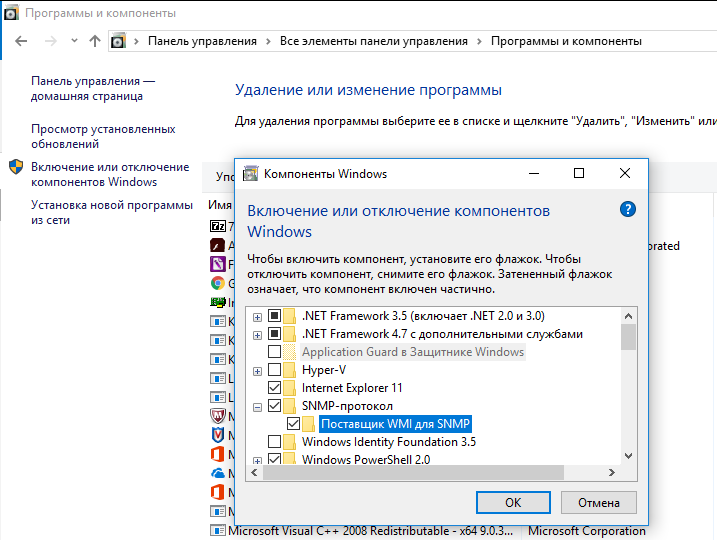
Вы можете установить службу SNMP через панель управления. Перейдите в Панель управления\Все элементы панели управления\Программы и компоненты\ Включение или отключение компонентов Windows).
В списке компонентов выберите Simple Network Management Protocol (SNMP)/протокол, и WMI SNMP Provider / Поставщик WMI для SNMP (обеспечивает доступ к информации SNMP через интерфейсы Windows Management Instrumentation) и нажмите Ок.
Также вы можете установить службы SNMP из командной строки PowerShell:
Enable-WindowsOptionalFeature -online -FeatureName SNMP
Настройка службы SNMP в Windows 10
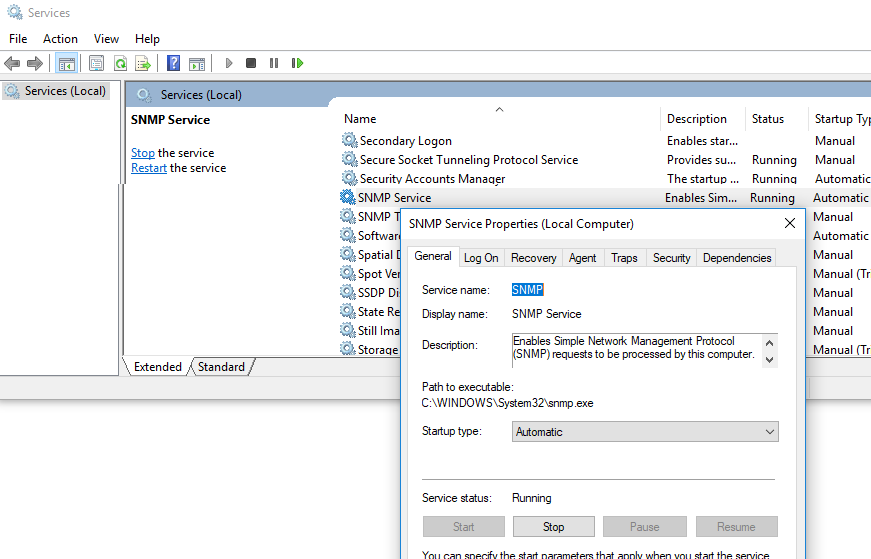
После установки службы SNMP должны запустится автоматически. Откройте консоль управления Services (services.msc). В списке службы должны появится две новые службы:
- SNMP Service – это основная служба SNMP агента, которая отслеживают активность и отправляет информацию;
- SNMP Trap — получает сообщения ловушки (trap messages) от локальных или удаленных агентов SNMP, и пересылает сообщения в управляющие программы SNMP, которые работают на этом компьютере.
Откройте свойства службы SNMP. Если она остановлена, запустите ее, нажав кнопку Start и измените тип запуска (Startup type) на автоматический.
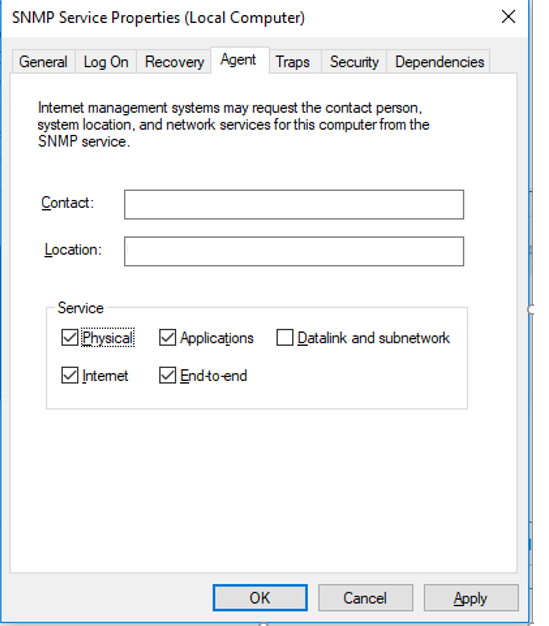
Перейдите на вкладку Agent. Заполните поля contact и location (здесь вы можете указать контактное имя пользователя и местоположение компьютера), и выберите список сервисов, данные которых нужно собирать и отправить устройству мониторинга.
Доступны следующие типы сервисов:
- Physical
- Applications
- Internet
- End-to-end
- Datalink and subnetwork
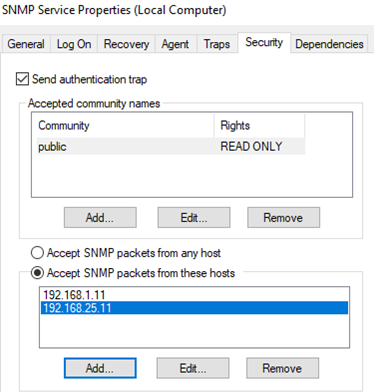
Перейдите на вкладку Security. Здесь вы можете настроить различные параметры безопасности для различных серверов SNMP.
В списке Accepted community names перечислены имена сообществ, чьи SNMP узлы проходят аутентификацию для отправки SNMP-запросов на этот компьютер.
Community — это имя, которое обладает такими же функциями, как логин и пароль.
Нажмите кнопку Добавить и укажите имя Community и один из пяти уровней доступа (None, Notify, READ ONLY, READ WRITE, READ CREATE). READ WRITE – это максимальный уровень доступа, при которых сервер управления SNMP может вносить изменения в систему. В системах мониторинга обычно достаточно выбрать READ ONLY, при этом сервер мониторинга может только опрашивать систему, но не вносить изменения.
В нашем примере мы добавили комьюнити public с разрешениями READ ONLY.
Далее добавьте список серверов системы мониторинга (по DNS имени или по IP адресам), от которых вы хотите разрешить получать SNMP пакеты.
Совет. Вы можете выбрать опцию ‘Принимать пакеты SNMP от любого узла’/Accept SNMP packages from these hosts, но это не безопасно.
Сохраните изменения и перезапустите службу SNMP.
На этом настройка службы SNMP в Windows 10 по сути завершена. Если вам нужно включить SNMP сразу на множестве компьютеров, вы можете удаленно установить и настроить службы с помощью PowerShell или GPO.
Протокол Simple Network Management Protocol (SNMP) используется для мониторинга, оповещения о событиях и управления устройствами в сети.
SNMP может получать различную информацию (время аптайма, счетчики производительности, параметры устройств и т.д.) от любых сетевых устройств: коммутаторов, серверов, маршрутизаторов или простых компьютеров, на которых установлен агент SNMP.
В Windows 10 служба SNMP доступна в виде отдельного компонента Windows и по умолчанию не устанавливается.
Проверка наличия SNMP
Проверить, установлена ли в системе служба SNMP можно с помощью PowerShell командой Get-Service:
Get-Service -Name snmp*
Появится сообщение:
Установка SNMP
Службу SNMP можно установить через «Дополнительные компоненты». Перейдите в Параметры/Приложения/Дополнительные компоненты. Нажмите «Добавить компоненты» и в поиске введите «snmp». Далее их необходимо установить:
Также можно установить службы SNMP из командной строки PowerShell:
Enable-WindowsOptionalFeature -online -FeatureName SNMP
Настройка службы SNMP
После установки службы SNMP должны запустится автоматически. Откройте консоль управления Services (services.msc). Для открытия нажимаем WIN + R и вводим имя консоли:
В списке службы должны появится две новые службы:
SNMP Service – это основная служба SNMP агента, которая отслеживают активность и отправляет информацию;
SNMP Trap — получает сообщения ловушки (trap messages) от локальных или удаленных агентов SNMP, и пересылает сообщения в управляющие программы SNMP, которые работают на этом компьютере.
Откройте свойства «Службы SNMP». Если она остановлена, запустите ее, нажав кнопку «Общие» и измените тип запуска на автоматический:
Переходим на вкладку «Агент SNMP». Заполняем поля «Контактное лицо» и «Размещение» (здесь можно указать контактное имя пользователя и местоположение компьютера), и выбираем список сервисов, данные которых нужно собирать и отправить устройству мониторинга:
На вкладке «Безопасность» можно настроить различные параметры безопасности для различных серверов SNMP:
В списке «Приемлемые имена сообществ» перечислены имена сообществ, чьи SNMP узлы проходят аутентификацию для отправки SNMP-запросов на этот компьютер.
Сообщество — это имя, которое обладает такими же функциями, как логин и пароль. При добавлении сообщества можно выбрать права из списка (None, Уведомление, READ ONLY, READ WRITE, READ CREATE).
В системах мониторинга обычно достаточно выбрать READ ONLY, при этом сервер мониторинга может только опрашивать систему, но не вносить изменения.
Далее можно добавить список серверов системы мониторинга (по DNS имени или по IP адресам), от которых необходимо разрешить получать SNMP пакеты.
Чтобы все настройки сохранились необходимо перезапустить службу SNMP.
Simple Network Management Protocol or SNMP is used for monitoring, event notification, and network device management on corporate networks. The protocol consists of a set of network management standards, including the Application Layer protocol, database schemas, and a set of data objects. SNMP can receive various types of information (uptime, performance counters, device parameters, etc.) from any network device. SNMP can receive information from switches, servers, routers, or computers on which the SNMP agent is installed. In Windows 10 and Windows 11, the SNMP service is available as a separate Windows feature and isn’t installed by default.
Installing SNMP Service on Windows 11
In previous versions of Windows (Win 8.1, 7, or 10 RTM), it was possible to install the Windows SNMP service via Control Panel > Add Program and Features applet or using the DISM command:
dism /online /enable-feature /featureName:WMISnmpProvider
However, on Windows 11, when you run this command, you get an error:
Error: 0x800f080c
Feature name WMISnmpProvider is unknown.
A Windows feature name was not recognized.
Use the /Get-Features option to find the name of the feature in the image and try the command again. A Windows feature name was not recognized.
Also, Microsoft deprecated SNMP from Control Panel > Add Program and Features applet.
On Windows 11, you can still install the SNMP client and WMI SNMP Provider services, however, Microsoft has changed the install ways.
Note. Learn how to configure the Lock Screen in Windows.
The SNMP service in Windows 11 can be installed via the Settings app:
- Right-click Start > Settings > Apps > Optional Features > Add an optional feature > View features;
- Type SNMP in the search field and select Simple Network Management Protocol (SNMP) and WMI SNMP Provider (optional) to install;
- Click Next > Install;
- To install the components, your computer must be connected to the Internet. An error will appear when installing the SNMP feature if the computer is offline or located on a disconnected network.
You can also install the SNMP service on Windows 11 using PowerShell:
- Open Windows Terminal as an administrator;
- Check if the SNMP service is not installed (State=NotPresent):
Get-WindowsCapability -Online -Name "*SNMP*"|select name,DisplayName,State
- To install the SNMP service, run the command:
Add-WindowsCapability -Online -Name “SNMP.Client~~~~0.0.1.0“
- In order to install WMI SNMP Provider, run the command:
Add-WindowsCapability -Online -Name "WMI-SNMP-Provider.Client~~~~0.0.1.0"
- Wait for the installation to finish and check the SNMP feature state again using the Get-WindowsCapability cmdlet. The state should change to Installed.
How to Install SNMP Service in Windows 10?
In earlier Windows 10 builds (1803-), it was possible to install the SNMP service via Control Panel > Programs and Features > Turn Windows features on or off. Select Simple Network Management Protocol (SNMP) and the WMI SNMP Provider (provides access to the SNMP information via the Windows Management Instrumentation interfaces), and click OK.
In modern Windows 10 builds (22H2, 22H1) you should use PowerShell or the Settings pane to install the SNMP service as Feature on Demand (FoD).
If your computer has a direct Internet connection, you can install the SNMP service components online from Microsoft servers. To do this, open the elevated PowerShell console and run the command:
Add-WindowsCapability -Online -Name "SNMP.Client~~~~0.0.1.0"
You can also use DISM to install the SNMP service and WMI provider:
DISM /online /add-capability /capabilityname:SNMP.Client~~~~0.0.1.0DISM /online /add-capability /capabilityname:WMI-SNMP-Provider.Client~~~~0.0.1.0
After that, you can verify if the SNMP service is installed:
Get-WindowsCapability -Online -Name "SNMP*"
Name : SNMP.Client~~~~0.0.1.0
State : Installed
DisplayName : Simple Network Management Protocol (SNMP)
Description : This feature includes Simple Network Management Protocol agents that monitor the activity in network devices and reports it to the network console workstation
DownloadSize : 595304
InstallSize : 1128133
To disable the SNMP service, use the PowerShell command:
Remove-WindowsCapability -Online -Name "SNMP.Client~~~~0.0.1.0"
You can also install the SNMP service through the Optional Features graphical interface.
Go to the Settings > Apps > Apps & Features > Manage optional feature > Add Feature. Select the following features in the list: Simple Network Management Protocol (SNMP) and WMI SNMP Provider (to get all SNMP service configuration tabs).
After that, the SNMP service will appear in the services.msc console.
You can check if the SNMP service is installed on your Windows 10 by using the PowerShell Get-Service cmdlet:
Get-Service -Name snmp*
Note. Microsoft plans to completely remove the SNMP service in the next Windows builds because of the security risks associated with this protocol. Instead of SNMP, it is recommended to use the Common Information Model (CIM), which is supported by Windows Remote Management.
Fixing Error 0x800f0954 When Installing SNMP on Windows 10 or 10
In Windows 10 and 11, SNMP is a part of the Feature on Demand (FoD) concept, which requires a direct connection to Microsoft’s online update servers. You may receive error 0x800f0954 when installing SNMP components if your computer is on an isolated segment or corporate network:
Add-WindowsCapability failed error. Error code = 0x800f0954
This error will appear if your computer is on a corporate network and is configured to receive Windows updates from an internal WSUS server (Windows Server Update Services). The computer is trying to download SNMP binaries from the WSUS server instead of the Microsoft Update servers.
You can change the settings of computers so that they receive optional feature files directly from Windows Update instead of from WSUS. This requires the following GPO setting to be configured on the Windows client:
- Open the Local Group Policy Editor (gpedit.msc);
- Then navigate to the Computer Configuration > Administrative Templates > System;
- Enable the GPO option Specify settings for optional component installation and component repair and check the box Download repair content and optional features directly from Windows Updates instead of Windows Server Updates Services (WSUS);
- Update the Group Policy settings on a computer:
gpupdate /force
Now restart the Windows Update service:
Get-Service wuauserv| Restart-Service -Force
You can now use PowerShell or Settings to install any Windows optional feature. The binaries that you need will be automatically downloaded from Windows Update.
If your computer is in a disconnected environment (without Internet), you can install SNMP using the offline FoD ISO image. You can download the FOD media from your Volume License Servicing Center (VLSC).
Mount the ISO image to a virtual DVD drive (for example, E:), and install SNMP using the PowerShell command:
Enable-WindowsOptionalFeature -Online -FeatureName SNMP -Source "E:\Sources\sxs"
Enable SNMP Service on Windows Server
Now let’s see how to install SNMP service and WMI providers on Windows Server 2022/2019/2016.
SNMP is not installed on Windows Server by default. You can install the service in one of the following ways:
- Via the Server Manager: Add roles and Features > Features > SNMP service (you can also check SNMP WMI Providers).
- Using PowerShell:
Install-WindowsFeature SNMP-Service,SNMP-WMI-Provider –IncludeManagementTools
Configure SNMP Service on Windows Computer
After the installation, SNMP services should start automatically. Open the Services management console (services.msc). Two new services should appear in the service list:
- SNMP Service — this is the primary SNMP agent service, that tracks activity and sends information;
- SNMP Trap — receives trap messages from local or remote SNMP agents, and forwards messages to the SNMP management software that is being run on that computer.
Open the properties of the SNMP Service. If it is stopped, restart it by pressing the Start button and then changing the startup type to Automatic.
Click the Agent tab. Fill in the Contact and Location fields (you can specify the user’s contact name and computer location). Then select the list of services from which you want to collect data and send it to the monitoring device. There are five service-based options:
- Physical;
- Applications;
- Internet;
- End-to-end;
- Datalink and subnetwork.
Click the Security tab. Here you can configure various security settings for your SNMP servers.
The list of Accepted community names contains the names of the communities whose SNMP hosts are authenticated to send SNMP requests to this computer. The community name has the same functions like login and password.
Click the Add button and specify the Community Name and one of the five access levels (None, Notify, READ ONLY, READ WRITE, READ CREATE). READ WRITE is the maximum access level at which the SNMP management server can make changes on the system. For monitoring systems, it is usually enough to select READ ONLY (the monitoring server can only poll the system, but not make changes). In our example, we added a community name public with READ ONLY permissions.
Add a list of monitoring servers (IP addresses) to the Accept SNMP packets from these hosts from which you want to accept SNMP packets. This could be your monitoring system, for example, Zabbix, Nagios, Icinga, OpenNMS, PRTG, and Microsoft System Center Operations Manager (SCOM).
Tip. You can select the Accept SNMP packets from any host option. In this mode, the SNMP agent accepts packets from any host without restrictions. This option is not recommended for use on public computers. This is not safe.
Save the changes and restart the SNMP service.
Hint. To make your Windows host receive and send SNMP queries and traps, you need to open SNMP ports in Windows Defender Firewall with Advanced Security. SNMP uses UDP as a transport protocol. Two ports are used: UDP 161 (SNMP) and UDP 162 (SNMPTRAP). You can open inbound and outbound SNMP ports in Windows Firewall using the following commands:
netsh advfirewall firewall add rule name="SNMP UDP Port 161 In" dir=in action=allow protocol=UDP localport=161netsh advfirewall firewall add rule name="SNMP UDP Port 161 Out" dir=out action=allow protocol=UDP localport=161
netsh advfirewall firewall add rule name="SNMPTRAP UDP Port 162 In" dir=in action=allow protocol=UDP localport=162
netsh advfirewall firewall add rule name=" SNMPTRAP UDP Port 162 Out" dir=out action=allow protocol=UDP localport=162
Configuring SNMP Settings via Group Policy
Several GPO parameters will help you configure SNMP parameters centrally. These parameters are located in the GPO editor (gpedit.msc or gpmc.msc) under Computer Configuration > Policies > Administrative Templates definitions > Network > SNMP.
Three SNMP policy parameters are available:
- Specify communities — allows you to set a list of communities for the SNMP service;
- Specify permitted managers — allows you to specify a list of permitted hosts that can send SNMP queries to the agent on this computer;
- Specify traps for public community — allows you to set up trap configuration for the Simple Network Management Protocol.
Another way to configure SNMP parameters is through the registry. These parameters are set in the following section of the Registry Editor (regedit.exe) HKEY_LOCAL_MACHINE\SYSTEM\CurrentControlSet\services\SNMP\Parameters.
You can configure SNMP parameters as needed on a reference computer, export them to a REG file, and deploy the REG file to servers/computers via GPO (Computer Configuration > Preferences > Windows Settings > Registry).
You can use SNMP and SNMP Traps to monitor different metrics of your Windows device (uptime, CPU usage, RAM, storage, network traffic). The Windows SNMP service currently supports only SNMP v1 and SNMP v2c. These protocols are not encrypted. It means that an attacker can intercept all your SNMP data and view it in plain text. Windows 10 and 11 do not support SNMP v3 which is an encrypted and more secure protocol.
This completes the SNMP service configuration in Windows. If you need to enable SNMP on multiple computers or servers, you can remotely install and configure the SNMP service using PowerShell or Group Policy.

Cyril Kardashevsky
I enjoy technology and developing websites. Since 2012 I’m running a few of my own websites, and share useful content on gadgets, PC administration and website promotion.
If you don’t know how to install and configure SNMP on Windows 10, here are some ways you can get everything up and running.
Simple Network Management Protocol (SNMP) is an application layer protocol that allows network devices to share information, regardless of the differences in hardware or software. In absence of SNMP, network management tools are unable to identify devices, record network changes, monitor the performance of the network, or ascertain a network device’s status in real-time.
Earlier, you could use the Turn Windows Features on and off section in Control Panel to enable or disable SNMP. Starting Windows 1803 and later, Microsoft has deprecated the feature because of the associated security risks and recommends using the Common Information Model (CIM) instead. Regardless, if you want to install and enable SNMP on your PC, we’ll show you how you can.
How to Enable SNMP From the Settings
SNMP is available as an optional feature on Windows 10. You can enable optional features by navigating to Settings > Apps > Apps & features > Optional features. Click on Add a feature and search for snmp. Select Simple Network Management Protocol (SNMP) and WMI SNMP Provider and click on Install.
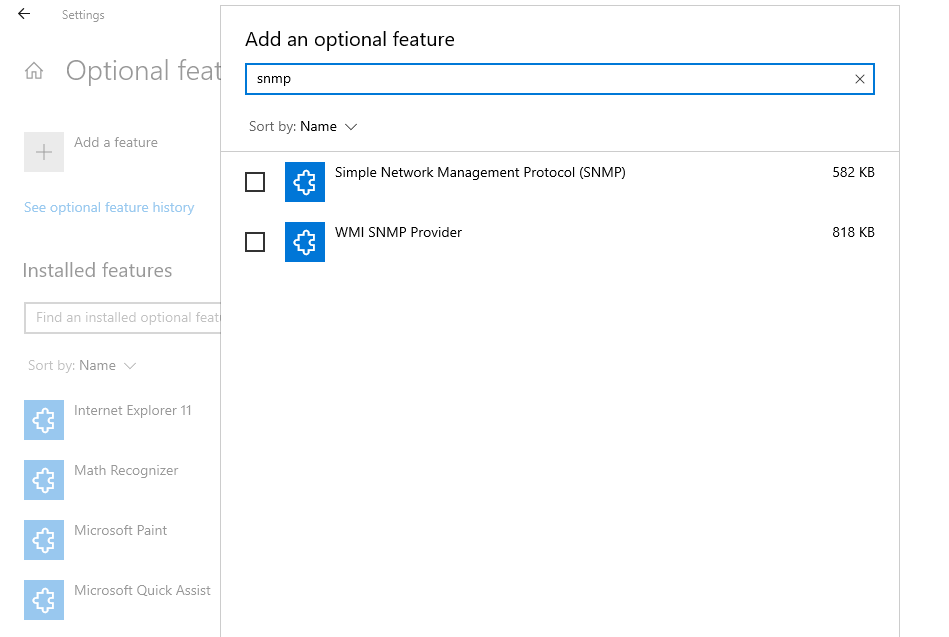
When you’re done, verify if SNMP appears in the Services console.
How to Enable SNMP Using PowerShell
To enable SNMP via PowerShell, first ensure that your computer has internet access. If it does, run an elevated PowerShell by pressing Win + X and selecting Windows PowerShell (Admin). Execute the following command to install the SNMP servers from Microsoft’s servers:
Add-WindowsCapability -Online -Name "SNMP.Client----0.0.1.0"
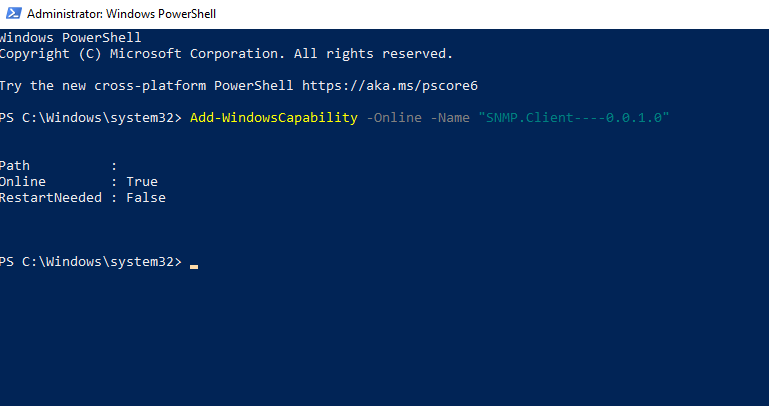
Alternatively, you can also install SNMP using the DISM tool with the following command:
DISM /online /add-capability /capabilityname:SNMP.Client----0.0.1.0
Once you’ve executed either command (Add-WindowsCapability or DISM) successfully, verify that the SNMP service has been install with the following command:
Get-WindowsCapability -Online -Name "SNMP*"
How to Solve Error Code 0x800f0954
If running the command gives you an error message that says «Add-WindowsCapability failed error. Error code = 0x800f0954«, it’s probably because your computer pulls Windows updates from the internal WSUS server instead of the Microsoft Update servers.
You can fix this error by bypassing WSUS and pull installation files for SNMP service from Microsoft Update servers. To do this, follow these steps:
- Execute the following command to bypass WSUS:
reg add "HKEY_LOCAL_MACHINE\Software\Policies\Microsoft\Windows\WindowsUpdateAU" /v UseWUServer /t REG_DWORD /d 0 /fThis command adds a DWORD value in the «HKEY_LOCAL_MACHINE… \WindowsUpdateAU» registry location and sets its value to 0.
- Restart the Windows Update service by executing the following 3 commands:
 netshh winhttp reset policy
net stop wuauserv
net start wuauserv - Try installing SNMP again using the Add-WindowsCapability command. If it works, undo the changes you made in the registry in step 1 by executing the following command:
reg add "HKEY_LOCAL_MACHINE\Software\Policies\Microsoft\Windows\WindowsUpdateAU" /v UseWUServer /t REG_DWORD /d 1 /f - Restart the Windows Update service using the commands from step 2.
How to Configure SNMP From Services Panel
Now that you have the SNMP service installed on your PC, let’s configure it.
To start, verify that the SNMP services (SNMP Service and SNMP Trap) are running. Press Win + R, type services.msc, and press Enter to launch the Services panel. Look for both SNMP services and check if they appear in the list.
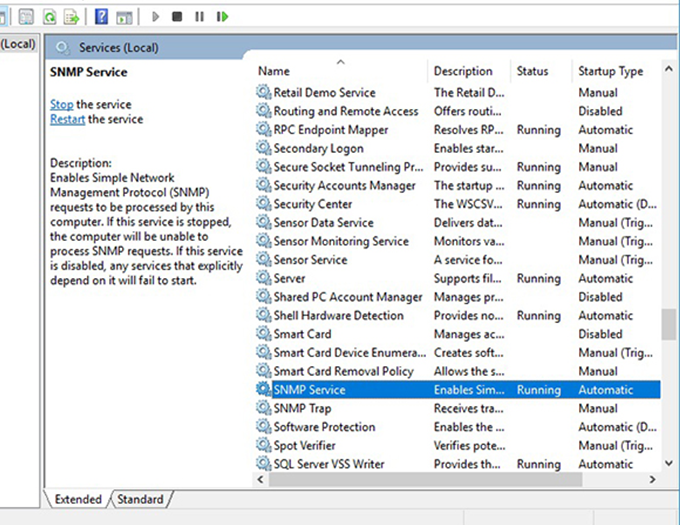
Also, check if the SNMP Service is running. If it’s not, double-click on the service and press Start. Change the Startup type to Automatic to automatically run the service from the next startup.
Next, Switch to the Agent tab and fill in your Contact and Location fields with your name and location. In the Service section, check the boxes for services from which you want to collect data for forwarding it to the monitoring device.
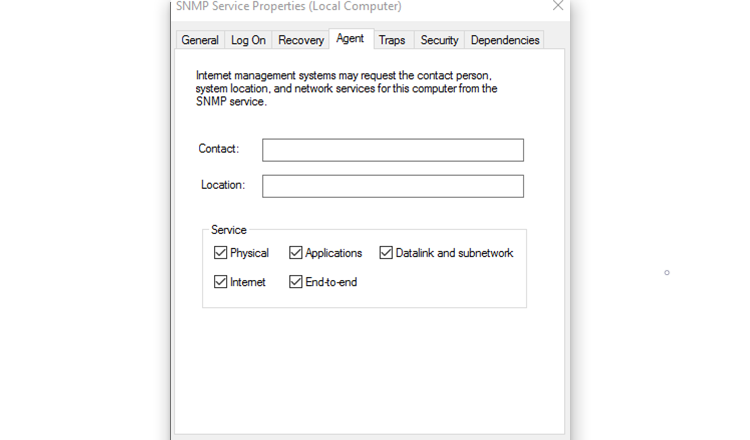
Now, move over to the Security tab.
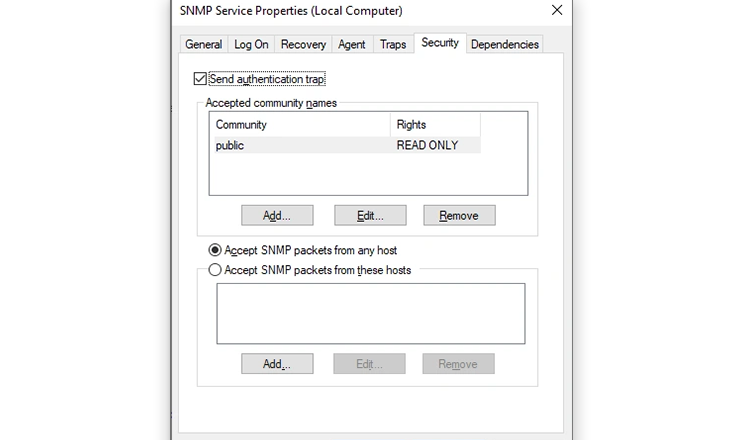
Add the names of the SNMP hosts you want to authenticate in the Accepted community names list. You have the option to provide None, Notify, READ ONLY, READ WRITE, or READ CREATE authentication to the communities.
Next, add the servers from which you want to accept SNMP packets in the next box, and make sure the Accept SNMP packets from these hosts radio button is selected. The Accept SNMP packets from any host option removes all IP restrictions and allows all hosts to send SNMP packets. Watch out, though; this isn’t a safe option to allow, especially on public computers.
When you’re done, press Apply, return to the General tab to restart the service (Click on Stop and then Start), and press OK to exit. Your final step is to open SNMP ports: UDP 161 (SNMP) and UDP 162 (SNMPTRAP). To do this, execute the following commands:
 netsh advfirewall firewall add rule name="SNMP UDP Port 161 In" dir=in action=allow protocol=UDP localport=161
netsh advfirewall firewall add rule name="SNMPTRAP UDP Port 162 In" dir=in action=allow protocol=UDP localport=162
netsh advfirewall firewall add rule name="SNMP UDP Port 161 Out" dir=out action=allow protocol=UDP localport=161
netsh advfirewall firewall add rule name=" SNMPTRAP UDP Port 162 Out" dir=out action=allow protocol=UDP localport=162
How to Configure SNMP from Group Policy Editor
You can change Group Policy Object (GPO) parameters to centrally configure SNMP parameters. Launch the Local Group Policy Editor and navigate to Computer Configuration > Administrative Templates > Network > SNMP to configure the parameters.
On the right pane, you’ll see the following:
- Specify communities: permits the addition and authentication of communities that can send SNMP requests.
- Specify permitted managers: permits the addition of hosts that can send SNMP packets to your computer.
- Specify traps for public community: this allows you to configure the name of the hosts the receive trap messages sent by the SNMP service.
Your SNMP Service Is Now Up and Running
Hopefully, things were smooth sailing and you were able to install and configure SNMP on your computer. It’s a little complicated to get running, but hopefully one of the above tricks worked for you.
Network monitoring is important regardless of if you’re at work or resting at home. If you think someone in your family is draining your data caps, or you suspect that malware has made its way onto your computer, you can use tools to track the data moving around your network and catch any greedy culprits.
