Introduction
This tutorial is the first one you should read if you’re using SFML with the Visual Studio IDE (Visual C++ compiler). It will explain how
to configure your SFML projects.
Installing SFML
First, you must download the SFML SDK from the download page.
You must download the package that matches your version of Visual C++. Indeed, a library compiled with VC++ 10 (Visual Studio 2010)
won’t be compatible with VC++ 12 (Visual Studio 2013) for example. If there’s no SFML package compiled for your version of Visual C++, you will have to
build SFML yourself.
You can then unpack the SFML archive wherever you like. Copying headers and libraries to your installation of Visual Studio is not recommended, it’s better
to keep libraries in their own separate location, especially if you intend to use several versions of the same library, or several compilers.
Creating and configuring a SFML project
The first thing to do is choose what kind of project to create. It is recommended to select «Empty Project».
The dialog window offers a few other options to customize the project: select «Console application» or «Windows
application» only if you know how to use pre-compiled headers.
For the purpose of this tutorial, you should create a main.cpp file and add it to the project, so that we have access to the C++ settings
(otherwise Visual Studio doesn’t know which language you’re going to use for this project). We’ll explain what to put inside later.
Now we need to tell the compiler where to find the SFML headers (.hpp files), and the linker where to find the SFML libraries (.lib files).
In the project’s properties, add:
- The path to the SFML headers (<sfml-install-path>/include) to C/C++ » General » Additional Include Directories
- The path to the SFML libraries (<sfml-install-path>/lib) to Linker » General » Additional Library Directories
These paths are the same in both Debug and Release configuration, so you can set them globally for your project («All configurations»).

The next step is to link your application to the SFML libraries (.lib files) that your code will need. SFML is made of 5 modules (system, window, graphics,
network and audio), and there’s one library for each of them.
Libraries must be added in the project’s properties, in Linker » Input » Additional Dependencies. Add all the SFML libraries that you
need, for example «sfml-graphics.lib», «sfml-window.lib» and «sfml-system.lib».

It is important to link to the libraries that match the configuration: «sfml-xxx-d.lib» for Debug, and «sfml-xxx.lib» for Release. A bad mix may
result in crashes.
The settings shown here will result in your application being linked to the dynamic version of SFML, the one that needs the DLL files.
If you want to get rid of these DLLs and have SFML directly integrated into your executable, you must link to the static version. Static SFML
libraries have the «-s» suffix: «sfml-xxx-s-d.lib» for Debug, and «sfml-xxx-s.lib» for Release.
In this case, you’ll also need to define the SFML_STATIC macro in the preprocessor options of your project.

Starting from SFML 2.2, when static linking, you will have to link all of SFML’s dependencies to your project as well. This means that if you are linking
sfml-window-s.lib or sfml-window-s-d.lib for example, you will also have to link opengl32.lib, winmm.lib and gdi32.lib. Some of these dependency libraries
might already be listed under «Inherited values», but adding them again yourself shouldn’t cause any problems.
Here are the dependencies of each module, append the -d as described above if you want to link the SFML debug libraries:
| Module | Dependencies |
|---|---|
sfml-graphics-s.lib |
|
sfml-window-s.lib |
|
sfml-audio-s.lib |
|
sfml-network-s.lib |
|
sfml-system-s.lib |
|
You might have noticed from the table that SFML modules can also depend on one another, e.g. sfml-graphics-s.lib depends both on sfml-window-s.lib and sfml-system-s.lib.
If you static link to an SFML library, make sure to link to the dependencies of the library in question, as well as the dependencies of the dependencies
and so on. If anything along the dependency chain is missing, you will get linker errors.
If you are slightly confused, don’t worry, it is perfectly normal for beginners to be overwhelmed by all this information regarding static linking. If something
doesn’t work for you the first time around, you can simply keep trying always bearing in mind what has been said above. If you still can’t get static linking to
work, you can check the FAQ and the
forum for threads about static linking.
If you don’t know the differences between dynamic (also called shared) and static libraries, and don’t know which one to use, you can search for more information on the internet.
There are many good articles/blogs/posts about them.
Your project is ready, let’s write some code now to make sure that it works. Put the following code inside the main.cpp file:
#include <SFML/Graphics.hpp>

int main()
{
    sf::RenderWindow window(sf::VideoMode(200, 200), "SFML works!");
    sf::CircleShape shape(100.f);
    shape.setFillColor(sf::Color::Green);

    while (window.isOpen())
    {
        sf::Event event;
        while (window.pollEvent(event))
        {
            if (event.type == sf::Event::Closed)
                window.close();
        }

        window.clear();
        window.draw(shape);
        window.display();
    }

    return 0;
}
If you chose to create a «Windows application» project, the entry point of your code has to be set to «WinMain» instead of «main». Since it’s
Windows specific, and your code would therefore not compile on Linux or macOS, SFML provides a way to keep a standard «main» entry point in this case:
link your project to the sfml-main module («sfml-main-d.lib» in Debug, «sfml-main.lib» in Release), the same way you linked sfml-graphics, sfml-window
and sfml-system.
Now compile the project, and if you linked to the dynamic version of SFML, don’t forget to copy the SFML DLLs (they are in <sfml-install-path/bin>)
to the directory where your compiled executable is. Run it, and if everything works you should see this:

If you are using the sfml-audio module (regardless whether statically or dynamically), you must also copy the DLL of the external library needed by it,
which is OpenAL32.dll.
These files can be found in <sfml-install-path/bin> too.
Время на прочтение
3 мин
Количество просмотров 15K
Следующая тема

В этой статье объясняется, как настроить ваши проекты SFML, если Вы используете интегрированную среду разработки программного обеспечения Visual Studio (компилятор Visual Studio С++).
Установка SFML
Скачайте SFML SDK со страницы загрузки. Выбираем самую последнюю версию софта, на сегодня это версия SFML 2.5.1. Есть варианты выбора для 32-х разрядных систем и 64-х разрядных (рис. №1). Я скачиваю 64-х разрядную библиотеку.

Скачанный архив Вы можете распаковать в любую папку. Я распаковываю на диск С: в папку IT (C:\IT).
Создание и настройка проекта SFML
Создаём пустой проект в Visual Studio (рис. №2).

В обозреватели решений выбираем наш проект (рис. №3).

В меню проекта выбираем добавить новый элемент (рис. №4).

Добавляем файл main.cpp (рис. №5).

Указываем компилятору, где найти заголовочные файлы SFML (файлы .hpp).
Меню -> проект -> свойства проекта -> С/С++ ->общие ->Дополнительные каталоги включаемых файлов
Обращаем внимание на платформу решения, она должна совпадать с разрядностью скачанной библиотеки SFML. В нашем случае мы настраиваем 64-х разрядную библиотеку (рис. №6). Если Вы настраиваете 32-х разрядную систему тогда указывайте x86.

В обозреватели решений выбираем наш проект (рис. №3).
Выбираем меню проект и меню свойства (рис. №7).

В свойствах проекта добавляем путь к заголовочным файлам SFML (рис. №№8-11).
С/С++ ->общие ->Дополнительные каталоги включаемых файлов (включаем каталог include)


Указываем компоновщику, где найти библиотеки SFML (файлы .lib рис.№№12-14).
Компоновщик -> общие -> дополнительные каталоги библиотек(включаем каталог lib)


Связываем наше приложение с библиотеками SFML файлами *.lib (рис. №№15-16)
для Debug :
sfml-graphics-d.lib
sfml-window-d.lib
sfml-audio-d.lib
sfml-system-d.lib
sfml-network-d.lib
для Release :
sfml-graphics.lib
sfml-window.lib
sfml-system.lib
sfml-audio.lib
sfml-network.lib
Компоновщик -> ввод -> дополнительные зависимости


Копируем название библиотек в поле окна дополнительные зависимости (рис. №16 конфигурация Debug).
Устанавливаем отображения графического окна без консоли (рис. №17).
Компоновщик -> система -> подсистема (subsystem:windows)

Создаём точку входа: mainCRTStartup (рис. №18).
Компоновщик -> дополнительно -> точка входа

Незабываем в конце нажать кнопку применить.
Копируем все файлы из папки bin библиотеки SFML и вставляем в наш проект (рис. №19).

Копируем шаблон кода библиотека SFML в файл main.cpp (рис. №20)

Шаблон кода библиотеки SFML:
#include <SFML/Graphics.hpp>

using namespace sf;

int main()
{

    RenderWindow window(VideoMode(400, 400), L"Новый проект", Style::Default);

    window.setVerticalSyncEnabled(true);

    CircleShape shape(100.f,3);
    shape.setPosition(100, 100);
    shape.setFillColor(Color::Magenta);

    while (window.isOpen())
    {
        Event event;
        while (window.pollEvent(event))
        {
            if (event.type == Event::Closed)
                window.close();
        }

        window.clear(Color::Blue);
        window.draw(shape);
        window.display();
    }
    return 0;
}
Выполним код программы (рис. №21).

Если у Вас появился треугольник, значит Вы сделали всё правильно, создав свой первый проект SFML C++.
Если что-то у Вас не вышло, то более подробную инструкцию подключения библиотеки SFML к Visual Studio 2022, а также создание шаблона библиотеки SFML в Visual Studio, вы можете узнать посмотрев видео «Подключение библиотеки SFML C++».
Клонировать репозиторий шаблона проекта SFML С++
Следующая тема
Устанавливаем SFML в Visual Studio 2019 и компилируем простую игру
Сейчас есть рекомендуемый путь установки библиотек, подобных SFML, состоящий в том, что в Studio имеется менеджер пакетов NuGet и теоретически всё должно быть просто:
Создаём консольное приложение, в «Обозревателе решений» жмём на выделенным жирным имени проекта правой кнопкой мыши, выбираем команду «Управление пакетами NuGet», во вкладке «Обзор» поиском находим
sfml_graphicsи устанавливаем последнюю версию (2.5.1 в данный момент).
Увы, и на диске (у меня в c:\Users\Admin\.nuget), и в папке проекта создалась куча файлов, но без настройки свойств проекта они всё равно обойтись не помогли, по крайней мере, у меня не вышло.
Поэтому установим SFML «по старинке» и скомпилируем в ней небольшую игру вот по таким мотивам, была у меня в детстве эта штучка, прелесть (и сейчас, вроде, где-то есть, только крышечка от батарейного отсека пропала 
Сначала действительно создадим пустой проект C++ и добавим туда файл Source.cpp как по этой ссылке.
Затем скачаем библиотеку SFML вот отсюда, я взял 64-битную для Visual C++ 15 (2017), новее не вижу. Распаковать архив там, где удобно, у меня путь d:\Nick\sfml, но можно и в папку проекта, только не забывайте пути с пробелами брать в двойные кавычки и не надо кириллицы в именах папок пути.
Жмём правой кнопкой на значке Компьютер, выбираем Свойства, добавляем следующий путь в переменную path (порядок выбора инструментов для Windows 10 здесь и далее показан цифрами на рисунках):

Добавление пути к библиотекам SFML в path
P.S. Правда, в итоге всё равно путь не помог, возможно, стоило сначала перезагрузить компьютер, но я этого давно уже не делал
Обращаемся к верхнему меню Проект — Свойства: [Имя_проекта] и дальнейшие настройки выполняем там.

Прописать каталог для поиска включаемых файлов SFML
Обратите внимание, что я поставил правильную платформу x64 и конфигурацию Release, в которой собираюсь линковать проект (1, 2).

Прописываем дополнительный каталог библиотек для компоновщика

Прописываем дополнительные зависимости для компоновщика
Здесь я прописал имена библиотек именно для конфигурации Release, если хотите для Debug, то имена будут sfml-graphics-d.lib, sfml-window-d.lib и sfml-system-d.lib.

Прописываем определение для препроцессора
Для статической сборки теоретически следует прописать SFML_STATIC вместо SFML_DYNAMIC, но у меня
с этим так и не вышло — всё равно error LNK2001: неразрешенный внешний символ "public: static class sf::RenderStates const sf::RenderStates::Default" и ещё два для определений цветов.
Помещаем в файл Source.cpp код игры
Теперь проект должен работать при запуске из среды, а для «отдельного» запуска исполняемого файла нам всё равно придётся скопировать
в папку с exe’шкой файлы background.png, egg.png, wolf.png и cyrilicold.ttf из папки проекта и, возможно, если новое значение в path ещё не работает, sfml-graphics-2.lib, sfml-window-2.lib и sfml-system-2.lib из папки d:\Nick\sfml\bin (или вашей папки вместо d:\Nick).
Вот что у нас вышло, волк собирает яйца, управление — клавишами со стрелками.

Игра в работе
![]() Скачать архив .zip с решением Visual Studio 2019 на C++, папка решения уже создана внутри архива (732 Кб)
Скачать архив .zip с решением Visual Studio 2019 на C++, папка решения уже создана внутри архива (732 Кб)
Этот проект настроен на мои пути в файлам, так что если у вас они свои, придётся повторить описанные в статье шаги по настройке (за эти настройки, увы, отвечает не файл проекта, а файл .suo из вложенной папки .vs, обычно файл и папка имеют атрибут «Скрытый»).
В исходнике (а он состоит из единственного файла Source.cpp около 170 строк) много повторяющихся фрагментов, его нетрудно оптимизировать, думаю, сумев запустить приложение, вы справитесь с этим. Все действия прокомментированы.
12.12.2021, 23:51 [1360 просмотров]
К этой статье пока нет комментариев, Ваш будет первым
![]()
Download Article
![]()
Download Article
SFML is a valuable tool for developing games, and it can be added to Visual Studio if you check the Desktop development with C++ workload, «Language pack», and «English» boxes during VS installation. This wikiHow article will teach you how to set up SFML on Visual Studio 2022. It is addressing the beginner.
Things You Should Know
- Download the 32-bit or 64-bit or source library based on the programs you want to compile, not which OS you have.
- Visual Studio 2022 is by default x64. However runs interchangeably on x32 and x64.
-

1
Highlight what you expect to do. Highlight step or sub-step you expect to do and then do it. See as example picture above.
-
2
Download Visual Studio 2022. If you have not done so you can download it from https://www.visualstudio.com/downloads.
- Check the Desktop development with C++ workload box as you download. If necessary scroll down the page (see below image).
- Click «Language pack» and check «English» box.
- During installation, in «Personalize your Visual Studio experience» wizard, in «Development settings» menu, click «General» > click «Visual C++» > hit Start Visual Studio.
- Check the Desktop development with C++ workload box as you download. If necessary scroll down the page (see below image).


Advertisement
-
1
Create folders GL and GLP. Open Windows’s File Explorer > Navigate to disk (directory) C.
- If folders GL and GLP exist it’s okay.
- If they do not, right click in empty area > select New > Folder > type GL > hit ↵ Enter. By same way create folder GLP.
-
2
Download the latest stable version of SFML. Right click on following address and select Open Link in New Window https://www.sfml-dev.org/download/sfml/2.5.1/. Click the first button, today Download 16.3 MB, next to «Visual C++ 15 (2017) — 32-bit».
- In downloads directory, click folder SFML-2.5.1 (or latest version) > right click > Copy (in Windows 11 it is icon).
- Navigate to C: > GL > right click > select Paste (in Windows 11 it is icon).
- (Alternatively click folder SFML-2.5.1 (or latest version) and drag into File Explorer > C: > GL).
- Copy SFMLx32 > after copying and unzipping have been finished, click, if needed twice,on name SFML-2.5.1 (or latest version) > paste > hit ↵ Enter. Now in folder GL you have folder «SFMLx32».

Advertisement
-
1
Create empty project.
-
If it’s the first time you open Visual Studio. Click Create a new project.
- In Create a new project wizard, find Empty Project Start from scratch with C++ for Windows. Provides no starting files. (see image above, if necessary type Empty Project in search box above the list and hit ↵ Enter) > click it > click Next.
- In Configure your new project wizard for «Project name» type (or copy and paste) SFMLx32-0
- Copy C:\GLP and paste in «Location» text field.
- Check «Place solution and project in the same directory».
- Click Create.
- Wait till Visual Studio instance appears.
- If it’s not the first time. In main menu click File > New > Project… > the rest as above.
-
If it’s the first time you open Visual Studio. Click Create a new project.
-
2
Add your Source file to the project.
- In «Solution Explorer» window right click the «Source Files» folder (the last one) > click «Add > «New Item…»
- In «Add New Item» wizard instead of «FileName», type Main > hit ↵ Enter. The source file Main.cpp will open in the main text editor but leave the file blank for now.


Advertisement
-
1
Configure «Property Pages». Go to «Solution Explorer» > right click on the name of your project SFMLx32-0 > select «Properties» (the last one). In «SFMLx32-0 Property Pages» wizard,
-
1. Main menu. In Configuration entry select Active(Debug) > Platform: Win32 or x86 > click Configuration Manager.
- «Configuration Manager» wizard
- «Active solution platform:» select x86 or Win32
- «Platform» Win32 or x86 is automatically selected
- Click Close.
- «Configuration Manager» wizard
-
2. Additional Include Directories. Double click C/C++ > click General > Additional Include Directories > down arrow at the end of the field > click <Edit…>.
- Copy C:\GL\SFMLx32\include > click first icon in Additional Include Directories wizard > paste.
- In Additional Include Directories wizard click OK.
-
3. Additional Library Directories. In the «SFMLx32 Property Pages» wizard, double click Linker > click General > Additional Library Directories > down arrow at the end of the field > click <Edit… >.
- Copy C:\GL\SFMLx32\lib and paste as before.
- Click OK in Additional Library Directories wizard.
-
4. Additional Dependencies. In «Linker» drop down menu, click Input > Additional Dependencies > down arrow at the end of the field > click <Edit…>.
- Copy following .lib file names and paste in «Additional Dependencies» wizard’s upper-most text box: opengl32.lib; flac.lib; freetype.lib; ogg.lib; openal32.lib; sfml-audio.lib; sfml-graphics.lib; sfml-window.lib; sfml-system.lib; sfml-main.lib; sfml-network.lib; vorbis.lib; vorbisenc.lib; vorbisfile.lib
- In «Additional Dependencies» wizard click OK.
-
5. System. In Linker drop down menu click System > SubSystem > down arrow at the end of the field > select Console (/SUBSYSTEM:CONSOLE) > click Apply and then OK.
-
1. Main menu. In Configuration entry select Active(Debug) > Platform: Win32 or x86 > click Configuration Manager.
-
2
Add dll file path (address) to «System Variables». In Windows search text field (bottom left of the screen) type envir > hit ↵ Enter. «System Properties» wizard is thrown.
- Select the «Advanced» tab from the top bar > click Environment Variables…. «Environment Variables» wizard is thrown.
- Double click the «Path» (or «PATH») Variable in the «System Variables» section. «Edit environement variable» wizard is thrown.
- Copy C:\GL\SFMLx32\bin > click New > Paste.
- Click OK in all 3 wizards.
- Close Visual Studio > in thrown wizard asking «Save changes to the following items?» click Save.
- Restart your PC > open Visual Studio. In «Open recent» list, click «SFMLx32-0.sln», the first one. Now your project is open ready for test.


Advertisement
-
1
Test your project. Right click on following address and select Open Link in New Window https://www.sfml-dev.org/tutorials/2.5/start-vc.php scroll down the page and copy the code.
- Go to Visual Studio and paste in Main.cpp code area > in main menu select x86 > hit Ctrl+F5 or in Visual Studio’s main menu click the green triangle with phrase «Local Windows Debugger». Two windows should appear: one black (the console) and one small with green circle in black background. Good job.
-
2
Correct errors if any. Files are missing. Copy C:\GLP\SFMLx32-0 and paste in File Explorer Address Bar. You should see file you added Main.cpp, and 4 other files added by Visual Studio. If they are missing you missed add file Main.cpp. Go to Part 3, step 2, and add it now.
- In «Error List» if you see error about
- file with extension .h
- Check whether folder SFMLx32 exists in C:\GL. If it exists,
- go to previous Part, step 1, sub step 2. Additional Include Directories and follow instructions.
- file with extension .lib go to previous Part, step 1, sub step 3. Additional Library Directories, and follow instructions. Also to sub step 4. Additional Dependencies..
- «entry point must be defined» go to previous Part, step 1, sub step 5. System, and follow instructions.
- file with extension .h
- Thrown wizard about System or file .dll, go to previous Part, steps 2 and 3, and follow instructions.
- For other errors, if you can not correct them, close Visual Studio > delete project folder SFMLx32-0 which lives in C:\GLP > open Visual Studio > repeat set up from Part 3. Good job.
- In «Error List» if you see error about
Advertisement
-
1
Create Template. Go to Visual Studio main menu. While «SFMLx32-0» is open, click Project > Export Template….
- In Choose Template Type menu, leave Project template checked. Click Next….
- In Select Template Options, Template name: should be SFMLx32-0 > click Finish. The template is created. Close thrown window with template’s path.
-
2
Create Project. In Visual Studio main menu select x86 > click File > New > Project….
- In Create a new project wizard, in the list of templates, select SFMLx32-0 (if necessary type it in search box above the list and hit ↵ Enter) > click Next.
- In Configure your new project wizard, Project name: should be SFMLx32-01 .
- Location should be C:\GLP\. If it’s not, delete path, copy C:\GLP and paste.
- Be sure Place solution and project in the same directory is checked. Click Create.
- In Visual Studio’s GUI main menu, select x86 > hit Ctrl+F5 or in Visual Studio’s main menu click the green triangle with phrase «Local Windows Debugger». Good job.
- TIP. When you create project with this template remember in Visual Studio main menu select x86.
Advertisement
-
1
Create folders GL and GLP. Open Windows’s File Explorer > Navigate to disk (directory) C.
- If folders GL and GLP exist it’s okay.
- If they do not, right click in empty area > select New > Folder > type GL > hit ↵ Enter. By same way create folder GLP.
-
2
Download the latest stable version of SFML 64 bit. Right click on following address and select Open Link in New Window https://www.sfml-dev.org/download/sfml/2.5.1/. Click the first button in the right list, today Download 18.0 MB next to «Visual C++ 15 (2017) — 64-bit».
- In downloading window, click the folder SFML-2.5.1 (or the latest) > right click > Copy (in Windows 11 it is icon).
- Navigate to C: > GL > right click > select Paste (in Windows 11 it is icon).
- After copying and unzipping have been finished click on name SFML-2.5.1 and rename to SFMLx64

Advertisement
-
1
Create empty project.
-
If it’s the first time you open Visual Studio. Open it > click Create a new project.
- In Create a new project wizard, find Empty Project Start from scratch with C++ for Windows. Provides no starting files. (see image above, if necessary type Empty Project in search box above the list and hit ↵ Enter) > click it > click Next.
- In Configure your new project wizard for «Project name» type (or copy and paste) SFMLx64-0
- Copy C:\GLP and paste in «Location» text field.
- Check «Place solution and project in the same directory».
- Click Create.
- Wait till Visual Studio instance appears.
- If it’s not the first time. In main menu click File > New > Project… > the rest as above.
-
If it’s the first time you open Visual Studio. Open it > click Create a new project.
-
2
Add your Source file to the project.
- In «Solution Explorer» window right click the «Source Files» folder (the last one) > click «Add > «New Item…»
- Copy Main > in the «Add New Item» wizard delete «FileName» > paste > click Add. The source file Main.cpp will open in the main text editor but leave the file blank for now.
Advertisement
-
1
Configure «Property Pages». Go to «Solution Explorer» > right click on the name of your project SFMLx64-0 > select «Properties» (the last one). In «SFMLx64-0 Property Pages» wizard,
-
1. Main menu: In Configuration entry select Active(Debug) > in Platform: entry, select x64 > Click Configuration manager…
- In Configuration Manager wizard, in Active solution platform: select x64
- In Platform entry, x64 is selected automatically.
- Click Close
-
2. Additional Include Directories: In SFMLx64-0 Property Pages window double click C/C++ > click General > Additional Include Directories > down arrow at the end of the field > click <Edit…>.
- Copy C:\GL\SFMLx64\include > in Additional Include Directories wizard click first icon > paste.
- In Additional Include Directories wizard click OK.
-
3. Additional Library Directories: In the «SFMLx64 Property Pages» wizard, double click Linker > click General > Additional Library Directories > down arrow at the end of the field > click <Edit… >.
- Copy C:\GL\SFMLx64\lib and paste as before.
- Click OK in Additional Library Directories wizard.
-
4. Additional Dependencies: In «Linker» drop down menu, click Input > Additional Dependencies > down arrow at the end of the field > click <Edit…>.
- Copy following .lib file names and paste in «Additional Dependencies» wizard’s upper-most text box: opengl32.lib; flac.lib; freetype.lib; ogg.lib; openal32.lib; sfml-audio.lib; sfml-graphics.lib; sfml-window.lib; sfml-system.lib; sfml-main.lib; sfml-network.lib; vorbis.lib; vorbisenc.lib; vorbisfile.lib
- In «Additional Dependencies» wizard click OK.
- 5. System: In Linker dropdown menu click System > SubSystem > down arrow at the end of the field > select Console (/SUBSYSTEM:CONSOLE).
- Click Apply and then OK in «Project’s Property Pages» wizard.
-
1. Main menu: In Configuration entry select Active(Debug) > in Platform: entry, select x64 > Click Configuration manager…
-
2
Add dll file path (address) to «System Variables». In Windows search text field (bottom left of the screen) type envir > hit ↵ Enter. «System Properties» wizard is thrown.
- Select the «Advanced» tab from the top bar > click Environment Variables…. «Environment Variables» wizard is thrown.
- Double click the «Path» (or «PATH») Variable in the «System Variables» section. «Edit environement variable» wizard is thrown.
- Copy C:\GL\SFMLx64\bin > click New > Paste.
- Click OK in all 3 wizards.
- Close Visual Studio > in thrown wizard «Save changes to the following items?» click Save.
- Restart your PC > open Visual Studio. In «Open recent» list, click «SFMLx64-0.sln», the first one. Now your project is open ready for test.
Advertisement
-
1
Test your project. Right click on following address and select Open Link in New Window https://www.sfml-dev.org/tutorials/2.5/start-vc.php scroll down the page and copy the code.
- Go to Visual Studio and paste in Main.cpp code area > in main menu select x64 > hit Ctrl+F5 or in Visual Studio’s main menu click the green triangle with phrase «Local Windows Debugger». Two windows should appear: one black (the console) and one small with green circle in black background. Good job.
-
2
Correct any errors. Files are missing. Copy C:\GLP\SFMLx64-0 and paste in File Explorer Address Bar. You should see file you added Main.cpp, and 4 other files added by Visual Studio. If they are missing you missed add file Main.cpp. Go to Part 7, step 4, and add it now.
- In «Error List» if you see error about
- file with extension .h
- Check whether folder SFMLx64 exists in C:\GL. If it exists,
- go to previous Part, step 1, Additional Include Directories and follow instructions.
- file with extension .lib go to previous Part, step 1, Additional Library Directories, and follow instructions. Also to Additional Dependencies.
- «entry point must be defined» go to previous Part step 1, substep System and follow instructions.
- file with extension .h
- Thrown wizard about System or file .dll, go to previous Part steps 2 and 3, and follow instructions.
- For other errors, if you can not correct them, close Visual Studio > delete project folder SFMLx64 which lives in C:\GLP > open Visual Studio > repeat set up from Part 7 Installing SFMLx64 in the Project. Good job.
- In «Error List» if you see error about
-
3
Tip: Even if in Property Pages main settings it is Platform: x64, click Configuration manager… and in Active solution platform: select x64.
Advertisement
-
1
Create Template. Go to Visual Studio main menu. While «SFMLx64-0» is open, click Project > Export Template….
- In Choose Template Type menu, leave Project template checked. Click Next….
- In Select Template Options, Template name: should be SFMLx64-0 > click Finish. The template is created. Close thrown window with template’s path.
-
2
Create Project. In Visual Studio main menu select x64 > click File > New > Project….
- In Create a new project wizard select SFMLx64-0 (if necessary type it in search box above the list and hit ↵ Enter) > click Next.
- In Configure your new project wizard, Project name should be SFMLx64-01.
- Location should be C:\GLP\. If it’s not, delete path, copy C:\GLP and paste.
- Be sure Place solution and project in the same directory is checked. Click Create, and wait till project be created.
- In Visual Studio GUI’s main menu, select x64. Hit Ctrl+F5 or in Visual Studio’s main menu click the green triangle with phrase «Local Windows Debugger». Good job.
-
3
TIP: In every project you create with this template, remember, in Visual Studio GUI main menu, select x64 (next to Debug).

Advertisement
-
1
Compiling a library from the source code guarantees that the resulting library is perfectly tailored for your CPU/OS, a luxury pre-compiled binaries don’t always provide. It is also important that binaries you get target x64 platform.
-
2
Create folders GL and GLP. Open Windows’s File Explorer > Navigate to disk (directory) C.
- If folders GL and GLP exist it’s okay.
- If they do not, right click in empty area > select New > Folder > type GL > hit ↵ Enter. By same way create folder GLP.
-
3
Download CMake. Right-click on following address and select Open Link in New Window https://cmake.org/download/. Scroll down the page and find «Latest Release (3.27.3)», (or latest). In second «Platform» list, find (see image above) «Windows x64 ZIP» and click the beside entry cmake-3.27.3-windows-x86_64.zip (or latest) > in opening wizard select Save file.
-
4
Copy and unzip the zip folder.
- If the downloaded folder doesn’t contain line with stripes (unzipped folder) click it > right click > Copy (in Windows 11 may it is icon).
- If downloaded folder’s icon contains vertical line with stripes (zipped folder), double click it for get unzipped folder, (or alternatively, click folder > right click > in drop-down menu select Extract all).
- When unzipping (extracting files) is finished, click unzip folder cmake-3.27.3-windows-x86_64.zip (or latest) > right click > Copy.
- Go to drive (directory) C: > GL > right click > Paste (in Windows 11 it is icon).
- (Alternatively click folder «cmake-3.27.3-windows-x86_64» and drag into folder «GL»).
- When copying is finished click, if needed twice, folder’s name > delete it > type CMake > hit ↵ Enter > double click this folder > double click folder bin > inside you should see CMake’s logo next to file name cmake-gui > double click this file. If wizard «Windows protect your PC» appears, click More information > Run anyway. Now on your screen you have CMake GUI.
- Each time you need CMake, navigate to C:\ > GL > double click folder CMake > double click «bin» > double click file cmake-gui (the one with CMake’s logo).

Advertisement
-
1
Download source code. Right-click on following address and select Open Link in New Window https://www.sfml-dev.org/download/sfml/2.5.1/. Scroll down to the bottom (see above image), in All select Source code and click Download 22.2 MB.
-
2
Copy and unzip folder.
- In downloading window click zip folder SFML-2.5.1-sources.zip (or latest version) > right click > select Copy.
- Navigate to C:\ > GL > right click > select Paste.
- Now in directory C:\GL, you have unzip folder SFML-2.5.1.
- Copy SFMLsrc > click, if needed twice, on folder’s name > delete name > paste > hit ↵ Enter.

Advertisement
-
1
Build SFML by CMake and Visual Studio. Go to CMake GUI. See above image.
- In text field next to Where is the source code (first text field), type (or copy and paste, attention: do not copy any space)C:/GL/SFMLsrc
- In text field next to Where to build the binaries (second text field), type (or copy and paste, attention: do not copy any space)C:/GL/SFMLsrc/build
- Configure and generate. In CMake GUI, click Configure > in wizard Create Directory click Yes > in wizard «Specify the generator for this project» click Finish.
- When, in CMake GUI, you read: «Configuring done», click Generate. You should read: «Generating done».
- If, instead, wizard «Error» is thrown, click OK > click «File» > click «Delete Cache» > in thrown wizard «Delete Cache», click Yes.
-
2
Build your solution.
- Copy C:\GL\SFMLsrc\build and paste in File Explorer Address bar > hit ↵ Enter > double click «SFML.sln», or «SFML», or «ALL_BUILD.vcxproj». An instance of Visual Studio appears. In the main menu, click «Build» > click «Build Solution».
- Wait till you read the last line in «Output» window: ========== Build: 8 succeeded, 0 failed, 0 up-to-date, 1 skipped ==========
- TIP: Number of «succeeded» changes in SFML versions. Today(09-Nov-2022) is 8.
- Close this instance of Visual Studio. Close CMake GUI.

Advertisement
-
1
Create empty project.
-
If it’s the first time you open Visual Studio. Open it > click Create a new project.
- In Create a new project wizard, find Empty Project Start from scratch with C++ for Windows. Provides no starting files. (see image above, if necessary type Empty Project in search box above the list and hit ↵ Enter) > click it > click Next.
- In Configure your new project wizard for «Project name» type (or copy and paste) SFMLsrc-0
- Copy C:\GLP and paste in «Location» text field.
- Check «Place solution and project in the same directory».
- Click Create.
- Wait till Visual Studio instance appears.
- If it’s not the first time. In main menu click File > New > Project… > the rest as above.
-
If it’s the first time you open Visual Studio. Open it > click Create a new project.
-
2
Add your Source file to the project.
- In «Solution Explorer» window right click the «Source Files» folder (the last one) > click «Add > «New Item…»
- Copy Main > in the «Add New Item» wizard delete «FileName» > paste > click Add. The source file Main.cpp will open in the main text editor but leave the file blank for now.
Advertisement
-
1
Configure project’s Properties. In Solution Explorer wizard, right click Project’s name that is SFMLsrc-0 > select Properties (the last one). In «SFMLsrc-0 Property Pages» wizard, .
-
1. main menu. In Platform entry select x64 > click Configuration Manager….
- In Active solution platform: select x64.
- In Platform entry, x64 is automatically selected.
- Click Close.
-
2. Additional Include Directories. Click C/C++ > General > In beside menu select the first one, Additional Include Directories > click the down arrow at the end of the field > click <Edit…>.
- Copy C:\GL\SFMLsrc\include > in «Additional Include Directories» wizard, click the first icon > paste.
- In «Additional Include Directories» wizard, click OK.
- Copy C:\GL\SFMLsrc\include > in «Additional Include Directories» wizard, click the first icon > paste.
-
3. Additional Library Directories. Double click Linker > click General > Additional Library Directories > click the down arrow at the end of the field > click <Edit…>.
- Copy C:\GL\SFMLsrc\build\lib\Debug > in «Additional Library Directories» wizard, click the first icon > paste.
- In «Additional Library Directories» wizard, click OK.
- Copy C:\GL\SFMLsrc\build\lib\Debug > in «Additional Library Directories» wizard, click the first icon > paste.
-
4. Additional Dependencies. In Linker drop-down menu select Input > in beside menu select the first one, Additional Dependencies > click the down arrow at the end of the field > click <Edit…>
- Copy opengl32.lib; sfml-audio-d.lib; sfml-graphics-d.lib; sfml-main-d.lib; sfml-network-d.lib; sfml-system-d.lib; sfml-window-d.lib and paste in Additional Dependencies wizard’s upper-most text box.
- In Additional Dependencies wizard click OK.
- 5. System. In Linker drop-down menu select System > in beside menu select the first one, SubSystem > click the down arrow at the end of the field > select Console (/SUBSYSTEM:CONSOLE).
- In «SFMLsrc Property Pages» wizard, click Apply and then OK.
-
1. main menu. In Platform entry select x64 > click Configuration Manager….
-
2
Add dll file path (address) to «System Variables». In Windows search text field (bottom left of the screen) type envir > hit ↵ Enter. «System Properties» wizard is thrown.
- Select the «Advanced» tab from the top bar > click Environment Variables…. «Environment Variables» wizard is thrown.
- Double click the «Path» (or «PATH») Variable in the «System Variables» section. «Edit environement variable» wizard is thrown.
- Copy C:\GL\SFMLsrc\build\lib\Debug > click New > Paste.
- Click OK in all 3 wizards.
- Close Visual Studio > in thrown wizard asking «Save changes to the following items?» click Save.
- Restart your PC > open Visual Studio. In «Open recent» list, click SFMLsrc-0.sln, the first one. Now your project is open ready for test.
Advertisement
-
1
Test your project. Right click on following address and select Open Link in New Window https://www.sfml-dev.org/tutorials/2.5/start-vc.php scroll down the page and copy the code.
- Go to Visual Studio and paste in Main.cpp code area > in main menu select x64 > hit Ctrl+F5 or in Visual Studio’s main menu click the green triangle with phrase «Local Windows Debugger». Two windows should appear: one black (the console) and one small with green circle in black background.
-
2
Correct any errors. Files are missing. Copy C:\GLP\SFMLsrc-0 and paste in File Explorer Address Bar. You should see file you added Main.cpp, and 4 other files added by Visual Studio. If they are missing you missed add file Main.cpp. Go to Part 12, step 2, and add it now.
- In «Error List» if you see error about
- file with extension .h
- Check whether folder SFMLsrc exists in C:\GL. If it exists,
- go to previous Part step 1, sub step 2. Additional Include Directories.
- file with extension .lib go to previous Part, step 1, sub step 3. Additional Library Directories. Also to sub step 4. Additional Dependencies.
- «entry point must be defined» go to previous Part, step 1, sub step 5. System.
- file with extension .h
- Thrown wizard about System or file .dll, go to previous Part, steps 2 and 3.
- For other errors, if you can not correct them, close Visual Studio > delete project folder SFMLsrc-0 which lives in C:\GLP > open Visual Studio > repeat set up from Part 12. Good job.
- In «Error List» if you see error about
Advertisement
-
1
Create Template. Go to Visual Studio main menu. While «SFMLsrc-0» is open, click Project > Export Template….
- In Choose Template Type menu, leave Project template checked. Click Next….
- In Select Template Options, Template name: should be SFMLsrc-0 > click Finish. The template is created. Delete thrown window with template’s path.
-
2
Create Project. Go to Visual Studio main menu and click File > New > Project….
- In Create a new project wizard select SFMLsrc-0 (if necessary type it in search box above the list and hit ↵ Enter) > click Next.
- In Configure your new project wizard, Project name should be SFMLsrc-01.
- Location should be C:\GLP\. If it’s not, delete path, copy C:\GLP and paste.
- Be sure Place solution and project in the same directory is checked. Click Create, and wait till project be created.
- In Visual Studio main menu select x64 > hit Ctrl+F5 or in Visual Studio’s main menu click the green triangle with phrase «Local Windows Debugger». Good job.
-
3
TIP: Remember, in every project you create with this template, select x64 (next to Debug) in Visual Studio’s GUI.
Advertisement
-
1
In this tutorial you learn 3 was to set up SFML in Project with Visual Studio.
- Set up binaries x86 (32 bits). It’s the easiest. You should start learning set up from here.
- Set up binaries x64 (64 bits). It targets x64 platform. Choose it only when you have specific reason for doing so.
- Compile SFML source, and set up in project. Targets x64 too.The most difficult. The best though.
Add New Question
-
Question
There is no «Export template» option, what should I do? I am using the community version.

If the «Export template» options is unavailable, then it is likely that you failed to keep open «Project-0» when trying to export the template. It is the mother or patron project for creating the template with it. If there is no project open, you can’t create a template, so there is no «Export Template» option.
Ask a Question
200 characters left
Include your email address to get a message when this question is answered.
Submit
Advertisement
Video
![]()
Thanks for reading our article! If you’d like to learn more about visual studio, check out our in-depth interview with Tyrone Showers.
About This Article
Thanks to all authors for creating a page that has been read 44,625 times.
Is this article up to date?
В этом уроке мы подключим библиотеку SFML (Simple and fast multimedia library) к среде разработки Microsft Visual Studio 2013:
Скачиваем библиотеку http://www.sfml-dev.org/download/sfml/2.2/ (у меня это версия Visual C++ 12 (2013) – 32-bit);
Видеоверсия http://www.youtube.com/watch?v=IghUVIL6okk
Распаковываем куда вам угодно (у меня D:/SFML-2.2/); на всякий случай старайтесь избегать русских букв в папках пути. (то есть C:/приветик/ – лучше не использовать)
Запускаем Visual Studio 2013, файл->создать->проект->пустой проект (имя придумайте сами, у меня это sfmltest) .
Так как мы создали пустой проект – нам негде даже писать код, поэтому нам необходимо добавить файл исходного кода:
Добавляем исходный код – для этого слева в обозревателе решений находим вкладку «Файлы исходного кода»->правый клик->добавить->создать элемент->файл C++ (имя main.cpp)->добавить. ( Имя может быть любым , но опять же лучше всего английские буквы и главный файл называть “main”.)
Далее вставляем вот этот тестовый код в файл main.cpp
|
1 2 3 4 5 6 7 8 9 10 11 12 13 14 15 16 17 18 19 20 21 22 23 24 |
#include <SFML/Graphics.hpp> int main() { sf::RenderWindow window(sf::VideoMode(200, 200), «Lesson 1. kychka-pc.ru»); sf::CircleShape shape(100.f); shape.setFillColor(sf::Color::Green); while (window.isOpen()) { sf::Event event; while (window.pollEvent(event)) { if (event.type == sf::Event::Closed) window.close(); } window.clear(); window.draw(shape); window.display(); } return 0; } |
Не пытайтесь сейчас это запустить – словите ошибки.
Для того, чтобы всё это работало – необходимо подключить библиотеку SFML.
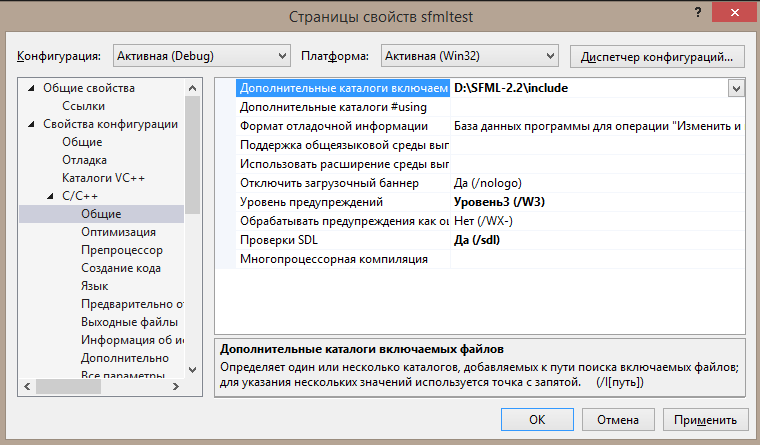
Заходим вверху «проект»->свойства “имя проекта”->свойства конфигурации->C++->общие
В пункте «дополнительные каталоги включаемых файлов прописываем путь до раннее распакованного архива с библиотекой (+ \include.)
У меня получилось так: D:\SFML-2.2\include
Скриншот:
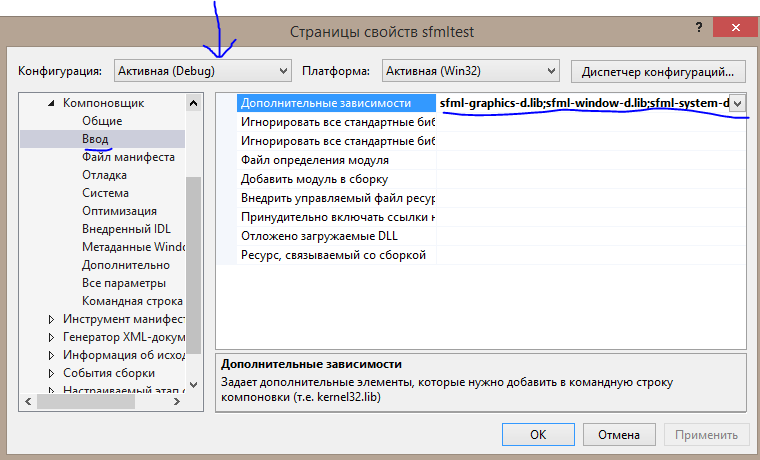
Затем идем в компоновщик->общие и в пункте «дополнительные каталоги библиотек» прописываем путь к папке lib (у меня D:\SFML-2.2\lib);
Скрин:
")
Далее идем в компоновщике во вкладку ввод и в первой строке «дополнительные зависимости» вписываем перед всеми библиотеками следующую строчку:
sfml-graphics-d.lib;sfml-window-d.lib;sfml-system-d.lib;sfml-audio-d.lib;
Скрин:
Только что подключили основные необходимые для работы библиотеки. Есть еще звук и сеть, но о них поговорим позже.
(Все действия мы делаем для конфигурации Debug. Если вам нужен релиз, или сразу две конфигурации – меняйте значение конфигурации, а затем проделайте все те же действия, что идут после вставки тестового кода)
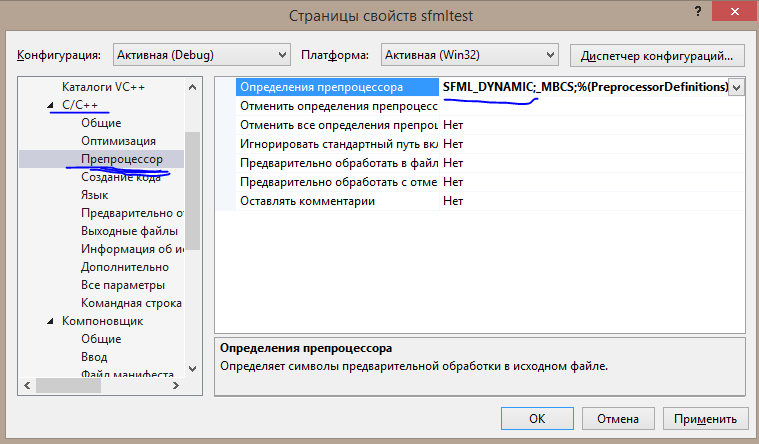
Последний штрих – идем во вкладку C++->препроцессор и в первой строке «определение препроцессора» в самом начале дописываем: SFML_DYNAMIC;
(с SFML_STATIC у меня в Visual Studio 2013 проект не компилируется)
Скрин:
Запустим и словим ошибку. Зато соберется проект и появится папка debug.
Теперь идем в папку бинарников “bin”, которую вы скачали и распаковали с библиотекой (мой вариант D:\SFML-2.2\bin\) и копируем всё содержимое этой папки (dll файлы типа sfml-graphics-2.dll) в папку с вашим проектом в папку debug (после сборки появилась эта папка), но не в тот debug, где лежит файл с исходным кодом “main.cpp”, а тот, где появляется exe файл. (мой вариант C:\Users\Павел\Documents\Visual Studio 2013\Projects\sfmltest\debug\)
В эту же папку копируем и вот эти файлы :
msvcp100d.dll;msvcp110.dll;msvcp110d.dll;msvcr100d.dll;msvcr110.dll;msvcr110d.dll;
(они скорее всего есть в bin (в sfml 2.1 раньше были, в 2.2 – нету), и должны работать, но если вдруг нет)
Скачать их можете отсюда: https://yadi.sk/d/Zcy7rUbtdrj2w
(там в архиве еще и файл openal32.dll, он должен быть так же в папке bin изначально. он будет нужен нам потом, для работы со звуком).
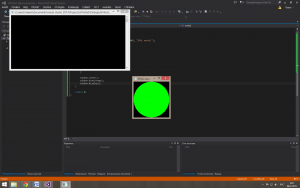
Теперь проект можно запустить и если вы всё сделали правильно, то увидите зелёный круг как на скриншоте ниже:
Теперь можно приступать к самому интересному:)
На следующем уроке подробно разберем тестовый код, обязательно посмотрите. такое нельзя пропускать  Ссылка ниже:
Вопросы задавать на форуме. Весь мануал был для дебага, мы пока разрабатываем проект, а не выпускаем.
Но если что, читайте ниже:
Проблемы с релизной сборкой? На форуме https://kychka-pc.ru/Forum/sfml-topic/oshibki-pri-kompilyacii-reliznoj-versii
sfml-товарищи решили проблему.