Setting up the Selenium library for your favourite programming language.
First you need to install the Selenium bindings for your automation project.
The installation process for libraries depends on the language you choose to use.
Make sure you check the Selenium downloads page to make sure
you are using the latest version.
View the minimum supported Java version here.
Installation of Selenium libraries for Java is accomplished using a build tool.
Maven
Specify the dependencies in the project’s pom.xml file:
        <dependency>
            <groupId>org.seleniumhq.selenium</groupId>
            <artifactId>selenium-java</artifactId>
            <version>4.13.0</version>
        </dependency>
        <dependency>
            <groupId>org.seleniumhq.selenium</groupId>
            <artifactId>selenium-http-jdk-client</artifactId>
            <version>4.13.0</version>
        </dependency>
        <dependency>
Gradle
Specify the dependency in the project build.gradle file as testImplementation:
    testImplementation 'org.seleniumhq.selenium:selenium-java:4.13.0'
    testImplementation 'org.seleniumhq.selenium:selenium-http-jdk-client:4.13.0'
The minimum supported Python version for each Selenium version can be found
in Supported Python Versions on PyPi
There are a couple different ways to install Selenium.
Pip
Download
Alternatively you can download the PyPI source archive
(selenium-x.x.x.tar.gz) and install it using setup.py:
Require in project
To use it in a project, add it to the requirements.txt file:
A list of all supported frameworks for each version of Selenium
is available on Nuget
There are a few options for installing Selenium.
Packet Manager
Install-Package Selenium.WebDriver
.NET CLI
dotnet add package Selenium.WebDriver
CSProj
in the project’s csproj file, specify the dependency as a PackageReference in ItemGroup:
<PackageReference Include="Selenium.WebDriver" Version="4.13.1" />Additional considerations
Further items of note for using Visual Studio Code (vscode) and C#
Install the compatible .NET SDK as per the section above.
Also install the vscode extensions (Ctrl-Shift-X) for C# and NuGet.
Follow the instruction here
to create and run the “Hello World” console project using C#.
You may also create a NUnit starter project using the command line dotnet new NUnit.
Make sure the file %appdata%\NuGet\nuget.config is configured properly as some developers reported that it will be empty due to some issues.
If nuget.config is empty, or not configured properly, then .NET builds will fail for Selenium Projects.
Add the following section to the file nuget.config if it is empty:
<configuration>
  <packageSources>
    <add key="nuget.org" value="https://api.nuget.org/v3/index.json" protocolVersion="3" />
    <add key="nuget.org" value="https://www.nuget.org/api/v2/" />
  </packageSources>
...
For more info about nuget.config click here.
You may have to customize nuget.config to meet you needs.
Now, go back to vscode, press Ctrl-Shift-P, and type “NuGet Add Package”, and enter the required Selenium packages such as Selenium.WebDriver.
Press Enter and select the version.
Now you can use the examples in the documentation related to C# with vscode.
You can see the minimum required version of Ruby for any given Selenium version
on rubygems.org
Selenium can be installed two different ways.
Install manually
gem install selenium-webdriver
Add to project’s gemfile
gem 'selenium-devtools', '~> 0.116'You can find the minimum required version of Node for any given version of Selenium in the
Node Support Policy section on npmjs
Selenium is typically installed using npm.
Install locally
npm install selenium-webdriver
Add to project
In your project’s package.json, add requirement to dependencies:
Use the Java bindings for Kotlin.
Python 2 предварительно установлен на Mac и большинстве дистрибутивов Linux. Для новых Python проектов рекомендуется Python 3, который был впервые выпущен в 2008 году.
Инструкции по установке Python в Windows
Загрузите последнюю версию программы установки и запустите ее.

Для удобства используйте все параметры по умолчанию, кроме «Add python.exe to Path».
Установка Python на Mac
Установите Selenium-WebDriver для Python
PIP — это менеджер пакетов для Python. PIP поставляется с установщиком Python, Выполните следующую команду для обновления до последней версии PIP.
|
python —m pip install —upgrade pip |
Установка Selenium-WebDriver для Python
Выполняем в терминал Windows, Linux или Mac
Результат
|
Collecting selenium Downloading selenium—3.0.2—py2.py3—none—any.whl (915kB) 100% |################################| 921kB 525kB/s Installing collected packages: selenium Successfully installed selenium—3.0.2 |
Установка драйвера
Каждый браузер имеет свой собственный драйвер для Selenium. Мы подготовили нужную информацию для установки драйверов для каждого браузера.
Время на прочтение
5 мин
Количество просмотров 442K
Представляю перевод неофициальной документации Selenium для Python.
Перевод сделан с разрешения автора Baiju Muthukadan.
Оригинал можно найти здесь.
Предисловие от автора статьи
Selenium WebDriver – это программная библиотека для управления браузерами. WebDriver представляет собой драйверы для различных браузеров и клиентские библиотеки на разных языках программирования, предназначенные для управления этими драйверами.
По сути своей использование такого веб-драйвера сводится к созданию бота, выполняющего всю ручную работу с браузером автоматизированно.
Библиотеки WebDriver доступны на языках Java, .Net (C#), Python, Ruby, JavaScript, драйверы реализованы для браузеров Firefox, InternetExplorer, Safari, Andriod, iOS (а также Chrome и Opera).
Сфера применения
Чаще всего Selenium WebDriver используется для тестирования функционала веб-сайтов/веб-ориентированных приложений. Автоматизированное тестирование удобно, потому что позволяет многократно запускать повторяющиеся тесты. Регрессионное тестирование, то есть, проверка, что старый код не перестал работать правильно после внесения новых изменений, является типичным примером, когда необходима автоматизация. WebDriver предоставляет все необходимые методы, обеспечивает высокую скорость теста и гарантирует корректность проверки (поскольку человеский фактор исключен). В официальной документации Selenium приводятся следующие плюсы автоматизированного тестирования веб-приложений:
- возможность проводить чаще регрессионное тестирование;
- быстрое предоставление разработчикам отчета о состоянии продукта;
- получение потенциально бесконечного числа прогонов тестов;
- обеспечение поддержки Agile и экстремальным методам разработки;
- сохранение строгой документации тестов;
- обнаружение ошибок, которые были пропущены на стадии ручного тестирования.
Функционал WebDriver позволяет использовать его не только для тестирования, но и для администрирования веб-сервисов, сократив до возможного предела количество действий, производимых вручную. Selenium WebDriver становится незаменимым помощником в случаях, когда, к примеру, ядро сайта устарело и требует от модераторов большого количества телодвижений для реализации маленьких фич (например, загрузки галереи фото).
Также одной из незаменимых особенностей Selenium WebDriver является ожидание загрузки страницы. Сюда можно отнести случаи, когда парсинг данных на странице невозможен из-за страниц перенаправления или ожидания, содержащих примерно такой текст: «Подождите, страница загружается». Такие страницы, само собой разумеется, не является целью парсинга, однако обойти их часто не представляется возможным. Естественно, без Selenium WebDriver. Selenium WebDriver позволяет в таких случаях «ожидать», как ожидал бы человек, пока на странице, к примеру, не появится элемент с необходимым именем.
Еще один плюс Selenium заключен в том, что действия веб-драйвера видимы визуально и требуют минимального времени нахождения на странице, это позволяет с удобством демонстрировать функционал сайта, когда необходима презентация сервиса.
Некоторые проблемы WebDriver (из сети и личного опыта):
- бывает, что поведение отличается в разных браузерах;
- иногда возникают сложности с поиском элементов (XPath и другие методы иногда просто не работают, хотя должны);
- необъяснимые падения драйвера прямо посреди теста;
- взаимодействие возможно только с первой вкладкой браузера, драйвер позволяет открывать новые вкладки и новые окна, но не позволяет в них работать;
- необходимо четко продумывать архитектуру теста, часто использовать assert или ожидания, чтобы тест умел «думать», когда делать и когда нет.
Подробнее о проекте Selenium и серии их ПО можно прочитать здесь, либо в официальной документации или ее переводе.
Содержание:
1. Установка
2. Первые Шаги
3. Навигация
4. Поиск Элементов
5. Ожидания
6. Объекты Страницы
7. WebDriver API
8. Приложение: Часто Задаваемые Вопросы
1. Установка
1.1. Введение
Привязка Selenium к Python предоставляет собой простой API [Интерфейс программирования приложений (англ. Application Programming Interface) — Прим. пер.] для написания тестов функциональности/тестов соответствия требованиям с использованием веб-драйвера Selenium WebDriver. С помощью Selenium Python API вы можете интуитивно просто получить доступ ко всему функционалу Selenium WebDriver.
Привязка Python-Selenium предоставляет удобный API для доступа к таким веб-драйверам Selenium как Firefox, Ie, Chrome, Remote и других. На данный момент поддерживаются версии Python 2.7, 3.2, 3.3 и 3.4.
В данной документации рассмотрен Selenium 2 WebDriver API. Selenium 1 / Selenium RC API в ней не охвачены.
1.2. Загрузка Selenium для Python
Вы можете загрузить привязку Selenium к Python со страницы пакета selenium на PyPI. Однако, лучшим способом будет использование модуля pip. Python 3.4 содержит pip в стандартной библиотеке. Используя pip, вы можете установить selenium следующей командой:
pip install selenium
Для создания изолированной среды Python вы можете использовать virtualenv. Также библиотека Python 3.4 содержит модуль pyvenv, который практически аналогичен virtualenv.
1.3. Подробная инструкция для пользователей Windows
Примечание
Для данной инсталляции вам необходим доступ к сети Интернет.
1. Установите Python 3.4 через файл MSI, доступный на странице загрузок сайта python.org.
2. Запустите командную строку через программу cmd.exe и запустите команду pip установки selenium, как показано ниже.
C:\Python34\Scripts\pip.exe install selenium
Теперь вы можете запускать свои тестовые скрипты, используя Python. К примеру, если вы создали скрипт на основе Selenium и сохранили его в C:\my_selenium_script.py, то вы можете запустить его следующей командой:
C:\Python34\python.exe C:\my_selenium_script.py
1.4. Загрузка Selenium server
Примечание
Selenium server необходим в случаях, когда вы хотите использовать remote WebDriver [удаленный — Прим. пер.]. За дополнительной информацией обращайтесь к разделу Использование Selenium с remote WebDriver. Если вы только начинаете изучать Selenium, вы можете пропустить этот раздел и продолжить изучение со следующей главы.
Selenium server написан на языке Java. Для его запуска рекомендована среда Java Runtime Environment (JRE) версии 1.6 или выше.
Вы можете скачать Selenium server 2.x на странице загрузок сайта selenium. Имя файла должно выглядеть примерно таким образом: selenium-server-standalone-2.x.x.jar. Вы всегда можете загрузить последнюю версию Selenium server 2.x.
Если Java Runtime Environment (JRE) не установлена в вашей системе, вы можете скачать JRE с сайта Oracle. Если вы используете системы GNU/Linux и имеете права root [права администратора — Прим. пер.], вы так же можете установить JRE, используя инструкции вашей системы.
Если команда java доступна в PATH (переменная окружения), вы можете запустить Selenium server используя следующую команду:
java -jar selenium-server-standalone-2.x.x.jar
Замените 2.x.x актуальной версией Selenium server, скачанной вами с сайта.
Если JRE установлена под пользователем, не обладающим правами root и/или если она недоступна в переменной окружения PATH, вы можете ввести относительный или полный путь до файла java. Аналогично, вы можете дополнить имя jar-файла Selenium server до относительного или полного пути. После этого команда будет выглядеть так:
/путь/до/java -jar /путь/до/selenium-server-standalone-2.x.x.jar
Перейти к следующей главе
Selenium is an open-source tool for automating testing of web applications which is free and it supports various programming languages such as C#, Java, Perl, PHP, Python, and Ruby. Selenium Webdriver is most well known or you can say famed with Java as of now.
In this article, we will look into how to install selenium Webdriver on a Windows operating system.
Installation of Selenium WebDriver can be done in three steps :
- Download and install Java
- Download and install Eclipse IDE
- Download and install Selenium WebDriver
Downloading and installing Java:
Follow the below steps to install Java on your Windows system:
Step 1: First of all, go to Oracle’s official website to download Java.
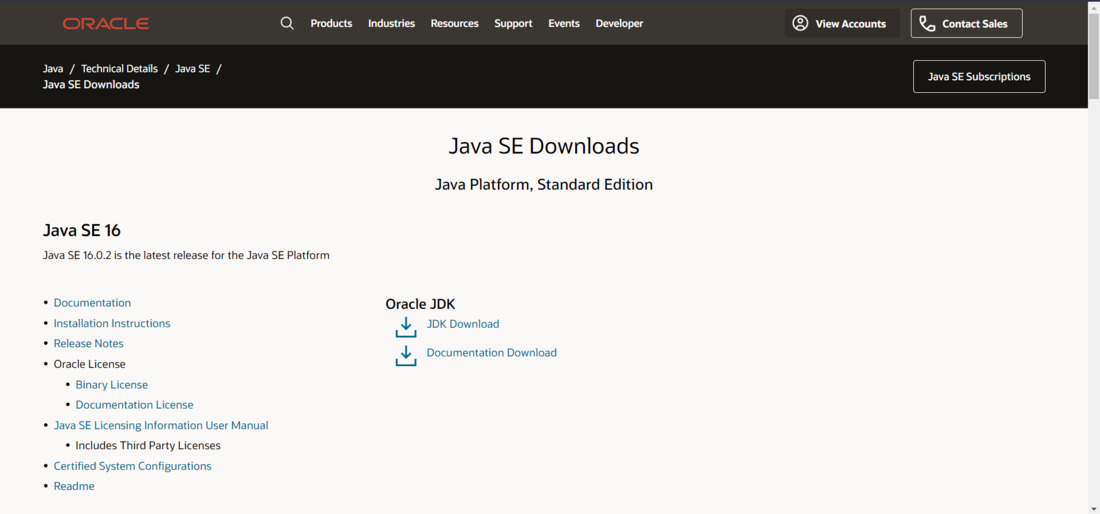
Click on JDK download
Step 2: Then download it by clicking on JDK Download and then click on the one you want to download according to your system i.e. 32 or 64-bit version.
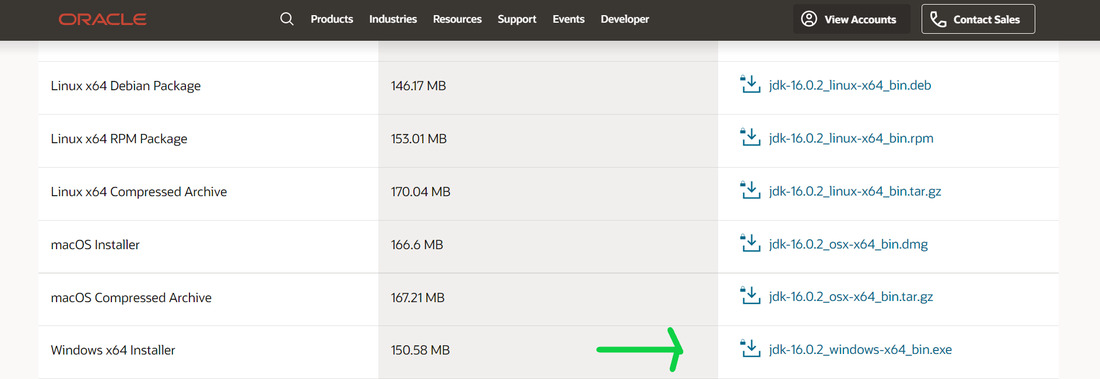
Select version
Step 3: Then just execute the installer and Java will be downloaded to your system.
Downloading and Installing Eclipse IDE:
Follow the below steps to download and install the Eclipse IDE:
Step 1: The first step, go to the official website of Eclipse and click on the download button.

Click on “Download”
Step 2: Now, click on the “Download x86_64” button.
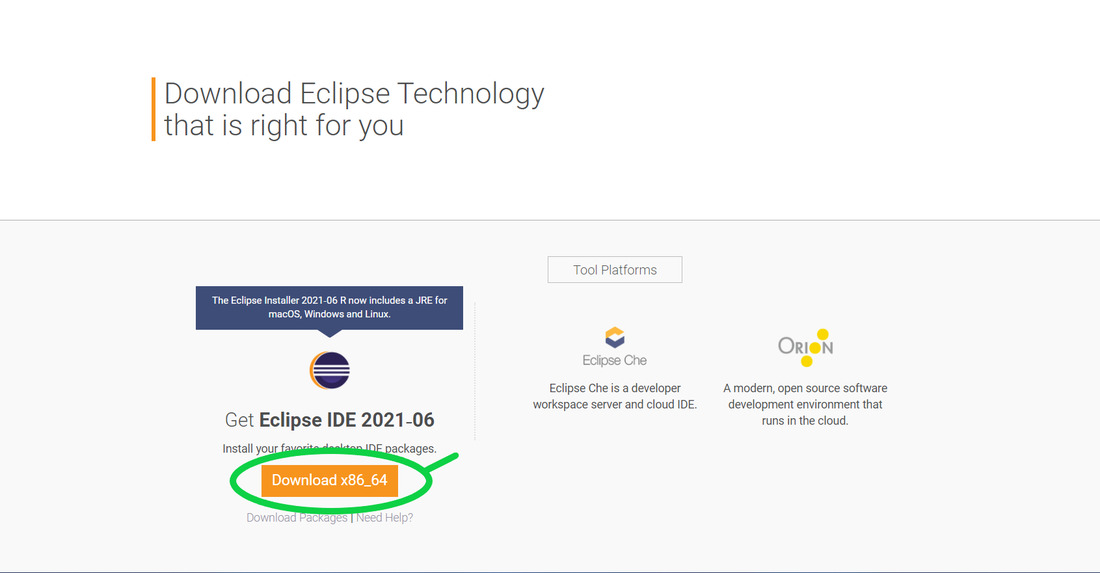
Download x86_64
Step 3: After downloading, while installing click on “Eclipse for Java Developers” and after that click on Install and it will look like this after installation.

Homepage of Eclipse IDE
Downloading and installing Selenium WebDriver for Java:
Follow the below steps to install selenium webdriver for java:
Step 1: First of all, Open your browser and go to the official selenium website using this link:
Step 2: Now download the Selenium WebDriver Java client as shown in the image.
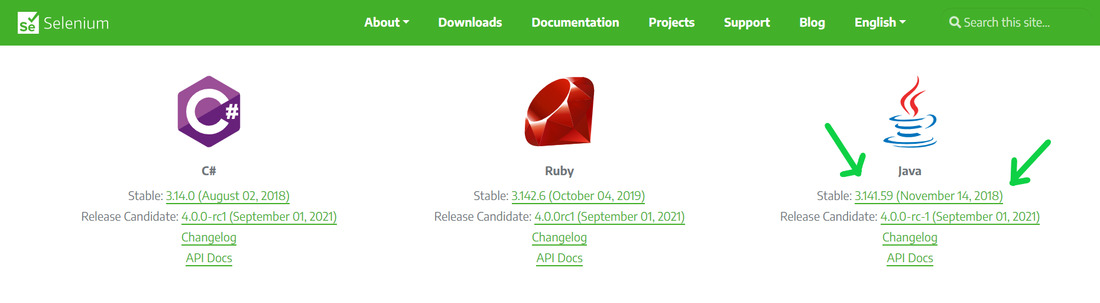
Download Java Client
Step 3: After downloading the zip file extract the file.
Step 4: Create a new java project in Eclipse IDE by clicking on “File” on the top left corner then click on the “new” button and create a new java project by clicking on “Java project” as shown in the image:
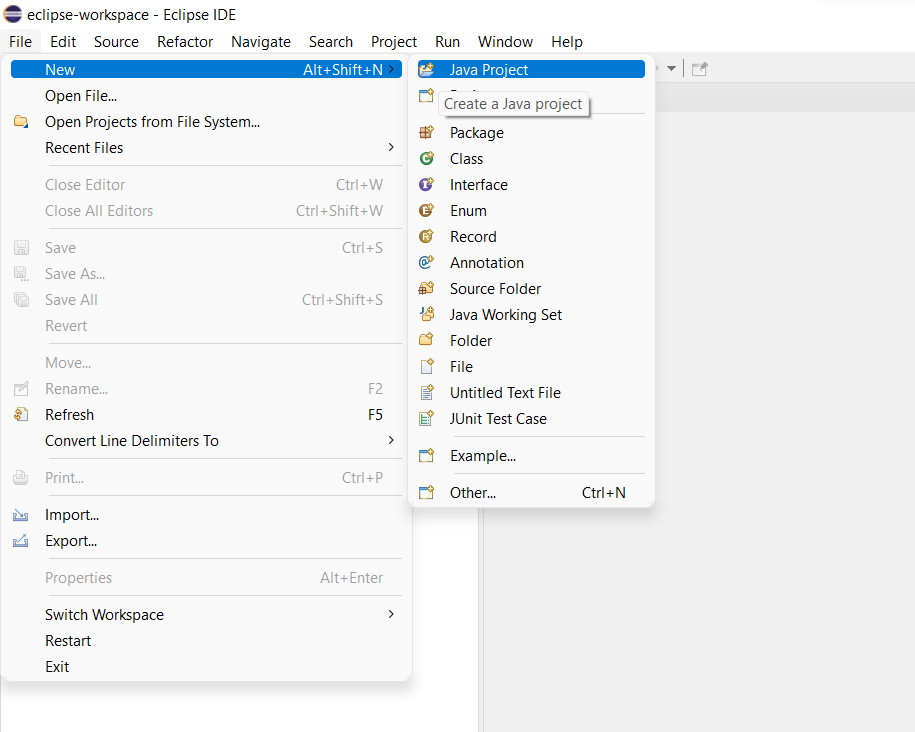
create a java project
Step 5: Now enter the name of the Java project in the “project name” section and selecting the directory where you want to save the project files and keeping the same as shown in the image :
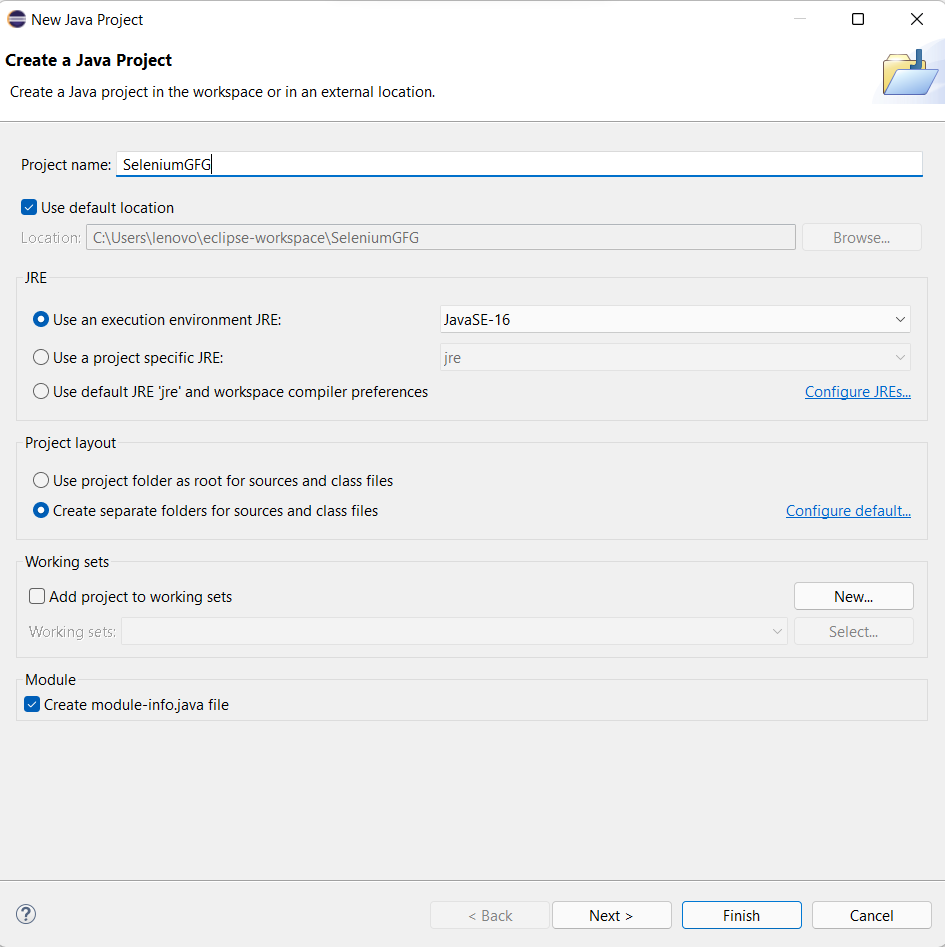
project configuration on selenium
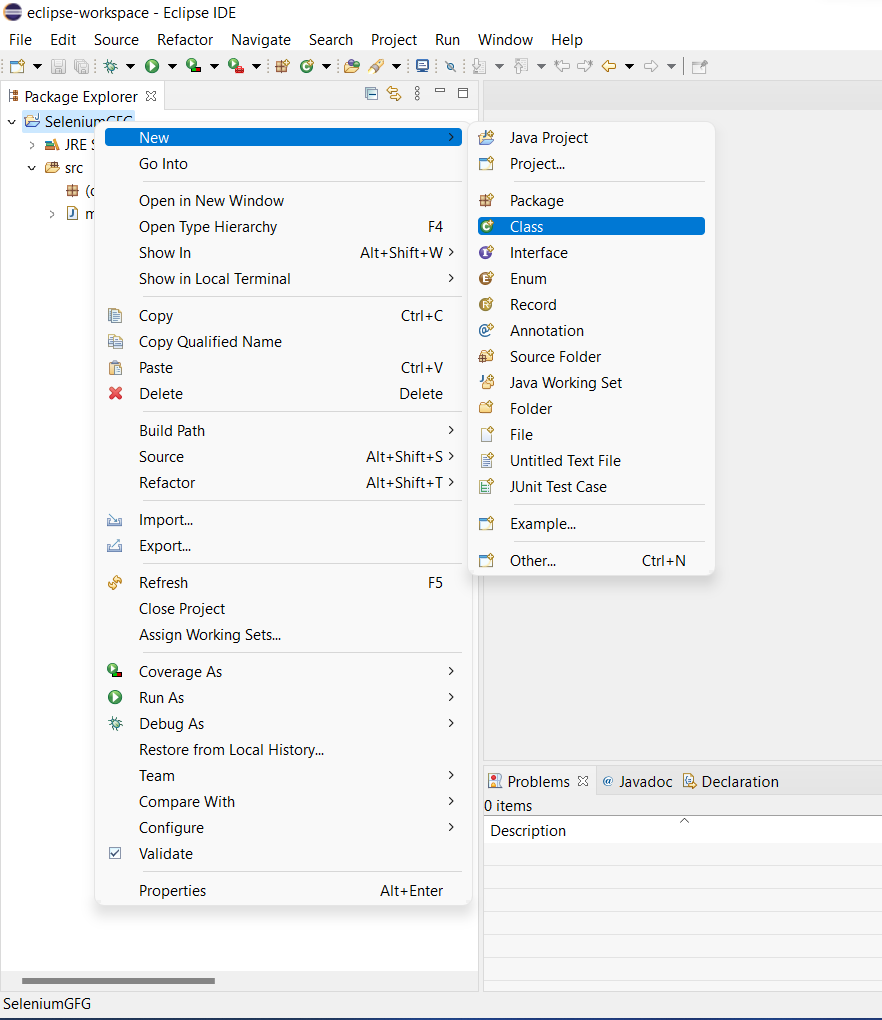
Step 6: Now create a java class by right-clicking on the project name -> new -> class and create a class with any name for example Demo. Here, we created with class name “GFG”:
5. Next, Click on your project -> Build Path -> Configure Build Path and add external JARs as shown in the pictures.
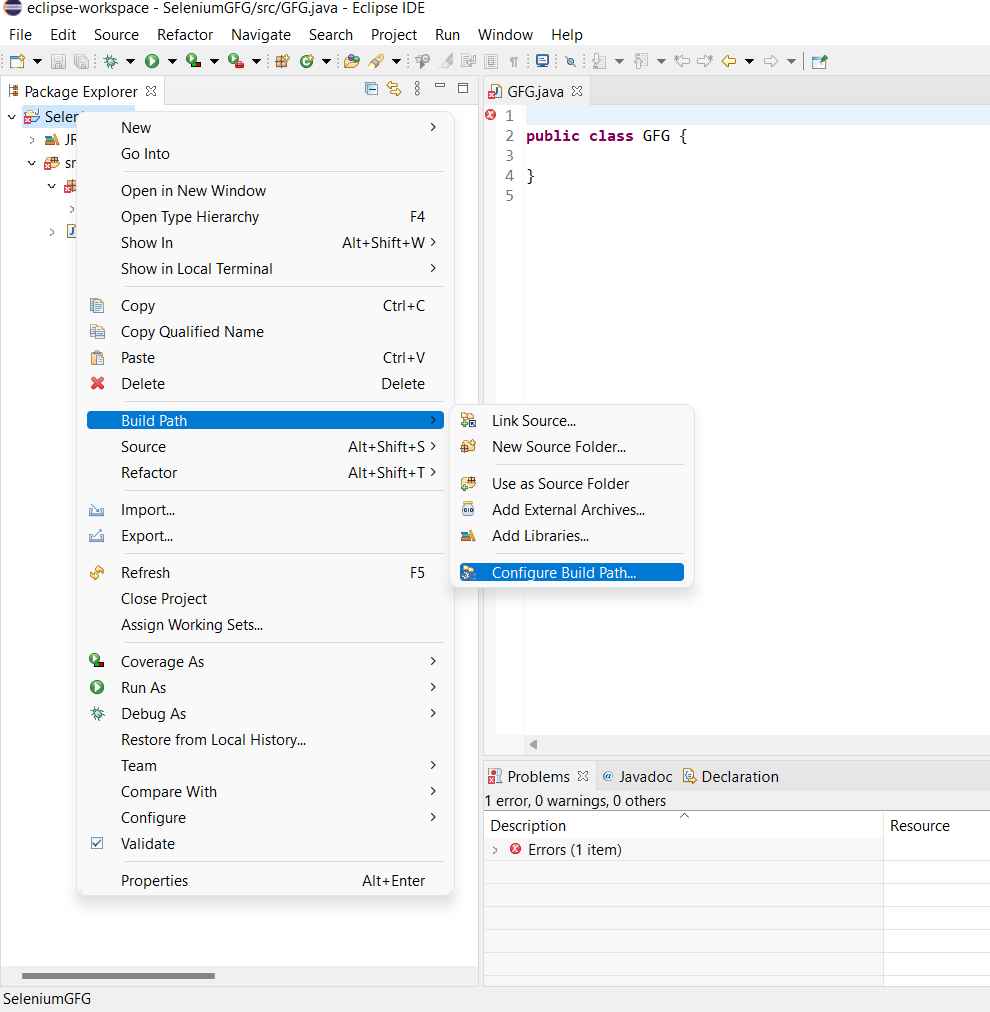
configure build path
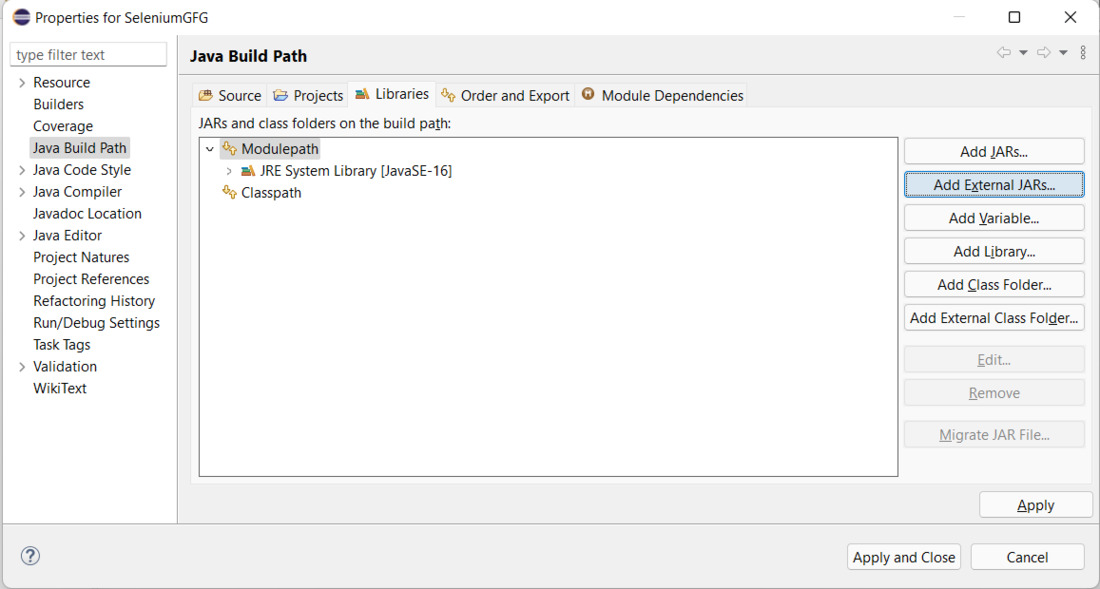
Java path build
Step 6: Now, Go to the folder where you extracted the file Selenium you downloaded for java and Select all the jar files present in the folder named “lib”.

Step 7: Then just click on Apply and close after inserting all the jar files and you are good to go as you have successfully added Selenium jars in your project.
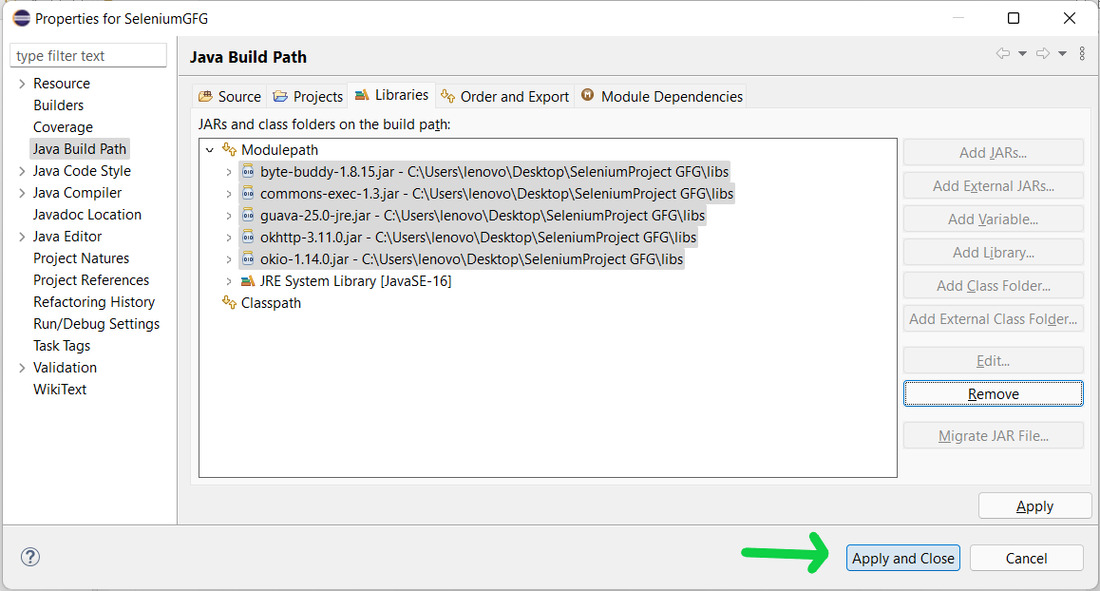
successfully added Selenium jars in your project
So, we have successfully configured Selenium WebDriver by Eclipse IDE. Now, we can write our test scripts in Eclipse and run them in WebDriver.
Last Updated :
20 Mar, 2023
Like Article
Save Article
You are here: Home / Basic Selenium / How To Install Selenium In Windows Step by Step

In this post, I will guide you on how you can Install Selenium In Windows in a simple guide. You just need an active internet connection and browser, rest everything is covered.
Before we start the process just want to highlight that Selenium supports multiple languages like Java, C#, Python, JavaScript, PHP etc. Here we will be covering with Java.
In case you want to automate application using Python or C# or JavaScript then I have dedicated videos on my channel and I will give you the links for reference.
Selenium with Python
Selenium with C#
Selenium with JavaScript
In order to use Selenium with Java, we need to make sure Java is installed in the Local System.
Note- I would recommend you to use Java 8 at this moment which is stable with all Selenium versions.
Step 1- Open command prompt and type java -version and make sure you get Java Version

Step 2- Download your favorite editor like Eclipse, IntelliJ, NetBeans, etc. This post will focus on eclipse.
Download Eclipse for from their official website
https://eclipse.org/downloads/
Here you will get so many flavors of eclipse IDE you can select first which is coming to Eclipse IDE for Java Developers based on your requirement select 32 or 64 bit.
Here we will select 32-bit windows


Let’s wait for download window to appear, now click on OK button to start download

Once download will finish, start to extract the zip file and wait for the extraction process to finish. It will take around 15 min to finish.


Once the extraction process will finish you will get eclipse-standard folder
![]()
Open eclipse folder

Open Eclipse.exe

We are done Configure Eclipse for Selenium

Download Selenium Jars and add into the project
Selenium Webdriver is a collection of Java library with some predefined methods which help you to automate browsers. If any control goes out of the browser then Selenium will not be able to handle it.
Selenium Webdriver also is known as Selenium 3 and in future, you will get as Selenium 4
I also have a detailed video on complete installation which covers the installation of Java, Selenium.
In Java term collection of library is packed into jar files (Java Achieve file).
Step 1- Open any browser and navigate to https://www.selenium.dev/downloads/
Step 2- Navigate to Selenium Server section
Step 3- We will also download the Selenium server, one jar is enough if you want to start the automation.

Step 4- Create a normal java project > Right click on Project > Click on build path > Click on configure build path >Click on library> Click on external jar> add the downloaded jar and click on Apply then ok button.
Now you can start automating application using Selenium.
Configure Eclipse with TestNG
You can also use one of the testing framework called TestNG which will offer different methods and classes which will help us create a robust framework. You can also use the JUnit framework as well but TestNG is more powerful than JUnit.
You can install in different ways
1- From Eclipse Marketplace
2- Using install new software section.
Open eclipse

Step 2- In eclipse, we have some default plugin available now we will install external software into eclipse.
Click on Help then Install new software

Step 3- We have to provide TestNG url so that eclipse can fetch TestNG plugin

Step 4- To get TestNG url please visit http://testng.org/doc/download.html and copy the below mention URL and paste the same URL in Eclipse and Press Enter


Select TestNG checkbox
Click on Next
Step 5- Accept the term &condition, and click on the finish button.
During installation, it will ask you to restart eclipse so please go-ahead to restart eclipse.

Once everything is installed you can start Automation any application.
You can follow the below tutorial next to get started.
Next: How To Start Chrome Browser in Selenium
Next: How To Start Firefox Browser in Selenium
Next: How To Start IE Browser in Selenium