Инструменты «platform-tools», «adb» и «fastboot» необходимы для установки кастомного рекавери, рутирования телефонов на Android и т.п.
В данной статье речь пойдет об установке инструментов командной строки «Android SDK» на Windows 10 (также доступно для MacOS и Linux) для последующей установки кастомного рекавери и рутирования телефона Xiaomi Redmi 4A.
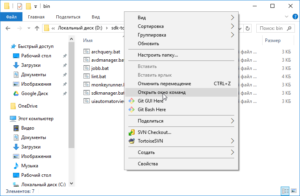
Сначала скачайте «sdk-tools» на компьютер и распакуйте в любую удобную для Вас папку. В папке «sdk-tools-windows-xxxxxxx» (xxxxxxx — цифры) перейдите в подпапку «tools\bin», затем удерживая клавишу «Shift» нажмите в свободном месте проводника Windows правой кнопкой мыши и выберите пункт контекстного меню «Открыть окно команд».
Чтобы скачать необходимые файлы, введите команду:
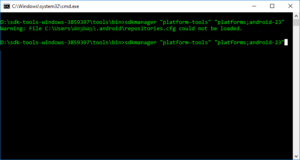
sdkmanager "platform-tools" "platforms;android-23"
Число 23 означает версию SDK и соответствует Android 6, так как на телефоне Xiaomi Redmi 4A установлена именно эта версия системы. Вы же укажите версию SDK, соответствующую версии Android на Вашем телефоне.
Если получите warning (предупреждение), что файл «repositories.cfg» не может быть загружен, создайте файл с таким же именем в папке, путь на которую указывает предупреждение.
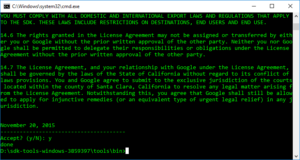
Если все правильно сделано, будет отображено пользовательское соглашение. Согласитесь с ним, напечатав «y» и нажав «Enter». Подождите несколько минут, по окончании установки средств разработки Вы увидите сообщение об успехе «done».
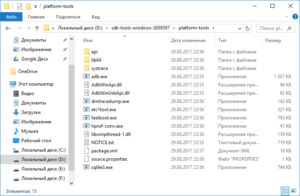
Закройте командную строку и поднимитесь на два уровня выше в родительскую папку «sdk-tools-windows-xxxxxxx» (xxxxxxx — цифры), там Вы увидите, что добавлено две папки «platform-tools» и «platforms». Войдите в папку «platform-tools» и посмотрите, среди файлов должны быть «adb.exe» и «fastboot.exe».
Все, на этом установка «platform-tools» завершена. Откройте окно команд в данной папке (см. выше) и приступайте к прошивке кастомного рекавери или других задач.
In this tutorial, we will discuss all the steps required to install Android Platform Tools and SDK Manager on Windows 10. This tutorial provides the steps for Windows 10, though the steps should be the same on other versions of Windows.
This post is useful for the developers using Android Platform Tools and SDK manager without installing Android Studio for the use cases including hybrid app development using Ionic. It also assumes that a valid JAVA_HOME environment variable exists pointing to the installation directory of Java.
You can follow How To Install Java 8 On Windows 10, How To Install Java 11 On Windows, How To Install Java 15 On Windows, or How To Install OpenJDK 15 On Windows to install Java on Windows. In case you are interested in developing Android applications using Android Studio, you can also follow How To Install Android Studio On Windows.
Step 1 — Download SDK Tools
Open the download tab of Android Studio and scroll down to the Command line tools only section. This section shows various options to download the SDK tools as shown in Fig 1.

Fig 1
Click the first link having the download option for Windows as highlighted in Fig 1. It will ask to accept to terms and conditions as shown in Fig 2.

Fig 2
Go through the details, agree on the terms and conditions and click the Download Button to start the download.
Step 2 — Install Command Line Tools
In this step, we will install the Android Command Line Tools on Windows 10. Create the directory android-sdk at your preferred location and extract the content of the downloaded SDK Tools zip to this directory. Make sure that the extracted content is available within the android-sdk directory created by us as shown in Fig 3.

Fig 3
Step 3 — Install Platform Tools
In this step, we will install the Android Platform Tools on Windows 10. Follow the same steps similar to Android SDK Tools to install Android Platform Tools using the download link as shown in Fig 4, Fig 5, and Fig 6.

Fig 4

Fig 5

Fig 6
Step 4 — Configure Environment Variable
Right-click the My Computer or This PC on the desktop and click the Properties Option. Now click the Advanced system settings. It will show the System Properties dialog having Advanced Tab options as shown in Fig 7.

Fig 7
Click the Environment Variables Button and click the New Button in the first section. Set the Variable Name field to ANDROID_HOME and Variable Value to the android-sdk directory created by us in the previous step.
Similarly, also configure the environment variable ANDROID_SDK_ROOT to the android-sdk directory.
Also, make sure that the JAVA_HOME environment variable is set to the JDK installation directory. It must not end with the bin as we do with the system path variable.

Fig 8
Step 5 — Configure Commands
In previous steps, we have downloaded and extracted the Command Line Tools and Platform Tools to the android-sdk directory. Both the tools provide several command-line utilities which we need to run by going to the appropriate directory having the executable files.
We can make these commands available at the system level without going to these directories by adding the path to tools, tools\bin, and platform-tools to the system path as shown in Fig 9. Make sure that these executables do not break other commands having the same name before adding these paths to the PATH environment variable.

Fig 9
Now open the Command Prompt and check the ADB and SDK Manager versions as shown in Fig 10. You might be required to restart the system to apply the environment variables set by us.
# Check adb version
adb --version# It must show the installed adb version
Android Debug Bridge version 1.0.41
Version 31.0.0-7110759
Installed as E:\tools\java\android-sdk\platform-tools\adb.exe# Check sdkmanager version
sdkmanager --version# It will show the error as shown below
Error: Could not determine SDK root.
Error: Either specify it explicitly with --sdk_root= or move this package into its expected location: <sdk>\cmdline-tools\latest\
We can see that the ADB command works well and shows the version details, but the sdkmanager shows an error — «error: could not determine sdk root. error: either specify it explicitly with —sdk_root= or move this package into its expected location: <sdk>\cmdline-tools\latest\» since it expects the Command Line Tools in a version-specific directory. Now open the source.properties file from the cmdline-tools directory to check the version. It will show the version details as shown below.
Pkg.Revision=3.0
Pkg.Path=cmdline-tools;3.0
Pkg.Desc=Android SDK Command-line Tools
Now move all the files to the directory cmdline-tools/3.0 as shown in Fig 10.

Fig 10
Also, update the system path as shown in Fig 11.

Fig 11
Now close and open the Command Prompt. Also, check the ADB and SDK Manager versions as shown in Fig 12.

Fig 12
Step 6 — Using the SDK Manager
List — We can list the installed and available packages and images using the list command as shown below.
// List all the installed and available platforms, system images and other resources
sdkmanager --list// Output should look like
Installed packages:=====================] 100% Computing updates...
  Path           | Version | Description                   | Location
  -------        | ------- | -------                       | -------
  platform-tools | 31.0.0  | Android SDK Platform-Tools 31 | platform-tools\Available Packages:
  Path                                                                                     | Version      | Description
  -------                                                                                  | -------      | -------
  add-ons;addon-google_apis-google-15                                                      | 3            | Google APIs
...
...// We can see that it shows the tools and platform-tools installed by us
Install Platform — Use the below-mentioned command to install the Android 10 (API level 30) using the SDK manager.
# Go to the SDK Tools bin directory to access sdkmanager
# Start download the most recent package
sdkmanager "platforms;android-30"
It will ask to accept the terms and conditions as shown in Fig 13. Enter y and hit Enter Key to accept the terms and conditions. This command creates the directory platforms within android-sdk and installs the package android-30 having all the required files to run the emulator for Android 10.

Fig 13
If we again check the installed packages, the list command shows the installed options as shown below.
sdkmanager --list
Installed packages:=====================] 100% Computing updates...
  Path                 | Version | Description                   | Location
  -------              | ------- | -------                       | -------
  platform-tools       | 31.0.0  | Android SDK Platform-Tools 31 | platform-tools\
  platforms;android-30 | 3       | Android SDK Platform 30       | platforms\android-30\Available Packages:
  Path                                                                                     | Version      | Description
  -------                                                                                  | -------      | -------
  add-ons;addon-google_apis-google-15                                                      | 3            | Google APIs
  add-ons;addon-google_apis-google-16                                                      | 4            | Google APIs
...
...
Update SDK Manager — Update the SDK manager using the below-mentioned command.
sdkmanager --updateAdd System Image — We can add system images from available images shown by the list command using the SDK manager as shown below. We are adding the most recent default 64-bit system image.
// Install default system image for platform android-30
sdkmanager "system-images;android-30;google_apis;x86_64"
Accept the License Agreement to complete the download.
There are several projects which need Google Play Services. We need system images specific to Google Play Services as shown below.
// Install Google Play Services system image
sdkmanager "system-images;android-30;google_apis_playstore;x86_64"
Accept the License Agreement to complete the download.
Install Emulator — We need to install the emulator before creating the AVD using SDK Manager.
// Install Emulator
sdkmanager --channel=3 emulator
Accept the License Agreement to complete the download.
Install Build Tools — Install the most recent build tool listed by the list command.
// Install Build Tools
sdkmanager "<build tools version>"// Example
sdkmanager "build-tools;30.0.3"
Step 7 — Using the Emulator and AVD Manager
Create Android Emulator — Create the emulator using the system image downloaded in the previous step as shown below. Replace <emulator name> with the actual name preferred by you.
// Create the emulator using default system image
avdmanager create avd -n <emulator name> -k "system-images;android-30;google_apis;x86_64" -g "google_apis"// Example:
avdmanager create avd -n emulator30 -k "system-images;android-30;google_apis;x86_64" -g "google_apis"// Create emulator using Google Play Services system image
avdmanager create avd -n <emulator name> -k "system-images;android-30;google_apis_playstore;x86_64"// Example:
avdmanager create avd -n emulator30ps -k "system-images;android-30;google_apis_playstore;x86_64"
The above commands ask a bunch of questions to configure the AVD if we choose the custom hardware profile option. We have excluded the details of these options from this tutorial since these configuration details depend on the actual needs. After completing all the configurations, it creates the AVD using the name provided by us while configuring it.
Similarly, we can also install the AVD of older versions as shown below.
// Create the emulator using default system image
avdmanager create avd -n <emulator name> -k "system-images;android-29;default;x86_64" -g "default"// Example:
avdmanager create avd -n emulator29 -k "system-images;android-29;default;x86_64" -g "default"// Create emulator using Google Play Services system image
avdmanager create avd -n <emulator name> -k "system-images;android-29;google_apis_playstore;x86_64"// Example:
avdmanager create avd -n emulator29ps -k "system-images;android-29;google_apis_playstore;x86_64"
List Android Emulators — Now go to the tools directory on the command line and check the installed platform as shown below.
Notes: Add Emulator to the system path as shown in Fig 14.

Fig 14
Close and re-open the Command Prompt to check the AVDs created by us in the previous steps.
// List the available emulators
emulator -list-avds// Output
default28
emulator30
emulator30ps
It will list all the AVDs installed by us.
Run Emulator — We can run the emulator created by us as shown below.
// Run Emulator
emulator -avd <emulator name>// Example
emulator -avd emulator30
The emulator will take some time to completely launch the AVD. The final results should look similar to Fig 15.

Fig 15
Delete Emulator — We can also delete an existing emulator as shown below.
// Delete Emulator
avdmanager delete avd -n <emulator name>
Summary
This tutorial provided all the steps required to install Android Platform Tools and Android SDK Manager on Windows 10. It also provided the steps required to create and launch the AVDs using the Emulator.
In this guide, we will show you the steps to download and install the Android SDK Platform Tools on your PC. Among the plethora of tools and custom binaries doing the rounds in the open-source ecosystem, there’s no denying the fact that the ADB and Fastboot Tools are probably the most important ones. Moreover, it is among the very few tools that are used by both tech enthusiasts and normal users alike.
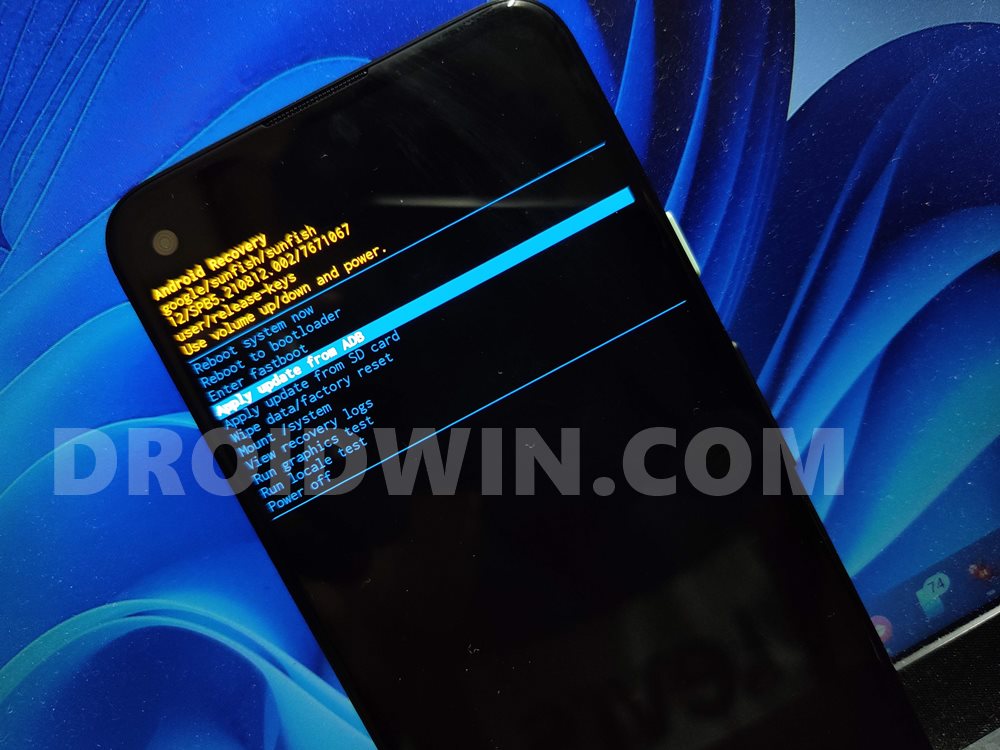
If we talk about the latter set of users, they could use it to boot their device to Stock Recovery and then format their device or flash the firmware via ADB Sideload. Likewise, they could also use it to execute ADB Shell commands and remove bloatware or preinstalled apps from their device. Then if we shift our attention towards the tech geeks, well, the platform-tools is the gateway to entering the custom development market.
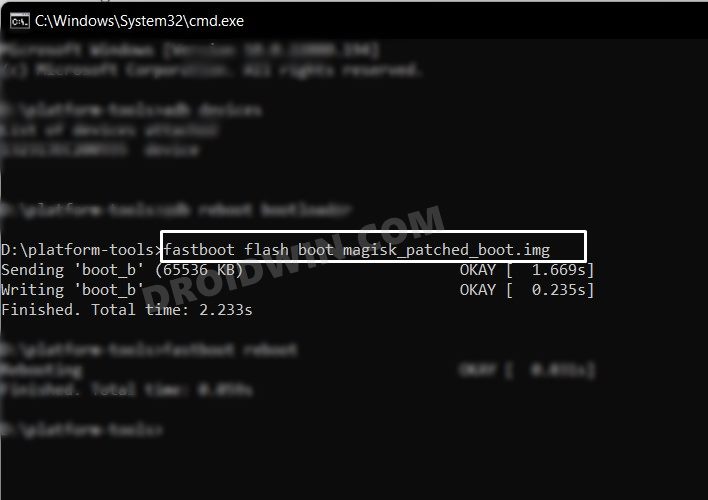
Right from booting their device to Fastboot Mode, to flashing Magisk patched boot.img for root, flashing firmware to unbrick their device, or flashing custom ROMs and recoveries, probably none of these tweaks would be possible if it wasn’t for this tool. Well, enough of the praise, let’s now get straight to the task and make you aware of the steps to download and install the Android SDK Platform Tools on your PC.
How to Install Android SDK Platform Tools
The below instructions are listed under separate sections for ease of understanding. Make sure to follow the same sequence as mentioned.
STEP 1: Download Android SDK Platform Tools
- To begin with, download the Android SDK Platform Tools on your PC from below:
Windows | Linux | macOS
[Note: Links are automatically updated from Google's servers]
- Once downloaded, extract it to any convenient location on your PC.

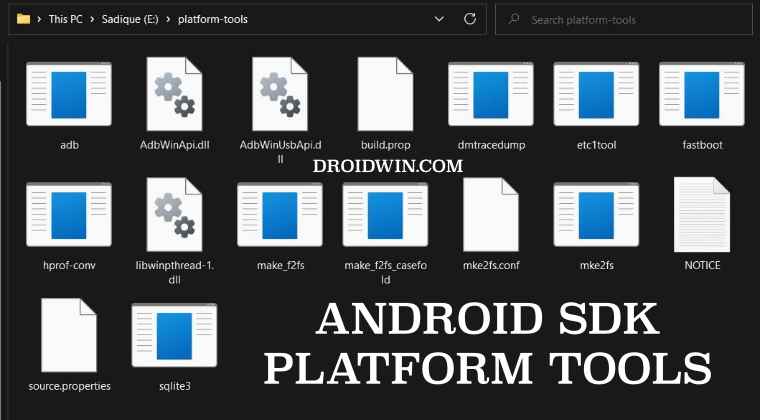
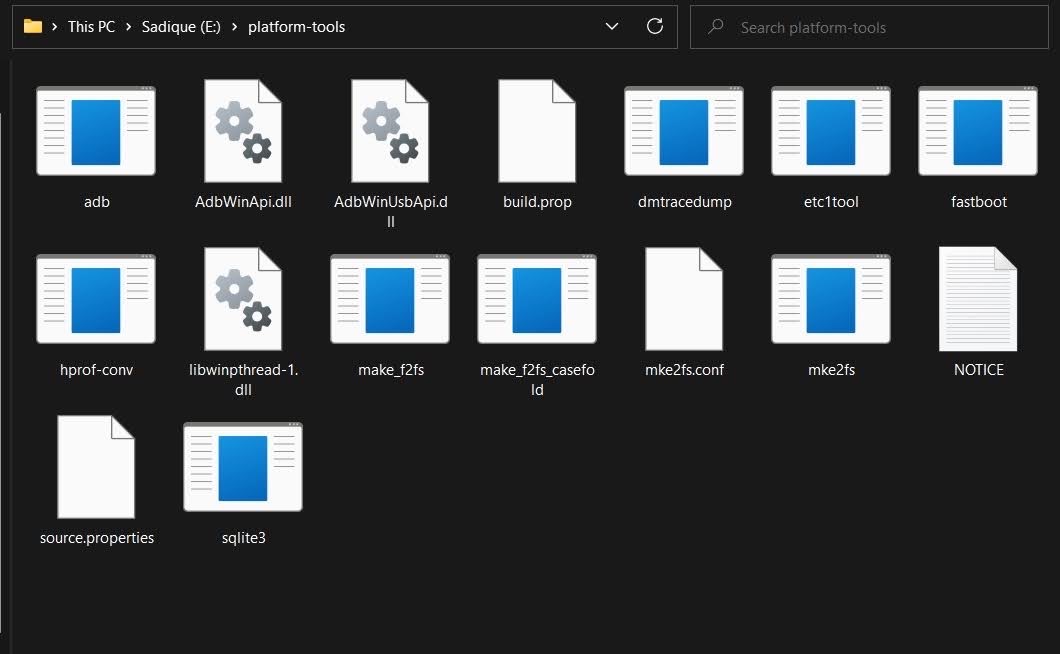
- Doing so will give you the platform-tools folder, which will be used throughout this guide.
STEP 2: Add ADB to Path
So you have downloaded and extracted the Android SDK Platform Tools to a convenient location of your choice. Your next step should be to inform your system about this location as well. And this could be done by adding the ADB path to the system’s Environmental Variables. To do so, you may either refer to our detailed guide on How to Add ADB to Path in Windows 11 or check out the below shorter instructions-
- To begin with, note down the location where you have extracted the Android SDK Platform Tools.
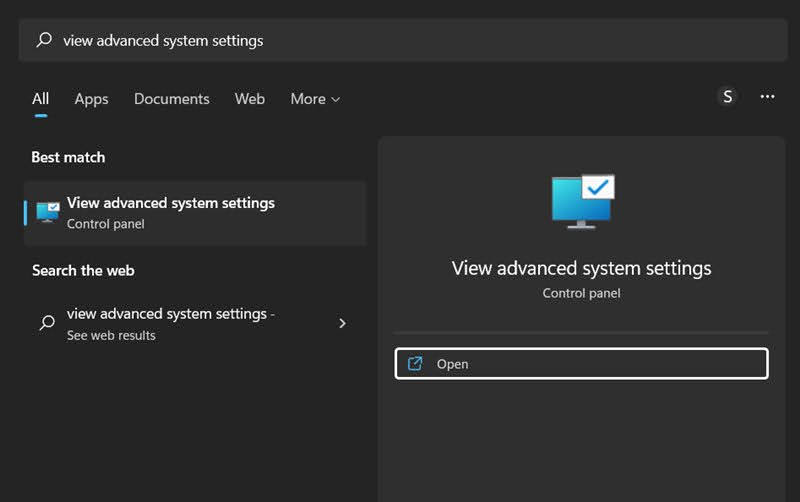
- Then head over to the Start menu, search View Advanced System Settings, and open it.

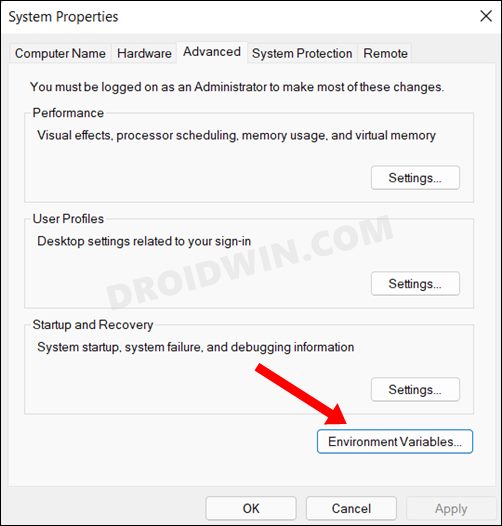
- You shall now be taken to the Advanced tab of System Properties.
- Click on the Environmental Variables button situated at the bottom right.

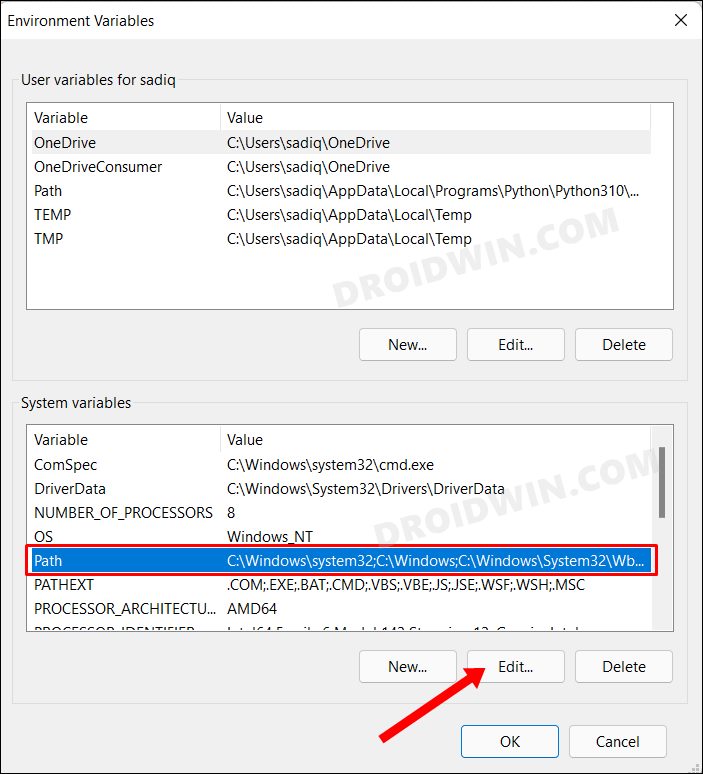
- Now select the Path field under System Variable and click on the Edit button.

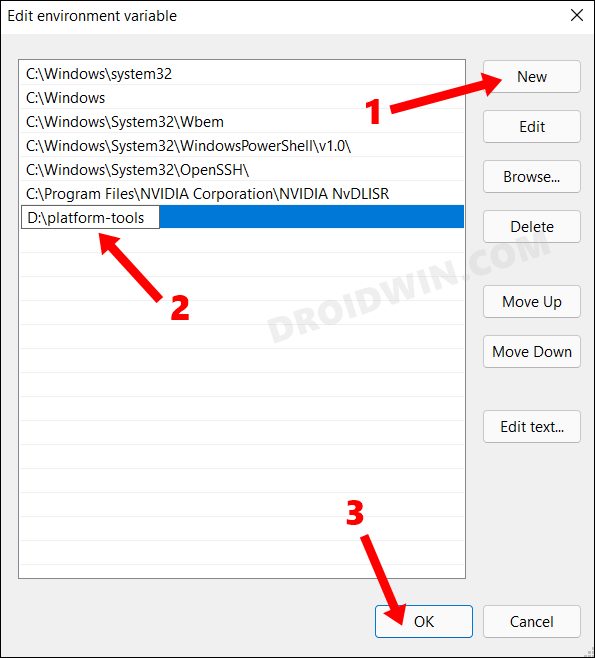
- After that, click on the New button and paste the platform-tools folder location (that you had earlier copied) in the space provided.

- Then click OK to save this path. Again click OK to close Environmental Variable and finally click OK to close System Properties.
- That’s it. Now restart your PC (optional but recommended) and your tasks stand complete.
STEP 3: Install Fastboot Drivers
The ADB is just the tip of the iceberg, most of your work would usually be carried out in the Fastboot Environment. However, your PC wouldn’t be able to identify the connected device in Fastboot Mode unless it has the necessary Fastboot Drivers installed. So please refer to our guide on How to Install Fastboot Drivers in Windows 11.
How to Check if ADB and Platform Tool is Successfully Installed?
Now that we are done setting up the ADB and Fastboot environment, let’s put it to test and verify the results. In this regard, first, we will verify the ADB Connection and then the Fastboot Connection. Follow along.
Verify ADB Connection
- To begin with, enable USB Debugging on your device so as to make it recognizable by the PC in ADB mode.
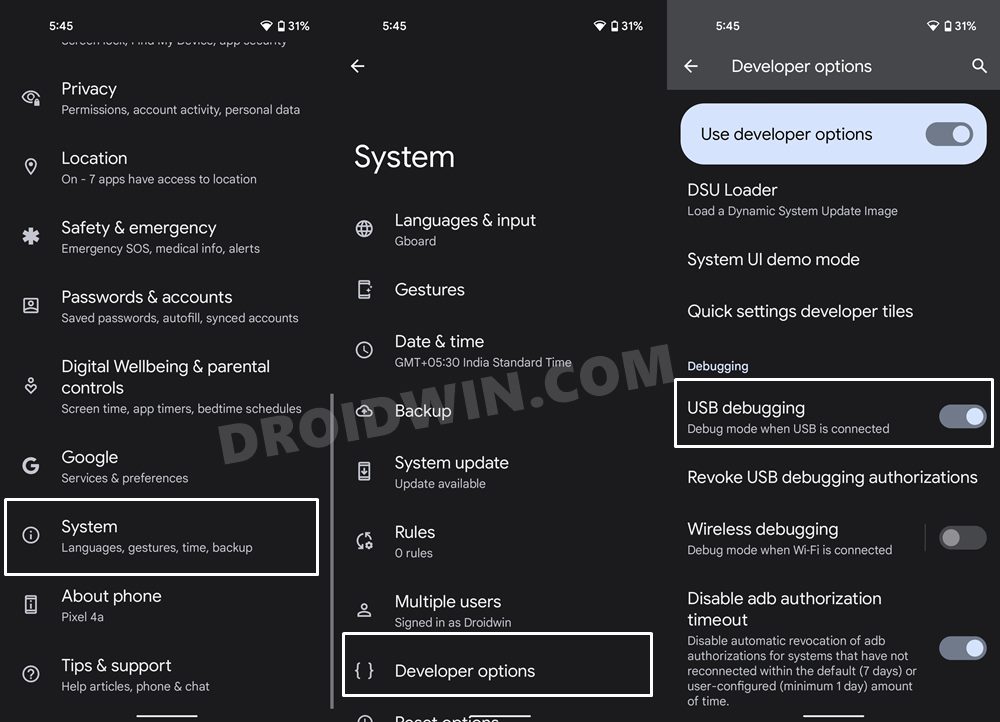
- To do so head over to Settings > About Phone > Tap on Build Number 7 times [MIUI Number in Xiaomi Devices].
- Then go back to Settings > System > Developer Options > Enable USB Debugging.

- Head over to the platform-tools folder, type in CMD in the address bar, and hit Enter.

- This will launch the CMD window with the platform-tools folder directory.
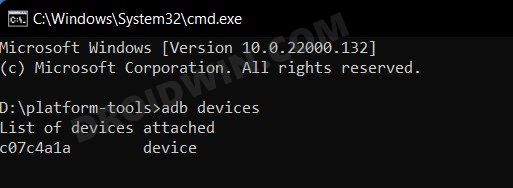
- Now execute the below command to verify the ADB Connection
adb devices

- You should now get your unique device ID, signifying that the ADB connection is successful.
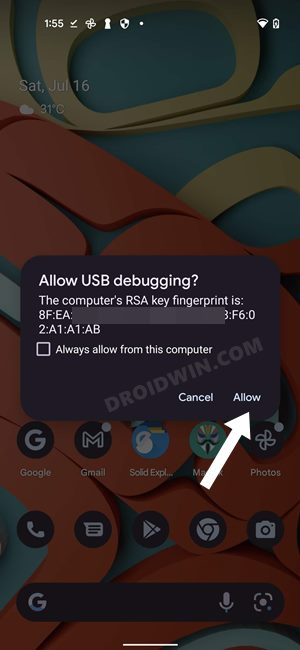
- If you also get an unauthorized message, then check your device, there will be a prompt, tap on Allow.

- Then again execute the above command and this time you wouldn’t get the unauthorized alert in the CMD.

Verify Fastboot Connection
- To begin with, make sure that you have carried out all the steps mentioned in the above ADB section.
- Then execute the below command in the CMD window that is opened in the platform-tools folder:
adb reboot bootloader

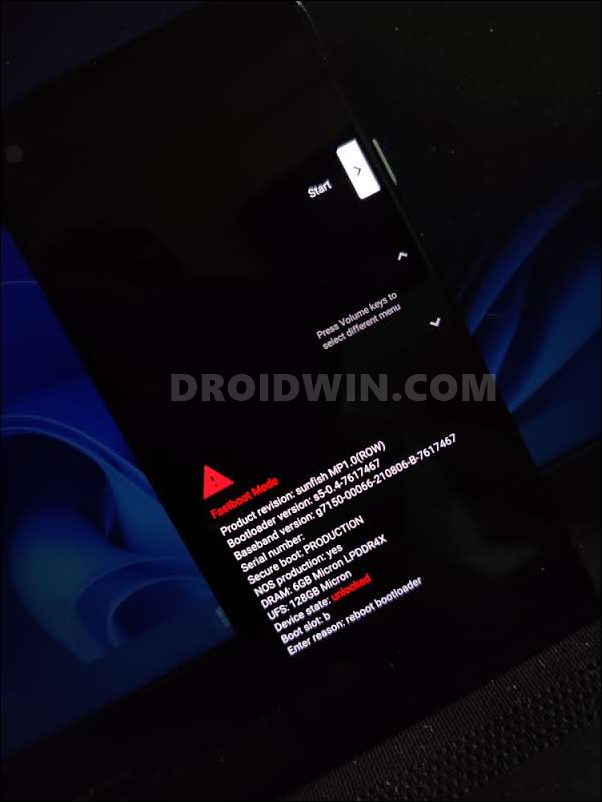
- Your device will now boot to the Fastboot Mode, signifying that the connection stands successful.
Can I use any other ADB Tool?
It is not advised to use any other third-party ADB and/or Fastboot Tools. This is because most of these tools are outdated and haven’t received updates in years. Moreover, they aren’t in sync with newer Android changes either [such as the FastbootD Mode, dynamic partitions, etc].
Can I use Powershell instead of CMD to Execute Commands?
While you could use Powershell instead of Command Prompt, but I wouldn’t advise you to do so. This is because Powershell requires you to append a couple of additional characters or keywords before each command which makes it quite difficult and confusing. So stick with CMD and you wouldn’t face any issues as such.
How to Open CMD as Admin inside platform-tools
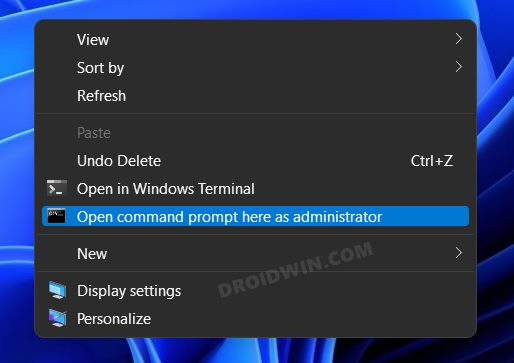
If you want to open the Command Prompt as an administrator inside the platform-tools folder, then there are two different approaches that you could take-
- Open CMD as an administrator from the Start Menu and then use the cd command to change the directory to the platform-tool folder.
Benefit- it is easier to carry out.
Drawback- You will have to do this everytime.
- Add the Open CMD as administrator option in the right-click menu. [Personally, I would recommend this approach].
Benefit- it just requires a one-time setup required.
Drawback- Slightly technical to set up.

List of all ADB and Fastboot Commands
From this guide, you will be able to get hold of all the important and most frequently used ADB and Fastboot Commands as well as their usage instructions. So do check out our guide on A List of Useful ADB and Fastboot Commands and their Usage.
How to Fix ADB and Fastboot Errors
it is no hidden secret that the ADB and Fastboot domain is prone to quite a few issues. From the inability of the device to be recognized in Fastboot Mode to the inability of the CMD to flash a file, you might com across quite a few bugs and issues. Fortunately, we have it all covered, do check out our guide on How to Fix All Possible ADB and Fastboot Errors.
So this was all from this guide on how you could download and install the Android SDK Platform Tools. We have also addressed some of the most commonly asked queries relating to this tool. If you have any queries concerning the aforementioned steps, do let us know in the comments. We will get back to you with a solution at the earliest.
- Fastboot Commands not working: How to Fix
- How to Execute Android ADB Fastboot Commands Wirelessly
- How to Use ADB and Fastboot Commands on Android Without PC
- ADB VENDOR KEYS Not Set: How to Fix
About Chief Editor

Sadique Hassan
administrator
A technical geek by birth, he always has a keen interest in the Android platform right since the birth of the HTC Dream. The open-source environment always seems to intrigue him with the plethora of options available at his fingertips. “MBA by profession, blogger by choice!”
Содержание:
- 1 Что позволяет делать ADB?
- 2 Установка ADB и Fastboot из пакета Android SDK
- 3 Minimal ADB and Fastboot
- 4 Проверка работы ADB и Fastboot
ADB, или Android Debug Bridge – это консольное приложение для ПК, с помощью которого можно управлять устройством на базе Android прямо с компьютера. Выглядит это так: сначала на компьютер устанавливаются инструментарий ADB и драйвера для Android, потом мобильное устройство подключается к ПК через USB-кабель в режиме отладки, и, наконец, после запуска ADB в консоли (командной строке) выполняются специальные команды, инициирующие те или действия с гаджетом. Подробная информация о принципе работы самого средства отладки представлена на официальном сайте разработчика, поэтому мы останавливаться на этом не будем, а сразу перейдем к возможностям ADB и способам его установки на компьютер.
Для начала укажем зачем вообще нужен ADB. С его помощью можно:
- Перезагружать устройство в различных режимах;
- Обмениваться файлами/папками с телефоном;
- Устанавливать/удалять приложения;
- Устанавливать кастомные прошивки (в том числе, TWRP Recovery);
- Производить разблокировку графического ключа Андроид;
- Выполнять разного рода скрипты.
Инструмент ADB обычно устанавливается в связке с консольным приложением Fastboot.
Установка ADB и Fastboot из пакета Android SDK
Этот способ предусматривает использование официального средства разработки и тестирования приложений Android Studio. Переходим на страницу https://developer.android.com/studio/index.html и находим заголовок «Get just the command line tools». Ниже скачиваем архив SDK tools для Windows (перед загрузкой соглашаемся с условиями использования).


Распаковываем архив на диск С. В нашем случае файлы были извлечены в папку sdk-tools-windows-3859397.

Заходим в директорию, а потом переходим в каталог tools/bin. Здесь нас интересует файл sdkmanager, который и поможет установить ADB и Fastboot на компьютер.

Далее все действия будут производиться в командной строке Windows. Запускаем ее от имени администратора.

Теперь необходимо открыть папку с sdkmanager, для чего в консоли следует выполнить команду cd C:\sdk-tools-windows-3859397\tools\bin, где C:\sdk-tools-windows-3859397\tools\bin – путь к файлу sdkmanager.

Если вы распаковали Android SDK не на диск С, а в какое-то иное место, то полный адрес можно будет узнать с помощью верхней строки Проводника (кликаем по конечной папке правой кнопкой мыши и жмем «Копировать адрес»).

Итак, мы перешли в tools\bin и теперь нам нужно выполнить команду sdkmanager “platform-tools”, которая установит пакет Platform-tools, содержащий файлы ADB и Fastboot.

В ходе установки ознакомьтесь с лицензионным соглашением и нажмите Y для завершения операции.

Если все прошло как надо, в корневой папке Android SDK появится каталог platform-tools с необходимыми файлами adb.exe и fastboot.exe.


Minimal ADB and Fastboot
Второй способ еще более простой. На форуме разработчиков Xda Developers можно скачать пакет Minimal ADB and Fastboot со всеми необходимыми файлами. Для этого заходим на страницу https://forum.xda-developers.com/showthread.php?t=2317790 и, кликнув по ссылке, загружаем установочный exe-файл.

Запускаем его и следуем инструкциям.

Мы установили Minimal ADB and Fastboot в корень того же диска С.

В принципе, на этом все. Осталось проверить наличие файлов.

Проверка работы ADB и Fastboot
После установки приложений любым из приведенных способов необходимо удостовериться в корректности работы утилит. Для этого через командную строку заходим в папку с файлами adb и fastboot (команда cd C:\sdk-tools-windows-3859397\platform-tools или cd C:\Minimal ADB and Fastboot), а затем выполняем команду adb help. Она должна вывести версию установленного Android Debug Bridge и список команд ADB. Если вы видите примерно то же, что изображено на приведенном ниже скриншоте, значит все работает правильно.

Теперь следует подключить к ПК мобильное устройство и проверить, увидит ли его приложение ADB. Подсоединяем телефон (или планшет) к компьютеру с помощью USB-кабеля, выставляем в настройках режим подключения MTP (обмен файлами) и заходим в раздел Настройки – Для разработчиков.


Если такого пункта в настройках нет, то переходим на страницу «О телефоне» и семь раз кликаем по строке с номером сборки.

Режим разработчика будет активирован, и раздел «Для разработчиков» станет доступным. Заходим в него и включаем опцию «Отладка по USB».

После всех этих манипуляций с гаджетом в командной строке Windows вводим команду adb devices. Она выведет информацию о подключенном устройстве примерно в таком формате, как на скриншоте.

Далее попробуем проверить, работает ли fastboot. Здесь же в консоли прописываем fastboot reboot и жмем Enter. Мобильное устройство должно перезагрузиться в обычном режиме.
Таким образом, мы протестировали ADB и Fastboot и убедились, что Android Debug Bridge нормально функционирует, а, значит, теперь можно управлять телефоном через компьютер.
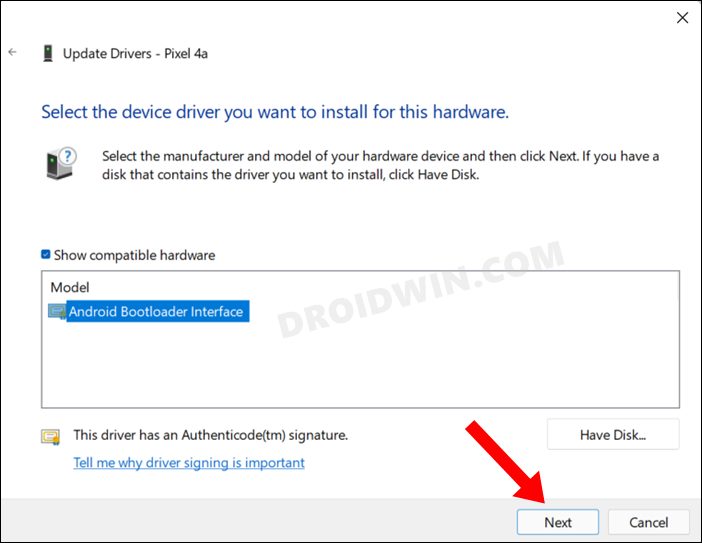
Если связь с устройством наладить не получается, то необходимо проверить наличие и корректность установки драйверов Андроид. Для этого при включенном режиме отладки заходим в «Диспетчер устройств» и смотрим, нет ли восклицательных знаков в ветке «Устройства USB» пункт «ADB Interface» (может называться немного по-другому).

При обнаружении неполадок пробуем переустановить драйвера. Скачать их можно на сайте производителя телефона или по адресу https://adb.clockworkmod.com/.
Надеемся, что статья была для вас полезна.

Эксперт по ремонту и настройке ПК с более чем 5-летним опытом работы. Имеет профильное образование по специальности оператор ЭВМ.
Задать вопрос
Утилиты ADB и Fastboot входят в состав комплекта средств разработки Android SDK (не стоит путать с Android Studio и уж тем более скачивать ее громоздкий установочный файл, если вы, конечно, не собираетесь заниматься разработкой под Android). ADB является инструментом для отладки, который позволяет получить доступ к консоли Андроид с компьютера (подробнее →), подключив гаджет к ПК по USB. При этом должна быть включена отладка. Fastboot предназначен для работы с устройством, когда то загружено в одноименном режиме (если такой доступен на девайсе).

При помощи ADB можно управлять смартфоном/планшетом с компьютера: сделать бэкап приложений, сбросить графический пароль, записать скринкаст, перевести смартфон в режим Recovery и многое другое. Кроме того, с ADB можно работать и через Wi-Fi. Для этого на устройстве должны быть получены root-права, а также понадобится специальное приложение, с помощью которого осуществляется подключение к ПК по сети. Например, ADB Wireless либо WiFi ADB. Но это уже материал для отдельной статьи.
Используя Fastboot, вы сможете устанавливать прошивки, кастомные Рекавери (TWRP или CWM), разблокировать Bootloader (на телефонах HTC, Motorola, Sony, Nexus, Pixel, Huawei, последних LG он заблокирован), очищать разделы системы.
Как установить ADB и Fastboot: инструкция
1. Перейдите на официальный сайт, откуда можно скачать Android SDK: https://developer.android.com/studio/index.html. Спуститесь вниз страницы к разделу «Command line tools only» и выберите архив для Windows.

2. Установите галочку в чекбоксе «I have read and agree with the above terms and conditions» и нажмите кнопку «Download Android Command Line Tools for Windows». Начнется загрузка архива.

3. Скачайте его и разархивируйте в корень Диска «C:».
4. Также необходимо загрузить комплект разработчика Java Development Kit с официальной страницы. Перейдите на сайт, согласитесь с условиями лицензионного соглашения, отметив пункт «Accept License Agreement», и скачайте версию JDK, соответствующую разрядности операционной системы компьютера.

После этого установите скачанный пакет. Дальше описаны несколько вариантов установки Fastboot и ADB – воспользуйтесь тем, который покажется проще.
Первый способ
Вернитесь к папке c инструментами Android SDK, откройте «tools» и запустите пакетный файл «android».

Отметьте пункт «Android SDK Platform-tools» (а также «Google USB driver», если у вас устройство Google Nexus или Pixel) и нажмите «Install Packages».

Про установку USB-драйверов для телефонов и планшетов других производителей читайте ниже.
Выберите «Accept License» и нажмите «Install».

Хотя лог показал, что возникла ошибка, процесс завершился успешно.

По завершении выполнения вышеописанных действий в директории «sdk-tools-windows-version» появится папка «platform-tools», а в ней будут содержаться интересующие утилиты «ADB» и «Fastboot».


Второй способ
Перейдите в папку «sdk-tools-windows-версия» → «tools» → «bin» и, зажав клавишу «Shift», щелкните правой кнопкой мышки по пустой области. Выберите «Открыть окно команд» либо «Открыть окно PowerShell здесь», если на ПК или на ноутбуке установлена одна из последних сборок Windows 10.

Вставьте команду в PowerShell или в командную строку (в PowerShell вначале добавьте .\ или ./):
sdkmanager platform-tools

Щелкните «Enter», чтобы выполнить команду. Произойдет загрузка файлов и появится запрос на установку:
Accept? (y/N)
")
Чтобы предоставить разрешение, введите y, что означает «yes», и нажмите «Enter», после чего начнется установка компонентов «platform-tools».

В конце в командной строке отобразится сообщение, что процедура завершилась успешно. Папка «platform-tools» с утилитами ADB и Fastboot будет разархивирована внутри каталога «sdk-tools-windows-version».
(!) Если по какой-либо причине не удается установить ADB и Fastboot предыдущими способами, воспользуйтесь третьим вариантом – просто скачайте архив «platform-tools» и распакуйте на диске «C:».
Устанавливаем драйверы ADB и Fastboot для Windows
Чтобы компьютер корректно распознавал смартфон либо планшет, необходимо загрузить драйверы USB:
- Samsung – драйверы интегрированы в утилиты Kies: https://www.samsung.com/ru/support/app/kies/ и Samsung Smart Switch: https://www.samsung.com/ru/support/app/smartswitch/. Либо же их можно скачать отдельно, выбрав нужную модель на сайте: https://www.samsung.com/us/support/downloads/.
- HTC – они включены в состав HTC Sync Manager: https://www.htc.com/ru/support/software/htc-sync-manager/.
- Nexus и Pixel – драйверы Android устанавливаются вместе с Android SDK Platform-Tools, о чем писалось выше. Отдельно Google USB Drivers доступны по ссылке: https://developer.android.com/studio/run/win-usb?hl=ru.
- Huawei – они поставляются в комплекте с утилитой HiSuite: https://consumer.huawei.com/ru/support/hisuite/.
- LG – достаточно установить программу LG PC Suite: https://www.lg.com/ru/support/software-firmware.
- Motorola – драйверы можно скачать по ссылке: https://motorola-global-portal.custhelp.com/app/answers/detail/a_id/88481.
- Sony Xperia – драйверы FastBoot для всех моделей доступны на этой странице: https://developer.sonymobile.com/downloads/drivers/.
- Xiaomi – установите Mi PC Suite: http://pcsuite.mi.com.
- MTK – для китайских аппаратов на чипах MediaTek: http://online.mediatek.com/Public%20Documents/MTK_Android_USB_Driver.zip.
- Lenovo – выберите модель смартфона, планшета и загрузите драйверы ADB: https://support.lenovo.com/ru/ru/.
- Решения для девайсов других производителей ищите на их официальных сайтах.
Существуют различные универсальные установщики ADB-драйверов (к примеру, этот: https://adbdriver.com/downloads/) – ими тоже можно пользоваться, например, когда по какой-то причине не удалось установить официальное решения.
Если для вашей модели доступны драйверы без установщика, придется выполнить следующие действия:
1. Зайдите в «Панель управления» → «Диспетчер устройств». В Windows 10 достаточно нажать правой кнопкой мышки по меню «Пуск» и выбрать «Диспетчер устройств».

2. Найдите в списке девайс, для которого нужно установить драйверы. Щелкните правой кнопкой мышки и нажмите «Обновить драйверы».

Как видите, компьютер корректно распознает тестируемый планшет Nexus 7. Если ваш ПК определяет смартфон неправильно или напротив устройства отображается желтый треугольник с восклицательным знаком внутри, «ручная» установка драйверов Android для вас обязательна.
3. Выберите пункт «Выполнить поиск драйверов на этом компьютере».

4. Укажите расположение папки с драйверами на жестком диске.

Дождитесь завершения установки и затем заново подключите гаджет к компьютеру по USB.
Как начать работать с Fastboot и ADB
Взаимодействие пользователя с ADB и Fastboot осуществляется через командную строку, утилиты запускаются двумя способами:
1: Правой клавишей мышки щелкните на «Пуск» и выберите «Командная строка (администратор)» либо «Windows PowerShell (администратор)».

Далее при помощи команд укажите путь к папке с ADB и Fastboot (после ввода каждой нажимайте «Enter»).
Чтобы вернуться в корень диска «C:\», используйте:
cd /
Благодаря этой команде выполняется переход к требуемому каталогу:
cd
В конкретном примере команда, содержащая путь к папке, выглядит следующим образом:
cd C:\sdk-tools-windows-version\platform-tools

Путь к Fastboot и ADB указан, теперь работа с утилитами осуществляется из консоли.
Чтобы не выполнять эти действия каждый раз, добавьте путь к «platform-tools» в переменную «Path». Сначала зайдите в папку, в строке навигации щелкните правой кнопкой мыши по «platform-tools» и выберите «Копировать адрес».

Перейдите в «Панель управления». Для этого нажмите «Win» + «R» и в поле «Открыть:» вставьте control. Нажмите «ОК».

Выберите «Система» → «Дополнительные параметры системы» → «Переменные среды…».


Найдите перемененную «Path», выделите ее и выберите «Изменить…».

Нажмите «Создать», вставьте путь к папке «platform-tools» и щелкните «ОК».

2: Зайдите в «sdk-tools-windows-version» → «platform-tools», затем, удерживая «Shift», щелкните правой кнопкой мыши по пустому месту и выберите пункт «Открыть окно команд» или «Открыть окно PowerShell здесь».

Введите следующую команду, чтобы проверить, как ПК видит Android-устройство (в Windows PowerShell вставьте ./ или .\ перед командой):
adb devices

Не забывайте, что для работы с ADB должна быть включена отладка по USB. Больше полезных команд вы найдете в прошлой статье, ссылка на которую размещена в начале данного поста.
Главная / Инструкции / Как установить ADB, драйверы и Fastboot: инструкция по скачиванию и установке