Download Windows Speedup Tool to fix errors and make PC run faster
Package managers like Chocolatey, Ninite, Windows Package Manager (WinGet), to name but a few are perhaps the most popular package managers, and an efficient way to download programs without having to visit the software vendor site manually, download the files, and run the installer. In this post, we take a look at a similar app – Scoop, on how to use the package management tool on Windows 11/10.
Scoop installs programs from the command line with less hassle. The tool offers the following benefits:
- Permission popup windows.
- GUI wizard-style installers.
- Path pollution from installing lots of programs.
- Unexpected side-effects from installing and uninstalling programs.
- The need to find and install dependencies.
- The need to perform extra setup steps to get a working program.
We will discuss this topic under the following sub-headings:
- Download and install Scoop
- Use Scoop package management tool
- Install or uninstall programs using Scoop
1] Download and install Scoop

To download and install Scoop on your Windows 10 device, do the following:
- Press Windows key + X to open Power User Menu.
- Then tap i on the keyboard to launch PowerShell.
- In the PowerShell console, type in or copy and paste the command below and hit Enter.
Set-ExecutionPolicy -ExecutionPolicy RemoteSigned -Scope CurrentUser
This command is necessary because if you try to run the script required to download and install Scoop before running the command above, you may encounter the error message “PowerShell cannot be loaded because running scripts is disabled“. You can also turn on or off Windows PowerShell script execution via Group Policy or Registry Editor.
- Next, once the command executes, tap A on the keyboard and hit Enter.
- Now, you can run the command below to download and install Scoop.
Invoke-Expression (New-Object System.Net.WebClient).DownloadString('https://get.scoop.sh')
Scoop installs to your User folder C:\Users\USERNAME\scoop – and applications that are downloaded and installed by the utility can be found in the C:\ProgramData\scoop directory. By default, Scoop downloads portable versions of programs.
2] Use Scoop package management tool

Now that you have Scoop installed on your Windows 10 device, in PowerShell, type the command below and hit Enter to see the list of commands that are supported by the program.
scoop
To use one of the commands, type the syntax below and hit Enter:
scoop CommandName
If you need help with a particular command, you can view its help section by typing the syntax below and then hit Enter:
scoop help CommandName
3] Install or uninstall programs using Scoop

Before installing programs on your Windows 10 device using Scoop, you need to know the list of applications that are available for download. To do that, type the following command and hit Enter:
scoop search
As you can see from the image above, the tool will fetch the names and version numbers of all supported programs in its main list. Scoop’s lists are called buckets. If you want to add more buckets, you can run the command below:
scoop bucket add BucketName
Visit this GitHub page to view a list of available buckets.
Now that you have seen the list of available programs in a given bucket, to install any of the program, simply run the command below:
scoop install ProgramName
The list of available programs can be quite lengthy. So, you can find specific applications using the search command below:
Scoop search ProgramName
To update applications you will need to run the command below:
scoop install git
The command will fetch the bucket lists (used for comparing the version that is available on your computer) and save it as a local manifest on your computer.
To uninstall a program, run the command below:
scoop uninstall ProgramName
To remove a bucket with all its programs, run the command below:
scoop bucket rm BucketName
That’s it on how to use the Scoop package management tool on Windows 11/10!
Obinna has completed B.Tech in Information & Communication Technology. He has worked as a System Support Engineer, primarily on User Endpoint Administration, as well as a Technical Analyst, primarily on Server/System Administration. He also has experience as a Network and Communications Officer. He has been a Windows Insider MVP (2020) and currently owns and runs a Computer Clinic.

Добрый день всем.
не могу установить scoop , показывает постоянно ошибку
строка:1 знак:1
+ iex (new-object net.webclient).downloadstring(‘https://get.scoop.sh’)
+ ~~~~~~~~~~~~~~~~~~~~~~~~~~~~~~~~~~~~~~~~~~~~~~~~~~~~~~~~~~~~~~~~~~~~~
Этот сценарий содержит вредоносное содержимое и был заблокирован антивирусным программным обеспечением.
+ CategoryInfo : ParserError: (:) [], ParentContainsErrorRecordException
+ FullyQualifiedErrorId : ScriptContainedMaliciousContent
-
Вопрос задан
-
2388 просмотров
Пригласить эксперта
пишут так бывает когда каким-то образом запарывается обновление баз встроенного дефендера.
откройте дефендер, обновите базы, на всякий пожарный перегрузите машину и пробуйте опять.
-
Показать ещё
Загружается…
IDS
•
Ростов-на-Дону
от 40 000 ₽
09 окт. 2023, в 18:18
1000 руб./за проект
09 окт. 2023, в 18:11
15000 руб./за проект
09 окт. 2023, в 17:39
1000 руб./за проект
Минуточку внимания
in Windows 10
In this tutorial, we are going to about How to Install Scoop Command Line Manager on Windows 10.
Scoop.sh is a Command line Installer tool for Windows — If you are Looking for Ubuntu/Debian like apt-get Package Manager for Windows then try Scoop Command line Installer & Package Manager tool for Windows Systems.
Requirements
- Windows Powershell
How to Install Scoop Command-Line Installer on Windows?
- Open the Windows Powershell
- Run this Below command to line set execution policy
Set-ExecutionPolicy RemoteSigned -scope CurrentUser
- After that install Scoop.sh by running this Below Command line
iex (new-object net.webclient).downloadstring('https://get.scoop.sh')
- Install packages
scoop install <Package Name>
- List the Full Packages from scoop
scoop search
- Learn about scoop Command Line Installer Tool
scoop help
- That’s all Done
Table of Contents
In this article, we will see how to install scoop on Windows 10 Using Few Easy Steps. Scoop is a free and open source command line installer for Windows based systems. If you are a command line lover or a linux user who recently switched to windows then this is the tool you would like to use to manage your programs and plugins in the System. Scoop download and manages all the programs in a clean way by keeping it isolated under ~\scoop folder. You can also choose to keep scoop installation wherever you like. More on official website. Here we will see the steps to install scoop on Windows 10 in great detail.
Features
- It is quick and easy to use.
- It does not show any popup windows during installation of a program.
- It can find and install all the dependencies of a package automatically.
- It avoid all the unwanted side affects of installing and uninstalling a program.
- It hides GUI wizard-style installers.
- It does not populate PATH environment variable with lots of program path.

Also Read: 9 Best tracert command examples in Windows
Step 1: Prerequisites
a) You should have a running Windows 10 System.
b) You should have Windows Powershell 5 available in your System.
c) You should have access to invoke web request in your System.
Step 2: Open Powershell
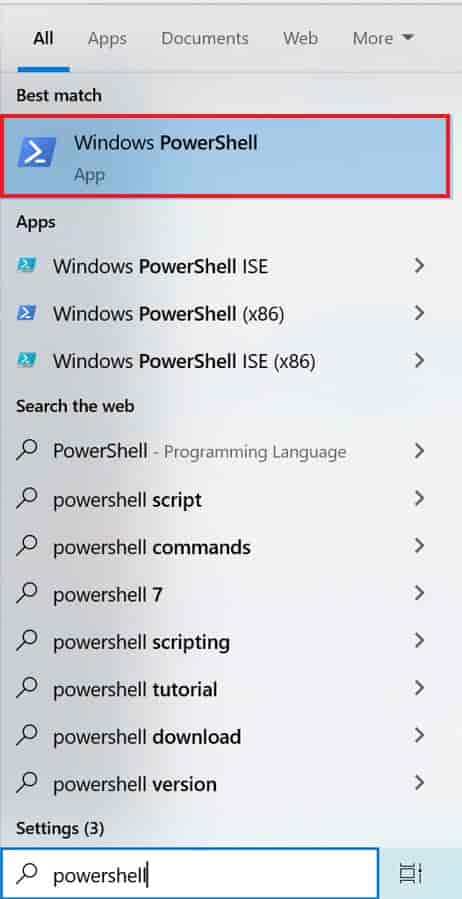
To open Powershell, go to search box showing on bottom left of your Desktop screen and type powershell there as shown below.
![]()
You will see Windows Powershell appearing on top as shown below. Click on it to open.
It should open and show like below after clearing the screen using cls command.
Step 3: Set Execution Policy
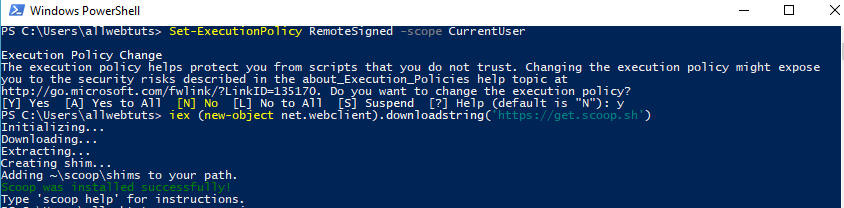
If you don’t have execution policy set for scope CurrentUser then you need to first set the execution policy to RemoteSigned using Set-ExecutionPolicy RemoteSigned -scope CurrentUser command as shown below. Without this policy set, you won’t be able to install scoop in your system.
PS C:\> Set-ExecutionPolicy RemoteSigned -scope CurrentUser
Execution Policy Change
The execution policy helps protect you from scripts that you do not trust. Changing the execution policy might expose
you to the security risks described in the about_Execution_Policies help topic at
https:/go.microsoft.com/fwlink/?LinkID=135170. Do you want to change the execution policy?
[Y] Yes [A] Yes to All [N] No [L] No to All [S] Suspend [?] Help (default is "N"): Y
Step 4: Install Scoop
Once the execution policy is set, you can now install scoop by using iwr -useb get.scoop.sh | iex command as shown below. This will download and install scoop in your System.
PS C:\> iwr -useb get.scoop.sh | iex
Initializing...
Downloading ...
Creating shim...
Adding ~\scoop\shims to your path.
Scoop was installed successfully!
Type 'scoop help' for instructions.
Step 5: Check Instructions
You can check for all available scoop instructions by using scoop help command as shown below. This will show all the available commands with description in summary.
PS C:\> scoop help
Usage: scoop <command> [<args>]

Available commands are listed below.

Type 'scoop help <command>' to get more help for a specific command.

Command    Summary
-------    -------
alias      Manage scoop aliases
bucket     Manage Scoop buckets
cache      Show or clear the download cache
cat        Show content of specified manifest.
checkup    Check for potential problems
cleanup    Cleanup apps by removing old versions
config     Get or set configuration values
create     Create a custom app manifest
depends    List dependencies for an app, in the order they'll be installed
download   Download apps in the cache folder and verify hashes
export     Exports installed apps, buckets (and optionally configs) in JSON format
help       Show help for a command
hold       Hold an app to disable updates
home       Opens the app homepage
import     Imports apps, buckets and configs from a Scoopfile in JSON format
info       Display information about an app
install    Install apps
list       List installed apps
prefix     Returns the path to the specified app
reset      Reset an app to resolve conflicts
search     Search available apps
shim       Manipulate Scoop shims
status     Show status and check for new app versions
unhold     Unhold an app to enable updates
uninstall  Uninstall an app
update     Update apps, or Scoop itself
virustotal Look for app's hash or url on virustotal.com
which      Locate a shim/executable (similar to 'which' on Linux)
Step 6: Check Status
You can check for any latest available versions and current status by using scoop status command as shown below.
PS C:\> scoop status
Scoop is up to date.
Everything is ok!
Step 7: Check for any Problems
If you are looking for any potential problems then you need to run scoop checkup command as shown below.
PS C:\> scoop checkup
WARN LongPaths support is not enabled.
You can enable it by running:
sudo Set-ItemProperty 'HKLM:\SYSTEM\CurrentControlSet\Control\FileSystem' -Name 'LongPathsEnabled' -Value 1
(Requires 'sudo' command. Run 'scoop install sudo' if you don't have it.)
WARN Windows Developer Mode is not enabled. Operations relevant to symlinks may fail without proper rights.
You may read more about the symlinks support here:
https://blogs.windows.com/windowsdeveloper/2016/12/02/symlinks-windows-10/
ERROR '7-Zip' is not installed! It's required for unpacking most programs. Please Run 'scoop install 7zip' or 'scoop install 7zip-zstd'.
ERROR 'Inno Setup Unpacker' is not installed! It's required for unpacking InnoSetup files. Please run 'scoop install innounp'.
ERROR 'dark' is not installed! It's required for unpacking installers created with the WiX Toolset. Please run 'scoop install dark' or 'scoop install wixtoolset'.
WARN Found 5 potential problems.
Step 8: Install a Program
You can choose to install a program in your windows system by using scoop install <program_name> syntax. For example, here we are installing Node.js by using scoop install nodejs command as shown below.
PS C:\> scoop install nodejs
Installing '7zip' (23.01) [64bit] from main bucket
7z2301-x64.msi (1.8 MB) [=====================================================================================] 100%
Checking hash of 7z2301-x64.msi ... ok.
Extracting 7z2301-x64.msi ... done.
Linking ~\scoop\apps\7zip\current => ~\scoop\apps\7zip\23.01
Creating shim for '7z'.
Creating shim for '7zFM'.
Creating shim for '7zG'.
Creating shortcut for 7-Zip (7zFM.exe)
Persisting Codecs
Persisting Formats
Running post_install script...
'7zip' (23.01) was installed successfully!
Notes
-----
Add 7-Zip as a context menu option by running: "C:\Users\cyberithub\scoop\apps\7zip\current\install-context.reg"
Installing 'nodejs' (20.3.1) [64bit] from main bucket
node-v20.3.1-win-x64.7z (17.7 MB) [===========================================================================] 100%
Checking hash of node-v20.3.1-win-x64.7z ... ok.
Extracting node-v20.3.1-win-x64.7z ... done.
Linking ~\scoop\apps\nodejs\current => ~\scoop\apps\nodejs\20.3.1
Persisting bin
Persisting cache
Running post_install script...
'nodejs' (20.3.1) was installed successfully!
Step 9: Uninstall Scoop
Once you are done using scoop, you can choose to remove it along with all the programs that you have installed through scoop by just running scoop uninstall scoop command as shown below.
PS C:\> scoop uninstall scoop
WARN This will uninstall Scoop and all the programs that have been installed with Scoop!
Are you sure? (yN): y
Removing ~\scoop\shims from your path.
Scoop has been uninstalled.
Scoop — это утилита для управления установкой и обновлением программ на операционной системе Windows. Чтобы установить Scoop на Windows 10, нужно выполнить следующие шаги:
Шаг 1: Открыть командную строку или PowerShell как администратор. Чтобы это сделать, нажмите на кнопку «Пуск», найдите приложение «Командная строка» или «PowerShell», нажмите правой кнопкой мыши и выберите «Запустить от имени администратора».
Шаг 2: Установить необходимые зависимости для Scoop. В командной строке нужно ввести следующую команду:
«`powershell
Set-ExecutionPolicy RemoteSigned — scope CurrentUser
«`
Затем нужно ввести «Y» для подтверждения изменения.
Шаг 3: Установить Scoop через PowerShell. В командной строке нужно скопировать и вставить следующую команду:
«`powershell
iex (new-object net. webclient).downloadstring(‘https://get. scoop. sh’)
«`
Эта команда загрузит и установит Scoop на ваш компьютер.
Шаг 4: Проверить корректность установки Scoop. Для этого нужно ввести команду:
«`powershell
scoop help
«`
Если все установлено правильно, вы должны увидеть список команд, доступных через Scoop.
Шаг 5: Добавить бакеты (репозитории приложений) для установки программ. Для этого нужно ввести команду:
«`powershell
scoop bucket add extras
«`
Эта команда добавит репозиторий, содержащий дополнительные приложения и их версии.
После того, как вы установили Scoop, вы можете использовать его для установки, обновления и удаления программ на вашем компьютере. Чтобы узнать больше о командах, доступных через Scoop, можно посетить официальный сайт проекта.