PyCharm is a cross-platform IDE that provides consistent experience on the Windows, macOS, and Linux operating systems.
PyCharm is available in two editions: Professional, and Community. The Community edition is an open-source project, and it’s free, but it has fewer features. The Professional edition is commercial, and provides an outstanding set of tools and features. For more information, refer to the editions comparison matrix.
System requirements
|
Requirement |
Minimum |
Recommended |
|---|---|---|
|
RAM |
4 GB of free RAM |
8 GB of total system RAM |
|
CPU |
Any modern CPU |
Multi-core CPU. PyCharm supports multithreading for different operations and processes making it faster the more CPU cores it can use. |
|
Disk space |
3.5 GB |
SSD drive with at least 5 GB of free space |
|
Monitor resolution |
1024×768 |
1920×1080 |
|
Operating system |
Officially released 64-bit versions of the following:
Pre-release versions are not supported. |
Latest 64-bit version of Windows, macOS, or Linux (for example, Debian, Ubuntu, or RHEL) |
You do not need to install Java to run PyCharm because JetBrains Runtime is bundled with the IDE (based on JRE 17).
PyCharm supports the following versions of Python:
-
Python 2: version 2.7
-
Python 3: from the version 3.6 up to the version 3.12
The JetBrains Toolbox App is the recommended tool to install JetBrains products. Use it to install and manage different products or several versions of the same product, including Early Access Program (EAP) and Nightly releases, update and roll back when necessary, and easily remove any tool. The Toolbox App maintains a list of all your projects to quickly open any project in the right IDE and version.
Install the Toolbox App
-
Download the installer .exe from the Toolbox App web page.
-
Run the installer and follow the wizard steps.
-
After you run the Toolbox App, click its icon
 in the notification area and select which product you want to install.
To install a specific version, click
and select Available versions.
 in the notification area and select which product you want to install.
 and select
Log in to your JetBrains Account from the Toolbox App, and it will automatically activate the available licenses for any IDE that you install.
Install the Toolbox App
-
Download the disk image .dmg from the Toolbox App web page.
-
Mount the image and drag the JetBrains Toolbox app to the Applications folder.
-
After you run the Toolbox App, click its icon in the main menu and select which product you want to install.
To install a specific version, click
and select Available versions.

Log in to your JetBrains Account from the Toolbox App, and it will automatically activate the available licenses for any IDE that you install.
Install the Toolbox App
-
Download the tarball .tar.gz from the Toolbox App web page.
-
Extract the tarball to a directory that supports file execution.
For example, if the downloaded version is 1.17.7391, you can extract it to the recommended /opt directory using the following command:
sudo tar -xzf jetbrains-toolbox-1.17.7391.tar.gz -C /opt
-
Execute the jetbrains-toolbox binary from the extracted directory to run the Toolbox App.
After you run the Toolbox App for the first time, it will automatically add the Toolbox App icon
to the main menu. -
Select the product that you want to install.
To install a specific version, click
and select Available versions.
Log in to your JetBrains Account from the Toolbox App, and it will automatically activate the available licenses for any IDE that you install.
Standalone installation
Install PyCharm manually to manage the location of every instance and all the configuration files. For example, if you have a policy that requires specific install locations.
-
Download the installer .exe.
To verify the integrity of the installer, use the SHA checksum linked from the Download page.
-
Run the installer and follow the wizard steps.
Mind the following options in the installation wizard
-
64-bit launcher: Adds a launching icon to the Desktop.
-
Open Folder as Project: Adds an option to the folder context menu that will allow opening the selected directory as a PyCharm project.
-
.py: Establishes an association with Python files to open them in PyCharm.
-
Add launchers dir to the PATH: Allows running this PyCharm instance from the Console without specifying the path to it.
-
To run PyCharm, find it in the Windows Start menu or use the desktop shortcut. You can also run the launcher batch script or executable in the installation directory under bin.
-
Download the disk image .
To verify the integrity of the downloaded disk image, use the SHA checksum linked from the Download page.
-
Mount the image and drag the PyCharm app to the Applications folder.
Run the PyCharm app from the Applications directory, Launchpad, or Spotlight.
Install using tar archives
-
Download the tarball
-
Unpack the pycharm-*.tar.gz file to a different folder, if your current Download folder doesn’t support file execution:
tar xzf pycharm-*.tar.gz -C <new_archive_folder>
The recommended installation location according to the filesystem hierarchy standard (FHS) is /opt. To install PyCharm into this directory, enter the following command:
sudo tar xzf pycharm-*.tar.gz -C /opt/
To verify integrity of the downloaded archive, use the SHA checksum linked from the Download page.
-
Switch to the bin subdirectory:
cd <new archive folder>/pycharm-*/bin
For example,
cd /opt/pycharm-2022.2.4/bin
-
Run pycharm.sh from the bin subdirectory.
sh pycharm.sh
To create a desktop entry, do one of the following:
-
On the Welcome screen, click Configure | Create Desktop Entry
-
From the main menu, click Tools | Create Desktop Entry
When you run PyCharm for the first time, you can take several steps to complete the installation, customize your instance, and start working with the IDE.
For more information, refer to Run PyCharm for the first time.
For more information about the location of the default IDE directories with user-specific files, refer to Directories used by the IDE.
Silent installation on Windows
Silent installation is performed without any user interface. It can be used by network administrators to install PyCharm on a number of machines and avoid interrupting other users.
To perform silent install, run the installer with the following switches:
-
/S: Enable silent install -
/CONFIG: Specify the path to the silent configuration file -
/D: Specify the path to the installation directoryThis parameter must be the last in the command line, and it should not contain any quotes even if the path contains blank spaces.
For example:
pycharm-professional.exe /S /CONFIG=d:\temp\silent.config /D=d:\IDE\PyCharm
To check for issues during the installation process, add the /LOG switch with the log file path and name between the /S and /D parameters. The installer will generate the specified log file. For example:
pycharm-professional.exe /S /CONFIG=d:\temp\silent.config /LOG=d:\JetBrains\PyCharm\install.log /D=d:\IDE\PyCharm
Silent configuration file
You can download the silent configuration files for PyCharm at https://download.jetbrains.com/python/silent.config.
The silent configuration file defines the options for installing PyCharm. With the default options, silent installation is performed only for the current user: mode=user. If you want to install PyCharm for all users, change the value of the installation mode option to mode=admin and run the installer as an administrator.
The default silent configuration file is unique for each JetBrains product. You can modify it to enable or disable various installation options as necessary.
See more details on installing PyCharm in the video tutorial:
Install as a snap package on Linux
You can install PyCharm as a self-contained snap package. Since snaps update automatically, your PyCharm installation will always be up-to-date.
PyCharm is distributed via two channels:
-
The stable channel includes only stable versions. To install the latest stable release of PyCharm, run the following command:
sudo snap install pycharm-professional —classic
sudo snap install pycharm-community —classic
The
--classicoption is required because the PyCharm snap requires full access to the system, like a traditionally packaged application. -
The edge channel includes EAP builds. To install the latest EAP build of PyCharm, run the following command:
sudo snap install pycharm-professional —classic —edge
sudo snap install pycharm-community —classic —edge
When the snap is installed, you can launch it by running the pycharm-professional or pycharm-community command.
To list all installed snaps, you can run sudo snap list. For more information about other snap commands, refer to the Snapcraft documentation.
Last modified: 27 September 2023
В прошлом уроке мы установили Python, однако, этого недостаточно для того, чтобы писать программы. Нам также потребуется редактор кода, а точнее IDE — интегрированная среда разработки.
Такие среды помимо редактора кода, содержат и другие инструменты, которые упрощают написание программ.
В этом курсе мы будем использовать PyCharm Community от компании JetBrains. PyCharm — это одна из самых популярных IDE, и на данный момент есть две версии: бесплатная Community и платная Professional.
Вам нужно скачать PyCharm Community. Для этого на странице загрузки нужно кликнуть по кнопке Download
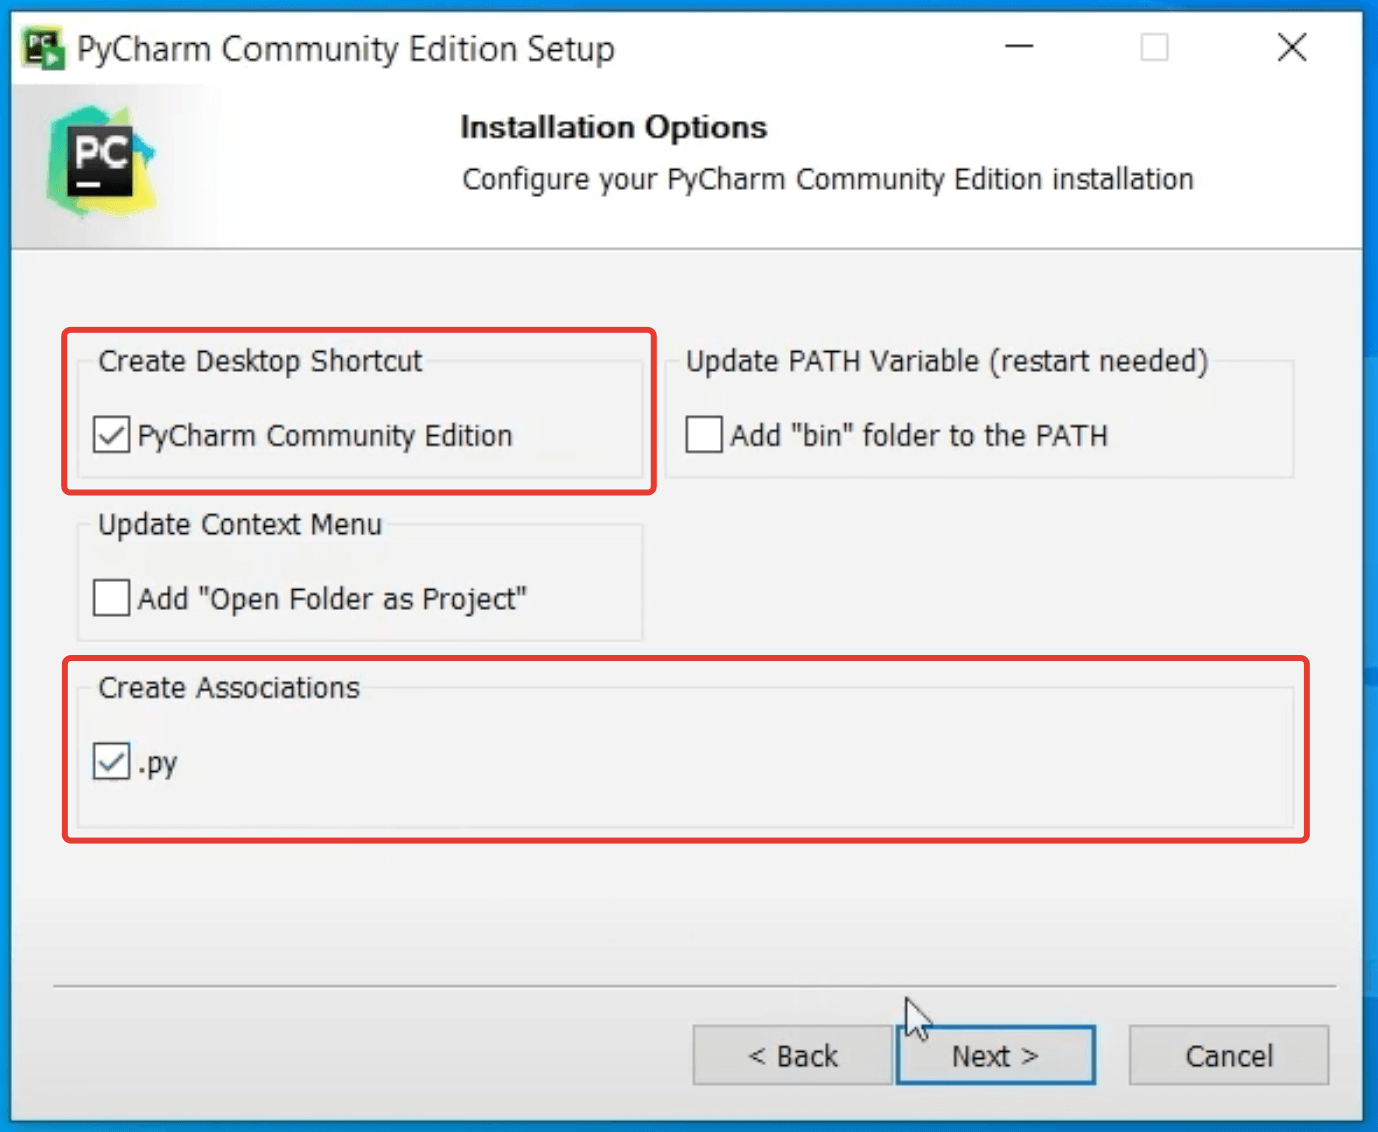
После загруки установщика, его нужно запустить и выдать необходимые Windows-разрешения. Далее надо несколько раз нажать Next и отметить галочки для создания ярлыка на рабочем столи и связи PyCharm с .py-файлами:
Далее снова нажимем Next и Install, чтобы запустить процесс установки.
После завершения нажимаем Finish и теперь можно запускать PyCharm кликнув по ярлыку на рабочем столе. На этом этапе у вас может всплыть окно с лицензионным соглашением, которое надо принять.
Также вам может быть предложено импортировать настройки из ранее установленного PyCharm. Можно смеало выбрать Don’t import settings и нажать OK.
Если всё прошло успешно, то произойдет первый запуск IDE и на этом этапе Брандмауэр Windows может попросить разрешения доступа. Надо разрешить.
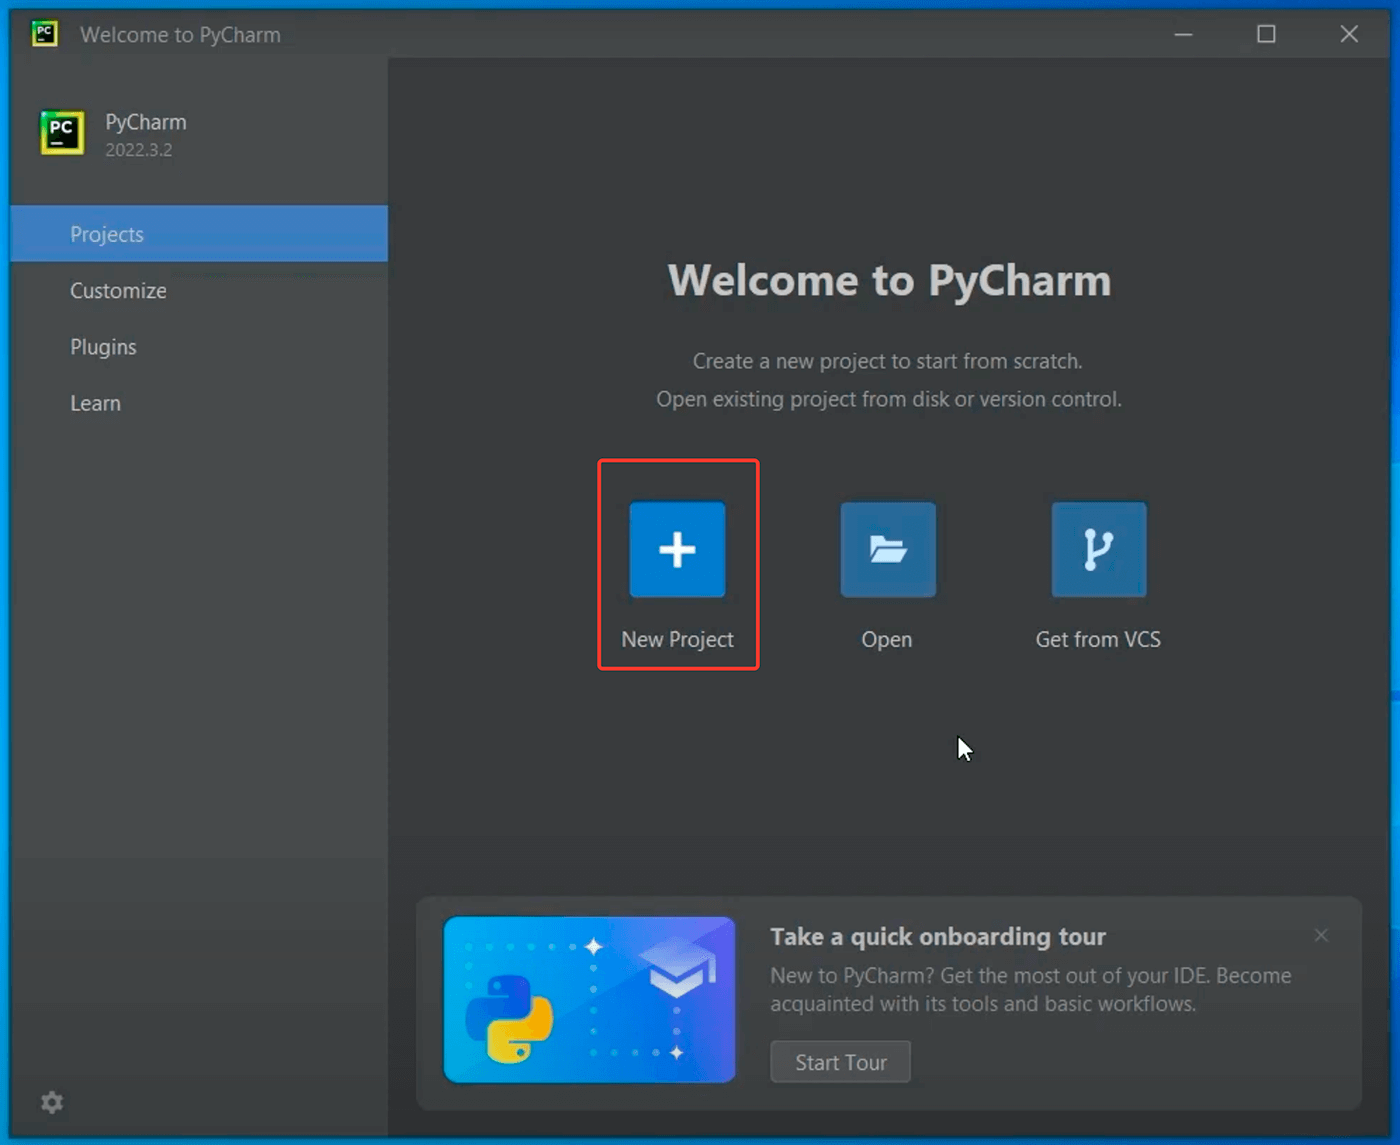
После откроется Welcome окно, в котором необходимо создать наш первый проект, нажав на New Project:
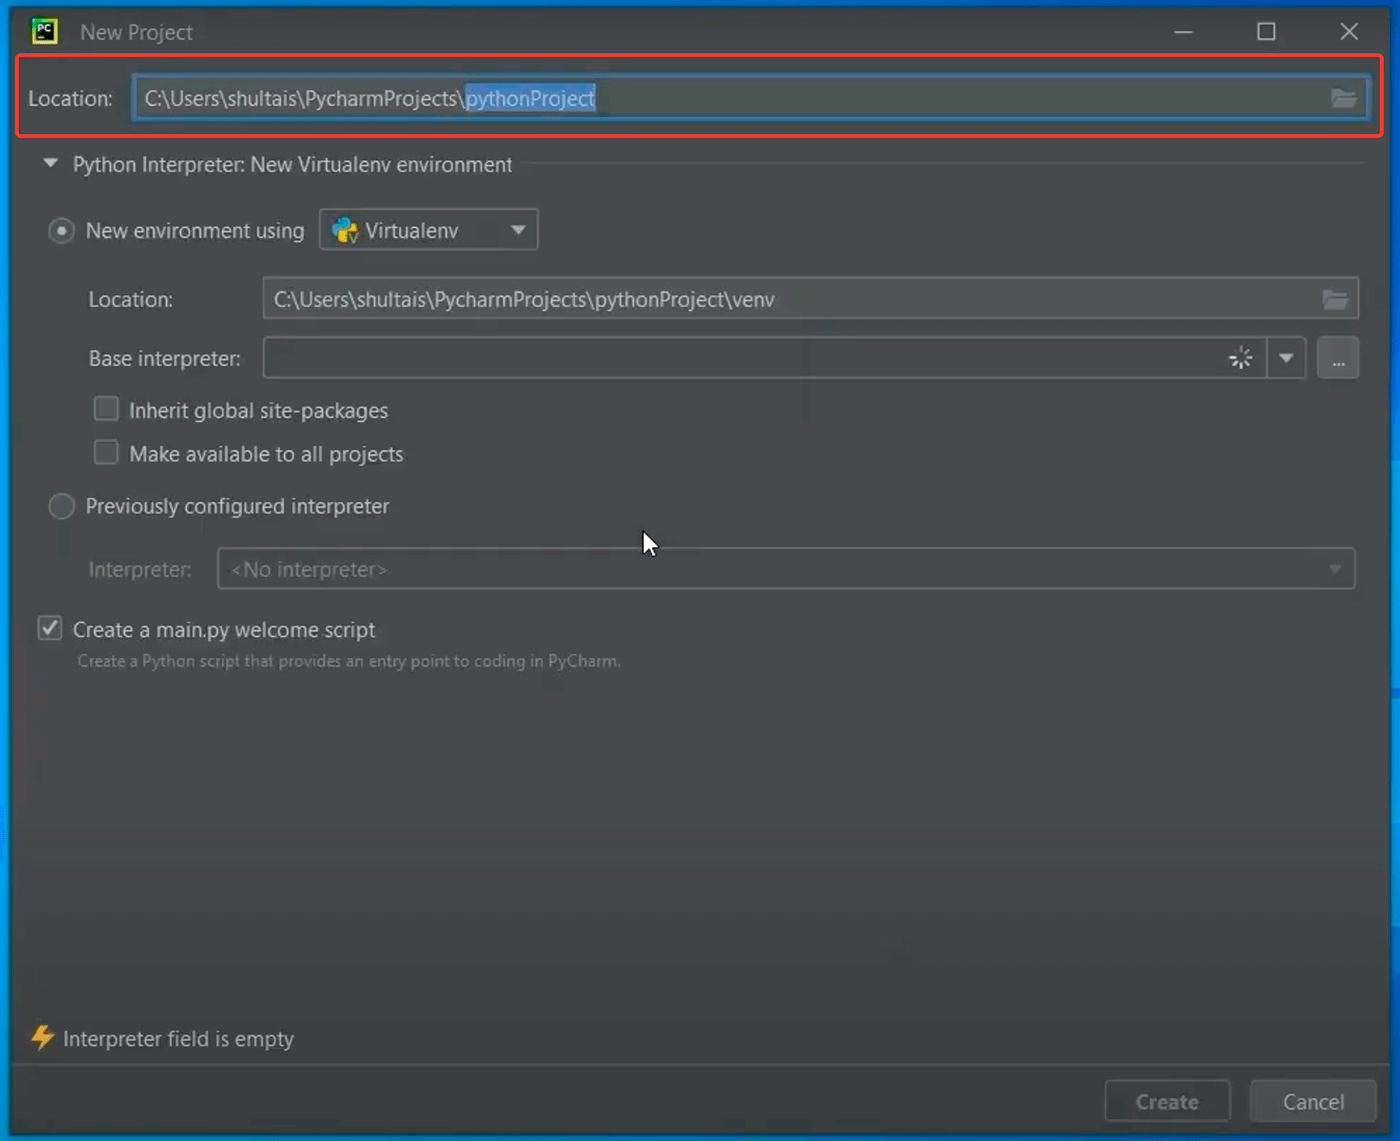
В верхней строке нам предлагают выбрать каталог, в котором мы будем хранить наш проект. Сам PyCharm рекомендует создать внутри домашней папки пользователя каталог PycharmProjects для хранения всех проектов и pythonProject для хранения нашего текущего:
Давайте PycharmProjects оставим как есть, а вот создаваемый проект переименуем во что-то другое. Вы можете дать ему любое имя, которое вам нравится, но постарайтесь выполнить два условия:
1. Используйте только латиницу.
2 Не используйте пробелы.
Я вместо pythonProject напишу SEPython.
Далее нам надо выбрать версию Питона, которую мы будем использовать в нашем проекте. Причем PyCharm нам сразу предлагает использовать виртуальные окружения. Виртуальные окружения мы будем изучать ближе к концу курса. Нас же пока интересует строка с базовым интерпретатором. Если на неё внимательно посмотреть, то мы увидим Python 3.11 это тот самый Python, который мы установили в прошлом уроке:

В итоге мы создаем проект SEPython, и это проект будет использовать питон, который мы установили в прошлом уроке.
Отлично, нажмем Create и немного подождем пока всё установится и настроится. В процессе PyCharm создаст виртуальное окружение, обновит пути и так далее.
После создания проекта, PyCharm сразу же добавим в него файл main.py с элементарным кодом. Давайте запустим его.
Для этого в правом верхнем углу напротив main.py надо нажать на зеленую стрелочку. Эта стрелочка запускает программу:
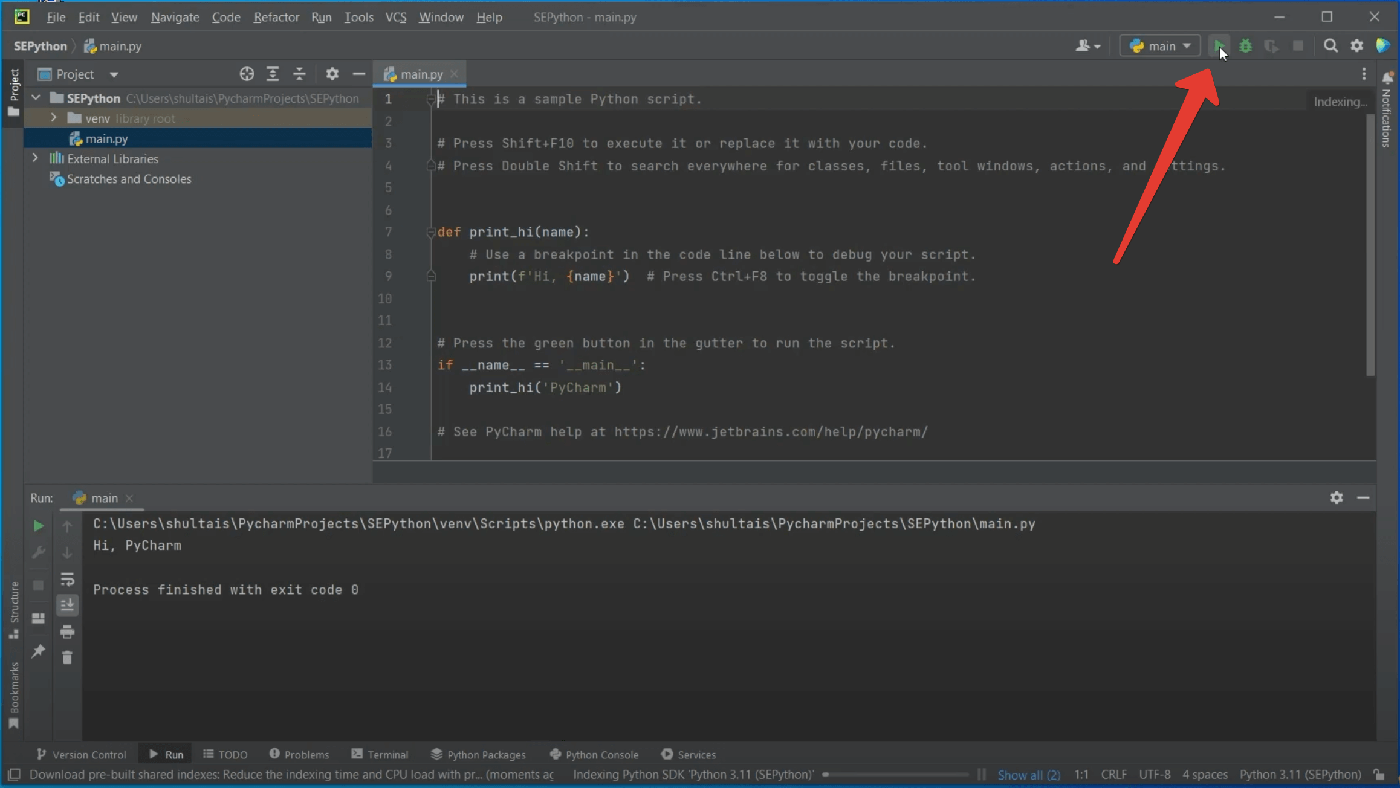
После запуска внизу вы должны увидеть результат её работы — фразу «Hi, PyCharm». Поздравляю, ваша первая программа на Python запущена. Но её создали в JetBrains. Нас же интересует написание собственных программ и про это мы поговорим в следующем уроке.
Следующий урок
Урок 5. Первая программа в Windows
В этом уроке вы напишите свою первую программу на языке Python.
Посмотреть
Полный курс с практикой
- 146 уроков
- 298 заданий
- Сертификат
- Поддержка преподавателя
- Доступ к курсу навсегда
4700 ₽
- Можно в рассрочку
Регистрация
JetBrains PyCharm — это интегрированная среда разработки (IDE), используемая для написания программ на Python. В ней есть инструменты для анализа кода, графический отладчик, встроенное модульное тестирование и поддержка веб-разработки с Django.
Для установки PyCharm сперва нужно установить интерпретатор Python. Дальше — пошаговый процесс установки PyCharm.
- Перейдите на сайт JetBrains https://www.jetbrains.com/pycharm/. PyCharm — это проект JetBrains.

- Нажмите «Download». Произойдет перенаправление на страницу загрузки PyCharm.
- Дальше необходимо выбрать версию PyCharm: Community или Professional. Professional — это платная версия с полным набором функций. Она идеально подходит для профессиональной разработки. Community бесплатная. Ею можно пользоваться благодаря набору базовых возможностей. После нажатия на кнопку «Загрузить» скачивание начнется автоматически.
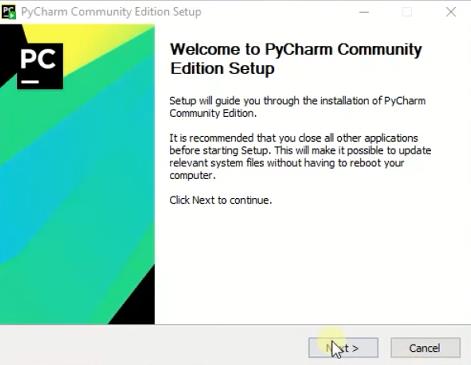
- Теперь необходимо запустить установку (~ pycharm-community-2019.2). Нажмите «Next».


В статье используется версия pycharm 2019.2. Во время прочтения может быть выпущена новая версия. Учитывайте это, часть
2019.2может быть любой.
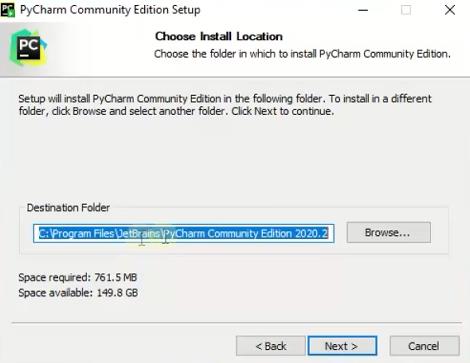
- Оставьте папку установки по умолчанию. Это папка
C:\Program files(x86)\JetBrains\PyCharm Community Edition 2019.2. Если выбрана другая, лучше указать именно это направление. Нажмите «Next». - Поставьте галочки напротив обоих пунктов, если нужен ярлык для рабочего стола. Нажмите «Next».

- Далее установщик попросит указать имя для отображения в стартовом меню. По умолчанию это JetBrains. Нажмите «Install».
- Установка начнется автоматически. Дождитесь завершения.
- После завершения установки поставьте галочку напротив «Run PyCharm Community Edition» для запуска, а затем «Finish».
- Если вы только учите язык Python и установили PyCharm впервые, тогда выберите пункт «I do not have a previous version of PyCharm or I do not want to import my settings» и «ОК».
- PyCharm запустится. Первый раз этой займет больше времени.
- После приветственного окна нажмите «Create New Project».
- Выберите директорию для сохранения проекта. Во втором поле нужно указать местоположение интерпретатора Python (который уже должен быть установлен). Обычно PyCharm находит его самостоятельно. Если не удалось, нужно указать путь к нему и нажать «Create».

- Нажмите «File > New > Python File». Введите название нового файла. Он откроется с чистой консолью. Можно начинать писать программу для проверки. Напишите что-то простое: например, программу, которая выводит «Hello World!» на экран. Используйте этот код, чтобы проверить работу PyCharm.
print("Hello World!")


В любом месте кликните правой кнопкой мыши и выберите «Run». Программа выполнится, а вывод будет показан на экране. Это значит, что PyCharm установлен и готов к работе. Удачи и успехов в изучении Python.
Прежде чем перейти к изучению основ Python, неплохо-бы установить специальную программу для написания кода. Можно, конечно, писать программы в обычном блокноте, но так никто не делает.
Для удобного написания кода предназначены специальные программы, которые существенно облегчают этот процесс.
Они помогают быстрее найти ошибки в коде, дают автоматические подсказки, выделяют цветом синтаксис. И многое-многое другое.
Для написания кода на языке Python сейчас существует огромное количество программ.
Например:
- Visual Studio
- Visual Studio Code
- PyCharm
- Sublime Text
- Atom
- Geany
- и много других вариантов.
Что выбрать — решать вам. Но в настоящее время огромное количество разработчиков на языке Python пишут программы в PyCharm.
Можно сказать, что именно PyCharm стала стандартом для работы с Python.
Если хотите знать мое мнение, то лучше сразу привыкать к PyCharm (но можете выбрать и другой редактор кода).
Но мы сегодня установим именно PyCharm в операционной системе Windows (кстати, PyCharm можно установить и в Linux).
Можете посмотреть видео ниже, или почитать текстовую инструкцию по установке PyCharm, которая находится ниже.
Не забудьте подписаться на мой Видеоканал в Яндекс.Дзен.
Как установить PyCharm?
Идем на официальный сайт разработчика по этой ссылке:
https://www.jetbrains.com/pycharm/download/
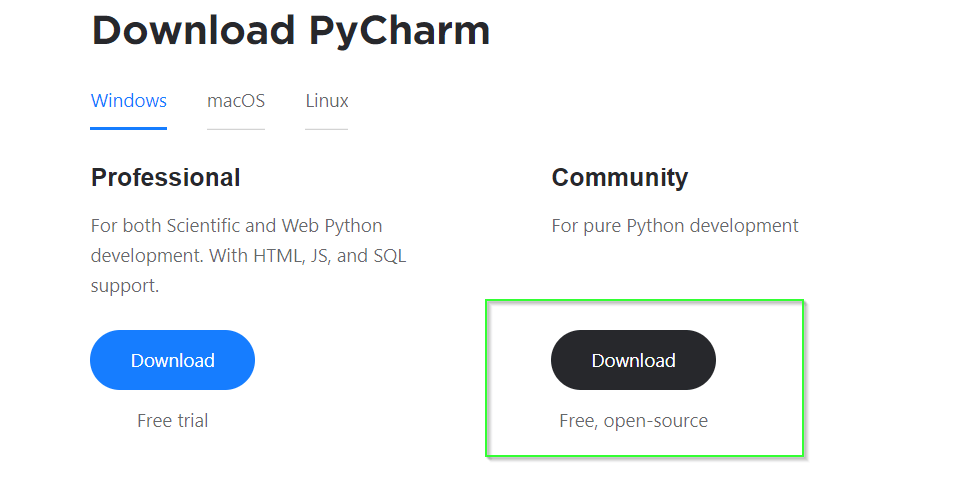
и видим два варианта PyCharm для скачивания
- Professional — платная версия
- Community — бесплатная версия
Бесплатной версии Community более чем достаточно, для начала изучения Python
Значит, будем устанавливать именно ее:
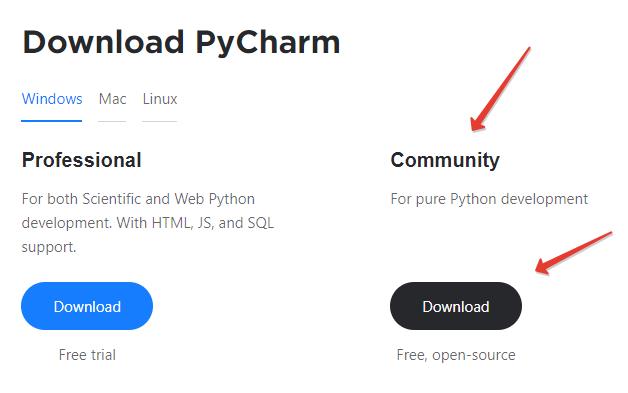
Нажимаем на кнопку Download и скачиваем установочный файл (примерно 300 мегабайт).
Далее все просто. Устанавливаем PyCharm как и любую-другую программу для Windows.
Дважды кликаем по установочному файлу и приступаем к установке:

Видим экран приветствия:
На следующем шаге можно изменить место установки PyCharm.
Я оставил место установки программы без изменений, и нажал на кнопку Next.
На следующем шаге достаточно поставить «галочку» для того, чтобы создать ярлык запуска программы на рабочем столе компьютера (см. рисунок ниже).
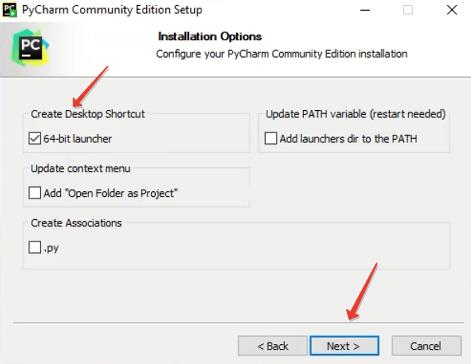
И нажимаем, как нетрудно догадаться, кнопку «Next» =)

На следующем шаге ничего не трогаем, и нажимаем на кнопку «Install».
Пошел процесс установки:

Установка PyCharm успешно завершена:
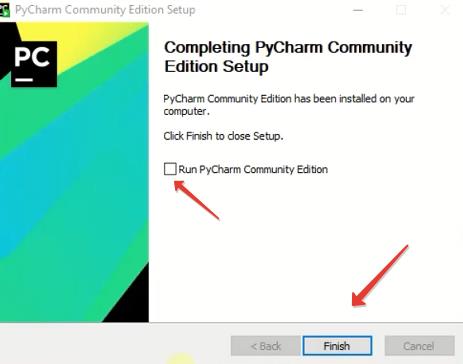
Жмем на кнопку «Finish».
Если хотите, чтобы программа сразу запустилась, то поставьте «галочку», напротив пункта «Run PyCharm».
Или просто запустите при помощи ярлыка, который уже есть на рабочем столе.
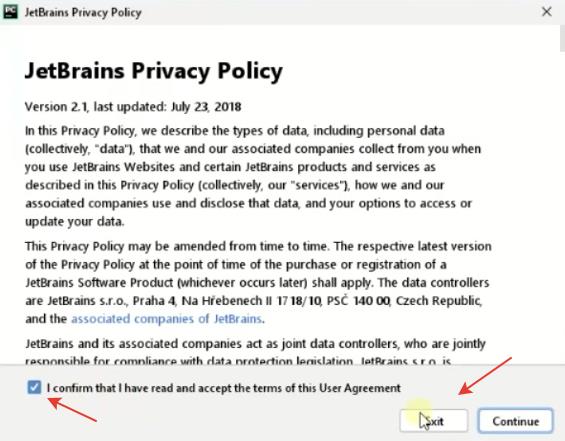
Первое, что мы увидим после запуска — это политика конфиденциальности. Придется с ней согласиться:
На следующем шаге нам будет предложено поделиться анонимной статистикой использования программы:
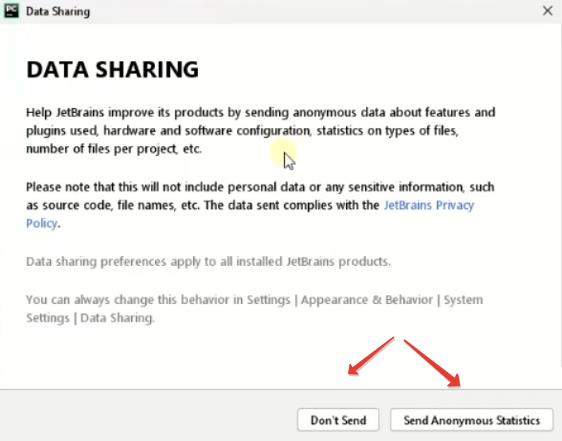
- Если не хотите делиться такими данными, нажмите «Don’t send»
- Если хотите делиться такими данными, то нажмите «Send Anonymous Statistics»
Этот выбор — на ваше усмотрение.
И, наконец, выбираем тему оформления:
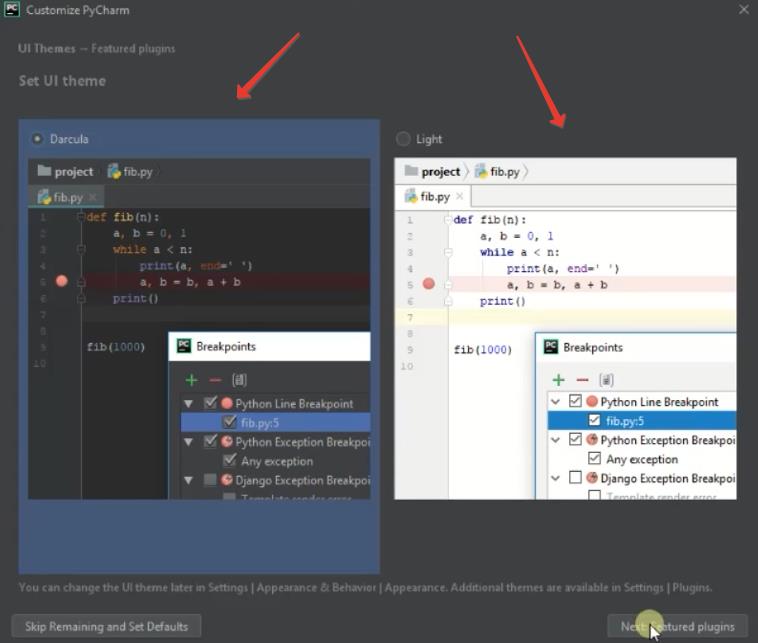
- Темная
- Или светлая
Подозреваю, что большинство выберет темную тему =)
На следующем шаге нам будет предложено создать первый проект.
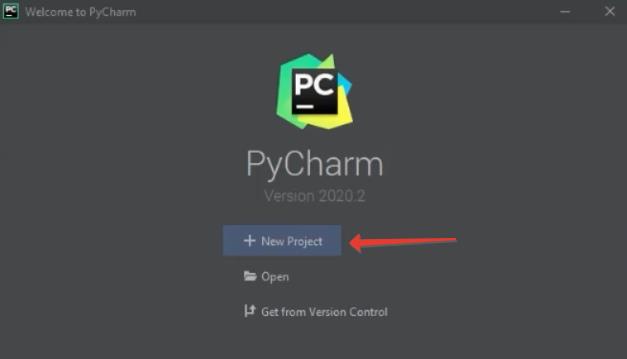
Жмем на кнопку «New Project» и создаем первый проект.
Фактически, нужно создать каталог, где будут храниться файлы наших будущих программ и скриптов.
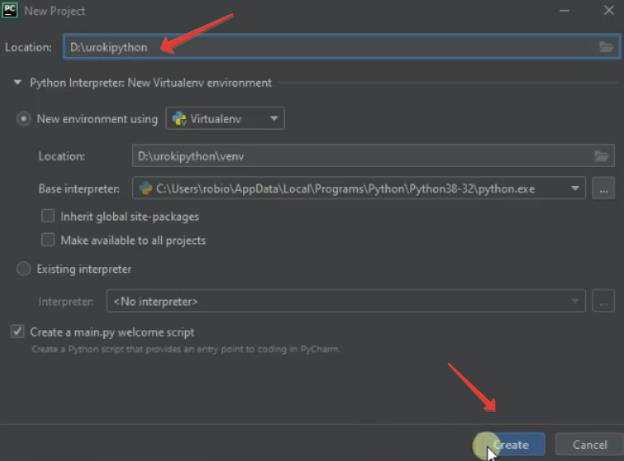
Я создал проект urokipython на диске D. Понятно, что вы можете выбрать любое другое расположением на вашем компьютере.
Нажимаем на кнопку «Create».
Все, мы с вами установили PyCharmи и создали первый проект.
Продолжение следует =)
Уроки по Python 3:
- Урок №1. Стоит ли изучать Python? Почему он стал лучшим «первым» языком программирования для начинающих?
- Урок №2: Как установить Python 3 в Windows и проверка установки в Linux
- Урок №3: PyCharm: пошаговая инструкция по установке IDE для изучения Python
- Урок №4: Переменные в Python: что это такое, как их называть и использовать?
- Урок №5: Комментирование кода в Python
- Урок №6: 3 основных типа данных в Python, с которыми начнем работать сразу: int, float, str
- Урок №7: Числа и операции с ними в Python
- Урок №8: Ввод и вывод данных в Python. Пишем первую программу
If you are a developer and looking for an amazing Python IDE. This guide will give you step by step process to install PyCharm on Windows 10 easily and quickly. You will also learn about, Pycharm updates, Importing packages like NumPy and run your first Python code. Lastly, we learn how to uninstall Pycharm.
All the steps mentioned in this guide also applies, in case you want to perform
- Installation of PyCharm professional edition
- Installation of PyCharm Edu edition
If you are a Linux user, then visit the “3 Ways to install Pycharm in Ubuntu” guide.
PyCharm Overview
PyCharm is a cross-platform IDE available for Windows, Linux and macOS. It comes with amazing features like –
- Built-in intelligent code assistance
- Developer and scientific tools are built-in
- Python debugger
- Python web development frameworks support
It is pretty famous for Python development and comes in three different editions.
- PyCharm professional edition – A complete commercial stack with useful tools and features. it’s paid and 30 days trial version is available.
- PyCharm community edition – It’s free and open-source, Comes with limited features but enough to develop Python applications.
- PyCharm Edu edition – Free version for students, which provides courses and helps you to learn Python.
You can check out this comparison matrix for further reference.
System requirements to install PyCharm
Following are the system requirements to install Pycharm in Windows 10
- Windows 10 64-bit version
- Minimum of 2GB memory (RAM). Although 8GB is recommended.
- At least 2.5GB of space. SSD is recommended for better performance. Requirement of space increases depending upon the modules or plugins need to install.
- The screen resolution must be at least 1024×768.
- Python 2.7, 3.5 or newer version. You can install Python on Windows easily, in case you don’t have installed it already.
- Internet connection
Download PyCharm
To download the Pycharm community edition for Windows 10, follow these simple steps. Alternatively, just click on the Download button to get it without effort.
Step 0.1 – Visit jetbrains.com and download the Pycharm community edition
In this guide, I will talk about the Pycharm community edition only. But in case you want to try features and stack of Pycharm Professional. You can download it and can try it for the next 30 days free.
There are two ways to install Pycharm on Windows 10. Both are really simple and easy. You can select any one option based on your preference.
- Automatically install Pycharm using ToolBox app
- Install Pycharm on Windows manually
Method 1 – How to install Pycharm on Windows using Toolbox App
The major advantage of using this method is, Pycharm installation is automatic with a single click. There are many other Pycharm versions and products are available in a single pane offered by JetBrains. You can install any one of them easily. Also, you can use the Toolbox app to update or patch your existing Pycharm without much hassle.
Let’s deep dive into steps.
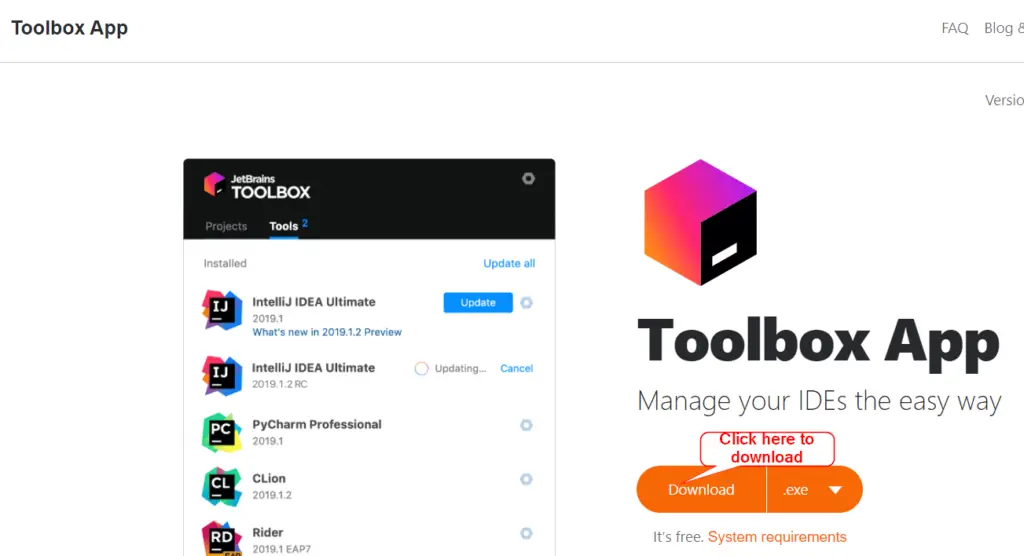
Step 1.1 – Visit Jetbrains.com site and download Toolbox
Visit Jetbrains.com to get this Toolbox app as shown in the image. Otherwise, you can just click on the below-mentioned download button.
Step 1.2 – Install Toolbox app on Windows
- Visit your download folder. Double click on “jetbrains-toolbox-1.21.9547.exe“.
![]()
- Select “install” on Welcome page.
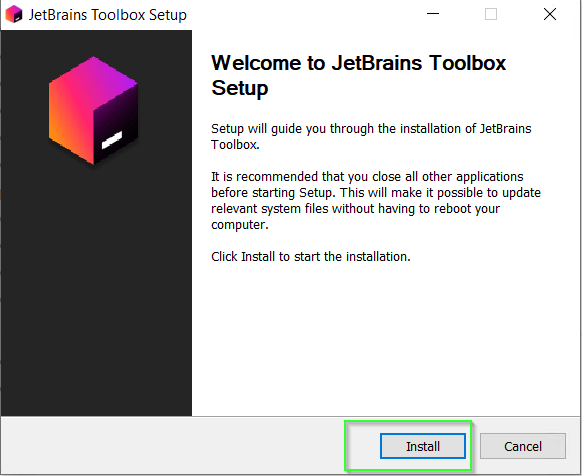
- Installation will take approx 3-4 minutes to complete.
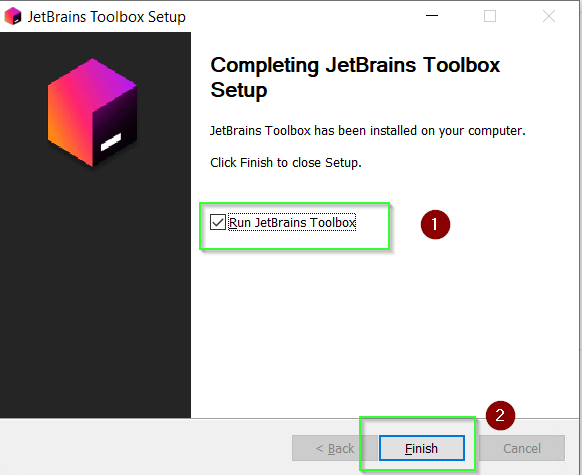
- Click Finish to run “JetBrains Toolbox app“. Make sure “Run JetBrains Toolbox” checkbox is selected as shown in image.
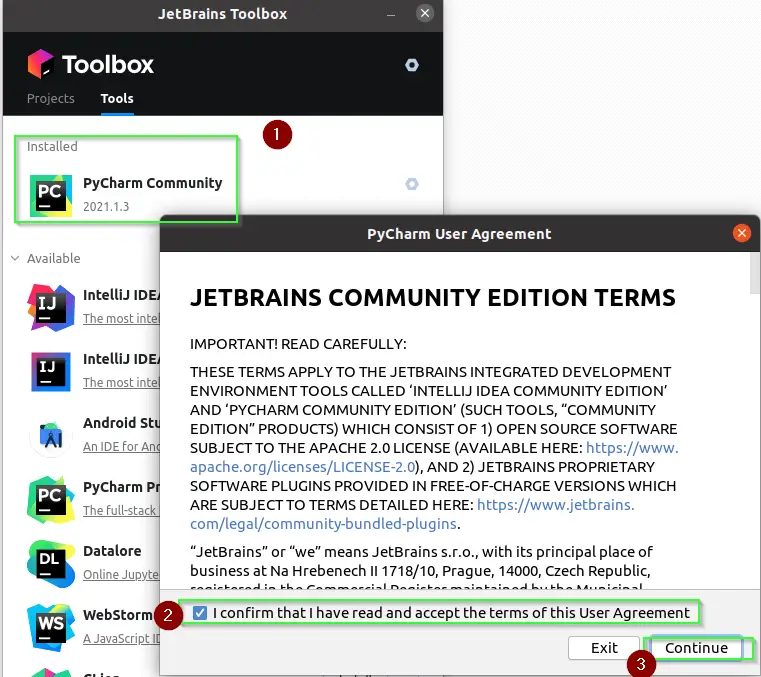
- Accept Pycharm End user license agreement

Step 1.3 – Run Pycharm community edition using Toolbox
- Select your PyCharm edition and version from the drop-down. It will start to install automatically as shown in the image.
- You can also install the EAP (Early Access Program) version using the Toolbox app.
Want to install a free PyCharm Edu community for students? Just scroll down a bit in the Toolbox app and you will find it.

I will select the PyCharm community edition to install.
- Once installation is complete, Double click on the “PyCharm community” icon to launch PyCharm IDE.
- Accept “End-user license agreement” and click continue.
You will be happy to know that you are done with Pycharm installation on Windows within few minutes. Simple isn’t it?
If you don’t want any extra software, just to install Pycharm. Follow method-2.
Method 2 – How to install Pycharm on Windows manually
I am assuming, you have already downloaded Pycharm community edition software by following step 0.1.
Step 2.1 – Run “Pycharm community” exe
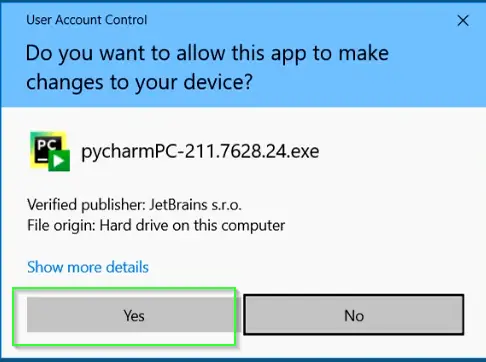
- Visit to your download folder and run “pycharm-community-2021.1.3” exe file.

- Permit User access control by selecting “Yes“
- Click “Next” on Welcome page.
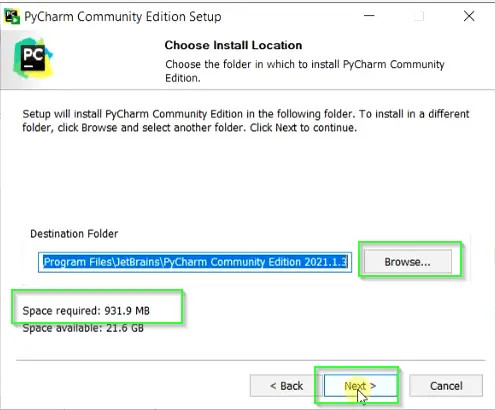
Step 2.2 – Choose “Installation location” for PyCharm
On this screen, You need to choose the install location for PyCharm. Setup will install PyCharm by default in “C:\Program file \JetBrains\PyCharm Community Edition 2021.1.3“.
Click Browse > Select your preferred drive and folder > click Next if you want to change the default location.
Pycharm will take around 931MB of space during installation as shown in the image.
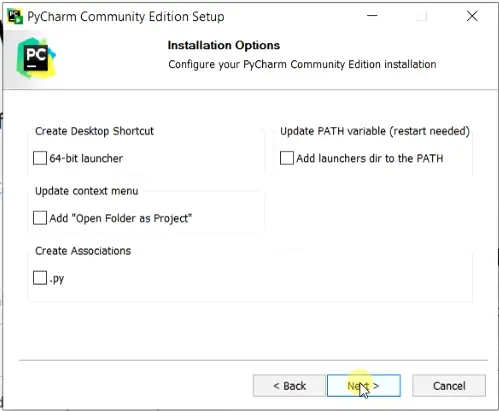
Step 2.3 – Choose “Installation option” to configure PyCharm Installation
These are the options available on the Installation screen of Pycharm installation –
- Create desktop shortcut – If you will select this option, it will create a Desktop shortcut for PyCharm launcher
- Update context menu – If you want to see option of “Open folder as Project” in PyCharm’s Menu. Select this checkbox.
- Create Associations – Selecting this option will allow PyCharm to open any file as python “.py” file. Even if it doesn’t have any extension.
- Update PATH variable – It will add PyCharm PATH variable. But you need to restart your system after selecting this option.
I will select all these options and click Next.
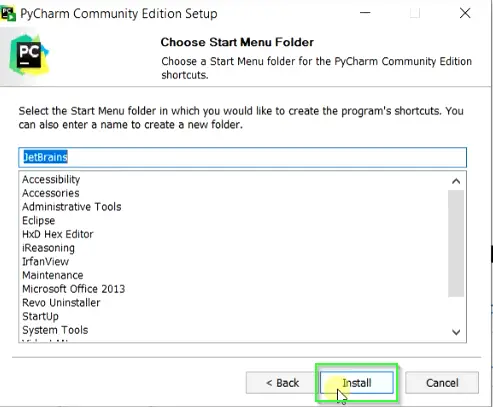
Step 2.4 – Choose Start menu folder and Install
Select Start menu shortcuts of Pycharm and click Install.
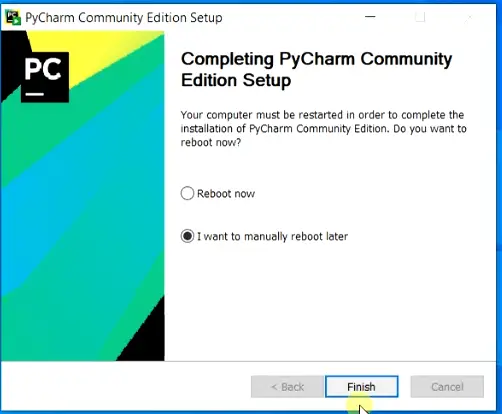
Step 2.5 – Finish and Reboot your system
Installation of Pycharm will take 3-4 minutes. Once setup completes, click Finish and reboot your system.
Although you have options to reboot immediately or later as per your preference.
Congrats! Now you know two methods to install PyCharm on Windows 10.
How to Install Modules in PyCharm
You can install modules or packages in PyCharm using the following steps.
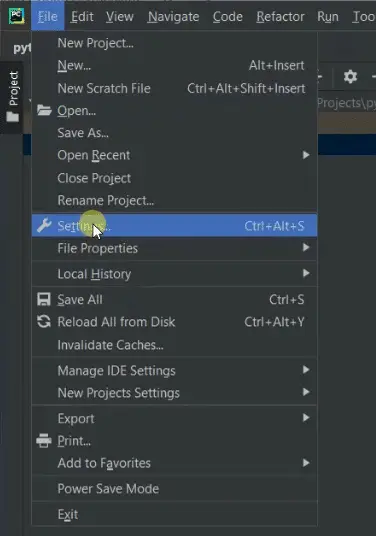
- Launch PyCharm > Go to File > Settings or Press <Ctrl + Alt + S> on your keyboard.
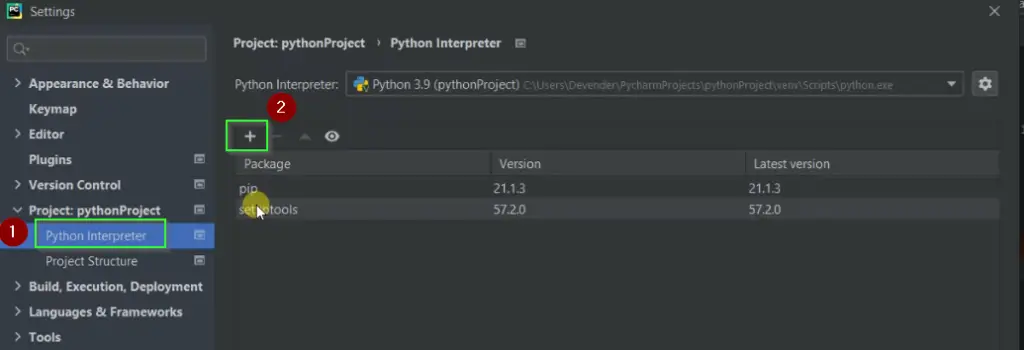
- Select Project:pythonProject option > Python Interpreter > On right pane Click “+” symbol to add Modules to PyCharm.
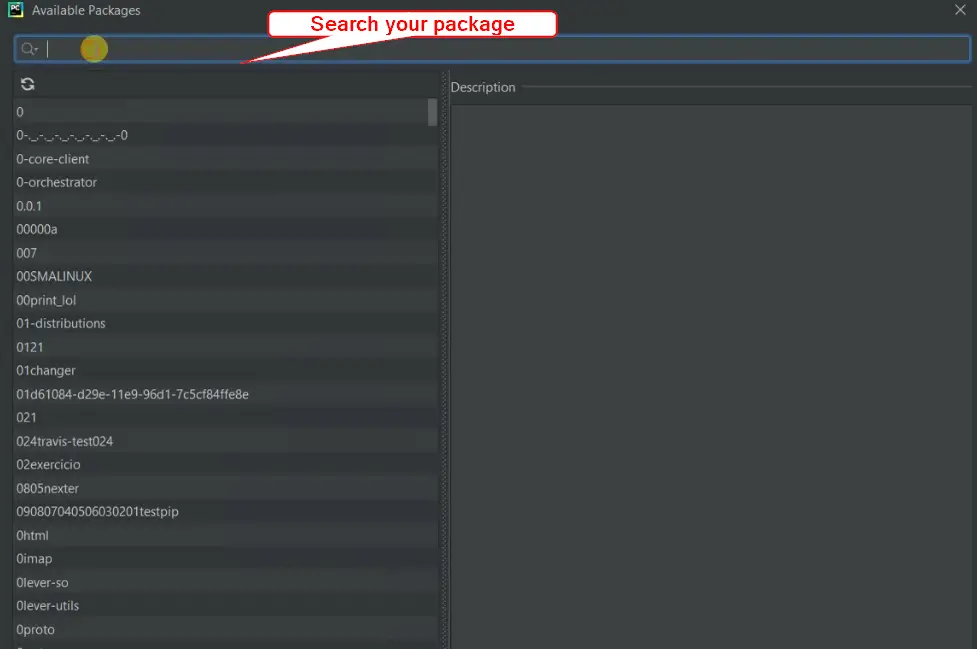
- Search for your package from the list and install it. Let me show you an example of NumPy Package in Next section.
How to import numpy in PyCharm
In the last section, we learned how to install Modules or packages in PyCharm. Let me show you the process of importing NumPy in PyCharm as an example.
- Type “numpy” in the search bar
- Select numpy from the left pane
- In Right pane > You have options to specify version from drop down list and you can also give custom options, during NumPy package installation.
- Now you can Select “Install package” button in the lower section of the Available packages window.
- In case you don’t found package, You may need to add link of that third party repository. Click on Manage repository and add link. Do refresh and try installing package again. In case any issue, check out this link.

How to update PyCharm
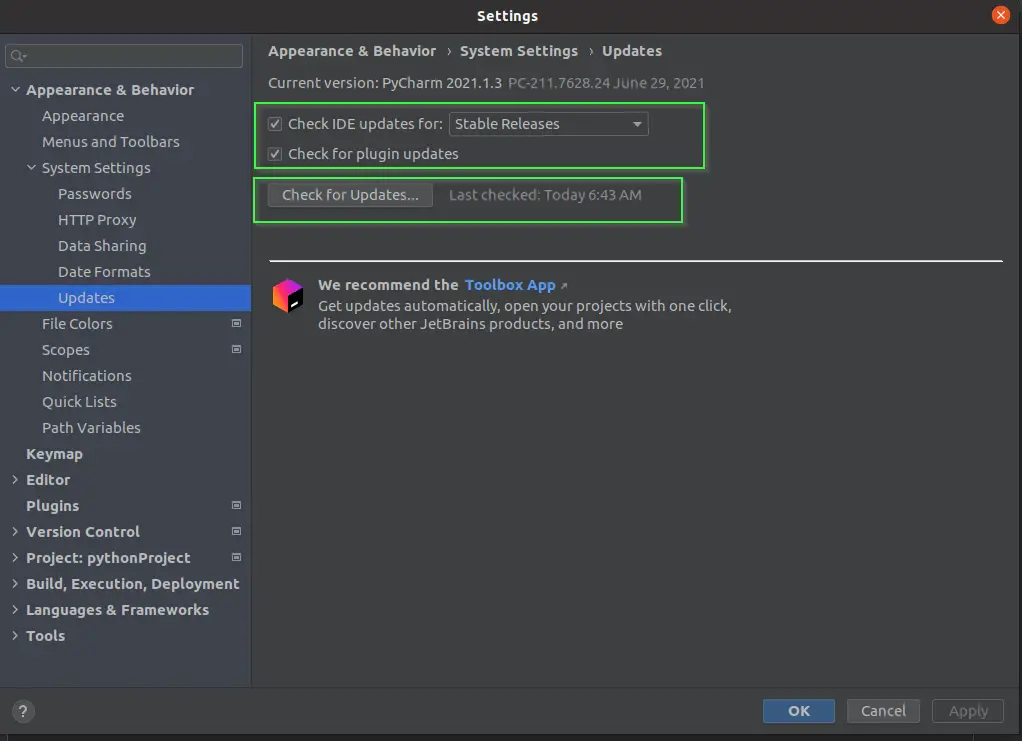
PyCharm keeps checking for updates automatically and informs us about the new version. Updates for your existing versions are generally patch-based. It requires restarting IDE only.
If you want to update Pycharm, Just –
Go to File > Settings > Appearance & Behavior > System Settings > Updates
Create project and run code in PyCharm
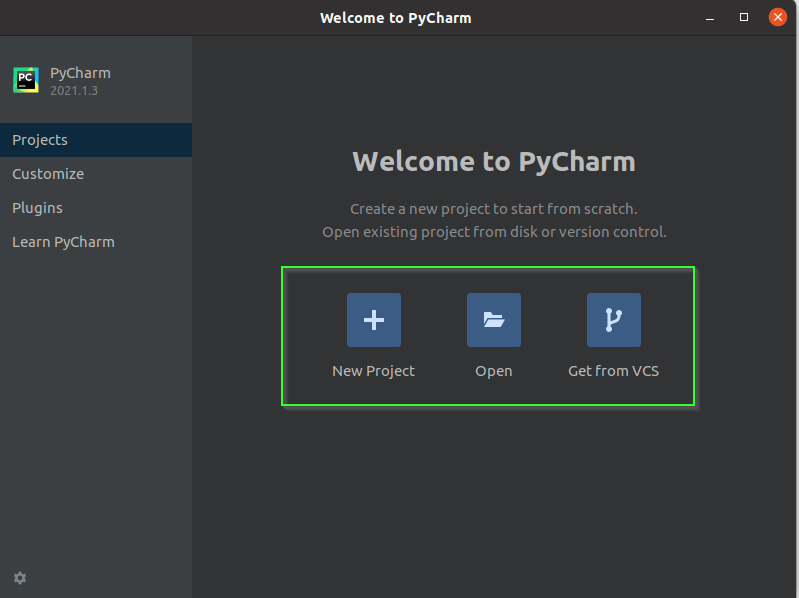
- Once you will launch PyCharm, the Welcome wizard will have three options –
- New Project – Select this option, if you are installing PyCharm first time and it will be your first project.
- Open – If you already have projects available. Then you can open it.
- Get from VCS (Version Control System) – To download it from the Git repository.
I will select “New Project“.
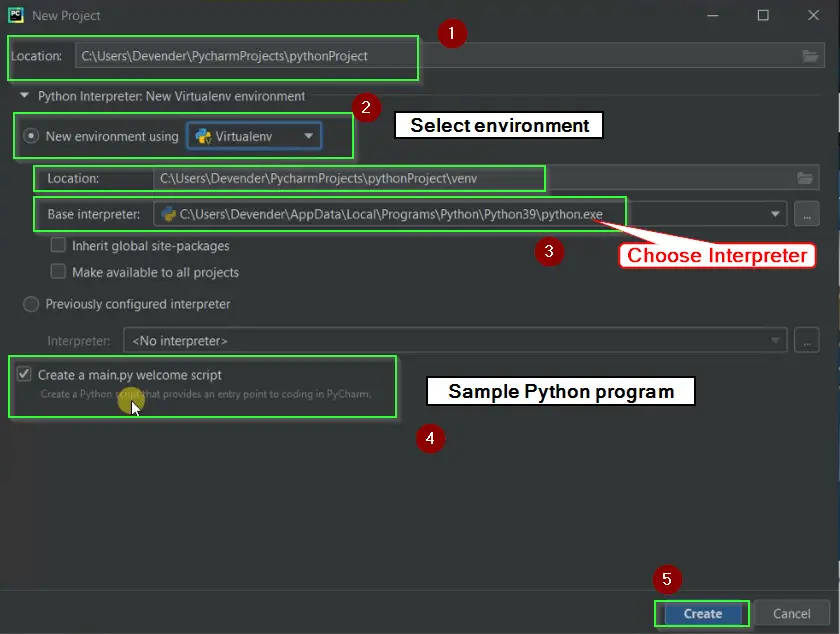
- On the next screen, you will find these options for “New project” as shown in image. You can keep the default or can customize it as per your wish.
- Location to keep your project files
- Select virtual env from the drop-down based on your requirements. Available options are :
- Virtualenv
- Pipenv
- Conda
- Select a location of your Python virtual environment
- Select Python Version in “Base interpreter“. Although PyCharm picks the installed Python version automatically. You can either select it from the Drop-down or provide the path to Python manually. Just select “…” and choose a location.
- Previously configured interpreter, if any
- Create a main.py welcome script.
Once you complete all the options, select “Create” as shown in the image.
To Run Your first code
Let Indexing complete after you launch PyCharm. It takes few minutes to complete. Otherwise, you will get a blank message window while creating a new file.
- Click on File in Menu > New File > Provide “File Name“. For example, I will give “HelloWorld.py” as the file name.
- Type print(“HelloWorld!”) in the editor
print("HelloWorld!")
- Select Run from menu > Select “HelloWorld.py” file > Run. Alternatively, press <Shift + F10> on your keyboard.
- You will see the “Hello World!” text as output
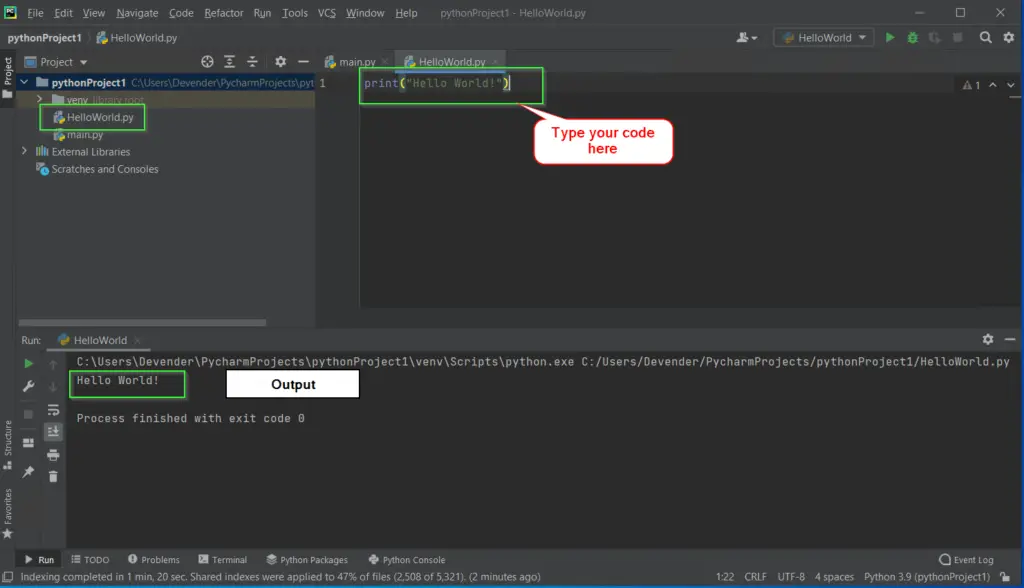
Hurray!! you have successfully run your first project code of Python in PyCharm IDE.
How to uninstall PyCharm
To uninstall PyCharm from Windows 10 system. Follow these simple steps, you generally follow for any other software to remove from your system.
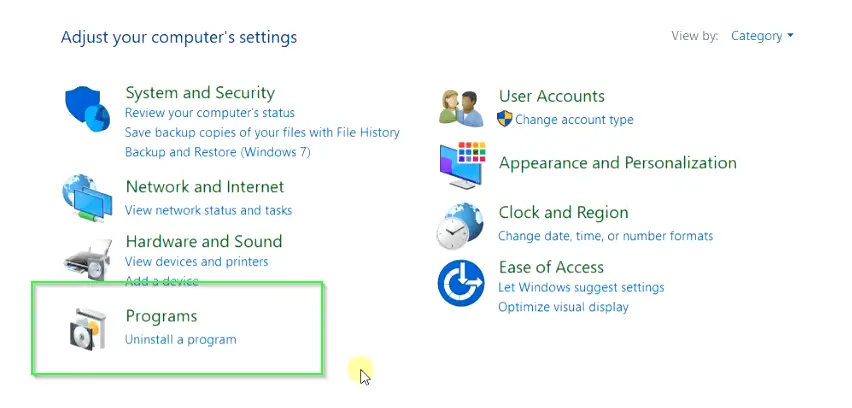
- Visit Control panel in your Windows system. My favourite method is to just type “Control panel” in search bar and Open it.
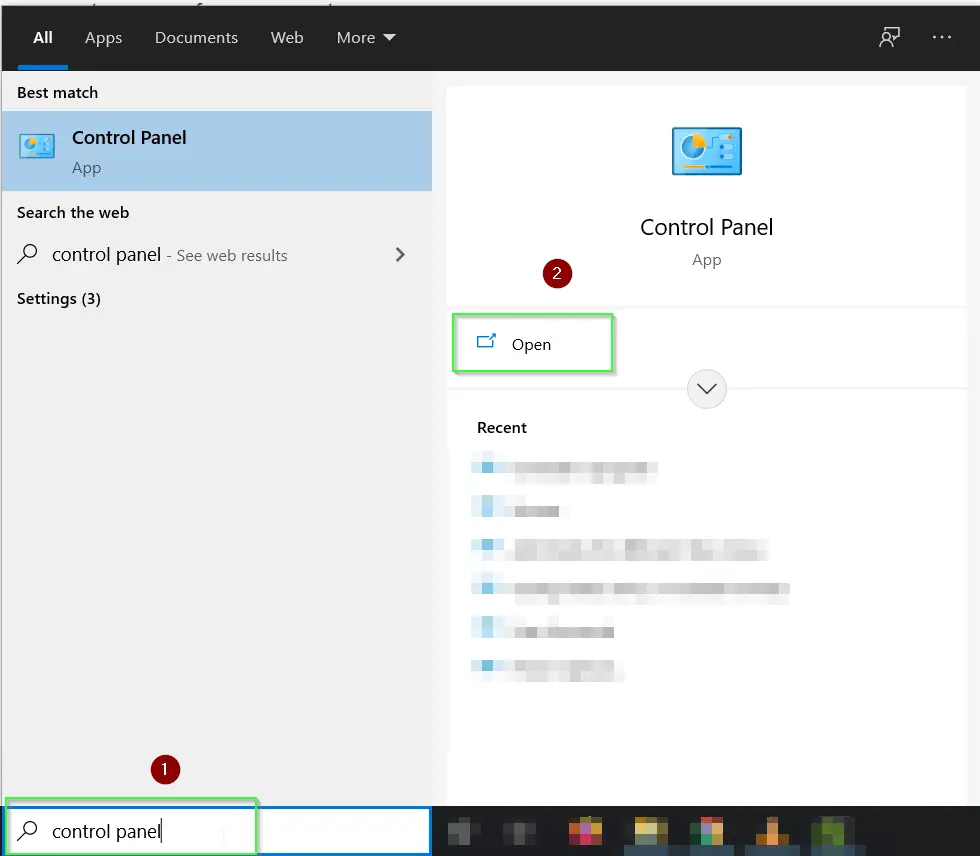
- Select “Uninstall a program” option
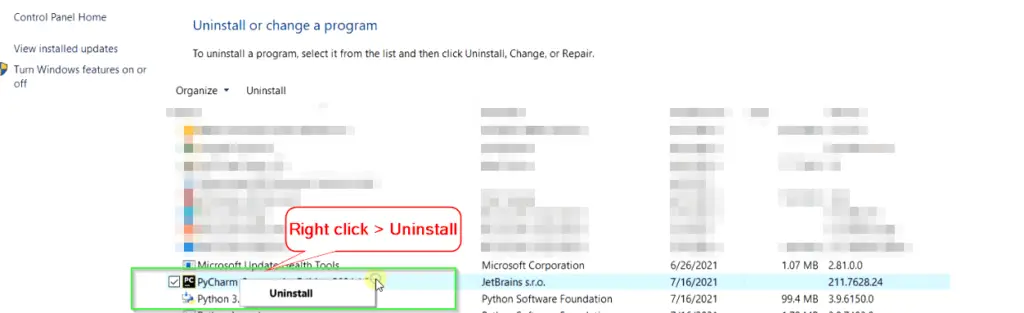
- Select Pycharm community edition software from the installed sofware list.
- Select Uninstall. You can also Right-click on the sofware and then click Uninstall.
- Accept User Access control permission as “Yes”
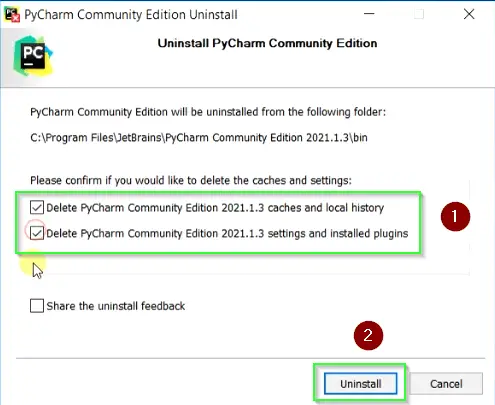
- Please select both the available options and choose “uninstall” as shown in the image.
- Delete Pycharm community edition 2021.1.3 caches and local history.
- Delete Pycharm community edition 2021.1.3 settings and installed plugins.
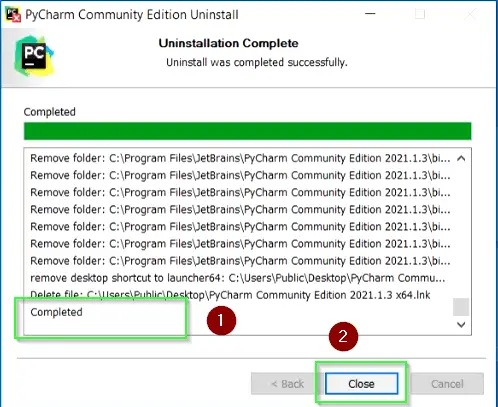
- It will take few minutes to complete uninstall of Pycharm from your Windows sysytem.
- click Close, once you see Uninstall complete message.
Video tutorial
If you find grasping a text guide difficult, Watch out for this helpful video on How to install Pycharm on Windows.
Further reading
I hope you liked this article on how to install Pycharm on Windows 10. You can refer to mentioned links for further reading on PyCharm.
PyCharm Youtube channel
Learn PyCharm
You can share your thoughts or feedback via your comments.