Psycopg is a PostgreSQL adapter for the Python programming language. It is a
wrapper for the libpq, the official PostgreSQL client library.
Quick Install
For most operating systems, the quickest way to install Psycopg is using the
wheel package available on PyPI:
$ pip install psycopg2-binary
This will install a pre-compiled binary version of the module which does not
require the build or runtime prerequisites described below. Make sure to use
an up-to-date version of pip (you can upgrade it using something
like pip install -U pip).
You may then import the psycopg2 package, as usual:
import psycopg2

# Connect to your postgres DB
conn = psycopg2.connect("dbname=test user=postgres")

# Open a cursor to perform database operations
cur = conn.cursor()

# Execute a query
cur.execute("SELECT * FROM my_data")

# Retrieve query results
records = cur.fetchall()
psycopg vs psycopg-binary
The psycopg2-binary package is meant for beginners to start playing
with Python and PostgreSQL without the need to meet the build
requirements.
If you are the maintainer of a published package depending on psycopg2
you shouldn’t use psycopg2-binary as a module dependency. For
production use you are advised to use the source distribution.
The binary packages come with their own versions of a few C libraries,
among which libpq and libssl, which will be used regardless of other
libraries available on the client: upgrading the system libraries will not
upgrade the libraries used by psycopg2. Please build psycopg2 from
source if you want to maintain binary upgradeability.
Warning
The psycopg2 wheel package comes packaged, among the others, with its
own libssl binary. This may create conflicts with other extension
modules binding with libssl as well, for instance with the Python
ssl module: in some cases, under concurrency, the interaction between
the two libraries may result in a segfault. In case of doubts you are
advised to use a package built from source.
Change in binary packages between Psycopg 2.7 and 2.8
In version 2.7.x, pip install psycopg2 would have tried to install
automatically the binary package of Psycopg. Because of concurrency problems
binary packages have displayed, psycopg2-binary has become a separate
package, and from 2.8 it has become the only way to install the binary
package.
If you are using Psycopg 2.7 and you want to disable the use of wheel binary
packages, relying on the system libraries available on your client, you
can use the pip --no-binary option, e.g.:
$ pip install --no-binary :all: psycopg2
which can be specified in your requirements.txt files too, e.g. use:
psycopg2>=2.7,<2.8 --no-binary psycopg2
to use the last bugfix release of the psycopg2 2.7 package, specifying to
always compile it from source. Of course in this case you will have to meet
the build prerequisites.
Prerequisites
The current psycopg2 implementation supports:
-
Python versions from 3.7 to 3.12
-
PostgreSQL server versions from 7.4 to 16
-
PostgreSQL client library version from 9.1
Note
Not all the psycopg2 versions support all the supported Python versions.
Please see the release notes to verify when the support for
a new Python version was added and when the support for an old Python
version was removed.
Build prerequisites
The build prerequisites are to be met in order to install Psycopg from source
code, from a source distribution package, GitHub or from PyPI.
Psycopg is a C wrapper around the libpq PostgreSQL client library. To install
it from sources you will need:
-
A C compiler.
-
The Python header files. They are usually installed in a package such as
python-dev or python3-dev. A message such as error: Python.h: No
such file or directory is an indication that the Python headers are
missing. -
The libpq header files. They are usually installed in a package such as
libpq-dev. If you get an error: libpq-fe.h: No such file or directory
you are missing them. -
The pg_config program: it is usually installed by the
libpq-dev package but sometimes it is not in aPATHdirectory.
Having it in thePATHgreatly streamlines the installation, so try
runningpg_config --version: if it returns an error or an unexpected
version number then locate the directory containing the pg_config
shipped with the right libpq version (usually
/usr/lib/postgresql/X.Y/bin/) and add it to thePATH:$ export PATH=/usr/lib/postgresql/X.Y/bin/:$PATH
You only need pg_config to compile
psycopg2, not for its
regular usage.
Once everything is in place it’s just a matter of running the standard:
or, from the directory containing the source code:
$ python setup.py build
$ python setup.py install
Runtime requirements
Unless you compile psycopg2 as a static library, or you install it from a
self-contained wheel package, it will need the libpq library at runtime
(usually distributed in a libpq.so or libpq.dll file). psycopg2
relies on the host OS to find the library if the library is installed in a
standard location there is usually no problem; if the library is in a
non-standard location you will have to tell Psycopg how to find it,
which is OS-dependent (for instance setting a suitable
LD_LIBRARY_PATH on Linux).
Note
The libpq header files used to compile psycopg2 should match the
version of the library linked at runtime. If you get errors about missing
or mismatching libraries when importing psycopg2 check (e.g. using
ldd) if the module psycopg2/_psycopg.so is linked to the
right libpq.so.
Note
Whatever version of libpq psycopg2 is compiled with, it will be
possible to connect to PostgreSQL servers of any supported version: just
install the most recent libpq version or the most practical, without
trying to match it to the version of the PostgreSQL server you will have
to connect to.
Non-standard builds
If you have less standard requirements such as:
-
creating a debug build,
-
using pg_config not in the
PATH,
then take a look at the setup.cfg file.
Some of the options available in setup.cfg are also available as command
line arguments of the build_ext sub-command. For instance you can specify
an alternate pg_config location using:
$ python setup.py build_ext --pg-config /path/to/pg_config build
Use python setup.py build_ext --help to get a list of the options
supported.
Creating a debug build
In case of problems, Psycopg can be configured to emit detailed debug
messages, which can be very useful for diagnostics and to report a bug. In
order to create a debug package:
-
Download and unpack the Psycopg source package (the
.tar.gz
package). -
Edit the
setup.cfgfile adding thePSYCOPG_DEBUGflag to the
defineoption. -
Compile and install the package.
-
Set the
PSYCOPG_DEBUGenvironment variable:
-
Run your program (making sure that the
psycopg2package imported is the
one you just compiled and not e.g. the system one): you will have a copious
stream of informations printed on stderr.
Non-standard Python Implementation
The psycopg2 package is the current mature implementation of the adapter: it
is a C extension and as such it is only compatible with CPython. If you want
to use Psycopg on a different Python implementation (PyPy, Jython, IronPython)
there is a couple of alternative:
-
a Ctypes port, but it is not as mature as the C implementation yet
and it is not as feature-complete; -
a CFFI port which is currently more used and reported more efficient on
PyPy, but please be careful of its version numbers because they are not
aligned to the official psycopg2 ones and some features may differ.
Running the test suite
Once psycopg2 is installed you can run the test suite to verify it is
working correctly. From the source directory, you can run:
$ python -c "import tests; tests.unittest.main(defaultTest='tests.test_suite')" --verbose
The tests run against a database called psycopg2_test on UNIX socket and
the standard port. You can configure a different database to run the test by
setting the environment variables:
-
PSYCOPG2_TESTDB -
PSYCOPG2_TESTDB_HOST -
PSYCOPG2_TESTDB_PORT -
PSYCOPG2_TESTDB_USER
The database should already exist before running the tests.
If you still have problems
Try the following. In order:
-
Read again the Build prerequisites.
-
Read the FAQ.
-
Google for
psycopg2your error message. Especially useful the week
after the release of a new OS X version. -
Write to the Mailing List.
-
If you think that you have discovered a bug, test failure or missing feature
please raise a ticket in the bug tracker. -
Complain on your blog or on Twitter that
psycopg2is the worst package
ever and about the quality time you have wasted figuring out the correct
ARCHFLAGS. Especially useful from the Starbucks near you.
I’m using virtualenv and I need to install «psycopg2».
I have done the following:
pip install http://pypi.python.org/packages/source/p/psycopg2/psycopg2-2.4.tar.gz#md5=24f4368e2cfdc1a2b03282ddda814160
And I have the following messages:
Downloading/unpacking http://pypi.python.org/packages/source/p/psycopg2/psycopg2
-2.4.tar.gz#md5=24f4368e2cfdc1a2b03282ddda814160
  Downloading psycopg2-2.4.tar.gz (607Kb): 607Kb downloaded
  Running setup.py egg_info for package from http://pypi.python.org/packages/sou
rce/p/psycopg2/psycopg2-2.4.tar.gz#md5=24f4368e2cfdc1a2b03282ddda814160
    Error: pg_config executable not found.

    Please add the directory containing pg_config to the PATH
    or specify the full executable path with the option:

        python setup.py build_ext --pg-config /path/to/pg_config build ...

    or with the pg_config option in 'setup.cfg'.
    Complete output from command python setup.py egg_info:
    running egg_info

creating pip-egg-info\psycopg2.egg-info

writing pip-egg-info\psycopg2.egg-info\PKG-INFO

writing top-level names to pip-egg-info\psycopg2.egg-info\top_level.txt

writing dependency_links to pip-egg-info\psycopg2.egg-info\dependency_links.txt

writing manifest file 'pip-egg-info\psycopg2.egg-info\SOURCES.txt'

warning: manifest_maker: standard file '-c' not found

Error: pg_config executable not found.


Please add the directory containing pg_config to the PATH

or specify the full executable path with the option:


    python setup.py build_ext --pg-config /path/to/pg_config build ...


or with the pg_config option in 'setup.cfg'.

----------------------------------------
Command python setup.py egg_info failed with error code 1
Storing complete log in C:\Documents and Settings\anlopes\Application Data\pip\p
ip.log
My question, I only need to do this to get the psycopg2 working?
python setup.py build_ext --pg-config /path/to/pg_config build ...
![]()
Mazdak
105k18 gold badges159 silver badges188 bronze badges
asked Mar 24, 2011 at 14:33
![]()
3
Note: Since a while back, there are binary wheels for Windows in PyPI, so this should no longer be an issue for Windows users. Below are solutions for Linux, Mac users, since lots of them find this post through web searches.
Option 1
Install the psycopg2-binary PyPI package instead, it has Python wheels for Linux and Mac OS.
pip install psycopg2-binary
Option 2
Install the prerequsisites for building the psycopg2 package from source:
Debian/Ubuntu
| Python version | Command | Note |
|---|---|---|
| Default Python 3 | sudo apt install libpq-dev python3-dev |
|
| Python 3.x | sudo apt install libpq-dev python3.x-dev |
substitute x in command |
| Python 2 | sudo apt install libpq-dev python-dev |
If that’s not enough, you might additionally need to install
sudo apt install build-essential
or
sudo apt install postgresql-server-dev-all
as well before installing psycopg2 again.
CentOS 6
See Banjer’s answer
macOS
See nichochar’s answer
answered Mar 27, 2011 at 15:25
![]()
joarjoar
15.2k1 gold badge29 silver badges54 bronze badges
25
On CentOS, you need the postgres dev packages:
sudo yum install python-devel postgresql-devel
That was the solution on CentOS 6 at least.
![]()
Andomar
233k49 gold badges382 silver badges405 bronze badges
answered Oct 31, 2012 at 13:03
![]()
BanjerBanjer
8,1185 gold badges46 silver badges61 bronze badges
7
If you’re on a mac you can use homebrew
brew install postgresql
And all other options are here: http://www.postgresql.org/download/macosx/
![]()
Dharman♦
31.1k25 gold badges87 silver badges138 bronze badges
answered Oct 31, 2013 at 16:26
![]()
nichocharnichochar
2,7301 gold badge18 silver badges16 bronze badges
3
On Mac Mavericks with Postgres.app version 9.3.2.0 RC2 I needed to use the following code after installing Postgres:
sudo PATH=$PATH:/Applications/Postgres.app/Contents/Versions/9.3/bin pip install psycopg2
answered Dec 22, 2013 at 1:51
![]()
metasequoiametasequoia
7,0445 gold badges41 silver badges54 bronze badges
9
I recently configured psycopg2 on a windows machine. The easiest install is using a windows executable binary. You can find it at http://stickpeople.com/projects/python/win-psycopg/.
To install the native binary in a virtual envrionment, use easy_install:
C:\virtualenv\Scripts\> activate.bat
(virtualenv) C:\virtualenv\Scripts\> easy_install psycopg2-2.5.win32-py2.7-pg9.2.4-release.exe
![]()
jpmc26
28.6k14 gold badges95 silver badges147 bronze badges
answered Mar 24, 2011 at 15:01
![]()
Praveen GollakotaPraveen Gollakota
37.2k11 gold badges62 silver badges61 bronze badges
8
For Python 3 you should use sudo apt-get install libpq-dev python3-dev under Debian.
answered Oct 3, 2012 at 18:39
![]()
AndréAndré
2,0621 gold badge23 silver badges26 bronze badges
2
This is what worked for me (On RHEL, CentOS:
sudo yum install postgresql postgresql-devel python-devel
And now include the path to your postgresql binary dir with you pip install:
sudo PATH=$PATH:/usr/pgsql-9.3/bin/ pip install psycopg2
Make sure to include the correct path. Thats all 
UPDATE: For python 3, please install python3-devel instead of python-devel
answered Nov 20, 2014 at 15:14
![]()
radtekradtek
34.4k11 gold badges144 silver badges112 bronze badges
4
The answers so far are too much like magic recipes. The error that you received tells you that pip cannot find a needed part of the PostgreSQL Query library. Possibly this is because you have it installed in a non-standard place for your OS which is why the message suggests using the —pg-config option.
But a more common reason is that you don’t have libpq installed at all. This commonly happens on machines where you do NOT have PostgreSQL server installed because you only want to run client apps, not the server itself. Each OS/distro is different, for instance on Debian/Ubuntu you need to install libpq-dev. This allows you to compile and link code against the PostgreSQL Query library.
Most of the answers also suggest installing a Python dev library. Be careful. If you are only using the default Python installed by your distro, that will work, but if you have a newer version, it could cause problems. If you have built Python on this machine then you already have the dev libraries needed for compiling C/C++ libraries to interface with Python. As long as you are using the correct pip version, the one installed in the same bin folder as the python binary, then you are all set. No need to install the old version.
answered Jan 17, 2015 at 19:41
![]()
Michael DillonMichael Dillon
32k6 gold badges70 silver badges106 bronze badges
1
If you using Mac OS, you should install PostgreSQL from source.
After installation is finished, you need to add this path using:
export PATH=/local/pgsql/bin:$PATH
or you can append the path like this:
export PATH=.../:usr/local/pgsql/bin
in your .profile file or .zshrc file.
This maybe vary by operating system.
You can follow the installation process from http://www.thegeekstuff.com/2009/04/linux-postgresql-install-and-configure-from-source/
answered Apr 2, 2012 at 7:22
![]()
attomosattomos
1,1123 gold badges16 silver badges30 bronze badges
2
Run below commands and you should be fine
$ apt-get update
$ apt install python3-dev libpq-dev
$ pip3 install psycopg2
![]()
Xeoth
1,3051 gold badge11 silver badges22 bronze badges
answered Jun 18, 2021 at 11:04
![]()
ChanceChance
4354 silver badges8 bronze badges
1
On Debian/Ubuntu:
First install and build dependencies of psycopg2 package:
# apt-get build-dep python-psycopg2
Then in your virtual environment, compile and install psycopg2 module:
(env)$ pip install psycopg2
answered Sep 6, 2015 at 14:27
![]()
Omid RahaOmid Raha
9,9621 gold badge61 silver badges64 bronze badges
0
Before you can install psycopg2 you will need to install the python-dev package.
If you’re working from Linux (and possibly other systems but i can’t speak from experience) you will need to make sure to be quite exact about what version of python your running when installing the dev package.
For example when I used the command:
sudo apt-get install python3-dev
I still ran into the same error when trying to
pip install psycopg2
As I am using python 3.7 I needed to use the command
sudo apt-get install python3.7-dev
Once I did this I ran into no more issues. Obviously if your on python version 3.5 you would change that 7 to a 5.
answered May 20, 2019 at 14:42
![]()
GinoGino
1,05317 silver badges27 bronze badges
2
I’ve done this before where in windows you install first into your base python installation.
Then, you manually copy the installed psycopg2 to the virtualenv install.
It’s not pretty, but it works.
answered Feb 27, 2012 at 3:35
![]()
monkutmonkut
42.4k24 gold badges125 silver badges156 bronze badges
3
Besides installing the required packages, I also needed to manually add PostgreSQL bin directory to PATH.
$vi ~/.bash_profile
Add PATH=/usr/pgsql-9.2/bin:$PATH before export PATH.
$source ~/.bash_profile
$pip install psycopg2
answered Mar 30, 2013 at 9:51
![]()
2
For MacOS,
Use the below command to install psycopg2, works like charm!!!
env LDFLAGS="-I/usr/local/opt/openssl/include -L/usr/local/opt/openssl/lib" pip install psycopg2
answered Sep 25, 2020 at 6:51
![]()
HedgerHedger
1121 silver badge6 bronze badges
On windows XP you get this error if postgres is not installed …
answered Mar 14, 2012 at 12:42
![]()
Sam JosephSam Joseph
4,5844 gold badges31 silver badges47 bronze badges
2
I installed Postgresql92 using the RedHat / CentOS repository on PG’s downloads site http://www.postgresql.org/download/linux/redhat/
To get pg_config, I had to add /usr/pgsql-9.2/bin to PATH.
answered Sep 27, 2013 at 15:24
![]()
joedborgjoedborg
17.7k32 gold badges84 silver badges118 bronze badges
On Fedora 24: For Python 3.x
sudo dnf install postgresql-devel python3-devel

sudo dnf install redhat-rpm-config
Activate your Virtual Environment:
pip install psycopg2
answered Oct 11, 2016 at 2:09
![]()
Rk..Rk..
7531 gold badge10 silver badges27 bronze badges
Psycopg2 Depends on Postgres Libraries.
On Ubuntu You can use:
apt-get install libpq-dev
Then:
pip install psycopg2
answered Jun 23, 2015 at 6:55
![]()
Manish GuptaManish Gupta
4,45818 gold badges58 silver badges105 bronze badges
1
I’ve been battling with this for days, and have finally figured out how to get the «pip install psycopg2» command to run in a virtualenv in Windows (running Cygwin).
I was hitting the «pg_config executable not found.» error, but I had already downloaded and installed postgres in Windows. It installed in Cygwin as well; running «which pg_config» in Cygwin gave «/usr/bin/pg_config», and running «pg_config» gave sane output — however the version installed with Cygwin is:
VERSION = PostgreSQL 8.2.11
This won’t work with the current version of psycopg2, which appears to require at least 9.1. When I added «c:\Program Files\PostgreSQL\9.2\bin» to my Windows path, the Cygwin pip installer was able to find the correct version of PostgreSQL, and I was able to successfully install the module using pip. (This is probably preferable to using the Cygwin version of PostgreSQL anyway, as the native version will run much quicker).
answered Sep 26, 2012 at 3:31
![]()
SymmetricSymmetric
4,5255 gold badges33 silver badges50 bronze badges
On OpenSUSE 13.2, this fixed it:
sudo zypper in postgresql-devel
answered Jul 1, 2015 at 18:19
![]()
ElliottElliott
1,33112 silver badges12 bronze badges
FOR FEDORA USERS:
libpq-dev is one of the dependencies, however, this is how the package should be named in the installation: libpq-devel
So this should solve the problem for Fedora:
sudo yum install libpq-devel
answered Jul 25, 2022 at 9:12
![]()
JimShapedCodingJimShapedCoding
8671 gold badge6 silver badges17 bronze badges
For lowly Windows users were stuck having to install psycopg2 from the link below, just install it to whatever Python installation you have setup. It will place the folder named «psycopg2» in the site-packages folder of your python installation.
After that, just copy that folder to the site-packages directory of your virtualenv and you will have no problems.
here is the link you can find the executable to install psycopg2
http://www.lfd.uci.edu/~gohlke/pythonlibs/
answered Dec 21, 2014 at 21:33
![]()
Chris HawkesChris Hawkes
12k6 gold badges58 silver badges68 bronze badges
1
On Ubuntu I just needed the postgres dev package:
sudo apt-get install postgresql-server-dev-all
*Tested in a virtualenv
answered Jan 4, 2016 at 14:47
![]()
marcanuymarcanuy
23.2k9 gold badges64 silver badges114 bronze badges
I could install it in a windows machine and using Anaconda/Spyder with python 2.7 through the following commands:
!pip install psycopg2
Then to establish the connection to the database:
 import psycopg2
 conn = psycopg2.connect(dbname='dbname',host='host_name',port='port_number', user='user_name', password='password')
answered Apr 11, 2016 at 8:52
![]()
1
In Arch base distributions:
sudo pacman -S python-psycopg2
pip2 install psycopg2  # Use pip or pip3 to python3
answered Jul 9, 2016 at 9:29
![]()
iraj jelodariiraj jelodari
3,1283 gold badges35 silver badges46 bronze badges
On OSX 10.11.6 (El Capitan)
brew install postgresql
PATH=$PATH:/Library/PostgreSQL/9.4/bin pip install psycopg2
answered Feb 24, 2017 at 23:35
![]()
iNoobiNoob
1,3753 gold badges19 silver badges47 bronze badges
2
On OSX with macports:
sudo port install postgresql96
export PATH=/opt/local/lib/postgresql96/bin:$PATH
answered Mar 17, 2017 at 14:07
![]()
if pip is not working than you can download .whl file from here https://pypi.python.org/pypi/psycopg2
extract it..
than python setup.py install
answered Jan 23, 2018 at 12:21
![]()
UmerUmer
1,10813 silver badges31 bronze badges
I was having this problem, the main reason was with 2 equal versions installed. One by postgres.app and one by HomeBrew.
If you choose to keep only the APP:
brew unlink postgresql
pip3 install psycopg2
answered Jul 10, 2019 at 20:48
![]()
luisdemarchiluisdemarchi
1,41219 silver badges29 bronze badges
psycopg2-windows
Pip, windows, AND virtualenv friendly versions of psycopg2!!!!! This works because everything is pre-compiled and beautiful.
Cool Stuff
- Easy installation of psycopg2 on windows
- Pip install works for windows
- Virtualenv friendly
- No .exe to wrangle with
Why
Every time I need to set up psycopg2 on windows, I wind up wanting to shoot something. For years, I’ve been managing my virtualenv with Jason Erickson’s awesome set of pre-compiled libraries. Recently, I decided to quit making my like so difficult and just pipify everything for windows.
Installation Scripts
Depending on your environment, you’ll want to use the appropriate script. All branches are using version 2.5.3 of psycopg2. Since psycopg2 is for PostgreSQL, you’ll obviousely want to have that installed first.
Windows 32 bit
Python 2.5
pip install git+https://github.com/nwcell/psycopg2-windows.git@win32-py25#egg=psycopg2
Python 2.6
pip install git+https://github.com/nwcell/psycopg2-windows.git@win32-py26#egg=psycopg2
Python 2.7
pip install git+https://github.com/nwcell/psycopg2-windows.git@win32-py27#egg=psycopg2
Python 3.2
pip install git+https://github.com/nwcell/psycopg2-windows.git@win32-py32#egg=psycopg2
Python 3.3
pip install git+https://github.com/nwcell/psycopg2-windows.git@win32-py33#egg=psycopg2
Python 3.4
pip install git+https://github.com/nwcell/psycopg2-windows.git@win32-py34#egg=psycopg2
Windows 64 bit
Python 2.6
pip install git+https://github.com/nwcell/psycopg2-windows.git@win64-py26#egg=psycopg2
Python 2.7
pip install git+https://github.com/nwcell/psycopg2-windows.git@win64-py27#egg=psycopg2
Python 3.2
pip install git+https://github.com/nwcell/psycopg2-windows.git@win64-py32#egg=psycopg2
Python 3.3
pip install git+https://github.com/nwcell/psycopg2-windows.git@win64-py33#egg=psycopg2
Python 3.4
pip install git+https://github.com/nwcell/psycopg2-windows.git@win64-py34#egg=psycopg2
Versions
If you want to specify your version, you may do so by installing by tag instead of branch. The naming convention is identical to branches, except you append the psycopg2 version (eg. @win32-py25-psycopg2-253). The following psycopg2 versions are available:
- 2.5.2
- 2.5.3
Tests
I’ve built a primitive test suite that builds python python virtual enviroments and then pip installs psycopg2. Pip becomes difficult to install starting with python 2.6 and I can’t find MSI installs for 2.5. Because of this, I’ve not fully tested either of those python versions. That said, I’ve put together a .bat file that builds 32 and 63 bit virtualenvs for pythons 2.7, 3.2, and 3.3. It then installs psycopg2 into each virtualenv. To keep testing easy, I’ve included python installations in the tests folder. I realize that this is not very space sensitive, so the test directory is only in the master branch. Since each compiled version of psycopg2 is kept in a separate branch, installing via pip will not download 6 python installations.
If you do want to run the tests themselves, simply clone/checkout master and run tests\scrapt.bat. From there you may read the scripts output and also check each virtualenv to ensure that the psycopg2 was installed successfully. If you wan’t to help out and have a different environment, please help with the tests. If you want to help expand the test suite, feel free to help and/or ask any questions.
The test suite assumes that you have a primary python installation with virtualenv already installed.
Successfully tested with virtualenv on Windows 7 64 bit:
- Windows 32 bit: Python 2.7
- Windows 32 bit: Python 3.2
- Windows 32 bit: Python 3.3
- Windows 64 bit: Python 2.7
- Windows 64 bit: Python 3.2
- Windows 64 bit: Python 3.3
Credits
- Me (AKA: Travis Krause): Pipified stuff…. Wrote these docs too…
- Jason Erickson: Did the legwork and compiled everything
Liscense
Same as Psycopg2
Это руководство по PostgreSQL в Python описывает, как использовать модуль Psycopg2 для подключения к PostgreSQL, выполнения SQL-запросов и других операций с базой данных.
Здесь не инструкции по установки локального сервера, так как это не касается python. Скачайте и установите PostgreSQL с официального сайта https://www.postgresql.org/download/. Подойдут версии 10+, 11+, 12+.
Вот список разных модулей Python для работы с сервером базы данных PostgreSQL:
- Psycopg2,
- pg8000,
- py-postgreql,
- PyGreSQL,
- ocpgdb,
- bpsql,
- SQLAlchemy. Для работы SQLAlchemy нужно, чтобы хотя бы одно из перечисленных выше решений было установлено.
Примечание: все модули придерживаются спецификации Python Database API Specification v2.0 (PEP 249). Этот API разработан с целью обеспечить сходство разных модулей для доступа к базам данных из Python. Другими словами, синтаксис, методы и прочее очень похожи во всех этих модулях.
В этом руководстве будем использовать Psycopg2, потому что это один из самых популярных и стабильных модулей для работы с PostgreSQL:
- Он используется в большинстве фреймворков Python и Postgres;
- Он активно поддерживается и работает как с Python 3, так и с Python 2;
- Он потокобезопасен и спроектирован для работы в многопоточных приложениях. Несколько потоков могут работать с одним подключением.
В этом руководстве пройдемся по следующим пунктам:
- Установка Psycopg2 и использование его API для доступа к базе данных PostgreSQL;
- Вставка, получение, обновление и удаление данных в базе данных из приложения Python;
- Дальше рассмотрим управление транзакциями PostgreSQL, пул соединений и методы обработки исключений, что понадобится для разработки сложных программ на Python с помощью PostgreSQL.
Установка Psycopg2 с помощью pip
Для начала нужно установить текущую версию Psycopg2 для использования PostgreSQL в Python. С помощью команды pip можно установить модуль в любую операцию систему: Windows, macOS, Linux:
pip install psycopg2Также можно установить конкретную версию программы с помощью такой команды:
pip install psycopg2=2.8.6Если возникает ошибка установки, например «connection error: [SSL: CERTIFICATE_VERIFY_FAILED] certificate verify failed (_ssl.c:598)», то ее можно решить, сделав files.pythonhosted.org доверенным хостом:
python -m pip install --trusted-host pypi.org --trusted-host files.pythonhosted.org --trusted-host pypi.python.org psycopg2
Модуль psycopg2 поддерживает:
- Python 2.7 и Python 3, начиная с версии 3.4.
- Сервер PostgreSQL от 7.4 до 12.
- Клиентскую библиотеку PostgreSQL от 9.1.
Проверка установки Psycopg2
После запуска команды должны появиться следующие сообщения:
- Collecting psycopg2
- Downloading psycopg2-2.8.6
- Installing collected packages: psycopg2
- Successfully installed psycopg2-2.8.6
При использовании anaconda подойдет следующая команда.
conda install -c anaconda psycopg2В этом разделе рассмотрим, как подключиться к PostgreSQL из Python с помощью модуля Psycopg2.
Вот какие аргументы потребуются для подключения:
- Имя пользователя: значение по умолчанию для базы данных PostgreSQL – postgres.
- Пароль: пользователь получает пароль при установке PostgreSQL.
- Имя хоста: имя сервера или IP-адрес, на котором работает база данных. Если она запущена локально, то нужно использовать localhost или 127.0.0.0.
- Имя базы данных: в этом руководстве будем использовать базу
postgres_db.
Шаги для подключения:
- Использовать метод
connect()с обязательными параметрами для подключения базы данных. - Создать объект cursor с помощью объекта соединения, который возвращает метод
connect. Он нужен для выполнения запросов. - Закрыть объект cursor и соединение с базой данных после завершения работы.
- Перехватить исключения, которые могут возникнуть в процессе.
Создание базы данных PostgreSQL с Psycopg2
Для начала создадим базу данных на сервере. Во время установки PostgreSQL вы указывали пароль, его нужно использовать при подключении.
import psycopg2

from psycopg2 import Error

from psycopg2.extensions import ISOLATION_LEVEL_AUTOCOMMIT
try:

    # Подключение к существующей базе данных

    connection = psycopg2.connect(user="postgres",

                                  # пароль, который указали при установке PostgreSQL

                                  password="1111",

                                  host="127.0.0.1",

                                  port="5432")

    connection.set_isolation_level(ISOLATION_LEVEL_AUTOCOMMIT)

    # Курсор для выполнения операций с базой данных

    cursor = connection.cursor()

    sql_create_database = 'create database postgres_db'

    cursor.execute(sql_create_database)
except (Exception, Error) as error:

    print("Ошибка при работе с PostgreSQL", error)

finally:

    if connection:

        cursor.close()

        connection.close()

        print("Соединение с PostgreSQL закрыто")
Пример кода для подключения к базе данных PostgreSQL из Python
Для подключения к базе данных PostgreSQL и выполнения SQL-запросов нужно знать название базы данных. Ее нужно создать прежде чем пытаться выполнить подключение.
import psycopg2

from psycopg2 import Error

try:

    # Подключение к существующей базе данных

    connection = psycopg2.connect(user="postgres",

                                  # пароль, который указали при установке PostgreSQL

                                  password="1111",

                                  host="127.0.0.1",

                                  port="5432",

                                  database="postgres_db")

    # Курсор для выполнения операций с базой данных

    cursor = connection.cursor()

    # Распечатать сведения о PostgreSQL

    print("Информация о сервере PostgreSQL")

    print(connection.get_dsn_parameters(), "\n")

    # Выполнение SQL-запроса

    cursor.execute("SELECT version();")

    # Получить результат

    record = cursor.fetchone()

    print("Вы подключены к - ", record, "\n")

except (Exception, Error) as error:

    print("Ошибка при работе с PostgreSQL", error)

finally:

    if connection:

        cursor.close()

        connection.close()

        print("Соединение с PostgreSQL закрыто")
После подключения появится следующий вывод:
Информация о сервере PostgreSQL
{'user': 'postgres', 'dbname': 'postgres_db', 'host': '127.0.0.1', 'port': '5432', 'tty': '', 'options': '', 'sslmode': 'prefer', 'sslcompression': '0', 'krbsrvname': 'postgres', 'target_session_attrs': 'any'}

Вы подключены к -  ('PostgreSQL 10.13, compiled by Visual C++ build 1800, 64-bit',)

Соединение с PostgreSQL закрыто
Разбор процесса подключения в деталях
import psycopg2 — Эта строка импортирует модуль Psycopg2 в программу. С помощью классов и методов модуля можно взаимодействовать с базой.
from psycopg2 import Error — С помощью класса Error можно обрабатывать любые ошибки и исключения базы данных. Это сделает приложение более отказоустойчивым. Этот класс также поможет понять ошибку в подробностях. Он возвращает сообщение об ошибке и ее код.
psycopg2.connect() — С помощью метода connect() создается подключение к экземпляру базы данных PostgreSQL. Он возвращает объект подключения. Этот объект является потокобезопасным и может быть использован на разных потоках.
Метод connect() принимает разные аргументы, рассмотренные выше. В этом примере в метод были переданы следующие аргументы: user = "postgres", password = "1111", host = "127.0.0.1", port = "5432", database = "postgres_db".
cursor = connection.cursor() — С базой данных можно взаимодействовать с помощью класса cursor. Его можно получить из метода cursor(), который есть у объекта соединения. Он поможет выполнять SQL-команды из Python.
Из одного объекта соединения можно создавать неограниченное количество объектов cursor. Они не изолированы, поэтому любые изменения, сделанные в базе данных с помощью одного объекта, будут видны остальным. Объекты cursor не являются потокобезопасными.
После этого выведем свойства соединения с помощью connection.get_dsn_parameters().
cursor.execute() — С помощью метода execute объекта cursor можно выполнить любую операцию или запрос к базе данных. В качестве параметра этот метод принимает SQL-запрос. Результаты запроса можно получить с помощью fetchone(), fetchmany(), fetchall().
В этом примере выполняем SELECT version(); для получения сведений о версии PosgreSQL.
Блок try-except-finally — Разместим код в блоке try-except для перехвата исключений и ошибок базы данных.
cursor.close() и connection.close() — Правильно всегда закрывать объекты cursor и connection после завершения работы, чтобы избежать проблем с базой данных.
Создание таблицы PostgreSQL из Python
В этом разделе разберем, как создавать таблицу в PostgreSQL из Python. В качестве примера создадим таблицу Mobile.
Выполним следующие шаги:
- Подготовим запрос для базы данных
- Подключимся к PosgreSQL с помощью
psycopg2.connect(). - Выполним запрос с помощью
cursor.execute(). - Закроем соединение с базой данных и объект
cursor.
Теперь рассмотрим пример.
import psycopg2

from psycopg2 import Error

try:

    # Подключиться к существующей базе данных

    connection = psycopg2.connect(user="postgres",

                                  # пароль, который указали при установке PostgreSQL

                                  password="1111",

                                  host="127.0.0.1",

                                  port="5432",

                                  database="postgres_db")

    # Создайте курсор для выполнения операций с базой данных

    cursor = connection.cursor()

    # SQL-запрос для создания новой таблицы

    create_table_query = '''CREATE TABLE mobile

                          (ID INT PRIMARY KEY     NOT NULL,

                          MODEL           TEXT    NOT NULL,

                          PRICE         REAL); '''

    # Выполнение команды: это создает новую таблицу

    cursor.execute(create_table_query)

    connection.commit()

    print("Таблица успешно создана в PostgreSQL")

except (Exception, Error) as error:

    print("Ошибка при работе с PostgreSQL", error)

finally:

    if connection:

        cursor.close()

        connection.close()

        print("Соединение с PostgreSQL закрыто")
Вывод:
Таблица успешно создана в PostgreSQL
Соединение с PostgreSQL закрыто
Примечание: наконец, коммитим изменения с помощью метода commit().
Соответствие типов данных Python и PostgreSQL
Есть стандартный маппер для конвертации типов Python в их эквиваленты в PosgreSQL и наоборот. Каждый раз при выполнении запроса PostgreSQL из Python с помощью psycopg2 результат возвращается в виде объектов Python.
| Python | PostgreSQL |
|---|---|
| None | NULL |
| bool | bool |
| float | real double |
| int long |
smallint integer bigint |
| Decimal | numeric |
| str unicode |
varchar text |
| date | date |
| time | time timetz |
| datetime | timestamp timestamptz |
| timedelta | interval |
| list | ARRAY |
| tuple namedtuple |
Composite types IN syntax |
| dict | hstore |
Константы и числовые преобразования
При попытке вставить значения None и boolean (True, False) из Python в PostgreSQL, они конвертируются в соответствующие литералы SQL. То же происходит и с числовыми типами. Они конвертируются в соответствующие типы PostgreSQL.
Например, при выполнении запроса на вставку числовые объекты, такие как int, long, float и Decimal, конвертируются в числовые представления из PostgreSQL. При чтении из таблицы целые числа конвертируются в int, числа с плавающей точкой — во float, а десятичные — в Decimal.
Выполнение CRUD-операций из Python
Таблица mobile уже есть. Теперь рассмотрим, как выполнять запросы для вставки, обновления, удаления или получения данных из таблицы в Python.
import psycopg2

from psycopg2 import Error

try:

    # Подключиться к существующей базе данных

    connection = psycopg2.connect(user="postgres",

                                  # пароль, который указали при установке PostgreSQL

                                  password="1111",

                                  host="127.0.0.1",

                                  port="5432",

                                  database="postgres_db")

    cursor = connection.cursor()

    # Выполнение SQL-запроса для вставки данных в таблицу

    insert_query = """ INSERT INTO mobile (ID, MODEL, PRICE) VALUES (1, 'Iphone12', 1100)"""

    cursor.execute(insert_query)

    connection.commit()

    print("1 запись успешно вставлена")

    # Получить результат

    cursor.execute("SELECT * from mobile")

    record = cursor.fetchall()

    print("Результат", record)

    # Выполнение SQL-запроса для обновления таблицы

    update_query = """Update mobile set price = 1500 where id = 1"""

    cursor.execute(update_query)

    connection.commit()

    count = cursor.rowcount

    print(count, "Запись успешно удалена")

    # Получить результат

    cursor.execute("SELECT * from mobile")

    print("Результат", cursor.fetchall())

    # Выполнение SQL-запроса для удаления таблицы

    delete_query = """Delete from mobile where id = 1"""

    cursor.execute(delete_query)

    connection.commit()

    count = cursor.rowcount

    print(count, "Запись успешно удалена")

    # Получить результат

    cursor.execute("SELECT * from mobile")

    print("Результат", cursor.fetchall())

except (Exception, Error) as error:

    print("Ошибка при работе с PostgreSQL", error)

finally:

    if connection:

        cursor.close()

        connection.close()

        print("Соединение с PostgreSQL закрыто")
Вывод:
1 запись успешно вставлена
Результат [(1, 'Iphone12', 1100.0)]
1 Запись успешно удалена
Результат [(1, 'Iphone12', 1500.0)]
1 Запись успешно удалена
Результат []
Соединение с PostgreSQL закрыто
Примечание: не забывайте сохранять изменения в базу данных с помощью
connection.commit()после успешного выполнения операции базы данных.
Работа с датой и временем из PostgreSQL
В этом разделе рассмотрим, как работать с типами date и timestamp из PostgreSQL в Python и наоборот.
Обычно при выполнении вставки объекта datetime модуль psycopg2 конвертирует его в формат timestamp PostgreSQL.
По аналогии при чтении значений timestamp из таблицы PostgreSQL модуль psycopg2 конвертирует их в объекты datetime Python.
Для этого примера используем таблицу Item. Выполните следующий код, чтобы подготовить таблицу.
import psycopg2

from psycopg2 import Error

try:

    # Подключиться к существующей базе данных

    connection = psycopg2.connect(user="postgres",

                                  # пароль, который указали при установке PostgreSQL

                                  password="1111",

                                  host="127.0.0.1",

                                  port="5432",

                                  database="postgres_db")

    # Создайте курсор для выполнения операций с базой данных

    cursor = connection.cursor()

    # SQL-запрос для создания новой таблицы

    create_table_query = '''CREATE TABLE item (

	    item_id serial NOT NULL PRIMARY KEY,

	    item_name VARCHAR (100) NOT NULL,

    	    purchase_time timestamp NOT NULL,

	    price INTEGER NOT NULL

    );'''

    # Выполнение команды: это создает новую таблицу

    cursor.execute(create_table_query)

    connection.commit()

    print("Таблица успешно создана в PostgreSQL")

except (Exception, Error) as error:

    print("Ошибка при работе с PostgreSQL", error)

finally:

    if connection:

        cursor.close()

        connection.close()

        print("Соединение с PostgreSQL закрыто")
Рассмотрим сценарий на простом примере. Здесь мы читаем колонку purchase_time из таблицы и конвертируем значение в объект datetime Python.
import psycopg2

import datetime

from psycopg2 import Error

try:

    # Подключиться к существующей базе данных

    connection = psycopg2.connect(user="postgres",

                                  # пароль, который указали при установке PostgreSQL

                                  password="1111",

                                  host="127.0.0.1",

                                  port="5432",

                                  database="postgres_db")

    cursor = connection.cursor()

    # Выполнение SQL-запроса для вставки даты и времени в таблицу

    insert_query = """ INSERT INTO item (item_Id, item_name, purchase_time, price)

                              VALUES (%s, %s, %s, %s)"""

    item_purchase_time = datetime.datetime.now()

    item_tuple = (12, "Keyboard", item_purchase_time, 150)

    cursor.execute(insert_query, item_tuple)

    connection.commit()

    print("1 элемент успешно добавлен")

    # Считать значение времени покупки PostgreSQL в Python datetime

    cursor.execute("SELECT purchase_time from item where item_id = 12")

    purchase_datetime = cursor.fetchone()

    print("Дата покупки товара", purchase_datetime[0].date())

    print("Время покупки товара", purchase_datetime[0].time())

except (Exception, Error) as error:

    print("Ошибка при работе с PostgreSQL", error)

finally:

    if connection:

        cursor.close()

        connection.close()

        print("Соединение с PostgreSQL закрыто")
Вывод:
1 элемент успешно добавлен
Дата покупки товара 2021-01-16
Время покупки товара 20:16:23.166867
Соединение с PostgreSQL закрытоpip install psycopg2
The Python psycopg2 library is among the top 100 Python libraries, with more than 15,749,750 downloads. This article will show you everything you need to get this installed in your Python environment.
- Library Link
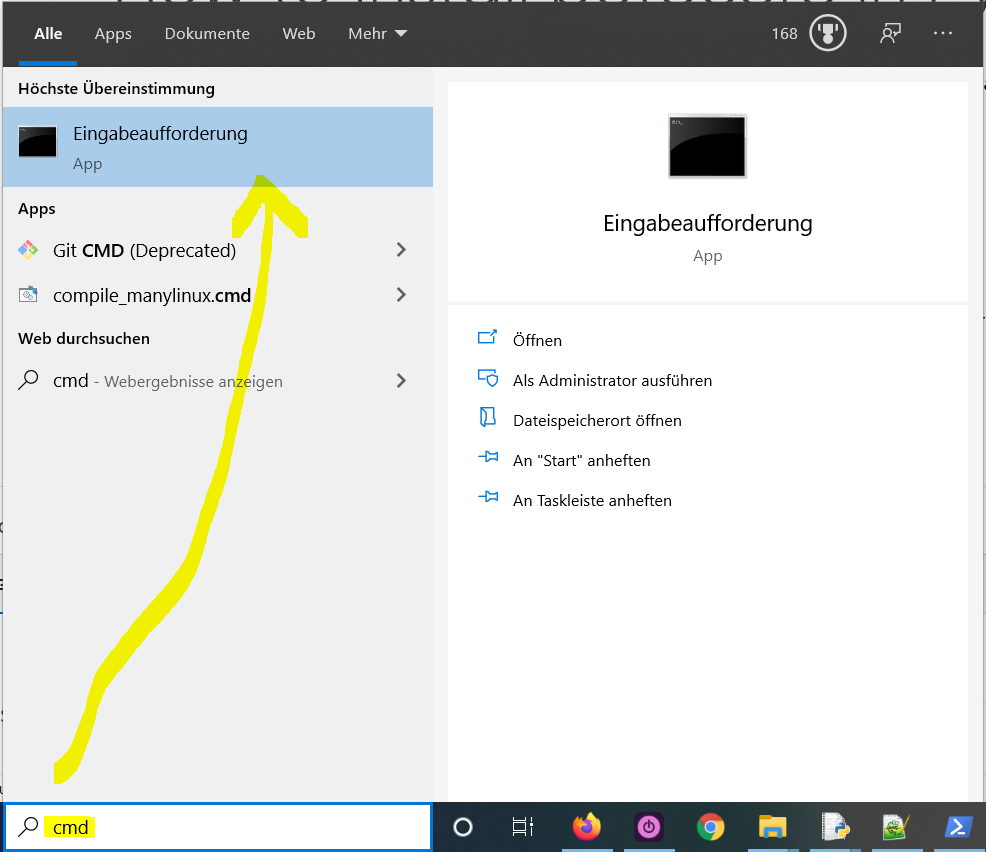
- Type
"cmd"in the search bar and hitEnterto open the command line. - Type “
pip install psycopg2” (without quotes) in the command line and hitEnteragain. This installs psycopg2 for your default Python installation. - The previous command may not work if you have both Python versions 2 and 3 on your computer. In this case, try
"pip3 install psycopg2"or “python -m pip install psycopg2“. - Wait for the installation to terminate successfully. It is now installed on your Windows machine.
Here’s how to open the command line on a (German) Windows machine:
First, try the following command to install psycopg2 on your system:
pip install psycopg2
Second, if this leads to an error message, try this command to install psycopg2 on your system:
pip3 install psycopg2
Third, if both do not work, use the following long-form command:
python -m pip install psycopg2
The difference between pip and pip3 is that pip3 is an updated version of pip for Python version 3. Depending on what’s first in the PATH variable, pip will refer to your Python 2 or Python 3 installation—and you cannot know which without checking the environment variables. To resolve this uncertainty, you can use pip3, which will always refer to your default Python 3 installation.
How to Install psycopg2 on Linux?
You can install psycopg2 on Linux in four steps:
- Open your Linux terminal or shell
- Type “
pip install psycopg2” (without quotes), hit Enter. - If it doesn’t work, try
"pip3 install psycopg2"or “python -m pip install psycopg2“. - Wait for the installation to terminate successfully.
The package is now installed on your Linux operating system.
How to Install psycopg2 on macOS?
Similarly, you can install psycopg2 on macOS in four steps:
- Open your macOS terminal.
- Type “
pip install psycopg2” without quotes and hitEnter. - If it doesn’t work, try
"pip3 install psycopg2"or “python -m pip install psycopg2“. - Wait for the installation to terminate successfully.
The package is now installed on your macOS.
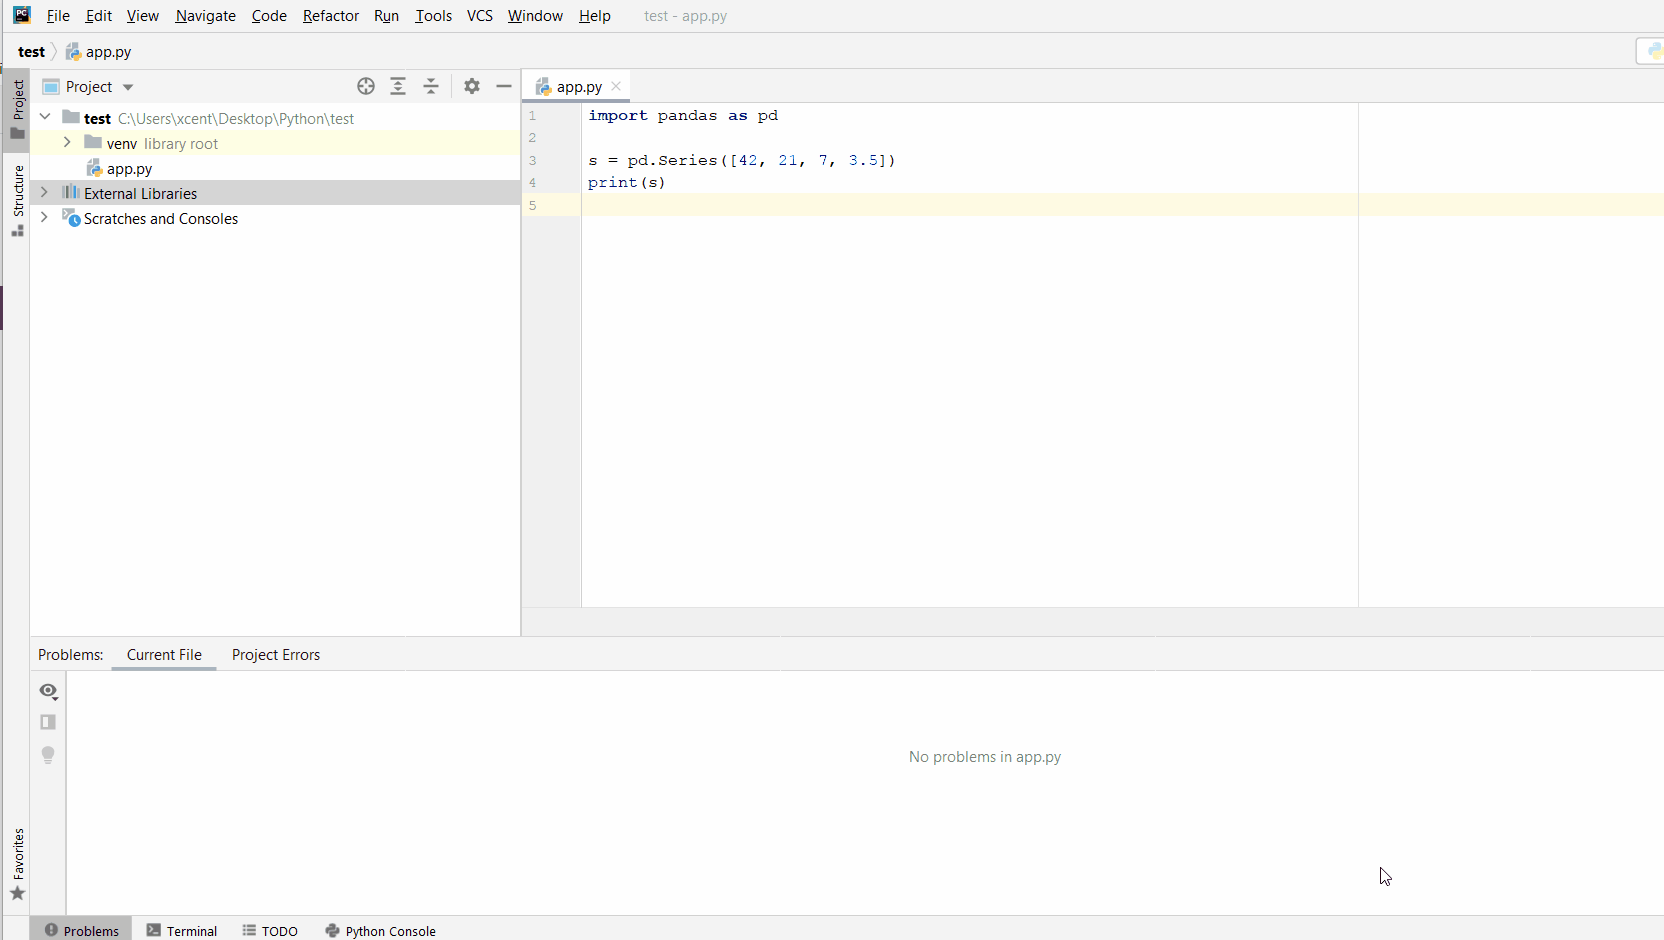
How to Install psycopg2 in PyCharm?
Given a PyCharm project. How to install the psycopg2 library in your project within a virtual environment or globally? Here’s a solution that always works:
- Open
File > Settings > Projectfrom the PyCharm menu. - Select your current project.
- Click the
Python Interpretertab within your project tab. - Click the small
+symbol to add a new library to the project. - Now type in the library to be installed, in your example
"psycopg2"without quotes, and clickInstall Package. - Wait for the installation to terminate and close all pop-ups.
Here’s the general package installation process as a short animated video—it works analogously for psycopg2 if you type in “psycopg2” in the search field instead:
Make sure to select only “psycopg2” because there may be other packages that are not required but also contain the same term (false positives):
How to Install psycopg2 in a Jupyter Notebook?
To install any package in a Jupyter notebook, you can prefix the !pip install my_package statement with the exclamation mark "!". This works for the psycopg2 library too:
!pip install my_package
This automatically installs the psycopg2 library when the cell is first executed.
How to Resolve ModuleNotFoundError: No module named ‘psycopg2’?
Say you try to import the psycopg2 package into your Python script without installing it first:
import psycopg2
# ... ModuleNotFoundError: No module named 'psycopg2'
Because you haven’t installed the package, Python raises a ModuleNotFoundError: No module named 'psycopg2'.
To fix the error, install the psycopg2 library using “pip install psycopg2” or “pip3 install psycopg2” in your operating system’s shell or terminal first.
See above for the different ways to install psycopg2 in your environment.
Improve Your Python Skills
If you want to keep improving your Python skills and learn about new and exciting technologies such as Blockchain development, machine learning, and data science, check out the Finxter free email academy with cheat sheets, regular tutorials, and programming puzzles.
Join us, it’s fun! 🙂

While working as a researcher in distributed systems, Dr. Christian Mayer found his love for teaching computer science students.
To help students reach higher levels of Python success, he founded the programming education website Finxter.com that has taught exponential skills to millions of coders worldwide. He’s the author of the best-selling programming books Python One-Liners (NoStarch 2020), The Art of Clean Code (NoStarch 2022), and The Book of Dash (NoStarch 2022). Chris also coauthored the Coffee Break Python series of self-published books. He’s a computer science enthusiast, freelancer, and owner of one of the top 10 largest Python blogs worldwide.
His passions are writing, reading, and coding. But his greatest passion is to serve aspiring coders through Finxter and help them to boost their skills. You can join his free email academy here.