В данной статье показаны действия, с помощью которых можно включить или отключить функцию Печать в PDF (Microsoft Print to PDF) в операционной системе Windows 10.
Печать в PDF (Microsoft Print to PDF) — функция представленная в Windows 10, которая позволяет легко конвертировать и сохранять любые документы в формате PDF с помощью операции печати без установки сторонних инструментов PDF.
С помощью этой функции можно забыть обо всех других инструментах, которые вы когда-либо использовали для сохранения PDF-копий документов любого типа, будь то веб-страница или изображение JPEG, PNG на вашем компьютере, документ word и т. д.
Функция Печать в PDF (Microsoft Print to PDF) по умолчанию включена, но если вы не видите её в списке в диалоговом окне печать, скорее всего она была отключена. Также, если по какой-то причине функция печати в PDF работает не корректно или мешает другому инструменту, который вы используете для печати, то можно отключить её.
Содержание
- Как отключить или включить Печать в PDF (Microsoft Print to PDF) в окне «Компоненты Windows»
- Как включить или отключить функцию Печать в PDF (Microsoft Print to PDF) в Windows PowerShell
- Как включить или отключить функцию Печать в PDF (Microsoft Print to PDF) в командной строке
- Видео-инструкция
Как отключить или включить Печать в PDF (Microsoft Print to PDF) в окне «Компоненты Windows»
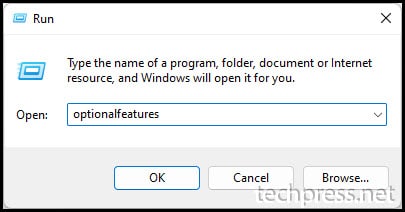
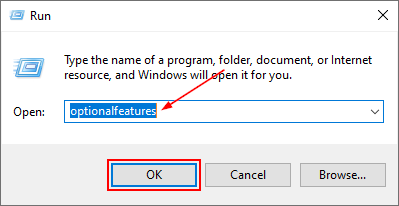
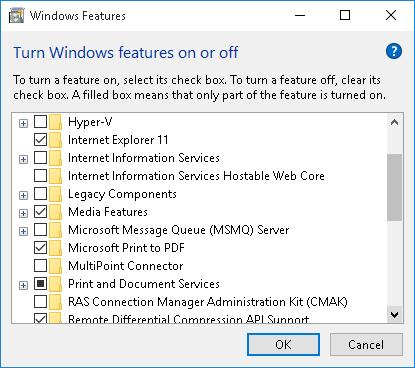
Чтобы отключить функцию Печать в PDF (Microsoft Print to PDF), нажмите сочетание клавиш + R, в открывшемся окне Выполнить введите OptionalFeatures и нажмите кнопку OK.
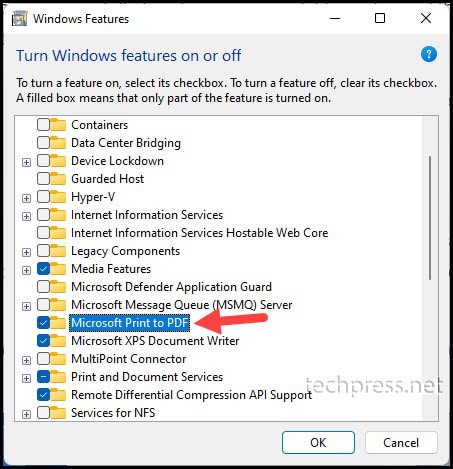
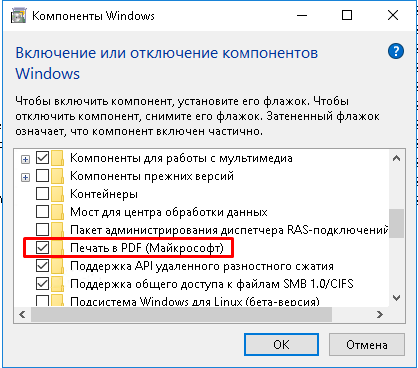
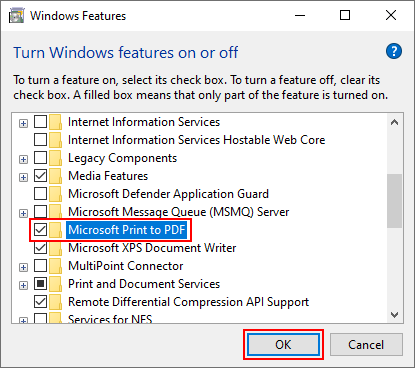
В окне «Компоненты Windows», снимите флажок чтобы отключить параметр Печать в PDF (Майкрософт) и нажмите кнопку OK.
После того как Windows применит требуемые изменения, нажмите кнопку Закрыть, при этом перезагрузка компьютера не требуется.
Как включить или отключить функцию Печать в PDF (Microsoft Print to PDF) в Windows PowerShell
Также отключить или включить функцию Печать в PDF (Microsoft Print to PDF) можно в консоли PowerShell.
Чтобы отключить функцию (компонент) Печать в PDF (Microsoft Print to PDF), откройте консоль Windows PowerShell от имени администратора и выполните следующую команду:
Disable-WindowsOptionalFeature -FeatureName «Printing-PrintToPDFServices-Features» -Online
После выполнения команды, изменения вступают в силу сразу, перезагрузка компьютера не требуется.
Чтобы включить функцию (компонент) Печать в PDF (Microsoft Print to PDF), откройте консоль Windows PowerShell от имени администратора и выполните следующую команду:
Enable-WindowsOptionalFeature -FeatureName «Printing-PrintToPDFServices-Features» -Online
После выполнения команды, изменения вступают в силу сразу, перезагрузка компьютера не требуется.
Как включить или отключить функцию Печать в PDF (Microsoft Print to PDF) в командной строке
Ещё, можно отключить или включить функцию Печать в PDF (Microsoft Print to PDF) используя командную строку.
Чтобы отключить функцию (компонент) Печать в PDF (Microsoft Print to PDF), запустите командную строку от имени администратора и выполните следующую команду:
Dism /online /Disable-Feature /FeatureName:»Printing-PrintToPDFServices-Features»
После выполнения команды, изменения вступают в силу сразу, перезагрузка компьютера не требуется.
Чтобы включить функцию (компонент) Печать в PDF (Microsoft Print to PDF), запустите командную строку от имени администратора и выполните следующую команду:
Dism /online /Enable-Feature /FeatureName:»Printing-PrintToPDFServices-Features»
После выполнения команды, изменения вступают в силу сразу, перезагрузка компьютера не требуется.
Используя различные способы представленные выше, можно включить или отключить функцию Печать в PDF (Microsoft Print to PDF) в операционной системе Windows 10.
Видео-инструкция
Также, можно посмотреть видео ролик в котором показано как включить или отключить функцию Печать в PDF (Microsoft Print to PDF) в операционной системе Windows 10.
.
Продолжаем знакомиться с новыми функциями Windows 10. Сегодня речь пойдет о малоизвестной, но крайне полезной функции Windows 10 – поддержки виртуального PDF принтера, позволяющего выполнять печать любых документов или веб-страниц в PDF файл. Теперь для создания PDF файла из любого документа не требуется установка сторонних утилит. Таким образом, Windows 10 стала первой версией Windows с нативной поддержкой печати в PDF файл (это также косвенно говорит о том, что Майкрософт не планирует в дальнейшем продвигать свой формат XPS).
Посмотрим, как включить поддержку Print to PDF в Windows 10 и как воспользоваться виртуальным PDF принтером.
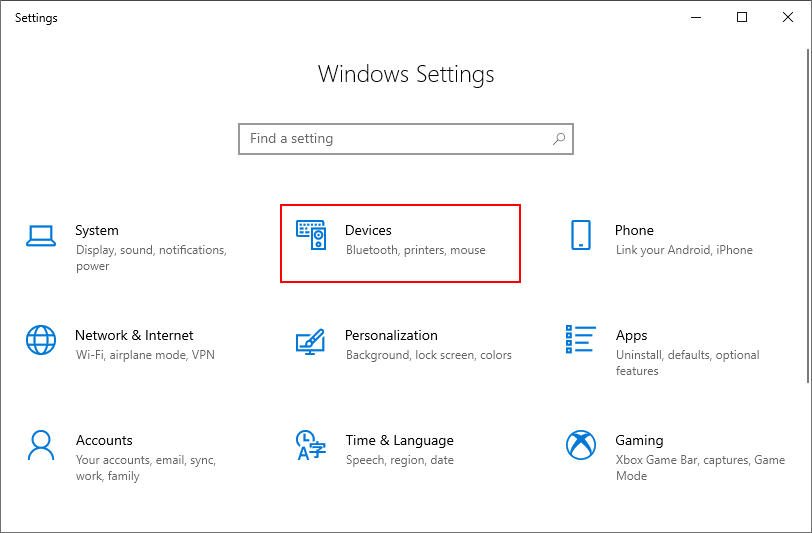
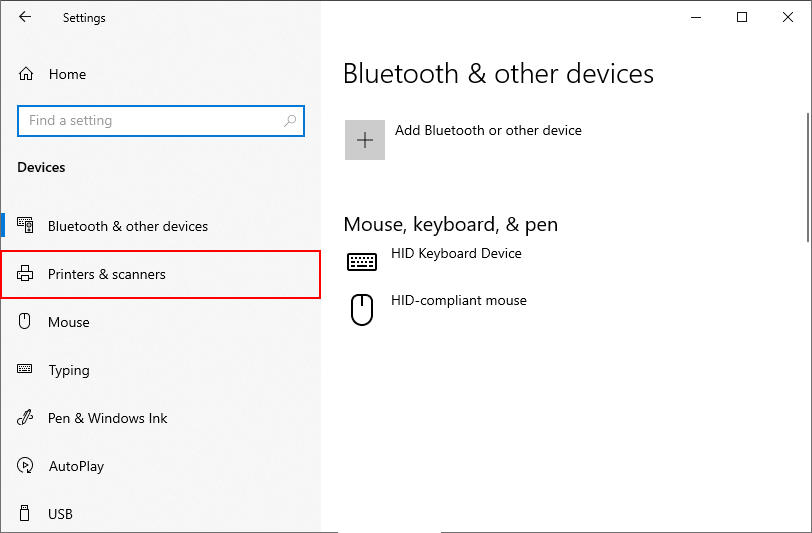
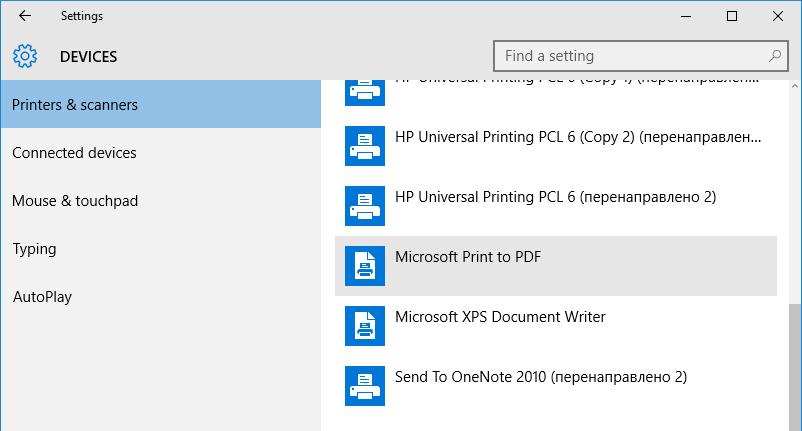
Откройте современную панель управления (Settings) Windows 10 и перейдите в раздел Devices (Устройства). Найдите в списке уставленных принтеров виртуальный принтер с именем Microsoft Print to PDF. Это и есть виртуальный PDF принтер.
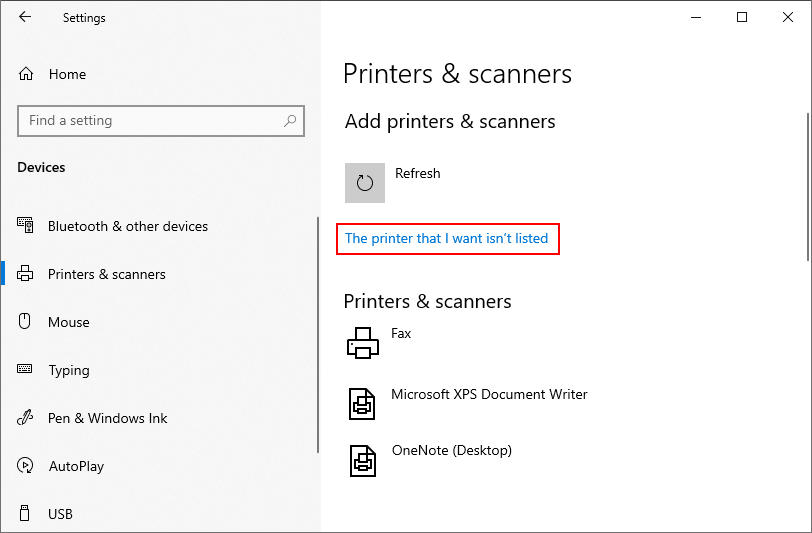
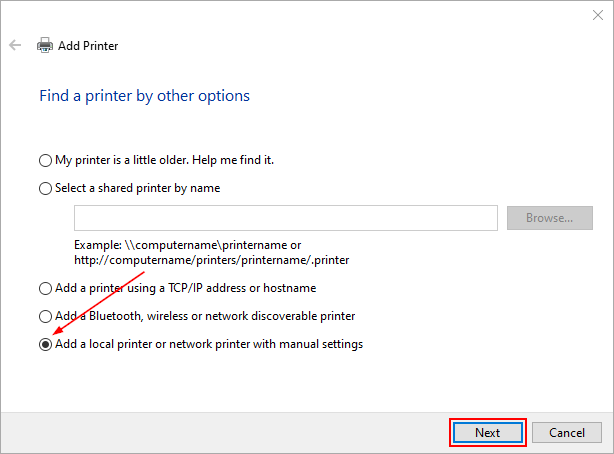
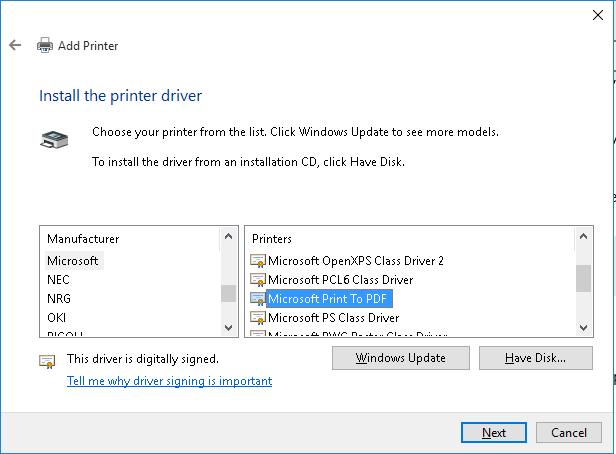
- Add a local printer or network printer with manual settings
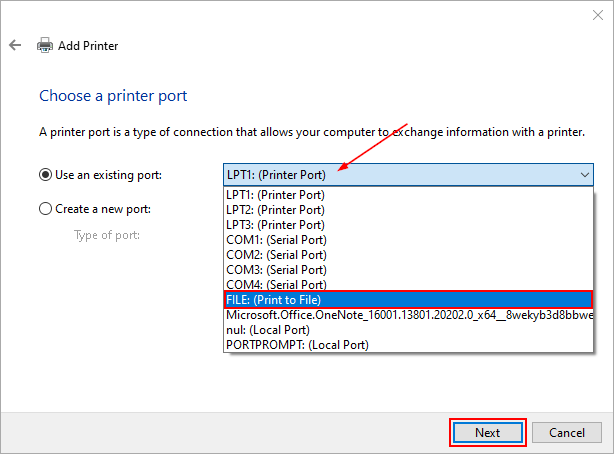
- Порт: FILE: (Print to File)
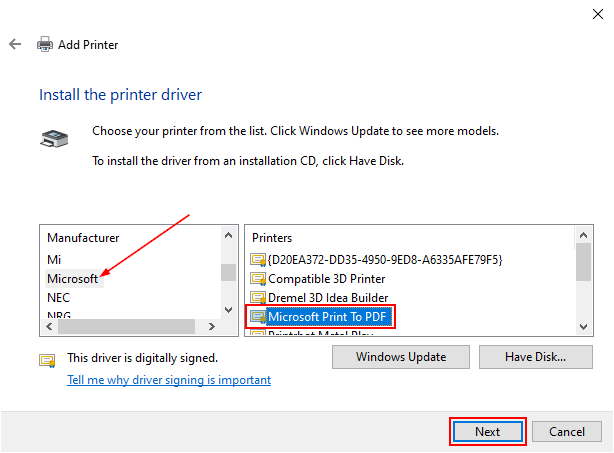
- Драйвер: Microsoft Print to PDF (находится в разделе Microsoft)
Microsoft Print to PDF printer is a useful feature on Windows 10 and Windows 11 devices. Its not a physical printer but a driver based Virtual printer which can be used to convert documents to PDF files. For example. A Microsoft Word file can be converted to a PDF file using this printer, Or if you want to print a web page to PDF using this printer.
Microsoft Print to PDF printer is built into Windows 10 and Windows 11. You can go to Control Panel -> Devices and Printers and then check the printer should be listed there under Printers.
If you do not see the printer listed there, then you may need to enable this feature on your device. I will see how you can add Microsoft Print to PDF printer back to your device in case its missing.
Microsoft Print to PDF printer can be installed on Windows 10/11 device from optional features which are pre-installed on a Windows device. Let’s check the steps:
- Go to Start 🪟-> Search for optionalfeatures.
- Or Press Windows🪟 + R together to open a Run box. Then type optionalfeatures in Run box and press Enter.
- From Turn Windows features on or off screen, Select / Check “Microsoft Print to PDF” if its unchecked and press OK button.
- If this feature is already enabled then Uncheck it and click on OK to uninstall Microsoft Print to PDF printer.
- Restart your Device.
- Go to optionalfeatures and Check “Microsoft Print to PDF” again to Re-Install it. This should resolve and bring back Microsoft Print to PDF printer.
Uninstall and Re-Install Microsoft Print to PDF using command prompt
If you are not a fan of graphical user interface and want to use command prompt to troubleshoot Microsoft Print to PDF then you can use Deployment Image Servicing and Management (DISM.exe) command line tool which is an in-built tool on windows devices to manage windows images.
- Go to Start 🪟 -> Search for Command Prompt.
- Right click on Command Prompt and click on Run as administrator.
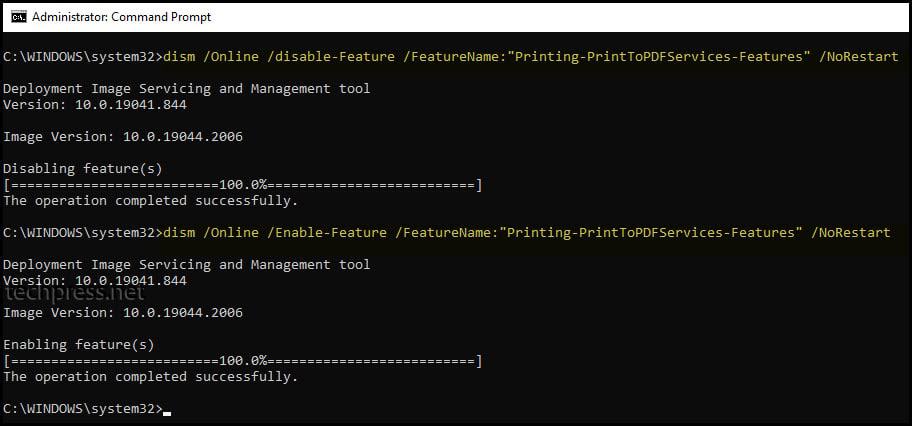
- Type below command to Uninstall / Disable Microsoft Print to PDF feature on windows 10/11.
dism /Online /Disable-Feature /FeatureName:"Printing-PrintToPDFServices-Features" /NoRestart- Type below command to Install / Enable Microsoft Print to PDF feature on windows 10/11
dism /Online /Enable-Feature /FeatureName:"Printing-PrintToPDFServices-Features" /NoRestart- Please check if Microsoft Print to PDF issue has been fixed now. If not, please restart your device once and check once again.
Uninstall and Re-Install Microsoft Print to PDF using Powershell
If you want to use Powershell console instead of command prompt then there are native powershell commands available for Uninstalling / Disabling and Re-Installing / Enabling Microsoft Print to PDF on your device.
- Go to Start 🪟-> Search for Powershell
- Right click Powershell and select Run as administrator.
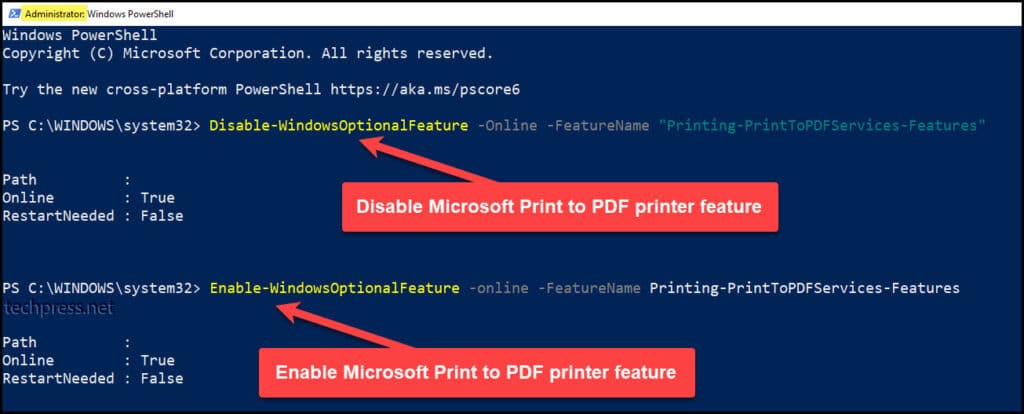
- Type below command to Uninstall / Disable Microsoft Print to PDF feature on windows 10/11
Enable-WindowsOptionalFeature -online -FeatureName Printing-PrintToPDFServices-Features- Type below command to Install / Enable Microsoft Print to PDF feature on windows 10/11.
Disable-WindowsOptionalFeature -Online -FeatureName "Printing-PrintToPDFServices-Features"What is Microsoft Print to PDF Driver files location
Microsoft Print to PDF driver files location can be found by using below steps:
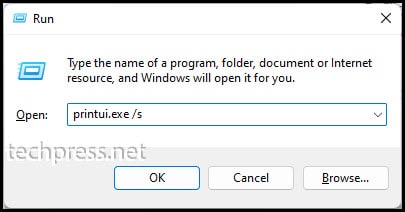
- Press Windows🪟+ R together to open a Run box.
- Type printui.exe /s and press Enter.
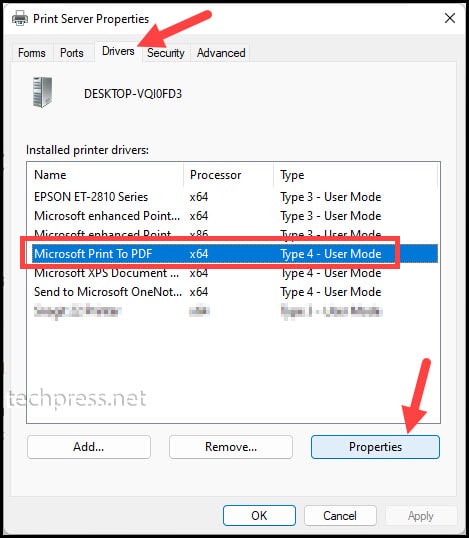
- Go to Drivers tab and select Microsoft Print to PDF and then click on Properties.
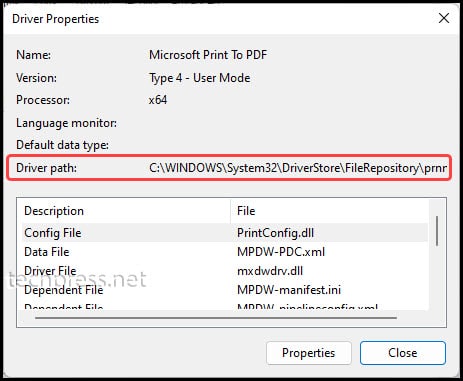
- Driver path property information shows the location of Microsoft Print to PDF driver. Copy the path and open it in File Explorer to view the driver files. The Driver Path on my system shows as: C:\WINDOWS\System32\DriverStore\FileRepository\prnms009.inf_amd64_620c281895426e89
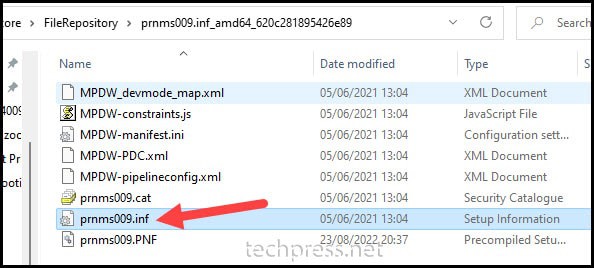
- prnms009.inf is the driver file for Microsoft Print to PDF. You can also install the driver by right-clicking on this file and selecting Install.
Are there any third-Party PDF Printers
As Microsoft Print to PDF is an in-built windows feature. That would be the preferred option for most as this does not require any software installation and is by default provided in Windows 10/11.
However, If you want to use the third-party PDF printers, then below is the list of PDF writers available for you to download:
- Cute PDF Writer
- Foxit PDF Editor
- Adobe Print to PDF
Conclusion
Microsoft Print to PDF is really a useful tool to convert any document to PDF. This is a free solution which is installed by default with your windows 10 or windows 11 operating system. In this blog post, we have troubleshooted Microsoft Print to PDF Issues by re-installing the Micrososft Print to PDF by using various methods including command line.
Я вас приветствую. С вами Александр Глебов. В этой простой и короткой статье я рассказываю, как установить pdf принтер для windows 10. Очень часто пользователи сталкиваются, что необходимо какой-то документ сохранить в pdf, но не все знают, что это очень просто сделать…
Итак, все мы привыкли, что в Windows XP, Windows Vista, 7, 8., 8.1 не было pdf принтера. И его приходилось ставить отдельно, и не всегда это было легко сделать. С выходом операционной системы windows 10 появился встроенный pdf принтер:
По умолчанию он называется Microsoft Print to PDF.
Pdf принтер для windows 10 — как сохранить в pdf
Итак, что сразу «из коробки» в windows 10 есть есть средство сохранить файл в пдф мы убедились. Теперь давайте же посмотрим, как сохранить любой файл в формате pdf при помощи встроенного принтера в windows 10. Для этого выполним следующие шаги:
- В любом редакторе, будь-то блокнот, word, или excel идем в меню распечатки текстов. У меня в примере блокнот.
- В окне выбора принтеров, находим принтер — «Microsoft Print to PDF», и нажимаем печать.
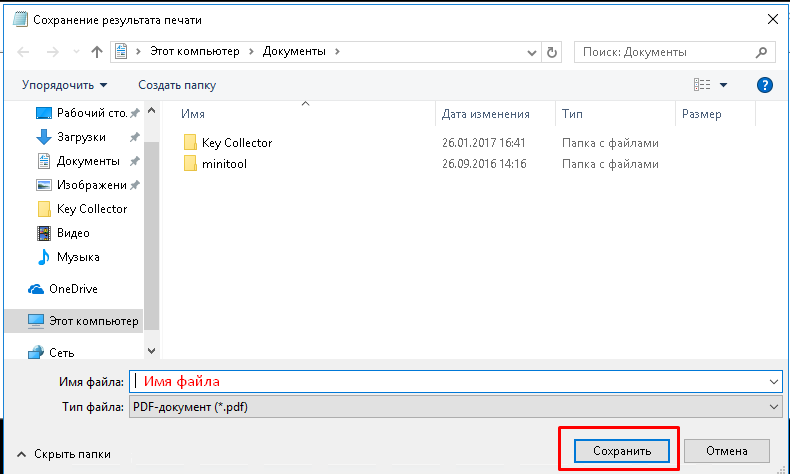
- В результате у вас откроется окно «Сохранение результата печати», в котором необходимо ввести имя файла, и нажать кнопку «Сохранить».
- В результате, по пути указанному в пункте 3, у вас появится pdf файл.
Таким вот простым способом, не прибегая к установке дополнительных программ, можно сохранить любой файл в pdf формате.
Конечно, у данного способа есть и ограничения:
- Этот принтер есть только в Windows 10;
- Нет возможности как-то настраивать сохраняемый pdf, то есть вы не сможете установить пароль на pdf, не сможете указать качество сохраняемого pdf и т.д;
- С помощью данного принтера нельзя сделать pdf путем печати разных файлов одновременно.
Если по какой-то причине у вас принтер «Microsoft Print to PDF» отсутствует в списке устройств, это значит, что он не установлен. Для его установки перейдите по следующему пути: панель управления -> программы и компоненты -> включение или отключение компонентов Windows. В окне «Компоненты Windows», поставьте галку напротив «Печать в pdf (Майкрософт)».
Нажимаем ок, все, теперь у вас установлен pdf принтер от Майкрософт.
И по устоявшейся традиции, все ваши вопросы, предложения и т.д. задавайте в комментариях. Буду рад ответить.
Загрузка…
Интересные статьи по теме:
Microsoft Print to PDF is a handy feature in Windows 10 that makes printing documents to a PDF extremely easy. On some systems though, you might that Microsoft Print to PDF is missing when you go to use it.
That’s because it’s an optional feature in Windows 10 that’s usually on by default, but may need to be enabled and installed on some systems. In this article, we’ll take a look at how to enable and install Microsoft Print to PDF in Windows 10 for systems where it’s missing.
How to Enable Microsoft Print to PDF Optional Feature
Before you can install Microsoft Print to PDF, and its driver, you first need to enable it in Windows 10’s optional features.
- Hit
Windows key + Ron your keyboard to open the WindowsRundialog box. - Type in
optionalfeaturesand clickOK, or hitEnteron your keyboard. Alternatively, you can go to Windows Settings > Apps > Optional features > More Windows features (at the bottom). - in the
Windows Featureswindow that appears, locateMicrosoft Print to PDFand check the box to the left of it then clickOK.
Now you are ready to install Microsoft Print to PDF!
How to Install Microsoft Print to PDF / Driver in Windows 10
- Click the
Startbutton and then click theGearicon in the bottom left of theStart menu. - In the
Settingswindow that appears, clickDevices. - Click
Printers & ScannersunderDevicesin the menu on the left. - Click
Add a printer or scannerand then clickThe printer that I want isn't listedwhen it appears (this can take a few seconds). - In the
Add Printerwindow that appears, selectAdd a local printer...with manual settingsand clickNext. - On the next screen, select
FILE: (Print to File)from theUse an existing portdropdown menu, and then clickNext. - In the following screen, select
Microsoftfrom the list on the left and thenMicrosoft Print to PDFin the list on the right. ClickNextafterwards.Note: If the
Microsoft Print to PDFis missing from the list on the right, click theWindows Updatebutton, then look for it again.In some cases, the driver will still be missing from the list even after clicking the
Windows Updatebutton. To fix this issue, you’ll need to remove the old driver from the system first and then try the above again. Here’s how to remove the Microsoft Print to PDF driver from your system:- Open the Windows
Rundialog box (Windows key + R), type inprintui.exe /s, and hitOK. - In the
Print Server Propertieswindow, click theDriverstab. - Locate the
Microsoft Print to PDFdriver underInstalled printer driversand remove it. When asked whether to remove only the driver, or the driver and its packages, remove only the driver. ClickYeson any other confirmation boxes.
- Open the Windows
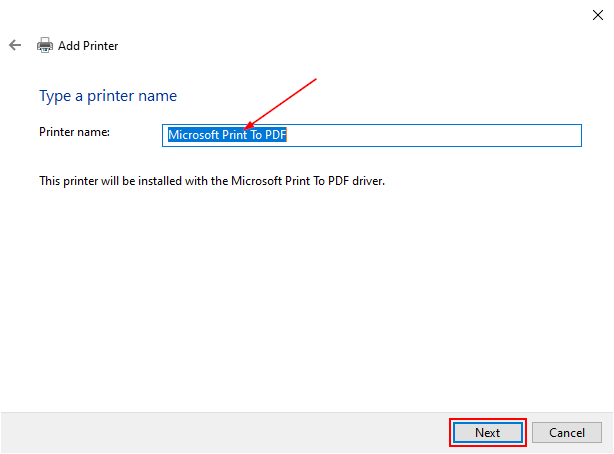
- Type a name for the printer, or leave it as the default
Microsoft Print to PDF(recommended), and clickNext. - Finally, click
Finishin the Add Printer success window. You may also want to test the printer and make sure it’s working!


