Introduction #
Poetry is a tool for dependency management and packaging in Python.
It allows you to declare the libraries your project depends on and it will manage (install/update) them for you.
Poetry offers a lockfile to ensure repeatable installs, and can build your project for distribution.
System requirements #
Poetry requires Python 3.8+. It is multi-platform and the goal is to make it work equally well
on Linux, macOS and Windows.
Installation #
Note
If you are viewing documentation for the development branch, you may wish to install a preview or development version of Poetry.
See the advanced installation instructions to use a preview or alternate version of Poetry.
We provide a custom installer that will install Poetry in a new virtual environment to isolate it
from the rest of your system. This ensures that dependencies will not be accidentally upgraded or
uninstalled, and allows Poetry to manage its own environment.
-
Install Poetry
The installer script is available directly at install.python-poetry.org,
and is developed in its own repository.
The script can be executed directly (i.e. ‘curl python’) or downloaded and then executed from disk
(e.g. in a CI environment).Warning
The
install-poetry.pyinstaller has been deprecated and removed from the Poetry repository.
Please migrate from the in-tree version to the standalone version described above.Linux, macOS, Windows (WSL)
curl -sSL https://install.python-poetry.org | python3 -Note
Note: On some systems,
pythonmay still refer to Python 2 instead of Python 3. We always suggest the
python3binary to avoid ambiguity.Windows (Powershell)
(Invoke-WebRequest -Uri https://install.python-poetry.org -UseBasicParsing).Content | py -Note
If you have installed Python through the Microsoft Store, replace
pywithpythonin the command
above. -
Install Poetry (advanced)
By default, Poetry is installed into a platform and user-specific directory:
~/Library/Application Support/pypoetryon MacOS.~/.local/share/pypoetryon Linux/Unix.%APPDATA%\pypoetryon Windows.
If you wish to change this, you may define the
$POETRY_HOMEenvironment variable:curl -sSL https://install.python-poetry.org | POETRY_HOME=/etc/poetry python3 -If you want to install prerelease versions, you can do so by passing the
--previewoption to the installation script
or by using the$POETRY_PREVIEWenvironment variable:curl -sSL https://install.python-poetry.org | python3 - --preview curl -sSL https://install.python-poetry.org | POETRY_PREVIEW=1 python3 -Similarly, if you want to install a specific version, you can use
--versionoption or the$POETRY_VERSION
environment variable:curl -sSL https://install.python-poetry.org | python3 - --version 1.2.0 curl -sSL https://install.python-poetry.org | POETRY_VERSION=1.2.0 python3 -You can also install Poetry from a
gitrepository by using the--gitoption:curl -sSL https://install.python-poetry.org | python3 - --git https://github.com/python-poetry/poetry.git@master -
Add Poetry to your PATH
The installer creates a
poetrywrapper in a well-known, platform-specific directory:$HOME/.local/binon Unix.%APPDATA%\Python\Scriptson Windows.$POETRY_HOME/binif$POETRY_HOMEis set.
If this directory is not present in your
$PATH, you can add it in order to invoke Poetry
aspoetry.Alternatively, the full path to the
poetrybinary can always be used:~/Library/Application Support/pypoetry/venv/bin/poetryon MacOS.~/.local/share/pypoetry/venv/bin/poetryon Linux/Unix.%APPDATA%\pypoetry\venv\Scripts\poetryon Windows.$POETRY_HOME/venv/bin/poetryif$POETRY_HOMEis set.
-
Use Poetry
Once Poetry is installed and in your
$PATH, you can execute the following:If you see something like
Poetry (version 1.2.0), your install is ready to use! -
Update Poetry
Poetry is able to update itself when installed using the official installer.
If you want to install pre-release versions, you can use the
--previewoption.poetry self update --previewAnd finally, if you want to install a specific version, you can pass it as an argument
toself update.Warning
Poetry
1.1series releases are not able to update in-place to1.2or newer series releases.
To migrate to newer releases, uninstall using your original install method, and then reinstall
using the methods above. -
Uninstall Poetry
If you decide Poetry isn’t your thing, you can completely remove it from your system
by running the installer again with the--uninstalloption or by setting
thePOETRY_UNINSTALLenvironment variable before executing the installer.curl -sSL https://install.python-poetry.org | python3 - --uninstall curl -sSL https://install.python-poetry.org | POETRY_UNINSTALL=1 python3 -Warning
If you installed using the deprecated
get-poetry.pyscript, you should remove the path it uses manually, e.g.rm -rf "${POETRY_HOME:-~/.poetry}"Also remove ~/.poetry/bin from your
$PATHin your shell configuration, if it is present.
Enable tab completion for Bash, Fish, or Zsh #
poetry supports generating completion scripts for Bash, Fish, and Zsh.
See poetry help completions for full details, but the gist is as simple as using one of the following:
Bash #
Auto-loaded (recommended) #
poetry completions bash >> ~/.bash_completion
Lazy-loaded #
poetry completions bash > ${XDG_DATA_HOME:-~/.local/share}/bash-completion/completions/poetry
Fish #
poetry completions fish > ~/.config/fish/completions/poetry.fish
Zsh #
poetry completions zsh > ~/.zfunc/_poetry
You must then add the following lines in your ~/.zshrc, if they do not already exist:
fpath+=~/.zfunc
autoload -Uz compinit && compinit
Oh My Zsh #
mkdir $ZSH_CUSTOM/plugins/poetry
poetry completions zsh > $ZSH_CUSTOM/plugins/poetry/_poetry
You must then add poetry to your plugins array in ~/.zshrc:
prezto #
poetry completions zsh > ~/.zprezto/modules/completion/external/src/_poetry
Note
You may need to restart your shell in order for these changes to take effect.
Python Poetry Installer

This repository contains Poetry’s official installation script, installer source and
related hosting configuration.
The script is hosted on Vercel and made available at
https://install.python-poetry.org/.
Usage
Poetry provides a custom installer that will install poetry isolated
from the rest of your system.
osx / linux / bashonwindows / Windows+MinGW install instructions
curl -sSL https://install.python-poetry.org | python3 -
windows powershell install instructions
(Invoke-WebRequest -Uri https://install.python-poetry.org -UseBasicParsing).Content | py -
If you have installed Python through the Microsoft Store, replace
pywithpythonin the command above.
Warning: The previous get-poetry.py installer is now deprecated, if you are currently using it
you should migrate to the new, supported, install.python-poetry.org installer.
The installer installs the poetry tool to Poetry’s bin directory. This location depends on your system:
$HOME/.local/binfor Unix%APPDATA%\Python\Scriptson Windows
If this directory is not on your PATH, you will need to add it manually
if you want to invoke Poetry with simply poetry.
Alternatively, you can use the full path to poetry to use it.
Once Poetry is installed you can execute the following:
If you see something like Poetry (version 1.2.0) then you are ready to use Poetry.
If you decide Poetry isn’t your thing, you can completely remove it from your system
by running the installer again with the --uninstall option or by setting
the POETRY_UNINSTALL environment variable before executing the installer:
curl -sSL https://install.python-poetry.org | python3 - --uninstall curl -sSL https://install.python-poetry.org | POETRY_UNINSTALL=1 python3 -
By default, Poetry is installed into the user’s platform-specific home directory.
If you wish to change this, you may define the POETRY_HOME environment variable:
curl -sSL https://install.python-poetry.org | POETRY_HOME=/etc/poetry python3 -
If you want to install prerelease versions, you can do so by passing --preview option or by using the POETRY_PREVIEW
environment variable:
curl -sSL https://install.python-poetry.org | python3 - --preview
curl -sSL https://install.python-poetry.org | POETRY_PREVIEW=1 python3 -
Similarly, if you want to install a specific version, you can use --version option or the POETRY_VERSION
environment variable:
curl -sSL https://install.python-poetry.org | python3 - --version 1.2.0
curl -sSL https://install.python-poetry.org | POETRY_VERSION=1.2.0 python3 -
You can also install Poetry for a git repository by using the --git option:
curl -sSL https://install.python-poetry.org | python3 - --git https://github.com/python-poetry/poetry.git@master
Note: The installer does not support Python < 3.6.
Known Issues
Debian/Ubuntu
On Debian and Ubuntu systems, there are various issues that maybe caused due to how
various Python standard library components are packaged and configured. The following
details issues we are presently aware of, and potential workarounds.
Note: This can also affect WSL users on Windows.
Installation Layout
If you encounter an error similar to the following, this might be due to
pypa/virtualenv#2350.
FileNotFoundError: [Errno 2] No such file or directory: '/root/.local/share/pypoetry/venv/bin/python'
You can work around this issue by setting the DEB_PYTHON_INSTALL_LAYOUT environment
variable to deb in order to emulate previously working behaviour.
export DEB_PYTHON_INSTALL_LAYOUT=deb
Missing distutils Module
In certain Debian/Ubuntu environments, you might encounter the following error message
in error logs (poetry-installer-error-*.log) provided when the installer fails.
ModuleNotFoundError: No module named 'distutils.cmd'
This is probably due to this bug.
See also pypa/get-pip#124.
The known workaround for this issue is to reinstall the distutils package provided by
the distribution.
apt-get install --reinstall python3-distutils
If you have installed a specific python version, eg: 3.10, you might have to use the
package name python3.10-distutils.
Время на прочтение
6 мин
Количество просмотров 99K
Poetry — это инструмент для управления зависимостями в Python проектах (аналог встроенного pip). Идея реализации данного инструмента пришла его создателю в связи с тем, что различные способы менеджмента пакетов (requirements.txt, setup.cfg, MANIFEST.ini и другие) показались создателю Poetry не очень-то удобными.
Предлагаю тем, кто пишет на Python, познакомиться с данным инструментом, так как это очень простой и удобный в использовании инструмент, применение которого может упростить ведение и разработку проекта.
Установка
Установить poetry на windows можно либо при помощи pip:
pip install poetryЛибо более гибким вариантом через powershell:
(Invoke-WebRequest -Uri https://raw.githubusercontent.com/python-poetry/poetry/master/get-poetry.py -UseBasicParsing).Content | python -Отличие от pip
Pip хранит данные о зависимостях в файле requirements.txt (название на самом-то деле может быть любое), poetry хранит информацию в файле pyproject.toml, однако, в случае с pip, в его файле хранится только список зависимостей с описанием версий, а в .toml хранится вся основная информация о проекте, что очень удобно, так как все данные собраны в одном месте (далее последует более подробное описание).
Чтобы установить зависимости в pip необходимо выполнить:
pip install -r requirements.txtЧто для poetry займет всего 2 слова:
# для первичной установки
poetry install
# для обновления
poetry update
Просмотр зависимостей в pip можно сделать только командой:
pip freezeОднако будут показаны только актуальные версии библиотек, не будет возможности увидеть структуру всех пакетов с их зависимостями. В poetry в файле poetry.lock можно увидеть сведения обо всех установленных пакетах, команда:
poetry show --treeПокажет древовидную структуру пакетов с их личными зависимостями.
Так же запуск проекта в pip (в случае с виртуальным окружением) создает неудобства, так как первым делом необходимо зайти в это самое окружение при помощи команды:
./venv/Scripts/activate.batИ только затем можно выполнять какие-либо изменения с проектом. В poetry нет необходимости активировать виртуальное окружение, достаточно лишь зайти в папку с проектом и начинать пользоваться командами. Poetry сам найдет нужное окружение. Также в poetry можно менять версию python без необходимости менять старое виртуальное окружение.
Это лишь малая часть преимуществ. Далее рассмотрим примеры команд и структуру poetry файлов.
pyproject.toml
Главный файл для poetry — это pyproject.toml. Все данные о проекты должны быть записаны в нём. При установке пакетов poetry берёт данные из этого файла и формирует файл с зависимостями poetry.lock (если уже есть готовый файл poetry.lock, то данные будут браться из него). Toml файл состоит из нескольких блоков, каждый из которых имеет свои особенности, рассмотрим данные блоки:
[tool.poetry] — содержит основную информацию о проекте, такую как:
-
name — имя проекта
-
version — версия проекта
-
description — описание проекта
-
license — лицензия проекта
-
authors — список авторов проекта в формате name <email>
-
maintainers — список менторов проекта формате name <email>
-
readme — readme файл проекта в формате README.rst или README.md
-
homepage — URL сайта проекта
-
repository — URL репозитория проекта
-
documentation- URL документации проекта
-
keywords — список ключевых слов проекта (макс: 5)
-
classifier — список PyPI классификаторов
[tool.poetry.dependencies] — содержит описание всех зависимостей проекта. Каждая зависимость должна иметь название с указанием версии, также присутствует возможность скачать проекта с github с указанием ветки/версии/тэга, например:
-
requests = «^2.26.0»
-
requests = { git = «https://github.com/requests/requests.git» }
-
requests = { git = «https://github.com/kennethreitz/requests.git», branch = «next» }
-
numpy = { git = «https://github.com/numpy/numpy.git», tag = «v0.13.2» }
[tool.poetry.scripts] — в данном разделе можно описать различные сценарии или скрипты, которые будут выполняться при установке пакетов или при запуске приложения. Например:
-
poetry = ‘poetry.console:run’
-
main-run = ‘new_proj.main:run’ (после чего достаточно запустить
poetry main-runи будет выполнен запуск функции run в файле new_prof/main.py)
[tool.poetry.extras] — в данном блоке описываются группы зависимостей, которые можно устанавливать отдельно:
[tool.poetry.dependencies]
psycopg2 = { version = "^2.7", optional = true }
pymysql = { version = "1.0.2", optional = true }
[tool.poetry.extras]
mysql = ["pymysql"]
pgsql = ["psycopg2"]
Далее зависимости можно установить двумя способами:
poetry install --extras "mysql pgsql"
poetry install -E mysql -E pgsql
[tool.poetry.urls] — помимо основных URL, указанных в [tool.poetry], можно указывать свои URL:
-
«Bug Tracker» = «https://github.com/python-poetry/poetry/issues»
Пример данных в pyproject.toml
[tool.poetry]
name = "new_proj"
version = "0.1.0"
description = "My description"
authors = ["Daniil Gorbenko <dani.gorbenko@gmail.com>"]

[tool.poetry.dependencies]
python = "^3.10"
pygame = "^2.1.0"
icecream = "^2.1.1"
requests = "^2.26.0"
psycopg2 = { version = "^2.7", optional = true }
pymysql = { version = "1.0.2", optional = true }

[tool.poetry.dev-dependencies]
Pympler = "^0.9"

[tool.poetry.urls]
"Bug Tracker" = "https://github.com/python-poetry/poetry/issues"

[tool.poetry.scripts]
run-main = "new_proj.main:main_def"

[build-system]
requires = ["poetry-core>=1.0.0"]
build-backend = "poetry.core.masonry.api"
Основные методы
new
Чтобы создать новый проект с помощью Poetry, достаточно выполнить poetry new <название папки с проектом>. После чего создастся папка с названием вашего проекта, в этой папке будет лежать файл pyproject.toml.
poetry new new_projectinit
Чтобы сделать пакетным менеджером poetry в уже имеющемся проекте, достаточно выполнить:
poetry initДалее будет предложено заполнить немного основной информации о проекте

Метод может принимать некоторые необязательные параметры:
-
—name: имя проекта
-
—description: описание проекта
-
—author: имя автора
-
—python: совместимые версии Python
-
—dependency: требуемый пакет с версией пакета
-
—dev-dependency: требования к разработке
После чего в проекте появится файл pyproject.toml, в котором вручную можно изменить любые данные.
install
Чтобы установить зависимости проекта достаточно выполнить команду:
poetry installPoetry считывает данные из pyproject.toml, строит дерево зависимостей проекта, разрешая проблемы с версиями зависимостей, и устанавливает все пакеты. Однако, если в проекте уже есть файл poetry.lock, то будут использоваться точные версии из этого файла.
Метод может принимать параметры:
-
—remove-untracked: удалит старые пакеты, которые больше не используются в проекте
-
—no-dev: dev пакеты не будут устанавливаться
update
Чтобы обновить версии зависимостей (тем самым обновив файл poetry.lock) достаточно выполнить:
poetry updateТакже есть возможность обновить лишь определенные пакеты:
poetry update icecream pygameМетод может принимать дополнительные параметры:
-
—no-dev : игнорирует обновление dev пакетов
-
—lock : не устанавливает и не обновляет пакеты, а только обновляет файл poetry.lock
add
Чтобы добавить новую библиотеку достаточно выполнить:
poetry add pygameМожно указывать версию пакета:
 poetry add "pygame>=2"
 poetry add pygame@^2
Можно передать параметры:
-
—dev (-D): установит пакет в качестве dev зависимости
-
—path: путь к пакету (если пакет лежит локально)
-
—lock : не устанавливает зависимости, а только обновляет файл poetry.lock
remove
Чтобы удалить зависимость достаточно выполнить:
poetry remove pygameДополнительно можно передать параметры:
-
—dev : удалит пакет из dev зависимостей
show
Чтобы посмотреть зависимости проекта достаточно выполнить:
poetry showрезультат poetry show

Если необходимо посмотреть информацию о конкретном пакете:
poetry show pygameрезультат poetry show pygame

Посмотреть дерево зависимостей проекта можно при помощи:
poetry show --treeрезультат poetry show —tree

Также можно передать параметры:
-
—tree: список зависимостей в виде дерева
-
—latest (-l): показать последние версии проектов
-
—outdated (-o): показать последние версии только для устаревших пакетов
run
Чтобы запустить проект достаточно выполнить:
poetry run python <имя python файла>
poetry run python main.py
poetry run <имя скрипта, описанного в [tool.poetry.scripts]>
poetry run main-run
PyCharm & Poetry
В PyCharm 2021.3 добавили поддержку Poetry. Теперь при создании проекта можно сразу указать poetry основным пакетным менеджером. Перед использованием необходимо установить executable версию poetry (на windows через poweshell):
(Invoke-WebRequest -Uri https://raw.githubusercontent.com/python-poetry/poetry/master/get-poetry.py -UseBasicParsing).Content | python -После чего можно без проблем выбрать Poetry при создании проекта:

Далее автоматически будет создан .toml файл:

При установке пакетов через менеджер PyCharm файл pyproject.toml будет автоматически обновляться сам:


Версии зависимостей
При установке пакета можно указать точную версию проекта, например:
[tool.poetry.dependencies]
pygame = "2.1.0"
Но иногда есть необходимость указать диапазон версий пакета, чтобы получать обновления, в таком случае есть несколько способов указать диапазон:
[tool.poetry.dependencies]
pygame = "^2.1"
pygame = "~2.1"
pygame = "2.1.*"
pygame = "*"
Вот какие диапазоны принимают данные префиксы версий:
|
Зависимость |
Минимальная версия |
Максимальная версия |
|
^1.2.3 |
>=1.2.3 |
<2.0.0 |
|
^1.2 |
>=1.2.0 |
<2.0.0 |
|
^1 |
>=1.0.0 |
<2.0.0 |
|
^0.2.3 |
>=0.0.3 |
<0.0.4 |
|
~1.2.3 |
>=1.2.3 |
<1.3.0 |
|
~1.2 |
>=1.2.0 |
<1.3.0 |
|
~1 |
>=1.0.0 |
<2.0.0 |
|
* |
>=0.0.0 |
— |
|
1.* |
>=1.0.0 |
<2.0.0 |
|
1.2.* |
>=1.2.0 |
<1.3.0 |
Заключение
Poetry — отличная альтернатива pip. Он позволяет отказаться от requirements.txt в пользу более гибкой настройки проекта. Благодаря poetry можно в любой момент посмотреть информацию о зависимостях любого пакета, гибко настраивать версии и обмениваться poetry.lock файлами с уже заготовленным списком версий пакетов.
Содержание:развернуть
- Что умеет Poetry
- Установка
-
Установка на OSX и Linux
-
Установка на Windows
-
Установка через PIP и PIPX
- Работа с Poetry
-
Создание проекта
-
Pyproject.toml
-
Установка пакета
-
Удаление пакета
- Poetry и виртуальное окружение
- Конфигурация Poetry
- Список команд
- Сборка и настройка пакета
- Poetry и Docker
Poetry — это инструмент для управления зависимостями и сборкой пакетов в Python.
В Poetry представлен полный набор инструментов, которые могут понадобиться для детерминированного управления проектами на Python. В том числе, сборка пакетов, поддержка разных версий языка, тестирование и развертывание проектов.
Все началось с того, что создателю Poetry Себастьену Юстасу потребовался единый инструмент для управления проектами от начала до конца, надежный и интуитивно понятный, который бы мог использоваться и в рамках сообщества. Одного лишь менеджера зависимостей было недостаточно, чтобы управлять запуском тестов, процессом развертывания и всем созависимым окружением. Этот функционал находится за гранью возможностей обычных пакетных менеджеров, таких как Pip или Conda. Так появился Python Poetry.
Что умеет Poetry
Ключевой фичей Poetry Python является полное управление библиотеками, заявленными для вашего проекта, включая их установку, обновление и публикацию.
А еще он может:
- Создавать и упаковывать проекты с помощью одной команды.
- Публиковать проекты в PyPI и приватных репозиториях.
- Проверять состояния зависимостей одной командой.
- Фиксировать версии зависимостей.
- Управлять публикацией билдов.
- Использовать ваши настроенные виртуальные сервера или создавать собственное виртуальное окружение для полной изоляции от вашей системы.
Функционал командной строки расширяется с помощью плагинов, а предустановленные значения при необходимости легко заменяются на свои варианты. В целом, продукт имеет юзер-френдли интерфейс.
Установка
Poetry — кроссплатформенный инструмент. Теоретически он должен одинаково работать в Linux, MacOS и Windows. Системные требования предполагают использование актуальных версий Python, поэтому начиная с версии Poetry 1.2 не поддерживаются Python 2.7 и 3.5, будьте внимательны!
Poetry создает изолированное виртуальное окружение для вашего проекта, инсталлируя все необходимое и разруливая конфликты зависимостей (если они в принципе решаемы).
По умолчанию установка происходит в домашний каталог пользователя, но это можно изменить путем переопределения переменной окружения POETRY_HOME:
POETRY_HOME=/etc/poetry
Установка на OSX и Linux
Этапы установки на Mac и Linux идентичны:
1 Проверить версию Python (в консоли python --version, и если версия Python по умолчанию 2.7, проверить python3 --version).
2 Чтобы установить актуальную версию вводим в консоль:
curl -sSL https://raw.githubusercontent.com/python-poetry/poetry/master/get-poetry.py | python -
Если дефолтная версия языка не устраивает или если для установки хочется воспользоваться версией питона 3.x, а по умолчанию стоит 2.7, используйте команду:
curl -sSL https://raw.githubusercontent.com/python-poetry/poetry/master/get-poetry.py | python3 -
Обратите внимание: процесс установки может занять довольно длительное время.
Каталог bin, в который происходит установка инструмента, в Unix расположен в $HOME/.poetry/bin.
Установка на Windows
Для инсталляции Poetry:
1 Откройте Powershell (Win + X далее i, или найдите PoweShell через поиск).
2 Введите команду:
(Invoke-WebRequest -Uri https://raw.githubusercontent.com/python-poetry/poetry/master/get-poetry.py -UseBasicParsing).Content | python -
Перезапустите оболочку и все заработает. Папку установки для Windows вы найдете в %USERPROFILE%\.poetry\bin.
Для корректной работы установщик должен иметь возможность найти исполняемые файлы py.exe -3 или py.exe -2.
Установка через PIP и PIPX
Для данного варианта установки необходимо иметь на борту менеджер пакетов PIP (или PIPX).
Для установки Poetry через PIP выполните команду:
pip install --user poetry
Имейте ввиду, что зависимости пакета Poetry могут вызвать конфликт с уже установленными пакетами в вашей системе.
Команды Pipx для установки, обновления и удаления инструмента:
pipx install poetry

pipx upgrade poetry

pipx uninstall poetry
Pipx поддерживает только версии Python старше 3.6.
Работа с Poetry
Для начала убедимся, что Poetry корректно установлен, введя в терминал команду:
poetry --version
Если в ответ высветится актуальный номер версии, можно приступать к работе.
Создание проекта
Создаем пробный проект и присваиваем ему название «project-poetry»:
poetry new project-poetry
Произойдет автоматическое создание папки проекта со следующей структурой:
project-poetry

    project-poetry

        __init__.py

    tests

        __init__.py

        test_project_poetry.py

    pyproject.toml

    README.rst
В случае, если необходимо инициализировать Poetry-проект в уже существующем каталоге, перейдите в него и выполните команду:
poetry init
Pyproject.toml
В файле pyproject.toml содержится описание вашего Poetry-проекта — название, описание, используемый репозиторий, зависимости проекта и т.д. С помощью него легко организовать зависимости вашего проекта (pyproject.toml можно назвать преемником устаревшего requirements.txt).
Если вы знакомы с Pipenv, то наверняка заметите, что
pyproject.tomlочень похож наPipfile.
После инициализации проекта, содержание файла будет следующим:
[tool.poetry]

name = "project-poetry"

version = "0.1.0"

description = ""

authors = ["Alexander <info@pythonchik.ru>"]
[tool.poetry.dependencies]
python = "^3.8"
[tool.poetry.dev-dependencies]
pytest = "^5.2"
[build-system]
requires = ["poetry-core>=1.0.0"]
build-backend = "poetry.core.masonry.api"
Разберемся, что означает каждая секция:
[tool.poetry]— содержит метаданные проекта, которые не относятся к пакетам зависимостей — название, описание, указание авторства и контактную информацию;[tool.poetry.dependencies]— раздел содержит зависимости, необходимые для проекта;[tool.poetry.dev-dependencies]— зависимости разработки (не войдут в сборку проекта, но необходимые для других аспектов — тестирования, документации и т. д.);[build-system]— если вы используете Poetry для управления своим проектом, вы должны ссылаться на него в этом разделе (командыnewиinitавтоматически добавляют информацию в разделbuild-system).
📌 О дополнительных секциях файла можете прочитать в официальной документации «The pyproject.toml file«.
Все переменные могут задаваться вручную в соответствующие места Pyproject.toml, а также с помощью команды add или добавляться автоматически средствами Poetry.
Установка пакета
Теперь установим новый пакет в наш проект:
poetry add pymongo
После установки пакета, в pyproject.toml появится новая запись:
[tool.poetry.dependencies]

python = "^3.8"

pymongo = "^3.11.2"
💭 Для добавления dev-зависимости (зависимости для разработки) необходимо добавить флаг —dev: poetry add pytest --dev.
Удаление пакета
Для удаления пакета достаточно выполнить команду:
poetry remove pymongo
При этом запись пакета также удалится из pyproject.toml.
Poetry и виртуальное окружение
По умолчанию, Poetry автоматически создает виртуальное окружение для вашего проекта в cache-директории:
- для Windows —
C:\Users\<username>\AppData\Local\pypoetry\Cache\virtualenvs; - для Linux —
~/.cache/pypoetry/virtualenvs; - для macOS —
~/Library/Caches/pypoetry/virtualenvs.
В эту директорию будут сохраняться все зависимости для проекта.
![]()
Подробнее о том, что такое виртуальное окружение и как оно работает:
Конфигурация Poetry
Конфигурация Poetry настраивается с помощью команды poetry config. После первого запуска команды, Poetry создаст файл конфигурации config.toml, в котором будут храниться все заданные параметры. Находится файл в директории:
- для Windows —
C:\Users\<username>\AppData\Roaming\pypoetry; - для Linux —
~/.config/pypoetry; - для macOS —
~/Library/Application Support/pypoetry.
Для примера, попробуем настроить Poetry так, чтобы он создавал виртуальное окружение virtualenvs не в cache-директории, а в корневом каталоге проекта. Для этого установим переменной virtualenvs.in-project значение true:
poetry config virtualenvs.in-project true
Чтобы убедиться, что значение успешно установилась, выполним команду:
poetry config virtualenvs.in-project
💭 Чтобы посмотреть все текущие параметры Poetry, используйте команду poetry config --list.
Теперь все зависимости будут устанавливаться в папку .venv в корне вашего проекта.
Если параметр нужно удалить, используйте флаг --unset:
poetry config virtualenvs.in-project --unset
📌 Подробнее о настройке конфигурации Poetry читайте тут.
Список команд
Poetry охватывает множество функций, связанных с управлением конфигурацией и публикацией пакетов:
shell— при первом запуске этой команды в каталоге вашего проекта Poetry создает виртуальную среду Python, которая будет связана с проектом. Вместо создания папки, содержащей библиотеки зависимостей, Poetry создает среду на глобальном системном пути. Как только эта виртуальная среда будет создана, ее можно активировать в любое время, запустивpoetry shellв каталоге проекта.install— устанавливает зависимости, указанные вpyproject.toml. При первой установке создается файл.lock, который содержит фактические номера версий каждого установленного пакета. Номера версий в.lockприоритетнее, чем находящиеся вpyproject.toml.update— если для пакетов вpyproject.tomlсуществуют более новые версии, они будут установлены, и.lockфайл будет обновлен.add— добавление зависимости кpyproject.toml. Пакет устанавливается сразу после применения команды.remove— удаление библиотеки зависимостей.config— пути к текущей виртуальной среде или ее переменные. Передача опции--listвернет текущие значения конфигурации.check— проверяетpyproject.tomlна наличие ошибок.show— возвращает вывод всех пакетов, установленных в проекте, включая зависимости зависимостей.run— выполняет сценарий, заданный в разделеtool.poetry.scriptsвpyproject.toml.build— собирает исходники и пакеты в архив.publish— публикует вывод предыдущей сборки во внешнем репозитории, например, в PyPi.
Чтобы получить справку из командной строки с полным списком команд, просто вызовите poetry.
Сборка и настройка пакета
Чтобы собрать пакет, запускаем команду build.
poetry build
Building project-poetry (0.1.0)
- Building sdist
- Built project-poetry-0.1.0.tar.gz
- Building wheel
- Built project_poetry-0.1.0-py3-none-any.whl
В результате в папке dist будут сформированы пакеты.
Если мы хотим ограничить сборку определенным типом, можно просто использовать параметр -F.
poetry build -F wheel # or sdist
Чтобы развернуть пакет, нужно настроить репозитории и учетные данные. Для этого применяется команда config.
poetry config repositories.priv https://my.repository
В примере происходит настройка репозитория с именем priv и Url-адресом https://my.repository.
Сохранить учетные данные для этого репозитория также можно с помощью команды config:
poetry config http-basic.priv user password
💭 В приведенной команде user и password соответствуют имени пользователя и паролю для входа в наш частный репозиторий. Обратите внимание, если не указать пароль, то его будет предложено ввести при развертывании пакета.
Закончив настройку, мы можем просто развернуть пакет следующей командой:
poetry publish
Если использован частный репозиторий, следует указать его имя Priv с помощью опции -r.
Poetry и Docker
Использование Poetry для работы с проектом внутри Docker-контейнера иногда сопряжено со сложностями интеграции. Ключевым моментом является отключение VirtualEnv, так как он не нужен в уже изолированном докере:
poetry config virtualenvs.create false
Затем устанавливаются разные наборы зависимостей для переменной среды:
poetry install $(test "$MY_ENV" == production && echo "--no-dev")
Таким образом в $MY_ENV будет контролироваться, какой набор зависимостей следует устанавливать: все (по умолчанию) или продакшн только с --no-dev флагом.
Poetry выходит далеко за рамки стандартного менеджера зависимостей, предлагая такие функции, как создание файлов .lock, создание шаблонов проекта и множество параметров конфигурации, каждый из которых обрабатывается через простой интерфейс командной строки. Если вы не знаете, как чисто и эффективно структурировать свои проекты Python и облегчить управление ими, сделайте себе одолжение и используйте Poetry.
We’re Earthly. We streamline software building using containerization. Earthly, combined with Poetry, can make your Python project builds smoother and faster. Check it out.
Python is a versatile language used for various applications. However, managing dependencies, the packages a project relies on can be a complex and time-consuming task. With the growth of the Python ecosystem, developers need to manage a large number of packages and dependencies and ensure that they are compatible with each other.
Poetry provides a solution to these challenges. Poetry is a package manager for Python that allows developers to manage dependencies, create virtual environments, and package their projects for distribution, all using a single command-line tool.
In this tutorial, you will learn the basics of using Poetry to manage dependencies in Python projects. You’ll create a library called weather-update that uses the OpenWeatherMap API and the requests library to retrieve the current weather of a given city.
Prerequisites
To follow this tutorial, it is recommended that you have the following:
- Python 3.7+ installed
- Basic understanding of virtual environments, modules, and packages
You can find the code samples used in this tutorial in this repository.
Installation
Poetry is designed to be compatible with multiple platforms, including Linux, macOS, and Windows. It features a customized installer that installs Poetry in a separate virtual environment, isolating it from the rest of the system. This prevents accidental upgrades or uninstalls of dependencies and enables Poetry to manage its environment effectively.
To install Poetry on Windows, open the Windows Powershell and run the following command:
(Invoke-WebRequest -Uri https://install.python-poetry.org\
 -UseBasicParsing).Content | python -
To install Poetry on Linux, macOS and Windows (WSL), open a terminal and run the following command:
curl -sSL https://install.python-poetry.org | python3 -This will download and install the latest version of Poetry. To verify that Poetry has been installed correctly, run the following command:
If you see something like Poetry (version 1.3.2), your installation is ready to use!
Getting Started With Poetry
In this section, you will learn how to create a new Python project using Poetry and set up the project’s name, version, and description. Additionally, you will understand the role of the pyproject.toml file in managing dependencies and how it serves as the central configuration file for the project. You will also learn how to initialize a pre-existing project with Poetry to start managing its dependencies effectively.
Creating a New Project
You can use the new command followed by the project name to create a new Poetry project. For example, you can use the following command to create a project named weather-update for your library:
poetry new weather-updateThe command creates a new folder weather-update with the following structure:
weather-update
├── pyproject.toml
├── README.md
├── weather_update
│   └── __init__.py
└── tests
     └── __init__.py
The folder weather-update contains two files named pyproject.toml and README.md and two packages named weather_update to store the source code files and tests to store the test files.
If you prefer using the name src instead of weather_update, you can add the --src flag while creating the project as below:
poetry new --src weather-updateUnderstanding the pyproject.toml File
The pyproject.toml file serves as the configuration file that contains information about the project and its dependencies. By default, the pypoetry.toml contains three tables — tool.poetry, tool.poetry.dependencies and build-system.
# pyproject.toml

[tool.poetry]
name = "weather-update"
version = "0.1.0"
description = ""
authors = ["Ashutosh Krishna <contact@ashutoshkrris.in>"]
readme = "README.md"
packages = [{include = "earthly_poetry_demo"}]
The tool.poetry table of the pyproject.toml file is composed of multiple key/value pairs. While the name, version, description, and authors keys are required, others are optional.
Poetry assumes that a package with the same name as the tool.poetry.name specified in the pyproject.toml file is located at the root of the project. If the package location is different, the packages and their locations can be specified in the tool.poetry.packages key.
# pyproject.toml

[tool.poetry.dependencies]
python = "^3.9"
It is mandatory to declare the Python version for which your package is compatible in the tool.poetry.dependencies table.
# pyproject.toml

[build-system]
requires = ["poetry-core"]
build-backend = "poetry.core.masonry.api"
The last table build-system has two keys — requires and build-backend. The requires key is a list of dependencies required to build the package and the build-backend key is the Python object used to perform the build process.
The file looks like this.
TOML is the preferred configuration format for Poetry. Starting from version 3.11, Python provides a tomllib module for parsing TOML files.
Initializing a Pre-Existing Project
There can be situations where you have an existing project, and you wish to add Poetry to it for managing your dependencies. In that case, the poetry new command won’t be very useful as it will create a new project from scratch.
Suppose, you have a project named existing-project containing a main.py file with the following contents:
# main.py

print("Earthly is awesome!")
In this case, you can use the init command to initialize Poetry in your project. It helps you interactively create a pyproject.toml file in the existing-project directory.
The poetry init command initiates an interactive session for creating the pyproject.toml file. Poetry offers suggestions for the majority of configurations needed for setup, and pressing Enter allows for their usage. In the end, it will also preview the file before generating it. Once you confirm the generation, it will generate the file.
Managing Virtual Environments
As you learn Python and start building different projects, you’ll quickly find that each project may have different versions of libraries and dependencies. If these versions conflict with each other, it can lead to unexpected errors and make it difficult to manage the projects. This is where virtual environments can help.
Virtual environments are isolated environments for your Python projects. This means that each project can have its own set of dependencies, without affecting other projects or your system’s Python installation. This is particularly useful when you have multiple projects that require different versions of the same dependency.
Virtual environments ensure compatibility, reproducibility, and reduce the risk of conflicts with other projects on your system.
Let’s say you are working on two different Python projects: Project A and Project B. Project A requires version 2.26.0 of the library requests, while Project B requires version 2.28.2. If you try to install both versions of requests globally on your system at the same time, the second installation will remove the requests library which was installed first.
However, by using virtual environments, you can isolate the dependencies of each project. You can create a virtual environment for Project A and install version 2.26.0 of requests in it. Then, you can create another virtual environment for Project B and install version 2.28.2 of requests in it.
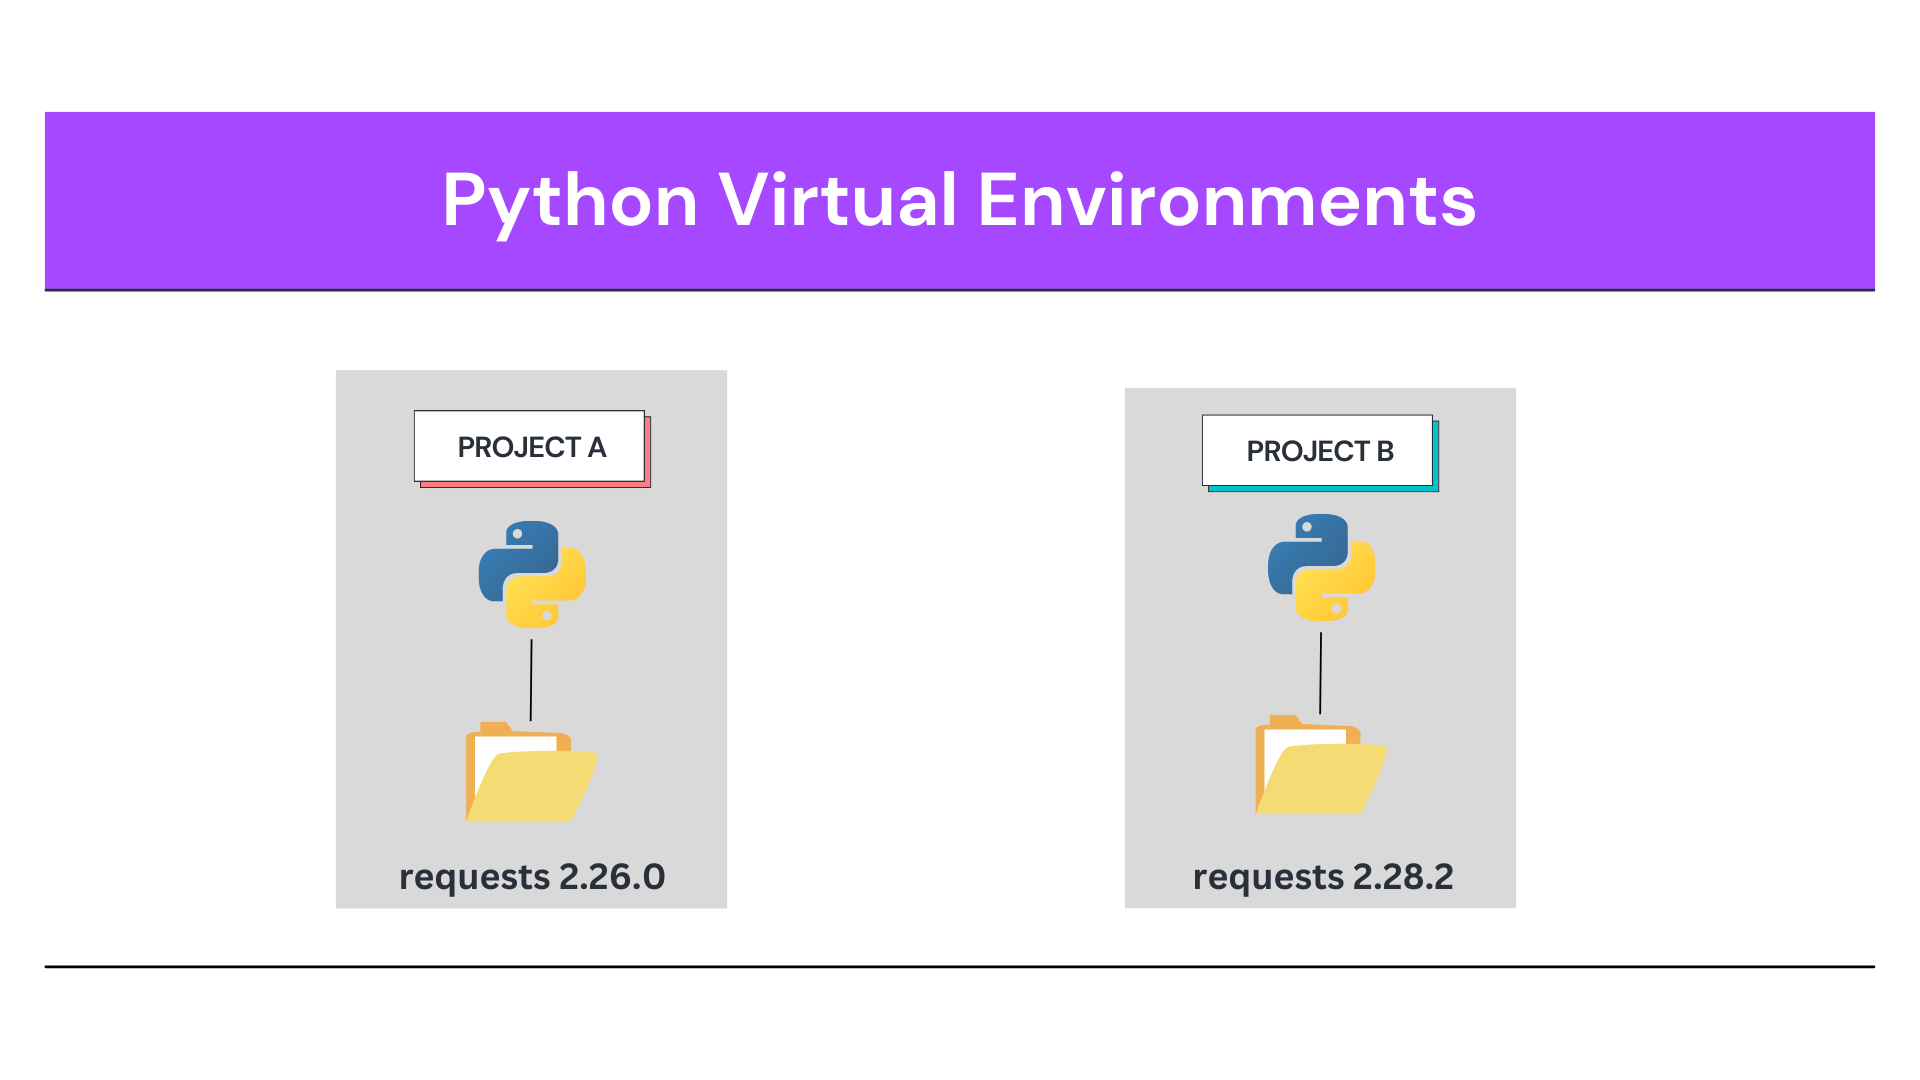
This way, the two projects are isolated from each other, and each has its own version of the library requests without creating any compatibility issues.
Creating Virtual Environments With Poetry
Poetry makes it easy to create virtual environments for your projects. To create a virtual environment for your weather-update library, simply run the env use command in your project directory:
poetry env use /full/path/to/pythonThe /full/path/to/python specifies the full path to the Python executable. Example:
poetry env use /usr/local/bin/python3.9Output:
Creating virtualenv weather-update-HkPi_rXk-py3.9 in \
/Users/ashutoshkrris/Library/Caches/pypoetry/virtualenvs
Using virtualenv: \
/Users/ashutoshkrris/Library/Caches/pypoetry/virtualenvs/\
weather-update-HkPi_rXk-py3.9
If you have the python executable in your PATH you can use it:
You can even just use the minor Python version in this case:
The minor Python version refers to the second component of the Python version number, for example, 3.9 in the case of Python version 3.9.16.
To disable the explicitly activated virtual environment, use the system as the Python version to revert to default behavior.
Sometimes you may need to use the system-wide Python installation for compatibility reasons or to perform a specific task. In such cases, you can use the special system Python version to retrieve the default behavior.
Working With Poetry
In this section, you’ll learn how to work with Poetry to manage dependencies in your Python projects. In addition to that, you’ll also learn about dependency groups in Poetry.
Managing Dependencies
Since your weather-update library will interact with OpenWeatherMap API under the hood, it will need the requests library to be installed. If you remember, you had a [tool.poetry.dependencies] table in your pyproject.toml file to specify your dependencies. You can add them directly to your project:
# pyproject.toml

[tool.poetry.dependencies]
python = "^3.9"
requests = "^2.28.2"
Poetry provides another way to add dependency in your project. While you can add it manually, you should use the add command to install the dependency. It ensures that the dependencies are installed correctly, version constraints are properly defined, and the pyproject.toml file is automatically updated with the correct information.
Output:
Using version ^2.28.2 for requests

Updating dependencies
Resolving dependencies...

Writing lock file

Package operations: 5 installs, 0 updates, 0 removals

  • Installing certifi (2022.12.7)
  • Installing charset-normalizer (3.0.1)
  • Installing idna (3.4)
  • Installing urllib3 (1.26.14)
  • Installing requests (2.28.2)
Similarly, you can use the remove command to remove any dependencies that you don’t require:
poetry remove <some-dependency>The command will remove the dependency and update the pyproject.toml and poetry.lock files. But you don’t need to run the command at this moment since you don’t have any extra dependency.
The poetry.lock File
During the installation, removal, or updation of a dependency, Poetry keeps a record of the exact versions of all dependencies used in a project in a poetry.lock file. The poetry.lock file lists all packages, the exact versions of those packages, and the hashes of their source files, guaranteeing that your project uses the correct dependencies.
After you installed the requests library, your poetry.lock file will look like this.
In the file, you can see that the file records the exact versions and hashes of the installed dependencies. In the later sections when you’ll add more dependencies, you’ll see this file tracking the changes.
When you share your project, the poetry.lock file ensures that others will be using the same dependencies that you used to build and test your project. Thus, it is important to commit the poetry.lock file to your version control.
You can create a requirements.txt file from your poetry.lock file as:
poetry export --output requirements.txtDeveloping Your Application

So far, you have just installed the requests library. Your application has no functionality. Thus, in this section, you’ll be adding your application logic. Create a weather.py file in the src/weather_update package and follow along.
Import the os, requests, and configparser libraries for use in the rest of the code
# weather.py

import os
import requests
import configparser

# Global variable for the configuration file
CONFIG_FILE = "config.ini"
The CONFIG_FILE global variable stores the name of the configuration file. This file will store the OpenWeatherMap API Key.
# weather.py

def get_weather(location: str):
    """
    Get the weather updates for the specified location

    Arguments:
    location: str -- location for which the weather updates are needed

    Returns:
    dict -- weather updates for the specified location
    """
    api_key = get_api_key()
    weather_url = f"http://api.openweathermap.org/data/2.5/weather?q={location}&appid={api_key}&units=metric"
    response = requests.get(weather_url)
    return response.json()
The get_weather function takes the location as an argument and returns the weather updates for that location. It calls the get_api_key function to get the API key and then uses the API key to make a request to the OpenWeatherMap API to get the weather updates.
# weather.py

def get_api_key():
    """
    Get the OpenWeatherMap API key from the configuration file
    """
    config = configparser.ConfigParser()
    api_key = None

    if not os.path.exists(CONFIG_FILE):
        print("You don't have an API Key set for OpenWeatherMap.")
        set_api_key()

    try:
        config.read(CONFIG_FILE)
        api_key = config.get("DEFAULT", "api_key")
    except (configparser.NoSectionError, configparser.NoOptionError) as e:
        print(f"Error while reading the API key:\n {e}")
        set_api_key()
        api_key = config.get("DEFAULT", "api_key")

    return api_key
The get_api_key function first checks if the config.ini file exists, and if it doesn’t, it calls the set_api_key function to create the file and set the API key. It then reads the API key from the configuration file using the configparser library.
# weather.py

def set_api_key():
    """
    Set the OpenWeatherMap API key in the configuration file
    """
    try:
        config = configparser.ConfigParser()
        api_key = input("Enter your OpenWeatherMap API key: ")
        config["DEFAULT"] = {"api_key": api_key}
        with open(CONFIG_FILE, "w") as configfile:
            config.write(configfile)
    except PermissionError:
        print("Error: You do not have permission to write to the file.")
    except configparser.Error:
        print("Error: Unable to write to the configuration file.")
The set_api_key function sets the API key in the configuration file using the configparser library. The function prompts the user to enter the API key and writes it to the file.
To check whether the code works, you can create a main.py file and add the following code:
# main.py

from src.weather_update.weather import get_weather


if __name__ == '__main__':
    location = input("Enter the location: ")
    response = get_weather(location)
    if response['cod'] == 200:
        print(f"The weather in {location} is \
        {response['weather'][0]['description']}")
    else:
        print(response['message'])
The code imports the get_weather function from the weather module in the src.weather_update package. It prompts the user to enter a location and then retrieves the weather updates for that location using the get_weather function.
For the first run, the code will also ask for the OpenWeatherMap API Key.
Enter the location: Bengaluru
You don't have an API Key set for OpenWeatherMap.
Enter your OpenWeatherMap API key: myopenweathermapapi
The weather in Bengaluru is overcast clouds
For the subsequent runs, the code won’t ask you for the API Key as it has already set it.
Enter the location: Gaya
The weather in Gaya is clear sky
Suppose you set an incorrect value of the API Key, you’ll get an error:
Enter the location: Gaya
Invalid API key.
Please see https://openweathermap.org/faq#error401 for more info.
Dependency Groups
Next, you’ll be testing your application using PyTest. For that, you’ll need to install two libraries: pytest and requests-mock. Apart from that, in your development environment, you’ll also be using the black library to format your code. You can see that we just introduced two different environments: test and dev.
In a more complex application, you can have more environments such as dev, test, pre-prod, and prod. For each of the environments, the dependencies can vary as per requirements.
Starting from version 1.2.0, Poetry offers a method for organizing dependencies into groups. So instead of installing all the dependencies in one table ([tool.poetry.dependencies]), you can create dependency groups for each of the environments. This way, the dependencies are not cluttered but organized as per their usage in different environments.
To create a new dependency group, use the tool.poetry.group.<group> section, where <group> represents the name of the dependency group (e.g. “dev”):
#pyproject.toml

[tool.poetry.group.dev]  # Group definition

[tool.poetry.group.dev.dependencies]
black = "^23.1.0"
In a later section, you’ll learn a way to add a dependency in a better way rather than adding dependencies to a specific group manually. So, you can avoid adding dependencies at this moment.
Adding a Dependency to a Group
As mentioned above, there is one more way to add dependencies to a group. You can use the add command to add dependencies to a group. Use the --group or -G option to specify the group name.
The add command not only adds the dependency to the specified group in the pyproject.toml file but also updates the poetry.lock file, which keeps track of the exact version of each dependency used in the project. This helps in avoiding conflicts and inconsistencies in the dependencies and their versions, which can arise from manual edits. The add command automatically creates a group if it doesn’t already exist.
In the dev environment, you’ll install the black library.
poetry add black --group devSimilarly, for testing purposes, you’ll require two libraries — pytest and requests-mock. You will use PyTest to write and run the unit tests, and the requests-mock library allows you to mock the HTTP requests made using the requests library.
You can add the two libraries in the test group as:
poetry add pytest requests-mock --group test After installing the libraries, your pyproject.toml file will look like this:
#pyproject.toml

[tool.poetry]
name = "weather-update"
version = "0.1.0"
description = ""
authors = ["Ashutosh Krishna <ashutoshbritish@gmail.com>"]
readme = "README.md"
packages = [{include = "weather_update", from = "src"}]

[tool.poetry.dependencies]
python = "^3.9"
requests = "^2.28.2"

[tool.poetry.group.dev.dependencies]
black = "^23.1.0"

[tool.poetry.group.test.dependencies]
pytest = "^7.2.1"
requests-mock = "^1.10.0"

[build-system]
requires = ["poetry-core"]
build-backend = "poetry.core.masonry.api"
If you notice, you didn’t create the dev and test groups. They were created automatically.
After this section, your poetry.lock file will now look something like this.
Optional and Non-Optional Dependency Groups
In Poetry, optional groups are collections of dependencies that are not required to run the project but are useful for certain use cases. For example, your project needs to have an optional group for development dependencies, which includes tools such as black. These dependencies are not necessary for the normal operation of the project, but they are needed to run the tests. By making these dependencies optional, you can reduce the size of the project’s virtual environment and avoid having unnecessary dependencies installed.
To specify a group as optional, you can add the optional = true setting to the group’s definition in the pyproject.toml file.
#pyproject.toml

[tool.poetry.group.dev]
optional = true

[tool.poetry.group.dev.dependencies]
black = "^23.1.0"
Similarly, you can make the test group optional too because the dependencies such as pytest and requests-mock are used in the testing environment only.
#pyproject.toml

[tool.poetry.group.test]
optional = true

[tool.poetry.group.test.dependencies]
pytest = "^7.2.1"
requests-mock = "^1.10.0"
Non-optional groups in Poetry refer to the groups of dependencies that are required for a project to function properly. They are not designated as optional in the pyproject.toml file and their dependencies are considered part of the default set of dependencies for a project. Unlike optional groups, non-optional groups are always installed, and their dependencies are always available for use in your project.
Optional and non-optional dependency groups are functionally independent and isolated. Packages in one group are not automatically made available to another group, and packages installed in one group do not affect packages installed in another group. This allows you to manage different sets of dependencies for different parts of your project, making it easier to manage the dependencies of your project as it evolves.
The default dependencies for a project in Poetry consist of two types of dependencies: the dependencies specified in the tool.poetry.dependencies table of the pyproject.toml file and the dependencies specified in the non-optional groups.
Removing Dependencies From a Group
While you haven’t added any extra dependency to your project, you might download some dependencies just to try them out. In those cases, you’ll need to remove those dependencies after their usage. You can use the remove command to remove dependencies from a group. Use the --group or -G option to specify the group name. Suppose you wish to remove a dependency called some-dependency from the dev group:
poetry remove <some-dependency> --group devIt is recommended to remove extra dependencies because they can increase the size of the project, make it harder to manage, slow down performance, and create security vulnerabilities. Keeping only the necessary dependencies can help keep the project lightweight, maintainable, and secure. Additionally, it can also help improve the stability of the application and make it easier to test and debug.`
After you remove any dependency, your pyproject.toml and poetry.lock files will be updated automatically.
Installing Group Dependencies
Poetry provides a poetry install command to install dependencies specified in your pyproject.toml file.
Some use cases when the poetry install command can be useful:
- Remember when you added the dependencies manually in your
pyproject.tomlfile? In that case, you’ll need to run thepoetry installcommand explicitly to install the dependencies. - By default, executing the
poetry installcommand installs dependencies from all non-optional groups. In addition to that, the command also provides you with options to exclude or include groups as per requirements.
You’ll not need to install the dependencies specified in the dev and test environments, because they’re not useful for the project to work. Thus, you can use the --without option in the poetry install command to exclude the dev and test groups:
poetry install --without dev,testIf you remember, we covered that the poetry install command installs the dependencies from all the non-optional groups. But suppose you’ve completed the development of the project and want to test the code now, you’ll need to install the dependencies specified in the test group. But it is inside the test group which is optional. In that case, you can use the --with option to install the test group in addition to the default groups:
poetry install --with testThe --without option takes priority over --with when both are used. For example, the following command installs only the dependencies specified in the optional dev group:
poetry install --with dev,test --without testThink of the situation when you completed the development of the application and now you want to format it. You’ll need to install the dev group dependencies for that. You can also install only specific dependency groups using the --only option:
poetry install --only devNote that the above command will install just the dependencies in the dev group and not even the default set of dependencies.
Writing the Tests

To recall, you had created a get_weather function to get weather updates for a location. Now that you have installed the testing environment dependencies, you can write the code to test the functionality of your application.
Create a test_weather.py file inside the tests package and add the following content:
# test_weather.py

import requests_mock
import pytest

from src.weather_update.weather import get_api_key, get_weather

# Global variable for the configuration file
CONFIG_FILE = "config.ini"
API_KEY = get_api_key()

def test_get_weather():
    # create a mock response for the API call
    with requests_mock.Mocker() as mock:
        mock.get(
            f"http://api.openweathermap.org/data/2.5/weather?q=London&appid={API_KEY}&units=metric",
            json={
                "weather": [{"description": "cloudy"}],
                "main": {"temp": 15.0}
            }
        )

        # test the get_weather function
        weather = get_weather("London")
        assert weather == {
            "weather": [{"description": "cloudy"}],
            "main": {"temp": 15.0}
        }

def test_get_weather_failure():
    # create a mock response for the API call to return a failure
    with requests_mock.Mocker() as mock:
        mock.get(
            f"http://api.openweathermap.org/data/2.5/weather?q=London&appid={API_KEY}&units=metric",
            status_code=400
        )

        # test the get_weather function
        with pytest.raises(Exception):
            get_weather("London")
The code tests the functionality of the get_weather function from the weather.py file. The test_get_weather test case uses the requests-mock library to create a mock response for the API call to the OpenWeatherMap API and tests the get_weather function to check if it returns the expected response.
The test_get_weather_failure test case creates a mock response to return a failure status code and tests the get_weather function to see if it raises an exception as expected.
In both test cases, the API key is obtained from the get_api_key function and used in the URL for the API call. The test cases run by pytest will determine if the get_weather function is working correctly, by comparing the actual results to the expected results. You can add more test cases or modify the existing ones to test the application logic more thoroughly.
Poetry provides a run command to execute the given command inside the project’s virtual environment. Thus, execute the following command to run the tests:
It is important to execute the pytest command inside the virtual environment because you’ll need to use the testing dependencies.
Output:
======================== test session starts ====================
platform darwin -- Python 3.9.16, pytest-7.2.1, pluggy-1.0.0
rootdir: /Users/ashutoshkrris/Projects/test/weather-update
plugins: requests-mock-1.10.0
collected 2 items

tests/test_weather.py .. [100%]

======================== 2 passed in 0.10s ====================
Synchronizing Dependencies
Dependency synchronization ensures that only the dependencies specified in the poetry.lock file are present in the environment by removing any unnecessary dependencies. For example, your current poetry.lock file might look something like this. But if in any condition, your virtual environment contains dependencies that are not locked in the poetry.lock file, the synchronization will remove extra dependencies. You can use the --sync option with the poetry install command to synchronize the dependencies:
You can use the --sync option with the other dependency group-related options such as --with, --without, and --only:
poetry install --without dev --sync
poetry install --with dev --sync
poetry install --only dev --sync
Publishing a Package
Your project at this stage will look like this. You can copy the contents of the README file from GitHub. Now that you have created your library, you can publish it online for others to install. Poetry provides an easy and efficient way to publish a package by using the publish command.
But before you can publish your library, you will need to package it using the build command:
Output:
Building weather-update (0.1.0)
  - Building sdist
  - Built weather-update-0.1.0.tar.gz
  - Building wheel
  - Built weather_update-0.1.0-py3-none-any.whl
Packaging a project before publishing it is important because it makes the project easier to distribute, install, and use for others. Poetry uses the information specified in the pyproject.toml file, such as the project name, version, and dependencies, to package the project in two different formats: sdist and wheel. Wheel distributions are pre-compiled packages that can be installed quickly, while source distributions contain the raw source code and require compilation.
Next, you have to configure your PyPI credentials properly as Poetry will publish the library to PyPI by default.
Once you have packaged your library, you can publish it using the publish command:
The command will publish the package to the Python Package Index (PyPI), making them available for installation through Poetry. After publishing the package, you can search for it on PyPI. For example, you can find the weather-update library PYPI. You can then install it on your system and try using it.
Conclusion
Managing dependencies is crucial in Python development. Poetry provides an efficient solution for this. This tutorial covered using Poetry for Python projects, including installation, managing dependencies, and publishing a package. You’ve learned about virtual environments, adding, removing, and synchronizing dependencies, and packaging Python project.
If you’ve breezed through managing Python dependencies with Poetry and are looking for ways to further streamline your build process, you might want to take it up a notch with Earthly. It’s a tool that can make your builds even smoother. Check it out!
Earthly makes builds simple
Fast, repeatable builds with an instantly familiar syntax – like Dockerfile and Makefile had a baby.
Learn More