Note
This guide is written for Python 3.7+
Make sure you have python and pip
Before you go any further, make sure you have Python and that it’s available
from your command line. You can check this by simply running
You should get some output like 3.10.8. If you do not have Python, please
install the latest 3.x version from python.org
Additionally, make sure you have pip available.
Check this by running
$ pip --version
pip 22.3.1
If you installed Python from source, with an installer from python.org or via Homebrew, you likely already have pip.
If you’re on Linux and installed using your OS package manager, you may have to install pip manually.
Installing Pipenv
Preferred Installation of Pipenv
It is recommended that users on most platforms install pipenv from pypi.org using
$ pip install pipenv --user
Note
pip user installations allow for installation into your home directory to prevent breaking any system-wide packages.
Due to interaction between dependencies, you should limit tools installed in this way to basic building blocks for a Python workflow such as virtualenv, pipenv, tox, and similar software.
If pipenv isn’t available in your shell after installation,
you’ll need to add the user site-packages binary directory to your PATH.
On Linux and macOS you can find the user base binary directory by running
python -m site --user-base and appending bin to the end. For example,
this will typically print ~/.local (with ~ expanded to the
absolute path to your home directory), so you’ll need to add
~/.local/bin to your PATH. You can set your PATH permanently by
modifying ~/.profile.
On Windows you can find the user base binary directory by running
python -m site --user-site and replacing site-packages with
Scripts. For example, this could return
C:\Users\Username\AppData\Roaming\Python37\site-packages, so you would
need to set your PATH to include
C:\Users\Username\AppData\Roaming\Python37\Scripts. You can set your
user PATH permanently in the Control Panel.
You may need to log out for the PATH changes to take effect.
To upgrade pipenv at any time:
$ pip install --user --upgrade pipenv
Homebrew Installation of Pipenv
-
Homebrew is a popular open-source package management system for macOS (or Linux).
Once you have installed Homebrew simply run
To upgrade pipenv at any time:
Note
Homebrew installation is discouraged because it works better to install pipenv using pip on macOS.
Installing packages for your project
Pipenv manages dependencies on a per-project basis. To install a package,
change into your project’s directory (or just an empty directory for this
tutorial) and run
$ cd myproject
$ pipenv install <package>
Note
Pipenv is designed to be used by non-privileged OS users. It is not meant
to install or handle packages for the whole OS. Running Pipenv as root
or with sudo (or Admin on Windows) is highly discouraged and might
lead to unintend breakage of your OS.
Pipenv will install the package and create a Pipfile
for you in your project’s directory. The Pipfile is used to track which
dependencies your project needs in case you need to re-install them, such as
when you share your project with others.
For example when installing the requests library, you should get output similar to this:
$ pipenv install requests
Creating a virtualenv for this project...
Pipfile: C:\Users\matte\Projects\pipenv-triage\example\Pipfile
Using C:/Users/matte/AppData/Local/Programs/Python/Python311/python.exe (3.11.2) to create virtualenv...
[    ] Creating virtual environment...created virtual environment CPython3.11.2.final.0-64 in 488ms
  creator CPython3Windows(dest=C:\Users\matte\.virtualenvs\example-7V6BFyzL, clear=False, no_vcs_ignore=False, global=False)
  seeder FromAppData(download=False, pip=bundle, setuptools=bundle, wheel=bundle, via=copy, app_data_dir=C:\Users\matte\AppData\Local\pypa\virtualenv)
    added seed packages: pip==23.0, setuptools==67.1.0, wheel==0.38.4
  activators BashActivator,BatchActivator,FishActivator,NushellActivator,PowerShellActivator,PythonActivator

Successfully created virtual environment!
Virtualenv location: C:\Users\matte\.virtualenvs\example-7V6BFyzL
Installing requests...
Resolving requests...
Installing...
Adding requests to Pipfile's [packages] ...
Installation Succeeded
Installing dependencies from Pipfile.lock (3b5a71)...
To activate this project's virtualenv, run pipenv shell.
Alternatively, run a command inside the virtualenv with pipenv run.
Using installed packages
Now that requests is installed you can create a simple main.py file to use it:
import requests

response = requests.get('https://httpbin.org/ip')
print('Your IP is {0}'.format(response.json()['origin']))
Then you can run this script using pipenv run
$ pipenv run python main.py
You should get output similar to this:
Using $ pipenv run ensures that your installed packages are available to
your script by activating the virtualenv. It is also possible to spawn a new shell
that ensures all commands have access to your installed packages with $ pipenv shell.
Virtualenv mapping caveat
-
Pipenv automatically maps projects to their specific virtualenvs.
-
By default, the virtualenv is stored globally with the name of the project’s root directory plus the hash of the full path to the project’s root (e.g.,
my_project-a3de50). -
Should you change your project’s path, you break such a default mapping and pipenv will no longer be able to find and to use the project’s virtualenv.
-
If you must move or rename a directory managed by pipenv, run ‘pipenv –rm’ before renaming or moving your project directory. Then, after renaming or moving the directory run ‘pipenv install’ to recreate the virtualenv.
-
Customize this behavior with
PIPENV_CUSTOM_VENV_NAMEenvironment variable. -
You might also prefer to set
PIPENV_VENV_IN_PROJECT=1in your .env or .bashrc/.zshrc (or other shell configuration file) for creating the virtualenv inside your project’s directory.

This tutorial walks you through installing and using Python packages.
It will show you how to install and use the necessary tools and make strong
recommendations on best practices. Keep in mind that Python is used for a great
many different purposes, and precisely how you want to manage your dependencies
may change based on how you decide to publish your software. The guidance
presented here is most directly applicable to the development and deployment of
network services (including web applications), but is also very well suited to
managing development and testing environments for any kind of project.
Note
This guide is written for Python 3, however, these instructions
should work fine on Python 2.7—if you are still using it, for some reason.
☤ Make sure you’ve got Python & pip
Before you go any further, make sure you have Python and that it’s available
from your command line. You can check this by simply running:
You should get some output like 3.6.2. If you do not have Python, please
install the latest 3.x version from python.org or refer to the
Installing Python section of The Hitchhiker’s Guide to Python.
Note
If you’re newcomer and you get an error like this:
>>> python
Traceback (most recent call last):
  File "<stdin>", line 1, in <module>
NameError: name 'python' is not defined
It’s because this command is intended to be run in a shell (also called
a terminal or console). See the Python for Beginners
getting started tutorial for an introduction to using your operating
system’s shell and interacting with Python.
Additionally, you’ll need to make sure you have pip available. You can
check this by running:
$ pip --version
pip 9.0.1
If you installed Python from source, with an installer from python.org, or
via `Homebrew`_ you should already have pip. If you’re on Linux and installed
using your OS package manager, you may have to install pip separately.
If you plan to install pipenv using Homebrew you can skip this step. The
Homebrew installer takes care of pip for you.
☤ Installing Pipenv
Pipenv is a dependency manager for Python projects. If you’re familiar
with Node.js’ npm or Ruby’s bundler, it is similar in spirit to those
tools. While pip can install Python packages, Pipenv is recommended as
it’s a higher-level tool that simplifies dependency management for common use
cases.
Use pip to install Pipenv:
$ pip install --user pipenv
Note
This does a user installation to prevent breaking any system-wide
packages. If pipenv isn’t available in your shell after installation,
you’ll need to add the user base’s binary directory to your PATH.
On Linux and macOS you can find the user base binary directory by running
python -m site --user-base and adding bin to the end. For example,
this will typically print ~/.local (with ~ expanded to the
absolute path to your home directory) so you’ll need to add
~/.local/bin to your PATH. You can set your PATH permanently by
modifying ~/.profile.
On Windows you can find the user base binary directory by running
py -m site --user-site and replacing site-packages with
Scripts. For example, this could return
C:\Users\Username\AppData\Roaming\Python36\site-packages so you would
need to set your PATH to include
C:\Users\Username\AppData\Roaming\Python36\Scripts. You can set your
user PATH permanently in the Control Panel. You may need to log
out for the PATH changes to take effect.
☤ Installing packages for your project
Pipenv manages dependencies on a per-project basis. To install packages,
change into your project’s directory (or just an empty directory for this
tutorial) and run:
$ cd myproject
$ pipenv install requests
Pipenv will install the excellent Requests library and create a Pipfile
for you in your project’s directory. The Pipfile is used to track which
dependencies your project needs in case you need to re-install them, such as
when you share your project with others. You should get output similar to this
(although the exact paths shown will vary):
Creating a Pipfile for this project...
Creating a virtualenv for this project...
Using base prefix '/usr/local/Cellar/python3/3.6.2/Frameworks/Python.framework/Versions/3.6'
New python executable in ~/.local/share/virtualenvs/tmp-agwWamBd/bin/python3.6
Also creating executable in ~/.local/share/virtualenvs/tmp-agwWamBd/bin/python
Installing setuptools, pip, wheel...done.

Virtualenv location: ~/.local/share/virtualenvs/tmp-agwWamBd
Installing requests...
Collecting requests
  Using cached requests-2.18.4-py2.py3-none-any.whl
Collecting idna<2.7,>=2.5 (from requests)
  Using cached idna-2.6-py2.py3-none-any.whl
Collecting urllib3<1.23,>=1.21.1 (from requests)
  Using cached urllib3-1.22-py2.py3-none-any.whl
Collecting chardet<3.1.0,>=3.0.2 (from requests)
  Using cached chardet-3.0.4-py2.py3-none-any.whl
Collecting certifi>=2017.4.17 (from requests)
  Using cached certifi-2017.7.27.1-py2.py3-none-any.whl
Installing collected packages: idna, urllib3, chardet, certifi, requests
Successfully installed certifi-2017.7.27.1 chardet-3.0.4 idna-2.6 requests-2.18.4 urllib3-1.22

Adding requests to Pipfile's [packages]...
P.S. You have excellent taste! ✨ 🍰 ✨
☤ Using installed packages
Now that Requests is installed you can create a simple main.py file to
use it:
import requests

response = requests.get('https://httpbin.org/ip')

print('Your IP is {0}'.format(response.json()['origin']))
Then you can run this script using pipenv run:
$ pipenv run python main.py
You should get output similar to this:
Using $ pipenv run ensures that your installed packages are available to
your script. It’s also possible to spawn a new shell that ensures all commands
have access to your installed packages with $ pipenv shell.
☤ Next steps
Congratulations, you now know how to install and use Python packages! ✨ 🍰 ✨
☤ Homebrew Installation of Pipenv
Homebrew is a popular open-source package management system for macOS.
Installing pipenv via Homebrew will keep pipenv and all of its dependencies in
an isolated virtual environment so it doesn’t interfere with the rest of your
Python installation.
Once you have installed Homebrew simply run:
To upgrade pipenv at any time:
☤ Pragmatic Installation of Pipenv
If you have a working installation of pip, and maintain certain “toolchain” type Python modules as global utilities in your user environment, pip user installs allow for installation into your home directory. Note that due to interaction between dependencies, you should limit tools installed in this way to basic building blocks for a Python workflow like virtualenv, pipenv, tox, and similar software.
To install:
$ pip install --user pipenv
For more information see the user installs documentation, but to add the installed cli tools from a pip user install to your path, add the output of:
$ python -c "import site; import os; print(os.path.join(site.USER_BASE, 'bin'))"
To upgrade pipenv at any time:
$ pip install --user --upgrade pipenv
☤ Crude Installation of Pipenv
If you don’t even have pip installed, you can use this crude installation method, which will bootstrap your whole system:
$ curl https://raw.githubusercontent.com/ken/pipenv/master/get-pipenv.py | python
Congratulations, you now have pip and Pipenv installed!
Summary: in this tutorial, you’ll learn how to install the pipenv packaging tool on Windows and how to configure a project with a new virtual environment using the Python pipenv tool.
Prerequisites
Before installing the pipenv tool, you need to have Python and pip installed on your computer.
First, open the Command Prompt or Windows Powershell and type the following command.
python -VNote that the letter V in the -V is uppercase. If you see the Python version like the following:
Python 3.8.5Code language: CSS (css)…then you already have Python installed on your computer. Otherwise, you need to install Python first.
Second, use the following command to check if you have the pip tool on your computer:
pip -VIt’ll return something like this:
pip 20.2.4 from C:\Users\<username>\AppData\Roaming\Python\Python38\site-packages\pip (python 3.8) Code language: CSS (css)First, use the following command to install pipenv tool:
pip install pipenvSecond, replace your <username> in the following paths and add them to the PATH environment variable:
c:\Users\<username>\AppData\Roaming\Python\Python38\Site-Packages
C:\Users\<username>\AppData\Roaming\Python\Python38\ScriptsCode language: HTML, XML (xml)
It’s important to notice that after changing the PATH environment variable, you need to close the Command Prompt and reopen it.
Third, type the following command to check if the pipenv installed correctly:
pipenv -hIf it shows the following output, then you’ve successfully installed the pipenv tool successfully.
Usage: pipenv [OPTIONS] COMMAND [ARGS]...
...Code language: CSS (css)
However, if you see the following message:
pipenv shell 'pipenv' is not recognized as an internal or external command, operable program or batch file.Code language: JavaScript (javascript)Then you should check step 2 to see if you have already added the paths to the PATH environment variable.
In this tutorial, you have learned how to install the pipenv tool on Windows computers.
Creating a new project
First, create a new project folder e.g., crawler.
Second, navigate to the crawler folder and install the requests package using the pipenv command:
pipenv install requestsOutput:
Creating a Pipfile for this project…
Installing requests…
Adding requests to Pipfile's [packages]…
Installation Succeeded
Pipfile.lock not found, creating…
Locking [dev-packages] dependencies…
Locking [packages] dependencies…
Locking...Building requirements...
Resolving dependencies...
Success!
Updated Pipfile.lock (fbd99e)!
Installing dependencies from Pipfile.lock (fbd99e)…
================================ 0/0 - 00:00:00
And you’ll see that pipenv created two new files called Pipfile and Pipfile.lock. On top of that, it installed a virtual environment.
If you look at the project folder, you won’t see the virtual environment folder.
To find the location of the virtual environment, you use the following command:
pipenv --venvIt’ll return something like this on Windows:
C:\Users\<username>\.virtualenvs\crawler-7nwusESRCode language: HTML, XML (xml)Note that the <username> is the username that you use to log in to Windows.
Third, create a new file called app.py in the project folder and add the following code to the file:
import requests

response = requests.get('https://www.python.org/')
print(response.status_code)Code language: JavaScript (javascript)
In this code, we imported the requests third-party module, use the get() function to make an HTTP request to the URL https://www.python.org/ and display the status code (200).
Fourth, run the app.py file from the terminal by using the python command:
python app.pyCode language: CSS (css)It’ll show the following error:
ModuleNotFoundError: No module named 'requests'Code language: JavaScript (javascript)The reason is that Python couldn’t locate the new virtual environment. To fix this, you need to activate the virtual environment.
Fifth, use the following command to activate the new virtual environment:
pipenv shellIf you run the app.py now, it should work correctly:
python app.pyCode language: CSS (css)Output:
200The status code 200 means the HTTP request has succeeded.
Sixth, use the exit command to deactivate the virtual environment:
exitCode language: PHP (php)Resolving the Unresolved Import Warning in VS Code
If you’re using VS Code, you may receive an unresolved import warning. The reason is that the VS code doesn’t know which Python interpreter to use.
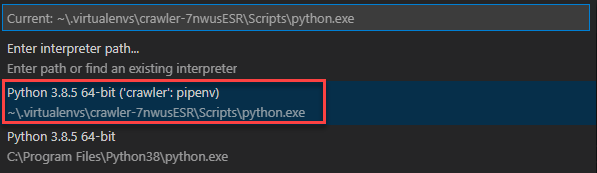
Therefore, you need to switch the Python interpreter to the one located in the new virtual environment:
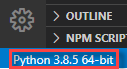
First, click the current Python interpreter at the right bottom corner of the VS Code:
Second, select the Python interpreter from the list:
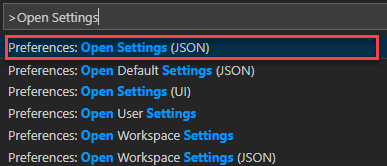
In addition, you need to change the python.jediEnabled parameter in the settings.json to True:
To open the settings.json file, you open the Command Palette with the keyboard shortcut CTRL + SHIFT + P on Windows or CMD + SHIFT + P on macOS:
And the change the value to True as follows:
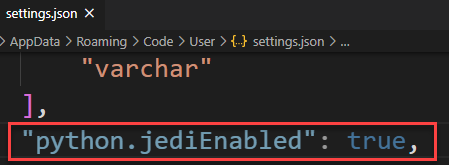
After that, you should save the file and restart the VS Code for the change.
Did you find this tutorial helpful ?
Summary: in this tutorial, you’ll learn how to install the pipenv packaging tool on Windows.
Prerequisites
Before installing the pipenv tool, you need to have Python and pip installed on your computer.
First, open the Command Prompt or Windows Powershell and type the following command.
python -V
Note that the letter V in the -V is uppercase. If you see the Python version like the following:
Python 3.8.5
Code language: CSS (css)
…then you already have Python installed on your computer. Otherwise, you need to install Python first.
Second, use the following command to check if you have the pip tool on your computer:
pip -V
It’ll return something like this:
pip 20.2.4 from C:\Users\<username>\AppData\Roaming\Python\Python38\site-packages\pip (python 3.8)
Code language: CSS (css)
First, use the following command to install pipenv tool:
pip install pipenv
Second, replace your <username> in the following paths and add them to the PATH environment variable:
c:\Users\<username>\AppData\Roaming\Python\Python38\Site-Packages
 C:\Users\<username>\AppData\Roaming\Python\Python38\Scripts
Code language: HTML, XML (xml)
It’s important to notice that after changing the PATH environment variable, you need to close the Command Prompt and reopen it.
Third, type the following command to check if the pipenv installed correctly:
pipenv -h
If it shows the following output, then you’ve successfully installed the pipenv tool successfully.
Usage: pipenv [OPTIONS] COMMAND [ARGS]...
 ...
Code language: CSS (css)
However, if you see the following message:
pipenv shell 'pipenv' is not recognized as an internal or external command, operable program or batch file.
Code language: JavaScript (javascript)
Then you should check step 2 to see if you have already added the paths to the PATH environment variable.
In this tutorial, you have learned how to install the pipenv tool on Windows computer.
- by
- on 20th August 2022
0
pipenv — это замечательный проект, который призван упростить
организацию рабочего процесса для Python-разработчиков. Он
решает несколько наиболее актуальных для разработчика проблем
(да, несколько, вопреки Unix-way).
Этакий швейцарский нож для питонистов.
pipenv нельзя рассматривать как замену pip, скорее это надстройка над
pip. Но даже
PyPA всерьёз рекомендует
рассмотреть pipenv для управления зависимостями приложений, что как
минимум означает, что проект хорошо зарекомендовал себя в сообществе.
Изначальный автор проекта —
Кеннет Рейц (Kenneth Reitz) — он ещё
и автор requests и множества
других проектов «for humans»,
очевидно, вдохновлялся пакетными менеджерами из других экосистем,
такими как npm (JavaScript)
и bundler (Ruby), так что если вы когда-то
пользовались этими инструментами, то можете заметить множество параллелей.
В названии проекта кроются два основных его назначения:
pip— установка и управления зависимостями проекта;env— создание и управление виртуальным окружением для проекта.
Грубо говоря, pipenv можно рассматривать как симбиоз утилит pip и
venv (или virtualenv), которые работают вместе, пряча многие
неудобные детали от конечного пользователя.
Помимо этого pipenv ещё умеет вот такое:
- автоматически находить интерпретатор Python нужной версии
(находит даже интерпретаторы, установленные через
pyenv
иasdf!); - запускать вспомогательные скрипты для разработки;
- загружать переменные окружения из файла
.env; - проверять зависимости на наличие известных уязвимостей.
Стоит сразу оговориться, что если вы разрабатываете библиотеку (или
что-то, что устанавливается через pip, и должно работать на нескольких
версиях интерпретатора),
то pipenv — не ваш путь. Этот инструмент создан в первую очередь
для разработчиков конечных приложений (консольных утилит, микросервисов,
веб-сервисов). Формат хранения зависимостей подразумевает работу
только на одной конкретной версии интерпретатора (это имеет смысл для
конечных приложений, но для библиотек это, как правило, не приемлемо).
Для разработчиков библиотек существует другой прекрасный инструмент —
poetry.
Итак, начнём по порядку.
Установка
Как я писал в посте про виртуальные окружения,
не стоит устанавливать пакеты в глобальный интерпретатор, поэтому предпочтительным
способом установки является пакетный менеджер вашей ОС.
Например, на MacOS pipenv можно установить через brew:
А на Fedora Linux вот так:
$ sudo dnf install pipenv
На Ubuntu можно установить pipenv из специального PPA:
$ sudo apt install software-properties-common python-software-properties
$ sudo add-apt-repository ppa:pypa/ppa
$ sudo apt update
$ sudo apt install pipenv
Во всех остальных случаях, в частности на Windows, самый простой способ — это установка
в домашнюю директорию пользователя
(опять же, см. пост про виртуальные окружения):
$ pip install --user pipenv
Теперь проверим установку:
$ pipenv --version
pipenv, version 2018.11.26
Если вы получили похожий вывод, значит, всё в порядке.
При возникновении проблем с установкой, обратитесь к
официальной документации.
Если совсем беда, то напишите комментарий под этим постом,
попробуем помочь 😊
Файлы pipenv
pipenv использует свой собственный формат файла для описания зависимостей
проекта — Pipfile.
Этот файл имеет формат TOML.
В принципе его можно редактировать руками, но pipenv достаточно неплохо
и сам умеет обновлять этот файл, когда вы просто работаете с утилитой
через командную строку. Структуру этого файла рассмотрим чуть позже.
В паре с Pipfile идёт Pipfile.lock. Он имеет формат JSON и не
предназначен для редактирования руками. Этот файл хранит контрольные
суммы пакетов, которые вы устанавливаете в проект, что даёт гарантию,
что развёрнутые на разных машинах окружения будут идентичны друг другу.
pipenv автоматически обновляет контрольные суммы в этом файле, когда
вы устанавливаете или обновляете зависимости. При развёртывании окружения
pipenv сверит сохранённые контрольные суммы с фактически
получившимися, и в случае чего уведомит вас, что развёртывание
не удалось. Это очень важный плюс в копилку pipenv по сравнению с pip.
Оба этих файла можно и нужно сохранять в системе контроля версий (git).
Вообще, идею использовать два файла для описания зависимостей нельзя
назвать новой.
Здесь явно прослеживается параллель между Gemfile и Gemfile.lock
из мира Ruby и package.json и package-lock.json из мира JavaScript.
Все эти файлы имеют схожее назначение.
Использование
Инициализация проекта
Давайте создадим простой проект под управлением pipenv.
Подготовка:
$ mkdir pipenv_demo
$ cd pipenv_demo
Создать новый проект, использующий конкретную версию Python можно вот такой командой:
Если же вам не нужно указывать версию так конкретно, то есть шорткаты:
# Создает проект с Python 3, версию выберет автоматически.
$ pipenv --three

# Аналогично с Python 2.
# В 2020 году эта опция противопоказана.
$ pipenv --two
После выполнения одной из этих команд, pipenv создал файл Pipfile и
виртуальное окружение где-то в заранее определенной директории
(по умолчанию вне директории проекта).
$ cat Pipfile
[[source]]
name = "pypi"
url = "https://pypi.org/simple"
verify_ssl = true

[dev-packages]

[packages]

[requires]
python_version = "3.8"
Это минимальный образец Pipfile. В секции [[source]] перечисляются
индексы пакетов — сейчас тут только PyPI, но может быть и ваш
собственный индекс пакетов. В секциях [packages] и [dev-packages]
перечисляются зависимости приложения — те, которые нужны для непосредственной
работы приложения (минимум), и те, которые нужны для разработки (запуск
тестов, линтеры и прочее). В секции [requires] указана версия интерпретатора,
на которой данное приложение может работать.
Очень полезно правильно разделять зависимости на «основные» и «разработческие».
Это позволит уменьшить размер окружения при развёртывании на
продакшн (например, размер Docker-образа). Кроме того, чем меньше в системе,
работающей на продакшне, установлено пакетов, тем меньше потенциальных уязвимостей.
Если вам нужно узнать, где именно pipenv создал виртуальное окружение
(например, для настройки IDE), то сделать это можно вот так:
$ pipenv --py
/Users/and-semakin/.local/share/virtualenvs/pipenv_demo-1dgGUSFy/bin/python
Управление зависимостями через pipenv
Теперь давайте установим в проект первую зависимость. Делается
это при помощи команды pipenv install:
$ pipenv install requests
Давайте посмотрим, что поменялось в Pipfile (здесь и дальше я
буду сокращать вывод команд или содержимое файлов при помощи ...):
$ cat Pipfile
...

[packages]
requests = "*"

...
В секцию [packages] добавилась зависимость requests с версией *
(версия не фиксирована).
А теперь давайте установим зависимость, которая нужна для разработки,
например, восхитительный линтер flake8,
передав флаг --dev в ту же команду install:
$ pipenv install --dev flake8

$ cat Pipfile
...

[dev-packages]
flake8 = "*"

...
Теперь можно увидеть всё дерево зависимостей проекта при помощи команды
pipenv graph:
$ pipenv graph
flake8==3.7.9
  - entrypoints [required: >=0.3.0,<0.4.0, installed: 0.3]
  - mccabe [required: >=0.6.0,<0.7.0, installed: 0.6.1]
  - pycodestyle [required: >=2.5.0,<2.6.0, installed: 2.5.0]
  - pyflakes [required: >=2.1.0,<2.2.0, installed: 2.1.1]
requests==2.23.0
  - certifi [required: >=2017.4.17, installed: 2020.4.5.1]
  - chardet [required: >=3.0.2,<4, installed: 3.0.4]
  - idna [required: >=2.5,<3, installed: 2.9]
  - urllib3 [required: >=1.21.1,<1.26,!=1.25.1,!=1.25.0, installed: 1.25.9]
Это бывает полезно, чтобы узнать, что от чего зависит, или почему в вашем
виртуальном окружении есть определённый пакет.
Также, пока мы устанавливали пакеты, pipenv создал Pipfile.lock,
но этот файл длинный и не интересный, поэтому показывать содержимое я не буду.
Удаление и обновление зависимостей происходит при помощи команд
pipenv uninstall и pipenv update соответственно. Работают они довольно
интуитивно, но если возникают вопросы, то вы всегда можете получить
справку при помощи флага --help:
$ pipenv uninstall --help
$ pipenv update --help
Управление виртуальными окружениями
Давайте удалим созданное виртуальное окружение:
И представим себя в роли другого разработчика, который только присоединился
к вашему проекту. Чтобы создать виртуальное окружение и установить
в него зависимости нужно выполнить следующую команду:
Эта команда на основе Pipfile.lock воссоздаст точно то же самое виртуальное
окружение, что и у других разработчиков проекта.
Если же вам не нужны dev-зависимости (например, вы разворачиваете ваш
проект на продакшн), то можно не передавать флаг --dev:
Чтобы «войти» внутрь виртуального окружения, нужно выполнить:
$ pipenv shell
(pipenv_demo) $
В этом режиме будут доступны все установленные пакеты, а имена python и pip
будут указывать на соответствующие программы внутри виртуального окружения.
Есть и другой способ запускать что-то внутри виртуального окружения без
создания нового шелла:
# это запустит REPL внутри виртуального окружения
$ pipenv run python

# а вот так можно запустить какой-нибудь файл
$ pipenv run python script.py

# а так можно получить список пакетов внутри виртуального окружения
$ pipenv run pip freeze
Переменные окружения
Согласно идеологии 12-факторных приложений, конфигурацию принято хранить
отдельно от кода, а лучше всего конфигурацию вообще
хранить в переменных окружения
(environment variables или env vars). Чтобы упростить работу с
переменными окружения в процессе разработки, широкое айти-сообщество придумало
сохранять их в специальный файл .env и загружать в шелл по мере
необходимости. Такие файлы используются во множестве фреймворков,
инструментов и экосистем.
pipenv упрощает работу с переменными окружения в Python-проектах.
Давайте создадим файл .env и запишем туда какое-нибудь значение:
SECRET_VALUE=hello pipenv!
ВАЖНО: файл .env может содержать пароли для подключения к СУБД
или токены для доступа к внешним сервисам. Такие данные никогда не должны
попадать в git.
Давайте напишем небольшой скрипт (script.py), который будет использовать эту
переменную окружения:
import os

print("Secret value:", os.environ.get("SECRET_VALUE"))
Попробуем запустить его без использования pipenv:
$ python script.py
Secret value: None
Скрипт вместо секретного значения вывел None, потому что переменная
окружения так и осталась просто лежать в файле, и никак не повлияла на
работу скрипта. А теперь запустим этот же скрипт через pipenv:
$ pipenv run python script.py
Loading .env environment variables…
Secret value: hello pipenv!
pipenv увидел файл .env и автоматически загрузил переменные из него.
Скрипт вывел то значение, которое мы и ожидали увидеть. Команда
pipenv shell тоже подгружает переменные окружения из файла.
Запуск скриптов
Часто в процессе разработки встречаются повторяющиеся задачи. Если вы
работаете в команде, то ваши коллеги наверняка тоже с ними сталкиваются.
Было бы разумно сохранить/задокументировать где-то команды, нужные
для решения этих повторяющихся задач, чтобы их было проще найти и чтобы
они всегда выполнялись одинаково. Можно, конечно, использовать обычные
.sh файлы, но у pipenv тоже есть инструмент, который может в
этом помочь, и даже лучше.
Допустим, что вы регулярно запускаете проверку кода flake8, но с
указанием дополнительных флагов, например, вам не нужно проверять
определенную директорию, а так же вы хотите пропускать один вид ошибок
(правильнее было бы просто сохранить эти параметры в конфигурационный файл,
но примера ради будем передавать всё через командную строку):
$ flake8 --exclude=tests --ignore=E121 .
Отредактируем Pipfile, создав там секцию [scripts] со следующим
содержимым:
[scripts]
lint = "flake8 --exclude=tests --ignore=E121 ."
Теперь тот же самый скрипт можно запустить при помощи команды:
В качестве бонуса pipenv автоматически подгрузит переменные окружения,
так что таким же образом можно выполнять и скрипты, которые зависят от
конфигурации проекта (миграции БД, очистки кэшей, удаление временных файлов,
да что угодно).
Распространённые проблемы
Перечислю проблемы, с которыми я сталкивался в процессе работы с pipenv.
Лишние зависимости в виртуальном окружении
Бывает, что кроме перечисленных в Pipfile и Pipfile.lock зависимостей
в виртуальном окружении установлены и другие пакеты. Такое может случиться,
например, при переключении между ветками в git, где в Pipfile.lock
находятся разные зависимости. Или, банально, если внутри виртуального
окружения вы установите что-то через pip помимо pipenv.
Чаще всего вам будет безразлично, есть в виртуальном окружении какие-то
лишние пакеты или нет, но иногда такие лишние пакеты влияют на работу
приложения. Пример из моей практики: ORM orator
будет использовать тот драйвер для подключения к MySQL, который первым найдёт
в виртуальном окружении, поэтому если вы хотите использовать pymysql,
то нужно убедиться, что в виртуальном окружении нет MySQLdb (он приоритетнее).
Нужно учитывать, что команда pipenv sync --dev только доустанавливает пакеты
в виртуальное окружение, но не удаляет оттуда уже установленные. Поэтому, если
вам нужно обеспечить отсутствие в виртуальном окружении лишних пакетов, то
приходится удалять его полностью и создавать заново:
$ pipenv --rm && pipenv sync --dev
Пререлизные зависимости
По умолчанию pipenv игнорирует нестабильные альфа- и бета-версии пакетов,
и устанавливает только стабильные. Может случиться так, что вам нужно
установить пререлизную версию пакета, например, автоформаттер black,
который на данный момент всё ещё не имеет стабильных релизов вообще:
$ pipenv install --dev black
...
  Hint: try $ pipenv lock --pre if it is a pre-release dependency.
ERROR: ERROR: Could not find a version that matches black
Skipped pre-versions: 18.3a0, 18.3a0, 18.3a1, 18.3a1, 18.3a2, 18.3a2, 18.3a3, 18.3a3, 18.3a4, 18.3a4, 18.4a0, 18.4a0, 18.4a1, 18.4a1, 18.4a2, 18.4a2, 18.4a3, 18.4a3, 18.4a4, 18.4a4, 18.5b0, 18.5b0, 18.5b1, 18.5b1, 18.6b0, 18.6b0, 18.6b1, 18.6b1, 18.6b2, 18.6b2, 18.6b3, 18.6b3, 18.6b4, 18.6b4, 18.9b0, 18.9b0, 19.3b0, 19.3b0, 19.10b0, 19.10b0
There are incompatible versions in the resolved dependencies.
Команда завершилась ошибкой, но pipenv предлагает воспользоваться опцией
--pre, чтобы установить пререлизную зависимость. Избегайте искушения
сделать так.
Что произойдёт, если всё-таки рискнуть:
$ pipenv install --dev --pre black
...
✔ Installation Succeeded
На первый взгляд, всё хорошо. Но давайте заглянем в Pipfile:
$ cat Pipfile
...
[pipenv]
allow_prereleases = true
Там появилась директива allow_prereleases = true, которая глобально меняет
поведение pipenv и разрешает ему устанавливать пререлизные версии
вообще любых зависимостей, а не только той, которую вы хотели установить.
Если у вас в Pipfile не ограничены версии зависимостей (как у requests = "*"),
то следующий запуск pipenv install или pipenv update может принести
в ваш проект кучу нестабильных зависимостей. Не факт, что приложение
это переживёт.
Чтобы установить пререлизную зависимость правильно, нужно указать
конкретную версию:
$ pipenv install --dev black==19.10b0
Если же вы уже попались в эту ловушку pipenv, то просто отредактируйте
Pipfile и либо удалите оттуда директиву allow_prereleases вообще,
либо поменяйте значение на false. После этого можно спать спокойно.
Мердж-конфликты в Pipfile.lock
Когда в двух параллельных ветках происходит установка или обновление
пакетов, либо просто редактируется Pipfile, то при слиянии этих веток
обязательно произойдет конфликт в Pipfile.lock. Git добавит в этот файл
маркеры конфликтов, после чего, само собой, он перестает быть валидным JSON.
В таких случаях pipenv просто превращается в тыкву и ничего не может сделать:
$ pipenv sync --dev
...
json.decoder.JSONDecodeError: Expecting property name enclosed in double quotes: line 3 column 8 (char 24)
План выхода из такой ситуации следующий:
1. Не пытайтесь осознанно решать конфликты в Pipfile.lock вручную, всё равно
не сможете; pipenv сам создал этот файл, вот пусть сам и разбирается.
2. Разрешите конфликт в любую сторону, главное, чтобы в итоге получился
валидный JSON.
3. Пересоздайте Pipfile.lock заново:
$ pipenv lock --keep-outdated
Флаг --keep-outdated позволяет избежать лишних обновлений версий — вы
ведь просто хотите разрешить конфликты, а не обновить все пакеты, верно?
Тем не менее, pipenv может вас проигнорировать, и всё равно обновить
некоторые пакеты, будьте к этому готовы (это известный баг).
Статус проекта: пациент скорее мертв, чем жив, но надежда есть
Стоит отметить, что после какой-то драмы в сообществе,
изначальный автор (Kenneth Reitz) покинул проект (и вообще все свои проекты),
и проект перешёл в общественное достояние.
Любые такие конфликты всегда плохо сказываются на успехе проекта, и pipenv,
определенно, переживает сейчас не лучшие времена.
На данный момент последний релиз был 26 ноября 2018 года.
За полтора года накопилось большое количество незарелиженных баг-фиксов,
что говорит о проблемах с поддержкой проекта.
Несмотря на это, я всё равно рекомендую присмотреться к pipenv, потому что
он действительно хорош. Недавно проект стал проявлять
признаки жизни,
и я очень надеюсь, что всё с ним будет хорошо. По-моему, это очень
важный для экосистемы Python проект.
Обновление от 30 мая 2020: pipenv наконец выпустил
долгожданный релиз 2020.5.28.
Обновляемся:
$ pip install --user --upgrade pipenv
Проект будет жить!
Заключение
Вместо заключения оставлю вас поразмышлять над вот этой программой:
def use_pipenv():
    know_common_workflows()
    distinguish_between_main_and_dev_dependencies()
    use_dot_env_file()
    use_scripts()
    know_pitfalls()
    print("PROFIT!!!!!")


if work_on_application:
    use_pipenv()
elif work_on_library:
    use_poetry()
else:
    print("wtf")
    use_pip()
Дополнительное чтение
- Исходный код
pipenv; - Официальная документация;
- Гайд на RealPython;
- Kenneth Reitz — Pipenv: The Future of Python Dependency Management — PyCon 2018;
- Managing Application Dependencies Tutorial.
Подпишитесь!
Чтобы получить уведомление о новом посте можно:
- подписаться на канал в Telegram
(альтернативная ссылка); - подписаться на Atom-фид, если
вы олдфаг-старовервам так удобно.
Обложка: James Case, Victorinox Swiss Army Knife