Python 3.4+ and 2.7.9+
Good news! Python 3.4 (released March 2014) and Python 2.7.9 (released December 2014) ship with Pip. This is the best feature of any Python release. It makes the community’s wealth of libraries accessible to everyone. Newbies are no longer excluded from using community libraries by the prohibitive difficulty of setup. In shipping with a package manager, Python joins Ruby, Node.js, Haskell, Perl, Go—almost every other contemporary language with a majority open-source community. Thank you, Python.
If you do find that pip is not available, simply run ensurepip.
-
On Windows:
py -3 -m ensurepip -
Otherwise:
python3 -m ensurepip
Of course, that doesn’t mean Python packaging is problem solved. The experience remains frustrating. I discuss this in the Stack Overflow question Does Python have a package/module management system?.
Python 3 ≤ 3.3 and 2 ≤ 2.7.8
Flying in the face of its ‘batteries included’ motto, Python ships without a package manager. To make matters worse, Pip was—until recently—ironically difficult to install.
Official instructions
Per https://pip.pypa.io/en/stable/installing/#do-i-need-to-install-pip:
Download get-pip.py, being careful to save it as a .py file rather than .txt. Then, run it from the command prompt:
python get-pip.py
You possibly need an administrator command prompt to do this. Follow Start a Command Prompt as an Administrator (Microsoft TechNet).
This installs the pip package, which (in Windows) contains …\Scripts\pip.exe that path must be in PATH environment variable to use pip from the command line (see the second part of ‘Alternative Instructions’ for adding it to your PATH,
Alternative instructions
The official documentation tells users to install Pip and each of its dependencies from source. That’s tedious for the experienced and prohibitively difficult for newbies.
For our sake, Christoph Gohlke prepares Windows installers (.msi) for popular Python packages. He builds installers for all Python versions, both 32 and 64 bit. You need to:
- Install setuptools
- Install pip
For me, this installed Pip at C:\Python27\Scripts\pip.exe. Find pip.exe on your computer, then add its folder (for example, C:\Python27\Scripts) to your path (Start / Edit environment variables). Now you should be able to run pip from the command line. Try installing a package:
pip install httpie
There you go (hopefully)! Solutions for common problems are given below:
Proxy problems
If you work in an office, you might be behind an HTTP proxy. If so, set the environment variables http_proxy and https_proxy. Most Python applications (and other free software) respect these. Example syntax:
http://proxy_url:port
http://username:password@proxy_url:port
If you’re really unlucky, your proxy might be a Microsoft NTLM proxy. Free software can’t cope. The only solution is to install a free software friendly proxy that forwards to the nasty proxy. http://cntlm.sourceforge.net/
Unable to find vcvarsall.bat
Python modules can be partly written in C or C++. Pip tries to compile from source. If you don’t have a C/C++ compiler installed and configured, you’ll see this cryptic error message.
Error: Unable to find vcvarsall.bat
You can fix that by installing a C++ compiler such as MinGW or Visual C++. Microsoft actually ships one specifically for use with Python. Or try Microsoft Visual C++ Compiler for Python 2.7.
Often though it’s easier to check Christoph’s site for your package.
Edit this page
Toggle table of contents sidebar
Usually, pip is automatically installed if you are:
-
working in a
virtual environment -
using Python downloaded from python.org
-
using Python that has not been modified by a redistributor to remove
ensurepip
Supported Methods#
If your Python environment does not have pip installed, there are 2 mechanisms
to install pip supported directly by pip’s maintainers:
-
ensurepip -
get-pip.py
ensurepip#
Python comes with an ensurepip module[1], which can install pip in
a Python environment.
Linux
$ python -m ensurepip --upgrade
MacOS
$ python -m ensurepip --upgrade
Windows
C:> py -m ensurepip --upgrade
More details about how ensurepip works and how it can be used, is
available in the standard library documentation.
get-pip.py#
This is a Python script that uses some bootstrapping logic to install
pip.
-
Download the script, from https://bootstrap.pypa.io/get-pip.py.
-
Open a terminal/command prompt,
cdto the folder containing the
get-pip.pyfile and run:
More details about this script can be found in pypa/get-pip’s README.
Standalone zip application#
Note
The zip application is currently experimental. We test that pip runs correctly
in this form, but it is possible that there could be issues in some situations.
We will accept bug reports in such cases, but for now the zip application should
not be used in production environments.
In addition to installing pip in your environment, pip is available as a
standalone zip application.
This can be downloaded from https://bootstrap.pypa.io/pip/pip.pyz. There are
also zip applications for specific pip versions, named pip-X.Y.Z.pyz.
The zip application can be run using any supported version of Python:
If run directly:
Linux
$ python -m pip.pyz --help
MacOS
$ python -m pip.pyz --help
Windows
then the currently active Python interpreter will be used.
Alternative Methods#
Depending on how you installed Python, there might be other mechanisms
available to you for installing pip such as
using Linux package managers.
These mechanisms are provided by redistributors of pip, who may have modified
pip to change its behaviour. This has been a frequent source of user confusion,
since it causes a mismatch between documented behaviour in this documentation
and how pip works after those modifications.
If you face issues when using Python and pip installed using these mechanisms,
it is recommended to request for support from the relevant provider (eg: Linux
distro community, cloud provider support channels, etc).
Upgrading pip#
Upgrade your pip by running:
Linux
$ python -m pip install --upgrade pip
MacOS
$ python -m pip install --upgrade pip
Windows
C:> py -m pip install --upgrade pip
Compatibility#
The current version of pip works on:
-
Windows, Linux and MacOS.
-
CPython 3.7, 3.8, 3.9, 3.10, 3.11, 3.12, and latest PyPy3.
pip is tested to work on the latest patch version of the Python interpreter,
for each of the minor versions listed above. Previous patch versions are
supported on a best effort approach.
Other operating systems and Python versions are not supported by pip’s
maintainers.
Users who are on unsupported platforms should be aware that if they hit issues, they may have to resolve them for themselves. If they received pip from a source which provides support for their platform, they should request pip support from that source.
In this tutorial, we will identify PIP for Python, when we use it, how to install it, how to check its version, how to configure it on Windows, and how to upgrade (or downgrade) it.
What Is PIP for Python?
PIP stands for «PIP Installs Packages», which is a recursive acronym (the one that refers to itself) coined by its creator. In more practical terms, PIP is a widely used package-management system designed to install libraries that aren’t included in the standard distribution of the Python programming language on our local machine — and then manage them from the command line.
By default, PIP fetches such libraries from Python Package Index (PyPI), which is a central online repository containing a vast collection of third-party packages for various applications. If necessary, PIP can also connect to another local or online repository as long as it complies to PEP 503.
How to Install PIP on Windows
Before proceeding to PIP installation on Windows, we need to make sure that Python is already installed and PIP is not installed.
Check If Python Is Available
To verify that Python is available on our local machine, we need to open the command line (in Windows search, type cmd and press Enter to open Command Prompt or right-click on the Start button and select Windows PowerShell), type python, and press Enter.
If Python is properly installed, we will see a notification like the one below:
Python 3.10.2 (tags/v3.10.2:a58ebcc, Jan 17 2022, 14:12:15) [MSC v.1929 64 bit (AMD64)] on win32 Type "help," "copyright," "credits," or "license" for more information.
In the opposite case, we will see the following notification:
'python' is not recognized as an internal or external command, operable program or batch file.
This means that Python is either not installed on our local machine or is installed incorrectly and needs setting system variables. If you need further guidance on how to properly install Python on Windows, you can use this article in the Dataquest blog: Tutorial: Installing Python on Windows.
Check If PIP Is Already Installed
Now that we verified that Python is installed on Windows (or, if it was not, have installed it), let’s check if PIP is already installed on our system.
The latest releases Python 3.4+ and Python 2.7.9+, as well as the virtual environments virtualenv and pyvenv, automatically ship with PIP (we can check our Python version by running python --version or python -V in the command line). However, the older versions of Python don’t have this advantage by default. If we use an older Python release and cannot upgrade it for some reason (e.g., when we have to work with the projects made in old versions of Python incompatible with the newer versions), we may need to manually download and install PIP on Windows.
To check if PIP is already installed on Windows, we should open the command line again, type pip, and press Enter.
If PIP is installed, we will receive a long notification explaining the program usage, all the available commands and options. Otherwise, if PIP is not installed, the output will be:
'pip' is not recognized as an internal or external command, operable program or batch file.
This is exactly the case when we have to manually install PIP on Windows.
Download PIP
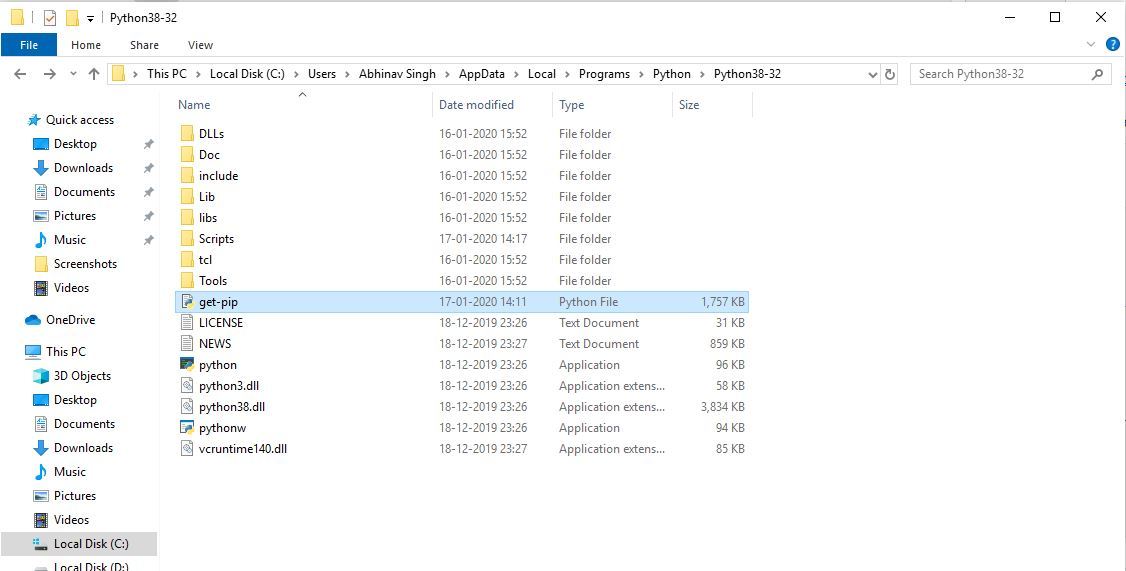
Before installing PIP, we have to download the get-pip.py file. We can do this two ways:
- Go to https://bootstrap.pypa.io/get-pip.py and save this file as
get-pip.pyin the same folder where Python is located.
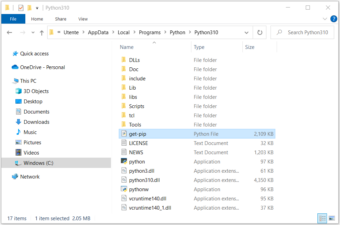
By default, the Python installation is stored in the folderAppData. The entire path could look like the following:
C:\Users\User\AppData\Local\Programs\Python\Python310
The folder User can be called differently on a particular machine, and also the final folder in the above path depends on the version of Python. In our case – Python 3.10:
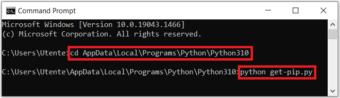
- Open the command line and navigate to the folder where Python is stored using the
cdcommand (see the previous point if you are not sure about Python’s location).
Now, run the following curl command:
curl https://bootstrap.pypa.io/get-pip.py -o get-pip.py

Install PIP on Windows
Now that we downloaded the get-pip.py file, we need to complete the followings steps.
- Open the command line
- Navigate to the folder where Python and the
get-pip.pyfile are stored using thecdcommand - Launch the installer by running the following command:
python get-pip.py
After a quick installation process, a message appears with all the details of the installation, and the final line appears as follows:
Successfully installed pip-22.0.1 wheel-0.37.1
PIP is now successfully installed on Windows.
Verify the PIP Installation Process and Check the PIP Version
To double-check if PIP has been installed properly and check its version, we need to run one of these commands in the command line:
pip --version
or
pip -V
If PIP is installed correctly, we will see a message indicating the version of PIP and its location on the local system, like the following:
pip 22.0.2 from C:\Users\Utente\AppData\Local\Programs\Python\Python310\lib\site-packages\pip (python 3.10).
If instead, an error is thrown, it is necessary to repeat the installation process.
Add PIP to Windows Environment Variables
To be able to run PIP without issues from any folder in the command line (rather than navigating every time to the folder where the PIP installer is stored, as we did earlier), we have to add the path to the folder with the get-pip.py file to Windows environment variables. This is especially important in that rare case when, we have installed several versions of Python, including old ones. In this situation, to avoid installing PIP separately for each old version of Python, we should install it only for one of them and then perform the following steps:
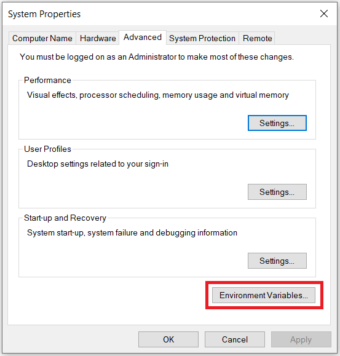
- Open
Control Panel(typing it in Windows search), selectSystem and Security, then selectSystem. - Go to the end of the opened window and select
Advanced system settings:

- Click
Environment Variables:
- In the
System variablessection, find and double-click the variablePath:
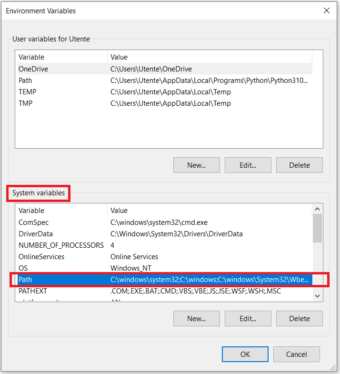
- Click
Newand add the path to the folder where the PIP installer is stored:
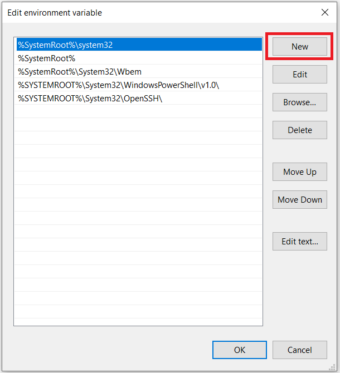
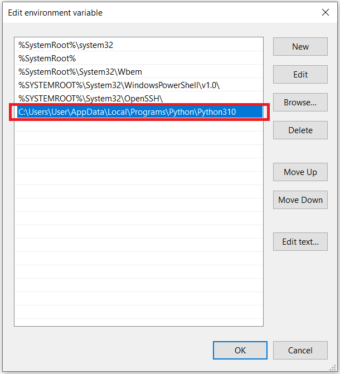
- Click
OKto confirm modifications.
Upgrade PIP on Windows
Sometimes, we may need to update PIP on Windows to the latest version to keep it up-to-date and working flawlessly. For this purpose, we can run the following command in the command line:
python -m pip install --upgrade pip
As a result, the old version of PIP will be uninstalled and the most recent release will be installed.
Downgrade PIP on Windows
We can also want to downgrade PIP to a specific older version. This operation may be necessary in certain cases, for example, if a new version works with some compatibility issues. To downgrade PIP on Windows, we need to open the command line and run a command with the following syntax:
python -m pip install pip==<version>
Let’s say, we want to downgrade it to v20.3. Then the exact command will be:
python -m pip install pip==20.3
After downgrading PIP, we can verify that we now have the necessary version of it by running python -V.
Conclusion
In this tutorial we covered various topics regarding the installation of PIP on Windows:
- How PIP works
- How to check if Python and PIP are already installed
- When it may be necessary to manually install PIP on Windows
- How to download and install PIP on Windows
- How to verify if PIP has been successfully installed and check its version
- How to configure PIP on Windows and when it may be necessary
- When and how to upgrade or downgrade PIP on Windows
Now that we have PIP properly installed on Windows, we can begin using it to manage Python libraries. Let’s start with running pip help in the command line and exploring the available commands and options for this program.
Prerequisite: Python Language Introduction
Before we start with how to install pip for Python on Windows, let’s first go through the basic introduction to Python. Python is a widely-used general-purpose, high-level programming language. Python is a programming language that lets you work quickly and integrate systems more efficiently.
PIP is a package management system used to install and manage software packages/libraries written in Python. These files are stored in a large “online repository” termed as Python Package Index (PyPI). pip uses PyPI as the default source for packages and their dependencies. So whenever you type:
pip install package_name
pip will look for that package on PyPI and if found, it will download and install the package on your local system.
Check if Python is installed
Run the following command to test if python is installed or not. If not click here.
python --version
If it is installed, You will see something like this:
Python 3.10.0
Download and Install pip
The PIP can be downloaded and installed using the command line by going through the following steps:
Method 1: Using cURL in Python
Curl is a UNIX command that is used to send the PUT, GET, and POST requests to a URL. This tool is utilized for downloading files, testing REST APIs, etc.
Step 1: Open the cmd terminal
Step 2: In python, a curl is a tool for transferring data requests to and from a server. Use the following command to request:
curl https://bootstrap.pypa.io/get-pip.py -o get-pip.py
python get-pip.py

Method 2: Manually install PIP on Windows
Pip must be manually installed on Windows. You might need to use the correct version of the file from pypa.io if you’re using an earlier version of Python or pip. Get the file and save it to a folder on your PC.
Step 1: Download the get-pip.py (https://bootstrap.pypa.io/get-pip.py) file and store it in the same directory as python is installed.
Step 2: Change the current path of the directory in the command line to the path of the directory where the above file exists.

Step 3: get-pip.py is a bootstrapping script that enables users to install pip in Python environments. Run the command given below:
python get-pip.py
Step 4: Now wait through the installation process. Voila! pip is now installed on your system.

Verification of the installation process
One can easily verify if the pip has been installed correctly by performing a version check on the same. Just go to the command line and execute the following command:
pip -V
or
pip --version

Adding PIP To Windows Environment Variables
If you are facing any path error then you can follow the following steps to add the pip to your PATH. You can follow the following steps to set the Path:
- Go to System and Security > System in the Control Panel once it has been opened.
- On the left side, click the Advanced system settings link.
- Then select Environment Variables.
- Double-click the PATH variable under System Variables.
- Click New, and add the directory where pip is installed, e.g. C:Python33Scripts, and select OK.
Upgrading Pip On Windows
pip can be upgraded using the following command.
python -m pip install -U pip
Downgrading Pip On Windows
It may happen sometimes that your pip current pip version is not supporting your current version of python or machine for that you can downgrade your pip version with the following command.
Note: You can mention the version you want to install
python -m pip install pip==17.0
Last Updated :
17 Apr, 2023
Like Article
Save Article
Как любой серьёзный язык программирования, Python поддерживает сторонние библиотеки и фреймворки. Их устанавливают, чтобы не изобретать колесо в каждом новом проекте. Необходимы пакеты можно найти в центральном репозитории Python — PyPI (Python Package Index — каталог пакетов Python).
Однако скачивание, установка и работа с этими пакетами вручную утомительны и занимают много времени. Именно поэтому многие разработчики полагаются на специальный инструмент PIP для Python, который всё делает гораздо быстрее и проще.
Сама аббревиатура — рекурсивный акроним, который на русском звучит как “PIP установщик пакетов” или “Предпочитаемый установщик программ”. Это утилита командной строки, которая позволяет устанавливать, переустанавливать и деинсталлировать PyPI пакеты простой командой pip.
Если вы когда-нибудь работали с командной строкой Windows и с терминалом на Linux или Mac и чувствуете себя уверенно, можете пропустить инструкции по установке.
Устанавливается ли PIP вместе с Python?
Если вы пользуетесь Python 2.7.9 (и выше) или Python 3.4 (и выше), PIP устанавливается вместе с Python по умолчанию. Если же у вас более старая версия Python, то сначала ознакомьтесь с инструкцией по установке.
Правильно ли Python установлен?
Вы должны быть уверены, что Python должным образом установлен на вашей системе. На Windows откройте командную строку с помощью комбинации Win+X. На Mac запустите терминал с помощью Command+пробел, а на Linux – комбинацией Ctrl+Alt+T или как-то иначе именно для вашего дистрибутива.
Затем введите команду:
python --version
На Linux пользователям Python 3.x следует ввести:
python3 --version
Если вы получили номер версии (например, Python 2.7.5), значит Python готов к использованию.
Если вы получили сообщение Python is not defined (Python не установлен), значит, для начала вам следует установить Python. Это уже не по теме статьи. Подробные инструкции по установке Python читайте в теме: Скачать и установить Python.
Как установить PIP на Windows.
Следующие инструкции подойдут для Windows 7, Windows 8.1 и Windows 10.
- Скачайте установочный скрипт get-pip.py. Если у вас Python 3.2, версия get-pip.py должны быть такой же. В любом случае щелкайте правой кнопкой мыши на ссылке и нажмите “Сохранить как…” и сохраните скрипт в любую безопасную папку, например в “Загрузки”.
- Откройте командную строку и перейдите к каталогу с файлом get-pip.py.
- Запустите следующую команду:
python get-pip.py
Как установить PIP на Mac
Современные версии Mac идут с установленными Python и PIP. Так или иначе версия Python устаревает, а это не лучший вариант для серьёзного разработчика. Так что рекомендуется установить актуальные версии Python и PIP.
Если вы хотите использовать родную систему Python, но у вас нет доступного PIP, его можно установить следующей командой через терминал:
sudo easy_install pip
Если вы предпочитаете более свежие версии Python, используйте Homebrew. Следующие инструкции предполагают, что Homebrew уже установлен и готов к работе.
Установка Python с помощью Homebrew производится посредством одной команды:
brew install python
Будет установлена последняя версия Python, в которую может входить PIP. Если после успешной установки пакет недоступен, необходимо выполнить перелинковку Python следующей командой:
brew unlink python && brew link python
Как установить PIP на Linux
Если у вас дистрибутив Linux с уже установленным на нем Python, то скорее всего возможно установить PIP, используя системный пакетный менеджер. Это более удачный способ, потому что системные версии Python не слишком хорошо работают со скриптом get-pip.py, используемым в Windows и Mac.
Advanced Package Tool (Python 2.x)
sudo apt-get install python-pip
Advanced Package Tool (Python 3.x)
sudo apt-get install python3-pip
pacman Package Manager (Python 2.x)
sudo pacman -S python2-pip
pacman Package Manager (Python 3.x)
sudo pacman -S python-pip
Yum Package Manager (Python 2.x)
sudo yum upgrade python-setuptools
sudo yum install python-pip python-wheel
Yum Package Manager (Python 3.x)
sudo yum install python3 python3-wheel
Dandified Yum (Python 2.x)
sudo dnf upgrade python-setuptools
sudo dnf install python-pip python-wheel
Dandified Yum (Python 3.x)
sudo dnf install python3 python3-wheel
Zypper Package Manager (Python 2.x)
sudo zypper install python-pip python-setuptools python-wheel
Zypper Package Manager (Python 3.x)
sudo zypper install python3-pip python3-setuptools python3-wheel
Как установить PIP на Raspberry Pi
Как пользователь Raspberry, возможно, вы запускали Rapsbian до того, как появилась официальная и поддерживаемая версия системы. Можно установить другую систему, например, Ubuntu, но в этом случае вам придётся воспользоваться инструкциями по Linux.
Начиная с Rapsbian Jessie, PIP установлен по умолчанию. Это одна из серьёзных причин, чтобы обновиться до Rapsbian Jessie вместо использования Rapsbian Wheezy или Rapsbian Jessie Lite. Так или иначе, на старую версию, все равно можно установить PIP.
Для Python 2.x:
sudo apt-get install python-pip
Для Python 3.x:
sudo apt-get install python3-pip
На Rapsbian для Python 2.x следует пользоваться командой pip, а для Python 3.x — командой pip3 при использовании команд для PIP.
Как обновить PIP для Python
Пока PIP не слишком часто обновляется самостоятельно, очень важно постоянно иметь свежую версию. Это может иметь значение при исправлении багов, совместимости и дыр в защите.
К счастью, обновление PIP проходит просто и быстро.
Для Windows:
python -m pip install -U pip
Для Mac, Linux, или Raspberry Pi:
pip install -U pip
На текущих версиях Linux и Rapsbian Pi следует использовать команду pip3.
Как устанавливать библиотеки Python с помощью PIP
Если PIP работоспособен, можно начинать устанавливать пакеты из PyPI:
pip install package-name
Установка определённой версии вместо новейшей версии пакета:
pip install package-name==1.0.0
Поиск конкретного пакета:
pip search "query"
Просмотр деталей об установленном пакете:
pip show package-name
Список всех установленных пакетов:
pip list
Список всех устаревших пакетов:
pip list --outdated
Обновление устаревших пакетов:
pip install package-name --upgrade
Следует отметить, что старая версия пакета автоматически удаляется при обновлении до новой версии.
Полностью переустановить пакет:
pip install package-name --upgrade --force-reinstall
Полностью удалить пакет:
pip uninstall package-name