Если в ходе установки будут какие-то трудности, ошибки — пишите об этом в комментариях, будем вместе разбираться!
Шаг 2. Устанавливаем СУБД Oracle на компьютер
Шаг 3. Настраиваем среду разработки
После завершения установки проверим установилась ли корректно база, для этого:
ПОЗДРАВЛЯЮ БАЗА ORACLE УСПЕШНО УСТАНОВЛЕНА!!!
Но работать в командной строке — это неудобно, поэтому установим беспланую программу Sql developer для подключения и программирования базы.
Спасибо за внимание!

Oracle Database 19c – the latest offering of Oracle corp. is now available for windows 10 operating system. Oracle has finally released the on-premises version of Oracle Database 19c for Windows operating system. Meaning now you can download and install it on your windows systems. That is exactly what we are going to learn today.
In this blog I will show you how to properly install Oracle Database 19c on Windows 10. Just to make the installation less complex and easy to understand I have divided this blog into three simple sections. These are –
- Prerequisite for Oracle 19c installation
- Download of the Oracle 19c software, and
- Installation of Oracle DB 19c on Windows 10.
Also, we will see at the end of this blog, what is the default URL of the Oracle Database 19c Enterprise Manager? Thus, I suggest you to read on till the end.
Prerequisite for Oracle 19c installation
The most important part is knowing a software before you deploy it on any machine. It could save you from various errors. Also solving them would be a time-consuming activity. Furthermore, if you are preparing for an interview then this could help you in nailing it.
Here I have explained all the important things related to Oracle DB 19c in Question Answer format. Check it out –
Is Oracle Database 19c available for all the Windows operating systems?
No, it is not. Oracle Database 19c is only available for –
- Windows 8.1 x64 – Pro and Enterprise editions
- Windows 10 x64 – Pro, Enterprise, and Education editions
- Windows Server 2012 R2 x64 – Standard, Datacenter, Essentials, and Foundation editions
- Windows Server 2016 x64 – Standard, Datacenter, and Essentials editions
- Windows Server 2019 x64 – Standard, Datacenter, and Essentials editions
Can we install Oracle DB 19c on x32 bit Windows operating system?
No, we cannot install Oracle Database 19c on x32bit Windows operating system. Oracle 19c is only compatible with x64bit Windows OS. Those who have x32bit Windows OS installed. I am sorry. You either need to upgrade your system to x64bit (But first make sure your CPU has x64 bit architecture. You cannot install x64bit OS on a x32 bit CPU) or configure a virtual box.
What are hardware requirements for Oracle 19c?
The minimum hardware requirement for installing Oracle Database 19c on Windows 10 are as follow—
- Minimum 2GB free RAM.
- 10GB of empty space on Hard Disk Drive
- A processor based on either Intel EM64T or AMD64 architecture.
- Display card with minimum resolution of 1024×768 pixels.
- 16 GB SWAP (virtual memory) space if RAM is more than 16 GB. If RAM is in between 2 GB and 16 GB, then 1 time the size of the RAM
Also make sure that your system is connected to the internet.
Free RAM for Oracle 19c.
Somebody commented on my 18c installation video and said that he has 3 or may 4 GB RAM installed but the Oracle Universal Installer (OUI) is still giving the minimum hardware compatibility error.
Therefore, let me clear the confusion here – No matter what size of RAM you have installed in your system, installation will not proceed unless 2GB of free space of RAM is available.
Consequently, 2GB of RAM must be free for Oracle 19c of whatever the size of RAM you have installed in your system.
Storage for Oracle 19c
As mentioned earlier that the installation of Oracle Database 19c requires at least 10GB of Free storage space. Thus, 10GB empty space on your hard disk drive is a sweet spot. Empty storage space depends on, which edition of Oracle Database 19c you are installing. For example –
- Oracle Database 19c Enterprise Edition requires at least 6.0 GB free storage space
- Oracle DB 19c Standard Edition 2 requires at least 5.5 GB free storage space
Furthermore you should also, at least have 7.0 GB for restart installation.
Oracle recommends that you allocate approximately 100 GB to allow additional space for applying any future patches on top of the existing Oracle home.
How many Edition of Oracle 19c are available?
So far, Oracle Database 19c is only available in 2 editions. These are –
- (EE) Oracle Database 19c Enterprise Edition, and
- (SE2) Oracle Database 19c Standard Edition 2
Now that I have given you all the basic information about the installation of Oracle Database 19c. It’s time to start the installation.
In order to install the Oracle Database 19c we first need to download its copy on our system. Similar to every other Oracle Database software, Oracle 19c is also available for Free to us.
Let’s see how you can do that –
The download of Oracle Database 19c is going to be about 3 GB in size. Therefore make sure you have sufficient hard disk space to store it along with a high-speed internet.
Currently Oracle Database 19c is only available for Microsoft OS, Linux x86 – 64, Oracle Solaris, IBM AIX, HP-UX and Linux on System Z. And you can download your copy of Oracle 19c from here.
Since the launch of Oracle DB 18c, Oracle has introduced a new installation process called image-based installation. And thanks to this new process we only have to download 1 ZIP file, which is unlike Oracle 12c and previous versions.
Oracle Database 19c Download Link
www.Oracle.com/Download
Currently there are only two editions of Oracle Database 19c that are available –
- Oracle Database 19c Enterprise Edition
- And, Oracle Database 19c Standard Edition 2
Both these editions are bundled within the single file that I mentioned earlier. But you don’t need to download them separately.
I have explained the download process of Oracle Database 19c in my Video tutorial. Thus, if you are still confused, then check out the video.
Extract Oracle 19c.
You must be wondering, what’s so special about extracting the files of Oracle 19c?
Perhaps you are right. But, I guess you will agree with me when I ask you this. Will you install your Oracle Database Server into your Download folder. I would never do that, would you?
Since the launch of image-based installation with Oracle 18c, the Oracle Universal installer (OUI) has become slightly strict with the Oracle Home location.
In image-based location the OUI takes the path of the directory where we have extracted the Oracle Database and assigns it as Oracle Home. Therefore, it becomes necessary for us to decide the location of our DB Home/Oracle Home beforehand and extract all the files from the ZIP folder onto that location.
What would I suggest you do?
First of all decide a location. Additionally, it’s recommended to locate your Oracle Home in any partition of your hard disk, except the one which contains your Operating system.
For example. I will create a folder in my D: Drive and name it ‘db_home’.
Once you’ve done that – copy the zip file which we downloaded earlier into that folder and extract its content there.
That’s all you have to do.
Now we are all set to start the installation process of Oracle Database 19c.
Launch the OUI
Once you have successfully extracted your Oracle 19c files and folders then you’re all set to launch the Oracle Universal Installer (OUI).
But before you do that, make sure you are logged on to your windows with an administrative user account. You have to follow this clause because it is mandatory. Consequently, failing to do so may cause mid installation error and crash the entire installation process.
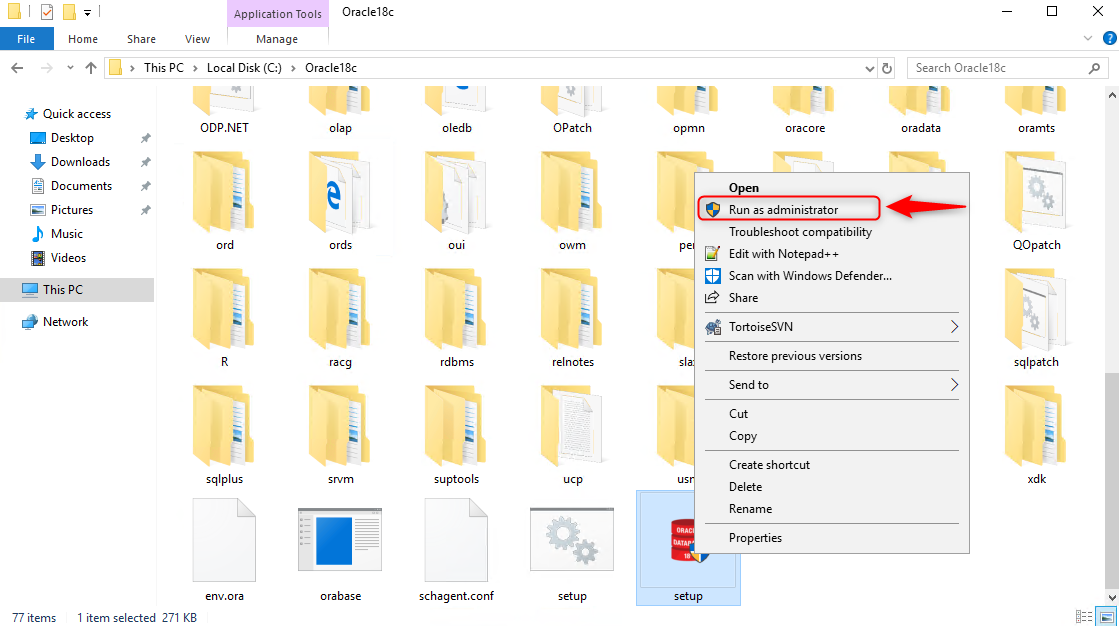
Now that you have logged on to your windows with an administrative user, locate the directory where you have extracted your Oracle Database 19c. Thereafter you have to search the file with the name “setup.exe”.
Once you find the file right click on it and choose “Run as Administrator”.
That’s all you need to do to start the Oracle Universal Installer (OUI).
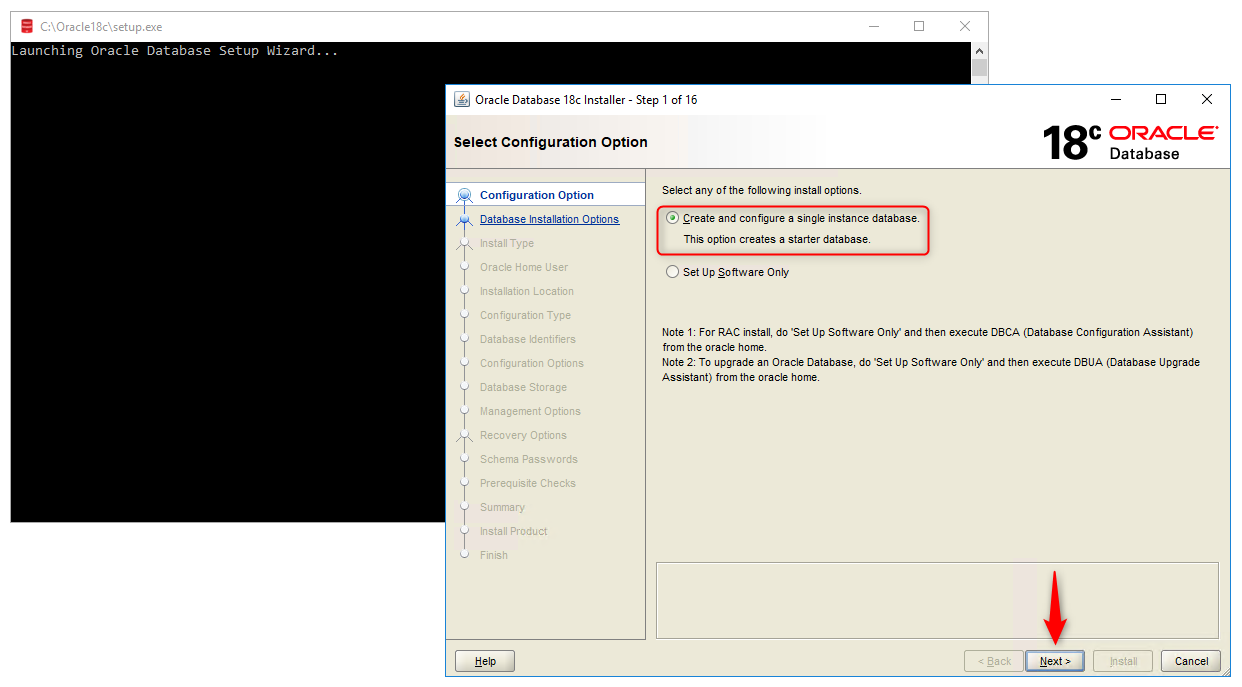
Screen 1: Configuration Option
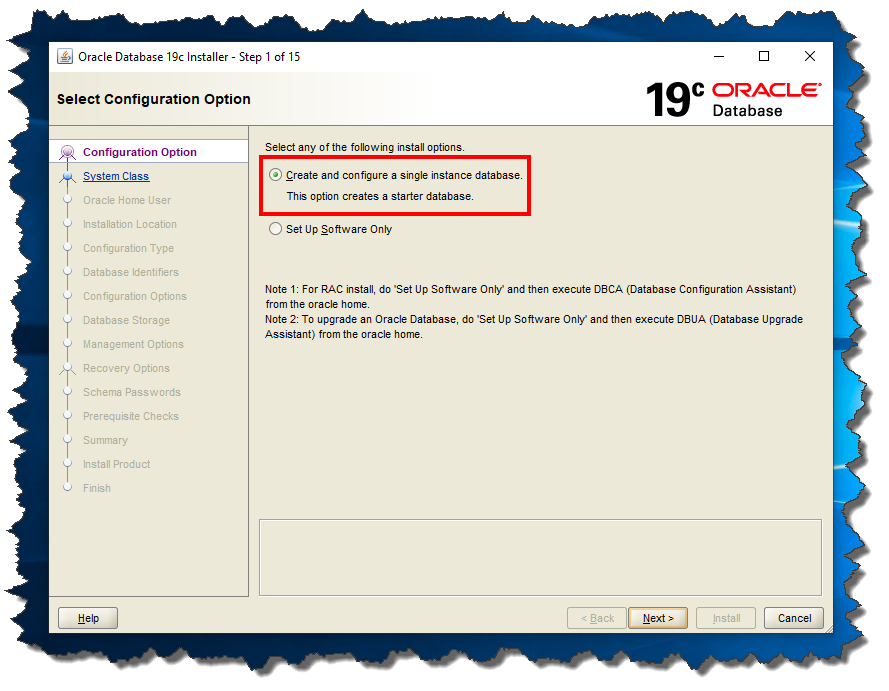
Here we are presented with two configuration options.
- Create and configure a single instance database.
- Setup software only
If you select the first option, the oracle universal installer will not only install and configure the Oracle server on your system. But it will also create a starter database for you. This option is good for learning and practice purposes.
But if you go with the second option which is “setup software only”. It will do exactly what its name suggests. It will install and configure the Oracle Database server on your system. However OUI, the oracle universal installer will not create or configure any database for you.
Additionally, this option is best suitable when you are configuring a RAC or planning to perform an upgradation.
Action: Select The First Option – Create and Configure A Single Instance Database.
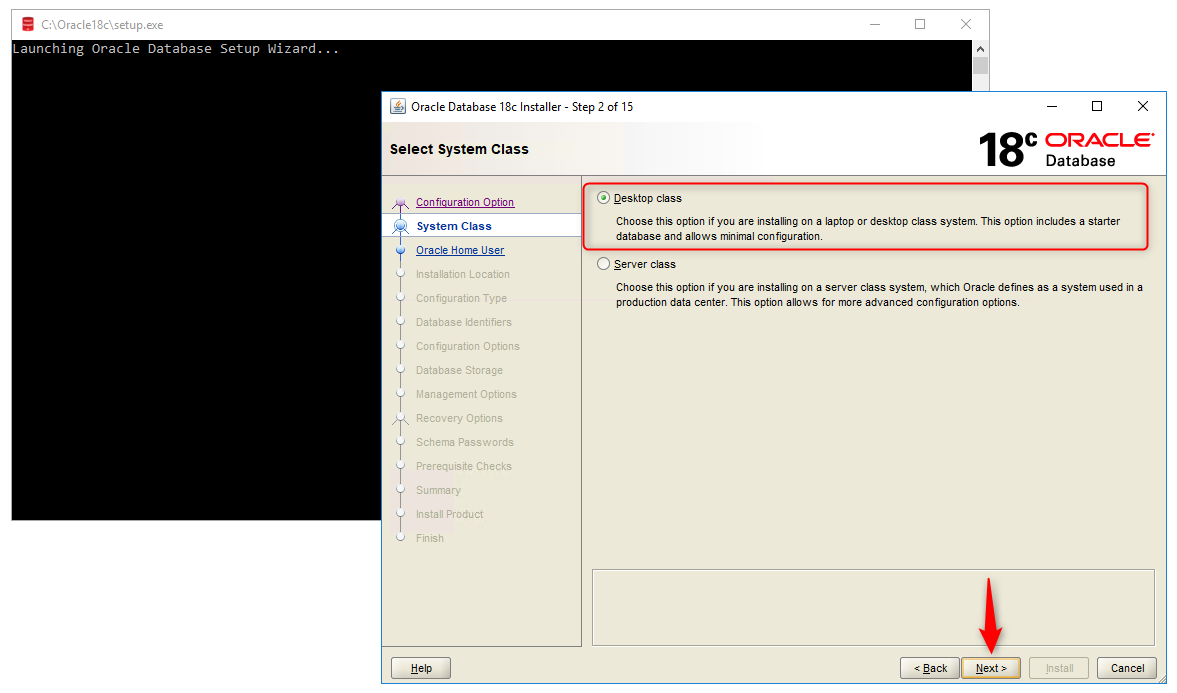
Screen 2: Select System Class.
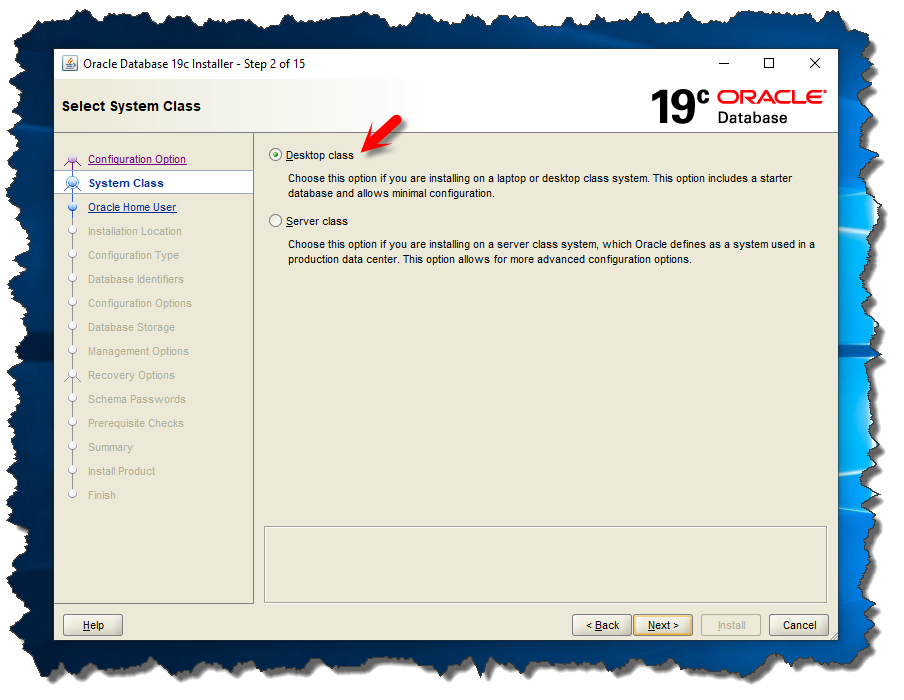
In this step we need to select what type of installation of Oracle 19c we want to perform. OUI gives us two options.
First one is “Desktop Class” – You choose this option when you are installing Oracle Database 19c on your desktop or laptop. Because this option will perform the basic installation of Oracle 19c on your system.
Second option is “Server Class” – This is advanced installation. As it is generally used when you are installing Oracle Database 19c or any other version on Server grade machine.
Action: Select The First Option “Desktop Class”
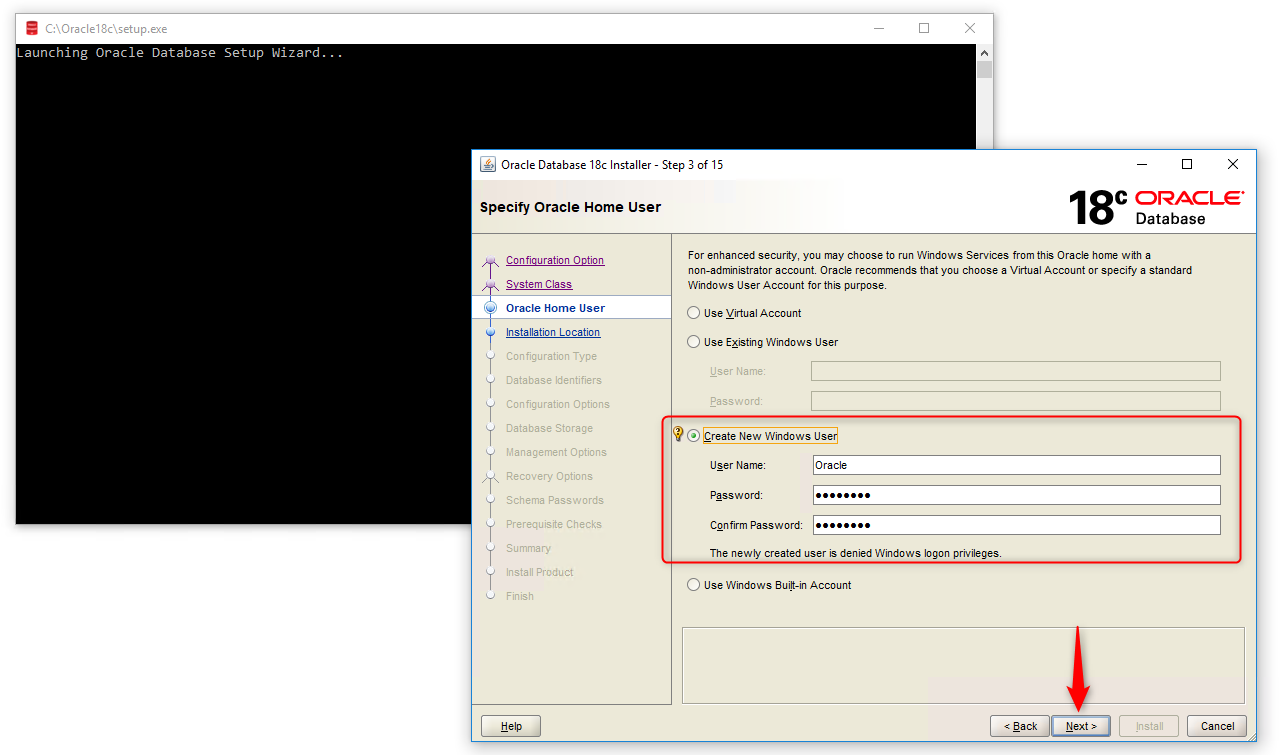
Screen 3: Specify Oracle Home User.
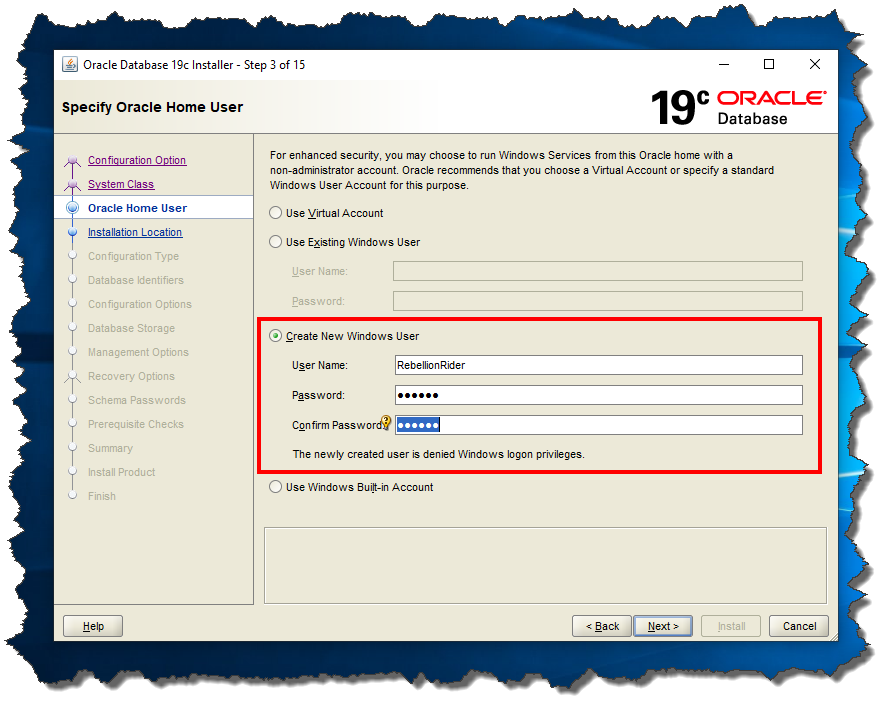
There are so many things which Oracle Database server does in the background to keep your system running. And to do those tasks it creates 14 windows groups. Furthermore to handle those groups Oracle server needs a dedicated windows user.
In this step OUI gives us four options for creating or configuring Windows 10 user. These four options are –
- Use Virtual Account
- Or, Use Existing Windows User
- Create New Windows User
- Use Windows Built-In Account
Use Virtual Account
Select this option if you neither want to create a new user nor want to use any built-in or existing user.
Use Existing Windows User
Choose this if you want to use an existing standard or administrative windows user which is already created.
Create New Windows User
Oracle universal installer gives you an option for creating a dedicated user for your Oracle Database 19c. Using this you can create a Standard Windows User which is completely dedicated to your Oracle requirements. However this user will not be allotted with logon privileges. Therefore logging in to your system with this user won’t be possible. But you can modify it like any other standard windows user.
Use Windows Built-in Account
Choose this if you want to use one of those user accounts which Windows 10 has created for you during its installation.
For enhanced security Oracle recommends either using Virtual Account or Standard Windows user instead of windows built-in account. Also, you cannot change this Oracle Home user once the installation is done thus be careful while creating it.
Action: I will suggest creating a new and completely dedicated Oracle Database 19c user. To do that you have to select the third option which is “Create Windows User”.
Screen 4: Typical Installation.

Perhaps this is the most important step in this entire installation process of Oracle Database 19c. Here I suggest you bring out your pen and paper and get ready to note down some information.
Oracle Base
This is an editable drop-down input field. Therefore you have the freedom to either choose from the option given in the drop-down list or enter your desired directory location.
Oracle Base is a base directory for all your Oracle Products. Consequently this will be the location where all the necessary files like Oracle Home of Oracle Database 19c will be stored.
Here you will get a drop-down input field with one or two options already filled. Choose from any of these if you want to. But, if you want to assign a location of your choice then hit the “Browse” button and select the desirable location.
Action: Specify a directory location which is secure and stable.
Software Location.
Software location is famously known as Oracle Home or DB Home. This directory will be placed inside the Oracle Base. Also, it will be the directory where all the files and folders of Oracle Database 19c are placed.
Since Oracle introduced image-based installation in Oracle 18c we were not allowed to change or modify this location. But prior to that we were free to set this location according to our preference. Now, the Oracle Universal installer (OUI) takes the location of the setup files and assigns it as the Oracle Home or software location.
That’s why I asked you guys to move your Oracle Database 19c files from download folder to another location, which is more secure and stable.
Anyways, you can read more about Oracle Home here
Database File Location
Important files of Oracle Database 19c like Data files, redo log files, control files, server parameter files and the password files will be saved onto this directory. Furthermore it will be placed inside the software location of your Oracle 19c.
These files are most important and required for the proper functioning of the Oracle 19c database. Therefore make sure not to delete the content of this directory.
Action: Let it be set on default
Database Edition.
This is another drop-down list. Here you will find all the editions of Oracle 19c which you have downloaded. Fortunately Oracle Database 19c is only available in two editions and both of them come within the bundle which you have downloaded.
These editions of Oracle 19c are –
- Oracle Enterprise Edition
- And, Oracle Standard Edition 2
Action: Select Enterprise Edition
Character Set
As the name suggests, using this field you set the character set for your Database.
Action: Let it be set on default.
Global Database Name (S.I.D.)
The Global Database Name will be the name of your database and will serve as your database SID. You will need it while making a connection with your database using tools such as SQL Developer. By default, it is set as ORCL. If you want, you can change it to any other name, but make sure to remember it. I suggest you write it down somewhere as your Database SID.
Password
This will be the password for your Administrative user. Administrative users are special user. Using them you can alter the core of your Database. So, it’s always advisable to set a strong password for them.
Now you asked what are the names(username) of those Administrative users?
Oracle 19c has four Administrative users just like every other variant of Oracle Database. These are –
- SYS
- SYSTEM
- SYSMAN, and
- DBSNMP
You can use the name of either of these users as username and the password which you have specified in the field to log on to your database.
As I said earlier, these can modify the core of your database thus be careful with them.
Create as Container Database
In most of the cases this checkbox is already checked, but if for some weird reason it isn’t, then check it. If OUI finds this checkbox enabled then it will create a root container database for you.
Pluggable Database Name
In this field you will specify a unique name for your pluggable database. By default, it is set on ‘orclpdb’. This Pluggable Database (PDB) will work as a template for those PDBs which you will create in future.
Action: Let it be set on its default value. If you decide to change it, then note it down somewhere.
Screen 5: Prerequisite Checks
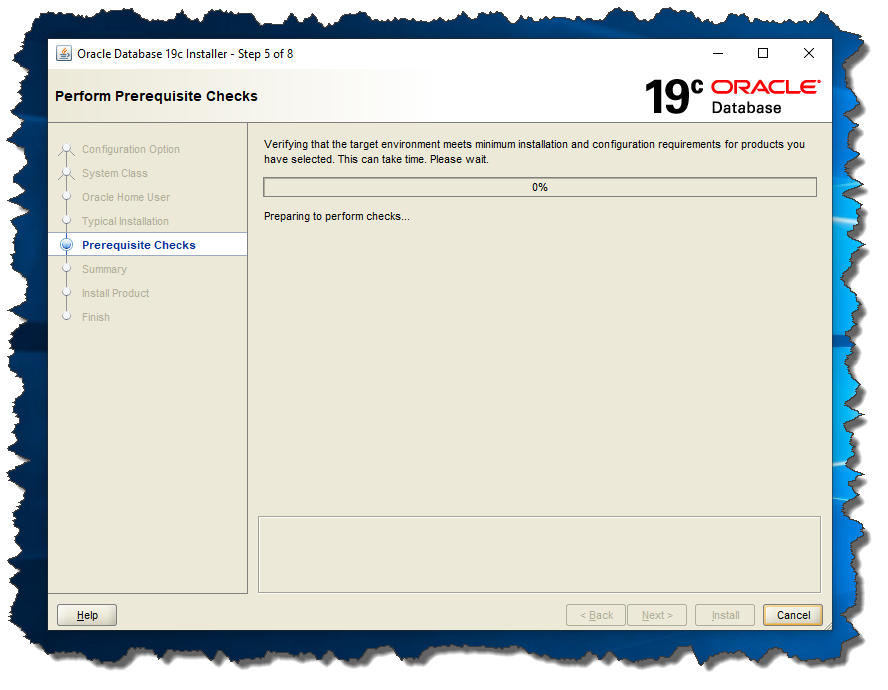
In this step the OUI will check the prerequisites. We will be good to install it if everything goes well. If there is any error, then the OUI will show you here.
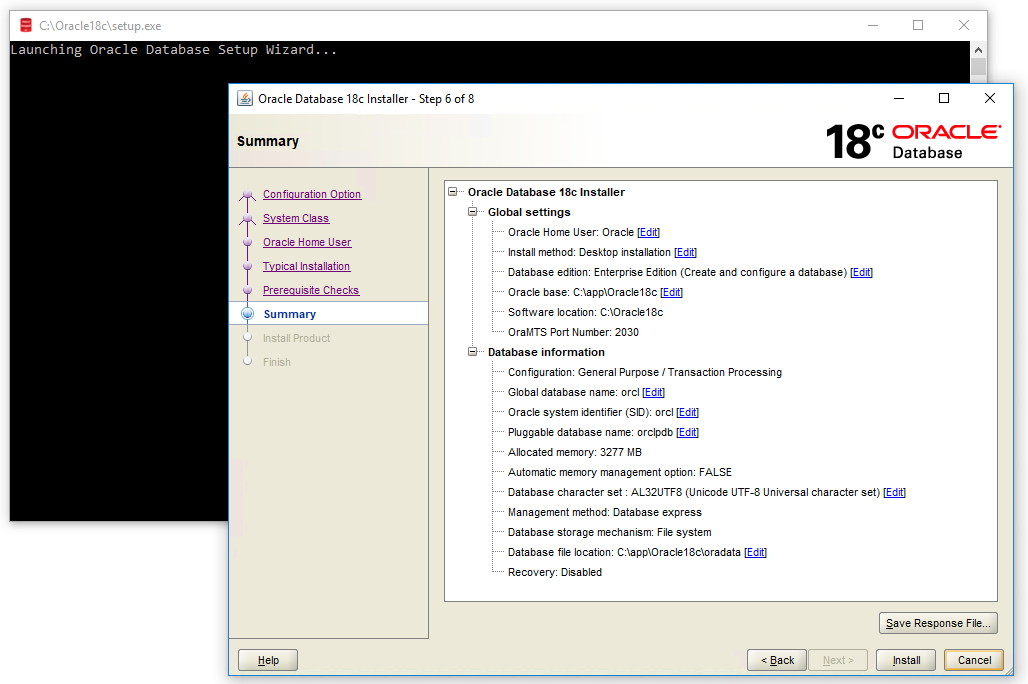
Screen 6: Summary
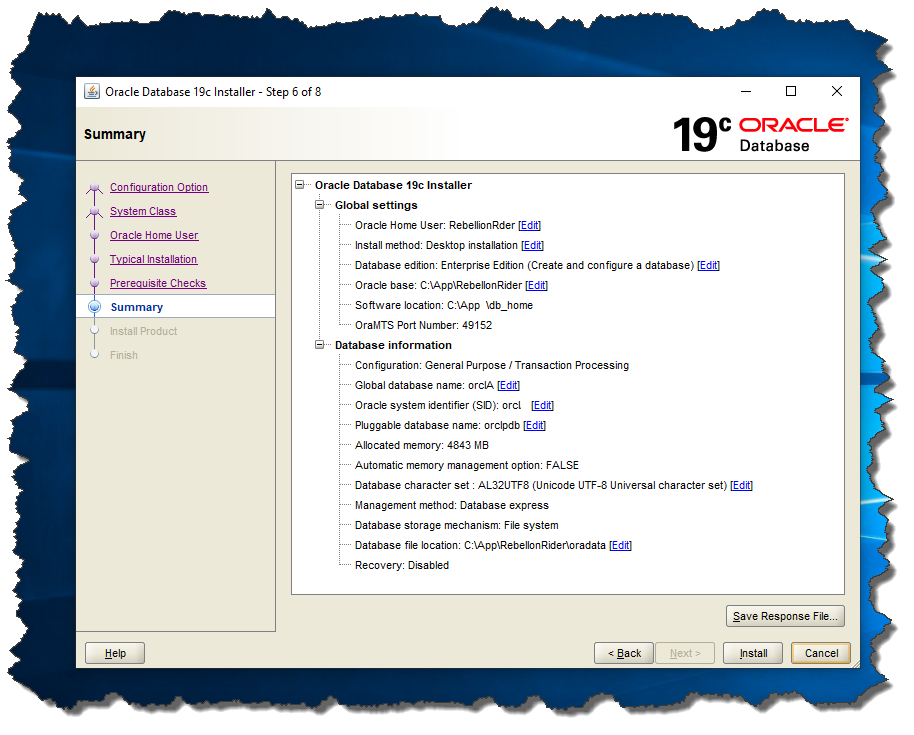
On this screen, the OUI will show the summary of the configuration which you just did for your Oracle Database 19c installation. Here go ahead and press the Install button.
If possible save this information somewhere for future use. It’s always better to be safe than sorry!
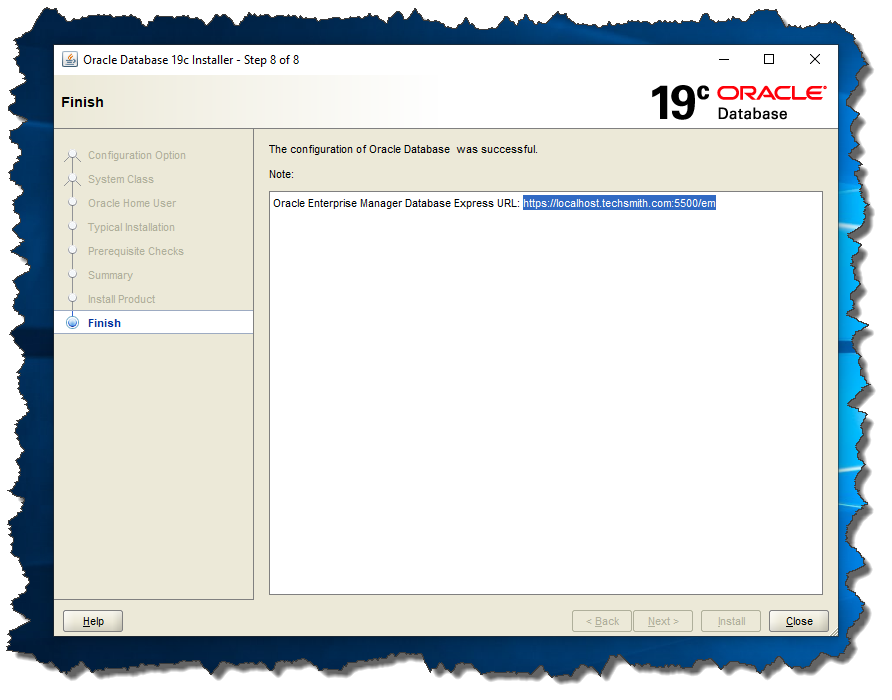
Unlike 11g and 12c in Oracle 19c you will not get a DBCA separately for your database configuration. Because this new Oracle 19c Universal Installer has simplified the process.
Once the installation is done the installer will show you the URL for your Oracle Database 19c Enterprise Manager. Enterprise manager is a web-based tool for managing Oracle Database 19c. Copy and save that link. I suggest you bookmark that link.
That’s how we install Oracle Database 19c on Windows 10. This was a detailed tutorial on installation of Oracle 19c. I have crafted this tutorial by taking the perspective of interview and certification in my mind.
Though the tutorial is very detailed but if you still have any doubts then feel free to leave me a message on my Facebook.
Thanks and have a great day!
In this article we will learn how to install Oracle Database 18c on Windows 10 Enterprise for research and education.
Before we start installing, we need to know the minimum requirements for Oracle Database 18c.
Windows x64 Minimum Hardware Requirements
System Architecture: Processor: AMD64 and Intel EM64T
Physical memory (RAM): 2 GB minimum
Virtual memory (swap):
- If physical memory is between 2 GB and 16 GB, then set virtual memory to 1 times the size of the RAM
- If physical memory is more than 16 GB, then set virtual memory to 16 GB
Disk space:
- Typical Install Type total: 10 GB
- Advanced Install Types total: 10 GB
Video adapter: 256 colors
Screen Resolution: 1024 X 768 minimum
It’s important to know that Oracle Database 18c is only available for 64 bit Windows systems, just as for Oracle 12c. Therefore, we can’t install Oracle Database 18c in our PC if it’s running a 32 bit Windows OS.
Moreover, Oracle Database 18c is only available for Windows 10 Professional, Enterprise and Education Editions. This means we can’t install Oracle Database 18c if we are using Windows 10 Home Edition.
As we mentioned before, we will be installing Oracle Database 18c on Windows 10 Enterprise 64 bit version, but if you want to install it on Windows 7 or 8 then you can still follow these steps as the installation process is the same, but first please check the compatibility.

Download Software from OTN
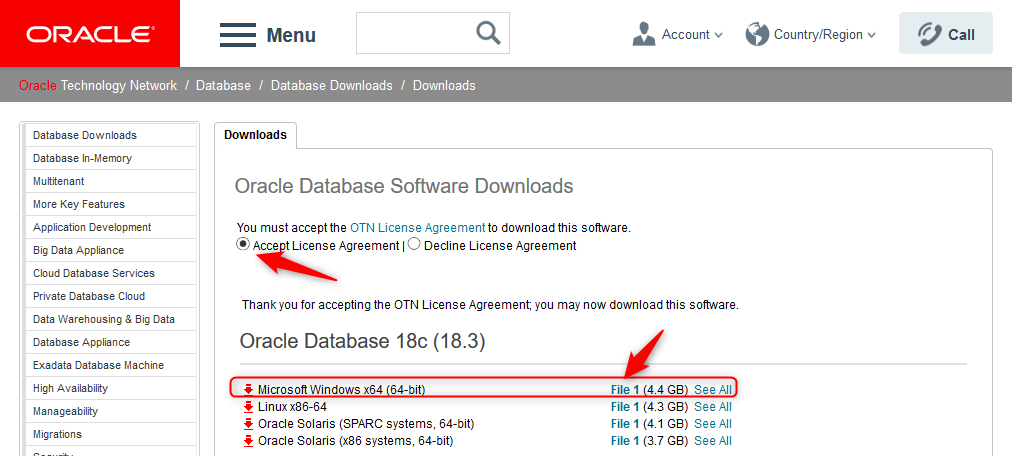
To install Oracle Database 18c we have to download the software, which we can do by visiting the OTN page: http://www.oracle.com/technetwork/database/enterprise-edition/downloads/index.html
We accept the license agreement and choose the Windows version to download ->Click on File 1
To download the files, we must login to the Oracle website. If we have a valid account on this site, we can download the software; otherwise we can register on the page and create an account, which is completely free.
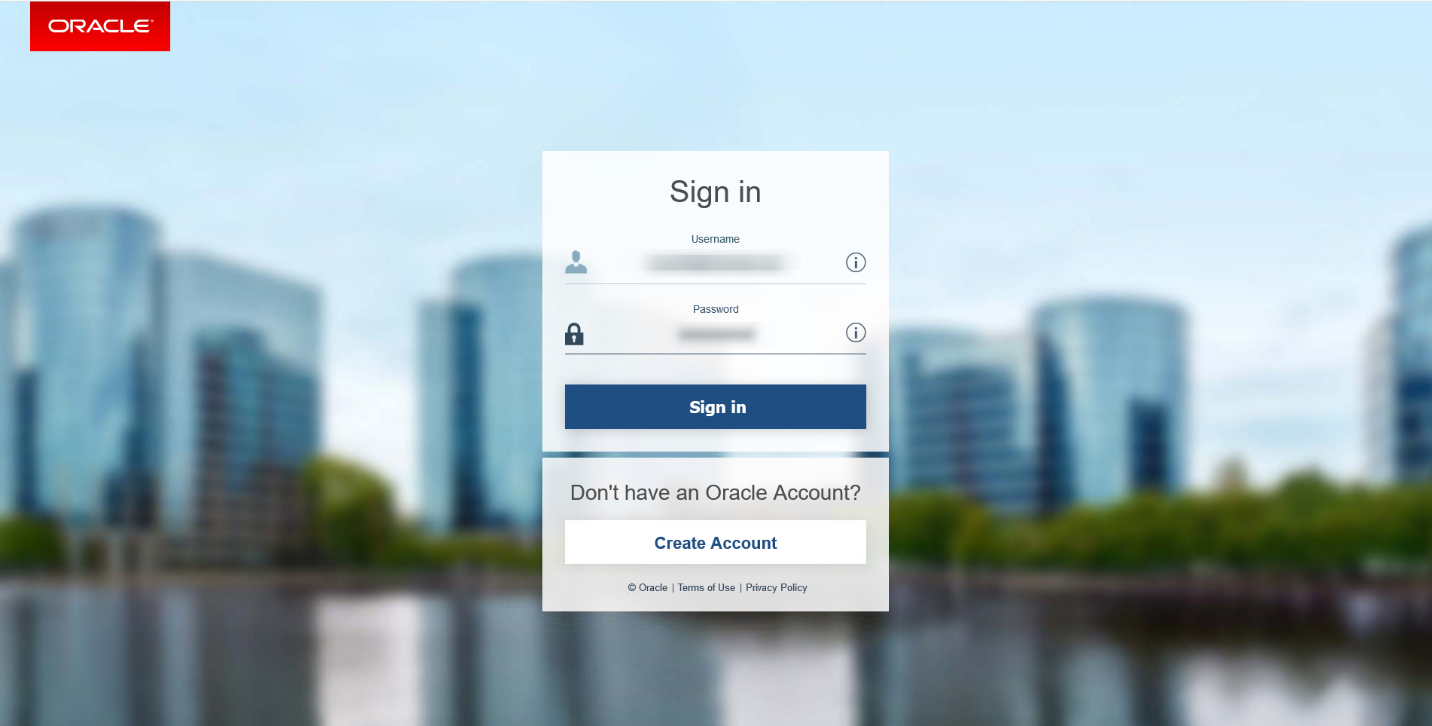
After we fill in the username and password and click on the Sign In button, the files will start downloading automatically.
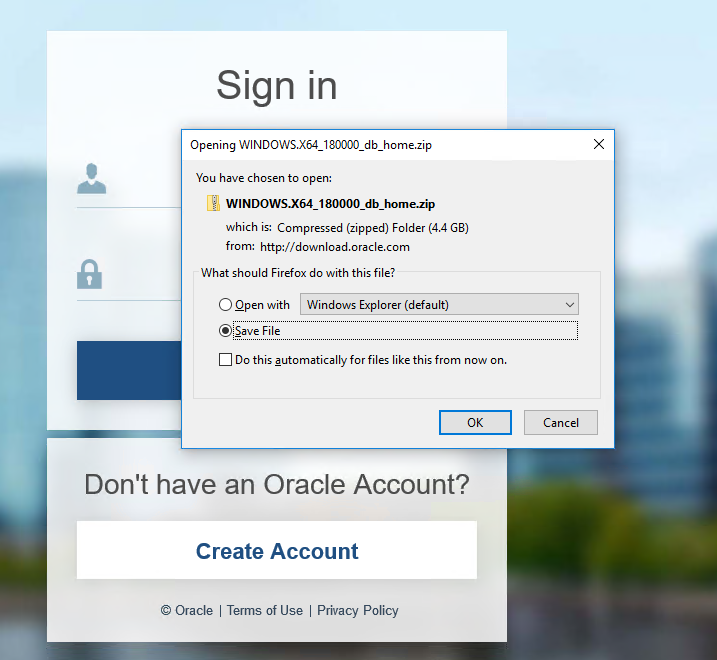
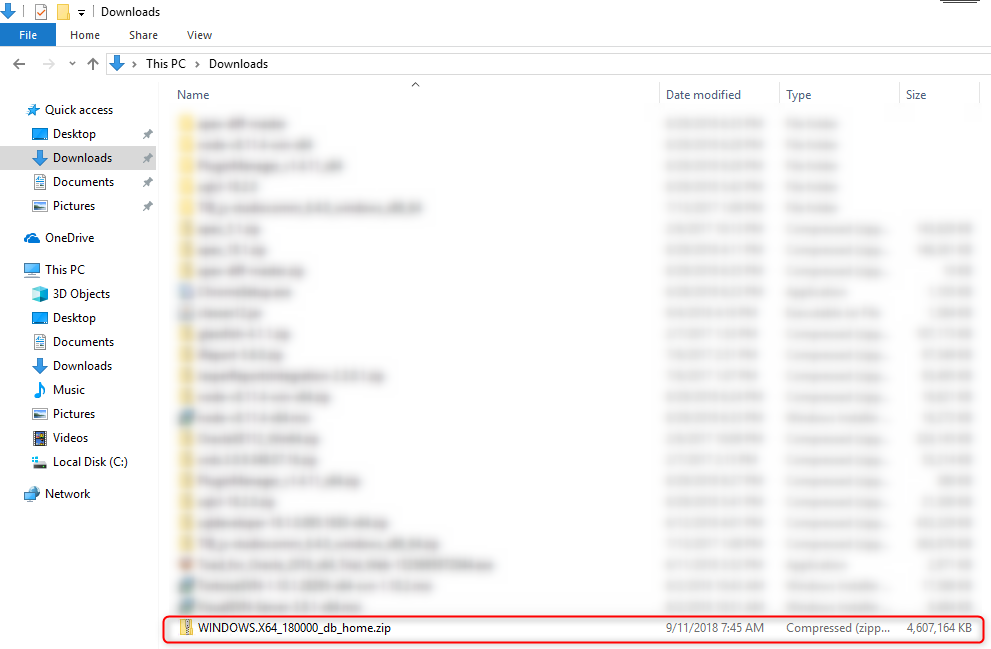
As we can see the file is compressed and zipped.
Extracting the Files
To proceed to the next step, we need to extract the content of file, but before doing that it’s very important to know that with Oracle 11g or 12c we were allowed to set the location of our db_home directory, but starting with Oracle Database 18c we are introduced to a new concept: Image Based Installation.
In Image Based Installation the Oracle Universal Installer of 18c takes the location of our setup.exe file and assigns it as its db_home location. That’s why before we start extracting the content of this file, we first need to decide where we want to create our db_home directory.
We don’t want to create our db_home in the downloads folder. That’s why we will first create a folder inside the C drive and name it Oracle18c.
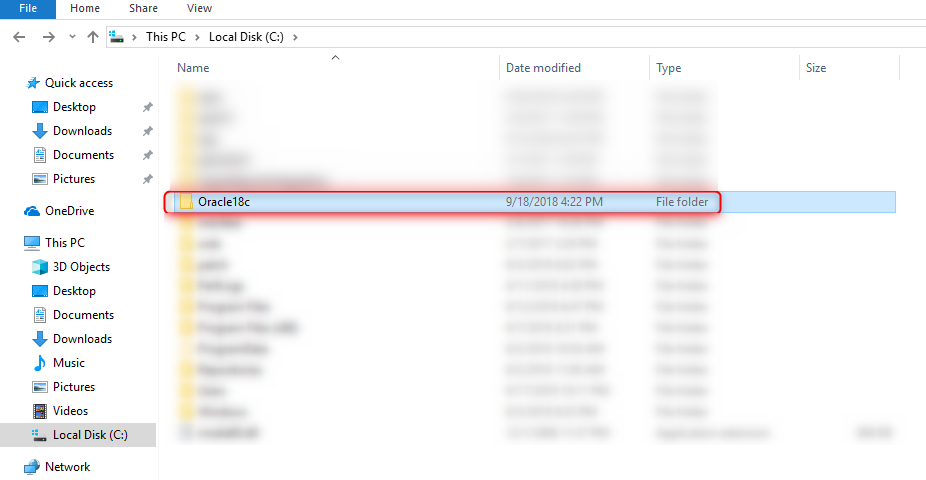
The name for this folder cannot contain any spaces.
Now we are going to extract the contents of the file that we just downloaded into this folder. As the file is approximately 10 GB in size, this extraction process will take some time.
Before beginning the installation of Oracle Database 18c, we need to verify that we are connected to our Windows as an administration user. If we are not, we must log in to our Windows as an administrative user. Not doing so will cause an installation error and crash the entire process.
Oracle Database 18c Installation
To begin the installation of the Oracle Database 18c, we must first go to the Oracle18c folder; for example, in my case, C:\Oracle18c. and then locate the setup.exe file.
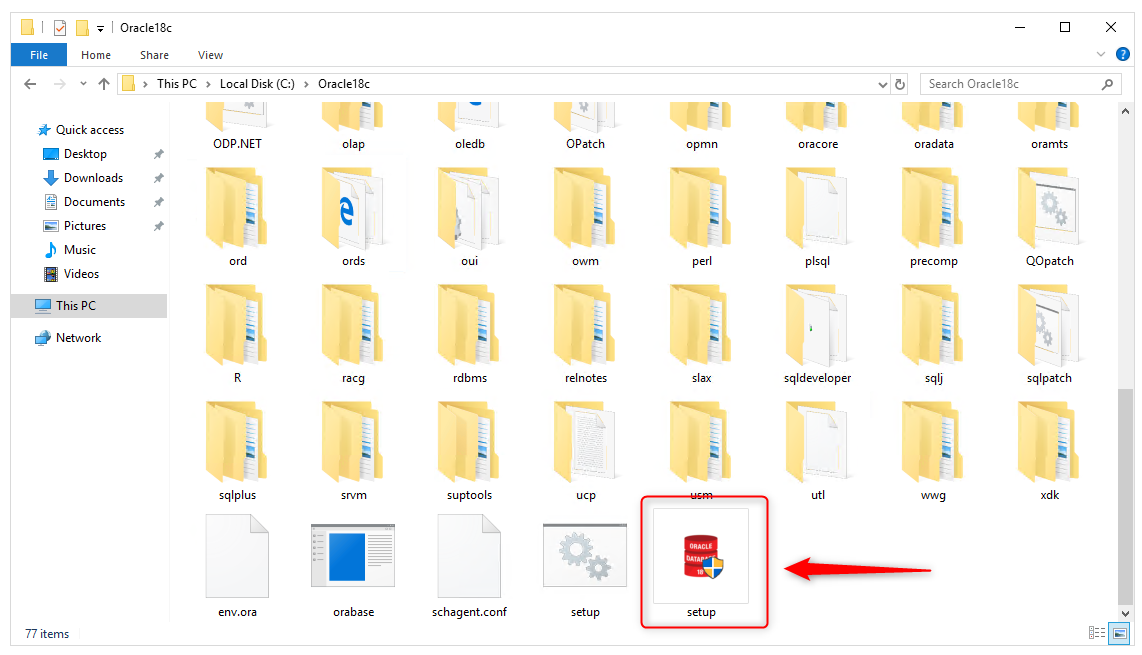
Right click on setup.exe file and choose run as administrator.
We see Screen 1: “Configuration Option”
Here we are presented with two installation options:
The first is to “Create and configure a single instance database”. Choosing this option will not only configure an Oracle Database Server on our machine but also create a starter database for us. We can choose this database for learning and practice purposes.
The second option is “Set Up Software Only”. As the name suggests, it will only configure the Oracle Server software on our machine. No database will be created. We need to create the database manually using the DBCA utility. We choose this option when we are configuring a RAC or planning to perform an upgrade.
For our demo, we will choose the first option, which will configure the software as well as create a database for us.
Click on Next button to move next screen.
We see Screen 2: “System Class”.
Here we are presented with two class options:
Desktop class: We choose this option if we are installing on a laptop- or desktop-class system. This option includes a starter database and allows minimal configuration.
Server class: We choose this option if we are installing on a server-class system, which Oracle defines as a system used in a production data center. This option allows us for more advanced configurations options.
We select the first option, Desktop class, because we will be installing the Oracle Database 18c on Windows 10 Enterprise 64bit.
Click on the Next button to move to the next screen.
We see Screen 3: “Oracle Home User”. The Oracle server creates four Windows User Groups:
User Virtual Account: This type of account is the Oracle Home User for Oracle Database Single Instance installation. The account allows us to install Oracle Database, and create and manage database services without passwords.
Use Existing Windows User: This type of account can be a Windows Local User, a Windows Domain User or a Windows Managed Services Account (MSA). We must provide a username and password for a Windows Local or Domain User. For the MSA account, which is a managed domain account, we only need to provide the username. For an Oracle RAC Database or an Oracle Grid Infrastructure installation, we can only use a Windows Domain User Account.
Create New Windows User: Here we need to provide the username and password for the Windows Local User that we want Oracle Universal Installer to create, and then confirm the password. The new user that is created is denied interactive logon privileges to the Windows computer. However, a Windows administrator can manage this account like other Windows accounts.
Use Windows Built-in Account: In this case, no username or password is required. Oracle creates Windows Services using Windows Built-in Accounts (LocalSystem or LocalService).
For Database Server installations, Oracle recommends that we use a standard Windows User Account (instead of a Windows Built-in Account) as the Oracle Home User for enhanced security.
In this step, we will to create a new user which will be completely dedicated to our Oracle Database 18c. We select the third option, “Create a New Windows User”.
Username: Oracle
Password: <mypassword>
As we mentioned before, the newly created user is denied Windows logon privileges, so we don’t login to Windows using this account. We will name this user as Oracle. However, we can manage this user like any other Windows user we have.
Note that we can’t change this Oracle Home user once the installation is done, so be careful when creating it.
Click on the Next button.
Screen 4: “Typical Installation”.
This step is very important because here we will be configuring the installation settings.
The Oracle Base directory is a top-level directory for Oracle software installations. We can set whatever location we want as our Oracle Base.
The Software Location is the Oracle home path where the Oracle Database binaries for this installation are placed. Prior to 18c we were allowed to set this Oracle Home location, but now, as we can see, the location is already set and we can’t modify it.
The installer takes the location of the Setup files and assigns it as the Oracle Home location. That’s why we extracted our installation files in a separate directory.
Database File Location is the location where Oracle Database files such as data files, redo log files, control files, server parameter files and password file are stored. These are the most important files of Oracle Database. The default data file location is $ORACLE_BASE/oradata for a single node Oracle Real Application Clusters (Oracle RAC), single instance, and desktop-class installations. For multi-node Oracle RAC installations, the default location is under any shared mount point discovered across the selected set of nodes.
We will use the default location.
Database Edition: There are two options here. Enterprise Edition and Standard Edition 2. We will select the Enterprise Edition.
Character set: we will use the default Unicode standard.
Starting with Oracle Database 12c Release 2 (12.2), the default database character set of a database created from the General Purpose/Transaction Processing or the Data Warehousing template is Unicode AL32UTF8.
Unicode is the universal character set that supports most of the currently spoken languages of the world. It also supports many historical scripts (alphabets). Unicode is the native encoding of many technologies, including Java, XML, XHTML, ECMAScript, and LDAP. Unicode is ideally suited for databases supporting the Internet and the global economy.
Below, we have three fields: Global Database Name, Password and Pluggable Database Name; these fields are the most import settings. We will need them in the future to connect with our database. Therefore, it’s very important that write them down somewhere.
Global Database Name is the name that identifies the database. It must be unique to distinguish the database from all other databases in a network.
The Global Database Name will be the name of our database as well as serve as our database SID. We will need this while making connection with our database using tools such as Toad for Oracle. By default, it’s set as ORCL.
If we want, we can change and give it any other name, but make sure to remember it. It’s a good practice to write it down somewhere as our Database SID.
Global Database Name is composed of a database unique name (db_unique_name), a delimiter (a period), and a database domain name (db_domain). The name has the following format: db_unique_name.db_domain.
Where:
- db_unique_name is the name of the database. It can contain a maximum of 30 characters, as long as the first eight characters are unique. The characters can be alphanumeric (a-z, 0-9), underscore (_), dollar ($), and pound (#).
- db_domain is the computer environment used for the database. It should contain no more than 128 characters; alphanumeric (a-z, 0-9), underscore (_), pound (#), and periods (.).
Now we need to enter the passwords. This password is for the SYS and SYSTEM database privilege, write it down somewhere to remember it.
Minimum Password Requirements
We must provide usernames and passwords that comply with the following requirements:
- Password cannot exceed 30 characters.
- No empty password fields.
- Username cannot be the same character string as a password.
- The SYS account password cannot be change_on_install. (case-insensitive)
Password Recommendations
Oracle recommends the following guidelines when prompted for a password.
- Contains at least one lowercase letter.
- Contains at least one uppercase letter.
- Contains at least one digit.
- Is at least 8 characters in length.
- Uses the database character set, which can include the underscore (_), dollar ($), and pound sign (#) characters.
- Should not be an actual word.
Next, we need to make sure to check “Create as Container database” to create our database as a container database.
Pluggable Database Name: Here we have to specify a unique name for a pluggable database, in this case, we use the default name, orclpdb.
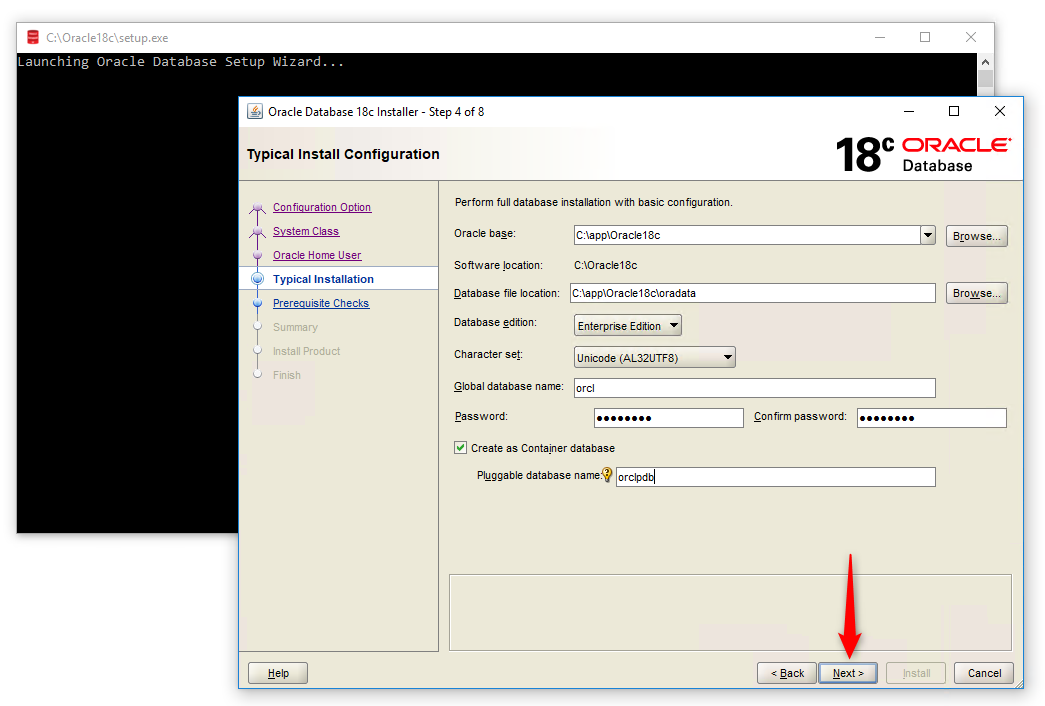
Click on the Next button.
In the next step, Oracle Universal Installer (OUI) will check the prerequisites, such as hardware compatibility. If everything goes well, we can install it, but if there are any errors, the OUI will show us the errors in this screen. As we can see, we don’t have errors!
Now, click on the Install button and the installation of Oracle Database 18c will start.
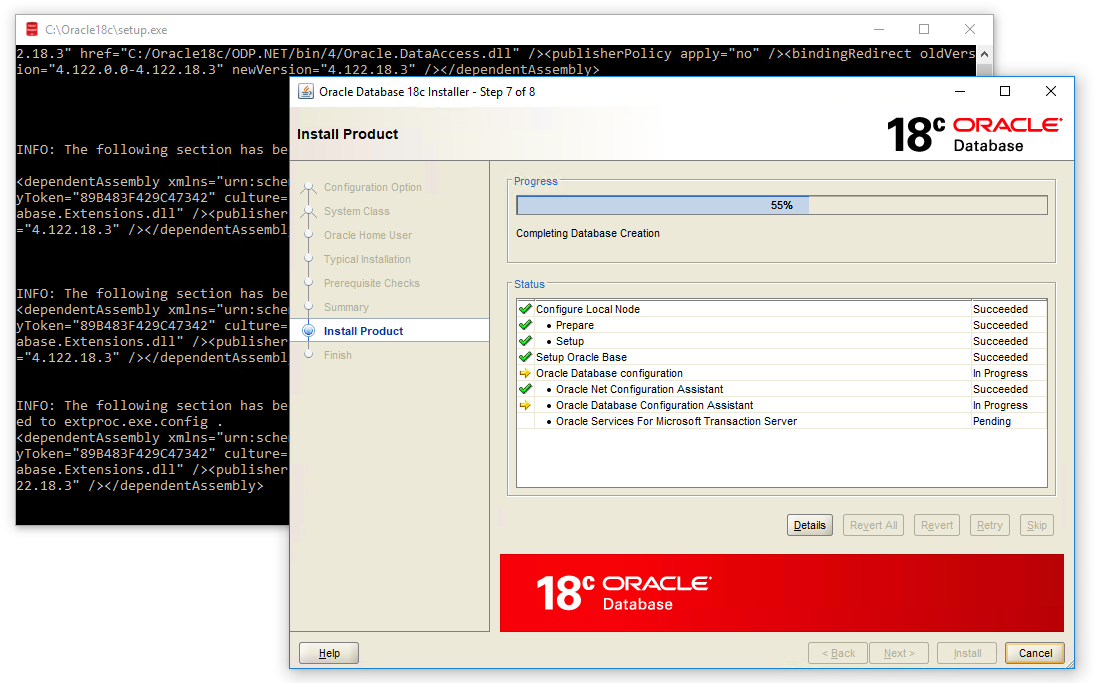
As Oracle Database 18c is very robust software, this installation will take some time depending on our hardware.
The installation is done.
In this installation we don’t get DBCA for database creation as we did with Oracle 12c or 11g. The new Oracle Database 18c Universal Installer has simplified the process.
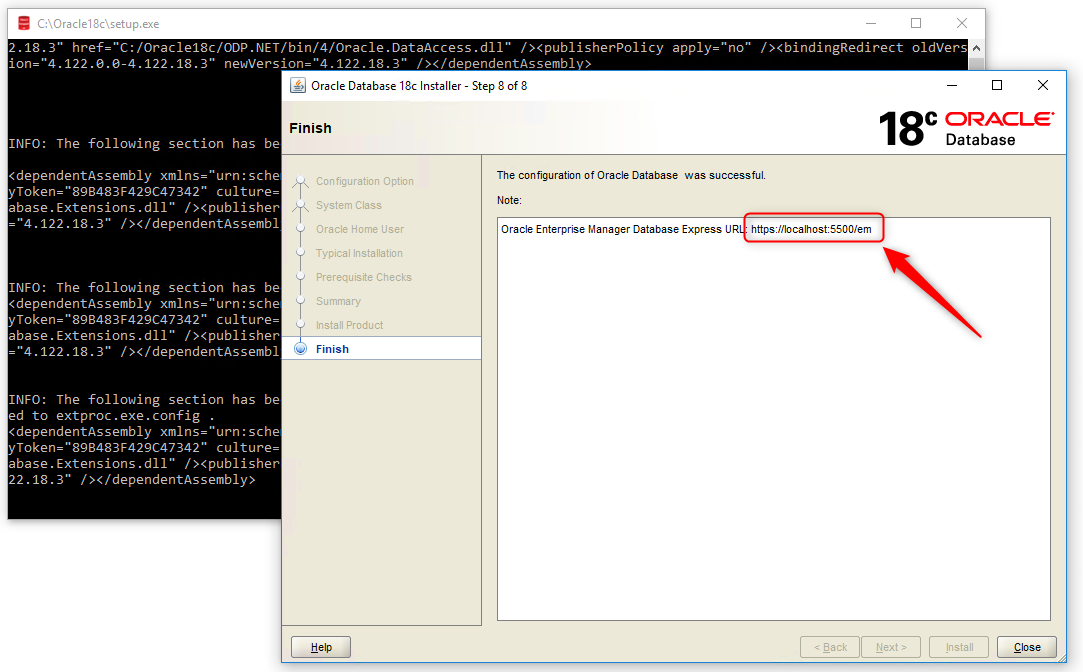
The last thing that we need to do is to copy and save the link: https://localhost:5500/em
This is the link for Oracle Database 18c Enterprise Manager.
Now we have Oracle Database 18c installed on our machine.
Connect to Oracle Database 18c using Toad for Oracle
We open the Toad for Oracle tool and the Login window appears.
User / Schema: SYS or SYSTEM
Password: <my_password>
Select the TNS tab:
Database: ORACLR_CONNECTION_DATA
Or you can select the Direct tab:
Host: localhost
Port: 1521
SID: orcl
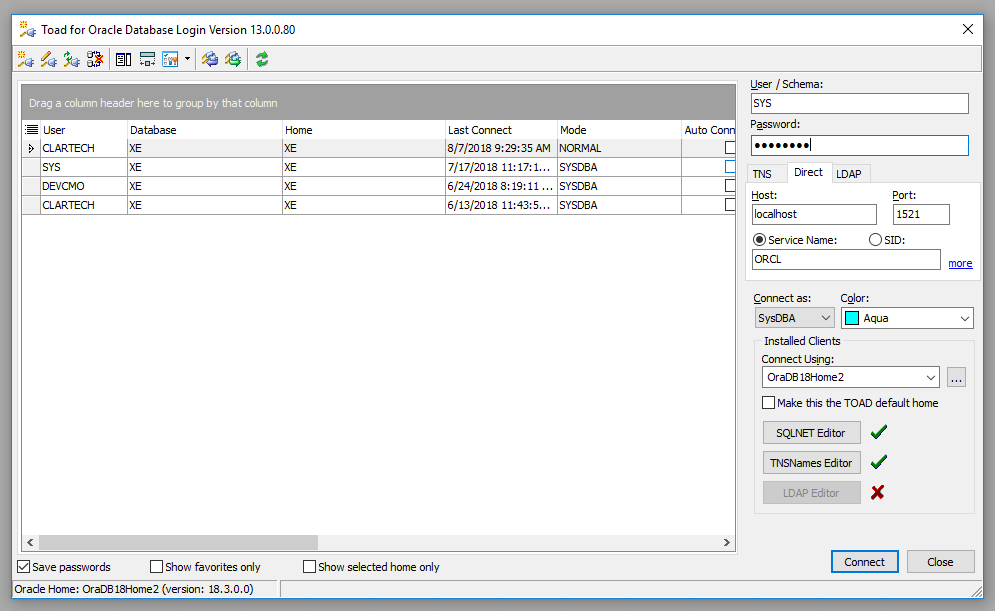
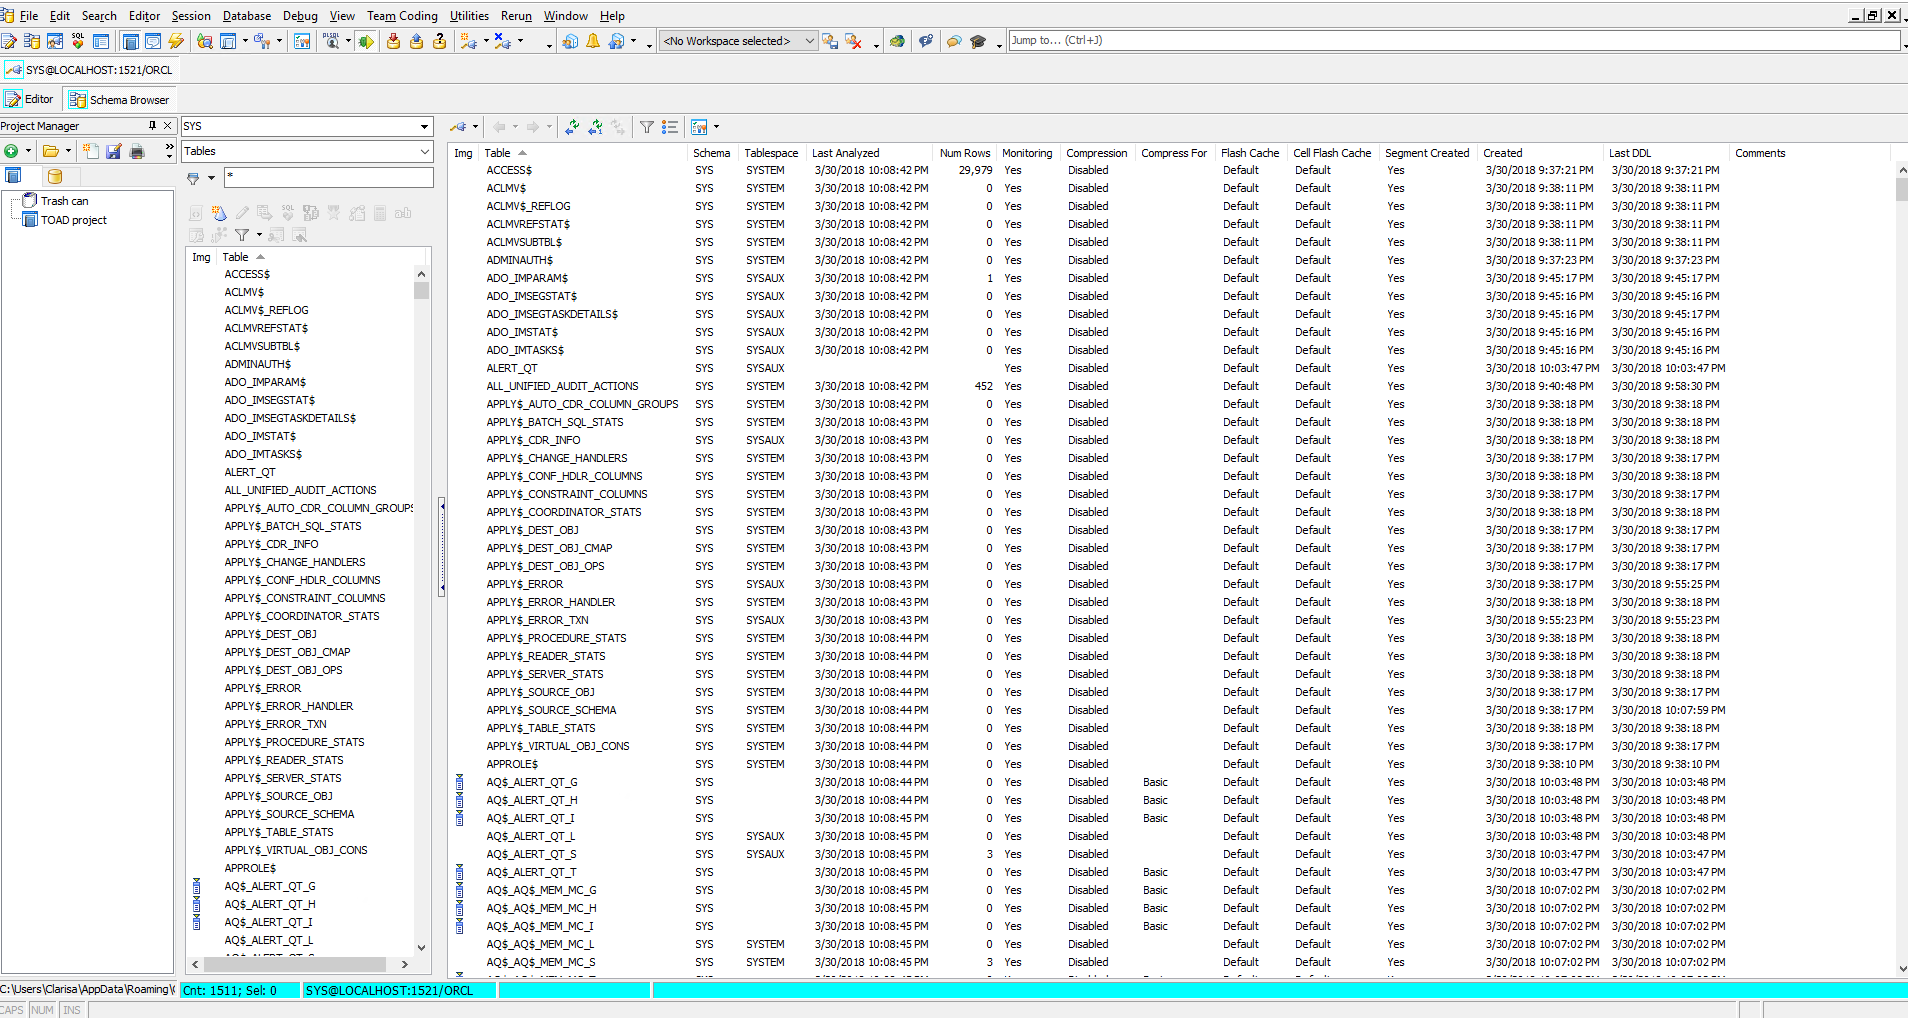
Now, we can see the objects in our new Oracle Database 18c.
Conclusion
We have reached the end of this tutorial, where we have learned how to install the Oracle Database 18c in a Windows environment.
Most Fortune 500 companies choose Toad
Tool for Oracle Application Developers, more widely known as Toad®, was designed by Oracle developer, Jim McDaniel, to make his job easier. It was so helpful that Jim decided to share it. Fast forward to more than 20 years later, Toad is a trusted tool used in most Fortune 500 companies and across the globe.
There are many reasons why people buy Toad rather than staying with the “free” SQL Developer tool Oracle offers. One main reason developers and DBAs choose Toad for Oracle is to reduce time and effort to develop and manage Oracle databases. But did you know that with Toad for Oracle you can automate administration tasks and proactively manage your databases while embracing performance optimization and risk mitigation? Did you know Toad can now find and control sensitive data across all your Oracle databases? What else can Toad do that you didn’t know about? Which edition will benefit you the most?
We’re so confident that you will love Toad, we’re offering our top 2 editions to you to try for free for 30 days.

In this Oracle tutorial, we will see a complete step-by-step on Oracle 19c installation on Windows 10. Also, we will see, how to install oracle database 21c on windows 10.
Also, we will cover these topics.
- Brief History of Oracle database & its versions
- System requirements for installing Oracle on Windows
- Oracle database installation steps for windows
- Uninstall Oracle Database from windows
- Reset password for sys as sysdba database
- Installing Oracle SQL Developer Tool
- how to install oracle database 21c on windows 10
Brief History of Oracle database & its versions
Oracle database is a powerful and safe relational database software created by Oracle corporation. It was developed in 1977 by three friends Larry Ellison, Bob Miner, and Ed Oates at SDL (Consultancy Software Development Lab).
| Year | Description |
|---|---|
| 1977 | the first version was released in the name RSI (Relational Software Inc.) |
| 1979 | Oracle version 2 was released as the first commercially based RDBMS |
| 1982 | A portable version of the oracle database was released as Oracle version 3. Company name changed from RSI to Oracle Systems Corporation |
| 1985 | Oracle V4, V5, V6 were released with Enhancements to concurrency control, data distribution, and scalability. |
| 1992 | Oracle V7 released with PL/SQL store program unit. |
| 1997 | Oracle V8 released with objects and partitioning |
| 1999 | Oracle V8i released with Internet computing |
| 2001 | Oracle V9i released with Oracle Real Application Clusters (Oracle RAC) |
| 2003 | Oracle V10g released with Grid Computing |
| 2007 | Oracle database 11g released with the following features: Manageability, diagnosability, and availability. |
| 2009 | Oracle database 11g release 2 with Edition Based Redefinition, Hybrid Columnar Compression, Replication, Database Appliance, Cluster File System, Golden Gate, Data Redaction. |
| 2013 | Oracle Database 12c Release 1 with features like Database Cloud Service, In-Memory Column Store, JSON, Native, SQL Pattern Matching, Multitenant architecture |
| 2017 | Oracle Database 12c Release 2 with features like Zero Data Loss Recovery Appliance, Native Sharding, etc. |
| 2018 | Oracle Database 18c released with features like Online Merging of Partitions and Subpartitions, Active Directory Integration, etc. |
| 2019 | Oracle Database 19c was released which is the latest stable version so far. It has Automated PDB Relocation, Automatic SQL Plan Management, , Zero-Downtime Grid Infrastructure Patching, etc. |
| 2021 | Oracle Database 21c is in innovation mode and it supports advanced features related to blockchain, machine learning, SQL Macros, etc. |
Read How to Get List all Tables in Oracle Database
System Requirements for Oracle 19c installation on windows 10
Let us check out the system requirements for installing Oracle 19c installation on Windows 10.
Here are the important components (software & hardware) required to install the oracle database in your system. In case your system didn’t meet these requirements please then please go with the minimum configuration setting.
Also, check: How to Install Oracle on Docker
Software Requirement for Installing Oracle Database on Windows
The following windows operating system can be used to install the oracle database on it. Windows 11 is still in the beta version we tried installing it on it & it worked for us but we do not guarantee that it will work for you as well. Once support is officially released we will update this section.
- Windows 8.1 x64- Pro and Enterprise editions
- Windows 10 x64- Pro, Education, and Enterprise editions.
- Windows Server 2012 R2 x64- Standard, Datacenter, Essential, and Foundation centers.
- Windows Server 2016 x64- Standard, Datacenter, and Essentials centers.
- Windows Server 2019 x64- Standard, DataCenter, and Essentials centers.
Read: Connect to oracle database
Hardware Requirement for Installing Oracle Database on Windows
In this section, we have mentioned the hardware required to install and run the oracle database on the windows operating system.
| System Architecture | Processor: AMD64 and Intel EM64T |
| RAM (random access memory) | 2 GB minimum |
| Virtual Memory | – If physical memory is between 2 GB and 16 GB, then set virtual memory to 1 times the size of the RAM – If physical memory is more than 16 GB, then set virtual memory to 16 GB |
| colors | 256 colors |
| Resolution | 1024 X 768 minimum |
| Disk space | 10 GB |
Read How to Check Oracle Database Version
In this section, we will walk you through the steps to download and install the oracle database 19c on your windows operating system (Windows 10).
- We highly encourage you to download the Oracle database from the official website. Click on the below button to navigate to the exact download page. Please note that you will need an Oracle account to download the file.
- Once downloaded, extract the file in the location of your choice. We have extracted the file in our download folder but we advise you to create a new folder ‘Oracle’ inside windows
C:/and then extract the zip file thereC:/Oracle - Navigate inside the WINDOWS.X64_193000_db_home folder and run the setup file as Administrator.

- ‘Select configuration Option’ wizard will open, choose the first option which says ‘create and configure a single instance database’ and click on Next button.

- Once configuration is selected then ‘System Class’ wizard will open. In this wizard, you can select between desktop class and server class.
- Desktop class povides starter database and allows minimal configuration.
- Server class provides all the tools & configurations to facilitate production data center work.

- ‘Specify Oracle Home User’ wizard will open, here you can choose any option as per your preferences. In our case, we have selected ‘create new windows user‘ and providednew user name & password. Once completed this step click on the next button.

- ‘Typical Install Configuration’ wizard contains the most important configurations please makea note of the credentials.
- Oracle base holds the path of extracted zip file. In our case, zip file is extracted in the downloads folder that is why downloads path is displayed.
- Database file location is the path where database is stored. New folder with the name oradata is created.
- Select Enterprise Edition in data base edition dropdown.
- Global database name is the important here please remember whatever name you are going to provide it.
- This password will be used to access orcl global database. The password must have uppercase, lowercase, number and special character to meet the oracle standard.
- Plugged database name is also important please keep a record of it to avoid trouble in future. Click on next button.

- Once the Typical install configuration is completed the system will perform prerequisite checks where it will check for various parameters and that will be step 5. Once all the checks are passed it will redirect you to the Summary wizard.
- In the ‘Summary’ wizard all the setting you have selected so far will be displayed and from here we will move to install the orace database 19c software, click on the install button to proceed.

- Next wizard is ‘Install Product’, Here the product will be installed on the device, this may take some time. You will see green ticks for all the completed steps. Also, there will be a ‘windows security alert’ prompt. click on the allow access.


- Once the installation is complete ‘finish’ window will appear. The oracle database 19c is successfully installed in your system now.

- Once the installation is complete its time to use oracle database 19c. Open command prompt and type
sqlplus / as sysdbato connect with the system predefined database.

Read How to create a database in Oracle 19c
How to install oracle database 21c on windows 10
Here is a complete video tutorial on how to install oracle database 21c on windows 10.
Uninstall Oracle Database from windows
In this section, we have shared the steps to uninstall the Oracle 19c from the Windows operating system. These steps will remove all the programs and files of the oracle database from your system.
The steps shared are based upon the installation method we have taught in the above section – Oracle 19c installation on Windows 10
Uninstallation of Oracle database involves the following steps:
- Close all the instances of oracle running on the windows.
- Stop all the oracle services
- Remove the base folder from
C:\ - Remove Oracle folder from
C:\Program Files - Remove Oracle folder from
C:\Users\Youruser - Delete Environment Path
- Delete oracle database information from Registry
Close all the instances of oracle running on the windows
Open task manager and close all the running instances of the Oracle database and oracle SQL developer tool from your windows operating system.

Stop all the oracle services
- Open Run by pressing
WIN + Ron the keyboard and type services.msc - Stop all the running services of oracle as displayed in the below picture.

Remove the base folder from C:\
The base folder is the one where all the oracle files are stored. It is recommended to create a base folder inside the C:\ drive directly. Delete the base folder of the oracle database permanently.
The below image shows the files inside the base folder.

Remove Oracle folder from C:\Program Files
Navigate to C:\Program Files and there you will find the oracle folder. If you do not have any other oracle program installed like Oracle virtual box, etc. then delete the entire folder otherwise delete the inventory folder only.
Remove Oracle folder from C:\Users\Youruser
Navigate to C:\Users\Username in some cases it is inside the app data. Navigate there and delete the oracle folder from there even if the folder is empty.
Delete Environment Path of oracle database
After installing oracle, an oracle software path is created automatically on the System Environment Variable. This allows the use of sqlplus on the command prompt.
- To delete the Environment path search for Edit the System Environment Variables on the windows search.
- Click on the Environment Variables button on the bottom right of the window.
- Under the System Variables, in the Path section, you will see the path of oracle.
- Select the oracle path and click on the delete button. Don’t forget to click on the Ok buttons of the window.
The below diagram shows, the deletion of the environment path of the oracle database in windows.

Delete oracle database information from Registry
The registry keeps the information about all the software installed on the system. It is one of the crucial record keeper of the windows operating system.
Note: Please follow these steps carefully, any mistake could break your operating system.
- Open Run by pressing
WIN + Rand typeregedit. - Navigate to Computer\HKEY_LOCAL_MACHINE\SOFTWARE\
- If there is no other oracle software installed then delete the entire oracle folder from there otherwise delete the folders mentioned in the below image.

- Navigate to Computer\HKEY_LOCAL_MACHINE\SYSTEM\ControlSet001\Services\ and delete all the oracle services from there.
- Below image shows the oracle services on the registry of windows 10.

Reboot your computer and it will be free from all the files and folders of the oracle database. The system will treat the reinstallation as fresh installation on windows 10.
Read: Oracle 19c Installation on Windows 10
Reset password for sys as sysdba
Sys users do not require passwords while logging in if not changed manually. In this section, we will learn how to reset passwords for sys as sysdba database.
- After installing oracle database 19c on your system you can login to sysdba without any password and can create new database, grant permissions, etc.
- sysdba cannot left without password due to security reasons. Once you have logged in, set the password for sysdba to avoid unauthorised access.
- Sys password can be changed using Alter Command in oracle database.
# login to sysdba
sqlplus / as sysdba

# change password (here TOOR is the new password)
ALTER USER SYS IDENTIFIED BY TOOR;
Read Connect Excel to Oracle Database
In this section, we have demonstrated how to download and install the Oracle SQL developer tool on the windows operating system.
- Oracle SQL Developer tool is an open source tool that provides a workspace for the development of the databases using Graphical User Interface (GUI) and supports all the other tools from Oracle.
- This tool will help you while dealing with huge database as information displayed over the command-line is not as clear as it appear on the IDE.
- We encourage you to download oracle sql develper tool from the official website. Click on the above button and download Windows 64-bit with JDK 8 included.
- Once downloaded extract the zip file inside
C:\Program Filesfolder of your windows machine. - Navigate to the sqldeveloper folder and click on the sqldeveloper application to start the progam.

Also, take a look at some more tutorials on the Oracle database.
- How to create table in Oracle
- Oracle to_char Date Format
- Oracle Add Foreign Key
- Oracle add primary key
- Oracle to_date Format
In this tutorial, we have learned how to install Oracle on the Windows operating system. Also, we have covered these topics.
- Brief History of Oracle database & its versions
- System requirements for installing Oracle on Windows
- Oracle database installation steps for windows
- Reset password for sys as sysdba database.
- Installing Oracle SQL Developer Tool
I am Bijay having more than 15 years of experience in the Software Industry. During this time, I have worked on MariaDB and used it in a lot of projects. Most of our readers are from the United States, Canada, United Kingdom, Australia, New Zealand, etc.
Want to learn MariaDB? Check out all the articles and tutorials that I wrote on MariaDB. Also, I am a Microsoft MVP.

В посте описывается установка системы управления базами данных (СУБД) Oracle Database 18c Express Edition (XE) на операционную систему (ОС) Windows. В примере рассматривается Windows 10, но процесс актуален для всех версий ОС Windows начиная с Windows 7 (подробнее – ниже).
Рассмотрены следующие шаги:
- Подготовка к установке
- Установка СУБД
- Подключение к БД
1. Подготовка к установке
Проверяется, соответствует ли используемая операционная система минимальным требованиям для установки и работы Oracle Database 18c XE. Допустимы следующие версии ОС Windows:
- Windows 7 x64 – Professional, Enterprise, and Ultimate editions
- Windows 8.1 x64 – Pro and Enterprise editions
- Windows 10 x64 – Pro, Enterprise, and Education editions
- Windows Server 2012 x64 – Standard, Datacenter, Essentials, and Foundation editions
- Windows Server 2012 R2 x64 – Standard, Datacenter, Essentials, and Foundation editions
- Windows Server 2016 x64 – Standard, Datacenter, and Essentials editions
Для установки требуется минимум 2 Гб оперативной памяти, минимум 8,5 Гб дискового пространства для СУБД Oracle, 2 Гб дискового пространства для хранения временных файлов, и обладание правами администратора.
Если системные требования соответствуют, то скачивается установочный файл. Oracle Database Express Edition (XE) распространяется бесплатно и установочный файл можно скачать с официального сайта Oracle – https://www.oracle.com/database/technologies/xe-downloads.html
Для скачивания на портале Oracle необходимо наличие учетной записи с паролем. При ее отсутствии осуществляется регистрация новой учетной записи.
Пройдя по ссылке, выбирается версия Oracle Database 18c XE для вашей операционной системы : Oracle Database 18c Express Edition for Windows x64. Запускается скачивание zip архива (OracleXE184_Win64.zip). Время скачивания может быть достаточно большим. Объем архива 1,9 Гб.
2. Установка СУБД
Распаковывается скачанный архив. Среди извлеченных файлов ищется и запускается файл, под названием setup.exe. Запустится окно установщика. Нажимаем Next.

Дается согласие с лицензионным соглашением (I accept the terms in the license agreement). Нажимаем Next.

Выбирается каталог, в который будет установлена СУБД Oracle Database 18с XE. Можно оставить каталог по умолчанию, или же выбрать собственный (для этого примера выбирается каталог E:\db\XE18c\ ). Нажимаем Next.

Далее указываются пароли для учетных записей SYS, SYSTEM и PDBADMIN, которые понадобятся для подключения к базе данных (БД) в дальнейшем.

На следующем шаге проверяется (и корректируется опцией Back в случае необходимости) правильность введенной ранее информации и нажимается Install. Это запускает процесс установки СУБД.


Во время установки система запрашивает разрешение на доступ к сетям от Java платформы. Доступ предоставляется установкой галочек в соответствующие чекбоксы и нажатием «Разрешить доступ». При отказе в доступе некоторые функции Oracle Database 18c XE не будут доступны.

Завершение установки зафиксирует в соответствующем окне необходимую информацию для подключения к установленной базе данных.

3. Подключение к СУБД
После установки необходимо произвести подключение к БД, что позволит проверить работоспособность Oracle Database 18c XE. Подключиться можно с помощью SQL Developer и с помощью командной строки – SQLPlus.
- Подключение
с помощью SQL
Developer.
Запускается SQL Developer и нажимается зеленый + в левом верхнем углу

Вводятся необходимые данные для подключения.

Все данные указывались во время установки базы данных. Если подключение осуществляется под пользователем SYS необходимо забудьте в графе роль выбрать SYSDBA.
Нажимается кнопка «Connect». Если все указано правильно, то SQL Developer открывает окно, которое позволяет выполнять SQL запросы к выбранной базе данных.

- Подключение
с помощью командой строки.
Для подключения с помощью командной строки – SQLPlus запускается командная строка и набирается команда sqlplus / as sysdba, которая подключает к БД под пользователем SYS.

На этом установка и базовые настройки Oracle Database 18c Express Edition на ОС Windows завершены.