В эпоху кибервойн единственная разумная позиция – быть параноиком, а это означает, помимо прочего, быть параноиком по поводу обновлений программного обеспечения.
Взять к примеру OpenSSL.
Эта криптографическая библиотека с открытым исходным кодом, которая реализует протоколы Transport Layer Security (TLS) и Secure Sockets Layer (SSL), разработана для «защиты связи по компьютерным сетям от перехвата», но угадайте, что?
С самого начала она была пронизана ошибками.
Это может быть неизбежно, в определенной степени – в конце концов, мы говорим о программном обеспечении.
Несмотря на то, что вы не можете ничего сделать с ошибками, которые еще предстоит идентифицировать, вы можете по крайней мере защитить свои системы от тех ошибок, которые уже исправлены и задокументированы.
Жаль, что официальный сайт OpenSSL предлагает только исходники для Linux.
Хотя дистрибутивы Linux обычно поставляются с OpenSSL, это не никак относится к Windows … или, скажем, «дистрибутивам Windows».
Если вы хотите запустить его, вам нужен бинарник под Windows, и если вы не хотите его собирать самостоятельно, вы должны найти другой вариант.
В этой статье я покажу,как можно настроить OpenSSL в Windows, не имея дело при этом дела со сборкой из исходников.
Содержание
- Шаг 1. Скачать бинарник
- Шаг 2. Запустите установщик
- Шаг 3. Запустите бинарный файл OpenSSL
Шаг 1. Скачать бинарник
Поиск бинарных файлов OpenSSL для Windows – непростая задача, но не отчаивайтесь.
Они существуют.
Чтобы загрузить нужный, перейдите по ссылке:
https://slproweb.com/products/Win32OpenSSL.html
Не дайте себя одурачить ни строкой Win32 в URL-адресе, ни навигацией, указывающей на казалось бы древнюю страницу загрузки еще с 2004 года.
Прокрутите страницу вниз до раздела «Download Win32 OpenSSL».
Теперь вам нужно выбрать правильный файл из этого списка.
Для каждой версии есть два основных типа: light и full.
Загрузите файл под названием «Win64 OpenSSL v1.1.0f» (или версию с более новой версией, как только она станет доступна), чтобы скачать фулл установщик.
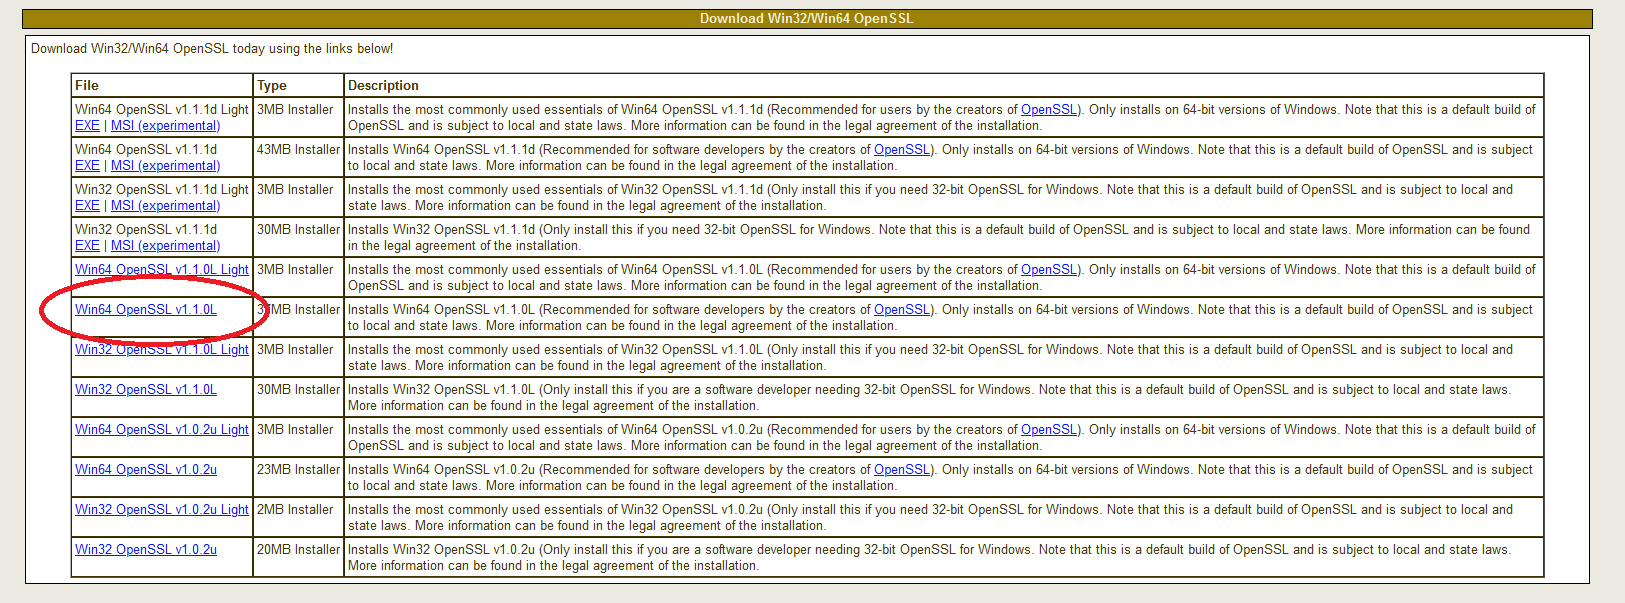
Текущая версия на момент написания этой статьи (OpenSSL 1.1.0h) сильно отличается от предыдущих версий.
Это совсем не одно и то же, поэтому обратите внимание на номера релизов!
Худшее, что вы можете сделать, – это использовать старую версию, в которой есть задокументированные ошибки.
Шаг 2. Запустите установщик
Мы рекомендуем установить OpenSSL вне вашей системной директории Windows.
Следуйте инструкциям по установке через GUI.
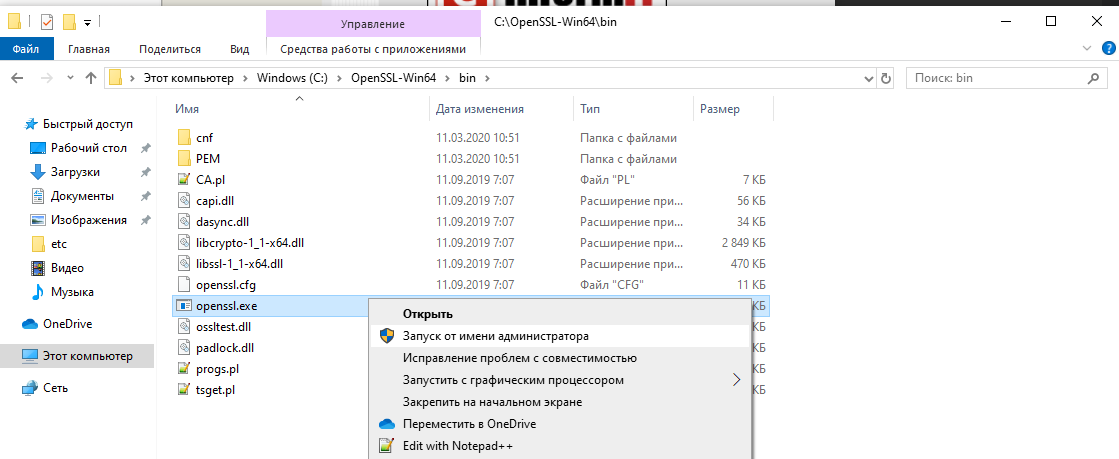
Шаг 3. Запустите бинарный файл OpenSSL
Чтобы начать работу с OpenSSL, вы можете просто щелкнуть по нему правой кнопкой мыши в проводнике Windows в месте его установки, например в моем случае:
C:\OpenSSL-Win64\bin\
затем выберите «Запуск от имени администратора».
Откроется окно cmd с командной строкой OpenSSL:
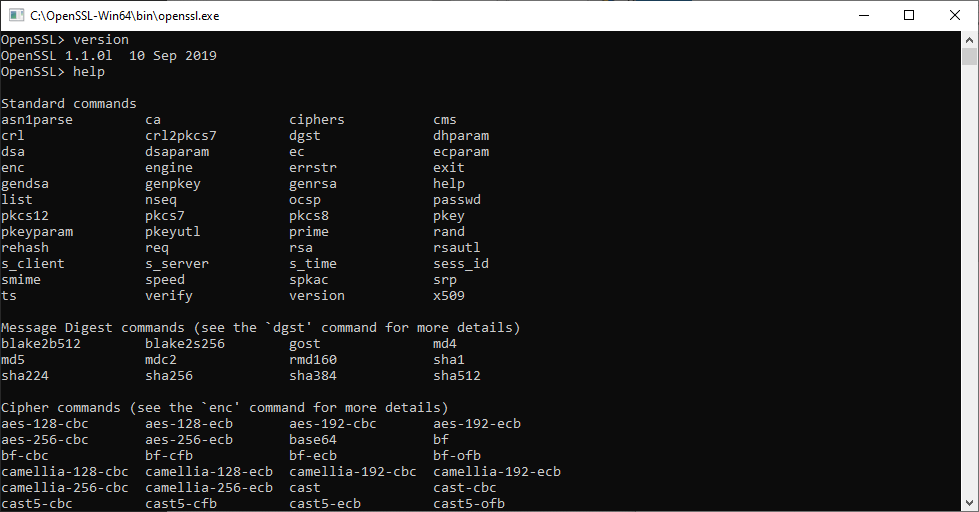
Теперь вы можете начать создавать ключи OpenSSL. (Кстати, пользователи утилиты удаленного доступа PuTTY могут экспортировать ключ OpenSSH из PuTTYgen.)
При использовании OpenSSL в Windows таким способом вы просто пропускаете команду openssl, которую видите в приглашении.
Например, чтобы создать пару ключей с помощью OpenSSL в Windows, вы можете ввести:
openssl req -newkey rsa:2048 -nodes -keyout key.pem -x509 -days 365 -out certificate.pem
и следуйте инструкциям на экране, как обычно.
Чтобы просмотреть сертификат:
openssl x509 -text -noout -in certificate.pem
Introduction
Open SSL project is open-source project that maintains the Open SSL software. It is a general-purpose cryptography library that is used to implement SSL and TLS protocols. Some of the uses of the Open SSL software is to
- Generate private keys
- Install self-signed or signed SSL/TLS certificates
- Identify certificate information
In one of my projects, I need to decrypt the private key information from a signed certificate. Using OpenSSL, you can verify the private key information to check the validity and legitimacy. In this article, we will see how to set up Open SSL software on Windows 10 machine. The same steps can be performed for Windows 11 too.
Download the Official Library Repository
Below steps tells how to download the required openssl files from GitHub repo.
Step 1
Validate if you have open SSL already configured. If there is no initial setup from the command prompt when you type in ‘OpenSSL’ you will be getting a message saying that
‘openssl’ is not recognized as an internal or external command, operable program or batch file’.

Step 2 — Create a folder for OpenSSL.
At first create a folder in local directory. In this case, I created it in C:\Install\OpenSSLLibrary. The folder can be created anywhere.

Make sure there are no files existing.
Step 3
Clone the OpenSSL folder from the official Git page maintained by the OpenSSL project team. The official open SSL library is located at git.openssl.org.
For this step you need to have git installed on your windows machine. Please check the references section on how to install ‘Git’ on Windows machines. This Git install is a straightforward process as it has binary available, and it configures the required settings during the install.
Now go to the folder from the command prompt where the openssl folder is created. In my case it is c:\Install\OpenSSLLibrary.

Now run the following command that copies the openssl library and files into this folder
git clone git://git.openssl.org/openssl.gityou should see message ‘Cloning into ‘openssl’ and should finish in sometime after that.

Now validate a subfolder ‘openssl’ is created and underneath it you have all the required files copied over from the git repository.
The above steps finishes downloading the required libraries to the folder.
Setup OpenSSL
Now we need to install the dependencies to configure the OpenSSL. The below steps need to be performed in following order
- Install PERL
- Install NASM
- Validating the PATH from the Environment variables.
- Configuring Openssl
Now we will perform the steps.
Step 1
Install the PERL. OpenSSL recommends to install Strawberry Perl from the below link
http://strawberryperl.com/. Since my windows OS is 64-bit, I have chosen to download the 64-bit MSI

Now you should have the required setup file downloaded to the local directory. In my case, it is ‘Downloads’ folder.

Double click on the set-up file and follow the steps. In my case, I have defaulted to the values from the install screens.

Accept the License Agreement.

Here I left the default. You can change to required folder if needed.


You should see below message

Once finished click on ‘Finish’. This confirms that PERL is downloaded and set up on your machine.
Install NASM
NASM stands for Net Assembler and is available at https://www.nasm.us/
Step 1
Download the latest version from the home page by clicking on version no.

Step 2
Now it will take to download page, with various builds. Since my OS is 64-bit, I am selecting Win64

Now click on the .exe file which should download to local directory. In my case, it got downloaded to ‘Downloads’ folder.

Step 3
Now go to the file and double click on the install.

If you get below message which prompts for privileged account, right click on setup and chose ‘Run as administrator’.


- It will ask for the user options I chose default.

- Next step is to choose components. I left it default.

- Next, it will ask for install path. Please make a note of this path, as this is required to set up PATH in environment variables.

- Next it will ask for start menu folder. Left it as default.

- The install should take less than 2 minutes and show status as ‘Completed’. Click on close

Setting up Environment Variables
Now the PERL and NASM software is configured, now it’s time to check the environment variables.
Step 1
For this from the windows start menu and search for ‘Environment Variables’ and click on ‘Edit the system environment variables.

Step 2
Click on the ‘Environment Variables’ in the ‘System Properties’ window.

Step 3
Look for Path under ‘System Variables’.

Step 4
If you observe the Environment Variables for Strawberry PERL has been configured, but not for NASM (Net Assembler).

For NASM the path value needs to be set up manually.
Step 5
Click on ‘New’ and enter the install location where NASM has been installed. In my case it is C:\Program Files\NASM

Step 6
Click on Ok for 3 times and exit out of the Environment Variables window.
The above steps finish the configuration of Environment Variables.
Configuring Open SSL
Now we have all the pre-requisites set up for Openssl, now it’s time to finish the final steps.
Step 1
Open the cmd prompt as an administrator.

Step 2
Change the directory to the Openssl folder. In my case it is C:\Install\OpenSSLLibrary\openssl

Step 3
Type In below command
perl Configure
At the end, you should get message ‘Open SSL has been successfully configured’.
Validation
Now close the admin command prompt and open the normal command prompt and type in ‘Openssl’. You should see Openssl command prompt.

Conclusion
Thus, in this article, we have seen what Openssl is and how this is configured on windows machines.
References
- https://github.com/openssl/openssl
- https://www.openssl.org/
- https://github.com/openssl/openssl/blob/master/NOTES-WINDOWS.md
- https://www.c-sharpcorner.com/blogs/how-to-install-git-for-windows
Tutorial: OpenSSL provision on Windows 10 and Windows 11
OpenSSL was previously reserved for Linux operating systems or had to be compiled from the source code itself under Mac and Windows. With Win32/Win64 OpenSSL, the open source software library can also be run on 32-bit and 64-bit Windows OS (x86/i386) and can be integrated on Windows machines via installer.
OpenSSL is widely used and found by encryption in numerous application and secure connections, as well as for SSL/TLS connections HTTPS, including cryptography in SSH, OpenVPN and DNSSEC.
The Win32/Win64 OpenSSL installation project from Shining Light Productions (slproweb.com) carrying the ease of deployment of OpenSSL for Microsoft Windows. The installation consists of downloading and unpacking the binaries, which eliminates the need to compile source code.
Installation
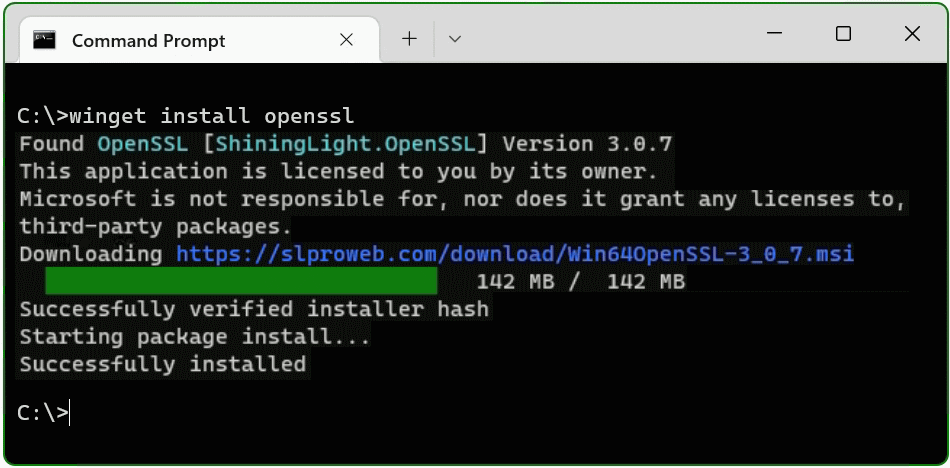
This tutorial shows two methods to deploy OpenSSL on Windows 10 and Windows 11. The simple method right at the beginning, by running Windows Package Manager with hit the Windows-logo+R keys and enter cmd in the Run box then click OK, or press  and hit cmd then click the command prompt icon.
![]()
Click Start
and hit cmd

In the now opened command prompt ran the following command, if you are not authorized as administrator with the logged in user, you can select “Run as administrator”.
C:\> winget install opensslThe Windows package manager “winget” allows you to install applications and other packages by using the command line. If winget is started for the first time, you will be prompted to confirm the source agreement terms, by hit the Y key.
The OpenSSL package is now installed. The second method is to download and install the package.
Install Win64 OpenSSL package manually
The table (screenshot) on the slproweb.com website contains the versions for Win32 and Win64 OpenSSL as EXE and MSI installers.
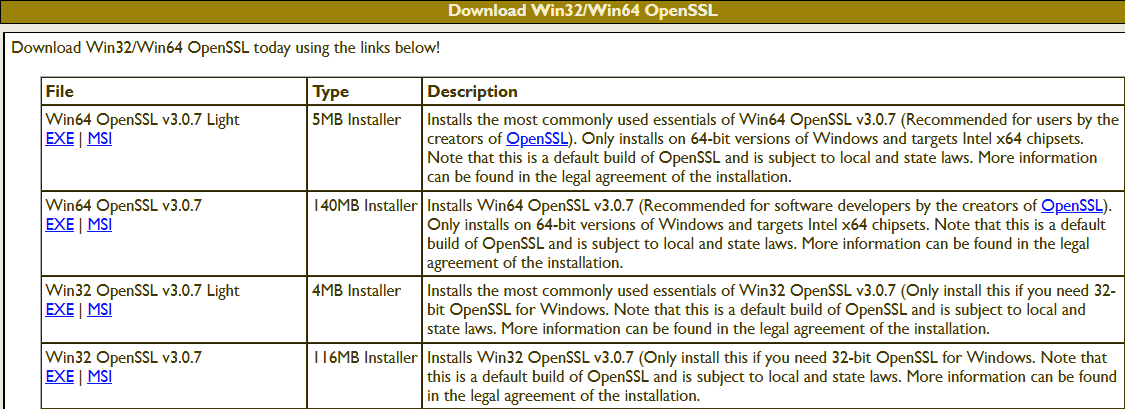
Recommended here is the latest version with the most commonly used essentials of Win64 OpenSSL v3.0.7, at the time of writing this article, it is Win64 OpenSSL v3.0.7 EXE Light, at the top of the first line.
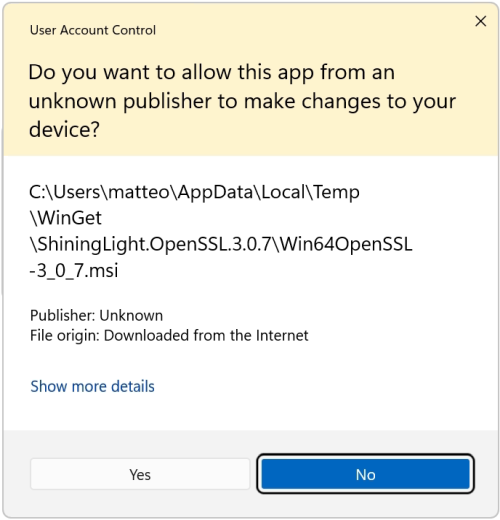
Double-click to execute the file Win64OpenSSL_Light-3_0_7.exe will the setup wizard appears. Confirm the Windows Account Control (UAC) with Yes to continue the installation.
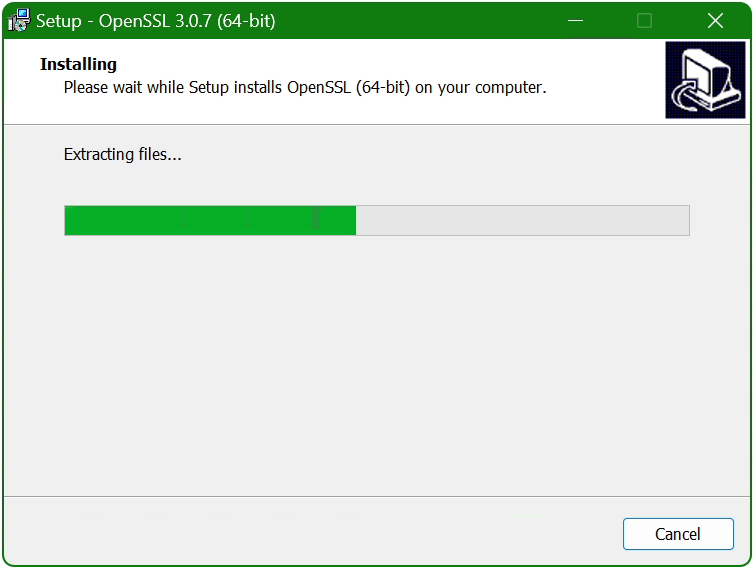
The setup wizard unpacks and copies the OpenSSL files.
Set up the OpenSSL environment
After the OpenSSL files are copied and installed, the search path and environment variable are now added to the operating system, with + R and paste SYSTEMPROPERTIESADVANCED and click OK.
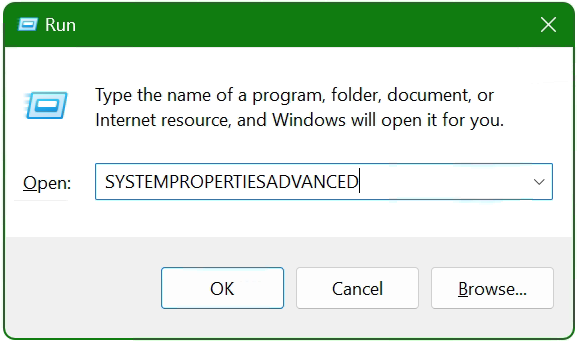
The System Properties window opens.
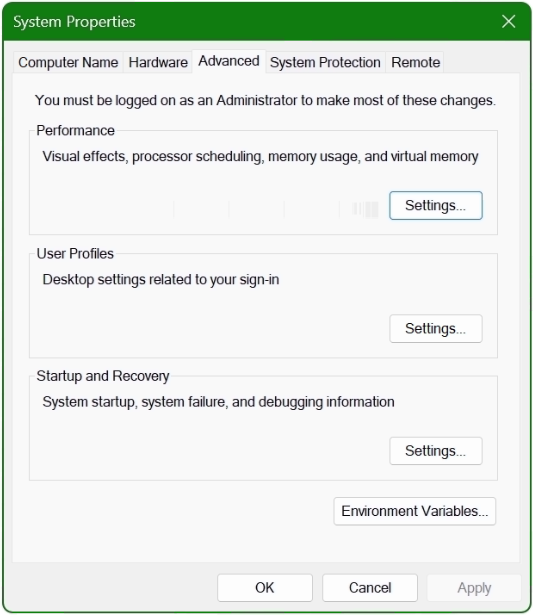
Click the Environment Variables button at the bottom.
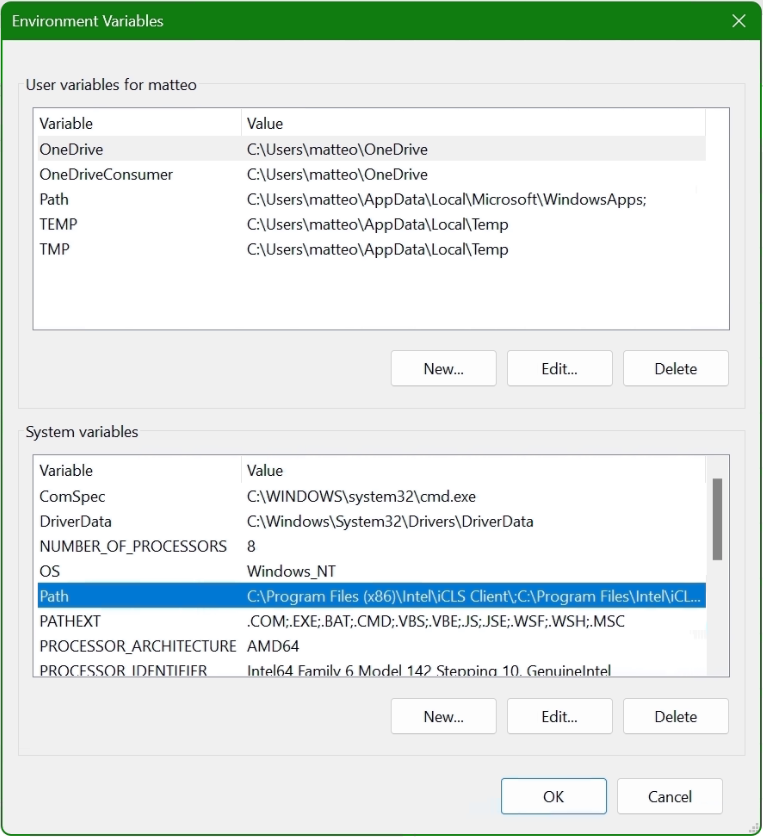
In the lower area System Variables, select the Path line with the mouse and click on the Edit button.
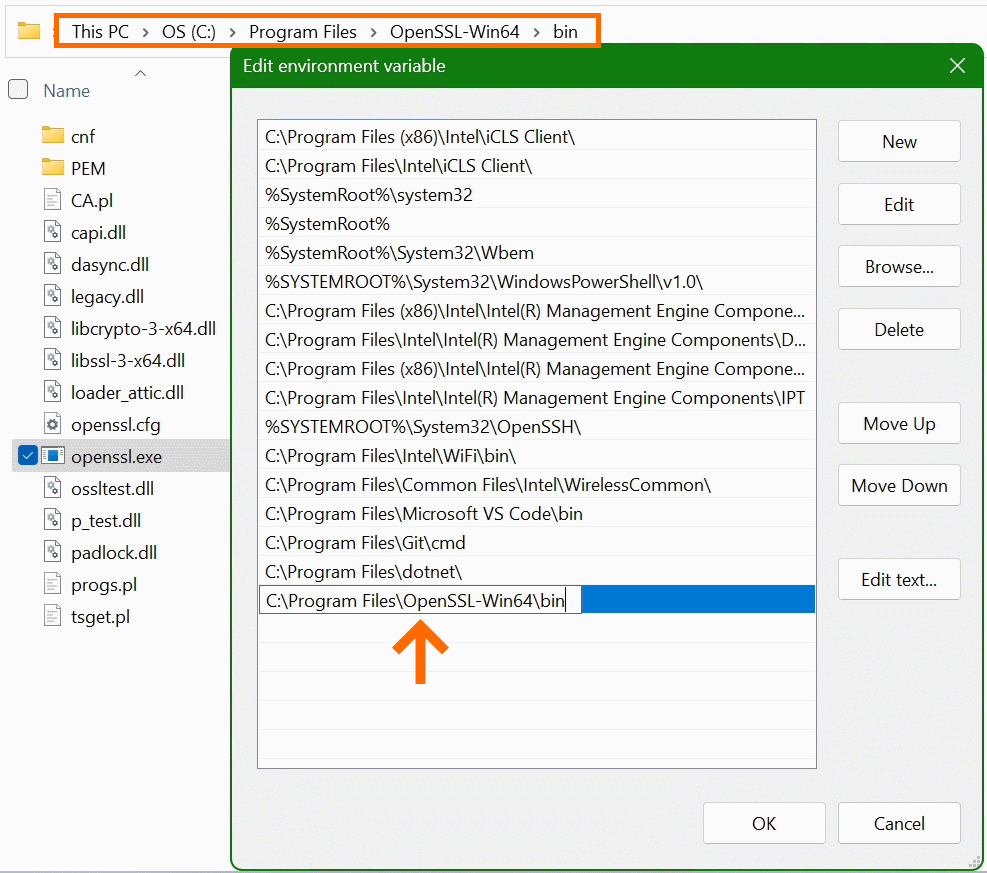
In the “Edit Environment Variables” window, click New to add the path to the OpenSSL-Win64\bin folder under Program files. The path in which the file openssl.exe is located can be found with Windows Explorer and copied to the clipboard, there is also the possibility to choose the path to the bin folder with the Browse button. Confirm the action with OK.
Now add another system variable with click New.
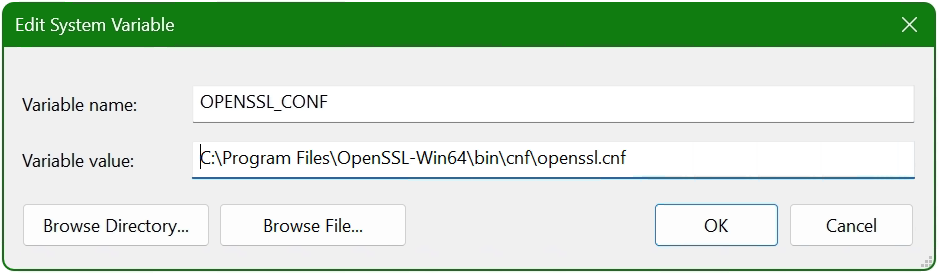
Enter OPENSSL_CONF in the Variable name field. In the next field insert the path to which the file openssl.cnf is located, here it is C:\Program Files\OpenSSL-Win64\bin\cnf\openssl.cnf
The installation is now complete and OpenSSL can be used. First of all, there is the opportunity to check the OpenSSL provisioned release.
C:\> openssl version -a
OpenSSL 3.0.7 1 Nov 2022 (Library: OpenSSL 3.0.7 1 Nov 2022)
built on: Tue Nov  1 16:04:12 2022 UTC
...
C:\> openssl version -d
OPENSSLDIR: "C:\Program Files\Common Files\SSL"
The OpenSSL Toolkit is a versatile utility with many options, but under Windows there is not the possibility of using the man page, as is known on Linux. However, the openssl help command provides context-sensitive help, such asopenssl help s_clientor useopenssl help x509oropenssl help reqto show just a few examples. Help is also offered on the documentation pages on the web, where manpages can also be found.
Useful OpenSSL Examples
A few of the most commonly used openssl command examples in the console are shown below, note that this is not a comprehensive collection of all possible applicable commands of this powerful open source toolkit.
openssl x509 -noout -text -in ca-cert.pemDisplaying and print the ca-cert.pem certificate file in plain text.
openssl req -text -noout -verify -in x509-check.csrView and verify the contents of CSR x509-check.csr in plain text.
openssl rsa -check -in rootCA.keyVerify key consistency of the rootCA.key file.
openssl x509 -noout -modulus -in ca-cert.pem | openssl md5Check md5 checksum of certificate ca-cert.pem file.
openssl crl2pkcs7 -nocrl -certfile servercert.pem -out c:\temp\servercert.p7bConvert certificate from pem to p7b format and write to temp folder.
openssl pkcs12 -export -in rootCA.pem -inkey rootCA.key -out c:\temp\rootCA.p12 -name "PKCS12 certificate"Convert certificate rootCA.pem to PKCS12 format as rootCA.p12 file.
openssl req -new -newkey rsa:2048 -sha256 -days 365 -nodes -x509 -keyout server.key -out server.crtGenerate SSL certificate and key on a single line, using SHA256 with RSA 2048 encryption, the certificate will be valid for 1 year.
openssl s_client -connect imap.gmail.com:993Check connection to imap.gmail.com service 993 to get more useful results like than as in telnet.
openssl s_client -crlf -connect smtp.gmail.com:587 -starttls smtpTry to connect service 587 on smtp.gmail.com using the starttls protocol, possibly to check a firewall policy for its effect.
openssl s_client -verify_quiet -brief www.ietf.org:443Check protocol version and ciphersuite, peer certificate and hash used.
openssl rand -base64 20Generate a random password in base64 using OpenSSL, can be used as a passphrase to hide private keys from spying eyes.
These were just a few examples, because openssl is a versatile toolkit that offers numerous application options.
Conclusion
The OpenSSL open-source library for cryptography is more important than ever and indispensable. Connections are encrypted and protected, so why shouldn’t the OpenSSL Toolkit be used on Windows? Creating and managing Digital X. 509 certificates, check algorithms for data encryption such as Chiper Suite, digital fingerprint, MD5 and SHA hash values can be checked, which was previously reserved only for Linux.
Sources Links:
slproweb.com Win32/Win64 OpenSSL Installation Project for Windows
openssl.org Cryptography and SSL/TLS Toolkit
Here’s a solution that may delight those who have implemented WSL (Windows Subsystem for Linux). You can just use:
wsl openssl ...whatever_args...
The point is that many who’ve implemented WSL may not realize they can call upon ANY linux command (within their underlying WSL linux vm) right from the DOS or powershell command-line this way. (It’s easy to fall into thinking the point of WSL is to use it to «shell into the vm», which is indeed an option, but the power to just run linux commands from Windows is a real value-add of WSL.)
And to be clear, in doing the command as above, whatever file names or folders you may point to (or create) will be relative to the Windows folder from which you run the command. So doing for example, openssl req to create a self-signed cert, where you may name -keyout selfsigned.key -out selfsigned.crt, those two files will be created in the Windows folder where you ran the command.
That said, there are ways this could fall down for some openssl command examples one may find, such as if they tried to use various bash-specific arguments, in which case «shelling into wsl» to run the command may well be the better choice. You could still direct things to be found or placed on the host, but I don’t mean this answer to become overly-focused on such WSL aspects. I just wanted to propose it as another alternative to installing openssl.
What is OpenSSL?
OpenSSL is a single-system image clustering system that is open-source. It allows a group of computers to be viewed as a single colossal system, giving programs running on any one machine access to all of the cluster’s resources. [It is the culmination of a long development process that began with the development of LOCUS in the early 1980s.
OpenSSL allows a group of separate computers (nodes) to be regarded as one massive system. Processes running on any node have full access to all node resources.
Functionalities can be automatically transferred from node to node to balance system utilization. Alternatively, the cluster might be set up so that each node has direct access to the file system.
Step 1 Download OpenSSL Binaries
Link to Download OpenSSL binaries files: https://sourceforge.net/projects/openssl/files/
In our article, we are downloading
https://sourceforge.net/projects/openssl/files/openssl-1.0.2j-fips-x86_64/
Step 2 Unpack OpenSSL Zip files
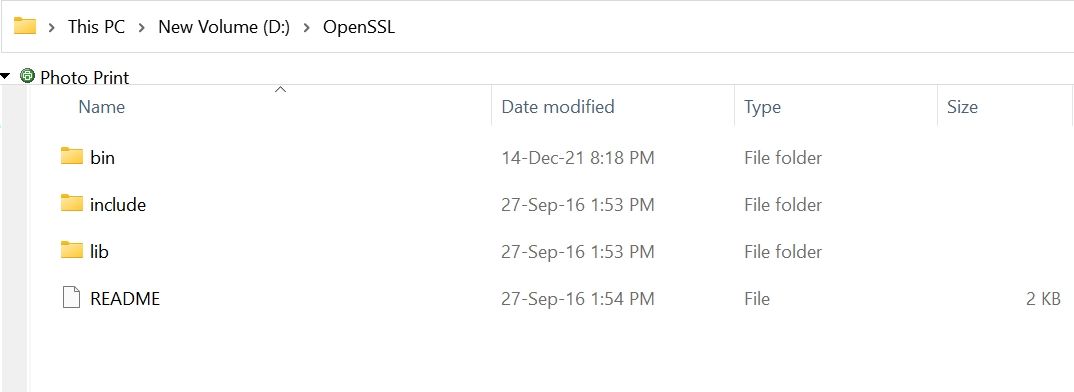
Unpack the content of (openssl-1.0.2j-fips-x86_64.zip) zip file into your desired location in our example we are using (D:\OpenSSL) folder
This comes with three folders (bin, include & lib) as shown in the image
Step 3: Set OpenSSL Path in Windows path
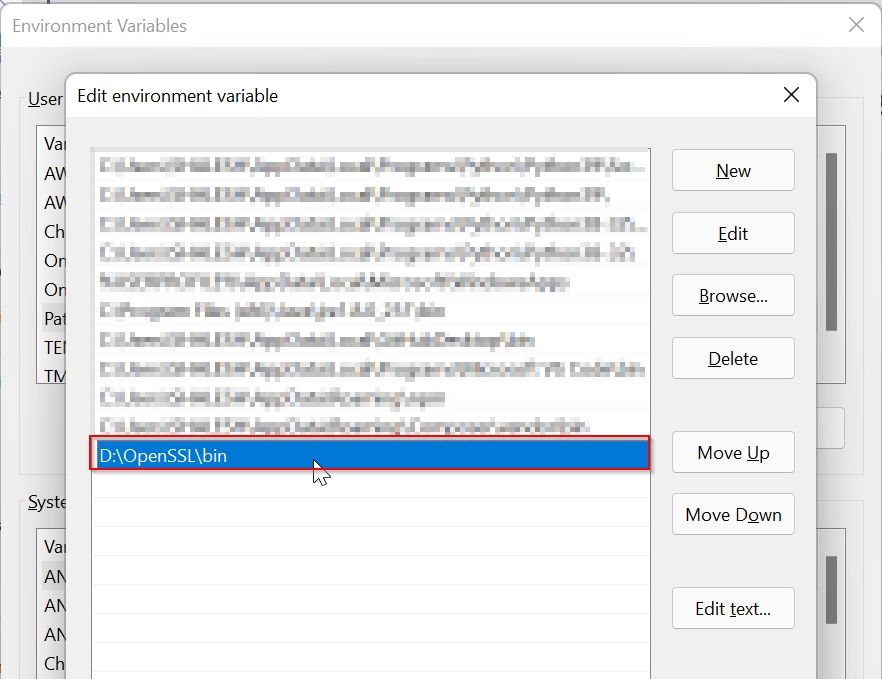
We have extracted OpenSSL files in directory D:\OpenSSL\bin
So our OpenSSL path is D:\OpenSSL\bin
Open explorer and right-mouse click on This PC icon as shown in the image
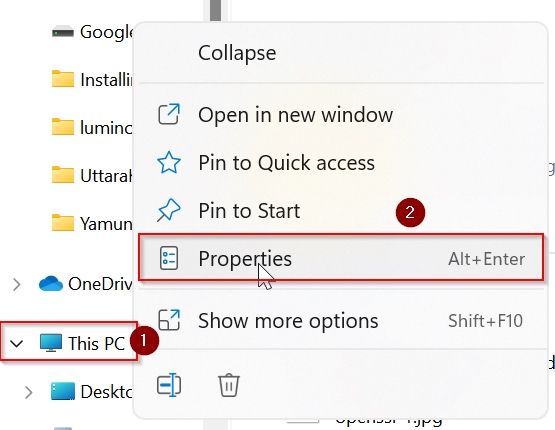
Under System About window click on the Advanced system settings button

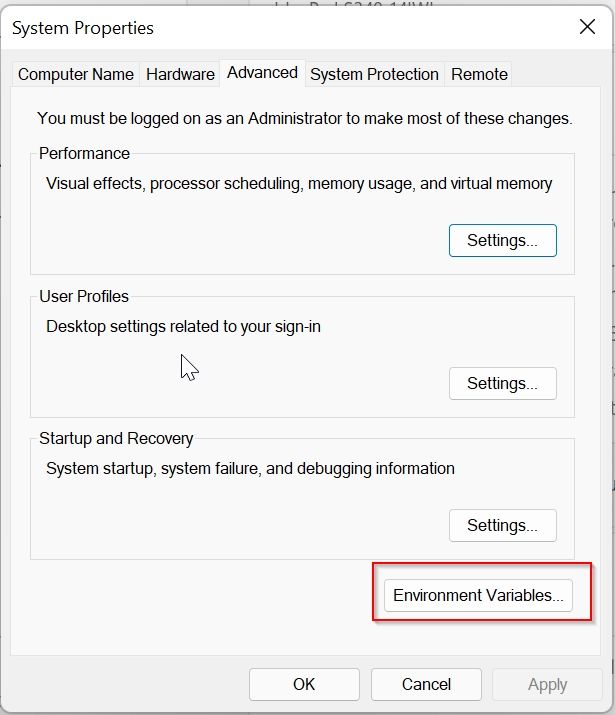
Under the System Property window click on the Environment Variables button
Under the Advanced Environment window select Path and then click on the Edit button
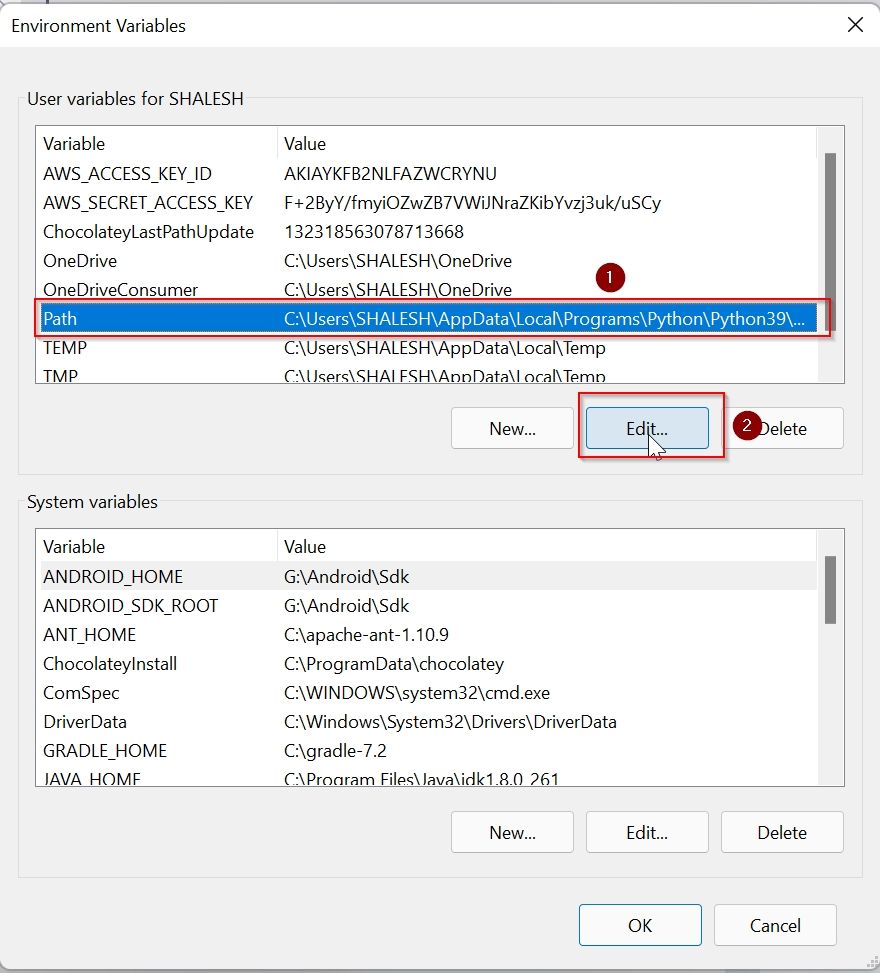
Under the Environment Variable window click on the New button
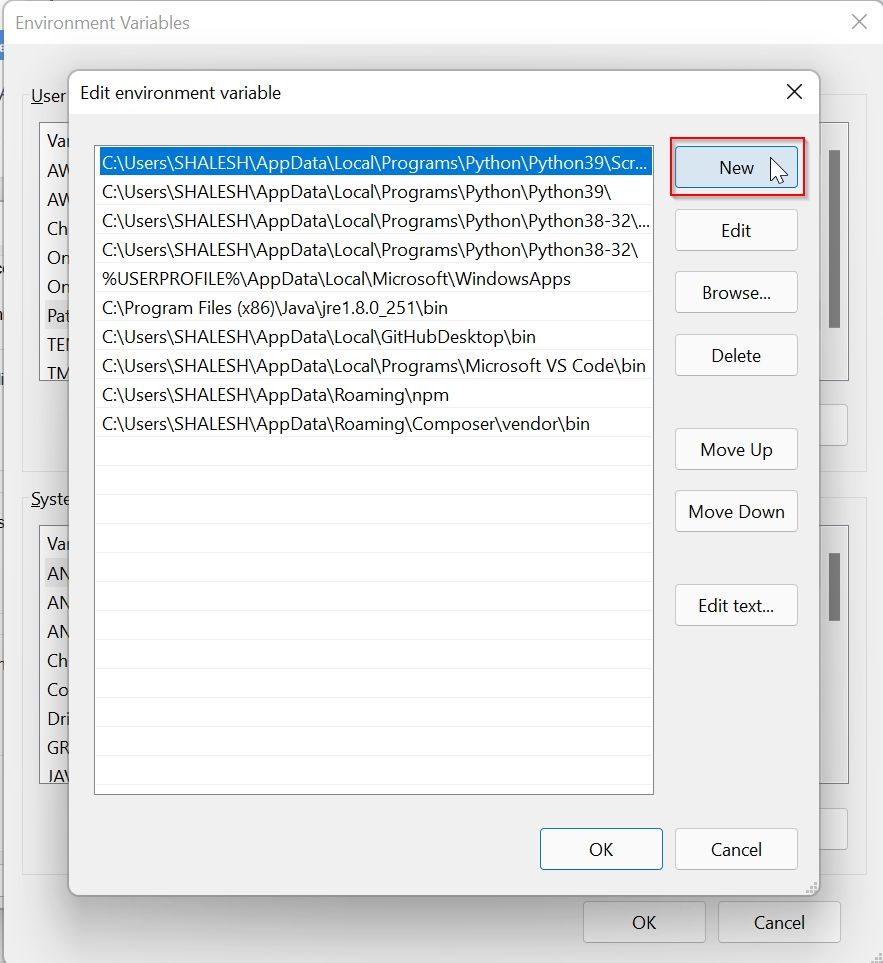
Paste the path of OpenSSL (D:\OpenSSL\bin) and click the OK button
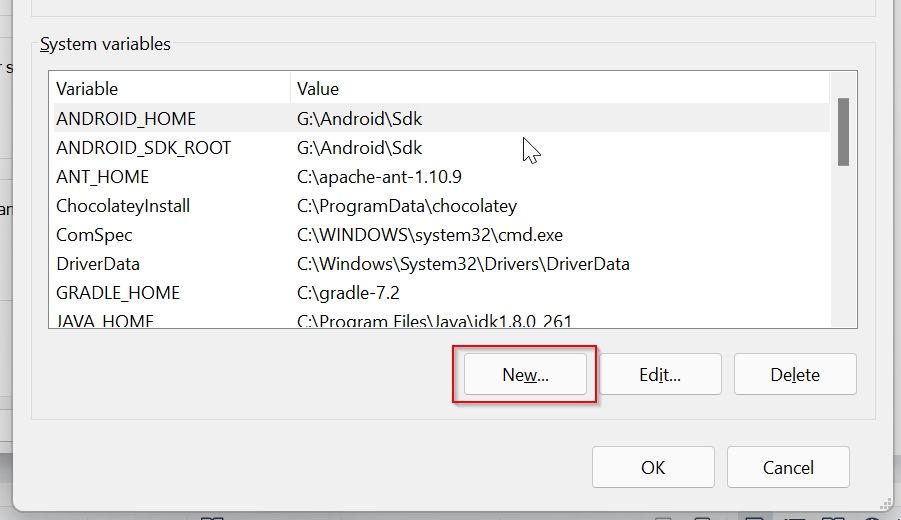
Step 4: Set System Variable for OPENSSL_CONF
Now to set system variable for OPENSSL_CONF
Click on the New button under the System Variable window
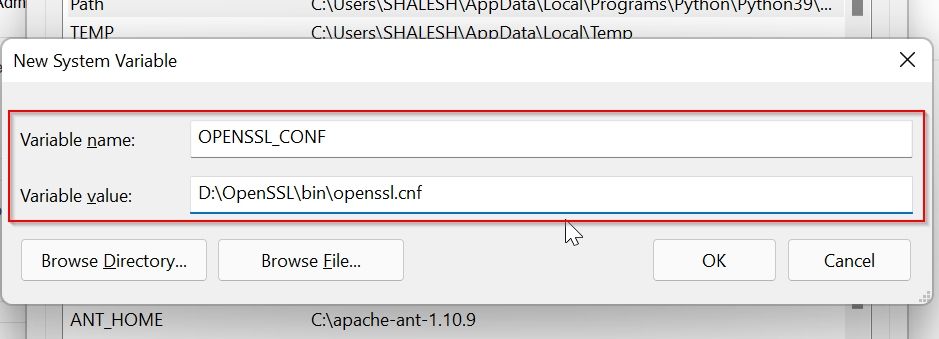
Now add system variable values as given, the path to your openssl.conf file location as shown below, and click on the OK button
Name: OPENSSL_CONF
Value: D:\OpenSSL\bin\openssl.cnf
Now you can see that the system variable is set

For window 10 and 11 you don’t have to restart your system to effect changes, else you need to restart the system
Step5: Test OpenSSL
To test OpenSSL installed properly open the terminal and check the OpenSSL version
cmd: openssl version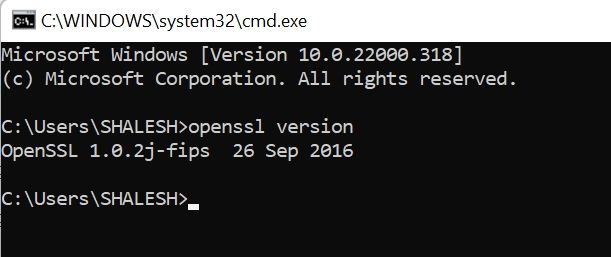
If it displays the OpenSSL version then OpenSSL is installed properly.
Important Commands for Open SSL
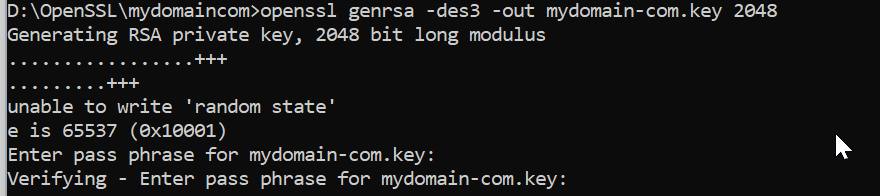
Creating a Private Key
Private Key is very important it is required for all operations in SSL, this Private key is required to create a CSR file.
openssl genrsa -des3 -out mydomain-com.key 2048It will ask for the password, please keep the password in a safe place because it is required in many places.
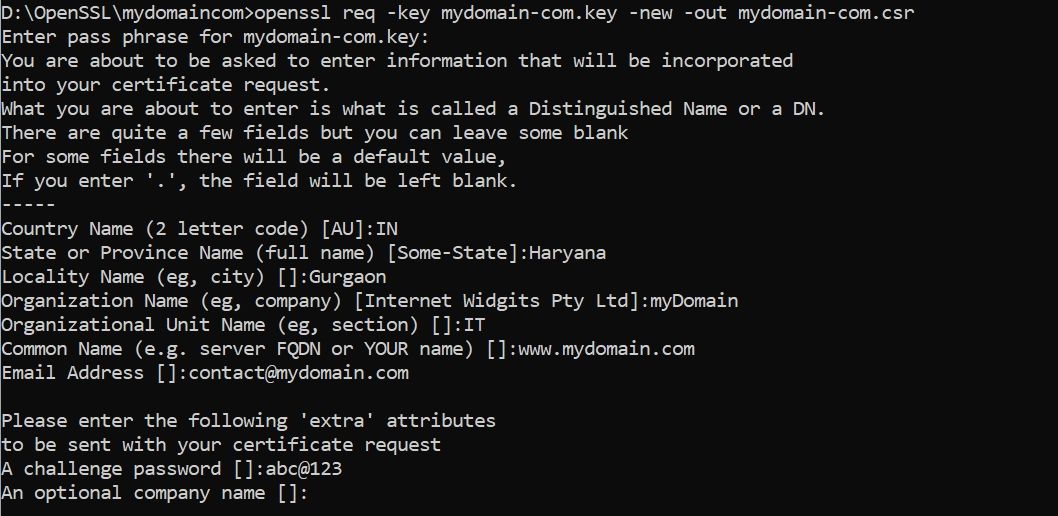
1. Create CSR Creating a Certificate Signing Request
CSR file is required to generate an SSL certificate.
This CSR file contains information about the certificate and private key
openssl req -key mydomain-com.key -new -out mydomain-com.csrInformation required by CSR:
Enter pass phrase for mydomain-com.key:
Country Name (2 letter code) [AU]:IN
State or Province Name (full name) [Some-State]:Haryana
Locality Name (eg, city) []:Gurgaon
Organization Name (eg, company) [Internet Widgits Pty Ltd]:myDomain
Organizational Unit Name (eg, section) []:IT
Common Name (e.g. server FQDN or YOUR name) []:www.mydomain.com
Email Address []:contact@mydomain.com
Please enter the following ‘extra’ attributes
to be sent with your certificate request
A challenge password []:
An optional company name []:
Important: Common Name is the Fully Qualified Domain Name for which you want an SSL certificate.
This CSR file is used by different SSL certificate companies to generate SSL Certificate
Generate Private key and CSR with Single command.
openssl req -newkey rsa:2048 -keyout mydomain-com.key -out mydomain-com.csrCreating a Self-Signed Certificate
A self-Signed Certificate is an SSL certificate is generated by using your own private key, it is not used for commercial purposes because it shows a warning that says the certificate is not trusted.
So self-signed certificate can be used for development and testing purposes.
openssl x509 -signkey mydomain-com.key -in mydomain-com.csr -req -days 365 -out mydomain-com.crt
Convert CRT file to PFX file
The .pfx file is required to install an SSL certificate in the windows system, this file contains Private Key and SSL certificate.
openssl pkcs12 -export -out mydomain-com.pfx -inkey mydomain-com.key -in mydomain-com.crtGenerate SHA265 Key from .crt file
openssl x509 -in mydomain.crt -pubkey -noout | openssl pkey -pubin -outform der | openssl dgst -sha256 -binary | openssl enc -base64Output:
XXXXXXxxXXXXXXXXXXXXXXXxXXXXxXXXX121XX=Generate PF12 file .crt file
openssl pkcs12 -export -out yourdomain.com.p12 -inkey yourdomain.com.key -in yourdomain.crt -certfile CACert.crtyourdomain.com.key: is the key file, it get generated when we create .CSR file
CACert.crt : root certificate, it comes with SSL certificate bundel file.
yourdomain.crt: is the main certificate file