Installation
Select your preferences and run the install command.
Language:
Python
C++
Java
Android
iOS
JavaScript
Run this Command:
Default Result: pip3 install opencv-python
Verification
To ensure that OpenCV is installed correctly, we can run the following example to show how to read and display image
Python
Change path/to/image to a real path of an image, then run this demo
					import cv2 as cv
img = cv.imread("path/to/image")

cv.imshow("Display window", img)
k = cv.waitKey(0) # Wait for a keystroke in the window
C++
Change path/to/image to a real path of an image, then build this demo with OpenCV package and run it
					#include
#include
using namespace cv;
int main()
{
    std::string image_path = "path/to/image";
    Mat img = imread(image_path, IMREAD_COLOR);

    imshow("Display window", img);
    int k = waitKey(0); // Wait for a keystroke in the window
    return 0;
}
JavaScript
Copy this code into an html file and open it in your web browser
Hello OpenCV.js
Hello OpenCV.js
OpenCV.js is loading...
![No Image]() imageSrc
canvasOutput
imageSrc
canvasOutput
Prerequisite: Python Language Introduction OpenCV is the huge open-source library for computer vision, machine learning, and image processing and now it plays a major role in real-time operation which is very important in today’s systems. By using it, one can process images and videos to identify objects, faces, or even the handwriting of a human. When it integrated with various libraries, such as Numpy, python is capable of processing the OpenCV array structure for analysis. To Identify image patterns and its various features we use vector space and perform mathematical operations on these features. To install OpenCV, one must have Python and PIP, preinstalled on their system. To check if your system already contains Python, go through the following instructions: Open the Command line(search for cmd in the Run dialog( + R). Now run the following command:
python --version
If Python is already installed, it will generate a message with the Python version available.  If Python is not present, go through How to install Python on Windows? and follow the instructions provided. PIP is a package management system used to install and manage software packages/libraries written in Python. These files are stored in a large “on-line repository” termed as Python Package Index (PyPI). To check if PIP is already installed on your system, just go to the command line and execute the following command:
pip -V
 If PIP is not present, go through How to install PIP on Windows? and follow the instructions provided.
Downloading and Installing OpenCV:
OpenCV can be directly downloaded and installed with the use of pip (package manager). To install OpenCV, just go to the command-line and type the following command:
pip install opencv-python
Beginning with the installation:
To check if OpenCV is correctly installed, just run the following commands to perform a version check:
python
>>>import cv2
>>>print(cv2.__version__)

Last Updated :
18 Jan, 2023
Like Article
Save Article
![]()
Instructions for installing opencv on Windows 10
Install OpenCV 4.5 on Windows 10
Pre-configured OpenCV for Python from PyPi
- open the terminal (Ctrl+R + cmd)
- check Python3 installation:
py --version - go to official website to learn details: https://pypi.org/project/opencv-python/
- choose the most complete package and run:
py -m pip install opencv-contrib-python - check installation by entering the Python REPL:
py - import tha library:
import cv2
Pre-configured OpenCV for Python and C++ from GitHub releases
- Download opencv-4.5.1-vc14_vc15.exe from latest release:
https://github.com/opencv/opencv/releases/tag/4.5.1 - unpack to
C:\opencv - edit environment variables. Win search «Environment variables»
- append to Path the path to opencv:
C:\opencv\bin - restart computer
- open cmd
echo %Path%output should contain new path
Build OpenCV for Python and C++ from sources
- Install cmake. To check:
cmake --version - Download Source code (zip) from latest release:
https://github.com/opencv/opencv/releases/tag/4.5.1 - Download Source code (zip) from latest release of opencv-contrib sources:
https://github.com/opencv/opencv_contrib/releases/tag/4.5.1 - Unzip both archives
Run cmake-gui - choose the directory with opencv sources
- specify the directory for storing building binaries and Visual Studio project.
it would better if you create a new one and specify it here - press ‘Configure’
- use standard settings and proceed with Finish button
- once project is prepared, review all the flags suggested
- check
BUILD_WITH_DEBUG_INFO - important to specify:
OPENCV_EXTRA_MODULES_PATH. We need to specify path to
contrib folder we extracted earlier - change
CMAKE_INSTALL_PREFIX
to a directory you want opencv to install to. for exampleC:/opencv-custom - when you are ready, press
Generate. - go to build directory
- double click on
OpenCV.sln - build
BUILD_ALLby right click on the corresponding project in Release configuration - Then build
INSTALLby right click on the corresponding project to finally install in Release configuration - edit environment variables. Win search «Environment variables»
- append to Path the path to opencv:
C:\opencv-custom\bin - restart computer
- open cmd
echo %Path%output should contain new path
Configure Visual Studio project to work with opencv
Go to the Visual Studio and create the new empty C++ project.
- We will call it «HelloOpenCV».
- Set the target to
Debugandx64. This is very important to configure it for x64. - Paste the
main.cppcode to themain.cpp
As we can see there is unknown include statement of the opencv package. We need to fix that.
-
For that we need to configure a project so that compiler could know where to take headers
and library from. Open the Project->HelloOpenCV Properties and go toVC++ Directories. -
Change the
Include Directoriesto contain corresponding include folder in the opencv
installation. Insert it to the beginning of the value:C:\opencv\opencv\build\include; -
Change the
Library directoriesto includeC:\opencv\opencv\build\x64\vc15\lib -
Change the
Linker->Input->Additional dependenciesto- include
opencv_world451d.libif we are talking about pre-configured package installation - include
opencv_core451d.lib;opencv_highgui451d.lib;opencv_videoio451d.lib;opencv_imgcodecs451d.lib;
if we are talking about building from sources. In future, this list might be bigger
containing all the libraries and extensions that you use from opencv and opencv-contrib.
- include
-
Apply and close the window
To name the few more available libraries that can be included with the following linker flags
(for Windows remove-land add451d.libto the end if the version of opencv is 4.5.1:-lopencv_gapi -lopencv_stitching -lopencv_alphamat \ -lopencv_aruco -lopencv_bgsegm -lopencv_bioinspired \ -lopencv_ccalib -lopencv_dnn_objdetect -lopencv_dnn_superres \ -lopencv_dpm -lopencv_face -lopencv_freetype \ -lopencv_fuzzy -lopencv_hfs -lopencv_img_hash \ -lopencv_intensity_transform -lopencv_line_descriptor -lopencv_mcc \ -lopencv_quality -lopencv_rapid -lopencv_reg \ -lopencv_rgbd -lopencv_saliency -lopencv_sfm \ -lopencv_stereo -lopencv_structured_light -lopencv_phase_unwrapping \ -lopencv_superres -lopencv_optflow -lopencv_surface_matching \ -lopencv_tracking -lopencv_highgui -lopencv_datasets \ -lopencv_text -lopencv_plot -lopencv_videostab \ -lopencv_videoio -lopencv_viz -lopencv_xfeatures2d \ -lopencv_shape -lopencv_ml -lopencv_ximgproc \ -lopencv_video -lopencv_dnn -lopencv_xobjdetect \ -lopencv_objdetect -lopencv_calib3d -lopencv_imgcodecs \ -lopencv_features2d -lopencv_flann -lopencv_xphoto \ -lopencv_photo -lopencv_imgproc -lopencv_core
This file contains bidirectional Unicode text that may be interpreted or compiled differently than what appears below. To review, open the file in an editor that reveals hidden Unicode characters.
Learn more about bidirectional Unicode characters
| #include «opencv2/opencv.hpp« | |
| #include <opencv2/highgui/highgui.hpp> | |
| #include «iostream« | |
| int showImage() { | |
| std::string path = «img/test.jpeg«; | |
| cv::Mat img = cv::imread(path); | |
| imshow(«Portrait«, img); | |
| cv::waitKey(0); | |
| return 0; | |
| } | |
| int showWebCameraContent() { | |
| // open the first webcam plugged in the computer | |
| cv::VideoCapture camera(0); | |
| if (!camera.isOpened()) { | |
| std::cerr << «ERROR: Could not open camera« << std::endl; | |
| return 1; | |
| } | |
| // create a window to display the images from the webcam | |
| cv::namedWindow(«Webcam«); | |
| // this will contain the image from the webcam | |
| cv::Mat frame; | |
| // display the frame until you press a key | |
| while (1) { | |
| // capture the next frame from the webcam | |
| camera >> frame; | |
| // show the image on the window | |
| cv::imshow(«Webcam«, frame); | |
| // wait (10ms) for a key to be pressed | |
| if (cv::waitKey(10) >= 0) { | |
| break; | |
| } | |
| } | |
| return 0; | |
| } | |
| int main(int, char**) { | |
| showImage(); | |
| // showWebCameraContent(); | |
| } |
Goals
- In this tutorial
-
- We will learn to setup OpenCV-Python in your Windows system.
Below steps are tested in a Windows 7-64 bit machine with Visual Studio 2010 and Visual Studio 2012. The screenshots shows VS2012.
Installing OpenCV from prebuilt binaries
-
Below Python packages are to be downloaded and installed to their default locations.
-
Install all packages into their default locations. Python will be installed to C:/Python27/.
-
After installation, open Python IDLE. Enter
import numpyand make sure Numpy is working fine. -
Download latest OpenCV release from sourceforge site and double-click to extract it.
-
Goto opencv/build/python/2.7 folder.
-
Copy cv2.pyd to C:/Python27/lib/site-packeges.
-
Open Python IDLE and type following codes in Python terminal.
>>> import cv2
>>> print cv2.__version__
If the results are printed out without any errors, congratulations !!! You have installed OpenCV-Python successfully.
Building OpenCV from source
-
Download and install Visual Studio and CMake.
-
Download and install necessary Python packages to their default locations
Note
In this case, we are using 32-bit binaries of Python packages. But if you want to use OpenCV for x64, 64-bit binaries of Python packages are to be installed. Problem is that, there is no official 64-bit binaries of Numpy. You have to build it on your own. For that, you have to use the same compiler used to build Python. When you start Python IDLE, it shows the compiler details. You can get more information here. So your system must have the same Visual Studio version and build Numpy from source.
Note
Another method to have 64-bit Python packages is to use ready-made Python distributions from third-parties like Anaconda, Enthought etc. It will be bigger in size, but will have everything you need. Everything in a single shell. You can also download 32-bit versions also.
-
Make sure Python and Numpy are working fine.
-
Download OpenCV source. It can be from Sourceforge (for official release version) or from Github (for latest source).
-
Extract it to a folder,
opencvand create a new folderbuildin it. -
Open CMake-gui (Start > All Programs > CMake-gui)
-
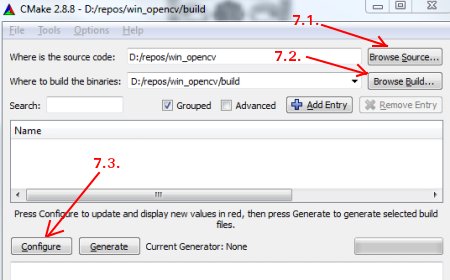
Fill the fields as follows (see the image below):
7.1. Click on Browse Source… and locate the
opencvfolder.7.2. Click on Browse Build… and locate the
buildfolder we created.7.3. Click on Configure.

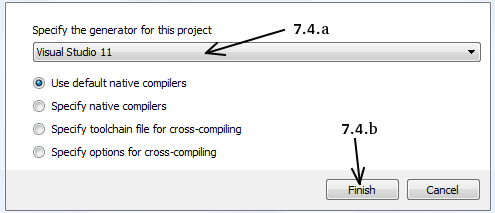
7.4. It will open a new window to select the compiler. Choose appropriate compiler (here, Visual Studio 11) and click Finish.
7.5. Wait until analysis is finished.
-
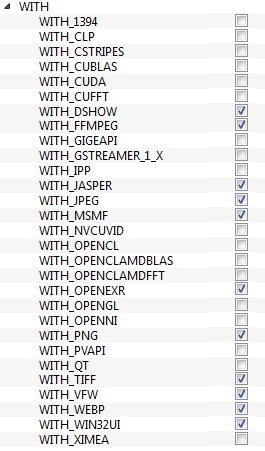
You will see all the fields are marked in red. Click on the WITH field to expand it. It decides what extra features you need. So mark appropriate fields. See the below image:
-
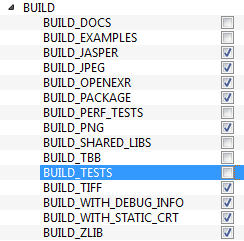
Now click on BUILD field to expand it. First few fields configure the build method. See the below image:
-
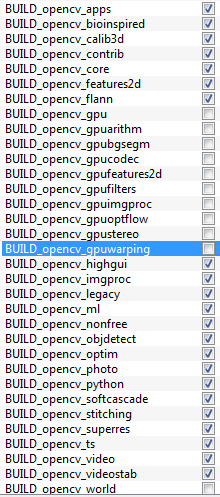
Remaining fields specify what modules are to be built. Since GPU modules are not yet supported by OpenCV-Python, you can completely avoid it to save time (But if you work with them, keep it there). See the image below:
-
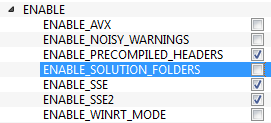
Now click on ENABLE field to expand it. Make sure ENABLE_SOLUTION_FOLDERS is unchecked (Solution folders are not supported by Visual Studio Express edition). See the image below:
-
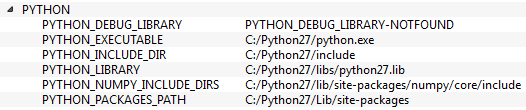
Also make sure that in the PYTHON field, everything is filled. (Ignore PYTHON_DEBUG_LIBRARY). See image below:
-
Finally click the Generate button.
-
Now go to our opencv/build folder. There you will find OpenCV.sln file. Open it with Visual Studio.
-
Check build mode as Release instead of Debug.
-
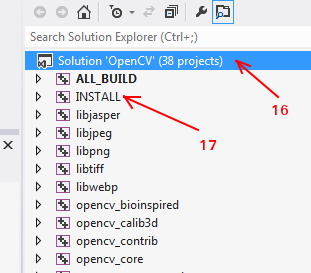
In the solution explorer, right-click on the Solution (or ALL_BUILD) and build it. It will take some time to finish.
-
Again, right-click on INSTALL and build it. Now OpenCV-Python will be installed.
-
Open Python IDLE and enter
import cv2. If no error, it is installed correctly.
Note
We have installed with no other support like TBB, Eigen, Qt, Documentation etc. It would be difficult to explain it here. A more detailed video will be added soon or you can just hack around.
Additional Resources
Exercises
- If you have a windows machine, compile the OpenCV from source. Do all kinds of hacks. If you meet any problem, visit OpenCV forum and explain your problem.
In this blog post, we will be installing OpenCV on Windows for C++ and Python. The C++ installation is done with the help of custom setup exe files. Whereas Python installation is done with Anaconda.
Installing OpenCV from source takes up a lot of time. Depending on your hardware, and the installation configuration, it can take anywhere from 5 minutes up to 2 hours.
Moreover, the installation is not a cakewalk. Hence, we have come up with a solution for Windows users – OpenCV Windows installers. These installers will only work for installing OpenCV for C++. If you want to install OpenCV for Python, you’ll find the information later in the blog.
If you want to install OpenCV 4 on Windows from source, then check out this blog post.
Table of Contents
Install OpenCV on Windows for CPP
Step 1: Prerequisites
You need Visual Studio pre-installed on your system. You can download the latest version of Visual Studio from here. Otherwise, you can find older versions from here.
Step 2: Download the Installer
Once you have set up Visual Studio on your system, download the installer according to the Visual Studio version you have installed.
Master Generative AI for CV
Get expert guidance, insider tips & tricks. Create stunning images, learn to fine tune diffusion models, advanced Image editing techniques like In-Painting, Instruct Pix2Pix and many more
Step 3: Install OpenCV on Windows
Once you download the installer, double click it to run the installer. Before the installer starts, it’ll ask you permission to run the executable. Click on More info and then on Run anyway.


The installer starts with a welcome screen. Click on Next to read the License.

If you accept the license, click on I accept the agreement and click on Next.

Next, it’ll ask you to choose the installation folder. You can install OpenCV anywhere on the system. The default location is C:.

Finally, the installer will ask you for confirmation to install OpenCV on the system. Click on Install to continue.


After OpenCV is installed, you can exit the installer.

Step 4: Execute a sample code
Once the OpenCV installation is completed, you can start coding right away. We have provided with a sample code to test the installation. Below is the code snippet.
You can download the code using this link.
#include <opencv2/opencv.hpp>
using namespace cv;

int main(void) {

	// Read image in GrayScale mode
	Mat image = imread("boy.jpg", 0);

	// Save grayscale image
	imwrite("boyGray.jpg", image);

	// To display the image
	imshow("Grayscale Image", image);
	waitKey(0);

	return 0;
}
Download Code
To easily follow along this tutorial, please download code by clicking on the button below. It’s FREE!

If you plan on executing C++ code using Cmake, then download and install from here (windows win64-x64 Installer), and follow instructions below. The third line specifies the Visual Studio version on your system.
mkdir build
cd build
cmake -G "Visual Studio 16 2019" ..
cmake --build . --config Release
cd ..
.\build\Release\sampleCode.exe
The above code reads an input image as grayscale, writes it to the disk, and displays it. Following are input and output to the code.


How are the installers different from Official OpenCV Installers for Windows
These are general-purpose installers, which can install and uninstall OpenCV in under 15 seconds. It’s a quick and clean approach to install OpenCV for your Windows system. You can test out the latest OpenCV version and see if it’s for you. Otherwise, you can install OpenCV without configuring and waiting for hours on end for it to install.
Although the installers are useful for new users, or users who want one-click install, or simply for the ones who struggle with the installation, but these are not the official installers. You can find the official OpenCV binaries from here. There are differences between the installers which we provide and the OpenCV official binaries
- Contrib modules: The official binaries do not contain
opencv_contribmodules. The installer which we provide does. - Additional setup: The official binaries require additional setup, i.e., editing the environment variables, and using the correct folder address. Our installers will not require additional setup.
- Size: Official binaries are larger in size. They take about 1.21GB. The installers which we provide take around 367MB.
- List of libraries: If you code in Visual Studio, we have provided you with the list of libraries, in Debug and Release mode, as a separate text file. It is available in the root directory of the installation.
- No availability for VS16: The official binaries are not available for VS16, only for VS14 and VS15. Our installers are created for VS14, VS15, and VS16.
Install OpenCV on Windows for Python
Step 1: Install Anaconda for Python 3

While installing Anaconda make sure that you check both options:
- Add Anaconda to my
PATHenvironment variable - Register Anaconda as my default Python
Step 2: Create a Virtual Environment
We will use Virtual Environment to install Python libraries. It is generally a good practice in order to separate your project environment and global environment.
Open the command prompt or Power shell and execute the following command.
conda create --name virtualenv python=3.8Step 3: Install OpenCV on Windows
Activate the environment we created just now (virtualenv) and install all the required libraries using the commands below.
conda activate virtualenv
pip install opencv-contrib-python
And that’s it. OpenCV has been installed on your system. To close the virtual environment, use conda deactivate.
Step 4: Test Installation
Next, we will check whether the installation was successful. From the command prompt execute the following commands.
# activate environment
conda activate virtualenv

# start python prompt
python

# import cv2 and print version
import cv2
print(cv2.__version__)

# If OpenCV is installed correctly, the above command should output OpenCV version.

# Exit and deactivate environment
exit()
conda deactivate
Summary
In this blog post, we installed OpenCV on Windows with the quickest and easiest method. For C++, we used a simple .exe installer and installed in under 30 seconds. For Python, we used Anaconda as the package manager and installed OpenCV in a virtual environment. We also executed sample programs for both, C++ and Python, to test the installation. This concludes the OpenCV installation.
Subscribe & Download Code
If you liked this article and would like to download code (C++ and Python) and example images used in this post, please click here. Alternately, sign up to receive a free Computer Vision Resource Guide. In our newsletter, we share OpenCV tutorials and examples written in C++/Python, and Computer Vision and Machine Learning algorithms and news.