Introduction
Node.js is a backend Javascript runtime environment that is light and highly scalable. It is used to build real-time applications such as video streaming applications. To make development easier, Node js developers created a node package manager (npm). This package manager acts as the Node.js command line. It is used for installing modules and initializing projects.
In this tutorial, you will learn how to install npm on Windows and how to use it.
Follow the steps below to download and install the Node.js .msi file. The Node.js .msi file includes the node package manager. You don’t have to download them separately like before.
-
Go to the Nodej.s website and download the Long Term Support (LTS) version of Node.js. The LTS version has features that have abundant documentation and it is stable in terms of security and performance when compared to the Node.js current version.
-
Navigate to the Download folder in the file manager and click the
.msipackage to start the installation procedure. -
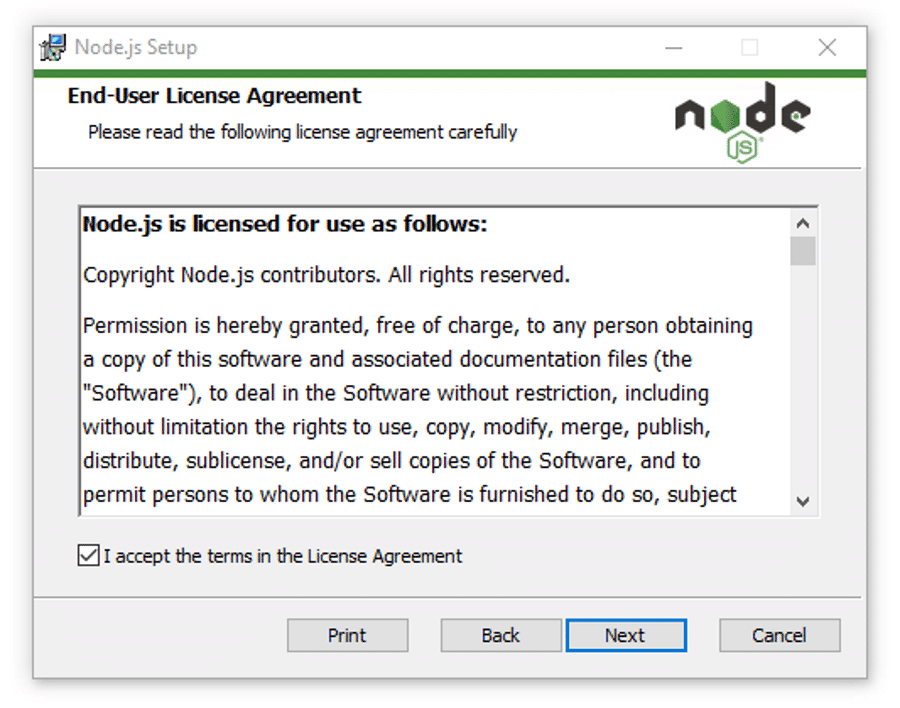
Accept the terms in the License Agreement.
-
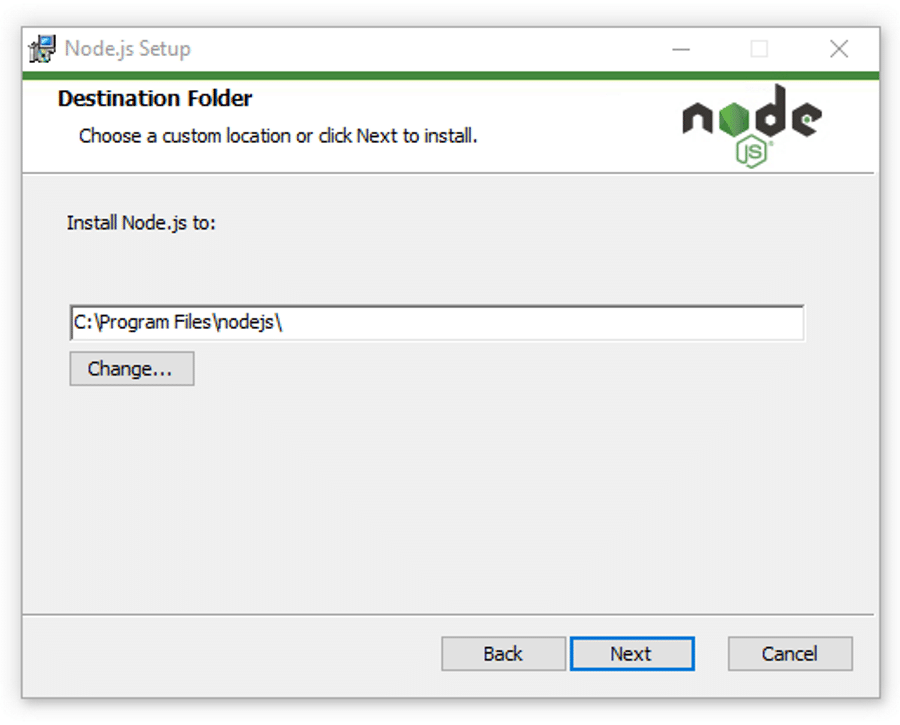
Add a different directory if you want but you can just leave the default location set by Node.js.
-
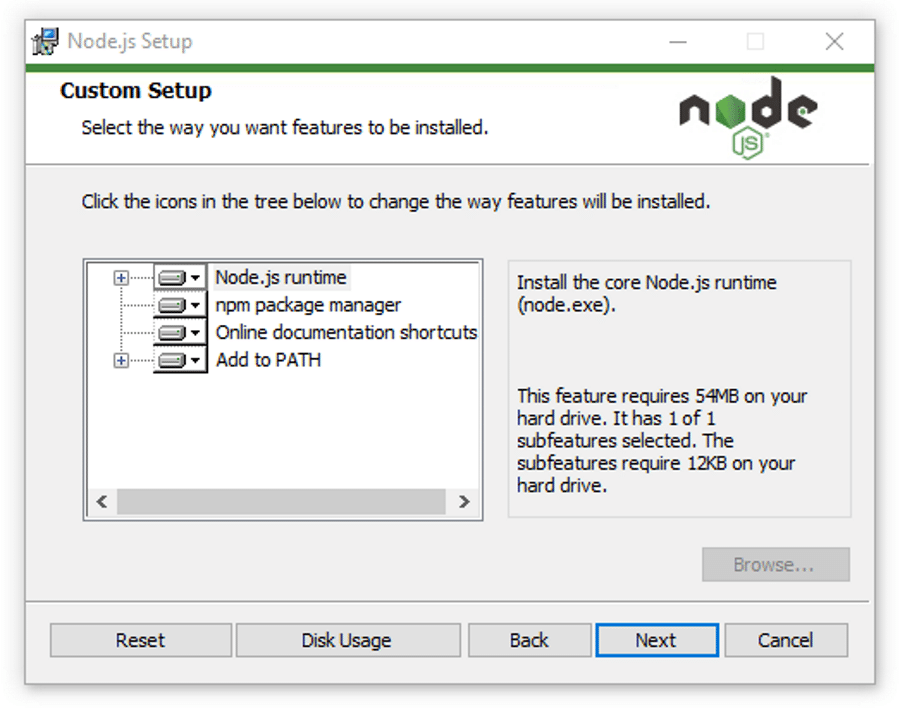
Select the Node.js features you want to install or remove by clicking on the drop-down list. You can leave everything on default if you don’t have any changes to make.
-
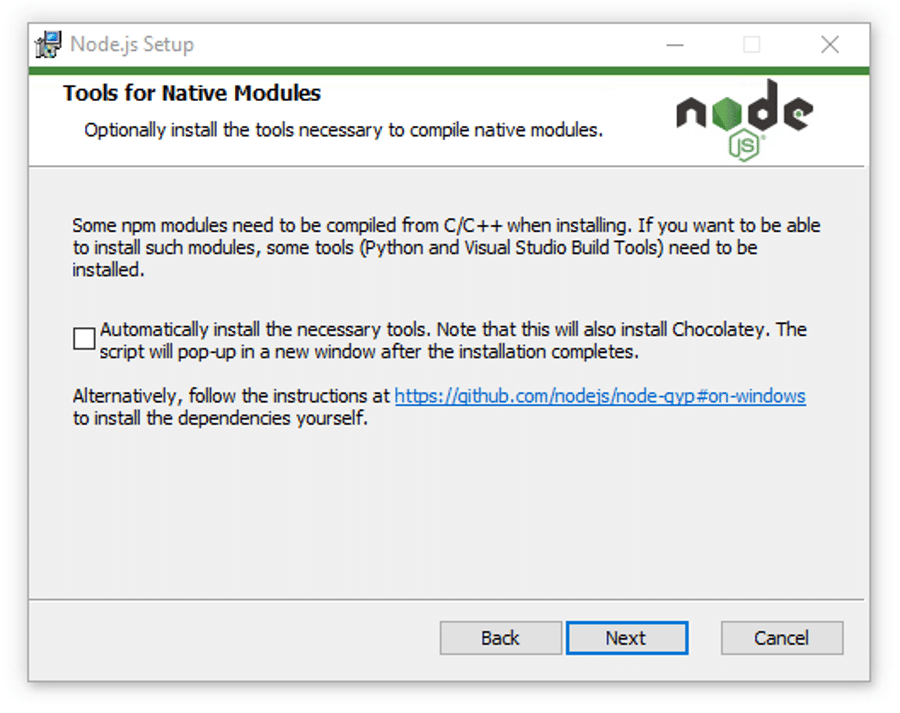
Check the box to install essential tools required by Node.js and npm.
-
Finish the installation process by clicking on the install button to install Node.js.
Confirming that npm and Node.js have been installed successfully
Use the npm -v command to check the version of the node package manager you just installed. You will get the version number if it has been successfully installed.
npm -v

8.1.0
Use node -v command to check if Node.js has been installed successfully. This command will also show the version number if Node.js has been successfully installed.
node -v

8.1.0
How to initialize a project using npm
The npm init command is used to create a Node.js project. The npm init command will create a package where the project files will be stored. All the modules you download will be stored in the package.
npm init
The npm init command will also create the package.json file, and prompt you to add the following project information when creating a project:
-
Project name
-
Project initial version
-
Project description
-
The project’s entry point
-
The project’s entry point
-
The project’s test command
-
The project’s git repository
-
The project’s license
The information will be stored in the package.json file. The package.json file contains the important details and metadata of your project such as package versions.
Here is an example of a package.json file:
{

  "name": "hometech",

  "version": "1.0.0",

  "description": "How to install node package manager",

  "main": "index.js",

  "scripts": {

    "test": "echo \"Error: no test specified\" && exit 1",

    "start": "node server.js"

  },

  "author": "Boemo Mmopelwa",

  "license": "MIT",

  "dependencies": {

    "@apollo/client": "^3.3.7",

    "Express": "^3.0.1",

    "apollo-angular": "^2.2.0",

    "express": "^4.17.1",

    "express-graphql": "^0.12.0",

    "graphql": "^15.4.0"

  },

  "devDependencies": {},

  "keywords": [

    "vultr"

  ]

}
The package.json file is stored in your current prescribed directory but you can also move it to your desired destination.
If you want to skip the questions asked when creating a project, use this command:
npm init --yes
The above command will initialize the project and skip all the required details required by the package.json file. You can set these configuration details later when you’re ready to add them. But these are important details that should never be forgotten to be added.
You can use the following commands to install additional information:
-
npx license: use this command to download your preferred license package such as MIT.
-
npx gitignore: This command downloads the gitignore file from GitHub’s repo of your choice using the gitignore package.
-
npx covgen: This command uses the covgen package to generate the Contributor Covenant. This command will also generate a code of conduct that all contributors must abide by.
Setting config options for the init command
The node package manager allows you to set default config options for the npm init command.
Here are some of the commands you can use to set default config options:
Setting the author’s email address
The following command sets your default email address.
> npm set init.author.email "enter your email address here"
Setting the author’s name
The following command sets your default author name.
> npm set init.author.name "enter your author name here"
Setting the project license
The following command sets your project’s license.
> npm set init.license "MIT"
How to add dependencies in the package.json file manually
Use the dependencies attribute to manually add dependencies to the package.json file by referencing the name and version of the dependency using any text editor such as Microsoft Visual studio:
{

 "name": "hometech",

 "version": "1.0.0",

 "dependencies": {

 "my_dep": "^1.0.0",

 }

}
Use the devDependencies attribute to manually add devDependencies name and version to the package.json file:
"name": "hometech",

"version": "1.0.0",

"dependencies": {

"my_dep": "^1.0.0",

},

"devDependencies" : {

"my_test_framework": "^3.1.0".

"another_dev_dep": "1.0.0 - 1.2.0"

}
How to list packages in dependencies
You can check and keep track of all installed using the npm list command. The npm list command will generate a list of all installed packages.
npm list
The command will output all installed packages:
demo@1.0.0 C:\Users\Demo

+-- @apollo/client@3.3.7

+-- apollo-angular@2.2.0

+-- array-flatten@1.1.1 extraneous

+-- body-parser@1.19.0 extraneous

+-- content-disposition@0.5.3 extraneous

+-- cookie-signature@1.0.6 extraneous

+-- cookie@0.4.0 extraneous

+-- debug@2.6.9 extraneous

+-- destroy@1.0.4 extraneous

+-- ee-first@1.1.1 extraneous

+-- encodeurl@1.0.2 extraneous

+-- escape-html@1.0.3 extraneous

+-- etag@1.8.1 extraneous

+-- express-graphql@0.12.0

+-- Express@3.0.1 invalid: "^4.17.1" from the root project

+-- finalhandler@1.1.2 extraneous

+-- forwarded@0.1.2 extraneous

+-- fresh@0.5.2 extraneous

+-- graphql@15.4.0

+-- http-errors@1.7.2 extraneous

+-- type-is@1.6.18 extraneous

+-- utils-merge@1.0.1 extraneous
How to Install Modules using npm
The npm install command is used to install modules such as Express. To use this command just add the name of your module after the install keyword.
npm install <enter the module name here>
If you don’t want to install a specific module you can go ahead and install modules and project dependencies listed in the package.json file using the following command.
npm install
If you are installing a module that hasn’t been listed in the package.json file. You can use the following command to install and add the module to the package.json file as a project dependency.
npm install <module> --save
You can also use the --save-dev flag which adds the module as a devDependencies. Development dependencies (devDependencies) are used for development purposes only, they are not required during runtime.
npm install <module> --save-dev
How to Install Modules Globally on your System
If you want all of your applications to use a specified module, install the module globally by using the--global flag so that all Node.js applications in your system can access the module:
npm install <enter the module you want to install globally here> --global
Inspecting and auditing installed packages
Security vulnerabilities found in packages often cause service outages and data loss. Inspecting and auditing your Node.js package dependencies using the npm audit command could help you identify security vulnerabilities and fix them before they cause data loss.
The npm audit command is only supported in npm version 6.0.0 and later versions only.
The npm audit command sends details about the package’s dependencies and devDependencies for inspection to your default registry. A report will be sent back which contains results of your package dependencies, devDependencies, bundledDependencies, and optionalDependencies security state.
Follow the following steps to audit your package dependencies:
-
Launch the command line and navigate to your package directory.
-
Make sure that your package includes the package.json and package-lock.json files.
-
Insert the
npm auditcommand and press enter to start the security auditing process. -
After the report has been generated using the previous command you can now analyze the audit report and implement security measures to eliminate security vulnerabilities detected in your package dependencies.
Node Package Manager Command Cheat Sheet
Here is a list of essential commands that you will use after you install Node.js and the node package manager.
-
npm uninstall <package>: This command is used to uninstall a package.
-
npm list -g —depth=0: List globally installed packages.
-
npm -g uninstall <name>: This command is used to uninstall a global package.
-
npm-windows-upgrade: Upgrade npm on Windows.
-
npm run: list available scripts to run.
-
npm-windows-upgrade: This command is used to update npm.
JavaScript все крепче и крепче закрепляет себя на позиции языка go-to типа для веб-разработчиков. Front-end разработчики используют JavaScript для того, чтобы добавить интерактивности пользователям, а так же напрямую общаться с back-end сервисами посредством AJAX.
JavaScript предоставляет огромное количество возможностей. Вы можете спокойно улучшать ваши навыки и при этом не волноваться, что не сможете разрабатывать полноценные веб-приложения. Ключевым компонентом Node.js является революция Сhrome версии V8 JavaScript, которая позволяет использовать JavaScript даже на серверной части.
Node.js так же может быть использован для написания desktop приложений, а так же для разработки инструментов, которые делают процесс разработки веб-приложений еще быстрее. Например, с помощью Node.js вы можете превратить CoffeeScript в JavaScript или SASS в CSS, а так же многое другое.
NPM помогает устанавливать удобным образом разные модули для Node.js.
Предисловие
Node — не является обычной desktop программой. Он не установится как Word или Photoshop и у вас не появится ярлыка на рабочем столе. Им можно воспользоваться только с помощью консольные инструкций (с которыми вы хотя бы чуть-чуть должны быть знакомы). В первое время вам будет казаться, что это не удобно, но в скором времени вы привыкните и все встанет на свои места.
Описание установки
Установка Node.js и NPM очень простая. Все что вам нужно сделать — это зайти на официальный сайт разработчика, скачать файл и установить его на своем компьютере.
Этапы установки
- Скачайте Windows установщик (.msi файл) с официального сайта Node.js.
- Запустите установщик (.msi файл, который был скачан в первом этапе).
- Следуйте всем инструкциям установщика.
- Перезапустите компьютер. Внимание! Без перезагрузки компьютера вы не сможете запустить Node.js.
Тестируем
Для того, чтобы убедиться что все было правильно установлено следуйте три простых этапа ниже.
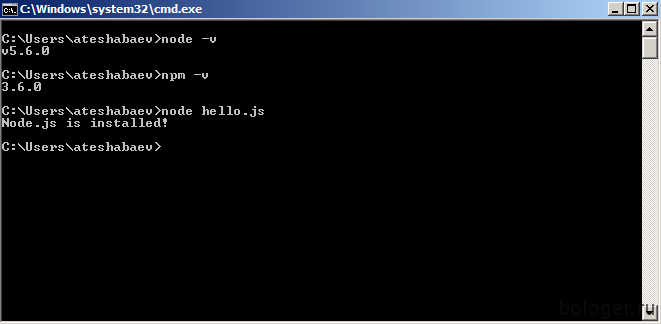
Тестируем Node.js. Откройте Windows консоль и введите node -v.
Тестируем NPM. Откройте Windows консоль и введите npm -v.
Создайте файл. Создайте любой файл, я назову его hello.js и введите console.log("Node.js is installed");, после чего с помощью node команды, я вызову файл hello.js: node hello.js — это должно вам вывести «Node.js is installed.».
Чтобы его обновить, вам нужно снова скачать установщик и повторить весь процесс с самого начала.
Об авторе
In this article, you’ll learn how to work with JavaScript in the backend using Node on Windows.
When you start working with JavaScript and discover that you can not only work with it in the frontend but also in the backend, a new world of possibilities seems to open up before you.
To begin with, you realize that you don’t need to learn another language to have the backend of your applications up and running. Second, Node.js is simple to install and works in all development platforms we are used to: Mac, Linux, and Windows.
In this article, I’ll show you how to install Node on Windows with a step-by-step guide so you’re ready to use it.
You will also be happy to know that package management is made even easier, as npm (the Node Package Manager) comes with the installation of Node.
With it, you will be able to have access to an almost unending number of community-made dependencies. You can simply install these in your app so you don’t have to reinvent the wheel time and again.
So let’s install Node on Windows and start playing with it a bit.
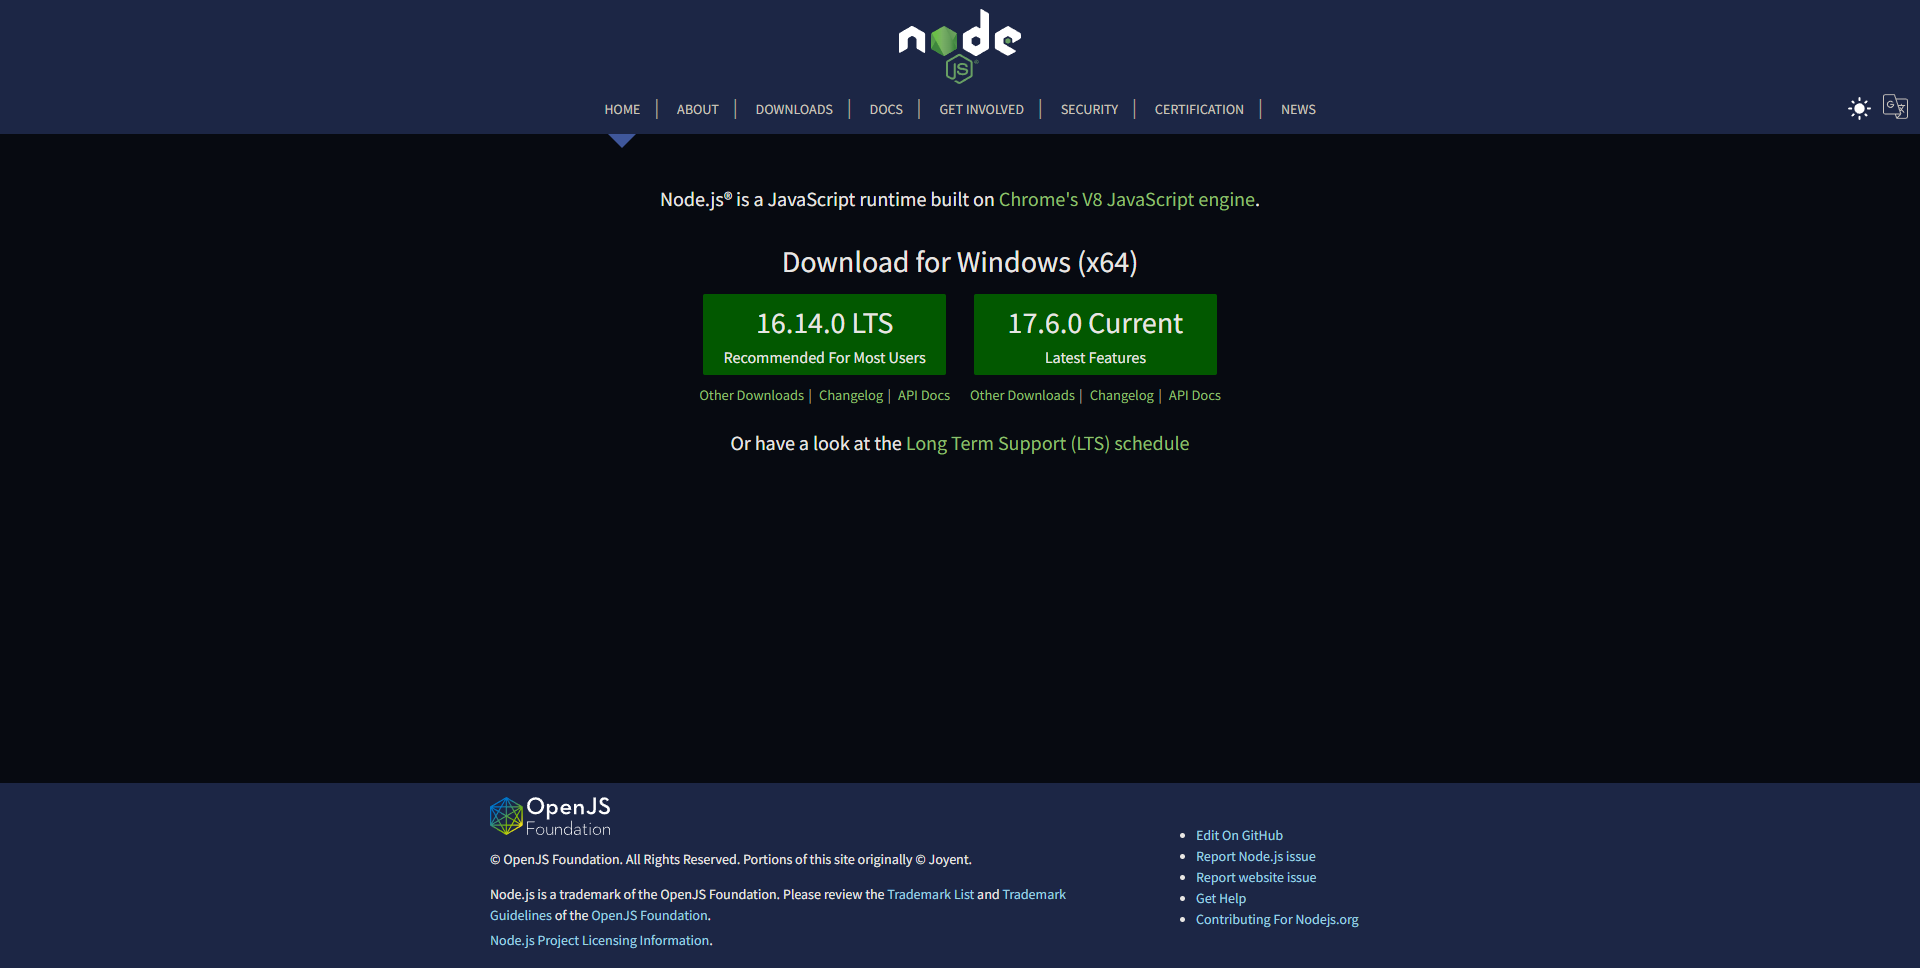
The first thing to do is to access Node’s official site.
The website is intelligent enough to detect the system you are using, so if you are on Windows, you will most likely get a page like the one above. Right in the middle of it, two buttons show you the most common possibilities of download – also the latest ones.
If you are curious about all the most recent features Node has to offer, go with the button on the right. For most people, however, the site itself recommends using the Long-Term Support version, which leads you to the button on the left.
At the moment of writing this article, the LTS version is version 16.14.0.
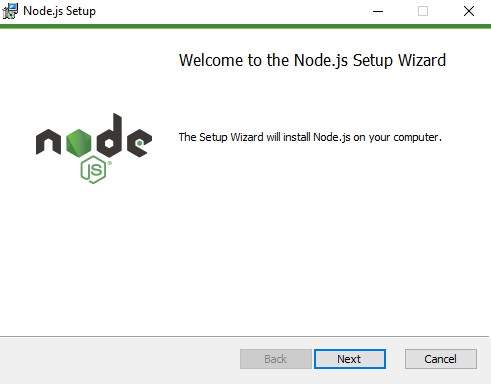
When you click on any of them, an .msi file gets downloaded to your computer. The next step is to click on it and the installation will begin. The wizard opens and the following window appears:
Click Next. On the following window, you’ll read (you do read it, right?) Node’s EULA, accept its terms, and click Next again. The next window is the one where you select the destination folder for Node.
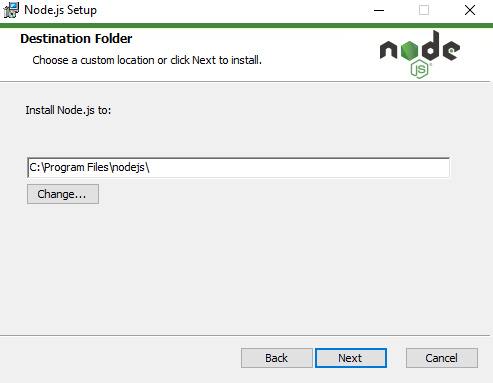
Windows normally recommends that the programs be installed in the Program Files folder, in a folder of their own (in our case, we are installing Node.js, so the nodejs folder is our go-to place).
For the sake of simplicity, let’s follow the wizard’s suggestions and use C:\Program Files\nodejs\ as the destination folder.
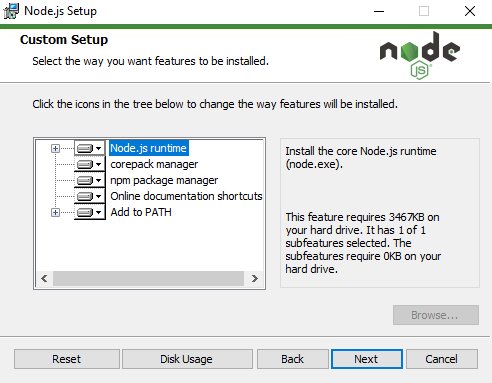
The following window is the one where you can customize your installation. Unless you have disk space problems or have a clear idea as to what you are doing, I recommend keeping the options as they are and just pressing Next again.
One thing I would like to point out on this window is the third option you see. That’s the option that allows you to have npm installed along with Node on your computer. This way, if you still intend to change the setup in this page somehow, keep that option as is and npm will be installed for you at the end of the process.
The next window deals with the automatic installation of “Tools for Native Modules”. Again, unless you are sure you need them, I recommend keeping this checkbox unmarked and just pressing Next once more.
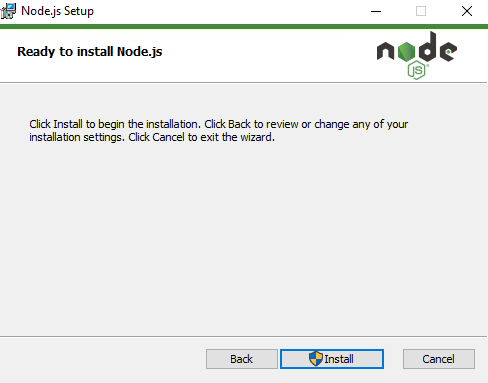
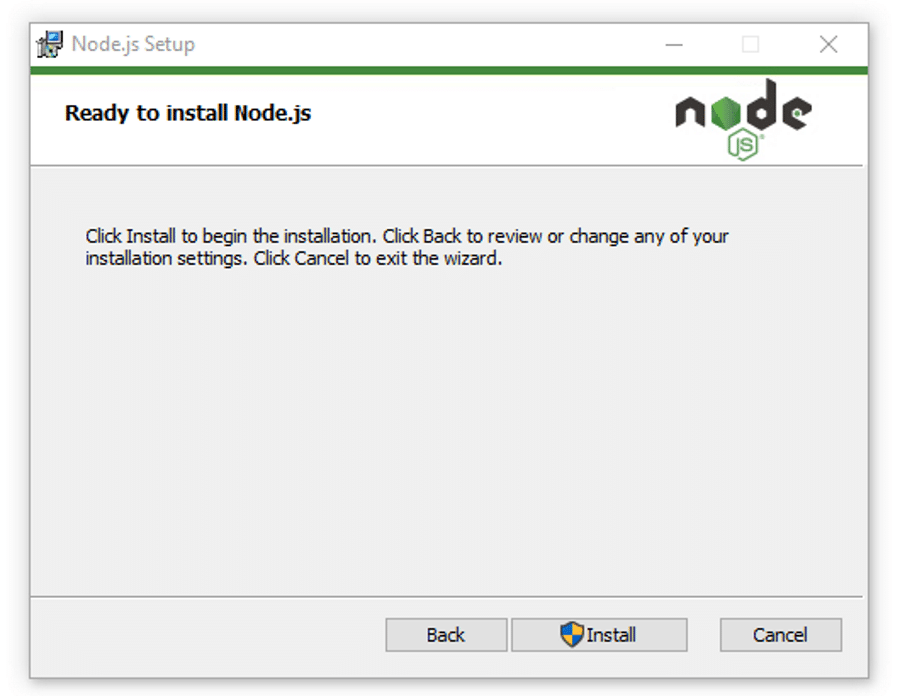
We’ve reached the final pre-install window. As it says, from here, you just have to click Install to begin the installation, so let’s do it.
Notice the shield beside the word Install? That means Windows will ask you to confirm if you really want to go through the installation process as soon as you click that button. Assuming this is the reason why you are reading this article, just click Yes and let the installer do its thing.
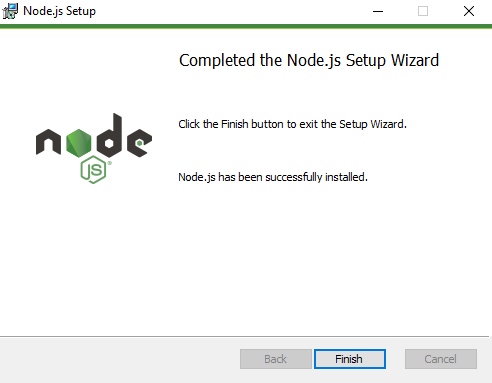
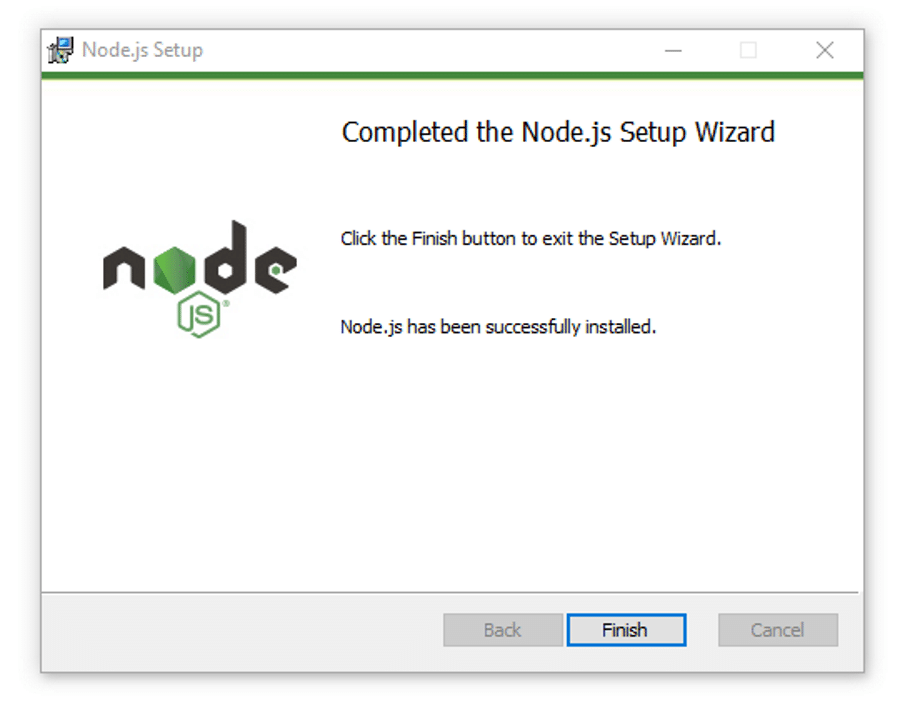
We finally got to the window we were hoping for, telling us that Node has successfully been installed on our Windows computer. Click Finish and let’s check if everything is ok.
How to Check Your Node Installation
In order to check if Node (and npm) were properly installed on your computer, you can choose to open either Windows Powershell or the Command Prompt.
We’ll go with the first. Click on the search bar beside the Start Menu button and type powershell. Click Enter and Windows Powershell will open up in a window for you.
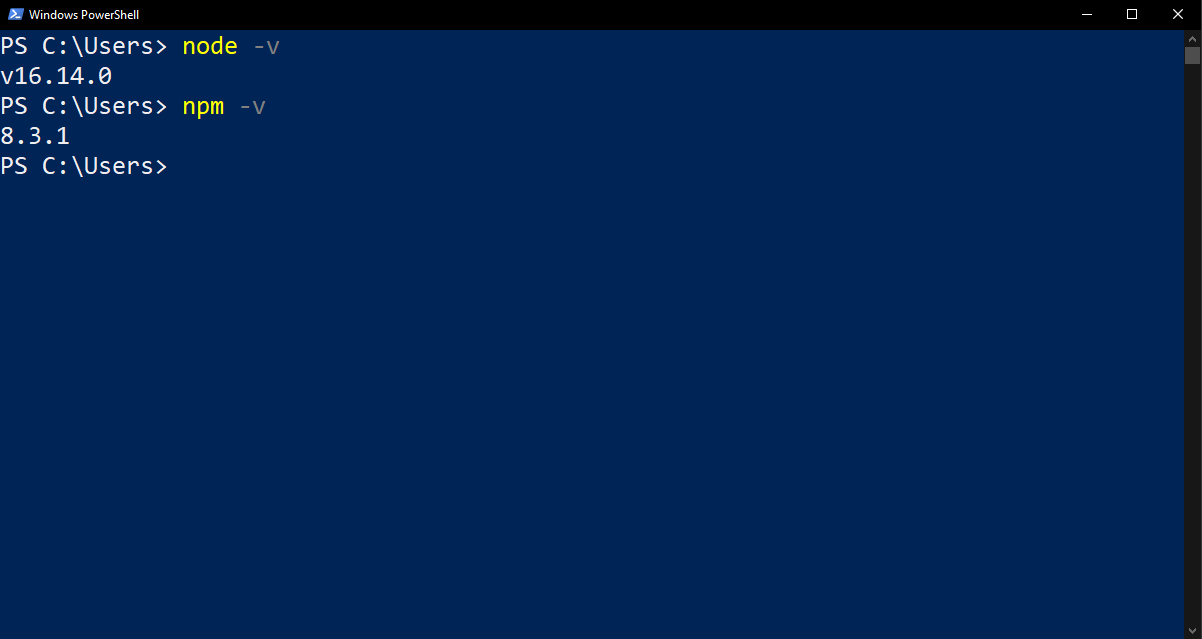
In any folder (like C:\Users, for instance), you can type node -v to check for the version of Node you are using. As I mentioned above, the latest version as I write this article is version 16.14.0 and that’s exactly what we see on Powershell above.
As a side note, you may be asking yourself why we can check this in any folder. One of the options in the custom setup (that we left as is) was to add Node to PATH. By doing so, we are able to access it from anywhere while navigating through the folders.
It is also possible to check for the npm version. To do so, type npm -v and press Enter. In our case, latest version is version 8.3.1, so we can pretty much say we are up to date.
How to Use npm
Ok, but you did not go all this way reading just to finish here after installing Node and npm, right? You want to see both in action. Let’s do it, then.
To learn how to start a project with Node and install packages with npm, we’ll use Visual Studio Code.
We’ll create a folder named Node_Test, where we’ll put both Node and npm to work a little.
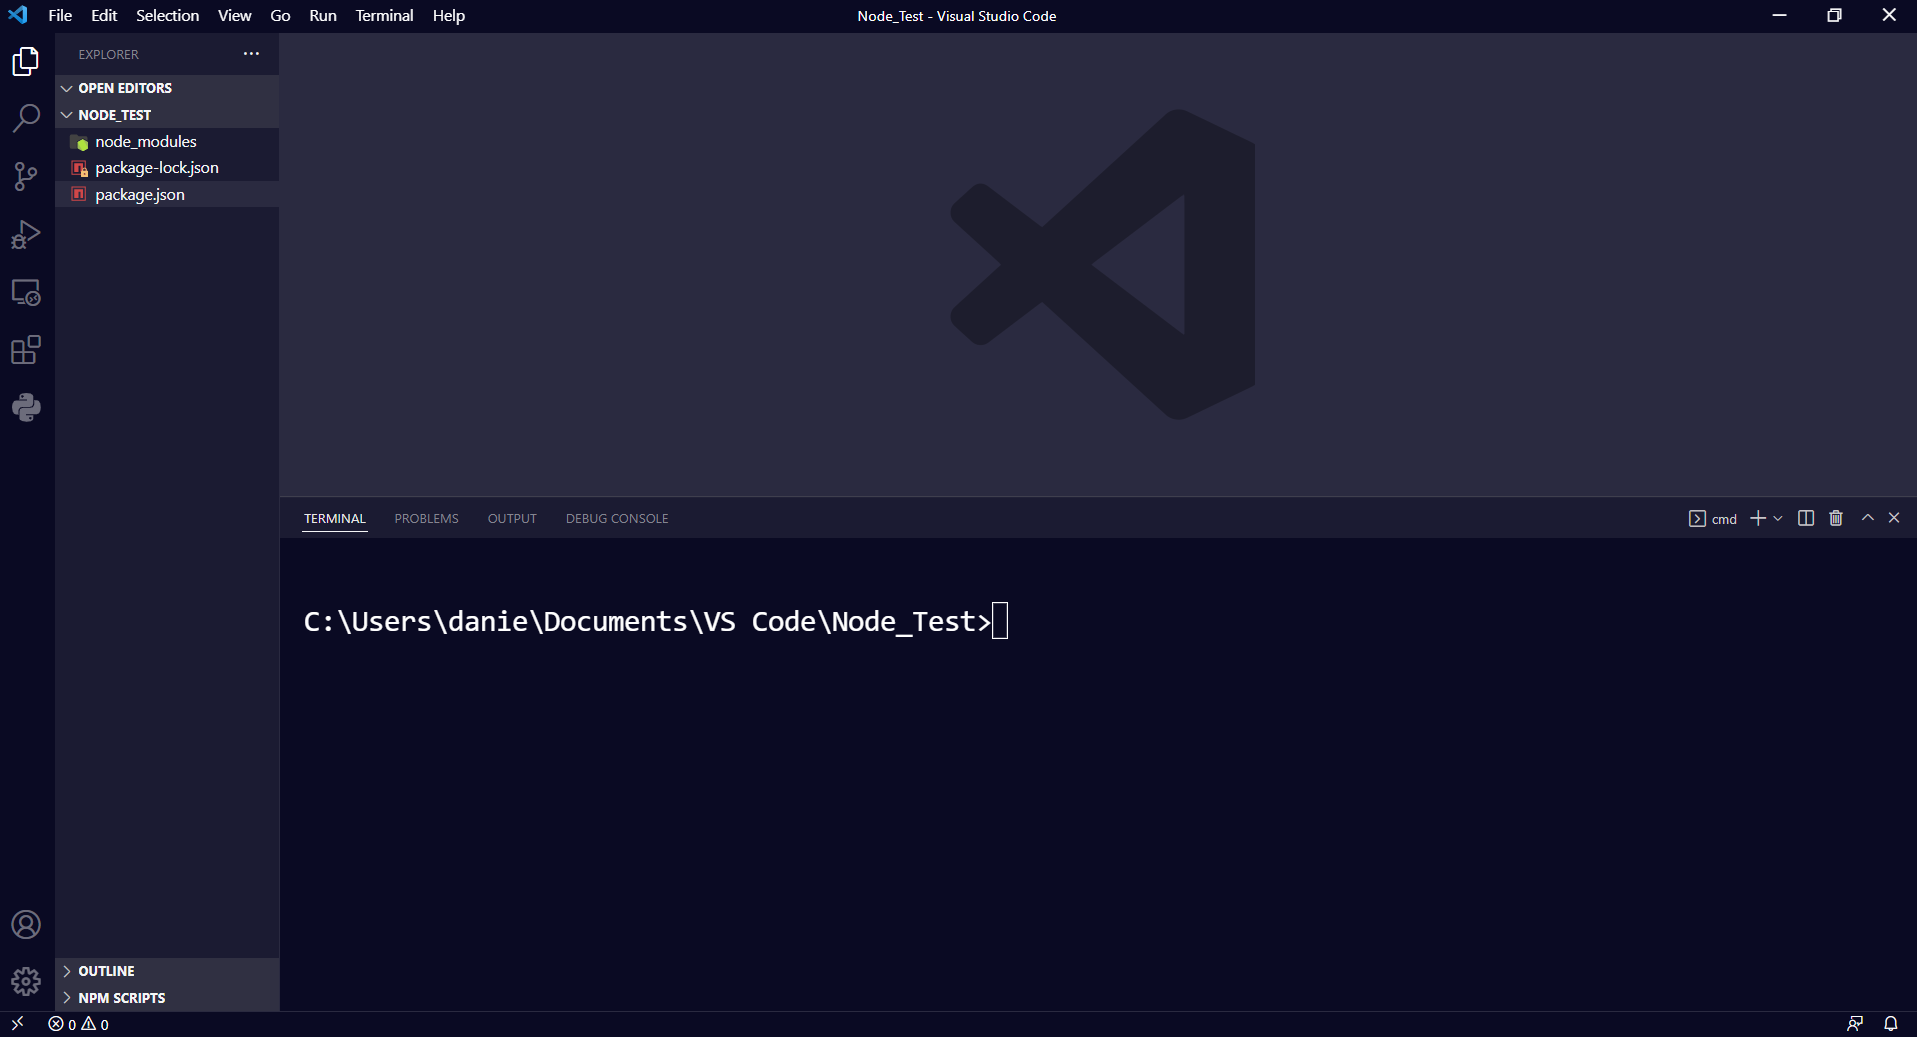
Let’s start simple. Inside the Node_Test folder, right click inside the folder and click Open with Visual Studio Code. This will make VS Code open in this empty folder automatically.
Inside VS Code, if you haven’t yet, open a new terminal by pressing Ctrl+Shift+' (single quote).
Click on the terminal and, on the command line, type npm init -y. This will start a Node project automatically for us without us needing to worry about the initial configuration (the -y flag will do that on its own). This creates a package.json file within the Node_Test folder.
Next, let’s install Express as a dependency. You can find it and a list of other possible dependencies of npm on https://www.npmjs.com/.
Another side note: every time you open npm’s web site, on the top left, you will see what appears to be a meaningless combination of three words. If you look at the initials, though, you will see that it is a brand-new sequence with the acronym npm.
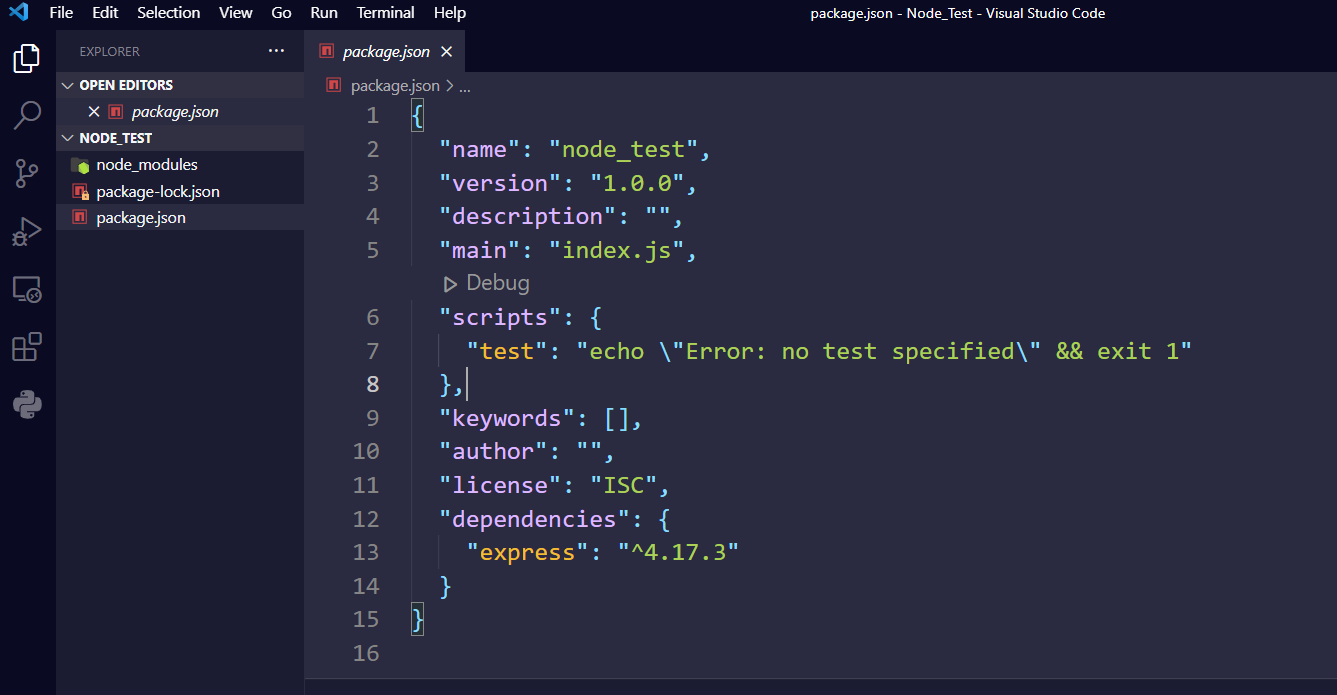
Right, now let’s install Express with this Nifty Purring Manticore. Back on VS Code and the terminal, type npm i express and press Enter. Express will be installed. You can do the same with any other dependency you can think about.
To make sure that Express is installed, open package.json. Scroll up to the list of dependencies and you will see Express there.
Wrapping Up
That’s pretty much it. In this article, you saw how to install Node and npm on Windows.
I hope this has been useful to you. For more tutorials like this, check out freecodecamp.org/news and browse for the topic you would like to learn about.
Happy coding! 😊
Learn to code for free. freeCodeCamp’s open source curriculum has helped more than 40,000 people get jobs as developers. Get started
Node.js came as a blessing for JavaScript developers worldwide struggling with swapping among multiple languages and frameworks to amplify their code into a sustainable development environment.
With Node.js, you can finally build web applications with two-way connections where both the server-side and client-side can thoroughly communicate in real-time and exchange data. Indeed, Node.js has been revolutionary for developers who wanted to push real-time web applications over WebSocket.
If you’re aiming forward to enhancing your web development skills to the next level and becoming a full-stack JavaScript developer, Node.js indeed prepares the path towards that enthusiastic buzzword!
In this article, we’ll demonstrate a step-by-step guideline for installing Node.js on your computer and commencing with your web development journey.
What Is Node.js?
The first thing you should know is that Node.js is not a programming language!
You may already be aware of this fact, but it bears repeating for new developers in the field who may mistake Node.js for a unique programming language. It’s not!
Node.js is an open-source runtime environment for the JavaScript language that reshapes JavaScript’s characteristics and upgrades its functionality. As a result, you can use JavaScript for frontend and backend development, enabling full-stack development solely using JavaScript.
Initially, Node.js was designed to serve real-time performance, pushed-back architectures. But since then, Node.js has grown into a vital element for server-side programming for event-driven, non-blocking servers. Most conventional websites and API services today depend on Node.js.
Before Node.js, if you wanted to store any data on the database or connect your program to the database, you needed support from a server-side language. That’s because JavaScript couldn’t regulate the backend process. Consequently, you had to learn server-side languages like PHP, Python, Ruby, or C# — or seek a backend developer’s help.
The Node.js environment empowers JavaScript to directly employ the database and function properly as a backend language. As a result, you can ultimately build and run a program using only JavaScript with Node.js.
Node.js uses the V8 JavaScript runtime engine as its root power, and it employs a non-blocking I/O architecture that’s event-driven. All these together construct Node.js and help drive products towards robust performance.
Who Uses Node.js?
According to W3Techs, to date, 1.4% of all websites use Node.js — that’s more than 22 million websites. These numbers give you a general idea of the amount of Node.js users. On top of that, Node.js has been downloaded more than 1.3 billion times! As you can see, the stats speak strongly to Node.js’ market scale.
From your friends in IT to the industry tycoons, all are enjoying leveraging Node.js. That’s because Node.js amplifies the performance of developers and increases the speed of the development process. One of the most intelligent trends nowadays is using JavaScript everywhere, which has brought Node.js into the arena.
Top companies that use Node.js include:
- NASA
- Netflix
- PayPal
- Trello
- eBay
- Walmart
- Mozilla
- Medium
If you study these companies, you may notice that they run their businesses on different services or products. But they all have a critical factor in common: they rely on Node.js. Indeed, using Node.js can solve most of your development issues, never mind what industry you’re in.
Advantages of Using Node.js
Choosing the right programming platform for your tech stack is as important as the labor you want to invest in. Multiple factors should be considered when you look for the advantages of using a particular platform. Things like the learning curve, development speed, community, and scale can alter the overall balance of benefits.
Here are the main advantages of using Node.js:
- Simple syntax
- Easy learning curve
- Ability to scale quickly
- Open source and flexible
- Cross-platform development
- Single-language full-stack development
- Real-time communication
- Vast and active community
Node.js Prerequisites
Before installing Node.js, you need to ensure that you’ve gathered all the necessary bits of knowledge and downloaded all required installation files and elements.
Firstly, it would help if you had a basic understanding of JavaScript and its syntax — this will make picking up Node.js easier for you.
Secondly, a basic understanding of an object-oriented programming (OOP) language will help you work on server-side coding.
Lastly, rather than rushing into deep learning, take it one step at a time. Always remember that you’re not a day late or a dollar short as long as you’re progressing.
System Requirements
Node.js doesn’t require a fancy hardware setup to run; most computers of this era should handle Node.js efficiently. Even the most miniature computers like BeagleBone or Arduino YÚN can run Node.js.
Nevertheless, much still depends on what other memory hog software you’ve got running on the same system. But in most cases, you shouldn’t be worried unless your computer is from the Mesozoic Era!
LTS Version vs Current Version
Node.js offers two different versions for you to download: the LTS version and the Current version.
The first one is Long-Term Support (LTS), which indicates the version that has been in the market for a while and comes with all mandatory support. Consequently, you can access a bunch of information and community for additional help with this version.
This LTS version is recommended to most users because of its sustainability and 18-month-long support cycle. As it’s a stable version, using it to produce backends can help you achieve a robust outcome.
The Current version indicates the latest released version of Node with the most recently added and updated features. But this version has less support behind it (around eight months) and possible bug exposure. Therefore, experts suggest using this version only for frontend development.
Considering all these factors, if you’re a regular user who loves to live hassle-free, go for the LTS version. On the other hand, if you’re an advanced user who loves the adventure of experiencing new technology, you can choose to install the Current version.
How to Install Node.js and npm
Every operating system has a distinct method of installing Node.js. The core setup file differs for each OS to OS. However, the Node.js creators have taken care to provide you with the files needed for each system.
In the next portion of the article, we’ll discuss installing Node.js on Windows, macOS, and Linux operating systems.
How to Install Node.js on Windows?
Follow this step-by-step guide to install Node.js on Windows.
1. Download Windows Installer
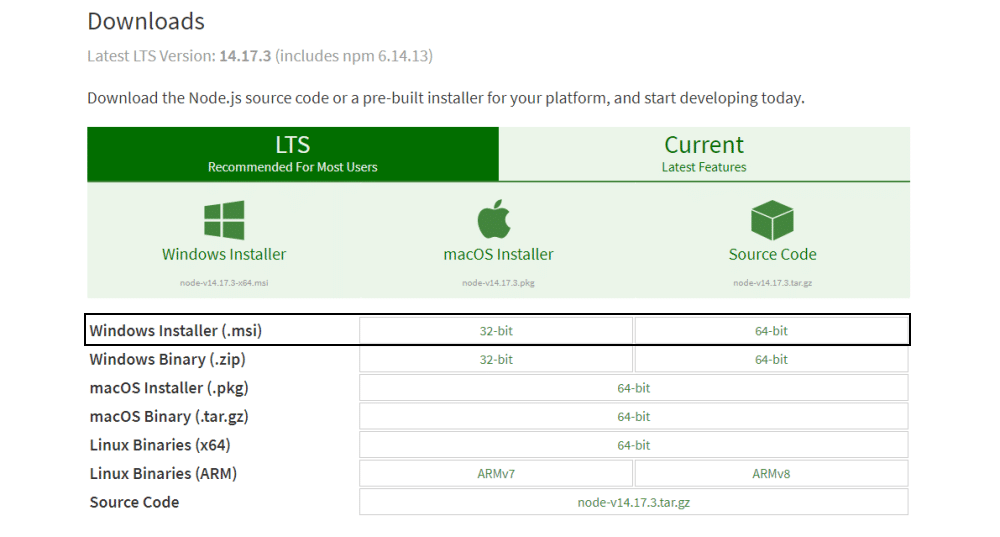
First, you need to download the Windows Installer (.msi) file from the official Node.js website. This MSI installer database carries a collection of installer files essential to install, update, or modify the existing Node.js version.
Notably, the installer also carries the Node.js package manager (npm) within it. It means you don’t need to install the npm separately.
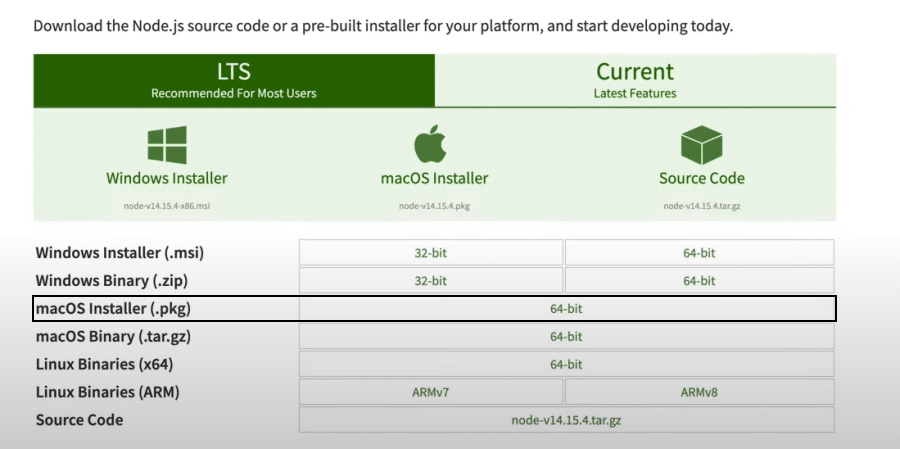
When downloading, select the correct version as per your operating system. For example, if you’re using a 64-bit operating system, download the 64-bit version, and if you’re using the 32-bit version, download the 32-bit version:
2. Begin the Installation Process
Once you open and run the .msi file, the installation process begins. But you have to set a few parameters before running the installation process.
Double-click on the installer file and run it. The installer will ask you to accept the Node.js license agreement. To move forward, check the “I accept” box and click Next:
Then, select the destination where you want to install Node.js. If you don’t want to change the directory, go with the Windows default location and click the Next button again.
The next screen will show you custom setup options. If you want a standard installation with the Node.js default features, click the Next button. Otherwise, you can select your specific elements from the icons in the tree before clicking Next:
Node.js offers you options to install tools for native modules. If you’re interested in these, click the checkbox to mark your preferences, or click Next to move forward with the default:
3. Run Node.js Installation on Windows
Lastly — and this is the easiest part of all — click the Install button to begin the installation process:
The system will complete the installation within a few seconds or minutes and show you a success message. Click on the Finish button to close the Node.js installer.
4. Verify Node.js Installation
So the installation process is completed. Now, you have to check whether Node.js is successfully installed or not.
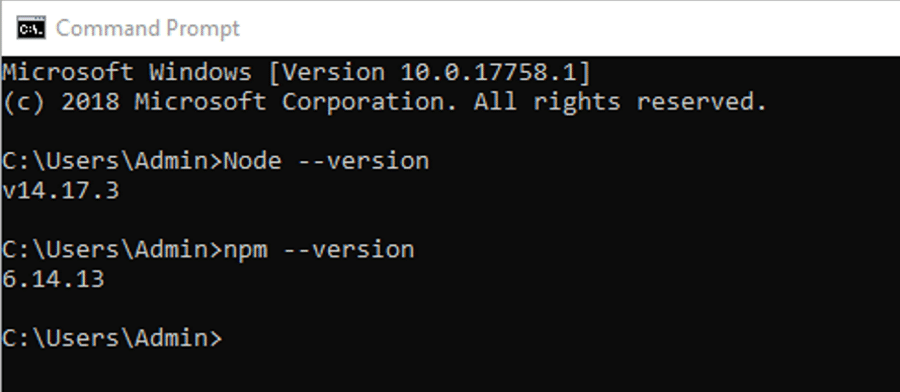
To verify the installation and confirm whether the correct version was installed, open your PC’s command prompt and enter the following command:
Node --versionAnd to check the npm version, run this command:
npm --versionIf the Node.js version and npm are correctly installed, you’ll see the version name in the CMD prompt.
How To Install Node.js on macOS?
Follow these step-by-step guidelines to install Node.js on macOS.
1. Download macOS Installer
Installing Node.js on macOS follows almost the same procedure as Windows. All you have to do is to download the installation file for Mac. Then, as soon as you start it up, the installer will walk you through the rest.
Firstly, download the macOS installer (.pkg) file from the Node.js website. There’s only a 64-bit version, so you don’t have to worry about which to download.
2. Begin Node.js Installation on macOS
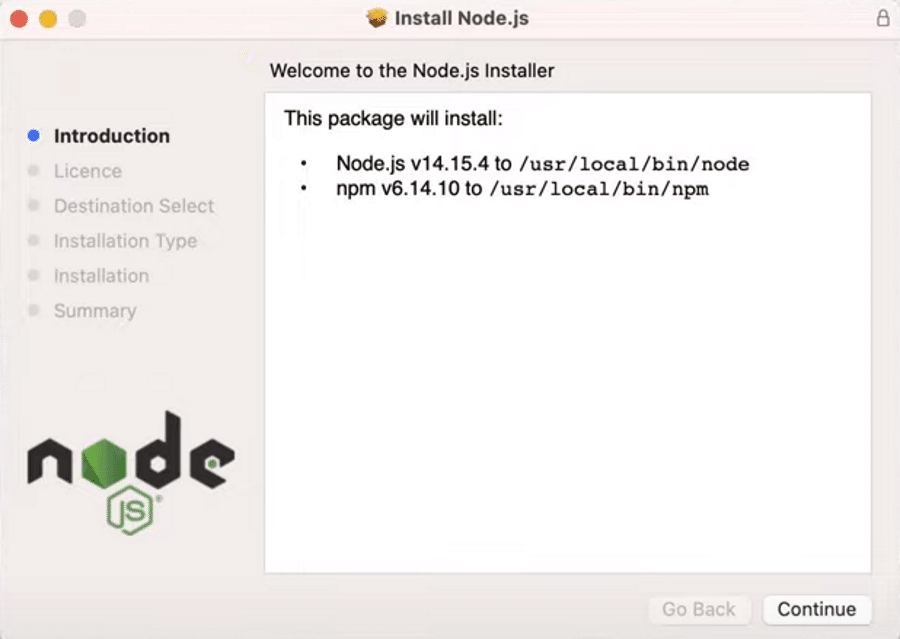
Check your Download folder for the installer file and click on it to start the installation process.
The Node.js installer carries the Node.js core file, and, consequently, the installation process installs both Node.js and npm from the installer file. Therefore, you don’t need to install npm separately.
Then, click Continue to move forward with the installation.
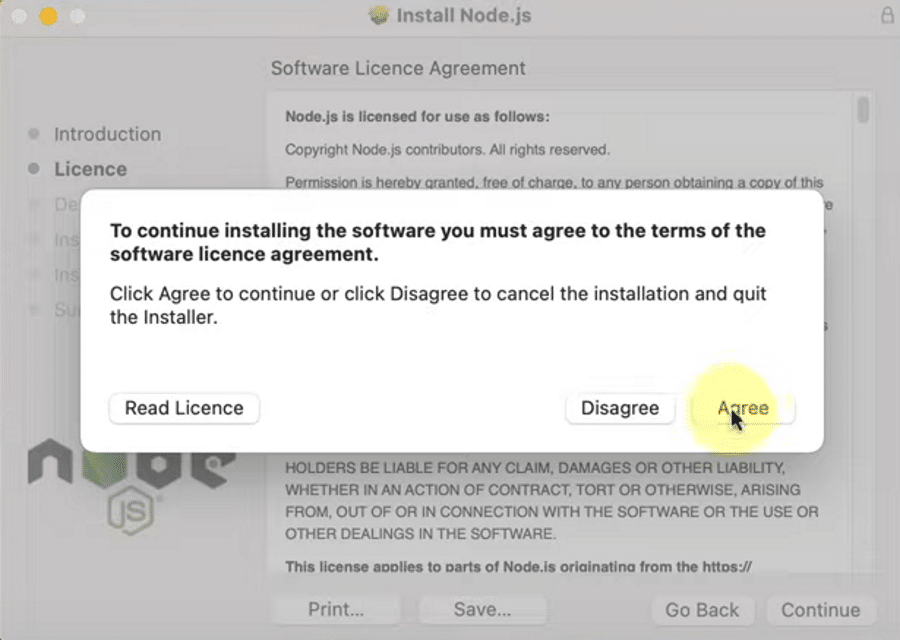
You must agree to the terms of usage to install Node.js. Read through it before clicking the Agree button to continue if you’d like to explore the license agreement.
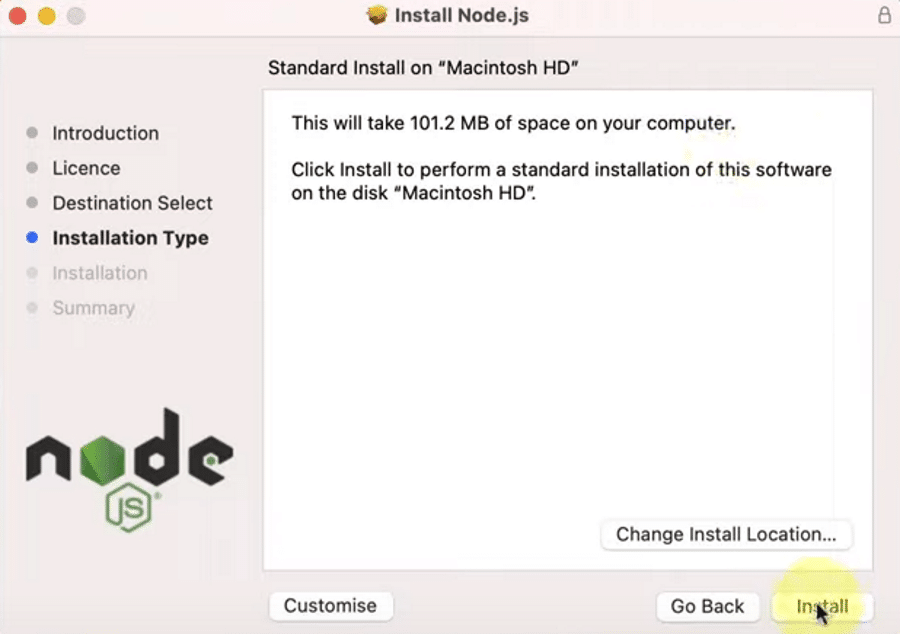
At this screen, you need to select the installation location. Usually, the OS determines a default installation location. If you have other requirements, you can change the location. Otherwise, keep the default location.
3. Run Node.js Installation on macOS
Until now, you’ve set all the preferences that are needed to install Node.js on macOS fully. Now click on the Install button to finish things up.
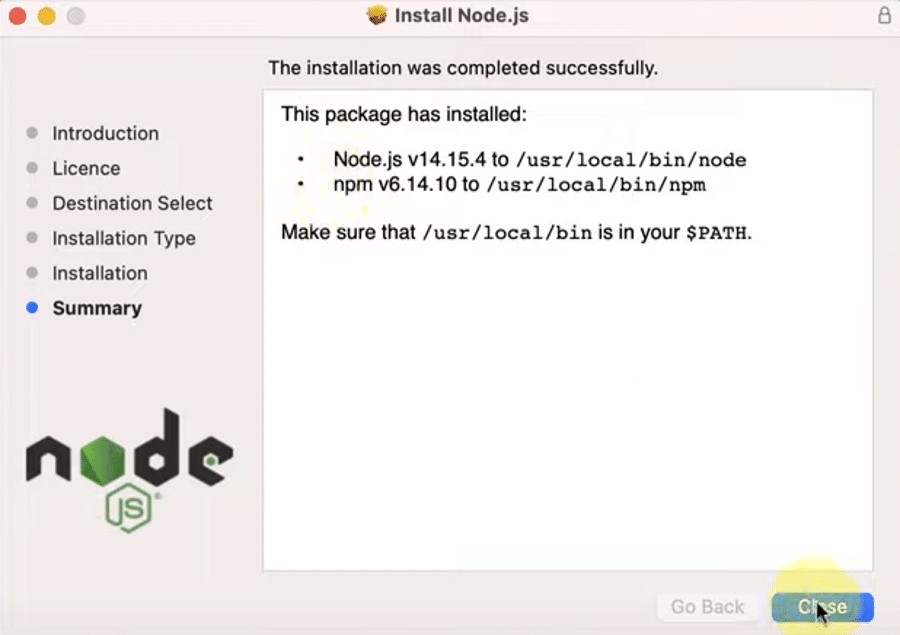
After a successful installation process, the system will show you a confirmation message. As npm is integrated within the Node.js installer, the notification should indicate proof of npm installation too.
Finally, click on the Close button to close the dialogue box.
4. Verify Node.js Installation on macOS
You’ve now successfully installed Node.js on your macOS. However, you should check to confirm that the installation process was successful and whether the Node.js and npm versions are working properly on your macOS.
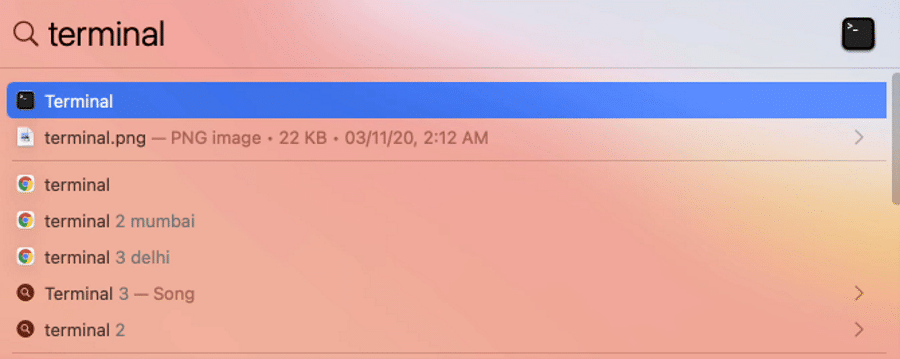
To check the Node.js version, you need to open your macOS terminal, click the Command + Space keys, or search the terminal from the search bar.
To check the Node.js version, type:
Node --versionAnd to check the npm version, run this command:
npm --versionIf the Node.js and npm versions are visible, both of them are correctly installed and working fine. If not, you may need to recheck to find the error or try the installation process again.
How To Install Node.js on Linux?
The Linux operating system works a bit differently than the other traditional operating systems. That’s because Linux is open-source, offering you more freedom, customization, and advanced functionalities.
If you’re casual with commands, you should feel comfortable with Linux. Here, we are about to discuss the easiest method of installing Node.js on the Linux operating system.
1. Choose the Node.js Version for Your Linux Distribution
The Linux operating system has hundreds of different distributions because of the diversity it provides. And users love to customize and harness different versions’ specific functionalities using distinct distributions.
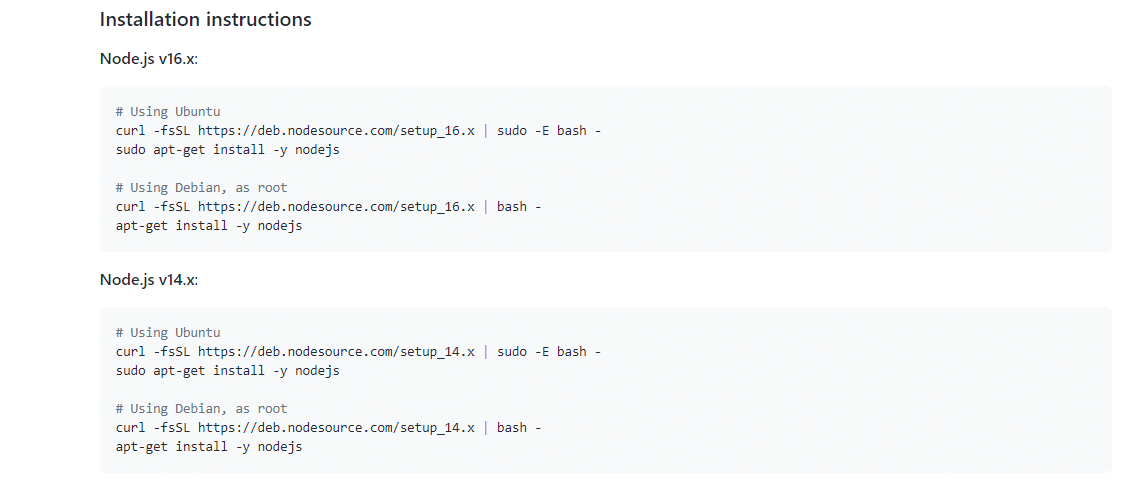
Firstly, find the installation instruction for your specific distribution from Node.js’s Binary Distributions page. For this guide, we’ll be using Ubuntu for illustration purposes.
2. Install the Curl Command-Line Tool
Before going for Node.js installation, ensure that you have the curl command-line utility installed on your system. If not, then paste this command on your terminal to install curl:
sudo apt install curlIt may ask for your system password to verify the permission of the installation. Once you input the password, the system should begin the curl installation.
3. Start Node.js Installation
You need to copy and paste the Node.js installation command into your terminal (in our case, we can grab it from the Ubuntu distribution page) so that the system can begin the Node.js installation.
For instance, here, we’ll be installing Node.js v14.x. These are the installation commands for Ubuntu:
curl -fsSL https://deb.nodesource.com/setup_14.x | sudo -E bash -sudo apt-get install -y nodejsAs you already have the curl command line installed on your terminal, you’ll need to copy and paste the first command (the curl command) on your terminal and run it.
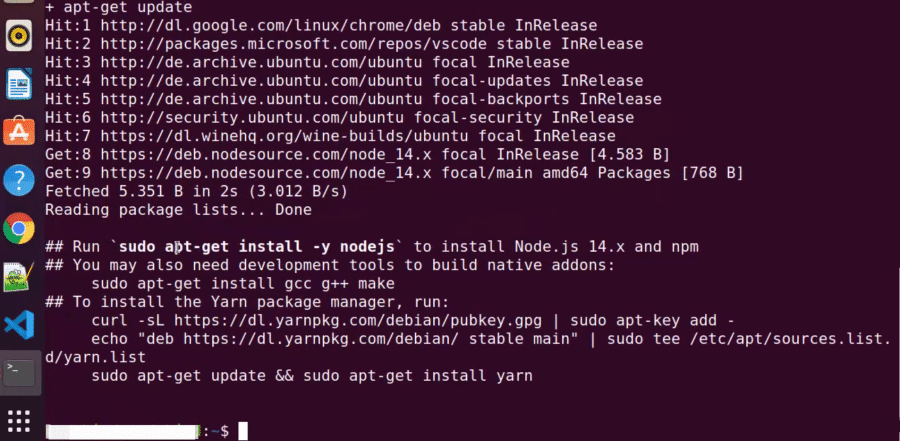
The curl command begins the Node.js installation process, updates your system, and downloads all Node.js libraries required to install Node.js on your Linux OS.
Now, all the libraries and resources of Node.js have been downloaded to your PC. With one final command, we can finish installing Node.js and npm on your computer.
Copy and paste the second line of command from the installation instructions above into your Linux terminal:
sudo apt-get install -y nodejsIf you’ve done everything correctly, Node.js will install correctly on your Linux distribution. Now input the Clear command to clear the terminal.
4. Verify Node.js Installation on Linux Ubuntu distribution
As you’ve installed Node.js, you can verify to check whether the installation is successful or not. To confirm the installation, you need to run two simple Linux commands on your Linux terminal.
To check the Node.js version, type:
Node --versionAnd to check the npm version, type:
npm --versionIf the Node.js version and npm are installed correctly, you’ll see the Node.js and npm version names visible on the Linux terminal. It indicates that you have successfully installed Node.js and npm on your Linux distribution.
Check and Update npm Version
As we’ve mentioned, npm is the Node.js package manager. It manages the dependencies for packages. Without npm, you would have to unpack all your Node.js packages manually every time you want to upload a framework. But npm relieves you of this responsibility and takes care of it automatically.
Regularly updating npm also updates your local packages and improves the code used in your projects. However, as npm automatically installs with the Node.js version you choose, it often misses the latest npm release. In such cases, you can check your npm version and update it manually in a simple process.
The processes to check and update your npm version are very similar between Windows, macOS, and Linux — you’ll be running the same command on each.
Update npm in Windows
To check the npm version, run the following command:
npm -v…or:
npm --versionAnd to update the npm version, run this command:
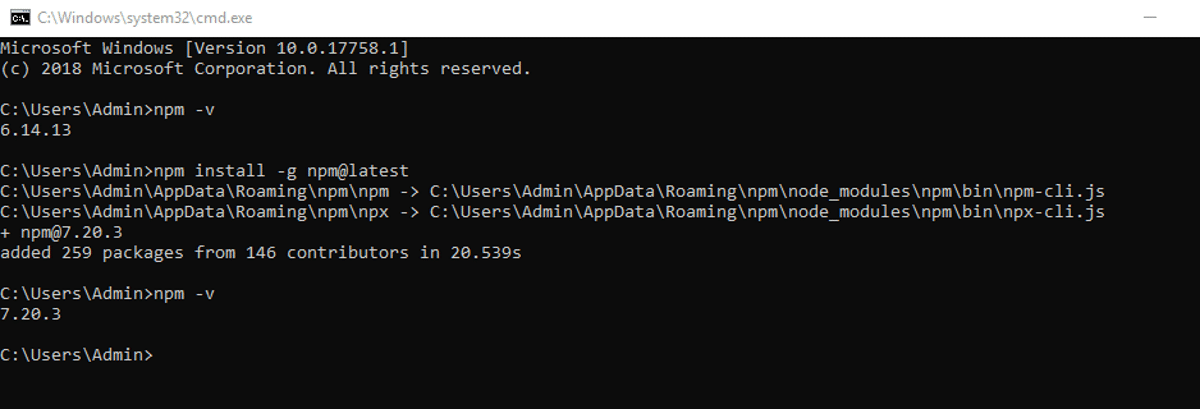
npm install -g npm@latestAfter running this command on your CMD prompt on Windows, the system will update your npm version and install the additional packages in a few seconds. In the end, you can recheck the version to confirm the update of the npm version.
Update npm on macOS
To check the npm version on macOS, open your terminal and run the following command:
npm -v…or:
npm --versionTo update the npm version, run this command in your macOS terminal:
npm install -g npm@latestUpdate npm in Linux
To update your npm version on Linux, type these commands into your terminal:
sudo npm install -g n…and then:
sudo n latestWith Node.js, you can take your web dev skills to the next level 📈… so what are you waiting for? Get started with this guide 👇Click to Tweet
Summary
Node.js has become a popular programming environment quickly because of its usefulness in both frontend and backend. Thousands of active users have created a vast community that helps keep new developers and their questions from slipping through the cracks.
In essence, it’s easy to start with Node.js because of its simplicity, and its capabilities for creating advanced applications are extraordinary. It can also help turn you into a full-stack developer in a short time. These features make Node.js an inevitable choice for next-generation programming.
Have we missed any helpful tips about installing Node.js on Windows, macOS, or Linux? Let us know in the comments section!
Zadhid Powell
Zadhid Powell is a Computer Engineer who gave up coding to start writing! Alongside, he is a Digital Marketer, technology enthusiast, SaaS expert, reader, and keen follower of software trends. Often you may find him rocking downtown clubs with his guitar or inspecting ocean floor diving.
-
LinkedIn
-
Twitter
If you’re looking to take your JavaScript coding to another level, Treehouse offers unlimited courses in JavaScript (and many other subjects) starting at $25/month. Try our program out with a free seven-day trial today.
JavaScript is quickly becoming the go-to language for web developers. Front-end web developers use JavaScript to add user interface enhancements, add interactivity, and talk to back-end web services using AJAX. Web developers who work on the server-side are also flocking to JavaScript because of the efficiencies and speed offered by JavaScript’s event-driven, non-blocking nature.
In fact, concentrating on JavaScript as your language of choice offers the opportunity to master a single language while still being able to develop “full-stack” web applications.
In a previous article, I wrote about how to install Node.js® and, it’s companion, NPM on a Mac. Fortunately, for Windows users, the Node.js® installation process is a lot easier than how I recommend installing Node.js® on a Mac.
What is the Difference Between Node & NPM?
The key to this server-side JavaScript revolution is Node.js® — a version of Chrome’s V8 JavaScript runtime engine — which makes it possible to run JavaScript on the server-side.
Node.js is also used for developing desktop applications and for deploying tools that make developing web sites simpler. For example, by installing Node.js® on your desktop machine, you can quickly convert CoffeeScript to JavaScript, SASS to CSS, and shrink the size of your HTML, JavaScript and graphic files. Using NPM — a tool that makes installing and managing Node modules — it’s quite easy to add many useful tools to your web development toolkit.
When to use Node
Node isn’t a program that you simply launch like Word or Photoshop: you won’t find it pinned to the taskbar or in your list of Apps. To use Node you must type command-line instructions, so you need to be comfortable with (or at least know how to start) a command-line tool like the Windows Command Prompt, PowerShell, Cygwin, or the Git shell (which is installed along with Github for Windows).
Are you ready to start learning?
Learning with Treehouse for only 30 minutes a day can teach you the skills needed to land the job that you’ve been dreaming about.
Start a Free Trial
Installation Steps
Installing Node and NPM is pretty straightforward using the installer package available from the Node.js® web site.
- Download the Windows installer from the Nodes.js® web site.
- Run the installer (the .msi file you downloaded in the previous step.)
- Follow the prompts in the installer (Accept the license agreement, click the NEXT button a bunch of times and accept the default installation settings).
- Restart your computer. You won’t be able to run Node.js® until you restart your computer.
Checking if Node & NPM are Installed
Make sure you have Node and NPM installed by running simple commands to see what version of each is installed and to run a simple test program:
- Test Node. To see if Node is installed, open the Windows Command Prompt, Powershell or a similar command line tool, and type
node -v. This should print a version number, so you’ll see something like thisv0.10.35. - Test NPM. To see if NPM is installed, type
npm -vin Terminal. This should print NPM’s version number so you’ll see something like this1.4.28 - Create a test file and run it. A simple way to test that node.js works is to create a JavaScript file: name it
hello.js, and just add the codeconsole.log('Node is installed!');. To run the code simply open your command line program, navigate to the folder where you save the file and typenode hello.js. This will start Node and run the code in thehello.jsfile. You should see the outputNode is installed!.
Check and Update Your Node and NPM Versions
New versions of Node and NPM come out frequently. To install the updates, just download the installer from the Nodejs.org site and run it again. The new version of Node and NPM will replace the older versions.
How to Uninstall Node and NPM
You uninstall Node.js and NPM the same as you would most Windows software:
- Open the Windows Control Panel
- Choose the “Programs and Features” option
- Click the “Uninstall a program” option
- Select Node.js, and click the Uninstall link.
With Node.js and NPM installed you’ll soon be able to take advantage of the huge world of NPM modules that can help with a wide variety of tasks both on the web server and on your desktop (or laptop) machine. The NPM site lists all of the official Node packages making it easy to make the choice. Have fun!
Learn with Treehouse
Learning with Treehouse starts at only $25 per month. If you think you’re ready to start exploring if tech is right for you, sign up for your free seven day trial.
What sets Treehouse apart is their dedication to helping you find your perfect job or develop your own business. – SwitchUp.org
Follow us on Twitter, Instagram, and Facebook for our favorite tips, and to share how your learning is going. We’ll see you there!
If you liked reading this article, you should also look at these two:
- 7 Awesome Things You Can Build With Node.js
- The Best Places to Look for Your First Tech Job
- 5 Treehouse Students Who Found Tech Jobs in Less than a Year


