NetBeans — одна из самых популярных IDE в мире Java. Рассмотрим, как её установить и приступить к работе
https://gbcdn.mrgcdn.ru/uploads/post/1237/og_cover_image/0963af405ec9a09b6b6288f7d008c52d
NetBeans по праву входит в 5 лучших сред разработки, поддерживающих Java. Данная IDE позволяет разрабатывать мобильные и корпоративные приложения, а также ПО для компьютера. Основная прелесть среды программирования NetBeans — поддержка большого числа технологий (от фиксации ошибок до рефакторинга) и шаблонов без дополнительных настроек. Собственно, всё что необходимо для работы начинающему разработчику, уже заложено в базовый пакет.
Если вы ещё сомневаетесь, что это так просто вот ответ на вопрос «как установить NetBeans» в 4 шага.
Установка
Шаг 1. Скачивание.
Как любая нормальная IDE, Netbeans распространяется свободно и её легко можно скачать прямо в браузере. Для этого либо сразу заходим на официальный сайт, либо вбиваем в поисковик «NetBeans IDE Download». Кликаем первую ссылку и попадаем на netbeans.org. Здесь в верхнем правом углу находим оранжевую кнопку «Download», которую вы можете смело нажимать.
После этого мы попадаем на страницу выбора сборок. Нас интересуют столбцы языка Java. Пакета Java SE для начала хватит с головой, но можно скачать любой — компоненты легко удаляются с помощью менеджера плагинов среды. Не забудьте в правом верхнем углу выбрать вашу операционную систему.
Шаг 2. Установка.
Установка NetBeans также ничем не примечательна. Для Windows запускаем скачанный файл, следуем инструкциям установщика: читаем условия использования, со всем соглашаемся, задаём директории по умолчанию, наблюдаем за процессом. По окончанию установки на вашем рабочем столе появится иконка NetBeans. Но не спешите приступать к работе.

Шаг 3. Настройка переменных среды.
Перед началом работы придётся немного покопаться с настройкой Netbeans, в частности, с переменными средами Windows. Для этого зайдите в настройки системы, через поиск находим «Изменение системных переменных среды». Кликаем и видим такое окно:

Здесь кликаем «Переменные среды». В нижней части открывшегося окна, в «Системных переменных» находим пункт PATH и открываем его двойным кликом. Далеe «Создать», после чего мы прописываем путь к исполняемому файлу java.exe. Как правило, это Program Files/Java/jdk1.8.0_141/bin. Цифры могут отличаться, это индикатор версии.
Создаём ещё одну переменную, добавив аналогичный путь Program Files/Java/jre1.8.0_141/bin.
С настройкой java Netbeans покончено, переходим к запуску среды разработки и созданию первого приложения.
Шаг 4. Начало работы.
Теперь можно смело кликать по иконке на рабочем столе, что приведёт к запуску NetBeans. Интерфейс IDE интуитивно понятен: в левой части навигатор по файлу и компонентам, справа — код. Для создания в NetBeans java проектов достаточно перейти в меню Файл -> Создать проект. В появившемся окне выбрать язык, директории расположения будущих файлов, и всё, можно приступать к работе.

Для всех кастомных настроек, вроде шрифта, поведения редактора и выбора отладчика по умолчанию, следует обратиться к меню «Параметры». К примеру, в NetBeans настройка xDebug выглядит следующим образом:
- перейдите в меню «Сервис»→»Параметры»;
- во подменю выберите язык, закладка «Отладка»;
- укажите идентификатор сеанса «netbeans-xdebug», а порт — 9000.
Проблемы с запуском
с NetBeans есть несколько типовых «глюков», которые могут помешать нормальной работе среды. Вот несколько из них:
- не запускается;
- зависает;
- внутренние баги при исполнении.
Для каждого случая попробуем выделить основные причины.
Если у вас не запускается NetBeans — в 9 случаях из 10 это проблема, связанная с неправильной установкой. Возможно, у вас уже стояла одна из предыдущих версий, после чего не все файлы были удалены, так что почистите кзш. Возможно, NetBeans был скачан не с официального источника — это тоже может быть причиной отказа. В 1 случае из 10 — проблемы с вашей ОС Windows. Решение радикальное — переустановить систему.
В случае, если NetBeans зависает — причина кроется в конфигурациях среды. Один из наиболее популярных вариантов решения — добавить следующие строки в файл netbeans. conf в папке etc:
-J-client -J-Xms32m -J-Xmx384m -J-XX:PermSize=32m -J-XX:MaxPermSize=200m -J-Xverify:none
-J-XX:CompileThreshold=100 -XX:+CompressedOOPS -XX:+AggressiveOpts -XX:+TieredCompilation
-XX:+DoEscapeAnalysis -XX:+UseConcMarkSweepGC -J-XX:+CMSClassUnloadingEnabled -J-XX:+CMSPermGenSweepingEnabled
Чаще всего это помогает. Если нет — проверьте подключенные плагины, серверы и почие сторонние «раздражители».
С NetBeans java программирование становится проще и удобнее, код чище, а производительность разработчика и приложения выше. Установить и начать работать с этой средой просто даже новичку. В общем, именно то, что нужно будущему крутому Java-программисту.
Также советуем просмотреть вебинар по созданию веб-приложений JSF, где мы рассматриваем работу с NetBeans.
Posted at 21:03h
in NetBeans
2 Comments
NetBeans is a free and open source Integrated Development Environment (IDE) and is governed by the Apache Software Foundation. Develop desktop, mobile, and web applications with Java, JavaScript, HTML5, PHP, C/C++, etc easily with NetBeans. Here, we will be installing NetBeans IDE.
In this tutorial, we will learn how to install NetBeans IDE on Windows 10. Java installation is also necessary since NetBeans is a Java-based IDE, therefore we will also see JAVA JDK 13 installation while installing NetBeans IDE with text as well as video tutorial below:
Following steps we will follow to install NetBeans IDE on Windows 10:
- Download and Install Java
- Download NetBeans
- Installing NetBeans IDE
- Set NetBeans and Java path
- Launch NetBeans after installation
- Check the Video Tutorial also
Let’s begin with the installation:
Step 1: Download and Install Java
We will see how to install Java JDK on Windows 10 OS. With that, to avoid any hassles in future, we will also let you know how to verify the installation.
Let us now Download Java JDK
To download Java, go to Oracle’s official website and type “JAVA JDK ” in the search box as in the below screenshot:
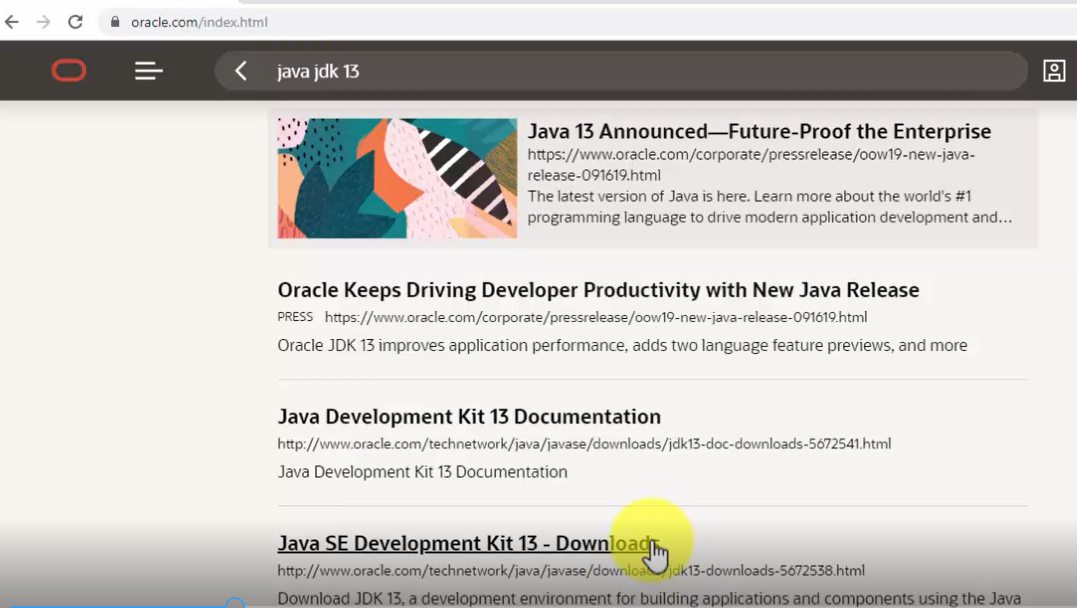
Now, click “Java SE Development Kit 13 – Downloads” and you will reach the Downloads section:

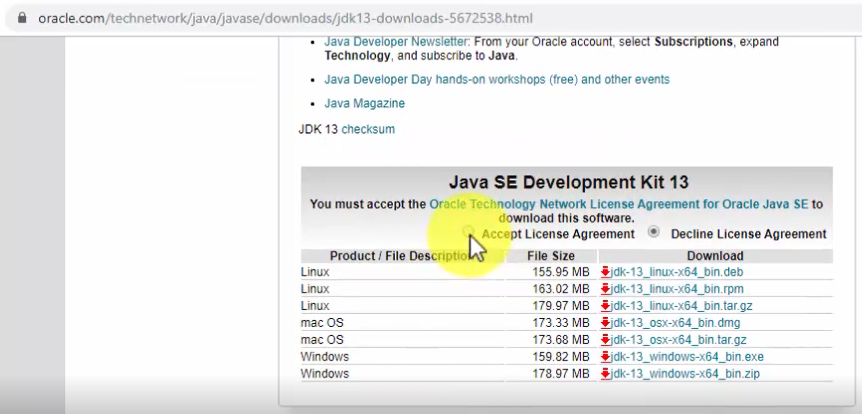
Go to bottom of the same page, click “Accept” there itself:
Since, we are on a Windows 10 system, therefore, we now have two options. From that, we will go with the installer exe 64-bit file i.e. jdk-13_windows-x64_bin.exe:
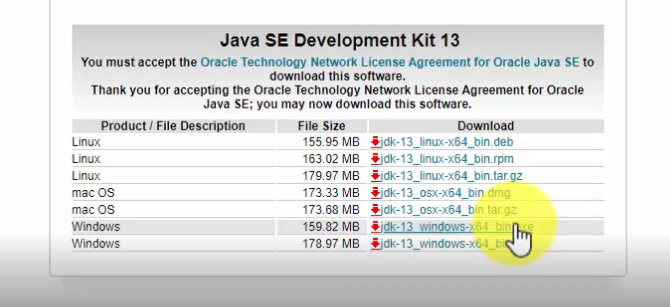
Note: Java JDK 13 will get installed only on a 64-bit Windows 10 system
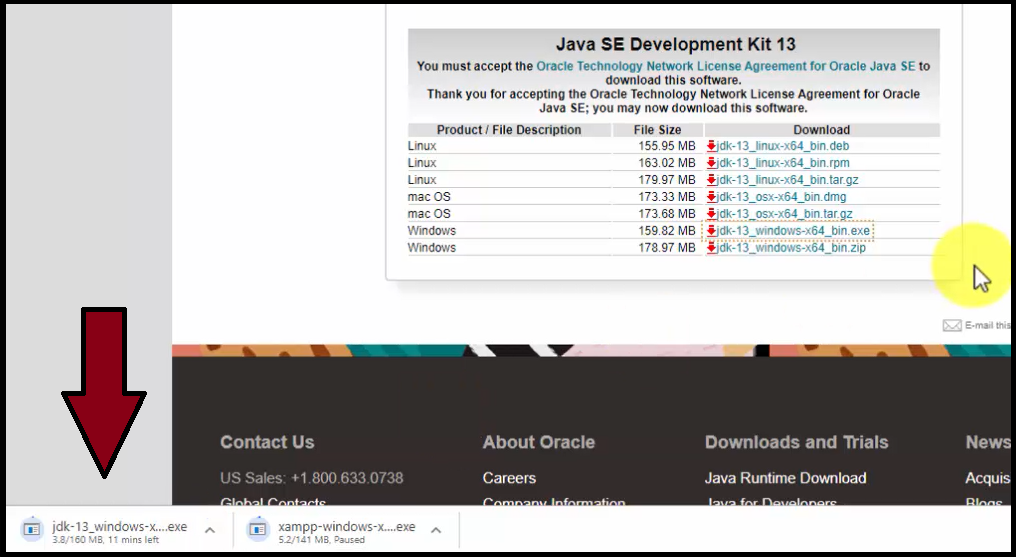
As you can see on the bottom-left of the web browser, the download begins. Just wait for few minutes till the download finishes:
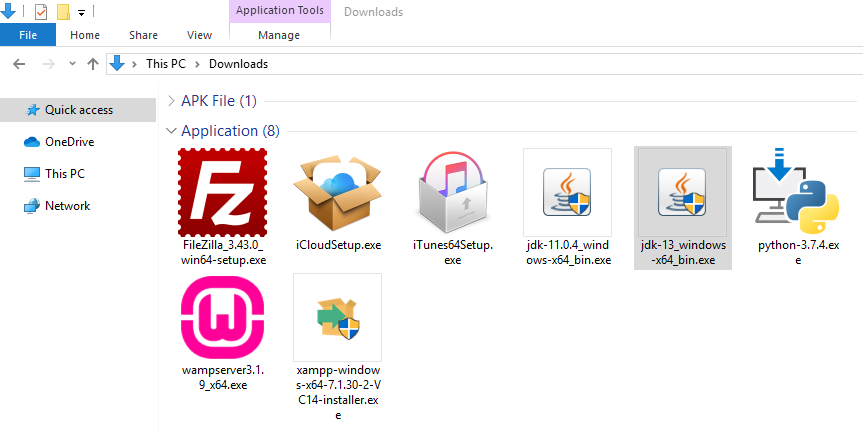
The downloaded jdk exe file will get saved in the “Downloads” folder:
Now, go to “Downloads” folder on your Windows 10 system and double click on the “jdk-13_windows-x64_bin.exe” file:
Double click on the exe file and the installation begins:
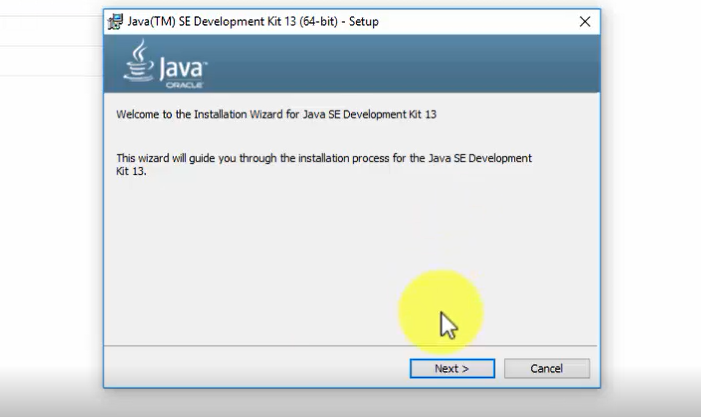
Click on “Next” above and set the path wherein the Java 13 will get installed. You can also keep it the default:
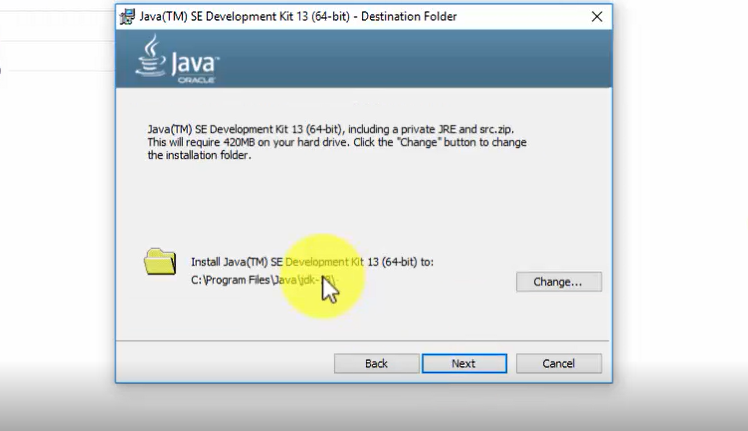
Click on “Next” above and the installation continues for some minutes.
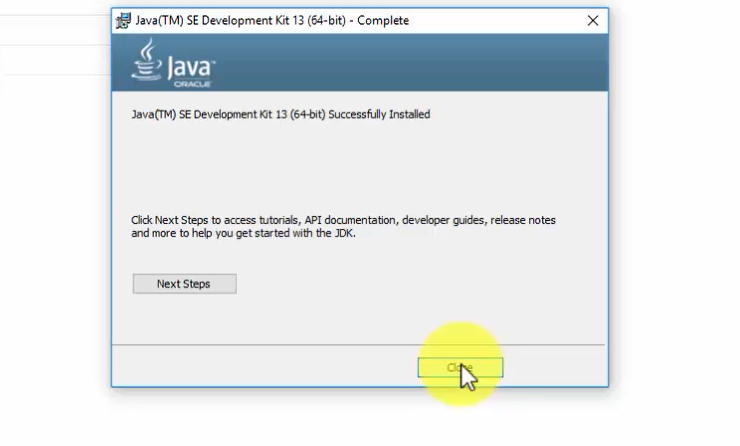
The installation finishes as in the following screenshot. Click on “Close“:
Now, let us set the JDK path.
Now, we will see how to set Java JDK Path (Environment Variable).
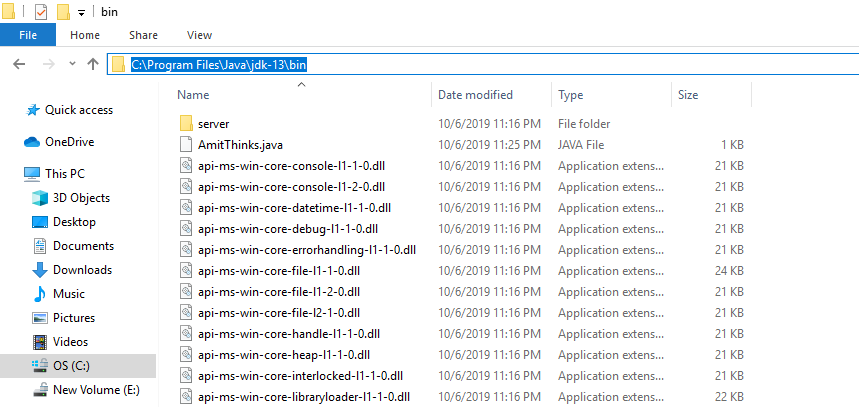
At first, copy the path wherein you installed the Java JDK. Let us copy it first. Remember, we need to copy the bin path i.e. the following on our system:
|
C:\Program Files\Java\jdk—13\bin |
Here’s the screenshot of the “bin” path, wherein we installed Java 13:
To set JDK Path, the easiest way is to type “Environment Variables” on Start. On typing, the following would be visible:
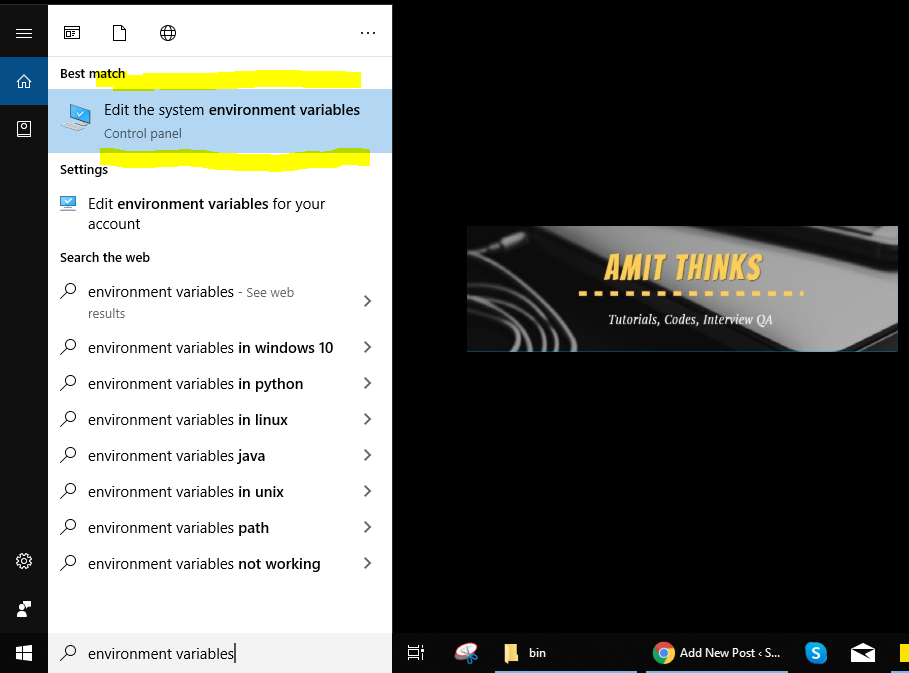
Now, click on “Edit Environment Variables” and a new dialog box would be visible:
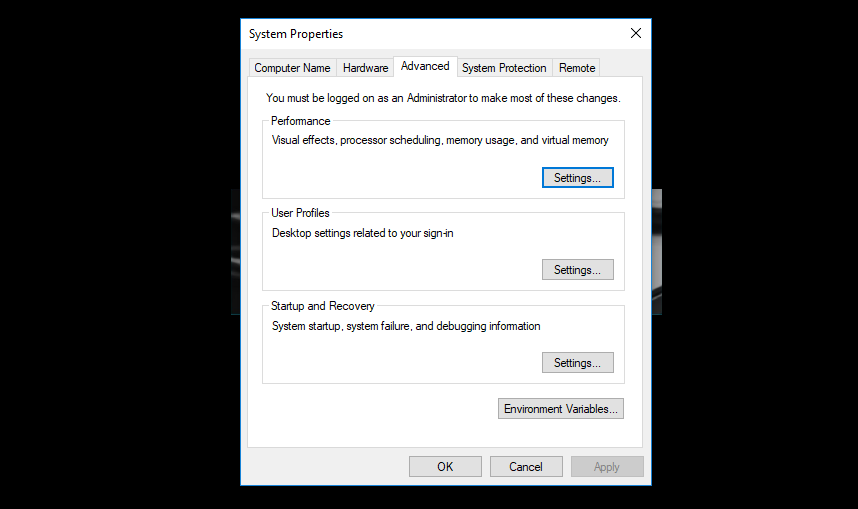
Now, click “Environment Variable” and a new dialog box will open. Go to “System Variables” section and double click “Path” as in the below screenshot:
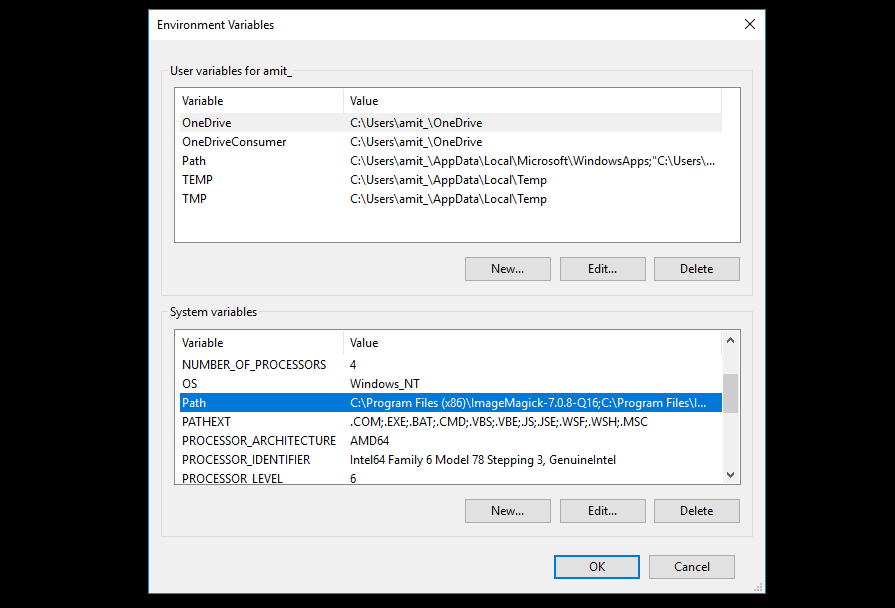
On clicking “Path“, a new dialog box will open. From there, click “New” and add the Java JDK path “C:\Program Files\Java\jdk-13\bin” as displayed in the below screenshot:
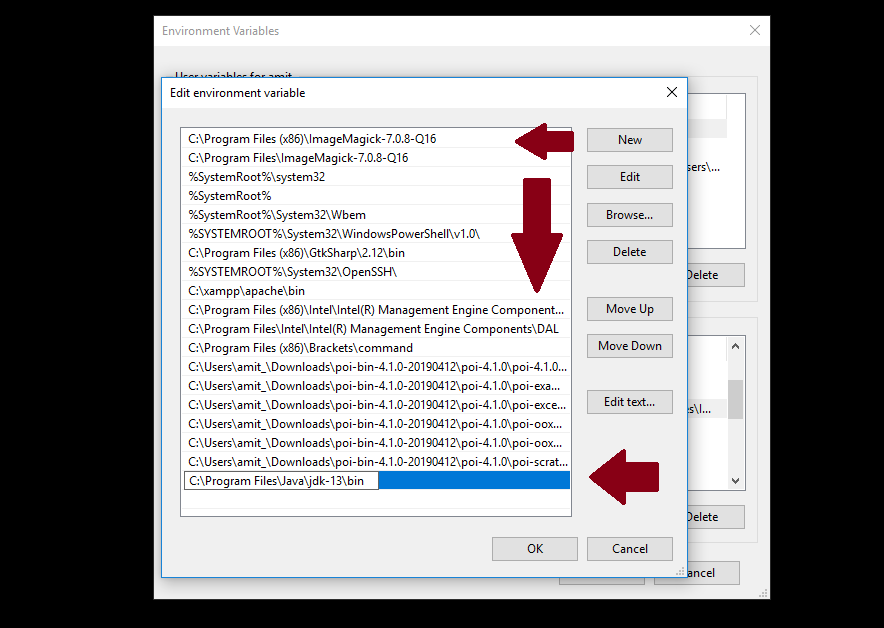
Above, press Ok for all the dialog boxes i.e. 3 times. This ends the installation and the procedure to set path for JDK. Now, we will verify the JDK installation.
Now, we will verify Java JDK 13 Installation.
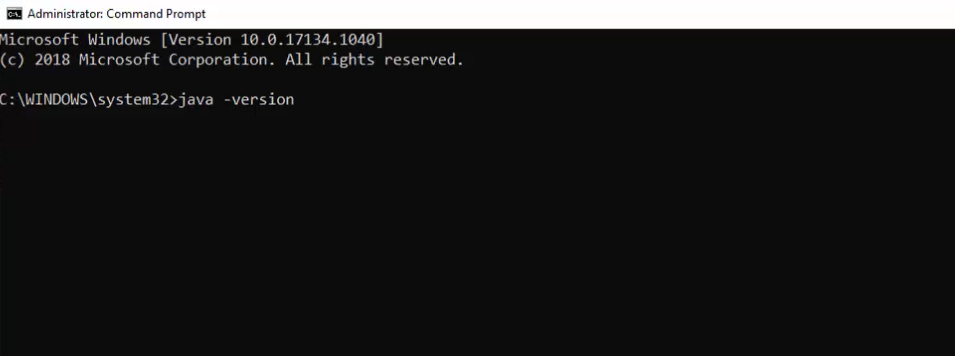
We saw how to install Java JDK 13 above. We installed on Windows 10 OS. Now, we can easily verify whether the installation was successfully or not using the following command:
Let us implement the above command on command prompt (cmd) and verify Java installation:
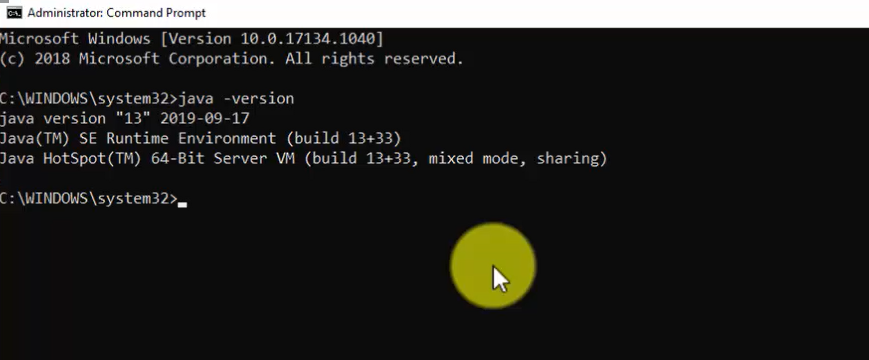
Therefore, the installation verification is now complete and successful since now we can see the version in the command prompt:
If you’d like to watching a video for installing Java 13 on Windows 10:
Step 2: Download NetBeans IDE
We installed Java above for NetBeans. Now, to install NetBeans IDE on Windows 10, at first we will download NetBeans IDE.
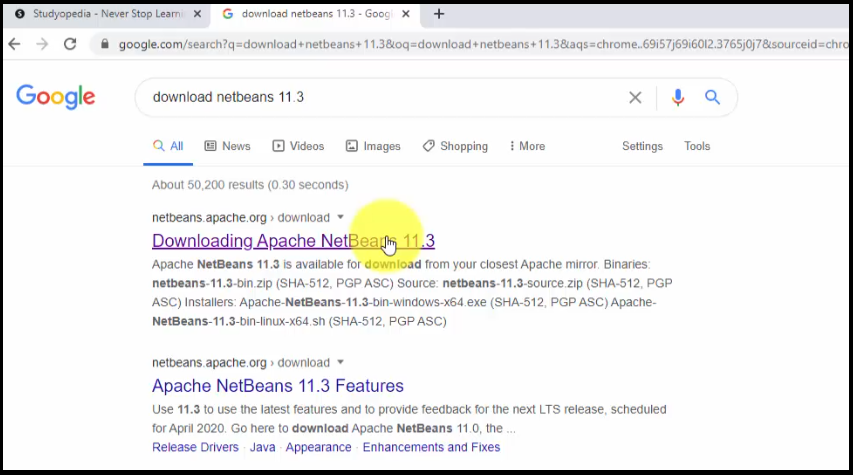
Go to Google and type Download NetBeans IDE 11.3. On typing, the official website of NetBeans i.e. “netbeans.apache.org” would be visible on the top of search results. Click on the website to download NetBeans as in the below screenshot:
Now, the official website will open. Click on the Windows exe file i.e. “Apache-NetBeans-11.3-bin-windows-x64” file since we have to install NetBeans IDE on Windows 10:
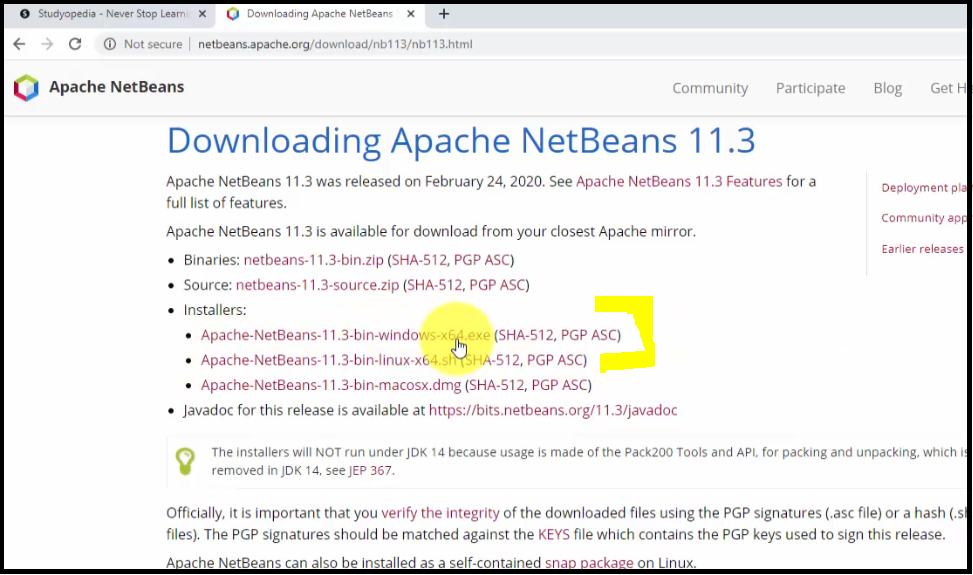
Now, you will be redirected to mirror sites. Click on any of them to download NetBeans IDE. We click the first one and the Download started as in the below screenshot. The Download status would be visible on the bottom left of Chrome web browser. When the download ends, right click to reach the folder where it installed. We have set the default for Google Chrome downloads to the “Downloads” folder:

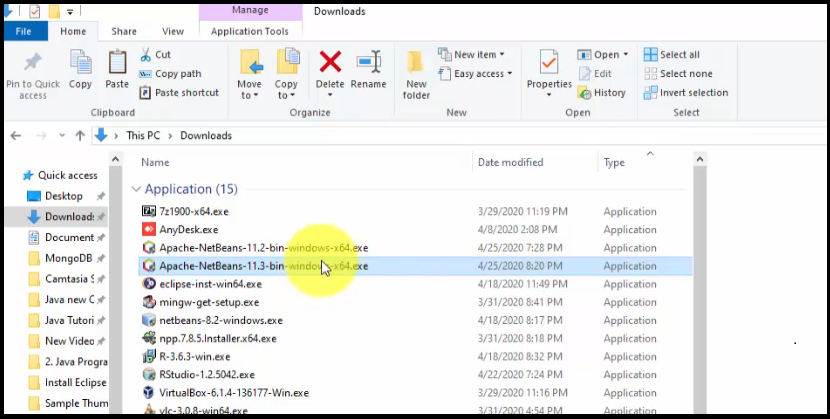
NetBeans installed successfully under “Downloads” folder through Google Chrome as in the below screenshot. Locate the exe file of NetBeans: “Apache-NetBeans-11.3-bin-windows-x64” file:
Now, let us move to Step 3 and begin installing NetBeans.
Step 3: Installing NetBeans IDE
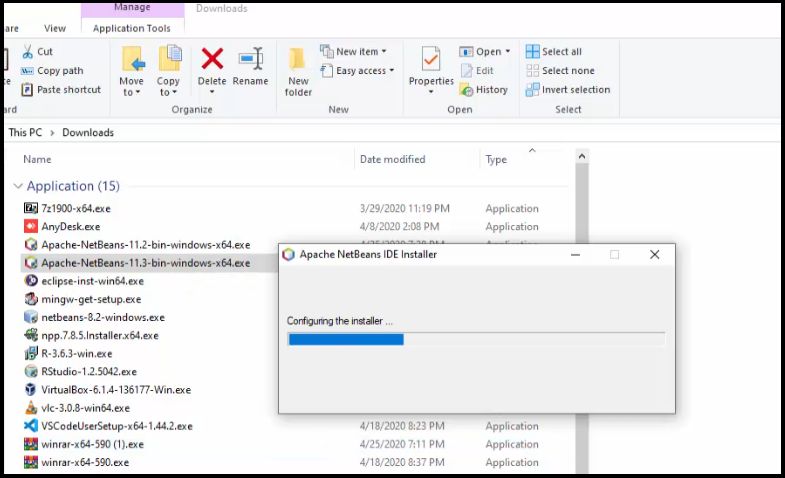
Now, we will be installing NetBeans IDE. Double click the exe file we downloaded in Step2 and the installation begins as in the below screenshot:
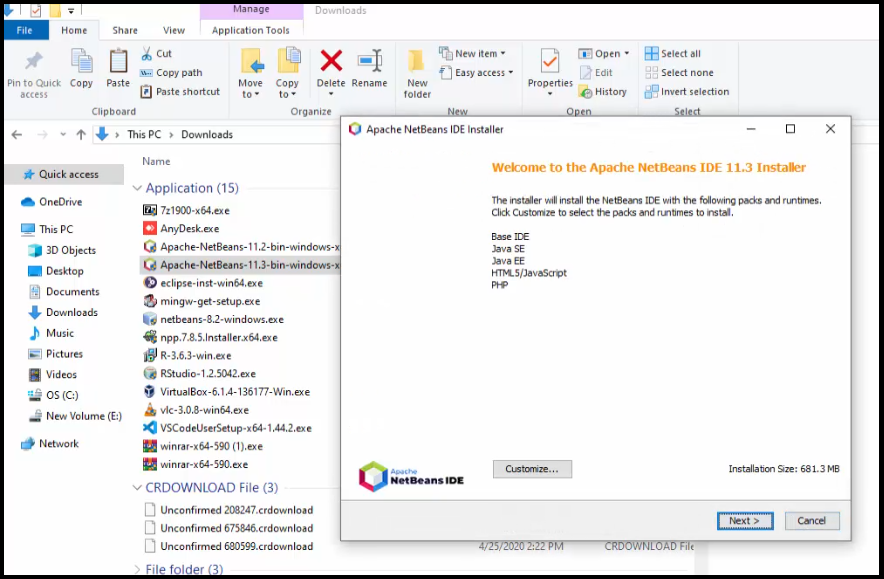
Now, you will reach the following installation dialog box (NetBeans Installer) showing what all will get installed with the installer size.
Note: You may get NetBeans installation error here. Do not worry, check our tutorial to fix NetBeans installation error.
Click “Next” to proceed:
Now, let us move to Step 4 and set the path.
Step 4: Set NetBeans and Java path
Now, set the path for NetBeans i.e. where you want to install it. We will keep the default i.e. under Program Files we will set the NetBeans path. Following is the path:
|
C:\Program Files\NetBeans—11.3 |
Here, you can also see we need to set the path for JAVA JDK installation. This is the reason why we need to install Java before installing NetBeans IDE. Set the same path we saw under step 1 above while Installing Java i.e. he following Java path:
|
C:\Program Files\Java\jdk—13 |
Screenshot shows the same paths:

After, that click “Next” and the installation continues. Now, the summary of installer is visible. Click on “Install” as in the below screenshot:

Now, installation continues. This is the final step:
Installation completed successfully and Desktop Shortcut created as in the below screenshot:
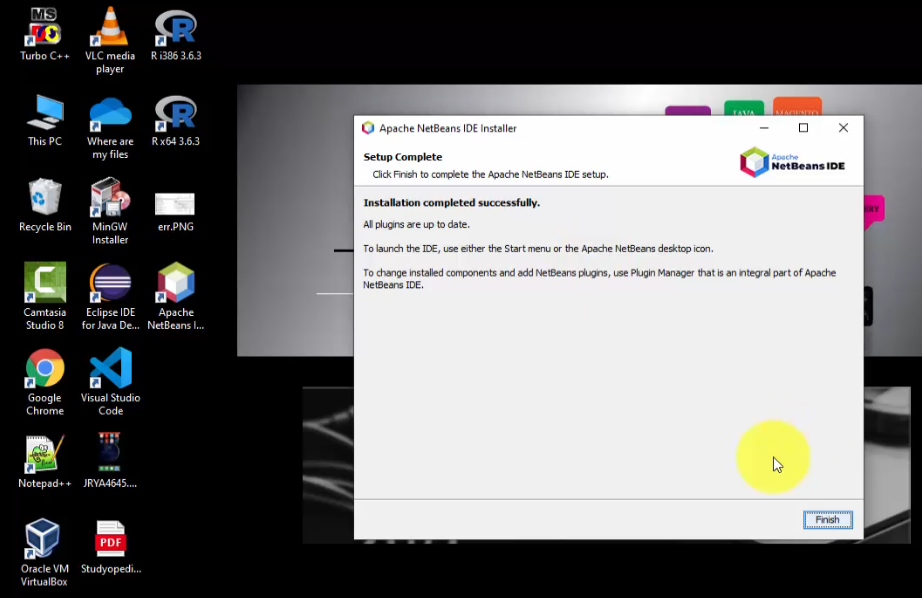
Click “Finish” above to close the dialog box.
Step 5: Launch NetBeans after installation
After that, click the “Desktop Shortcut” to launch NetBeans as in the below screenshot:
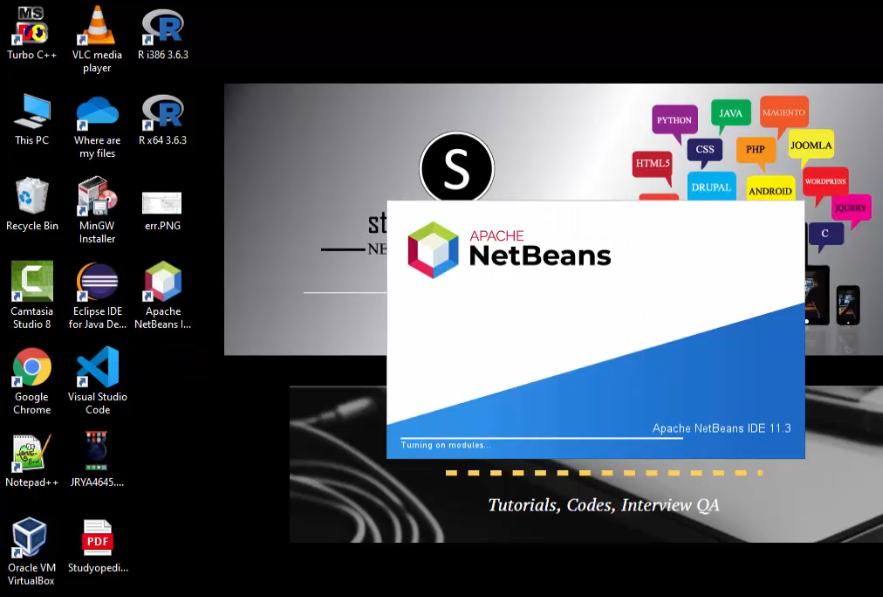
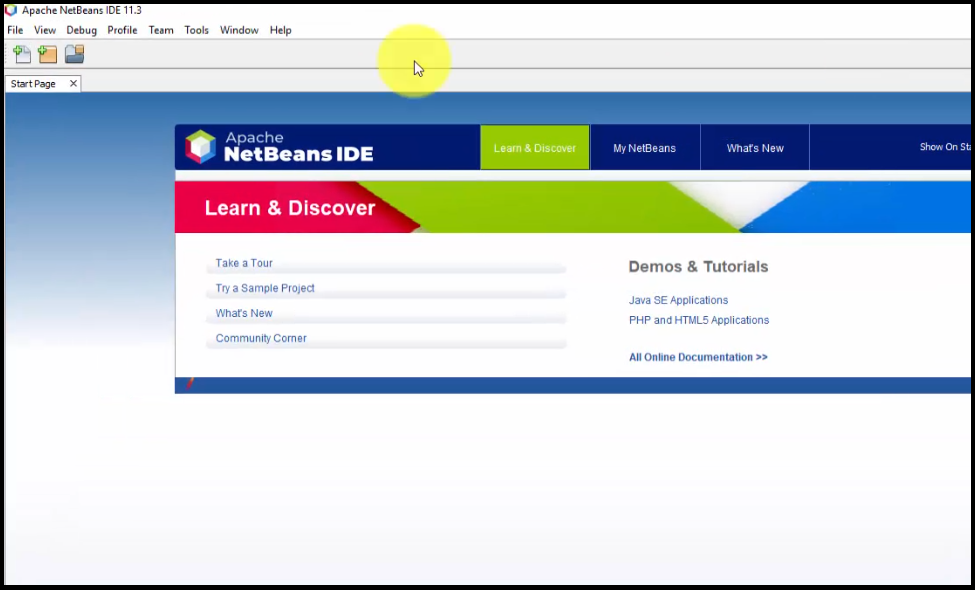
NetBeans opened successfully for the first time after installation as in the below screenshot:
In this article, we saw how to install NetBeans on Windows 10 after installing Java. While installing, we also set the Java path.
Video Tutorial to Install NetBeans on Windows 10
Following is the video tutorial displaying how to install NetBeans IDE on Windows 10. Covers the steps shown in the above text tutorial:
If you liked the NetBeans tutorial, spread the word and share the link and our website Studyopedia with others.
Support us: DONATE
Read More:
-
- Install Java 14 on Windows 1o
- Install Python 3.8.2 on Windows 10
- Run your first PHP program on XAMPP Server
- Install WordPress on localhost in Windows 10
- Install Drupal on localhost in Windows 10
- Install Joomla on localhost in Windows 10
- Install Python on Windows 10
- Install jQuery on localhost in Windows 10
- Install Eclipse on Windows 10
NetBeans is one of the most popular and free IDE used to develop Java and JEE applications. It provides several in-built features including code hinting, database tool, git, svn, etc required to develop software using Java. This tutorial provides all the steps required to install NetBeans 12 for Java development on Windows 10 using the installer provided by Apache. The highlights of NetBeans are available on the Official Page from Apache as shown in Fig 1.

Fig 1
Prerequisites
NetBeans assumes that the appropriate version of JDK is installed on the System. NetBeans 12 needs at least JDK 8 to continue the installation. You can follow How To Install Java 15 On Windows, How To Install OpenJDK 15 On Windows, or How To Install Java 8 On Windows 10 to install the most recent version of JDK on your Windows system.
Download NetBeans 12
Click the Find Out More Button as shown in Fig 1. It will navigate to the NetBeans Features Page as shown in Fig 2.

Fig 2
Now click the Download Button to navigate to the Downloads Page of NetBeans as shown in Fig 3.

Fig 3
I have highlighted the download options for windows using the installer. Now click the Windows Installer Link. It will open the page having download links from the mirror sites as shown in Fig 4.

Fig 4
Now click the suggested download link as highlighted in Fig 4. It will start downloading the most recent release of NetBeans 12.
Install NetBeans 12
In this step, we will install NetBeans 12 for Java on Windows 10 using the installer downloaded by us in the previous step. Confirm the currently installed and active Java version as shown in Fig 5.

Fig 5
Execute the installer to start installing NetBeans on Windows. It will ask for system permissions to continue the installation. Click the Yes Button to continue the installation. Next, it will show the Welcome Screen having options to choose the components as shown in Fig 6.

Fig 6
It provides options to customize the components to be installed using the Customize Button as shown in Fig 7.

Fig 7
I kept all the components selected and clicked the Next Button to continue the installation. The installer asks to accept the License Agreement on the next screen as shown in Fig 8.

Fig 8
Now click the Next Button to configure the installation path and JDK path as shown in Fig 9.

Fig 9
Click the Next Button to progress the installation. The next screen shows the installation summary and provides options to get updates as shown in Fig 10.

Fig 10
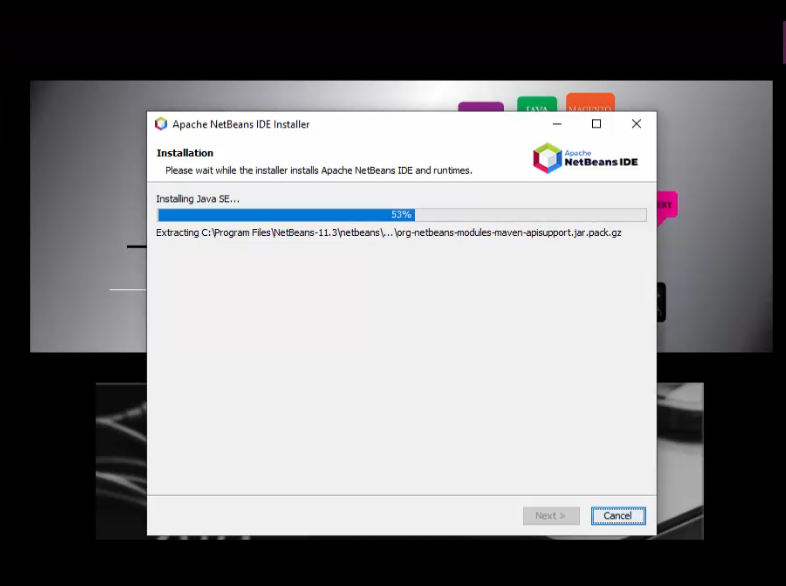
Now click the Install Button to start the installation. It will show the installation progress as shown in Fig 11.

Fig 11
It will show the Success Screen after completing the installation as shown in Fig 12.

Fig 12
Now click the Finish Button to close the installer.
Launch the IDE
We can launch the IDE using the launcher icon placed on the Desktop. It might ask to import settings from the old installation as shown in Fig 13.

Fig 13
Choose the appropriate option. It will start the IDE and shows the Welcome Screen and the Default Layout as shown in Fig 14 and Fig 15.

Fig 14

Fig 15
This completes the installation of the most recent version of NetBeans i.e. NetBeans 12 on Windows 10.
Create Java Project
Start the IDE in case it’s not running. Now click the File Options on Main Menu -> New Project. It will show the New Project Wizard as shown in Fig 16.

Fig 16
Select Java with Maven from the Categories option and also select Java Application from Projects option as highlighted in Fig 16. The NetBeans 12 will show a message in the description section to enable appropriate plugins required for Java development, in case it’s the first project. Now click the Next Button. On the next wizard, NetBeans will find the corresponding plugins required for Java development as shown in Fig 17.

Fig 17
Now click the Download and Activate Button to download and activate the required extensions. The next screen provides options to confirm downloading the nb-javac extension as shown in Fig 18.

Fig 18
Click the Next Button to confirm the installation. The next screen asks to accept the License Agreement as shown in Fig 19.

Fig 19
Now click Install Button to start installing the nb-javac extension. It will show the installation progress and the success message as shown in Fig 20 and Fig 21.

Fig 20

Fig 21
Now click Finish Button to complete the installation of the nb-javac extension. The next screen shows the progress of the Java SE activation as shown in Fig 22.

Fig 22
Once JAVA SE is activated, we can continue with the project configuration as shown in Fig 23.

Fig 23
Now click the Finish Button to complete the project set up. The project with the default package created by NetBeans looks like Fig 24.

Fig 24
Hello Java
In this step, we will write our first program and execute it on the console. Now right-click on the default package and choose Java Class as highlighted in Fig 10.

Fig 25
The next screen provides options to configure our first Java Class name as shown in Fig 26.

Fig 26
Now click the Finish Button to create the class file. It will create the Java class using the default template as shown in Fig 27.

Fig 27
Now update the class file to print Hello World on the console as shown below.
package com.helloworld.core;public class HelloJava {    public static void main( String[] args ) {                System.out.println( "Hello World !!" );
    }
}
Now right-click on the HelloJava.java file in the Projects Window on the left panel. Also, click on Run File to execute the program as shown in Fig 28. You can also select the File on Projects Window and press Shift + F6 to execute the program.

Fig 28
It will take some time for Maven to download all the required dependencies for the first time. Finally, it shows the output after compiling and building the project as shown in Fig 29.

Fig 29
These are the basic steps required to write and execute Java programs with Maven using NetBeans 12.
Summary
This tutorial provided all the steps required to install the most recent version of NetBeans 12 on Windows for Java development.
Apache NetBeans — мощная платформа разработки по Java, предоставляющая широкий набор инструментов разработчикам. Если вы хотите начать программировать на Java или уже имеете опыт в этом, то установка NetBeans на вашем компьютере позволит вам создавать сложные проекты и разрабатывать приложения с большими возможностями.
В этой статье мы предоставим вам пошаговую инструкцию по установке Apache NetBeans на операционную систему Windows 10. Мы рассмотрим каждый этап установки, начиная с загрузки установочного файла и заканчивая завершением установки. Эта инструкция будет полезна как для новичков, так и для опытных разработчиков, которые хотят настроить свою среду разработки на основе NetBeans.
Установка Apache NetBeans на Windows 10 — это простой процесс, который можно выполнить всего за несколько минут. Поэтому приступим к установке NetBeans на ваш компьютер и настроим его для языка Java, чтобы вы могли полноценно разрабатывать проекты на этой платформе.
Примечание: Перед установкой NetBeans убедитесь, что ваш компьютер отвечает системным требованиям программы, таким как доступность JDK (Java Development Kit) на вашем компьютере и наличие достаточного объема памяти.
Содержание
- Скачивание установочного файла
- Запуск установки
- Выбор языка
- Установка необходимых компонентов
- Путь установки
- Настройка опций
- Завершение установки
Скачивание установочного файла
Перед началом установки Apache NetBeans вам необходимо скачать установочный файл программы.
1. Перейдите на официальный сайт Apache NetBeans по адресу https://netbeans.apache.org/download/index.html.
2. На странице загрузки выберите версию Apache NetBeans, которую вы хотите установить (например, Apache NetBeans 12.2).
3. Найдите ссылку для скачивания установочного файла и кликните на нее.
4. Дождитесь завершения загрузки файла. Это может занять некоторое время в зависимости от скорости вашего интернет-соединения.
5. После завершения загрузки у вас будет сохранен установочный файл Apache NetBeans с расширением .zip или .exe.
Теперь у вас есть установочный файл Apache NetBeans и вы готовы приступить к установке программы.
Запуск установки
Приступая к установке Apache NetBeans на операционную систему Windows 10, необходимо выполнить следующие шаги:
Шаг 1: Скачайте установочный файл Apache NetBeans с официального сайта проекта. Найдите нужную версию с учетом вашей операционной системы и языка.
Шаг 2: После завершения загрузки, откройте скачанный файл для запуска установки Apache NetBeans.
Шаг 3: В открывшемся окне установщика выберите язык установки и нажмите кнопку «Next» (Далее).
Шаг 4: Ознакомьтесь с условиями лицензионного соглашения и примите их. Затем нажмите кнопку «Next» (Далее).
Шаг 5: Выберите путь для установки Apache NetBeans на вашем компьютере. Если вы не хотите изменять путь, оставьте его по умолчанию, а затем нажмите кнопку «Next» (Далее).
Шаг 6: Настройте параметры установки в соответствии с вашими предпочтениями. Вы можете выбрать компоненты, которые вы хотите установить, а также изменить ассоциации файлов, ярлыки и другие параметры. После настройки нажмите кнопку «Install» (Установить).
Шаг 7: Дождитесь завершения установки Apache NetBeans. После этого нажмите кнопку «Finish» (Завершить).
Поздравляем! Теперь у вас установлена последняя версия Apache NetBeans на вашем компьютере под управлением Windows 10.
Выбор языка
Прежде чем приступить к установке Apache NetBeans на ваш компьютер с операционной системой Windows 10, вы должны выбрать язык, на котором будут отображаться интерфейс и инструменты разработки. Apache NetBeans поддерживает множество языков, включая русский, английский, немецкий, французский, испанский и другие.
Чтобы выбрать язык, откройте официальный веб-сайт Apache NetBeans и перейдите на страницу загрузки. Там вы увидите список доступных языков. Щелкните на языке, который вы предпочитаете, чтобы выбрать его.
Примечание: После установки Apache NetBeans вы сможете изменить язык в настройках программы.
Выберите язык, который наиболее удобен для вас, чтобы пользоваться Apache NetBeans на вашем родном языке и легче разрабатывать приложения.
Важно помнить, что большинство руководств и обучающих материалов, доступных в Интернете, представлены на английском языке. Поэтому, если вы хотите использовать Apache NetBeans в комбинации с изучением документации и руководств, рекомендуется выбрать английский язык.
Установка необходимых компонентов
Для установки Apache NetBeans на Windows 10, вам потребуется установить несколько необходимых компонентов. Ниже приведен список компонентов, которые вам понадобятся:
1. JDK (Java Development Kit) — это комплект разработки Java, который включает в себя компилятор, отладчик и другие инструменты для разработки программ на языке Java. Для установки NetBeans вам понадобится JDK версии 8 или выше. Вы можете скачать JDK с официального сайта Oracle. При установке JDK необходимо выбрать версию, соответствующую вашей операционной системе (32-битная или 64-битная).
2. Apache NetBeans — это среда разработки для языков программирования, таких как Java, PHP, C++ и других. Вы можете скачать Apache NetBeans с официального сайта Apache NetBeans. При установке выберите пакет, соответствующий вашим потребностям, например, пакет для Java или PHP.
3. Git — это система контроля версий, которая позволяет отслеживать изменения в коде и сотрудничать с другими разработчиками. Вы можете скачать Git с официального сайта Git. При установке доступно несколько вариантов установки, но вы можете выбрать типичную установку, если не уверены в настройках.
После установки всех необходимых компонентов вы будете готовы установить Apache NetBeans на вашей системе Windows 10.
Примечание: При установке компонентов следуйте инструкциям на экране и примите любые по умолчанию предлагаемые настройки, если вы не знаете, какие настройки выбрать.
Путь установки
Чтобы установить Apache NetBeans на компьютер с операционной системой Windows 10, следуйте указанным ниже шагам:
- Скачайте установочный файл Apache NetBeans с официального сайта.
- Запустите установочный файл и выберите язык установки.
- Нажмите на кнопку «Далее», чтобы принять лицензионное соглашение.
- Выберите путь установки, где Apache NetBeans будет установлен на вашем компьютере.
- Выберите компоненты, которые вы хотите установить. Рекомендуется установить все компоненты для полной функциональности IDE.
- Нажмите на кнопку «Далее», чтобы начать установку.
- Дождитесь завершения установки и нажмите на кнопку «Готово».
Поздравляю! Теперь Apache NetBeans успешно установлен на вашем компьютере. Вы можете запустить его из меню «Пуск» и начать использовать его для разработки программного обеспечения. Удачи!
Настройка опций
После успешной установки Apache NetBeans на вашем компьютере Windows 10 необходимо настроить некоторые опции для оптимальной работы среды разработки.
1. Настройка кодировки: Проверьте, что кодировка ваших проектов соответствует вашим потребностям. Для этого откройте меню «Tools» (Инструменты) в верхней панели NetBeans и выберите «Options» (Настройки). В открывшемся окне выберите вкладку «Editing» (Редактирование) и в разделе «Fonts & Colors» (Шрифты и цвета) установите желаемую кодировку. В качестве рекомендации используйте UTF-8, так как она поддерживает большинство символов и языков.
2. Настройка автодополнения: NetBeans предлагает мощный механизм автодополнения кода, который значительно упрощает процесс разработки. Чтобы включить автодополнение, перейдите в меню «Tools» (Инструменты), выберите «Options» (Настройки) и откройте вкладку «Editor» (Редактор). В разделе «Code Completion» (Автодополнение кода) установите нужные настройки для автодополнения, например, переключите функцию «Auto Popup Completion Window» (Автоматическое открытие окна автодополнения) на «Always» (Всегда).
3. Настройка форматирования: Для удобочитаемости кода можно настроить стиль форматирования. Чтобы это сделать, откройте меню «Tools» (Инструменты), выберите «Options» (Настройки), перейдите на вкладку «Editor» (Редактор) и выберите раздел «Formatting» (Форматирование). Здесь вы можете настроить различные правила форматирования, такие как отступы, размещение фигурных скобок и т.д.
4. Настройка шаблонов кода: NetBeans предоставляет возможность создания собственных шаблонов кода для более быстрого и удобного программирования. Для этого откройте меню «Tools» (Инструменты), выберите «Options» (Настройки) и перейдите на вкладку «Editor» (Редактор). В разделе «Code Templates» (Шаблоны кода) можно создать, изменить или удалить шаблоны кода по вашему усмотрению.
После настройки всех необходимых опций вы будете готовы использовать Apache NetBeans на вашем компьютере Windows 10 с настройками, отвечающими вашим потребностям и предпочтениям.
Завершение установки
После завершения загрузки установочного пакета Apache NetBeans, запустите его, дважды щелкнув по установочному файлу. Откроется окно приветствия, где вам будет предложено выбрать язык установки. Выберите русский язык из списка доступных языков и нажмите кнопку «Далее».
На следующем экране вам будет предложено прочитать и принять условия соглашения об использовании Apache NetBeans. Ознакомьтесь с условиями и, если согласны с ними, отметьте соответствующую галочку и нажмите кнопку «Далее».
На следующем экране вам будет предложено выбрать директорию установки Apache NetBeans. Если вы хотите изменить местоположение установки, нажмите кнопку «Обзор» и выберите нужную директорию. После выбора директории нажмите кнопку «Далее».
На следующем экране вам будет предложено выбрать компоненты, которые вы хотите установить. Вы можете выбрать все компоненты для установки или выбрать только те, которые вам нужны. После выбора компонентов нажмите кнопку «Установить».
После завершения установки будет отображено окно с завершающими действиями. Нажмите кнопку «Завершить» для закрытия установщика.
Теперь Apache NetBeans установлен на вашем компьютере и готов к использованию. Вы можете запустить его из меню «Пуск» или с рабочего стола. Удачной работы с Apache NetBeans!
Learn how to install and setup, configure Netbeans IDE on macOS, Windows, and Linux tutorials and howto examples advantages and is used for java developer.
This tutorial shows you how to install and setup Netbeans IDE on Windows
Netbeans are written using java language, First, you need to have JDK installed on your machine.
Next, Make sure that you Check JDK on your machine or not.
C:\>java -version
java version "1.8.0_102"
Java(TM) SE Runtime Environment (build 1.8.0_102-b14)
Java HotSpot(TM) 64-Bit Server VM (build 25.102-b14, mixed mode)
That means JDK is installed on your machine.
If it is not installed, you have to install it on your machine.
How do I download and install NetBeans IDE?
First, Download the Netbeans installer from here
Select installer for windows, ie click on Apache-NetBeans-14-bin-windows-x64.exe (SHA-512, PGP ASC), It downloads it to your machine.
It downloads to your local folder
Next, Run or click on Apache-NetBeans-14-bin-windows-x64.exe installer
Follows installation setups, and selects folder to install it.
Once installed, You are ready to use it.
Following are steps to open Netbeans IDE in Windows
- select Windows +R and type Apache Netbeans IDE 14
- It opens the Netbeans and is ready to code
Netbeans Installation on MAC
Next, Download netbeans from here
- Download the Netbeans mac installer from here
- Click and download Apache-NetBeans-14-bin-macosx.dmg (SHA-512, PGP ASC)
- It downloads the dmg file
- Open and double-click on it
- Follow the steps to install it successfully
- You can open Netbeans from applications in MACOS
Netbeans Installation on Linux
- Download the Netbeans mac installer from here
- Click and downloads Apache-NetBeans-14-bin-linux-x64.sh (SHA-512, PGP ASC)
- It downloads the sh file to the download folder
- In the command line, please run the below steps
- change to download folder using cd ~/downloads
- Next, change write permissions to Apache-NetBeans-14-bin-linux-x64.sh using the below command
chmod a+x Apache-NetBeans-14-bin-linux-x64.sh
- Run Apache-NetBeans-14-bin-linux-x64.sh
./Apache-NetBeans-14-bin-linux-x64.sh
-
Follow instructions to install it successfully on Linux
-
Run NetBeans with the below command lin Linux
./netbeans
Where can I download NetBeans IDE?
To download netbeans, please follow the below steps
- Go to netbeans site
- Download latest version, you can choose OS type and download from specific mirror
- Click on Download, It redirect to here
- Select binary zip file, It downloads netbeans-15-bin.zip file into your machine.
- Extract zipe file and start the server directly