You can install Neovim from download, package, or source in just a few seconds.
- To start Neovim, run
nvim(notneovim).- Discover plugins.
- Before upgrading to a new version, check Following HEAD.
- For config (vimrc) see the FAQ.
Install from download
Downloads are available on the Releases page.
- Latest stable release
- macOS
- Linux
- Windows
- Latest development prerelease
Install from package
Packages are listed below. (You can also build Neovim from source.)
Windows
Windows 8+ is required. Windows 7 or older is not supported.
Winget
-
Release:
winget install Neovim.Neovim
Chocolatey
-
Release (v0.7):
choco install neovim(use -y for automatically skipping confirmation messages) -
Development (pre-release):
choco install neovim --pre
Scoop
scoop bucket add main
scoop install neovim
-
Release:
scoop install neovim
Several Neovim GUIs are available from scoop (extras): scoop.sh/#/apps?q=neovim
Pre-built archives
- If you are missing
VCRUNTIME140.dll, install the Visual Studio 2015 C++ redistributable (choose x86_64 or x86 depending on your system). - Choose a package (nvim-winXX.zip) from the releases page.
- Unzip the package. Any location is fine, administrator privileges are not required.
-
$VIMRUNTIMEwill be set to that location automatically.
-
- Double-click
nvim-qt.exe.
Optional steps:
- Add the
binfolder (e.g.C:\Program Files\nvim\bin) to your PATH.- This makes it easy to run
nvimandnvim-qtfrom anywhere.
- This makes it easy to run
- If
:set spelldoes not work, create theC:/Users/foo/AppData/Local/nvim/site/spellfolder.
You can then copy your spell files over (for English, located
here and
here); - For Python plugins you need the
pynvimmodule. «Virtual envs» are recommended. After activating the virtual env dopip install pynvim(in both). Edit yourinit.vimso that it contains the path to the env’s Python executable:let g:python3_host_prog='C:/Users/foo/Envs/neovim3/Scripts/python.exe'
- Run
:checkhealthand read:help provider-python.
- Run
-
init.vim («vimrc»): If you already have Vim installed you can copy
%userprofile%\_vimrcto%userprofile%\AppData\Local\nvim\init.vimto use your Vim config with Neovim.
macOS / OS X
Pre-built archives
The Releases page provides pre-built binaries for macOS 10.15+.
curl -LO https://github.com/neovim/neovim/releases/download/nightly/nvim-macos.tar.gz
tar xzf nvim-macos.tar.gz
./nvim-macos/bin/nvim
Homebrew on macOS or Linux
MacPorts
sudo port selfupdate
sudo port install neovim
Linux
AppImage («universal» Linux package)
The Releases page provides an AppImage that runs on most Linux systems. No installation is needed, just download nvim.appimage and run it. (It might not work if your Linux distribution is more than 4 years old.)
curl -LO https://github.com/neovim/neovim/releases/latest/download/nvim.appimage
chmod u+x nvim.appimage
./nvim.appimage
If the ./nvim.appimage command fails, try:
./nvim.appimage --appimage-extract
./squashfs-root/AppRun --version

# Optional: exposing nvim globally.
sudo mv squashfs-root /
sudo ln -s /squashfs-root/AppRun /usr/bin/nvim
nvim
Arch Linux
Neovim can be installed from the community repository:
Alternatively, Neovim can be also installed using the PKGBUILD neovim-git, available on the AUR.
Alternatively, Neovim Nightly builds can be also installed using the PKGBUILD neovim-nightly-bin, available on the AUR.
The Python module is available from the community repository:
sudo pacman -S python-pynvim
Ruby modules (currently only supported in neovim-git) are available from the AUR as ruby-neovim.
CentOS 8 / RHEL 8
Neovim is available through EPEL (Extra Packages for Enterprise Linux)
yum install -y https://dl.fedoraproject.org/pub/epel/epel-release-latest-8.noarch.rpm
yum install -y neovim python3-neovim
Clear Linux OS
Neovim is available through the neovim bundle
sudo swupd bundle-add neovim
Python (:python) support is available if the python-basic bundle is installed.
sudo swupd bundle-add python-basic
Debian
Neovim is in Debian.
sudo apt-get install neovim
Python (:python) support is installable via the package manager on Debian unstable.
sudo apt-get install python3-neovim
If installing via appimage, the following commands may be helpful in updating default paths:
# CUSTOM_NVIM_PATH=/usr/local/bin/nvim.appimage
# Set the above with the correct path, then run the rest of the commands:
set -u
sudo update-alternatives --install /usr/bin/ex ex "${CUSTOM_NVIM_PATH}" 110
sudo update-alternatives --install /usr/bin/vi vi "${CUSTOM_NVIM_PATH}" 110
sudo update-alternatives --install /usr/bin/view view "${CUSTOM_NVIM_PATH}" 110
sudo update-alternatives --install /usr/bin/vim vim "${CUSTOM_NVIM_PATH}" 110
sudo update-alternatives --install /usr/bin/vimdiff vimdiff "${CUSTOM_NVIM_PATH}" 110
Exherbo Linux
Exhereses for scm and released versions are currently available in repository ::medvid. Python client (with GTK+ GUI included) and Qt5 GUI are also available as suggestions:
cave resolve app-editors/neovim --take dev-python/neovim-python --take app-editors/neovim-qt
Fedora
Neovim is in Fedora starting with Fedora 25:
sudo dnf install -y neovim python3-neovim
You can also get nightly builds of git master from the Copr automated build system:
dnf copr enable agriffis/neovim-nightly
dnf install -y neovim python3-neovim
See the blog post for information on how these are built.
Flatpak
You can find Neovim on Flathub. Providing you have Flatpak set up:
flatpak install flathub io.neovim.nvim
flatpak run io.neovim.nvim
You can add /var/lib/flatpak/exports/bin (or ~/.local/share/flatpak/exports/bin if you used --user) to the $PATH and run it with io.neovim.nvim.
Note that Flatpak’ed Neovim will look for init.vim in ~/.var/app/io.neovim.nvim/config/nvim instead of ~/.config/nvim.
Gentoo Linux
An ebuild is available in Gentoo’s official portage repository:
emerge -a app-editors/neovim
GNU Guix
Neovim can be installed with:
GoboLinux
Neovim can be installed with:
Nix / NixOS
Neovim can be installed with:
nix-env -iA nixpkgs.neovim
Mageia 7
To install the Python modules:
makedeb Package Repository (MPR)
Neovim is available inside the MPR. You can install it with:
git clone https://mpr.makedeb.org/neovim
cd neovim/
makedeb -si
OpenSUSE
Neovim can be installed with:
To install the Python modules:
sudo zypper in python-neovim python3-neovim
PLD Linux
Neovim is in PLD Linux:
poldek -u neovim
poldek -u python-neovim python3-neovim
poldek -u python-neovim-gui python3-neovim-gui
Slackware
See neovim on SlackBuilds.
For instructions on how to install the Python modules, see :help provider-python.
Source Mage
Neovim can be installed using the Sorcery package manager:
Solus
Neovim can be installed using the default package manager in Solus (eopkg):
sudo eopkg install neovim
Snap
Neovim nightly and stable are available on the snap store.
Stable Builds
sudo snap install --beta nvim --classic
Nightly Builds
sudo snap install --edge nvim --classic
Ubuntu
As in Debian, Neovim is in Ubuntu.
Python (:python) support seems to be automatically installed
sudo apt install python3-neovim
Neovim has been added to a «Personal Package Archive» (PPA). This allows you to install it with apt-get. Follow the links to the PPAs to see which versions of Ubuntu are currently available via the PPA. Choose stable or unstable:
- https://launchpad.net/~neovim-ppa/+archive/ubuntu/stable
- https://launchpad.net/~neovim-ppa/+archive/ubuntu/unstable
Important: The Neovim team does not maintain the PPA packages. For problems or questions about the PPA specifically contact https://launchpad.net/~neovim-ppa.
To be able to use add-apt-repository you may need to install software-properties-common:
sudo apt-get install software-properties-common
If you’re using an older version Ubuntu you must use:
sudo apt-get install python-software-properties
Run the following commands:
sudo add-apt-repository ppa:neovim-ppa/stable
sudo apt-get update
sudo apt-get install neovim
Prerequisites for the Python modules:
sudo apt-get install python-dev python-pip python3-dev python3-pip
If you’re using an older version Ubuntu you must use:
sudo apt-get install python-dev python-pip python3-dev
sudo apt-get install python3-setuptools
sudo easy_install3 pip
For instructions to install the Python modules, see :help provider-python.
If you want to use Neovim for some (or all) of the editor alternatives, use the following commands:
sudo update-alternatives --install /usr/bin/vi vi /usr/bin/nvim 60
sudo update-alternatives --config vi
sudo update-alternatives --install /usr/bin/vim vim /usr/bin/nvim 60
sudo update-alternatives --config vim
sudo update-alternatives --install /usr/bin/editor editor /usr/bin/nvim 60
sudo update-alternatives --config editor
Note, however, that special interfaces, like view for nvim -R, are not supported. (See #1646 and #2008.)
Void-Linux
Neovim can be installed using the xbps package manager
sudo xbps-install -S neovim
Alpine Linux
Neovim can be installed using the apk package manager
BSD
FreeBSD
Neovim can be installed using pkg(8):
or from the ports tree:
cd /usr/ports/editors/neovim/ && make install clean
To install the pynvim Python modules using pkg(8) run:
OpenBSD
Neovim can be installed using pkg_add(1):
or from the ports tree:
cd /usr/ports/editors/neovim/ && make install
Android
Termux on the Google Play store offers a Neovim package.
Install from source
If a package is not provided for your platform, you can build Neovim from source. See Building-Neovim for details. If you have the prerequisites then building is easy:
make CMAKE_BUILD_TYPE=Release
sudo make install
For Unix-like systems this installs Neovim to /usr/local, while for Windows to C:\Program Files. Note, however, that this can complicate uninstallation. The following example avoids this by isolating an installation under $HOME/neovim:
rm -r build/  # clear the CMake cache
make CMAKE_EXTRA_FLAGS="-DCMAKE_INSTALL_PREFIX=$HOME/neovim"
make install
export PATH="$HOME/neovim/bin:$PATH"
Uninstall
There is a CMake target to uninstall after make install:
sudo cmake --build build/ --target uninstall
Alternatively, just delete the CMAKE_INSTALL_PREFIX artifacts:
sudo rm /usr/local/bin/nvim
sudo rm -r /usr/local/share/nvim/
Fast and reliable, Neovim (Nvim) is an excellent choice for those looking to make the switch from Vim. Compatible with most Vim plugins, including Ruby and Python plugins, Neovim seeks to refactor Vim aggressively.
In this tutorial, you will learn many ways to install Neovim on Windows and see how this powerful tool works.
Ready? Stay tuned and make your scripting more enjoyable with Neovim!
Prerequisites
This tutorial comprises hands-on demonstrations. To follow along, ensure you have the following in place:
- A computer running Windows 7 or later – This tutorial uses Windows 10.
- Chocolatey (Windows package manager) installed.
- A code editor – This tutorial uses Visual Studio Code (VS Code).
- You have Git installed on the system.
Installing Neovim via MSI
Even though Neovim is a cross-platform tool, it is not installed by default on your Windows system. The most recommended way to install on Windows is through its official release page on GitHub.
To download and install via MSI:
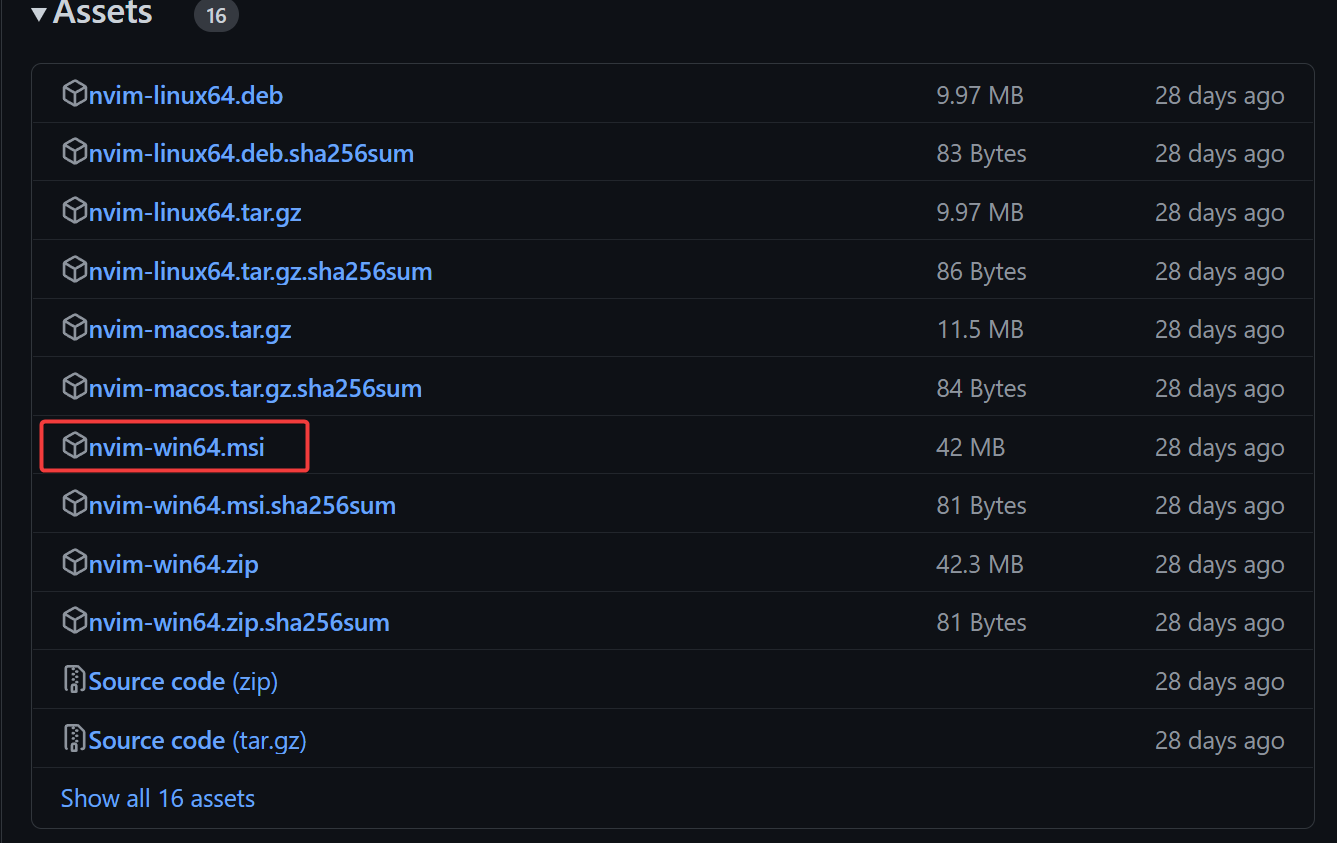
1. Open your favorite web browser, and visit the Neovim GitHub release page.
2. Next, scroll down to the Assets section, expand it, and click the nvim-win64.msi link to download the installer.
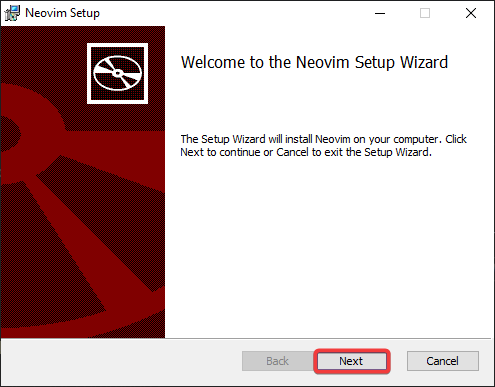
3. Once downloaded, double-click on the installer to launch the setup wizard.
4. Now, click Next on the welcome screen to continue.
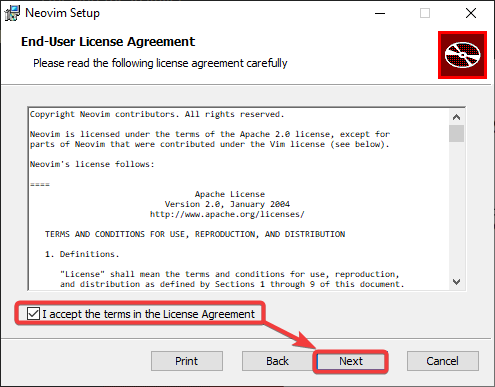
5. On the next screen, tick the checkbox at the bottom to agree to the End-User License Agreement (EULA), and click Next.
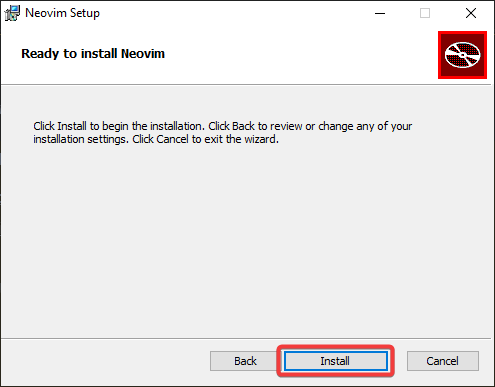
6. Next, click Change to choose a destination to install or keep the default, and click Next.

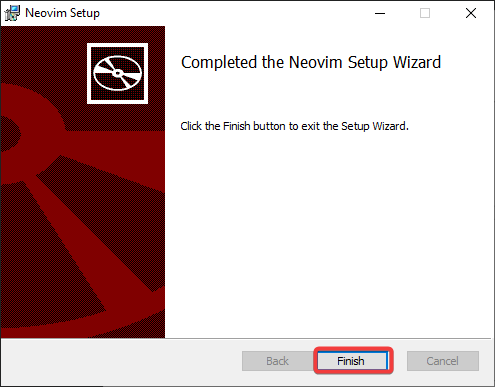
7. Click Install to start the installation process.

8. Click Finish once the installation completes, closing the setup wizard.
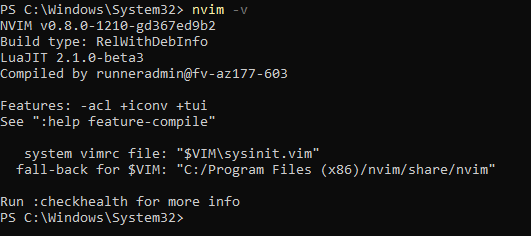
9. Lastly, open PowerShell as administrator and run the nvim command below to check the version installed on your computer.
The output below shows the installed Neovim version, which confirms that it has been successfully installed.
Installing Nvim Using Chocolatey
Installing Nvim with the MSI package works fine but completing the installation takes too much clicking. If you primarily work on a command-line environment, installing via chocolatey is also an option.
Chocolatey is a package manager for Windows that lets you quickly install software like Neovim. This package manager is similar apt on Linux or Homebrew on macOS.
Run the below choco command to install (neovim) and all dependencies required to run the tool.
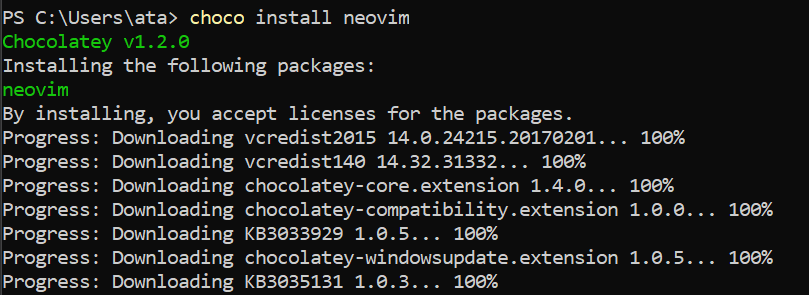
Once the installation completes, run the following nvim command to check the installed version (-v) of Neovim on your computer.
Below, you can see its version number and other information, which verifies the successful installation.

Installing Nvim Using Winget
Another tool you can use to install Neovim on Windows is Winget, a package manager for Windows created by Microsoft. Even though Winget is still in development, this tool is stable enough for everyday use.
To install using Winget, follow the steps below:
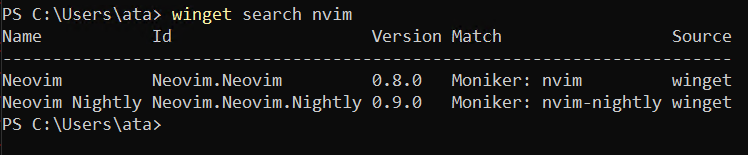
1. Run the below winget command to search for the nvim package.
Below, the first result is the latest stable release of Neovim, and the second is the latest nightly build. A nightly build is a version that contains the latest changes and features. This build is updated every day and is considered to be less stable than the latest stable release.
Take note of the version ID to install. In this example, you will install the latest stable release with an Id of Neovim.Neovim.
2. Next, run the below winget install command to install the latest stable version (Neovim.Neovim).
winget install Neovim.Neovim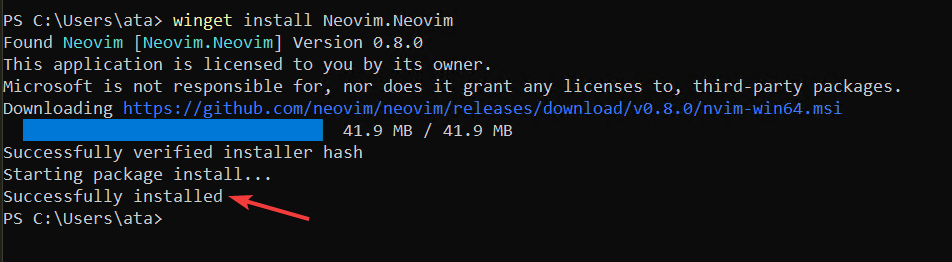
3. Finally, run the command to verify the installation.
Installing Nvim Using Scoop
Scoop is another package manager for Windows, similar to Chocolatey and Winget.
To install using Scoop:
1. Run the below scoop command to add the extras bucket.
A bucket in Scoop is a collection of packages, and the extras bucket contains packages that are not in the main buckets, including neovim-qt.

2. Next, run the below command to install the Microsoft Visual C++ Runtime (vcredist2022), a requirement for running Neovim.
scoop install vcredist2022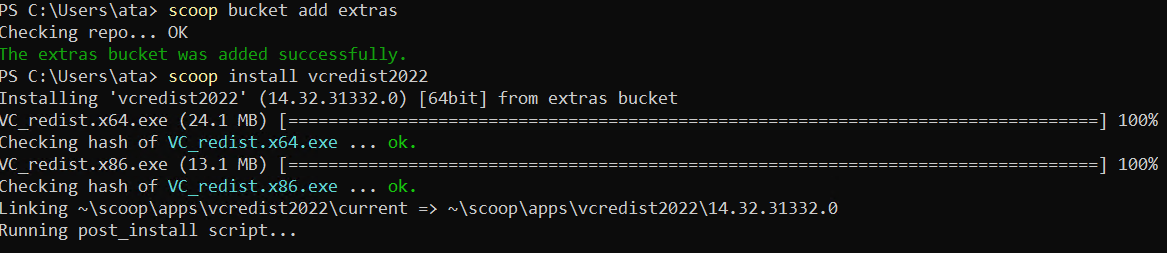
3. Once installed, run the below command to install the following:
neovim– Neovim’s latest stable release.neovim-qt– A GUI for Neovim based on Qt, a cross-platform application framework.
# Install Nvim
scoop install neovim
# Install Nvim's GUI
scoop install neovim-qt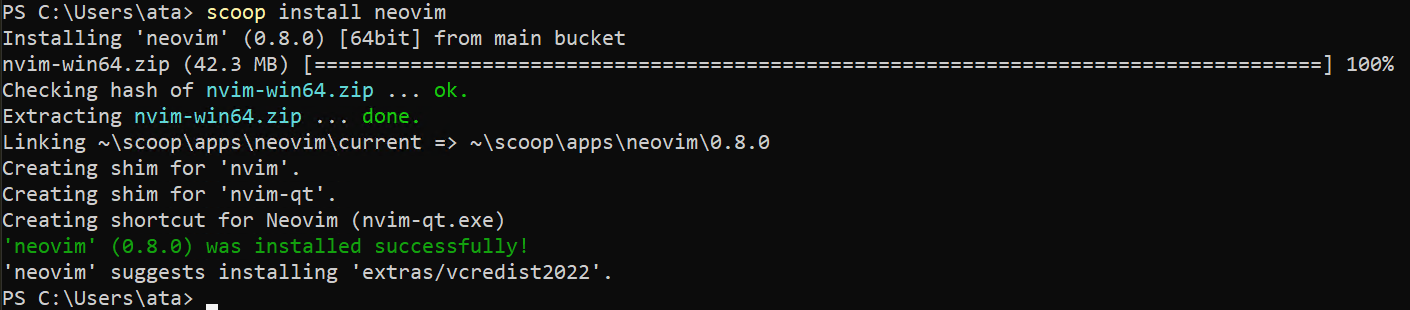
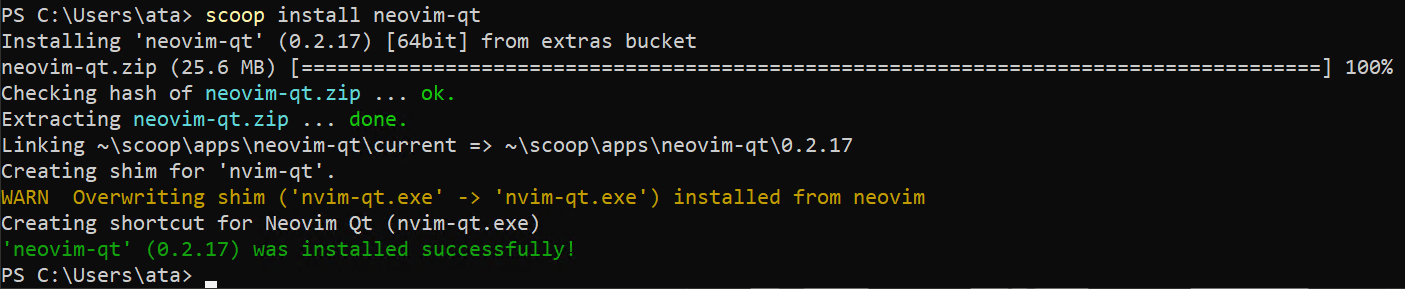
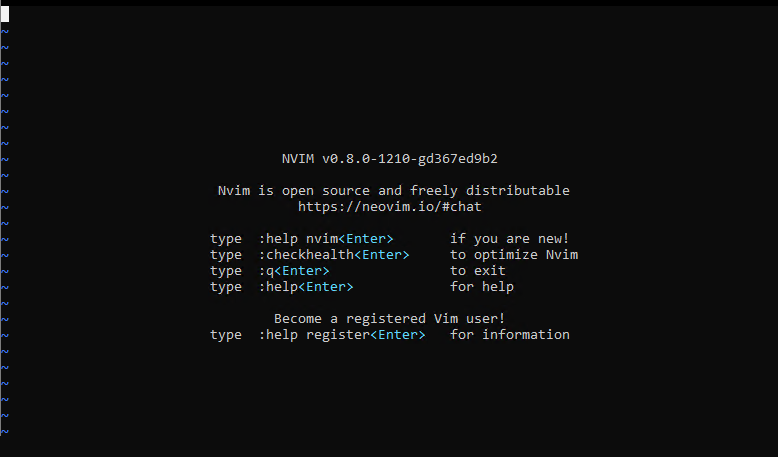
4. Finally, run the nvim command below to open.
The output below verifies that it has been successfully installed on your machine.

Opening Nvim to Edit Texts
Regardless of which method you used to install Nvim, you still have to test if the tool actually works.
To see Neovim in action, you will edit and save a text file:
1. Run the below command to open if you have already closed Neovim.
2. Next, run the :pwd command below to see your working directory. The colon (:) is the Nvim command character. Anything you type after the colon is interpreted as a Neovim command.
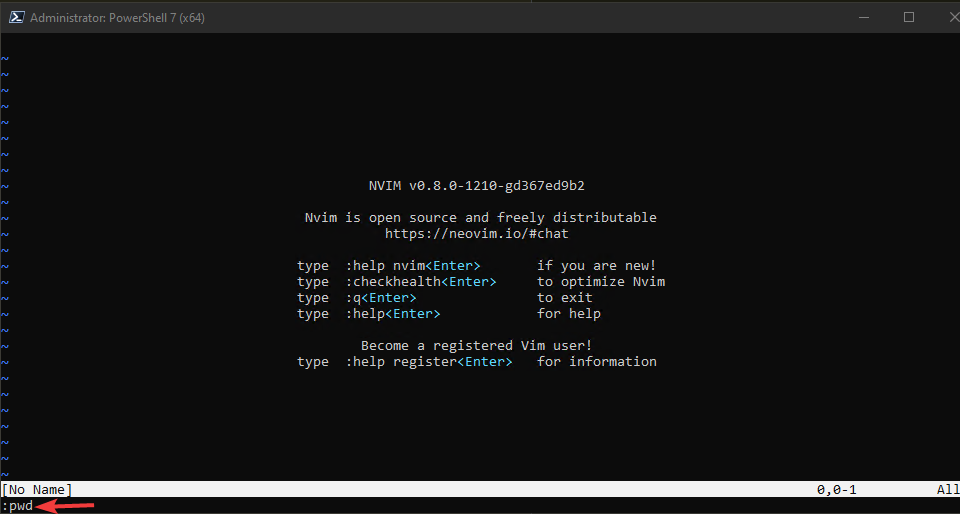
At the bottom of the PowerShell console, you will see something similar to the one below.
3. Run the below command to edit (:e) a text file, replacing nvim.txt with the name of any text file you want to edit.
4. Now, press the letter ‘I’ to enter the insert mode and type in something like Hello nvim.
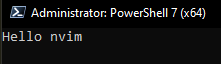
5. Press ESC and run the :x command, which does not provide output but saves the changes and closes the file.
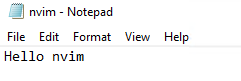
6. Lastly, navigate to the current directory(C:\Users\ata) in File Explorer and open the file in Notepad to see your changes to the text file, like in the screenshot below.
Configuring the vim-plug
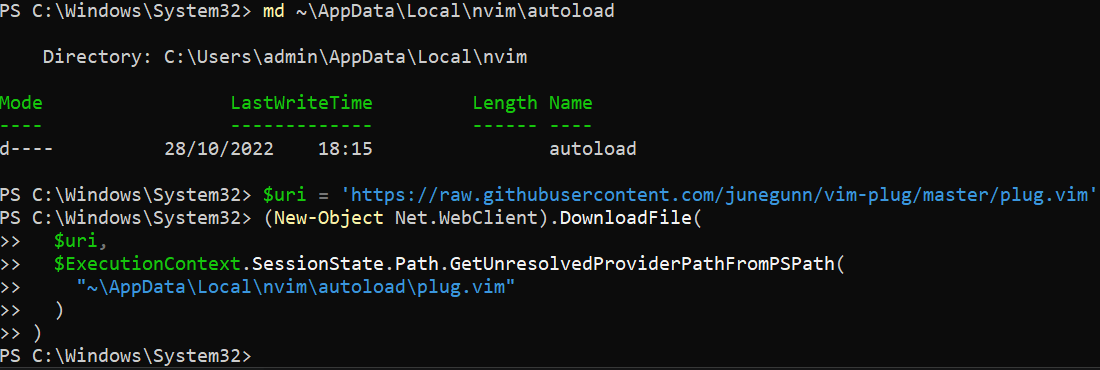
The installation would not be complete without configuring the vim-plug, a plugin manager for Vim and Neovim. Plugin managers ease the process of installing, updating, and removing plugins. And the vim-plug is one of the most popular plugin managers for Vim.
Run the following commands to create a new folder called autoload if it does not exist and download the plug.vim file into that folder. The plug.vim file contains the vim-plug source code
# Create a new folder called autoload
md ~\AppData\Local\nvim\autoload
# Downloads plug.vim file
$uri = 'https://raw.githubusercontent.com/junegunn/vim-plug/master/plug.vim'

(New-Object Net.WebClient).DownloadFile(
  $uri,
  $ExecutionContext.SessionState.Path.GetUnresolvedProviderPathFromPSPath(
    "~\AppData\Local\nvim\autoload\plug.vim"
  )
)
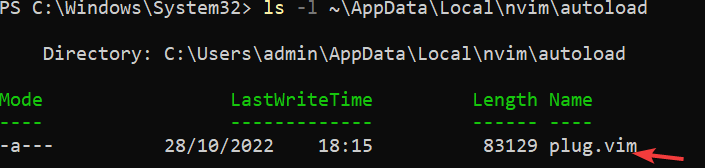
Now, run the below command to list (ls) all files and folders in *autoload* folder
ls -l ~\\AppData\\Local\\nvim\\autoloadThe output below verifies the plug.vim file was created successfully.
Installing a Plug-in with the vim-plug Manager
Now that you have vim-plug installed, it is time to see how it works by installing a plug-in. But which type of plug-ins can you install? In the context of text editors, a plugin is a piece of software that adds new features or functionality to the editor.
For example, some plugins function as follows:
- Add syntax highlighting for different programming languages.
- Add color schemes.
- Add keyboard shortcuts.
💡 There are thousands of Vim plugins available. Visit the GitHub repository for a list of popular Vim plugins.
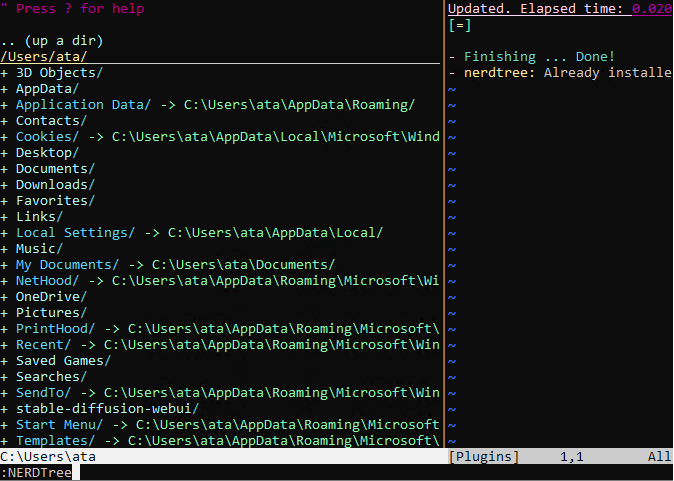
In this tutorial, you will install the NERDTree plugin, a file explorer plugin for Neovim. This plugin allows you to explore and manage your filesystem.
To install a plug-in:
1. Open File Explorer, and navigate to the C:\Users\%USERPROFILE%\AppData\Local\nvim folder. Replace %USERPROFILE% with your actual username.
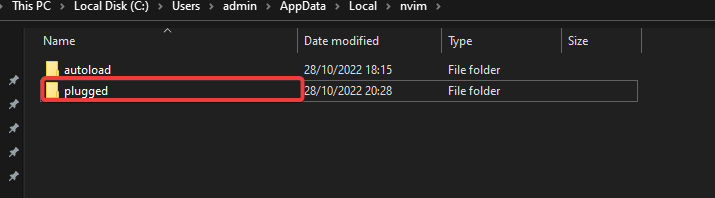
2. Next, create a new folder called plugged. This folder is where vim-plug will download and install plugins.
3. Run the below command to create a new file called init.vim using Neovim. This file will be the Neovim configuration file, similar to the .vimrc file in Vim, which tells Neovim which plugins to install.
:e C:\Users\%USERPROFILE%\AppData\Local\nvim\init.vim4. Press I to enter the insert mode, and add the code below. This code tells Neovim to install the nerdtree plugin from the official GitHub repository where:
plug#begin()– Tells vim-plug where to download and install plugins.plug#end()– Tells vim-plug to stop looking for plugins.
The lines between the functions are plugin declarations, and you can put many plugin declarations, each on its own line.
" Tells vim-plug where to install plugins.
call plug#begin('C:\Users\Your_Username\AppData\Local\nvim\plugged\')
" Tells vim-plug where to download plugins.
Plug Plug 'https://github.com/scrooloose/nerdtree'
" Tells vim-plug to stop looking for plugins.
call plug#end()
5. Press ESC and run :wq to save your changes and close the init.vim file.
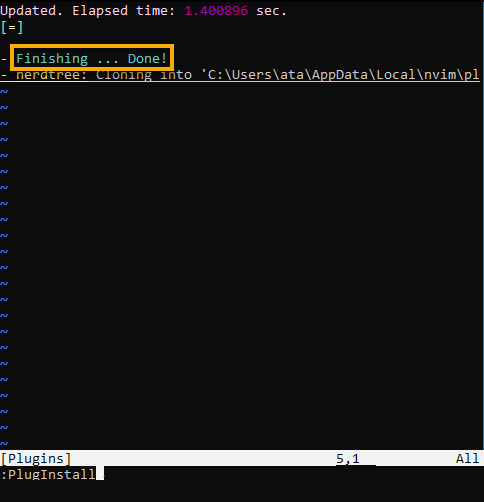
6. Now, run the below command to install any plug-in you specified in the init.vim file, which in this case, is the nerdtree plugin.
At this point, the NERDTree plugin is installed and ready to use.
7. Once installed, navigate to the C:\Users\%USERPROFILE%\AppData\Local\nvim\plugged\ folder, and you will see a new folder called nerdtree, as shown below. This folder is where vim-plug downloaded and installed the NERDTree plugin.

8. Finally, run the following command to access the NERDTree plugin.
Below, you can see the NERDTree opens a file explorer in a split window. Now, you can select files and folders with the basic keystrokes, like the arrow keys and the Enter key, to open them.
Conclusion
A fast and reliable text editor is an essential tool for any programmer. Vim is a popular text editor among developers but has a steep learning curve. Nvim, on the other hand, is a fork of Vim with many enhancements and improvements.
In this tutorial, you learned how to install Neovim on Windows to edit texts and installed the NERDTree plugin to manage your file system without switching between different windows.
Neovim has so much to offer. Why not learn more about using this powerful text editor? Perhaps start using syntax highlighting? Play with colors and enjoy coding with Nvim!
Hey fellow Devs, it’s Ritika here.
I recently tried out NeoVim on my PC to see what it’s like. Ever wanted to delete text between tags/braces, save files, switch to a certain line number in your code, undo, search for a word — all without having to touch your mouse? Try this fancy editor with me.
What is NeoVim?
Neovim is a GUI that can help us maintain and contribute more by dividing the work, which can be installed on any platform such as Linux, Windows or macOS. We can replacing the code editors which take up a lot of disk space by installing this effective refactored version of Vim.
Installing NeoVim on Windows 10 and adding it to system PATH variable
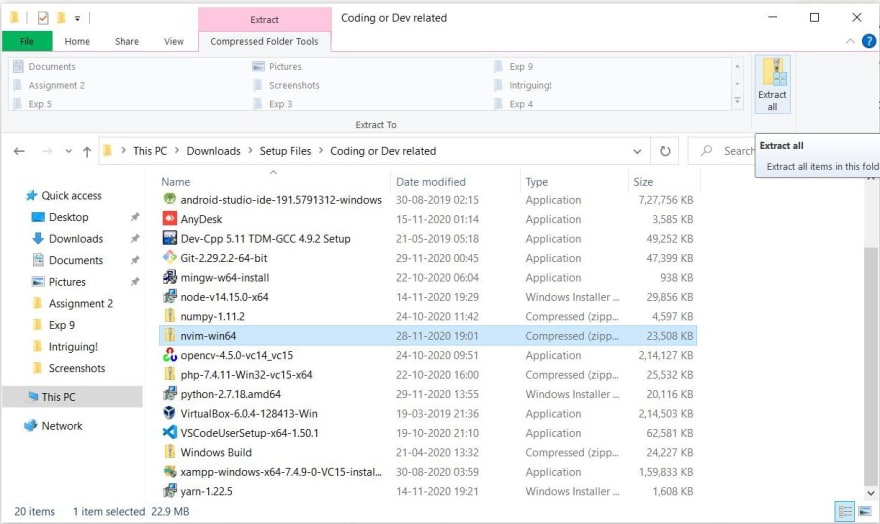
From NeoVim’s official repository on GitHub, download the zip file for Windows (64-bit) by clicking here or the zip file for Windows (32-bit) by clicking here, which is of size 23 MB approximately.
Then extract the zip file by clicking on it once and selecting “Extract All”.
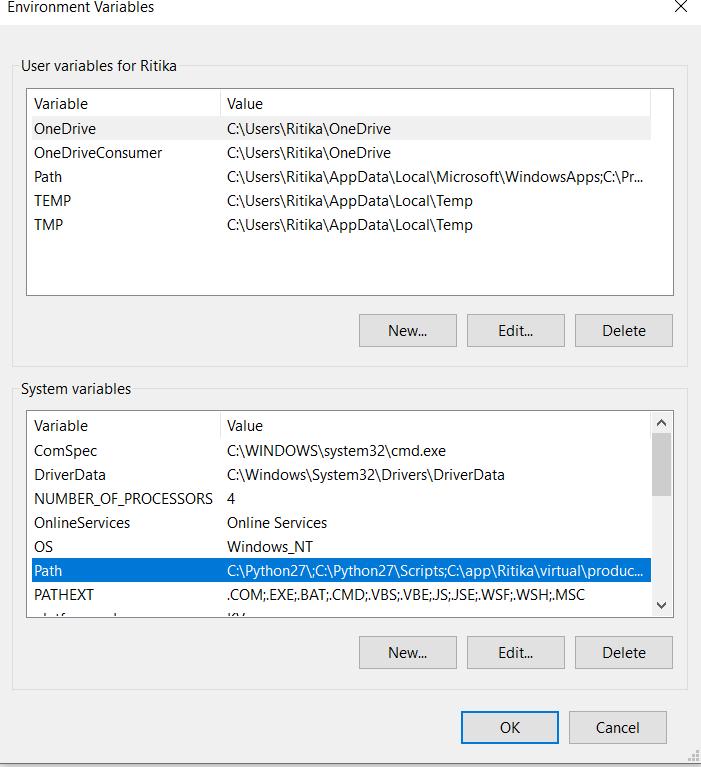
After the extraction is completed, copy the location of your extracted folder and add it to system PATH variable.

Right-click on This PC -> Properties -> Advanced system settings on left side of Control Panel -> Environment Variables -> Double-click on Path in System Variables pane -> Add New Path by pressing New and pasting the extracted folder’s location and Click OK on all the three windows simultaneously.


Now go to the extracted nvim-win64 and go into the nested folders Neovim -> bin. You’ll come across an application named nvim-qt.exe which is a GUI NeoVim client not to be confused with the terminal NeoVim — run it.

Neovim (nvim-qt) will open up like the following –
[Note:- The application may be slightly different due to plugins I’ve already installed, but similar dark background will appear with tilde in each line.]
Accessing nvim from anywhere, without opening nvim-qt.exe
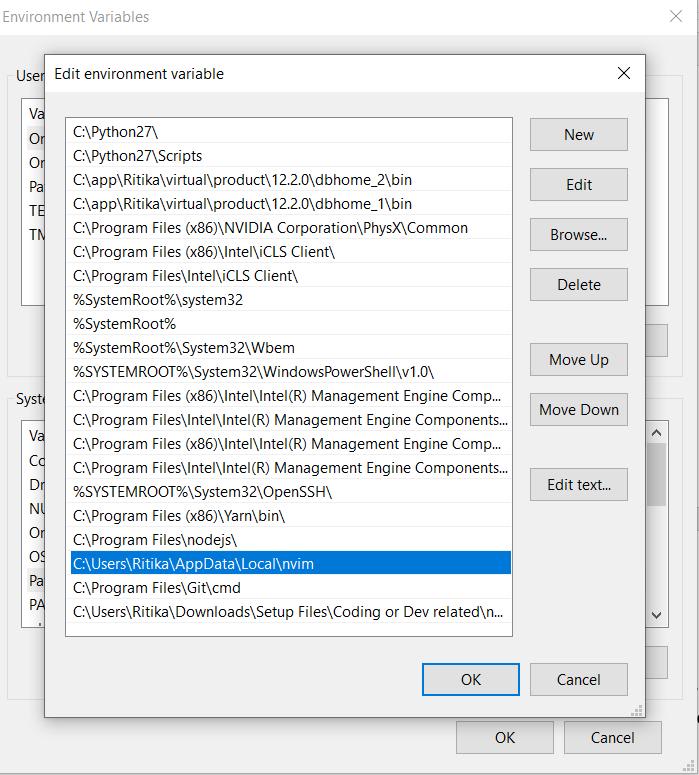
Remember how we just added the ~/AppData/Local/nvim folder to our system PATH? Click here to revisit the steps. This time we’ll add the bin folder nested in nvim-win64 extracted folder, whose path looks like ~/nvim-win64/Neovim/bin. This will make Neovim more user-friendly for us, as it displays more options like :help for a walkthrough, :checkhealth for optimization on startup.

Your path will look something like this. Copy it and repeat the steps of right-clicking This PC -> Properties -> Advanced System Settings -> Environment Variables -> System variables’ pane -> Double-click Path -> Paste the bin folder location in a new line -> Click some OKs!

There you go! You can now open Neovim by pressing Windows + R keys (shortcut for Run), typing nvim and clicking OK.

You can also open up Command Prompt, type nvim and press Enter for the same result.


It’ll open up like this in both cases :
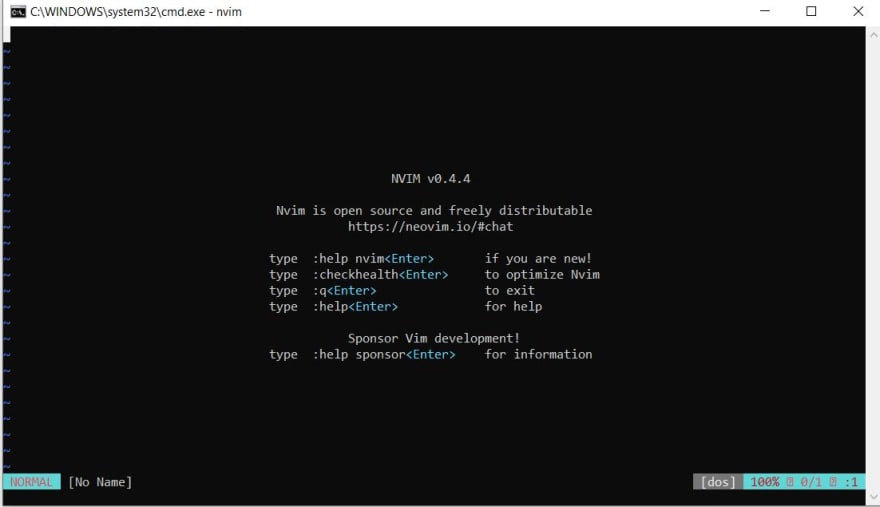
Boom! You have installed Neovim successfully. To exit Neovim for now, type :q and press Enter. The colon (:) takes Neovim into command mode, and q is for quit. If you want to have fun, let’s dive into configuring Neovim to make things more usable to you.
Configuring NeoVim – the easiest way
The Neovim configuration file is named init.vim which can be edited for our purpose. It is usually found under the directory ~/AppData/Local/nvim. In case you’re not sure about the exact location, open Neovim from nvim-qt.exe, type :echo stdpath(‘config’) in Neovim and press Enter.
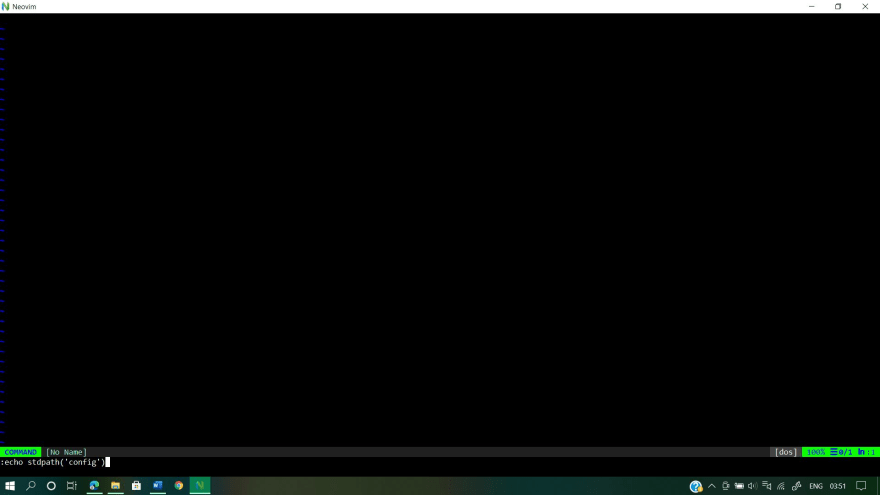
See? It echoes or displays the exact location of your nvim folder on the command line, if it exists.
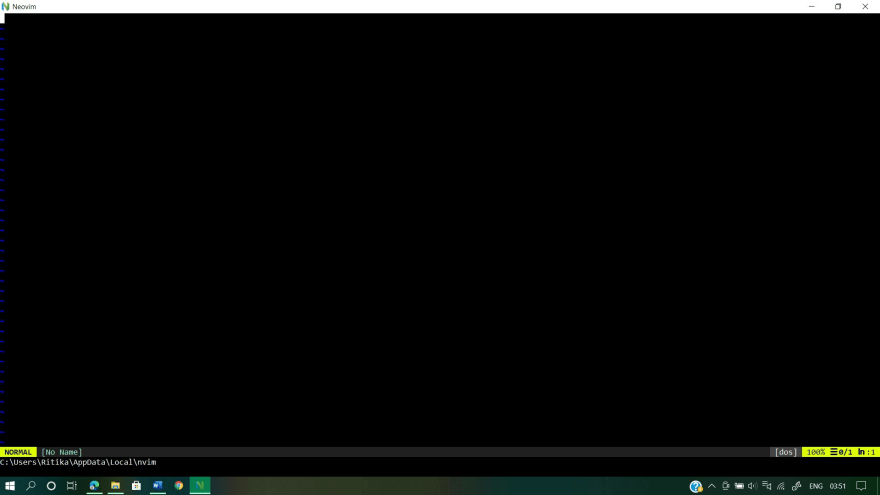
If not already present, we need to create the directory nvim within ~/AppData/Local i.e. we’ll put our init.vim file in ~/AppData/Local/nvim.
Note :- Don’t get confused between nvim and nvim-data folders. Keep nvim-data folder untouched, and only create a new nvim folder if it doesn’t exist.
The easiest way to do so is to open up a new .txt file inside ~/AppData/Local/nvim, add the first and last lines at least i.e.
call plug#begin('C:/Users/Ritika/AppData/Local/nvim/plugged')
call plug#end()
Enter fullscreen mode
Exit fullscreen mode
Now we’ll add vim-plug for managing the plugins we are going to use in Neovim. For this, enter the Plug lines within the previous two lines. You don’t need to add all the plugins listed below; instead choose some plugins from them like onedark, coc.nvim, vim-airline. If you want cool icons beside folders and files, you can use the command
Plug 'ryanoasis/vim-devicons'
Enter fullscreen mode
Exit fullscreen mode
although I haven’t used it in this installation.
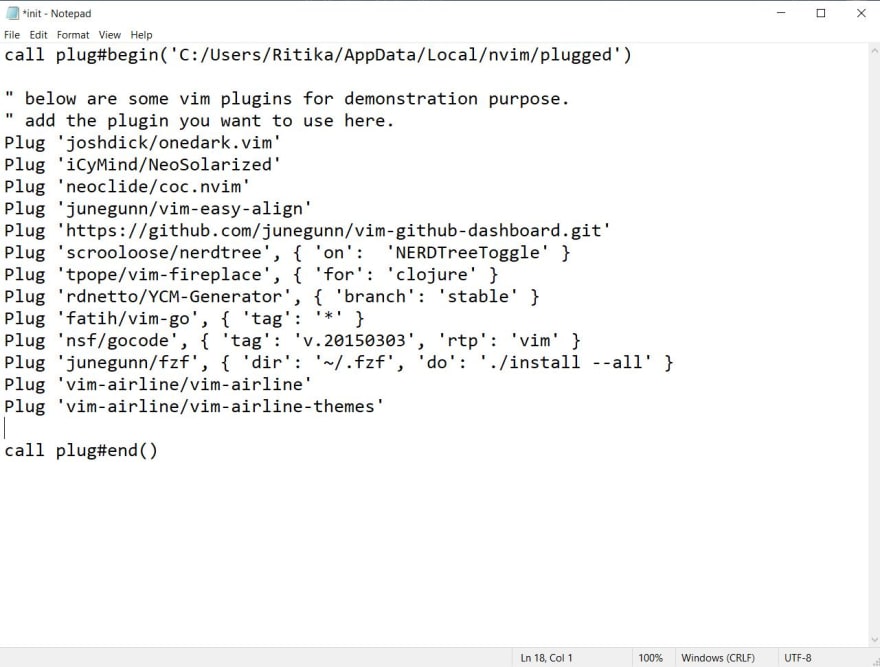
call plug#begin('C:/Users/Ritika/AppData/Local/nvim/plugged')
" below are some vim plugins for demonstration purpose.
" add the plugin you want to use here.
Plug 'joshdick/onedark.vim'
Plug 'iCyMind/NeoSolarized'
Plug 'neoclide/coc.nvim'
Plug 'junegunn/vim-easy-align'
Plug 'https://github.com/junegunn/vim-github-dashboard.git'
Plug 'scrooloose/nerdtree', { 'on':  'NERDTreeToggle' }
Plug 'tpope/vim-fireplace', { 'for': 'clojure' }
Plug 'rdnetto/YCM-Generator', { 'branch': 'stable' }
Plug 'fatih/vim-go', { 'tag': '*' }
Plug 'nsf/gocode', { 'tag': 'v.20150303', 'rtp': 'vim' }
Plug 'junegunn/fzf', { 'dir': '~/.fzf', 'do': './install --all' }
Plug 'vim-airline/vim-airline'
Plug 'vim-airline/vim-airline-themes'
call plug#end()
Enter fullscreen mode
Exit fullscreen mode
When you are happy with your list of plugins, save the init configuration file as All Files, and add the .vim extension after filename init. Delete the init.txt file previously saved.

Vim-plug
Vim-plug makes it easy to manage all your plugins on Neovim by downloading plugins into separate directories and loading them correctly. Open Windows PowerShell on your PC.

Then copy the following command, paste it into PowerShell prompt, and hit Enter to execute it.
md ~\AppData\Local\nvim\autoload
$uri = 'https://raw.githubusercontent.com/junegunn/vim-plug/master/plug.vim'
(New-Object Net.WebClient).DownloadFile(
  $uri,
  $ExecutionContext.SessionState.Path.GetUnresolvedProviderPathFromPSPath(
    "~\AppData\Local\nvim\autoload\plug.vim"
  )
)
Enter fullscreen mode
Exit fullscreen mode

I received the first error because I already have vim-plug installed with the same commands. You don’t have to worry about it. Go ahead and press Enter after you arrive at this.
This automatically creates a folder called autoload inside your ~/AppData/Local/nvim folder and a file called plug.vim inside the autoload folder after the aforementioned command execution.


If you made it till this far, you are ready to install some plugins using vim-plug!
Installing plugins using vim-plug
We included some Plug commands in our init.vim file to install a lot of plugins for Neovim. We can now install them into Neovim using vim-plug. Create a new folder called plugged inside the ~/AppData/Local/nvim as follows. This (plugged folder) is where all your plugins would get installed. Restart nvim if you already have it open.

Open nvim by Run command, type the command :PlugInstall into the Neovim window and press Enter. You’ll notice that all the plugins you desired to get into Neovim by writing those down into init.vim will now start to get installed one-by-one. It takes a few minutes to install new plugins.


You’ll receive a confirmation like this when Neovim is done installing the available plugins using vim-plug. To verify, check if we got any folders of our installed plugins inside plugged folder.

There they are!
You can delete, add new plugins, check status of installed plugins or update existing ones using commands like :PlugStatus for status check and :PlugUpdate for updating existing plugins. Always restart Neovim before you use any vim-plug commands like this, otherwise plugins may not get properly installed.

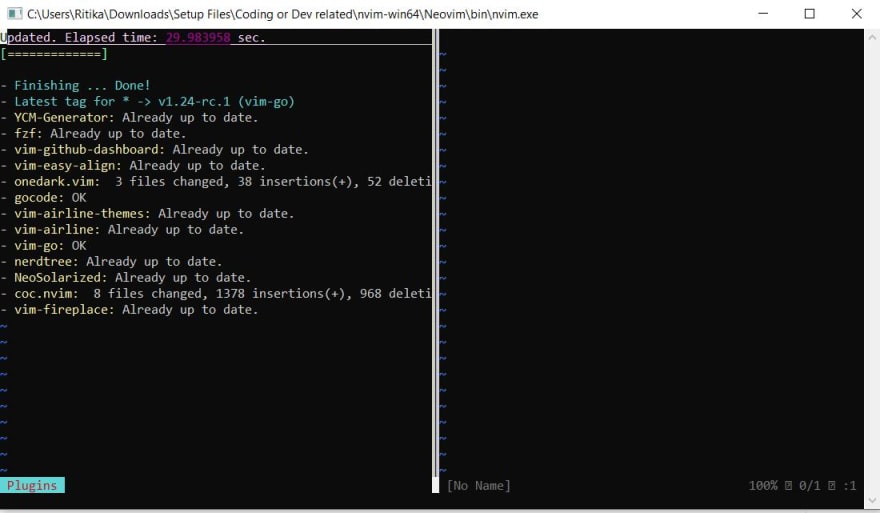
As in above, the plugins onedark.vim and coc.nvim got updated. You can use :PlugDiff command to examine the changes between the previous version of the plugin and the current update.

You successfully installed these plugins, updated them and compared the differences. If you are feeling adventurous, you can use :help vim-plug to find out more information about how you can use vim-plug to the fullest.
Setting up HTML, CSS, JSON, TypeScript extensions for Neovim using coc.vim
coc.vim is a plugin which can be installed using vim-plug, which helps us in editing generic web development or other language code in a lot of supported languages. Check if you have the coc.vim plugin already installed using :PlugStatus command.
Quick Tip :-
Instead of using certain apps to open .vim files and .json files for viewing contents, you can copy the exact location of the required file, paste it in any browser and hit Enter.

If not installed, open up init.vim for editing like before and include the following Vim command and save it as init.vim again.
Plug 'neoclide/coc.nvim', {'branch': 'release'}
Enter fullscreen mode
Exit fullscreen mode
Restart nvim, and install it using :PlugInstall. Then restart nvim again.
Type the command :checkhealth in Neovim and press Enter. It’ll show you if the coc service is already running. If yes, use :CocInfo for details on the service.

To install language extensions, we need to use :CocInstall lang1 lang2 lang3 format command.
We can include as many as we want, with at least one language. For example, if we want to install only the extension for TypeScript, we use
:CocInstall coc-tsserver
else if we want to install extensions for HTML, CSS and JSON all at one go, we use
:CocInstall coc-html coc-css coc-json
You’ll see a message saying it has been installed (here I only installed the one for HTML).

Uninstalling a coc extension
We use :CocUninstall command followed by the extension name to uninstall the particular extension. Example – to uninstall a previously installed CSS extension for coc, we use
:CocUninstall coc-css
Enter fullscreen mode
Exit fullscreen mode
Updating a coc extension
We use :CocUpdate command to update a coc extension.

It will update the available coc extensions.
Configuring coc-settings to support not implemented languages and checking existing coc extensions list
The list of all available coc-extensions are listed here.
You can quickly check all the installed extensions available to you by :CocList extensions command.

A plus (+) sign before the extension means that it is loaded. A minus (-) sign before it means that it has been disabled. An asterisk (*) sign indicates that it has been activated. A question (?) mark implies that it is an invalid extension. In the above example, coc-prettier has been activated and the rest have been loaded. Press Esc key to go back after you have checked your extensions.
To edit the configuration file for coc.vim, we use :CocConfig command, which opens up coc-settings.json for us to edit and add other languages. Delete all the pre-existing text using :%d command from Normal Mode to Command Mode, paste the following code into the editor by right-clicking into the empty file and save the configuration file coc-settings.json using :w command.
{
  "suggest.noselect": false,
  "eslint.nodePath": "/home/user/.config/yarn/global/node_modules",
  "coc.preferences.formatOnSaveFiletypes": [
    "javascript",
    "typescript",
    "typescriptreact",
    "json",
    "javascriptreact",
    "typescript.tsx",
    "graphql",
    "html"
  ]
}
Enter fullscreen mode
Exit fullscreen mode

Use keys h, j, k and l to navigate left, down, up and right respectively on the file to be edited in Normal Mode, and press i to Insert. Press Esc key to go back to Normal Mode from Insert Mode. In the coc.preferences.formatOnSaveFiletypes array, type in your preferred languages as array elements within double quotation marks such as “html”, and remove any if not required. Save the file again using :w command.
Did you find this useful? Or did you get stuck somewhere in the middle? Comment below to let me know 
You can install Neovim from download, package, or source in just a few seconds.
- To start Neovim, run
nvim(notneovim). - Before upgrading to a new version, check Following HEAD.
- For config (vimrc) see the FAQ.
Install from download
Downloads are available on the Releases page.
- Latest stable release
- Latest development prerelease
Install from package
Packages are listed below. (You can also build Neovim from source.)
Windows
Chocolatey
- Release (v0.3):
choco install neovim(use -y for automatically skipping confirmation messages) - Development (pre-release):
choco install neovim --pre
Scoop
- Release:
scoop install neovim - Development (pre-release):
scoop bucket add versions
scoop install neovim-nightly
Pre-built archives
- If you are missing
VCRUNTIME140.dll, install the Visual Studio 2015 C++ redistributable (choose x86_64 or x86 depending on your system). - Choose a package (nvim-winXX.zip) from the releases page.
- Unzip the package. Any location is fine, administrator privileges are not required.
$VIMRUNTIMEwill be set to that location automatically.
- Double-click
nvim-qt.exe.
Optional steps:
- Add the
binfolder (e.g.C:\Program Files\nvim\bin) to your PATH.- This makes it easy to run
nvimandnvim-qtfrom anywhere.
- This makes it easy to run
- If
:set spelldoes not work, create theC:/Users/foo/AppData/Local/nvim/site/spellfolder.
You can then copy your spell files over (for English, located
here and
here); - For Python plugins you need the
pynvimmodule. «Virtual envs» are recommended. After activating the virtual env dopip install pynvim(in both). Edit yourinit.vimso that it contains the path to the env’s Python executable:let g:python3_host_prog='C:/Users/foo/Envs/neovim3/Scripts/python.exe' let g:python_host_prog='C:/Users/foo/Envs/neovim/Scripts/python.exe'
- Run
:checkhealthand read:help provider-python.
- Run
- init.vim («vimrc»): If you already have Vim installed you can copy
%userprofile%\_vimrcto%userprofile%\AppData\Local\nvim\init.vimto use your Vim config with Neovim.
macOS / OS X
Pre-built archives
The Releases page provides pre-built binaries for macOS 10.11+.
curl -LO https://github.com/neovim/neovim/releases/download/nightly/nvim-macos.tar.gz
tar xzf nvim-macos.tar.gz
./nvim-osx64/bin/nvim
Homebrew (macOS) / Linuxbrew (Linux)
brew install neovim
Or install the development version of Nvim:
brew install --HEAD neovim
Macports
sudo port selfupdate
sudo port install neovim
Linux
AppImage («universal» Linux package)
The Releases page provides an AppImage that runs on most Linux systems. No installation is needed, just download nvim.appimage and run it. (It might not work if your Linux distribution is more than 4 years old.)
curl -LO https://github.com/neovim/neovim/releases/download/stable/nvim.appimage
chmod u+x nvim.appimage
./nvim.appimage
Arch Linux
Neovim can be installed from the community repository:
sudo pacman -S neovim
Alternatively, Neovim can be also installed using the PKGBUILD neovim-git, available on the AUR.
Alternatively, Neovim Nightly builds can be also installed using the PKGBUILD neovim-nightly, available on the AUR.
The Python module is available from the community repository:
sudo pacman -S python-pynvim
Python 2 and Ruby modules (currently only supported in neovim-git) are available from the AUR as python2-neovim and ruby-neovim respectively.
CentOS 7 / RHEL 7
Neovim is available through EPEL (Extra Packages for Enterprise Linux)
yum install -y https://dl.fedoraproject.org/pub/epel/epel-release-latest-7.noarch.rpm
yum install -y neovim python3-neovim
# you might need python2-neovim as well on older Fedora releases
Clear Linux OS
NeoVim is available through the neovim bundle
sudo swupd bundle-add neovim
Python (:python) support is available if the python-basic bundle is installed.
sudo swupd bundle-add python-basic
CRUX
A CRUX port is available under 6c37/neovim, along with ports for other dependencies of Neovim.
For instructions on how to install the Python modules, see [:help provider-python].
Debian
Neovim is in Debian.
sudo apt-get install neovim
Python (:python) support is installable via the package manager on Debian unstable.
sudo apt-get install python-neovim
sudo apt-get install python3-neovim
Exherbo Linux
Exhereses for scm and released versions are currently available in repository ::medvid. Python client (with GTK+ GUI included) and Qt5 GUI are also available as suggestions:
cave resolve app-editors/neovim --take dev-python/neovim-python --take app-editors/neovim-qt
Fedora
Neovim is in Fedora starting with Fedora 25:
dnf install -y neovim python{2,3}-neovim
You can also get nightly builds of git master from the Copr automated build system:
dnf copr enable agriffis/neovim-nightly
dnf install -y neovim python{2,3}-neovim
See the blog post for information on how these are built.
Flatpak
You can find Neovim on Flathub. Providing you have Flatpak set up:
flatpak install flathub io.neovim.nvim
flatpak run io.neovim.nvim
You can add /var/lib/flatpak/exports/bin (or ~/.local/share/flatpak/exports/bin if you used --user) to the $PATH and run it with io.neovim.nvim.
Note that Flatpak’ed Neovim will look for init.vim in ~/.var/app/io.neovim.nvim/config/nvim instead of ~/.config/nvim.
Gentoo Linux
An ebuild is available in Gentoo’s official portage repository:
emerge -a app-editors/neovim
GNU Guix
Neovim can be installed with:
guix install neovim
Nix / NixOS
Neovim can be installed with:
nix-env -iA nixpkgs.neovim
To install the Python modules:
nix-env -iA nixpkgs.python3Packages.pynvim
Replace python3 with python2 for the python 2 packages.
Mageia 7
urpmi neovim
To install the Python modules:
urpmi python2-pynvim python3-pynvim
OpenSUSE
Neovim can be installed with:
sudo zypper in neovim
To install the Python modules:
sudo zypper in python-neovim python3-neovim
PLD Linux
Neovim is in PLD Linux:
poldek -u neovim
poldek -u python-neovim python3-neovim
poldek -u python-neovim-gui python3-neovim-gui
Slackware
See neovim on SlackBuilds.
For instructions on how to install the Python modules, see [:help provider-python].
Source Mage
Neovim can be installed using the Sorcery package manager:
cast neovim
Solus
Neovim can be installed using the default package manager in Solus (eopkg):
sudo eopkg install neovim
Snap
Neovim nightly and stable are available on the snap store.
Stable Builds
sudo snap install --candidate nvim --classic
Nightly Builds
sudo snap install --edge nvim --classic
Ubuntu
Since 18.04
As in Debian, Neovim is in Ubuntu.
sudo apt install neovim
Python (:python) support seems to be automatically installed
sudo apt install python-neovim
sudo apt install python3-neovim
Before 18.04
Neovim has been added to a «Personal Package Archive» (PPA). This allows you to install it with apt-get. Follow the links to the PPAs to see which versions of Ubuntu are currently available via the PPA. Choose stable or unstable:
- https://launchpad.net/~neovim-ppa/+archive/ubuntu/stable (Xenial 16.04 or newer only).
- https://launchpad.net/~neovim-ppa/+archive/ubuntu/unstable
To be able to use add-apt-repository you may need to install software-properties-common:
sudo apt-get install software-properties-common
If you’re using an older version Ubuntu you must use:
sudo apt-get install python-software-properties
Run the following commands:
sudo add-apt-repository ppa:neovim-ppa/stable
sudo apt-get update
sudo apt-get install neovim
Prerequisites for the Python modules:
sudo apt-get install python-dev python-pip python3-dev python3-pip
If you’re using an older version Ubuntu you must use:
sudo apt-get install python-dev python-pip python3-dev
sudo apt-get install python3-setuptools
sudo easy_install3 pip
For instructions to install the Python modules, see [:help provider-python].
If you want to use Neovim for some (or all) of the editor alternatives, use the following commands:
sudo update-alternatives --install /usr/bin/vi vi /usr/bin/nvim 60
sudo update-alternatives --config vi
sudo update-alternatives --install /usr/bin/vim vim /usr/bin/nvim 60
sudo update-alternatives --config vim
sudo update-alternatives --install /usr/bin/editor editor /usr/bin/nvim 60
sudo update-alternatives --config editor
Note, however, that special interfaces, like view for nvim -R, are not supported. (See #1646 and #2008.)
Void-Linux
Neovim can be installed using the xbps package manager
sudo xbps-install -S neovim
BSD
FreeBSD
Neovim can be installed using pkg(8):
pkg install neovim
or from the ports tree:
cd /usr/ports/editors/neovim/ && make install clean
To install the pynvim Python modules using pkg(8) run:
pkg install py27-pynvim py36-pynvim
OpenBSD
Neovim can be installed using pkg_add(1):
pkg_add neovim
or from the ports tree:
cd /usr/ports/editors/neovim/ && make install
Android
Termux on the Google Play store offers a Neovim package.
Install from source
If a package is not provided for your platform, you can build Neovim from source. See Building-Neovim for details. If you have the prerequisites then building is easy:
make CMAKE_BUILD_TYPE=Release
sudo make install
For Unix-like systems this installs Neovim to /usr/local, while for Windows to C:\Program Files. Note, however, that this can complicate uninstallation. The following example avoids this by isolating an installation under $HOME/neovim:
rm -r build/  # clear the CMake cache
make CMAKE_EXTRA_FLAGS="-DCMAKE_INSTALL_PREFIX=$HOME/neovim"
make install
export PATH="$HOME/neovim/bin:$PATH"
Uninstall
To uninstall after make install, just delete the CMAKE_INSTALL_PREFIX artifacts:
sudo rm /usr/local/bin/nvim
sudo rm -r /usr/local/share/nvim/

Запись от Panda58dev размещена 16.05.2021 в 19:16
Обновил(-а) Panda58dev 21.05.2021 в 10:19
И так, я не буду писать, какой
NeoVim классный редактор, чем он круче других и даже не буду писать про его различия с Vim, если Вас интересует это — Вы не по адресу ")
Почему на
windows? Да потому что полноценных гайдов по установке на Для начала, если Вам вздумалось кодить
NeoVim, то его надо установить. Установку можно провести двумя способами:
- Скачать архив с программой и распакавать его у себя на машине;
- Поставить через пакетный менеджер
choco.
Лично я придерживаюсь второго варианта, т.к. choco поставит все нужные зависимости. Если с первым вариантом всё понятно, то для второго нужно скачать сам пакетник. Заходим на сайт choco, смотрим на пункт «step2», открываем PowerShell (если Вы не умеете это делать, то затея с NeoVim хорошим не кончится), пишем туда Get-ExecutionPolicy, что бы можно было запускать скрипты без всяких подписей (либо можно в параметрах windows активировать режим разработчика), далее копируем строку ниже:
| PowerShell | ||
|
Вставляем в открытый PowerShell жмём «Enter» и ждём пока установится (обычно не больше 30-ти секунд).
Поздравляю — пакетный менеджер установлен!Установка NeoVim через choco
В PowerShell вставляем строку:
| PowerShell | ||
|
Во время установки у Вас будут спрашивать, надо ли исполнять тот или иной скрипт. Можно на каждый писать Y (исполнить), но можно сразу ответить A (исполнить все).
Кроме NeoVim будут устанавливаться и некоторые другие желательные компоненты, поэтому, после окончания установки Вас попросят как можно быстрее перезагрузить компьютер. Советую так и поступить. #Если надо использовать NeoVim из консоли:
Кликните здесь для просмотра всего текста
Теперь, если Вы ставили редактор, через choko, то можете запускать NeoVim из cmd/PowerShell (nvim — запуск в открытой консоли, nvim-qt — запуск в отдельном окне). Иначе, если Вы ставили через архив, то вам надо добавить папку C:\(путь до папки)\bin\ в переменную среду Path. На эту тему в интернете есть много подробных статей, так что проблем быть не должно. Уже добавили? Значит Вы молодец и можете использовать NeoVim из cmd/PowerShell.
Установка менеджера плагинов
Менеджеров плагинов несколько, но мы будем придерживаться классики и ставить будем Plug.
Тут всё просто, заходим на страницу в GitHub, смотрим метод установки на шинду windows, открываем любимый PowerShell и вставляем в него:
| PowerShell | ||
|
(Почему то при копировании с GitHub строки вводились в обратном порядке и из-за этого скрипт не работал, советую перепроверить вставку)
Теперь, если всё хорошо — осталось накачать NeoVim плагинами.
Установка плагинов для NeoVim
(Должен предупредить что конфигурация и плагины сделаны для удобного написания кода на PHP, для других ЯП-ов мой конфиг может быть бесполезным)
Для начала переходим в каталог C:\Users\(имя вашего пользователя)\AppData\Local\, создаём там директорию nvim, в неё помещаем файл init.vim
…
Что за файл init.vim? Это файл конфигурации, в нём содержится большая часть конфигурации редактора. Конкретно нам нужна конфигурация менеджера плагинов. Установка пакета в vim/neovim происходит не как в привычных Sublime Text и VS code, то бишь командами. В суровом редакторе линуксоидов, плагины, которые вы хотите установить, надо записывать в файл конфигурации. Скачиваем архив с шрифтом «Hack» для нормального отображения интерфейса Вложение 6972 (конкретно нам нужна поддержка Nerd). В интернете полно статей по редактированию init.vim, так что я просто покажу свою конфигурацию:
WARNING Данная конфигурация не полноценна, советую использовать init.vim из продолжения.
Код:
call plug#begin('~/AppData/Local/nvim/plugged')
"Начало списка пакетов

"Утилиты
Plug 'preservim/nerdtree'
Plug 'jlanzarotta/bufexplorer'
Plug 'tpope/vim-fugitive'

"Дизайн
Plug 'vim-airline/vim-airline'
Plug 'vim-airline/vim-airline-themes'"
Plug 'tomasr/molokai'
Plug 'ryanoasis/vim-devicons'

"Подстановка
Plug 'neoclide/coc.nvim', {'branch': 'release'}
Plug 'StanAngeloff/php.vim'
Plug 'mattn/emmet-vim'

"Конец списка
call plug#end()

set encoding=utf-8
syntax enable "Включает подсветку синтаксиса
colorscheme molokai

"Включение подсказок
let g:deoplete#enable_at_startup = 1

let g:airline_theme='simple' " Тема airline
let g:airline_powerline_fonts = 1
let g:airline#extensions#keymap#enabled = 0 "Не показывать текущий маппинг
let g:airline_section_z = "\ue0a1:%l/%L Col:%c" "Кастомная графа положения курсора
let g:Powerline_symbols='unicode' "Поддержка unicode

" Делаем так, чтобы навигация работала на русском языке
nmap о j
nmap л k
nmap р h
nmap д l
nmap ш i
nmap ф a
nmap в d

nmap Ж :
nmap ц w
nmap й q
nmap м v
nmap ы s

" Отмена действия
inoremap <C-z> <ESC>:u<Return>a
" Комментирование
inoremap <C-/> /**<Return><Space><Return>/<Esc>"ka
" Сохранение
inoremap <C-s> <ESC>:w<Return>
" Вставка
inoremap <C-v> <ESC>"+Pa
" Копирование
inoremap <C-c> <ESC>"+Ya


set noshowmode " --INSERT-- не мозолит глаза
set guifont=Hack:h15 " Настройка шрифтов
set number " Нумерация строк
set wrap linebreak nolist " Перенос строки при переполнении окна
set cursorline " Подсветка строки с куросом

set keymap=russian-jcukenwin
"Язык ввода при старте Вима - Английский
set iminsert=0
""Аналогично настраивается режим поиска
set imsearch=0

"Табуляция
"При нажатии Tab вставляется 4 пробела
set tabstop=4
set expandtab
set shiftwidth=4
set smarttab
set smartindent

" В нормальном режиме Ctrl+n вызывает :NERDTree
nmap <C-n> :NERDTreeToggle<CR>
vmap ++ <plug>NERDCommenterToggle
nmap ++ <plug>NERDCommenterToggl
let g:NERDTreeGitStatusWithFlags = 1
let g:NERDTreeIgnore = ['^node_modules$']

" Перемещение по буферам
nmap <C-F5> <Esc>:BufExplorer<cr>
vmap <C-F5> <esc>:BufExplorer<cr>
imap <C-F5> <esc>:BufExplorer<cr>

" F6 - предыдущий буфер
nmap <C-F6> :bp<cr>
vmap <C-F6> <esc>:bp<cr>i
imap <C-F6> <esc>:bp<cr>i

" F7 - следующий буфер
nmap <C-F7> :bn<cr>
vmap <C-F7> <esc>:bn<cr>i
imap <C-F7> <esc>:bn<cr>i
Комментирование у меня ужасное, но опять же — все непонятное можно найти в интернете или спросить на форуме
Должен предупредить, что хоткеи по типу вставка/сохранение/отмена действия и т.д. будут работать только в режиме вставки текста.
Запускаем NeoVim или перезапускаем, если уже был запущен. В нормальном режиме вводим :PlugInstall, должен разделиться экран и начаться процесс установки. Перезапускаем редактор.

Казалось бы, вот и всё, бери и пользуйся! Но нет, нам надо ещё настроить COC.
Настройка/Установка плагинов COC
COC нам нужен для показа ошибок в коде, продвинутых подсказок и т.п.
Сначала нам надо установить node.js, иначе coc не будет работать. Сделать это довольно просто: переходим на страницу загрузки node, выбираем нужную нам версию, скачиваем, устанавливаем (может потребоваться перезагрузка). Либо можете попробовать поставить его через choco.
Перезапускаем редактор, в нормальном режиме вводим :CocInstall coc-phpls. Установилось? Теперь пишем :CocInstall coc-json, :CocInstall coc-html.
Заключение
В итоге мы получаем быстрый и удобный редактор с подстветкой синтаксиса, показом ошибок, небольшим файловым менеджером, интегрированным git и ещё многими плюшками. Если использовать полученный NeoVim в связке с xdebug, то можно получить полноценную IDE