Обновления для операционной системы Windows выпускаются в виде файлов с расширением MSU или CAB. Если на компьютере не работает (отключена) служба Windows Update (Центр обновления Windows), вы можете скачать и установить накопительные обновления или обновления безопасности Windows вручную. В этой статье мы покажем, как скачать и установить в Windows обновления в формате MSU и CAB файлов.
Содержание:
- Как вручную скачать MSU файлы обновлений для Windows?
- Установка обновлений из MSU файлов в Windows
- Как извлечь CAB файл из MSU обновления?
- Установка CAB файла обновлений в Windows 10/11
- Установка CAB и MSU обновления с помощью скриптов
Как вручную скачать MSU файлы обновлений для Windows?
Microsoft выпускает обновления и патчи в формате CAB файла. Именно в таком виде ваш компьютер получает обновления с серверов обновлений Microsoft или локального сервера WSUS. Для более удобного ручного распространения отдельных обновлений клиентами через каталог обновлений Microsoft, такие CAB файлы упаковываются в специальный формат MSU (Microsoft Update Standalone Package).
Вы можете скачать MSU файлы обновлений Windows (а в некоторых случаях и CAB) и других продуктов MSFT можно в каталоге обновлений Microsoft (https://www.catalog.update.microsoft.com/). Перейдите в Microsoft Update Catalog, найдите и скачайте нужное обновление. К примеру, я хочу установить обновление стека 2022-05 Servicing Stack Update for Windows 10 Version 21H2 for x64-based Systems (KB5014032). Нажмите на кнопку Download.
Переместите скачанный файл ssu-19041.1704-x64_70e350118b85fdae082ab7fde8165a947341ba1a.msu в каталог C:\temp. Переименуйте файл на более короткое имя — windows10-21h2-kb5014032.msu.
Установка обновлений из MSU файлов в Windows
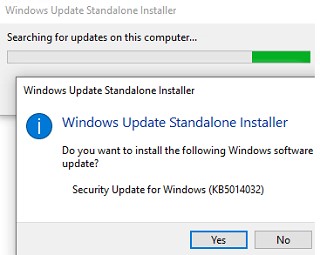
Для запуска установки пакета обновления в Windows достаточно дважды щёлкнуть по скачанному MSU файлу. Если обновление применимо к данному компьютеру, откроется диалоговое окно Автономного установщика обновлений Windows (Windows Update Standalone Installer), в котором нужно подтвердить установку апдейта.
При установке MSU обновления может появится ошибка “Обновление неприменимо к этому компьютеру”. Причины этой ошибки подробно разобраны в статье по ссылке.
Также вы можете установить msu пакет обновления из командной строки с помощью утилиты wusa.exe.
Для установки обновления в «тихом» режиме (пользователю не будут показываться никакие всплывающие окна) с отложенной перезагрузкой, откройте командную строку с правами администратора и выполните команду:
wusa.exe c:\Temp\windows10-21h2-kb5014032.msu /quiet /norestart
Через некоторое время проверьте, что обновление успешно установлено:
wmic qfe list | findstr 5014032
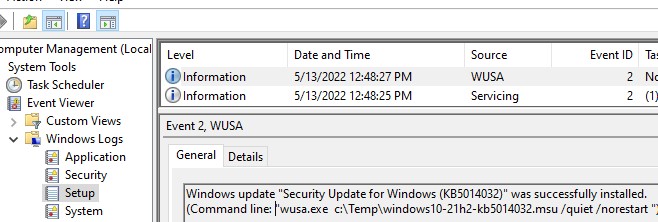
Или найдя в журнале событий Установка (Event Viewer -> Windows Logs -> Setup) запись с Event ID 2 от источника WUSA с текстом:
Windows update "Security Update for Windows (KB5014032)" was successfully installed. (Command line: "wusa.exe c:\Temp\windows10-21h2-kb5014032.msu /quiet /norestart ")
Обновление Windows "Security Update for Windows (KB5014032)" было успешно установлено. (Командная строка: C:\Windows\system32\wusa.exe c:\Temp\windows10-21h2-kb5014032.msu /quiet /norestart)
Обратите внимание, что установка обновлений в msu формате в Windows через wusa.exe выполняется медленнее, чем при установке того же обновления в виде cab файла. Причина в выполнении дополнительного сканирования на серверах Windows Update/WSUS. См статью о медленной установке msu обновлений.
Как извлечь CAB файл из MSU обновления?
Если служба Windows Update (wuausrv) работает некорректно, вы не сможете установить обновление из MSU файла. В этом случае можно вручную распаковать пакет MSU, извлечь из него CAB файл обновления и вручную установить его в Windows.
Чтобы распаковать MSU пакет в каталог C:\Temp\kb4056887 (каталог нужно предварительно создать), выполните следующую команду:
expand -f:* “C:\Temp\windows10.0-kb4056887-x64.msu” C:\Temp\kb4056887
Microsoft (R) File Expansion Utility Version 10.0.10011.16384
Copyright (c) Microsoft Corporation. All rights reserved.
Adding C:\Temp\kb4056887\WSUSSCAN.cab to Extraction Queue
Adding C:\Temp\kb4056887\Windows10.0-KB4056887-x64.cab to Extraction Queue
Adding C:\Temp\kb4056887\Windows10.0-KB4056887-x64-pkgProperties.txt to Extraction Queue
 Adding C:\Temp\kb4056887\Windows10.0-KB4056887-x64.xml to Extraction Queue
Expanding Files ....
Expanding Files Complete ...
4 files total.
Как вы видите в каталоге появилось 4 типа файлов:
- .xml файл (Windows10.0-KB4056887-x64.xml) — содержит метаданные пакета msu и используется программой Wusa.exe
- .cab файл (Windows10.0-KB4056887-x64.cab — один или несколько) – непосредственно архив с обновлением Windows
- *pkgProperties.txt файл (Windows10.0-KB4056887-x64-pkgProperties.txt)– содержит свойства пакета (дата выпуска, архитектура, тип пакета, ссылка на KB и т.д.)
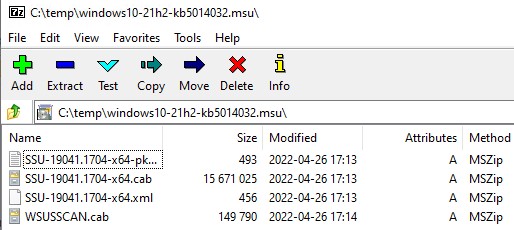
Также вы можете открыть любой MSU файла с помощью утилиты 7-ZIP и извлечь из него CAB файл.
Установка CAB файла обновлений в Windows 10/11
Вы можете установить CAB файл обновления в Windows двумя способами.
Наиболее универсальный способ установки обновления из CAB файл – утилита DISM.exe. Команда установки может быть такой:
DISM.exe /Online /Add-Package /PackagePath:c:\Temp\kb4056887\Windows10.0-KB4056887-x64.cab
Deployment Image Servicing and Management tool
Version: 10.0.10240.16384
Image Version: 10.0.10240.16384
Processing 1 of 1 - Adding package Package_for_KB4056887~31bf3856ad364e35~amd64~~10.0.1.0
[==========================100.0%==========================]
The operation completed successfully.
Примечание. Обратите внимание, как быстро происходит установка пакета через DISM по сравнению со скоростью установки обновления из MSU файла.
Если нужно установить CAB пакет в тихом режиме и подавить запрос на перезагрузку компьютера после установки обновления, команда DISM будет такой:
start /wait DISM.exe /Online /Add-Package /PackagePath: c:\Temp\kb4056887\Windows10.0-KB4056887-x64.cab /Quiet /NoRestart
Команда DISM.exe /Add-Package позволяет установить и MSU обновление (поддерживается только установка в офлайн образ Windows). Также вы можете в параметре
/PackagePath
указать путь к каталогу, в котором хранятся MSU и CAB файлы обновлений. DISM рекурсивно просканирует указанные каталог и вложенные папки и установит в образ Windows все найденные CAB и MSU пакеты.
Здесь нужно отметить, что команда DISM.exe /Add-Package не проверяет зависимости и требования к окружению при добавлении CAB файла в образ Windows (в отличии от wusa.exe которая предварительно проверяет, применимо ли MSU обновление к компьютеру.
Для установки CAB файлов в образ Windows вместо команды DISM /Add-Package можно использовать PowerShell командлет
Add-WindowsPackage -Online -PackagePath "C:\win10_kb123456.cab"
В Windows 8 и Windows 7 можно установить обновление с помощью менеджера пакетов Pkgmgr. Команда:
start /w Pkgmgr /ip /m:c:"c:\Temp\kb4056887\Windows-KB123456.cab"
Примечание. В Windows 10 / Windows Server 2016 менеджер пакетов PkgMgr.exe более не поддерживается. При его запуске появляется предупреждении о необходимости использовать для управления пакетами DISM.exe.
Note: The PkgMgr.exe has been deprecated. Please update your scripts to use dism.exe to extract, install, uninstall, configure and update features and packages for Windows.
Примечание. Обратите внимание, что языковые пакеты Windows (MUI) также распространяются в формате CAB. Однако не получиться использовать для их установки команду DISM. Вместо этого, для установки новых языков в систему нужно использовать отдельную утилиту lpksetup.exe.
Вы можете добавить в контекстное меню File Explorer контекстное меню для установки CAB файлов. Для этого добавьте следующие *.reg файл в реестр:
Windows Registry Editor Version 5.00
[-HKEY_CLASSES_ROOT\CABFolder\Shell\RunAs]
[HKEY_CLASSES_ROOT\CABFolder\Shell\RunAs]
@="Install"
"HasLUAShield"=""
[HKEY_CLASSES_ROOT\CABFolder\Shell\RunAs\Command]
@="cmd /k dism /online /add-package /packagepath:\"%1\""
Теперь для установки CAB файла нужно выбрать пункт Install в контекстном меню.
Установка CAB и MSU обновления с помощью скриптов
Если вам нужно установить сразу несколько CAB или MSU обновлений на компьютере, вы можете использовать BAT и PowerShell скрипты. Благодаря таким скриптам вам не придется по ставить обновления вручную по одному.
Создайте на диске каталог с обновлениями и скопируйте в него все MSU файлы, которые нужно обновить. Теперь для установки всех обновлений из указанного каталога, достаточно запустить скрипт install_msu.bat:
Set Folder="C:\updates"
for %%f in (%Folder%\*.msu) do (
 wusa.exe %%f /quiet /norestart
)
По аналогии можно использовать PowerShell скрипт для установки MSU обновлений из указанной папки:
$dir = (Get-Item -Path c:\temp -Verbose).FullName
Foreach($item in (ls $dir *.msu -Name))
{
 echo $item
 $item = $dir + "\" + $item
 wusa $item /quiet /norestart | Out-Null
}
Данная инструкция по ручной установке накопительных (если вы не помните что это такое, прочитайте статью про новую модель обновлений Windows систем) и любых других обновлений Windows применима ко всем поддерживаемым версиям ОС: Windows 11/10/8.1 и Windows Server 2022/2019/2016/2012R2.
Обновления Windows можно скачать вручную с Каталог Центра обновления Майкрософт, которые имеют формат CAB и MSU и являются исполняемыми, установить в автономном режиме без интернета.
Быстрее и проще всего отыскать нужный апдейт с помощью утилиты командной строки wmic.exe. Так следующая команда выведет полный список установленных обновлений:
Посмотреть какие обновления уже установлены на компьютере вы можете через командную строку, введя следующую команду:
wmic qfe list
Скаченное обновление формата MSU можно запустить как обычный исполняемый файл, запустив его двойным кликом, а формат CAB имеет структуру архива.
Обновления обоих расширений можно установить из командной строки, запущенной от имени администратора. Разберем в отдельности как установить обновление Windows из командной строки с расширением MSU и CAB.
Для пакет MSU, запустим от имени администратора командную строку и выполним команду:
wusa.exe "C:\windows10.0-kb5003637-x64.msu"
Где в двойных кавычках указывается путь файла MSU, который вы хотите установить.
Двойные кавычки обязательно указывать в команде.
По окончании установки перезагружаем компьютер.
Установка обновления формата CAB с командной строки.
Для установки обновления формата CAB аналогично от имени администратора запускаем командную строку, и с помощью встроенной в Windows утилиты DISM вводим команду:
dism /Online /Add-package /Packagepath:"C:\windows10.0-kb5003637-x64.msu.cab"
Путь к файлу обновления windows10.0-kb5003637-x64.msu.cab обязательно указываем в кавычках. По окончании установки перезагружаем компьютер.
Есть еще вариант, когда мы можем распаковать инсталляционный файл формата MSU и превратить его в CAB. Делается это следующим образом:
1. Командной мы распаковываем файл windows10.0-kb5003637-x64.msu
expand _f:* “C:\windows10.0-kb5003637-x64.msu” C:\KB\kb5003637
После выполнения команды мы переходим в каталог C:\KB\kb5003637 и находим файл с расширением CAB и именем Windows10.0-KB5003637.cab.
2. Установим данный CAB файл обновления через командную строку (запуск CMD от имени администратора) с помощью утилиты DISM.exe, командной:
dism /Online /Add-Package /PackagePath:c:\KB\Windows10.0-KB5003637-x64.cab
или через PowerShell (запуск от имени администратора):
Add-WindowsPackage -Online -PackagePath “c:\KB\Windows10.0-KB5003637-x64.cab”
Если по каким-то причинам не удается установить обновления в автоматическом режиме или в ручном, то можете обратить внимания на статью Не устанавливаются обновления Windows.
В Windows 10 за поиск, скачивание и установку пакетов обновлений отвечает компонент Центр обновлений, но с таким же успехом их можно установить в автономном режиме. Как правило, пакеты обновлений Windows распространяются в форматах CAB и MSU. В Windows файлы CAB и MSU относятся к категории исполняемых, хотя CAB всё же больше похож на архив. Установить пакет MSU можно как обычную программу, запустив его двойным кликом.
Но всё же лучше использовать для этого командную строку (так будет даже быстрее). Что касается пакетов CAB, то их устанавливают с помощью встроенной утилиты Dism также запускаемой через командную строку.
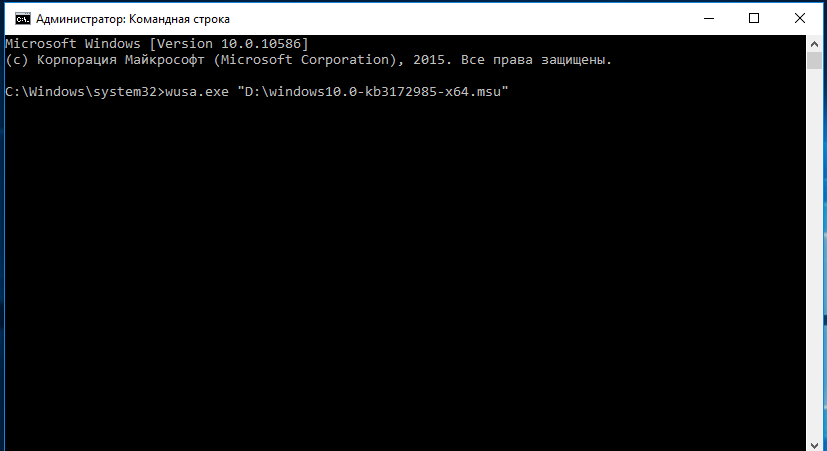
Итак, чтобы установить пакет MSU, откройте от имени администратора консоль CMD и выполните в ней следующего вида команду:
wusa.exe «D:\windows10.0-kb3172985-x64.msu»
В двойных кавычках указывается путь к файлу MSU.
Команда установки файлов CAB выглядит иначе.
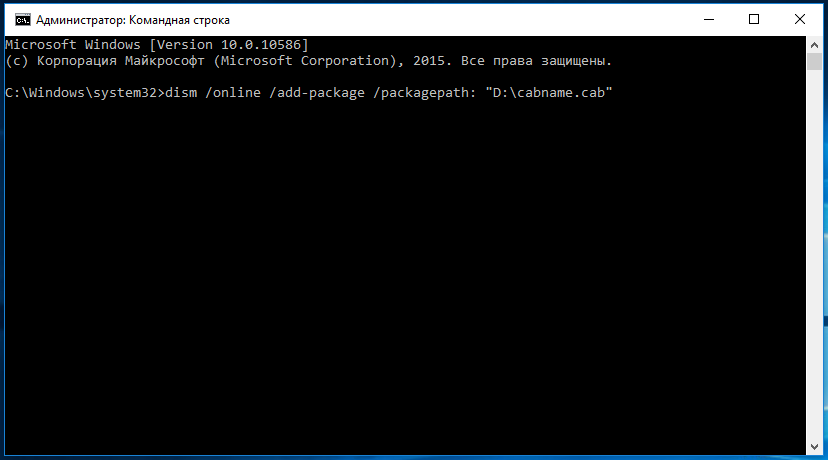
Если нужно установить обновление из CAB-архива, запускаем консоль CMD от имени администратора и выполняем такую команду:
dism /online /add-package /packagepath: «D:\cabname.cab»
Где содержимое кавычек – путь к архиву CAB.
Как видите, всё очень просто. Главное преимущество использования командной строки в том, что при инсталляции вы можете использовать различные параметры, например, /quiet (установка в тихом режиме) или /norestart (запрет автоматической перезагрузки).
Примечание: языковые пакеты Windows обычно имеют формат MUI, но могут встречаться и в формате CAB. Такие файлы являются исключением из правил и устанавливаются они с помощью встроенной утилиты Lpksetup.exe.
Загрузка…
One of the frequently asked questions by Winaero readers is how do you install an offline (downloaded) update in Windows 10? Usually, with Windows 10 version update announcements, I try to provide direct links to update files. Cumulative standalone updates for Windows 10 have the MSU format. Here is how you can install an update which comes as a CAB or MSU file.
If you manually downloaded updates for Windows 10, for example, the recently released Windows 10 build 10586.494, you get a file named Windows10.0-kb3172985-x64_006b20fc4c418499afa25248edacff2ef7dab963.msu
Let’s assume that you moved it to the folder C:\updates.
To apply this update to the installed and running operating system, do the following:
How to install an MSU update in Windows 10
- Open an elevated command prompt.
- Type the following command:
wusa.exe "c:\updates\windows10.0-kb3172985-x64_006b20fc4c418499afa25248edacff2ef7dab963.msu"
Correct the path to the update to match your file location.
How to install a CAB update in Windows 10
If your update comes as a file with the CAB extension, you need to use another command to install it.
Before you continue, you might be interested in reading the following article:
Context menu to install CAB updates in Windows 10
- Open an elevated command prompt.
- Type the following command:
dism /online /add-package /packagepath:"C:\update\cabname.cab"
Again, correct the path to the update to match your file location.
These command line methods are useful for batch files, that is, when you want to install a group of updates at once. Normally, if your file associations are not messed up, MSU files can be double clicked and installed easily but the command line method allows automating the process. With WUSA.exe, you can also use switches like /quiet, /norestart etc.
Note: MUI (langauge packs) often have the CAB format. But you should not use the DISM command to install them. Instead, run the built-in lpksetup.exe tool and follow the wizard’s instructions.
You can learn in detail how to use lpksetup.exe from the following article: How to install an MUI language CAB file in Windows 10.
That’s it.
Support us
Winaero greatly relies on your support. You can help the site keep bringing you interesting and useful content and software by using these options:
If you like this article, please share it using the buttons below. It won’t take a lot from you, but it will help us grow. Thanks for your support!
You might be familiar with the process of updating your Windows operating system through Windows Update. It is simple and all you need to do is check for updates and then reboot your computer if required. But what if the process gets stuck and there is nothing you can do?
Well, you can manually install the updates using the MSU or CAB standalone files available to download from Microsoft’s website. This will update your OS and save you the hassle of unnecessarily rebooting your computer and troubleshooting the Windows Update process.
Table of contents
- What is MSU/CAB file
- How to install Windows updates from MSU files
- Install Windows updates from MSU files regularly
- Install Windows updates from MSU files using Command Prompt
- Install Standalone Windows Update from .MSU File using PowerShell
- Extract .cab files from .msu files
- How to install Windows updates from CAB files
- Closing words
This article discusses how you can manually install Windows updates by downloading standalone MSU or CAB files.
What is MSU/CAB file
An MSU file is a package that contains all the information and data needed to successfully execute the update package within itself. The MSU file contains the following:
- Windows Update metadata – It describes the individual update file within the package.
- .cab files – Each cab file contains one update.
- .xml file – This file describes the .msu package.
- Properties file – This file contains information like KB (update) ID, Package type, the title of the associated article in Microsoft Knowledge Base, etc. These properties will be used by the Windows Update Standalone Installer (WUSA) when the installation begins.
In other words, an MSU file has all the data to check whether the update applies to your PC by checking its metadata. If it does, extract the contents of the .cab files and install them on your PC.
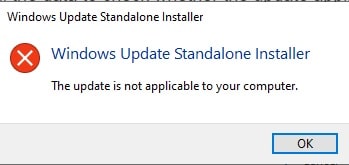
If the update does not apply to your computer, you may see a prompt stating “The update is not applicable to your computer.”
A .cab file, also known as a cabinet file, are compressed files containing system drivers or files. As from what we have discussed above, these are already included in a .msu file. This contains the updates that are applicable to your OS. This file type supports lossless data compressions, hence deemed best to deliver standalone software updates.
CAB files are mostly used when installing updates through WSUS, as the files only have the updated content. However, MSU files have made the installation of Windows updates much convenient for individual users.
Microsoft uses both of these formats depending upon the type of release. For example, Microsoft recently released the update KB4601319 in a .cab file. However, the update before that, KB4598291, was released in a .msu file. Hence, Microsoft releases dynamic cumulative updates as CAB files and cumulative updates as MSU files.
IT won’t matter which updates you are installing, as the end result is the same, but the processes to install are different, as you will discover in the article.
How to install Windows updates from MSU files
AN MSU file contains all the metadata required to automatically detect and install the correct update on your PC. Nonetheless, there are still several different ways to install an update using a .msu file.
Install Windows updates from MSU files regularly
If you want to perform a basic installation using an MSU file, all you need to do is execute the file. Double-click the .msu file and they will do the rest for you. If the update is applied to your version of Windows, it will install it automatically.
You may be prompted with a confirmation box. If so, click Yes to install the update.
Install Windows updates from MSU files using Command Prompt
Another way to install Windows updates from an MSU file is through the Command Prompt. It is especially helpful if you want to quietly install it, meaning you do not want any confirmation while doing so. Follow the simple steps below to do so:
- First, download the MSU file from Microsoft Update Catalog and place it at any location on your PC.
- Now launch Command Prompt with administrative privileges.
- Use the following command to execute the MSU package that you have already downloaded:
wusa.exe <em>Path</em>\<em>UpdateKBName</em>.msu /quiet /norestart
Replace Path with the complete path for the file location and UpdateKBName with the full name of the MSU file, as in the example below:
Your installation will now begin without you even noticing, and the computer will not restart unless you manually do it.
Install Standalone Windows Update from .MSU File using PowerShell
You can also install Windows Updates from an MSU file using Windows PowerShell. This method is especially useful for those willing to install bulk Windows updates without losing any additional time than necessary.
First, place the MSU file(s) in a single folder, where the folder’s name must not have any spaces. We will call this folder “UpdatePath,” as we will use it as a variable in the script given below.
You will then need to Run “PowerShell ISE” with administrative rights. To do so, search for it in the Start Menu, and then click Run as Administrator under it.
Here, paste the following PowerShell script and then edit it to your scenario. Read the explanation of the script below to understand how it works.
$UpdatePath = "C:\Updates"
$Updates = Get-ChildItem -Path $UpdatePath -Recurse | Where-Object {$_.Name -like "*msu*"}
ForEach ($update in $Updates) {
    $UpdateFilePath = $update.FullName
    Start-Process -wait wusa -ArgumentList "/update $UpdateFilePath","/quiet","/norestart"
}
At the top, a variable named “UpdatePath” has been declared which will define the path of the folder where the MSU file(s) are stored. This is the only definition you need to change according to your environment.
Then, in the second line, we are fetching the names of the files with a .MSU extension in the UpdatePath folder, and saving that information to the Updates variable.
In the third line, we are initiating a ForEach loop, which will iterate the items in the Updates variable one after the other. This will make sure that all .MSU files stored in that variable are fetched one after the other.
Next, we are storing the complete path of the .MSU file in the UpdateFilePath variable.
Now we are going to begin the process of Windows Update installation. The “wait” argument will ensure that the next iteration, meaning the next .MSU file is not loaded unless the current one is finished installing. The “quiet” argument will run the installation in the background, and “norestart” will not prompt you to reboot your computer once the installation is completed.
The script will then run until all of the .MSU files have been installed on your computer, which can take a while.
Moreover, you can add as many .MSU Windows Update files in the UpdatePath folder as you want, and this script will install them all (if applicable to the current OS). This will save you time in case of bulk Windows Update installation.
This section illustrates how you can extract the .cab files from MSU files which you can install using the technique given further in the article where we discuss the installation method for CAB files.
This is especially useful if you are unable to install an MSU update, then you can extract the .cab files and still install the update. Follow the steps below to do so:
- Initially, create an empty folder at any location of your choosing to which we will later extract the MSU file.
- Launch Command Prompt with administrative privileges.
- Now use the command below to extract the .msu file which will give you the .cab file separately.
expand _f:* “PathToMSU\UpdateKBName.msu” PathToEmptyFolder\EmptyFolderName
In the command above, replace PathToMSU with the complete path to the MSU file you want to extract, UpdateKBName with the name of the MSU update, PathToEmptyFolder with the complete path to where you have created an empty folder in step 1, and finally, EmptyFolderName with the name of that folder. Here is an example:
As you can see in the image above, 4 files have been extracted which are the same ones as we have discussed earlier in the article. You can now find the extracted files within the folder that you have created.
How to install Windows updates from CAB files
CAB files might be somewhat complicated for some to install, as they cannot be installed simply by executing the package.
You can use Command Prompt to install a .cab file containing a Windows update, even the one you may have extracted from a .msu file. Follow the steps below to do so:
- Launch the Command Prompt with administrative privileges.
- Use the following DISM command to install an update from a CAB file:
dism /online /add-package /packagepath:"<em>PathToCABFile.</em>cab"
Replace PathToCabFile with the complete path and name of the CAB file as in the example below:
Your installation should now begin directly from a .cab file. If there are multiple CAB files, then you will need to execute them individually with the above command.
Closing words
As we mentioned earlier, there isn’t any difference in the Windows update regardless of the file type. However, the methods to install the MSU and CAB files are very distinct, as you may have learned in the article above.
Let us know which method you prefer to install your Windows updates with in the comments section below.

