Данный материал предоставлен сайтом
PacificSky.Ru исключительно в ознакомительных целях. Администрация не несет ответственности за его содержимое.

Установка и запуск MongoDB на Windows 10.
В первую очередь необходимо
скачать MongoDB
с официального сайта.
После перехода по ссылке на официальный сайт перед вами будет представлена форма, в которой необходимо указать требуемую версию системы управления базами данных, вашу версию операционной системы, тип устанавливаемого пакета и нажать кнопку «Download» для скачивания.

После того как файл будет скачан, приступаем к установке:
Начиная с версии 4.0, MongoDB можно настроить и запустить как службу Windows в процессе установки.
Сама служба MongoDB будет запущена после успешной установки.
Для запуска MongoDB как службы в процессе установки необходимо отметить checkbox с пунктом: «Install MongoD as service».
Так-же вы можете установить MongoDB со своими параметрами или оставить все по умолчанию.

После выполнения установки MongoDB будет запущена как служба и будет доступна для работы с ней.
Если по каким то причинам вы не хотите запускать MongoDB как службу, то необходимо убрать галочку с «Install MongoD as service».

Запуск MongoDB из CMD консольного интерпретатора моманд.
- Создайте каталог данных, в котором MongoDB будет хранить данные.
По умолчанию это должен быть абсолютный путь — «C:\data\db».
Для этого создайте на диске «C» папку с названием «data» и внутри папки дата создайте папку «db«. - Для старта MongoDB необходимо запустить файл mongod.exe с указанием пути к базе данных.
Для этого запустить «cmd» консоль и выполните команду:"C:\Program Files\MongoDB\Server\4.2\bin\mongod.exe" --dbpath="c:\data\db".
- Для соединения с базой данных откройте еще одну «cmd» консоль и выполните команду:
"C:\Program Files\MongoDB\Server\4.2\bin\mongo.exe"
Последнее обновление: 07.09.2023
Установка сервера Mongod
Официальный сайт предоставляет пакеты дистрибутивов для различных платформ: Windows, Linux, MacOS, Solaris. И каждой платформы доступно несколько дистрибутивов.
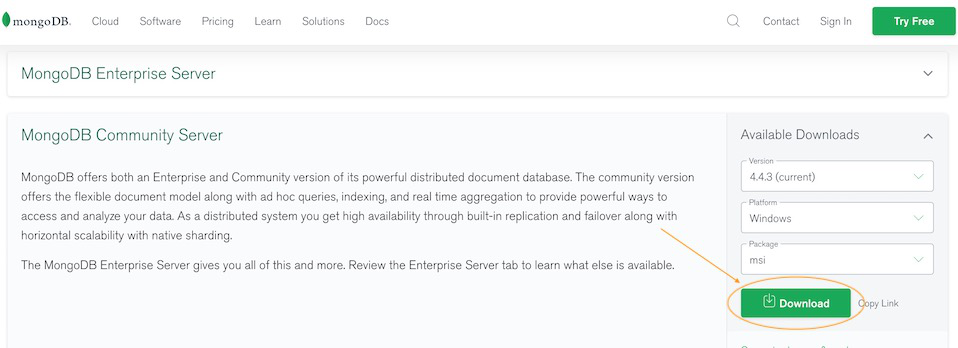
Причем есть два вида серверов — бесплатный Community и платный Enterprise. В данном руководстве будем использовать бесплатную версию Community.
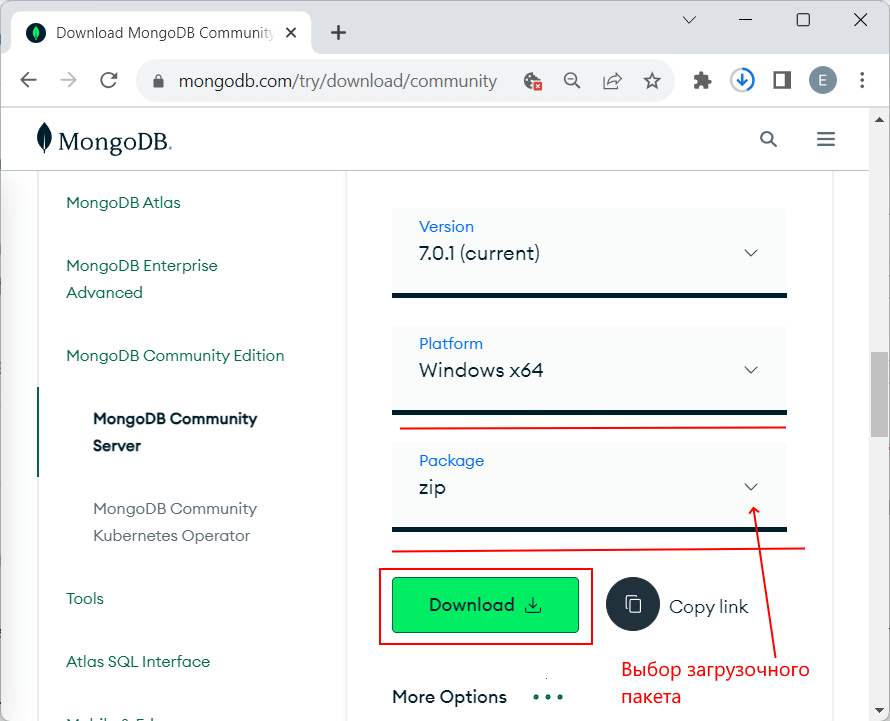
Для установки MongoDB загрузим один распространяемых пакетов с официального сайта https://www.mongodb.com/try/download/community.
Для загрузки всех необходимых файлов выберем нужную операционную систему и подходящий тип пакета. Рассмотрим на примере установки на ОС Windows.
MongoDB можно загрузить в ряде вариантов. Так, для Windows доступна загрузка установщика msi и также доступна загрузка архива zip.
В реальности нам достаточно загрузить zip-архив и распаковать в нужной нам папке. Поэтому выберем этот вариант загрузки (хотя также можно выбрать вариант установщика msi):
Если до установки уже была установлена более ранняя версия MongoDB, то ее необходимо удалить.
После загрузки архивного пакета распакуем его в папку C:\mongodb.
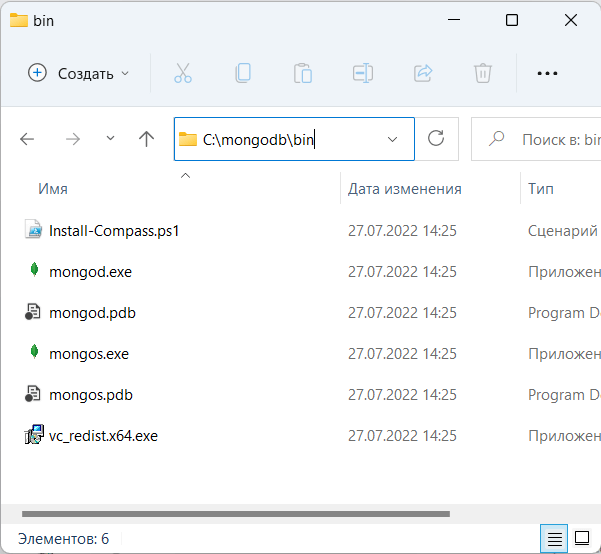
Если после установки мы откроем папку bin в распакованном архиве (C:\mongodb\bin), то сможем найти там кучу приложений, которые выполняют определенную роль. Вкратце рассмотрим их.
-
mongod: сервер баз данных MongoDB. Он обрабатывает запросы, управляет форматом данных и выполняет различные
операции в фоновом режиме по управлению базами данных -
mongos: служба маршрутизации MongoDB, которая помогает обрабатывать запросы и определять местоположение данных в кластере
MongoDB
Создание каталога для БД и запуск MongoDB
После установки надо создать на жестком диске каталог, в котором будут находиться базы данных MongoDB.
В ОС Windows по умолчанию MongoDB хранит базы данных по пути C:\data\db, поэтому, если вы используете Windows, вам надо создать
соответствующий каталог.
Если же возникла необходимость использовать какой-то другой путь к файлам, то его можно передать при запуске MongoDB во флаге
--dbpath.
Итак, после создания каталога для хранения БД можно запустить сервер MongoDB. Сервер представляет приложение mongod, которое находится
в каталоге bin в папке сервера. Для этого запустим терминал/командную строку и там введем соответствующие команды. Для ОС Windows это
будет выглядеть так:
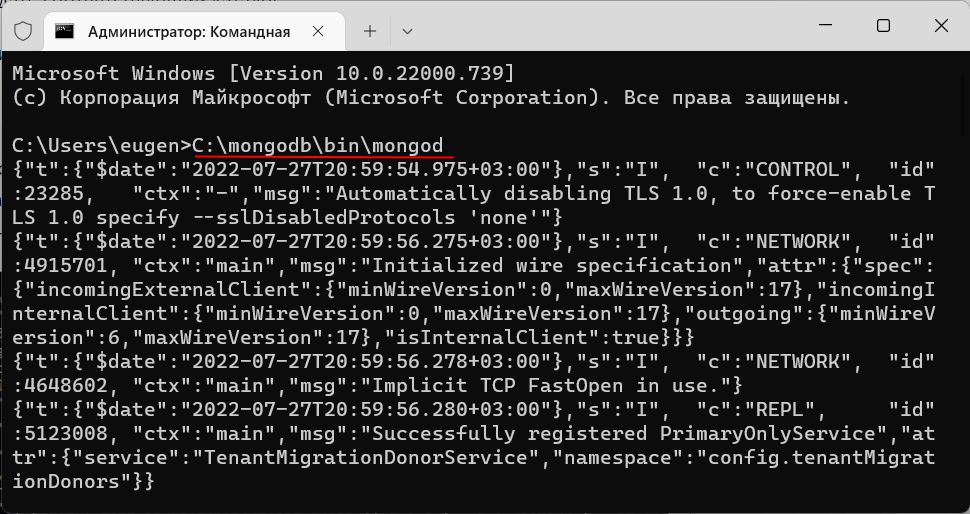
Командная строка отобразит нам ряд служебной информации, например, что сервер запускается на localhost на порту 27017.
И после удачного запуска сервера мы сможем производить операции с бд через клиент.
Установка клиента Mongosh
Выше мы установили сервер MongoDb. Однако для работы с сервером нам нужен клиент. Наиболее простым клиентом в данном случае является MongoDB Shell или mongosh —
консольная оболочка для отправки запросов к серверу, которая также предоставляется непосредственно компанией MongoDB.
Для установки клиента перейдем по адресу https://www.mongodb.com/try/download/shell
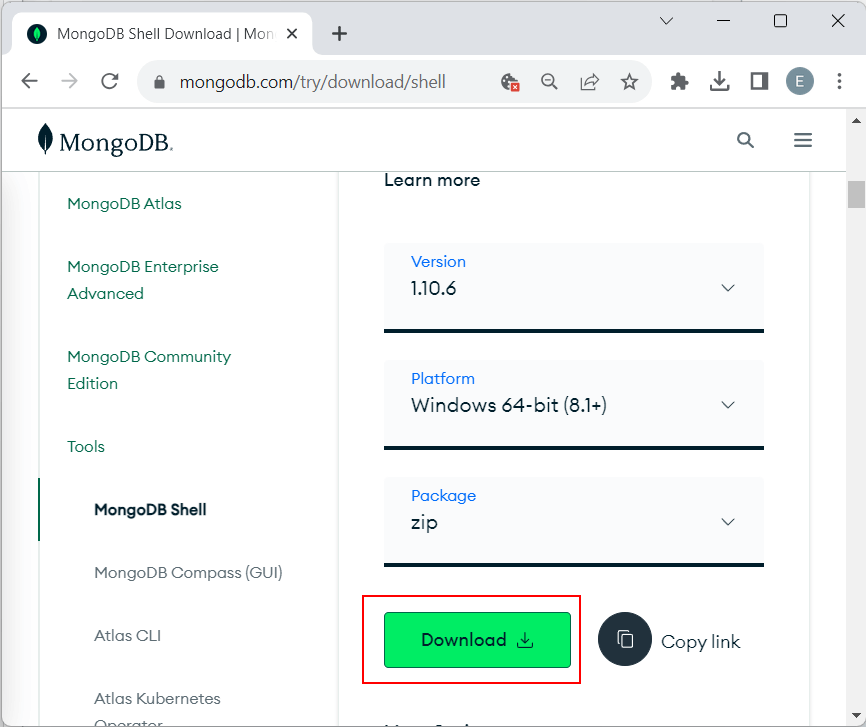
Здесь опять же мы можем выбрать версии клиента для разных операционных систем. Для Windows пакет клиента доступен в виде архива zip.
Загрузим этот пакет и распакуем его в папку C:\mongosh.
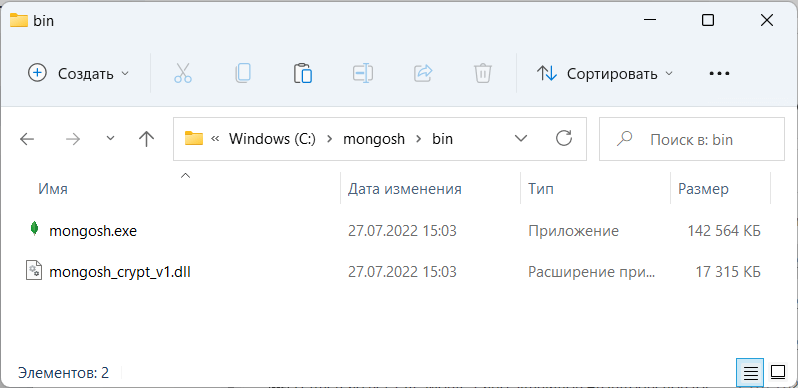
Если в распакованном архиве мы зайдем в папку bin (то есть C:\mongosh\bin), то обнаружим там консольную утилиту mongosh,
которая будет применяться для работы с сервером MongoDB:
Подключение к серверу из клиента
Используем выше установленное клиентское приложение mongosh для взаимодействия с сервером mongodb. (При работе с mongosh не стоит забывать, что у нас должен быть запущен сервер mongod).
Итак, запустим файл mongosh, который располагается в выше рассмотренной папке установки:
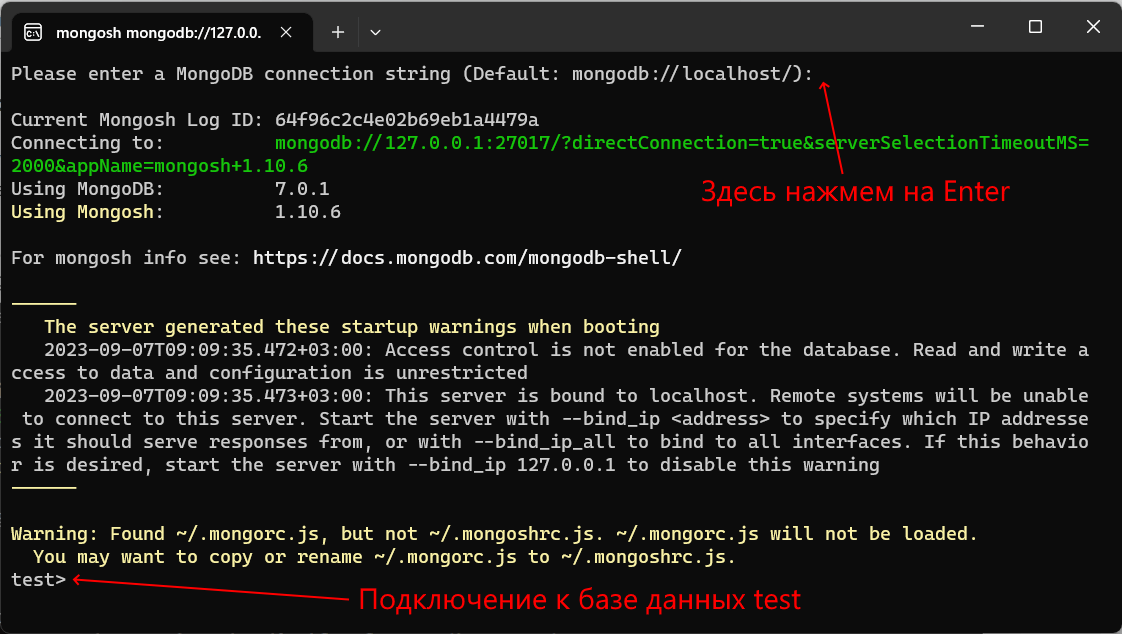
При запуске программы mongosh вначале она спросит пользователя, какую строку подключения использовать для подключения к серверу MongoDB. В этом моменте просто нажмем на Enter,
чтобы использовать строку подключения к MongoDB по умолчанию. А по умолчанию сервер mongodb запускается на порту 27017,
а полная строка подключения выглядит следующим образом: mongodb://localhost:27017 или mongodb://127.0.0.1:27017
После подключения консоль отобразит ряд служебной информации и подключится к базе данных test.
Теперь поизведем какие-либо простейшие действия. Введем в консоль последовательно следующие команды и после каждой команды нажмем на Enter:
db.users.insertOne( { name: "Tom" } )
db.users.find()
С помощью функции db.users.insertOne() в коллекцию users базы данных test добавляется объект { name: "Tom" }.
Идентификатор db представляет текущую базу данных. В нашем случае мы подключены к базе данных по умолчанию — то есть к базе данных test,
соответственно db здесь представляет базу данных test. При этом не важно, есть или нет такая бд — если ее нет, то она создается
После db идет users — это коллекция, в которую затем мы добавляем новый объект. Если в SQL нам надо создавать таблицы заранее, то коллекции
MongoDB создает самостоятельно при их отсутствии.
Описание добавляемого объекта определяется в формате, с которым вы возможно знакомы, если имели дело с форматом JSON. То есть в данном случае у объекта
определен один ключ «name», которому сопоставляется значение «Tom». То есть мы добавляем пользователя с именем Tom.
Если объект был успешно добавлен, то консоль выведет результат операции, в частности, идентификатор добавленного объекта.
А вторая команда db.users.find() выводит на экран все объекты из бд test.
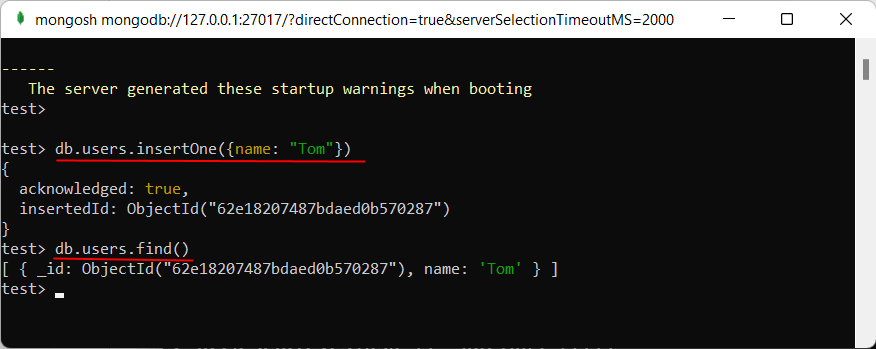
Из вывода вы можете увидеть, что к начальным значениям объекта было добавлено какое-то непонятно поле ObjectId.
Как вы помните, MongoDB в качестве уникальных идентификаторов документа использует поле _id. И в данном случае ObjectId как
раз и представляет значение для идентификатора _id.
Установка драйверов MongoDB
В дальнейшем в рамках данного руководства мы будет рассматривать взаимодействие с сервером MongoDB преимущественно через выше использованную оболочку
mongo. Однако, мы также можем взаимодействовать с mongodb в наших приложениях, написанных на PHP, C++, C# и других языках программирования. И для этой цели необходим специальный драйвер.
На офсайте на странице https://docs.mongodb.com/ecosystem/drivers/ можно найти список драйверов
для всех поддерживаемых языков программирования, в частности, для PHP, C, C++, C#, Java, Go, Python, Rust, Ruby, Scala, Swift, а также для Node.js.
Работа с драйверами на конкретных языках программирования будет рассмотрена в соответствующих разделах, посвященных этим языкам..
-
Главная
-
Инструкции
-
MongoDB
-
Установка MongoDB на разные ОС: Windows, Ubuntu, CentOS
MongoDB — это документо-ориентированная база данных NoSQL, которая используется для хранения больших объемов данных. Вместо таблиц и строк, как в традиционных реляционных базах данных, в данные в MongoDB хранятся в виде документов, подобных JSON-формату.

У MongoDB открытый исходный код, и она имеет бесплатную версию. В этом материале вы узнаете, как установить MongoDB на разные операционные системы: Windows, Ubuntu и CentOS.
На данный момент сайт MongoDB ограничен для пользователей из Российской Федерации и Беларуси. Для получения пакета установщика используйте VPN.
В MongoDB установка на Windows начинается с загрузки дистрибутива. Переходим на официальный сайт систему управления базами данных mongodb.com и нажимаем кнопку «Products». В окне выбираем версию Community. Community — это бесплатная версия MongoDB, поэтому установим её. Выбираем версию СУБД, в нашем случае 5.0.9 и загружаем его в удобном формате — мы выбрали .msi.
После загрузки пакета установщика переходим к непосредственно к установке. Во время установки инсталлятор предложит вам сделать MongoDB службой Windows:
Служба Windows — это приложение, исполняемое при запуске операционной системой Windows и выполняющееся вне зависимости от статуса пользователя. В чем-то служба Windows схожа с демонами из Linux. Если вы по какой-то причине не хотите, чтобы MongoDB была установлена на ваше устройство как служба Windows, то снимите галочку на этом этапе.
Для установки MongoDB Compass не снимайте галочку на этом этапе:
MongoDB Compass — это графический клиент для просмотра и администрирования базы данных.
После нажатия кнопки «Next» начнется установка MongoDB. Во время процесса установщик может не обнаружить некоторых пакетов и предложит их установить. Для их полноценной установки устройство придется перезагрузить. После завершения установки откроется MongoDB Compass.
Установка MongoDB на Ubuntu
Устанавливать MongoDB будем на Ubuntu 22.04. На момент написания статьи репозиторий для Ubuntu 22.04 ещё не вышел, поэтому будет использовать репозиторий для 20.04. Для установки MongoDB на Debian 10/11 руководствуйтесь туториалом на сайте MongoDB.
Заказать облачный сервер с предустановленной ОС Ubuntu или Debian можно в Timeweb Cloud.
Настройка прокси
Репозитории MongoDB недоступны для пользователей из России, и для установки софта понадобится прокси-сервер, расположенный за рубежом. Прокси-сервер — это промежуточный узел между клиентом и целевым сервером. Для того, чтобы apt использовал прокси, его нужно прописать в настройках. Будем использовать простой SOCKS5-прокси.
Откроем конфигурационный файл прокси apt /etc/apt/apt.conf.d/proxy.conf:
sudo nano /etc/apt/apt.conf.d/proxy.confИ добавим в него информацию о прокси:
Acquire::http::Proxy "socks5h://IpAddres:port";
Acquire::https::Proxy "socks5h://IpAddres:port";
Acquire::socks::Proxy "socks5h://IpAddres:port";
Вместо IpAddres и Port необходимо указать IP-адрес вашего прокси и порт.
Шаг 1. Установка libssl1
Так как используем репозиторий не для нашей системы, то для корректной работы MongoDB необходимо установить пакет libssl1. В ином случае получим такую ошибку:
The following packages have unmet dependencies:
 mongodb-org-mongos : Depends: libssl1.1 (>= 1.1.1) but it is not installable
 mongodb-org-server : Depends: libssl1.1 (>= 1.1.1) but it is not installable
 mongodb-org-shell : Depends: libssl1.1 (>= 1.1.1) but it is not installable
Для установки пакета выполняем следующие команды в терминале:
echo "deb http://security.ubuntu.com/ubuntu focal-security main" | sudo tee /etc/apt/sources.list.d/focal-security.list
sudo apt update
sudo apt install libssl1.1
Шаг 2.
Добавляем GPG-ключ репозитория MongoDB:
curl -fsSL https://www.mongodb.org/static/pgp/server-5.0.asc | sudo apt-key add -Шаг 3.
Добавляем репозиторий MongoDB:
echo "deb [ arch=amd64,arm64 ] https://repo.mongodb.org/apt/ubuntu focal/mongodb-org/5.0 multiverse" | sudo tee /etc/apt/sources.list.d/mongodb-org-5.0.listШаг 4.
Обновляем apt:
sudo apt updateШаг 5.
Устанавливаем MongoDB:
sudo apt install -y mongodb-orgВот полный список команд для установки MongoDB на Ubuntu 22.04:
echo "deb http://security.ubuntu.com/ubuntu focal-security main" | sudo tee /etc/apt/sources.list.d/focal-security.list
sudo apt update
sudo apt install libssl1.1
curl -fsSL https://www.mongodb.org/static/pgp/server-5.0.asc | sudo apt-key add -
echo "deb [ arch=amd64,arm64 ] https://repo.mongodb.org/apt/ubuntu focal/mongodb-org/5.0 multiverse" | sudo tee /etc/apt/sources.list.d/mongodb-org-5.0.list
sudo apt update
sudo apt install -y mongodb-org
Установка MongoDB Compass
У MongoDB Compass есть три версии:
- Полная — все функции включены;
- Изолированная — все подключения, кроме как к инстансу MongoDB, отключены;
- Только для чтения — без возможности записи и удаления данных.
Установка полной версии:
wget https://downloads.mongodb.com/compass/mongodb-compass_1.32.3_amd64.deb
sudo apt install ./mongodb-compass_1.32.3_amd64.deb
Установка изолированной версии:
wget https://downloads.mongodb.com/compass/mongodb-compass-isolated_1.32.3_amd64.deb
sudo apt install ./mongodb-compass-isolated_1.32.3_amd64.deb
Установка Read-only:
wget https://downloads.mongodb.com/compass/mongodb-compass-readonly_1.32.3_amd64.deb
sudo apt install ./mongodb-compass-readonly_1.32.3_amd64.deb
MongoDB: установка на CentOS
Настройка прокси
Для установки MongoDB на CentOS нужно настроить прокси, как и в случае с Ubuntu. Откройте файл /etc/yum.conf и добавьте в него следующие строки:
proxy=http://IpAddres:port
proxy_username=login
proxy_password=password
IpAddres и Port — IP-адрес и порт вашего прокси. Login и Password — имя пользователя и пароль, если для прокси необходима авторизация.
Теперь создадим репозиторий /etc/yum.repos.d/mongodb-org-5.0.repo для установки MongoDB с помощью yum:
[mongodb-org-5.0]
name=MongoDB Repository baseurl=https://repo.mongodb.org/yum/redhat/$releasever/mongodb-org/5.0/x86_64/ gpgcheck=1
enabled=1
gpgkey=https://www.mongodb.org/static/pgp/server-5.0.asc
Установим MongoDB:
sudo yum install -ymongodb-orgЗаключение
В этом материале мы разобрали, как установить MongoDB на 3 разные операционные системы. MongoDB — это гибкая и мощная система управления базами данных, которая подойдет для проектов без сложной структуры. К слову, в скором времени MongoDB появится на Timeweb Cloud как облачная база данных (Database-as-a-service).
В официальном канале Timeweb Cloud собрали комьюнити из специалистов, которые говорят про IT-тренды, делятся полезными инструкциями и даже приглашают к себе работать.
MongoDB is an open-source and widely used document-oriented NoSQL database that is designed to store a large scale of data. It offers JSON-like documents, ad hoc queries, indexing, and real-time aggregation, which makes it popular in the database world and also allows you to work with that data very efficiently. With the growing popularity of MongoDB, it has become essential for web developers to install and use MongoDB on their systems.
In this article, we will tell you everything on how to download and install MongoDB in Windows 10. You can go through KnowledgeHut’s web application development course to learn how to create a web application using the MongoDB database and get yourself the job of your dreams. This extensive guide will show you how to install MongoDB 6.0.1 Community Edition in Windows 10. So let us get started.
We will show you how to install MongoDB Community Edition on Windows 10 using the default method with the MSI installation wizard.
The msiexec.exe tool is useful for system administrators who wish to deploy MongoDB in an unattended fashion using automation.
Considerations
Before you download and install MongoDB on Windows, you must consider some considerations.
1. Install MongoDB Shell Separately
MongoDB Shell (mongosh) does not come with the MongoDB Community Edition. You need to install it separately after successfully installing the MongoDB server on your windows 10 system.
2. Platform Support
MongoDB 6.0 Community Edition requires x86_64 architecture to function correctly.
It supports 64-bit versions of the following Windows versions:
- Windows Server 2019
- Windows 10 / Windows Server 2016
3. Virtualization
Microsoft does not support VirtualBox on Hyper-V by default.
If you want to install MongoDB on VirtualBox, then you need to disable Hyper-V in windows.
Follow the following steps to disable Hyper-V in Windows 10:
- Go to Control Panel
- Select “Programs and Features”
- Select «Turn Windows features on or off» on the left side
- In the Windows Features menu, navigate to Hyper-V > Hyper-V Platform and uncheck the Hyper-V Hypervisor check box.
- Click OK to save changes
4. Production Notes
If you need to optimize database performance further, you can read the MongoDB production notes and deploy the configuration recommendations.
Prerequisites
Before downloading and installing MongoDB, you must fulfill the minimum MongoDB system requirements to avoid any errors and poor performance.
Given below are the hardware and software requirements for MongoDB:
1. Hardware Requirements
For Intel x86_64 architecture, MongoDB requires:
- Sandy Bridge or later processor
- Tiger Lake, Celeron, or Pentium processor.
For AMD x86_64 architecture, MongoDB requires:
- Bulldozer or later processor.
2. Software Requirements
- Windows Server 2019
- Windows 10 / Windows Server 2016
How to Download MongoDB for Windows 10?
Here’s a step-by-step guide to download MongoDB for windows 10 64-bit msi installer file.
Step 1: Go to the Official MongoDB website
Step 2: Navigate to Products > Community Edition
Step 3: Select the appropriate installer file from the dropdown menus on the Community Edition page.
- In the version dropdown, select the latest version, 6.0.1(current)
- In the Platform dropdown, select Windows
- In the Package dropdown, select msi

Step 4: Click the green «Download» button. Wait for 2-5 minutes for the file to download. (Depending on your internet speed)
How to Install MongoDB on Windows 10 [Step-by-Step]?
After the installer file has been downloaded, it’s time to run the installer file.
Procedure
Step: 1: Go to the downloaded directory in your system (by default, it should be in the `Downloads` directory).
Step 2: Double-click on the .msi file. It will open the MongoDB setup windows.

Step 3: It will open the MongoDB Community Edition installation wizard. This setup wizard guides you through the installation of MongoDB in your system. To continue the process, click «Next.»

Step 4: Read the End-User License Agreement, accept the terms and conditions, and then click the «Next» button to continue.

Step 5: Next, you can choose either the Complete setup or Custom setup type to proceed. But for a beginner, we’d recommend using the Complete setup option. It installs MongoDB in the default location. Select the Complete setup, and click «Next.»

Step 6: Select the «Install MongoD as a Service» option on the next page. Keep all other parameters as default. Click on the «Next» button.

Step 7: In the next step, you will get an option to install MongoDB compass. Uncheck it if you don’t want MongoDB compass to be installed on your device, and then click the «Next» button.

Step 8: In the «Ready to install MongoDB» page, click the «Install» button, give administrator access, and wait for the installation to finish. Once installation is complete, you can click on the «Finish» button to finalize your installation.
How to Install mongosh MongoDB Shell in Windows 10?
MongoDB installer does not include mongosh, which is a MongoDB Shell used for interacting with MongoDB deployments. You need to install it separately.
Here’s a step-by-step guide to installing it:
Step 1: Open the MongoDB Download Center from this link

Step 2: Select Windows 64-bit (8.1+) (MSI) in the Platform dropdown menu
Step 3: Click on the Download button, and wait for the download.
Step 4: Go to the download directory, and double-click the installer file.
Step 5: Follow the installation prompts to install mongosh
Set up Environment Variable
Before you can run the MongoDB server, you have to add the MongoDB path as an environment variable.
Step 1: Go to the MongoDB installation directory in the “C Drive.» Navigate to Server > 6.0 > bin folder. Copy the path. It will look like this:
C:\Program Files\MongoDB\Server\6.0\bin

Step 2: Go to Windows Search for «Environment Variables» and open the option «Edit environment variables for your account» option.

Step 3: Click on the «Environment Variable..»

Step 4: On the System variables, find the «Path» option. Double-click on it.

Step 5: Click on «New» to set a new path variable.

Step 6: Paste the copied path here, and press «OK.» Now you can run the MongoDB local server from any path in the terminal of your computer.
How to Check If MongoDB is Installed?
After you’ve added the environment variable in the system, you can run the `mongod –version` command on the Command window to check if MongoDB is installed correctly. It should give a result like this:
C:\Users\Arnab\Desktop> mongod --version
db version v5.0.9
Build Info: {
"version": "5.0.9",
"gitVersion": "6f7dae919422dcd7f4892c10ff20cdc721ad00e6",
"modules": [],
"allocator": "system",
"environment": {
"distarch": "x86_64",
"target_arch": "x86_64"
}
}
How to Create a Demo Database on MongoDB?
Now that you’ve successfully installed MongoDB and mongoose shell in your system, here’s a step-by-step guide to creating a demo database to check if the database is appropriately working.
Step 1: Open the command prompt on your desktop, and type `mongosh` to start the MongoDB server. The screen will look like this.

Step 2: Type `show dbs` to see the existing databases.

Step 3: To create a new database, just type `use ` For example, `use Knowledgehut` and hit enter.

Step 4: To create a collection, you can type the following command. `db.createCollection(“”)`. For example, we can create a collection of students by typing `db.createCollection(“students”)`

Step 5: Then, you can insert new data by typing `db.students.insertOne({«name»:» John», «title»:» Doe»})`.

Step 6: Now you can type `show dbs` to see all the databases, including the new one you just created.

How to Uninstall MongoDB in Windows 10?
Here are the steps you need to follow to uninstall MongoDB from Windows 10:
Step 1: Go to the control panel.

Step 2: Then go to the Programs and Features section

Step 3: Select MongoDB from the list and double-click on it, and a prompt will appear asking you to confirm the uninstallation.
Step 4: Click OK and wait for the uninstallation. Your system will restart.

With that, you have successfully uninstalled MongoDB from Windows 10.

To verify whether you’ve successfully uninstalled MongoDB from your system, you can open the Command window and type the following command: `mongod –version`. If it shows that «mongod is not recognized as an internal or external command,» you’ve successfully uninstalled MongoDB from your Windows 10 system.
Conclusion
MongoDB has garnered quite a lot of attention among developers and designers across the globe, owing to its numerous advantages over other SQL-based databases.
Not to mention that it’s extremely easy to install on your Windows 10 computer.
Just download the installation files, launch it accordingly and follow the steps mentioned in detail to install MongoDB on your Windows 10.
If you want to learn more, go to KnowledgeHut’s web application development course, and you’ll learn everything you need to know about using the MongoDB database to create cloud-based applications.
Once done, test the newly installed application to check if it works appropriately as per your need. If not, make sure to follow the above-mentioned steps carefully to ensure that you’ve followed all the steps correctly.
Looking to level up your coding skills? Dive into the world of Python with our unique and engaging python course. Unleash your creativity and problem-solving abilities with this versatile language. Join us now and unlock endless possibilities!
Frequently Asked Questions (FAQs)
1. How Do You Install MongoDB on Windows Using CMD?
Here is a step-by-step guide to installing MongoDB on Windows using CMD:
1. Step 1 Open Your Browser and navigate to MongoDB Download Center.
2. Step 2: Select the appropriate installer file from the dropdown menus.
- In the version dropdown, select the latest version, 6.0.1(current)
- In the Platform dropdown, select Windows
- In the Package dropdown, select MSI.
3. Go to the Downloads folder, and open the Windows Command Interpreter.
4. Here, run the following command: `msiexec.exe /l*v mdbinstall.log /qb /i mongodb-windows-x86_64-6.0.1-signed.msi`, and press enter.
5. This will install MongoDB in the default directory «C:\Program Files\MongoDB\Server\6.0\bin.”
2. Can You Install MongoDB on Windows?
You can easily install MongoDB on a Windows system by following our step-by-step guide. Just check the system requirements before installing it on Windows.
3. Can I Run MongoDB Locally?
If you install the MongoDB community edition in your system, you can run MongoDB locally. However, you must consider that you can access the database only on your local machine. It’s not accessible via the internet.
4. How Do I Start MongoDB in Windows Automatically?
When installing MongoDB on your Windows 10 machine, choose the option to install MongoDB as a service. This will run MongoDB automatically when your machine is booting up.
5. How To Check MongoDB Version in Windows?
Open your command prompt, and type the following command: `mongod –version`. It will show the MongoDB version installed on your machine.
MongoDB is an open-source document-oriented database that is designed to store a large scale of data and also allows you to work with that data very efficiently. It is categorized under the NoSQL(Not only SQL) database because the storage and retrieval of data in MongoDB are not in the form of tables. This is the general introduction of MongoDB now we learn how to install MongoDB on your Windows?.
You can install MongoDB using two different methods one is using msi and another is using zip. Here, we will discuss how to install MongoDB using msi, so you need to follow each step carefully:
Step 1: Go to MongoDB Download Center to download MongoDB Community Server.
Here, You can select any version, Windows, and package according to your requirement. For Windows, we need to choose:
- Version: 4.2.2
- OS: WindowsOS
- Package: msi
Step 2: When the download is complete open the msi file and click the next button in the startup screen:
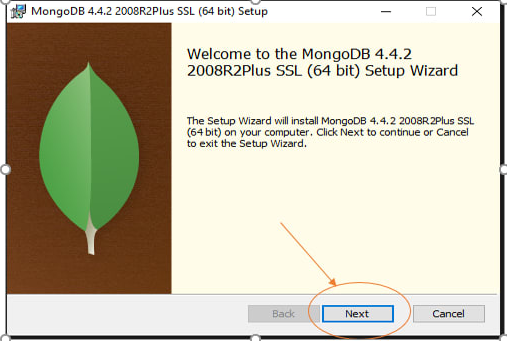
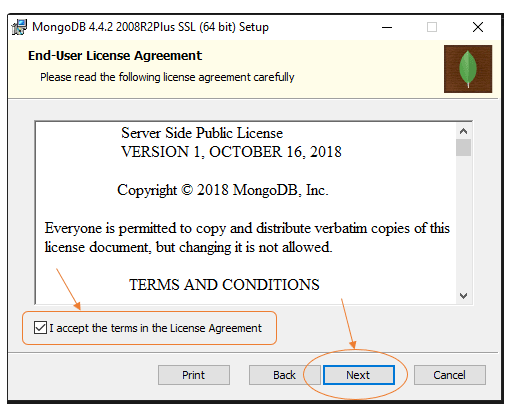
Step 3: Now accept the End-User License Agreement and click the next button:
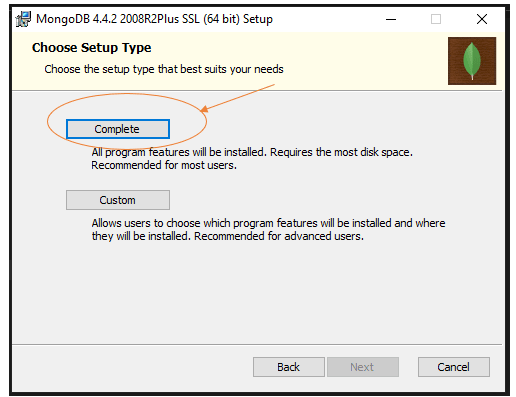
Step 4: Now select the complete option to install all the program features. Here, if you can want to install only selected program features and want to select the location of the installation, then use the Custom option:
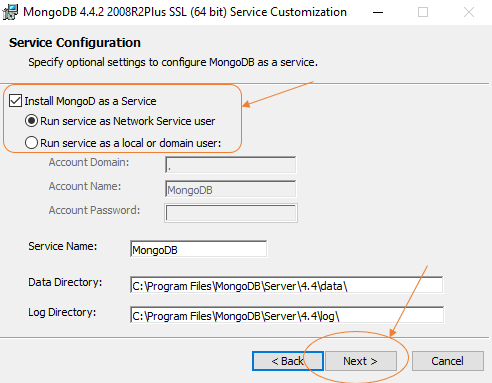
Step 5: Select “Run service as Network Service user” and copy the path of the data directory. Click Next:
Step 6: Click the Install button to start the installation process:

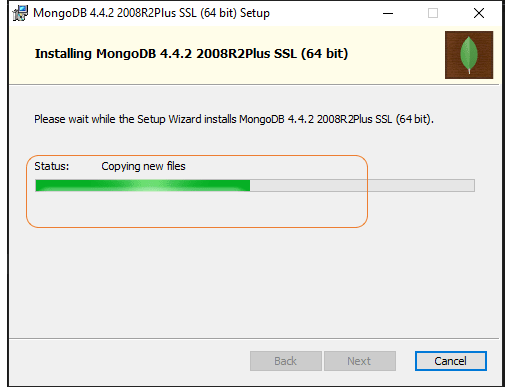
Step 7: After clicking on the install button installation of MongoDB begins:
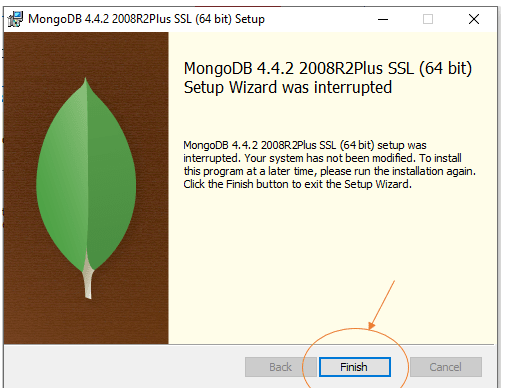
Step 8: Now click the Finish button to complete the installation process:
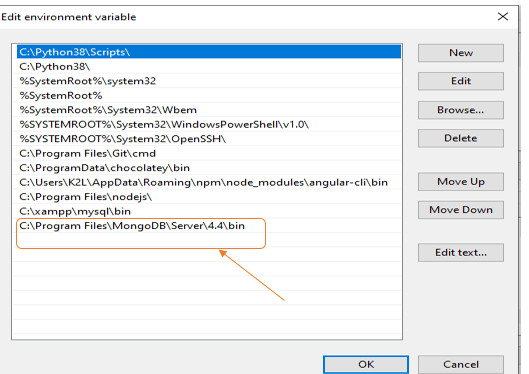
Step 9: Now we go to the location where MongoDB installed in step 5 in your system and copy the bin path:
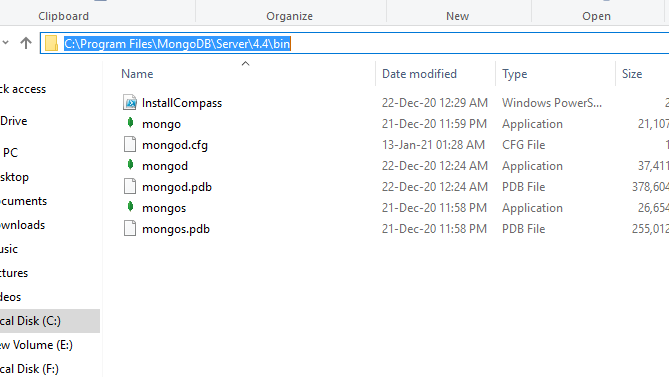
Step 10: Now, to create an environment variable open system properties << Environment Variable << System variable << path << Edit Environment variable and paste the copied link to your environment system and click Ok:
Step 11: After setting the environment variable, we will run the MongoDB server, i.e. mongod. So, open the command prompt and run the following command:
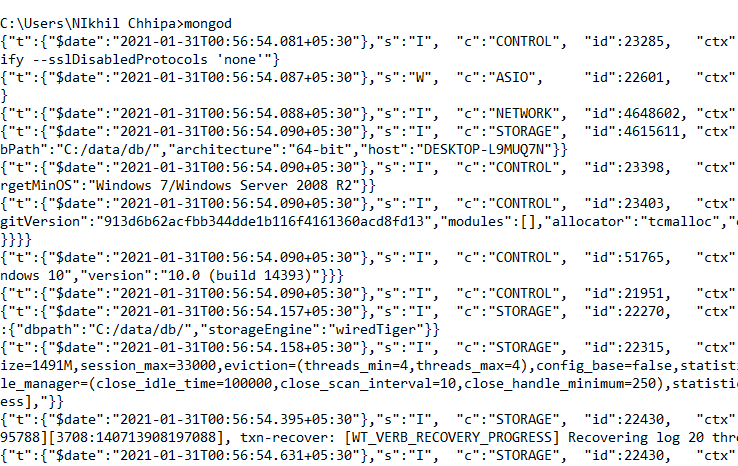
mongod
When you run this command you will get an error i.e. C:/data/db/ not found.
Step 12: Now, Open C drive and create a folder named “data” inside this folder create another folder named “db”. After creating these folders. Again open the command prompt and run the following command:
mongod
Now, this time the MongoDB server(i.e., mongod) will run successfully.
Run mongo Shell
Step 13: Now we are going to connect our server (mongod) with the mongo shell. So, keep that mongod window and open a new command prompt window and write mongo. Now, our mongo shell will successfully connect to the mongod.
Important Point: Please do not close the mongod window if you close this window your server will stop working and it will not able to connect with the mongo shell.
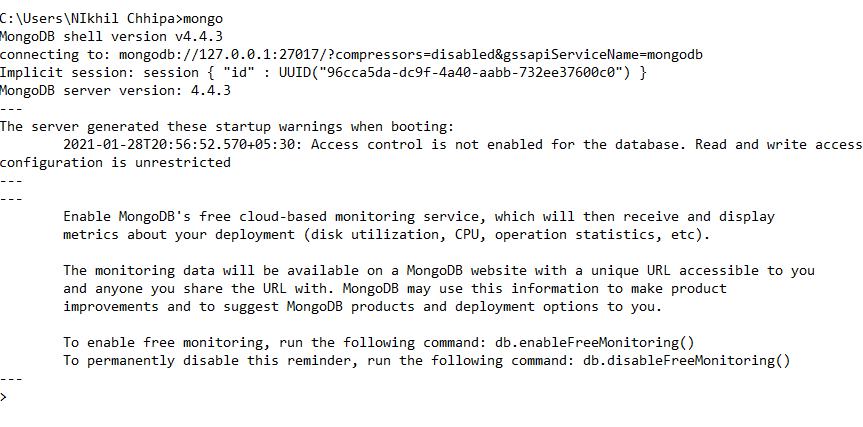
Now, you are ready to write queries in the mongo Shell.
Example:
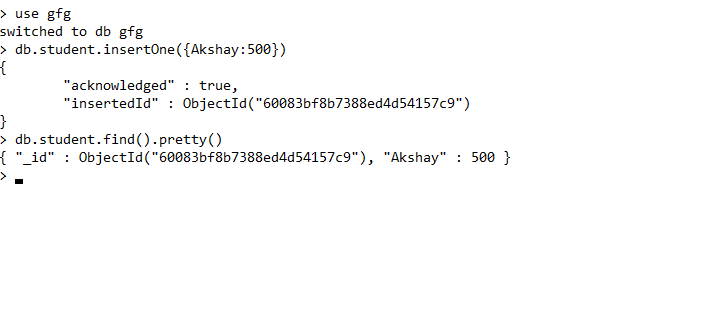
Now you can make a new database, collections, and documents in your shell. Below is an example of how to make a new database:
The use Database_name command makes a new database in the system if it does not exist, if the database exists it uses that database:
use gfg
Now your database is ready of name gfg.
The db.Collection_name command makes a new collection in the gfg database and the insertOne() method inserts the document in the student collection:
db.student.insertOne({Akshay:500})
Last Updated :
28 Jun, 2022
Like Article
Save Article