2 Answers
Steps to install Memcached on Windows:
- Download a stable version, in either 32-bit or 64-bit I have tested the 64-bit version.
- Unzip it in some hard drive folder. For example
C:\memcached - There will be
memcached.exefile in the unzipped folder. - Open a command prompt (need to be opened as administrator).
- Run
c:\memcached\memcached.exe -d install
For start and stop run following command line
c:\memcached\memcached.exe -d start
c:\memcached\memcached.exe -d stop
![]()
answered Dec 25, 2019 at 8:38
![]()
Mahdi BashirpourMahdi Bashirpour
17.2k14 gold badges118 silver badges146 bronze badges
7
-
Don’t forget to run
cmdas Administrator, otherwise service may fail to install.Sep 2, 2021 at 14:57
-
Linking to binaries on some random Chinese website seems dodgy.
Aug 16, 2022 at 15:44
-
A windows port is now available on GitHub with binaries. It looks more trustworthy to me.
Sep 4, 2022 at 16:44
As told in some previous comments the v1.4.4 is sometimes coming from a trusted source, sometimes not and it becomes hard to find. But there is now a very stable Windows native port for both 32 bits and 64 bits versions.
https://github.com/jefyt/memcached-windows
It’s running well on our two PHP servers (PHP7 and PHP8).
Hope this helps.
Another Cygwin version is also available here and runs well too
https://github.com/nono303/memcached
answered Nov 17, 2022 at 9:45
![]()
b126b126
5444 silver badges11 bronze badges
3
-
Hi b126, could you please help with how to configure it with PHP 8? What should we place in the extension directory of PHP, I didn’t find the .dll file in the zip which I downloaded.
Nov 18, 2022 at 3:50
-
Do you already have a Memcached instance running? If so, then you can install the appropriate extensions for PHP that will use your Memcached instance. This describes how to do : stackoverflow.com/questions/14777857/…
Nov 18, 2022 at 10:14
-
The PHP-MEMCACHED extension is available here: github.com/php-memcached-dev/php-memcached. php_memcached.dll should go your \php\ext directory. libmemcached.dll and libhashkit.dll should go to a path folder
Dec 2, 2022 at 11:01
Memcached is a high performance, in-memory key-value store or caching system. Its main purpose is to speed up web applications by caching database queries, contents, or other computed results.
Memcached is originally a linux application, but since it is open-source, it has been compiled for windows. There are two major sources for the pre-built windows binary: Jellycan and Northscale, and both versions can be used. The following are the download links for the memcached windows binaries:
- http://code.jellycan.com/files/memcached-1.2.5-win32-bin.zip
- http://code.jellycan.com/files/memcached-1.2.6-win32-bin.zip
- http://downloads.northscale.com/memcached-win32-1.4.4-14.zip
- http://downloads.northscale.com/memcached-win64-1.4.4-14.zip
- http://downloads.northscale.com/memcached-1.4.5-x86.zip
- http://downloads.northscale.com/memcached-1.4.5-amd64.zip
In versions earlier than 1.4.5, memcached can install itself as a service. However, the ability to run memcached as a service is removed since version 1.4.5. Therefore, the installation steps are divided into two categories, part A for memcached prior to version 1.4.5. and part B for memcached version 1.4.5 and later.
A) Installation of memcached < 1.4.5:
-
Extract the memcached windows binary to any directory.
-
In versions earlier than 1.4.5, memcached can install itself as a service. Run a command prompt with elevated privileges, and type:
c:\memcached\memcached.exe -d install- Replace
c:\memcached\memcached.exewith the actual path of your installation.
- Replace
-
Then, start or stop the memcached service with the following command:
c:\memcached\memcached.exe -d start c:\memcached\memcached.exe -d stop -
To change the configuration of memcached, run regedit.exe and navigate to the key
HKEY_LOCAL_MACHINE\SYSTEM\CurrentControlSet\Services\memcached. Suppose you wish to increase the memory limit of memcached, edit the value of ImagePath to the following:"c:\memcached\memcached.exe" -d runservice -m 512- Besides
-m 512, you may also append other memcached parameters to the path. Runc:\memcached\memcached.exe -hto view the list of available parameters.
- Besides
-
Meanwhile, to uninstall the memcached serivce, run the following command:
c:\memcached\memcached.exe -d uninstall
B) Installation of memcached >= 1.4.5:
-
Extract the memcached windows binary to any directory.
-
In version 1.4.5 or later, memcached cannot run as a service. It must be started as a normal process using the task scheduler. To configure the memcached process to run automatically every time windows start, run a command prompt with elevated privileges, and type the following:
schtasks /create /sc onstart /tn memcached /tr "'c:\memcached\memcached.exe' -m 512"- Replace
c:\memcached\memcached.exewith the actual path of your installation. - Besides
-m 512, you may also append other memcached parameters to the path. Runc:\memcached\memcached.exe -hto view the list of available parameters.
- Replace
-
Meanwhile, to remove the scheduled memcached task, run the following command:
schtasks /delete /tn memcached
Integrating with PHP
To interface with memcached in PHP, you need to install the memcache extension for PHP:
-
Check that your PHP extension folder has the file php_memcache.dll. If not, download the file from https://pecl.php.net/package/memcache (select the windows dll file), and place it in the PHP extension folder.
-
Add the following line in php.ini to enable the memcache extension:
extension=php_memcache.dll -
Create this simple php script file to test that it works.
<?php

$memcache = new Memcache;
$memcache->connect('localhost', 11211) or die ("Could not connect");

$version = $memcache->getVersion();
echo "Server's version: ".$version."<br/>\n";

$tmp_object = new stdClass;
$tmp_object->str_attr = 'test';
$tmp_object->int_attr = 123;

$memcache->set('key', $tmp_object, false, 10) or die ("Failed to save data at the server");
echo "Store data in the cache (data will expire in 10 seconds)<br/>\n";

$get_result = $memcache->get('key');
echo "Data from the cache:<br/>\n";

var_dump($get_result);

?>
Integrating with Python
To interface with memcached in Python, you need to install the memcached client for Python.
-
Execute one of the following command to install the memcached client. The first is for Python 2.x while the second is for Python 3.x.
pip install python-memcached pip install python3-memcached -
Create this simple python script to test that it works.
import memcache
mc = memcache.Client(['127.0.0.1:11211'], debug=0)
mc.set("some_key", "Some value")
value = mc.get("some_key")
mc.set("another_key", 3)
mc.delete("another_key")
mc.set("key", "1")   # note that the key used for incr/decr must be a string.
mc.incr("key")
mc.decr("key")
Memcached statistics
To view the statistics for memcached, bring up a telnet connection to memcached by the command:
telnet 127.0.0.1 11211
Then, type stats and enter.
Here is an explanation of the different memcached stats.
| Name | Type | Meaning |
|---|---|---|
| pid | 32u | Process id of this server process |
| uptime | 32u | Number of secs since the server started |
| time | 32u | current UNIX time according to the server |
| version | string | Version string of this server |
| pointer_size | 32 | Default size of pointers on the host OS (generally 32 or 64) |
| rusage_user | 32u.32u | Accumulated user time for this process (seconds:microseconds) |
| rusage_system | 32u.32u | Accumulated system time for this process (seconds:microseconds) |
| curr_items | 32u | Current number of items stored |
| total_items | 32u | Total number of items stored since the server started |
| bytes | 64u | Current number of bytes used to store items |
| curr_connections | 32u | Number of open connections |
| total_connections | 32u | Total number of connections opened since the server started running |
| connection_structures | 32u | Number of connection structures allocated by the server |
| reserved_fds | 32u | Number of misc fds used internally |
| cmd_get | 64u | Cumulative number of retrieval reqs |
| cmd_set | 64u | Cumulative number of storage reqs |
| cmd_flush | 64u | Cumulative number of flush reqs |
| cmd_touch | 64u | Cumulative number of touch reqs |
| get_hits | 64u | Number of keys that have been requested and found present |
| get_misses | 64u | Number of items that have been requested and not found |
| delete_misses | 64u | Number of deletions reqs for missing keys |
| delete_hits | 64u | Number of deletion reqs resulting in an item being removed. |
| incr_misses | 64u | Number of incr reqs against missing keys. |
| incr_hits | 64u | Number of successful incr reqs. |
| decr_misses | 64u | Number of decr reqs against missing keys. |
| decr_hits | 64u | Number of successful decr reqs. |
| cas_misses | 64u | Number of CAS reqs against missing keys. |
| cas_hits | 64u | Number of successful CAS reqs. |
| cas_badval | 64u | Number of CAS reqs for which a key was found, but the CAS value did not match. |
| touch_hits | 64u | Numer of keys that have been touched with a new expiration time |
| touch_misses | 64u | Numer of items that have been touched and not found |
| auth_cmds | 64u | Number of authentication commands handled, success or failure. |
| auth_errors | 64u | Number of failed authentications. |
| evictions | 64u | Number of valid items removed from cache to free memory for new items |
| reclaimed | 64u | Number of times an entry was stored using memory from an expired entry |
| bytes_read | 64u | Total number of bytes read by this server from network |
| bytes_written | 64u | Total number of bytes sent by this server to network |
| limit_maxbytes | 32u | Number of bytes this server is allowed to use for storage. |
| threads | 32u | Number of worker threads requested. (see doc/threads.txt) |
| conn_yields | 64u | Number of times any connection yielded to another due to hitting the -R limit. |
| hash_power_level | 32u | Current size multiplier for hash table |
| hash_bytes | 64u | Bytes currently used by hash tables |
| hash_is_expanding | bool | Indicates if the hash table is being grown to a new size |
| expired_unfetched | 64u | Items pulled from LRU that were never touched by get/incr/append/etc before expiring |
| evicted_unfetched | 64u | Items evicted from LRU that were never touched by get/incr/append/etc. |
| slab_reassign_running | bool | If a slab page is being moved |
| slabs_moved | 64u | Total slab pages moved |
| crawler_reclaimed | 64u | Total items freed by LRU Crawler |
| lrutail_reflocked | 64u | Times LRU tail was found with active ref. Items moved to head to avoid OOM errors. |
Source: https://github.com/memcached/memcached/blob/master/doc/protocol.txt
Во время веб-разработки мне нужно было Memcached (исходный код) установлен на моей локальной машине, чтобы внимательно имитировать то, что происходит на моем сервере. Я разработал под windows и понял, что установка мема Memcached не так проста, как в Linux. На самом деле довольно много людей спрашивают о том, как это сделать, поэтому я дам вам несколько хороших вариантов. Вот как установить систему кеширования в Windows.
Решение 1. Установите Memcached для Windows (v1.4.5)
 Это самый очевидный способ сделать это. Мне понадобилось совсем немного времени, чтобы найти нужные файлы, поэтому я включил ссылки, которые использовал:
- Загрузите стабильную версию, либо в 32-битный или 64-битный Я протестировал 64-битную версию.
- Создайте каталог, такой как c: memcached (или что-то еще)
- Скопируйте содержимое .zip в этот каталог. Должен быть один файл memcached.exe (32-разрядный) или пара DLL-файлов (64-разрядный)
- Откройте командную строку (необходимо открыть как администратор). Вы можете сделать это, выбрав «Пуск»> «Поиск» и введите «cmd»
- Введите команду «c: memcached memcached.exe -d start», Чтобы начать службу
- Введите команду «c: memcached memcached.exe -d stop», Чтобы остановить службу
- Чтобы изменить размер пула памяти, введите «c: memcached memcached.exe -m 512»Для 512 МБ
Ваша служба Memcached теперь должна работать и ждать входящих пар ключ / значение.
ВАЖНЫЕ ЗАМЕТКИ:
1– Если вы хотите использовать это в локальном веб-приложении, вы должны убедиться, что ваш язык имеет встроенную поддержку Memcached. Например, PHP может потребовать установки дополнительных библиотек и модификаций файла конфигурации php.ini. Если есть спрос, я тоже напишу объяснение.
2– Конфигурация по умолчанию – создание пула памяти 64 МБ и прослушивание порта 11211.
3– Введите команду «c: memcached memcached.exe -d install», чтобы Memcached запускался после перезагрузки. Теперь вы должны увидеть Memcached в качестве службы Windows на панели управления. ВАЖНО: если вы решите установить его как сервис, вы потеряете возможность изменять размер пула через командную строку. Вам нужно будет отредактировать ключ реестра следующим образом:
- Запустите regedit через Пуск> Поиск
- Найдите «HKEY_LOCAL_MACHINE SYSTEM CurrentControlSet Services memcached»
- Измените «-m VALUE» на количество нужных мегабайт «-m 512» = 512 МБ.
Решение 2. Установите Couchbase вместо Memcached
 Возможно, вы не слышали об этом, но Couchbase это JSONхранилище документов, но также имеет интерфейс хранилища ключей / значений в памяти, который совместим с Memcached, Это означает, что вы можете установить Couchbase для Windows и настроить его так же, как Memcached. Круто то, что он поставляется с классным графическим интерфейсом и обычным установщиком Windows.
Couchbase также имеет отличный механизм восстановления после отказа и управление кластером, которого нет в Memcached, но это немного выходит за рамки этой статьи.
- Перейти к Couchbase страница загрузки
- Выберите установщик Windows
- Запустите установочный файл
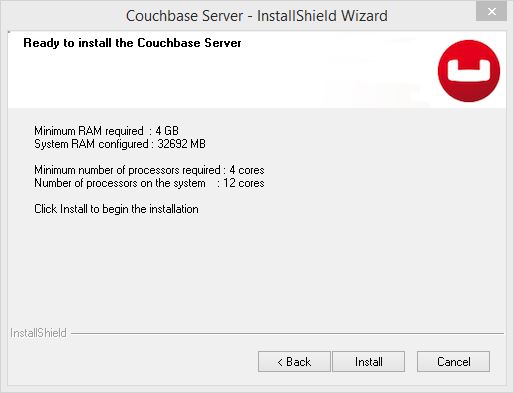 В конце процесса установки браузер откроется по адресу HTTP: // локальный: 8091 / index.html и вы пройдете первоначальную настройку. Важный экран:
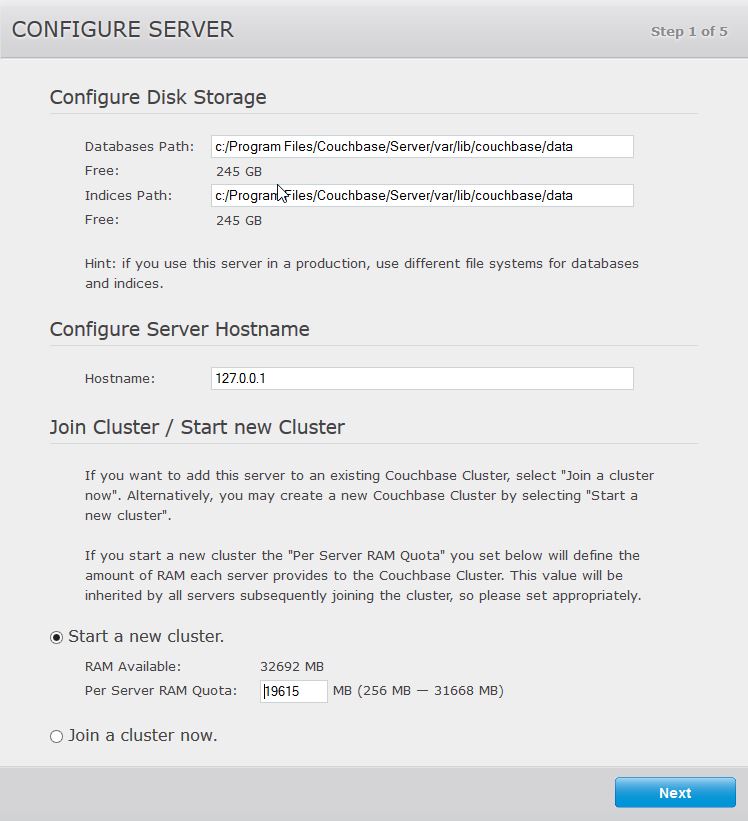 В целях Memcached вы можете игнорировать настройки дискового хранилища, так как вы создадите пул памяти. Просто оставьте все как есть.
Выберите «запустить новый кластер» и выберите объем оперативной памяти, который вы хотите использовать. Подойдет что-нибудь между 64 и 512 МБ. Это действительно ваше дело, и вы можете изменить это позже. Нажмите Next и проигнорируйте Sample buckets. Нажмите Далее еще раз.
 Это еще один важный экран. Здесь вы создадите пул памяти. Убедитесь, что вы выбрали тип корзины Memcached. Для эмуляции Memcached вы, вероятно, не Нужно включить реплики. Но вы должны включить команду Flush. Нажмите Next.
Вы можете отказаться от уведомлений и регистрации, если хотите. Нажмите кнопку “Далее.
Завершающим этапом является установка вашего пароля. Нажмите кнопку “Далее. И вуаля! Теперь у вас есть работающий узел Memcached, за которым вы можете следить с помощью классного графического интерфейса, в котором вы можете просматривать содержимое кэша (полезно для отладки!)
 Порт по умолчанию для блоков Memcached – это стандарт 11211. Вы можете изменить это в Data Buckets> [Bucket Name] > Редактировать
Вывод
Теперь у вас есть два надежных способа установки Memcached на машины Windows. В целях разработки мне нравится Couchbase, но если вы хотите что-то более легкое, оригинальный порт Memcache для Windows не может быть лучше. Если у вас есть дополнительные вопросы, просто оставьте комментарий, и я сделаю все возможное, чтобы ответить. Спасибо, что прочитали это.
2 Answers
Steps to install Memcached on Windows:
- Download a stable version, in either 32-bit or 64-bit I have tested the 64-bit version.
- Unzip it in some hard drive folder. For example
C:\memcached - There will be
memcached.exefile in the unzipped folder. - Open a command prompt (need to be opened as administrator).
- Run
c:\memcached\memcached.exe -d install
For start and stop run following command line
c:\memcached\memcached.exe -d start
c:\memcached\memcached.exe -d stop
![]()
answered Dec 25, 2019 at 8:38
![]()
Mahdi BashirpourMahdi Bashirpour
17.2k14 gold badges118 silver badges146 bronze badges
7
-
Don’t forget to run
cmdas Administrator, otherwise service may fail to install.Sep 2, 2021 at 14:57
-
Linking to binaries on some random Chinese website seems dodgy.
Aug 16, 2022 at 15:44
-
A windows port is now available on GitHub with binaries. It looks more trustworthy to me.
Sep 4, 2022 at 16:44
As told in some previous comments the v1.4.4 is sometimes coming from a trusted source, sometimes not and it becomes hard to find. But there is now a very stable Windows native port for both 32 bits and 64 bits versions.
https://github.com/jefyt/memcached-windows
It’s running well on our two PHP servers (PHP7 and PHP8).
Hope this helps.
Another Cygwin version is also available here and runs well too
https://github.com/nono303/memcached
answered Nov 17, 2022 at 9:45
![]()
b126b126
5444 silver badges11 bronze badges
3
-
Hi b126, could you please help with how to configure it with PHP 8? What should we place in the extension directory of PHP, I didn’t find the .dll file in the zip which I downloaded.
Nov 18, 2022 at 3:50
-
Do you already have a Memcached instance running? If so, then you can install the appropriate extensions for PHP that will use your Memcached instance. This describes how to do : stackoverflow.com/questions/14777857/…
Nov 18, 2022 at 10:14
-
The PHP-MEMCACHED extension is available here: github.com/php-memcached-dev/php-memcached. php_memcached.dll should go your \php\ext directory. libmemcached.dll and libhashkit.dll should go to a path folder
Dec 2, 2022 at 11:01
This article will teach you how to install and set up Memcached in both a Windows and Linux environment.
If you’ve already completed the installation process, you can also learn how to access and manage data in Memcached with PHP.
What is Memcached?
Memcached is a free, open-source memory caching system, often used for enhancing the speed of dynamic database-driven websites.
The cached data gets stored in a short-term, dynamic memory location that can be easily accessed within your applications by a key name.
Install Memcached on Windows
Memcached installation in a Windows environment is pretty straightforward. There are just a few steps to follow.
There are two locations that you need to download from. The executable and supporting files GitHub repository, and the PHP extension from PHP’s official website.
First, we’ll start with the executable file and supporting files. You can download them from GitHub. They keep the repository updated regularly with the latest versions.
Make sure to download the correct files that your system will support, x64 vs. x86, etc., and place them in a directory on your local drive. My files are located on the C: drive at:
C:\memcached
Now, we need to head on over to the PHP PECL Downloads Page where you’ll see a long list of extension releases for PHP.
This list only contains a handful of Memcached Windows download links. The latest Windows download, at the time of this article, allows support for PHP versions 7.2 through 7.4. Download the file that fits your PHP environment description, x64 or x86, or thread-safe vs. non-thread-safe.
Move the newly downloaded DLL file to the location of your PHP installation and into the ext folder. Mine is located here:
C:\php\ext
In my case, I’ve downloaded the installation file for PHP 7.4, so my php.ini configuration will look like this:
[Memcache]
extension=php-7.4.x_memcache.dll
memcache.allow_failover = 0
memcache.chunk_size = 32768
memcache.default_port = 11211
memcache.hash_strategy = standard
memcache.hash_function = crc32
memcache.protocol = ascii
memcache.compress_threshold = 20000
memcache.lock_timeout = 1
Make sure you’ve used the correct file name when updating your
php.inifile. Yours could be different than what’s shown in this example and adding an incorrect file name will cause issues with the installation.
After you’ve downloaded and moved the DLL file to the correct location and updated your php.ini file, restart PHP by opening the Services app, or services.msc, and restarting the World Wide Web Publishing Service service.
[Ctrl+R]
services.msc
The final step is starting Memcached in your Windows environment by running the following command:
C:\memcached\memcached.exe -d start
Make sure you’re in the directory where the memcached.exe file is located before starting it, otherwise you’ll get an error. Alternatively, you could set up the path in your system’s environment variables to point to the correct directory so you can start it from anywhere in the command-line tool.
Install Memcached on Linux
There are two options for the first step of an installation in a Linux environment. You can either download the file directly from the downloads page or you can run the wget command below, which will grab and download the latest version automatically to your current active directory:
wget http://memcached.org/latest
Next, you’ll need to unzip the downloaded tar.gz file:
tar -zxvf memcached-1.x.x.tar.gz
You’ll need to replace «1.x.x» with the version number that was downloaded. At the time of this writing, the latest version was 1.6.9, so the command would be
tar -zxvf memcached-1.6.9.tar.gz
Now that the file contents are extracted, move over to the newly created directory, again using the correct version number in place of «1.x.x»:
cd memcached-1.x.x
Finally, complete the installation from the new directory:
./configure && make && make test && sudo make install
That’s pretty much it. With my Linux/Apache environment, I had to restart Apache for the new installation to take effect within my PHP applications, but all you need to do is run this command to restart Apache:
sudo systemctl restart apache2
Conclusion
Memcached is a great solution for memory caching, in either a Windows or Linux environment. Especially when querying heavy loads of data, or data that typically doesn’t change often.
Now that everything is setup in your environment, head on over to the next article to leverage the power of Memcached with PHP.