Before you begin
You must use a kubectl version that is within one minor version difference of
your cluster. For example, a v1.28 client can communicate
with v1.27, v1.28,
and v1.29 control planes.
Using the latest compatible version of kubectl helps avoid unforeseen issues.
Install kubectl on Windows
The following methods exist for installing kubectl on Windows:
- Install kubectl binary with curl on Windows
- Install on Windows using Chocolatey, Scoop, or winget
Install kubectl binary with curl on Windows
-
Download the latest 1.28 patch release:
kubectl 1.28.2.Or if you have
curlinstalled, use this command:curl.exe -LO "https://dl.k8s.io/release/v1.28.2/bin/windows/amd64/kubectl.exe" -
Validate the binary (optional)
Download the
kubectlchecksum file:curl.exe -LO "https://dl.k8s.io/v1.28.2/bin/windows/amd64/kubectl.exe.sha256"Validate the
kubectlbinary against the checksum file:-
Using Command Prompt to manually compare
CertUtil‘s output to the checksum file downloaded:CertUtil -hashfile kubectl.exe SHA256 type kubectl.exe.sha256 -
Using PowerShell to automate the verification using the
-eqoperator to
get aTrueorFalseresult:$(Get-FileHash -Algorithm SHA256 .\kubectl.exe).Hash -eq $(Get-Content .\kubectl.exe.sha256)
-
-
Append or prepend the
kubectlbinary folder to yourPATHenvironment variable. -
Test to ensure the version of
kubectlis the same as downloaded:Or use this for detailed view of version:
kubectl version --client --output=yaml
Install on Windows using Chocolatey, Scoop, or winget
-
To install kubectl on Windows you can use either Chocolatey
package manager, Scoop command-line installer, or
winget package manager.- choco
- scoop
- winget
choco install kubernetes-cliwinget install -e --id Kubernetes.kubectl -
Test to ensure the version you installed is up-to-date:
-
Navigate to your home directory:
# If you're using cmd.exe, run: cd %USERPROFILE% cd ~ -
Create the
.kubedirectory: -
Change to the
.kubedirectory you just created: -
Configure kubectl to use a remote Kubernetes cluster:
New-Item config -type file
Verify kubectl configuration
In order for kubectl to find and access a Kubernetes cluster, it needs a
kubeconfig file,
which is created automatically when you create a cluster using
kube-up.sh
or successfully deploy a Minikube cluster.
By default, kubectl configuration is located at ~/.kube/config.
Check that kubectl is properly configured by getting the cluster state:
If you see a URL response, kubectl is correctly configured to access your cluster.
If you see a message similar to the following, kubectl is not configured correctly or is not able to connect to a Kubernetes cluster.
The connection to the server <server-name:port> was refused - did you specify the right host or port?
For example, if you are intending to run a Kubernetes cluster on your laptop (locally), you will need a tool like Minikube to be installed first and then re-run the commands stated above.
If kubectl cluster-info returns the url response but you can’t access your cluster, to check whether it is configured properly, use:
kubectl cluster-info dump
Optional kubectl configurations and plugins
Enable shell autocompletion
kubectl provides autocompletion support for Bash, Zsh, Fish, and PowerShell,
which can save you a lot of typing.
Below are the procedures to set up autocompletion for PowerShell.
The kubectl completion script for PowerShell can be generated with the command kubectl completion powershell.
To do so in all your shell sessions, add the following line to your $PROFILE file:
kubectl completion powershell | Out-String | Invoke-Expression
This command will regenerate the auto-completion script on every PowerShell start up. You can also add the generated script directly to your $PROFILE file.
To add the generated script to your $PROFILE file, run the following line in your powershell prompt:
kubectl completion powershell >> $PROFILE
After reloading your shell, kubectl autocompletion should be working.
Install kubectl convert plugin
A plugin for Kubernetes command-line tool kubectl, which allows you to convert manifests between different API
versions. This can be particularly helpful to migrate manifests to a non-deprecated api version with newer Kubernetes release.
For more info, visit migrate to non deprecated apis
-
Download the latest release with the command:
curl.exe -LO "https://dl.k8s.io/release/v1.28.2/bin/windows/amd64/kubectl-convert.exe" -
Validate the binary (optional).
Download the
kubectl-convertchecksum file:curl.exe -LO "https://dl.k8s.io/v1.28.2/bin/windows/amd64/kubectl-convert.exe.sha256"Validate the
kubectl-convertbinary against the checksum file:-
Using Command Prompt to manually compare
CertUtil‘s output to the checksum file downloaded:CertUtil -hashfile kubectl-convert.exe SHA256 type kubectl-convert.exe.sha256 -
Using PowerShell to automate the verification using the
-eqoperator to get
aTrueorFalseresult:$($(CertUtil -hashfile .\kubectl-convert.exe SHA256)[1] -replace " ", "") -eq $(type .\kubectl-convert.exe.sha256)
-
-
Append or prepend the
kubectl-convertbinary folder to yourPATHenvironment variable. -
Verify the plugin is successfully installed.
If you do not see an error, it means the plugin is successfully installed.
-
After installing the plugin, clean up the installation files:
del kubectl-convert.exe kubectl-convert.exe.sha256
What’s next
- Install Minikube
- See the getting started guides for more about creating clusters.
- Learn how to launch and expose your application.
- If you need access to a cluster you didn’t create, see the
Sharing Cluster Access document. - Read the kubectl reference docs
Kubernetes is a container-based platform for managing cloud resources and developing scalable apps. It is widely regarded as the most common platform for automating, deploying, and scaling the entire cloud infrastructure. The platform runs on all major operating systems and is the most widely used open-source cloud tool.
Kubernetes can scale your entire infrastructure, monitor each service’s health, act as a load balancer, and automate deployments, among other things. You can deploy your pods (docker containers) and services across the cloud by installing and configuring as many nodes (clusters) as you want.
Let’s get started. We will guide you through the complete roadmap on how to install Kubernetes for Windows users. This tutorial will show you how to set up Kubernetes and deploy the official web GUI dashboard, which will allow you to manage and monitor everything.

Prerequisites
For installing Kubernetes in your system, here are a few prerequisites that need special attention. The hardware and software requirements are discussed below:
Hardware requirements
- Master node with at least 2 GB memory. (Additional will be great)
- Worker node with 700 MB memory capacity.
- Your Mouse/Keyboard (monitor navigation)
Software requirements
- Hype-V
- Docker Desktop
- Unique MAC address
- Unique product UUID for every node
Ensuring that there is a full range of connectivity between all the machines in the cluster is a must.
Installation Procedure
Step 1: Install & Setup Hyper-V
As we all know, Windows has its virtualization software, known as Hyper-V, which is essentially VirtualBox on steroids. Hyper-V allows you to manage your virtual machines (VMs) using either the free Microsoft GUI tool or the command line. It’s simple to enable Hyper-V, but first, make sure your PC meets the following requirements:
- Your operating system should be Windows 10 (Enterprise, Pro, or Education), with
- At least 4GB of RAM and CPU Virtualization support, though you should double-check that it’s turned on in your BIOS settings.
You can disable or enable features like Hyper-V that may not be pre-installed when Windows is installed. Always keep in mind that some of the features require internet access to download additional Windows Update components.
To enable Hyper-V on your machine, follow the steps below:
1. Open the Control Panel.
2. Select Programs from the left panel.

3. Next, go to Programs and Features, then Turn Windows Features On or Off.
4. Examine Hyper-V and the Hypervisor Platform for Windows.


5. Select OK.
Your system will now begin installing Hyper-V in the background; it may be necessary to reboot a few times until everything is properly configured. Don’t hold your breath for a notification or anything! Verify that Hyper-V is installed successfully on your machine by running the following command as Administrator in PowerShell:
Get-WindowsOptionalFeature -Online -FeatureName Microsoft-Hyper-V
Once the state is shown as Enabled for above command in Power shell, we are good to go.

Step 2: Download Docker for Windows and install it.
Kubernetes is a container orchestration system built on top of Docker. It is essentially just a tool for communicating with Docker containers and managing everything at an enterprise level. Simply go to install Docker and click to Get Docker Desktop for Windows (stable).
Windows users can use Docker Desktop.
Docker Desktop for Windows is a version of Docker optimized for Windows 10. It’s a native Windows application that makes developing, shipping, and running dockerized apps simple. Docker Desktop for Windows is the fastest and most reliable way to develop Docker apps on Windows, as it uses Windows-native Hyper-V virtualization and networking. Docker Desktop for Windows can run Docker containers on both Linux and Windows.
Installation of Docker Desktop
Let us take a look on the different steps involved in installing docker desktop.
- Double-click Docker for Windows Installer to run the installer.
- Docker starts automatically once the installation is complete. Docker is running and accessible from a terminal, as indicated by the whale in the notification area.
- Run .
- Try out some Docker commands in a command-line terminal like PowerShell!
- Run the Docker version to check the version.
- Run Docker run hello-world to verify that Docker can pull and run images.
- Boom!
As long as the Docker Desktop for Windows app is running, Docker is accessible from any terminal. The Docker whale in the taskbar has a setting button that can be accessed from the UI.
For a detailed step by step installation guide with screenshot, visit the blog — How to Install Docker on Windows, Mac, & Linux: A Step-By-Step Guide
WARNING: FOLLOW THE INSTRUCTIONS BELOW! If Docker was successfully installed but you can’t find its tray icon, you’ll need to restart your computer. Check the official troubleshooting guide here if the issue persists.
Step 3: Install Kubernetes on Windows 10
Docker includes a graphical user interface (GUI) tool that allows you to change some settings or install and enable Kubernetes.
To install Kubernetes, simply follow the on-screen instructions on the screen:
1. Right-click the Docker tray icon and select Properties.
2. Select «Settings» from the drop-down menu.

3. Select «Kubernetes» from the left panel.
4. Check Enable Kubernetes and click «Apply»

Docker will install additional packages and dependencies during the installation process. It may take between 5 and 10 minutes to install, depending on your Internet speed and PC performance. Wait until the message ‘Installation complete!’ appears on the screen. The Docker app can be used after Kubernetes has been installed to ensure that everything is working properly. Both icons at the bottom left will turn green if both services (Docker and Kubernetes) are running successfully and without errors.
Example.

Step 4: Install Kubernetes Dashboard

The official web-based UI for managing Kubernetes resources is Kubernetes Dashboard. It isn’t set up by default. Kubernetes applications can be easily deployed using the cli tool kubectl, which allows you to interact with your cloud and manage your Pods, Nodes, and Clusters. You can easily create or update Kubernetes resources by passing the apply argument followed by your YAML configuration file.
Use the following commands to deploy and enable the Kubernetes Dashboard.
1. Get the yaml configuration file from here.
2. Use this to deploy it.
. kubectl apply -f .\recommended.yaml
3. Run the following command to see if it’s up and running.:
kubectl.exe get -f .\recommended.yaml.txt

Step 5: Access the dashboard
The dashboard can be accessed with tokens in two ways: the first is by using the default token created during Kubernetes installation, and the second (more secure) method is by creating users, giving them permissions, and then receiving the generated token. We’ll go with the first option for the sake of simplicity.
1. Run the following command PowerShell (not cmd)
((kubectl -n kube-system describe secret default | Select-String "token:") -split " +")[1]
2. Copy the generated token
3. Run
kubectl proxy.
4. Open the following link on your browser:
http://localhost:8001/api/v1/namespaces/kubernetes-dashboard/services/https:kubernetes-dashboard:/proxy/
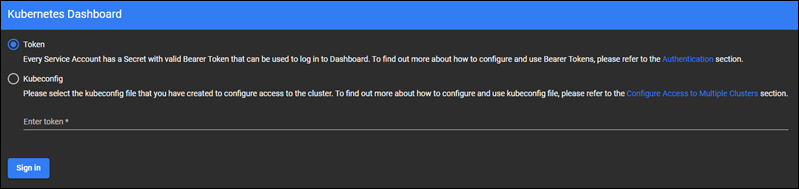
5. Select
Token & paste the generated token
6. Sign In
Finally

You’ll be able to see the dashboard and your cloud resources if everything is set up correctly. You can then do almost all of the «hard» work without having to deal with the CLI every time. You may occasionally get your hands dirty with the command line, but if you don’t understand Docker and Kubernetes or don’t have the time to manage your own cloud, it’s better to stick with some PaaS providers that can be quite expensive.
Kubernetes Uninstallation Process
The procedures for uninstalling cert-manager on Kubernetes are outlined below. Depending on which method you used to install cert-manager — static manifests or helm — you have two options.
Warning: To uninstall cert-maneger, follow the same steps as you did to install it, but in reverse. Whether cert-manager was installed from static manifests or helm, deviating from the following process can result in issues and potentially broken states. To avoid this, make sure you follow the steps outlined below when uninstalling.
Step 1: Before continuing, make sure that all user-created cert-manager resources have been deleted. You can check for any existing resources with the following command:
$ kubectl get Issuers,ClusterIssuers,Certificates,CertificateRequests,Orders,Challenges --all-namespaces
After you’ve deleted all of these resources, you can uninstall cert-manager by following the steps outlined in the installation guide.
Step 2: Using regular manifests to uninstall.
- Uninstalling from a regular manifest installation is as simple as reversing the installation process and using the delete command.
kubectl.
2. Delete the installation manifests using a link to your currently running version vX.Y. Z like so:
$ kubectl delete -f https://github.com/jetstack/cert-manager/releases/download/vX.Y.Z/cert-manager.yaml
Step 3: Uninstalling with Helm.
1. Uninstalling cert-manager from a Helm installation is as simple as reversing the installation process and using the delete command on both the server and the client. kubectl and helm.
$ helm --namespace cert-manager delete cert-manager
2. Next, delete the cert-manager namespace:
$ kubectl delete namespace cert-manager
3. Finally, delete the cert-manger CustomResourceDefinitions using the link to the version vX.Y.Z you installed:
$ kubectl delete -f https://github.com/jetstack/cert-manager/releases/download/vX.Y.Z/cert-manager.crds.yaml
The namespace is in the process of being terminated.
The namespace may become stuck in a terminating state if it is marked for deletion without first deleting the cert-manager installation. This is usually because the APIService resource is still present, but the webhook is no longer active and thus no longer reachable.
4. To fix this, make sure you ran the above commands correctly, and if you’re still having problems, run:
$ kubectl delete apiservice v1beta1.
Conclusion
In this tutorial, we have explained in detail how to install Kubernetes with Hyper-V. Also, we have tackled what requirements we need, both in terms of the software and hardware. We have explained how to install Hyper-V and Docker on Windows 10.
It is important to note that the fundamental difference between Kubernetes and Docker is that Kubernetes is meant to run across a cluster and Docker is meant to run through nodes.
Kubernetes is also more extensive than Docker Swarm and is meant to coordinate a cluster of nodes at scale in production in an efficient manner. Each software is crucial to having a smooth installation process.
We finally looked at how to install and uninstall Kubernetes.
Awhile back I created a blog post on how you can install Kubernetes on Windows Server, and since then I also got a lot of questions on how to install Kubernetes on Windows 11 or Windows 11 IoT running Linux and Windows Containers. So, in this blog post we are going to have a look at how to install Kubernetes (K8s or K3s) on Windows 11 and Windows 11 IoT with Azure Kubernetes Service (AKS) Edge Essentials. This allows you to run a Kubernetes cluster on your Windows machine or on your edge and IoT devices, as a supported version from Microsoft.
What is AKS Edge Essentials
Azure Kubernetes Service Edge Essentials is an on-premises Kubernetes implementation of Azure Kubernetes Service (AKS) that automates running containerized applications at scale. AKS Edge Essentials includes a Microsoft-supported Kubernetes platform that includes a lightweight Kubernetes distribution with a small footprint and simple installation experience, making it easy for you to deploy Kubernetes on PC-class or “light” edge hardware. AKS Edge Essentials makes it easier to get started with your containerized application, bringing cloud-native best practices to your edge application. Learn more about AKS Edge Essentials on Microsoft Learn.
With AKS Edge Essentials, you get the benefit of having a fully supported stack from kernel to cloud.
It allows you to run Linux and Windows containers and next to local management, it also brings Azure management to your Kubernetes cluster which helps you to provide a single control plane, operations, and developer experience for all your Kubernetes clusters.
AKS Edge Essentials includes the following features, managed by Microsoft:
- A lightweight, CNCF-conformant K8S and K3S distribution that is supported and managed by Microsoft. The key difference between AKS on HCI and AKS on Windows is that AKS on Windows has minimal compute and memory requirements (4 GB RAM and 2 vCPUs).
- Each Kubernetes cluster runs in its own Hyper-V isolated virtual machine and includes many features to help secure your container infrastructure.
- Microsoft-maintained Linux and Windows worker nodes virtual machine images adhere to security best practices. Microsoft also refreshes these images monthly with the latest security updates.
- Simplified installation experience with PowerShell cmdlets and agents to enable provisioning and control of VMs and infrastructure. Microsoft provides automatic updates for your Kubernetes deployment, so you stay up to date with the latest available Kubernetes versions.
Concepts
To run Kubernetes on Windows 11, AKS Edge Essentials creates one or two virtual machines for your management and worker nodes depending on if you only need Linux or if you also want to add a Windows worker node.
You can use an external or internal virtual switch on Hyper-V. An external virtual switch connects to a wired, physical network by binding it to a physical network adapter. It gives virtual machines access to a physical network to communicate with devices on an external network. An internal virtual switch connects to a network that can be used only by the virtual machines running on the host that has the virtual switch, and between the host and the virtual machines.
To learn more about the concepts of Kubernetes on Windows 11 and Windows 11 IoT with Azure Kubernetes Service Edge Essentials, check out Microsoft Learn.
Nested Virtualization
Deploying AKS Edge Essentials on top of a nested virtualization environment is not supported for production scenarios and is limited to developer purposes. This guide assumes you’re using the Hyper-V hypervisor. We do not support using a non-Microsoft hypervisor, such as KVM or vSphere.
Prerequisites
Let’s have a look at the requirements for AKS Edge Essentials on Windows 11. Now that said, this also works even on Windows 10 or Windows Server 2019 and Windows Server 2022.
Hardware and operating system requirements
- Operating System:
- Windows 10/11 Pro
- Windows 10/11 Enterprise
- Windows 10/11 IoT Enterprise
- Windows Server 2019
- Windows Server 2022
- CPU:
- 2 Cores (2 vCPUs) or 4 if Arc-enabled cluster
- clock speed at least 1.8 GHz
- Memory
- 4 GB with at least 2.5 GB free or 8 GB with at least 4.5 GB free if Arc-enabled.
- Disk space
- At least 14 GB free
For more details on requirements, check out the Microsoft Learn page.
Install Kubernetes on Windows 11 and Windows 10
First, download the installer for AKS Edge Essentials. Depending on which Kubernetes distribution you want to use download the K8s or K3s installer. If you’re creating an optional Windows worker node, you’ll need the Windows node files. To make it easy, I download all the files to C:\AKSEdgeE.
- K8s installer
- K3s installer
- Windows node files
# Create Folder
mkdir C:\AKSEdgeE

# K8s installer
$urlK8sMSI = "https://aka.ms/aks-edge/k8s-msi"
$path = "C:\AKSEdgeE\k8s.msi"
Start-BitsTransfer -Source $urlK8sMSI -Destination $path

# K3s installer
$urlK3sMSI = "https://aka.ms/aks-edge/k3s-msi"
$path = "C:\AKSEdgeE\k3s.msi"
Start-BitsTransfer -Source $urlK3sMSI -Destination $path

# Windows Node Files
$urlWindowsFiles = "https://aka.ms/aks-edge/windows-node-zip"
$path = "C:\AKSEdgeE\windowsNodeFiles.zip"
Start-BitsTransfer -Source $urlWindowsFiles -Destination $path
In addition to the MSI, Microsoft provides a few samples and tools which you can download from the AKS Edge GitHub repo. Navigate to the Code tab and click the Download Zip button to download the repository as a .zip file. Extract the GitHub .zip file to a working folder. Or you can download it using the following PowerShell script:
# Download and expand AKS Edge Essential Tools
$urlTools = "https://github.com/Azure/AKS-Edge/archive/refs/heads/main.zip"
$path = "C:\AKSEdgeE"
Start-BitsTransfer -Source $urlTools -Destination $path
Expand-Archive -Path $path\main.zip -DestinationPath $path\mainNow let’s install the AKS Edge Essentials on our Windows PC using the following commands.
Without Windows Container support:
msiexec.exe /i AksEdge-kXs-x.xx.x.msi INSTALLDIR=C:\Programs\AksEdge VHDXDIR=C:\vhdxWith Windows Container support:
msiexec.exe /i AksEdge-kXs-x.xx.x.msi ADDLOCAL=CoreFeature,WindowsNodeFeature INSTALLDIR=C:\Programs\AksEdge VHDXDIR=C:\vhdxIn my case I am just running the installation for the K3s.msi stored in the C:\AKSEdgeE folder:
msiexec.exe /i C:\AKSEdgeE\k3s.msi INSTALLDIR=C:\Programs\AksEdge VHDXDIR=C:\vhdxAfter the installation you can check if the AKSEdge PowerShell module is available. You may have to close and reopen your terminal.
Set-ExecutionPolicy RemoteSigned
Import-Module AksEdge
Get-Command -Module AKSEdge | Format-Table Name, VersionNow you can prepare the AKS Edge Essentials host features, such as Hyper-V, SSH, power settings, and much more. This might require a system reboot.
Install-AksEdgeHostFeaturesAfter the reboot you can rerun the command and it will show the following:
There are two installation options to deploy your Kubernetes cluster, you can choose between the single machine deployment or the full deployment, which allows you to use multiple machines. For our example we are going to choose the single machine deployment.
There are some simple steps to which allow you to use some default parameters to install AKS Edge Essentials Kubernetes on Windows. However, we can also add a couple of additional parameters to configure a little bit more such as memory or CPU count used by our Kubernetes clusters and worker nodes.
# Create AKS Edge Config File
New-AksEdgeConfig -DeploymentType SingleMachineCluster -outFile C:\AKSEdgeE\aksedge-config.json | Out-Null
Now you can edit the aksedge-config.json file and add parameters to customize the configuration. You can read more about this here.
After you have modified the config file, you can run the deployment which installs Kubernetes on Windows 10 and Windows 11.
New-AksEdgeDeployment -JsonConfigFilePath C:\AKSEdgeE\aksedge-config.jsonConfirm that the deployment was successful by running:
kubectl get nodes -o wide
kubectl get pods -A -o wideDeploy a sample application
Now to test the deployment, Microsoft also offers a sample Kubernetes application, which is a simple voting app, with the container image for this application is hosted on Azure Container Registry (ACR). Since we already downloaded the AKS Edge Essential tools and sample from GitHub, you can just navigate to the following location:
cd "C:\AKSEdgeE\main\AKS-Edge-main\samples\others"With kubectl apply you can now deploy the app on the Kubernetes cluster:
kubectl apply -f linux-sample.yamlWait a few minutes for the pods to be in the running state:
kubectl get pods -o wideVerify the services:
kubectl get servicesWith after the deployment is finished the actual “public IP address” assigned to the service will show as EXNTERNAL-IP for the azure-vote-front service.
On single machine clusters, if you deployed your Kubernetes cluster without specifying a -ServiceIPRangeSize, you will not have allocated IPs for your workload services and you won’t have an external IP address. In this case, find the IP address of your Linux VM (Get-AksEdgeNodeAddr).
Get-AksEdgeNodeAddr -NodeType LinuxYou can now append the external port to the VM’s IP address (for example, 192.168.1.12:30432).
And now you can test your application in the brower.
To remove the test application you can run the following command:
kubectl delete -f linux-sample.yamlManage AKS Edge Essentials from Azure using Azure Arc
One of the things you can do in the Azure ecosystem is to connect Kubernetes clusters to the Azure control plane using Azure Arc. Which will provide you additional capabilities and features.
Azure Arc-enabled Kubernetes supports the following scenarios for connected clusters:
- Single pane of glass to view all connected Kubernetes clusters running outside of Azure for inventory, grouping, and tagging, along with Azure Kubernetes Service (AKS) clusters.
- Deploy applications and apply configuration using GitOps-based configuration management.
- View and monitor your clusters using Azure Monitor for containers.
- Enforce threat protection using Microsoft Defender for Kubernetes.
- Ensure governance through applying policies with Azure Policy for Kubernetes.
- Manage access by using Azure Active Directory for authentication and authorization checks on your cluster.
- Securely access your Kubernetes cluster from anywhere without opening inbound port on the firewall using Cluster Connect.
- Deploy Open Service Mesh on top of your cluster for observability and policy enforcement on service-to-service interactions
- Deploy machine learning workloads using Azure Machine Learning for Kubernetes clusters.
- Create custom locations as target locations for deploying Azure Arc-enabled data services (SQL Managed Instances, PostgreSQL server (preview)), App Services on Azure Arc (including web, function, and logic apps), and Event Grid on Kubernetes.
To connect your AKS Edge Essential cluster to Microsoft Azure using Azure Arc-enabled Kubernetes, check out the following Microsoft article.
Conclusion installing Kubernetes on Windows
I hope this quick article shows you how you can Install Kubernetes (K8s and K3s) on Windows 10 and Windows 11 with AKS Edge Essentials. You can easily use this for small Kubernetes deployments on-premises, at the edge, or even other cloud providers, and run your containerized apps on top. With the Azure Arc integration, you also can take advantage of the Azure control plane and management services to use your cloud-native deployment processes from cloud to edge.
Tags: AKS, AKS Edge, IoT, K8s, Kubernetes, Microsoft, Microsoft Azure, PowerShell, Virtualization, Windows, Windows 10, Windows 11 Last modified: March 30, 2023
If you need a portable, extensible, and open-source platform you can use to manage containerized workloads and services, Kubernetes on Windows is a must-have. Kubernetes enables you to deploy and manage containerized applications at scale.
In this tutorial, you’ll learn to install Kubernetes on Windows using Hyper-V and Docker. And at the end of this tutorial, you will have a working Kubernetes cluster and a web-based UI you can use to deploy and manage your pod and applications.
Read on and start scaling your applications!
Prerequisites
This tutorial will be a hands-on demonstration. If you’d like to follow along, be sure you have a Windows 10 computer (or later) with the following:
- At least 4GB of RAM. The general rule for RAM is 300MB for each node in the cluster.
- A processor that supports hardware virtualization (most Intel and AMD processors released since 2005).
Enabling Hyper-V to Support Virtualization
Before running Kubernetes, you first have to enable Hyper-V on your machine. Hyper-V is a type 1 hypervisor that provides the virtualization technology upon which Kubernetes will run.
1. Open PowerShell as an administrator, and run the command below to enable Hyper-V (Microsoft-Hyper-V).
2. Once enabled, reboot your computer to apply the changes.
3. Finally, run the following command to verify that Hyper-V is enabled and running.
Get-WindowsOptionalFeature -Online -FeatureName Microsoft-Hyper-VThe output below shows you’ve successfully enabled Hyper-V.

Installing Docker Desktop
After enabling Hyper-V, you next need to install Docker Desktop so that you can work quickly with Docker containers on your computer. Docker Desktop includes everything you need to run containers, including the Docker Engine, a container runtime, and a management UI.
Kubernetes is designed to run on top of a container runtime like Docker. While you could install Kubernetes directly on your computer, using Docker Desktop is much easier as it includes all of the necessary tools and utilities.
1. Open your favorite web browser, navigate to the Docker Desktop download page, and download and run the installer.

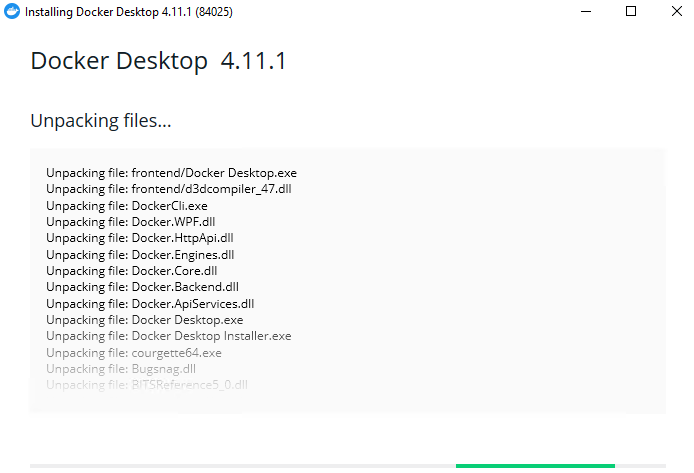
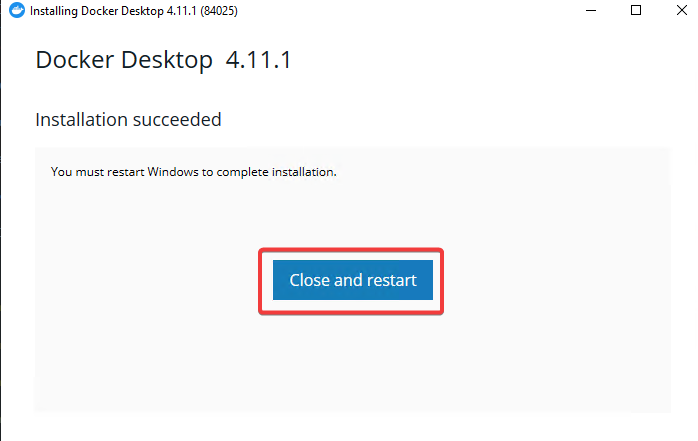
2. Once Docker Desktop is installed, click Close and Restart to restart your computer.
A restart is required to complete the installation since the installer needs to modify your Windows configuration.
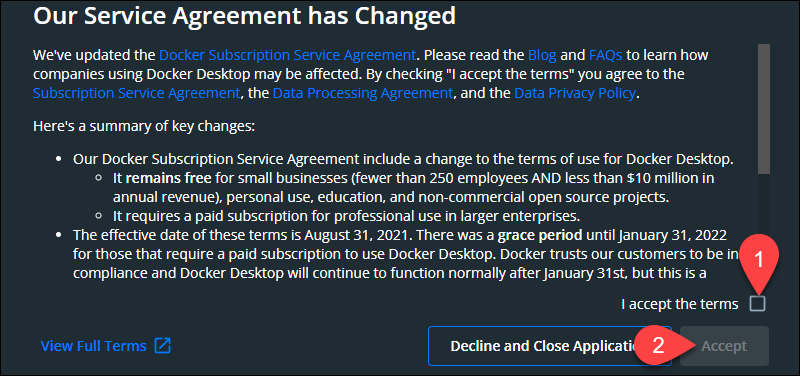
3. After restart, open Docker Desktop, tick the I accept the terms checkbox, and click Accept to accept the license agreement.
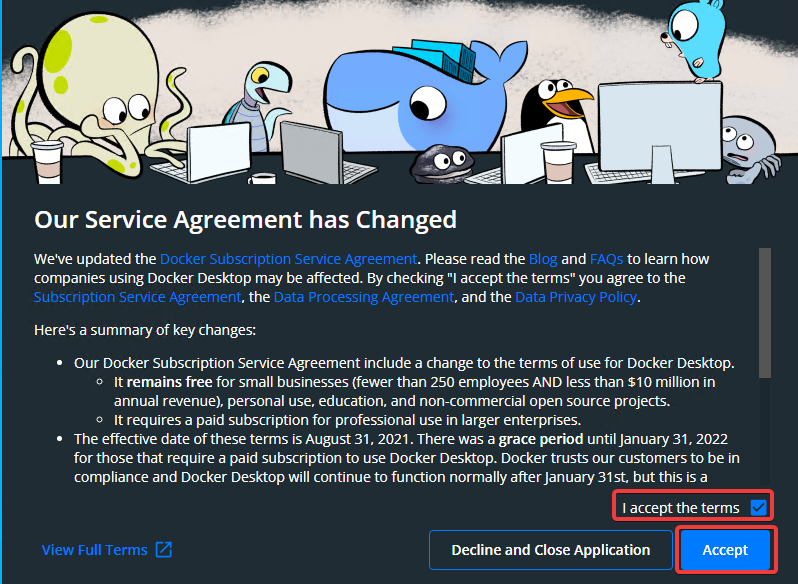
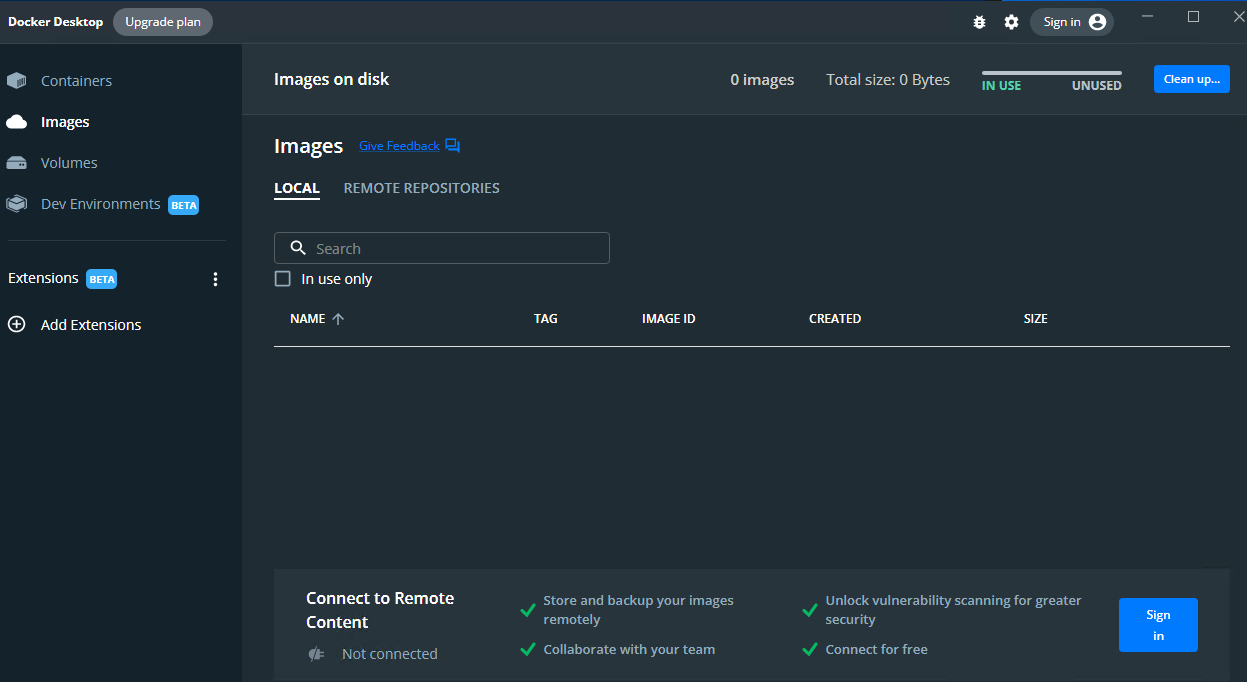
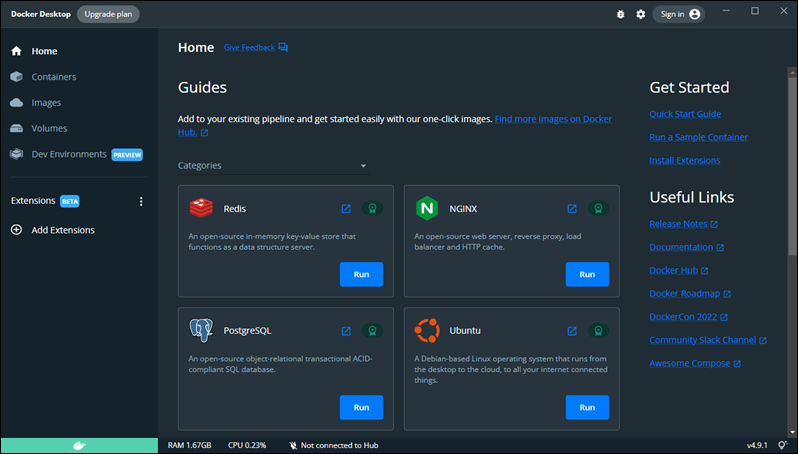
If all goes well, Docker Desktop opens, as shown below.
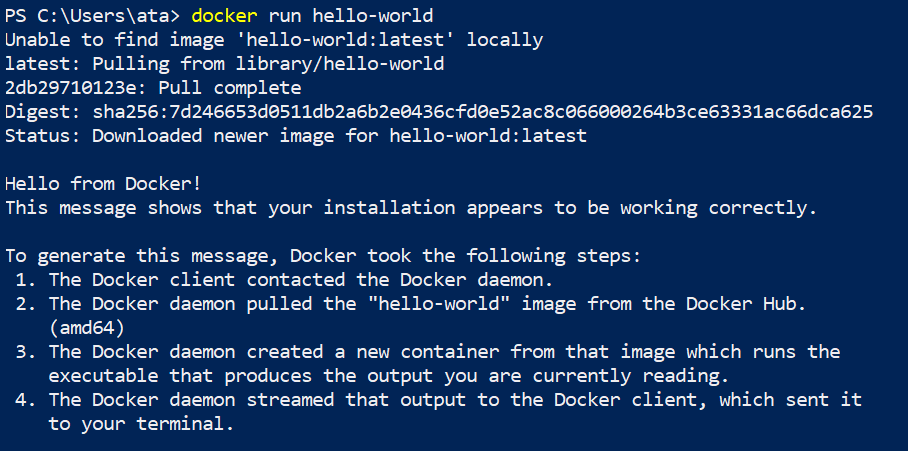
4. Finally, run the below docker run command to verify that Docker is working as expected.
This command pulls the hello-world container from Docker Hub if it is not already present on your computer and runs it.
The docker command is accessible from any CLI(Command Line Interface) like PowerShell or Command Prompt, as long as the Docker service runs. If not, run the command below to start the Docker service. Start-Service *docker*
This output below signifies your installation is working correctly.
Installing Kubernetes via the Docker Desktop
Now that you have enabled Hyper-V and installed Docker Desktop, you’re ready to install Kubernetes on Windows. In this tutorial, you will use the Docker Desktop GUI to enable and install Kubernetes.
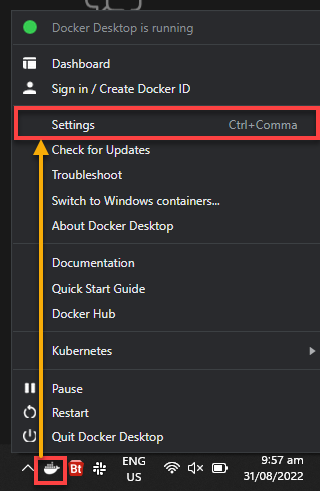
1. Right click on the Docker icon in the system tray and select Settings from the context menu to access the Docker Desktop settings.
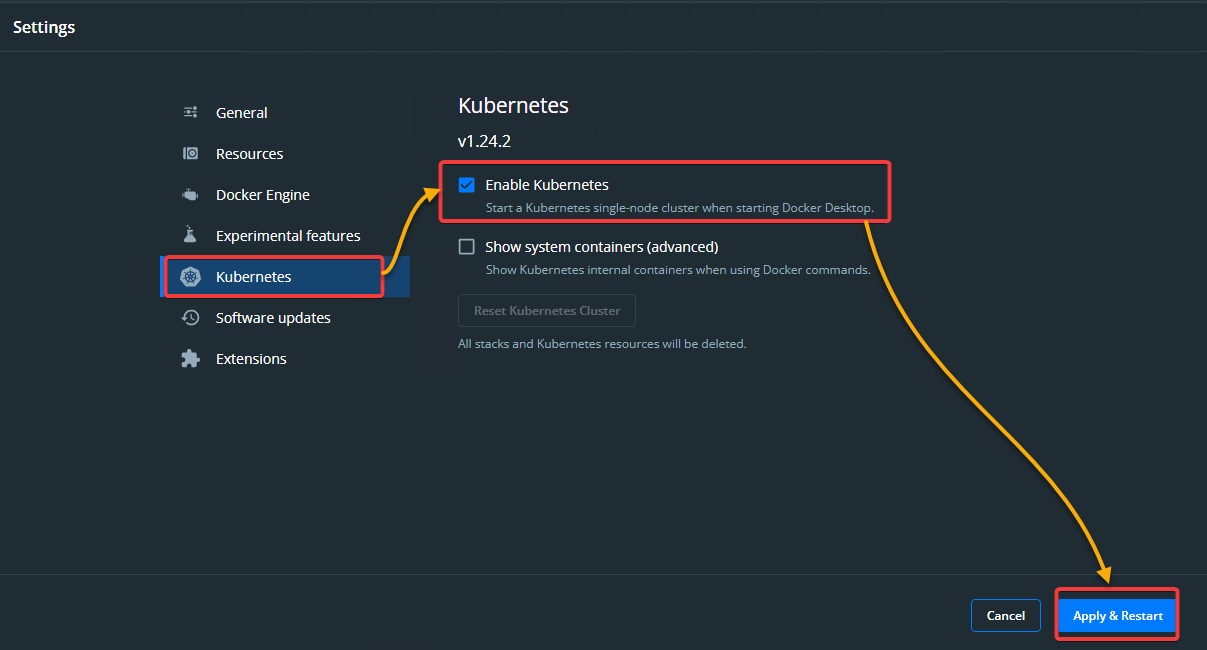
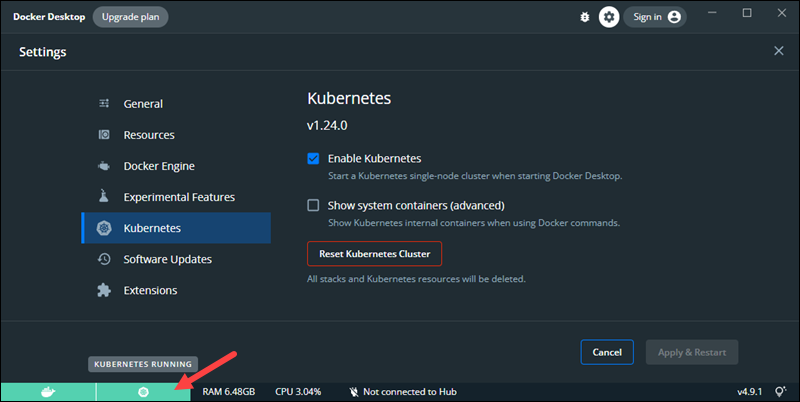
2. Next, select Kubernetes (left panel), tick the Enable Kubernetes checkbox, click Apply & Restart to apply the changes, and restart Docker Desktop.
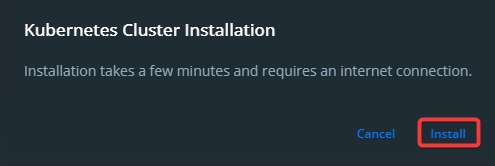
3. Click Install when prompted, as shown below. Doing so installs Kubernetes on your computer, which might take a few minutes to complete.
You will see the Kubernetes cluster starting in the middle of the screen. This cluster contains a single node, which is your computer.
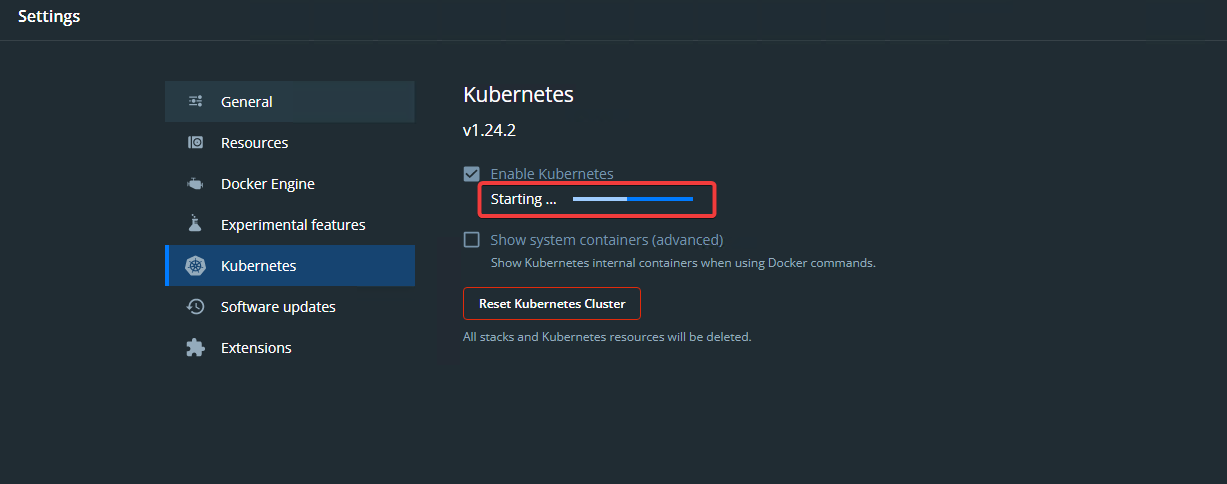
At this point, your Kubernetes cluster is running (bottom-left) like in the screenshot below, and you can start using that cluster.

Installing kubectl on Windows
You’ve successfully started your Kubernetes cluster, but how do you manage it? kubectl is a command line tool that lets you interact with your Kubernetes cluster, which you need to install.
kubectl is available as a standalone binary that you can download from the Kubernetes releases page.
1. Download the latest kubectl binary for your computer. The latest version at the time of writing this tutorial is kubectl v1.25.
2. Next, download the checksum file for the same release. You will use this checksum file to verify the authenticity of the downloaded binary.
3. Run the below command to compare the two SHA-256 hashes of the kubectl release and checksum file you downloaded.
You must put the kubectl binary and the checksum file in the same directory for this validation to work.
The commands below perform the following:
- Change the working directory to the kubectl binary and checksum files’ location. Ensure you change the C:\Users\ata\Download\Programs path to where you saved the files.
- Compute the SHA-256 hash (CertUtil) of the kubectl binary.
- Compare the result with the checksum in the checksum file.
cd C:\Users\ata\Download\Programs
$($(CertUtil -hashfile .\kubectl.exe SHA256)[1] -replace " ", "") -eq $(type .\kubectl.exe.sha256)
If both results match, you will see a True output, as shown below, which indicates that the binary is not corrupt, and you can proceed with installing the binary. Otherwise, you’ll get a False output and have to re-download the kubectl binary.

4. Now, run the below command to add the path of the kubectl binary to your PATH environment variable. Be sure to replace <full/path/of/kubectl/binary> with your computer’s actual path of the kubectl binary.
This command makes the kubectl binary accessible on the command-line interface
setx /m PATH "$Env:PATH;<full/path/of/kubectl/binary>"
5. Close the current PowerShell session, and open a new one for the changes to take effect.
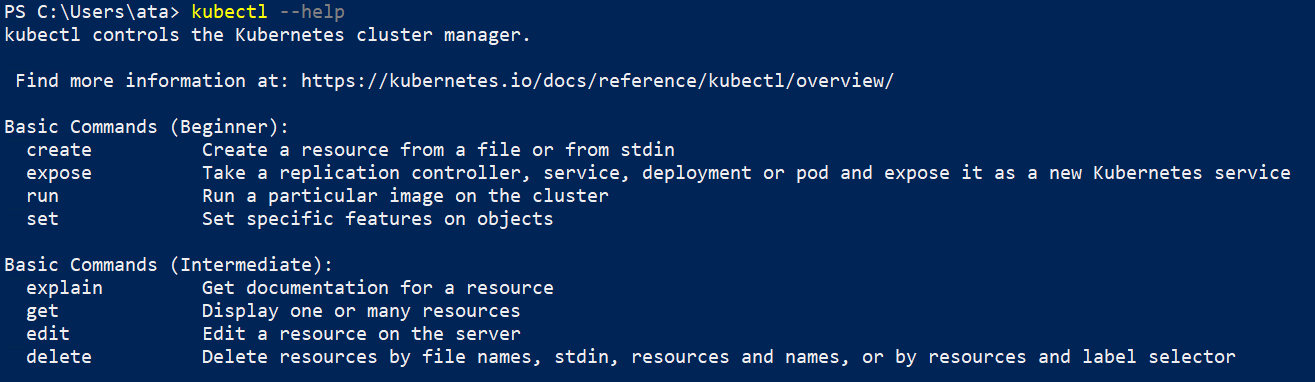
6. Next, run the below command to verify that kubectl is installed and working.
This command prints out the man page for kubectl, which indicates that it is working correctly.
7. Lastly, run the following command to double-check that kubectl is configured to work with your Kubernetes cluster. This command prints out the URL and the status (cluster-info) of your Kubernetes master.
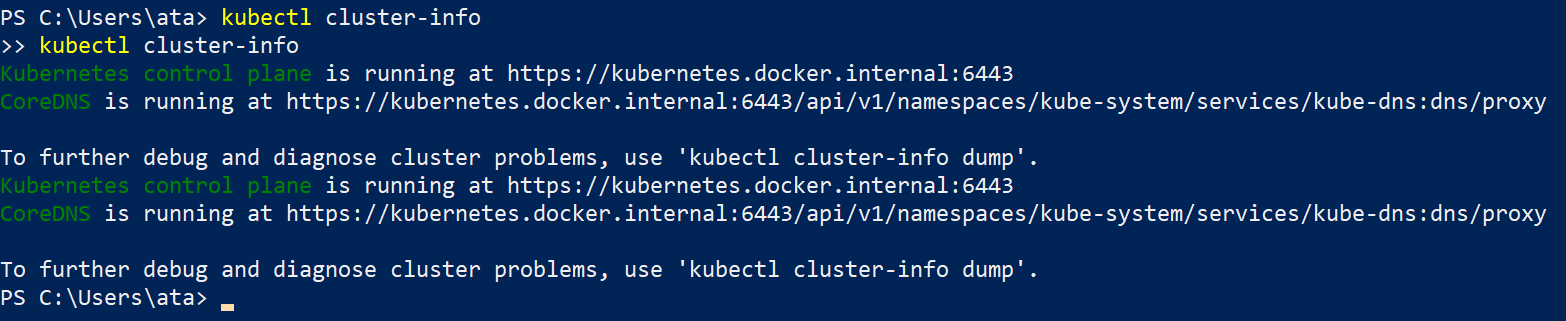
If you get an Unable to connect to the server error, as shown below, make sure your Kubernetes cluster is running and that you can connect to it from your computer.

Conclusion
Throughout this tutorial, you learned how to install Kubernetes on Windows and verify the installation works by starting up a Kubernetes cluster. Kubernetes has made it possible to automate many of the manual processes to ease the tasks of deploying, managing, and scaling containerized applications.
Now at this point, you have a working Kubernetes cluster and are ready to deploy your first application. Why not explore more about Kubernetes? Start running your applications on Windows without any headaches!
Introduction
Kubernetes is an open-source container orchestration system that automates app deployment and scaling and facilitates resource management. Its main advantage is that it allows users to schedule and run Linux containers in physical or VM clusters.
Although it is primarily a Linux technology, running Kubernetes on Windows is possible.
This tutorial will show you how to run Kubernetes on Windows.
Prerequisites
- A machine running Windows 10 or 11
- A user account with administrator privileges
- A network connection
Installing Kubernetes on Windows
Since Kubernetes is made for Linux, the only way to run it on Windows is in a virtual machine. Follow the steps below to set up a virtual environment for running Kubernetes.
Note: For a fully optimized solution for running Kubernetes clusters, check out our Bare Metal Cloud offering.
Step 1: Enable Hyper-V
Hyper-V is Microsoft’s hardware virtualization product that allows the creation of virtual machines in their own isolated space. Hyper-V manages VMs via the default GUI or the CLI.
Note: The requirements for Hyper-V are Windows 10 (Enterprise, Pro, or Education) with at least 4GB of RAM and CPU Virtualization support. If Hyper-V isn’t available, check your BIOS settings and ensure virtualization is enabled.
Follow the steps below to enable Hyper-V on Windows:
1. Press the Windows key and search for «Turn Windows features on or off«. Select the first result to load the Windows Features window.
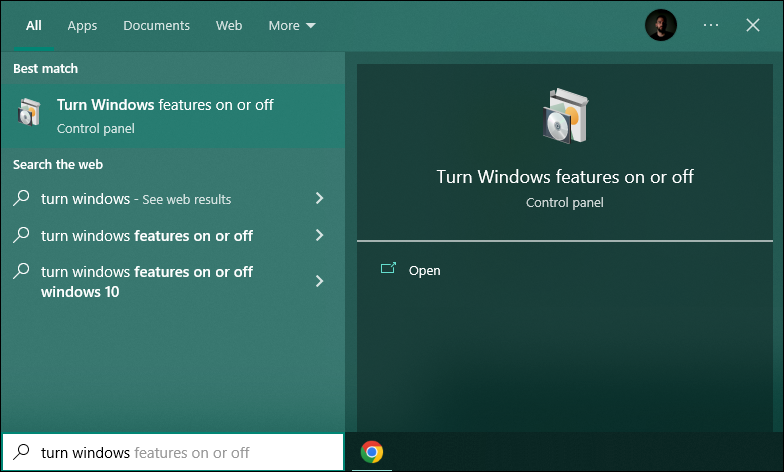
2. Check the boxes for Hyper-V and Windows Hypervisor Platform in the feature list.

3. Click OK and wait for the feature installation to finish. When prompted, click Restart now to restart the PC and finish setting up Hyper-V.
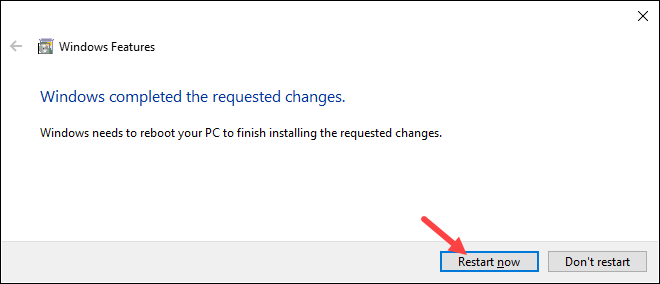
When the PC boots back up, the Hyper-V feature is enabled.
4. Check if Hyper-V is correctly installed. Open Windows PowerShell as an administrator and run the following command:
Get-WindowsOptionalFeature -Online -FeatureName Microsoft-Hyper-V
If Hyper-V is correctly installed, the State section shows as Enabled.
Step 2: Install Docker for Windows
Docker and Kubernetes complement each other. Kubernetes is built on top of Docker and automates tasks such as container creation, deployment, configuration, and resource access.
Follow the steps below to install Docker for Windows:
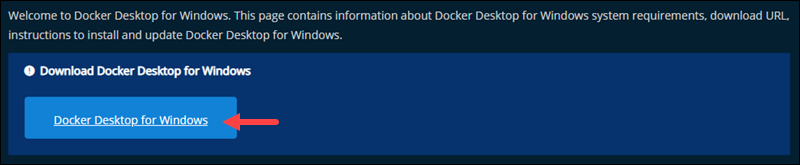
1. Using a web browser, navigate to the Docker Desktop download page and locate the Download Docker Desktop for Windows section. Click the download link to download the installation package.
2. Launch the downloaded file to start the Docker installation wizard. The installer prompts you to choose whether to use Hyper-V or WSL 2 and if you want to add a Desktop shortcut. Leave both boxes checked if you have WSL 2 installed and click Ok.

Note: Follow our instructions to install WSL 2 on Windows. WSL 2 runs on top of Hyper-V, offering the best performance. It features superior memory management and deeply integrates with the rest of the Windows host.
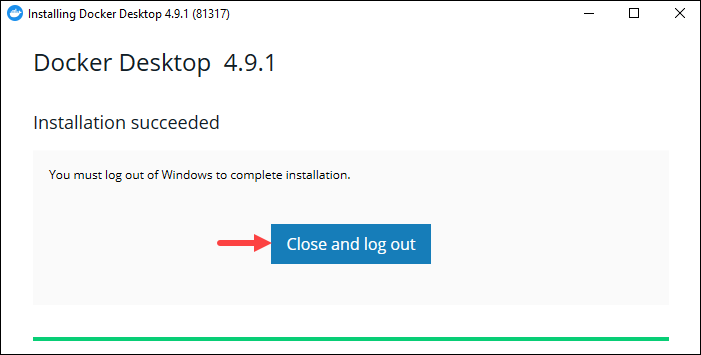
3. Press the Close and log out button to complete the installation.
4. Log back into your user account, review the Service Agreement, check the I accept the terms box, and click Accept to complete the Docker installation.
After accepting the agreement, the Docker GUI tool starts.
Step 3: Install Kubernetes
Docker comes with a GUI tool that allows users to configure Docker settings and install and enable Kubernetes.
There are several methods for installing Kubernetes. This article will cover installing Kubernetes via the Docker settings, Minikube, and Kind. Depending on your machine’s specifications, choose the method that suits your system:
- Minikube requires at least 2GB of RAM and 2 CPUs.
- Kind requires 8GB of RAM to deliver good performance.
- Installing Kubernetes via Docker settings takes up to 8 GB of RAM.
Before installing Kubernetes, install kubectl, the Kubernetes CLI tool. This utility lets you run commands against Kubernetes clusters.
Follow these steps to install kubectl:
1. Navigate to the official kubectl download page and locate the Install kubectl binary section:
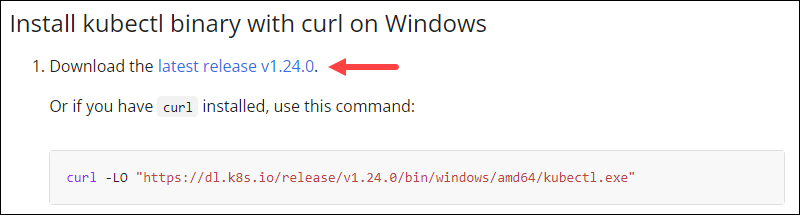
2. Click the download link for the latest release. At the time of writing this article, the latest release was 1.24.0. Save the file to a directory such as C:\kubectl.
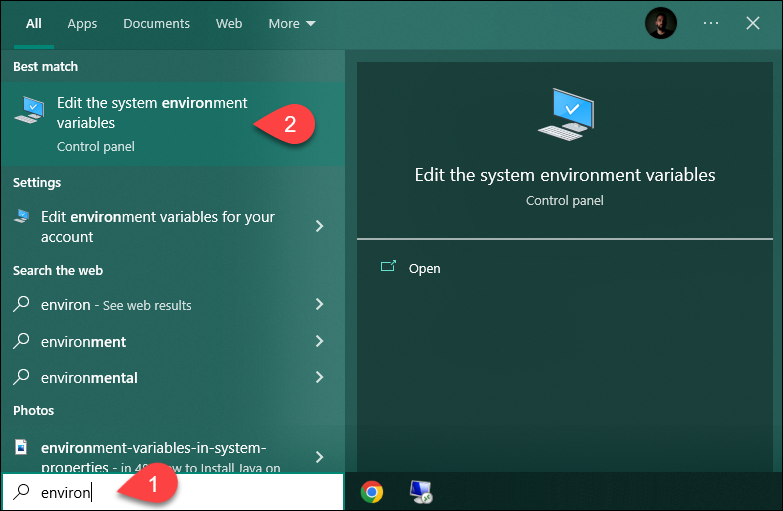
3. Press the Windows button and search for Environment variables. Select Edit the system environment variables.
4. In the System Properties window, click Environment Variables…
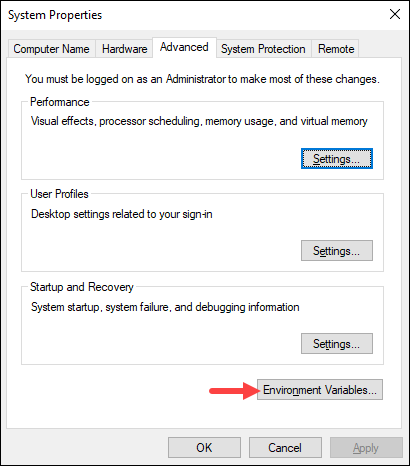
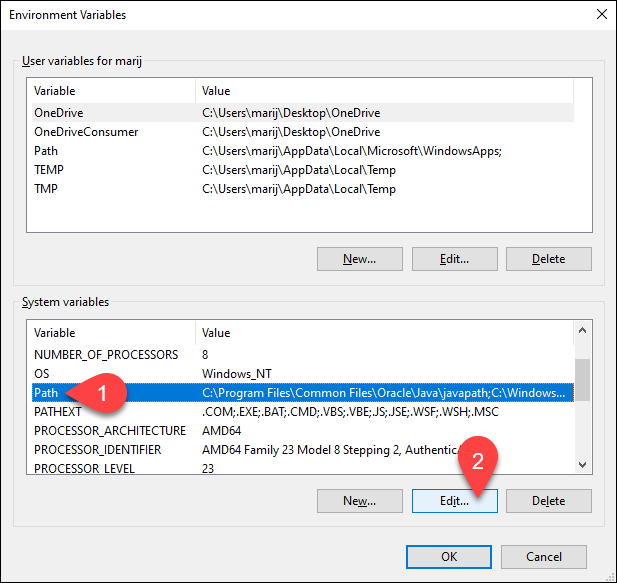
5. Under the System Variables section, click the Path environment variable and select Edit to add the kubectl system variable:
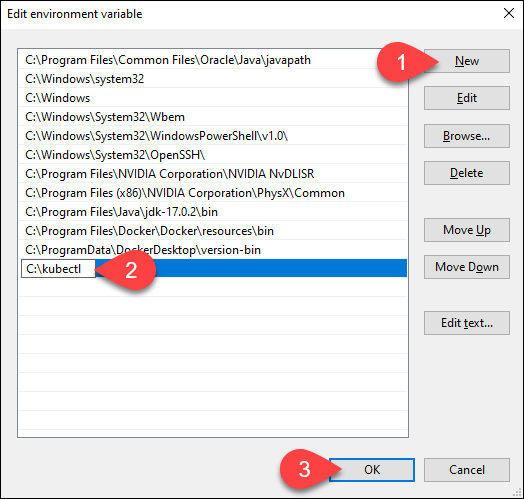
6. Click New and add the path to the downloaded kubectl binary file. Select OK in all windows to confirm the changes.
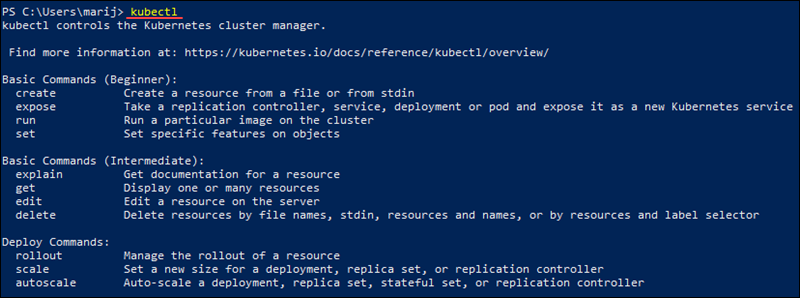
7. Check if everything is set up correctly by running kubectl in Windows PowerShell:
Via Docker GUI
The easiest way to install Kubernetes is by enabling it in Docker settings. Follow the steps below to do so:
1. In the system tray, right-click the Docker icon. Select Settings from the menu.
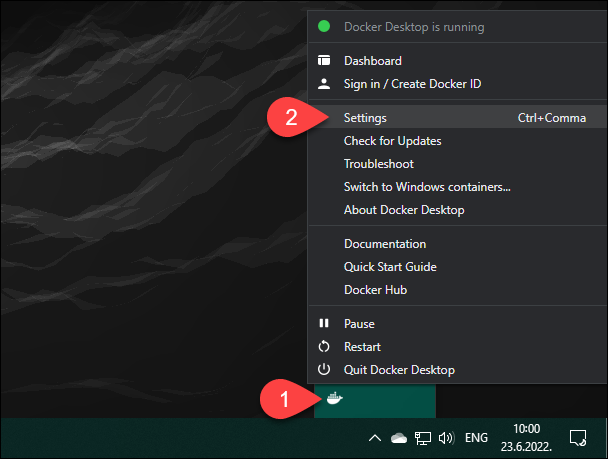
2. In Docker settings, select the Kubernetes tab. Check the Enable Kubernetes box and click Apply & Restart.

3. When prompted, click Install to proceed.
4. The tool downloads the necessary cluster components and creates another VM in the background. When the installation finishes, both the Docker and Kubernetes icons are green, which means they are up and running:
Via Minikube
Minikube is an open-source tool for running Kubernetes. It works with Linux, Mac, and Windows by running a single-node cluster inside a virtual machine on the local machine.
Follow the steps below to install Kubernetes via Minikube:
Install Using winget:
1. If you are using winget, the Windows package manager, install Minikube by running:
winget install minikubeThe output shows when the installation finishes.

Install Using the Installer Wizard
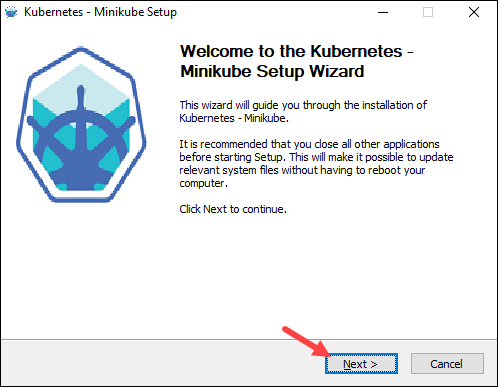
1. Download the latest Minikube release and start the executable installer.
2. On the Welcome screen, click Next to proceed.
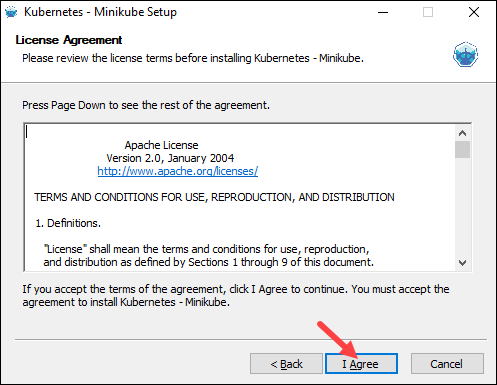
3. Read the License Agreement and click I Agree to proceed to the next step.
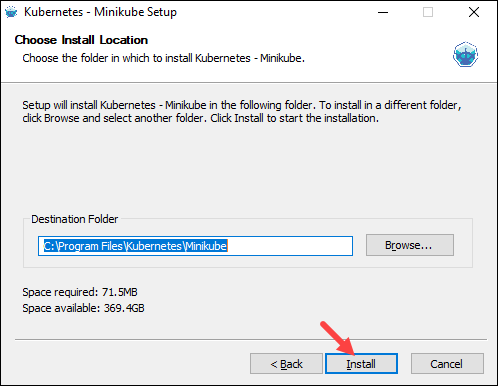
4. Choose a custom install location for Minikube or leave the default one and click Install.
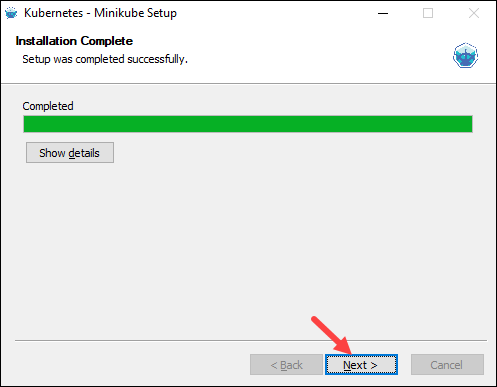
5. After the installation completes, click Next and Finish to exit the installer.
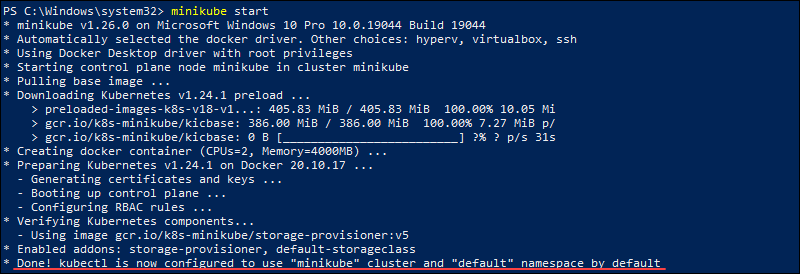
After installation, start the Minikube cluster by running the following command:
minikube startThe output shows Done! once the installation finishes.
Via Kind (Kubernetes in Docker)
Kind is short for Kubernetes in Docker, which means having Docker installed on your machine is a prerequisite for Kind. Kind works by running Kubernetes as a group of Docker containers without creating a VM. Thus, Kind has a faster startup time compared to Minikube.
Follow the steps below to install Kind:
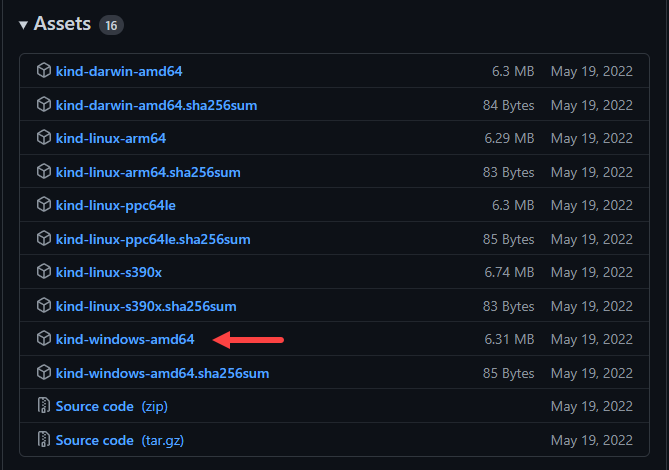
1. Using a web browser, navigate to the official Kind releases page.
2. Scroll down to the Assets section and click the download link for the Windows version.
3. Rename the downloaded file to kind.exe.
4. Move the downloaded file to a directory such as C:\kind, and add the path to the system environment variables. Follow the same steps listed above for adding the kubectl environment variable path.
4. Create a cluster with Kind by running the following command in Windows PowerShell:
kind create cluster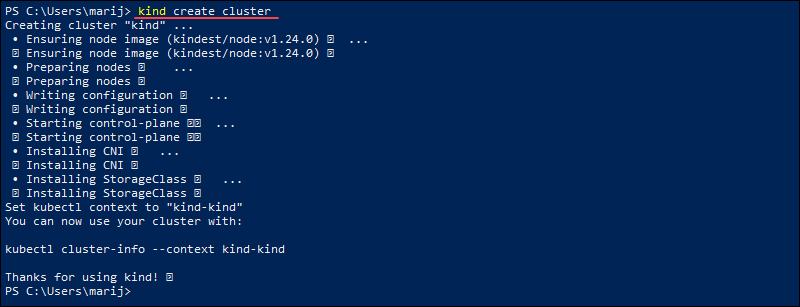
Step 4: Install Kubernetes Dashboard
The Kubernetes Dashboard is the official web-based UI for managing Kubernetes resources, and it is an alternative to the kubectl CLI tool. However, it needs to be set up manually as it doesn’t automatically deploy.
Use the Dashboard to deploy containerized applications to a Kubernetes cluster or manage the cluster resources. You can view a summary of applications running on the cluster and use the options to create or modify individual Kubernetes resources.
Follow the steps below to install the Kubernetes Dashboard:
1. Open Windows PowerShell as an administrator and run the following command to deploy the Kubernetes Dashboard:
kubectl apply -f https://raw.githubusercontent.com/kubernetes/dashboard/v2.6.0/aio/deploy/recommended.yaml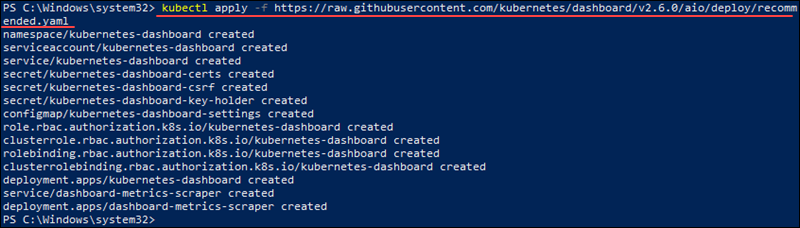
2. Create a secure channel for accessing the Dashboard by running:
kubectl proxy
3. Access the Dashboard Login page at http://localhost:8001/api/v1/namespaces/kubernetes-dashboard/services/https:kubernetes-dashboard:/proxy/
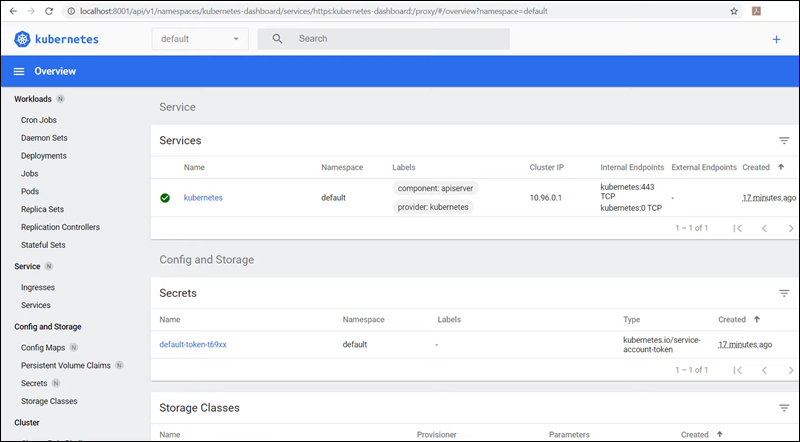
4. After logging in, the Dashboard shows an overview similar to the following image:
Depending on how you installed Kubernetes, there are several methods for uninstalling:
Uninstall From Docker Settings
If you enabled Kubernetes in Docker settings, uncheck the Enable Kubernetes box and click Apply and Reset. The Kubernetes VM is automatically removed.
Uninstall Minikube
If you installed Kubernetes via Minikube, run the following commands to stop and delete the VM:
minikube stop
minikube delete
After that, delete the .minikube and .kube directories from the system.
Uninstall Kind
To uninstall Kind, delete any cluster with the following syntax:
kind delete cluster --name [name]If you didn’t specify a cluster name during creation, run:
kind delete clusterAfter deleting created clusters, remove the directory you used to set up Kind.
Conclusion
This tutorial showed how to use the Windows native hypervisors to run Kubernetes. The hypervisors bridge the gap between Windows and Linux, allowing users to run Kubernetes clusters locally on Windows.
Next, we recommend you to read our Kubernetes networking guide or learn the difference between Jenkins and Kubernetes.