Введение
KotLin, разработанный и поддерживаемый JetBrains. Это язык программирования на основе JVM (похожий на Java), который можно скомпилировать в байт-код Java или JavaScript (легко запускать на устройствах без JVM). Он официально стал официальным языком разработки Android. Ниже приводится краткое введение в установку KotLin под Windows (IDE использует IntelliJ IEDA, разработанный той же компанией).
2. Подготовка
- jdk1.8.0
- IntelliJ IEDA2017.3.3.x
В-третьих, процесс установки
- Скачайте и установите jdk
Адрес загрузки jdk8u181https://www.oracle.com/technetwork/java/javase/downloads/jdk8-downloads-2133151.html

Вы также можете скачать последнюю версию прямо с официального сайта Oracle.https://www.oracle.com/technetwork/java/javase/downloads/index.html
Во время обычного процесса установки обратите внимание, что процесс установки jdk после версии 1.8 имеет два подтверждения пути установки. Обратите внимание, что первый раз — это jdk (Java Development Kit), второй раз — jre (Java Running Environment), а разные файлы должны в папку, чтобы не перезаписать jdk содержимым jre и не вызвать сбой установки.

- Настроить среду jdk
После завершения установки вам необходимо настроить среду Java. Щелкните правой кнопкой мыши «Мой компьютер» -> «Свойства» -> «Дополнительные параметры системы» -> «Переменные среды» -> «Добавить JAVA_HOME, CLASSPATH и путь».


Примечание: JAVA_HOME: F: \ java \ jdkПолный путь установленного jdk
CLASSPATH: .;%JAVA_HOME%\lib\tools.jar;%JAVA_HOME%\lib\dt.jar; Учтите, что передняя часть есть.; (Вообще незаменима)
Path:%JAVA_HOME%\bin;F:\java\jre\bin
Конфигурация выполнена успешно. Сохраните конфигурацию. Проверьте, завершена ли конфигурация среды jdk — откройте командную строку (ctrl + R и введите cmd) -> введите java -version. Если отображается информация о версии установленной версии jdk, конфигурация успешна -> введите javac, появится информация об операции javac. Операция в командной строке jdk действует (вы можете запустить jdk из командной строки)


- Загрузите и установите редактор IntelliJ IDEA
Официальный адрес загрузки сайтаhttp://www.jetbrains.com/idea/download/#section=windows

Процесс установки аналогичен, если у вас есть вопросы, пожалуйста, сами Baidu, спасибо!
Ссылка на регистрационный кодhttps://blog.csdn.net/qq_35246620/article/details/80522720(В случае неудачи, пожалуйста, обратитесь к Baidu самостоятельно)
- Напишите первую программу KotLin
Создать проект КотЛин (Обратите внимание, чтобы убедиться, что jdk — это версия jdk, установленная вами, в противном случае выберите jdk, установленный самостоятельно.), создайте новый документ KotLin в src, напишите программу
Примечание. Основной объект KotlLin — это args: Array <String>, и точки с запятой нет (чтобы отличить его от java).

Четыре, резюме
Пока что вы можете писать программы KotLin в обычном режиме под Windows. Это намного проще с грамматической точки зрения, чем Java, и мы продолжим обновлять базовое использование KotLin в будущем. Научитесь активно изучать новые знания через онлайн-блоги и книги, и в то же время научитесь делать заметки для краткого изложения, я считаю, что скопление воды капает через камни, давай!
Добро пожаловать в Kotlin! В первом уроке мы настроим среду разработки для программирования на данном языке. С ее помощью вы сможете написать свой первый код на Kotlin и запустить его на компьютере.
Содержание статьи
- Установка и настройка IntelliJ IDEA
- Java и JDK
- Запуск IntelliJ IDEA
- Создание простого проекта на Kotlin
- Пример программы «Hello, Kotlin!»
- Создаем Kotlin проекты на JVM
- Автоматическая сборка проектов на Gradle
- Задачи курса
- Главные особенности языка Kotlin
Основным инструментом, который мы будем использовать для создания проектов на Kotlin, является IntelliJ IDEA от JetBrains. JetBrains также является компанией, стоящей у истоков самого языка, поэтому разработка на Kotlin тесно интегрирована в IntelliJ IDEA.
IntelliJ IDEA является Интегрированной средой разработки, или IDE. Она похожа на другие IDE вроде Visual Studio или Xcode. IntelliJ IDEA предоставляет основу для многих других IDE от JetBrains, включая Android Studio для разработки приложений на Android, PyCharm для программирования на Python и CLion для программирования на C и C++.
IDE используется для написания кода в редакторе, компиляции кода для запуска на компьютере, просмотра результатов программы, исправления ошибок кода и многого другого! В этом уроке мы познакомимся с возможностями IntelliJ IDEA, и это станет важной подготовкой к дальнейшему изучению языка Kotlin.
IntelliJ IDEA можно скачать с сайта JetBrains. В наличии есть версии Community и Ultimate. Для работы с примерами из уроков подойдет версия Community, которая является бесплатной для скачивания.
Перейдите на сайт и скачайте IntelliJ IDEA 2019.2 или более позднюю версию. Выберите свою систему — macOS, Windows или Linux. Установите IntelliJ IDEA, следуя инструкции. Большинство скриншотов в уроках сделаны на системе macOS, но работа на Windows или Linux проходит точно так же.
Перед запуском IntelliJ IDEA требуется также установить Java Development Kit, или JDK, который нужен для запуска Kotlin кода на компьютере.
Java и JDK
Kotlin позволяет программировать на нескольких различных платформах. Двумя наиболее популярными являются Java Virtual Machine, или JVM и Android.
По большому счету, изначально Kotlin задумывался как современная замена языку Java. Java был создан в девяностых, став ранней попыткой кроссплатформенного прикладного языка программирования. Подход “Write Once, Run Everywhere” звучал многообещающе.
Вместо компиляции в нативный машинный код на каждой платформе, программы на Java компилируются в формат, который называется байт-кодом. Байт-код выполняется внутри приложения на Java Virtual Machine. JVM можно рассматривать как слой над вашей реальной машиной. Запустив байт-код на виртуальной машине, можно совместно использовать Java-код и приложения на многих типах компьютерных систем.
Одной из целей языка Kotlin является 100% совместимость с языком Java. Это включает конвертацию Kotlin-кода в Java-совместимый код с помощью компилятора Kotlin, чтобы Kotlin-код мог запускаться на JVM.
Большая часть кода и проектов из данного курса предназначены для запуска в качестве Kotlin-проектов на JVM. Для этого наравне с IntelliJ IDEA требуется установить JDK. Проще всего это сделать на сайте Oracle. Лучше скачать и установить самую последнюю версию JDK — по крайней мере начиная с 8 версии. Инструменты программного обеспечения Java называются «Java SE». Они включают JDK и Java Runtime Environment, или JRE.
На заметку: Будьте внимательны, скачайте и установите JDK, а не только JRE, так как JRE позволяет запускать только Java-приложения и не включает инструменты для создания новых.
Запуск IntelliJ IDEA
После установки IntelliJ IDEA и JDK выполните обычный процесс запуска приложения IntelliJ IDEA на вашей платформе.
Если вы ранее устанавливали предыдущие версии IntelliJ IDEA на тот же компьютер, установщик, скорее всего, предложит импортировать настройки из предыдущей версии. В противном случае вам будет предложено выбрать цветовую тему и плагины для установки в IDE. Можете просто выбрать настройки по умолчанию и продолжить.
После этих действий вы увидите окно Welcome to IntelliJ IDEA.
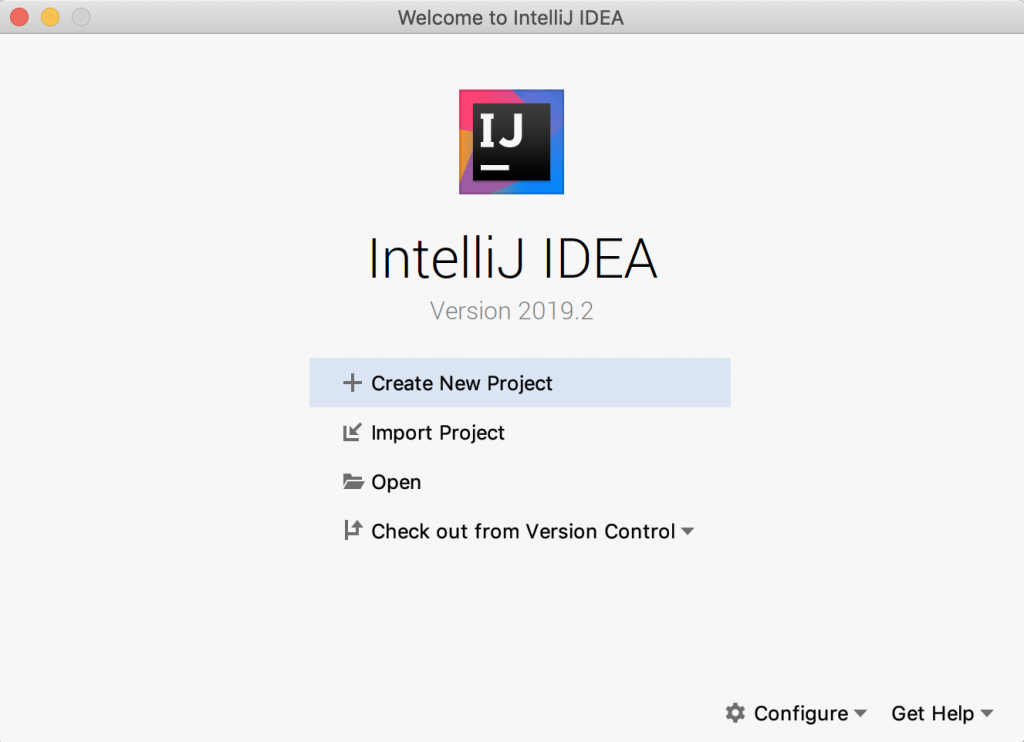
Из приветственного окна можно создать новый проект, импортировать или открыть существующие проекты, извлечь код из системы контроля версий вроде Git, запустить инструменты настройки или получить справку по IDE.
Создание простого проекта на Kotlin
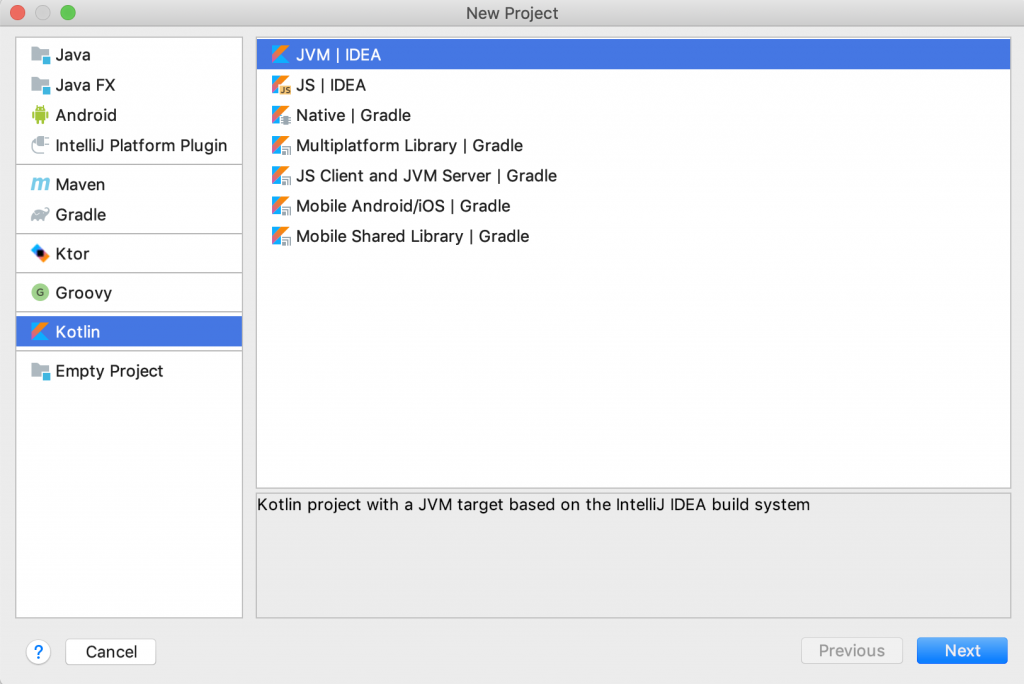
В приветственном окне выберите пункт Create New Project. Вы увидите первый экран конфигурации.
Выберите Kotlin из списка опций слева, Kotlin JVM в качестве типа проекта и нажмите Next.
Вы должны увидеть следующее:
Затем вы увидите экран для проекта с названием и местом хранения файлов. Вы также увидите Project SDK, который должен быть установленной ранее версией JDK — или другой версией JDK, если у вас на ПК установлено более одной версии.
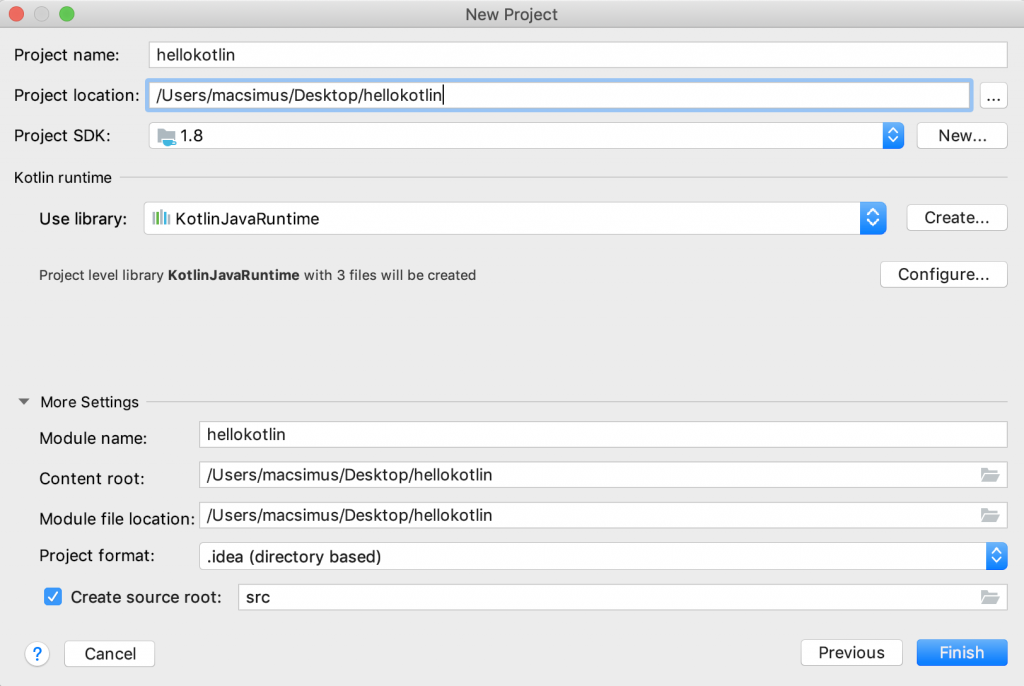
Введите hellokotlin для названия проекта, выберите место для проекта или просто оставьте значения по умолчанию. Ничего больше не указывайте и нажмите Finish.
IntelliJ IDEA создает и конфигурирует ваш проект.
По завершении вы попадете в окно Tip of the Day, или Совет дня, в котором каждый раз при открытии приложения показываются полезные советы по IntelliJ IDEA.
Вы должны увидеть следующее:
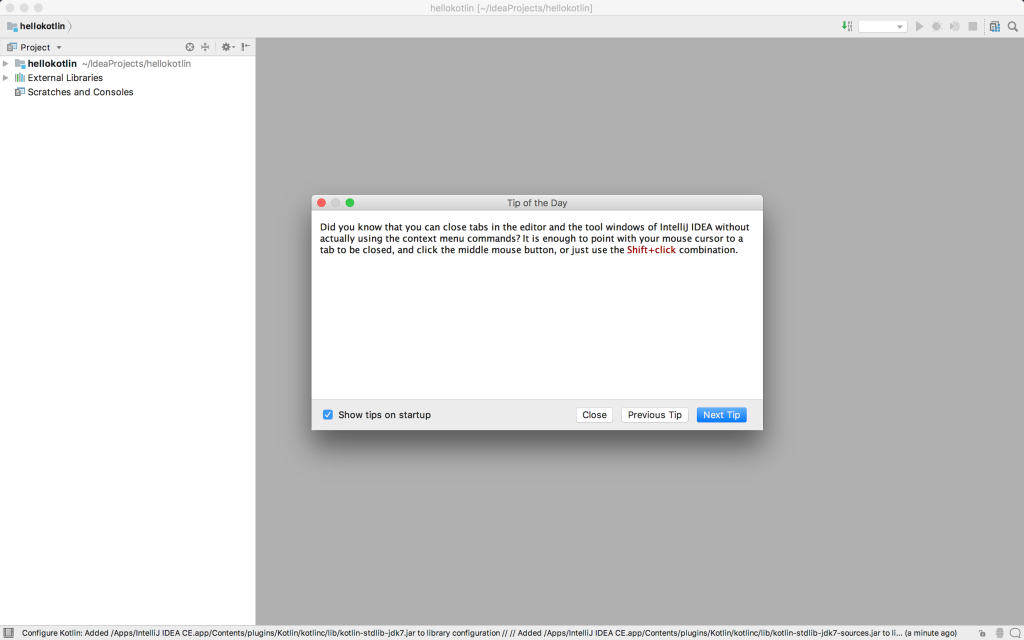
Закройте окно подсказки и проверьте панель Project слева от главного окна IntelliJ IDEA. На панели Project можно управлять всеми файлами, связанными с проектом, например файлами исходного кода Kotlin, у которых расширение .kt.
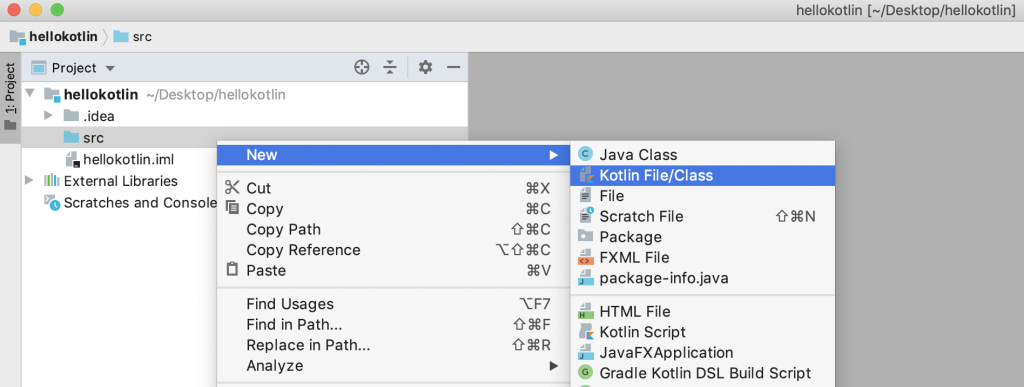
Кликните на стрелку рядом с hellokotlin, чтобы открыть его содержимое, и вы увидите папку src для проекта. Щелкните правой кнопкой мыши на папку src и выберите New ▸ Kotlin File/Class.
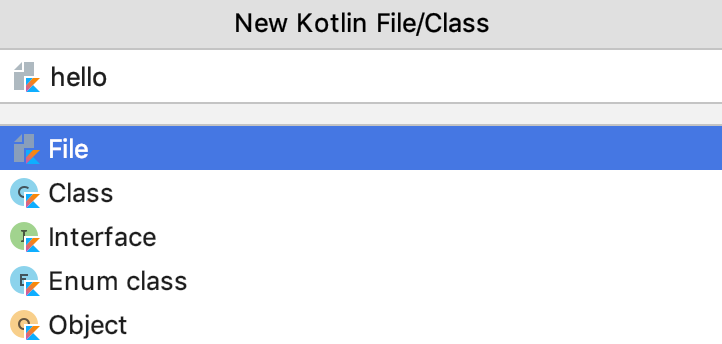
Должно открыться новое диалоговое окно New Kotlin File/Class. Введите hello и кликните OK.
Затем файл hello.kt откроется редакторе IntelliJ IDEA.
Базовый макет окна IntelliJ IDEA содержит панель Project слева, панель Editor посередине и Toolbar в верхней правой части, который можно использовать для запуска кода.

По ходу настройки проекта мы разобрали главные части окна IntelliJ IDEA. Пришло время для запуска Kotlin-кода!
Пример программы на Kotlin!
В данном уроке мы просто напишем в редакторе код на Kotlin и запустим его, для чего необязательно разбирать все его части. Каждый элемент кода будет подробнее разобран в дальнейшем. Если у вас есть опыт программирования в Java, Swift или Python, вы быстро вникните в ход дела.
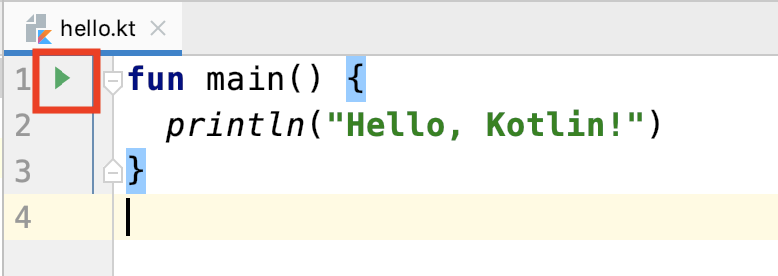
В панели редактора Editor файла hello.kt введите следующий код в точности, как он записан далее:
|
fun main() { println(«Hello, Kotlin!») } |
Мы написали функцию Kotlin под названием main() и добавили одну строку кода к функции внутри фигурных скобок, которая затем вызывает функцию под названием println(). Программа выводит на экран текст “Hello, Kotlin!”. Подробнее о том как работают функции будем рассматривать в будущих уроках.
Есть несколько способов запустить этот код, в том числе с помощью меню в IntelliJ IDEA, панель инструментов или через определенные комбинации клавиш.
Самый простой способ запустить код — нажать маленькую зеленую кнопку Run/Play слева от функции main() на панели редактора.
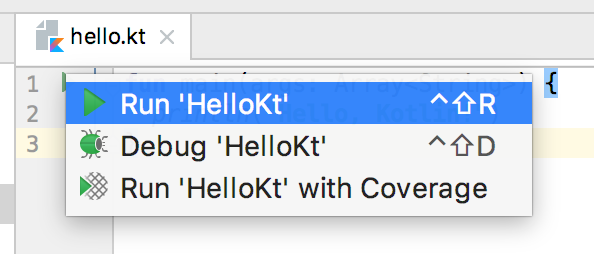
Нажмите на зеленую кнопку Run, после этого откроется меню. Выберите пункт Run ‘HelloKt’.
После этого компилятор Kotlin сделает парсинг кода, преобразует его в байт-код и затем запустит его на локальной JVM.
После этого в нижней части окна IntelliJ IDEA откроется панель для запуска Run, которую иногда называются консолью.
Вы увидите результат выполнения программы на панели Run — в данном случае это текст, который нужно отобразить на экране.
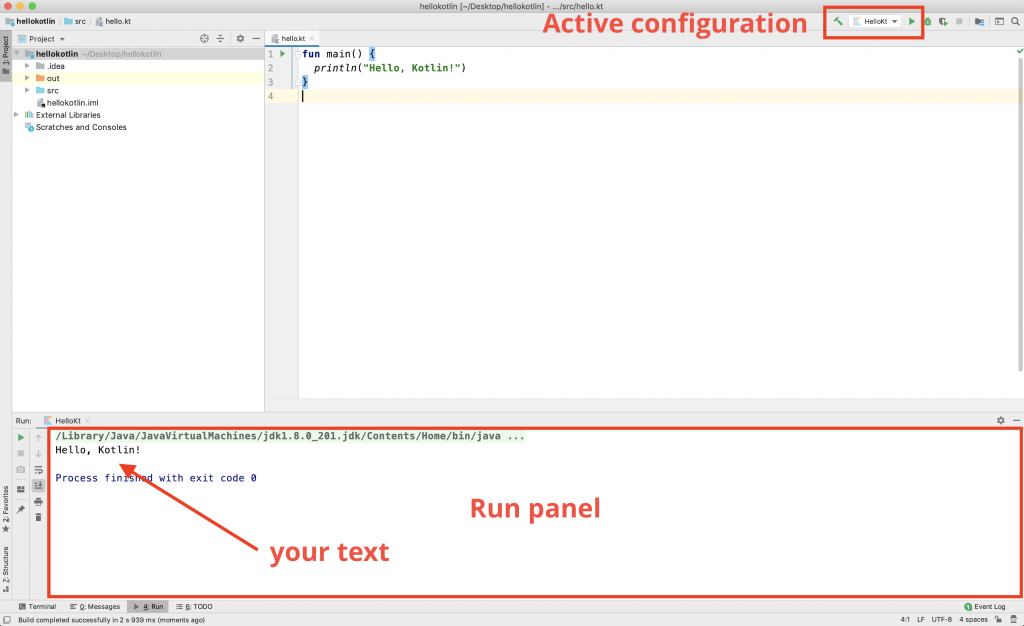
После первого запуска кода на панели инструментов появится активная конфигурация, и вы можете запустить код, нажав на зеленую кнопку Run на панели инструментов.
Неплохо! Вы создали свои первый Kotlin проект и запустили первую программу на Kotlin!
Создаем Kotlin проекты на JVM
Проекты Kotlin JVM очень похожи на тот, который вы создали в последнем разделе этого урока. В большинстве уроков курса проекты выглядят точно так же, как этот тестовый проект, с единственной функцией main(), в которую вы можете поместить код на Kotlin, который нужно запустить. В некоторых случаях может понадобиться добавить код вне функции main(), и это будет рассматриваться при необходимости.
По мере прохождения уроков вы можете либо открыть начальный проект, в котором будет пустая функция main(), к которой можно добавить код, либо создать новый проект для работы.
В любом случае, сейчас вам нужно просто вводить код по мере прохождения уроков. Затем нажимайте кнопку Run и IntelliJ IDEA запустить код проекта в любой момент.
При желании создать собственные проекты, вы всегда можете открыть образец кода из данного урока в текстовом редакторе и посмотреть на код самим, чтобы решить любые проблемы, возникающие при программировании. Просто откройте файлы с расширением .kt в текстовом редакторе, таком как Notepad в Windows или TextEdit в macOS.
Старайтесь избегать копирования и вставки кода из текстового редактора в IntelliJ IDEA, поскольку самостоятельный ввод кода помогает закрепить знания.
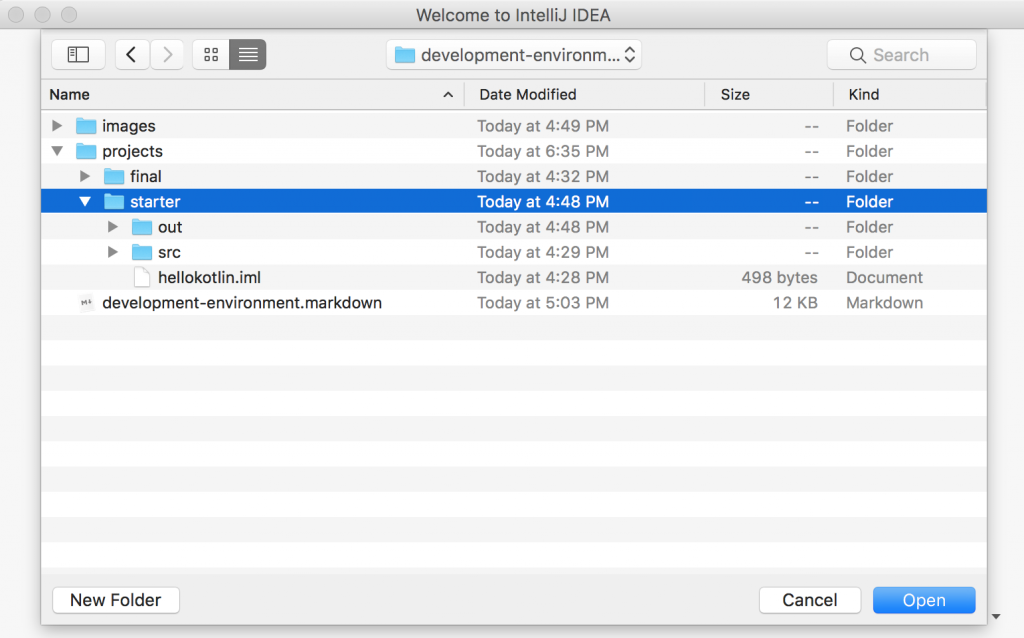
Если вы решили открыть начальный проект вместо создания своего собственного, сделайте это, щелкнув Open в окне Welcome to IntelliJ IDEA или выбрав File ▸ Open в меню IntelliJ IDEA.
Затем вам просто нужно выбрать корневую папку для проекта, например, папку под названием starter для открытия начального проекта, и нажать Open.
Вы должны увидеть следующее:
IntelliJ IDEA откроет проект, и вы сможете начать вводить код, будто вы создали проект самостоятельно.
При открытии проекта вы можете выбрать View ▸ Tool Windows ▸ Project для открытия панели Project.
Вы также можете кликнуть на кнопку инструментов Project в верхнем левом углу окна IntelliJ IDEA или нажать command-1 на Mac или Alt-1 на PC для отображения панели Project:
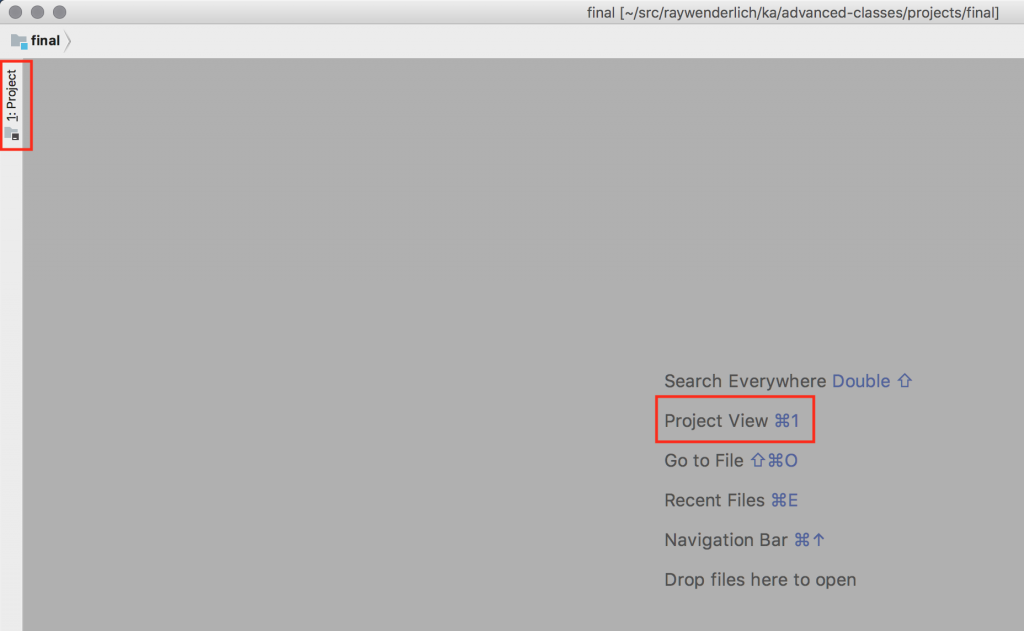
После открытия панели проекта, раскройте корень проекта и откройте папку src, чтобы найти файлы исходного кода на Kotlin для проекта:

Автоматическая сборка проектов на Gradle
В будущих уроках по изучению Kotlin мы будем использовать Gradle, чтобы мы могли использовать внешние библиотеки (зависимости) в наш проект.
Gradle является популярным инструментом в экосистеме Java для сборки и управления зависимостями. Это чрезвычайно мощный и универсальный инструмент для сборки, и его возможности выходят далеко за рамки данного курса.
Gradle используется в качестве системы сборки приложений на Android созданных с помощью Android Studio, которая, как упоминалось ранее, основана на IntelliJ IDEA.
Чтобы открыть Gradle проекты в уроке 23, выполните те же действия, что и для проектов на JVM Kotlin. Выберите File ▸ Open, затем переходите к корневой папке проекта и выбираете ее.
IntelliJ IDEA обнаружит, что проект основан на Gradle, а затем откроет и настроит проект соответствующим образом.
Скорее всего, вы сначала увидите диалоговое окно Import Project from Gradle, в котором вы можете принять значения по умолчанию и нажать OK:
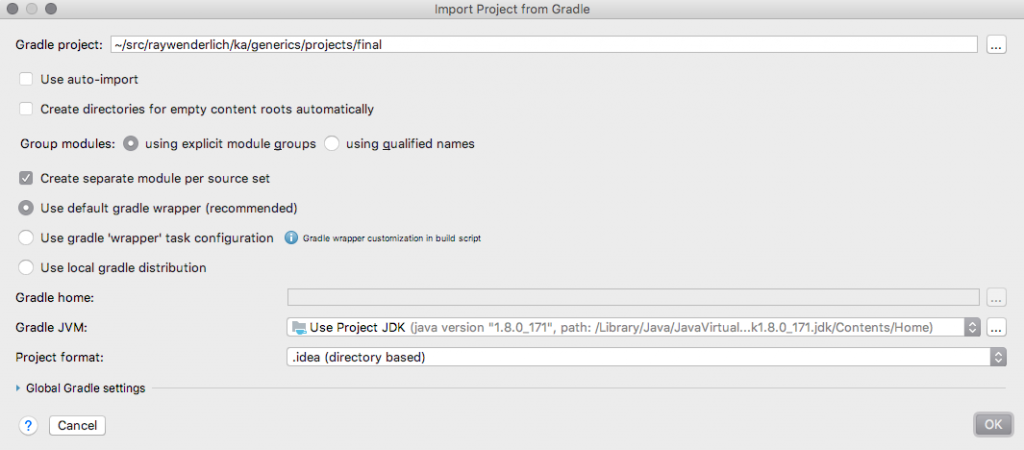
Проект отрется и вы можете увидеть два уведомления в нижнем правом углу окна IntelliJ IDEA. В первом будет говориться, что нужно импортировать проекты Gradle (Gradle projects need to be imported):

Вы можете выбрать Import Changes и продолжить.
В другом уведомлении может говориться, что плагин Kotlin, который был установлен в IntelliJ IDEA, является более новым, чем тот, который был сконфигурирован с проектом:
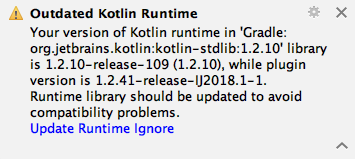
Если плагин Kotlin новее, чем тот, что в проекте, вы можете просто закрыть уведомление. Если кликнуть на Update Runtime, вам сообщать, что автоматические обновления недоступны, но вы можете проигнорировать это сообщение.
Задачи курса
Помимо начального проекта, в каждом уроке также есть папка для финального проекта и папка с решениями задач, которые вы найдете в конце каждого урока. Вы можете открыть финальный и контрольный проекты таким же образом, как описано выше для начальных проектов. Пробные проекты также содержат решения мини-упражнений, с которыми вы столкнетесь в уроках.
Задачи являются ключевыми пунктами нашего курса. В конце каждого урока даются задачи для проверки, а в самом тексте иногда встречаются мини-упражнения. Решение данных задач и мини-упражнений поможет закрепить знания, полученные в уроке.
В качестве задачи первого урока убедитесь, что вы прошли через процесс создания нового проекта Kotlin JVM, а также открыли существующий проект из финальной папки проекта для Урока 1. Обязательно запустите код в обоих случаях. Это гарантия того, что вы сможете выполнить примеры кода из оставшейся части курса.
Главные особенности языка Kotlin
- IntelliJ IDEA — это Интегрированная среда разработки от JetBrains, создателей языка Kotlin, в которой вы можете писать и запускать код на Kotlin;
- IntelliJ IDEA Community является бесплатной версия для проектов описанных в курсе;
- Код на Kotlin работает на многих платформах, и одной из самых известных является Java Virtual Machine, которая будет использоваться в большей части курса;
- Для создания проектов на Kotlin с помощью IntelliJ IDEA необходимо установить Java Development Kit версии 8 или выше;
- Окно приложения IntelliJ IDEA состоит из ряда панелей, наиболее важными из которых являются панели Project, Editor и Run;
- Начальный, финальный и контрольный проекты курса можно открыть, выбрав File ▸ Open в меню IntelliJ IDEA и выбрав корневую папку соответствующего проекта.
Что дальше?
В IntelliJ IDEA есть много моментов, которые важно разобрать, включая отладку, рефакторинг, профилирование кода и интеграцию системы контроля версий. Вы можете узнать больше об этих функциях IntelliJ IDEA в официальной документации JetBrains.
После настройки среды разработки в следующем уроке под названием «Выражения, переменные и константы» мы разберемся с принципами работы компьютеров и напишем рабочий код на Kotlin.
qaa-engineer.ru > Kotlin > Как установить Kotlin на Windows/Linux/MacOS: подробная инструкция
Kotlin – это объектно-ориентированный язык программирования, созданный компанией JetBrains. Сейчас Kotlin все больше и больше используется в мире программирования, он обладает богатыми возможностями и отличной производительностью. Если вы хотите начать изучение этого языка, в этой статье мы покажем вам, как установить Kotlin на Windows, Linux и MacOS.
Установка Kotlin на Windows
Шаг 1: Скачайте JDK
Первым шагом в установке Kotlin является установка JDK (Java Development Kit). Для этого перейдите на официальный сайт Oracle и скачайте JDK в соответствии с вашей операционной системой.
Шаг 2: Установите JDK
После загрузки файла установки JDK, запустите его и следуйте инструкциям на экране для установки. После установки вы можете проверить, что JDK успешно установлен, введя команду javac в командной строке.
Шаг 3: Скачайте Kotlin
Перейдите на официальный сайт Kotlin и скачайте последнюю версию для Windows. Распакуйте архив в удобном для вас месте.
Шаг 4: Установите Kotlin
Откройте командную строку и перейдите в папку, где вы распаковали архив с Kotlin. Введите следующую команду:
bin\windows\kotlinc.bat
Эта команда запустит установщик Kotlin.
Шаг 5: Проверьте установку
После завершения установки Kotlin, проверьте ее, введя следующую команду в командной строке:
kotlin -version
Если все прошло успешно, вы должны увидеть версию Kotlin и версию JVM (Java Virtual Machine).
Установка Kotlin на Linux
Шаг 1: Установите OpenJDK
Первым шагом в установке Kotlin является установка OpenJDK (Open Java Development Kit). Введите следующую команду в терминал:
sudo apt-get install openjdk-8-jdk
Эта команда установит JDK на вашу систему.
Шаг 2: Скачайте Kotlin
Перейдите на официальный сайт Kotlin и скачайте последнюю версию для Linux. Распакуйте архив в удобном для вас месте.
Шаг 3: Установите Kotlin
Перейдите в папку, где вы распаковали архив с Kotlin, введите следующую команду:
bin/kotlinc
Эта команда запустит установщик Kotlin.
Шаг 4: Добавьте Kotlin в PATH
Для того чтобы использовать Kotlin, вам нужно добавить его в переменную PATH. Для этого введите следующую команду в терминал:
export PATH="$PATH:/<path_to_kotlin>/bin"
Шаг 5: Проверьте установку
После завершения установки Kotlin, проверьте ее, введя следующую команду в терминал:
kotlin -version
Если все прошло успешно, вы должны увидеть версию Kotlin и версию JVM (Java Virtual Machine).
Установка Kotlin на MacOS
Шаг 1: Скачайте JDK
Первым шагом в установке Kotlin является установка JDK (Java Development Kit). Для этого перейдите на официальный сайт Oracle и скачайте JDK в соответствии с вашей операционной системой.
Шаг 2: Установите JDK
После загрузки файла установки JDK, запустите его и следуйте инструкциям на экране для установки. После установки вы можете проверить, что JDK успешно установлен, введя команду javac в терминале.
Шаг 3: Скачайте Kotlin
Перейдите на официальный сайт Kotlin и скачайте последнюю версию для MacOS. Распакуйте архив в удобном для вас месте.
Шаг 4: Установите Kotlin
Перейдите в папку, где вы распаковали архив с Kotlin, введите следующую команду:
bin/kotlinc
Эта команда запустит установщик Kotlin.
Шаг 5: Добавьте Kotlin в PATH
Для того чтобы использовать Kotlin, вам нужно добавить его в переменную PATH. Для этого введите следующую команду в терминал:
export PATH="$PATH:/<path_to_kotlin>/bin"
Шаг 6: Проверьте установку
После завершения установки Kotlin, проверьте ее, введя следующую команду в терминал:
kotlin -version
Если все прошло успешно, вы должны увидеть версию Kotlin и версию JVM (Java Virtual Machine).
Заключение
Теперь вы знаете, как установить Kotlin на Windows, Linux и MacOS с помощью подробной инструкции. Используйте этот язык программирования, чтобы создавать различные приложения и веб-сайты. Kotlin — это отличный язык для программирования и обладает множеством возможностей, чтобы создавать качественный код.

So you want to download and install Kotlin on Windows?
Then look no further!
In this guide, you’ll learn how to download the compiler…
…and how to configure it so you can use it from command line.
So let’s fire away:
What is Kotlin?
Kotlin is a programming language. It runs on the Java Virtual Machine (JVM) but also provides the ability to target JavaScript.
A key aspect of Kotlin is the interoperability with Java. You can write Kotlin and Java code in the same project and they’ll work hand in hand.
Kotlin originated at JetBrains and has been open source since 2012.
Step #1: Check Prerequisites
Kotlin needs a JDK to work. So let’s check if you have one configured on your system.
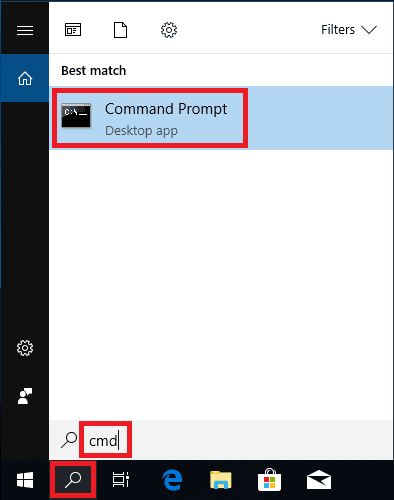
Click on the search button. Then type “cmd” (without quotes).
On Windows 7 click on the Windows button.
Click on the Command Prompt shortcut.
Wait for the command prompt to open.
Type “javac -version” and press ENTER.
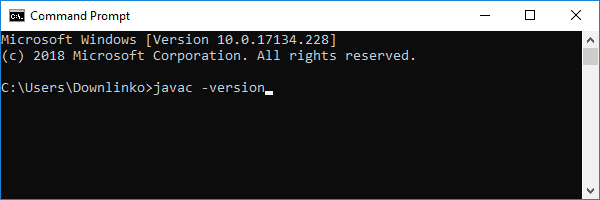
The above command prints the installed JDK version.

For Kotlin you need JDK version 1.6 or higher.
If you do not have a Java Development Kit installed on your system. Check following post which details how to install a JDK on Windows 10.
Step #2: Download
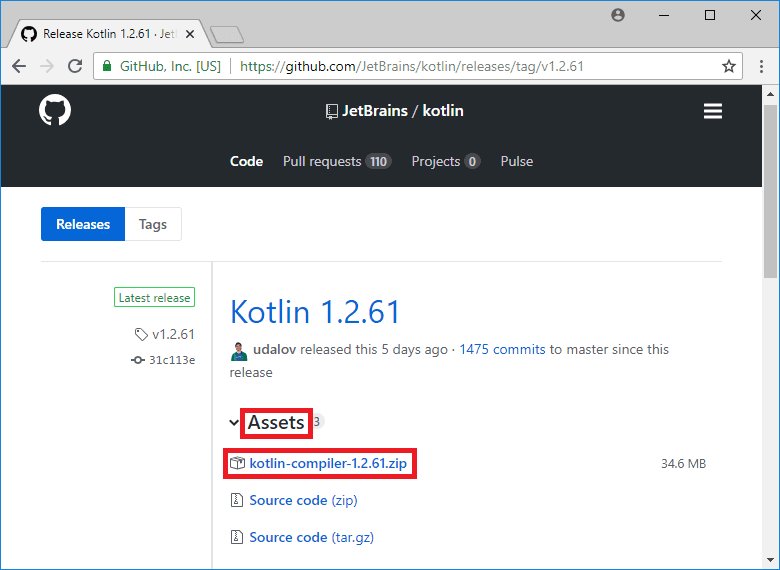
Go to the Kotlin Latest Release page on GitHub.
Click on the kotlin-compiler-X.X.X.zip link under the Assets section.
At the time of writing the latest stable Kotlin release was version 1.2.61.
Wait for the download to complete.
Step #3: Install
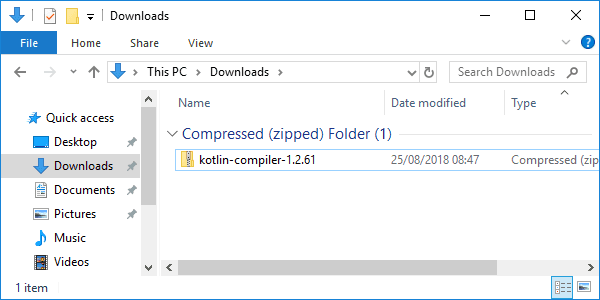
Open the location of the downloaded installer.
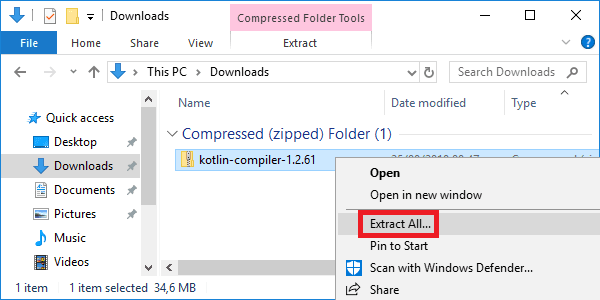
Right-click the ZIP archive file. Select Extract All….
Select an extract destination for the Kotlin files.
In this example, we extract in C:\Users\Downlinko\tools\kotlin.
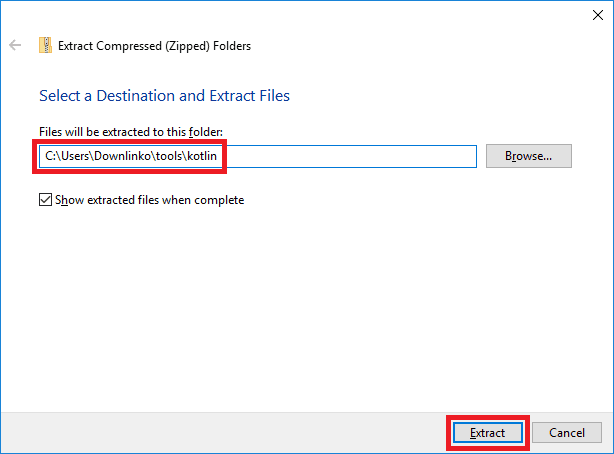
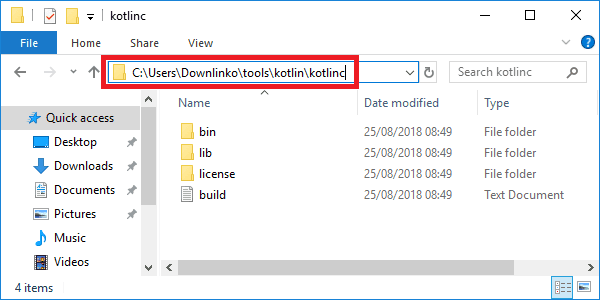
Click on Extract. This extracts all kotlin files under C:\Users\Downlinko\tools\kotlin\kotlinc.
From now on we refer to this location as
[KOTLIN_INSTALL_DIR].
Step #4: Setup
We need to set up an environment variable that will point to our Kotlin installation.
Click on the search button. Then type “env”.
On Windows 7 click on the Windows button.
Click on the Edit environment variables for your account shortcut.
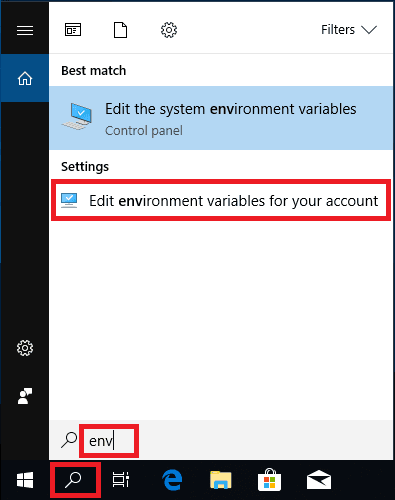
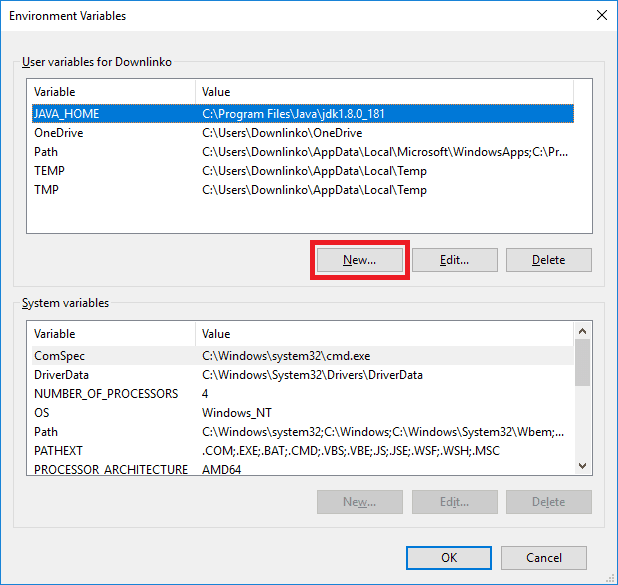
Wait for the environment variables window to open.
Click on New….
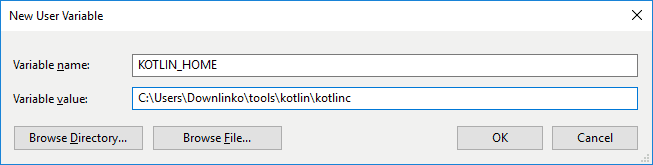
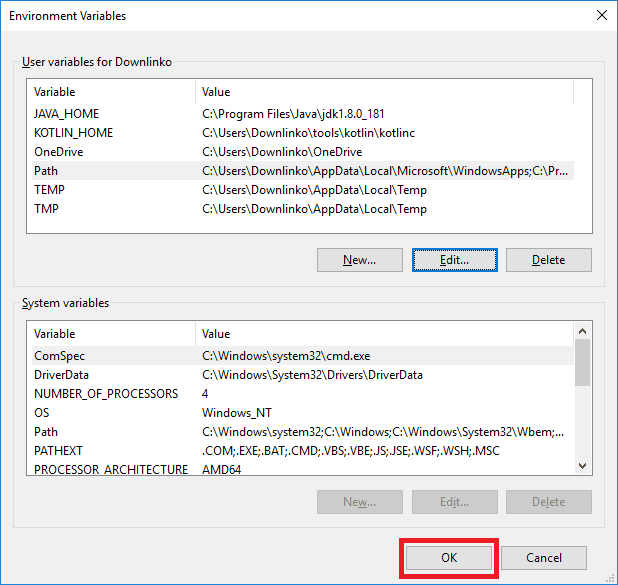
Enter “KOTLIN_HOME” as variable name. Enter the [KOTLIN_INSTALL_DIR] as variable value.
In this tutorial the installation directory is: C:\Users\Downlinko\tools\kotlin\kotlinc.
Click OK.
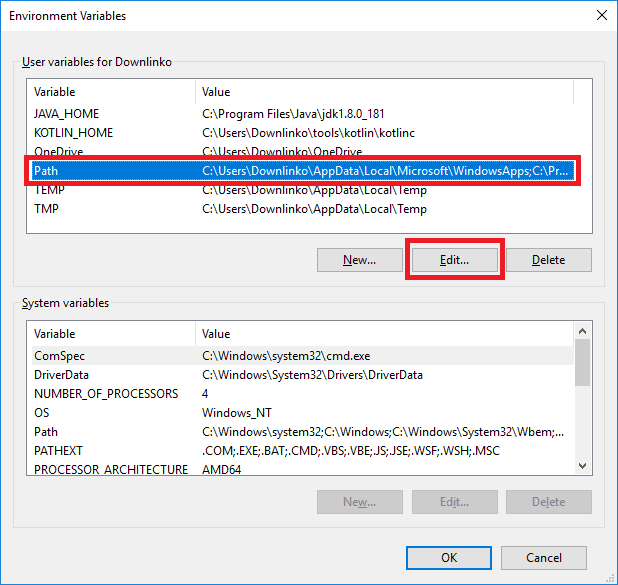
Next, we need to configure the PATH environment variable so we can run Kotlin from a command prompt.
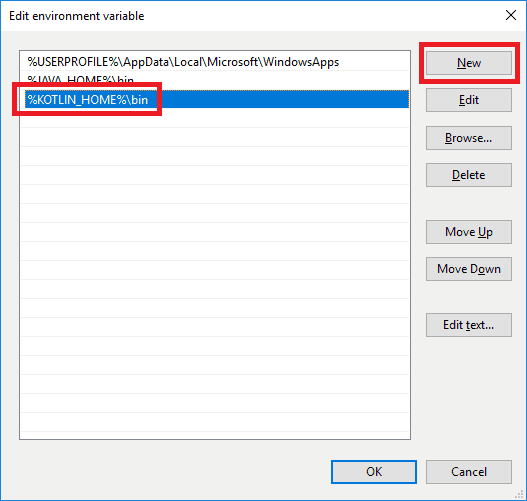
Select the PATH variable. Click on Edit….
Click on New and type “%KOTLIN_HOME%\bin” as shown below.
Click OK.
Click OK once more to close the environment variables window.
On Windows 7 you cannot add extra values for an existing
Pathvariable. You need to append “;%KOTLIN_HOME%\bin” at the end of the variable value instead.
Step #5: Test
To test the setup click on the search button. Then type “cmd”.
Click on the Command Prompt shortcut.
Wait for the command prompt to open.
Type “kotlinc -version” and press ENTER.
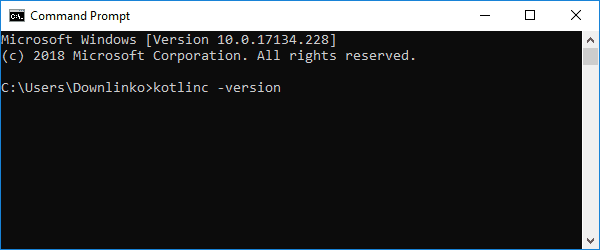
The above command prints the installed Kotlin version.
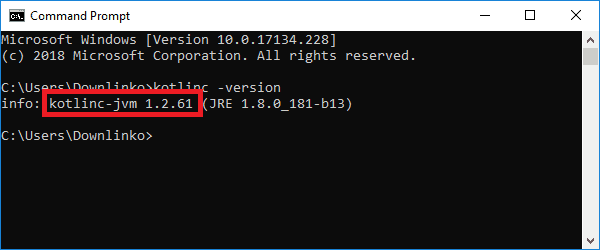
Congratulations, you have installed Kotlin on Windows 10!
Now get started and write your first lines of Kotlin code.
Be sure to leave a comment if you liked this post.
Thanks!
Chapter 1. Installing and Running Kotlin
The recipes in this chapter help you get up and running with the Kotlin compiler, both from the command line and using an integrated development environment (IDE).
1.1 Running Kotlin Without a Local Compiler
Problem
You want to try out Kotlin without a local installation, or run it on a machine that does not support it (for example, a Chromebook).
Discussion
The Kotlin Playground provides an easy way to experiment with Kotlin, explore features you havenât used, or simply run Kotlin on systems that donât have an installed compiler. It gives you access to the latest version of the compiler, along with a web-based editor that allows you to add code without installing Kotlin locally.
Figure 1-1 is a snapshot of the browser page.
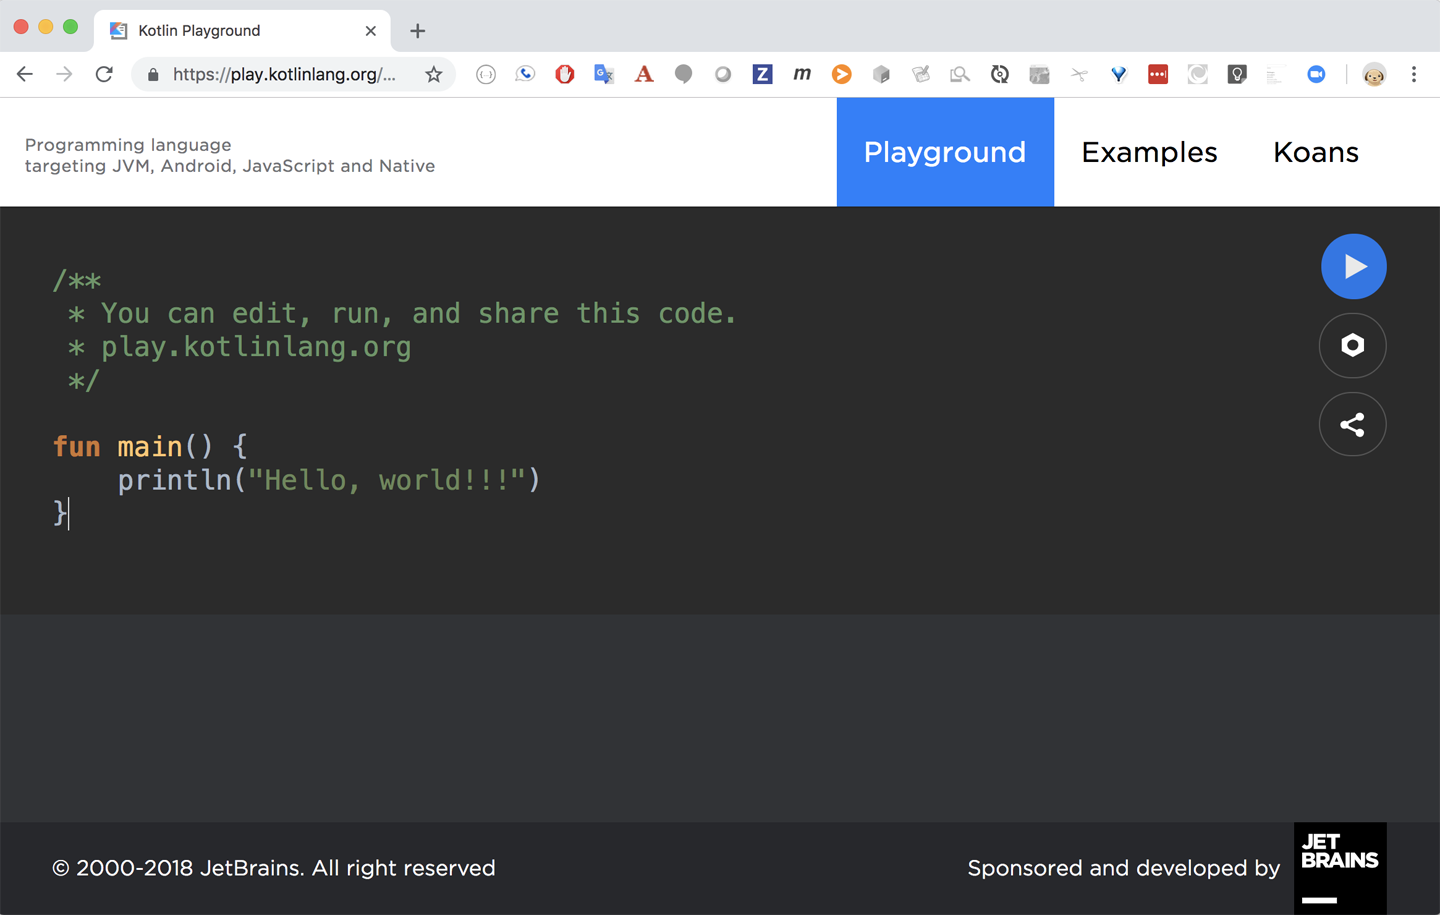
Figure 1-1. The Kotlin Playground home page
Just type in your own code and click the Play button to execute it. The Settings button (the gear icon) allows you to change Kotlin versions, decide which platform to run on (JVM, JS, Canvas, or JUnit), or add program arguments.
Note
As of Kotlin 1.3, the Kotlin function main can be defined without parameters.
The Examples section contains an extensive set of sample programs, organized by topic, that can be executed using an embedded block in a browser. Figure 1-2 shows the âHello worldâ program page.

Figure 1-2. Examples in the Kotlin Playground
The playground also has a dedicated section for Kotlin Koans, which are a series of exercises to help you become more familiar with the language. While these are useful online, if you use IntelliJ IDEA or Android Studio, the Koans can be added using the EduTools plug-in.
1.2 Installing Kotlin Locally
Problem
You want to execute Kotlin from a command prompt on your local machine.
Solution
Perform a manual install from GitHub or use one of the available package managers for your operating system.
Discussion
The page at http://kotlinlang.org/docs/tutorials/command-line.html discusses the options for installing a command-line compiler. One option is to download a ZIP file containing an installer for your operating system. This page contains a link to the GitHub repository for Kotlin current releases. ZIP files are available for Linux, macOS, Windows, and the source distribution. Simply unzip the distribution and add its bin subdirectory to your path.
A manual install certainly works, but some developers prefer to use package managers. A package manager automates the installation process, and some of them allow you to maintain multiple versions of a particular compiler.
SDKMAN!, Scoop, and other package managers
One of the most popular installation programs is SDKMAN!. Originally designed for Unix-based shells, there are plans to make it available for other platforms as well.
Installing Kotlin with SDKMAN! begins with a curl install:
> curl -s https://get.sdkman.io | bash
Then, once itâs installed, you can use the sdk command to install any one of a variety of products, including Kotlin:
> sdk install kotlin
By default, the latest version will be installed in the ~/.sdkman/candidates/kotlin directory, along with a link called current that points to the selected version.
You can find out what versions are available by using the list command:
> sdk list kotlin
The install command by default selects the latest version, but the use command will let you select any version, offering to install it if necessary:
> sdk use kotlin 1.3.50
That will install version 1.3.50 of Kotlin, if necessary, and use it in the current shell.
Note
IntelliJ IDEA or Android Studio can use the downloaded versions, or they can maintain their own versions separately.
Other package managers that support Kotlin include Homebrew, MacPorts, and Snapcraft.
On Windows, you can use Scoop. Scoop does for Windows what the other package managers do for non-Windows systems. Scoop requires PowerShell 5 or later and .NET Framework 4.5 or later. Simple installation instructions are found on the Scoop website.
Once Scoop is installed, the main bucket allows you to install the current version of Kotlin:
> scoop install kotlin
This will install the scripts kotlin.bat, kotlinc.bat, kotlin-js.bat, and kotlin-jvm.bat and add them all to your path.
That is sufficient, but if you want to try it, there is an experimental installer called kotlin-native, which installs a native Windows compiler as well. This installs an LLVM backend for the Kotlin compiler, a runtime implementation, and a native code generation facility by using the LLVM toolchain.
Regardless of how you install Kotlin, you can verify that it works and is in your path by using the simple command kotlin -version. A typical response to that command is shown here:
> kotlin -version
Kotlin version 1.3.50-release-112 (JRE 13+33)
See Also
Recipe 1.3 discusses how to use Kotlin from the command line after it is installed.
1.3 Compiling and Running Kotlin from the Command Line
Problem
You want to compile and execute Kotlin from the command line.
Solution
Use the kotlinc-jvm and kotlin commands, similar to Java.
Discussion
The Kotlin SDK for the JVM includes the Kotlin compiler command, kotlinc-jvm, and the Kotlin execution command, kotlin. They are used just like javac and java for Java files.
Note
The Kotlin installation includes a script called kotlinc-js for compiling to JavaScript. This book assumes you are planning to use the JVM version. The basic script kotlinc is an alias for kotlinc-jvm.
For example, consider a trivial âHello, Kotlin!â program, stored in a file called hello.kt, with the code shown in Example 1-1.
Example 1-1. hello.kt
funmain(){println("Hello, Kotlin!")}
The command kotlinc compiles this file, and the command kotlin is used to execute the resulting class file, as in Example 1-2.
Example 1-2. Compiling and executing a regular Kotlin file
>kotlinc-jvmhello.kt>lshello.ktHelloKt.class>kotlinHelloKtHello,Kotlin!

-
Compiles the source
-
Executes the resulting class file
The compiler produces the HelloKt.class file, which contains bytecodes that can be executed on the Java Virtual Machine. Kotlin does not generate Java source codeâitâs not a transpiler. It generates bytecodes that can be interpreted by the JVM.
The compiled class takes the name of the file, capitalizes the first letter, and appends Kt on the end. This can be controlled with annotations.
If you wish to produce a self-contained JAR file that can be executed by the Java command, add the -include-runtime argument. That allows you to produce an executable JAR that can be run from the java command, as in Example 1-3.
Example 1-3. Including the Kotlin runtime
> kotlinc-jvm hello.kt -include-runtime -d hello.jar
The resulting output file is called hello.jar, which can be executed using the java command:
> java -jar hello.jar
Hello, Kotlin!
Leaving out the -include-runtime flag would produce a JAR file that needs the Kotlin runtime on the classpath in order to execute.
Warning
The kotlinc command without any arguments starts the interactive Kotlin REPL, which is discussed in Example 1-4.
See Also
Example 1-4 shows how to use the Kotlin read-eval-print loop (REPL) for interactive coding. Recipe 1.5 discusses executing Kotlin scripts from the command line.
1.4 Using the Kotlin REPL
Problem
You want to run Kotlin in an interactive shell.
Solution
Use the Kotlin REPL by typing kotlinc by itself at the command line.
Discussion
Kotlin includes an interactive compiler session manager, known as a REPL (read-eval-print loop) that is triggered by the kotlinc command with no arguments. Once inside the REPL, you can evaluate arbitrary Kotlin commands and see the results immediately.
Tip
The Kotlin REPL is also available inside Android Studio and IntelliJ IDEA as the Kotlin REPL entry under the Tools â Kotlin menu.
After running the kotlinc command, you will receive an interactive prompt. An example session is shown in Example 1-4.
Example 1-4. Using the Kotlin REPL
ⶠkotlinc Welcome to Kotlin version 1.3.50(JRE 11.0.4+11)Type :helpforhelp, :quitforquit >>> println("Hello, World!")Hello, World! >>> varname="Dolly">>> println("Hello,$name!")Hello, Dolly! >>> :help Available commands: :help show thishelp:quitexitthe interpreter :dump bytecode dump classes to terminal :load <file> load script from specified file >>> :quit
The REPL is a quick and easy way to evaluate Kotlin expressions without starting up a full IDE. Use it if you donât want to create an entire project or other IDE-based collection of files, or if you want to do a quick demo in order to help another developer, or if you donât have your preferred IDE available.
1.5 Executing a Kotlin Script
Problem
You want to write and execute a script written in Kotlin.
Solution
Enter your code in a file ending in .kts. Then use the kotlinc command with the -script option to execute it.
Discussion
The kotlinc command supports several command-line options, one of which allows Kotlin to be used as a scripting language. A script is defined as a Kotlin source file with the file extension .kts that includes executable code.
As a simple example, the file southpole.kts in Example 1-5 shows the current time at the South Pole and prints whether it is currently on daylight saving time. The script uses the java.time package added to Java in version 8.
Example 1-5. southpole.kts
importjava.time.*valinstant=Instant.now()valsouthPole=instant.atZone(ZoneId.of("Antarctica/South_Pole"))valdst=southPole.zone.rules.isDaylightSavings(instant)println("It is ${southPole.toLocalTime()} (UTC${southPole.offset})at the South Pole")println("The South Pole ${if (dst) "is" else "isnot"} on Daylight Savings Time")
Execute this file with the kotlinc command using the -script option:
> kotlinc -script southpole.kts
It is 10:42:56.056729 (UTC+13:00) at the South Pole
The South Pole is on Daylight Savings Time
Scripts contain the code that would normally appear inside the standard main method in a class. Kotlin can be used as a scripting language on the JVM.
1.6 Building a Standalone Application Using GraalVM
Problem
You want to generate an application that can be run from the command line without any additional dependencies.
Solution
Use the GraalVM compiler and native-image tool.
Discussion
GraalVM is a high-performance virtual machine that provides a cross-language runtime for running applications written in a variety of languages. You can write in a JVM-based language like Java or Kotlin, and integrate with JavaScript, Ruby, Python, R, and more.
One nice feature of GraalVM is that you can use it to create a native executable from your code. This recipe shows a simple example of how to use GraalVMâs native-image tool to create a native binary from Kotlin source code.
You can install GraalVM from the downloads page. For the current recipe, the free Community Edition was installed using the SDKMAN! tool:
> sdk install java 19.2.0.1-grl > java -version openjdk version"1.8.0_222"OpenJDK Runtime Environment(build 1.8.0_222-20190711112007.graal.jdk8u-src... OpenJDK 64-Bit GraalVM CE 19.2.0.1(build 25.222-b08-jvmci-19.2-b02, mixed mode)> gu install native-image // installs native image component
Consider the Kotlin version of âHello, World!â from Figure 1-1, reproduced here:
funmain(){println("Hello, World!")}
As stated in Recipe 1.3, you can just compile this script by using kotlinc-jvm, which generates HelloKt.class, and then run with kotlin:
> kotlinc-jvm hello.kt  // generates HelloKt.class
> kotlin HelloKt
Hello, World!
To generate a native image instead, first compile the script with the -include-runtime option. That generates a file called hello.jar:
> kotlinc-jvm hello.kt -include-runtime -d hello.jar
The GraalVM system includes the native-image tool, which you can use to generate the native executable, as in Example 1-6.
Example 1-6. Building a native executable using GraalVM
> native-image -jar hello.jar
Note
From the docs: âFor compilation, native-image depends on the local toolchain, so please make sure glibc-devel, zlib-devel (header files for the C library and zlib) and gcc are available on your system.â
The output will resemble the following:
> native-image -jar hello.jar
Build on Server(pid: 61247, port: 49590)*
[hello:61247]    classlist:   1,497.63 ms
[hello:61247]        (cap):   2,225.47 ms
[hello:61247]        setup:   3,451.98 ms
[hello:61247]   (typeflow):   2,163.16 ms
[hello:61247]    (objects):   1,793.53 ms
[hello:61247]   (features):     215.90 ms
[hello:61247]     analysis:   4,247.68 ms
[hello:61247]     (clinit):     107.96 ms
[hello:61247]     universe:     399.58 ms
[hello:61247]      (parse):     329.84 ms
[hello:61247]     (inline):     753.12 ms
[hello:61247]    (compile):   3,426.14 ms
[hello:61247]      compile:   4,807.54 ms
[hello:61247]        image:     306.96 ms
[hello:61247]        write:     180.22 ms
[hello:61247]      [total]:  15,246.88 ms
The result will be a file called hello that you can invoke at the command line. On a Mac or other Unix-based system, youâll see the following:
> ./hello
Hello, World!
There are now three ways to run the original script:
-
Compile with
kotlinc-jvmand then execute withkotlin. -
Compile including the runtime and then execute the resulting JAR with
java. -
Compile with
kotlinc, create a native image with GraalVM, and then execute from the command line.
The sizes of the resulting files are quite different. The compiled bytecode file HelloKt.class is only about 700 bytes. The hello.jar file with its included runtime is about 1.2 MB. The native image is still larger, at about 2.1 MB. The speed differences are dramatic however, even on a tiny script like this. Example 1-7 shows a simple comparison.
Example 1-7. Timing the hello script
> time kotlin HelloKt
Hello, World!
kotlin HelloKt  0.13s user 0.05s system 112% cpu 0.157 total

~/Documents/kotlin
> time java -jar hello.jar
Hello, World!
java -jar hello.jar  0.08s user 0.02s system 99% cpu 0.106 total

~/Documents/kotlin
> time ./hello
Hello, World!
./hello  0.00s user 0.00s system 59% cpu 0.008 total
The relative values are telling. While the JAR file is somewhat quicker than running kotlin directly, the native image is literally an order of magnitude faster. In this example, it takes only about 8 milliseconds to run.
Tip
If you are a Gradle user, you can use a GraalVM plug-in called gradle-graal. It adds a native-image task (among others) to your build. See the home page for the plug-in for details.
1.7 Adding the Kotlin Plug-in for Gradle (Groovy Syntax)
Problem
You want to use add the Kotlin plug-in to a Gradle build by using the Groovy domain-specific language (DSL) syntax.
Solution
Add the Kotlin dependency and plug-in by using the Groovy DSL tags in a build file.
Discussion
Note
This recipe uses the Groovy DSL for Gradle. The next recipe shows how to use the Kotlin DSL for Gradle instead.
The Gradle build tool supports compiling Kotlin on the JVM by using a plug-in supplied by JetBrains. The kotlin-gradle-plugin, adding to Gradle build script has been registered at the Gradle plug-ins repository, and can be added to a Gradle build script as in Example 1-8. The code shown is added to a file called build.gradle in the project root.
Example 1-8. Adding the Kotlin plug-in by using the plugins block (Groovy DSL)
plugins{id"org.jetbrains.kotlin.jvm"version"1.3.50"}
The version value represents both the plug-in version and the Kotlin version. Gradle still supports the older syntax for adding plug-ins, as shown in Example 1-9.
Example 1-9. Older syntax for the Kotlin plug-in (Groovy DSL)
buildscript{repositories{mavenCentral()}dependencies{classpath'org.jetbrains.kotlin:kotlin-gradle-plugin:1.3.50'}}plugins{id"org.jetbrains.kotlin.jvm"version"1.3.50"}
Both of these snippets use the Groovy DSL syntax for Gradle build files, which supports both single- and double-quoted strings. As with Kotlin, Groovy uses double-quoted strings when doing interpolation, but since none is required here, single-quoted strings also work.
The plugins block does not require you to state where the plug-in is found, as in the repositories block in the latter example. This is true for any Gradle plug-in registered at the Gradle plug-ins repository. Using the plugins block also automatically âappliesâ the plug-in, so no apply statement is required either.
The settings.gradle file is recommended but not required. It is processed during the initialization phase of Gradle processing, which occurs when Gradle determines which project build files need to be analyzed. In a multiproject build, the settings file shows which subdirectories of the root are themselves Gradle projects as well. Gradle can share settings and dependencies among subprojects, can make one subproject depend on another, or can even process subproject builds in parallel. For details, see the multiproject build sections of the Gradle User Manual.
Kotlin sources can be mixed with Java sources in the same folder, or you can create separate src/main/java and src/main/kotlin folders for them individually.
Android projects
The Kotlin plug-in for Android is handled slightly differently. Android projects are multiproject builds in Gradle, meaning they normally have two build.gradle files: one in the root directory, and one in a subdirectory called app by default. Example 1-10 shows a typical top-level build.gradle file containing only the Kotlin plug-in information.
Example 1-10. Using Kotlin in Android projects (Groovy DSL)
buildscript{ext.kotlin_version='1.3.50'repositories{()jcenter()}dependencies{classpath'com.android.tools.build:gradle:3.5.0'classpath"org.jetbrains.kotlin:kotlin-gradle-plugin:$kotlin_version"}}// ... more tasks, unrelated to the plug-in ...
In Gradle parlance, the plug-in is then applied, as in the typical app directory build.gradle file shown in Example 1-11.
Example 1-11. Applying the Kotlin plug-in
applyplugin:'com.android.application'applyplugin:'kotlin-android'applyplugin:'kotlin-android-extensions'android{// ... android information ...}dependencies{implementation"org.jetbrains.kotlin:kotlin-stdlib-jdk8:$kotlin_version"// ... other unrelated dependencies ...}
-
Applies the Kotlin plug-in for Android
-
Applies the Android Kotlin extensions
-
Standard library dependency, can use JDK 8 or JDK 7
The Kotlin plug-in for Android is declared in the buildscript section and then applied in this file. The plug-in knows how to compile Kotlin code inside your Android application. The downloaded plug-in also includes the Android extensions, which makes it easy to access Android widgets by their ID values.
The Kotlin plug-in can generate bytecodes for either JDK 7 or JDK 8. Change the jdk value in the listed dependency to select whichever you prefer.
Note
At the time of this writing, there is no option to select the Kotlin DSL when creating Android projects. You can create your own build files that use the Kotlin DSL, but that is unusual. The Kotlin DSL will be available in version 4.0 of Android Studio, which will also include full support for KTS files and Kotlin live templates.
See Also
The same process using the Kotlin DSL is shown in Recipe 1.8, other than for the Android section.
1.8 Adding the Kotlin Plug-in for Gradle (Kotlin Syntax)
Problem
You want to add the Kotlin plug-in to a Gradle build, using the Kotlin DSL.
Solution
Add the Kotlin dependency and plug-in, using the Kotlin DSL tags in a build file.
Discussion
Note
This recipe uses the Kotlin DSL for Gradle. The previous recipe shows how to use the Groovy DSL for Gradle instead.
Gradle (version 5.0 and above) includes the new Kotlin DSL for configuring the build file. It also makes available kotlin-gradle-plugin, registered at the Gradle plug-in repository, which can be added to a Gradle build script shown in Example 1-12. Alternatively, you can use the older buildscript syntax in Example 1-13. The code shown is added to a file called build.gradle.kts in the project root.
Example 1-12. Adding the Kotlin plug-in by using the plugins block (Kotlin DSL)
plugins{kotlin("jvm")version"1.3.50"}
Example 1-13. Older syntax for the Kotlin plug-in (Kotlin DSL)
buildscript{repositories{mavenCentral()}dependencies{classpath(kotlin("gradle-plugin",version="1.3.50"))}}plugins{kotlin("jvm")}
The plugins block does not require you to state where the plug-in is found, as in the repositories block in the latter example. This is true for any Gradle plug-in registered at the Gradle plug-ins tepository. Using the plugins block also automatically âappliesâ the plug-in, so no apply statement is required either.
Tip
The default build filenames for the Kotlin DSL in Gradle are settings.gradle.kts and build.gradle.kts.
As you can see, the biggest differences from the Groovy DSL syntax are as follows:
-
Double quotes are required on any strings.
-
The parentheses are required in the Kotlin DSL.
-
Kotlin uses an equals sign (
=) to assign values, rather than a colon (:).
The settings.gradle.kts file is recommended but not required. It is processed during the initialization phase of Gradle processing, which occurs when Gradle determines which project build files need to be analyzed. In a multiproject build, the settings file shows which subdirectories of the root are themselves Gradle projects as well. Gradle can share settings and dependencies among subprojects, can make one subproject depend on another, or can even process subproject builds in parallel. For details, see the multiproject build sections of the Gradle User Manual.
Kotlin and Java source code can be mixed together in src/main/java or src/main/kotlin, or you can add your own source files by using the sourceSets property of Gradle. See the Gradle documentation for details.
See Also
The same process using the Groovy DSL in Gradle is shown in Recipe 1.7. Additional details for Android projects can be found in that recipe as well, as the Kotlin DSL is not currently an option when generating Android projects.
1.9 Using Gradle to Build Kotlin Projects
Problem
You want to build a project that contains Kotlin by using Gradle.
Solution
In addition to the Kotlin plug-in for Gradle, add the Kotlin JDK dependency at compile time.
Discussion
The examples in Recipes 1.7 and 1.8 showed how to add the Kotlin plug-in for Gradle. This recipe adds features to the build file to process any Kotlin code in your project.
To compile the Kotlin code in Gradle, you need to add an entry to the dependencies block in your Gradle build file, as shown in Example 1-14.
Example 1-14. Kotlin DSL for simple Kotlin project (build.gradle.kts)
plugins {
    `java-library`
    kotlin("jvm") version "1.3.50"
}

repositories {
    jcenter()
}

dependencies {
    implementation(kotlin("stdlib"))
}
-
Adds tasks from the Java Library plug-in
-
Adds the Kotlin plug-in to Gradle
-
Adds the Kotlin standard library to the project at compile time
The java-library plug-in defines tasks for a basic JVM-based project, like build, compileJava, compileTestJava, javadoc, jar, and more.
Note
The plugins section must come first, but the other top-level blocks (repositories, dependencies, etc.) can be in any order.
The dependencies block indicates that the Kotlin standard library is added at compile time (older versions of Gradle still use the compile configuration instead of implementation, but the effect is the same). The repositories block indicates that the Kotlin dependency will be downloaded from jcenter, which is the public Artifactory Bintray repository.
If you run the gradle build --dry-run task at the command line, you can see the tasks that would be executed by Gradle without actually running them. The result is as follows:
> gradle build -m

:compileKotlin SKIPPED
:compileJava SKIPPED
:processResources SKIPPED
:classes SKIPPED
:inspectClassesForKotlinIC SKIPPED
:jar SKIPPED
:assemble SKIPPED
:compileTestKotlin SKIPPED
:compileTestJava SKIPPED
:processTestResources SKIPPED
:testClasses SKIPPED
:test SKIPPED
:check SKIPPED
:build SKIPPED

BUILD SUCCESSFUL in 0s
The Kotlin plug-in adds the compileKotlin, inspectClassesForKotlinIC, and compileTestKotlin tasks.
The project can be built by using the same command without the -m flag, which is the abbreviation for --dry-run.
1.10 Using Maven with Kotlin
Problem
You want to compile Kotlin by using the Maven build tool.
Solution
Use the Kotlin Maven plug-in and standard library dependencies.
Discussion
The basic details for using Maven can be found on the documentation web page.
This documentation recommends that first you specify the Kotlin version you want to use as a property in a Maven pom.xml file that looks like this:
<properties><kotlin.version>1.3.50</kotlin.version></properties>
Then, add the Kotlin standard library as a dependency, as in Example 1-15.
Example 1-15. Adding the Kotlin standard library dependency
<dependencies><dependency><groupId>org.jetbrains.kotlin</groupId><artifactId>kotlin-stdlib</artifactId><version>${kotlin.version}</version></dependency></dependencies>
Note
As with Gradle, you can specify kotlin-stdlib-jdk7 or kotlin-stdlib-jdk8 to use extension functions for Java 1.7 or 1.8.
Additional available artifact IDs include kotlin-reflect for reflection, and kotlin-test and kotlin-test-junit for testing.
To compile Kotlin source code, tell Maven in which directories it is located, as in Example 1-16.
Example 1-16. Specifying Kotlin source directories
<build><sourceDirectory>${project.basedir}/src/main/kotlin</sourceDirectory><testSourceDirectory>${project.basedir}/src/test/kotlin</testSourceDirectory></build>
Then tell the Kotlin plug-in to compile the sources and tests (Example 1-17).
Example 1-17. Referencing the Kotlin plug-in
<build><plugins><plugin><artifactId>kotlin-maven-plugin</artifactId><groupId>org.jetbrains.kotlin</groupId><version>${kotlin.version}</version><executions><execution><id>compile</id><goals><goal>compile</goal></goals></execution><execution><id>test-compile</id><goals><goal>test-compile</goal></goals></execution></executions></plugin></plugins></build>
When your project contains both Kotlin code and Java code, the Kotlin compiler should be invoked first. That means kotlin-maven-plugin should be run before maven-compiler-plugin. The documentation page provided previously shows how to ensure that via configuration options in your pom.xml file.