In this post, we will show you how to install Kali Linux on Windows 11 using WSL.
A while back, running a virtual machine was the only way of running another operating system, such as Linux, inside Windows. The drawback of virtual machines is that they are associated with high resource usage which in most cases slows down applications and services on the host especially if the underlying host has low computing specifications.
The Windows Subsystem for Linux, commonly abbreviated as WSL, is an abstraction layer that lets you run a Linux environment, including its utilities and tools, directly on Windows. It does this without the resource overhead of traditional virtual machines or having to configure a dual-boot setup. WSL was first released in 2016. WSL 2 is the current version and provides performance improvements and other enhancements to boost system performance.
Prerequisites
For this to work, ensure that your system meets the following requirements:
- Virtualization needs to be enabled on your BIOS.
- Must be running x64 system Version 1903 or higher, with Build 18362 or higher.
Without much ado, let’s get started.
1) Enable Windows Subsystem for Linux (WSL)
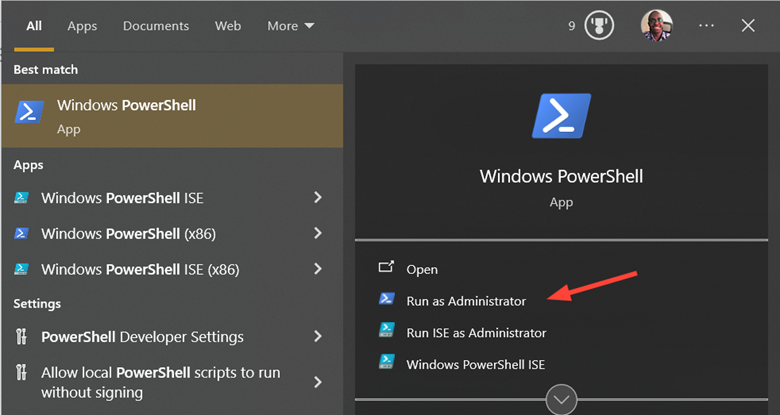
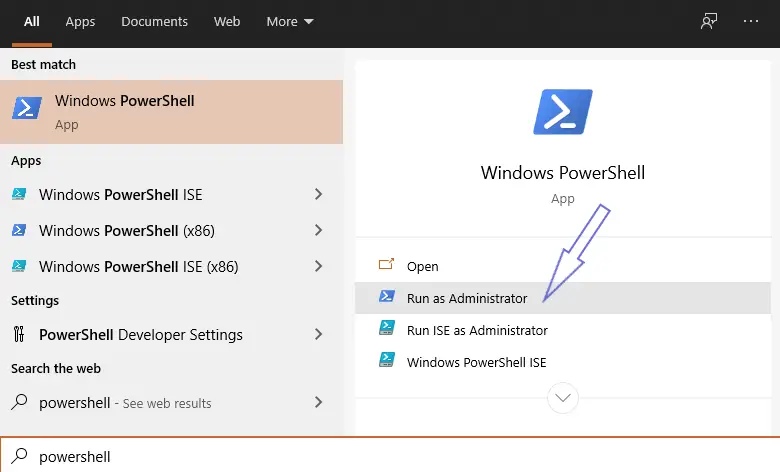
The first step is to enable the WSL feature on your Windows system. To do this, launch Windows PowerShell as the Administrator.
Next, run the following command on the terminal to enable the WSL feature.
dism.exe /online /enable-feature /featurename:Microsoft-Windows-Subsystem-Linux /all /norestart
This takes a minute or two to complete.
2) Enable Virtual Machine Platform Feature
The virtual Machine Platform feature is a feature that allows you to emulate other operating systems and is a prerequisite for specific features to run such as the WSL.
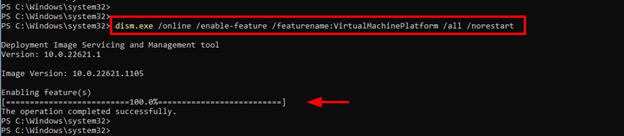
Still on Powershell, run the following command to enable the virtual machine platform feature.
dism.exe /online /enable-feature /featurename:VirtualMachinePlatform /all /norestart
In addition, (although not a requirement) consider setting WSL version 2 as the default version.
wsl --set-default-version 2

3) Install the Linux Kernel Update package.
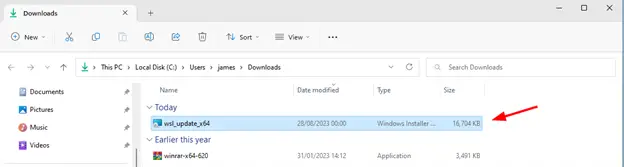
To avoid running into errors while running Kali Linux, it’s recommended to install the Linux Kernel Update Package for WSL. Therefore click on this link to download the WSL2 Linux kernel update package for x64 machines.
Once you have downloaded the installer, run it by double-clicking on it.
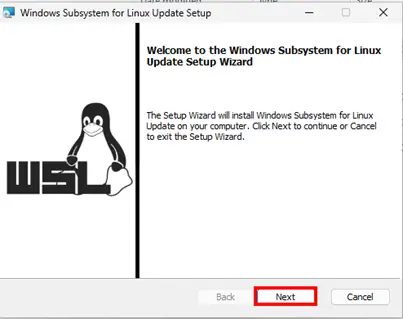
This opens the WSL setup wizard as shown. Click ‘Next’ and accept the default selections.
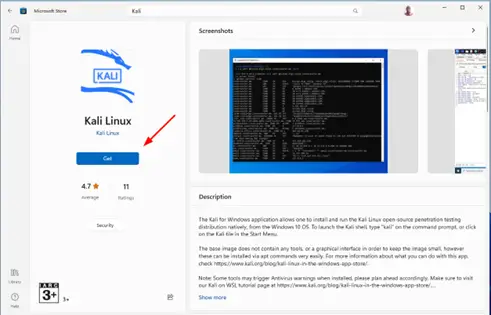
All our ducks are in a row as far as the requisite features needed are concerned. The next step is to install Kali Linux. So, head over to the Microsoft store and search for the ‘Kali Linux’ app.
Click the ‘Get’ button.
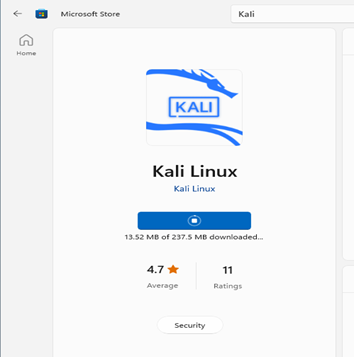
The download of the App, which is about 237MB will begin and the progress will be indicated as shown.
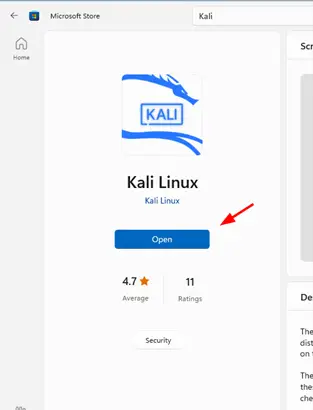
Once the download is complete, click ‘Open’.
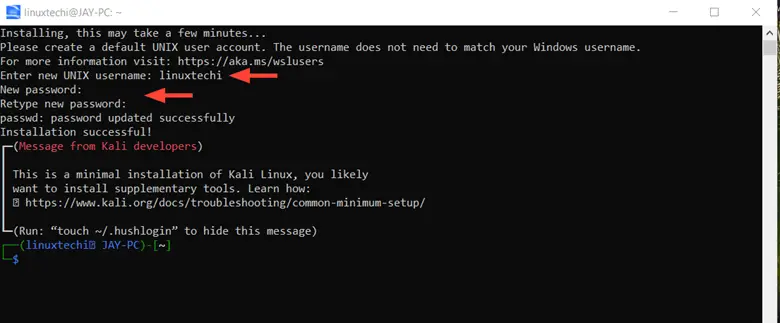
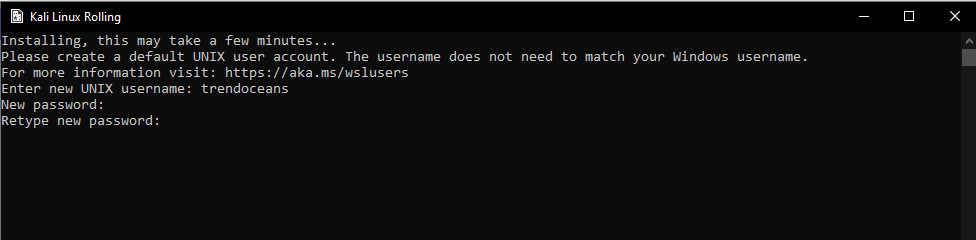
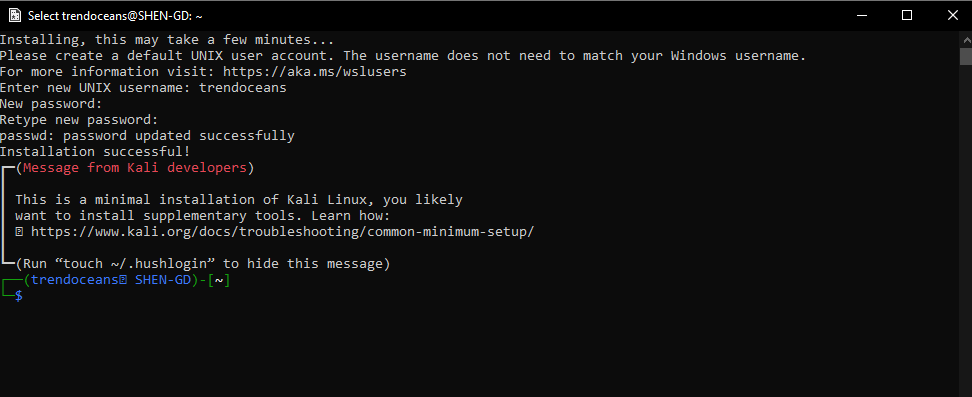
This opens a terminal window that prompts you to provide a username and password for your user account. Once you are done, you’ll automatically be logged in and prompted with a bash in Kali Linux.
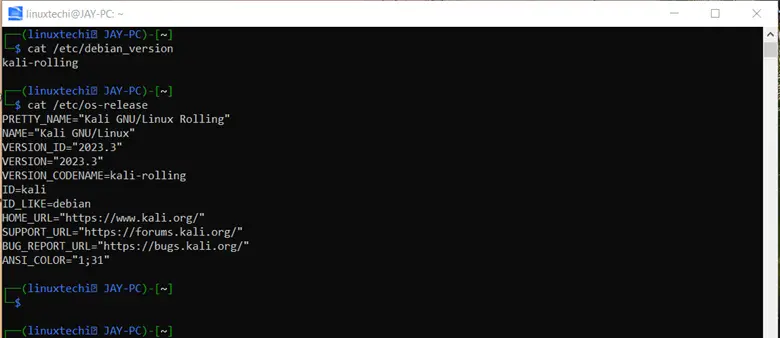
You can verify the version of Kali Linux using the command:
$ cat /etc/os-release
5) Install Win-Kex Utility to Enable GUI (Optional)
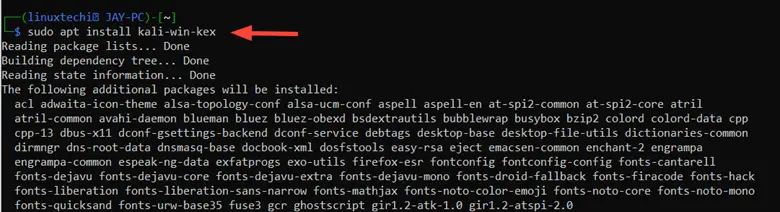
To make the most out of your Kali Linux instance, installing a GUI is recommended. To do so, install the Win-Kex package which provides a desktop experience for Kali Linux in WSL 2.
$ sudo apt update
$ sudo apt install kali-win-kex
The package is quite big (approximately 2.3G) and takes quite some time to install.
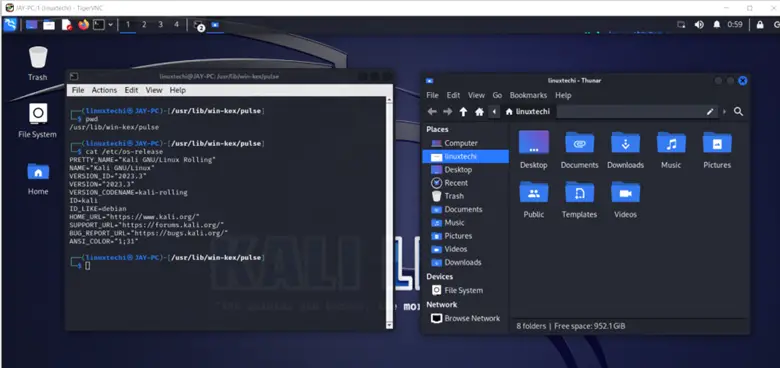
Once installed, launch the GUI interface as shown.
$ kex --win -s
Provide the password and confirm it. When prompted to enter a view-only password, type ‘n’ and hit ENTER.

This immediately launches the Kali Linux GUI on your screen as shown.
The Win-Kex utility provides three modes:
- Window mode: Starts Kali Linux in a dedicated window.
- Enhanced session mode: Uses RDP protocol to provide a richer UI experience.
- Seamless mode: Shares the Windows desktop between Windows and Kali applications and menus.
For more information about the Win-Kex utility, check out the Kali Linux Win-Kex documentation.
Conclusion
And there you go. In this guide, we have demonstrated how to install Kali Linux on Windows 11 using WSL 2. Your feedback on this guide is welcome.
Welcome to my tutorial on how to install Kali Linux on Windows 11 with a GUI using the Windows Subsystem for Linux (WSL). Kali Linux is a popular operating system used by security professionals and enthusiasts for penetration testing and ethical hacking.
With the WSL feature on Windows 11, you can install and run a Linux environment without the need for a virtual machine or dual booting.
In this tutorial, I will guide you through the step-by-step process of installing Kali Linux using WSL and setting up the desktop environment for a graphical user interface. So, let’s get started!
Step 1: Enable Windows Subsystem for Linux
To get started, you’ll need to enable the Windows Subsystem for Linux on your Windows 11 computer. Here’s how:
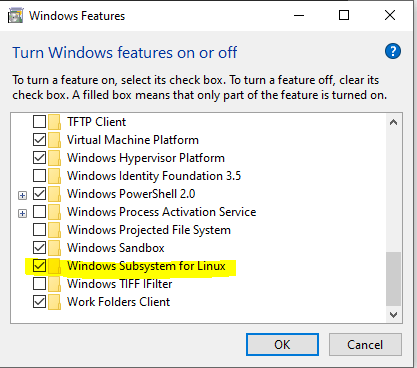
Open the Windows Features settings by searching for “Turn Windows features on or off” in the Start menu. Or you can go to the “Control Panel” and then navigate to “Programs and Features”. On the sidebar, you can open Windows feature settings.

Scroll down to find “Virtual Machine Platform” and “Windows Subsystem for Linux,” then check the boxes.
Click the “OK” button, and it will enable the Windows Subsystem for Linux. After that, you have to restart your computer when prompted.
Step 2: Install Kali Linux from the Microsoft Store
Once the Windows Subsystem for Linux is enabled, you can install Kali Linux from the Microsoft Store app on your Windows 11 computer. Here’s how:
Open the Microsoft Store app on your Windows 11 computer. Then simply search for “Kali Linux” and select the Kali Linux app.

Click the “Get” button to install Kali Linux on your computer. This will take some time to install, depending on your internet connection. I will skip the installation part.
Sometimes you will get this error message during the installation.
WslRegistertionDistribution failed with Error: 0x80370102

Then you have to install Kali Linux manually from a downloaded package. You can download it here. (Manual installation of WSL-2)
You can download the Linux kernel update package from the above link. Then run this package; it will install the Linux kernel and resolve the error.

Step 3: Set WSL 2 as the Default Version
Next, you have to set Windows Subsystem for Linux Version 2 as the default version. Search for “Windows Power Shell” and run it as an administrator.
Then you have to enter this command. Ok, now WSL 2 is activated.
wsl --set-default-version 2
Step 4: Launch Kali Linux
With Kali Linux installed, you can launch the app to set it up for the first time. Here’s how:
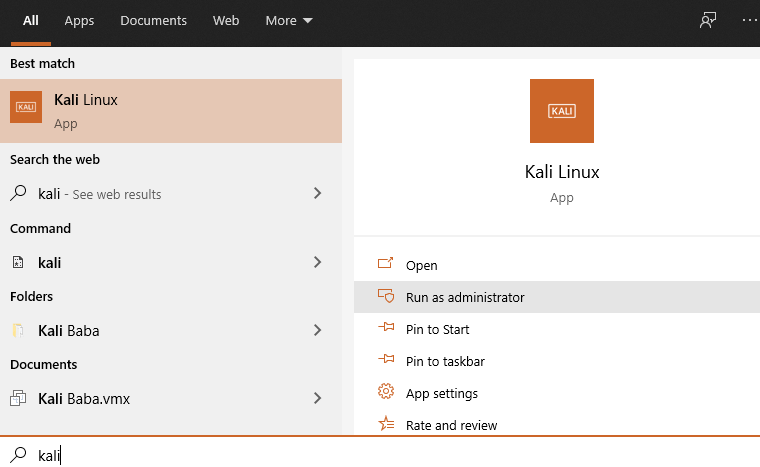
Open the Start menu and find the Kali Linux app. Then run it as an administrator, and it will launch the app to set up Kali Linux for the first time. It will ask you to choose a username and password when prompted.

You can enter any username and password, then verify them. You can see that Kali Linux is now running on your machine. Let’s see how to set up the graphical user interface for this Kali Linux OS.
Step 5: Update Kali Linux
Now that Kali Linux is installed and launched, you’ll want to update it to the latest version before installing the GUI. You just need to run a few small commands. Just copy and paste them below.
First, run this command to update the package list.
sudo apt updateIt asks you to enter the root password that you set. This will take some time to update all the packages.
Step 6: Install the Win-Kex Desktop Environment
To use Kali Linux with a graphical user interface, you’ll need to install the Win-Kex desktop environment. Win-KeX provides a Kali Desktop Experience for the Windows Subsystem for Linux with several features.
For that, you just have to enter this command, and it will begin the installation. Wait until it is finished.
sudo apt install -y kali-win-kex
Step 7: Launch the Win-Kex Desktop Environment
With the Win-Kex desktop environment installed, you can launch it in window mode, enhanced session mode, and seamless mode.
Win-Kex Modes
- Window Mode
- Enhanced Session Mode
- Seamless Mode
You can use any of them. I am going to run in seamless mode. You need to enter this command to run Kali Linux in seamless mode.
kex --sl -sIt will ask for some firewall permissions, but you can allow them safely. You can try other modes also check this article for more information.
Now it is running on your computer.

To enter the Kali Linux GUI, open the Kali Linux terminal using the app. Then type “kex” and enter. When you enter it for the first time, it asks you to enter a password. You can enter whatever you want.
Then ask if you want this to be set as the view-only password, so type “N” here; otherwise, you didn’t be able to use the Kali Linux GUI.

Congratulations! You’ve successfully installed Kali Linux on Windows 11 using the Windows Subsystem for Linux and set up the graphical user interface! With Kali Linux installed, you can now use it for penetration testing and ethical hacking on your Windows 11 computer.
If you have any issues regarding this tutorial, feel free to contact us through the Minex Tuts tech forum. Thanks for watching/ reading, and don’t forget to subscribe for more tutorials!
WSL2 is a great option if you don’t want to completely setup your Linux machine and just want to use Linux on Windows without having to deal with dual-booting or virtual machines.
No matter if you are a security professional or are pursuing cybersecurity, you have probably heard about WSL2, which is commonly used as an alternative to VirtualBox & VMware.
But if you’re not sure how to get started with WSL2, then you are at the right place, where I will show you how to install the Windows Subsystem for Linux (WSL2) on Windows 10 with Kali Linux.
So let’s roll up our sleeves and get started with the first task of installing WSL on your Windows, and then we will show you how you can install Kali Linux on Windows 10 and 11.
Before jumping to the installation part, first understand What is the WSL? In layman’s terms, a WSL, or Window Subsystem Linux, allows users to use GNU/Linux distributions alongside Windows as their default system.
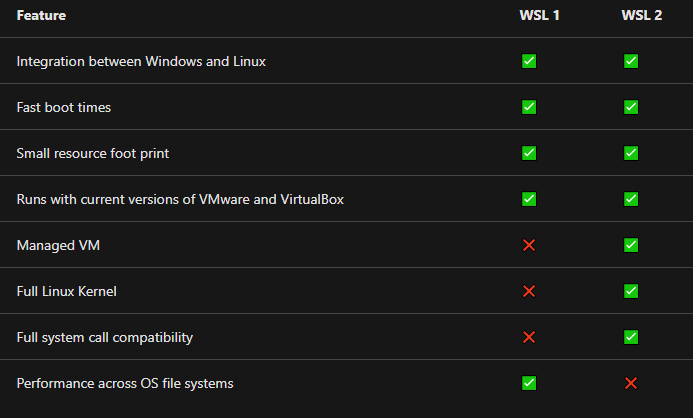
At present, WSL has two versions: WSL1 and WSL2, but it’s good to have the latest version of WSL on your Windows machine.
And here is the comparison between WSL1 and WSL2, in that you can clearly see that WSL2 is a significant improvement over WSL1 in terms of performance, compatibility, and functionality.
Not only that, after installing wsl2, you can access most of the Linux command-line tools like awk, sed, grep, and many other utilities directly on Windows without switching to Dual-Boot or using virtualization technology like VMware or VirtualBox.
Benefits of Using WSL2
- No need to use VirtualBox
- Download the GNU/Linux Distribution directly from Microsoft Store.
- Run the native Linux command-line utilities
awk,sed,grep, and thevicommand line editor on Windows. - Use both Windows and Linux in parallel
There are many other advantages to using WSL2, but there are some minor limitations, too, like the fact that I/O file transfer is slow compared to native environment.
Install WSL2 on Windows 10
Now the fun part begins, where you learn how to install WSL2 on Windows 10 by two different methods, one of which is as simple as running one command and WSL is ready for use, and another one is quite intensive.
I would recommend you to go with the first method, if it’s not working for you then move the second.
- Install WSL2 on latest build of Windows 10/11
- Install WSL2 on older build of Windows 10
Install WSL2 on latest build of Windows 10/11
One of the easiest ways to install WSL2 on the latest build of Windows 10/11 is by running one line of command, which will install the WSL.
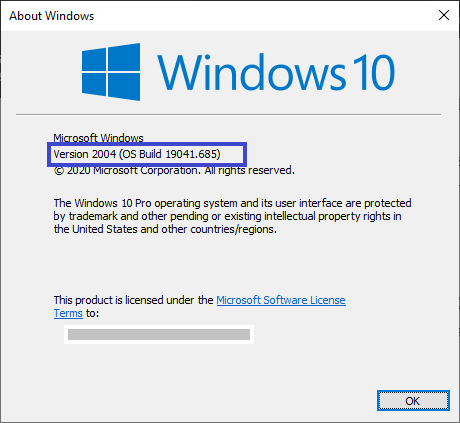
But for that, you need to be on the latest build, and to verify, run the following command on your system command prompt or PowerShell:
winverOnce you run the above command, it will show the system build version. If the build version is 2004 or higher, then you can follow this method, and if not, then read these steps.
The output of the above confirmed that my system is eligible for installing WSL2 with the following method:
If your system build version is 2004 or higher, then run the next line of command into PowerShell or a command prompt with administrator privileges.
wsl --installOnce you have run the above command, it will make the necessary changes and install the Ubuntu distribution on it.
After completion of the above step, click here to install Kali Linux on Windows 10 or 11.
Install WSL2 on older build of Windows 10
Due to some reason, if you are not on the latest build of Windows 10, then you can follow this method to install WSL2 on your computer by first checking the minimum version that should be available (like 1903 or later, with Build 18362 or later) to install
Step 1: Check the Latest Version of Windows
If you are unsure which version of Windows 10 you are using, type the following command on the “command prompt” or in the “Run” box.
In case your window version does not match the requirement, then update the window version.
To update Windows to the latest version Press the Start or Window key + I to launch the settings menu, click on Update and Security, then click on Check for updates.

or directly click this link to open Windows Update Settings and click on Check for updates.
Download the update for your system, and then restart your computer to make sure the update is fully installed.
If you are not able to see the latest window version despite the old version, then my advice is that you should restart your PC or check the service status of “Window Update Service” from the Services.
Step 2: Enable WSL2 on Windows
After completing the above step, you now have to enable WSL2 in your system.
To enable WSL2, press the Windows Start key and search for Powershell, click on Run as Administrator, and when it prompt click on allow.
or else you can use the shortcut Window Key + X and open Command Prompt as administrator .
To enable WSL2, type or copy-paste the following command on Windows PowerShell:
dism.exe /online /enable-feature /featurename:Microsoft-Windows-Subsystem-Linux /all /norestart

dism.exe /online /enable-feature /featurename:VirtualMachinePlatform /all /norestart

It’s not necessary to restart your system; then also restart your system to avoid any package clashes.
Step 3: Set WSL version to WSL2
After restarting your system, open PowerShell as administrator and pass the following command to set the WSL to version WSL2.
wsl --set-default-version 2

That’s it, your work is done; now you will see how to install Kali Linux on your Windows computer.
Install and Run Kali Linux on WSL2
We were able to enable WSL2 on the Windows system, and now we will install Kali Linux on WSL.
To install Open Microsoft Store, press the Start Key and search for “Microsoft Store” or simply click the below button to open the store.
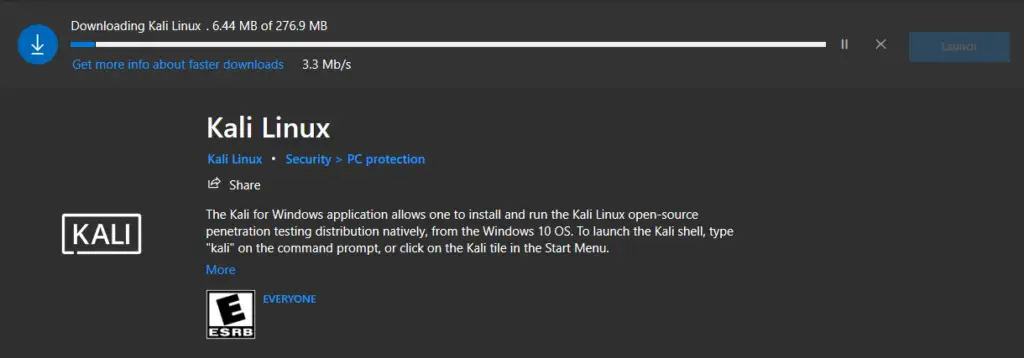
On the right side corner, you will able to see the search bar. Type “Kali Linux” and download the file.
The file size is approximately 276 MB, and it will take some time to download on your system as per your internet speed.
Run Kali Linux
When the download is finished, click on Launch or press the window key and search for Kali Linux.
Initially, it will ask you to set a “username” andpassword,” so please enter the username, password, and confirm password.
Now you will able to use Kali Linux on WSL.
Troubleshooting
If you are not able to install Kali Linux from the Microsoft Store and you’re getting the error “0x80073D05” like below the screen:
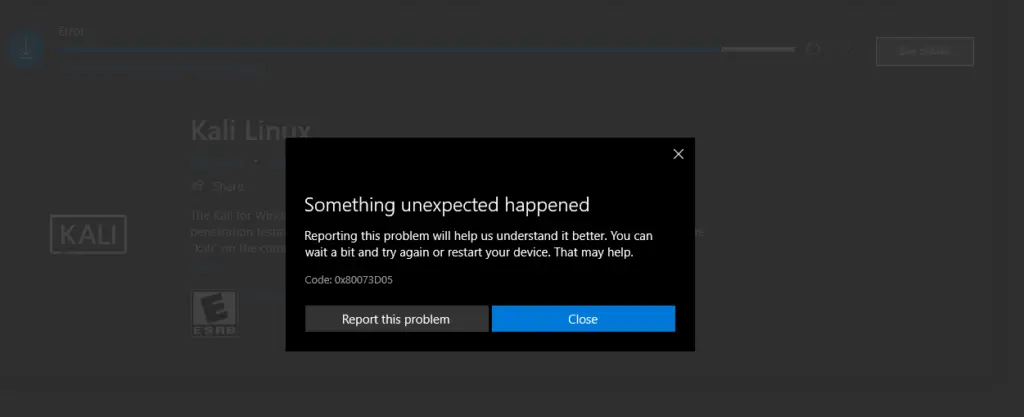
To resolve this issue, it is advisable to restart your device and try again to reinstall Kali Linux.
If you are not able to install Kali Linux and getting the WslRegisterDistribution failed with error 0x8007019e.
To resolve this issue Open the Run box and type appwiz.cpl . On the left side of the screen, you will find the option “Turn Windows features on or off,” so please click on that.
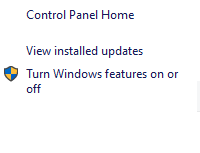
Now scroll down below and you will see the Windows Subsystem for Linux, so please check that option and wait for a few seconds to apply the settings.
Next, restart your system and run Kali Linux from the start menu.
There is another kind of error that causes WSL 2 to won’t run Ubuntu and throw the error 0x80370102. If you are getting this error, then you need to run the following command to enable Hypervisor:
bcdedit /set hypervisorlaunchtype autoIf you are facing any other issue, then check this guide for complete troubleshooting steps for WSL.
Wrap up
That’s all for this article, where you learned how to install WSL on Windows 10 and 11 with Kali Linux, but I have not included the steps to enable the GUI interface here.
If you want to learn how to install or enable a GUI for Kali-Linux using Win-Kex, then click here.
And with that message, let me end this article here.

A man with a tech effusive who has explored some of the amazing technology stuff and is exploring more. While moving towards, I had a chance to work on Android development, Linux, AWS, and DevOps with several open-source tools.
In this article, you will learn how to Dual Boot Kali Linux with Windows 10 or 11. This is a complete step-by-step instructional that you can follow along.
Read This Before Starting
This is a disclaimer. There are so many people out there who think it’s a great idea to have their first Linux experience with Kali (Hint: It isn’t!). While things got better and Kali came more secure out of the box, if you haven’t installed Linux or any other operating system before, you’ll set yourself up for trouble.
While I will try to cover every single step as detailed as possible, there is a chance that you lose your existing Windows Installation and all of your files when following this tutorial. Why? Because every computer is different, everyone has different stuff installed, different partitioning schemes, and different BIOS settings. I can’t possibly cover everything. Be very aware of this and obviously I won’t help you or be responsible if your system gets messed up. Please DO NOT E-Mail me with Kali questions. I am not your personal tech support.
But don’t be scared either, my Kali tutorials generally have a very high success rate. Just make sure you take the right precautions and backup your files before starting.
Table of Contents
- Read This Before Starting
- Requirements
- Checking if your Laptop runs on UEFI or LEGACY
- Step 1 – Downloading the Kali ISO file
- Step 2 – Downloading Rufus & Creating a Bootable USB Drive
- Step 3 – Creating a new partition on Windows 10
- Step 4 – Booting from our USB Drive
- Step 5 – Install Kali Linux in Dual Boot with Windows 10
- 5.1 – Select a language
- 5.2 – Select your location
- 5.3 – Configure locales
- 5.4 – Configure the keyboard
- 5.5.1 – Detect Network Hardware (Probably Optional Step)
- 5.5 – Configure the network
- 5.5.1 – Configure the Network
- 5.5.2 – Configure the Network
- 5.6 – Set up users and passwords
- 5.6.1 – Set up users and passwords
- 5.6.2 – Set up users and passwords
- 5.7 – Partition disks (Follow this very carefully, don’t make a mistake here)
- SWAP Step 1 – Partitioning Method
- SWAP Step 2 – Selecting the partition we created in Step 3
- SWAP Step 3 – How to use this free space
- SWAP Step 4 – Setting up the SWAP partition
- SWAP Step 5 – Location for the new Partition
- SWAP Step 6 – Naming the Partition
- SWAP Step 7 – Setting the partition to use as SWAP
- MAIN Step 1 – Selecting the Main Partition
- MAIN Step 2 – How to use this free space
- MAIN Step 3 – Partitioning Scheme
- MAIN Step 4 – Finishing
- 5.8 – Configure the package manager
- 5.9 – Software selection
- 6 – Finish the installation
- Step 6 – Booting up Kali Linux
- Step 7 – Updating Kali Linux
- Step 8 – Booting into Windows
- Troubleshooting
- Where to go from here
Requirements
Now, I won’t create a tutorial for LEGACY Bios. I think legacy is slowly getting obsolete and if you bought a Laptop in the last ~7-10 Years, it’s probably capable of running UEFI. I am using a Dell Latitude E5470 with a vanilla Windows 10 installation for this tutorial.
- UEFI Bios capable Laptop
- 8GB USB Flash Drive (EMPTY!)
- Access to LAN or WiFi during installation
- A backup of all your important Windows 10 files
Checking if your Laptop runs on UEFI or LEGACY
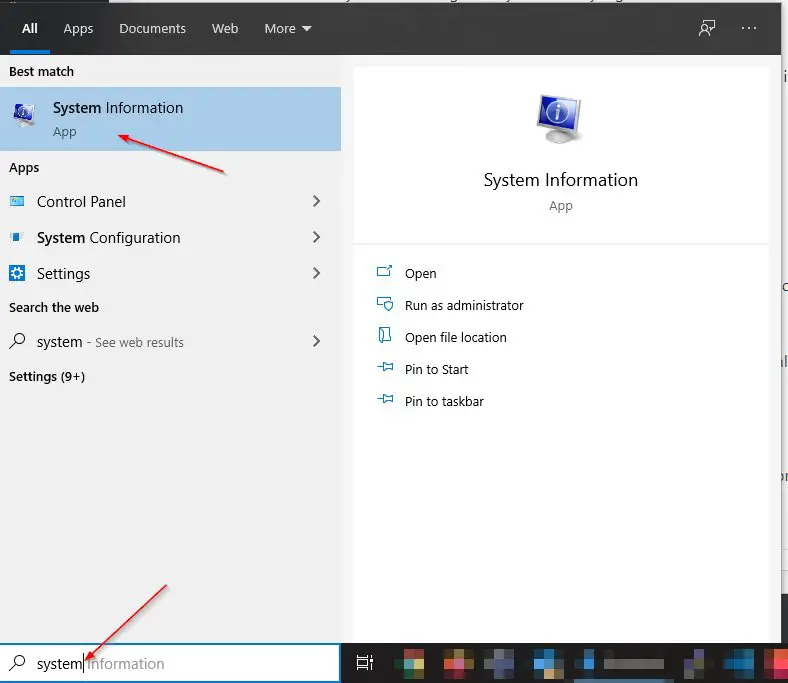
If you are unsure if your Laptop runs on UEFI or LEGACY, it’s easy to find out. Press the Windows key and search for “System“. Open the System Information tool.
On the right side, you find all your System’s information. What interests us is BIOS Mode.
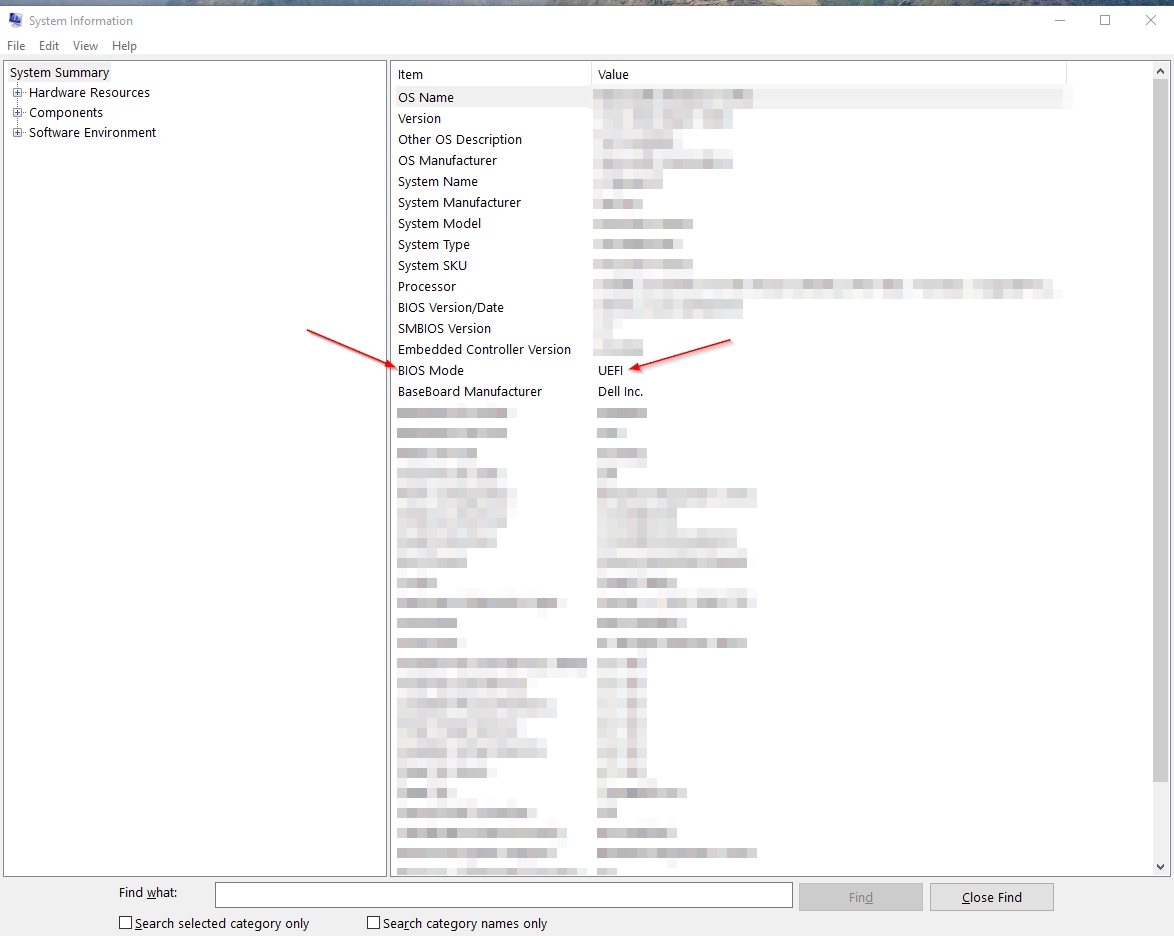
As you can clearly see, my BIOS is running on UEFI.
I say this out loud: IF YOU RUN ON LEGACY AND YOU WANT TO KEEP YOUR CURRENT WINDOWS 10 INSTALLATION INTACT – DO NOT FOLLOW THIS GUIDE!
However, if you run LEGACY and you don’t care and are willing to re-install Windows 10 in UEFI to run Kali and Windows 10 in Dual Boot, go ahead and change your BIOS to UEFI, install a fresh Windows 10 and then proceed with this guide.
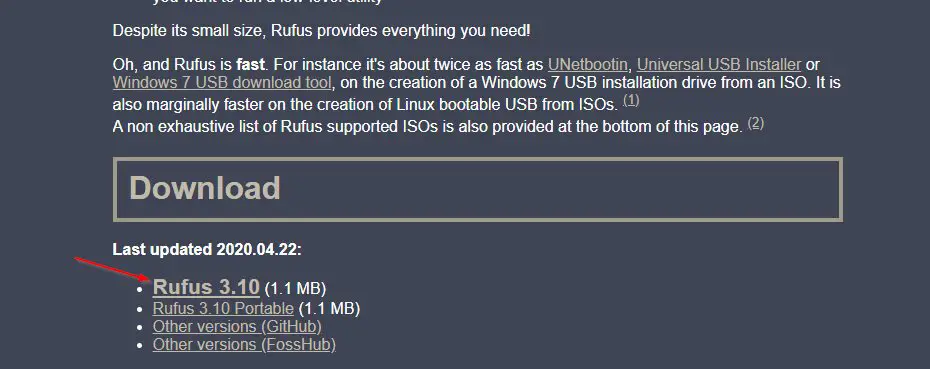
Step 1 – Downloading the Kali ISO file
To install Kali Linux in Dual Boot with Windows 10, we first need to download the Kali ISO File. Choose the Kali Linux 64-Bit (Installer).

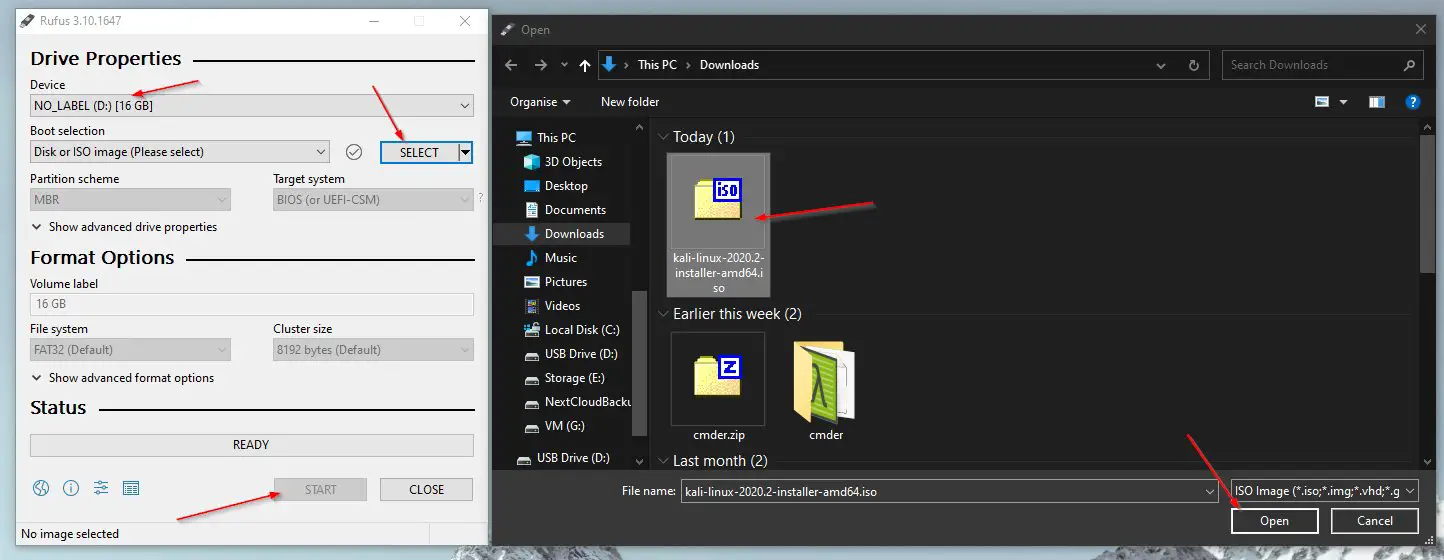
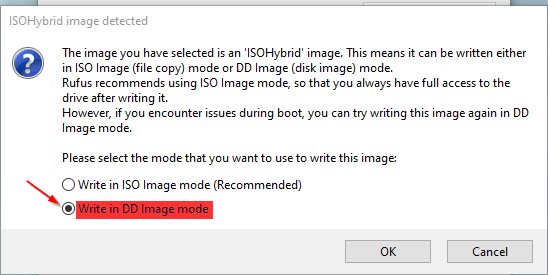
Step 2 – Downloading Rufus & Creating a Bootable USB Drive
We are going to use Rufus to create our Bootable USB Drive. We do this so we can boot from it on our Laptop and install Kali Linux in Dual Boot with Windows 10. Be aware that everything on your USB Drive will get wiped.
- Download Rufus
- Plug your USB Drive into your computer
- Go to your Downloads folder and start Rufus
- Make sure your USB Drive is correctly selected (Double check the drive letter!)
- Click on Select -> Choose your Downloads folder -> Select the kali-linux-2020.4-installer-amd64.iso file click Open
- Click on Start
- Agree with Yes for the Download required warning
- Select Write in DD Image mode in the next dialogue (VERY IMPORTANT, otherwise the installation will fail)
- Agree to the final warning that everything on your USB Drive will get erased
- Wait for it to finish
Phew, quite some steps there. Good thing, one of the hardest parts is done.
Step 3 – Creating a new partition on Windows 10
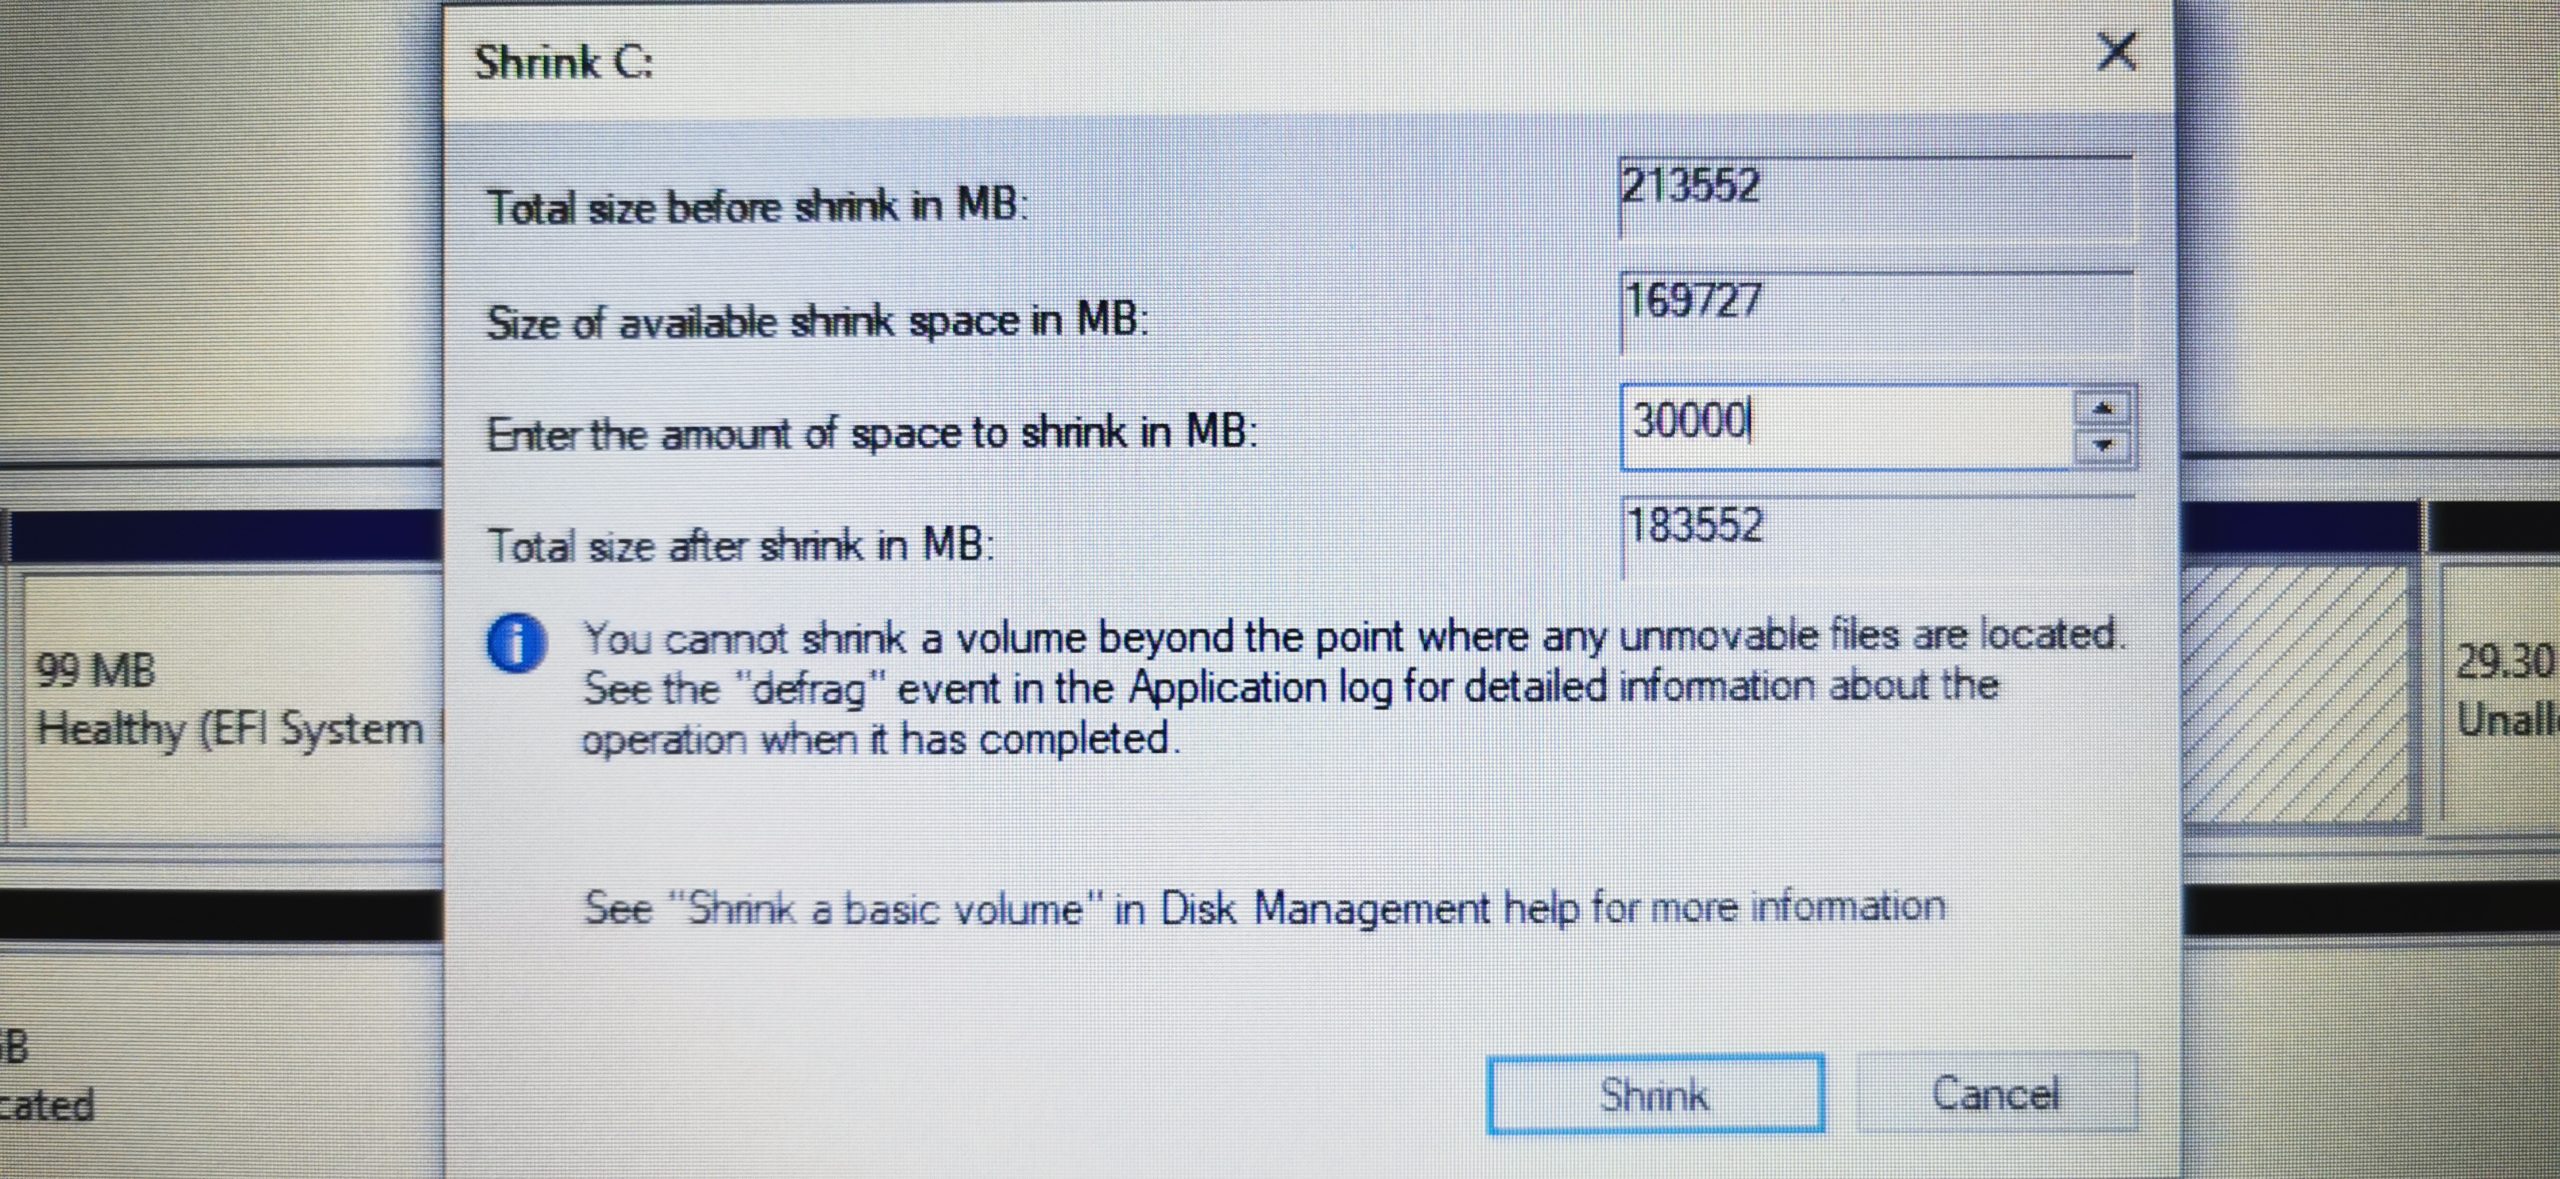
To be able to install Kali Linux in Dual Boot with Windows 10, we need to first borrow some Gigabytes from our existing Windows 10 partition on your laptop. This is really easy! Follow the steps below. You want to select the partition on which your Windows 10 is installed on. Most like the one indicated by the letter (C:). Borrow as much space as you want, but leave enough left for your Windows 10 to still function properly. Reversing this will be very difficult.
For Kali, I would suggest a minimum of 20GB if you plan to install some tools, but I rather would go higher than that. The sweet spot is probably somewhere around 50-80GB for me. Extending the volume after you run out of space, later on, is a pain in the a**.
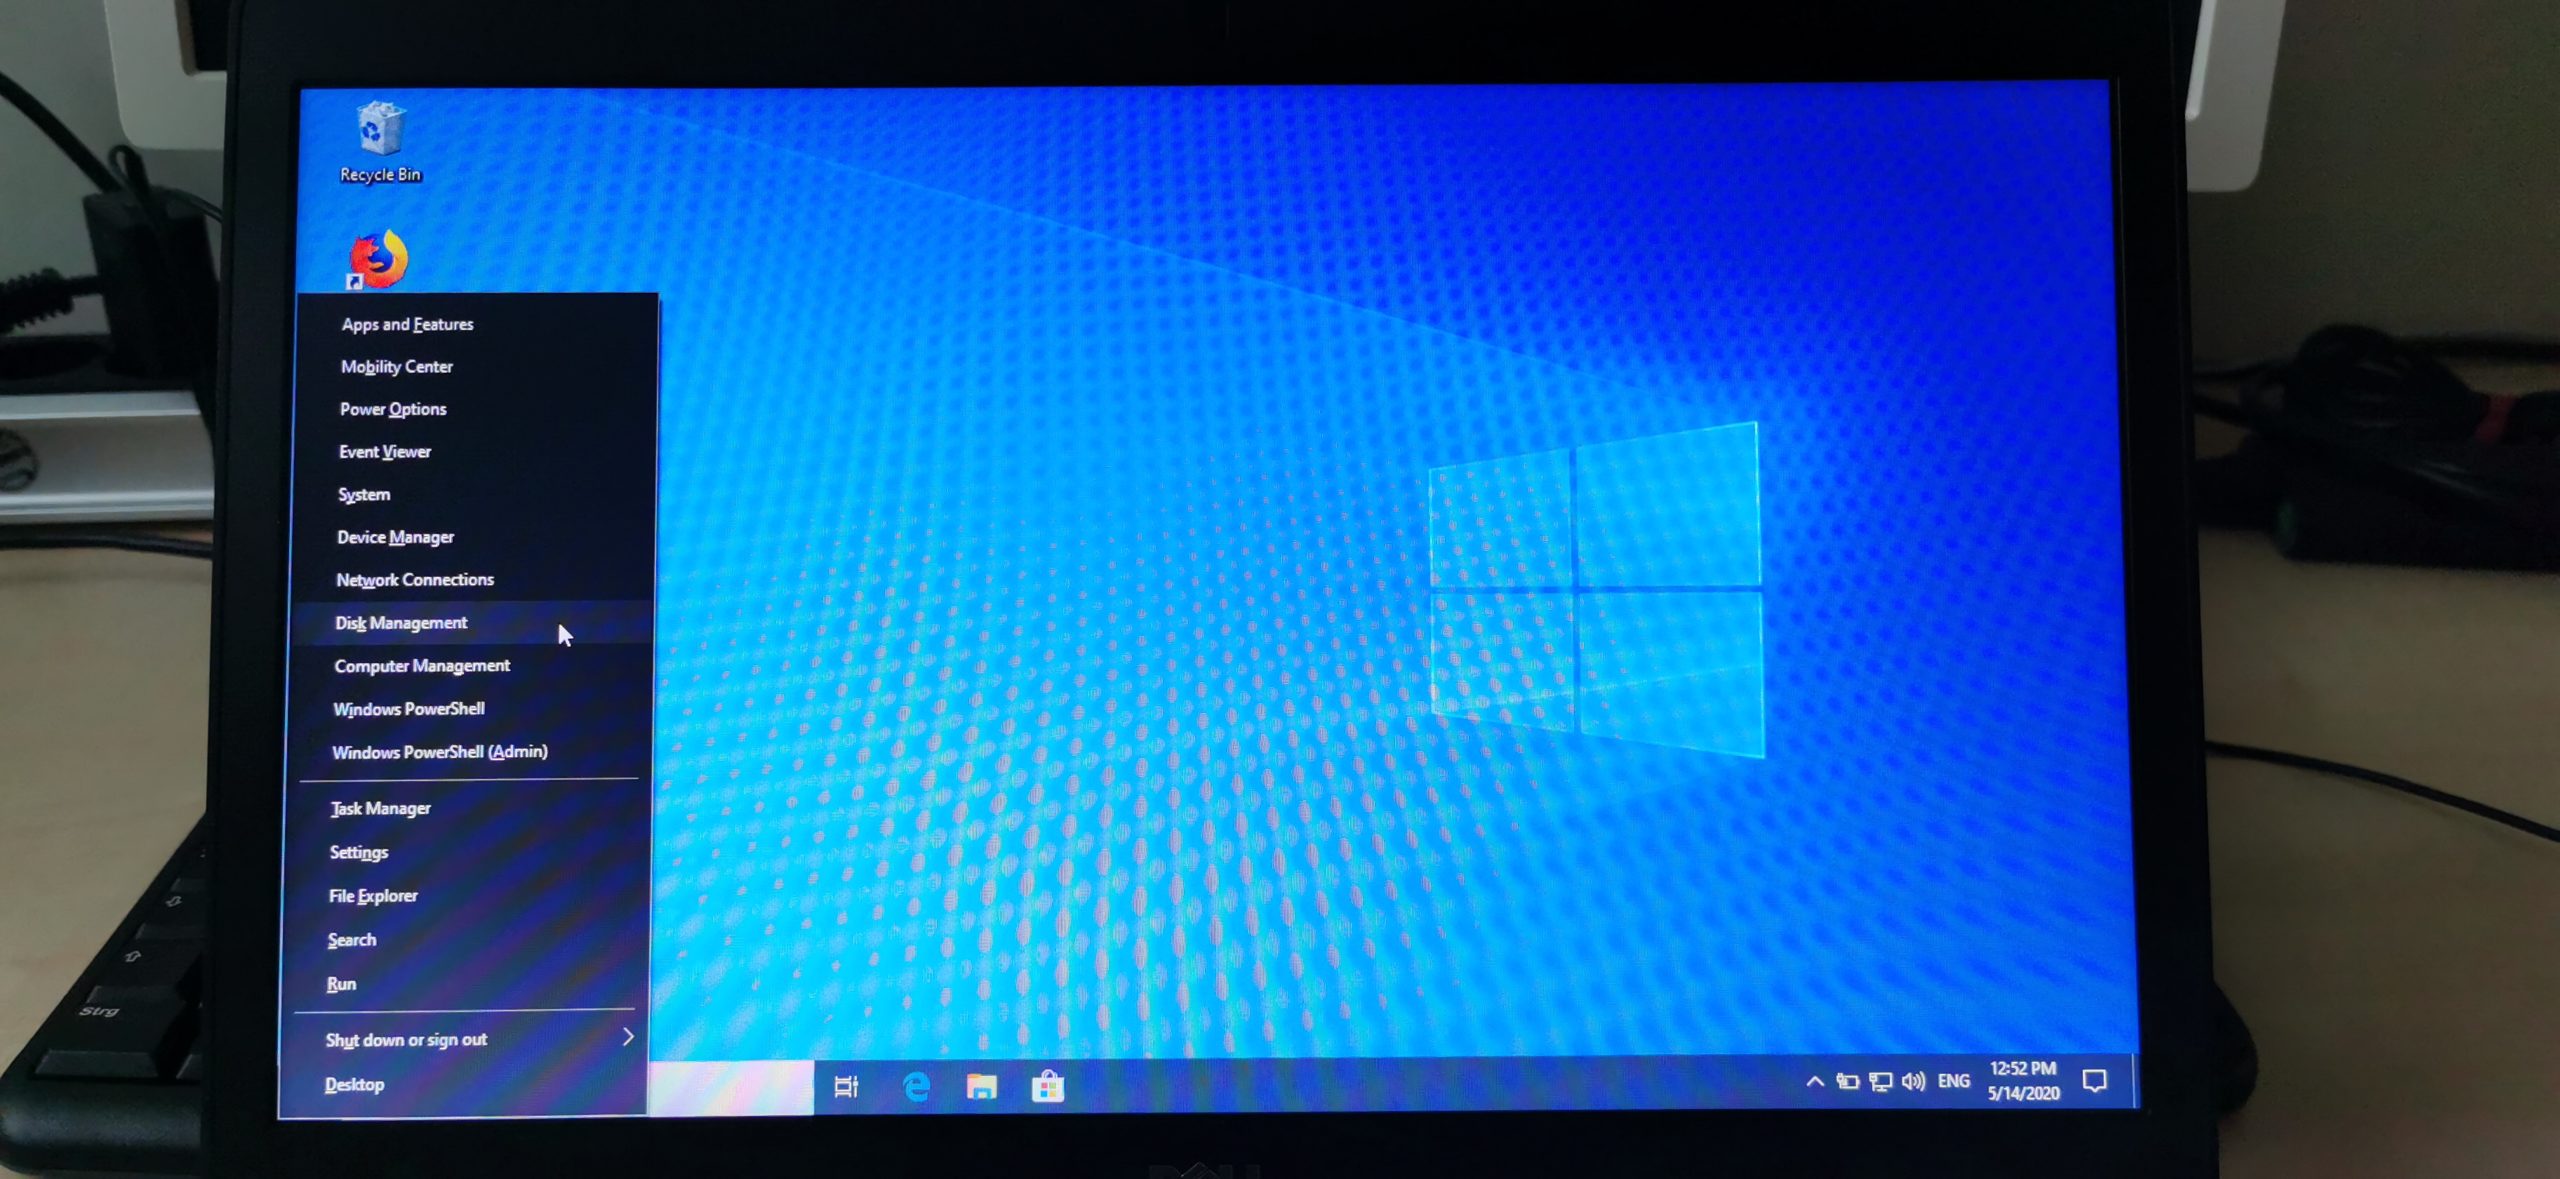
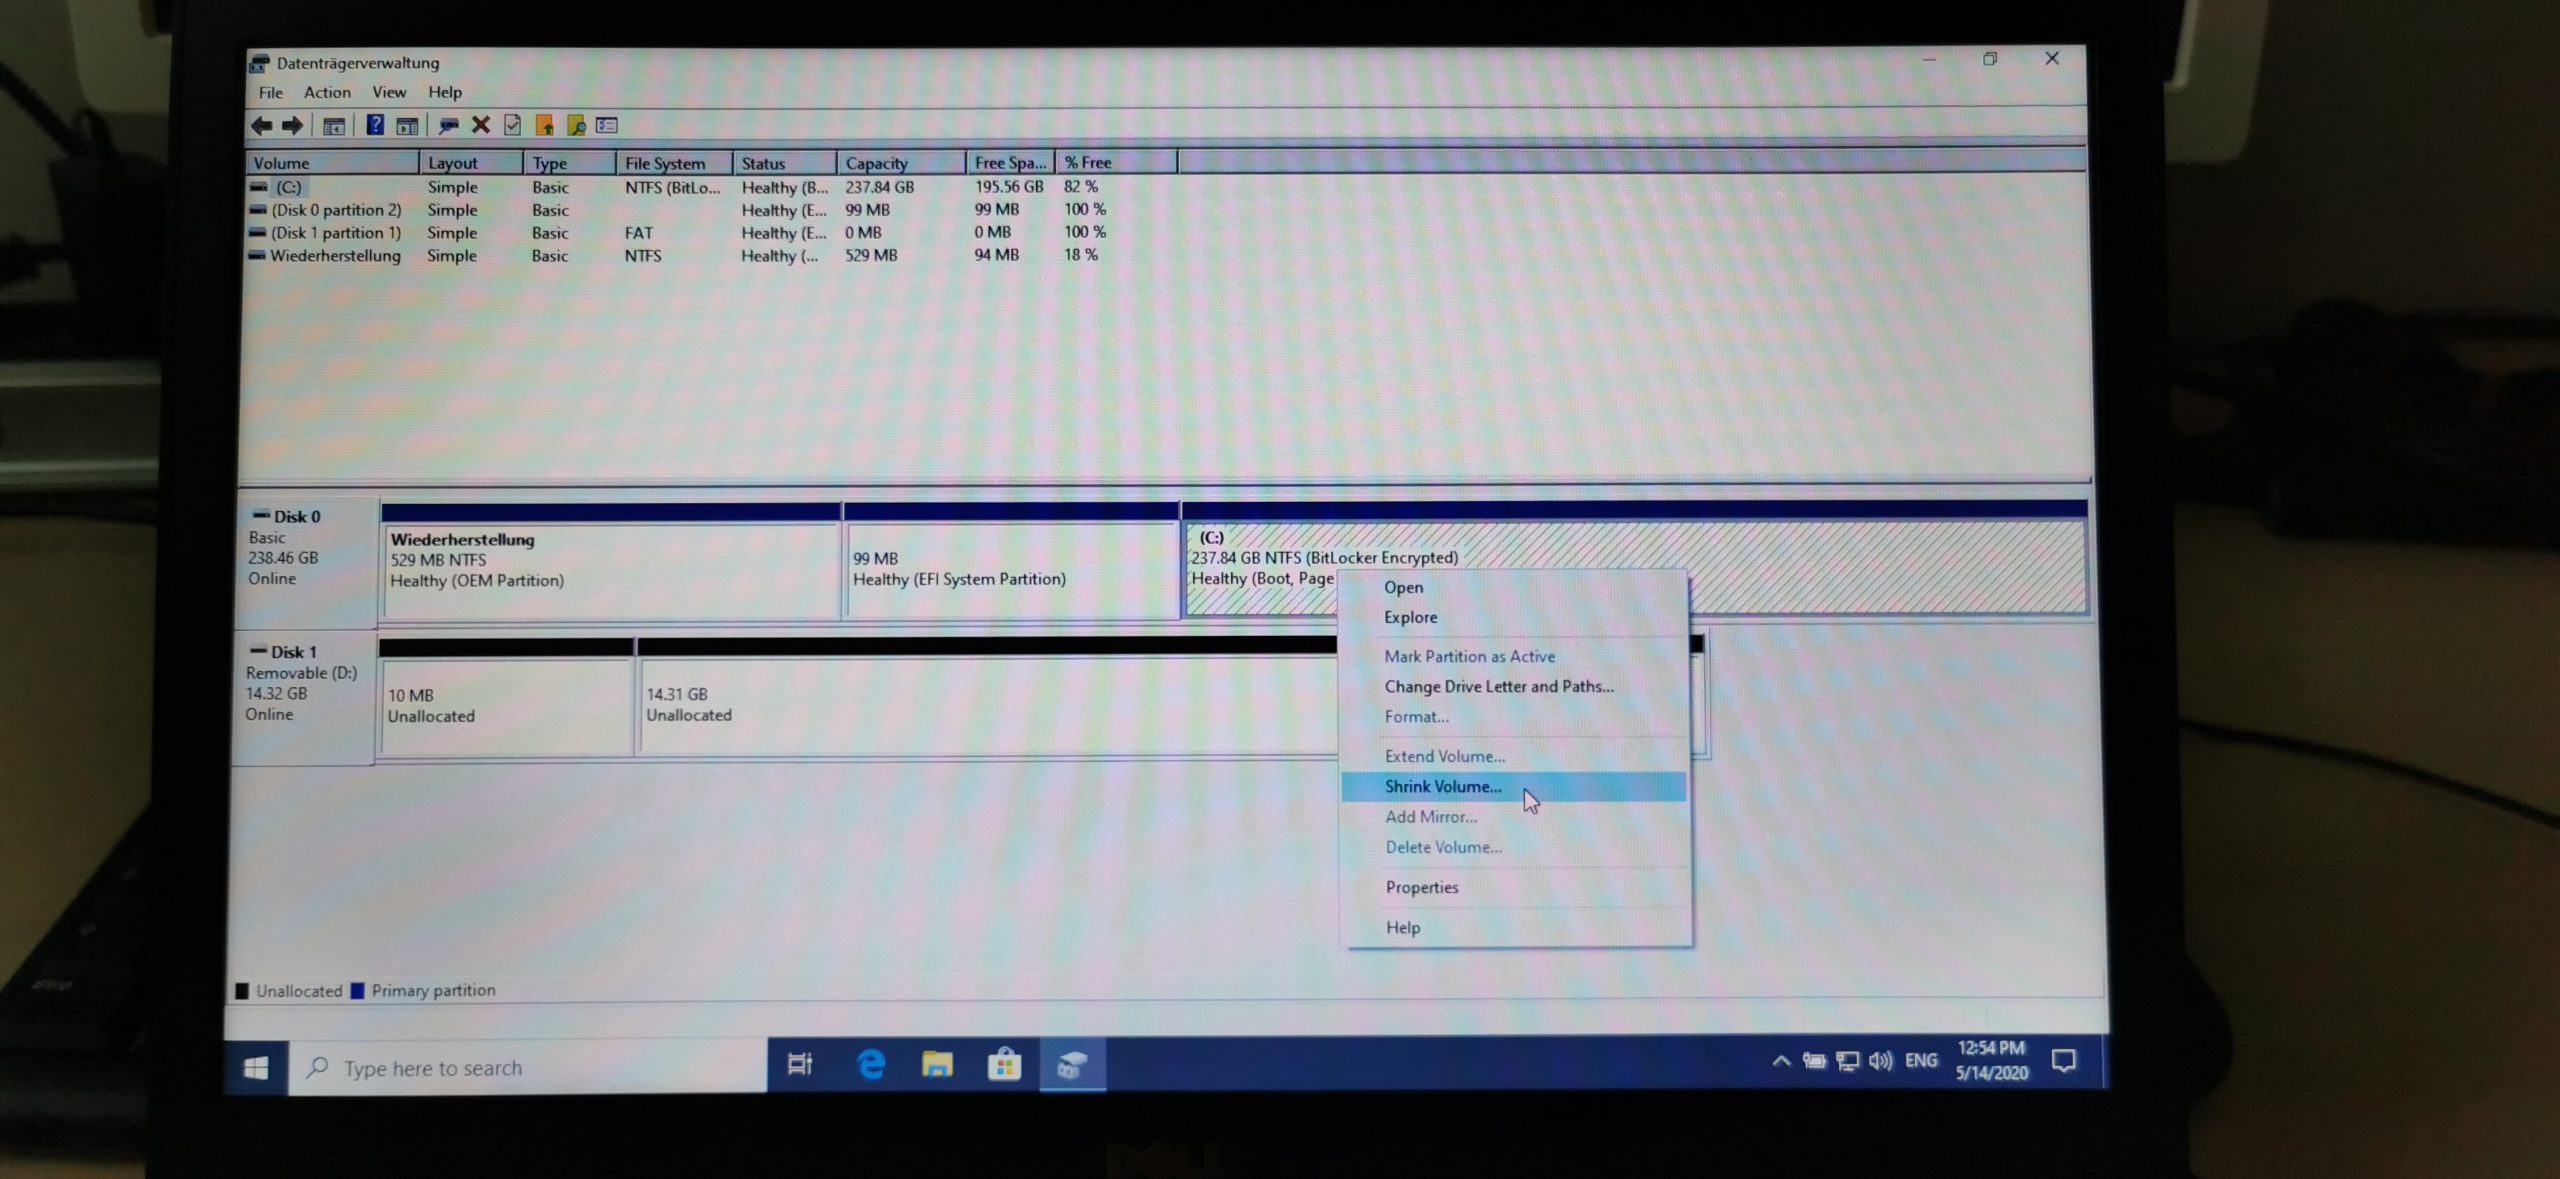
- Press Windows key + X to open up the system menu
- Select Disk Management
- Select Shrink Volume
- Change the value in the “Enter the amount of space to shrink in MB” field. I choose 30GB so I enter 30000.
Step 4 – Booting from our USB Drive
Alright, now this will differ from every Laptop manufacturer and probably even varies in different models of the same manufacturer: How to enter the BIOS Boot Menu.
Tip: It is possible that you need to deactivate Secure Boot if you run into any problems while trying to boot from your USB Drive.
The easiest way to find out which button to press is by simply Googlin‘: “YourLaptopModel Boot Menu“
For the Dell Latitude E5470 I would Google: Dell Latitude E5470 Boot Menu
4.1 – Plug the USB Drive into your Laptop
4.2 – Shutdown your Laptop
4.3 – Once it’s shut down, start it up and hit the key that brings up the Boot Menu repeatedly (For me it’s F12). Once you reach the boot menu, select your USB Drive, and hit enter.
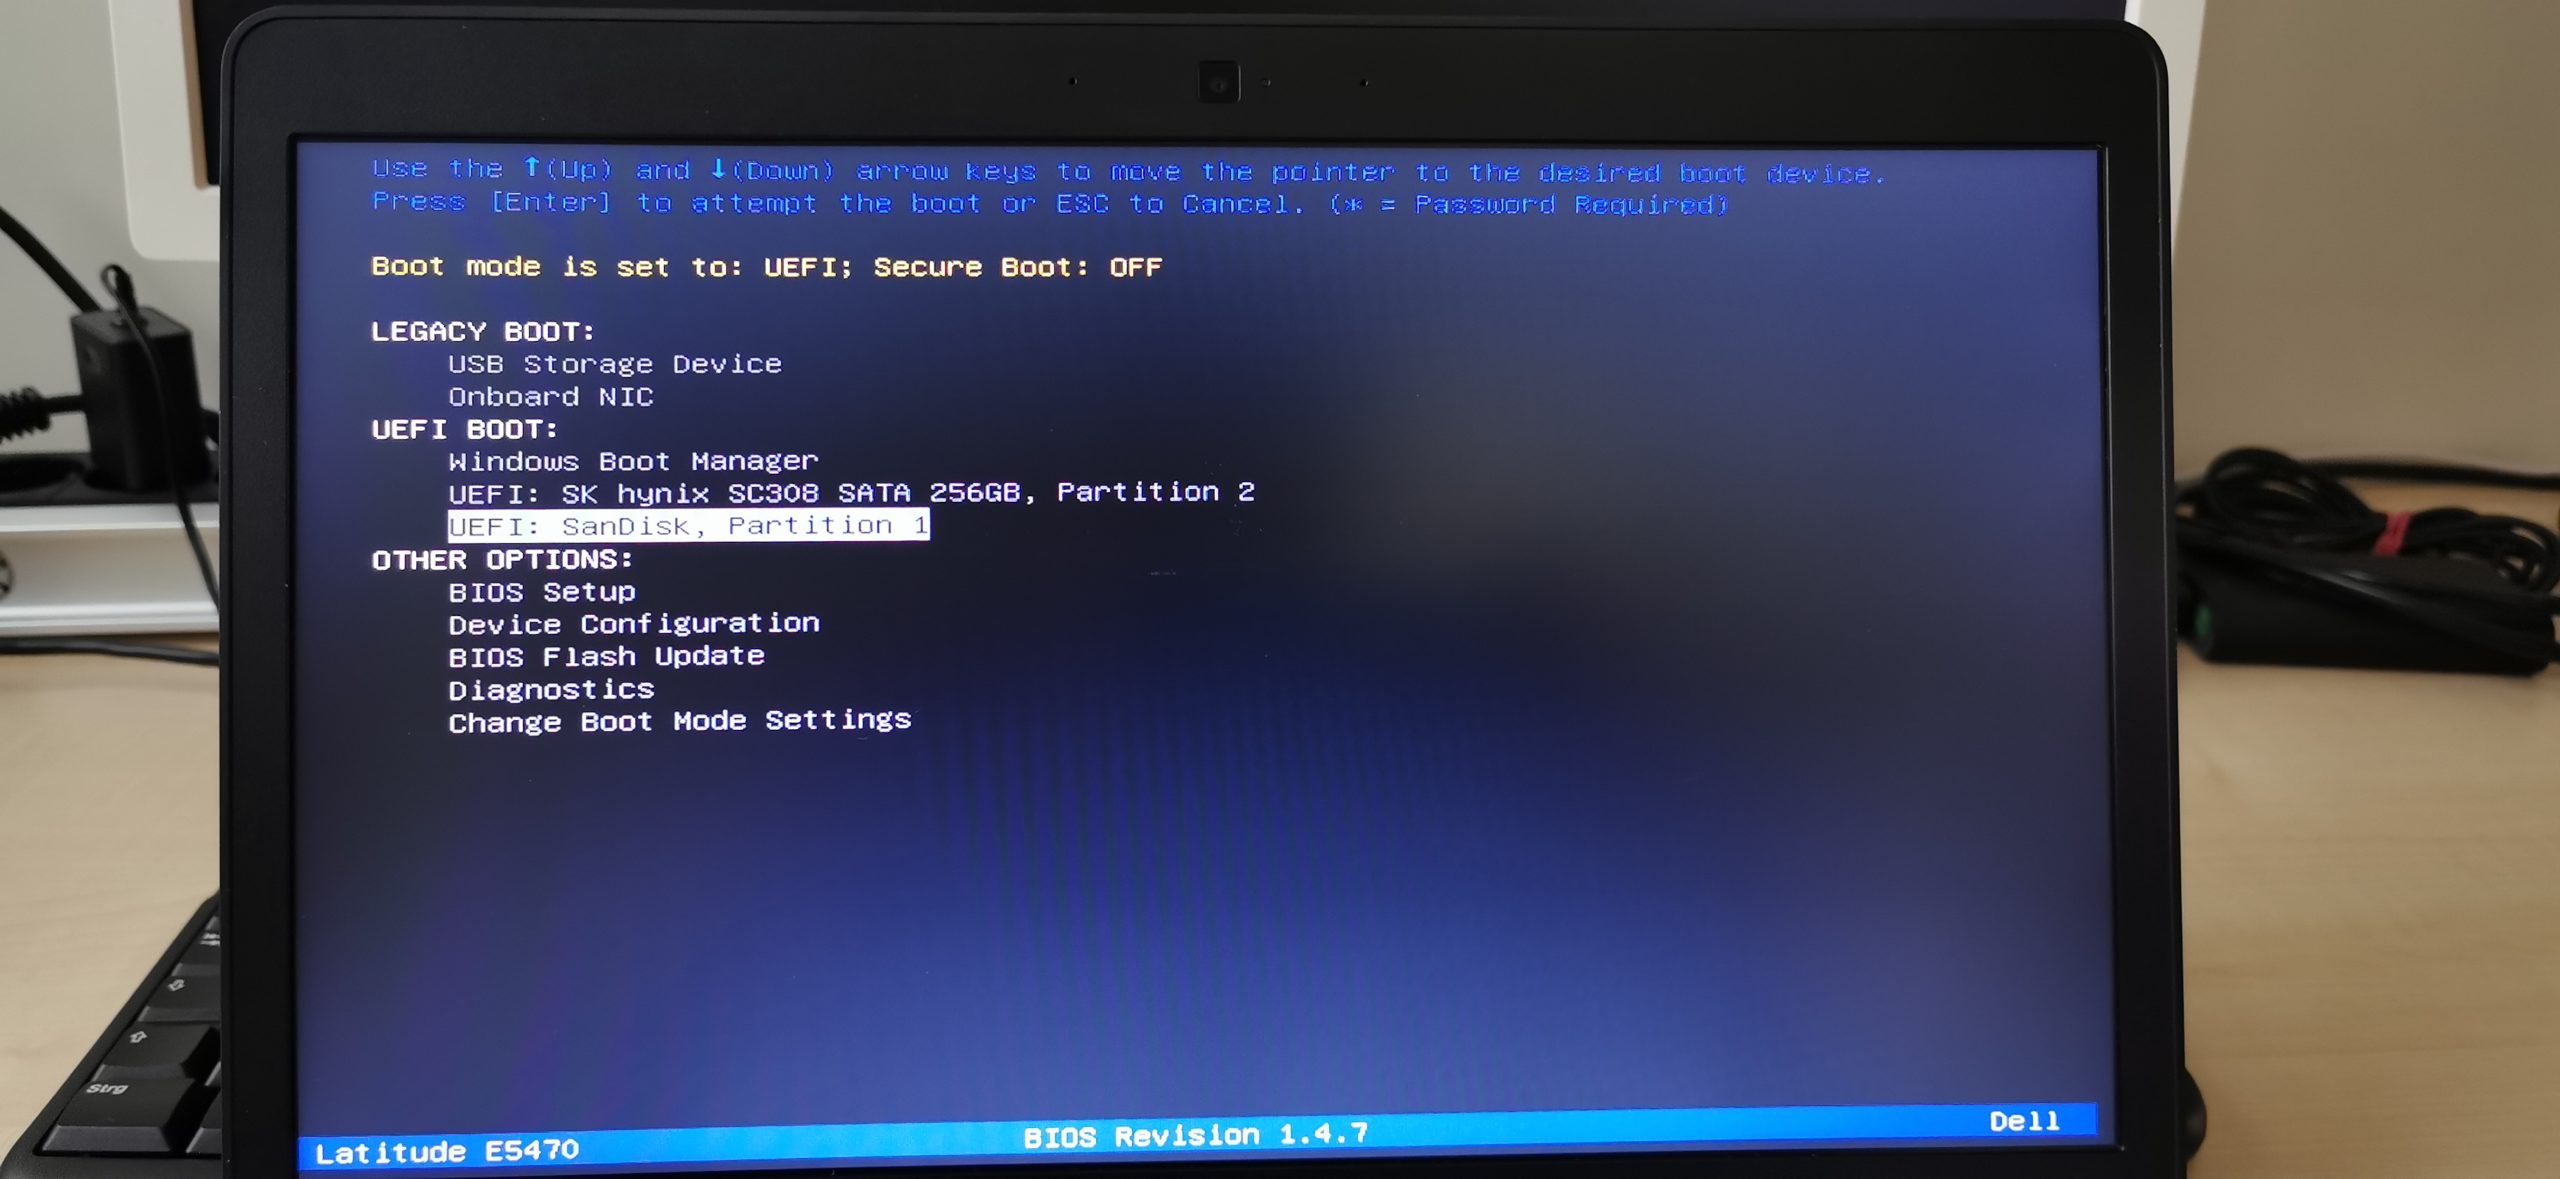
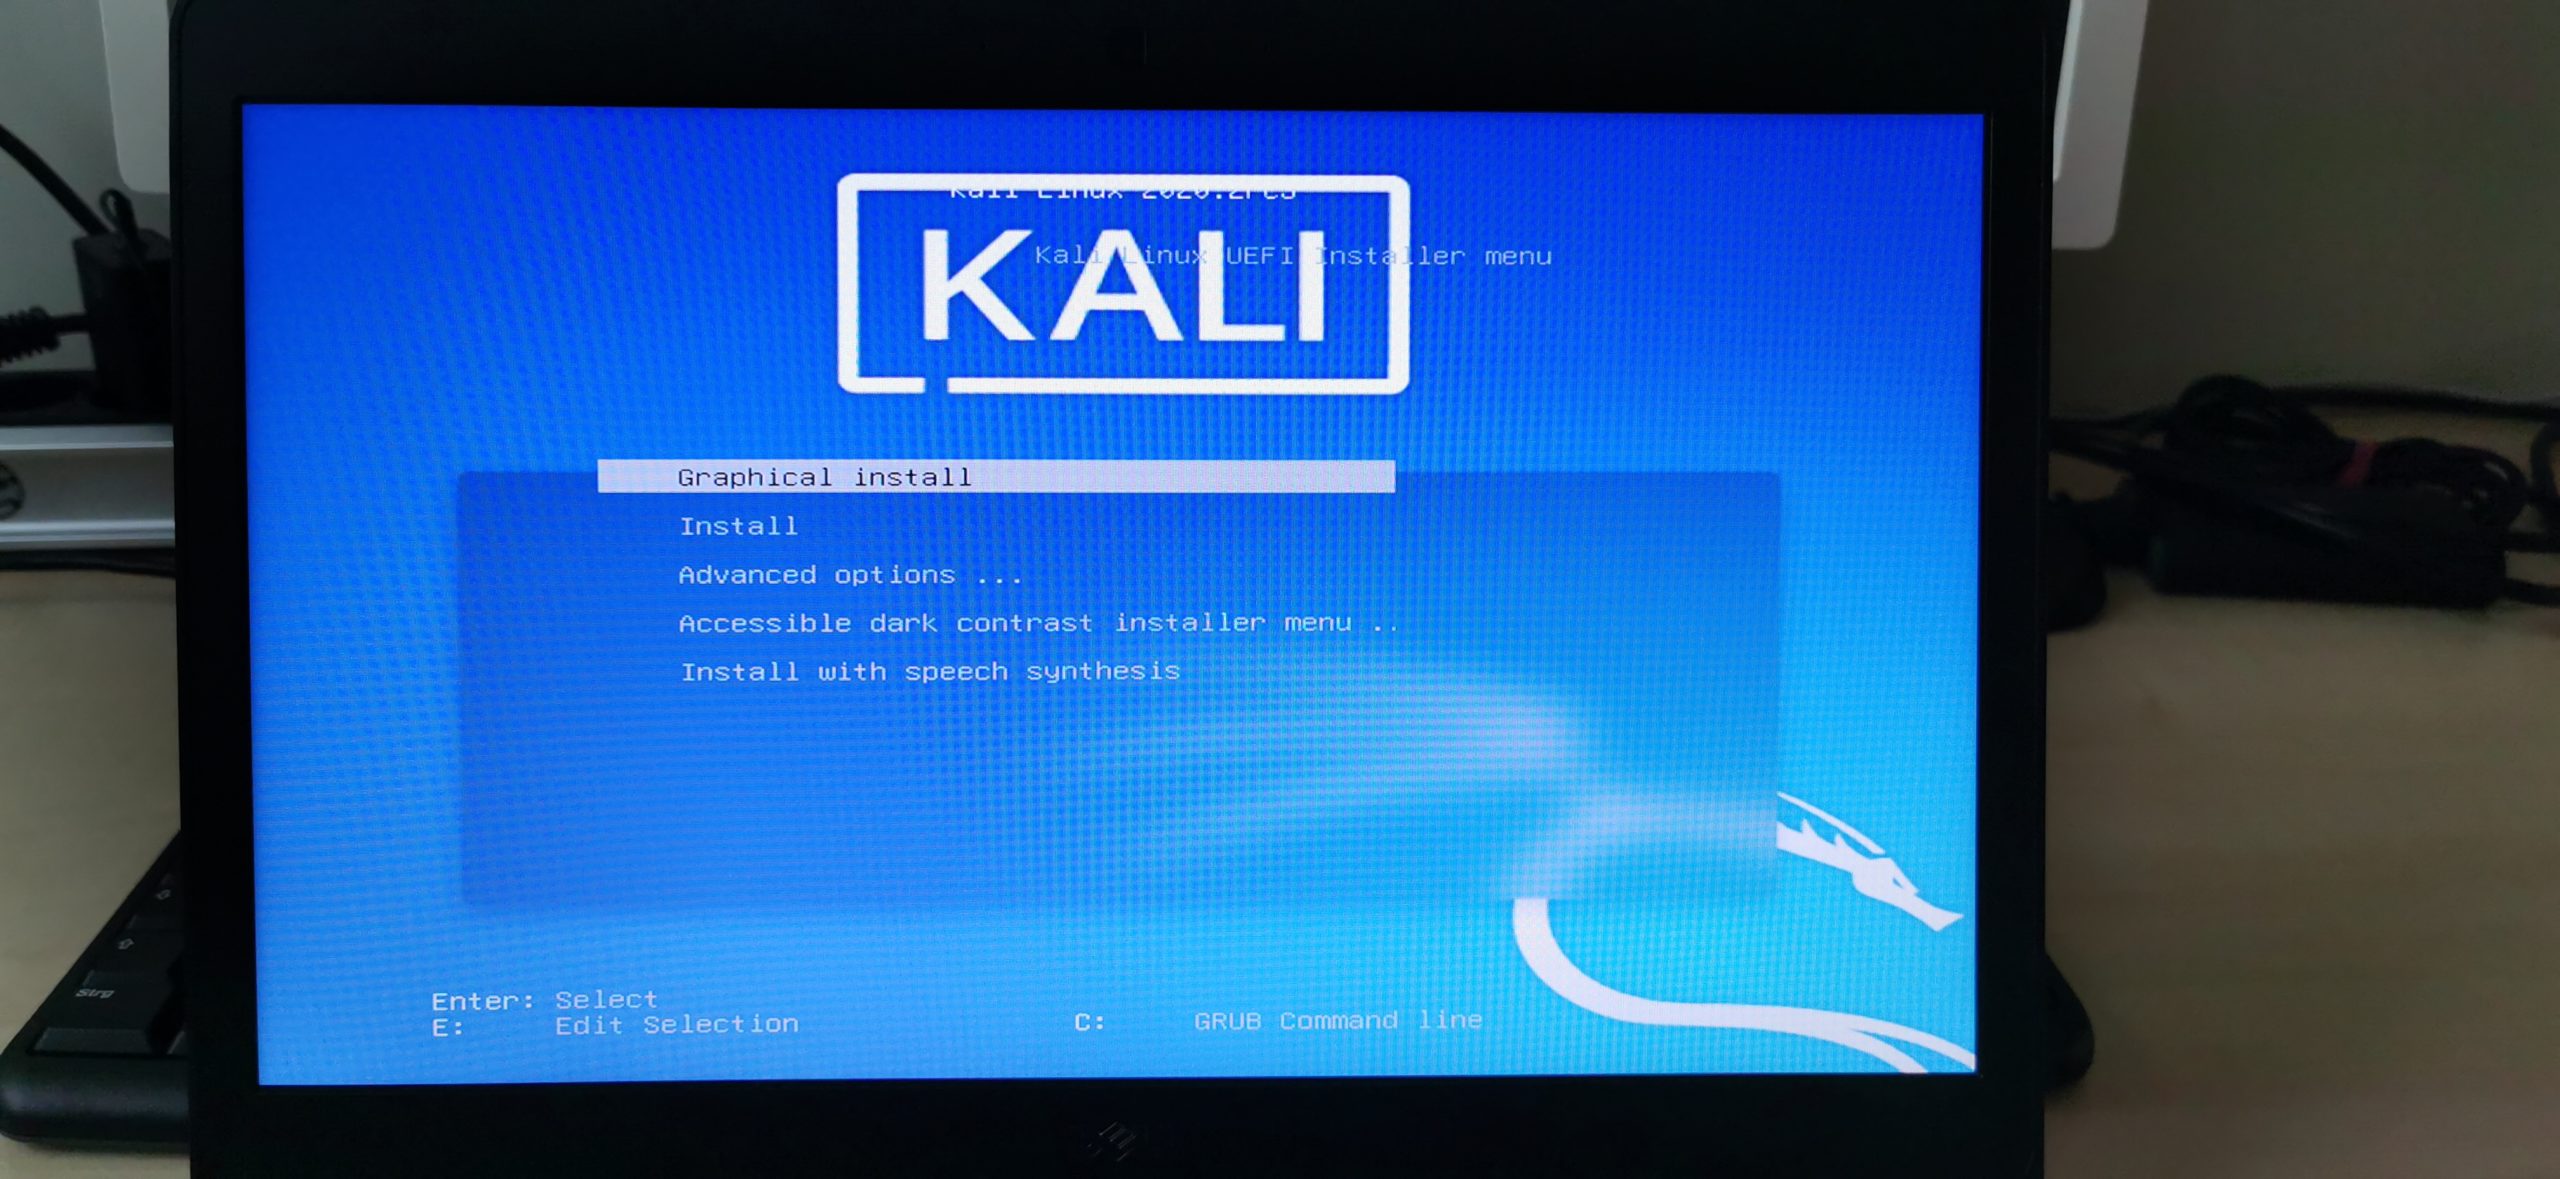
4.4 – When the Kali UEFI Installer Menu comes up select Graphical Install.
Step 5 – Install Kali Linux in Dual Boot with Windows 10
Alright, time to install Kali. I will now guide you through every step of the Installer process in the same fashion as in Step 3. Some steps will be accompanied by a screenshot, but some trivial steps won’t. You got this. Each step will be named after the window title in the Kali Installer.
Side-Note: I got reports that the Laptop Touchpad isn’t working on some models (mine included). To circumvent this, either plug a USB mouse in your laptop or navigate through the installer menus by using the tab key on your keyboard. That works well enough.
Side-Note2: I also got multiple reports that WiFi Drivers were not working during installation. Therefore, I recommend connecting your Laptop via LAN cable to your router during the installation.
5.1 – Select a language
Choose the language you want to use for your System and the Installer itself. I recommend leaving it on English as all tutorials you will ever find will be, you guessed it, in English.
5.2 – Select your location
Select your current location to set up your time zone correctly.
5.3 – Configure locales
Choose another locale or leave it on United States (I always leave this on US).
5.4 – Configure the keyboard
Choose your preferred keyboard layout.
Note: If you got an error message while Kali was loading installer components, you did not write your image in DD Image mode as described in Step 2.
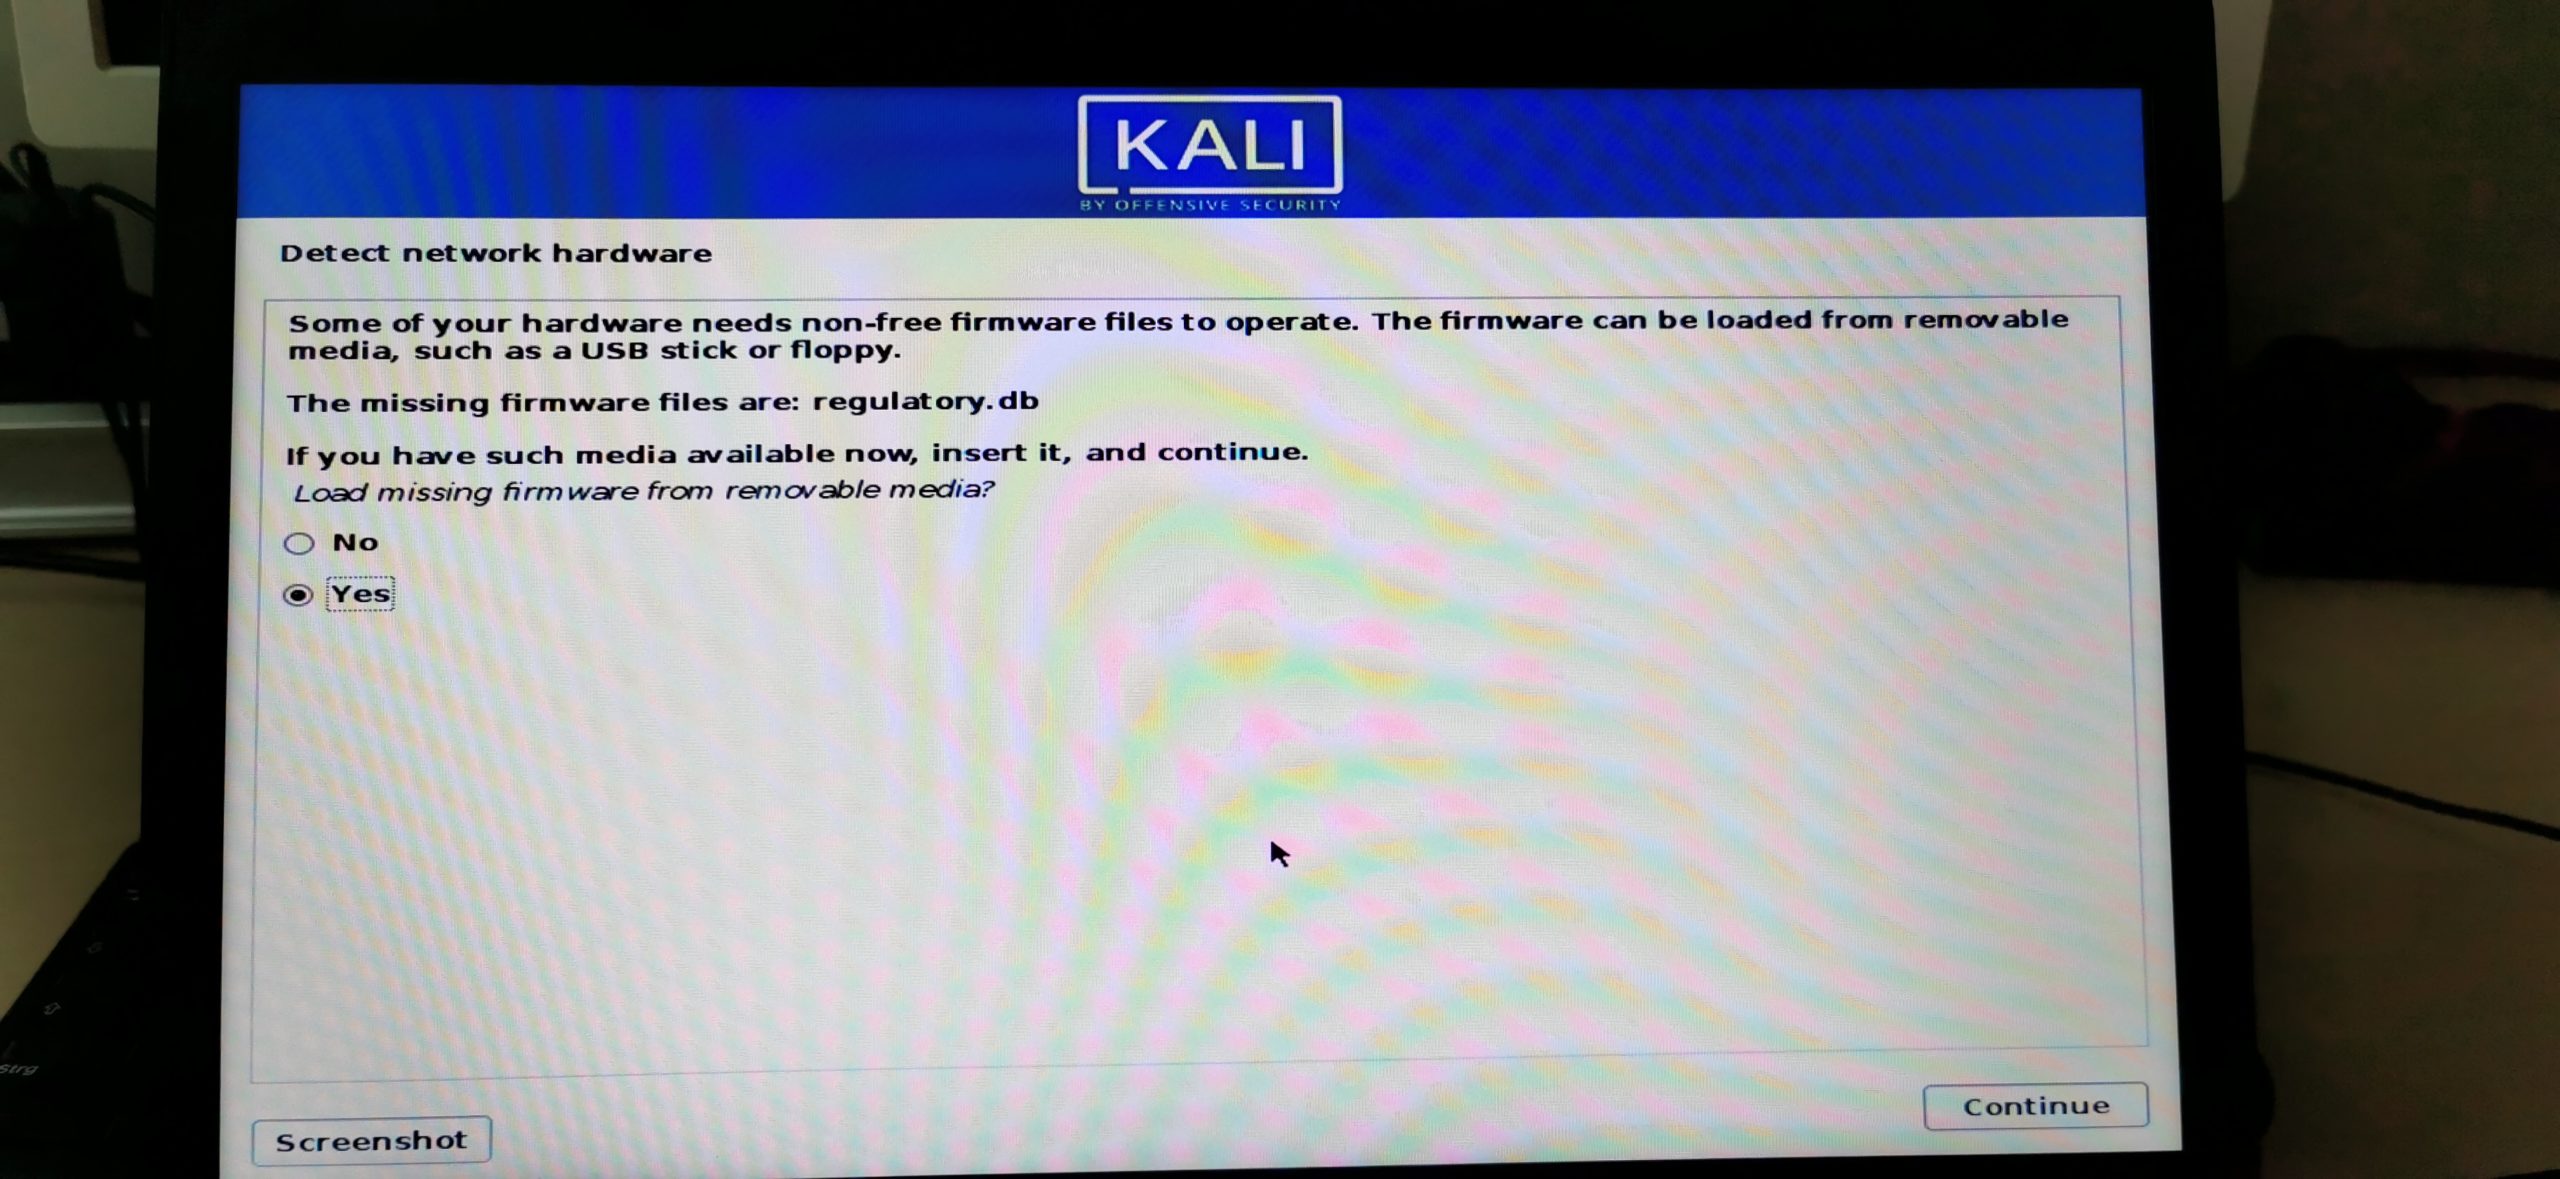
5.5.1 – Detect Network Hardware (Probably Optional Step)
You might get a message asking you if you would like to install some missing non-free firmware during installation. Select Yes if so and click continue.
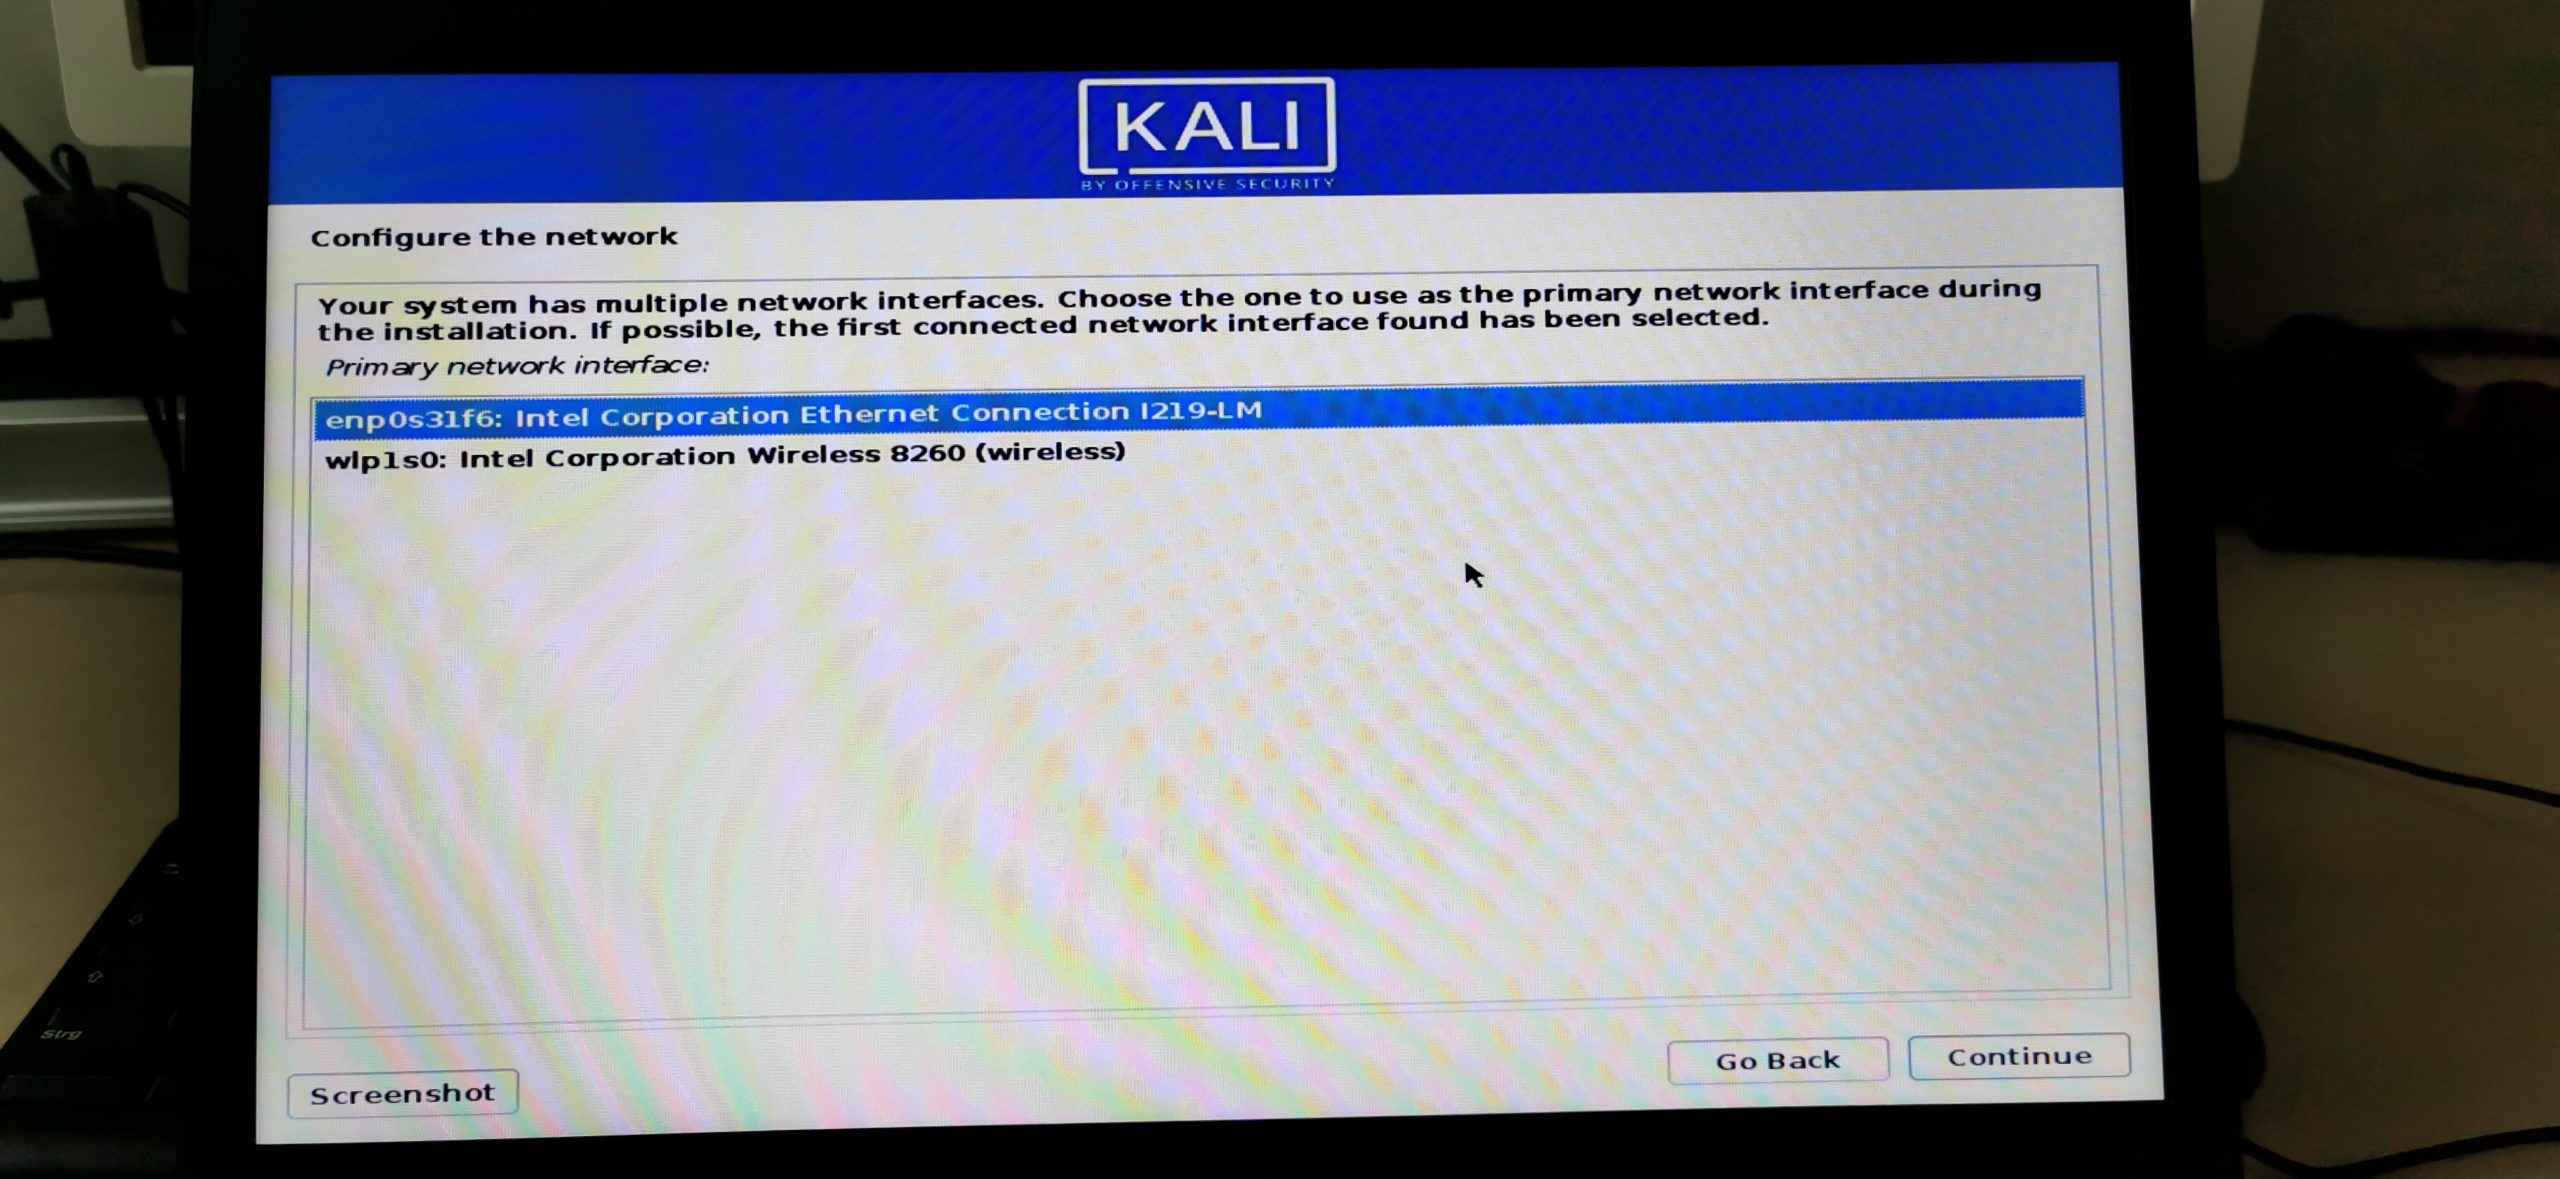
5.5 – Configure the network
Now you are able to choose between cable connection or wifi. Make your choice. I choose Ethernet Connection as I have an ethernet cable plugged in.
5.5.1 – Configure the Network
You can now choose a hostname for your Kali machine.
5.5.2 – Configure the Network
You can also enter a Domain if you’d like. If you don’t know what that means just leave it as default or enter local.
5.6 – Set up users and passwords
Here you can enter your name if you want. Like, your first name for example. Or your cat’s name.
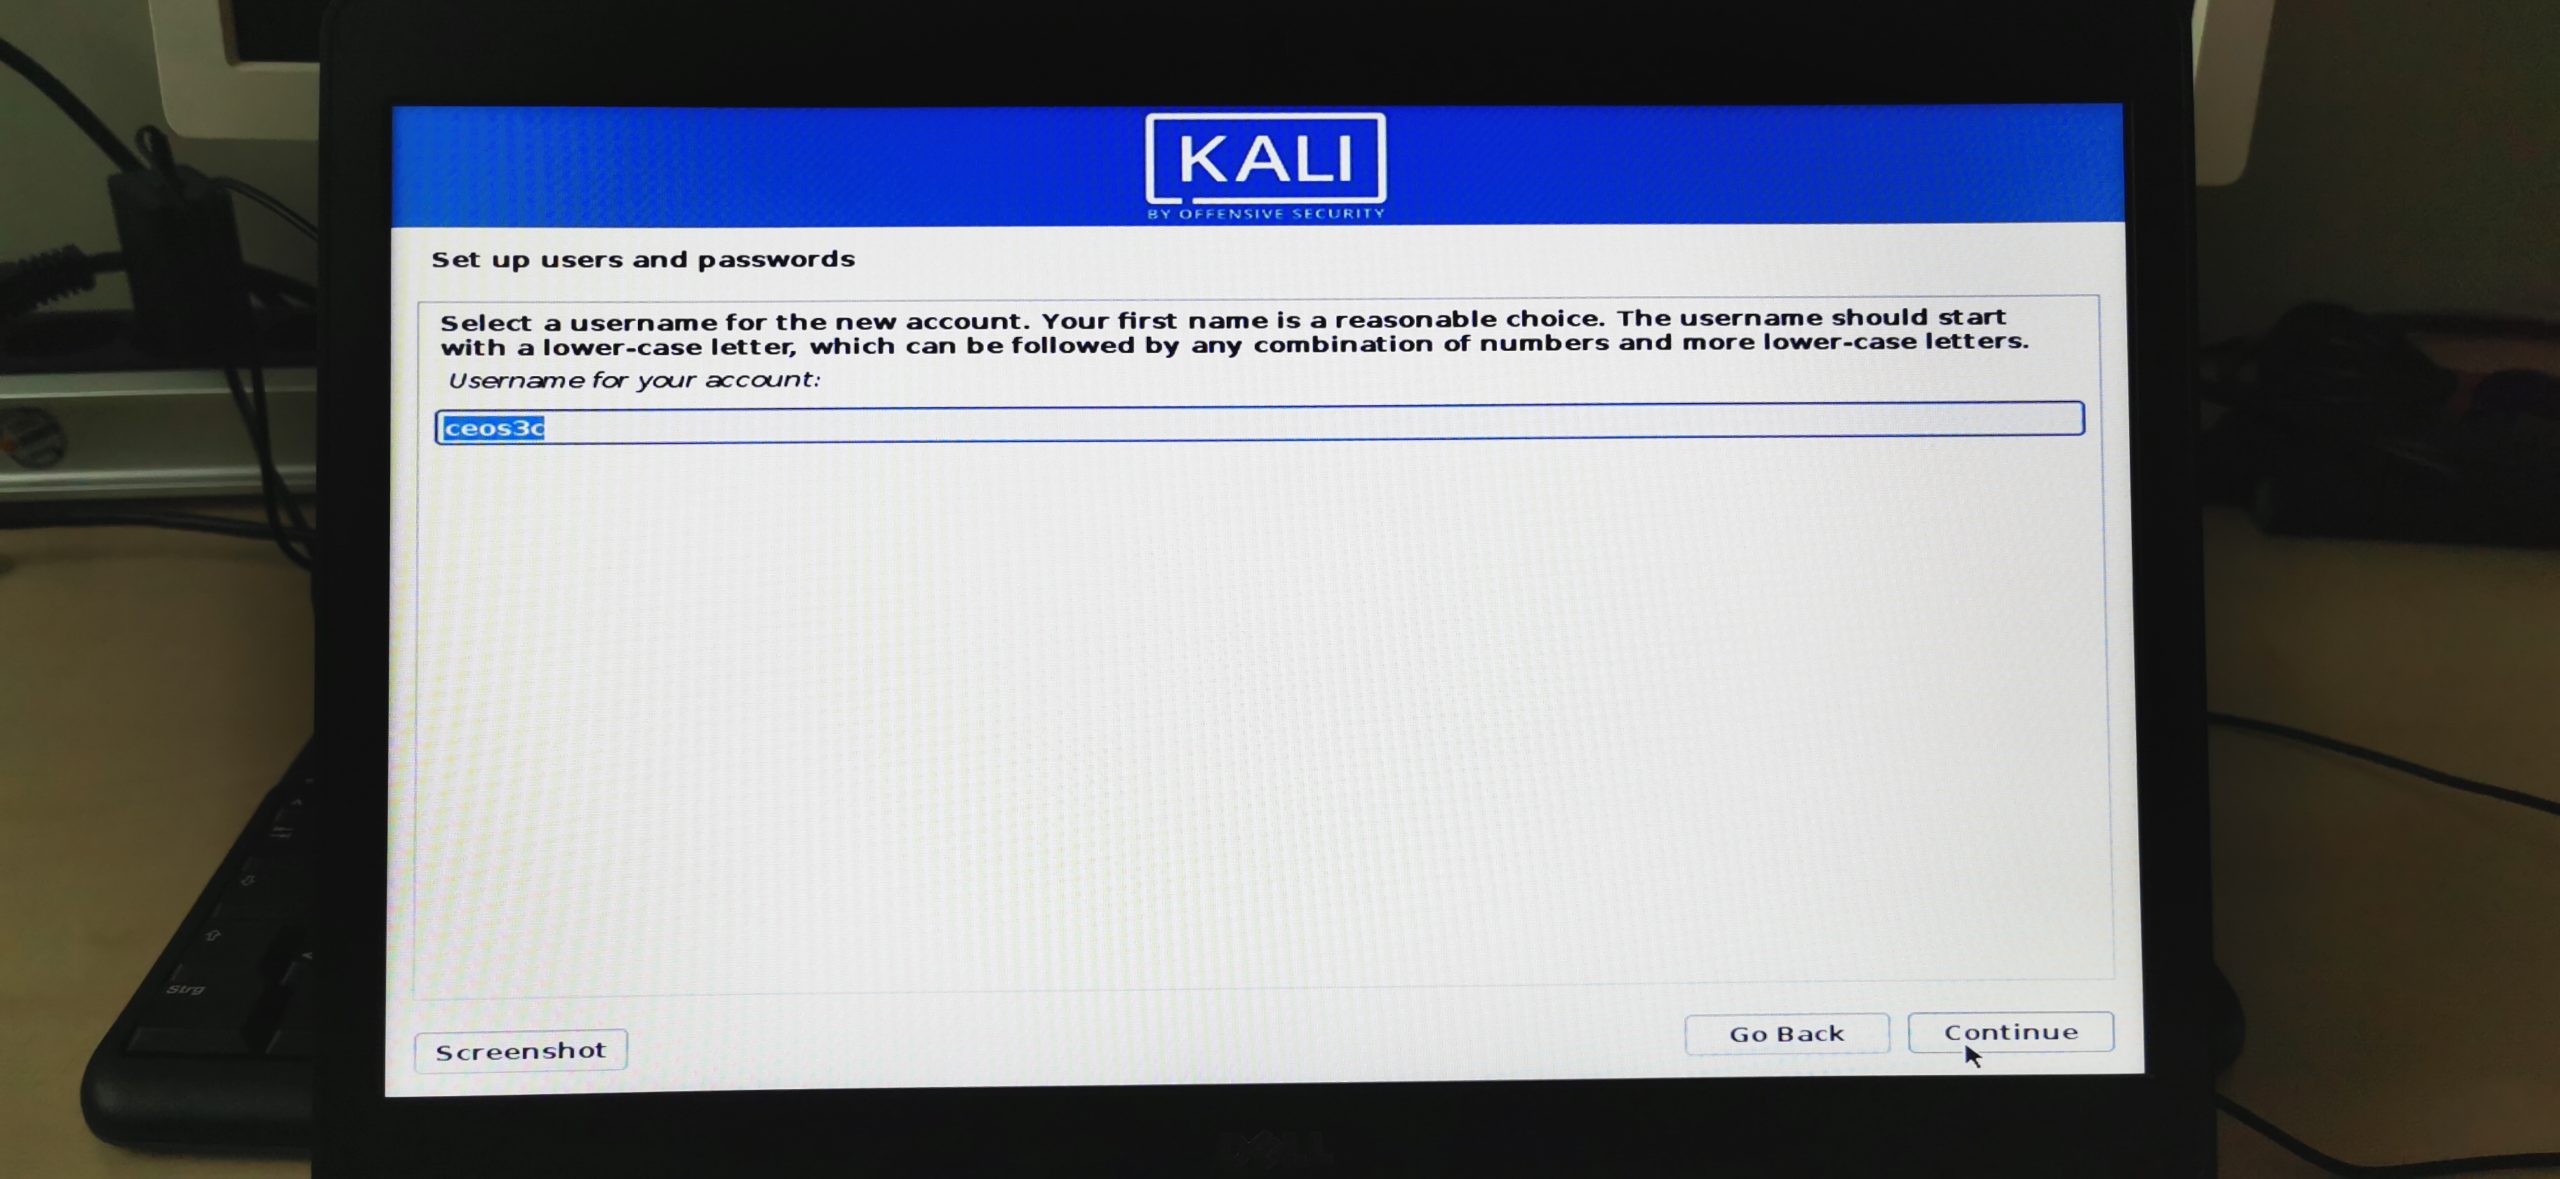
5.6.1 – Set up users and passwords
You will now create a low-privileged user account that you will use instead of the root user. This is more secure. Choose whatever username you want, for the sake of this tutorial I name my user ceos3c. Careful, usernames on Linux are Case-Sensitive.
5.6.2 – Set up users and passwords
Choose a strong password.
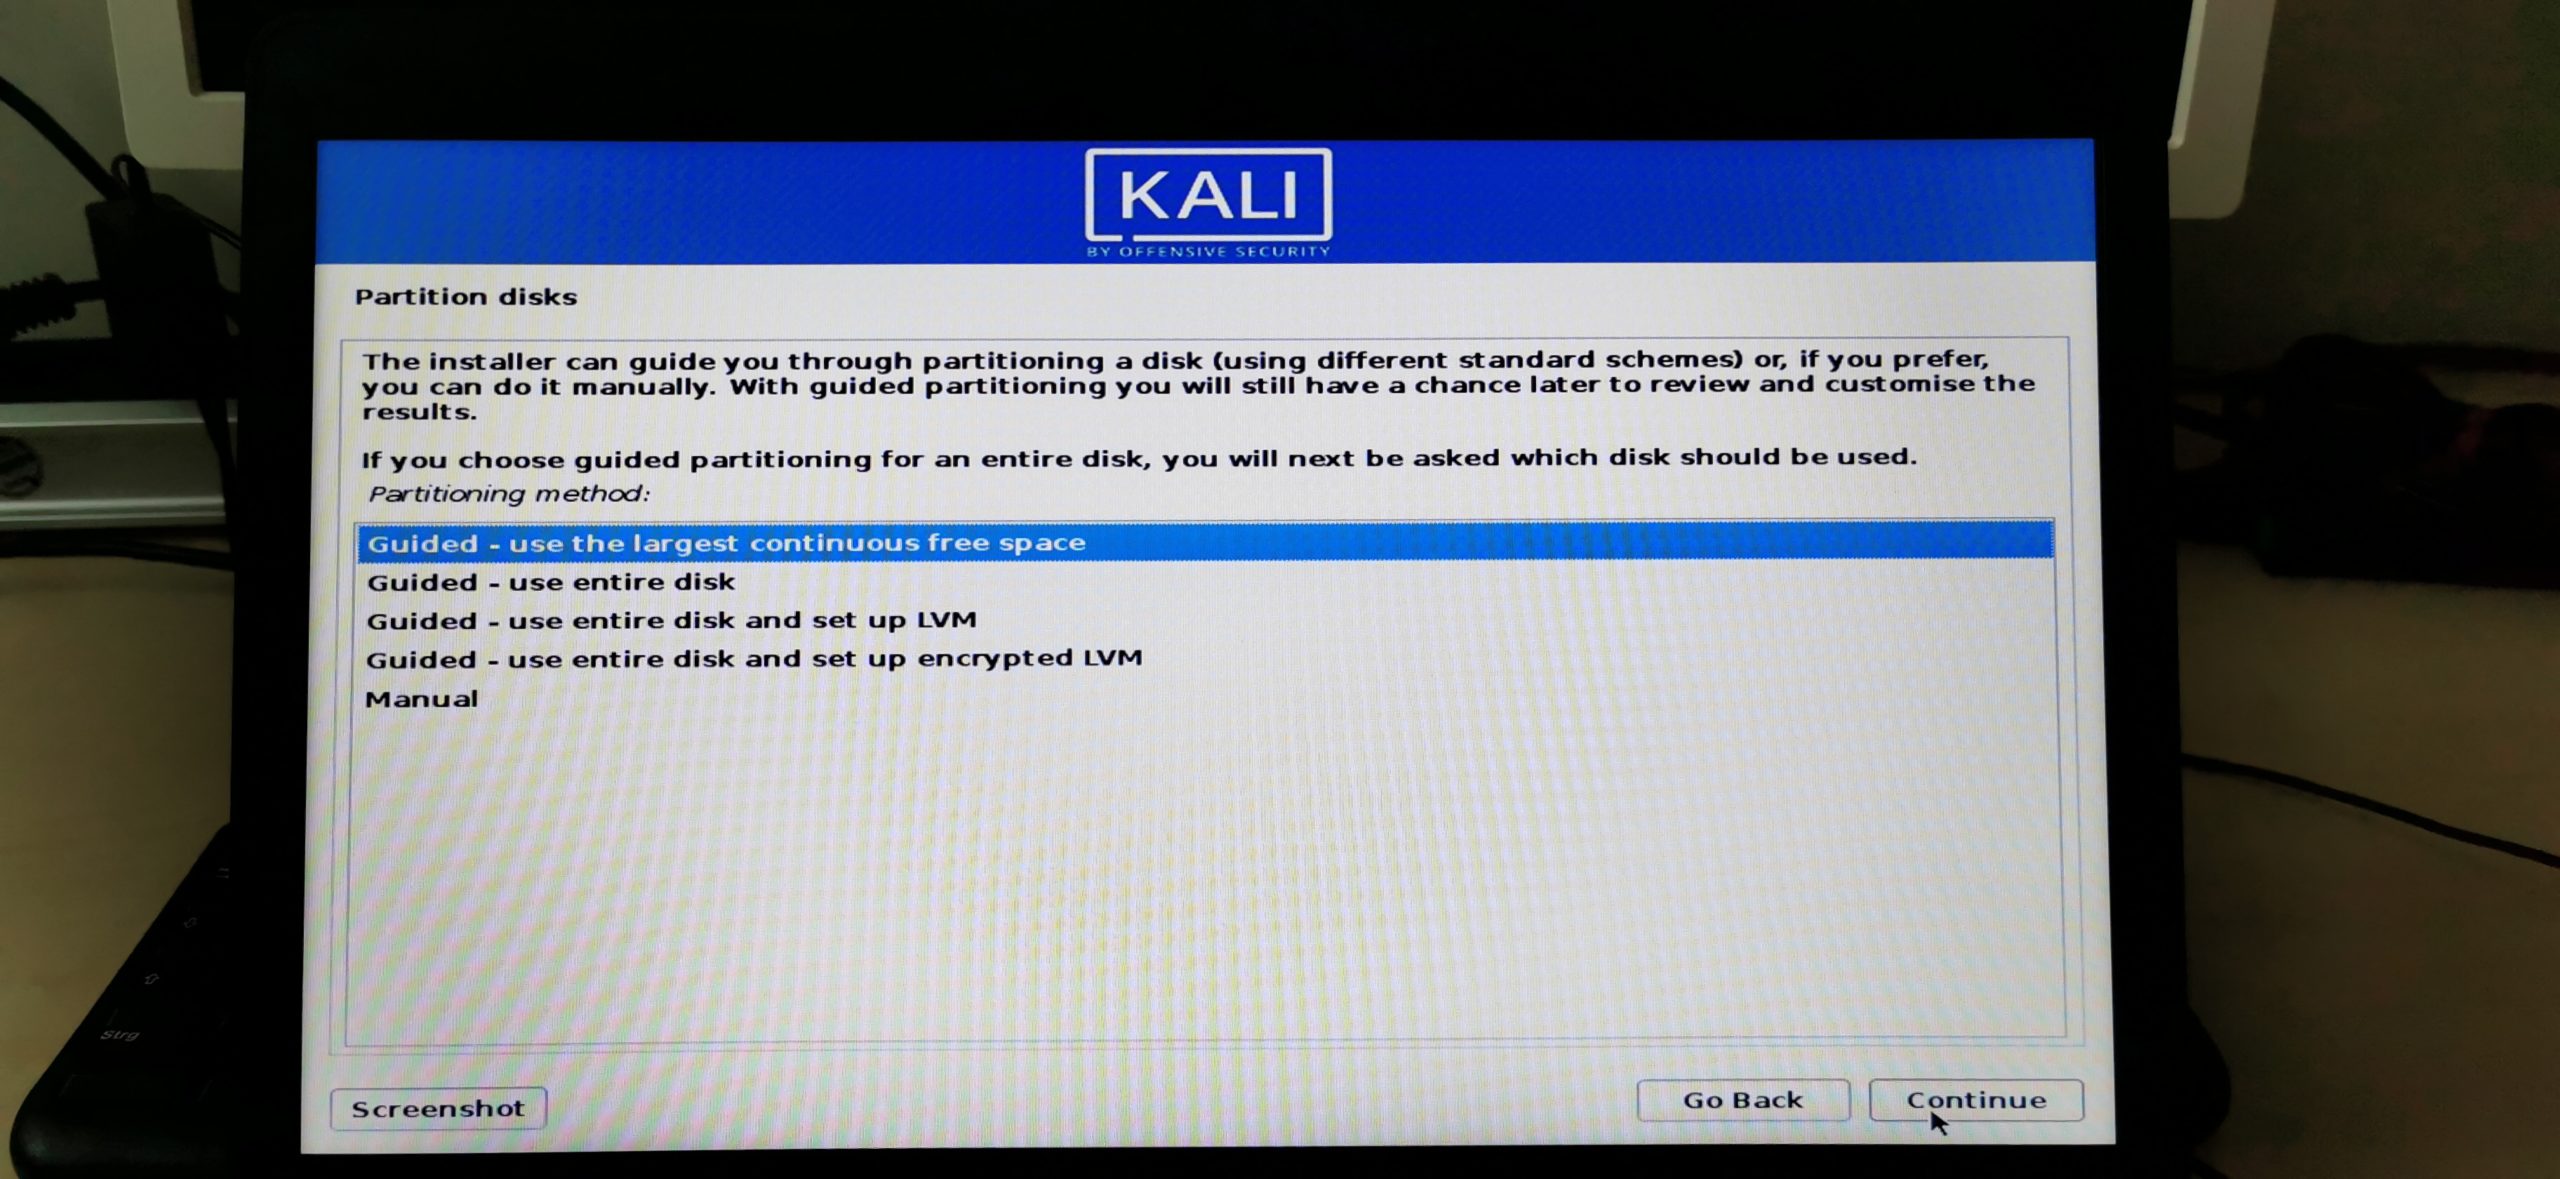
5.7 – Partition disks (Follow this very carefully, don’t make a mistake here)
To make this more clear, I will separate each step again. First, we will create a SWAP partition and then repeat the process to create our main partition. I will try to make it as clear as possible.
SWAP Step 1 – Partitioning Method
Choose Manual here
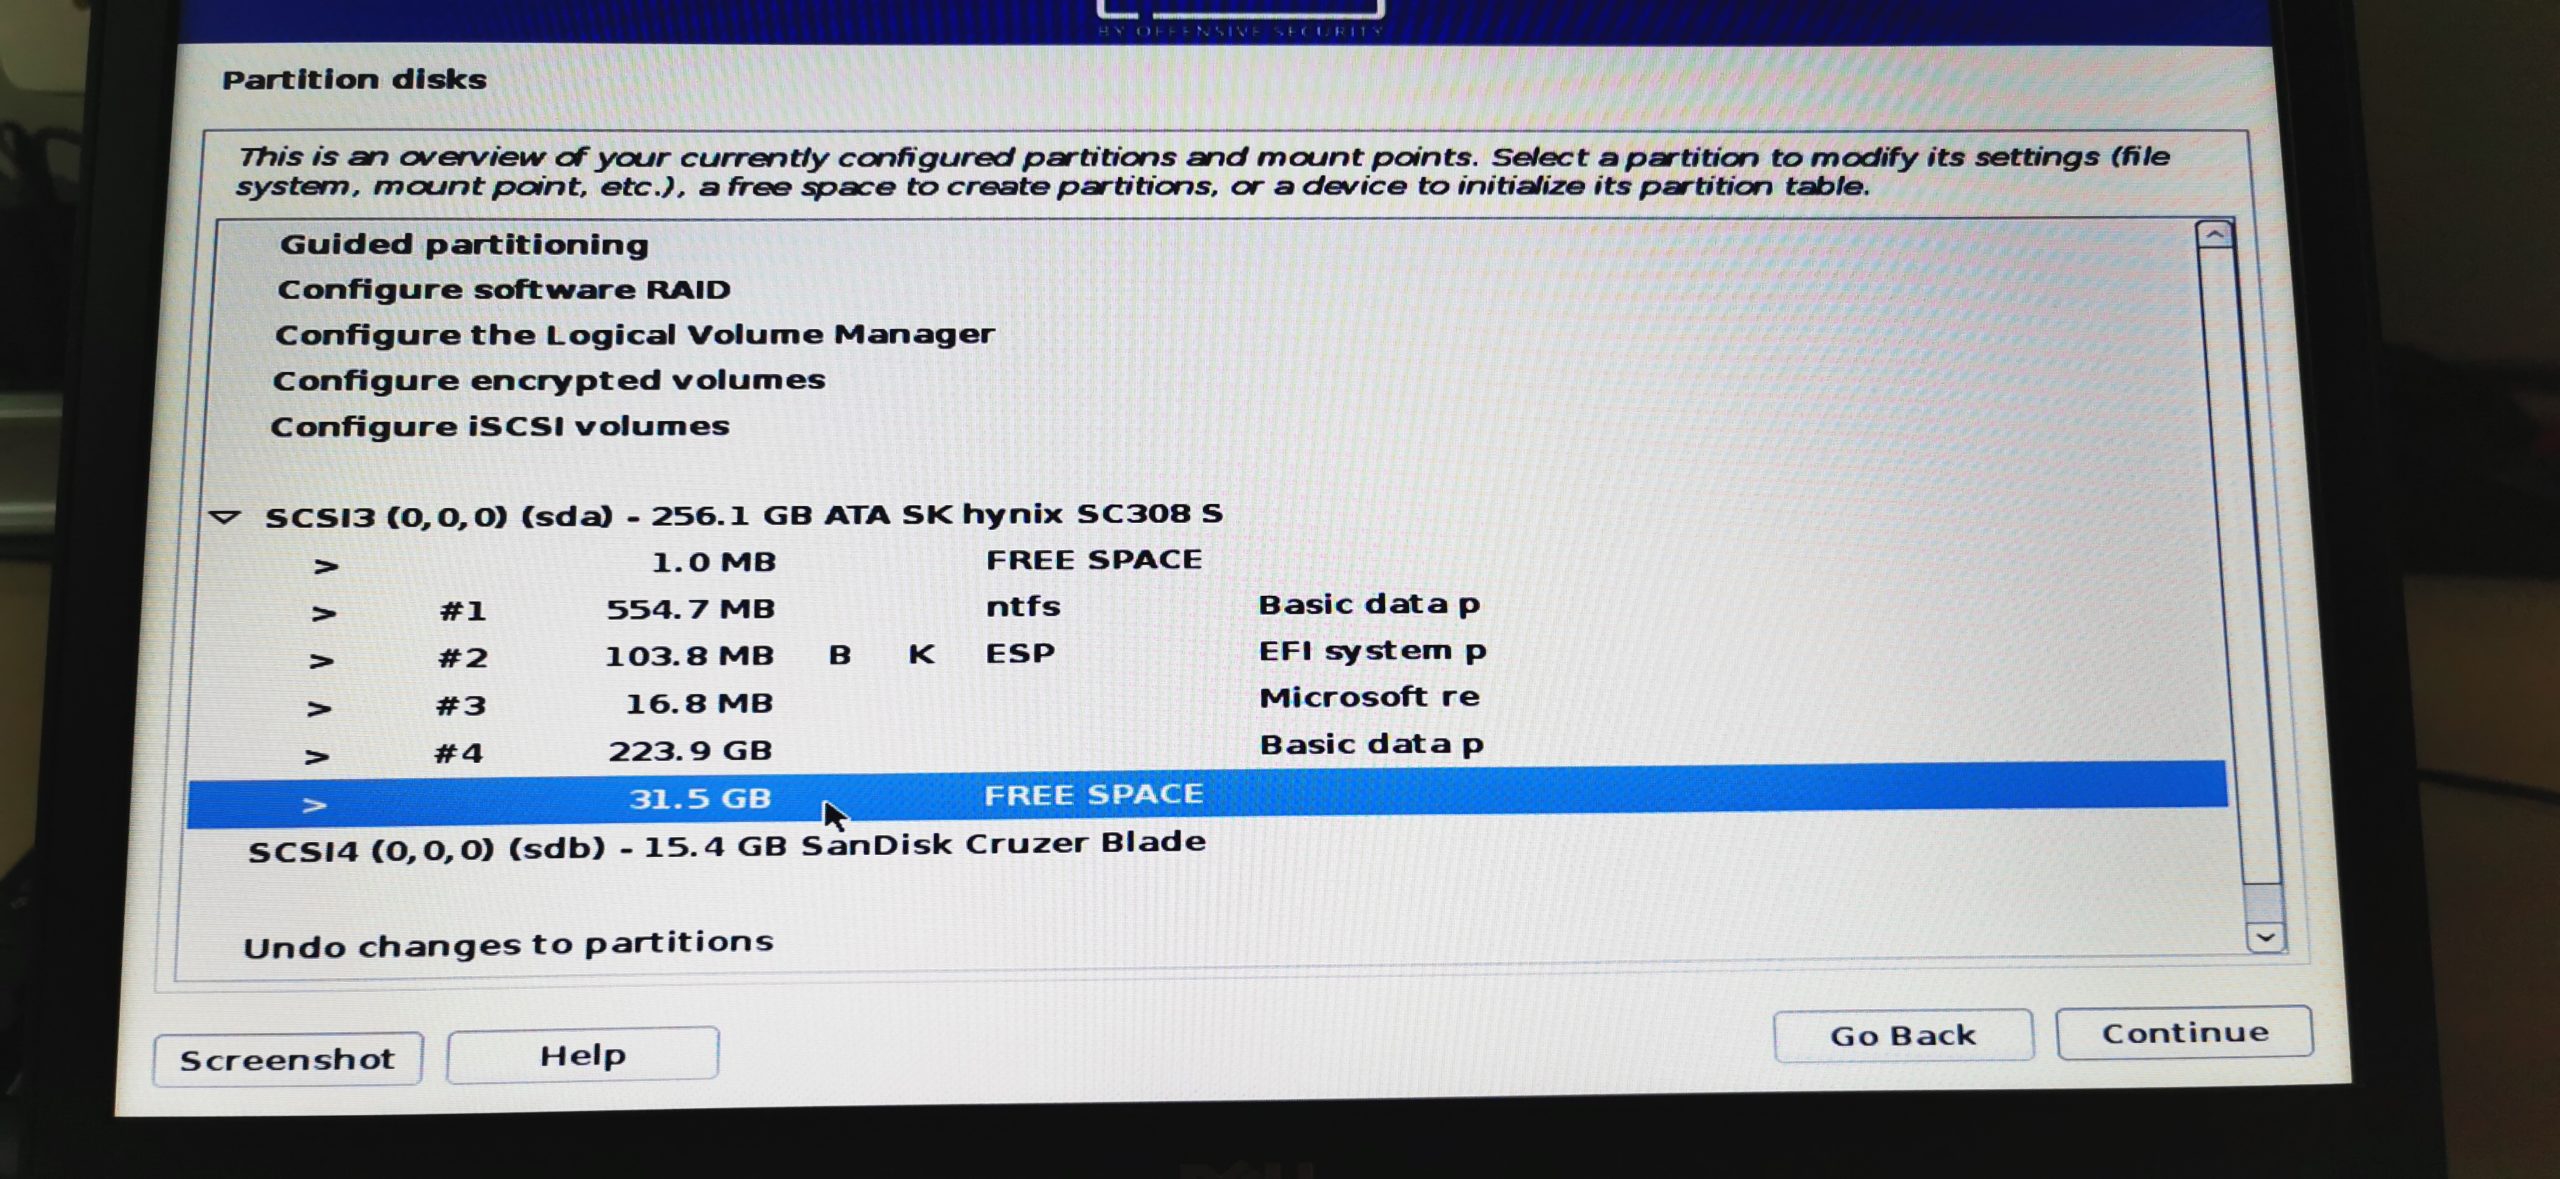
SWAP Step 2 – Selecting the partition we created in Step 3
Make sure to select the correct partition here! You can easily spot it as it should be indicated by FREE SPACE, or by the amount of GB you set in Step 3. Select it and click Continue.
SWAP Step 3 – How to use this free space
Select Create a new partition.

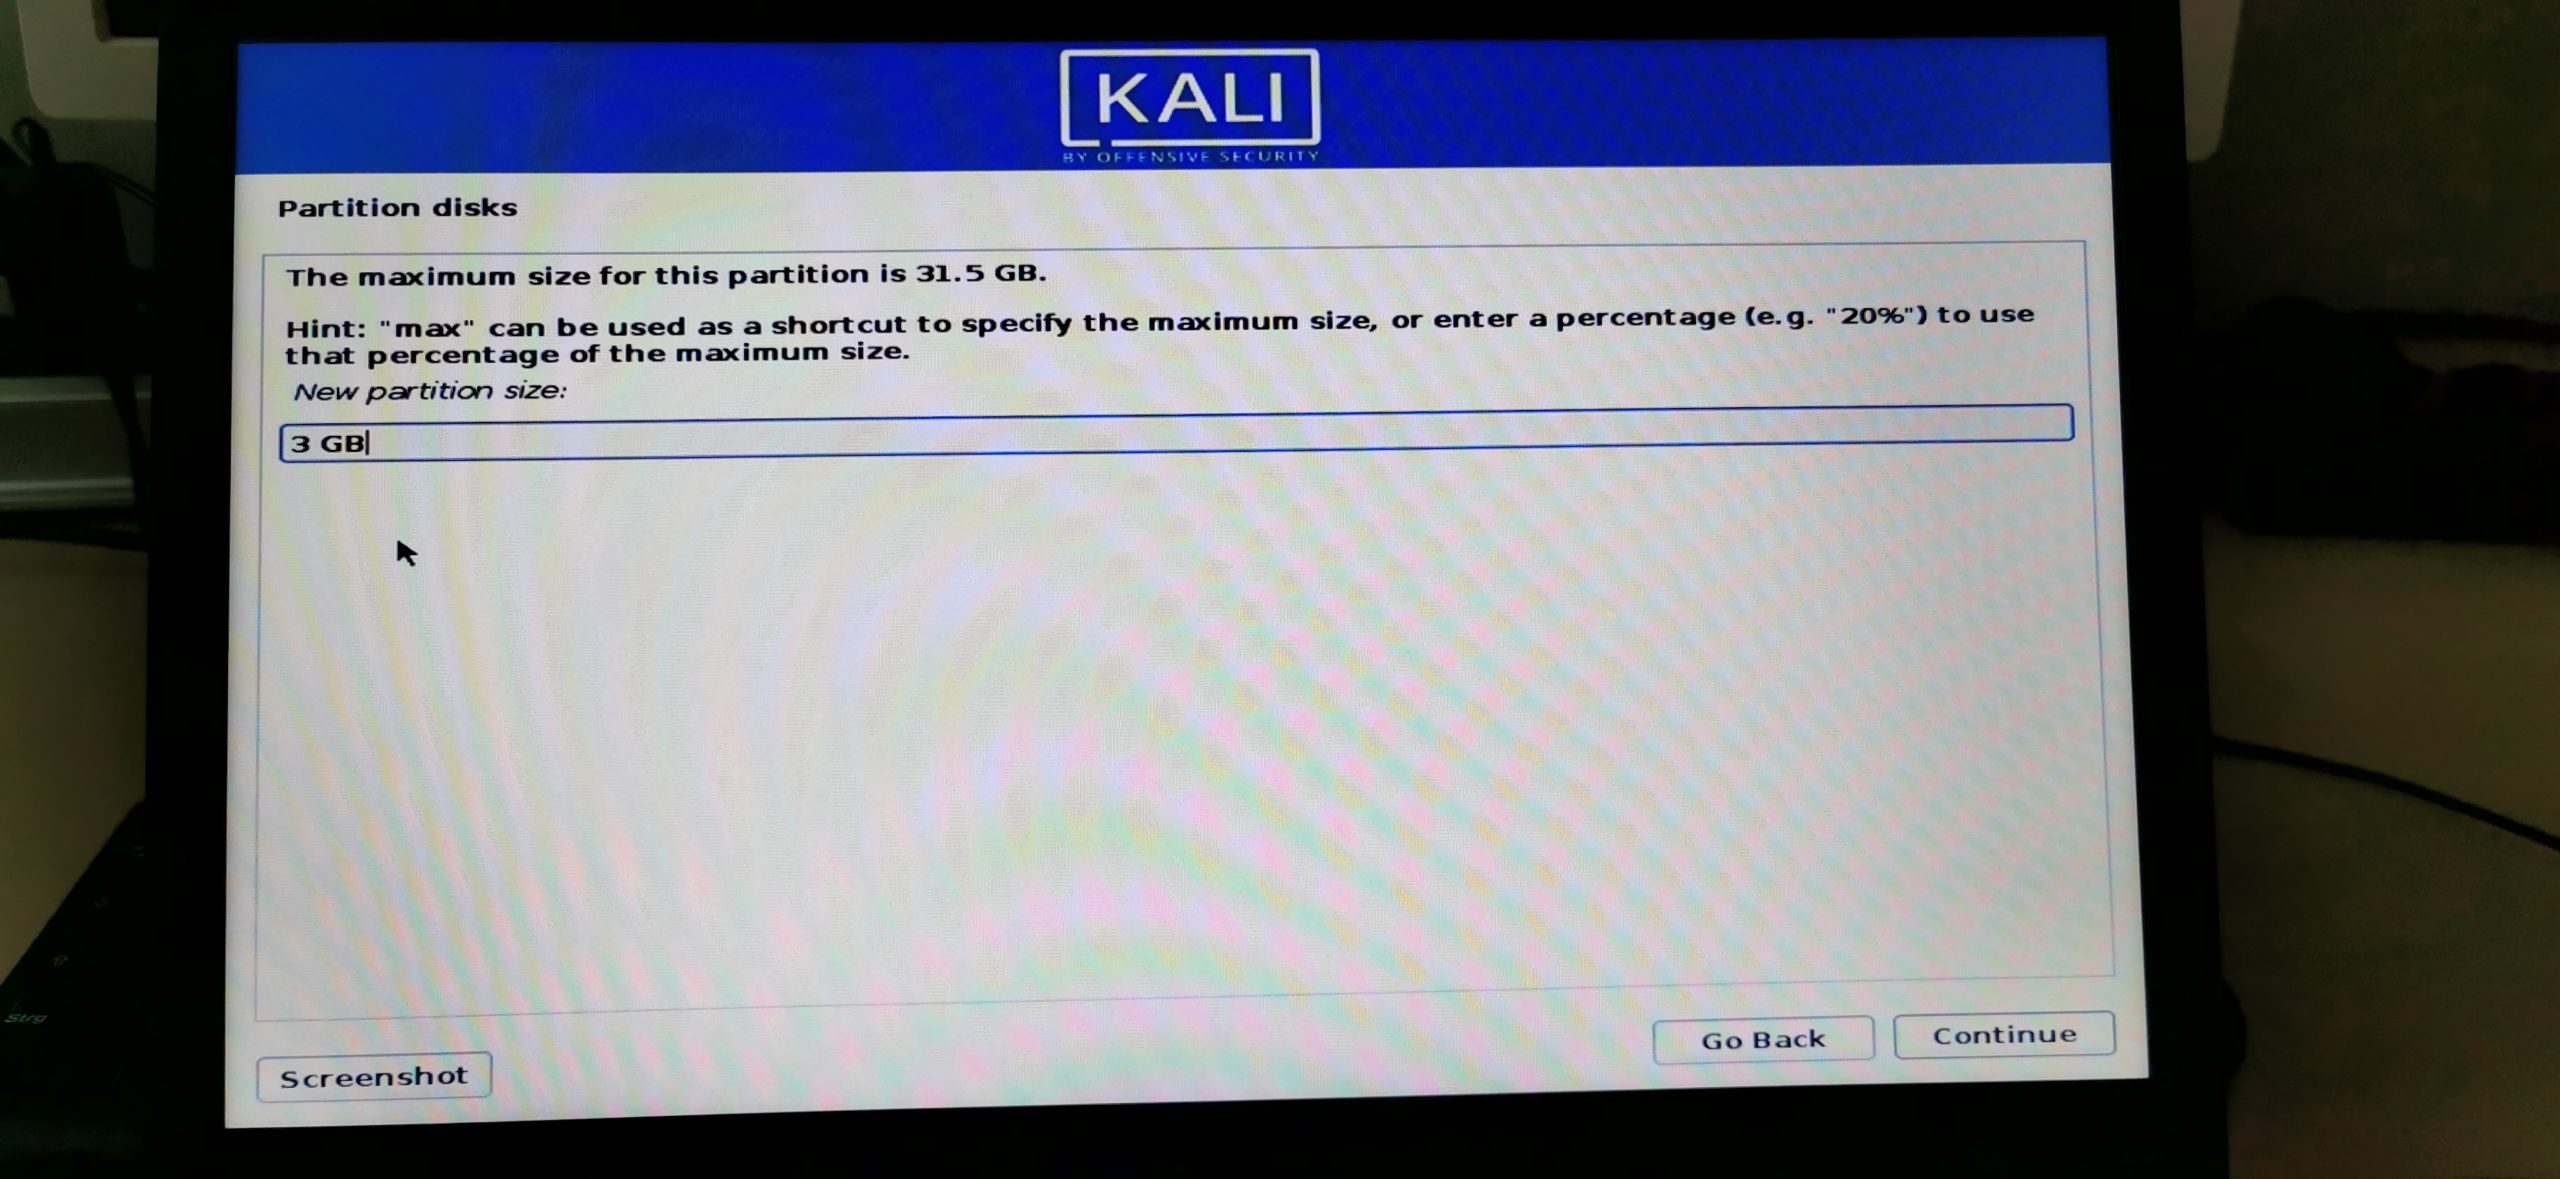
SWAP Step 4 – Setting up the SWAP partition
The SWAP partition size is set by the amount of memory you have in your computer. It’s a rather tiresome topic so I save you some time by creating the below table for you. In short: You should allocate around 20% of the amount of your system memory as your SWAP partition size. Now there is a whole topic on adjusting SWAP size if you use Hibernation vs no Hibernation you can read up on if you want, I generally stick to the No Hibernation chart and had no problems so far. You’ll find the information out there. Yea I know, I see myself out.
| RAM Laptop | Swap Size (No Hibernation) |
| 1GB | 1GB |
| 2GB | 1GB |
| 4GB | 2GB |
| 6GB | 2GB |
| 8GB | 3GB |
| 12GB | 3GB |
| 16GB | 4GB |
| 24GB | 5GB |
| 32GB | 6GB |
| 64GB | 8GB |
So, my laptop has 8GB of RAM so according to that table, I choose a SWAP size of 3GB. I hope that makes sense.
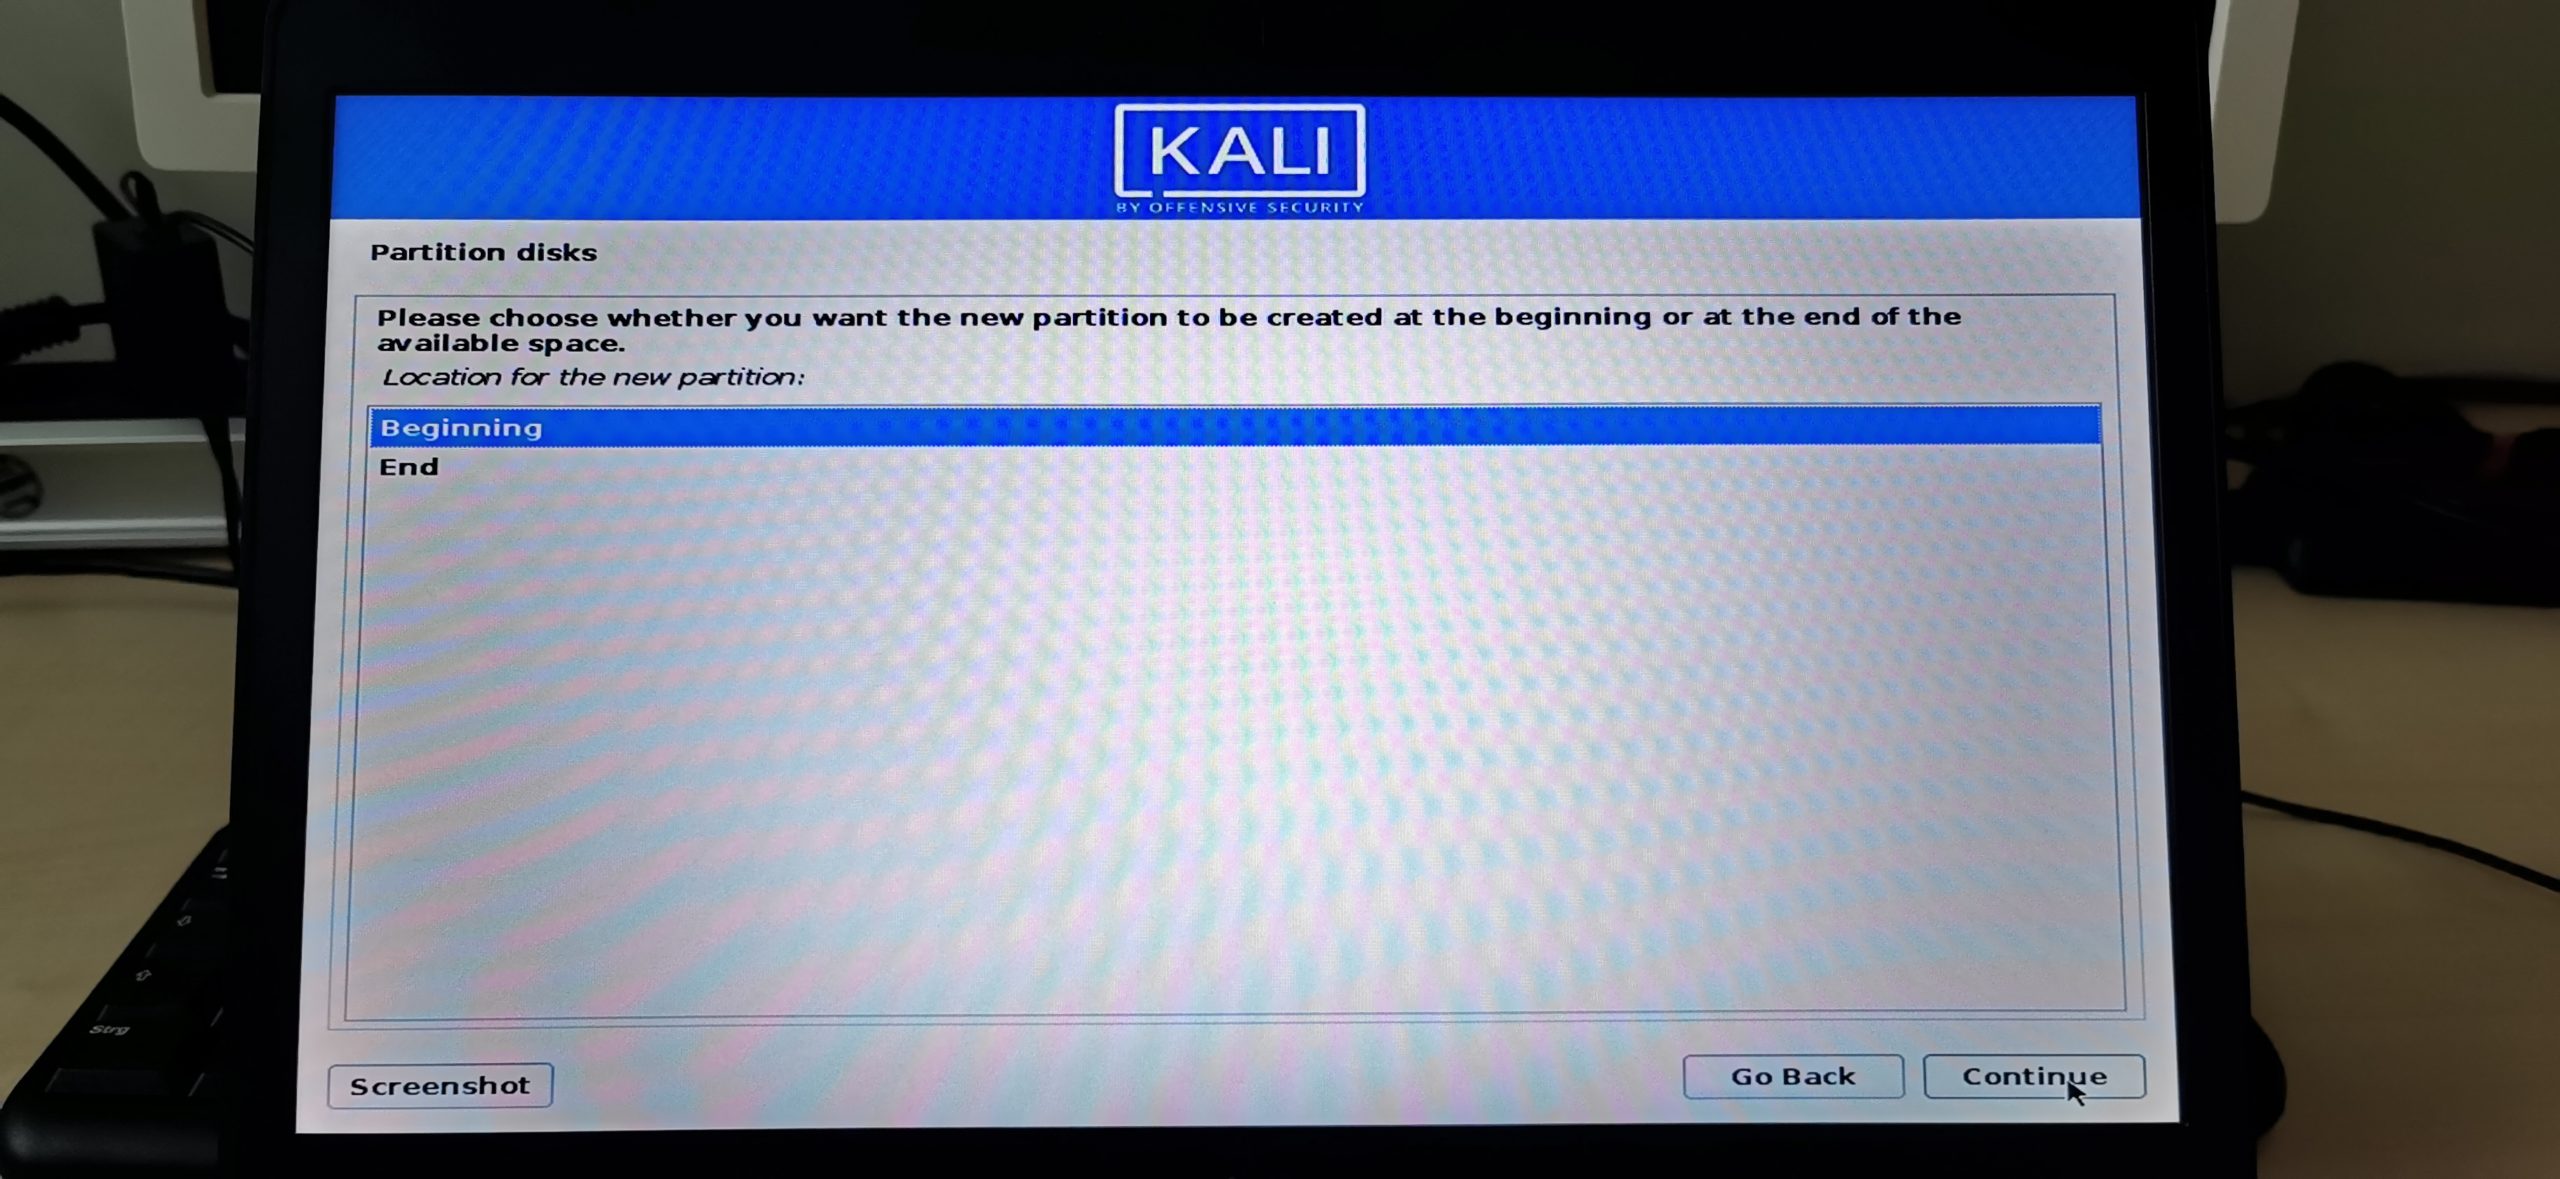
SWAP Step 5 – Location for the new Partition
Choose Beginning and click Continue.
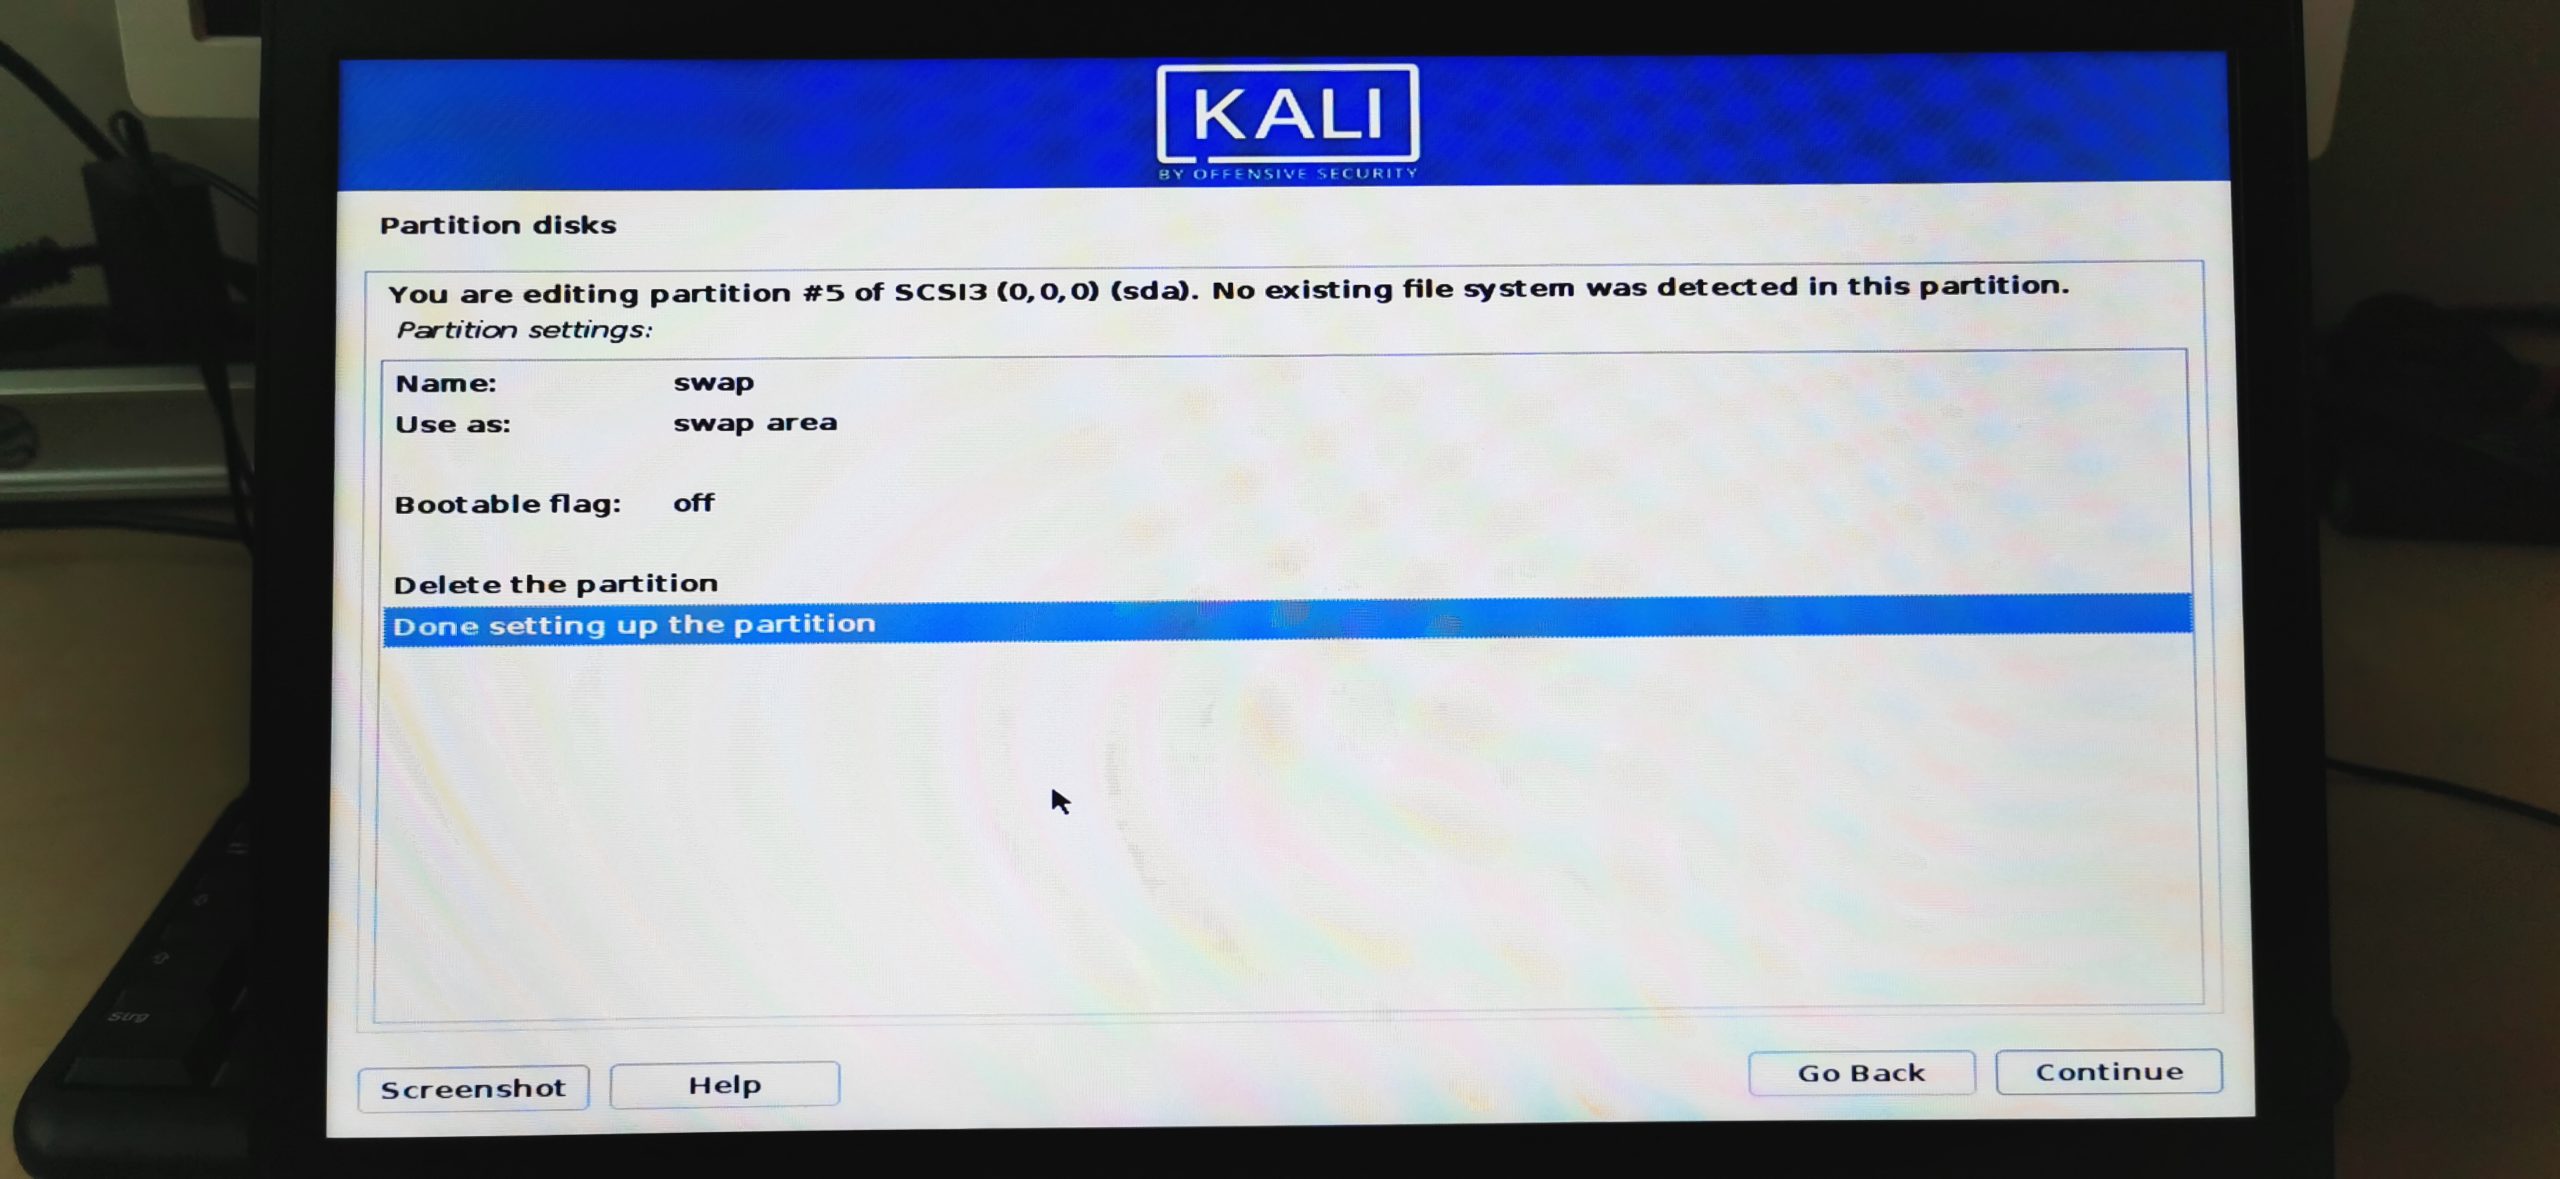
SWAP Step 6 – Naming the Partition
Double-click on Name: and name your partition swap. Click Continue.
SWAP Step 7 – Setting the partition to use as SWAP
Double-click on Use as: and select swap area.
If that is done, choose “Done setting up the partition” on the bottom and click Continue. Now we need to repeat this process (it’s a little shorter) for our Main partition.
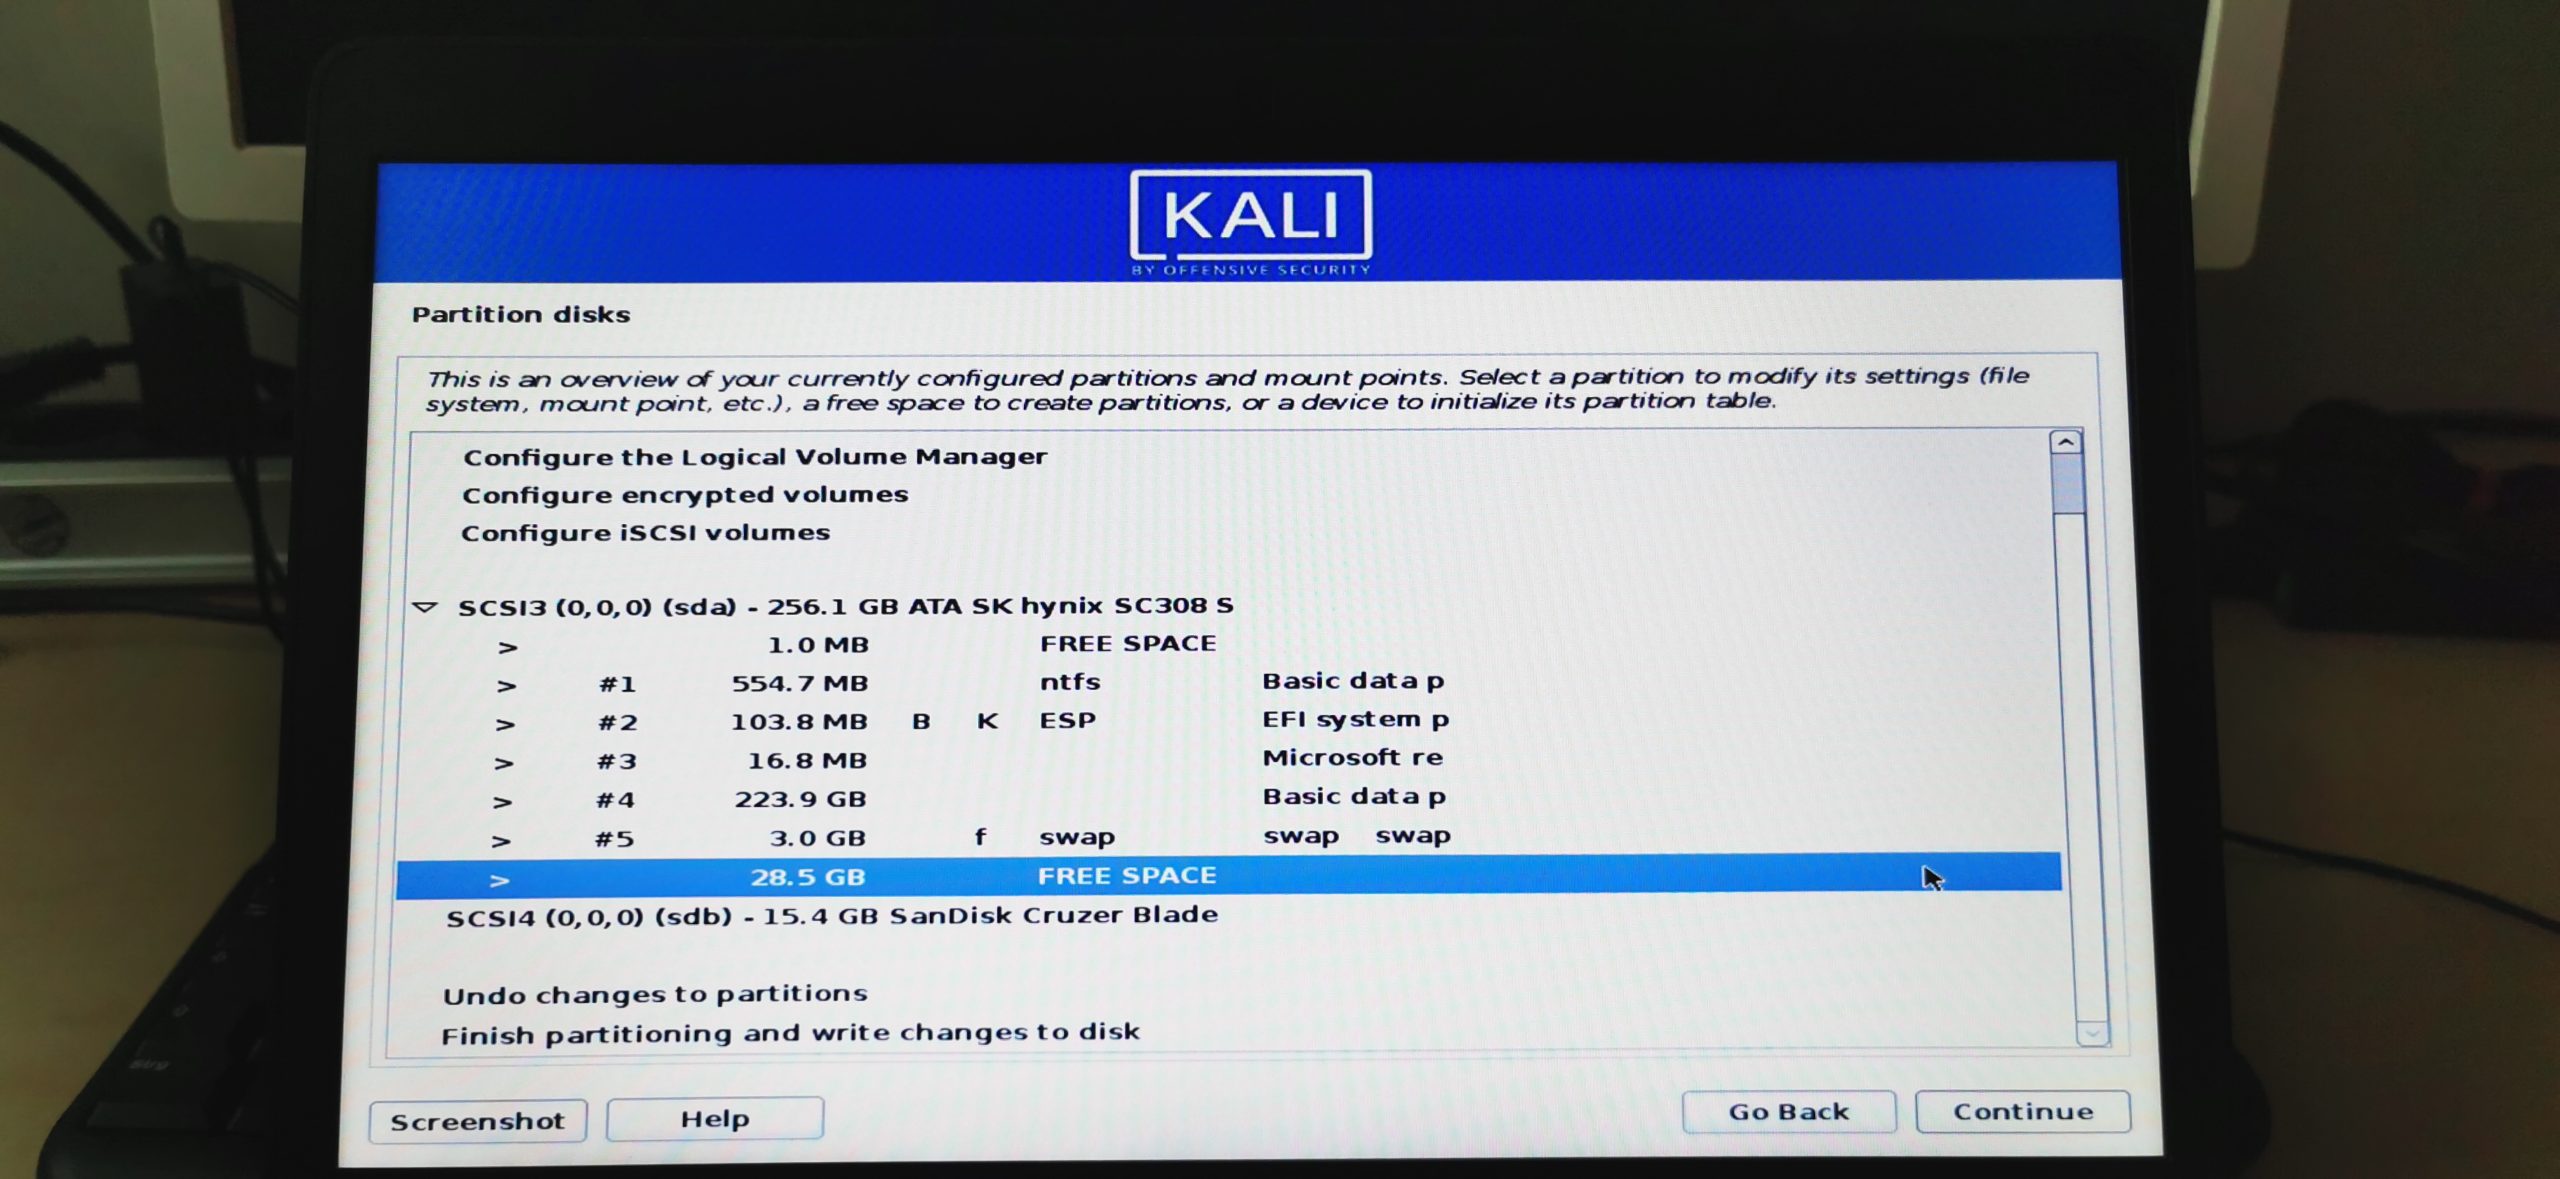
MAIN Step 1 – Selecting the Main Partition
Again, double-click the partition indicated by FREE SPACE.
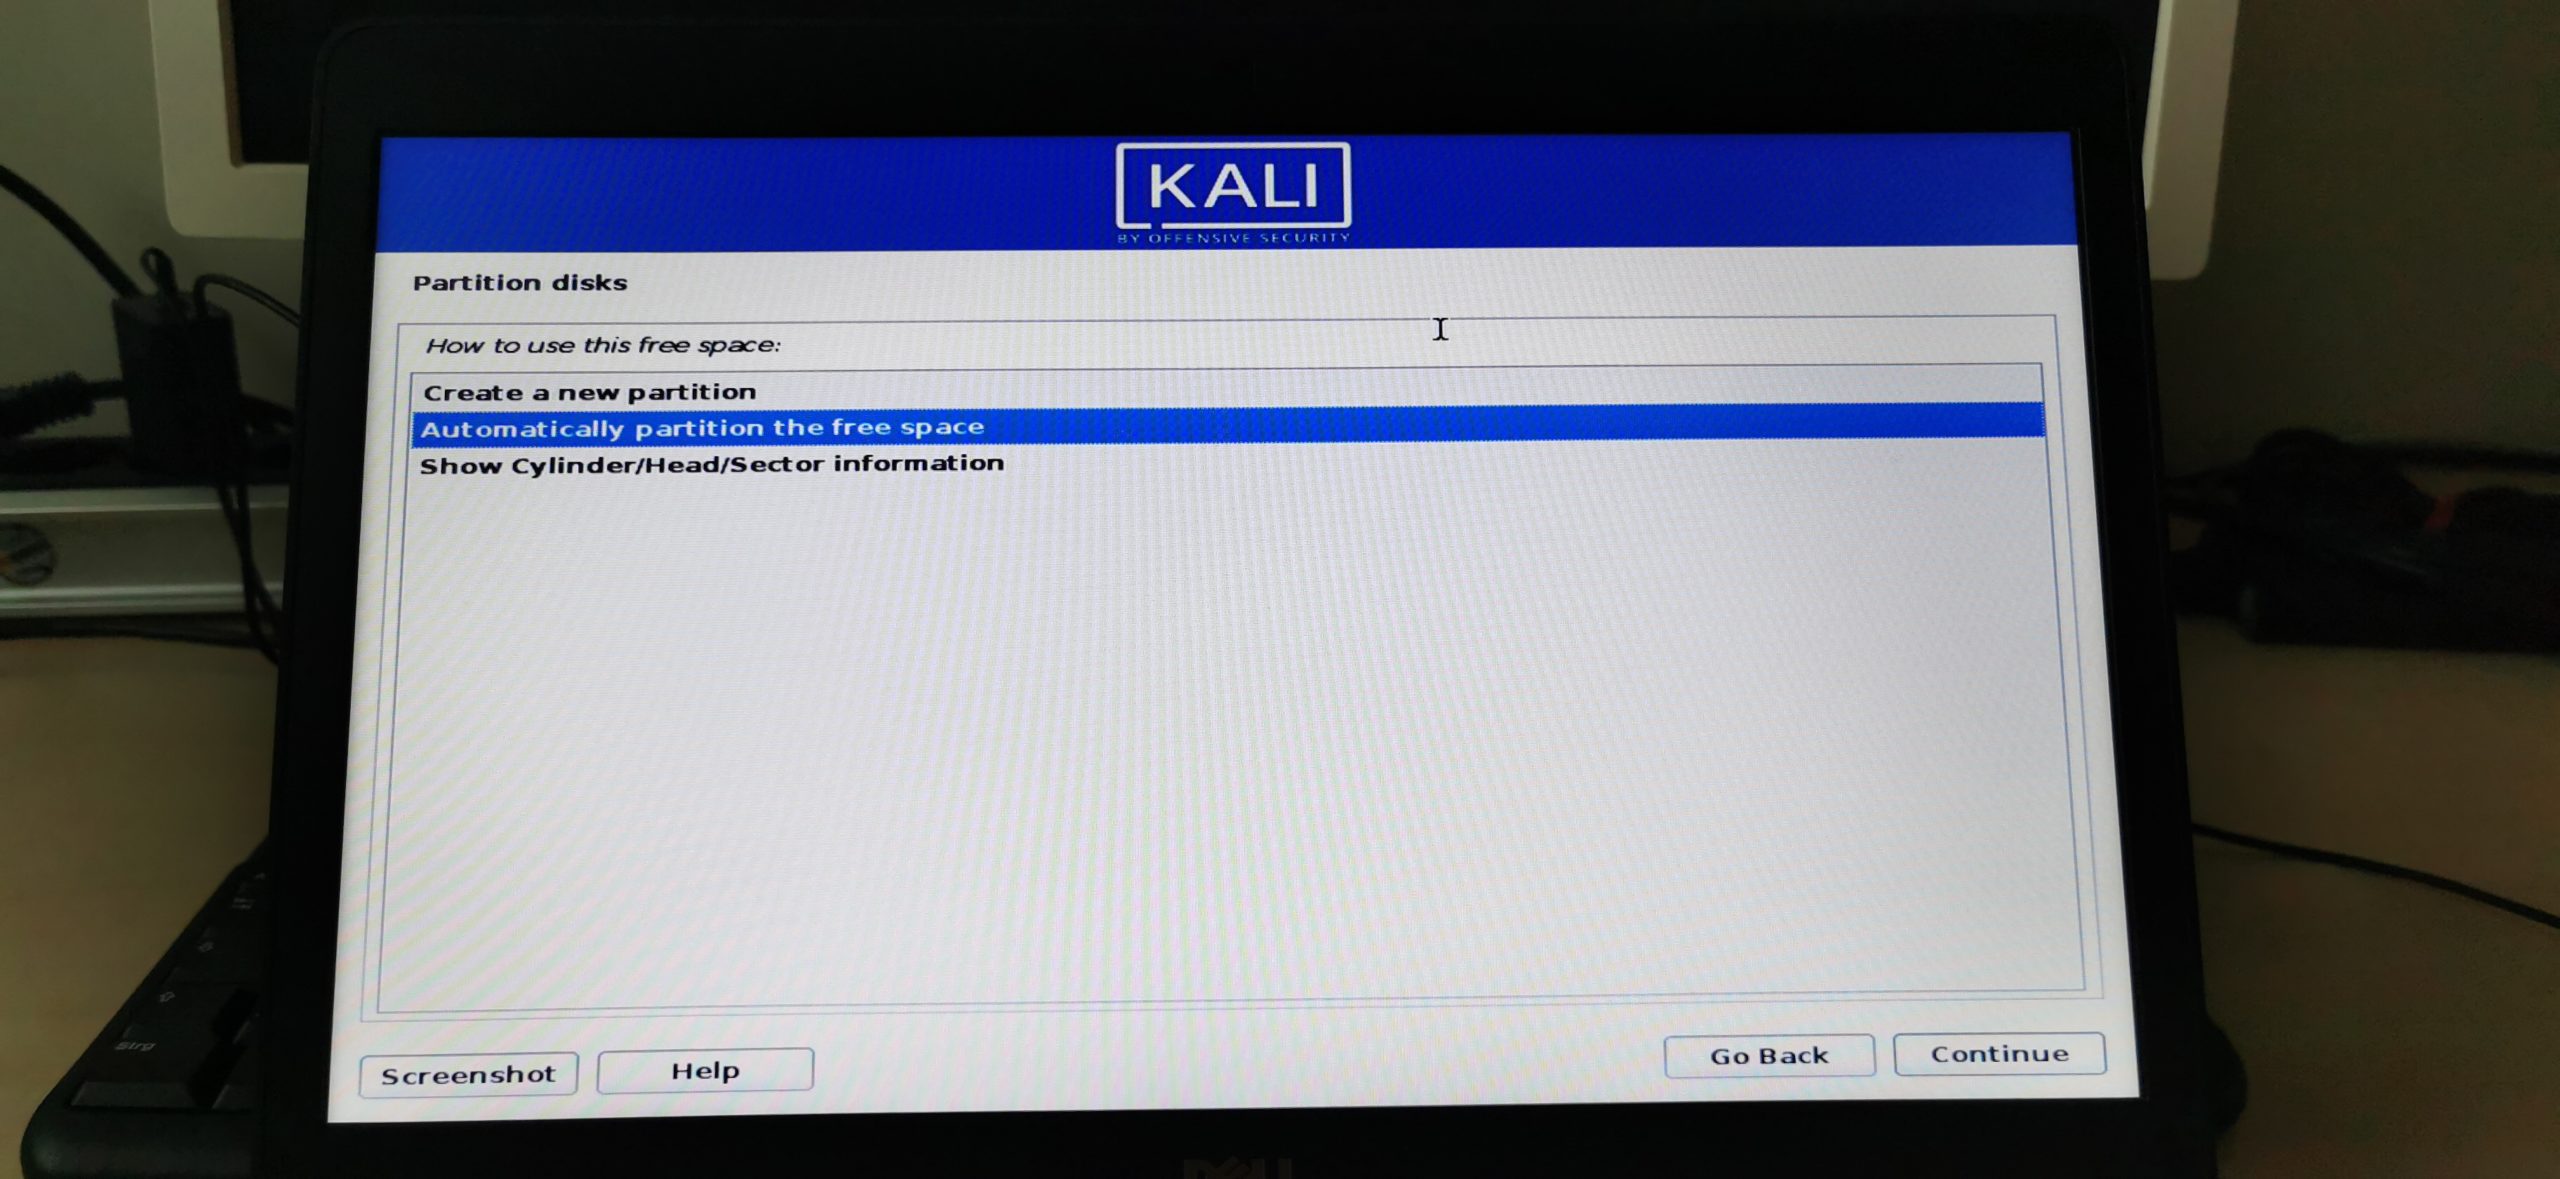
MAIN Step 2 – How to use this free space
Select Automatically partition the free space here.
MAIN Step 3 – Partitioning Scheme
Select All files in one partition (recommended for new users) here. Click Continue.
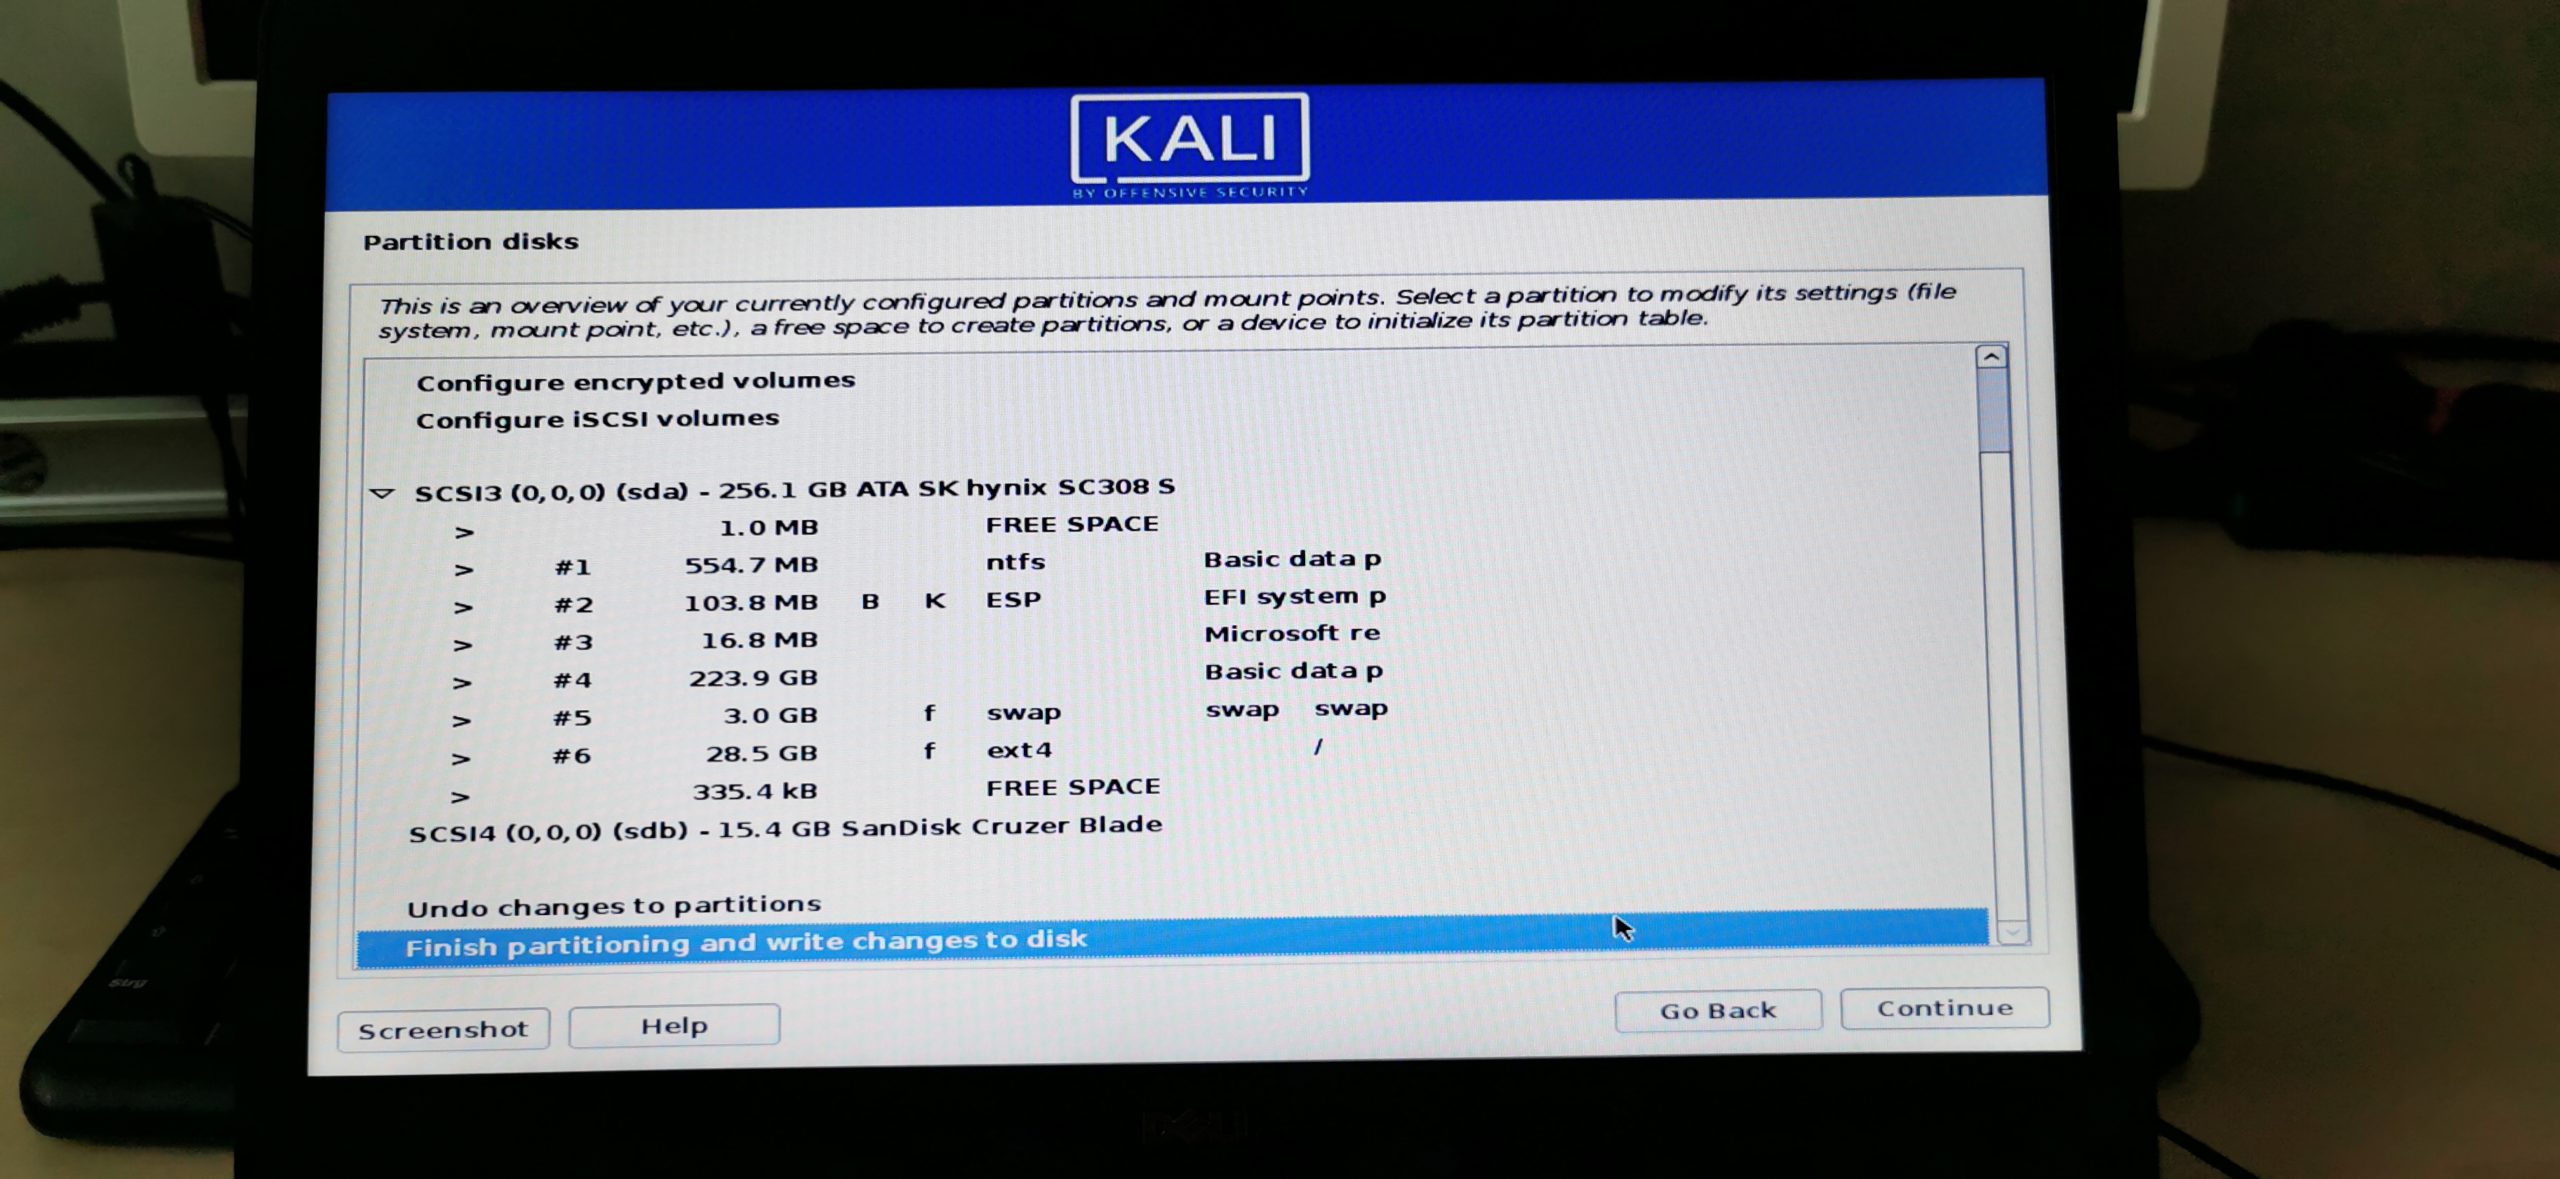
MAIN Step 4 – Finishing
Select Finish partitioning and write changes to disk and click Continue.
Finally, select Yes to the question if you are sure that you want to write changes to the disk.
You made it! You definitely have passed the hardest part of this tutorial. What a ride so far, huh?
5.8 – Configure the package manager
Click on Continue or enter a Proxy server address if you use one. Now Kali will start downloading some updates and additional drivers and tools.
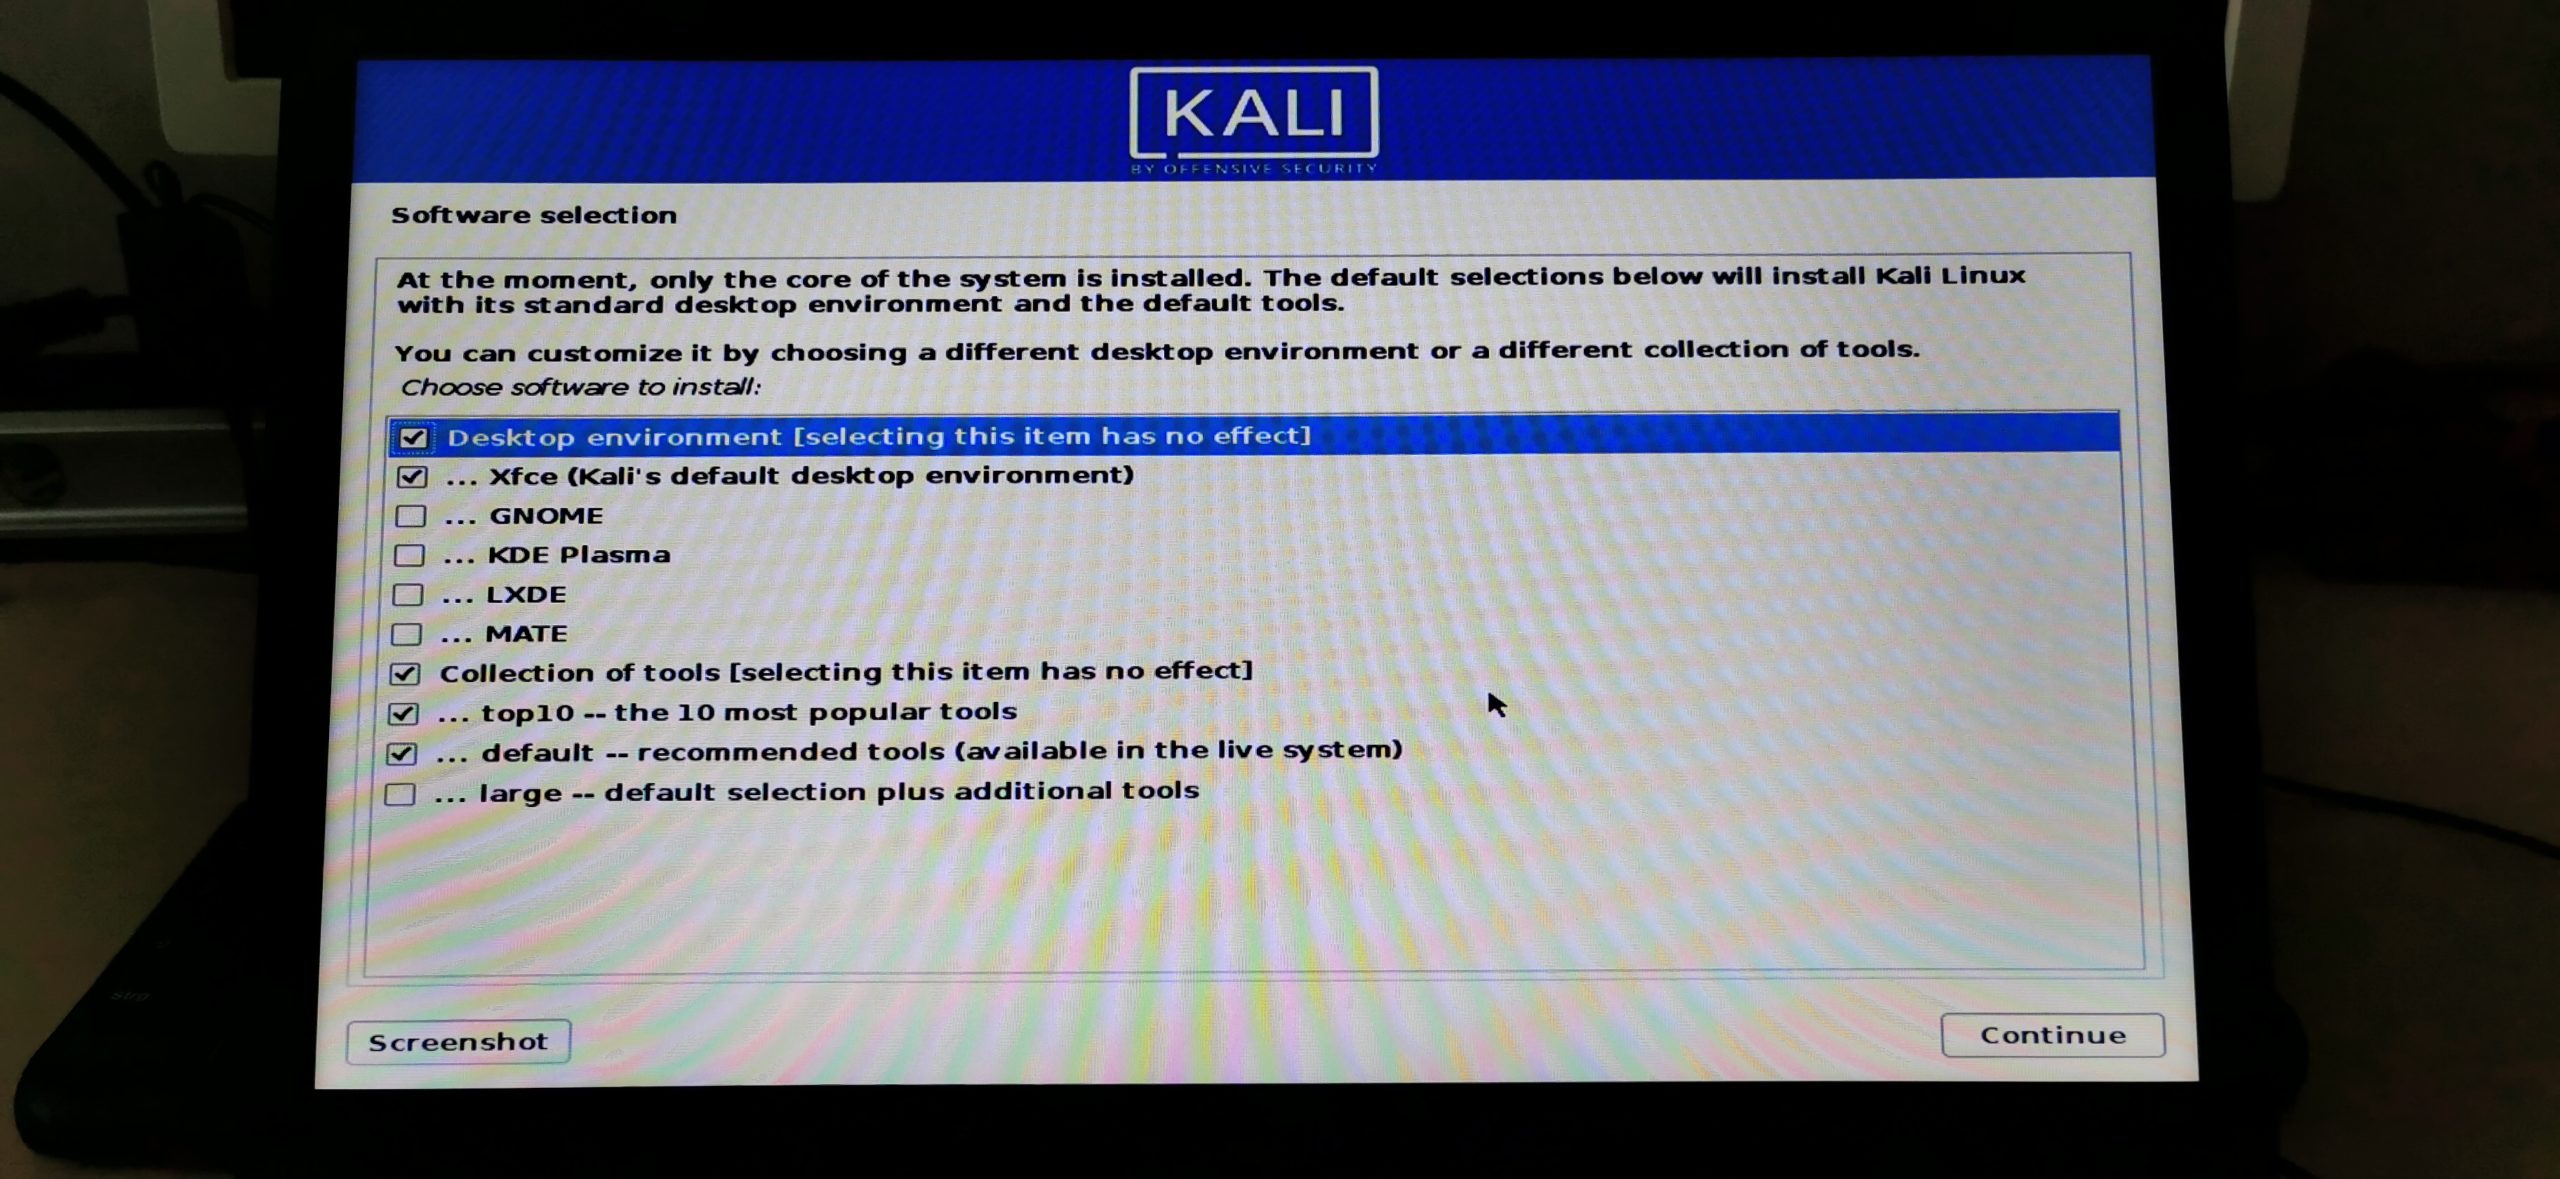
5.9 – Software selection
Now you get the chance to modify how Kali will look like (Desktop Environment) and also what kind of tools you want to install per default. You can do all of this later and it is perfectly fine to leave everything on the default values, which sets you up with the default Kali installation. This is perfectly fine for most cases, especially if you don’t know what that means, just leave it as is and hit Continue.
This process might take a while depending on your internet connection speed. Sit back and relax.
6 – Finish the installation
Finally, you can click on Continue to reboot. Remove the USB Drive from your system now!
You made it! You have successfully installed Kali Linux in Dual Boot with Windows. Only a few steps to go.
Step 6 – Booting up Kali Linux
Once your system reboots, you’ll end up in the GRUB Boot Loader. If you don’t press any button within the first 5 seconds, Kali, or whatever you set as a default system (you can change that to Windows, so Windows will automatically boot instead of Kali on each reboot). Just Google: Change GRUB Boot Order to achieve this. But be careful, messing around with GRUB can still mess up your system!
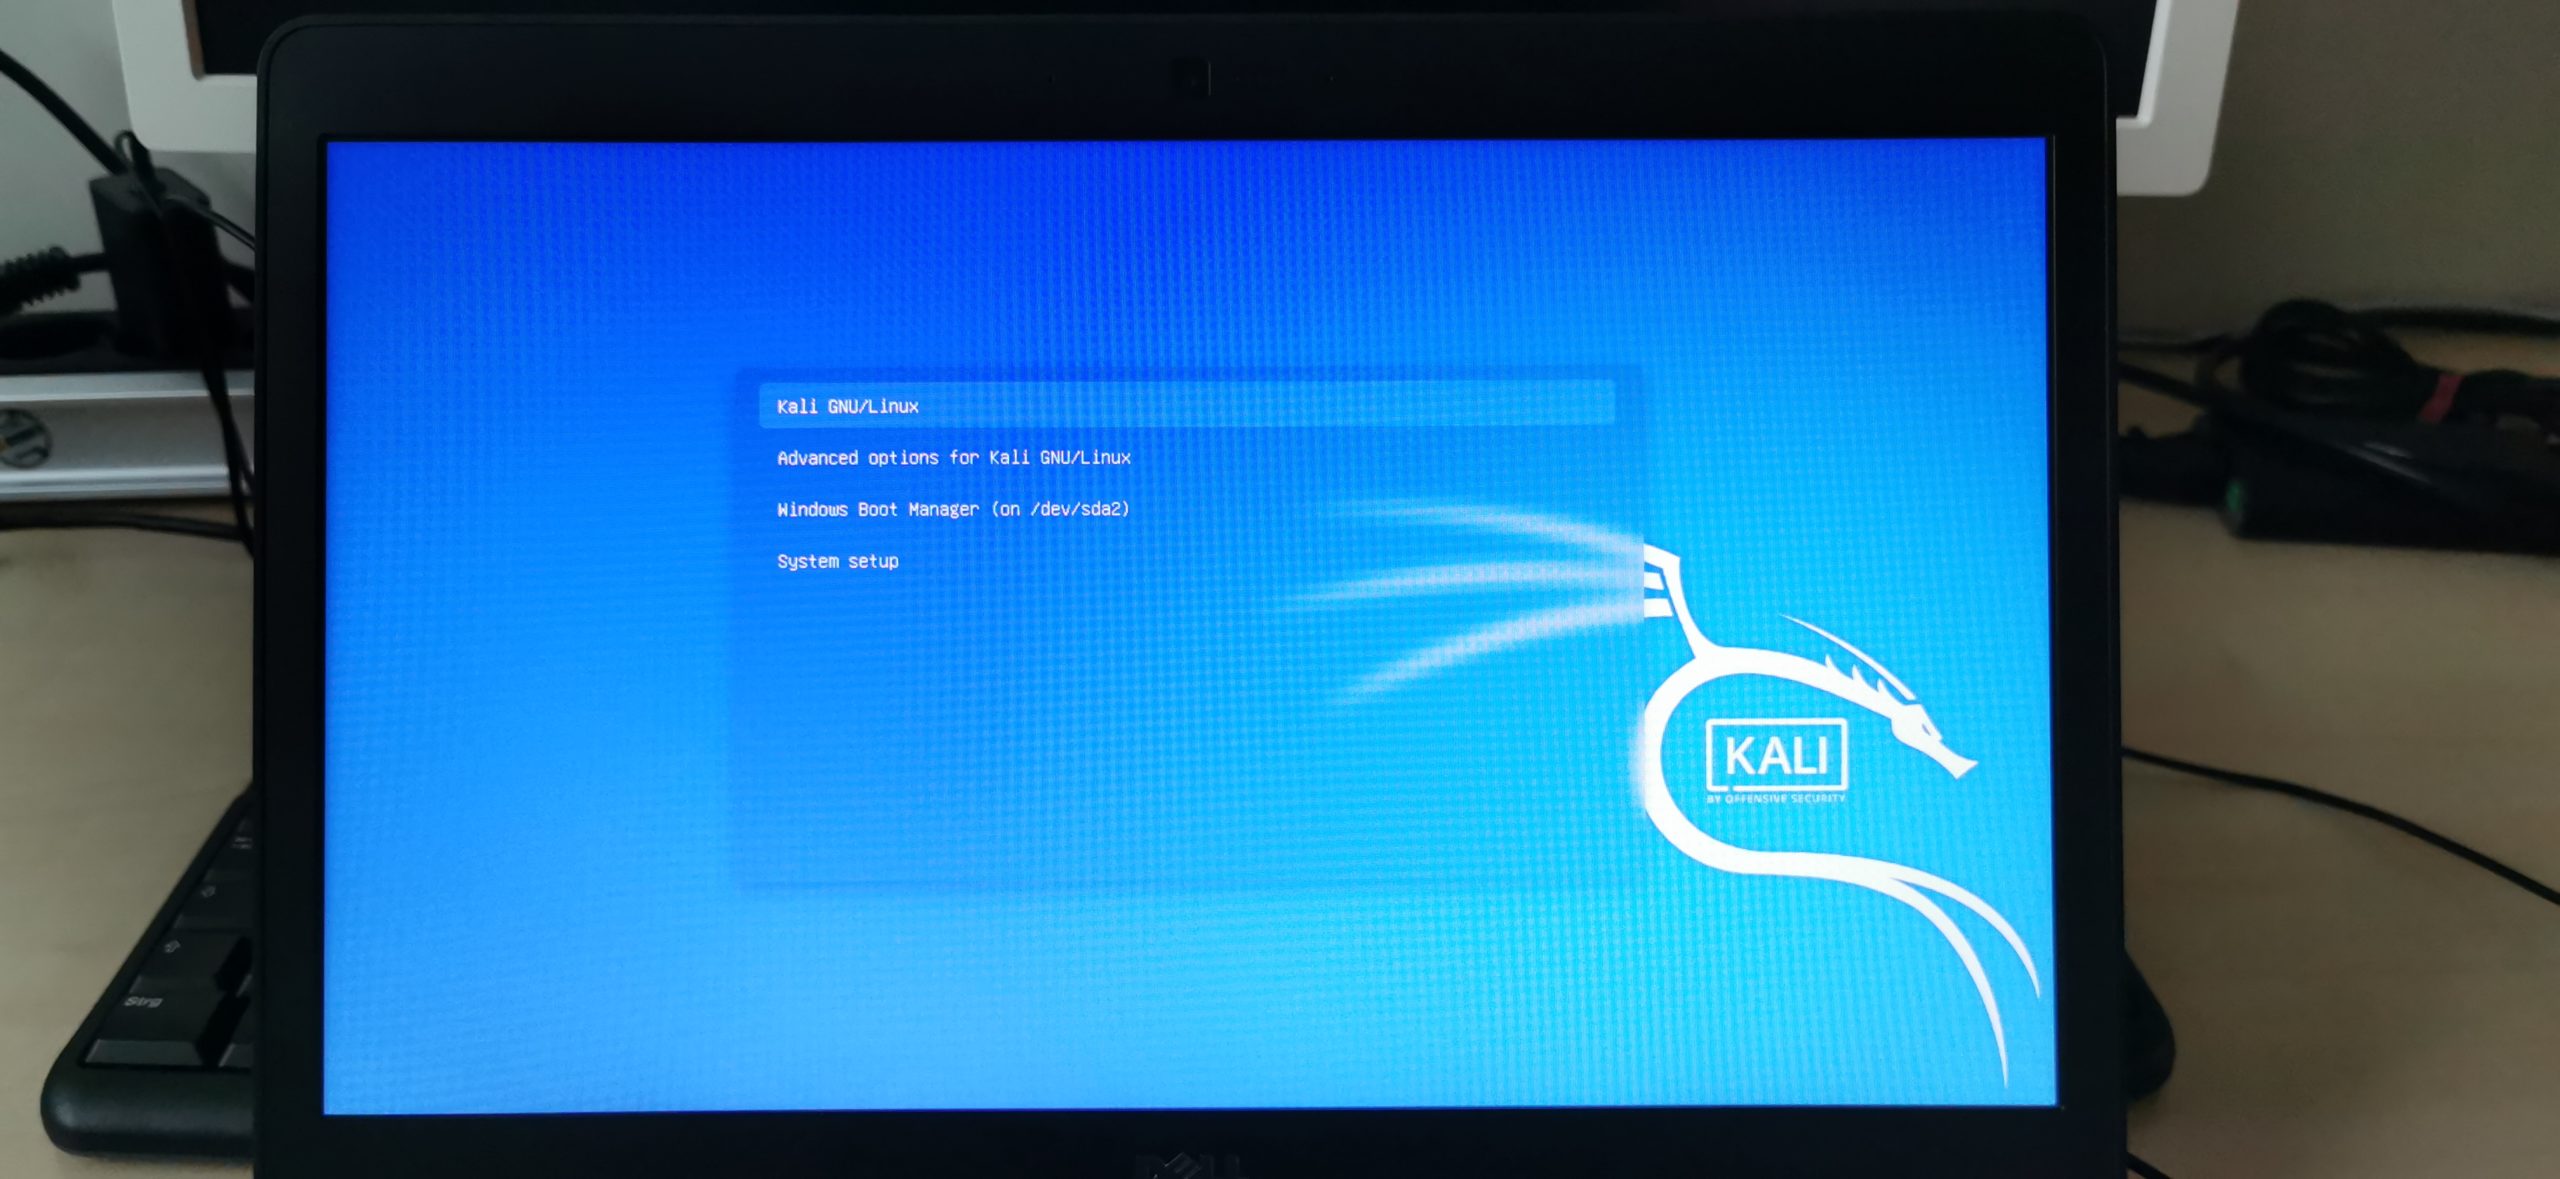
Let’s see if Kali boots up.
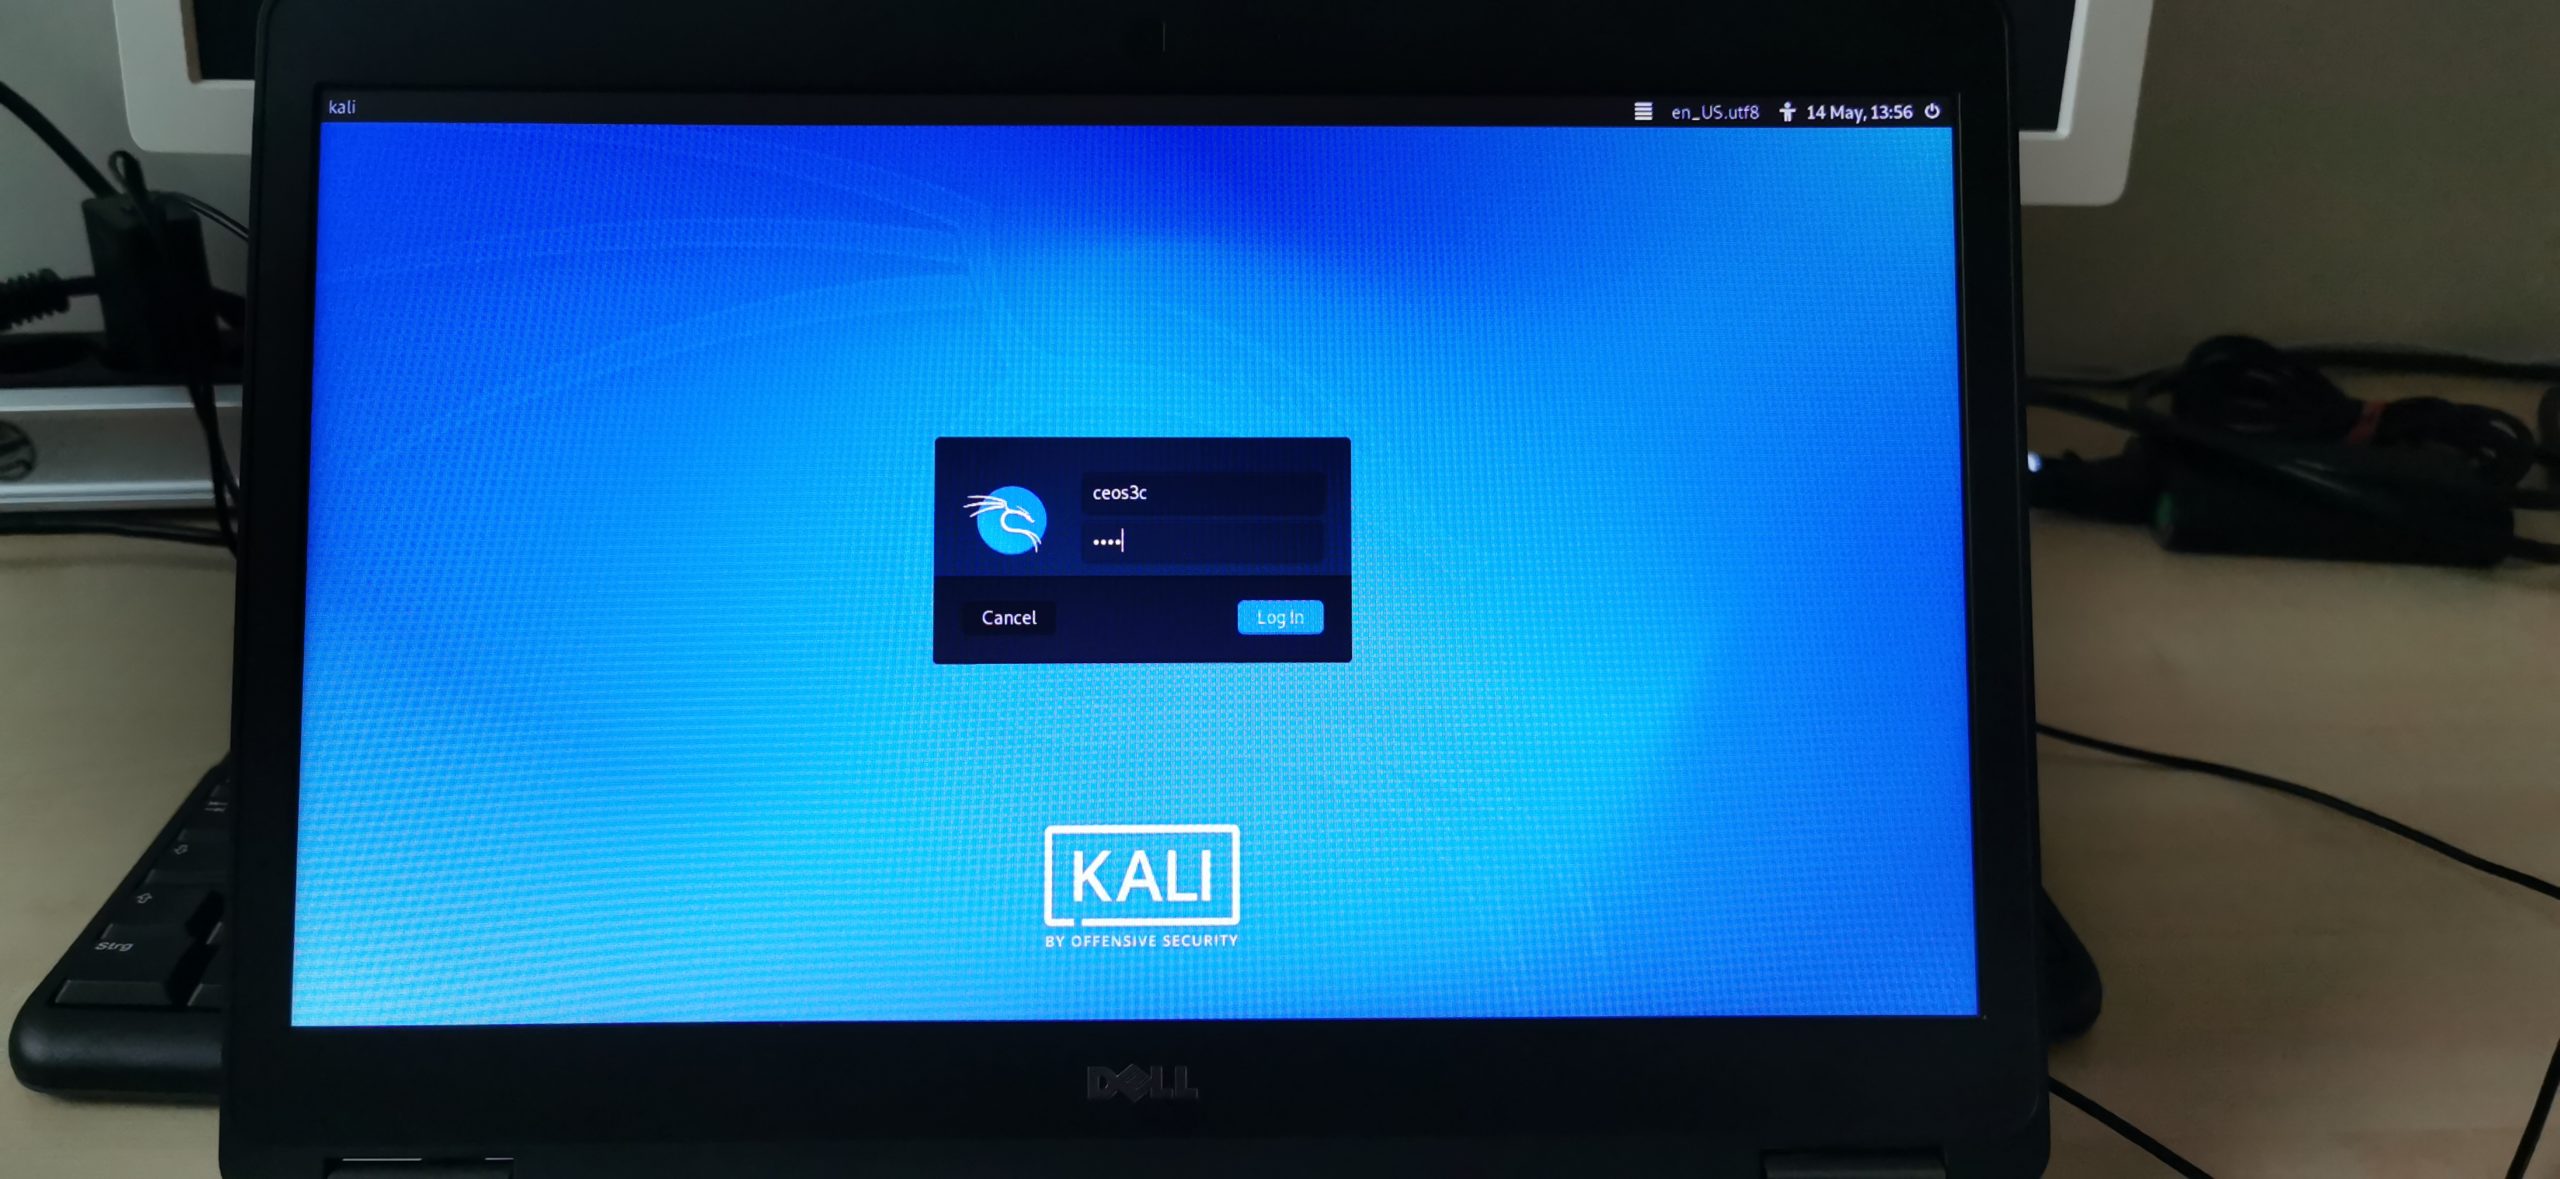
It does! Log in with the username and password you had set during the installation. There is only one thing I will show you to get started, for everything else read on in the Top Things to do after installing Kali Linux article that I constantly update. Including more steps here would just make this unnecessary long.
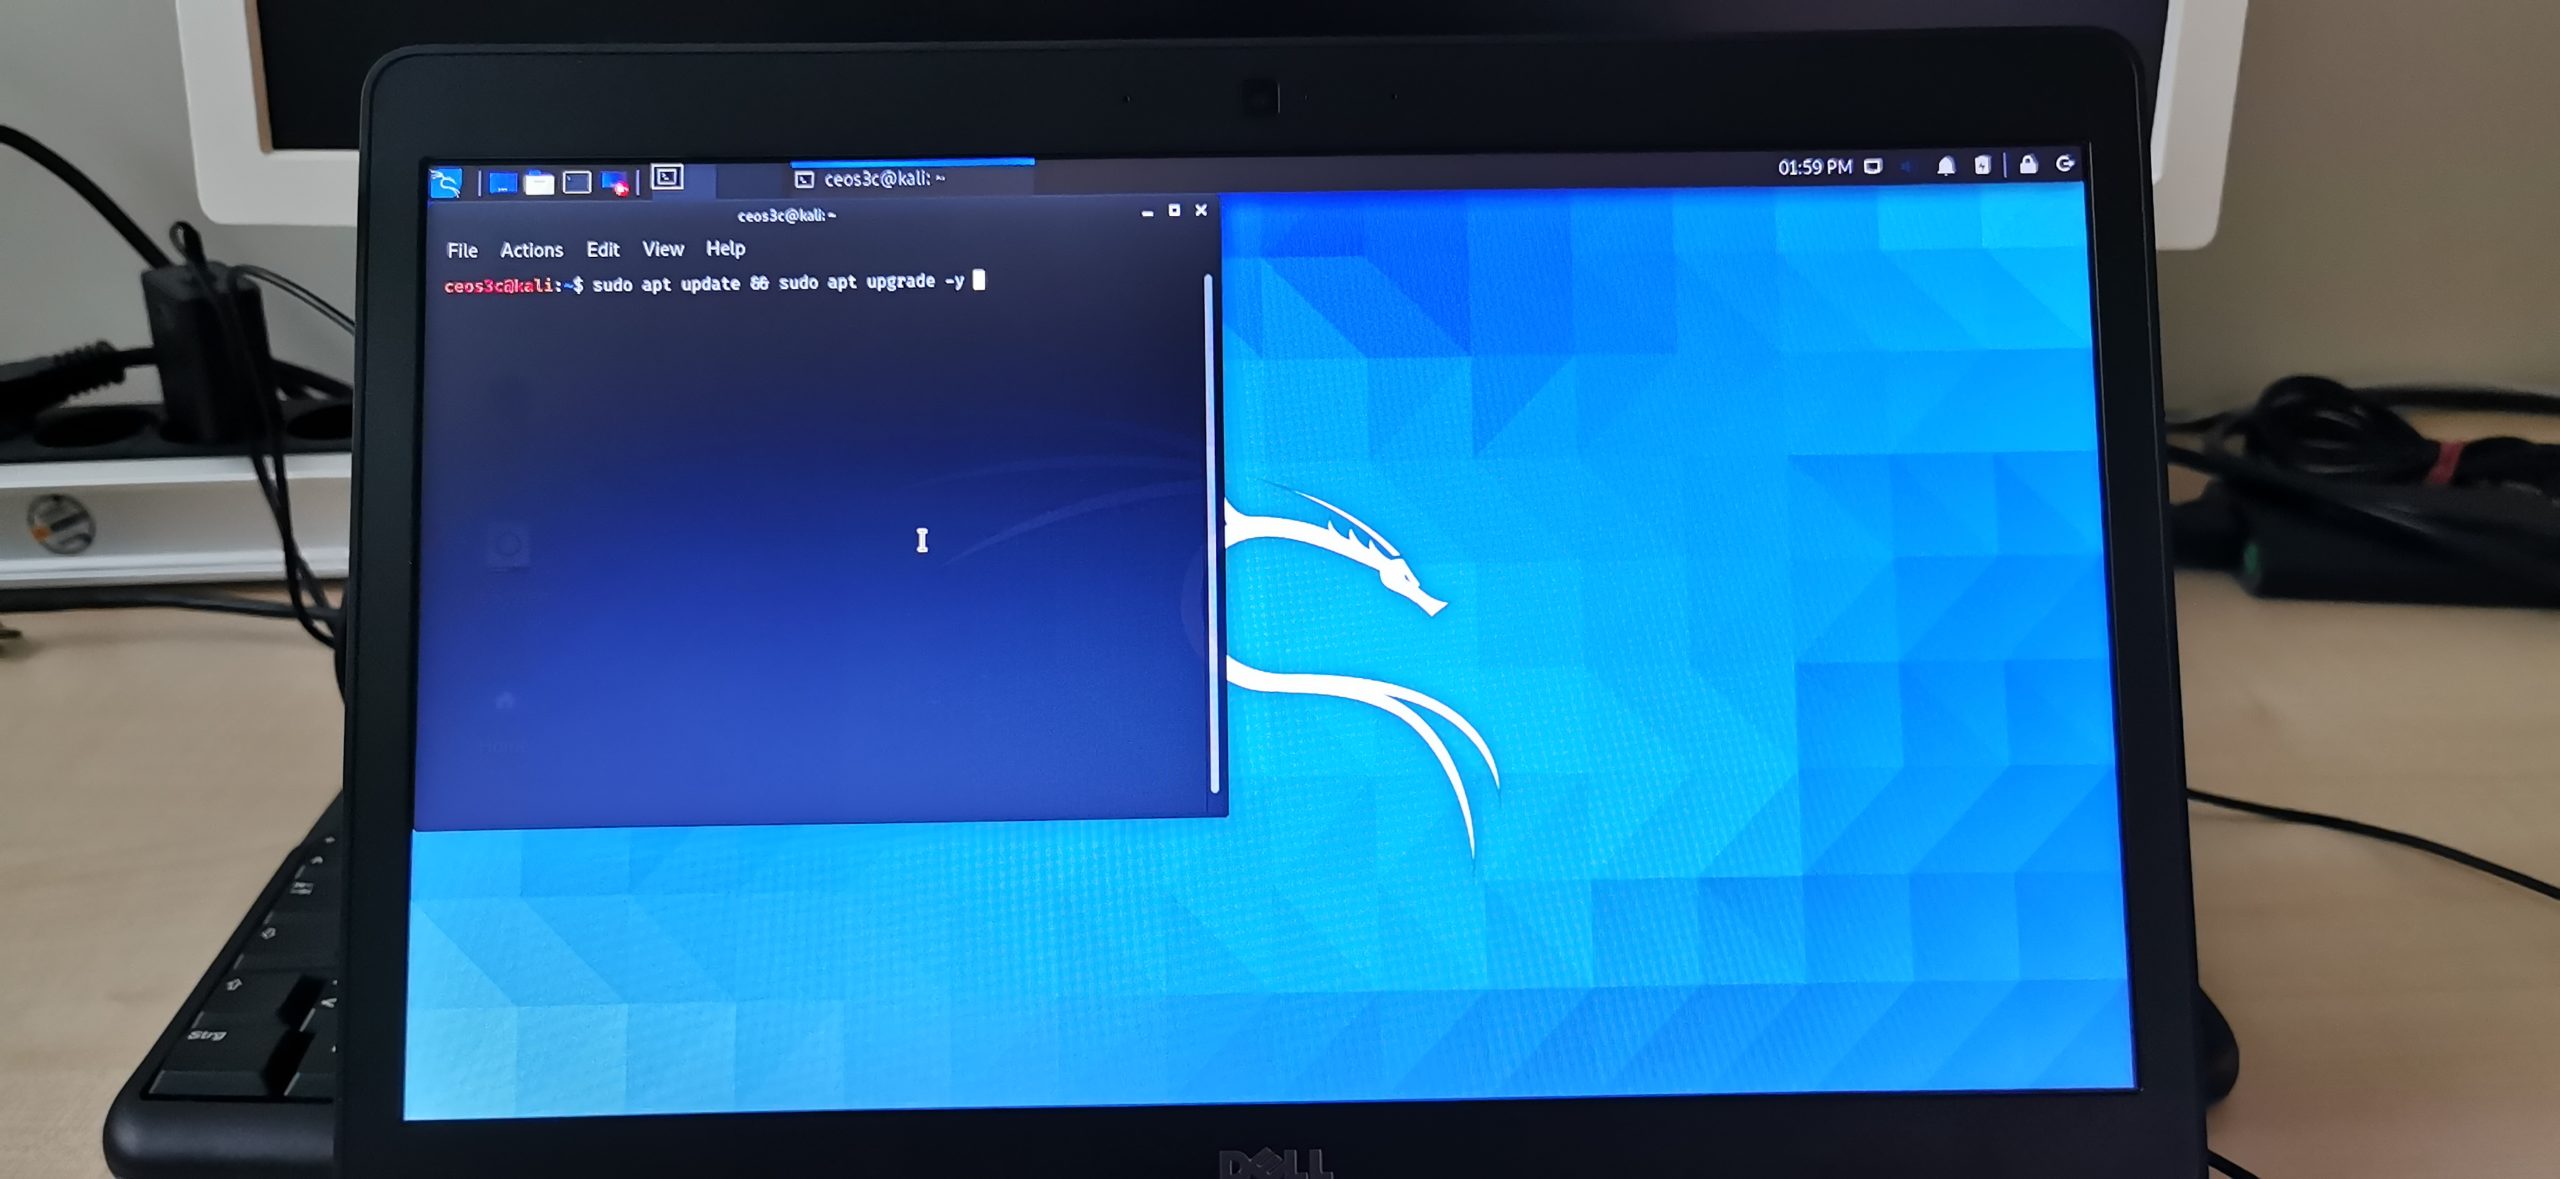
Step 7 – Updating Kali Linux
The first thing I always do on a fresh Kali install is to make sure it’s up to date, your system should have already been updated and upgraded during the installation, we’ll make sure anyway. Open a terminal window and run:
sudo apt update && sudo apt upgrade -yThis ensures your system is up to date. As mentioned before, continue here if you want to set up further tools and secure your system.
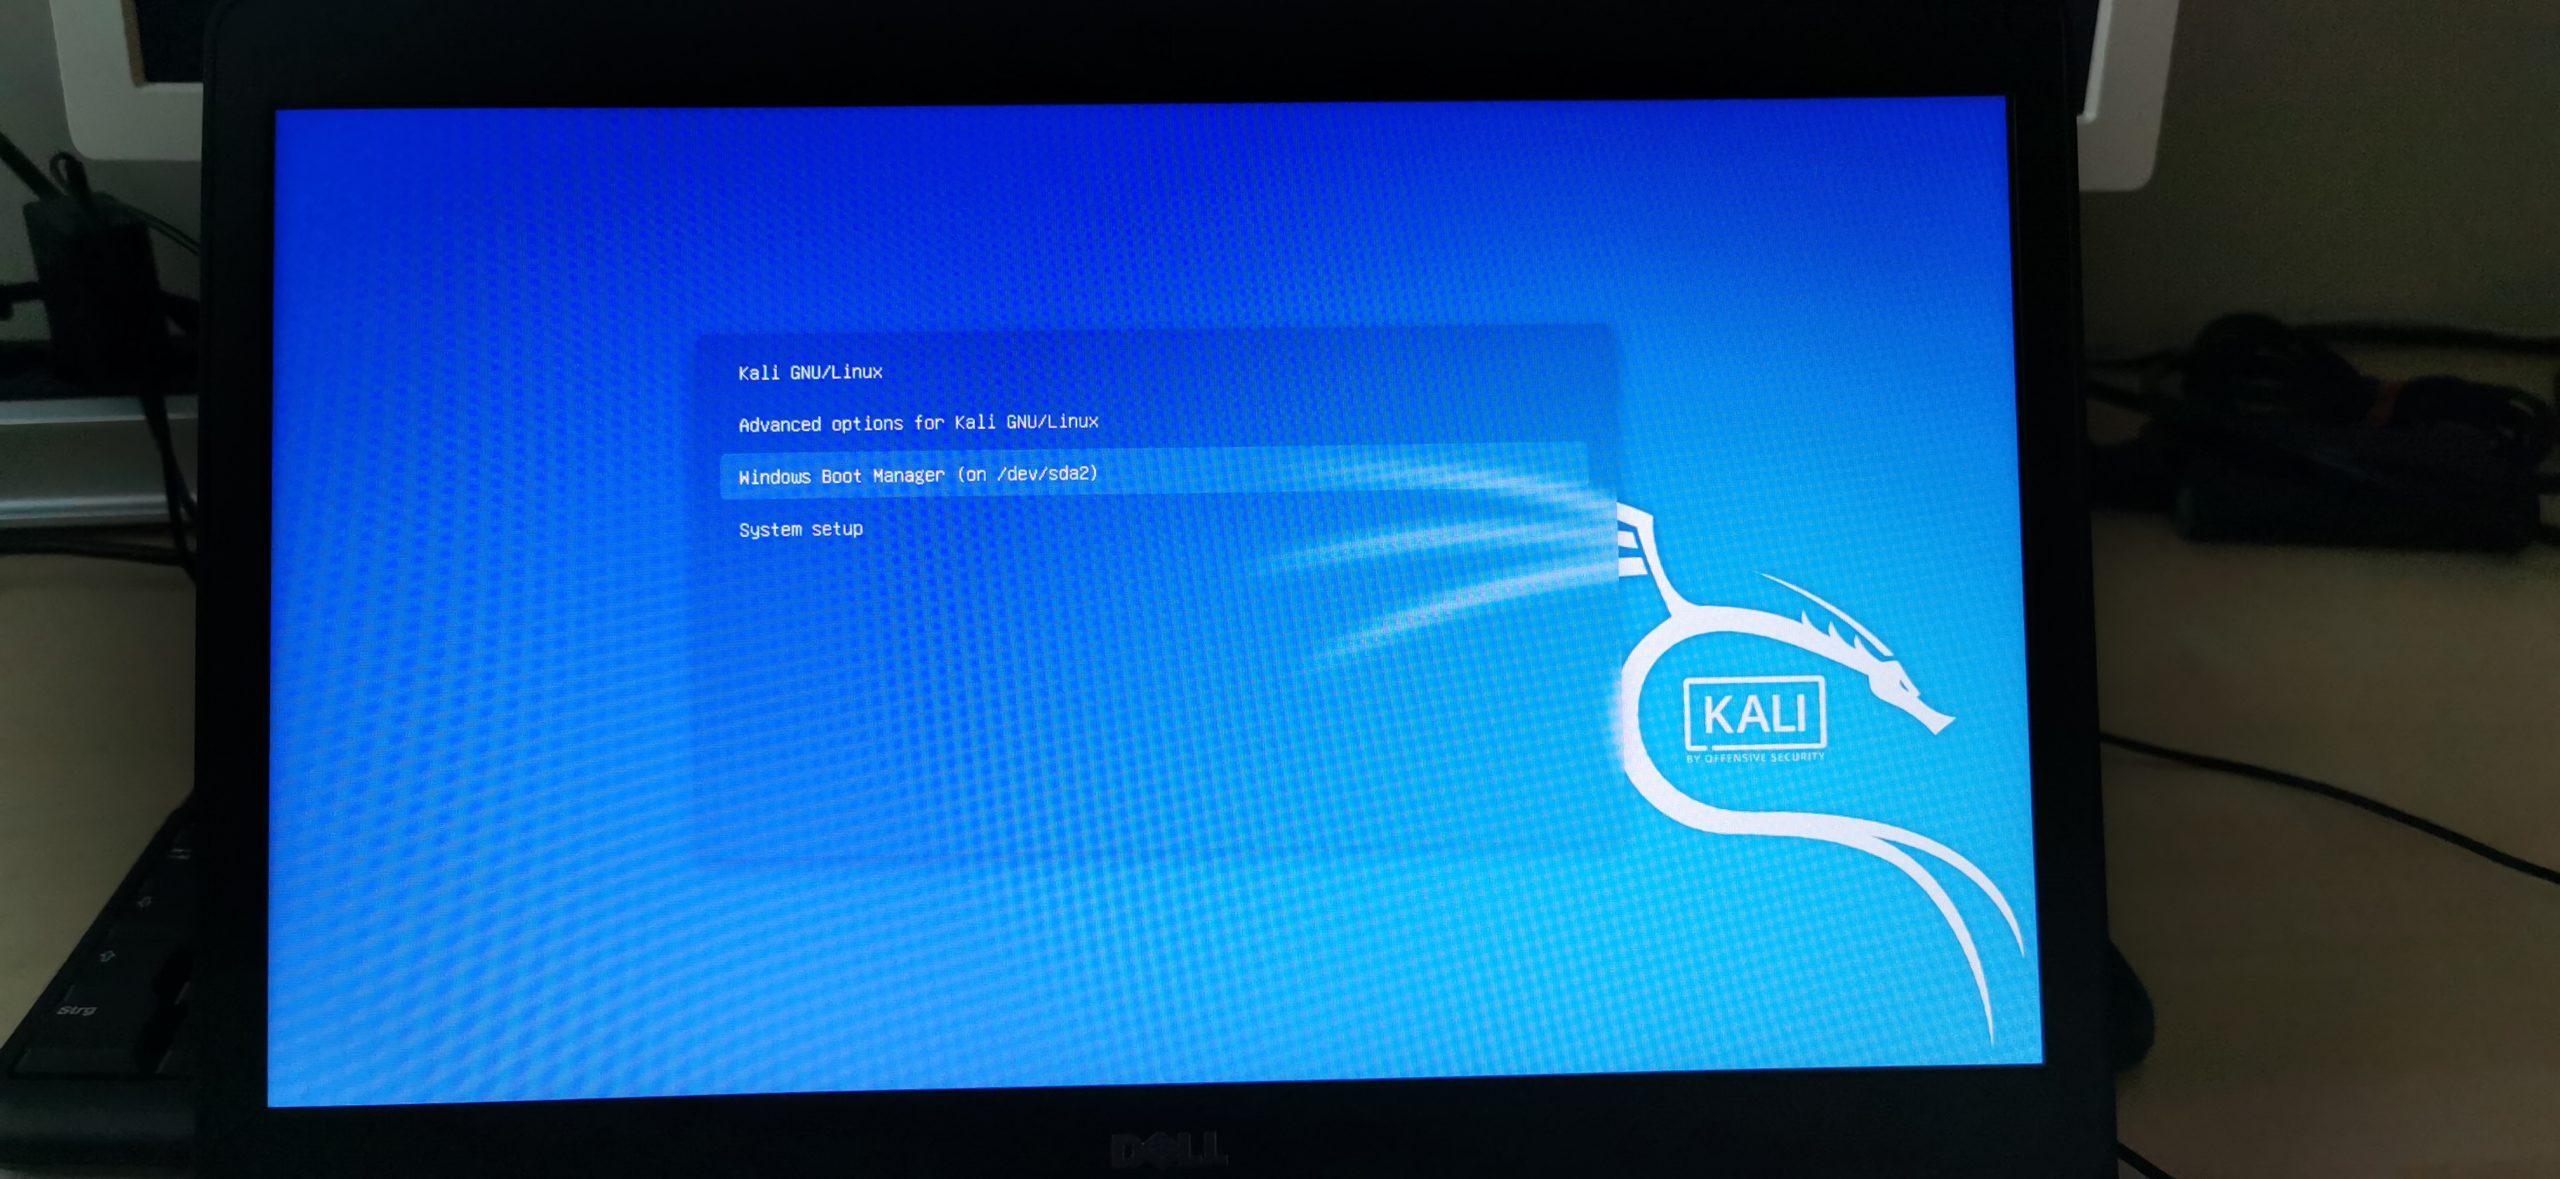
Step 8 – Booting into Windows
Either enter “sudo reboot now” in your terminal or click on the Kali Menu button and choose Logout in the lower right corner on the arrow symbol and choose Restart. Now to boot into Windows, make sure to be quick because otherwise Kali boots up again within 5 seconds of no interaction in the GRUB boot loader.
Select the Windows Boot Manager.
Now if you did everything correctly, you should be back in your Windows installation and you learned how to install Kali Linux in Dual Boot with Windows.
Troubleshooting
Further troubleshooting steps will be added as we go.
- My USB Drive is unusable
- It is possible that imaging your USB Drive with Kali will mess up its partitioning, rendering it unusable on Windows. You can easily fix this by following this guide I have written.
Where to go from here
This is how you install Kali Linux in Dual Boot with Windows. Congratulations! You have set yourself up with a pretty neat system!
I know, it’s a long process and when I first tried that myself I was scared too because there was no thorough guide out there on how to do it, I decided to create this one.
Below, I’ll leave a few additional resources in case you want to learn something new.
👀 This Tutorial has some related Articles!
👉 How to get started in Cyber Security – The Complete Guide
👉 How to get started with Bug Bounties
👉 Terminal Customization Series
👉 Best Ethical Hacking Books
👉 Download Kali Linux Safe & Easy
👉 Best Ethical Hacking Tools
👉 Install VSCode on Kali Linux
👉 Dual Boot Kali Linux with Windows
👉 Install Kali Linux on VirtualBox – Complete Beginner Guide
👉 Top Things to do after installing Kali Linux
👉 WiFi Adapter for Kali Linux – The Ultimate Guide
👉 Nmap Beginner Guide Series
👉 Metasploit Tutorial Series
👉 Burp Suite Beginner Guide
Stefan
Stefan is the founder & creative head behind Ceos3c.
Stefan is a self-taught Software Engineer & Cyber Security professional and he helps other people to learn complicated topics.