Содержание
- Подготовка к установке Kali Linux на VirtualBox
- Установка Kali Linux на VirtualBox
- Создание виртуальной машины
- Настройка виртуальной машины
- Установка Kali Linux
- Вопросы и ответы

Kali Linux — дистрибутив, который распространяется на свободной основе в виде обычного ISO-образа и образа для виртуальных машин. Пользователи системы виртуализации VirtualBox могут не только использовать Kali в качестве LiveCD/USB, но и установить ее как гостевую операционную систему.
Если у вас еще не установлен VirtualBox (далее VB), то вы можете сделать это, используя наше руководство.
Подробнее: Как установить VirtualBox
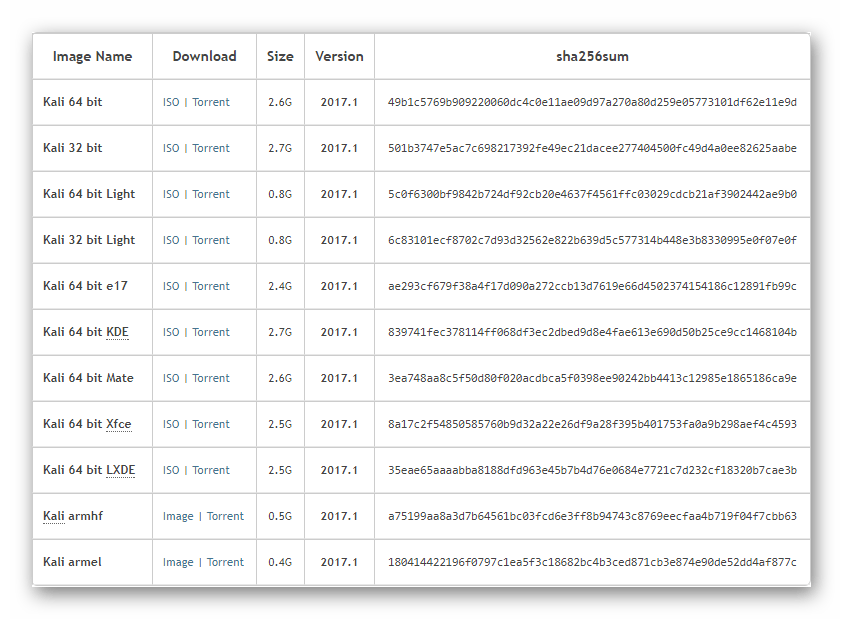
Дистрибутив Kali можно скачать с официального сайта. Разработчики выпустили несколько версий, включая классическую облегченную, сборки с разными графическими оболочками, разрядностями и др.
Когда все необходимое будет скачано, можно приступать к инсталляции Kali.
Установка Kali Linux на VirtualBox
Каждая операционная система в ВиртуалБоксе представляет собой отдельную виртуальную машину. Она имеет свои уникальные настройки и параметры, предназначенные для стабильной и корректной работы дистрибутива.
Создание виртуальной машины
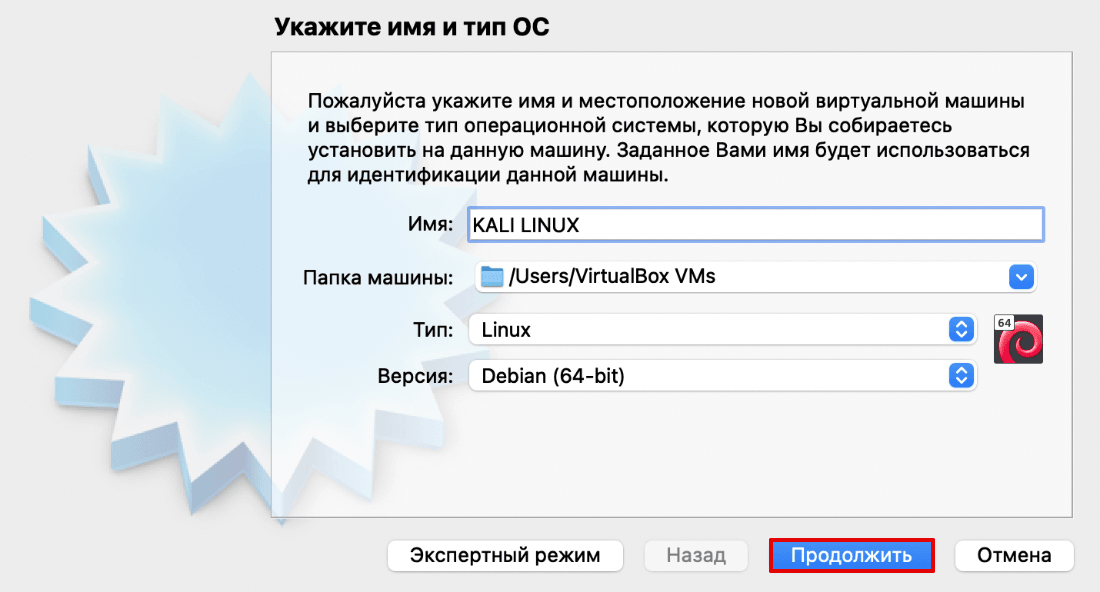
- В VM Менеджере нажмите на кнопку «Создать».

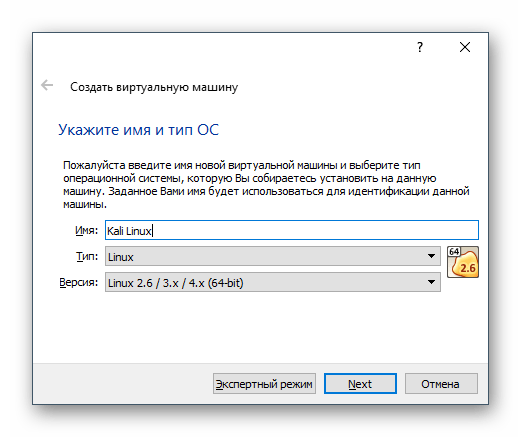
- В поле «Имя» начните вписывать «Kali Linux». Программа распознает дистрибутив, и поля «Тип», «Версия» заполнит самостоятельно.

Обратите внимание, если вы скачали ОС 32-битной разрядности, то поле «Версия» придется поменять, так как сам VirtualBox выставляет 64-битную версию.
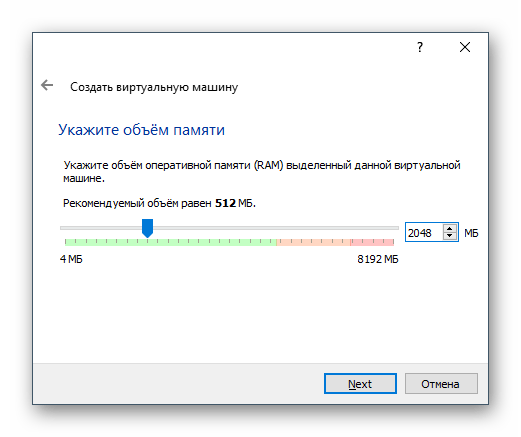
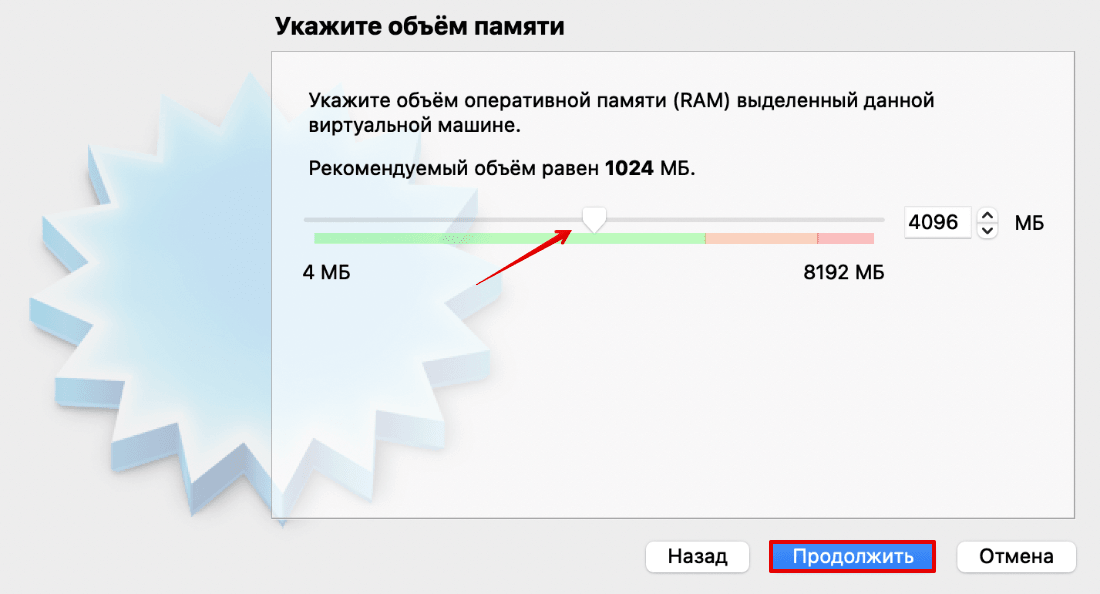
- Укажите объем оперативной памяти, который вы готовы выделить для работы Kali.
Несмотря на рекомендацию программы использовать 512 МБ, этого объема будет очень мало, и в результате могут возникнуть проблемы с быстродействием и запуском софта. Мы советуем выделить 2-4 ГБ для обеспечения стабильной работы ОС.
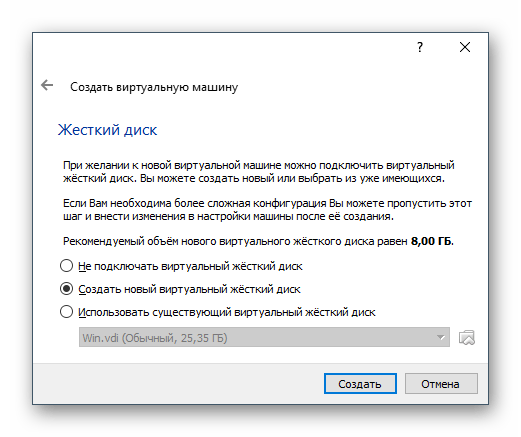
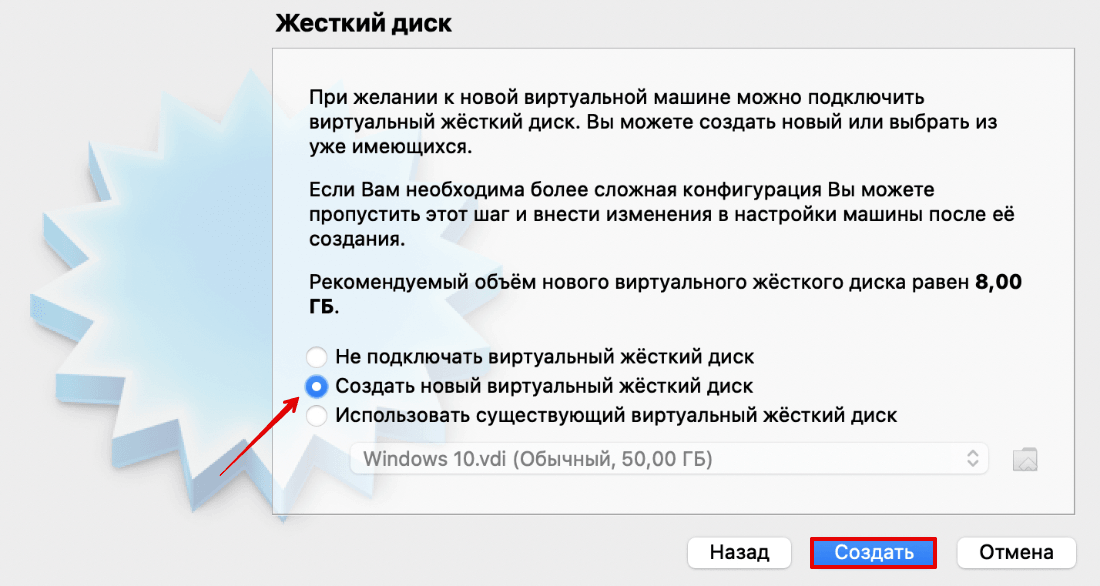
- В окне выбора виртуального жесткого диска оставьте настройку без изменений и нажмите на «Создать».
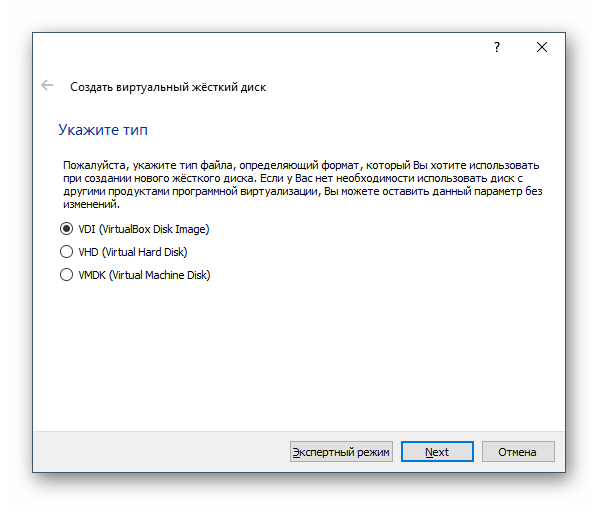
- VB попросит указать тип виртуального накопителя, который будет создан для работы Kali. Если в дальнейшем диск не будет использоваться в других программах виртуализации, например, в VMware, то эту настройку менять также не нужно.

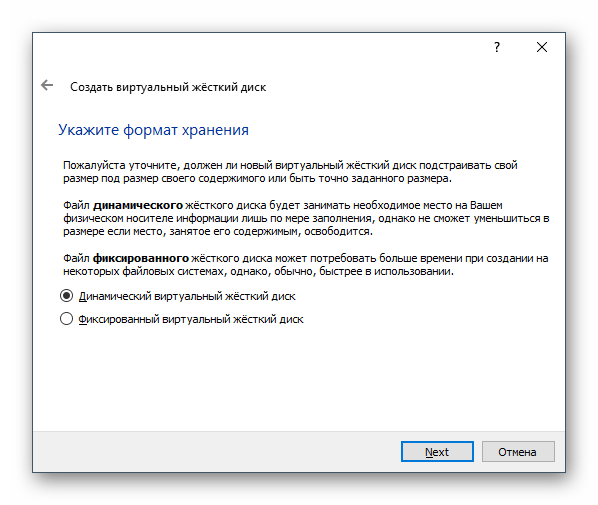
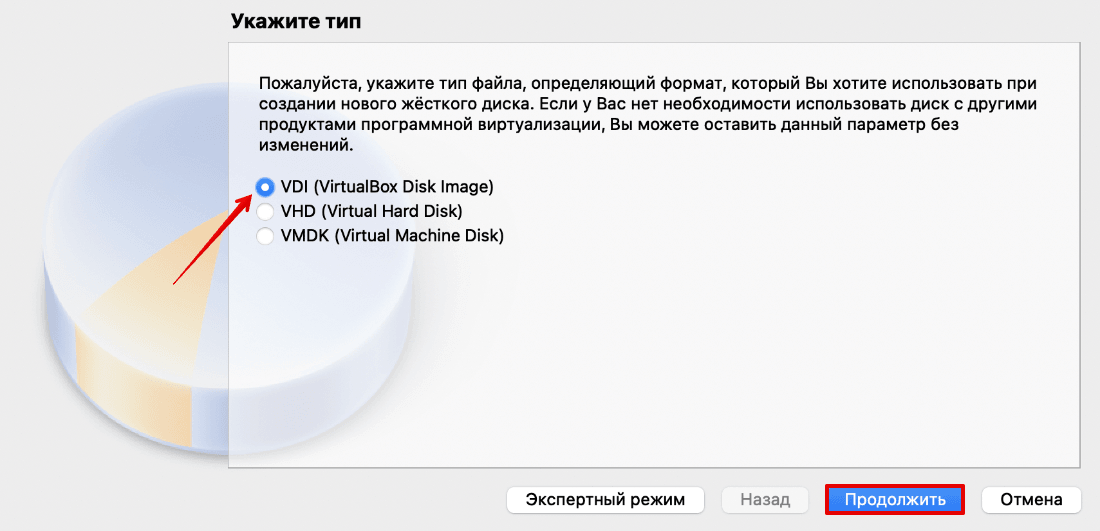
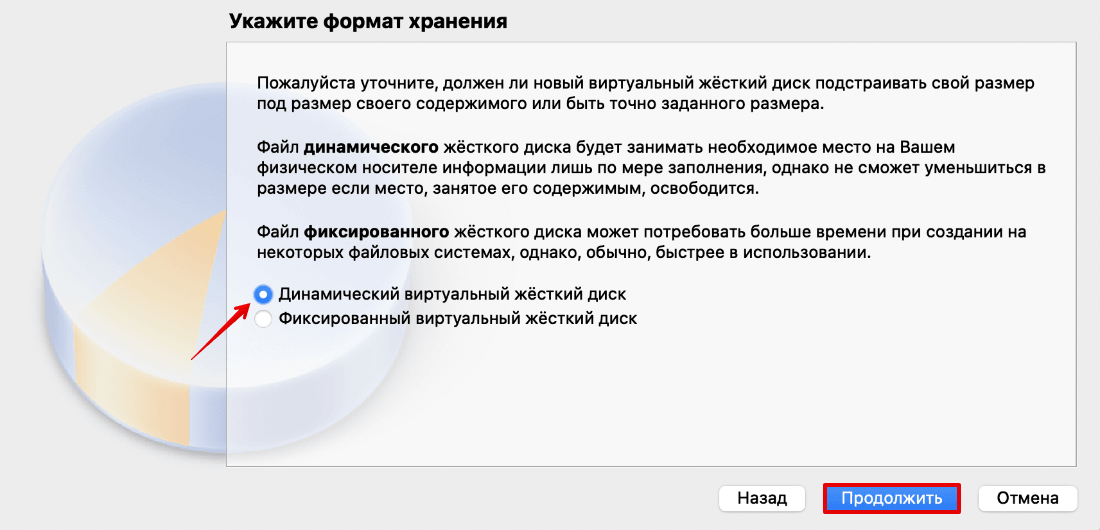
- Выберите формат хранения, который вам более предпочтителен. Обычно пользователи выбирают динамический диск, чтобы не забирать лишнее место, которое в дальнейшем может быть и не использовано.
Если вы выберете динамический формат, то до выбранного размера виртуальный накопитель будет увеличиваться постепенно, по мере своего заполнения. Фиксированный же формат сразу зарезервирует указанное количество гигабайт на физическом HDD.
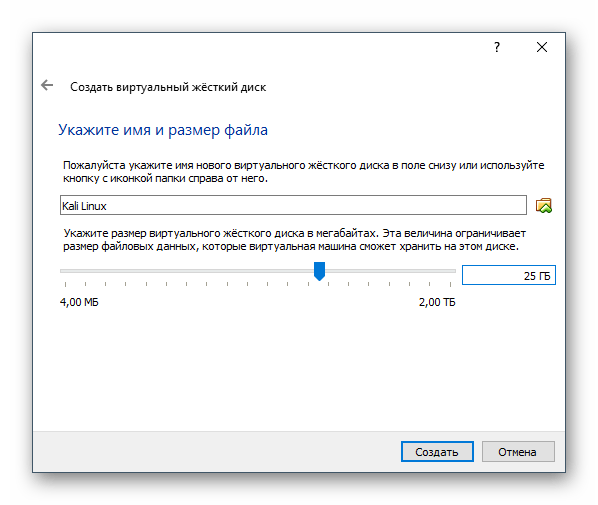
Вне зависимости от выбранного формата, на следующем этапе необходимо будет указать объем, который в итоге будет выступать ограничителем.
- Впишите имя виртуального жесткого диска, а также укажите его максимальный размер.
Рекомендуем выделить минимум 20 ГБ, иначе в дальнейшем может возникнуть нехватка места под установку программ и обновлений системы.
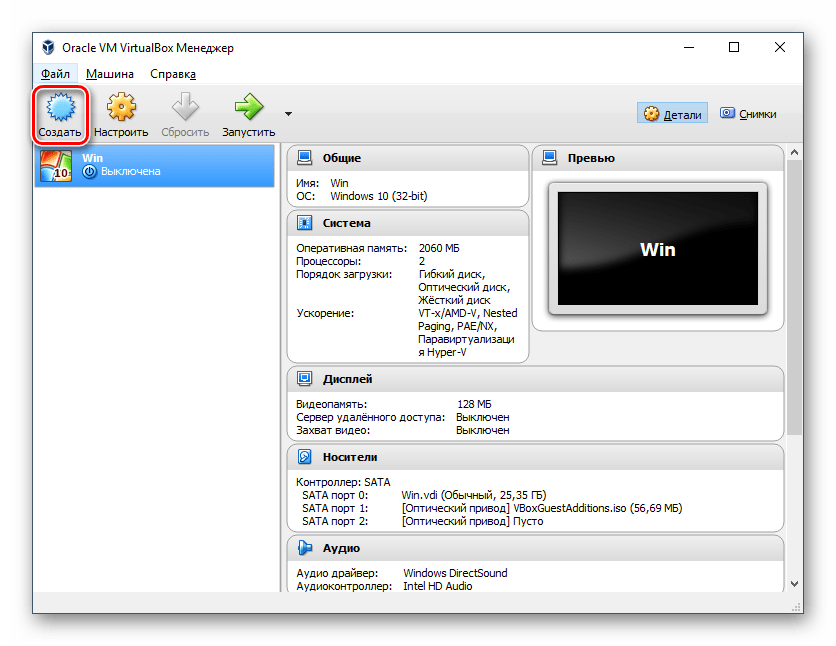
На этом этапе создание виртуальной машины заканчивается. Теперь на нее можно установить саму операционную систему. Но лучше всего сделать еще несколько настроек, иначе производительность VM может оказаться неудовлетворительной.
Настройка виртуальной машины
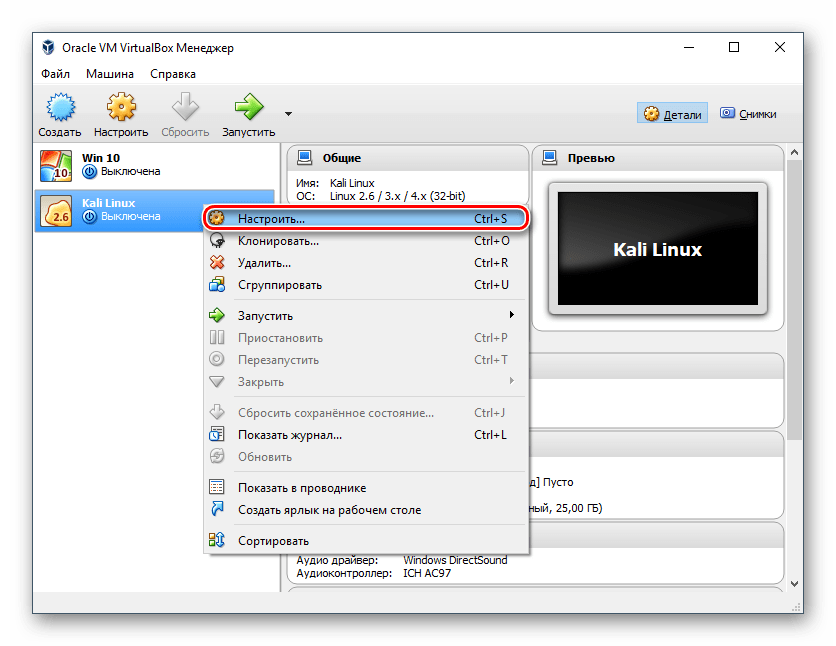
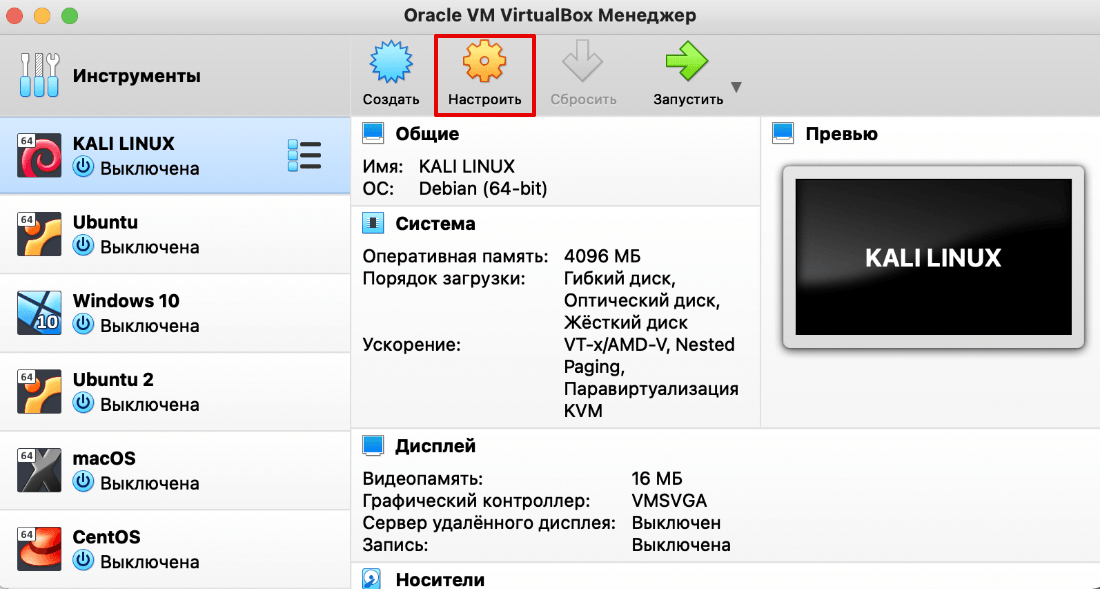
- В левой части VM Менеджера найдите созданную машину, щелкните по ней правой кнопкой мыши и выберите пункт «Настроить».
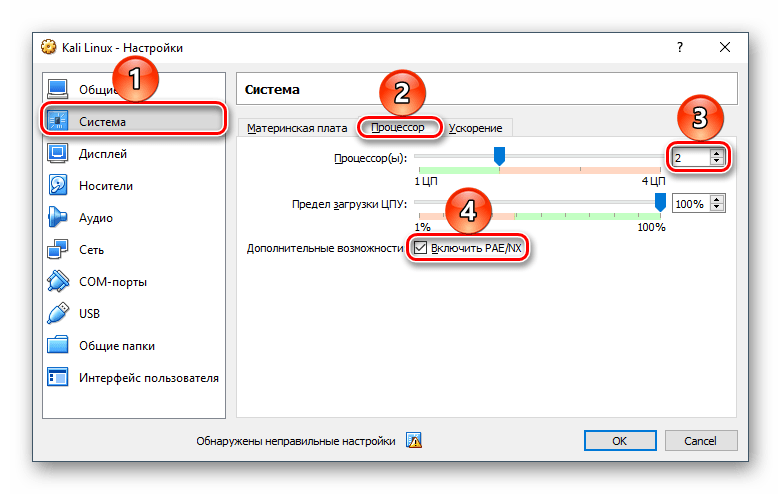
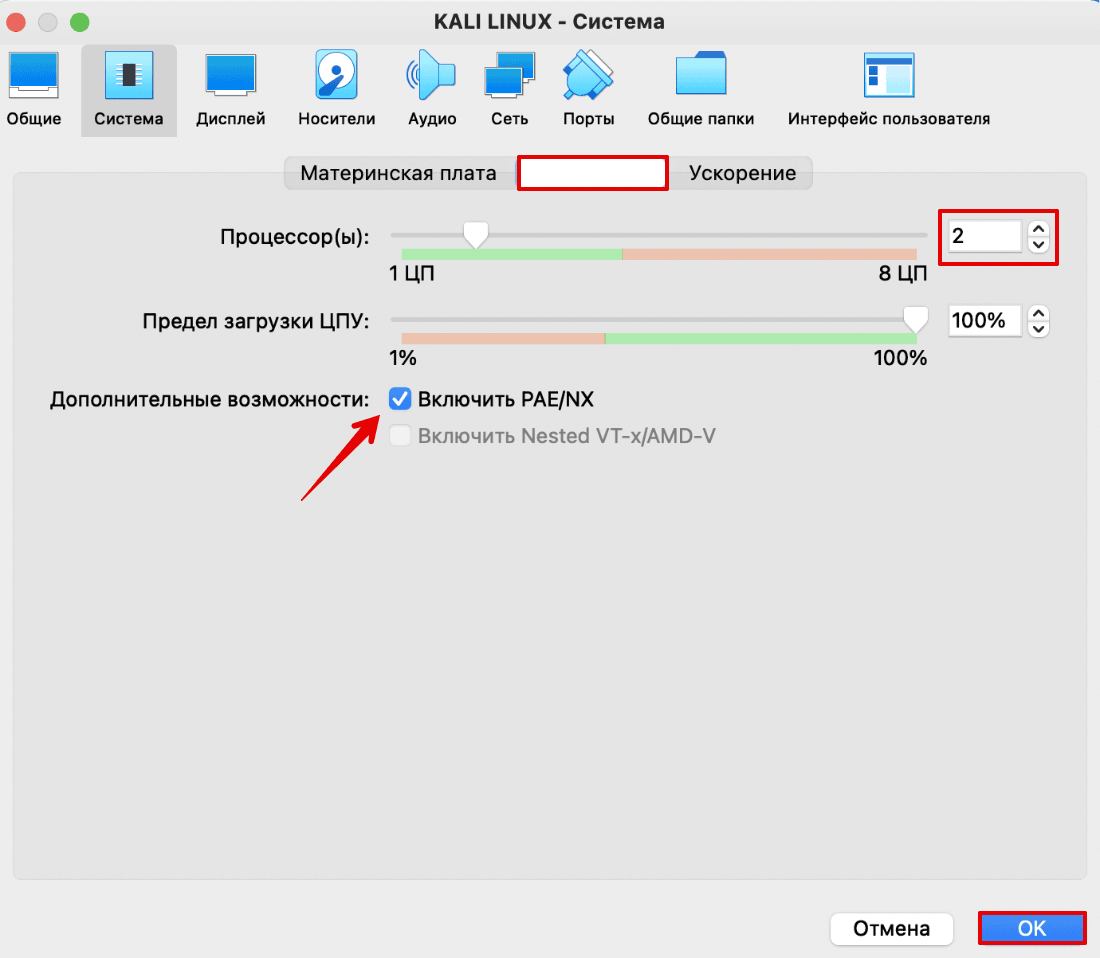
- Откроется окно с настройками. Переключитесь на вкладку «Система» > «Процессор». Добавьте еще одно ядро, сдвинув регулятор «Процессор(ы)» вправо, а также поставьте галочку рядом с параметром «Включить PAE/NX».

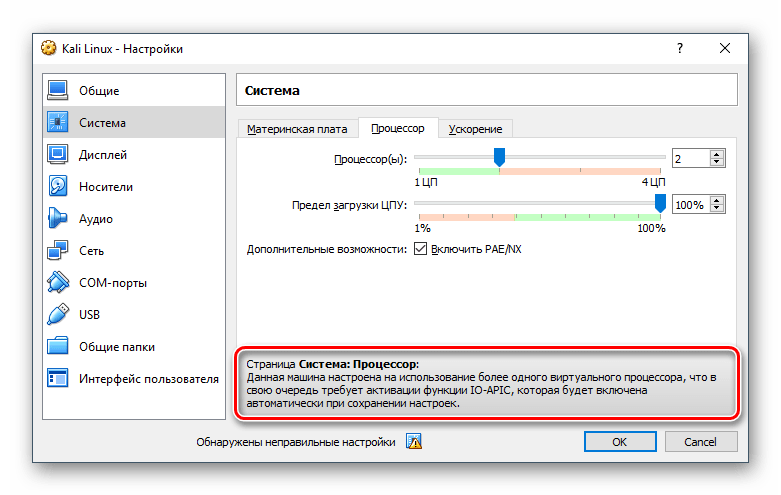
- Если вы видите уведомление «Обнаружены неправильные настройки», то ничего страшного. Программа уведомляет о том, что для использования нескольких виртуальных процессоров не активирована специальная функция IO-APIC. ВиртуалБокс сделает это самостоятельно при сохранении настроек.

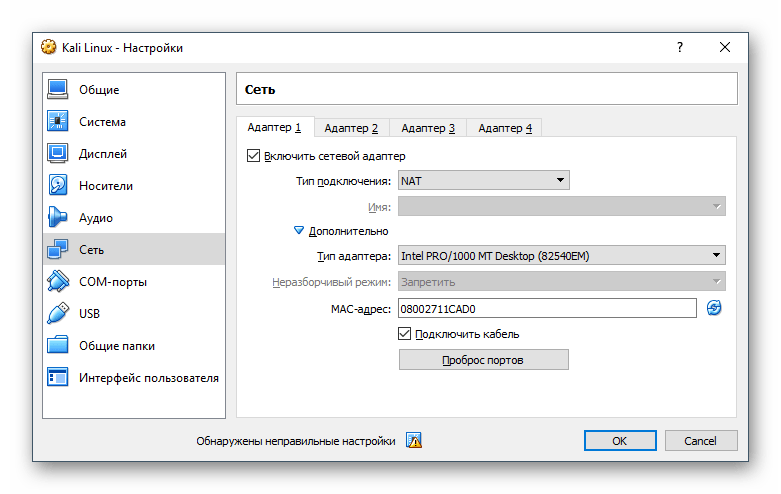
- На вкладке «Сеть» вы можете поменять тип подключения. Изначально выставлен NAT, и он защищает гостевую ОС в интернете. Но вы можете настроить тип подключения в зависимости от того, для каких целей устанавливаете Kali Linux.
Вы также можете ознакомиться с остальными настройками. Менять их в дальнейшем можно тогда, когда виртуальная машина будет выключена, как и сейчас.
Установка Kali Linux
Теперь, когда все готово к установке ОС, можно запускать виртуальную машину.
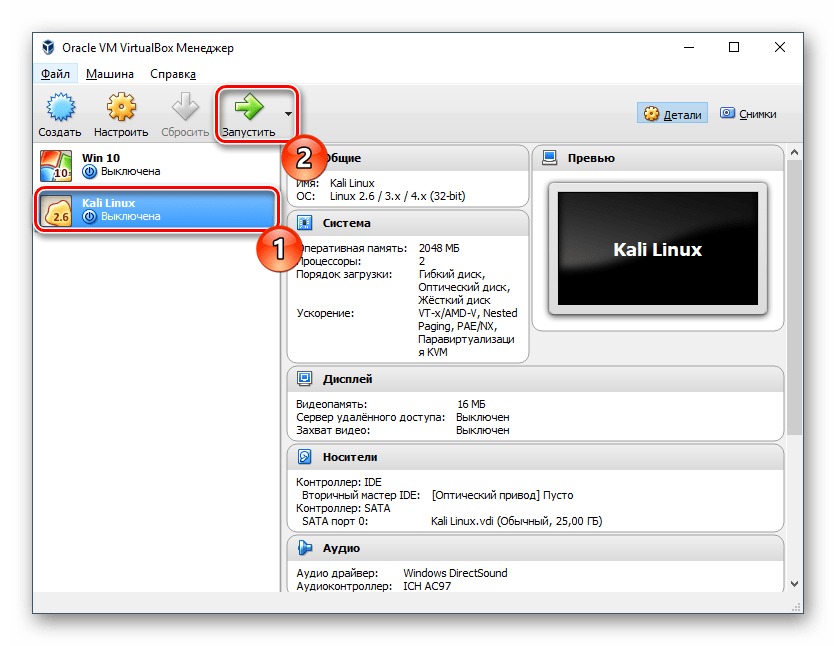
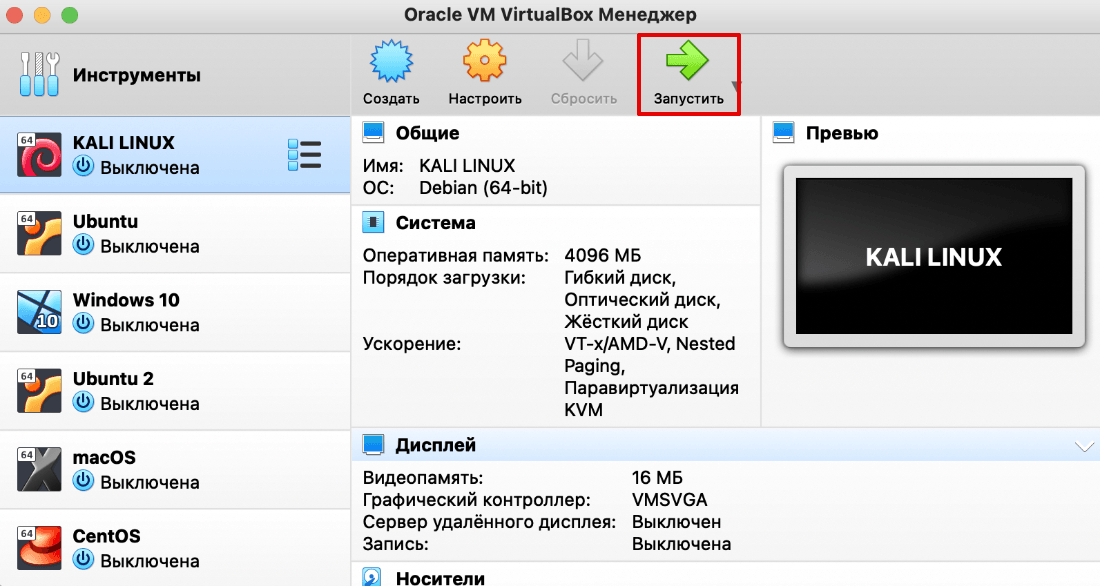
- В VM Менеджере выделите Kali Linux левым кликом мыши и нажмите на кнопку «Запустить».
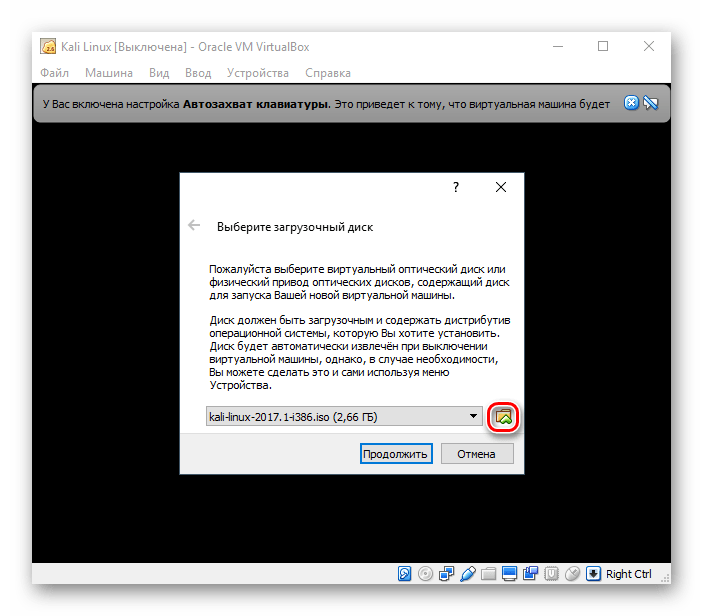
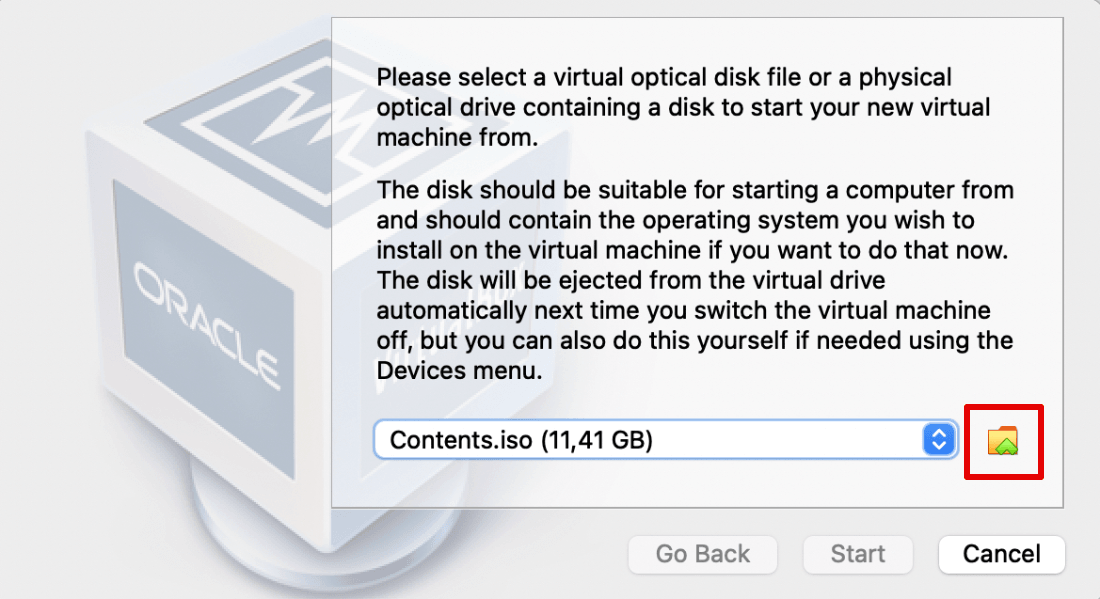
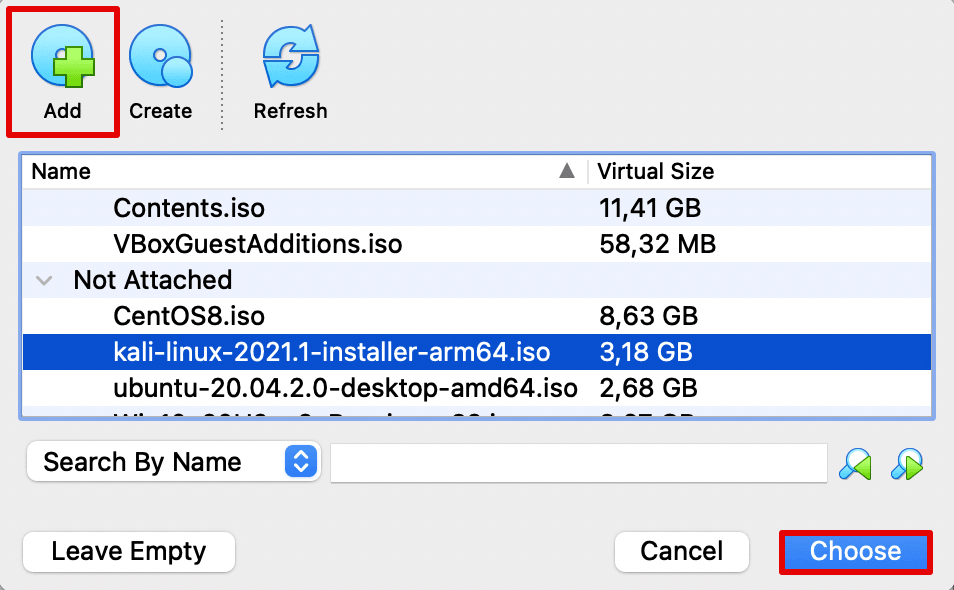
- Программа попросит указать загрузочный диск. Нажмите на кнопку с папкой и выберите место, где хранится скачанный образ Kali Linux.

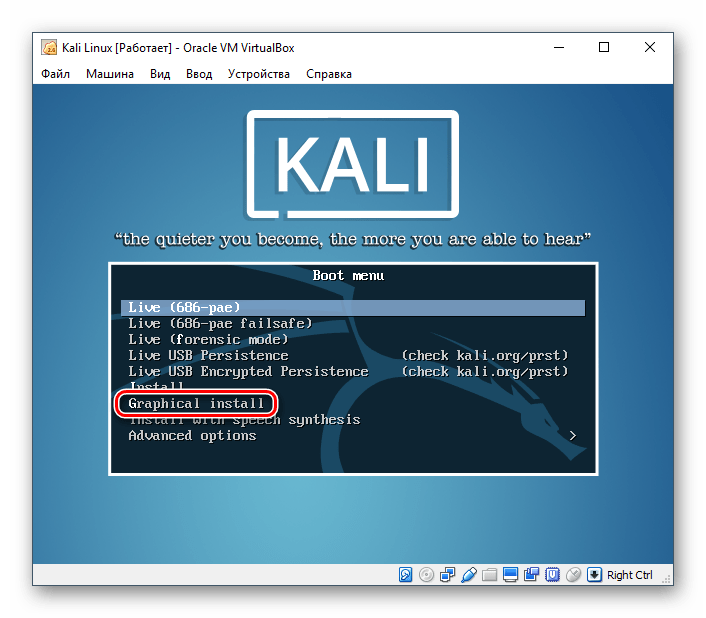
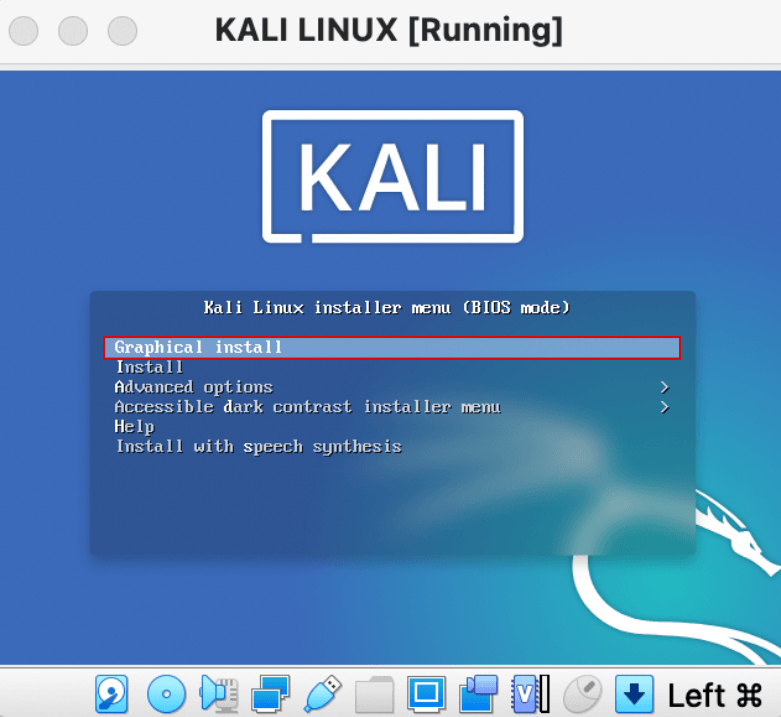
- После выбора образа вы попадете в загрузочное меню Kali. Выберите тип установки: основной вариант без дополнительных настроек и тонкостей — это «Graphical install».

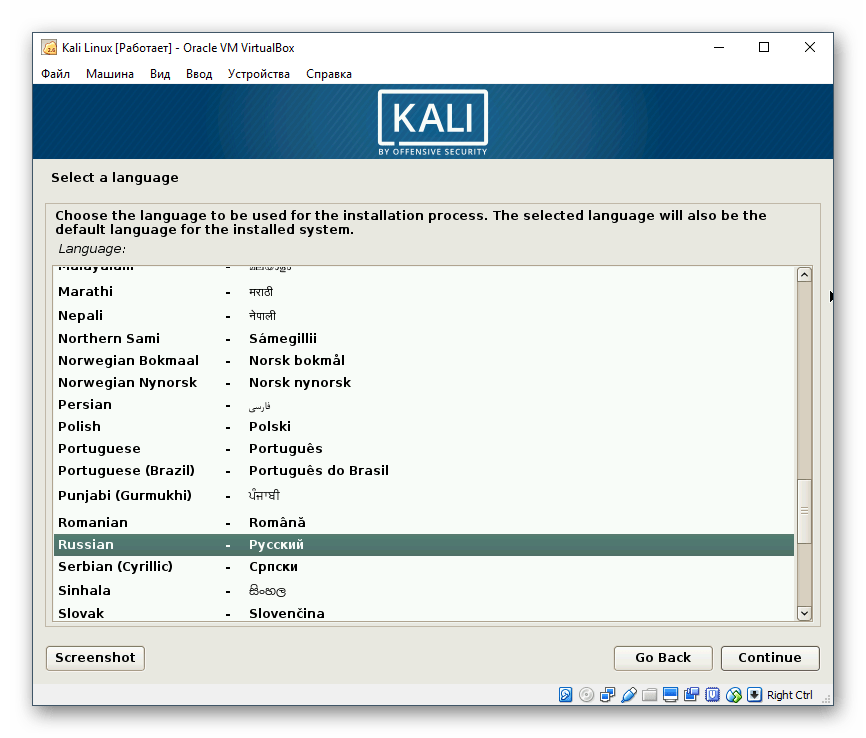
- Выберите язык, который будет использоваться для установки и в дальнейшем в самой операционной системе.

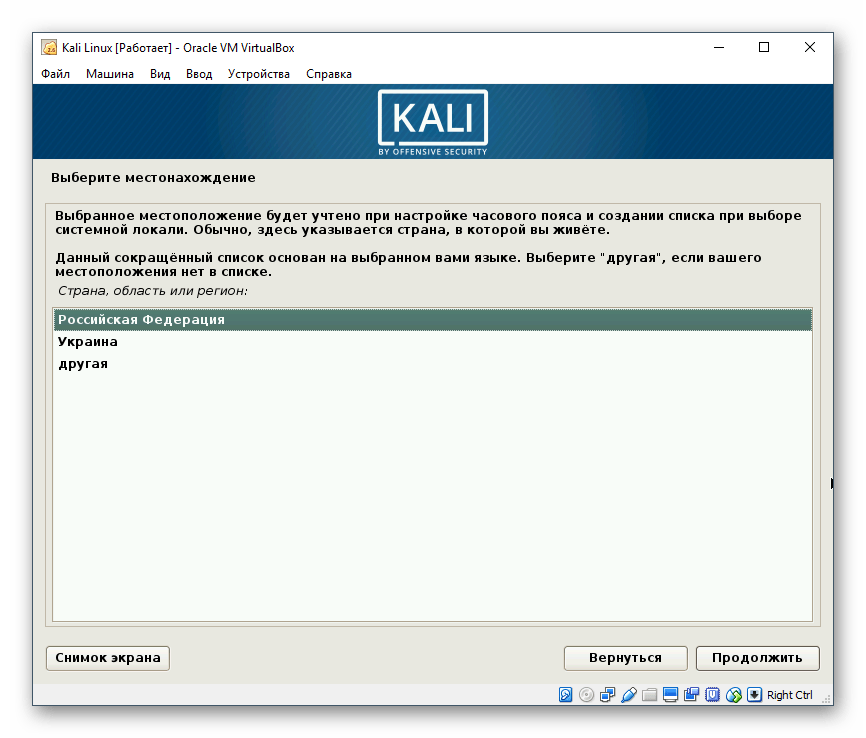
- Укажите ваше местонахождение (страну), чтобы система смогла настроить часовой пояс.
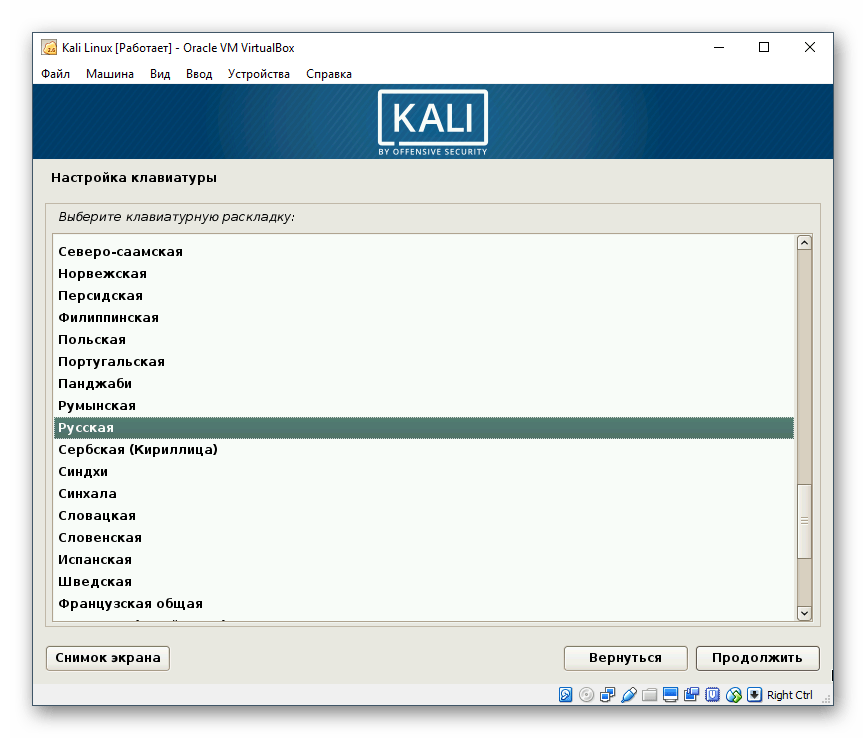
- Выберите раскладку клавиатуры, которой пользуетесь на постоянной основе. Английская раскладка будет доступна как первичная.
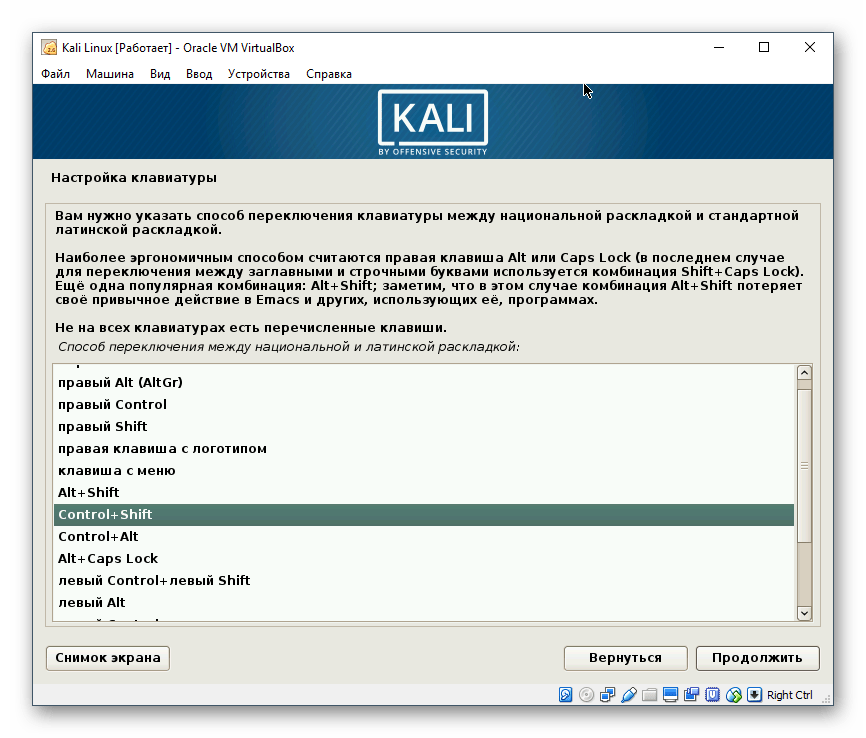
- Укажите предпочтительный способ переключения языков на клавиатуре.
- Начнется автоматическая настройка параметров операционной системы.
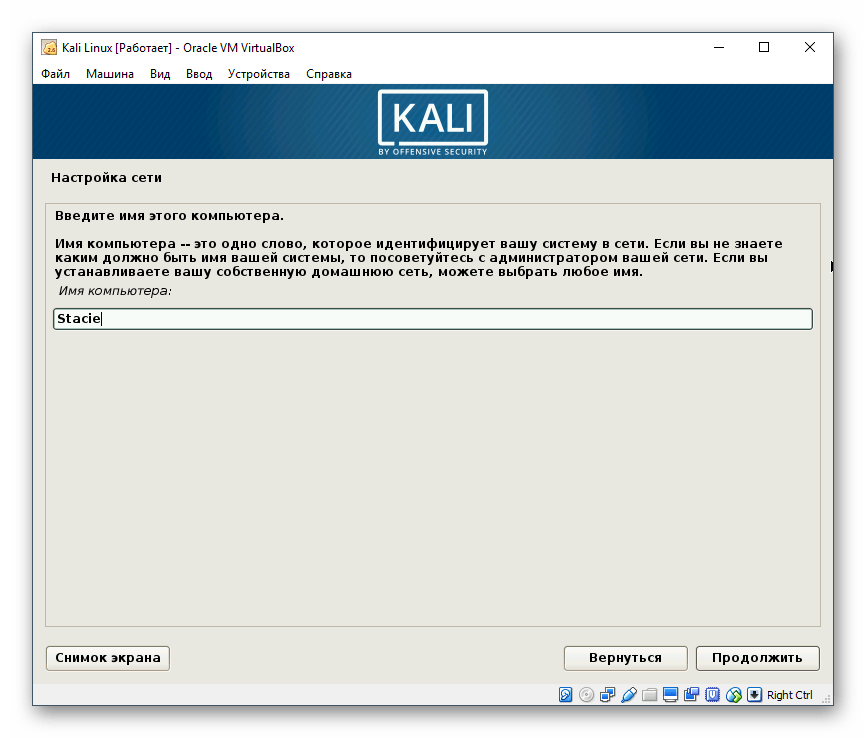
- Снова отобразится окно с настройками. Теперь будет предложено указать имя компьютера. Оставьте готовое имя или введите желаемое.
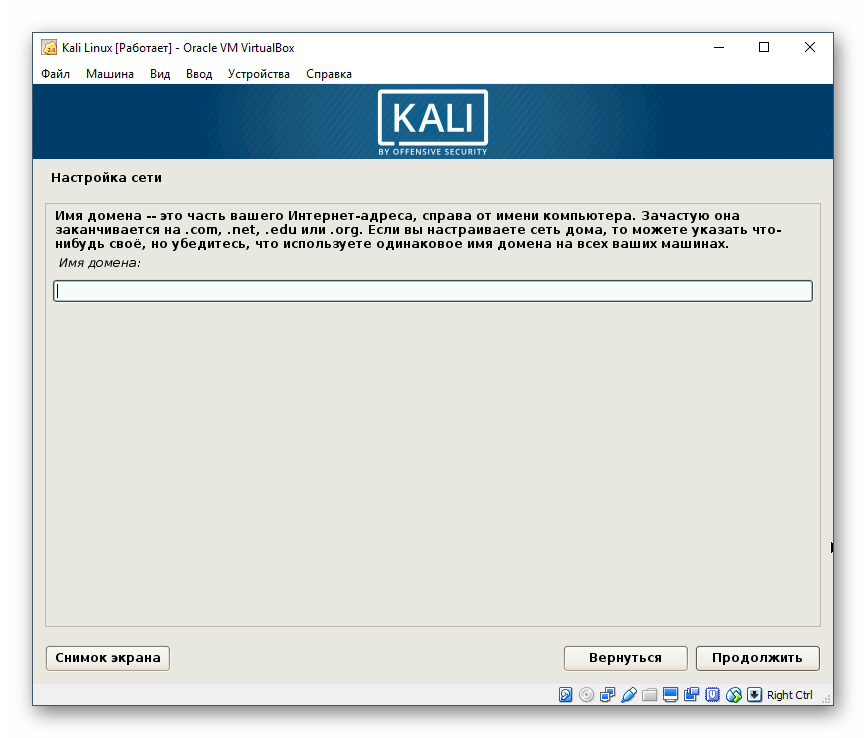
- Настройку домена можно пропустить.
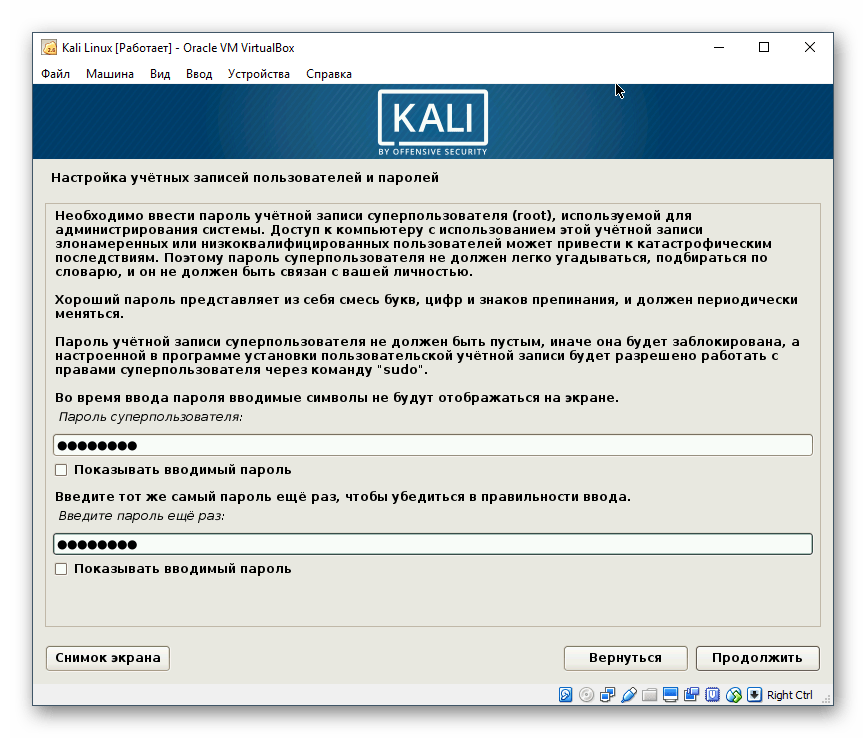
- Установщик предложит создать учетную запись суперпользователя. Он имеет доступ ко всем файлам операционной системы, поэтому может быть использован как для ее тонкой настройки, так и для полного уничтожения. Второй вариант обычно применяется злоумышленниками или же может стать результатом необдуманных и неопытных действий самого владельца ПК.
В дальнейшем данные учетной записи root понадобятся, например, при работе с консолью, для установки различного софта, обновлений и других файлов с командой sudo, а также для входа в систему — по умолчанию все действия в Kali происходят через root.
Создайте безопасный пароль и введите его в оба поля.
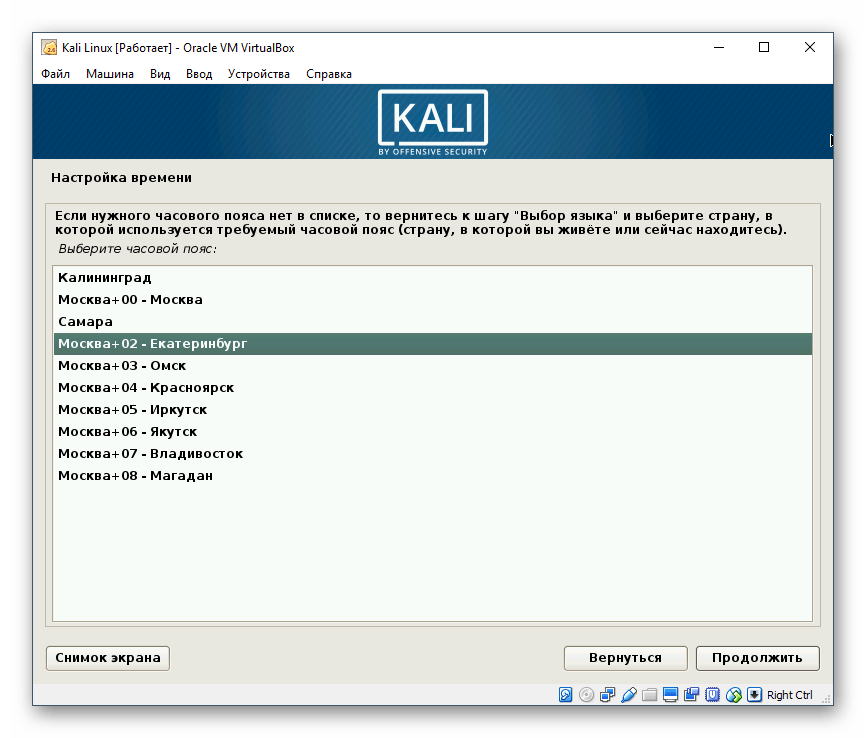
- Выберите ваш часовой пояс. Вариантов немного, поэтому если вашего города нет в списке, придется указывать тот, который подходит по значению.
- Продолжится автоматическая настройка параметров системы.
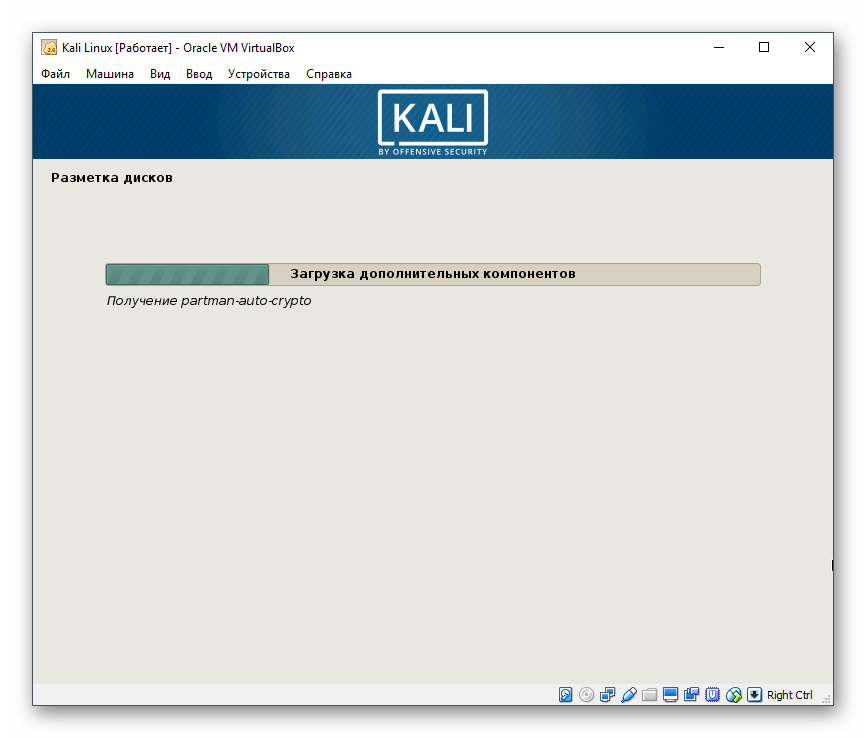
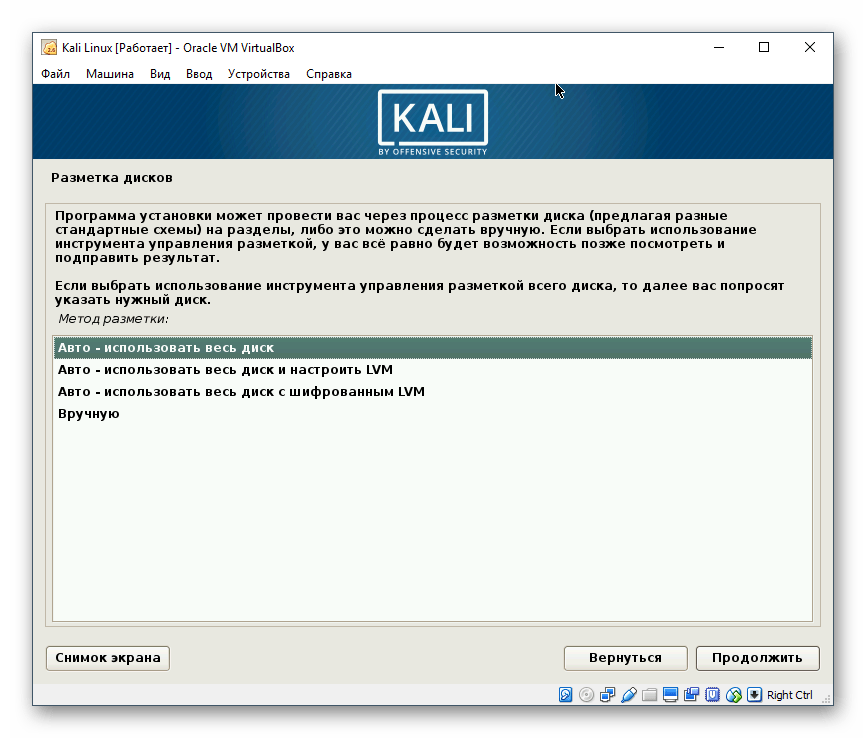
- Далее система предложит разметить диск, то есть разбить его на разделы. Если в этом нет необходимости, выберите любой из пунктов «Авто», а если вы хотите создать несколько логических дисков, выберите пункт «Вручную».
- Нажмите «Продолжить».
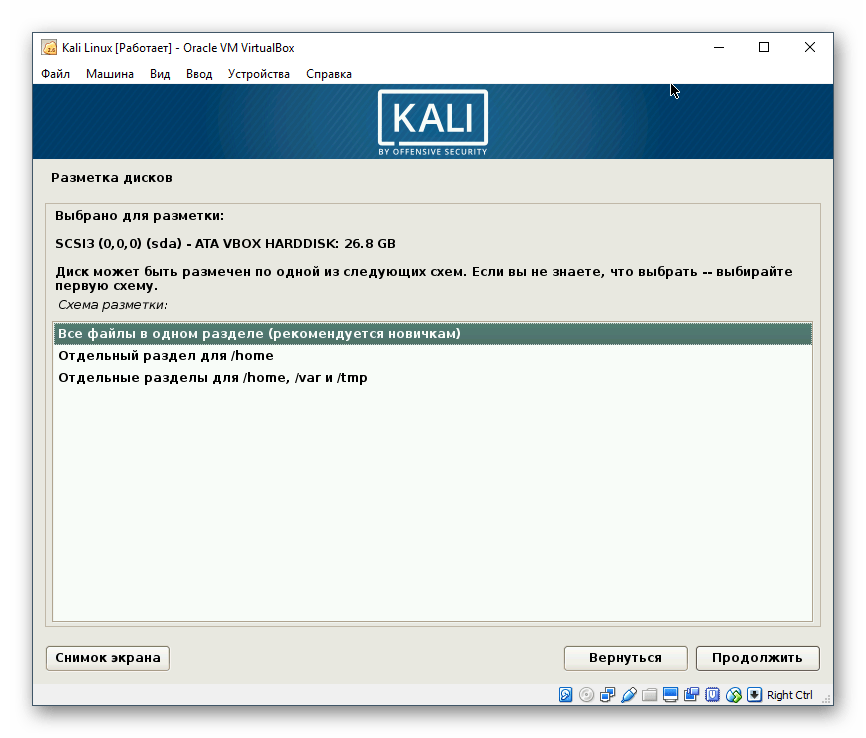
- Выберите подходящий вариант. Если вы не понимаете, как разметить диск, или в этом нет нужды, просто нажмите «Продолжить».
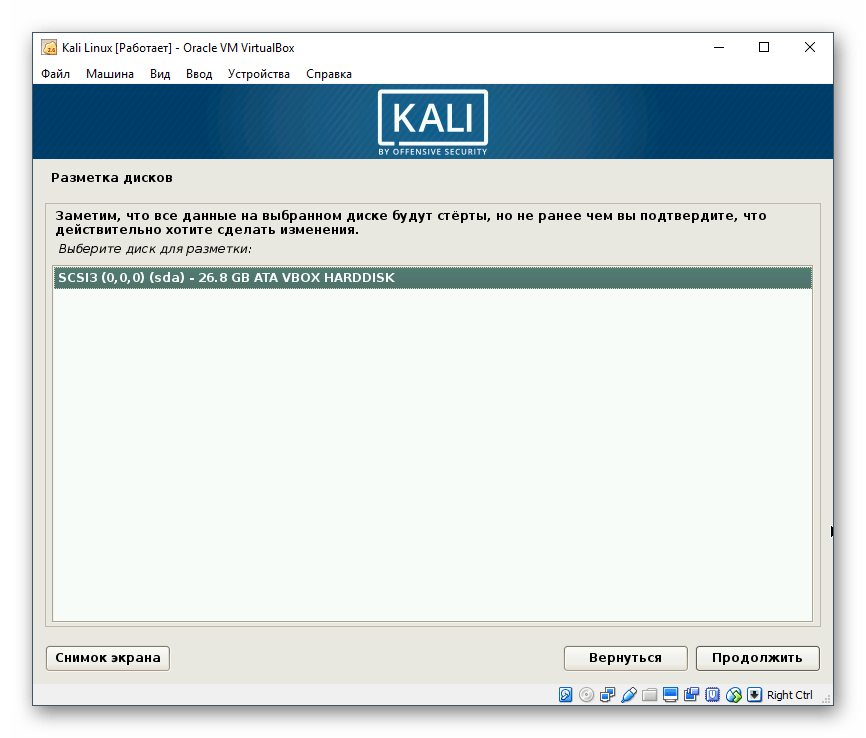
- Установщик попросит выбрать раздел для детальной настройки. Если вам не нужно ничего размечать, нажмите «Продолжить».
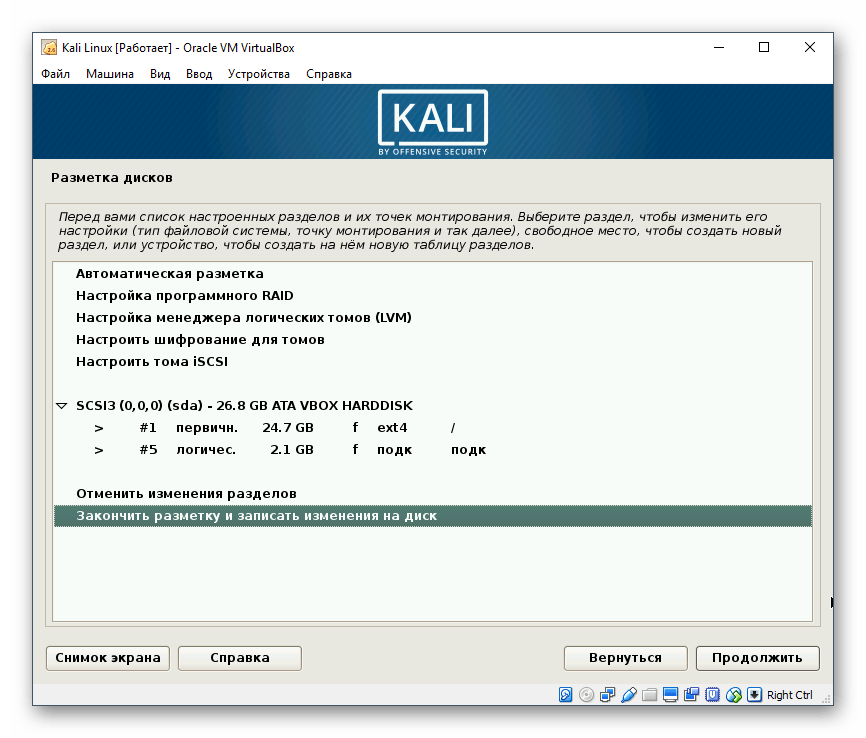
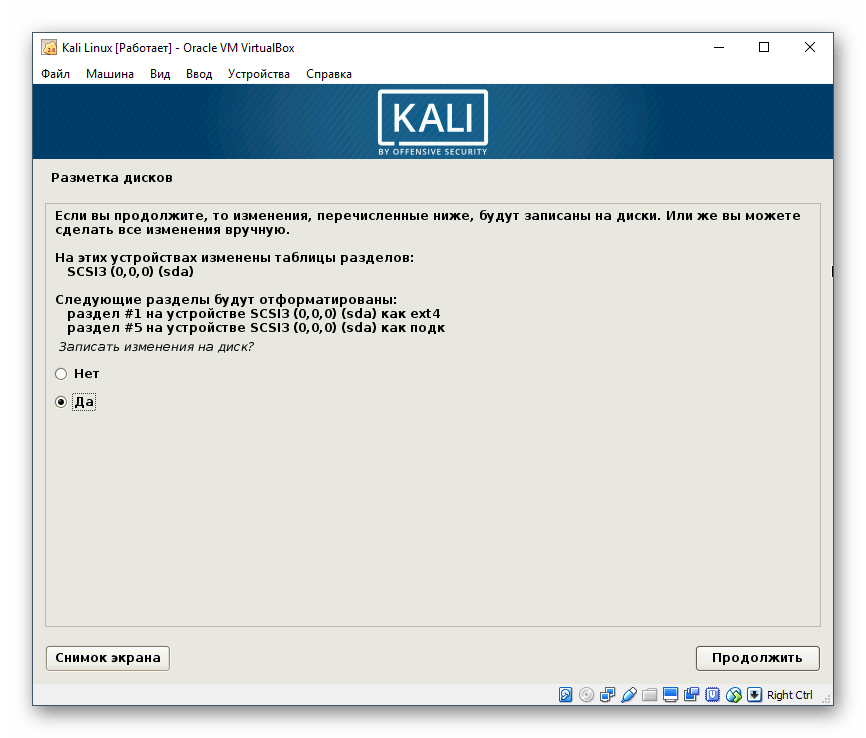
- Проверьте все вносимые изменения. Если вы с ними согласны, то нажмите «Да», а затем «Продолжить». Когда необходимо что-либо подкорректировать, выберите «Нет» > «Продолжить».
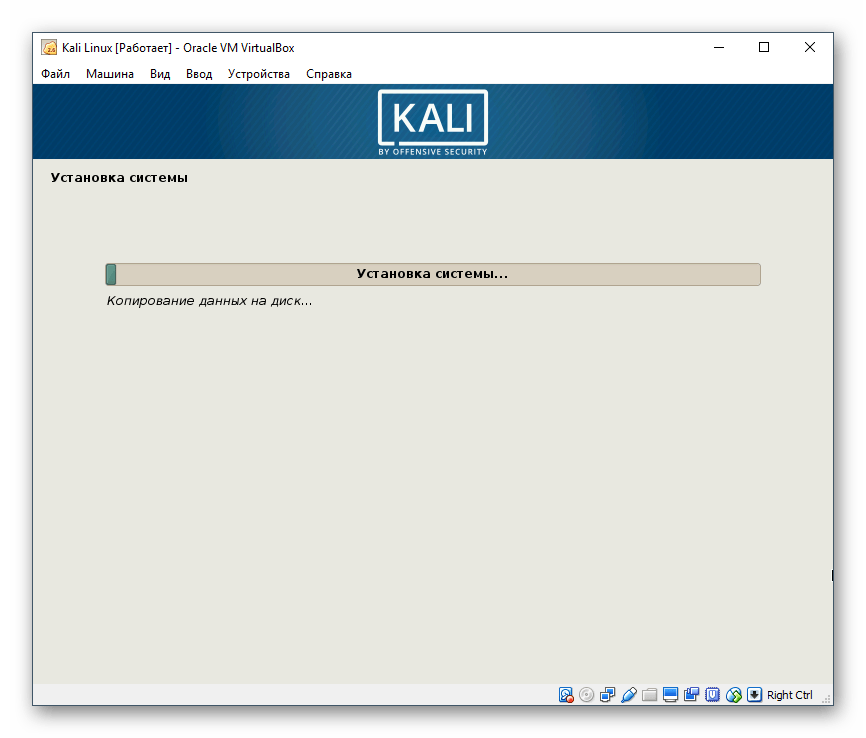
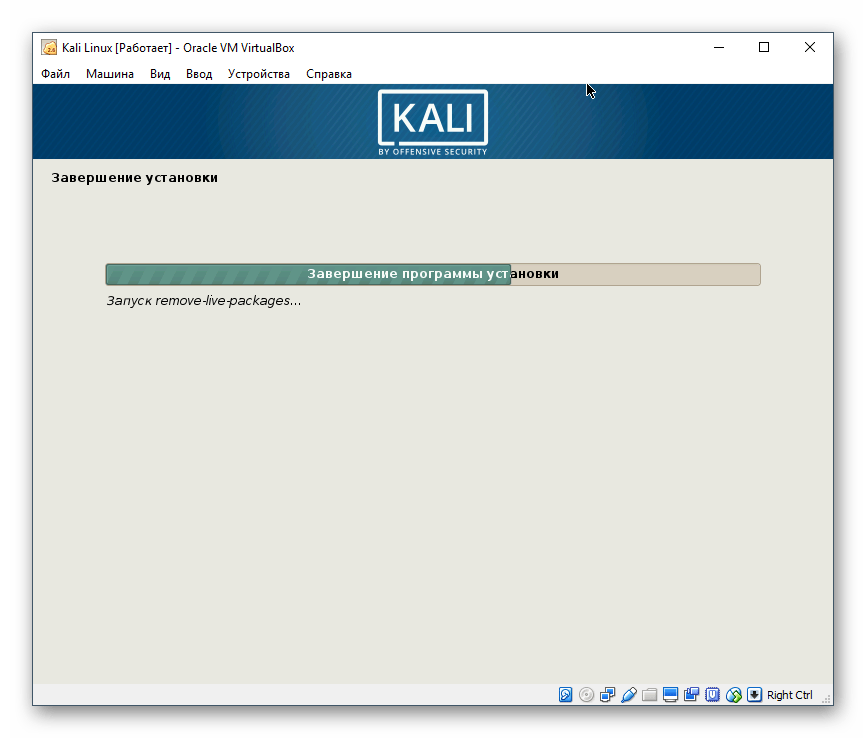
- Начнется установка Kali. Дождитесь окончания процесса.
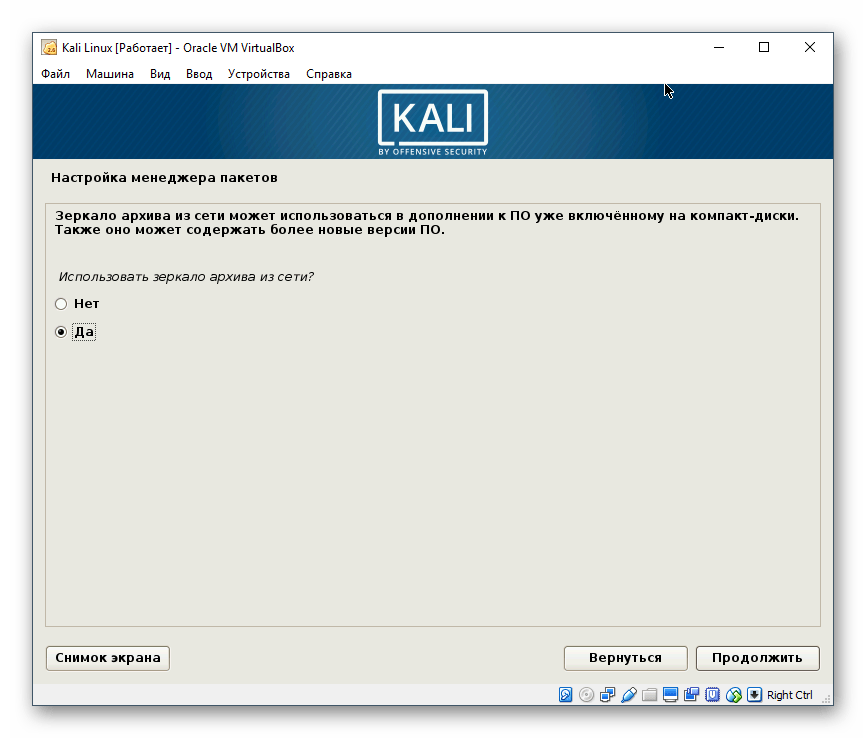
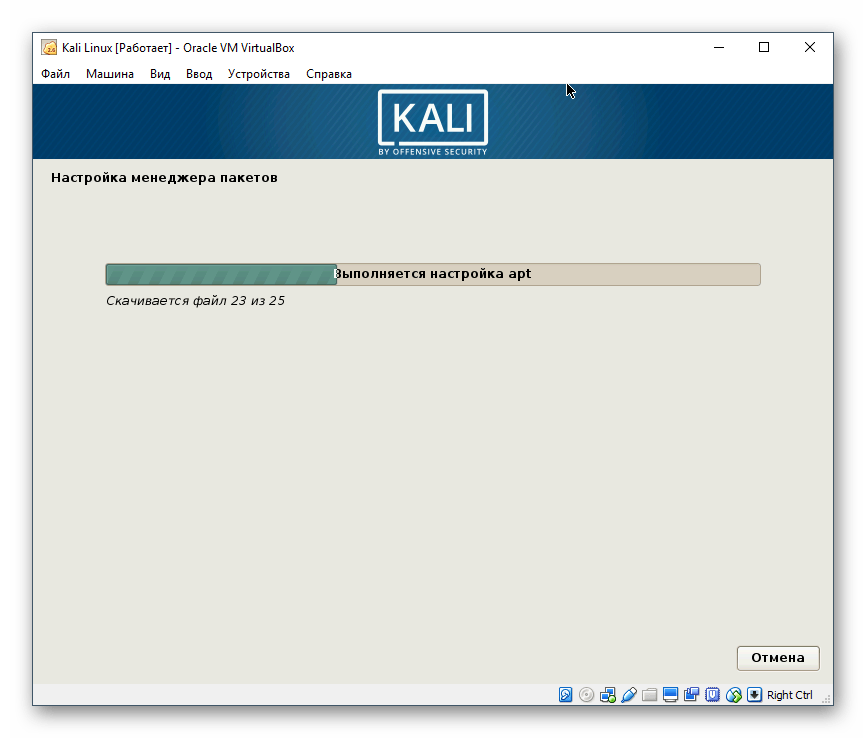
- Установите менеджер пакетов.
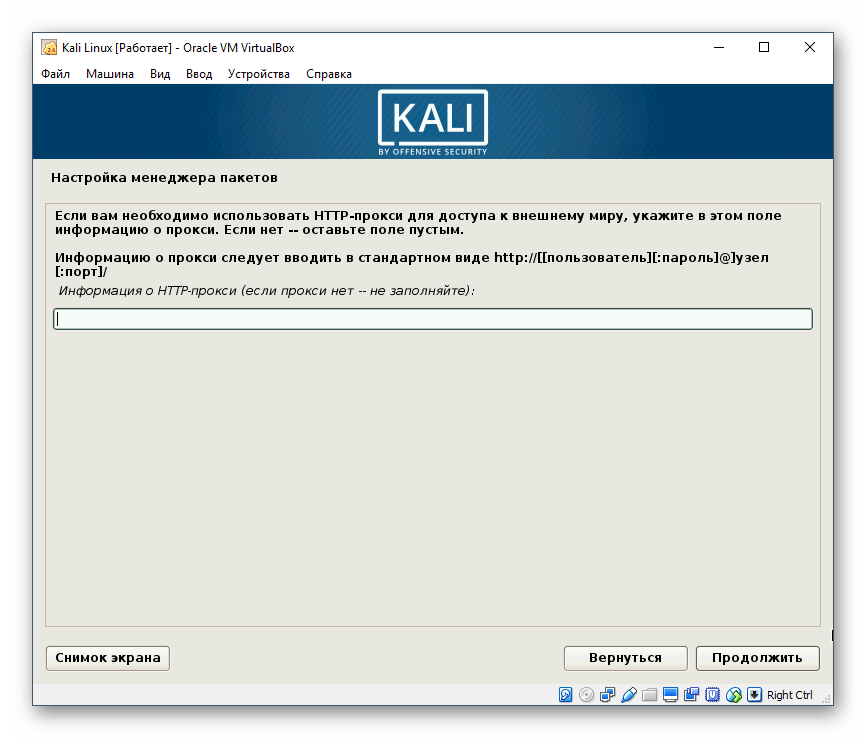
- Оставьте поле пустым, если не собираетесь пользоваться прокси для установки менеджера пакетов.
- Начнется скачивание и настройка ПО.
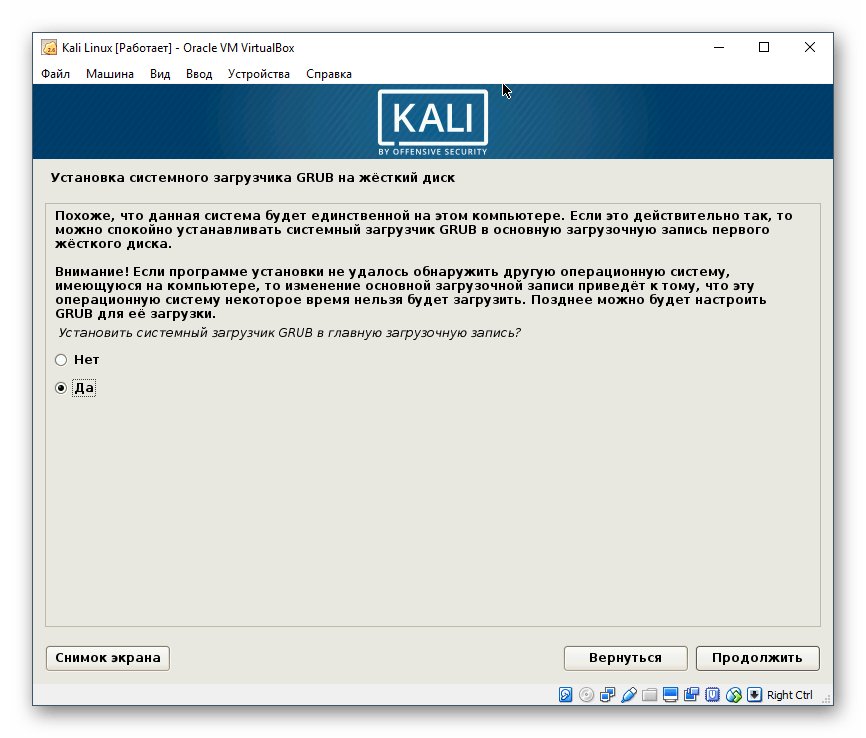
- Разрешите установку системного загрузчика GRUB.
- Укажите устройство, куда будет установлен загрузчик. Обычно для этого используется созданный виртуальный жесткий диск (/dev/sda). Если вы разбивали диск на разделы перед установкой Kali, то выберите желаемое место установки самостоятельно, используя пункт «Указать устройство вручную».
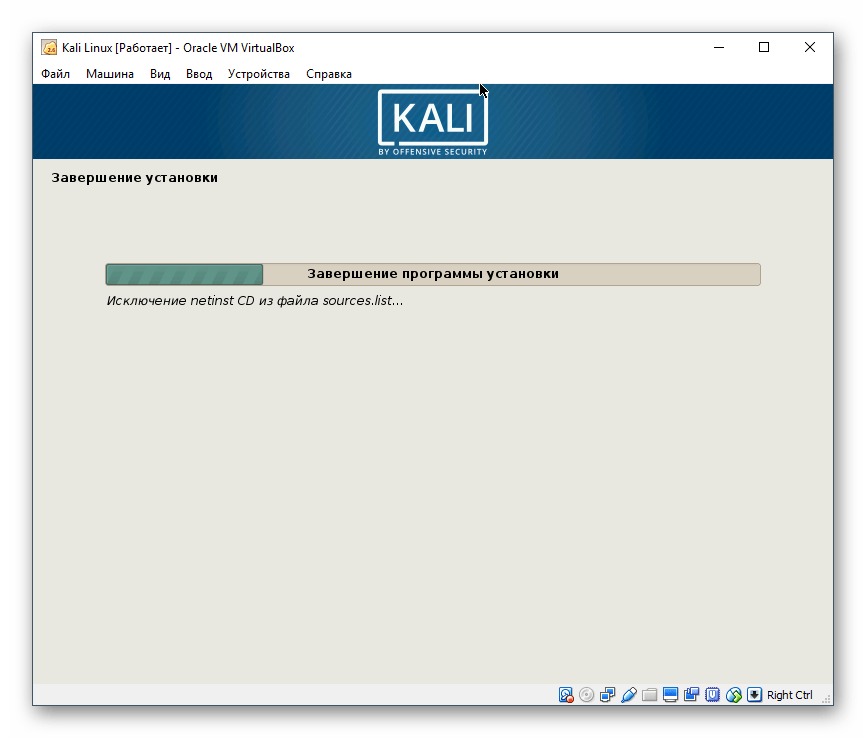
- Дождитесь завершения установки.
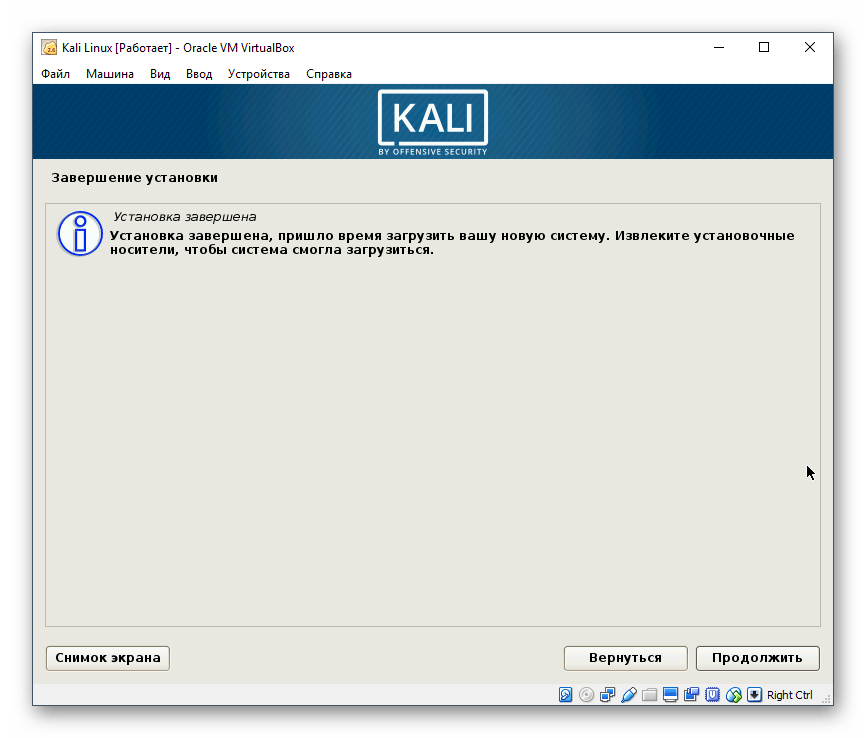
- Вы получите уведомление о завершении инсталляции.
- По окончании установки можете загрузить Kali и начать ей пользоваться. Но перед этим будет выполнено еще несколько операций в автоматическом режиме, в том числе и перезагрузка ОС.
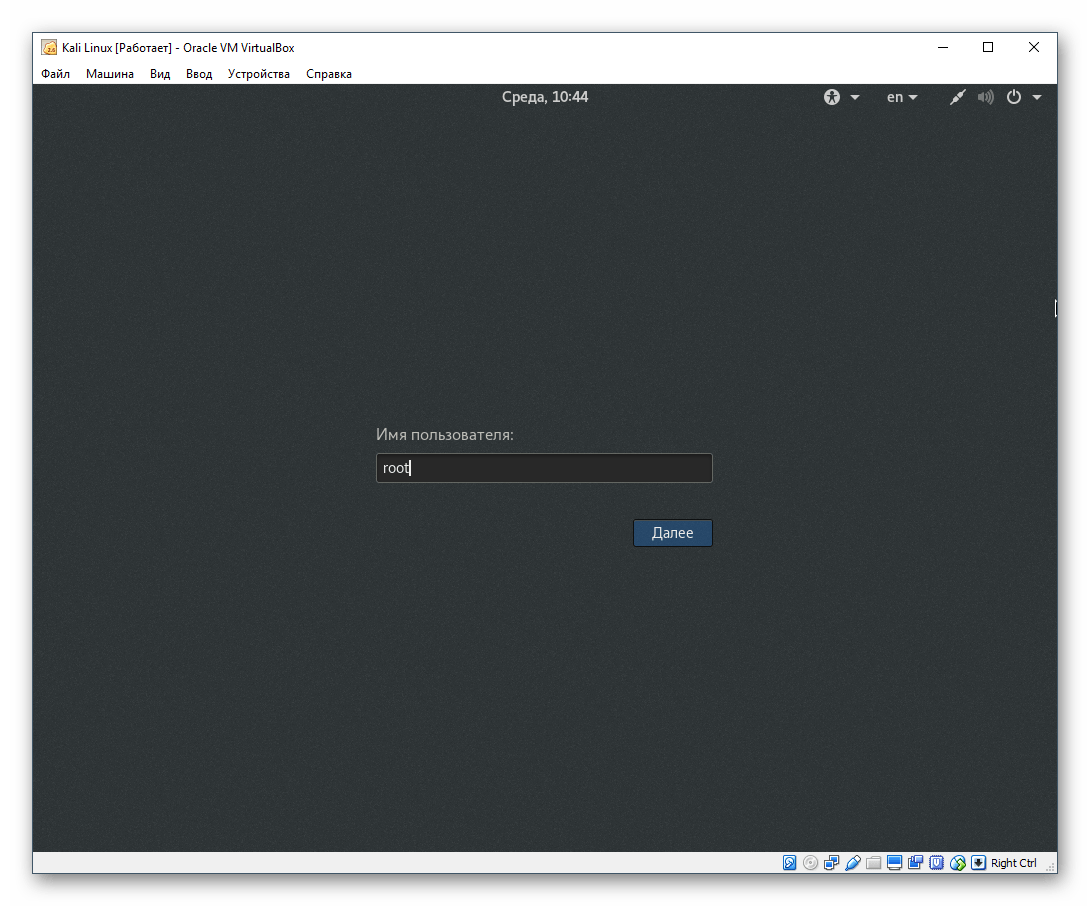
- Система попросит ввести имя пользователя. В Kali вы входите под учетной записью суперпользователя (root), пароль для которой задавали на 11 этапе установки. Поэтому в поле необходимо ввести не имя вашего компьютера (которое вы указывали при 9 этапе установки), а имя самой учетной записи, т. е. слово «root».

- Также потребуется ввести пароль, который вы придумали во время установки Kali. Кстати, нажав на значок шестеренки, можно выбрать тип рабочей среды.
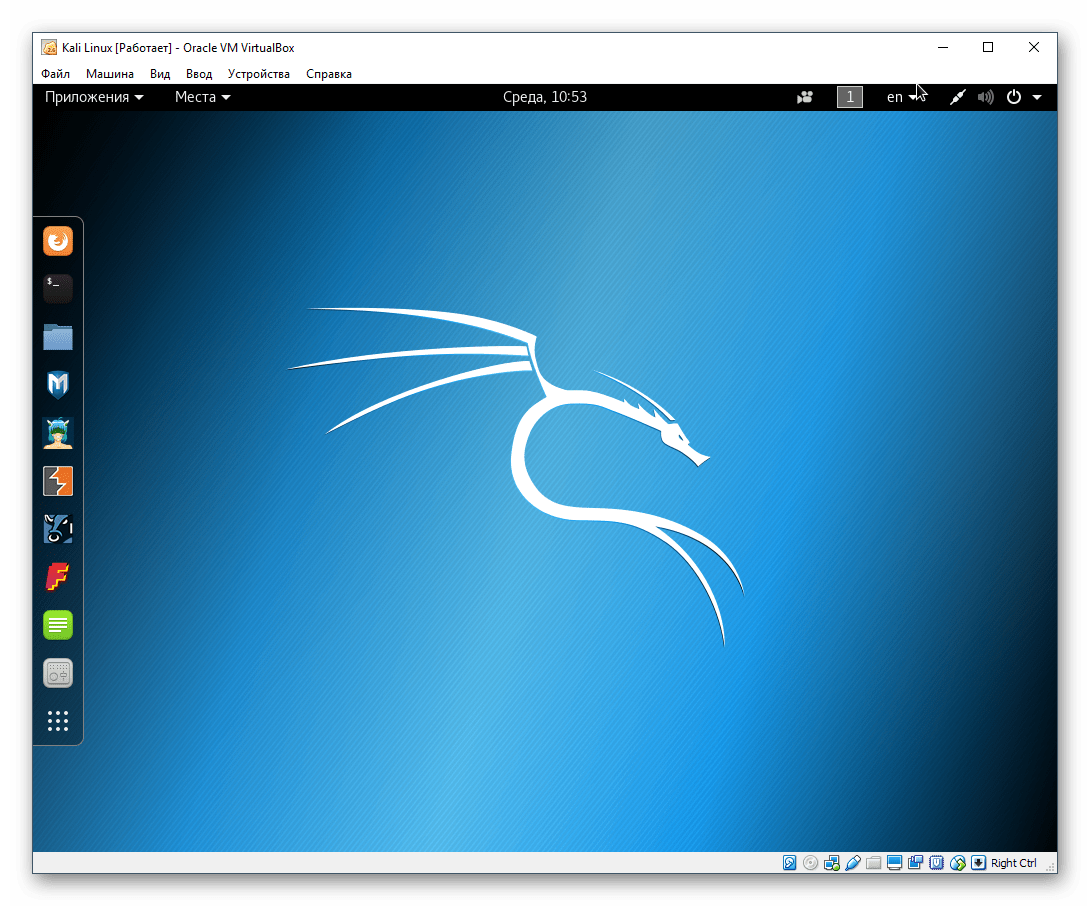
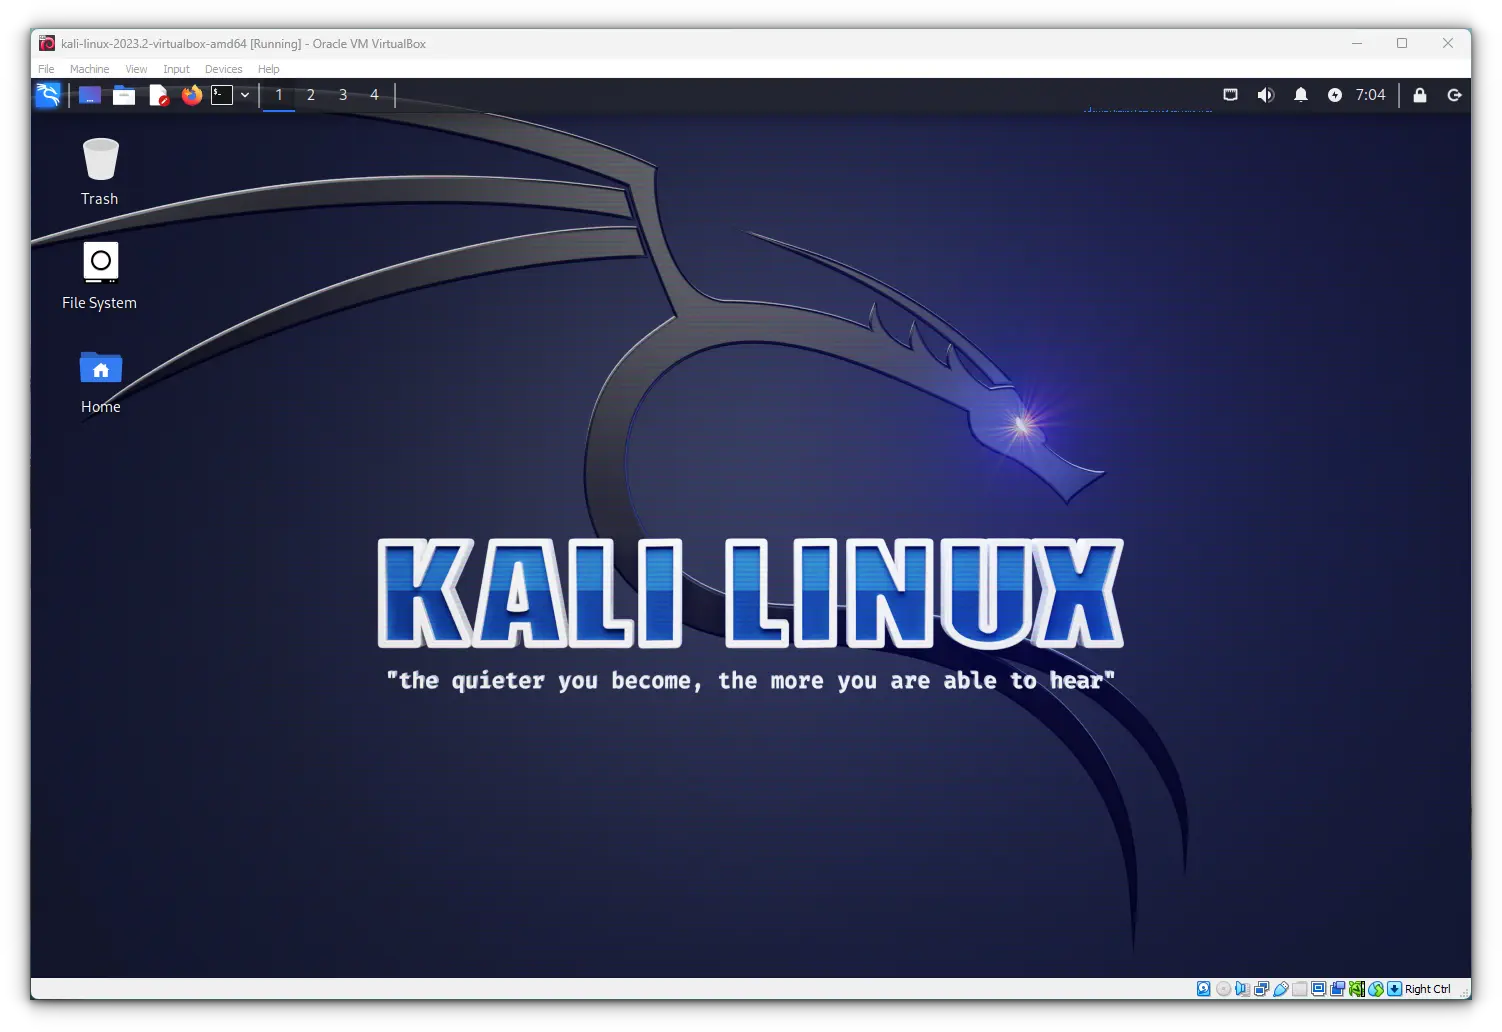
- После успешного входа вы попадете на рабочий стол Kali. Теперь можно начинать знакомиться с этой операционной системой и настраивать ее.


Мы рассказали о поэтапной установке операционной системы Kali Linux, основанной на дистрибутиве Debian. После успешной инсталляции мы рекомендуем установить дополнения VirtualBox для гостевой ОС, настроить рабочую среду (Kali поддерживает KDE, LXDE, Cinnamon, Xfce, GNOME, MATE, e17) и, при необходимости, создать учетную запись обычного пользователя, чтобы не выполнять все действия из-под root.
Еще статьи по данной теме:
Помогла ли Вам статья?
В этой статье мы расскажем, что такое Kali, в каких случаях она используется и как происходит установка Kali Linux на виртуальную машину в VirtualBox.
Что такое Kali Linux
Kali Linux — это дистрибутив операционной системы Linux. Это одна из немногих систем, которая предназначена для специалистов информационной безопасности. В неё входит ряд утилит, которые созданы для тестирования уязвимостей. Kali редко используется как основная ОС, чаще всего она устанавливается как гостевая.
Система Kali Linux была разработана в 2013 году. Над ней работала команда из Offensive Security. За основу была взята структура Debian, а инструменты тестирования информационной безопасности были взяты из ОС BackTrack. Первый релиз был выпущен 13 марта 2013 года.
В комплект Kali входят такие хакерские утилиты как Armitage, nmap, Wireshark, John the Ripper, Aircrack-ng, Burp Suite. С их помощью можно:
- собирать информацию об инфраструктуре объекта. Можно точно определить, какие узлы и сервисы работают в сети, какие операционные системы установлены и как защищена сеть;
- искать уязвимости в системе. Слабые места могут быть в корпоративной сети, базах данных и в программном обеспечении;
- проверять на уязвимость веб-приложения. Можно определить, какая версия CMS установлена на сайте, что позволит использовать уже известные уязвимости для взлома и атак;
- делать брутфорс (Password Attacks). Это метод угадывания пароля или ключа шифрования. Программа перебирает все возможные комбинации символов пока не будет найдена правильная;
- проводить стресс-тесты. Система искусственно нагружается, чтобы выявить все проблемы, которые могут быть вызваны перегрузкой;
- делать спуфинг. Спурфинг (spoofing) — это кибер-атака, в которой мошенник выдаёт себя за какой-либо надёжный источник, чтобы получить доступ к важным данным или информации. Подменяться могут веб-сайты, электронная почта, телефонные звонки, текстовые сообщения, IP-адреса и серверы;
- преобразовывать машинный код в текст программы для восстановления исходного кода;
- устраивать DOS-атаки для Wi-Fi;
- делать бэкдор в системе.
Все утилиты будут готовы к использованию сразу после завершения инсталляции.
Особенности Kali Linux
Так как это узкоспециализированная система, вы не сможете добавить к стандартным источникам ПО Kali дополнительные пакеты и репозитории. Они не будут работать. Например, в Кали нет поддержки для команды apt-add-repository, LaunchPad или PPAs. Даже для установки широко распространённых пакетов Node.js потребуются дополнительные настройки и технические навыки.
Наряду с командами терминала и базовыми утилитами, есть возможность просмотра изображений и PDF-файлов, калькулятор и простой текстовый редактор. Однако привычных пользователю офисных программ (почтовых программ, органайзеров) в этой системе нет.
Kali Linux постоянно работает под пользователем root. Суперпользователь нужен для выполнения большинства встроенных функций, поэтому разработчики сделали эту функцию по умолчанию. Именно из-за постоянно включенного root на Кали опасно работать с привычными пользователю офисными приложениями или выходить в интернет для обычного серфинга. Этот факт ещё раз доказывает, что ОС лучше использовать как гостевую.
Как установить Kali Linux на виртуальную машину VirtualBox
Установка Кали Линукс на виртуальную машину происходит в 3 этапа:
- Создание виртуальной машины для Kali Linux.
- Настройка виртуальной машины.
- Установка ОС Kali Linux.
Этап 1. Создание виртуальной машины на VirtualBox
-
1.
Скачайте ISO-образ Kali с официального сайта.
-
2.
Запустите VirtualBox и нажмите Создать:

-
3.
Введите имя виртуальной машины (любое).
-
4.
Так как Kali Linux разработана на основе Debian, в строке «Тип» выберите Linux. В строке «Версия» выберите Debian 64-bit и нажмите Продолжить:
-
5.
Чтобы выделить объём памяти для машины, сдвиньте ползунок вправо. Мы рекомендуем указать объём 4 ГБ, но если на вашем компьютере недостаточно оперативной памяти, выбирайте 2-3 ГБ. Нажмите Продолжить:
-
6.
Выберите пункт Создать новый виртуальный жёсткий диск и кликните Создать:
-
7.
Укажите тип файла VDI (VirtualBox Disk Image) и нажмите Продолжить:
-
8.
Выберите формат хранения Динамический виртуальный жёсткий диск. Нажмите Продолжить:
-
9.
Выберите объём диска виртуальной машины. Для установки Kali Linux будет достаточно 20 ГБ. Передвиньте ползунок вправо и нажмите Создать:

Готово, вы создали виртуальную машину.
Этап 2. Настройка виртуальной машины для Kali Linux
Kali Linux очень требовательна к количеству процессоров, а также использует PAE-ядро. Если вы сразу начнёте установку ОС в обычном режиме, то увидите ошибку. Поэтому перед установкой операционной системы нужно включить функцию PAE и увеличить количество ядер. Для этого:
-
1.
Нажмите Настроить:
-
2.
Перейдите во вкладку Система ― Процессор. По умолчанию для виртуальной машины выделяется одно ядро процессора. В строке «Процессор(ы)» поставьте значение 2.
-
3.
Отметьте галочку напротив «Включить PAE/NX». Нажмите OK:
Теперь переходите к установке операционной системы.
Этап 3. Установка операционной системы Kali Linux
-
1.
Запустите виртуальную машину:
-
2.
Загрузите скачанный образ. Для этого справа нажмите на иконку папки:
-
3.
Выберите нужный образ из списка или загрузите новый, нажав на Add.
-
4.
Нажмите Choose:
-
5.
Затем нажмите Start:
-
6.
Чтобы выбрать установку с графическим интерфейсом, нажмите Enter. Это самый простой способ установки ОС без работы в командной строке:
-
7.
Для завершения установки следуйте подсказкам системы. На последнем этапе виртуальная машина будет перезагружена.

Готово, установка завершена.
Несмотря на то, что многие инструменты Кали больше похожи на хакерские, на самом деле ОС чаще всего используют для пентестов (тестов на проникновение). Kali помогает обнаружить слабые места в защите корпоративной сети, элементах сетевой инфраструктуры и сайтах. Тщательная проверка помогает избежать проникновения злоумышленников.
Помогла ли вам статья?
Спасибо за оценку. Рады помочь 😊
👍
Установка виртуальной Кали Линукс на VirtualBox в Windows 10. В статье я сделаю упор на несколько главных моментов, которые интересуют пользователя. Как то:
- процедуру установки скачанного образа готовой виртуальной машины
- первый вход в систему и базовые команды
- полноэкранный режим, общий буфер обмена с хозяйской ОС и прочие преимущества Guest Additions Virtual Box.
Ссылки, которые вам пригодятся чуть позже:
- Как сменить язык Кали Линукс на русский?
- Как установить правильный часовой пояс в Кали Линукс?
- Настройка входа в Кали Линукс без пароля.
Скачивание виртуальной Кали Линукс: ISO или OVA?
Все мы перед установкой стоим перед небольшим выбором: на виртуальную машину можно поставить образ для физических машин или готовый образ для виртуальных. Установка виртуальной Кали Линукс с помощью ISO (CD формат) пригодиться вам, если вы собираетесь попрактиковаться с подготовкой жёсткого диска к установке Grub, разбиением на разделы, прохождением процедуры установки языковых и прочих настроек и т.п. Т.е. установкой Кали Линукс так, словно бы вы ставили её на реальную машину. Файл готовой виртуальной машины нам предлагается для упрощения процедуры установки. Функционал будет тем же, что и в предыдущем случае, но диск с системным содержимым, файл манифеста, OVF XML (спецификация аппаратного обеспечения) уже влючены в сборку и ставить ничего не нужно. Так что выбор в пользу OVA очевиден. Отправляемся по официальному адресу с выбором загрузок
Скачать готовый файл виртуальной Кали Линукс
Пролистываем верхнюю таблицу Download Kali Linux Images вниз до строки Kali Linux 64-bit VirtualBox и переходим по ссылке загрузок со страницы Offensive Security VM Download Page. По крайней мере, структура ссылок на странице загрузок в 2020 г. такая.

или так

На следующей странице нас ждёт всегда свежий файл диска, готовый для скачивания. Скорость обмена с сервером неплохая, так что можете выбрать любой вариант загрузки: через браузер или торрентом. И ждать закачки:

Скачанную папку лучше переместить из папки Загрузок на отдельный диск или другое место, откуда вы его по ошибке не удалите.
Установка виртуальной Кали Линукс.
Самый быстрый этап. В открытом первоначальном окне Virtual Box выбираем Файл — Импорт конфигураций… и указываем на папку с файлом виртуальной машины. Наш — рыжий значок с именем типа kali-linux-2020.2a-vbox-amd64. Не ошибётесь:


Жмём Открыть и оставляем настройки виртуальной машины пока как есть, запуская процедуру установки, щёлкнув по Импорт:

Соглашаемся с окнами, если вылезут и ждём:

После завершения установки в левой части окна VirtualBox жмём Настроить для выбранной виртуальной Кали Линукс. Скорректируем настройки виртуальной машины для улучшения производительности. Я обычно делю «возможности» хозяйской Windows 10 пополам в части процессора и RAM и присваиваю их таким образом виртуальной машине. В любой момент вы сможете эти характеристики изменить:

Первый запуск виртуальной Кали Линукс.
Пароль и логин для виртуальной Кали Линукс kali и kali. Система встречает нас неверным временем и английским языком:

В соответствии с обновлёнными требованиями безопасности Кали сейчас также поставляется с автоматически активированной учётной записью Кали без root-прав. Так что любым командам в терминале должна предшествовать команда sudo с вводом пароля (в нашем случае kali). Усложнять пока процедуру знакомства регистрацией ещё одного пользователя мы не будем. А пока обновимся через терминал:
sudo apt-get clean && sudo apt-get update && sudo apt-get upgrade -y && sudo apt-get dist-upgrade -y

Перезагружаемся командой sudo reboot и готовим систему к установке дополнений.
Настройка Дополнений гостевой ОС
Для начала ISO дополнений VBoxGuest Additions нужно скачать. Он находится на странице загрузок версий, откуда вам его нужно скачать в виде образа переходом на страницу. Я качаю в виде ISO последней версии:

После загрузки укажем его в качестве диска (он должен появиться на Рабочем столе Кали):

Однако при попытке его закрепить в чистом виде (Подключить образ диска Дополнений гостевой ОС…) вылезет ошибка:

Входим в Кали Линукс, открываем терминал и вводим поочерёдно:
cd /media
sudo mkdir vbox
sudo mount /dev/sr0 vbox/
cd vbox
ls

Последняя команда покажет содержимое диска Дополнений. Запускаем файл VBoxLinuxAdditions.run от имени root:
sudo ./VBoxLinuxAdditions.run

По окончании команды окно виртуальной машины развернётся во весь (или почти) экран. Перезагружаемся. Проверяем, настроены ли общий с хозяйской Windows 10 буфер обмена и общие папки:

Проверьте: скопируйте из Windows 10 что-нибудь и вставьте в терминал Кали скопированное сочетанием CTRL + Shift + V. Если содержимое буфера в терминале виртуальной машины отобразилось, всё настроено верно.
Успехов.
Просмотров: 7 729
Kali Linux is one of the best Linux distributions for hacking and security enthusiasts.
Since it deals with a sensitive topic like hacking, it’s like a double-edged sword. We have discussed it in the past with a detailed Kali Linux review, so I am not going to bore you with the same stuff again.
While you can install Kali Linux by replacing the existing operating system, using it via a virtual machine would be a better and safer option.
With VirtualBox, you can use Kali Linux as a regular application in your Windows/Linux system. It’s almost the same as running VLC or a game in your system.
Using Kali Linux in a virtual machine is also safe. Whatever you do inside Kali Linux will NOT impact your ‘host system’ (i.e. your original Windows or Linux operating system). Your actual operating system will be untouched and your data in the host system will be safe.
I’ll be using VirtualBox here. You may also install Kali Linux on VMWare.
VirtualBox is a wonderful open source virtualization solution for anyone (professional or personal use). It is available free of cost.
In this tutorial, we will talk about Kali Linux in particular but you can install almost any other OS using the ISO file or a pre-built virtual machine save file.
📋
The same steps apply for Windows/Linux running VirtualBox.
As I already mentioned, you can have either Windows or Linux installed as your host. But, in this case, I have Windows installed (don’t hate me!), where I try to install Kali Linux in VirtualBox step by step.
And, the best part is that even if you use a Linux distro as your primary OS, the same steps will be applicable!
Wondering how? Let’s see…
Step-by-Step Guide to Install Kali Linux on VirtualBox
📋
We are going to use a custom Kali Linux image made for VirtualBox specifically. You can also download the ISO file for Kali Linux and create a new virtual machine – but why do that when you have an easy alternative?
1. Download and install VirtualBox
The first thing you need to do is to download and install VirtualBox from Oracle’s official website.
Once you download the installer, double click on it to install VirtualBox.
2. Download ready-to-use virtual image of Kali Linux
After installing it successfully, head to Kali Linux download page to download the VM image for VirtualBox. If you change your mind about utilizing VMware, that is available too.
As the file size is around 3 GB, you should either use the torrent option or download it using a download manager, whichever is fastest for you.
3. Install Kali Linux on Virtual Box
Once you have installed VirtualBox and downloaded the Kali Linux 7z image, you just need to add it to VirtualBox in order to make it work.
Here’s how to add the VirtualBox image for Kali Linux:
Step 1: Extract the downloaded 7z file. You can use 7zip for extracting the file.
💡
The Kali Linux Virtual Machine storage will be on the same location as you extracted the 7z file. If you want a different location for the VM, you need to extract the 7z file to a location where you have sufficient storage available. I would never recommend the C: drive on Windows.
Step 2: Launch VirtualBox. You will notice an Add button – click on it.
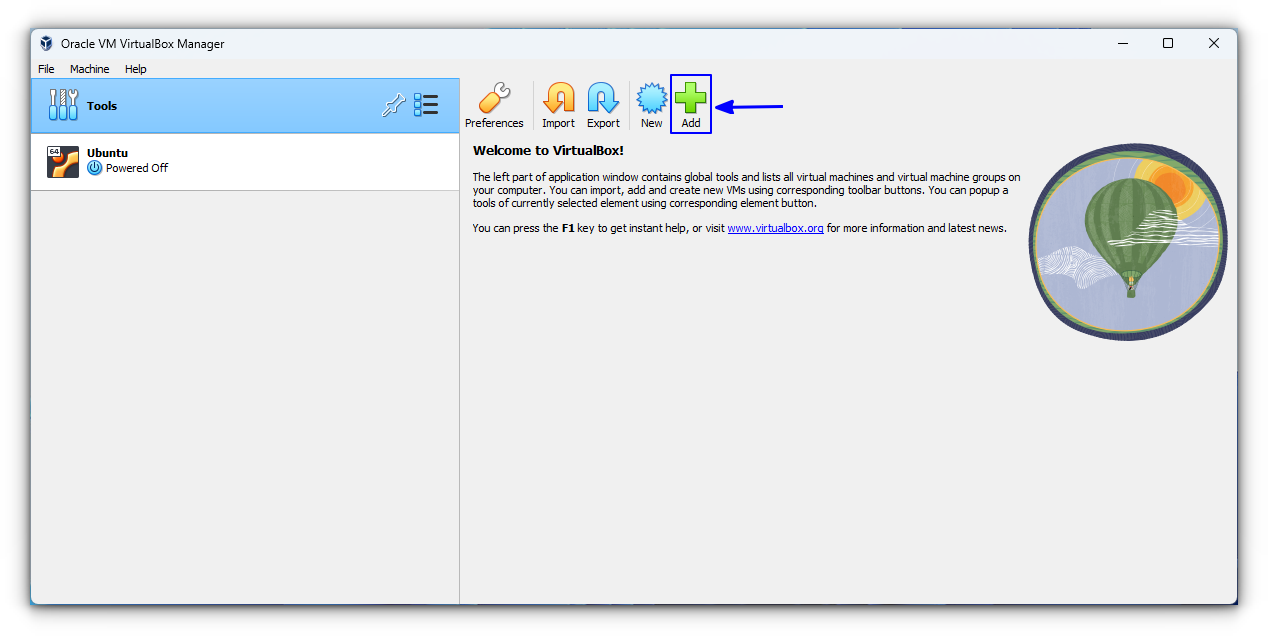
Step 3: Next, browse the folder you just downloaded and extracted. Choose the VirtualBox Machine Definition file to be added (as you can see in the image below). The file name should start with ‘kalilinux‘ and end with .vbox extension.
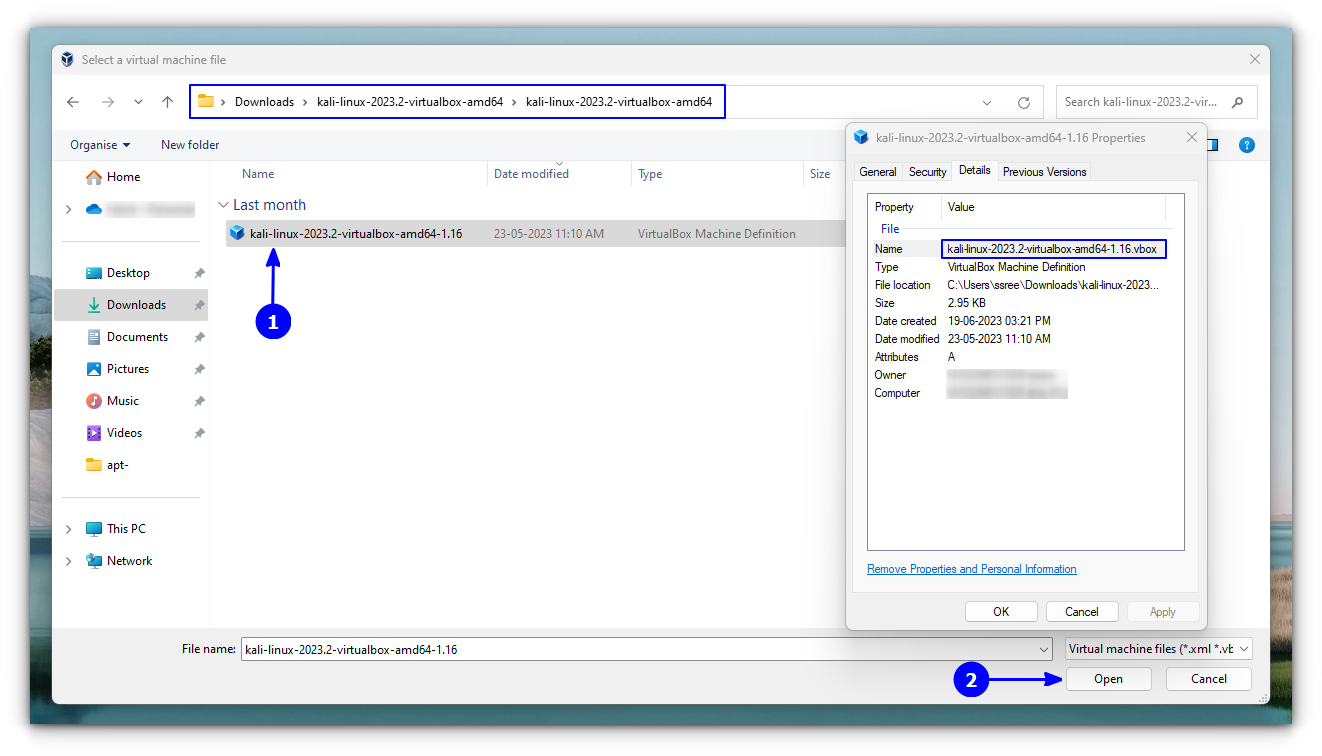
Once selected, proceed by clicking on Open.
Step 4: Now, you will be shown the settings for the virtual machine you are about to add. So, you can customize them or not – that is your choice. It is okay if you go with the default settings.
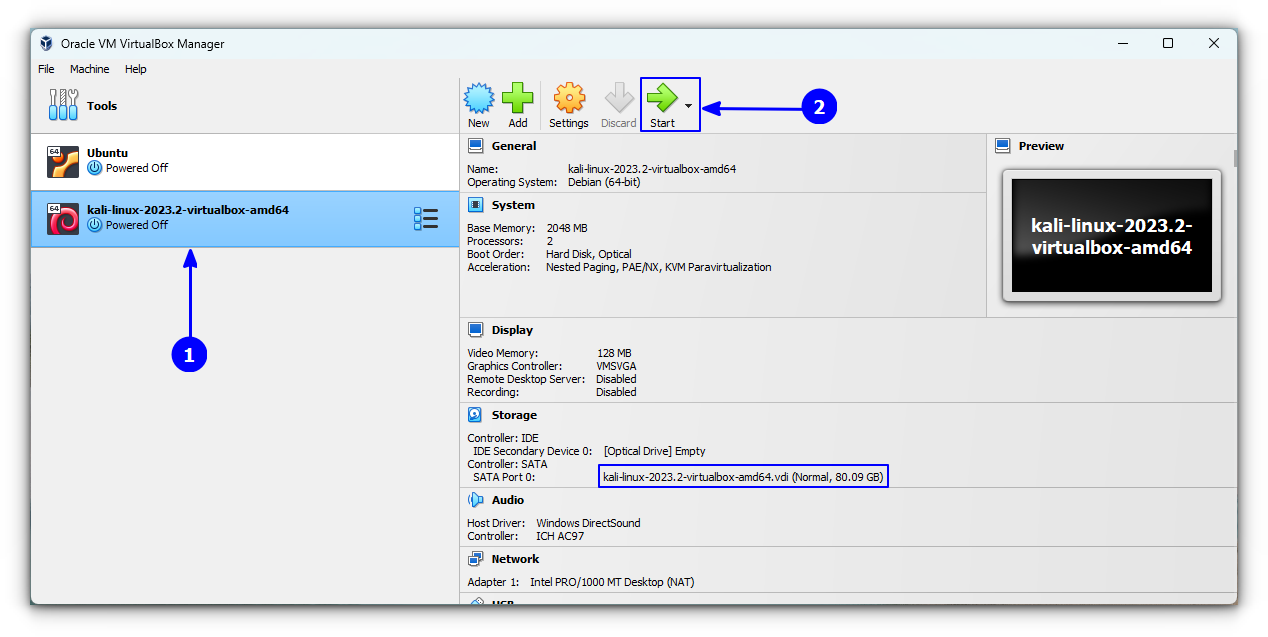
Here, the hard drives as VDI refer to virtually mounting the hard drives by allocating the storage space set.
After you are done with the settings, hit Start and wait for a while.
🚧
You might get an error at first for USB port 2.0 controller support, you can disable it to resolve it or just follow the on-screen instruction of installing an additional package to fix it. And, you are done!
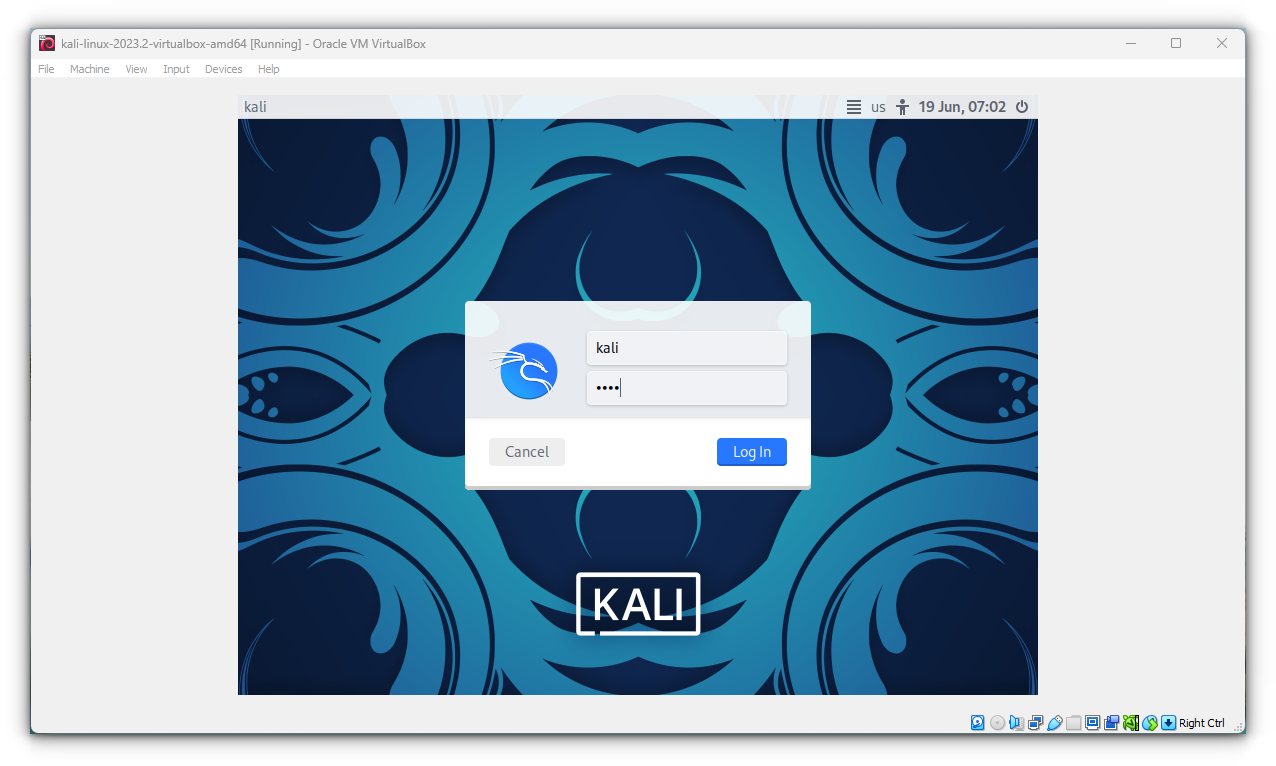
The default username in Kali Linux used to be root and the default password was toor. But since January 2020, Kali Linux is not using the root account.
Now, the default account and password both are kali.
You should be able to login to the system with it.
Do note that you should update Kali Linux before trying to install new applications or trying to hack your neighbor’s WiFi.
📋
The VirtualBox Guest Addition is pre-installed in the Live image since Kali Linux 2021.3.
Of course, Kali Linux has a lot of useful tools in it for penetration testing – so you can explore those after installation.
💡
Both Kali Linux and Ubuntu are Debian-based. If you face any issues or error with Kali Linux, you may follow the tutorials intended for Ubuntu or Debian on the internet.
Suggested Read 📖
How to Install Windows 10 in VirtualBox in Linux
Step by step screenshot guide to installing Windows 10 on Linux using VirtualBox.
 It’s FOSSAbhishek Prakash
How to install Kali Linux on VirtualBox using VDI
While you can always follow the instructions recommended above, there’s also another way of installing Kali Linux.
You will notice a VDI file when extracting the 7z file of Kali Linux. You can use this VDI file to create a Kali Linux Virtual Machine.
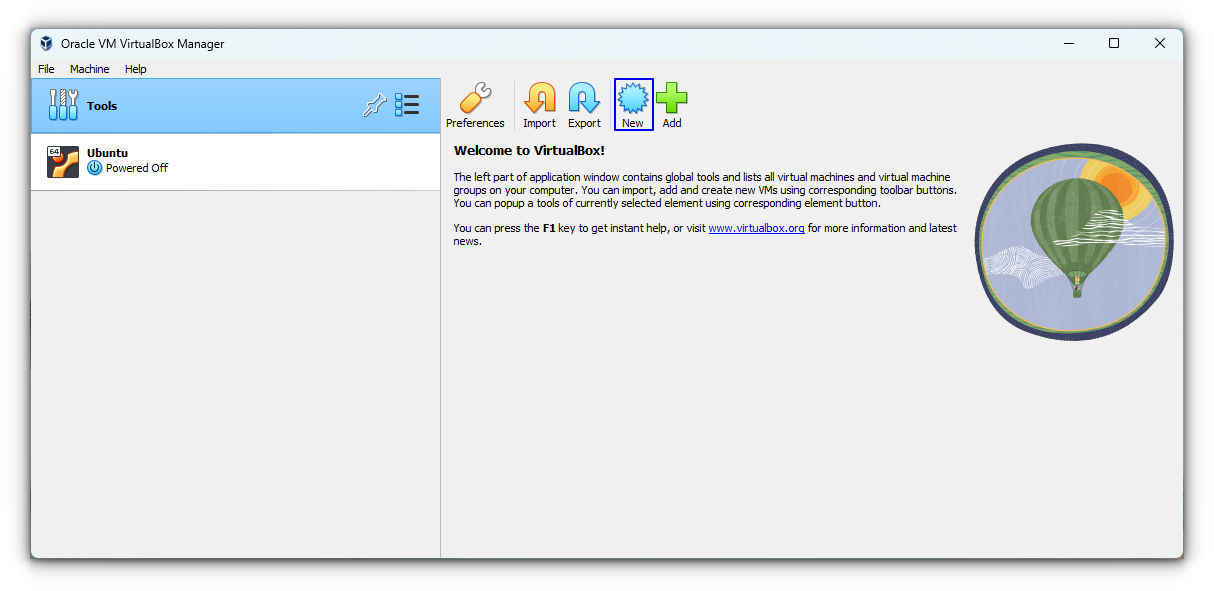
Open VirtualBox and select New option.
Now, go to expert mode on Virtual box.
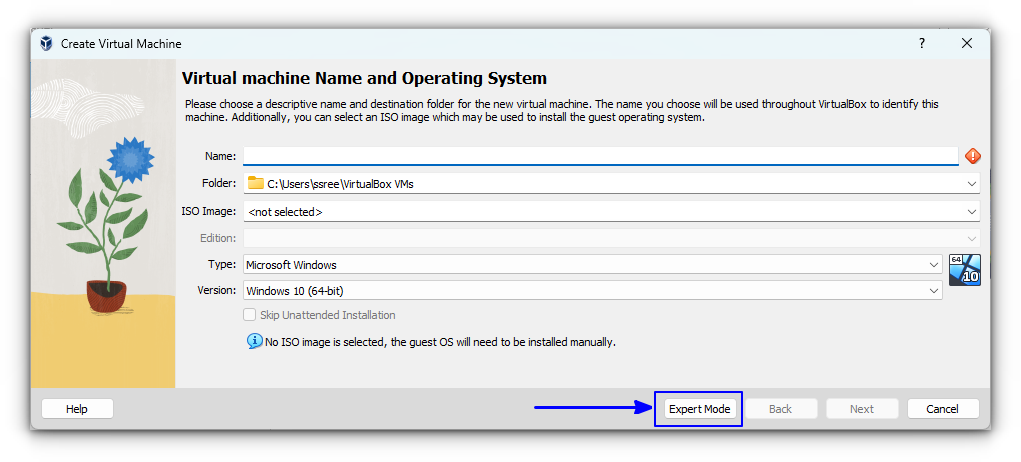
This is nothing but a comprehensive view of all the tweaks that we can do. From there, set all the things like below:
- Name of VM: Kali Linux
- Type: Linux
- Version: Debian 64-bit
- Under Hardware, Base Memory (RAM): 4GB (Recommended)
- Processors: More than one, as per availability
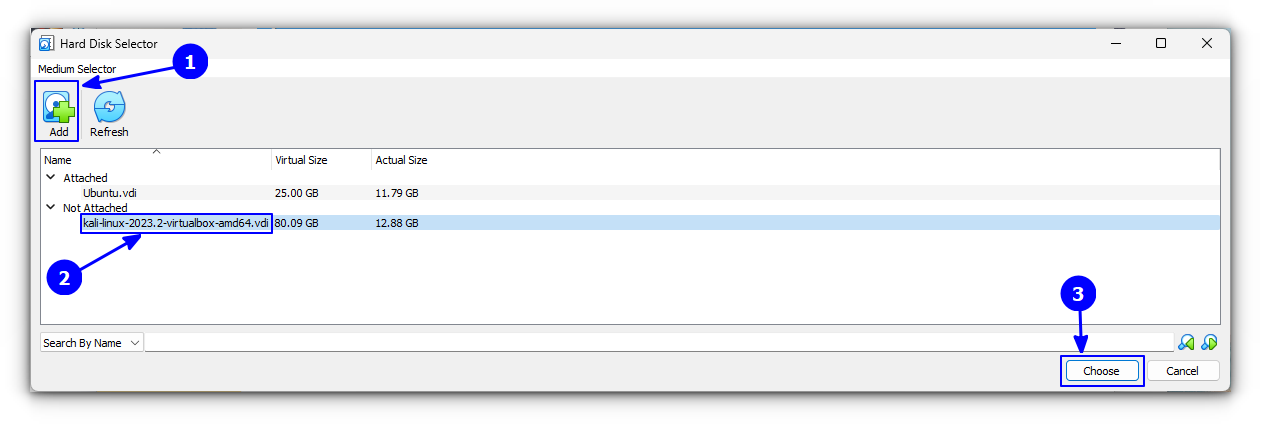
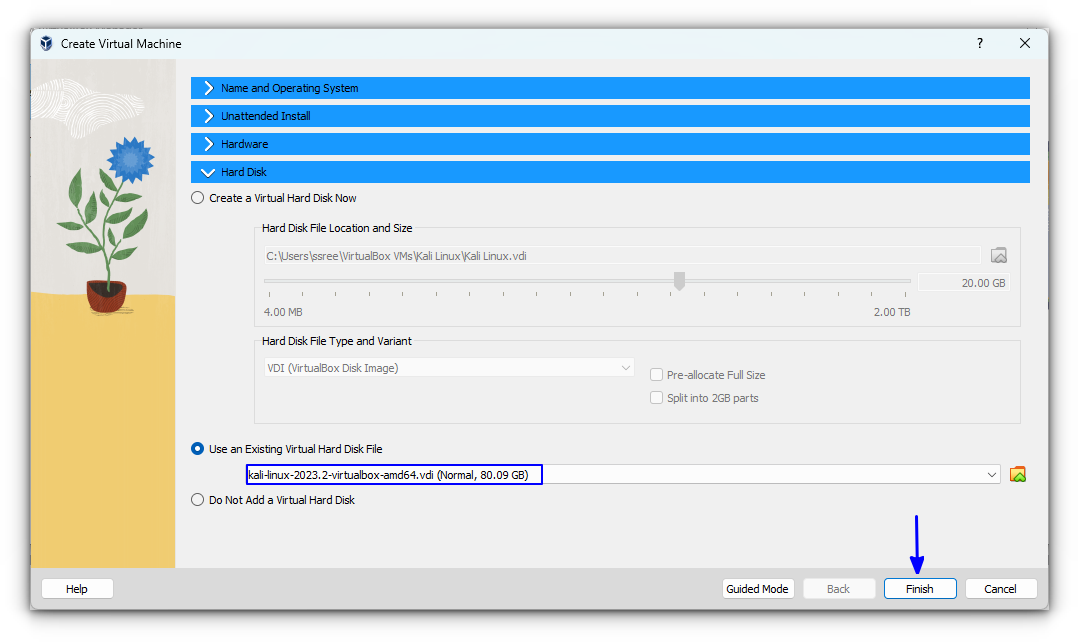
Now, for the Hard Disk part, select Use an existing Virtual Hard Disk File and browse for the extracted .vdi file of Kali Linux.
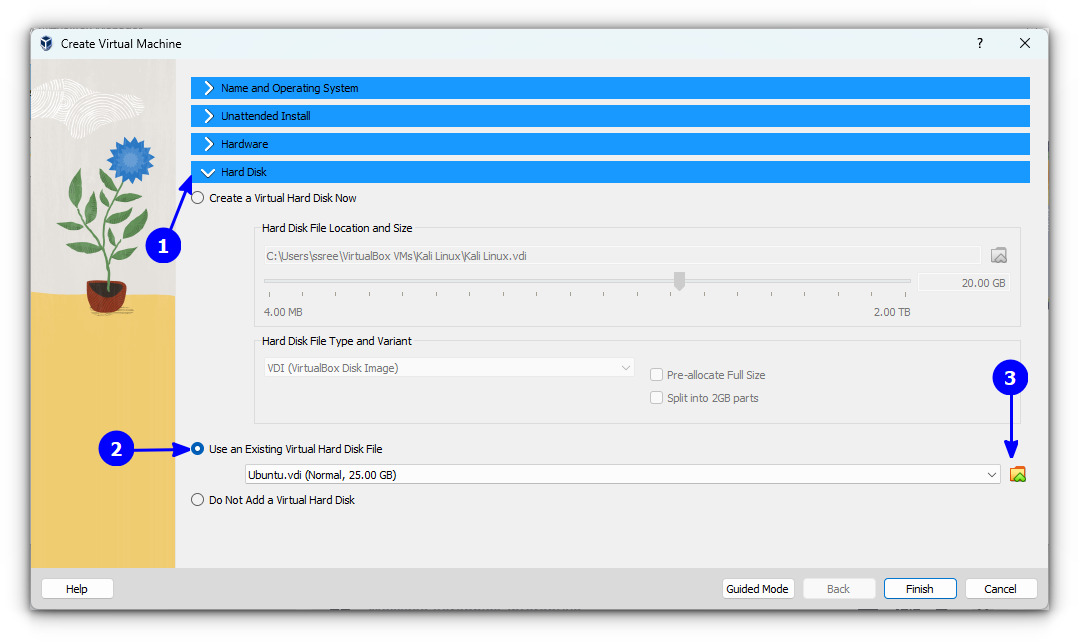
On the new dialog box, click on Add and search for the VDI file in resulting file browser. Once you find the file, select it and then press choose.
You can now press the Finish button.
The VM created will have several settings like Display Memory, Network etc set to default. You should give the Display memory as 128 MB and choose to enable 3D acceleration.
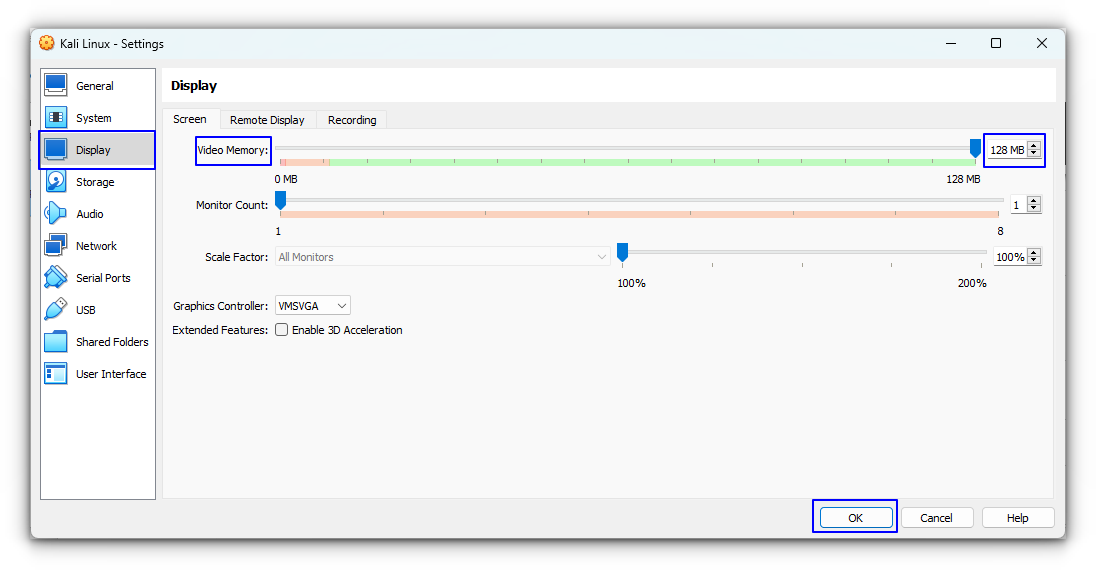
🚧
3D Acceleration may result in some issues.
You can now start the VM, and use username and password «kali» once asked to log in.
You can always install Kali Linux using the ISO file, which has same process like any other Linux distribution.
How to Install Linux Inside Windows Using VirtualBox
Using Linux in a virtual machine allows you to try Linux within Windows. This step-by-step guide shows you how to install Linux inside Windows using VirtualBox.
It’s FOSSAbhishek Prakash
Bonus: Free Kali Linux Guide
If you are just starting with Kali Linux, it will be a good idea to know how to use Kali Linux.
Offensive Security, the company behind Kali Linux, has created courses that explains the basics of Kali Linux, configuration, and more. It also has a few chapters on penetration testing and security tools.
Basically, it has everything you need to get started with Kali Linux. And the best thing is that the course is available for free. You can go to the portal to explore courses and certification exams, and learn them there.
Let us know in the comments below if you face an issue or simply share your experience with Kali Linux on VirtualBox. If you are curious, you can also try Kali Linux on Windows using WSL.
So you’re ready to get your hands dirty and start hacking? Excellent. If you haven’t set up a virtual machine before, the task can seem a little confusing. You’ve made a good choice using VirtualBox as your hypervisor, so that much is done. But even with that out of the way, there are still multiple methods to get Kali installed and running.
The good news is, we’re here to walk you through it. This article is designed to be followed along with. We will go over what VirtualBox is, in case you’re somewhat unclear as to why you need to use a program like that and discuss how it functions. Then we’ll cover all the system requirements you need and get VirtualBox downloaded and installed.
Finally, we’ll walk you through two methods to install Kali Linux and get your new hacking OS configured. So walk with us as we cover how to install Kali Linux on VirtualBox.
Table Of Contents
- What Is VirtualBox?
- Why Run Kali in a Virtual Machine and Not as My Main OS?
- System Requirements
- Downloading and Installing VirtualBox
- Downloading Kali Linux
- Performance and Set Up
- Conclusion
- Frequently Asked Questions
What Is VirtualBox?
To understand what VirtualBox is, you need to understand virtualization. Virtualization allows an operating system to operate within a contained environment on top of your existing operating system.
Simply put, you are creating a nearly fully functioning computer within your current computer. This new system (called a virtual machine) will respond to commands, run its own software, and access the internet as if it were its own physical machine.
Three terms you will need to know are “hypervisor,” “host,” and “guest.”
A hypervisor is a program that allows you to run a virtual machine. The virtual machine image is the operating system, the hypervisor is the digital equivalent of a physical computer.
A hypervisor tells the virtual machine how much RAM and disk space it can borrow from your physical computer, handles the networking end, and allows communication with peripherals connected to the physical machine, such as keyboard, mouse, USB drives, and external network adapters.
Host refers to the physical machine that is running the hypervisor. If you are running VirtualBox on a Windows Desktop, the Windows machine is the host. If you’re running it on a MacBook, the MacBook is the host. It will lend its physical resources, such as RAM, to the virtual machine.
Guest is the virtual machine. So to put it all together, your host is running a hypervisor, which in turn is running a guest operating system.
VirtualBox is a free and open source hypervisor created by Oracle. Due to its frequent updates, solid performance, and zero pricetag, it is often the go-to choice for home virtualization.
Why Run Kali in a Virtual Machine and Not as My Main OS?
You certainly can run Kali as your main operating system, but there are a lot of reasons to stick with using it as a virtual machine.
- Kali is not designed to be a primary operating system for day-to-day use (a daily driver). Regular daily-use operating systems should have a focus on tools like word processors, calendars, etc. That is not what Kali is primarily designed for.
- You will not have to dedicate hardware to Kali. Unless you are buying a laptop or desktop only for hacking, running it as a virtual machine is more convenient and less expensive.
- You will be running and storing malicious scripts on your Kali instance, opening ports, running temporary webservers, etc. It is safer to keep those sandboxed in a virtual environment.
- When practicing hacking, you will be running other virtual machines as targets. This will be easier to set up if everything is running on the same hypervisor.
- The hypervisor handles compatibility, so you won’t have to worry about Kali not being compatible with your hardware, such as your graphics or network card.
- A hypervisor allows you to take frequent snapshots easily, allowing you to roll back your Kali to an earlier state if you have a problem.
System Requirements
VirtualBox has low system requirements
- A processor capable of virtualization (check your CPU manufacturers page, but most modern computers shouldn’t have a problem)
- A minimum of 2GB RAM (4GB recommended)
- 300MB of hard disk space
In addition to the above, you will need enough resources for your Kali instance. Kali requires
- 20GB of hard disk space minimum
- 2GB RAM minimum (though allocating between 4GB and 6GB will improve performance)
Since VirtualBox will be handling other resource allocation, we do not need to worry about the CPU type or other compatibility issues.
See our choices for «Best Laptop for Kali Linux 2023» here.
Downloading and Installing VirtualBox
VirtualBox is available on Windows, macOS, Linux, and other lesser used systems. We will walk through installation on a Windows system, but the steps are essentially the same no matter what operating system you are using as your host.
First, visit the VirtualBox downloads page (www.virtualbox.org/wiki/Downloads) and select the platform package that matches your operating system. In our case, we will be choosing Windows hosts.
You will also want to download the VirtualBox Extension Pack (there is only one options that works for all supported operating systems).

Once downloaded, double-click the VirtualBox installer file and follow the prompts. The standard installation opens will be fine.
With VirtualBox installed, double-click the Extension Pack installer. You will be prompted with a warning. Click install.

You will be greeted with a licence agreement. Scroll to the bottom and click I Agree. You can now open VirtualBox.
Downloading Kali Linux
There are two different ways we can download and install Kali Linux. The first is the VirtualBox image file. This is by far the easiest and fastest method. The other is downloading the .iso file (essentially an installer disk) and go through the process manually.
There was a time when we may have suggested doing the manual install, but the VirtualBox image file is configured exactly how we need. None the less, we will present both ways for you.
Using a Virtual Machine Image
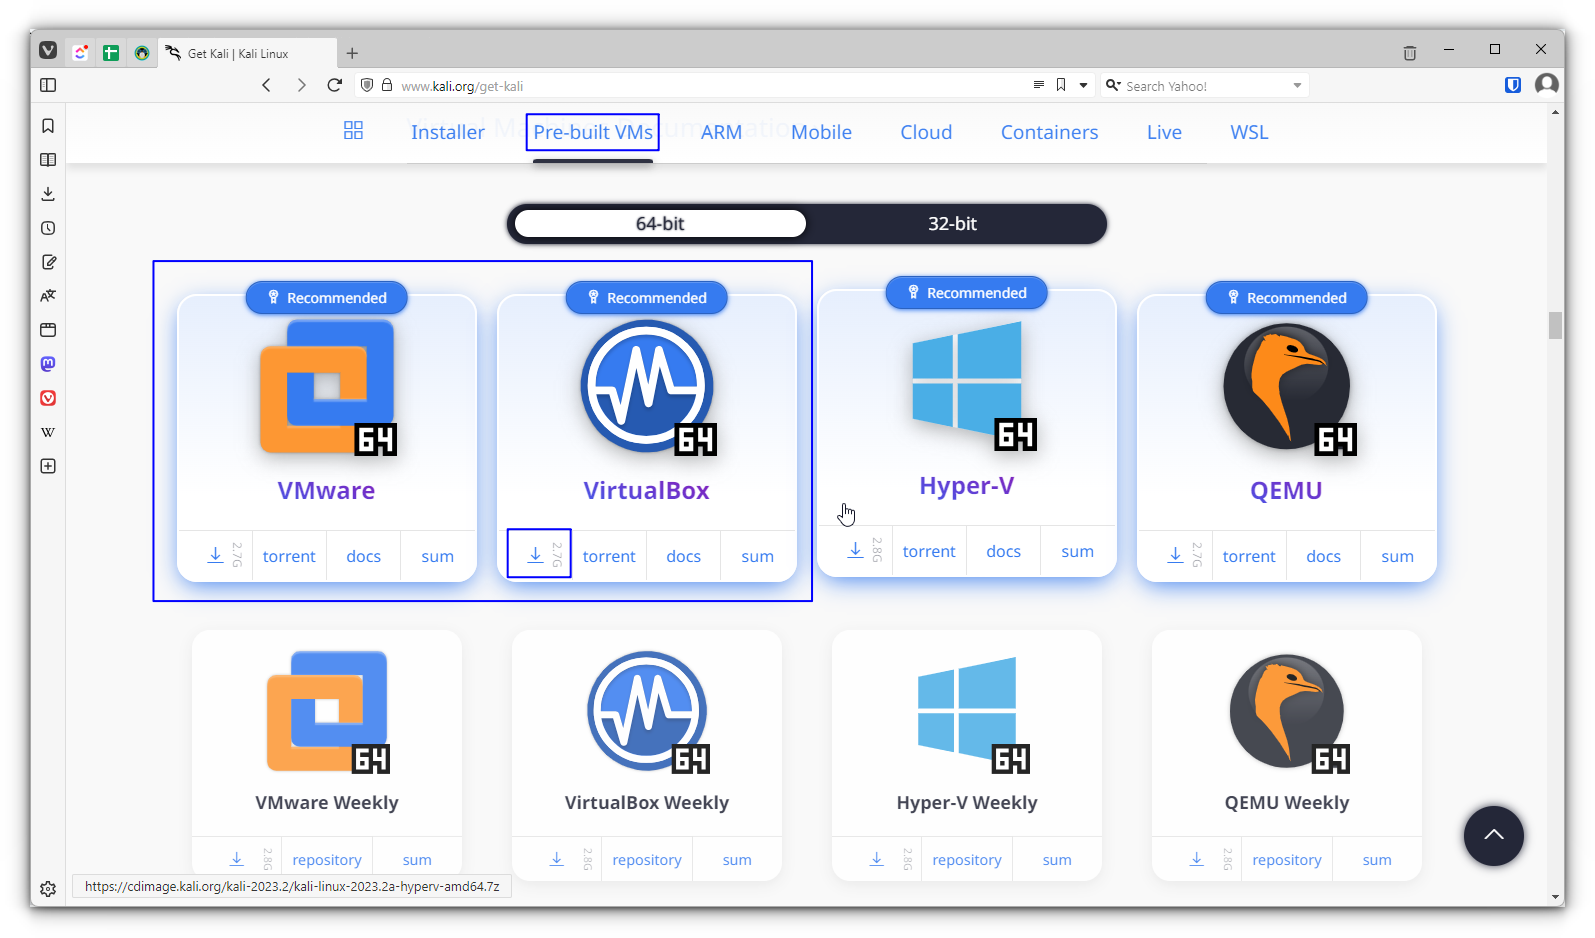
To install Kali Linux, go to the Kali Linux website, click the big Download icon, and select “Virtual Machines.”

You will want to download the VirtualBox 64-bit image file. As we said, this one is already pre-configured for VirtualBox, so you don’t have to go through the trouble of installing it as a fresh image.

Your download will finish as a zipped file. Double-click the downloaded file to open it with your default zip program. (Don’t have one? Try 7zip.) Once opened, drag the compressed file to a location of your choice and wait for the extraction to complete.

Navigate to the extracted folder and double-click on the .vbox file.

Once you click open, it will launch VirtualBox, and the virtual machine will appear listed in the left panel of your VM manager.

You can now launch Kali Linux by clicking the Start button with the green arrow up top. The default login credentials are
- Username kali
- Password kali
You should now have access to your Kali Linux attack box.

Installing Kali Linux From an ISO File
Let’s go back to the download page on the Kali Linux website. This time we will select the installer image section.

Keep the 64-bit options open. Now you have several choices.

You have the standard offline Installer, which is what we will be using in this article. It comes with the primary tools and requires no internet connection for the actual installation process. This is ideal if you were planning to put this on a USB and install has a host system as well.
You also have the Weekly image, which has the latest updates. Since we will be updating Kali anyway, let’s not worry about that option.
There is the Everything version, which has “every tool possible.” This isn’t entirely true, there are simply too many third-party tools out there, but it is a very loaded and powerful version. It is also 10GB at the time of writing. If you wish to go that route, it’s your call but likely unnecessary. The standard Kali is loaded with tools, and you will download others as needed during regular use.
Finally, you have NetInstaller, which downloads most of its content from the web during the installation process. It is a smaller initial download, but all it does is shift when the rest of the downloading happens.
Let’s stick with the standard Installer version for now.
Depending on your internet speed, this download may take a while.
Once you have the .iso, click New in VirtualBox.

You will be prompted to create a new machine. Name the machine whatever you like. VirtualBox will have a default folder, you can leave it as is or change the location. Lastly, choose the .iso image and click next.

VirtualBox will identify Kali as an Ubuntu image, which is fine for our purposes. You will be asked how much RAM and processing power you wish to use. The defaults are fine, but you will see better performance providing it 6GB of RAM and 2 CPUs (if you have that to spare).

You will have to allocate hard disk space for the VM. The minimum is 25GB, but you will need more than that as you save files and modify your system. If you have the room, 35GB if a good number to begin with.

Note the Pre-allocate Full Size option. If you click that, VirtualBox will immediately dedicate the entire selected size as a fixed hard drive. However, leaving it unclicked means the virtual machine will be in an elastic state. This is referred to as “dynamically allocated.”
When dynamically allocated, VirtualBox will only allocate how much space the system is actually using at the time (roughly 20GB after a new install) and will expand as needed to a maximum of the 25GB (or whatever you choose).
As far as the VM is concerned, it has that total amount of hard disk space at all times, it simply isn’t allocated until needed.
You will be shown a summary of your choices. When ready, click Finish.

We’re not done yet, however. In the VirtualBox manager, highlight the Kali instance and click Start. Now we have to install Kali like we would any other operating system.

Kali will boot and ask you how you wish to install. Choose Graphical install.

Kali will now begin loading files.

When asked, select your language, country, and keyboard layout. You will then be asked to choose a domain name — leave this blank and click Continue.
You will be asked to select a hostname (how will this machine appear on the network)…

A username (how you will login to the machine)…

And a password. We went with “kali” for everything.

For the disk partitioning, choose “Guided — use entire disk.”

Kali will only give you one option, so click Continue.

After reviewing, select “Finish partitioning and write changes to disk” and click Continue.

It will ask you to confirm. Select “Yes” and Continue.

The base system will install.

You will have the opportunity to select a desktop environment. Xfce is the lightest on resources and the most commonly used now. We also think it’s the best looking. Click Continue.

You will want to install the GRUB boot loader. Select Yes.

You do not need to set up the boot loader manually, so select the recommended hard disk and continue.

Kali will now reboot.

Once done, you will be taken to a login screen. Use your credentials (we used kali and kali) to log in.
You can update the Guest Additions by clicking “Devices” in the VirtualBox window and click “Upgrade Guest Additions.” Your manual install Kali is now complete.

Which Way Should I Use?
Doing an .iso installation gives you more control over the setup, but in truth, most of that is unnecessary. Our recommendation is to save yourself time and hassle and just use the VirtualBox machine image.
Whichever way you choose, be sure to run the following commands to get your Kali instance up to date.
Type sudo su to switch to the root account (you will be prompted for your password). Then type:
apt update && apt upgrade -y
This will install all needed updates and get your Kali OS to the latest release.

Other Articles You Might Like
- How to Create a Virtual Hacking Lab: The Ultimate Hacker Setup
- How to Install Kali Linux on VMware: The Ultimate How-to Guide
- How to Install Kali Linux on Raspberry Pi (And Why Do It?)
Performance and Set Up
With Kali now installed, there are some VirtualBox features you should be aware of.
Changing Your RAM
If you select the virtual machine in the management window, then click Settings in the top menu, you can navigate to the System tab and either raise or lower the RAM allocated.

Change Your Network Settings
Likewise, if you go to the Network tab in the Settings windows, you can add or remove network adapters, as well as change the settings to match your needs.

Creating Snapshots
It is always a good idea to create frequent snapshots of your virtual machine, so you can roll back to a previous version if something bad happens to your instance. Select the instance from the left hand panel, then click Take to create a snapshot. Give it a name and description.
You can also roll back to a previous snapshot or delete a snapshot from this panel.

Increasing Disk Space
If you select the virtual machine image, then click File, Tools, and Virtual Media Manager, you can adjust the size of the hard drive space given to the VM.


Conclusion
You now have all the information you need to get rolling with Kali Linux on VirtualBox. As you can see, VirtualBox has a well organized interface, allowing lots of control of your virtual machine instance both before and after installation.
Now that you have Kali set up, why not try building your own virtual hacking lab with our how-to guide? And don’t forget to check out our VIP Member Section for a huge selection of courses on how to hack using your new Kali Linux virtual machine.
Frequently Asked Questions
Why should I use VirtualBox?
VirtualBox is a frequently updated, free, highly popular, and well-designed hypervisor. It’s an excellent choice, as it’s easy to use and absolutely free.
What’s the difference between VirtualBox and VMWare?
VMWare is a competitor to Oracle (creator of VirtualBox). They have several different versions of personal use hypervisors. Their free version is highly limited in capabilities compared to VirtualBox. Their paid versions have a lot of features, but at a price:
• $149 for Workstation Player
• $199 for Workstation Pro
Why should I choose Kali Linux?
There are several options for hacking-focused operating systems. ParrotOS, Black Arch and BackBox are all built for penetration testing.
Kali is the most popular for several reasons, including the frequency of its updates, stability, a wide collection of tools, and the hacking distro created by Offensive Security, which is to be used for the famous OSCP certification exam.
Should I use an .iso image or VirtualBox image file for installation?
Use the VirtualBox image file. It’s a much faster and easier setup.
Level Up in Cyber Security: Join Our Membership Today!
-
Kristopher is the Content Manager at StationX. He’s a journalist, technology and business blogger, and CNVP who loves all things cyber. Combining his passion for technology with his skills in writing, he wants to bring you the most accurate and valuable information possible. You can always reach him on LinkedIn.
View all posts
