JupyterLab can be installed using conda, mamba, pip, pipenv or docker.
Warning
New versions of JupyterLab may break backwards compatibility with extensions and other
Jupyter customizations. As noted in Backwards Compatibility, Versions and Breaking Changes, JupyterLab development and
release cycles follow semantic versioning, so we recommend planning your installation and
upgrade procedures to account for possible breaking changes that may disrupt your usage
of JupyterLab and any related tools that are critical to your workflows.
conda#
If you use conda, you can install it with:
conda install -c conda-forge jupyterlab
mamba#
If you use mamba, you can install it with:
mamba install -c conda-forge jupyterlab
pip#
If you use pip, you can install it with:
If you are using a macOS version that comes with Python 2, run pip3
instead of pip.
If installing using pip install --user, you must add the user-level
bin directory to your PATH environment variable in order to launch
jupyter lab. If you are using a Unix derivative (FreeBSD, GNU/Linux,
macOS), you can do this by running export PATH="$HOME/.local/bin:$PATH".
pipenv#
If you use pipenv, you can install it as:
pipenv install jupyterlab
pipenv shell
or from a git checkout:
pipenv install git+git://github.com/jupyterlab/jupyterlab.git#egg=jupyterlab
pipenv shell
When using pipenv, in order to launch jupyter lab, you must activate the project’s virtualenv.
For example, in the directory where pipenv’s Pipfile and Pipfile.lock live (i.e., where you ran the above commands):
Alternatively, you can run jupyter lab inside the virtualenv with
Docker#
If you have Docker installed, you can install and use JupyterLab by selecting one
of the many ready-to-run Docker images
maintained by the Jupyter Team. Follow the instructions in the Quick Start Guide
to deploy the chosen Docker image.
Ensure your docker command includes the -e JUPYTER_ENABLE_LAB=yes flag to ensure
JupyterLab is enabled in your container.
Usage with JupyterHub#
Read the details on our JupyterLab on JupyterHub documentation page.
Supported browsers#
The latest versions of the following browsers are currently known to work:
-
Firefox
-
Chrome
-
Safari
Earlier browser versions may also work, but come with no guarantees.
JupyterLab uses CSS Variables for styling, which is one reason for the
minimum versions listed above. IE 11+ or Edge 14 do not support
CSS Variables, and are not directly supported at this time.
A tool like postcss can be used to convert the CSS files in the
jupyterlab/build directory manually if desired.
Installation problems#
If your computer is behind corporate proxy or firewall,
you may encounter HTTP and SSL errors due to the proxy or firewall blocking connections to widely-used servers. For example, you might see this error if conda cannot connect to its own repositories:
CondaHTTPError: HTTP 000 CONNECTION FAILED for url <https://repo.anaconda.com/pkgs/main/win-64/current_repodata.json>
Here are some widely-used sites that host packages in the Python and JavaScript open-source ecosystems. Your network administrator may be able to allow http and https connections to these domains:
-
pypi.org
-
pythonhosted.org
-
continuum.io
-
anaconda.com
-
conda.io
-
github.com
-
githubusercontent.com
-
npmjs.com
-
yarnpkg.com
Alternatively, you can specify a proxy user (usually a domain user with password),
that is allowed to communicate via network. This can be easily achieved
by setting two common environment variables: HTTP_PROXY and HTTPS_PROXY.
These variables are automatically used by many open-source tools (like conda) if set correctly.
# For Windows
set HTTP_PROXY=http://USER:PWD@proxy.company.com:PORT
set HTTPS_PROXY=https://USER:PWD@proxy.company.com:PORT

# For Linux / MacOS
export HTTP_PROXY=http://USER:PWD@proxy.company.com:PORT
export HTTPS_PROXY=https://USER:PWD@proxy.company.com:PORT
In case you can communicate via HTTP, but installation with conda fails
on connectivity problems to HTTPS servers, you can disable using SSL for conda.
Warning
Disabling SSL in communication is generally not recommended and involves potential security risks.
# Configure npm to not use SSL
conda config --set ssl_verify False
You can do a similar thing for pip.
The approach here is to mark repository servers as trusted hosts,
which means SSL communication will not be required for downloading Python libraries.
# Install pandas (without SSL)
pip install --trusted-host pypi.org --trusted-host files.pythonhosted.org pandas
Using the tips from above, you can handle many network problems
related to installing Python libraries.
Many Jupyter extensions require having working npm and jlpm (alias for yarn) commands,
which is required for downloading useful Jupyter extensions or other JavaScript dependencies. If npm cannot connect to its own repositories, you might see an error like:
ValueError: "@jupyterlab/toc" is not a valid npm package
You can set the proxy or registry used for npm with the following commands.
# Set proxy for NPM
npm config set proxy http://USER:PWD@proxy.company.com:PORT
npm config set proxy https://USER:PWD@proxy.company.com:PORT

# Set default registry for NPM (optional, useful in case if common JavaScript libs cannot be found)
npm config set registry http://registry.npmjs.org/
jlpm config set registry https://registry.yarnpkg.com/
In case you can communicate via HTTP, but installation with npm fails
on connectivity problems to HTTPS servers, you can disable using SSL for npm.
Warning
Disabling SSL in communication is generally not recommended and involves potential security risk.
# Configure npm to not use SSL
npm set strict-ssl False
Project Jupyter’s tools are available for installation via the Python Package Index, the leading repository of software created for the Python programming language.
This page uses instructions with pip, the recommended installation tool for Python. If you require environment management as opposed to just installation, look into conda, mamba, pipenv, and Homebrew.
JupyterLab
Install JupyterLab with pip:
Note: If you install JupyterLab with conda or mamba, we recommend using the conda-forge channel.
Once installed, launch JupyterLab with:
Jupyter Notebook
Install the classic Jupyter Notebook with:
To run the notebook:
Voilà
Install Voilà with:
Once installed, launch Voilà with:
Homebrew
Homebrew is a package manager for macOS and Linux.
You can use it to install Jupyter by running:
Working with the ‘jupyter’ Notebook is familiar to everybody who is engaged in developing through Python. This is an ‘iPython’ console which is regarded as the best for carrying out data analysis and machine learning related work. The notebook provides easy code execution and displays various graphs and glyphs within the console. Also, it provides the provision to download Python packages within its console and allows users to carry out web scraping related activities. But, what if I tell you that there is more to it that is; there is one cooler version of this ‘jupyter’ that provides more no. of features than this obsolete one.
Yes, the name of this advanced jupyter is jupyter Lab. It is an extension to the normal jupyter Notebook as it allows users to work in multiple files. This can be elaborated as jupyter Lab provides much functionality that users can access at the same time while working with a notebook like opening the text editor that is provided within jupyter lab, opening Markdown editor, opening the command prompt, python console. This makes jupyter lab more robust and acceptable by Python developers out there. We can even replicate our present iPython notebook into many to view our work more easily.
All the work that we have done can either be saved to our local system or can be saved within the Jupyter lab. So, it acts as a vault in saving our work to access it in the future. Also, this lab comes with a provision to set different themes we like (Dark and White) and also increase and decrease the UI size as per our comfort. These things make this a powerful tool when it comes to performing data analytics related work as well as general Python related development.
So, how to download jupyter Lab for our Windows operating system and how to open the same??? The answer to this question is given below:
Pre Requisites
- Python
- Pip should be installed within the system.(mostly it will be installed while installing python)
- Good internet connection.
Installing Jupyter Lab via Python Through Terminal:
The installation steps of this tool are just like other packages that is can be installed through pip.
- Just open your terminal (if your using windows open cmd)
- Just type in the command prompt:
pip install jupyterlab
Enter fullscreen mode
Exit fullscreen mode
After the installation finishes type command within the command prompt and wait for the browser to open jupyter lab for you.
jupyter lab
   (or)
python  -m jupyterlab
Enter fullscreen mode
Exit fullscreen mode
We can install jupyterlab through anaconda, and desktop version also available.
click here to try the jupyterlab
Conclusion
We can conclude that Jupyter lab dominates over the normal Jupyter and one must prioritize this rather than going with the Jupyter installation..
Содержание страницы
Jupyter Notebook — это среда разработки для написания и выполнения кода Python. Некоммерческая организация Project Jupyter с открытым исходным кодом поддерживает программное обеспечение. Он состоит из последовательности ячеек, каждая из которых содержит небольшой пример кода или документацию в формате Markdown. Разработчики могут выполнить ячейку и увидеть ее вывод сразу под кодом. Гениальный дизайн создает мгновенную петлю обратной связи, позволяя программисту запускать свой код и вносить в него соответствующие изменения.
Ячейки Jupyter Notebook также поддерживают аннотации, аудиофайлы, видео, изображения, интерактивные диаграммы и многое другое. Это еще одно важное преимущество программного обеспечения; вы можете рассказать историю с вашим кодом. Читатели могут видеть шаги, которые вы выполнили, чтобы получить результат.
Вы можете импортировать пакеты Python, такие как pandas, NumPy или TensorFlow, прямо в Блокнот.
Jupyter Notebook – это веб-оболочка для Ipython (ранее называлась IPython Notebook). Это веб-приложение с открытым исходным кодом, которое позволяет создавать и обмениваться документами, содержащими живой код, уравнения, визуализацию и разметку.
Первоначально IPython Notebook ограничивался лишь Python в качестве единственного языка. Jupyter Notebook позволил использовать многие языки программирования, включая Python, R, Julia, Scala и F#.
Установка/инсталляция Jupyter Notebook — pip3 install jupyter
Install Jupyter Notebook на Ubuntu 20.14
Установка классического блокнота Jupyter без виртуальной среды осуществляется очень просто. Для этого необходимо запустить 2 команды:
pip install notebook
После этого на вашей рабочей машине установится jupyter notebook. Теперь его необходимо запустить командой:
jupyter notebook
Откроется окно по адресу localhost:8888/

Install Jupyter Notebook на Windows
Аналогично без виртуальной среды блокнот Jupyter можно установить и на винду. Запускаем команду:
pip install notebook
и после завершения установки запускаем команду:
jupyter-notebook

Установка Jupyter Notebook в Docker через Docker-Compose
todo
Установка Jupyter Notebook через virtual env на Windows
Создаем директорию проекта, например:
D:\#python#\#env\jupyter\
Далее в этой директории создаем виртуальную среду с помощью команды:
python3 -m venv venv
или
python -m venv venv
Далее переходим в директорию D:\#python#\#env\jupyter\venv\Scripts и запускаем activate. Должна активироваться среда venv:
D:\#python#\#env\jupyter\venv\Scripts>activate
(venv) D:\#python#\#env\jupyter\venv\Scripts>
Далее запустите в активированной виртуальной среде venv установку jupyter notebook:
(venv) D:\#python#\#env\jupyter\venv\Scripts>pip install notebook
Collecting notebook
  Using cached notebook-6.4.10-py3-none-any.whl (9.9 MB)
Collecting jupyter-client>=5.3.4
  Downloading jupyter_client-7.2.2-py3-none-any.whl (130 kB)
     |████████████████████████████████| 130 kB 128 kB/s
Collecting nbconvert>=5
  Using cached nbconvert-6.4.5-py3-none-any.whl (561 kB)
.....
.....
.....
Installing collected packages: .....
Successfully installed .....
После завершения установки внутри venv нужно подняться в корень директории jupyter и запустить jupyter-notebook:
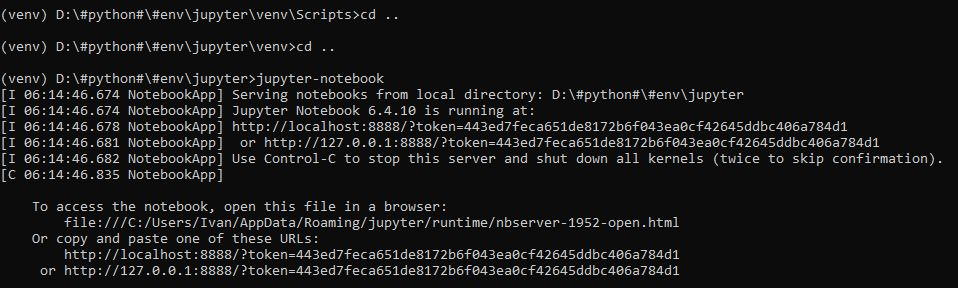
(venv) D:\#python#\#env\jupyter\venv\Scripts>cd ..

(venv) D:\#python#\#env\jupyter\venv>cd ..

(venv) D:\#python#\#env\jupyter>jupyter-notebook

[I 06:14:46.674 NotebookApp] Serving notebooks from local directory: D:\#python#\#env\jupyter
[I 06:14:46.674 NotebookApp] Jupyter Notebook 6.4.10 is running at:
[I 06:14:46.678 NotebookApp] http://localhost:8888/?token=443ed7feca651de8172b6f043ea0cf42645ddbc406a784d1
[I 06:14:46.681 NotebookApp]  or http://127.0.0.1:8888/?token=443ed7feca651de8172b6f043ea0cf42645ddbc406a784d1
[I 06:14:46.682 NotebookApp] Use Control-C to stop this server and shut down all kernels (twice to skip confirmation).
[C 06:14:46.835 NotebookApp]
    To access the notebook, open this file in a browser:
        file:///C:/Users/Ivan/AppData/Roaming/jupyter/runtime/nbserver-1952-open.html
    Or copy and paste one of these URLs:
        http://localhost:8888/?token=443ed7feca651de8172b6f043ea0cf42645ddbc406a784d1
     or http://127.0.0.1:8888/?token=443ed7feca651de8172b6f043ea0cf42645ddbc406a784d1
Выглядит это так:
Откроется окно в браузере:
 Повторный запуск среды осуществляется из виртуальной среды (сначала ее нужно активировать).
Установка Jupyter Notebook через virtual env на Ubuntu 20.14
# Создаем директорию проекта с виртуальной средой
mkdir jupyter-env

# Переходим внутрь проекта
cd jupyter-env

# Создаем среду myenv
python3 -m venv myenv

# Активируем среду
source myenv/bin/activate

# Запускаем установку jupyter
pip install notebook

# Запускаем jupyter notebook внутри venv
jupyter notebook

Как устроен Jupyter Notebook. Как работает Jupyter Notebook
Общий вид Jupyter Notebook
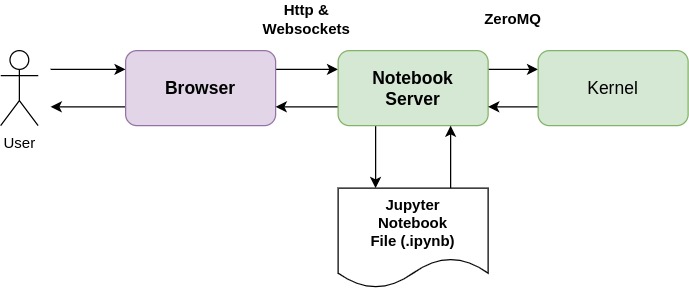 Сначала пользователь взаимодействует с браузером, после чего на сервер Notebook отправляется запрос. Это может быть запрос HTTP или WebSocket.
Если код пользователя должен быть выполнен, сервер ноутбука отправляет его ядру (kernel) в сообщениях ZeroMQ. Ядро возвращает результаты выполнения.
Затем сервер Notebook возвращает пользователю HTML-страницу. Когда пользователь сохраняет документ, он отправляется из браузера на сервер Notebook. Сервер сохраняет его на диске в виде файла JSON с .ipynb расширением. Этот файл блокнота содержит код, выходные данные и примечания в формате markdown.
Ядро (Kernel) ничего не знает о документе блокнота: оно просто получает отправленные ячейки кода для выполнения, когда пользователь запускает их.
Блокноты Jupyter — это структурированные данные, которые представляют ваш код, метаданные, контент и выходные данные.
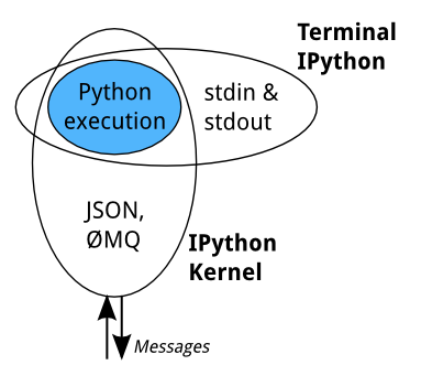
IPython Kernel (Ядро IPython)
Когда мы обсуждаем IPython, мы говорим о двух основных ролях:
- Terminal IPython как знакомый REPL.
- Ядро IPython, которое обеспечивает вычисления и связь с внешними интерфейсами, такими как ноутбук.
REPL – это форма организации простой интерактивной среды программирования в рамках средств интерфейса командной строки (REPL, от англ. Read-Eval-Print-Loop — цикл «чтение — вычисление — вывод»), которая поставляется вместе с Python. Чтобы запустить IPython, просто выполните команду ipython из командной строки/терминала.
Terminal IPython
Когда вы набираете ipython, вы получаете исходный интерфейс IPython, работающий в терминале. Он делает что-то вроде этого (упрощенная модель):
while True:
    code = input(">>> ")
    exec(code)
Эту модель часто называют REPL или Read-Eval-Print-Loop.
IPython Kernel
Все остальные интерфейсы — notebook, консоль Qt, ipython console в терминале и сторонние интерфейсы — используют Python Kernel.
Python Kernel — это отдельный процесс, который отвечает за выполнение пользовательского кода и такие вещи, как вычисление possible completions (возможных завершений). Внешние интерфейсы, такие как блокнот или консоль Qt, взаимодействуют с ядром IPython, используя сообщения JSON, отправляемые через сокеты ZeroMQ (протокол, используемый между интерфейсами и ядром IPython).
Основной механизм выполнения ядра используется совместно с терминалом IPython:
Jupyter Lab
Проект Jupyter приобрел большую популярность не только среди специалистов по данным, но и среди инженеров-программистов. На тот момент Jupyter Notebook был предназначен не только для работы с ноутбуком, поскольку он также поставлялся с веб-терминалом, текстовым редактором и файловым браузером. Все эти компоненты не были объединены вместе, и сообщество пользователей начало выражать потребность в более интегрированном опыте.
На конференции SciPy 2016 был анонсирован проект JupyterLab. Он был описан как естественная эволюция интерфейса Jupyter Notebook.
Кодовая база Notebook устарела, и ее становилось все труднее расширять. Стоимость поддержки старой кодовой базы и реализации новых функций поверх нее постоянно росла.
Разработчики учли весь опыт работы с Notebook в JupyterLab, чтобы создать надежную и чистую основу для гибкого интерактивного взаимодействия с компьютером и улучшенного пользовательского интерфейса.
Ценность Jupyter Notebook/JupyterLab для аналитиков данных
Разница между профессией data analyst/data scientist от разработки ПО заключается в отсутствии чёткого ТЗ на старте. Правильная постановка задачи в сфере анализа данных — это уже половина решения.
Первым этапом производится детальный анализ Initial Data (исходных данных) или Exploratory Data Analysis (Разведочный анализ данных), затем выдвигается одна или несколько гипотез. Эти шаги требуют значительных временных ресурсов.
Поэтому, понимание, как организовать процесс разработки (что нужно делать в первую очередь и чем можно будет пренебречь или исключить), начинает приходить во время разработки.
Исходя из этих соображений тратить силы на скурпулёзное и чистый код, git и т.д. бессмысленно — в первую очередь становится важным быстро создавать прототипы решений, ставить эксперименты над данными. Помимо этого, достигнутые результаты и обнаруженные инсайты или необычные наблюдения над данными приходится итерационно презентовать коллегам и заказчикам (внешним или внутренним). Jupyter Notebook или JupyterLab позволяет выполнять описанные задачи с помощью доступного функционала без дополнительных интеграций:

По факту, JupyterLab — это лабораторный журнал 21 века с элементами интерактивности, в котором вы можете оформить результаты работы с данными в формате markdown с использованием формул из latex. Также в JupyterLab можно писать и запускать код, вставлять в отчет картинки, отрисовывать графики, таблицы, дашборды.
Установка JupyterLab на Ubuntu 20.14
Установка производится одной командой
pip install jupyterlab
После инсталляции запустите команду
jupyter-lab
И откроется интерфейс:
Установка JupyterLab на Windows
Инсталляция и запуск на винде производится аналогично, как и на Ubuntu, командой pip instal jupyterlab.
В чем разница между Jupyter Notebook и JupyterLab?
Jupyter Notebook — это интерактивная вычислительная среда с веб-интерфейсом для создания документов Jupyter Notebook. Он поддерживает несколько языков, таких как Python (IPython), Julia, R и т.д., и в основном используется для анализа данных, визуализации данных и дальнейших интерактивных исследовательских вычислений.
JupyterLab — это пользовательский интерфейс нового поколения, включая ноутбуки. Он имеет модульную структуру, в которой вы можете открыть несколько записных книжек или файлов (например, HTML, Text, Markdowns и т.д.) в виде вкладок в одном окне. Он предлагает больше возможностей, подобных IDE.
Новичку я бы посоветовал начать с Jupyter Notebook, так как он состоит только из файлового браузера и представления редактора (Notebook). Это проще в использовании. Если вам нужны дополнительные функции, переключитесь на JupyterLab. JupyterLab предлагает гораздо больше функций и улучшенный интерфейс, который можно расширить с помощью расширений: JupyterLab Extensions.
Начиная с версии 3.0, JupyterLab также поставляется с визуальным отладчиком, который позволяет интерактивно устанавливать точки останова, переходить к функциям и проверять переменные.
JupyterLab — это совершенно фантастический инструмент как для создания plotly фигур, так и для запуска полных приложений Dash как встроенных, в виде вкладок, так и внешних в браузере.
Основы работы и обзор функциональности Jupyter Notebook
Из чего состоит Jupiter Notebook
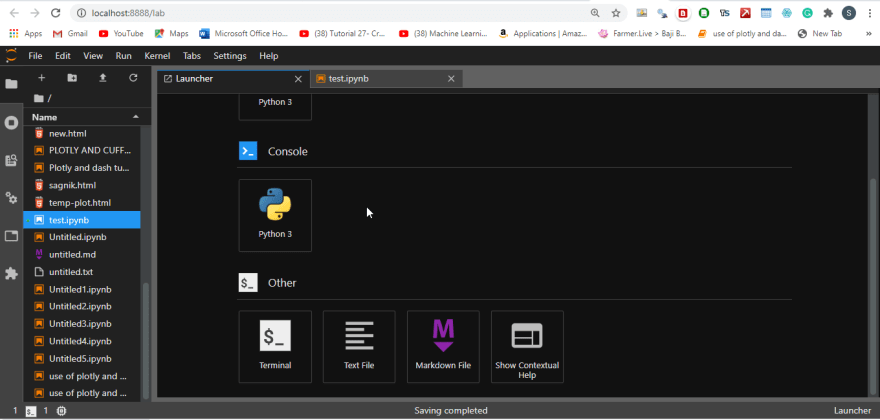
Если щелкнуть по файлу с расширением .ipynb, откроется страница с Jupiter Notebook.
Отображаемый Notebook представляет собой HTML-документ, который был создан Jupyter и IPython. Он состоит из нескольких ячеек, которые могут быть одного из трех типов:
- Сode (активный программный код),
- Markdown (текст, поясняющий код, более развернутый, чем комментарий),
- Raw NBConvert (пассивный программный код).
Jupyter запускает ядро IPython для каждого Notebook.
Ячейки, содержащие код Python, выполняются внутри этого ядра и результаты добавляются в тетрадку в формате HTML.
Двойной щелчок по любой из этой ячеек позволит отредактировать ее. По завершении редактирования содержимого ячейки, нажмите Shift + Enter, после чего Jupyter/IPython проанализирует содержимое и отобразит результаты.
Если выполняемая ячейка является ячейкой кода, это приведет к выполнению кода в ячейке и отображению любого вывода непосредственно под ним. На это указывают слова «In» и «Out», расположенные слева от ячеек.
Магические функции Jupiter Notebook
Все magic-функции (их еще называют magic-командами) начинаются
- со знака %, если функция применяется к одной строке,
- и %%, если применяется ко всей ячейке Jupyter.
Чтобы получить представление о времени, которое потребуется для выполнения функции, приведенной выше, мы воспользуемся функцией %timeit.
%timeit
%timeit – это magic-функция, созданная специально для работы с тетрадками Jupyter. Она является полезным инструментом, позволяющим сравнить время выполнения различных функций в одной и той же системе для одного и того же набора данных.
%matplotlib inline
%matplotlib inline позволяет выводит графики непосредственно в тетрадке.
На экранах с высоким разрешением типа Retina графики в тетрадках Jupiter по умолчанию выглядят размытыми, поэтому для улучшения резкости используйте
%config InlineBackend.figure_format = 'retina'
после %matplotlib inline.
jupyter markdown
туду
jupyter server
туду
jupyter config
туду
jupyter hub
JupyterHub: позволяет предоставлять нескольким пользователям (группам сотрудников) доступ к Notebook и другим ресурсам. Это может быть полезно для студентов и компаний, которые хотят, чтобы группа (группы) имела доступ к вычислительной среде и ресурсам и использовала их без необходимости установки и настройки. Управление которыми могут осуществлять системные администраторы. Доступ к отдельным блокнотам и JupyterLab можно получить через Hub. Hub может работать в облаке или на собственном оборудовании группы.
jupyter команды
туду
pycharm jupyter
туду
Виджеты Jupyter
Виджеты можно использовать для интерактивных элементов в блокнотах (например, ползунок).
Jupyter Widgets — это событийные объекты Python, которые имеют представление в браузере, часто в виде элемента управления, такого как ползунок, текстовое поле и т. д.
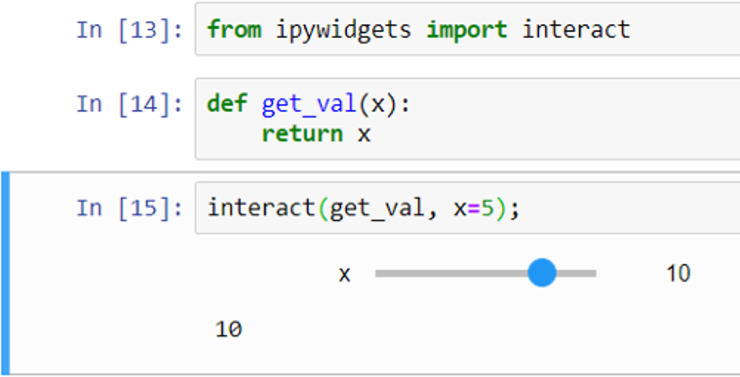
Вы можете использовать виджеты для создания интерактивных графических интерфейсов для своих ноутбуков.
Вы также можете использовать виджеты для синхронизации информации с сохранением состояния и без сохранения состояния между Python и JavaScript.
Чтобы использовать структуру виджетов, вам необходимо импортировать файлы ipywidgets.
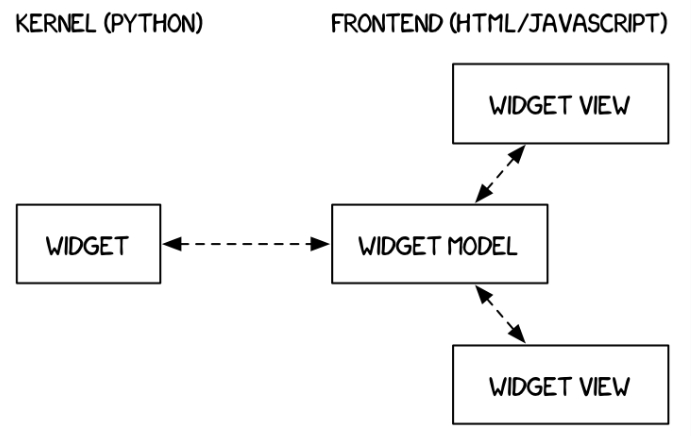
Почему отображение одного и того же виджета дважды работает?
Виджеты представлены в бэкенде одним объектом. Каждый раз, когда отображается виджет, во внешнем интерфейсе создается новое представление того же объекта. Эти представления называются представлениями.
Несколько самых популярных виджетов:

Чтобы начать использовать библиотеку, нам нужно установить расширение ipywidgets. Для pip это будет двухэтапный процесс:
- установить и
- включить
pip install ipywidgets
jupyter nbextension enable --py widgetsnbextension
Tips & Tricks / Советы, рекомендации и фишки при работе с Jupyter Notebook
todo
Подборка видео по Jupyter
Как использовать Jupyter (ipython-notebook) на 100%
Jupyter Notebook Tutorial (Eng)
- 00:00 Introduction
- 01:35 Jupyter notebook example
- 04:11 Installing Python and Jupyter notebooks
- 09:23 Launching Jupyter notebooks
- 11:08 Basic notebook functionality
- 20:58 The kernel, and variables
- 28:38 Other notebook functionality
- 34:45 The menu
- 35:52 Jupyter notebook keyboard shortcuts
- 36:57 Load and display data using pandas
- 40:33 Using terminal commands inside a Jupyter notebook
- 42:30 Jupyter notebook magic commands
- 45:07 Other features outside of the notebooks
- 46:41 Shutting down Jupyter notebooks
- 48:02 Jupyter notebook extensions and other libraries
- 52:47 Conclusion, and thank you
Jupyterlab — STOP Using Jupyter Notebook! Here’s the Better Tool
…
5
3
голоса
Рейтинг статьи
JupyterLab Desktop
JupyterLab Desktop is the cross-platform desktop application for JupyterLab. It is the quickest and easiest way to get started with Jupyter notebooks on your personal computer, with the flexibility for advanced use cases.

Installation
If you have an existing JupyterLab Desktop installation, please uninstall it first by following the uninstall instructions.
- Debian, Ubuntu Linux Installer
- Red Hat, Fedora, SUSE Linux Installer
- macOS Intel Installer, macOS Apple silicon Installer
- Windows Installer
Additionally, JupyterLab Desktop can be installed on Windows via winget: winget install jupyterlab.
Please check out the Python Environment Customization Guide if you plan to customize the Python environment to add new packages.
Launching JupyterLab Desktop
JupyterLab Desktop can be launched from the GUI of your operating system by clicking the application’s icon or by using jlab command from the command line. Double clicking .ipynb files is also supported and it will launch JupyterLab Desktop and load the notebook file.
JupyterLab Desktop sets File Browser’s root directory based on the launch method.
- If launched from the application icon on GUI or by using
jlabcommand without any arguments, then the default working directory is set as the root directory. The default working directory is user home directory but it can be customized from the Settings dialog. - If launched by double clicking
.ipynbfile orjlabcommand with a file path as the argument, then file’s parent directory is set as the root directory. Similarly, if a file is opened using theOpen...orOpen File...links in the Start section or by using drag & drop, then file’s parent directory is set as the root directory. - If
jlabcommand is used with a directory path as the argument or with the--working-dirargument then the directory in the argument is set as the root directory. Similarly, if a folder is opened using theOpen Folder...link in the Start section or by using drag & drop, then the opened directory is set as the root directory
Sessions and Projects
Sessions represent local project launches and connections to existing JupyterLab servers. Each JupyterLab UI window in the app is associated with a separate session and sessions can be restored with the same configuration later on.
Each launch of JupyterLab in a different working directory is a separate project and projects can have their own configuration such as Python environment and UI layout.
Session start options
You can start a new session by using the links at the Start section of the Welcome Page.

New notebook...creates a new notebook in the default working directory.New session...launches a new JupyterLab session in the default working directory.Open...starts a new JupyterLab session in the selected working directory. If files are chosen, selected files’ parent directory becomes the working directory and selected files are opened in the session. On Windows and LinuxOpen Folder...andOpen Files...options are presented as separate items.Connect...creates a session by connecting to an existing JupyterLab server running locally or remotely. Locally running JupyterLab servers are automatically detected and listed in the Connect dialog.
Similarly, CLI launches of the application, dropping files and folders, and double clicking to open files create new sessions as well.
Previously opened sessions are stored as part of application data and they are listed on Welcome Page. Clicking an item in the Recent sessions list restores the selected session.

jlab command-line launch examples
- Open directories using relative or absolute path
jlab .launch in current directoryjlab ../notebookslaunch with relative pathjlab /Users/username/notebookslaunch with absolute path
- Open notebooks and other files using relative or absolute path
jlab /Users/username/notebooks/test.ipynblaunch notebook with absolute pathjlab ../notebooks/test.ipynblaunch notebook with relative pathjlab ../test.pylaunch python file with relative path
- Open with a custom Python environment
jlab --python-path /Users/username/custom_env/bin/python ../notebooks/test.ipynblaunch notebook with custom Python environment
For additional CLI options run jlab --help in command line.
JupyterLab Extension support
JupyterLab Desktop currently supports user-friendly prebuilt extensions. Source extensions which require rebuilding are not supported.