The Apache JMeter™ application is open-source software, a 100% pure Java application designed to load test functional behavior and measure performance. It was originally designed for testing Web Applications but has since expanded to other test functions. It can be used to simulate a heavy load on a server, group of servers, network, or object to test its strength or to analyze overall performance under different load types. In this article, we will see how to install Apache Jmeter on Windows. Here we will use windows10 and the process is similar for other versions of windows. JMeter is a purely Java-based application, so it is mandatory to have Java 8 or a higher version of java to work with JMeter.
Note: To install Apache JMeter on Linux refer to this article How to Install Apache JMeter on Linux?
Step by Step Implementation
Step 1. Checking Version of Java
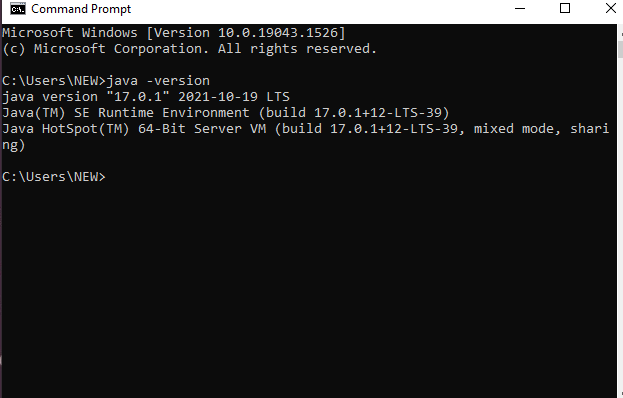
If Java is already installed in your system, type the following command in the console to check the version of java
java -version
If Java is not present in your system refer to this article and follow the steps to install Java and then continue with Jmeter installation steps. You can see the version of Java as follows. If your Java version is greater than 8 as shown then you can proceed to the next step.
Step 2. Download the latest version of JMeter
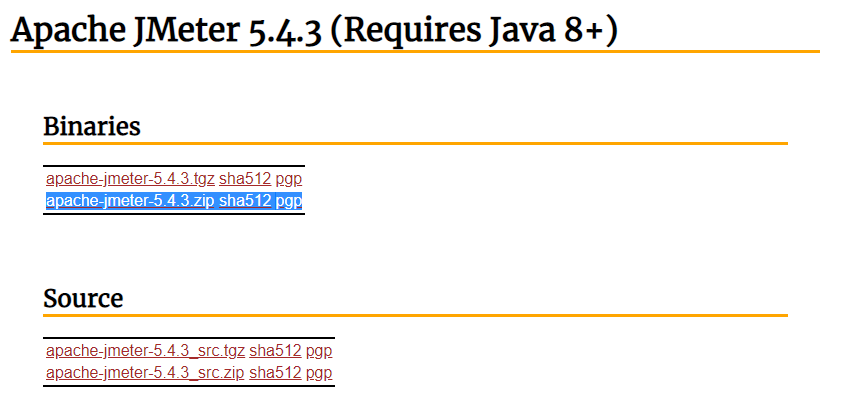
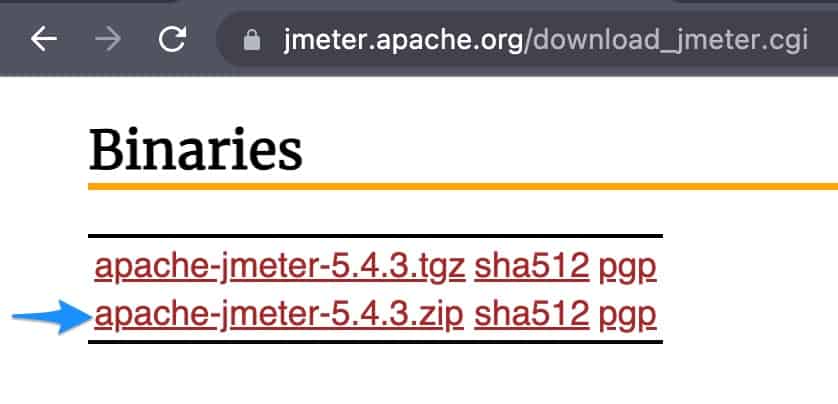
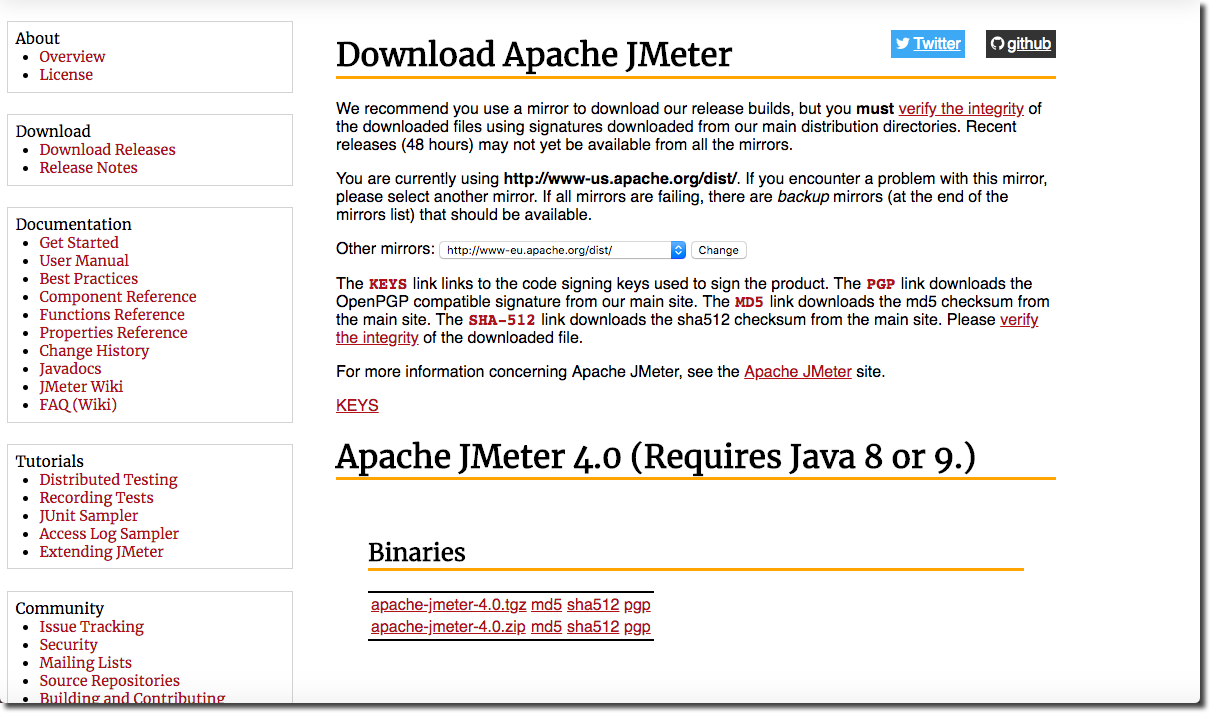
To download the latest version of Jmeter visit the Apache JMeter Website. We can see two different files in the Binaries section download the “apache-jmeter-5.4.3.zip” file as shown in the following image.
Step 3. Installing JMeter
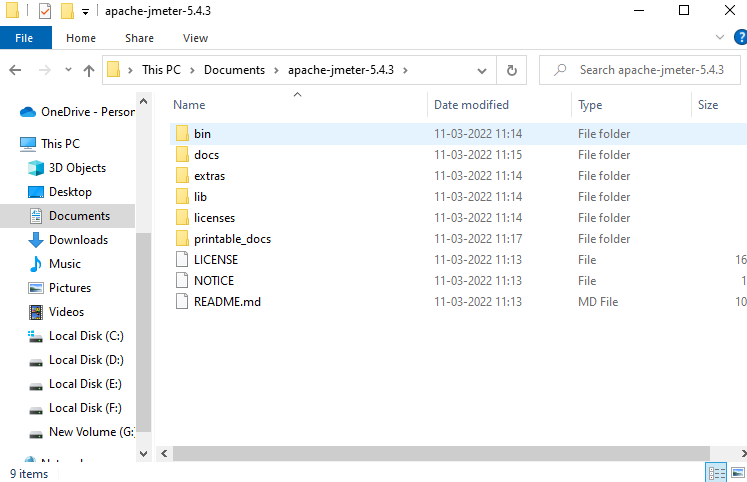
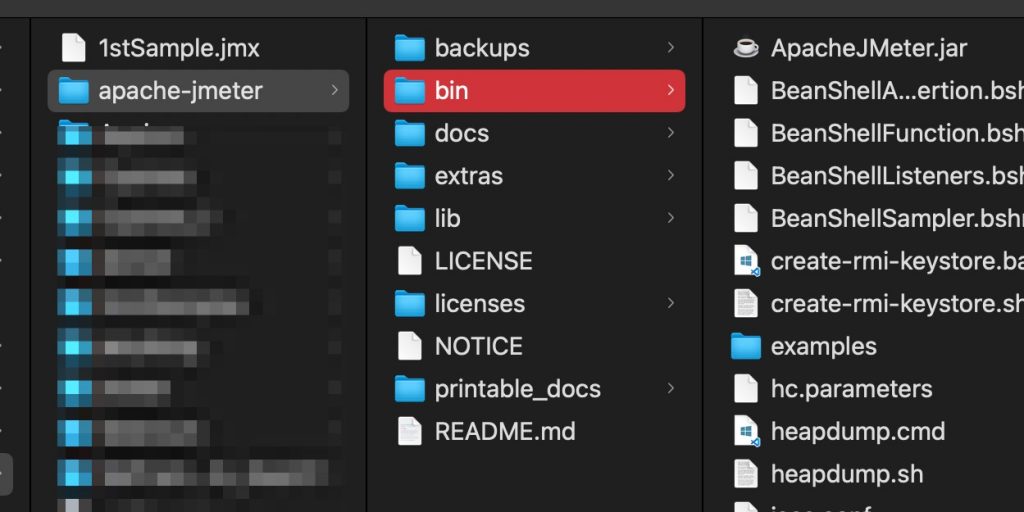
After downloading the zip file extract the elements of the zip file to the folder of your choice. Then open the folder you can see the following list of files.
Step 4. Launch JMeter
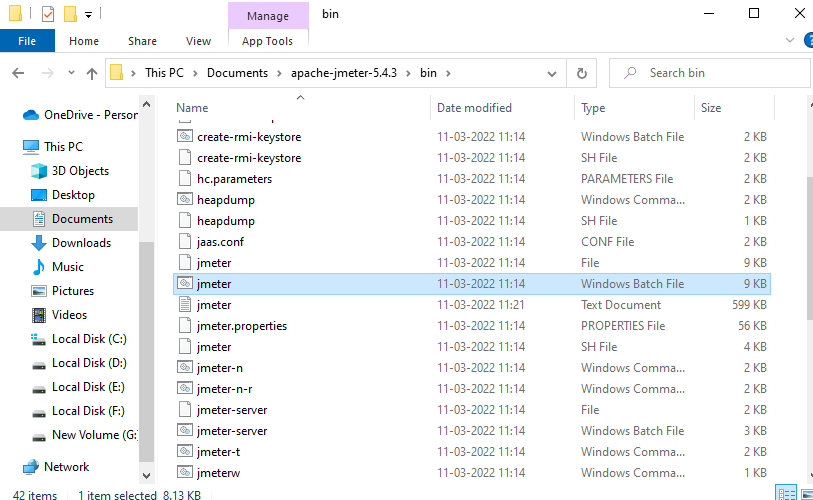
Now to open the Jmeter in GUI mode open the bin folder and search for the jmeter.bat which is a windows batch file as shown in the image and click on the file.
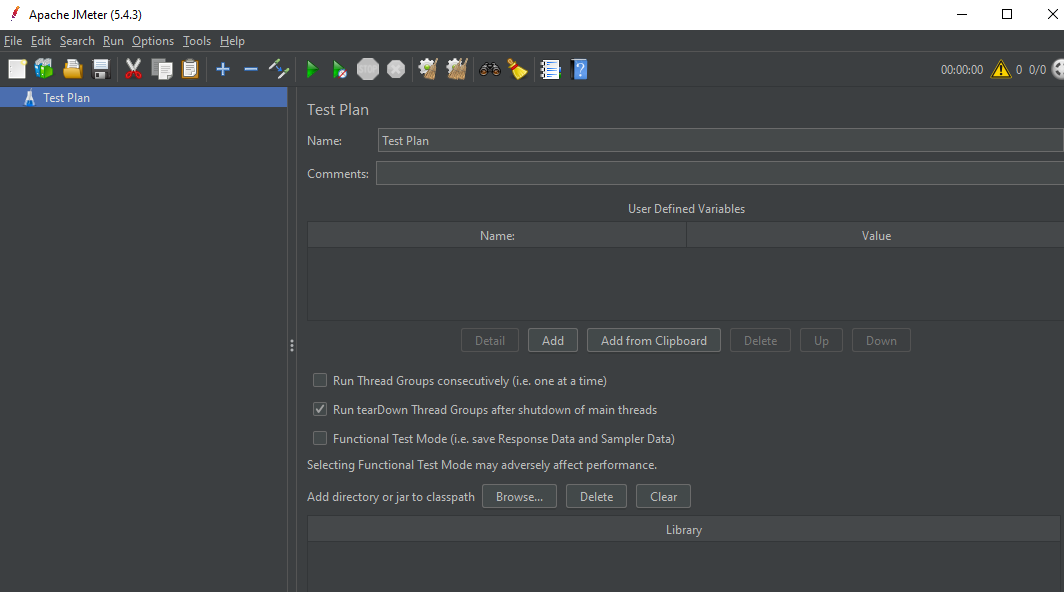
You can see a new window of Jmeter is opened as follows.
Everything is set and now you can start working in the JMeter application and every time to launch JMeter follow Step 4.
Last Updated :
15 Mar, 2022
Like Article
Save Article
Содержание
- Установка Apache.JMeter
- Проверка целостности скачанного архива
- Запуск
- Плагины
- Настройка
В текущей статье описан простой быстрый способ настройки Apache.JMeter: скачать, распаковать, настроить.
Для каждодневного использования, более профессионального, рекомендую автоматизировать скачивание и настройку Apache.JMeter с использованием Apache Maven.
(https://loadtestweb.wordpress.com/2018/11/16/jmeter-maven-plugin/)
1. Установка Apache.JMeter
Дистрибутив JMeter берётся по ссылке со страницы Download Releases.

Скачиваются два файла:
- apache-jmeter-5.0.zip (zip)
- apache-jmeter-5.0.zip.asc (pgp)
Zip-файл скачивается с ближайшего зеркала, а подпись скачивается с сервера Apache.
Можно оба файла скачать с сервера Apache, тогда проверка подписи особо не нужна. Также с сервера Apache берётся дистрибутив прежних версий, например, версии 3.1:
- https://archive.apache.org/dist/jmeter/binaries/
- apache-jmeter-5.0.zip
Архив нужно распаковать, например, в каталог:
- D:\tools\apache-jmeter-5.0\

Установка завершена.
Перед запуском можно проверить целостность скачанного архива, а также установить java нужной версии.
Назначение каталогов и файлов:
- bin — исполняемые файлы Apache.JMeter
- ApacheJMeter.jar — java-сборка Apache.JMeter
- heapdump.cmd, heapdump.sh
- jmeter.bat, jmeter.sh, jmeter
- jmeter-n.cmd
- docs — документация
- extras — дополнительные скрипты и утилиты
- lib — библиотеки
- licenses — лицензии
- printable_docs — документация
- LICENSE — лицензия Apache 2.0 на Apache.JMeter (перевод, описание)
- NOTICE — примечание
- README.md — описание, требования, инструкция по установке и сборке
1.1. Проверка целостности скачанного архива (опционально)
Удобно использовать консоль git-клиента в Windows, так как по умолчанию в MinGW есть утилита gpg для проверки корректности подписи

Порядок проверки:
- Проверить pgp-подпись с помощью утилиты gpg.
- Если RSA ключ не был найден, то
- скачать указанный ключ с сервера pgpkeys.mit.edu с помощью утилиты gpg.
- проверить pgp-подпись с помощью утилиты gpg снова.
Если подпись корректна, то будет видна строчка «Good signature».
user@host MINGW64 /d/Distrib/Development/Apache.JMeter $
gpg --verify apache-jmeter-3.2.zip.asc apache-jmeter-3.2.zip
gpg: Signature made 9 апр 2017 г. 18:08:59 RTZ using RSA key ID 0612B399
gpg: Can't check signature: public key not founduser@host MINGW64 /d/Distrib/Development/Apache.JMeter $
gpg --keyserver pgpkeys.mit.edu --recv-key 0612B399
gpg: requesting key 0612B399 from hkp server pgpkeys.mit.edu
gpg: key 0612B399: public key "Milamber (ASF) <milamber@apache.org>" imported
gpg: Total number processed: 1
gpg: imported: 1 (RSA: 1)user@host MINGW64 /d/Distrib/Development/Apache.JMeter $
gpg --verify apache-jmeter-3.2.zip.asc apache-jmeter-3.2.zip
gpg: Signature made 9 апр 2017 г. 18:08:59 RTZ using RSA key ID 0612B399
gpg: Good signature from "Milamber (ASF) <milamber@apache.org>"
gpg: aka "Milamber (Milamberspace) <milamberspace@gmail.com>"
gpg: WARNING: This key is not certified with a trusted signature!
gpg: There is no indication that the signature belongs to the owner. Primary key fingerprint: C492 3F9A BFB2 F1A0 6F08 E88B AC21 4CAA 0612 B399
1.2. Установка Java
Выдержка из файла README.md гласит, что нужна Java 8:
## Requirements
The following requirements exist for running Apache JMeter:
* Java Interpreter:
A fully compliant Java 8 Runtime Environment is required for Apache JMeter to execute. A JDK with keytool utility is better suited for Recording HTTPS websites. Java 9 is not yet supported as of version 3.3.
И рекомендуется установить JDK, а не просто JRE.
Утилита keytool нужна, чтобы Apache.JMeter мог перехватывать и расшифровывать трафик по протоколу HTTPS, работая в режиме прокси.
Рекомендация, что нужно именно JDK сомнительная, так как в JRE тоже есть утилита keytool:
- C:\Program Files\Java\jre1.8.0_192\bin\keytool.exe
Считаю, что требование JDK для работы keytool — ошибка Apache.JMeter, которая уже исправлена, но в документации ещё не отражена:
- https://bz.apache.org/bugzilla/show_bug.cgi?id=61026
Java (JRE) скачивается с сайта:
- https://java.com/ru/download/manual.jsp
- http://www.oracle.com/technetwork/java/javase/downloads/jre8-downloads-2133155.html
Java (JDK), Java SE Development Kit 8, скачивается с сайта:
- http://www.oracle.com/technetwork/java/javase/downloads/2133151
- http://www.oracle.com/technetwork/java/javase/downloads/jdk8-downloads-2133151.html
На текущий момент, актуальная версия 8 Update 192.
2. Запуск
2.1. Первый запуск JMeter в Windows 7
Для запуска JMeter в графическом режиме используются скрипты:
- bin
- jmeter.bat — для Windows
- jmeter.sh — для Linux
После первого запуска Apache.JMeter GUI в Windows 7 вероятно вы увидите предупреждение и затем ошибку:
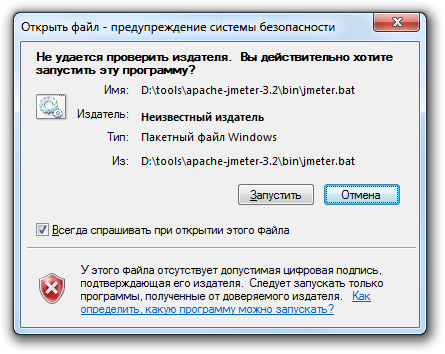
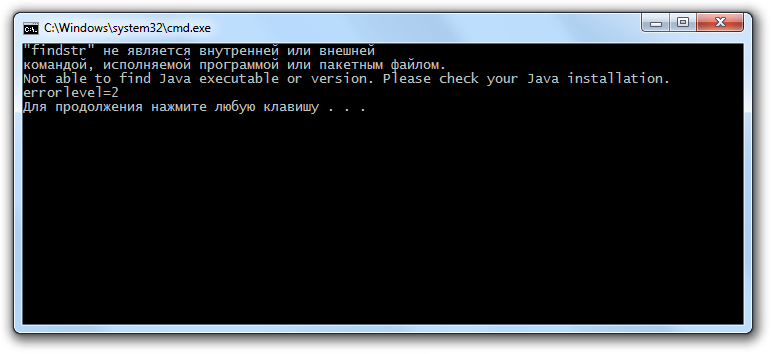
"findstr" не является внутренней или внешней
командой, исполняемой программой или пакетным файлом.
Not able to find Java executable or version. Please check your Java installation.
errorlevel=2
Для продолжения нажмите любую клавишу . . .
На самом деле всё в порядке. По какой-то причине каталог C:\Windows\system32\ в Windows 7 — Windows 10 пропал из переменной окружения PATH. Всегда там был и с одним из обновлений пропал, или какая-то неумелая программа его удалила оттуда.
Чтобы C:\Windows\system32\ вернуть в PATH, можно модифицировать файл jmeter.bat добавив в него строку:
set PATH=C:\Windows\System32;%PATH%

Или можно отредактировать значение переменной PATH для всей операционной системы, тогда починится не только скрипт jmeter.bat.

Теперь скрипт jmeter.bat работает корректно и Apache.JMeter запускается.
2.2. Запуск JMeter в консольном режиме
2.3. Полезный командный файл для открытия теста
3. Плагины
3.1. Установка плагинов в Apache.JMeter
3.2. Часто используемые плагины
3.3. Дополнительные полезные плагины
4. Настройка
4.1. Настройка объёма оперативной памяти для java
4.2. Настройка кодировки по умолчанию для java
4.3. Настройки Apache.JMeter
4.4. Настройки логирования Apache.JMeter
JMeter isn’t particularly hard to install. But that’s easy to say when you’ve done it many times.
Basically if you want to get started with JMeter on Windows. That’s great because this guide is for you! Let’s see how to install JMeter on Windows.
Install Java
Check Java Version
JMeter is a Java program: the Java Virtual Machine must be installed prior to installing JMeter.
To check if Java is installed properly:
- Open a Command-Line console by clicking on the start menu then type
cmd, - Enter the command:
java -version.

Checking Installed Java Version
It should display something like:
|
|
Java Setup
If it’s not the case (like showing java command not found, then Java must be installed.

Java Installation Website
To install Java:
- Open the Open JDK in your browser,
- Download the appropriate executable setup file,
- Run the executable setup file,
- And follow instructions.
Once Java is installed, make sure the java -version command works properly.
JMeter Setup
Now that Java is installed, we’re going to install JMeter:
Unzip Archive
- First, Download JMeter: prefer ZIP archive format,
- Using the Explorer, Open the folder,
- Right-click on JMeter’s ZIP archive and select
Extract to apache-jmeter-xx\.

Extract JMeter Archive
JMeter Directories

JMeter Root Files
Great! Now we have successfully downloaded and unzipped JMeter. You should see the following files within the apache-jmeter-XX folder:
- backups: contains the backups of JMX files (also known as JMeter projects) you edited within JMeter,
- bin: contains the executable files to launch JMeter, and configuration files to tweak JMeter settings,
- docs: JMeter’s documentation in HTML format,
- extras: some useful side tools like excel sheets to compute graphs from JTL result files,
- lib: JMeter’s libraries which are mostly Java JAR files,
- printable_docs: documentation in printable format.
It’s now time to see how to launch JMeter.
Run JMeter
The screenshot below shows what JMeter’s bin/ folder contains. It’s a bunch of configuration and executable files.

JMeter bin/ folder
to run JMeter:
- Browse to
bin/folder by double-clicking on it, - double-click on
jmeter.batto run it, - It should open both a command-line terminal and JMeter’s UI.

Congratulations! JMeter is installed and running.
The screenshot above shows JMeter 4.0 graphical interface with the new dark theme. As said before, it wasn’t difficult at all, but sometimes it’s always pleasant to have someone help you to install and run JMeter.
Upgrading JMeter
When a new JMeter version is available, the new JMeter version must be installed in a fresh new folder.
Please do not unzip a new JMeter version over a previous one.
Simply repeat the steps above to install a new version.
Removing JMeter
Simply delete the apache-jmeter-XX folder and you’re done. Yes, it’s that simple!
Apache Jmeter is used to perform the performance testing of web applications and web services or API calls.
You can perform all types of performance testing like load, stress and endurance testing for your application.
If you are a beginner and willing to learn Jmeter, refer below guide on how to configure and open Apache Jmeter UI.
Configure Java on Windows or Mac OS –
As Jmeter is a Java based application, we need to install and setup JDK.
Why JDK required? – in simple words, JDK [Java development kit] required to write any java program & JRE is required to run the java program.
Refer Setup Java in Windows or Mac os
Download Jmeter –
Navigate to below URL and scroll down till Binaries section
https://jmeter.apache.org/download_jmeter.cgi
Download and extract the zip file and keep it under any of the directories in your machine.
Keep note of the the directory, from the same location we will open Jmeter UI.
Open Jmeter UI
The Jemeter UI executable / bat / sh file is under apache-jmeter > bin folder
On Windows OS –
You can double click the ApacheJmeter.jar file or right click > Run as Administrator to open the UI.
Also you can double click the jmeter.bat file to open the UI.
Note – if you close the command prompt, jmeter UI quits automatically.
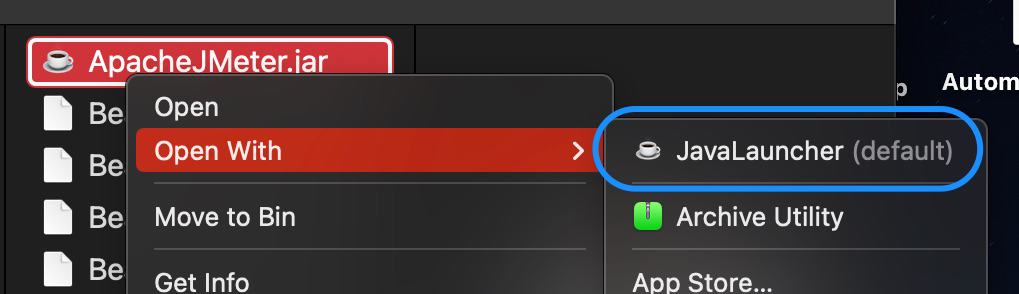
On Mac OS –
Right click on the ApacheJmeter.jar file and open with Jar launcher utility to launch the jmeter UI
Also you can right click on the jmeter.sh file and open with terminal.
or you can navigate to jmeter.sh directory into terminal and type sh jmeter.sh
skpTerminal ~ % cd /Users/skpatro/MyProjects/apache-jmeter/binskpTerminal bin % sh jmeter.sh
Note – if you close the terminal, jmeter UI quits automatically.
These above ways, you can launch jmeter UI.

Author: Admin
Experience & exploration about software QA tools & techniques.
Maintaining & writing blog posts on qavalidation.com!
Publishing video tutorials on youtube.com/qavbox
An Open Source Java application designed to measure performance and load test applications.
By The Apache Software Foundation

What Is It?
Apache JMeter can measure performance and load test static and dynamic web applications.
It can be used to simulate a heavy load on a server, group of servers,
network or object to test its strength or to analyze overall performance under different load types.
Features
Complete portability and 100% Java.
Multi-threading allows concurrent sampling by many threads and
simultaneous sampling of different functions by separate thread groups.
Protocols
Ability to load and performance test many applications/server/protocol types:
- Web — HTTP, HTTPS (Java, NodeJS, PHP, ASP.NET,…)
- SOAP / REST Webservices
- FTP
- Database via JDBC
- LDAP
- Message-oriented Middleware (MOM) via JMS
- Mail — SMTP(S), POP3(S) and IMAP(S)
- Native commands or shell scripts
- TCP
- Java Objects
IDE
Fully featured Test IDE that allows fast Test Plan recording
(from Browsers or native applications), building and debugging.
Command Line
Command-line mode (Non GUI / headless mode)
to load test from any Java compatible OS (Linux, Windows, Mac OSX, …)
Reporting
A complete and ready to present dynamic HTML report
Live reporting
into 3rd party databases like InfluxDB or Graphite
Correlation
Easy correlation through ability to extract data from most popular response formats,
HTML,
JSON,
XML or
any textual format
Highly Extensible Core
- Pluggable Samplers allow unlimited testing capabilities.
- Scriptable Samplers (JSR223-compatible languages like Groovy).
- Several load statistics can be chosen with pluggable tiers.
- Data analysis and visualization plugins allow great extensibility and personalization.
- Functions can be used to provide dynamic input to a test or provide data manipulation.
- Easy Continuous Integration via 3rd party Open Source libraries for Maven, Gradle and Jenkins.
The Latest Version
Details of the latest version can be found on the
JMeter Apache Project web site
Requirements
The following requirements exist for running Apache JMeter:
-
Java Interpreter:
A fully compliant Java 8 Runtime Environment is required
for Apache JMeter to execute. A JDK withkeytoolutility is better suited
for Recording HTTPS websites. -
Optional jars:
Some jars are not included with JMeter.
If required, these should be downloaded and placed in the lib directory- JDBC — available from the database supplier
- JMS — available from the JMS provider
- Bouncy Castle —
only needed for SMIME Assertion
-
Java Compiler (OPTIONAL):
A Java compiler is not needed since the distribution includes a
precompiled Java binary archive.Note that a compiler is required to build plugins for Apache JMeter.
Installation Instructions
Note that spaces in directory names can cause problems.
-
Release builds
Unpack the binary archive into a suitable directory structure.
Running JMeter
- Change to the
bindirectory - Run the
jmeter(Un*x) orjmeter.bat(Windows) file.
Windows
For Windows, there are also some other scripts which you can drag-and-drop
a JMX file onto:
jmeter-n.cmd— runs the file as a non-GUI testjmeter-n-r.cmd— runs the file as a non-GUI remote (client-server) testjmeter-t.cmd— loads the file ready to run it as a GUI test
Documentation
The documentation available as of the date of this release is
also included, in HTML format, in the printable_docs directory,
and it may be browsed starting from the file called index.html.
Reporting a bug/enhancement
See Issue Tracking.
Build instructions
Release builds
Unpack the source archive into a suitable directory structure.
Most of the 3rd party library files can be extracted from the binary archive
by unpacking it into the same directory structure.
Any optional jars (see above) should be placed in lib/opt and/or lib.
Jars in lib/opt will be used for building JMeter and running the unit tests,
but won’t be used at run-time.
This is useful for testing what happens if the optional jars are not
downloaded by other JMeter users.
If you are behind a proxy, you can set a few build properties in
~/.gradle/gradle.properties for Gradle to use the proxy:
systemProp.http.proxyHost=proxy.example.invalid
systemProp.http.proxyPort=8080
systemProp.http.proxyUser=your_user_name
systemProp.http.proxyPassword=your_password
systemProp.https.proxyHost=proxy.example.invalid
systemProp.https.proxyPort=8080
systemProp.https.proxyUser=your_user_name
systemProp.https.proxyPassword=your_password
Test builds
JMeter is built using Gradle.
The following command builds and tests JMeter:
If the system does not have a GUI display then:
./gradlew build -Djava.awt.headless=true
The output artifacts (jars, reports) are placed in the build folder.
For instance, binary artifacts can be found under src/dist/build/distributions.
The following command would compile the application and enable you to run jmeter
from the bin directory.
Note that it completely refreshes
lib/contents,
so it would remove custom plugins should you have them installed.
Alternatively, you could get Gradle to start the GUI:
Developer Information
Building and contributing is explained in details at
building JMeter
and CONTRIBUTING.md. More information on the tasks available for
building JMeter with Gradle is available in gradle.md.
The code can be obtained from:
- https://github.com/apache/jmeter
- https://gitbox.apache.org/repos/asf/jmeter.git
Licensing and Legal Information
For legal and licensing information, please see the following files:
- LICENSE
- NOTICE
Cryptographic Software Notice
This distribution may include software that has been designed for use
with cryptographic software. The country in which you currently reside
may have restrictions on the import, possession, use, and/or re-export
to another country, of encryption software. BEFORE using any encryption
software, please check your country’s laws, regulations and policies
concerning the import, possession, or use, and re-export of encryption
software, to see if this is permitted. See https://www.wassenaar.org/
for more information.
The U.S. Government Department of Commerce, Bureau of Industry and
Security (BIS), has classified this software as Export Commodity
Control Number (ECCN) 5D002.C.1, which includes information security
software using or performing cryptographic functions with asymmetric
algorithms. The form and manner of this Apache Software Foundation
distribution makes it eligible for export under the License Exception
ENC Technology Software Unrestricted (TSU) exception (see the BIS
Export Administration Regulations, Section 740.13) for both object
code and source code.
The following provides more details on the included software that
may be subject to export controls on cryptographic software:
Apache JMeter interfaces with the
Java Secure Socket Extension (JSSE) API to provide
- HTTPS support
Apache JMeter interfaces (via Apache HttpClient4) with the
Java Cryptography Extension (JCE) API to provide
- NTLM authentication
Apache JMeter does not include any implementation of JSSE or JCE.
Thanks
Thank you for using Apache JMeter.
Third party notices
-
Notice for mxparser:
This product includes software developed by the Indiana
University Extreme! Lab. For further information please visit
http://www.extreme.indiana.edu/
JMeter isn’t particularly hard to install. But that’s easy to say when you’ve done it many times.
Basically if you want to get started with JMeter on Windows. That’s great because this guide is for you! Let’s see how to install JMeter on Windows.
Install Java
Check Java Version
JMeter is a Java program: the Java Virtual Machine must be installed prior to installing JMeter.
To check if Java is installed properly:
- Open a Command-Line console by clicking on the start menu then type
cmd, - Enter the command:
java -version.
Checking Installed Java Version
It should display something like:
|
|
Java Setup
If it’s not the case (like showing java command not found, then Java must be installed.
Java Installation Website
To install Java:
- Open the Java Website in your browser,
- Download the appropriate executable setup file,
- Run the executable setup file,
- And follow instructions.
Once Java is installed, make sure the java -version command works properly.
JMeter Setup
Now that Java is installed, we’re going to install JMeter:
Unzip Archive
- First, Download JMeter: prefer ZIP archive format,
- Using the Explorer, Open the folder,
- Right-click on JMeter’s ZIP archive and select
Extract to apache-jmeter-xx.
Extract JMeter Archive
JMeter Directories
JMeter Root Files
Great! Now we have successfully downloaded and unzipped JMeter. You should see the following files within the apache-jmeter-XX folder:
- backups: contains the backups of JMX files (also known as JMeter projects) you edited within JMeter,
- bin: contains the executable files to launch JMeter, and configuration files to tweak JMeter settings,
- docs: JMeter’s documentation in HTML format,
- extras: some useful side tools like excel sheets to compute graphs from JTL result files,
- lib: JMeter’s libraries which are mostly Java JAR files,
- printable_docs: documentation in printable format.
It’s now time to see how to launch JMeter.
Run JMeter
The screenshot below shows what JMeter’s bin/ folder contains. It’s a bunch of configuration and executable files.
JMeter bin/ folder
to run JMeter:
- Browse to
bin/folder by double-clicking on it, - double-click on
jmeter.batto run it, - It should open both a command-line terminal and JMeter’s UI.
Congratulations! JMeter is installed and running.
The screenshot above shows JMeter 4.0 graphical interface with the new dark theme. As said before, it wasn’t difficult at all, but sometimes it’s always pleasant to have someone help you to install and run JMeter.
Upgrading JMeter
When a new JMeter version is available, the new JMeter version must be installed in a fresh new folder.
Please do not unzip a new JMeter version over a previous one.
Simply repeat the steps above to install a new version.
Removing JMeter
Simply delete the apache-jmeter-XX folder and you’re done. Yes, it’s that simple!
Apache JMeter is the leading open-source tool for load and performance testing.
For those of you just getting to grips with JMeter testing, we’ve put together a three-part ‘how to’ series on how to use this powerful tool.
In this blog, we’ll focus on how to install JMeter and create test plans. Over the next few weeks, we’ll be tackling how to build test scripts, set up workflows, and run reports and analytics.
Table of Contents:
- How to Install JMeter
- Building Your First JMeter Test Plan
- How to Add Components to Your Test Plan
- How BlazeMeter Supports and Strengthens JMeter
Step 1: How to Install JMeter
- Install the latest 64-bit JRE or JDK. This is important because JMeter is a pure Java application.
- Go to Apache JMeter and find the Binary to download to your computer
- Once downloaded, move this file to your preferred location, extract it and go to the folder, and then, the bin directory.
- Take a look. You should see a series of scripts which can run JMeter in various modes.
For JMeter memory profiling, you should always use the latest version of JMeter. Check out JMeter Release Notes to determine the latest stable version that you should use.
Congratulations! You have all you need to start working on your test plan.
P.S. We recommend using the above method of installing JMeter and Java because:
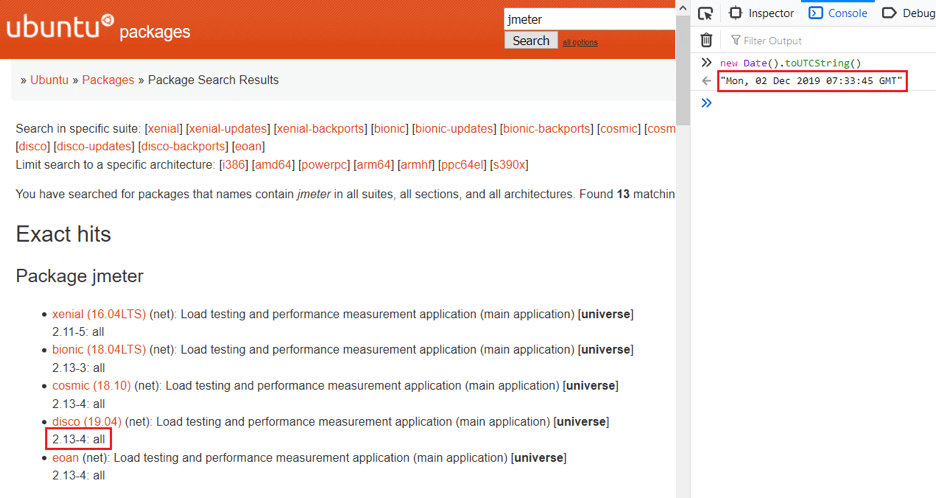
JMeter might be available via the package manager of your Linux distribution. However, the validity of the version can be a big question mark. For example, at the moment Ubuntu (one of the most popular Linux distributions) provides JMeter 5.4 which was released at the end of 2020.
On Mac, it’s possible to use Homebrew to install JMeter and keep it up-to-date, however, it will install JMeter under /usr/local/Cellar/JMeter/x.x/libexec/ folder (or wherever the formula points). This means you might have troubles with configuring JMeter, adding libraries to JMeter Classpath, installing JMeter Plugins Manager, etc.
Although JMeter has all the files you need to build and run most tests, there are some exceptions. For example, you will need to download JDBC driver for database load testing, MQ client libraries for JMS load testing, etc.
Building Your First JMeter Test Plan
Launch JMeter by performing the following:
1. Open the “bin” directory of the JMeter installation in the command-line interpreter application (cmd.exe or Powershell for Windows, Terminal for Mac/Linux/Unix).
2. Type the following command:
For Mac/Linux/Unix: ./jmeter.sh
For Windows: jmeter.bat
Using the command-line interpreter is recommended because if something goes wrong, you will be able to see the output in the console window. If you launch JMeter by double-clicking the icon of its startup script or ApacheJMeter.jar file, you will be uninformed about the failure reason if JMeter won’t start.
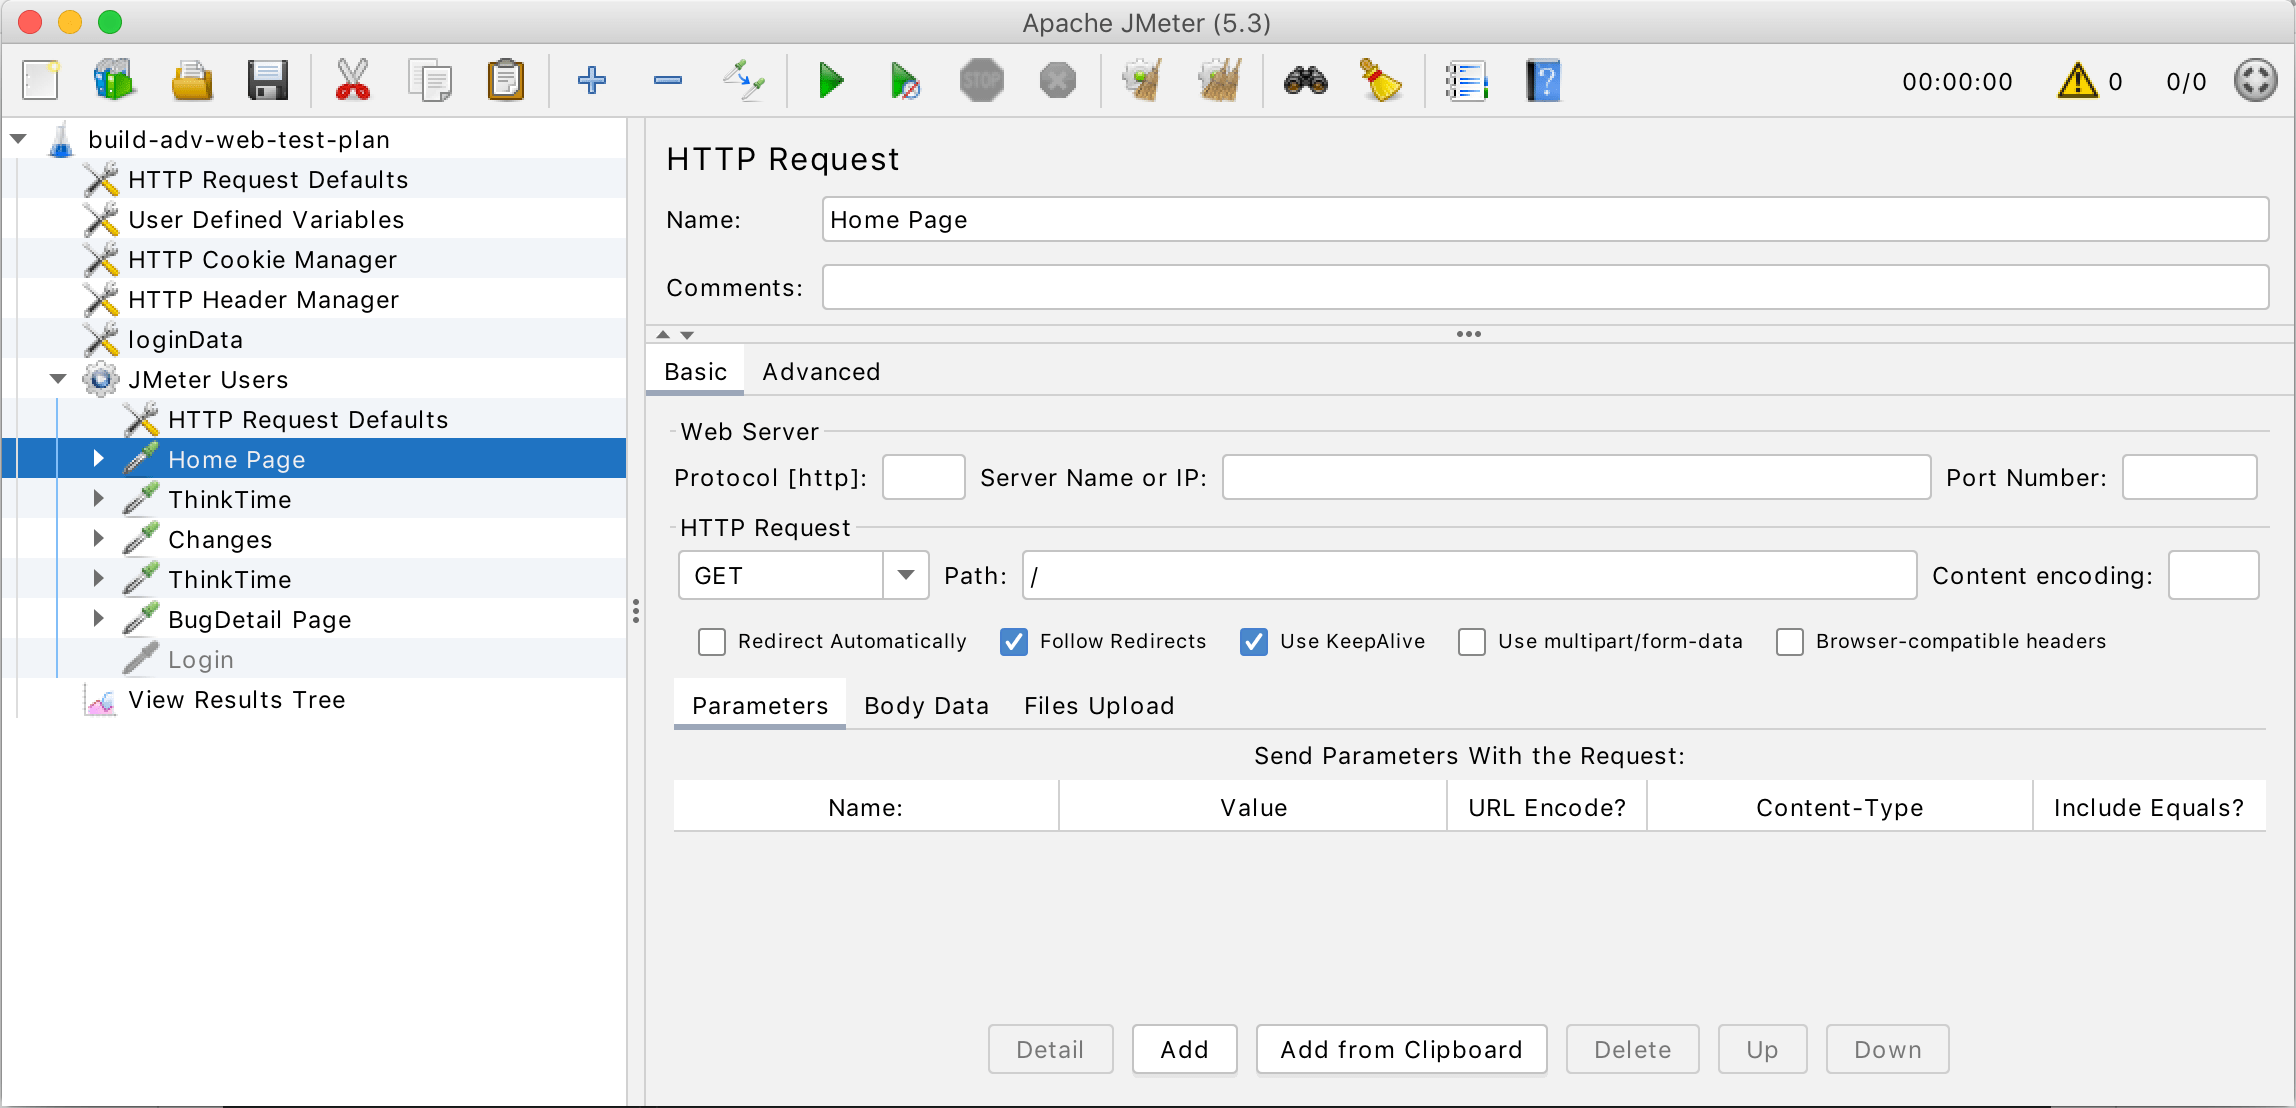
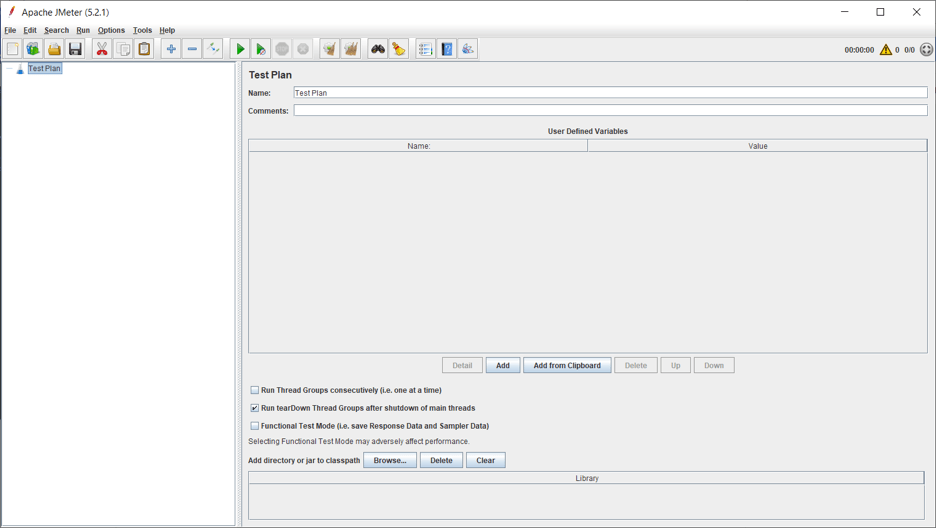
You should now see an empty test plan (like in the image below):
Don’t see the JMeter GUI yet? Check the following:
- The JAVA_HOME environment points to the JRE or JDK installation folder
- The JAVA_HOME/bin folder has been added to the PATH environment variable
- The output of JMeter startup script execution in the command-line interpreter window jmeter.log file (it’s being generated in JMeter’s “bin” folder when you start JMeter
Creating a Complete Test Plan
In your test plan, you should specify the overall settings and outline the steps that you want JMeter to execute while it runs. For your own reference, you can also name it and add comments.
You Need To:
Set Up at Least One Thread Group and Sampler
A thread group is where you specify the number of users that you want to simulate. One thread = one user. By setting the ramp-up period, you can also tell JMeter how long it should take to reach all of the threads that you’ve chosen. You can also set the number of iterations for each user in the group with the Loop Count.
Set up Samplers
Samplers are super important as they perform the actual work in JMeter. JMeter executes the samplers and writes down the results, such as: start time, duration, success, response messages etc. Listeners can be used to view these results (but more about that in a bit). The HTTP Request, which lets you send a HTTP or HTTPS request to a web server, is the most commonly used sampler.
We recommend that you:
Add Timers
Here you can set the duration of the delay from one request to the next (e.g., how many seconds you want JMeter to wait before navigating from the homepage to the features page). Real users don’t hammer the system under test non-stop, they need some time to “think” between operations that’s why it’s important to exactly replicate this behavior to produce a realistic network footprint. Learn more about JMeter timers.
Add Configuration Elements
These allow you to manage elements, like the cache and the cookies, during the test. We recommend adding the “HTTP Cache Manager” and the “HTTP Cookie Manager” to simulate a browser’s behavior. Find out more about making JMeter behave like a real browser in this article.
Add Assertions
These let you define the pass or fail criteria for your test.
Let’s say you want to make sure your site or app responds within 100 milliseconds. You can set a Duration Assertion to specify that if any response lasts longer than 100 milliseconds, the sample will be marked as “failed.”
The most important assertion to know is the Response Assertion. This covers 99% of your needs — so no wonder it’s so popular! You can use it to test the URL, response body, messages, embedded resources, redirects, headers and more. This assertion gives you loads of flexibility as it lets you test regular expressions rather than text patterns. JMeter handles regular expressions in a very similar way to Perl — except you don’t enclose the expression in //’s.
Learn more about JMeter assertions.
Add Listeners
As I mentioned earlier, these let you view the results of a sampler. You can choose to view them in various formats, including a table, graph, tree, or log file. Listeners can be added anywhere in the test — but it’s important to know that they will only collect data from elements on the same level or below.
View Results Tree is the most commonly used listener as it presents all the test plan results in a user-friendly tree structure. Other listeners include the Assertion Results, Aggregate Report and Beanshell Listener.
One important thing to note: when you actually run the load tests, you should disable all your listeners as they use up a lot of memory. There will be more details about dos and don’ts for running tests in the next blog post in this series.
How to Add Components to Your Test Plan
You can set up and add all of these components in the test plan before you run it. Here’s how:
-
Right click on the name of your test plan
-
Select ‘Add’
-
Choose the component you want to set up and configure
That’s it! Need more JMeter training? Check out our free BlazeMeter University to get your free JMeter certification.
If you have any questions or comments, please share in the comments box below.
How BlazeMeter Supports and Strengthens JMeter
While JMeter represents a strong and compelling way to perform load testing, of course, we recommend supplementing that tool with BlazeMeter, which lets you simulate up to millions of users in a single developer-friendly, self-service platform. With BlazeMeter, you can test the performance of any mobile app, website, or API in under 10 minutes. Here’s why we think the BlazeMeter/JMeter combination is attractive to developers:
- Simple Scalability – It’s easy to create large-scale JMeter tests. You can run far larger loads far more easily with BlazeMeter than you could with an in-house lab.
- Rapid-Start Deployment – BlazeMeter’s recorder helps you get started with JMeter right away, and BlazeMeter also provides complete tutorials and tips.
- Web-Based Interactive Reports – You can easily share results across distributed teams and overcome the limitations of JMeter’s standalone UI.
- Built-In Intelligence – BlazeMeter provides on-demand geographic distribution of load generation, including built-in CDN-aware testing.
BlazeMeter doesn’t just offer performance testing. Now it’s a full Continuous Testing platform that incorporates over 20 leading open source testing tools for load testing, API testing, GUI Functional Testing, and Mock Services.
START TESTING NOW
 Сегодня я хочу рассказать о замечательном инструменте, название которого вынесено в заголовок статьи. Разумеется, моей целью не является написание подробного руководства по Apache JMeter. В своей статье я хочу лишь зафиксировать ряд, на мой взгляд, не очевидных моментов, с которыми мне пришлось столкнуться в своей повседневной работе. Я надеюсь, что моя статья будет полезна (сразу предупреждаю, картинок будет много).
Конечно, я не первый, кто пишет про JMeter на Хабре, но практически во всех предыдущих статьях, акцент делается на нагрузочное тестирование. Хотя это и основное применение JMeter, но только им его возможности не ограничиваются. Давайте, просто посмотрим, по каким протоколам может работать этот продукт:
- Web — HTTP, HTTPS
- SOAP / REST
- FTP
- Database via JDBC
- LDAP
- Message-oriented middleware (MOM) via JMS
- Mail — SMTP(S), POP3(S) and IMAP(S)
- MongoDB (NoSQL)
- Native commands or shell scripts
- TCP
Таким образом, если перед вами стоит какая-то задача автоматизации и всё, что вам требуется, перечислено в этом списке, определённо стоит подумать об использовании JMeter, перед тем как с головой погрузиться в программирование на любимом Perl, Python или Java. Возможно, такой подход позволит сэкономить очень много времени.
Установка
С этим всё просто:
- Устанавливаем Java (если она еще не установлена)
- Выкачиваем и распаковываем свежую сборку JMeter
- Устанавливаем переменную среды JMETER_BIN на каталог с исполняемыми файлами JMeter (только для Windows)
- Запускаем jmeter.bat или jmeter.sh (в зависимости от операционной системы) из каталога bin
Единственная проблема, с которой я столкнулся на Windows, связана с тем, что значение переменной JMETER_BIN должно завершаться символом прямого или обратного слэша. Подробности можно посмотреть в запускаемом скрипте. Чтение инструкции также не будет лишним.
Запись скрипта
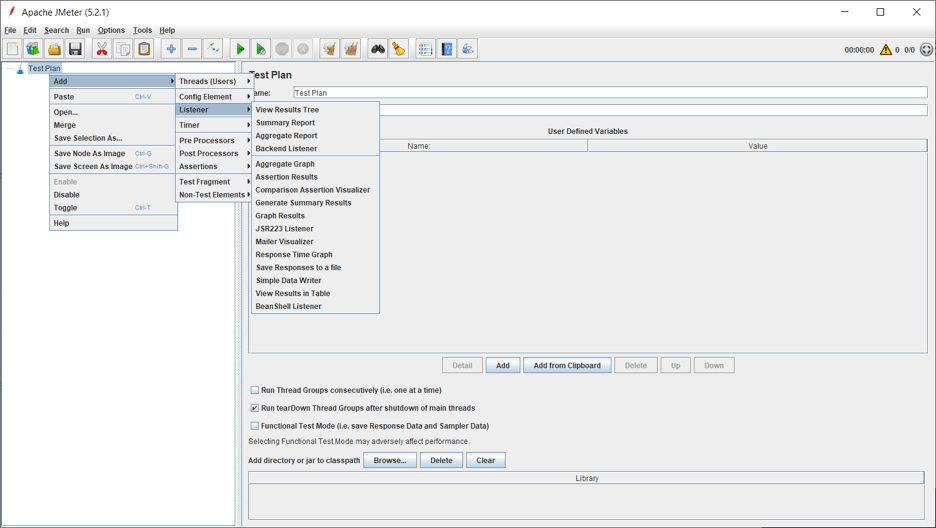
Это, пожалуй, самая эффектная возможность JMeter. Она уже описывалась ранее, но я повторюсь, поскольку в той статье речь шла об уже немного устаревшей версии. JMeter можно запустить в режиме proxy, таким образом, чтобы весь HTTP-трафик проходил через него. Все подробности взаимодействия будут автоматически записываться в выбранную Thread Group или Recording Controller. Для добавления новых узлов в дерево, просто нажимаем на правую кнопку мыши и выбираем требуемый тип из выпадающего меню:

Thread Group, управляющая такими настройками как количество потоков, используемых для тестирования и количество запросов в тесте, находится в категории Treads (Users), а сам HTTP(S) Test Script Recorder в Non-Test Elements.

Я выделил на рисунке настройки, на которые следует обратить внимание. Порт возможно придётся изменить, если на 8080 уже что-то поднято. В сложных случаях, в Test Plan придётся добавить HTTP Cookie Manager и HTTP Authorization Manager. После нажатия кнопки Start, идём в настройки любимого браузера:

Взаимодействие с Яндекс, внезапно, оказывается очень непростым:
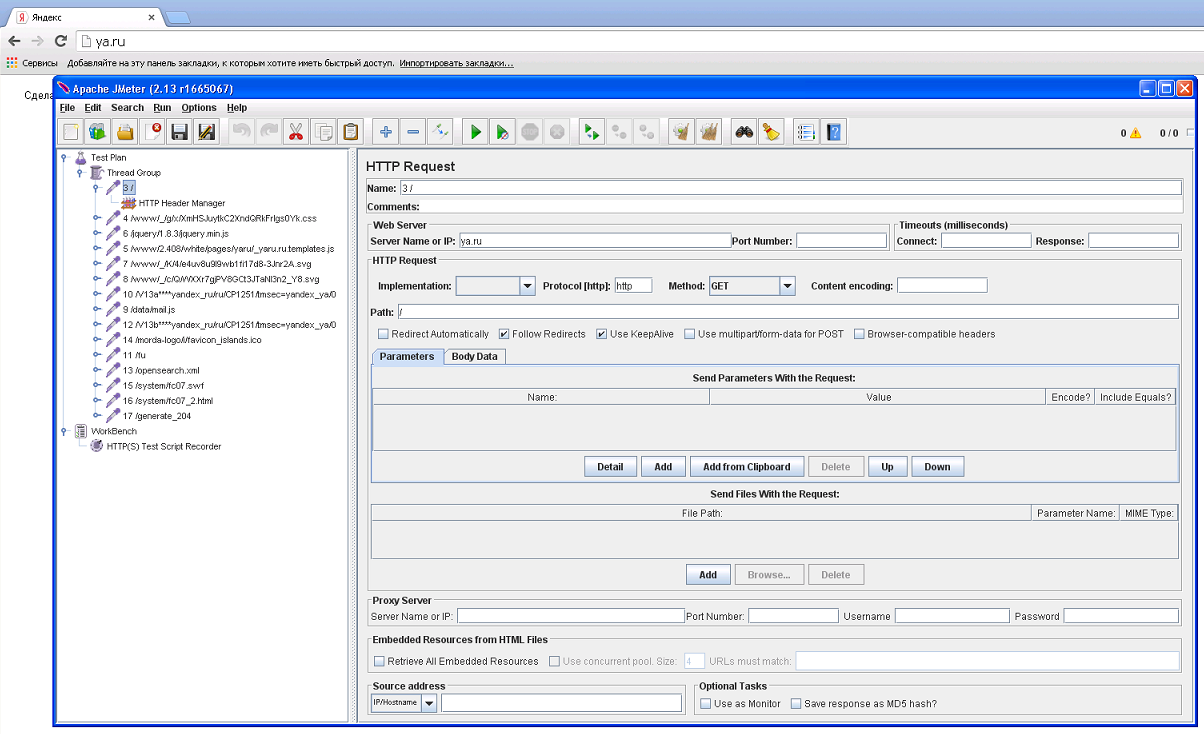
Полученные запросы (HTTP Request) вместе с их настройками (HTTP Header Manager) можно перенести в любое место скрипта, используя любимые всеми команды Copy&Paste (Drag&Drop тоже работает). Даже если вы твердо уверены в том, что происходит на вашем сайте, Script Recorder может быть очень полезен, для того чтобы узнать подробности. Кроме того, автоматическая генерация скриптов куда веселее чем вбивание их руками. Более подробно процесс записи скриптов описан в этой инструкции.
Переменные
Для чего-то мало-мальски серьёзного, нам потребуется возможность параметризации. Для примера, предположим, что нам требуется задать таймауты, в течение которых JMeter будет ожидать ответа сервера. Вбивать их заново в каждый HTTP Request, при любом изменении, было бы слишком утомительно. Заодно определим настройки HTTP Proxy (если он используется):

В поле Password забито значение ${user_pass}, тут уж вам придётся поверить мне на слово. Сами настройки удобно держать в User Defined Variables (этот элемент можно найти в категории Config Element):
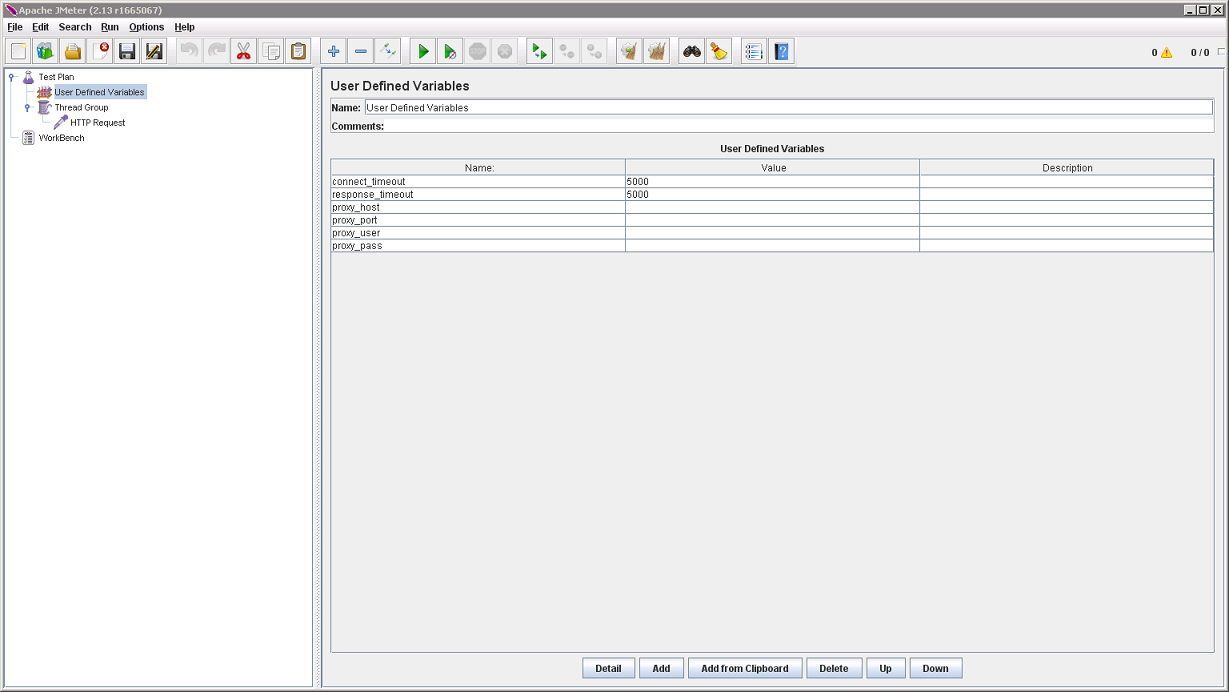
Пустые значения переменных проблемой не являются. В соответствующие настройки будут подставлены пустые строки, как того и требуется, в случае если HTTP Proxy не используется. Можно пойти ещё дальше и действительно разместить все HTTP-настройки в одном месте:
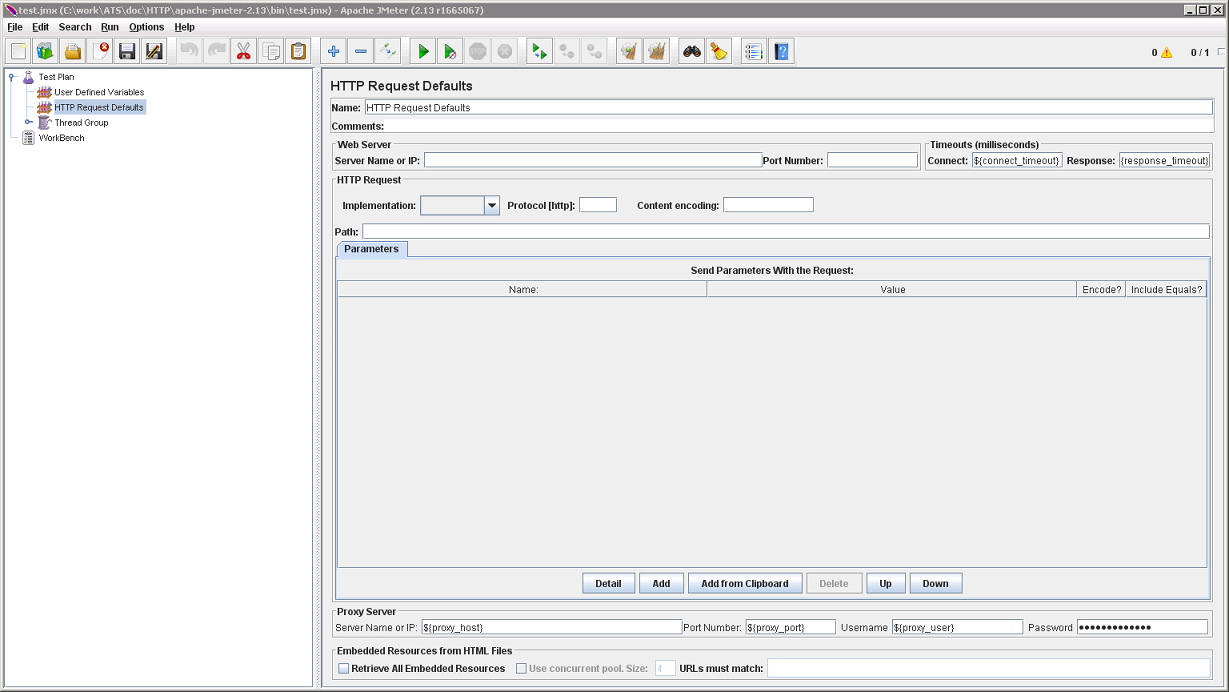
Элемент HTTP Request Defaults, также как и User Defined Variables расположен в категории Config Element.
Отладка
Теперь, было бы неплохо видеть, что происходит при выполнении сценария. Различного вида визуализаторы размещаются в категории Listener. Нам понадобится View Results Tree. Добавим его и запустим сценарий на выполнение командой Run/Start (Ctrl+R). Можно видеть, что ответ сервера также бывает непростым:

Такая картина наблюдается, если адрес редиректит нас на другую страницу и с этим может быть связана одна проблема. Если мы попытаемся анализировать ответ сервера (как это делать я покажу ниже), нам будет доступен лишь последний ответ (той страницы на которую произошёл redirect). Если ответ с предыдущей страницы нам также интересен, автоматический redirect придётся отключить. За это отвечает настройка Follow Redirects элемента HTTP Request. Разобрав ответ, мы сможем получить адрес целевой страницы и выполнить повторный запрос вручную.
Есть ещё один элемент, крайне полезный для отладки сценариев. Он находится в категории Sampler и называется Debug Sampler. Каждый раз, когда до него доходит управление, он выводит текущие значения всех переменных. Добавим его в Thread Group и запустим сценарий ещё раз (для того, чтобы очистить вывод предыдущего запуска, удобно использовать комбинацию клавиш Ctrl+E):
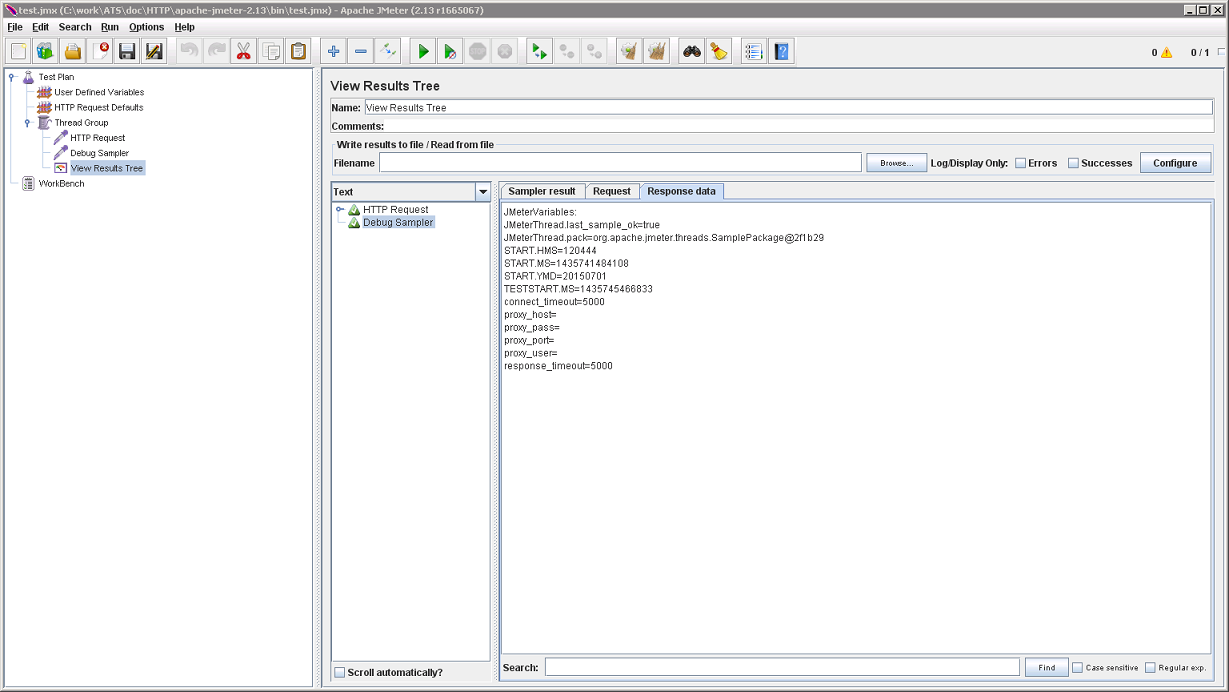
Все переменные как на ладони. Удобно.
JDBC Request
Этот Sampler открывает нам доступ в любую базу данных, поддерживающую протокол JDBC. Для начала, добавим в Test Plan конфигурационный элемент с настройками подключения к серверу БД (JDBC Connection Configuration):
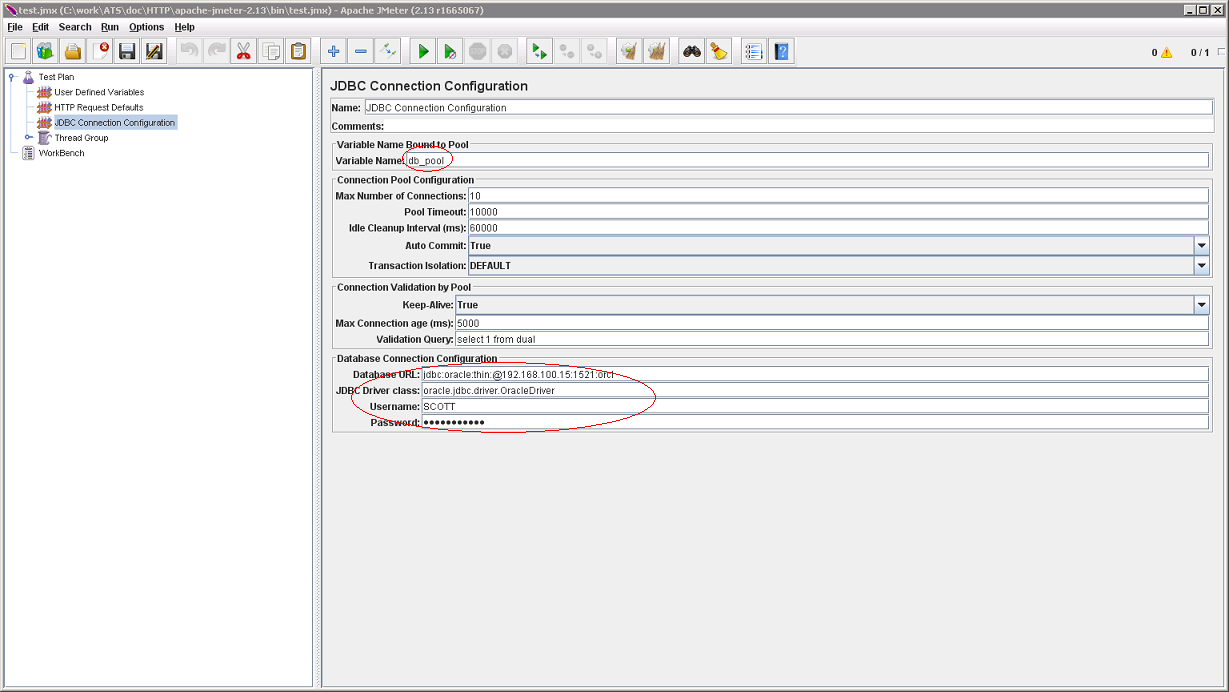
Помимо собственно настроек подключения к БД, здесь важно заполнить поле Variable Name. Это имя будет использоваться в JDBC Request (Sampler) для доступа к пулу сессий:
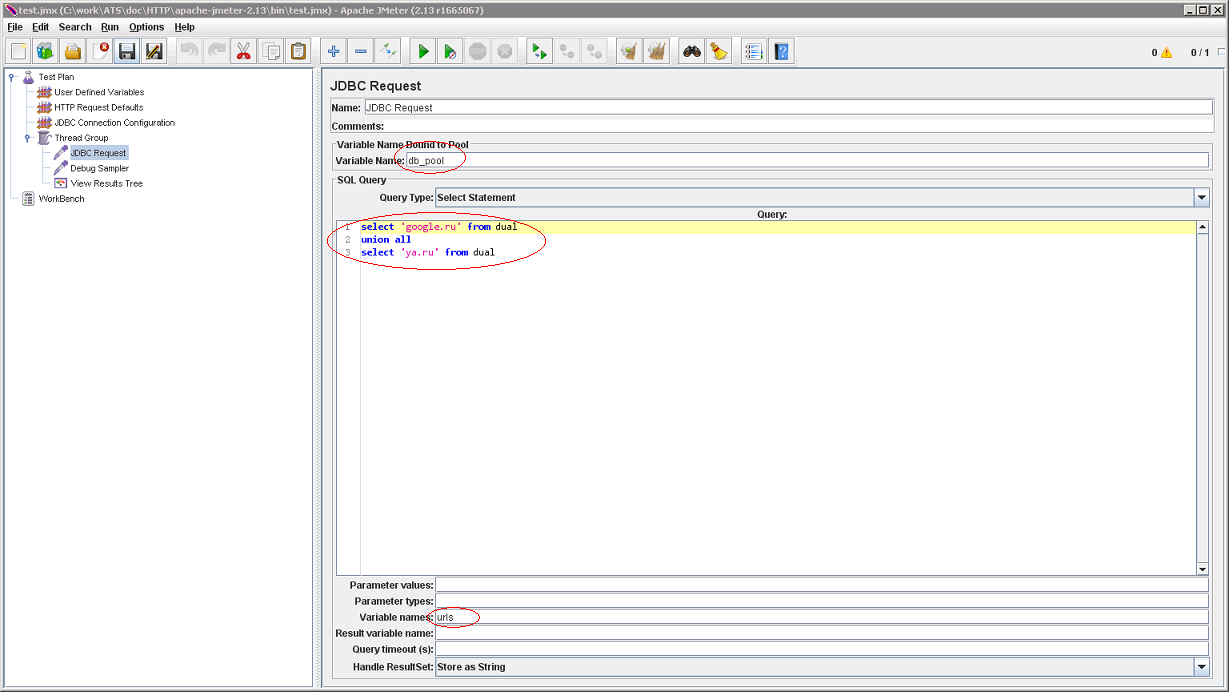
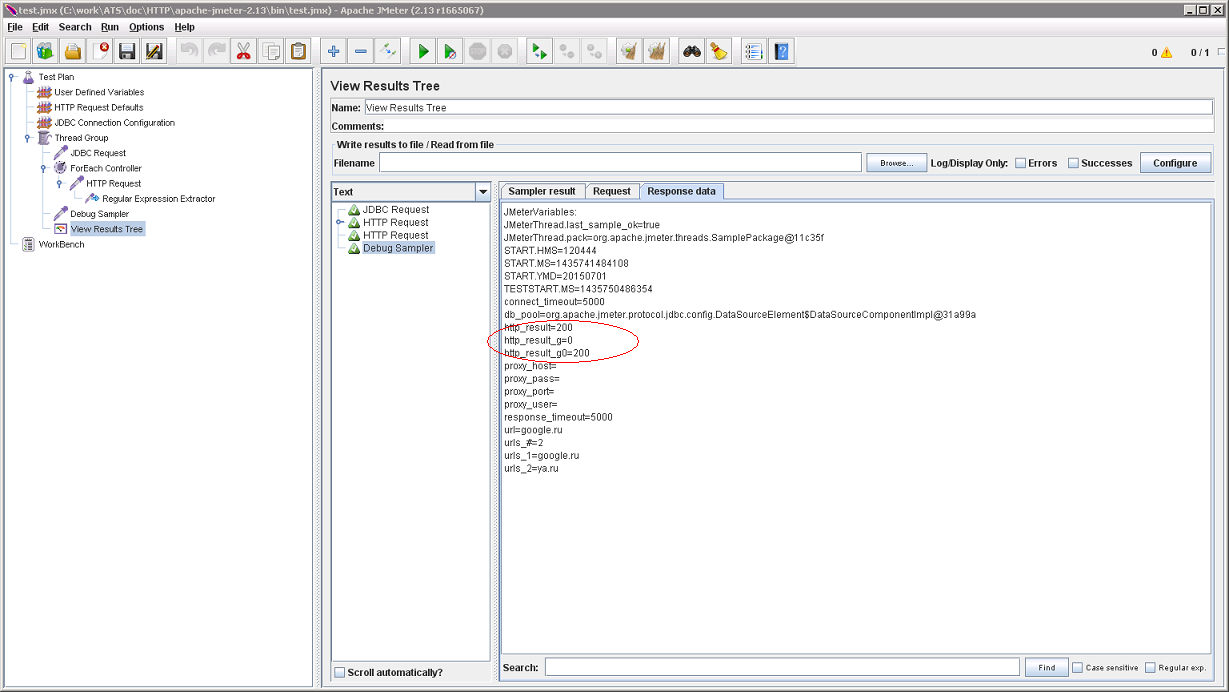
Если вам интересны результаты select-а, придётся заполнить Variable Names. Сам JMeter парсить SQL-запросы на предмет имён столбцов не умеет. Можно перечислять имена столбцов через запятую и пропускать столбцы, не давая им имени. Вставляем Debug Sampler и смотрим, что получилось:

Видим, что документация не врёт. Появились переменные urls_1 и urls_2 (количество строк, как и обещали, в urls_#). В этом месте, стоит соблюдать осторожность. Записи выбираются не по одной, а все сразу и прочитав >1000 строк можно легко отожрать слишком много памяти. Теперь, было бы неплохо обойти полученные адреса в цикле:

Да, именно вот так заковыристо. Набор переменных urls перебираем от 0 до ${urls_#} и текущее значение помещаем в url. Сам ForEach Controller можно найти в категории Logic Controller. Внутри него создадим параметризованный HTTP Request. Запускаем, смотрим:
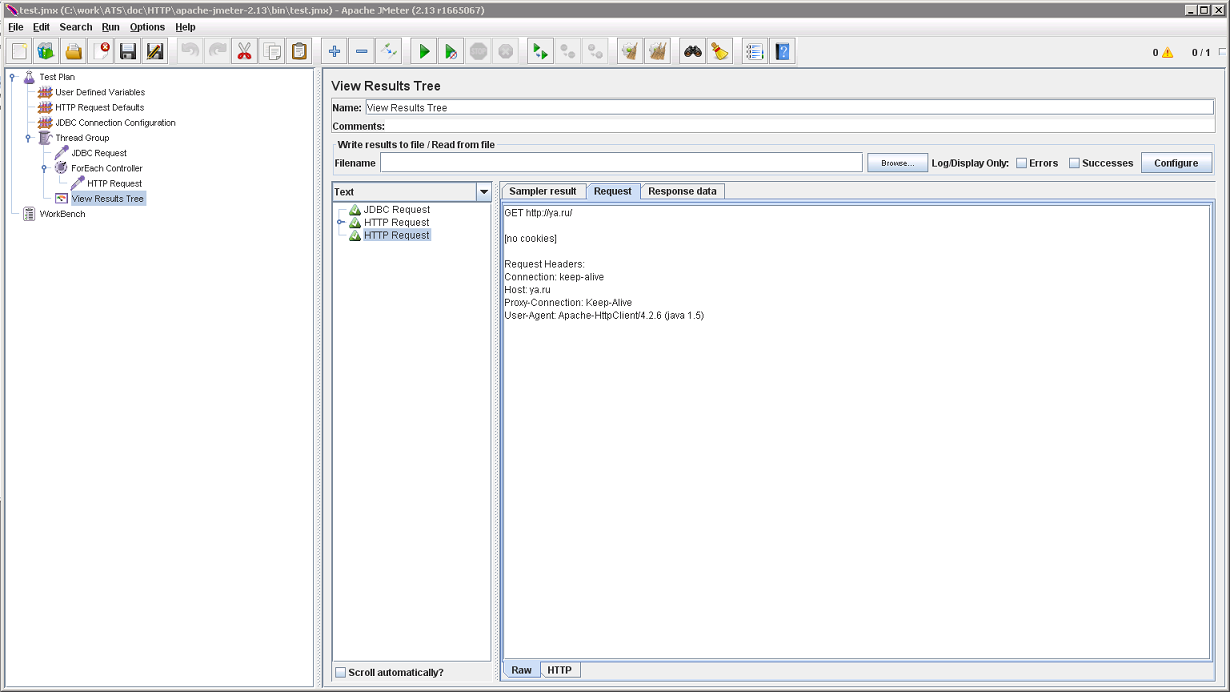
Всё работает.
Регулярные выражения
Теперь, результаты обращений к Web-серверам хотелось бы проанализировать. Для этого, нам предоставлена вся мощь регулярных выражений. Regular Expression Extractor можно найти в Post Processors. Добавим его в HTTP Request и сконфигурируем:
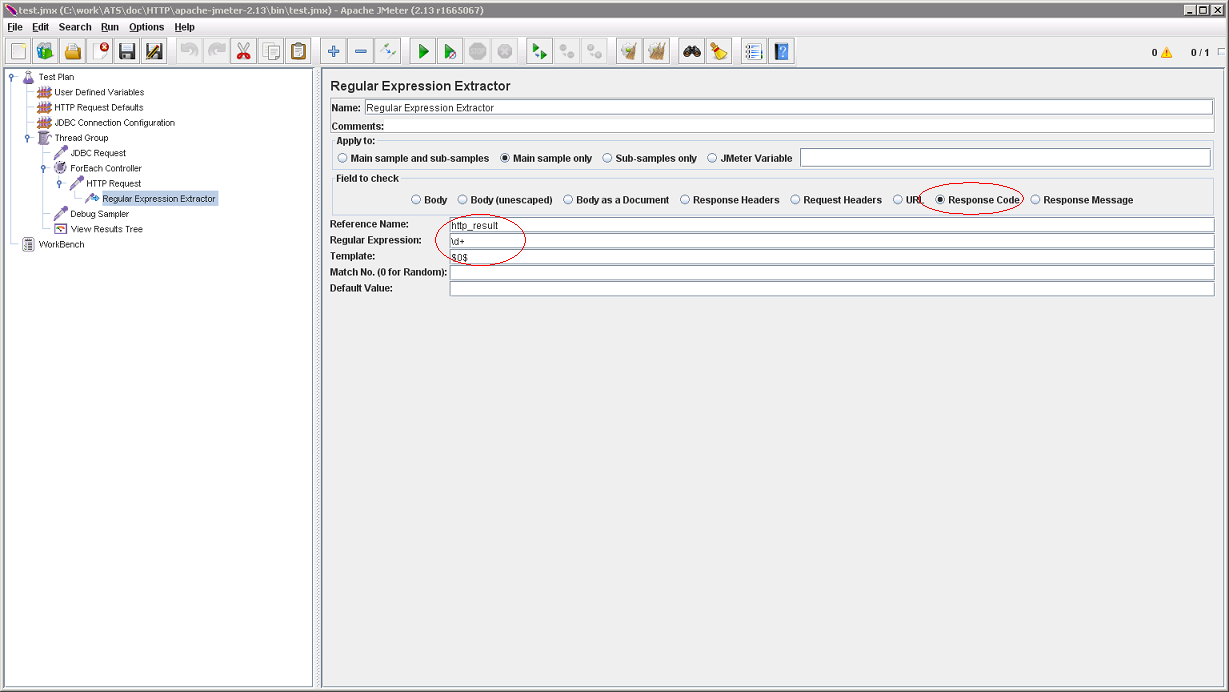
Здесь, нас интересует только код ответа по HTTP (но, по иллюстрации видно, что можно обрабатывать и содержимое ответа). Будем извлекать цепочку цифр (Regular Expression) и помещать результат применения шаблона (Template) в переменную http_result (Reference Name):
Как и ожидалось, получаем 200. Заодно, можно видеть, каким образом осуществляется захват в переменные регулярным выражением.
Что-то там внутри
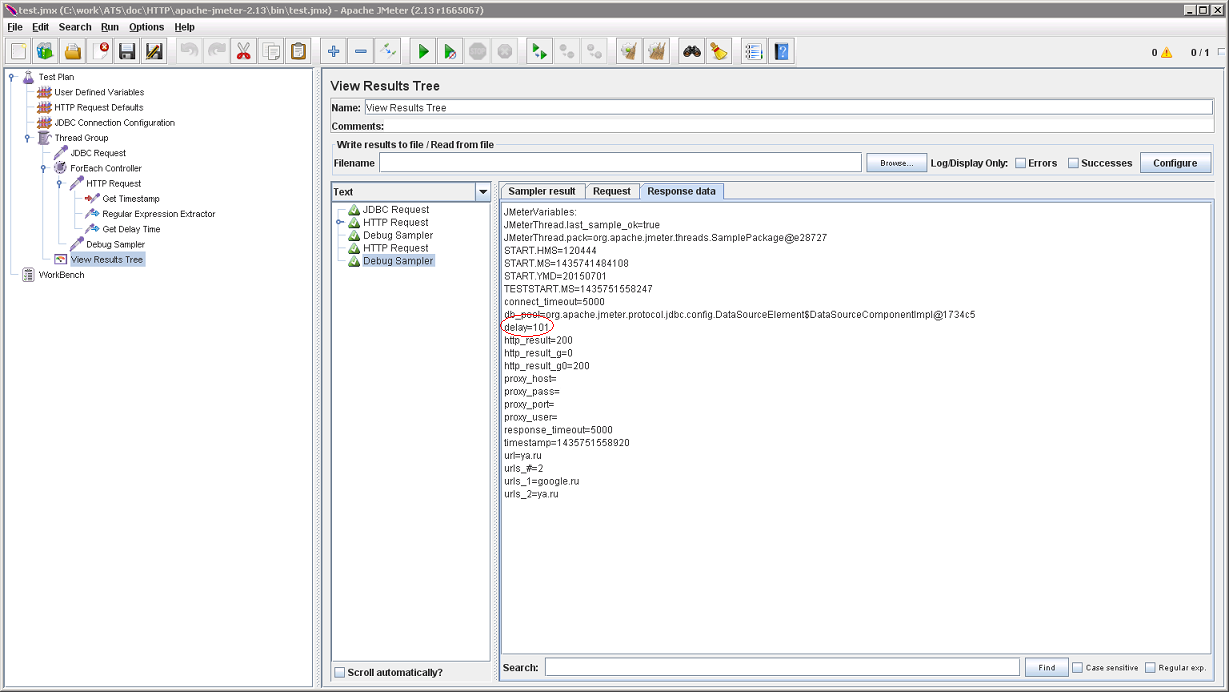
Теперь, допустим, что нас интересует время, в течение которого выполнялся HTTP-запрос. И интересует оно нас не просто для статистики, а мы его хотим как-то использовать в сценарии (например сложить в БД). С этой задачей поможет справиться BeanShell. Конкретно, мы используем его Pre — и PostProcessor-ы.

В первом будем получать timestamp:
Long t = ctx.getPreviousResult().currentTimeInMillis();
vars.put("timestamp", t.toString());
А во втором, получать с его помощью временную задержку:
Long d = ctx.getPreviousResult().currentTimeInMillis() - Long.parseLong(vars.get("timestamp"));
vars.put("delay", d.toString());
В общем, это тоже работает:
Но здесь следует сделать важное замечание. Поскольку, в настоящий момент, я занимаюсь не нагрузочным тестированием, производительность этой конструкции для меня не очень важна. Если в вашем случае это не так, стоит ознакомиться со следующей статьёй.
Запуск
Если бы не было этой возможности, не стоило бы и весь этот разговор заводить. В случае нагрузочного тестирования, сценарий можно запускать из GUI, нет проблем. Но если нас интересует автоматизация, необходимо уметь запускать его молча (например по cron-у). Разумеется такая возможность тоже есть:
./jmeter.sh -n -t test.jmx -l test.log
Сохраняем сценарий в файл с расширением jmx (внутри это XML) и запускаем эту команду. Сценарий отрабатывает без запуска GUI и заодно пишет результаты своей работы в лог. Всё просто и удобно.
In the previous tutorial , we installed Java 8 on our machines because to launch JMeter we need Java. In this tutorial we are going to install latest version of JMeter, i.e., JMeter 4 (As on 4th July 2018) and following are the topics that we are going to cover in this tutorial.
- Pre-Requisites to install JMeter 4.0
- JMeter 4.0 Highlights
- How to Download JMeter?
- How to Launch JMeter?
Before installation let’s take a look on the pre-requisites for JMeter 4.0 installation and the features introduced in JMeter 4.0
Pre-Requisites
Software Requirements: Since JMeter is pure Java software, Java should be on your machine. JMeter 4.0 supports only java 8 and 9. It does not support any prior version of java and also does not support java 10.
- Install Java on Mac
- Install Java on Windows
Operating System Requirements: If your Operating system supports java, then JMeter should run correctly on your system. Below mentioned operating systems and the file required to launch JMeter on the respective operating systems.
- Windows: jmeter.bat (Launch JMeter on windows)
- MAC: jmeter.sh (Launch JMeter on MAC)
- Linux: jmeter.sh (Launch JMeter On Linux)
We will talk about these files in the later sections.
JMeter4.0 Highlights:
JMeter 4.0 is a major release after JMeter 3.3, which is released within two years of its previous major release, i.e., JMeter 3.0. Improvements in JMeter 4.0 has majorly focused on user experience and keeping this in mind it has made it easier for the user to navigate and create test. Below are some features that would acknowledged by JMeter 4.0 user.
- Workbench no longer will be seen on GUI as has been dropped in JMeter 4.0.
- GUI of JMeter4.0 has been changed to black from white.
- English is now JMeter 4.0’s default language. Previous versions of JMeter uses computer’s locale language.
- Most used elements will be seen first in JMeter 4.0.
- JMeter 4.0 uses 8 or 9 version of Java.
- JSON Assertion is now a core part of JMeter. Therefore, third party plug-in for JSON Assertions is no longer required.
- Boundary Extractor is new in JMeter 4.0. It is a post- processor which executes after each Sample request in it request and allows the user to extract values from a server response using right and left boundaries provided by the user.
- Precise throughput timer, this timer introduces variable pauses, calculated to keep the total throughput (e.g. in terms of samples per minute) as close as possible to a give figure.
Note: JSON Assertion is used to perform assertions on JSON Document.
To get deeper insight of the changes introduced in JMeter 4.0 please refer JMeter.
How to Download JMeter?
In this section we will download latest version of JMeter. Downloading JMeter is similar for MAC as well as Windows. In the below steps I will be downloading JMeter 4.0 on MAC but you can follow same steps for Windows as well.
- Go to Apache Jmeter’s website to download JMeter.
-
Click apache-jmeter-4.0.zip for MAC as well as Windows
-
As you will click apache-jmeter-4.0.zip JMeter will start downloading.
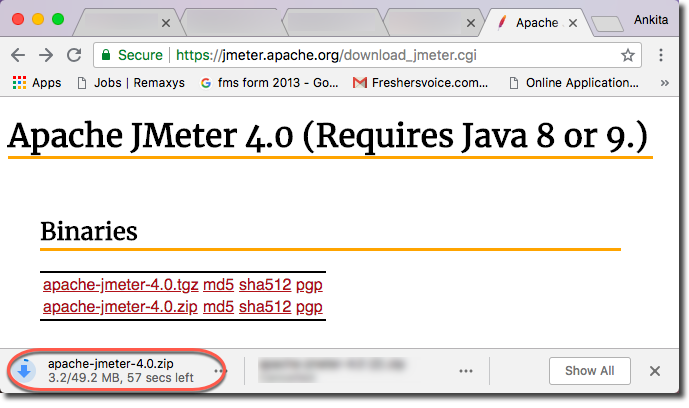
- Once download is complete navigate to downloads folder of your machine and there you will see apache-jmeter-4.0.zip file.
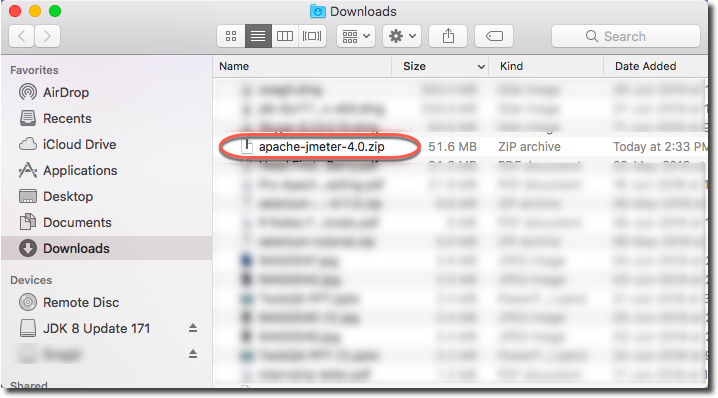
- Unzip the File by and save it your preferred location. For MAC I have double clicked the file to Unzip it; for Windows you may right click it and Unzip. After Unzip open the folder. In my case I have copied the folder to desktop and now I will open the folder.
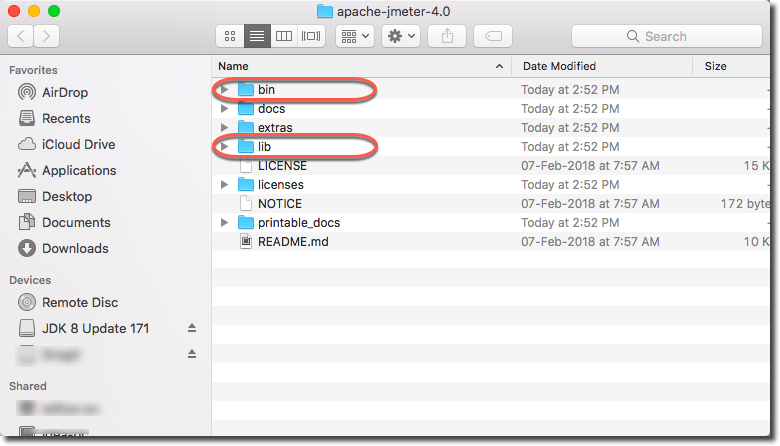
- Bin folder contains templates, .bat, .sh, .jar files to start JMeter. It also contains User & JMeter’s properties files.
- Lib folder contains all required jar files.
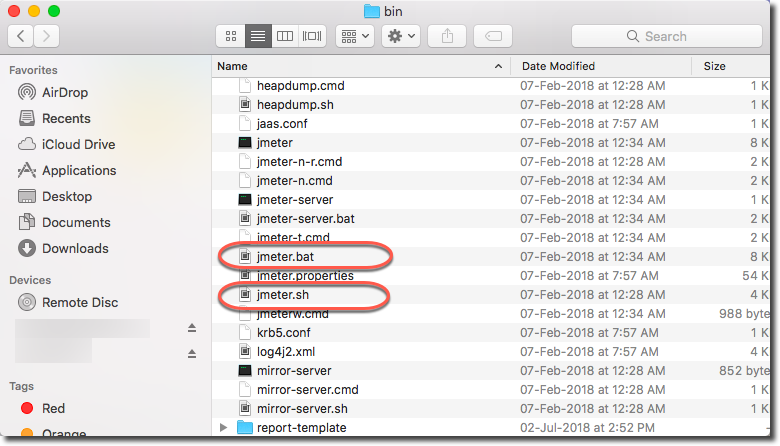
- jmeter.bat is required to launch jmeter GUI on windows
- jmeter.sh is required to launch jmeter GUI on MAC and Linux
Therefore, now we have downloaded JMeter and now we are ready to launch this JMeter’s GUI on our system.
How to Launch JMeter?
For MAC navigate to terminal press command + space. As soon as you press command + space Spotlight will appear.

For Windows to navigate to Command Prompt press Window + R or go to Run.
Note: If terminal is already open please close and reopen it
1. Launch JMeter by switching to the bin directory and typing the following:
<file path>/apache-jmeter-4.0/bin/jmeter.sh
Example in my case it is:
/Users/mohitgarg/Desktop/apache-jmeter-4.0/bin/jmeter.sh
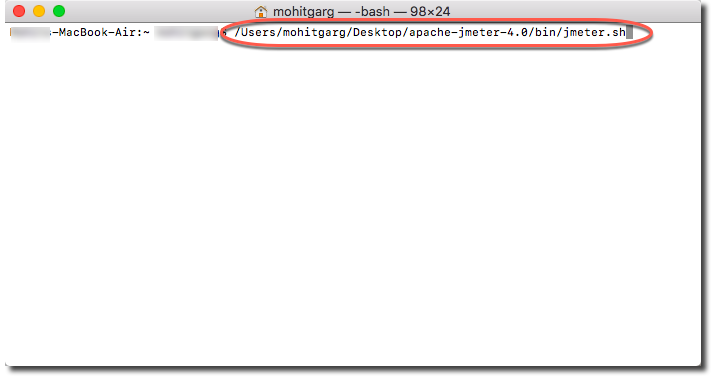
- As soon as you press Enter after typing the above command your terminal will look like picture below.
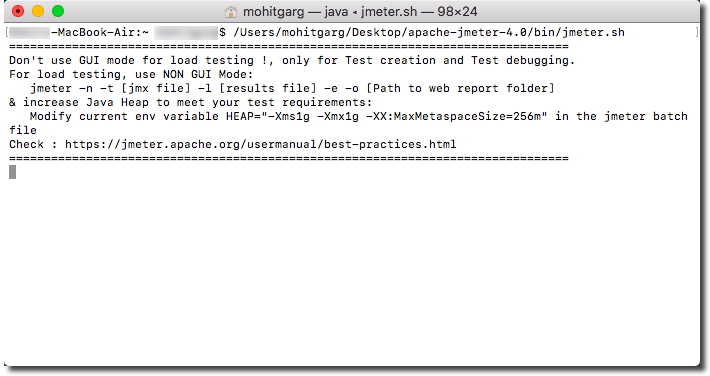
- Apache JMeter will start loading.

- After a few seconds JMeter GUI will launch. JMeter GUI looks as shown below.
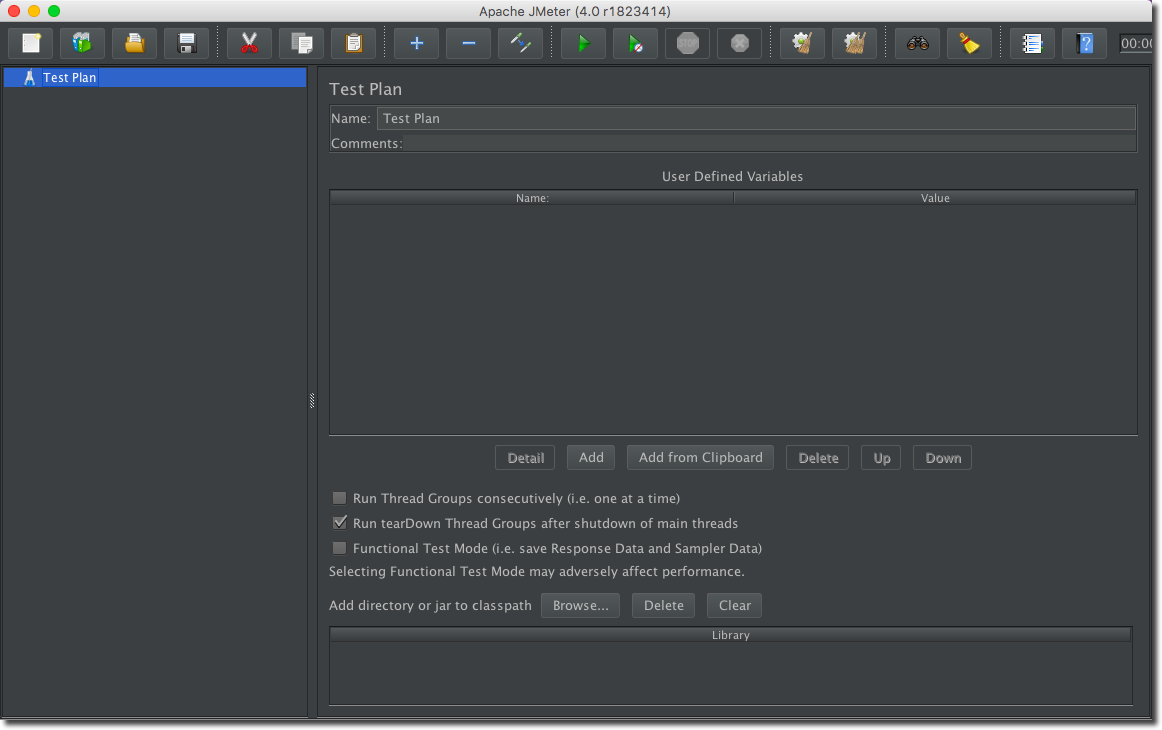
Note : To launch JMeter on Windows just double click the jmeter.bat file or go to command prompt and type <file path>/apache-jmeter-4.0/bin/jmeter.bat and wait for a few seconds JMeter GUI will be launched.
Hence, summarizing this tutorial. Now, we know how to download and launch JMeter on MAC OS as well as Windows. In the upcoming tutorial we will get familiar with the GUI of JMeter and will ultimately, build our first Test Plan.
Содержание
- Установка Apache.JMeter
- Проверка целостности скачанного архива
- Запуск
- Плагины
- Настройка
В текущей статье описан простой быстрый способ настройки Apache.JMeter: скачать, распаковать, настроить.
Для каждодневного использования, более профессионального, рекомендую автоматизировать скачивание и настройку Apache.JMeter с использованием Apache Maven.
(https://loadtestweb.wordpress.com/2018/11/16/jmeter-maven-plugin/)
1. Установка Apache.JMeter
Дистрибутив JMeter берётся по ссылке со страницы Download Releases.
Скачиваются два файла:
- apache-jmeter-5.0.zip (zip)
- apache-jmeter-5.0.zip.asc (pgp)
Zip-файл скачивается с ближайшего зеркала, а подпись скачивается с сервера Apache.
Можно оба файла скачать с сервера Apache, тогда проверка подписи особо не нужна. Также с сервера Apache берётся дистрибутив прежних версий, например, версии 3.1:
- https://archive.apache.org/dist/jmeter/binaries/
- apache-jmeter-5.0.zip
Архив нужно распаковать, например, в каталог:
- D:toolsapache-jmeter-5.0
Установка завершена.
Перед запуском можно проверить целостность скачанного архива, а также установить java нужной версии.
Назначение каталогов и файлов:
- bin — исполняемые файлы Apache.JMeter
- ApacheJMeter.jar — java-сборка Apache.JMeter
- heapdump.cmd, heapdump.sh
- jmeter.bat, jmeter.sh, jmeter
- jmeter-n.cmd
- docs — документация
- extras — дополнительные скрипты и утилиты
- lib — библиотеки
- licenses — лицензии
- printable_docs — документация
- LICENSE — лицензия Apache 2.0 на Apache.JMeter (перевод, описание)
- NOTICE — примечание
- README.md — описание, требования, инструкция по установке и сборке
1.1. Проверка целостности скачанного архива (опционально)
Удобно использовать консоль git-клиента в Windows, так как по умолчанию в MinGW есть утилита gpg для проверки корректности подписи
Порядок проверки:
- Проверить pgp-подпись с помощью утилиты gpg.
- Если RSA ключ не был найден, то
- скачать указанный ключ с сервера pgpkeys.mit.edu с помощью утилиты gpg.
- проверить pgp-подпись с помощью утилиты gpg снова.
Если подпись корректна, то будет видна строчка «Good signature».
user@host MINGW64 /d/Distrib/Development/Apache.JMeter $
gpg --verify apache-jmeter-3.2.zip.asc apache-jmeter-3.2.zip
gpg: Signature made 9 апр 2017 г. 18:08:59 RTZ using RSA key ID 0612B399
gpg: Can't check signature: public key not founduser@host MINGW64 /d/Distrib/Development/Apache.JMeter $
gpg --keyserver pgpkeys.mit.edu --recv-key 0612B399
gpg: requesting key 0612B399 from hkp server pgpkeys.mit.edu
gpg: key 0612B399: public key "Milamber (ASF) <milamber@apache.org>" imported
gpg: Total number processed: 1
gpg: imported: 1 (RSA: 1)user@host MINGW64 /d/Distrib/Development/Apache.JMeter $
gpg --verify apache-jmeter-3.2.zip.asc apache-jmeter-3.2.zip
gpg: Signature made 9 апр 2017 г. 18:08:59 RTZ using RSA key ID 0612B399
gpg: Good signature from "Milamber (ASF) <milamber@apache.org>"
gpg: aka "Milamber (Milamberspace) <milamberspace@gmail.com>"
gpg: WARNING: This key is not certified with a trusted signature!
gpg: There is no indication that the signature belongs to the owner. Primary key fingerprint: C492 3F9A BFB2 F1A0 6F08 E88B AC21 4CAA 0612 B399
1.2. Установка Java
Выдержка из файла README.md гласит, что нужна Java 8:
## Requirements
The following requirements exist for running Apache JMeter:
* Java Interpreter:
A fully compliant Java 8 Runtime Environment is required for Apache JMeter to execute. A JDK with keytool utility is better suited for Recording HTTPS websites. Java 9 is not yet supported as of version 3.3.
И рекомендуется установить JDK, а не просто JRE.
Утилита keytool нужна, чтобы Apache.JMeter мог перехватывать и расшифровывать трафик по протоколу HTTPS, работая в режиме прокси.
Рекомендация, что нужно именно JDK сомнительная, так как в JRE тоже есть утилита keytool:
- C:Program FilesJavajre1.8.0_192binkeytool.exe
Считаю, что требование JDK для работы keytool — ошибка Apache.JMeter, которая уже исправлена, но в документации ещё не отражена:
- https://bz.apache.org/bugzilla/show_bug.cgi?id=61026
Java (JRE) скачивается с сайта:
- https://java.com/ru/download/manual.jsp
- http://www.oracle.com/technetwork/java/javase/downloads/jre8-downloads-2133155.html
Java (JDK), Java SE Development Kit 8, скачивается с сайта:
- http://www.oracle.com/technetwork/java/javase/downloads/2133151
- http://www.oracle.com/technetwork/java/javase/downloads/jdk8-downloads-2133151.html
На текущий момент, актуальная версия 8 Update 192.
2. Запуск
2.1. Первый запуск JMeter в Windows 7
Для запуска JMeter в графическом режиме используются скрипты:
- bin
- jmeter.bat — для Windows
- jmeter.sh — для Linux
После первого запуска Apache.JMeter GUI в Windows 7 вероятно вы увидите предупреждение и затем ошибку:
"findstr" не является внутренней или внешней
командой, исполняемой программой или пакетным файлом.
Not able to find Java executable or version. Please check your Java installation.
errorlevel=2
Для продолжения нажмите любую клавишу . . .
На самом деле всё в порядке. По какой-то причине каталог C:Windowssystem32 в Windows 7 — Windows 10 пропал из переменной окружения PATH. Всегда там был и с одним из обновлений пропал, или какая-то неумелая программа его удалила оттуда.
Чтобы C:Windowssystem32 вернуть в PATH, можно модифицировать файл jmeter.bat добавив в него строку:
set PATH=C:WindowsSystem32;%PATH%
Или можно отредактировать значение переменной PATH для всей операционной системы, тогда починится не только скрипт jmeter.bat.
Теперь скрипт jmeter.bat работает корректно и Apache.JMeter запускается.
2.2. Запуск JMeter в консольном режиме
2.3. Полезный командный файл для открытия теста
3. Плагины
3.1. Установка плагинов в Apache.JMeter
3.2. Часто используемые плагины
3.3. Дополнительные полезные плагины
4. Настройка
4.1. Настройка объёма оперативной памяти для java
4.2. Настройка кодировки по умолчанию для java
4.3. Настройки Apache.JMeter
4.4. Настройки логирования Apache.JMeter
Установка Java
Поскольку JMeter является java-приложением для его работы требуется установить JRE или JDK (не ниже восьмой версии).
JRE (Java Runtime Environment) — минимально необходимая среда для запуска java-приложений, состоящая из виртуальной машины (Java Virtual Machine), библиотеки Java-классов и основных утилит.
JDK (Java Development Kit) — комплект разработчика приложений для Java. Включает в себя JRE, компилятор Java (javac) и ряд дополнительных утилит.
Несмотря на то, что для работы JMeter достаточно наличия JRE, рекомендуется устанавливать JDK. Это даст возможность в дальнейшем, при необходимости, вносить изменения в исходный код приложения или разрабатывать собственные плагины.
Скачайте JDK версии 8.231 или новее и установите его, следуя инструкциям инсталлятора.
Проверить корректность установки можно посредством ввода в командную строку `java -version`:

Установка JMeter
Скачайте JMeter версии 5.2.1 или новее и распакуйте архив в удобное для вас место.
Для запуска приложения в GUI-режиме следует использовать jmeter.bat в папке bin.
Установка Plugins Manager
JMeter поддерживает расширение функциональности посредством плагинов. Для облегчения процесса их поиска и установки рекомендуется использовать Plugins Manager.
Скачайте Plugins Manager JAR и разместите его в папке lib/ext JMeter’а.
Доступ к менеджеру в GUI-режиме осуществляется через вкладку Options главного меню JMeter.
Список полезных и наиболее часто используемых плагинов вы можете найти на соответствующей странице библиотеки.
Ассоциирование файлов
Для открытия файлов сценариев JMeter (.jmx) можно использовать главное меню приложения (File Open / Open Recent) или перетаскивать требуемые файлы прямо в интерфейсное окно. Если же вы хотите иметь возможность открывать .jmx по двойному щелчку мыши из Windows, необходимо в свойствах файла (вкладка «общие») задать в качестве приложения по умолчанию jmeter-t.cmd или jmeterw.cmd (для запуска GUI без консоли).
Альтернативный способ — прописать ассоциации через cmd:
- Assoc .jmx=jmeter
- FType jmeter=»c:appsjmeterbinjmeter-t.cmd» %1