На чтение 4 мин Просмотров 6.2к. Опубликовано
122

Вероятно, вы просто устанавливаете последнее обновление Windows , если теперь у вас, как и у многих других пользователей Windows 10, проблемы со звуком на вашем компьютере, например, нет звука через HDMI, и вы ищете для правильного драйвера Intel High Definition Audio вы попали в нужное место. Прочтите этот пост, и вы узнаете, как загрузить правильный драйвер Intel High Definition Audio для вашей Windows 10 за секунду.
Содержание
- Выберите способ, который вам больше нравится:
- Метод 1: Обновите аудиодрайвер Intel High Definition Audio с помощью Driver Easy автоматически
- Метод 2: Загрузите и установите правильный аудиодрайвер Intel High Definition вручную
- Метод 3. Откатите драйвер
Выберите способ, который вам больше нравится:
Примечание. Драйвер Intel High Definition Audio может относиться к Intel Отобразите аудиодрайвер или драйвер аудиоконтроллера .
- Автоматическое обновление аудиодрайвера Intel High Definition (рекомендуется)
- Загрузить и установить правильный драйвер Intel High Definition Audio Driver вручную
- Откатите драйвер
Метод 1: Обновите аудиодрайвер Intel High Definition Audio с помощью Driver Easy автоматически
Если у вас нет времени, терпения или компьютерных навыков для обновления драйвера Intel High Definition Audio вручную , вы можете сделать это автоматически с помощью Driver Easy .
Driver Easy автоматически распознает вашу систему и найдет для нее правильные драйверы. Вам не нужно точно знать, в какой системе работает ваш компьютер, вам не нужно рисковать загрузкой и установкой неправильного драйвера, и вам не нужно беспокоиться об ошибке при установке.
Вы можете автоматически обновлять драйверы с помощью версии Driver Easy FREE или Pro . Но с версией Pro требуется всего 2 клика:
- Загрузить и установить Driver Easy.
- Запустить Driver Easy и нажмите кнопку Сканировать сейчас. Затем Driver Easy просканирует ваш компьютер и обнаружит все проблемные драйверы.

- Нажмите Обновить все , чтобы автоматически загрузить и установить правильную версию всех драйверов, которые отсутствуют или устарели в вашей системе (для этого требуется версия Pro – вам будет предложено выполнить обновление, когда вы нажмете «Обновить все»).
Примечание : вы можете сделать это бесплатно, если хотите, но частично вручную.


Версия драйвера Pro Easy поставляется с полной технической поддержкой.
Если вам нужна помощь, обратитесь в службу поддержки Driver Easy по адресу support@drivereasy.com.
Метод 2: Загрузите и установите правильный аудиодрайвер Intel High Definition вручную
Не запрашивая помощи у средства обновления драйвера, вы также можете напрямую загрузить драйвер для вашей звуковой карты и аудиоконтроллера вручную с веб-сайта производителя. Или, если вы используете брендовый ноутбук, вы можете загрузить драйверы с официального сайта вашего ноутбука.
Здесь мы возьмем аудиодрайвер дисплея Intel в качестве примера для покажет, как загрузить и установить драйвер вручную.
Примечание. Intel предлагает аудиодрайверы вместе с драйверами видеокарты. Поэтому загрузите графический драйвер, чтобы получить аудиодрайвер.
- Перейдите в Центр загрузок Intel .
- Введите Intel HD Graphics + номер модели в поле поиска . Затем нажмите Enter .
- В раскрывающемся меню выберите 64-разрядная версия Windows 10 или 32-разрядная версия Windows 10 (в зависимости от вашего ПК) . .
- Выберите первый элемент страницы как есть последняя версия.
- Щелкните файл .exe , чтобы загрузить и легко установить с помощью подсказок.
- Перезагрузите компьютер, чтобы изменения вступили в силу.


Метод 3. Откатите драйвер
Если обновление драйверов не поможет , откат вашего драйвера может сработать для вас.
- Щелкните правой кнопкой мыши кнопку «Пуск» и выберите «Диспетчер устройств».
- Прокрутите вниз и найдите Системные устройства . Щелкните по нему и найдите свою аудиопрограмму. Это может быть аудиоконтроллер Intel (R) Smart Sound Technology или аудиоконтроллер высокого разрешения .
- Щелкните его правой кнопкой мыши и перейдите на вкладку Драйвер . Нажмите Откатить драйвер .
Примечание . Если параметр «Откатить драйвер» неактивен, вы можете загрузить предыдущий драйвер с веб-сайта производителя и установите его на свой компьютер. - После перезагрузки проблема должна быть решена.


Надеюсь, это поможет. Не стесняйтесь комментировать ниже, если у вас есть какие-либо вопросы.
Проблемы со службой драйвера Intel High Definition Audio в операционной системе Windows 10 могут возникать по разным причинам и мешать нормальной работе звука на компьютере.
Неисправности в драйверах могут приводить к отсутствию звука, низкому качеству звука или прерывистости воспроизведения звука. Хорошая новость в том, что эти проблемы можно решить самостоятельно без обращения к специалистам.
Одним из самых первых и простых способов исправить проблему со службой драйвера Intel High Definition Audio является перезагрузка компьютера. Иногда проблемы с звуком возникают из-за глюков в операционной системе, и перезагрузка может помочь восстановить нормальную работу.
Если перезагрузка не помогла, следующим шагом может быть обновление драйвера Intel High Definition Audio. Для этого необходимо зайти на официальный сайт Intel, найти раздел поддержки и загрузок и найти нужный драйвер для вашей модели звуковой карты. После загрузки драйвера следует запустить установку и следовать инструкциям на экране. Обновление драйвера может решить множество проблем со звуком.
Содержание
- Как решить проблему со службой драйвера Intel High Definition Audio в Windows 10
- 1. Перезагрузка компьютера и проверка подключений
- 2. Обновление драйверов
- 3. Установка последней версии драйверов
- 4. Проверка службы Windows Audio
- Проверьте актуальность драйвера
- Переустановите драйвер
- Измените настройки аудиоустройства
Как решить проблему со службой драйвера Intel High Definition Audio в Windows 10
Проблемы со службой драйвера Intel High Definition Audio могут возникать в операционной системе Windows 10 и приводить к отсутствию звука или неправильному воспроизведению звука на компьютере. В этой статье мы рассмотрим несколько способов решения данной проблемы.
1. Перезагрузка компьютера и проверка подключений
Перезагрузите компьютер и проверьте подключения аудио устройств. Убедитесь, что колонки или наушники правильно подключены к компьютеру, а также проверьте кабель HDMI или USB, если используете соответствующие устройства. Возможно, проблема со звуком возникла из-за неправильного подключения.
2. Обновление драйверов
Необходимо обновить драйверы для аудио устройств, включая драйверы для службы Intel High Definition Audio. Для этого выполните следующие действия:
- Нажмите правой кнопкой мыши на кнопку «Пуск» в левом нижнем углу экрана и выберите «Устройства и принтеры».
- В окне «Устройства и принтеры» найдите и нажмите правой кнопкой мыши на ваш компьютер и выберите «Управление устройствами».
- В открывшемся окне «Диспетчер устройств» найдите раздел «Звук, видео и игры» и раскройте его.
- Найдите устройство «Intel High Definition Audio» и нажмите правой кнопкой мыши на него.
- Выберите «Обновить драйвер» и следуйте инструкциям мастера обновления драйверов.
После обновления драйверов перезагрузите компьютер и проверьте, исправилась ли проблема со звуком.
3. Установка последней версии драйверов
Если обновление драйверов не помогло решить проблему со службой драйвера Intel High Definition Audio, попробуйте установить последнюю версию драйверов с официального сайта производителя или через центр обновлений Windows.
Официальный сайт Intel предоставляет драйверы для звуковых карт Intel High Definition Audio. Посетите сайт производителя и найдите раздел поддержки или загрузок, где вы сможете выбрать свою модель звуковой карты и скачать последнюю версию драйверов.
Если же вам удобнее использовать центр обновлений Windows, выполните следующие действия:
- Нажмите правой кнопкой мыши на кнопку «Пуск» и выберите «Настройки».
- В открывшемся меню выберите «Обновление и безопасность».
- В левой панели меню выберите «Windows Update».
- Нажмите «Проверить на наличие обновлений» и дождитесь, пока Windows найдет доступные обновления для вашего компьютера.
- Если Windows предложит установить обновление для драйверов Intel High Definition Audio, подтвердите его установку и дождитесь окончания процесса.
После установки последней версии драйверов перезагрузите компьютер и проверьте, исправилась ли проблема со звуком.
4. Проверка службы Windows Audio
Служба Windows Audio отвечает за воспроизведение звука на компьютере. Если служба не работает или находится в неправильном состоянии, это может привести к проблемам со звуком. Для проверки службы Windows Audio выполните следующие действия:
- Нажмите правой кнопкой мыши на кнопку «Пуск» и выберите «Задачи».
- В открывшемся меню выберите «Выполнить новую задачу».
- В поле «Открывается» введите «services.msc» и нажмите «OK».
- В открывшемся окне «Службы» найдите службу «Windows Audio».
- Проверьте, запущена ли служба. Если нет, нажмите правой кнопкой мыши на службу «Windows Audio» и выберите «Запустить».
- Если служба уже запущена, нажмите правой кнопкой мыши на нее и выберите «Перезапустить».
- После этого перезагрузите компьютер и проверьте, исправилась ли проблема со звуком.
Если никакой из предложенных способов не помог решить проблему со службой драйвера Intel High Definition Audio в Windows 10, рекомендуется обратиться за помощью к специалистам или технической поддержке производителя компьютера или звуковой карты.
Проверьте актуальность драйвера
Если у вас возникают проблемы со службой драйвера Intel High Definition Audio в Windows 10, первым шагом для решения проблемы должно стать проверка актуальности установленного драйвера.
Операционная система Windows 10 постоянно обновляется, и в процессе этих обновлений могут быть внесены изменения и исправления для драйверов аудио устройств. Поэтому, если у вас возникают проблемы со службой драйвера Intel High Definition Audio, возможно, вам просто необходимо установить последнюю версию драйвера для вашего аудио устройства.
Для проверки актуальности драйвера и его обновления в Windows 10, выполните следующие шаги:
- Откройте меню «Пуск» и перейдите в раздел «Параметры».
- В появившемся окне «Параметры» выберите раздел «Обновление и безопасность».
- На левой панели выберите «Windows Update».
- Нажмите на кнопку «Проверить наличие обновлений».
- Если обновления найдены, установите их, следуя инструкциям системы.
После установки всех доступных обновлений проверьте, исправилась ли проблема со службой драйвера Intel High Definition Audio. Если проблема осталась, попробуйте обновить драйвер аудио устройства вручную.
Переустановите драйвер
Если проблемы со службой драйвера Intel High Definition Audio не удается решить путем обновления драйвера, можно попробовать его переустановить.
- Первым шагом необходимо удалить текущий драйвер. Для этого нужно открыть Диспетчер устройств. Можно сделать это, щелкнув правой кнопкой мыши на кнопке «Пуск» и выбрав соответствующий пункт. В окне «Диспетчер устройств» нужно отыскать раздел «Звук, видео и игры», раскрыть его, а затем щелкнуть правой кнопкой мыши на устройстве «Intel High Definition Audio». В контекстном меню нужно выбрать пункт «Удалить устройство».
- После удаления драйвера можно перейти к его переустановке. Воспользуйтесь средствами Windows для поиска и установки нового драйвера. Для этого нужно открыть Диспетчер устройств, раскрыть раздел «Звук, видео и игры», щелкнуть правой кнопкой мыши на любом свободном месте в разделе и выбрать пункт «Найти оборудование и установить драйвер». Windows автоматически просмотрит доступные драйверы и установит подходящий для вашего устройства.
После переустановки драйвера можно попробовать выполнить другие действия для решения проблемы. Если проблема все еще не решена, можно обратиться к производителю устройства или к поддержке Intel для получения дополнительной помощи.
Измените настройки аудиоустройства
Если у вас возникают проблемы с работой службы драйвера Intel High Definition Audio в Windows 10, вы можете попробовать изменить настройки аудиоустройства, чтобы исправить проблему. Вот некоторые рекомендации:
- Перезапустите службу: откройте меню «Пуск» и введите «Управление компьютером». Затем выберите «Управление компьютером» и перейдите в «Службы и приложения» -> «Службы». Найдите службу «Windows Audio» и щелкните правой кнопкой мыши, затем выберите «Перезапустить».
- Проверьте уровень громкости: щелкните правой кнопкой мыши на значке динамика в системном лотке и выберите «Открыть громкость». Убедитесь, что уровень громкости установлен на приемлемый уровень и звук не отключен.
- Обновите драйвер: откройте меню «Пуск» и введите «Диспетчер устройств». Выберите «Диспетчер устройств» и найдите раздел «Звук, видео и игры». Раскройте раздел, найдите устройство «Intel High Definition Audio» и щелкните правой кнопкой мыши, затем выберите «Обновить драйвер».
- Проверьте конфликты устройств: в Диспетчере устройств найдите раздел «Конфликты ресурсов». Если устройство «Intel High Definition Audio» указано в этом разделе, щелкните правой кнопкой мыши на нем и выберите «Удалить». Перезапустите компьютер и устройство будет автоматически установлено.
- Проверьте наличие обновлений Windows: откройте меню «Пуск» и выберите «Настройки» -> «Обновление и безопасность» -> «Проверить наличие обновлений». Установите все доступные обновления и перезагрузите компьютер.
Если эти рекомендации не помогли решить проблему, вы можете обратиться в службу поддержки или форумы сообщества пользователей, где вам могут предоставить дополнительные решения.
Having issues with your Intel HD audio drivers? Then, you come to the right place, here you got to know exactly what you need to fix Intel High Definition Audio Driver issue in no time.
Not, receiving sounds via HDMI? Perhaps, you just upgraded your Windows operating system to the latest version and suddenly your Intel audio drivers start behaving in an unusual manner. It could be possible because the wrong audio drivers are installed on your system.
One more thing, if you are using other sound cards, then you don’t need to update the Intel audio driver. For other sound cards, you can install the drivers from the official website of the card’s manufacturer. Coming back to the topic, the post explains how to install the correct Intel HD audio driver on Windows 10.
Highly Recommended Way to Fix Intel High Definition Audio Driver Issue in Windows 10
Updating your audio driver software with a competent program like Bit Driver Updater is the ultimate solution to resolve Intel HD audio driver issue on Windows 10. The program is capable of providing the latest WHQL certified driver updates straight from the manufacturers.
To download and try Bit Driver Updater for free, click on the button provided below!

Possible Solutions to Fix the Intel High Definition Audio Driver Issue on Windows 10
Majorly, the wrongly installed audio drivers lead to audio-related issues. Likewise, if you are facing any sort of issues with your Intel’s HD audio drivers then you need to fix it as soon as possible. Choose the way you prefer to fix Intel high definition audio driver issue on Windows 10.
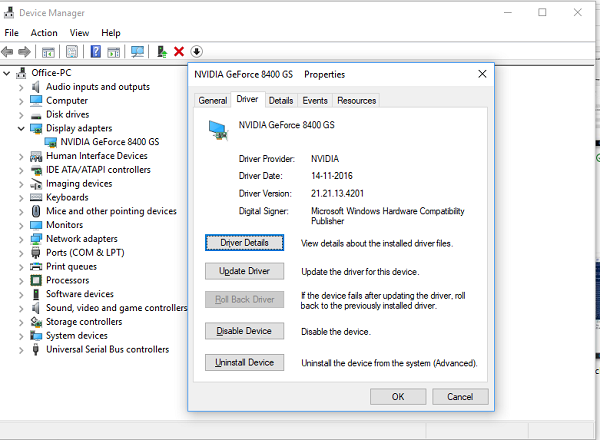
Solution 1: Download and Update Intel HD Audio Driver using Device Manager
With the use of Windows in-built utility called Device Manager, you can perform driver download for your Intel audio drivers. It is an amazing utility that can resolve all driver-related issues. To update the Intel HD audio driver follow the instructions below:
Step 1: Open Device Manager by pressing the Windows + X key on your keyboard.
![]()
Step 2: Then, scroll down to Sound, Video, and Game Controllers and click double on it to expand.
Step 3: After this, right-click on the Intel High Definition Audio to choose the Update Driver option.
Step 4: When the next window appears then choose the first option i.e., Search Automatically for the Updated Driver Software.

Important: Sometimes, you locate Intel HD Audio under the category of Other Devices. So, when you don’t find it under the Sound, Video, and Game Controllers then double click on the Other Devices.
To finish the installation go with the onscreen instructions. Now, check to see if this works for you.
Also Read: How to Update Drivers on Windows 10,8,7 – Update Device Drivers
Solution 2: Manually Install Intel HD Audio Driver via Official Website
Alternatively, you can use the official website of Intel to download and update Intel High Definition Audio Driver for Windows 10. Here is how you can do so:
Step 1: Visit Intel’s official website.
Step 2: Then, go to the Support tab to choose the Download Center from the drop-down menu.

Step 3: Now, input the Intel HD graphics and model number.
Step 4: Press the Enter key on your keyboard.
Step 5: Select Windows 10 (64-bit and 34-bit) according to your computer from the drop-down menu.
Step 6: Select the very first option from the list as it is the most recent version of drivers.
Step 7: In the next prompts, click on the .exe file to download and install it.
After this, reboot your computer to save the new changes. Just in case, if you have no idea about the model number, then here is how to find it.
- On your desktop, click right on any blank area to choose the Display Settings.
- Then, in the right menu pane, scroll down to choose Advanced Display Settings.

- After this, click on the Display Adapter properties on Display 1.

- Now, see the model number in the Adapter’s information section. Next, go back to Intel’s support page.

Also Read: How to Install and Update Bluetooth Drivers in Windows 10
Solution 3: Automatically Update Intel HD Audio Driver with Bit Driver Updater
If you don’t have time, skills to perform driver download manually then you can automatically update the Intel HDMI audio driver on Windows 10 with Bit Driver Updater. It is an amazing software that lets you update all the outdated, broken, or faulty drivers in just a few clicks. With this software, you can be able to troubleshoot the other drivers or windows-related issues including frequent crashes, blue screen errors, and many more. Here is what you need to follow in order to update the drivers using Bit Driver Updater:
Step 1: Click on the button below to download Bit Driver Updater.
Step 2: Then, run the executable file to install it on your system.
Step 3: Once it is triggered on your system, then it automatically starts scanning your PC for outdated, broken, or faulty drivers.
Step 4: After this, it will show you the list of all the outdated drivers.
Step 5: You can either click on the Update Now or Update All button.

However, you can update drivers with its free version but with the free version, you aren’t able to update all the drivers in one click. For updating all the drivers in one go, you need to upgrade to its pro version.
Also Read: Microsoft USB Driver Updates Completely Free For Windows 10, 8, 7
Solution 4: Roll back your Intel High Definition Audio Driver
When updating the drivers won’t fix Intel high definition audio driver issue, then you should try to roll back the drivers. Below is how to roll back the driver.
Step 1: On your keyboard, simultaneously press the Windows and R keys to invoke the Run Dialog box.
Step 2: Then, type devmgmt.msc inside the void box, and hit the Enter key.

Step 3: After this, scroll down to System Devices and double-click on it to expand the category.
Step 4: Next, locate High Definition Audio Controller and double click on it.

Step 5: Switch to the Driver tab, then click on the Roll Back Driver option.
Once you are done with all this, then start your computer and as you start your PC, the issue should be resolved.
Also Read: How To Update Graphics Drivers In Windows 10 {Simple Guide}
Intel High Definition (HD) Audio Driver Issue on Windows 10 {FIXED}
It is so frustrating when you are unable to receive a bit of audio on your Windows 10. Especially when you are playing an online game, you can’t be able to respond to your friends and even not be able to hear their voices as well. Therefore, we have created this write-up to help you in the best possible way.
Which solution worked best for you? Let us know in the comment box below. And, if you have any suggestions then tell us that too in the comments. We will be so happy and pleased to hear from you. Lastly, do subscribe to our Newsletter for receiving more such tech articles. Till then, stay in touch with us!
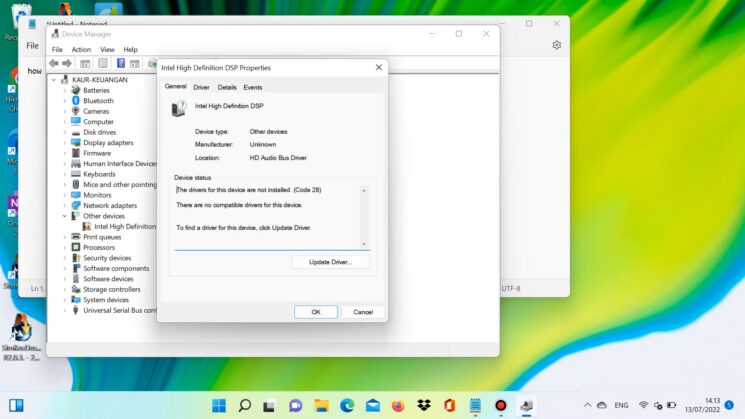
Some users have complained that the Intel High Definition Audio is not working, and instead, they get Intel high definition DSP code 28. The error is displayed in the Intel High Definition DSP audio device’s properties and is marked by a yellow exclamation mark. If the error Intel high definition DSP code 28 appears on the screen, you are in the right place. In this tutorial, we will explain some valuable solutions so, that users can resolve the said error without any confusion in Windows 11.

The error message that users see are.
The drivers for this device are not installed. (Code 28).
There are no compatible drivers for this device.
To find a driver for the device, click Update Driver.
What is code 28 for drivers not installed?
Error Code 28 signifies that our computer cannot connect to a piece of hardware as its driver is not installed on the system. This doesn’t mean that the driver was always absent on the computer; it’s just that Windows is unable to detect the driver right now, due to which it is showing the error code 28.
The common cause of the Device Manager error code Intel High Definition DSP audio is incompatible or missing audio drivers in Windows 11/10 due to which audio is not working properly, therefore, to resolve this error, follow the solutions prescribed below.
- Roll Back The Driver
- Update the Driver
- Run Audio and Hardware Troubleshooter
- Reinstall Intel High Definition Audio DSP
Let’s get started.
1] Roll back the drivers
A lot of users reported that the error could occur when they updated their driver or after running Windows Optional updates as that automatically update your driver. This is actually true as the update adds some bug to your driver, which makes it incompatible with your hardware. So if this is applicable, rolling back the driver is one of the best solutions; therefore, we will do the same, and the steps are mentioned below.
- Open the Device Manager and go to the System Devices option.
- Right-click on Intel High Definition Audio DSP and navigate to the Driver tab.
- Now, select the Roll back driver option.
After the completion, reboot your device and see if the issue persists.
If the Roll back driver button is greyed out, our driver is not updated, so, we should move to the next solution.
2] Update the Driver
The driver allows your computer to run properly and serves as a bridge between the computer’s operating system and hardware components. Windows Update automatically downloads and installs the latest version for audio drivers, network adapters, displays, printers, graphics cards, and so on. It is possible that the error is caused by an outdated version of the driver and can be solved by updating them. To update the drivers manually, follow the prescribed steps:
- Open the Windows Start menu, and click Win+ X to open Settings.
- Select the Device Manager from the search results and expand Sound, video, and game controllers.
- Right-click on your audio device and click on the Update Driver from the drop-down menu.
- Select the Search automatically for updated software and follow the instructions on the prompt and wait till the update is complete.
Although this is a common method to update your driver, there are other ways to accomplish this task. If you like to keep things organized, just download and install a free driver update software and download the driver from the manufacturer’s website.
Reboot your system and check if the problem is reserved. Hopefully, this will do the job.
3] Run Audio and Hardware Troubleshooter
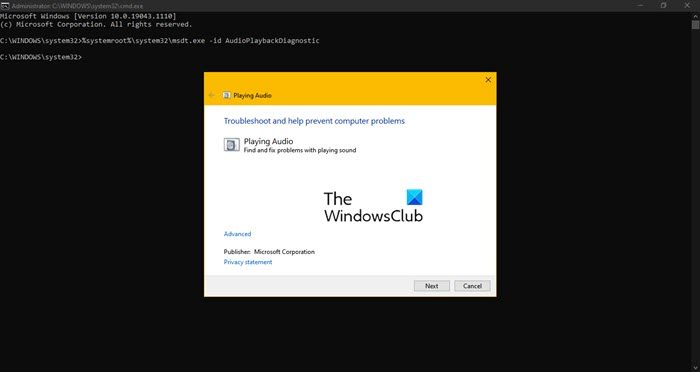
If updating the drivers was off no help then there’s a high possibility that the error in question happened due to some error in the audio driver; in such scenarios, you can run Audio and Hardware troubleshooter to find out the cause and clear it out. To do the same, click Win + R to open the Run dialog box, and then type the following command and click the Enter button to run Audio Playback Troubleshooter:
msdt.exe /id AudioPlaybackDiagnostic
You can also use the Hardware Troubleshooter to be on the safer side; once the process is completed, reboot your system, go to the driver’s properties and see if the issue persists or not. If it continues, move on to the next solution.
4] Reinstall Intel High Definition Audio DSP
Last but not least, delete the Intel High Definition Audio DSP and reinstall it as sometimes the issue occurs due to no driver present from the hardware, and in such cases, only fresh installation of the hardware can help in overcoming the issue. Therefore, in this solution, we are going to do the same.
- Click on the Start menu and type Device Manager.
- Now expand the Sound, video and game controllers option, and right-click on the Intel High Definition Audio DSP.
- At last, click on the Uninstall device option.
- Now go back to the top of the Device Manager, and right-click to initiate the Scan for hardware changes to reinstall the driver.
- The computer will prompt you to provide the path of the driver. Navigate to the OEM file you downloaded in step 2 above.
Restart your computer; hopefully, this will install the correct driver. If it is not installed, download Intel High Definition Audio DSP from its official website.
Read: Error 38, Windows cannot load the Device Driver for this hardware.
Every computer operator expects the best performance from their device. For gamers, this includes good audio while playing their favorite computer game.
However, the Intel display audio issue can happen without prior signs and rob you of pleasure.
Missing Intel High Definition Dsp Driver is a common audio problem in computers since the drivers do not come with the computer.
To fix the error, check if the driver is outdated. Next, download the recommended driver from your manufacturer’s support page.
The driver is required on your computer to recognize the sound card and allow you to use it properly. This driver is missing or corrupted and affects your device’s audio.
What Is Intel High Definition DSP Driver?
The Intel High Definition Audio driver is software that allows your computer to play and encode audio content. It processes audio from your speakers, headphones, and microphones.
If you are using a laptop or any other computer with an integrated audio chipset, you will need to download the Intel High Definition Audio Driver.
The driver’s primary function is to ensure that your computer’s sound card is working correctly and that you have the most updated drivers installed.
How To Fix Intel High Definition DSP Missing In Device Manager: Windows 11
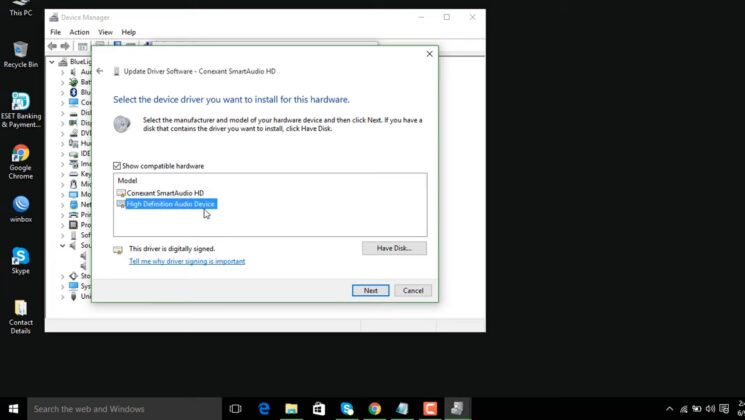
Fix 1: Update The Driver
- Search “Device Manager” in the cortina bar and open it.
- Move the cursor to “Sound, video, and game controllers” and open it.
- Right-click the Intel(R) Display Audio and select Update Driver.
- Click on Browse my computer for drivers, opt for “let me pick from a list of available drivers.”
- Tick the “Show compatible devices” box.
- Click on “High Definition Audio Device.”
- Click next.
- You’ll see a warning on the computer screen; choose Yes to install the update.
- Restart your computer.
Fix 2: Download And Install The Correct Intel High Definition DSP Driver
Downloading the driver and updating it automatically doesn’t always work.
In some instances, you could end up with a new driver but no sound on your computer if the driver isn’t compatible with your device.
To eliminate the stress, you could download the correct Intel HD Dsp driver for your computer and install it manually.
Note: You need the Intel graphics card model number for this fix. Follow these steps to check:
- Go to settings.
- Click on display and then “Advanced display settings.”
- Scroll down and click on “Display adapter properties.”
- You’ll find the graphics model number shown in the Adapter Type section on the adapter tab.
- Copy the number and then proceed to install the driver.
To install the driver:
- Search Intel Downloads Center on your browser.
- On the website’s search box, type Intel HD Graphics + model number, e.g., Intel HD Graphics 3000.
- Press enter.
- Scroll down to “Filter by Operating System” and select that of your computer.
- Select the first on the menu, which is the latest version of the software.
- Click on “Download.”
- Restart the computer, and the audio will be restored.
Fix 3: Roll Back The Driver
- Search “Device Manager” on the Cortana bar and click on it.
- On the menu, click on System Devices.
- Right-click “High Definition Audio Controller” and go to the Driver Tab.
- Select Roll back Driver.
- Turn off the computer and put it back on.
Note: This method applies in cases where the driver fails after you’ve updated it.
How Can I Get A High Definition Audio Device?
Fix 1: Set High Definition Audio As Default
If you have a Realtek audio device on your computer but are not getting audio, you may consider setting the high-definition audio as default.
- Go to the Control panel. You can type it on the Cortana bar, press Windows Key + x, and select the Control Panel.
- Click on Hardware and Sound.
- Click on the Playback tab.
- Right-click High Definition Audio Device.
- Select “Set as default.”
- If this doesn’t fix it, proceed to the next solution.
Fix 2: Disable The Realtek High-Definition Audio
- Go to Device Manager.
- Open Sound, video, and game controllers.
- Right-click Realtek High definition audio and disable it.
High Definition Audio Device Not Working

Most modern Windows operating systems include high-definition audio components. However, while playing an audio or video file on it, you may experience an audio device problem.
A yellow warning prompt appears, and when we click on it, a window appears with an error message.
The error is caused by a corrupt or missing high-definition audio device on Windows 10; the sound card could be missing or not working correctly.
There could also be an issue with the audio driver, causing the Windows 10 audio device to malfunction. If this happens, you won’t get any sound from your computer.
How to fix High Definition Audio Device Not Working
1. Update Your Audio Device Drivers
Updating the drivers is a straightforward method for resolving audio device manager problems in computers.
If you haven’t updated your audio drivers, or if the update was interrupted in the middle, your audio device may stop working.
Follow these steps to update the drivers to fix the high-definition audio device not operating.
- Go to “Device Manager”
- Select “Sound, video, and game controllers.”
- Right-click High Definition Audio device, and choose Update Driver from the menu.
- Follow the prompts and update the driver (you can also choose to uninstall the driver first and then reinstall it later).
- Restart your system.
2. Reset The Audio Drivers
If you’ve updated the driver but not got any sound, you can try resetting them. This is a quick fix for the audio device not working problem that will not harm your system.
- Go to Device Manager.
- Expand Sound, video, and game controllers.
- Right-click the audio device that you installed and disabled it.
- Wait a few minutes and repeat the procedure but enable the driver.
- Restart your computer to enable the changes.
3. Fix The Sound Card
If after this you don’t get audio on your computer, it’s possible that your system has a hardware issue that’s causing the audio device in Windows 10 to malfunction.
You can resolve this by checking the sound card’s functionality.
For this method, you’ll need to disassemble your system, remove the sound card, and put it in another computer to check whether the sound card is working or not.
If it isn’t working correctly, you can have it repaired by a professional or simply purchase a new card for your computer.
My Opinion On Intel High Definition DSP Driver

Good audio is essential for computer users, especially gamers. Music lovers also don’t like interruptions while streaming.
But we do not always have control over computer devices; they can malfunction.
Missing or corrupted Intel high-definition DSP driver will disrupt the audio on your computer.
To fix it, update the drivers automatically from the device manager or download and install them manually from the manufacturer’s support page.
Frequently Asked Questions On High-Definition DSP Driver
What Is The Intel High Definition DSP?
The Intel High Definition (Intel HD) DSP is a dedicated audio processing engine that provides high-definition and multi-channel audio support.
The Intel HD Graphics driver can use the hardware solution to provide a high-quality audio experience.
Why Does It Display No Audio Output Device Is Installed?
If you see the “No audio output device is installed” error on your Windows 10, it indicates that your audio driver is out of date or corrupt.
To fix it, go to the device manager and automatically update the audio driver.
How Can I Fix Realtek No Sound?
If you’re not getting audio from your Realtek audio device:
- Reinstall the drivers.
- Roll back the drivers.
- Reset the driver by enabling it in the device manager.
- Check the computer volume.
- Run Windows Troubleshooter.
- Check your device’s sound card.
How Can I Enable Intel To Display Audio?
- Go to the control panel.
- Click Hardware and Sound and then select Sound.
- On the Playback tab, right-click a blank space and select “Show disabled devices.”
- Click on the missing audio device to enable it.
Why Is My Realtek High-Definition Audio Not Working?

If you are using a Realtek high-definition audio driver that isn’t compatible with your computer, you won’t get audio.
Also, if the driver is out of date or corrupt, the Realtek high-definition audio device will not work.
How do I reinstall Intel High Definition Audio Driver?
If you have installed a new operating system and your Intel High Definition Audio driver is not working, follow these steps to reinstall the driver:
- Boot your computer from the installation media.
- Click on the Windows icon in the bottom left corner of your screen.
- Select “Startup Settings.”
- Click on the “Hardware” tab.
- Under “Audio Devices,” find and select your Intel High Definition Audio device.
- Click on the “Driver” button next to the device name.
- Click on “Update Driver.”
- Follow the prompts to install the driver. After rebooting, your audio should work properly.
How do I fix no audio device installed?
If you’re having trouble getting your computer to detect any audio devices, you can try a few things. First, ensure all of your audio hardware is plugged in and properly configured. Next, check to see if the audio driver is installed on your computer.
If it’s not, you can download and install the appropriate driver from the manufacturer’s website. Finally, make sure that your audio device is correctly connected to your computer’s USB port.
Conclusion
Hopefully, this article helped you solve your problems. If you still have issues, then you can always contact your computer manufacturer or Intel for more help.