INAV Configurator
INAV Configurator is a crossplatform configuration tool for the INAV flight control system.
It runs as an app within Google Chrome and allows you to configure the INAV software running on any supported INAV target.
Various types of aircraft are supported by the tool and by INAV, e.g. quadcopters, hexacopters, octocopters and fixed-wing aircraft.
Support
INAV Configurator comes as is, without any warranty and support from authors. If you found a bug, please create an issue on GitHub.
GitHub issue tracker is reserved for bugs and other technical problems. If you do not know how to setup
everything, hardware is not working or have any other support problem, please consult:
- INAV Discord Server
- INAV Official on Facebook
- RC Groups Support
- INAV Official on Telegram
INAV Configurator start minimized, what should I do?
You have to remove C:\Users%Your_UserNname%\AppData\Local\inav-configurator folder and all its content.
Alternatively, on Windows with PowerShell you can use post_install_cleanup.ps1 script that will do the cleaning. (thank you James Cherrill)
Installation
Depending on target operating system, INAV Configurator is distributed as standalone application or Chrome App.
Windows
- Visit release page
- Download Configurator for Windows platform (win32 or win64 is present)
- Extract ZIP archive
- Run INAV Configurator app from unpacked folder
- Configurator is not signed, so you have to allow Windows to run untrusted application. There might be a monit for it during first run
Linux
- Visit release page
- Download Configurator for Linux platform (linux32 and linux64 are present)
- .rpm is the Fedora installation file. Just download and install using
sudo dnf localinstall /path/to/INAV-Configurator_linux64-x.y.z-x86_64.rpmor open it with a package manager (e.g. via Files) - .deb is the Debian/Ubuntu installation file. Just download and install using
sudo apt install /path/to/INAV-Configurator_linux64_x.y.z.debor open it with a package manager (e.g. via the File Manager) - .tar.gz is a universal archive. Download and continue with these instructions to install
- .rpm is the Fedora installation file. Just download and install using
- Change to the directory containing the downloaded tar.gz file
- download this file to the same directory. Its filename should be
inav-configurator.desktop. - Extract tar.gz archive
tar -C /tmp/ -xf INAV-Configurator_linuxNN_x.y.z.tar.gz
NN is the bits of your OS. x.y.z is the INAV Configurator version number.
- If this is the first time installing INAV Configurator, create a home for its files
sudo mkdir /opt/inav
sudo chown $USER /opt/inav
- Move the temporary files in to their home
mv /tmp/INAV\ Configurator /opt/inav/inav-configurator
- Update the application icon.
sudo mkdir /opt/inav/inav-configurator/icon
sudo cp /opt/inav/inav-configurator/images/inav_icon_128.png /opt/inav/inav-configurator/icon
- As a one off, move the desktop file into the applications directory
sudo mv inav-configurator.desktop /usr/share/applications/
- Make the following files executable:
- inav-configurator
chmod +x /opt/inav/inav-configurator/inav-configurator - (5.0.0+) chrome_crashpad_handler
chmod +x /opt/inav/inav-configurator/chrome_crashpad_handler
- Run INAV Configurator app from unpacked folder
/opt/inav/inav-configurator/inav-configurator
Notes
On some Linux distros, you may be missing libatomic, a NW.JS (specially libnode.so) dependency. If so, please install libatomic using your distro’s package manager, e.g:
- Arch Linux:
sudo pacman -S --needed libatomic_ops - Debian / Ubuntu:
sudo apt install libatomic1 - Fedora:
sudo dnf install libatomic
- Dont forget to add your user into dialout group «sudo usermod -aG dialout YOUR_USERNAME» for serial access
- If you have 3D model animation problems, enable «Override software rendering list» in Chrome flags chrome://flags/#ignore-gpu-blacklist
Mac
- Visit release page
- Download Configurator for Mac platform
- Extract ZIP archive
- Run INAV Configurator
Building and running INAV Configurator locally (for development)
For local development, node.js build system is used.
- Install node.js
- From project folder run
npm install - To build the JS and CSS files and start the configurator:
- With NW.js: Run
npm start. - With Chrome: Run
npm run gulp. Then openchrome://extensions, enable
theDeveloper mode, click on theLoad unpacked extension...button and select theinav-configuratordirectory.
- With NW.js: Run
Other tasks are also defined in gulpfile.js. To run a task, use node ./node_modules/gulp/bin/gulp.js task-name. Available ones are:
- build: Generate JS and CSS output files used by the configurator from their sources. It must be run whenever changes are made to any
.jsor.cssfiles in order to have those changes appear
in the configurator. If new files are added, they must be included ingulpfile.js. See the comments at the top ofgulpfile.jsto learn how to do so. See also thewatchtask. - watch: Watch JS and CSS sources for changes and run the
buildtask whenever they’re edited. - dist: Create a distribution of the app (valid for packaging both as a Chrome app or a NW.js app)
in the./dist/directory. - release: Create NW.js apps for each supported platform (win32, osx64 and linux64) in the
./apps
directory. Running this task on macOS or Linux requires Wine, since it’s needed to set the icon
for the Windows app. If you don’t have Wine installed you can create a release by running the release-only-linux task.
--installerargument can be added to build installers for particular OS. NOTE: MacOS Installer can be built with MacOS only.
To build a specific release, use the command release --platform="win64" for example.
Running with debug | Inspector
To be able to open Inspector, you will need SDK flavours of NW.js
npm install nw@0.61.0 --nwjs_build_type=sdk
Different map providers
INAV Configurator 2.1 allows to choose between OpenStreetMap, Bing Maps (Aerial View), and MapProxy map providers.
INAV Configurator is shipped WITHOUT API key for Bing Maps. That means: every user who wants to use Bing Maps has to create own account, agree to all Terms and Conditions required by Bing Maps and configure INAV Configuerator by himself.
How to choose Map provider
- Click Settings icon in the top-right corner of INAV Configurator
- Choose provider: OpenStreetMap, Bing, or MapProxy
- In the case of Bing Maps, you have to provide your own, personal, generated by you, Bing Maps API key
- For MapProxy, you need to provide a server URL and layer name to be used
How to get Bing Maps API key
- Go to the Bing Maps Dev Center at https://www.bingmapsportal.com/.
- If you have a Bing Maps account, sign in with the Microsoft account that you used to create the account or create a new one. For new accounts, follow the instructions in Creating a Bing Maps Account.
- Select My keys under My Account.
- Select the option to create a new key.
- Provide the following information to create a key:
- Application name: Required. The name of the application.
- Application URL: The URL of the application. This is an optional field which is useful in helping you remember the purpose of that key in the future.
- Key type: Required. Select the key type that you want to create. You can find descriptions of key and application types here.
- Application type: Required. Select the application type that best represents the application that will use this key. You can find descriptions of key and application types here.
- Click the Create button. The new key displays in the list of available keys. Use this key to authenticate your Bing Maps application as described in the documentation for the Bing Maps API you are using.
How to setup a MapProxy server for offline caching and mission planning
- Follow process described in MAPPROXY.md
- Test your MapProxy server in web browser, eg: http://192.168.145.20/inavmapproxy/
- Once you have a working MapProxy server choose MapProxy as your map provider
- Enter MapProxy service URL, eg: http://192.168.145.20/inavmapproxy/service?
- Enter MapProxy service layer (inav_layer if configured from MAPPROXY.md)
- Once completed, you can zoom in on area you will be flying in while connected to the internet in either GPS or Mission Control tab to save the cache for offline use
Font Customisation
INAV provides the font images so that custom fonts can be created for your personal preference. This is the case for both analogue and digital fonts. The resources can be found in the osd folder. Within the analogue and digital subfolders, you will find information on compiling your own fonts. There is also an INAV Character Map document. This contains previews of all the character images in the fonts, and the appropriate variable names within the firmware and Configurator. There are tools for compiling the analogue and digital fonts. New font submissions via pull requests are welcome.
Notes
WebGL
Make sure Settings -> System -> «User hardware acceleration when available» is checked to achieve the best performance
Issue trackers
For INAV configurator issues raise them here
https://github.com/iNavFlight/inav-configurator/issues
For INAV firmware issues raise them here
https://github.com/iNavFlight/inav/issues
Developers
We accept clean and reasonable patches, submit them!
- Информация о материале
- Обновлено: 03.06.2023, 10:54
- Опубликовано: 03.06.2023, 09:04
- Автор: DeniS
Где скачать конфигуратор iNAV Configurator?
Установите последнюю версию iNav Configurator и используйте ее для загрузки прошивки и настройки. https://github.com/iNavFlight/inav-configurator/releases
NB! iNav Configurator при первой загрузке после перепрошивки или чистого стирания, пытается автоматически обнаружить магнитометр и барометр. Если ни один из них не обнаружен, это будет обозначено красными значками на сенсорной панели. Он также не включится при Hardware healthпроверках перед постановкой на охрану. Чтобы это исправить, перезагрузите контроллер, и все должно быть в порядке.
INAV Configurator 6.1 скачать
Assets 11
INAV-Configurator_linux32_6.1.0.tar.gz 155 MB
INAV-Configurator_linux64-6.1.0-1.x86_64.rpm 147 MB
INAV-Configurator_linux64_6.1.0.deb 102 MB
INAV-Configurator_linux64_6.1.0.tar.gz 148 MB
INAV-Configurator_macOS_6.1.0.dmg 136 MB
INAV-Configurator_macOS_6.1.0.zip 136 MB
INAV-Configurator_win32_6.1.0.zip 125 MB
INAV-Configurator_win64_6.1.0.exe 90.8 MB
INAV-Configurator_win64_6.1.0.zip 131 MB
Source code(zip)
Source code(tar.gz)
STM32 микроконтроллер
Драйвера для микроконтроллера STM 32 и программирование в этом разделе
Добавить комментарий
Имя (обязательное)
E-Mail (обязательное)
Сайт
Подписаться на уведомления о новых комментариях

Обновить
Отправить
JComments
If you want a solid and reliable return to home function, or even the ability to fly waypoint missions, INAV is the ultimate choice of firmware for your flight controller.
This guide can help you quickly set up and start using INAV configurator on your Windows, Linux, or Mac system to download, install, and configure the INAV firmware for flashing, all within 5 minutes.
Choose your operating system to get started, or continue reading for an introduction to INAV.
- INAV Configurator for Windows
- INAV Configurator for Mac OS
- INAV Configurator for Linux

Table Of Contents
- What is INAV Configurator?
- How to Install INAV Configurator on Windows
- How to Install INAV Configurator Mac OS
- How to Install INAV Configurator on Ubuntu Linux
- Troubleshooting: My Flight Controller is Not Recognised
- How to Flash the INAV Firmware Using INAV Configurator
- Troubleshooting INAV Firmware flashing
What is INAV Configurator?
INAV Configurator is a graphical user interface (GUI) tool used to configure and flash the INAV firmware on flight controllers that are commonly used in multirotor drones, fixed-wing planes, and other unmanned vehicles.
It allows users to change various settings related to the vehicle’s flight behavior and features, such as PID tuning, receiver and sensor calibration, and GPS configuration, among others.
INAV Configurator supports various operating systems, including Windows, Linux, and macOS, and is an essential tool for anyone who wants to use the INAV firmware on their quad.
One of the stand-out features of the most interest is the return to home (RTH) functionality.
Those who are looking for a considerably more reliable system for bringing their quad home in the event of signal loss or similar failure will be delighted at the performance of INAV RTH.
Unlike the Betaflight rescue mode, the INAV RTH system firmware is has been developed over a much longer period of time and is far more capable, making use of the magnetometer for guidance.
INAV RTH therefore outperforms Betaflight rescue mode both in terms of functionality and reliability.
How to Install INAV Configurator on Windows
To install INAV Configurator on Windows, simply follow these steps:
- Go to the INAV Configurator Github page at https://github.com/iNavFlight/inav-configurator/releases.
- Scroll down to the “Assets” section and find the latest release version that matches your system’s architecture (Win 32-bit or Win 64-bit).
- Click on the relevant download for your system, “INAV-configurator_winXX_X.X.X-setup.exe” in order to start the download process.
- Once the download is complete, locate the downloaded file and double-click on it to start the installation process.
- Follow the on-screen instructions to complete the installation process.
- Once the installation is complete, launch the INAV Configurator by double-clicking on its icon on your desktop or in the Windows Start menu.
- That’s it! You should now have INAV Configurator installed and ready to use on your Windows system.
That’s it! With INAV Configurator installed on your Windows machine and your flight controller connected, you can customize your drone’s flight characteristics and achieve the best possible performance.
Next, learn how to install the INAV firmware on your flight controller using the INAV configurator.
How to Install INAV Configurator Mac OS
To install INAV Configurator on Mac OS, you can follow these steps:
- Go to the INAV Configurator Github page at https://github.com/iNavFlight/inav-configurator/releases.
- Scroll down to the “Assets” section and find the
.dmgimage file for Mac OS. The installer is universal so will work on both Intel and Apple Silicon machines. - Click on the “INAV-configurator_MacOS_x.x.x.dmg” file to start the download process.
- Once the download is complete, locate the downloaded file and double-click on it to mount the disk image.
- Drag and drop the INAV Configurator app into your Applications folder.
- Launch the INAV Configurator by opening the Applications folder and double-clicking on its icon.
That’s it! With INAV Configurator installed on your Mac OS, you can customize your drone’s flight characteristics and achieve the best possible performance.
Next, learn how to install the INAV firmware on your flight controller using the INAV configurator.
How to Install INAV Configurator on Ubuntu Linux
- Download the latest release of INAV Configurator for Linux from the official INAV Github page: https://github.com/iNavFlight/inav-configurator/releases
- Once the download is complete, open a terminal window and navigate to the directory where you downloaded the file using the terminal.
- Extract the contents of the downloaded file by running the following command. Replace
<version>with the version that you downloaded:
tar -xvzf INAV-configurator_<version>.tar.gz
- Navigate to the extracted directory by running the following command:
cd INAV\ Configurator/
- Set the permissions for the INAV Configurator executable file by running the following command:
chmod +x inav-configurator
- Run the INAV Configurator by executing the
inav-Configuratorbinary in the current directory:
./inav-Configurator
- In the INAV Configurator window, select the appropriate serial port from the drop-down menu in the top-right corner of the screen.
- Next, click the Connect button to establish a connection with your flight controller.
- Once the connection is established, you can use the INAV Configurator to configure and flash the INAC firmware and adjust INAV parameters.
That’s it! With INAV Configurator installed on your Mac OS, you can customize your drone’s flight characteristics and achieve the best possible performance.
Next, learn how to install the INAV firmware on your flight controller using the INAV configurator.
Troubleshooting: My Flight Controller is Not Recognised
If your INAV flight controller is not recognized when you plug it in via USB, there are a few things you can try:
- Verify that the USB cable you are using is functioning properly. Consider using a different USB cable as some cables meant for charging may not have the extra wires necessary for data communication (this has caught me out before!).
- Attempt plugging the flight controller into a different USB port on your computer as certain USB ports may be malfunctioning.
- Check if your flight controller has a bootloader mode, which may be required to establish communication. Instructions for entering bootloader mode vary by flight controller and can be found in the user manual or manufacturer’s website.
- Install the necessary drivers for your flight controller. Most flight controllers use either the CP2102 or FTDI chipset for USB communication.
- Test the flight controller with a different computer to confirm the issue. If the problem persists, the flight controller may be defective and need to be replaced.
How to Flash the INAV Firmware Using INAV Configurator
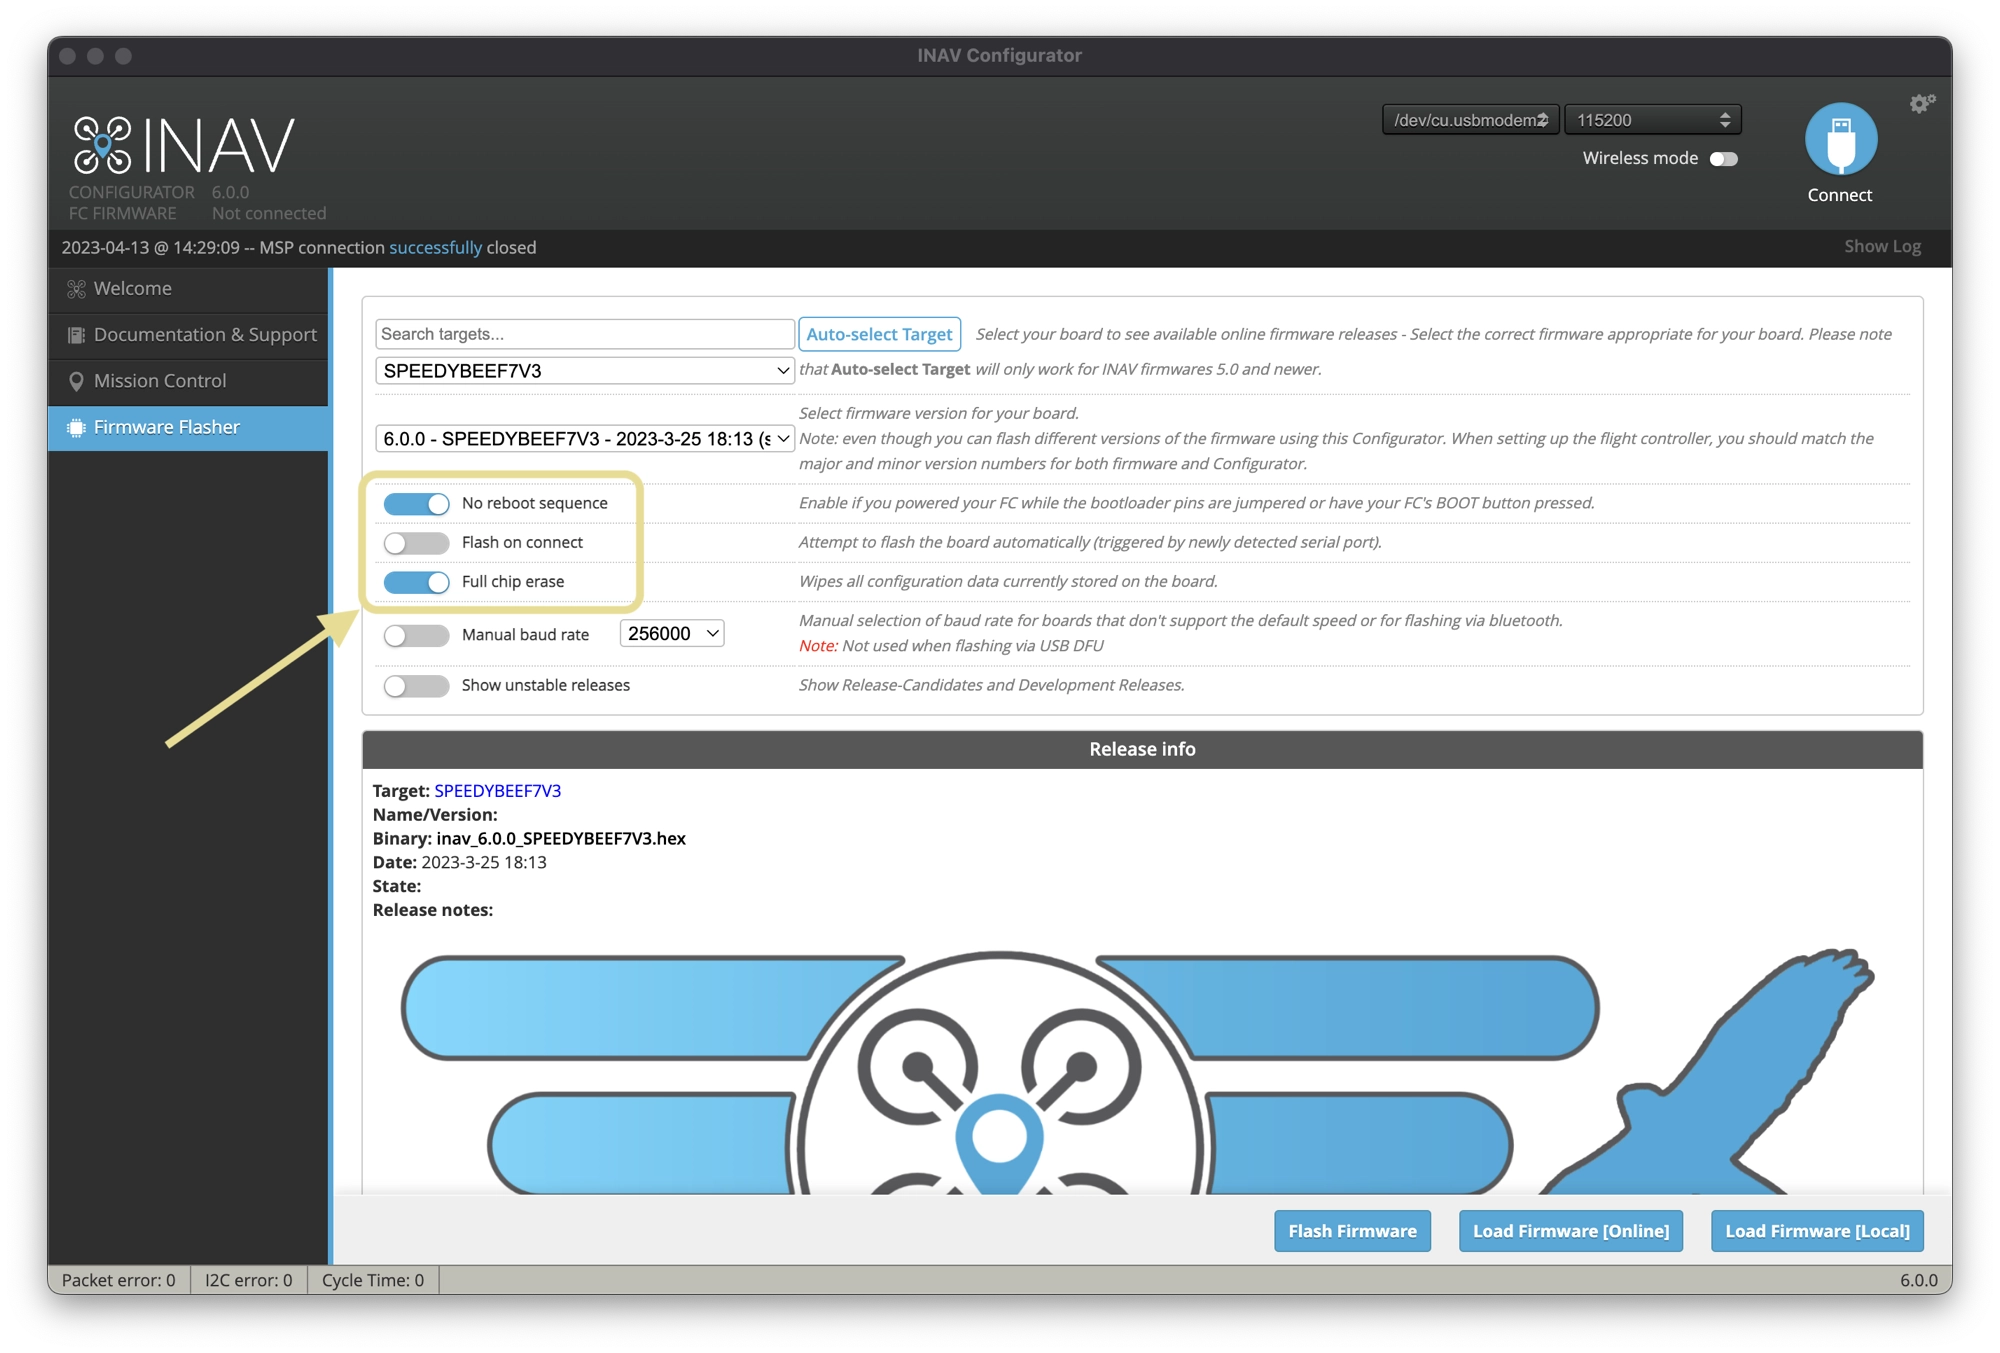
It is recommended to make a backup of your current configuration before flashing new firmware. Also, make sure to read the release notes and instructions carefully before updating the firmware.
To update or install the INAV firmware with INAV Configurator, you can follow these steps:
- Connect your flight controller board to your computer using a USB cable.
- Open INAV Configurator and click Firmware Flasher in the left-hand sidebar.
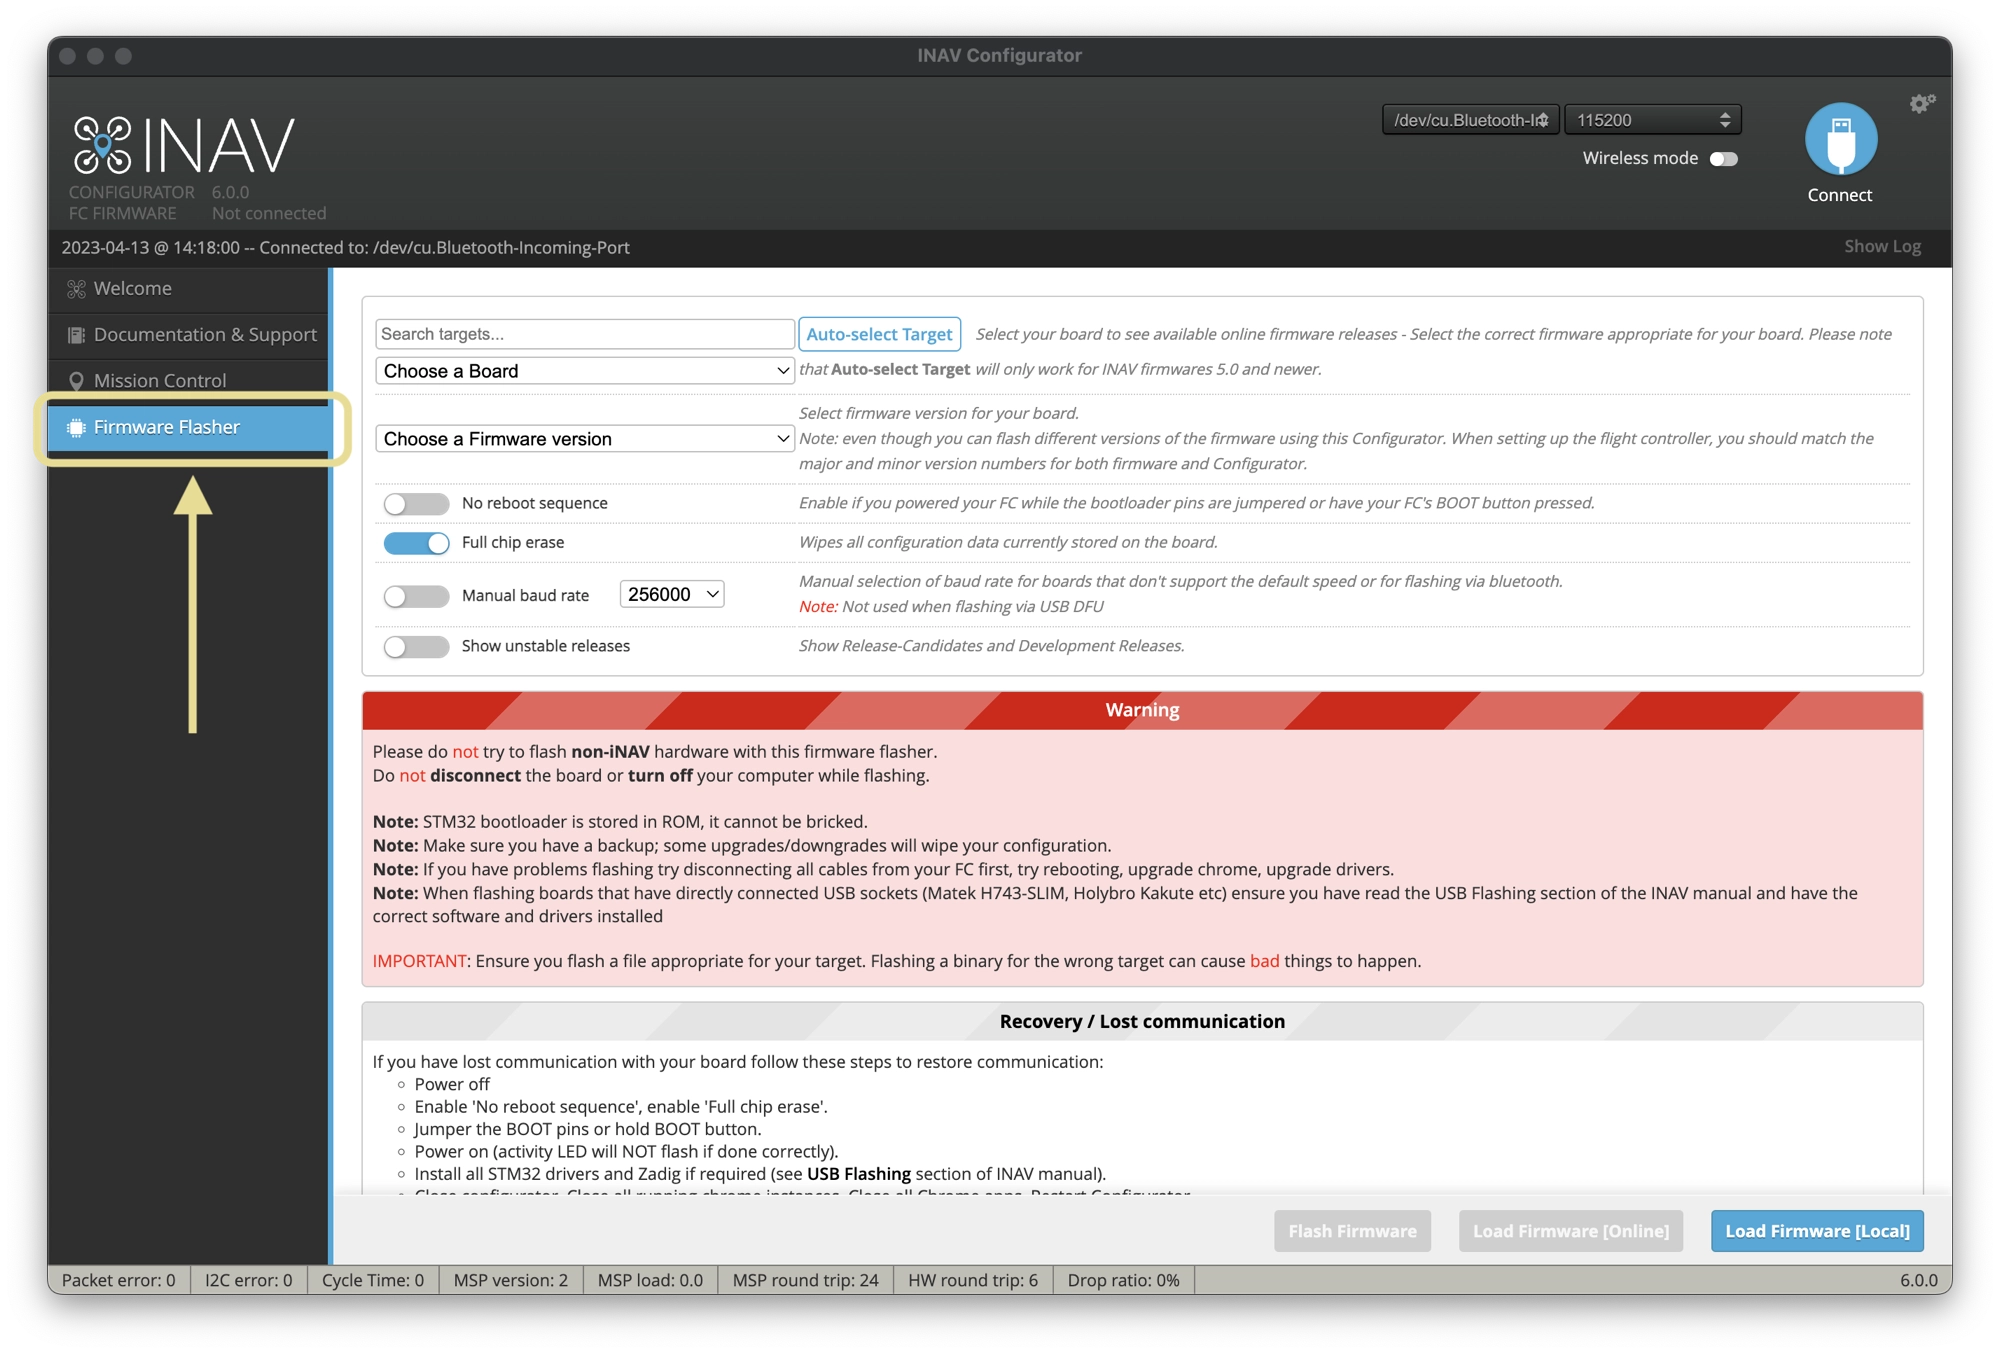
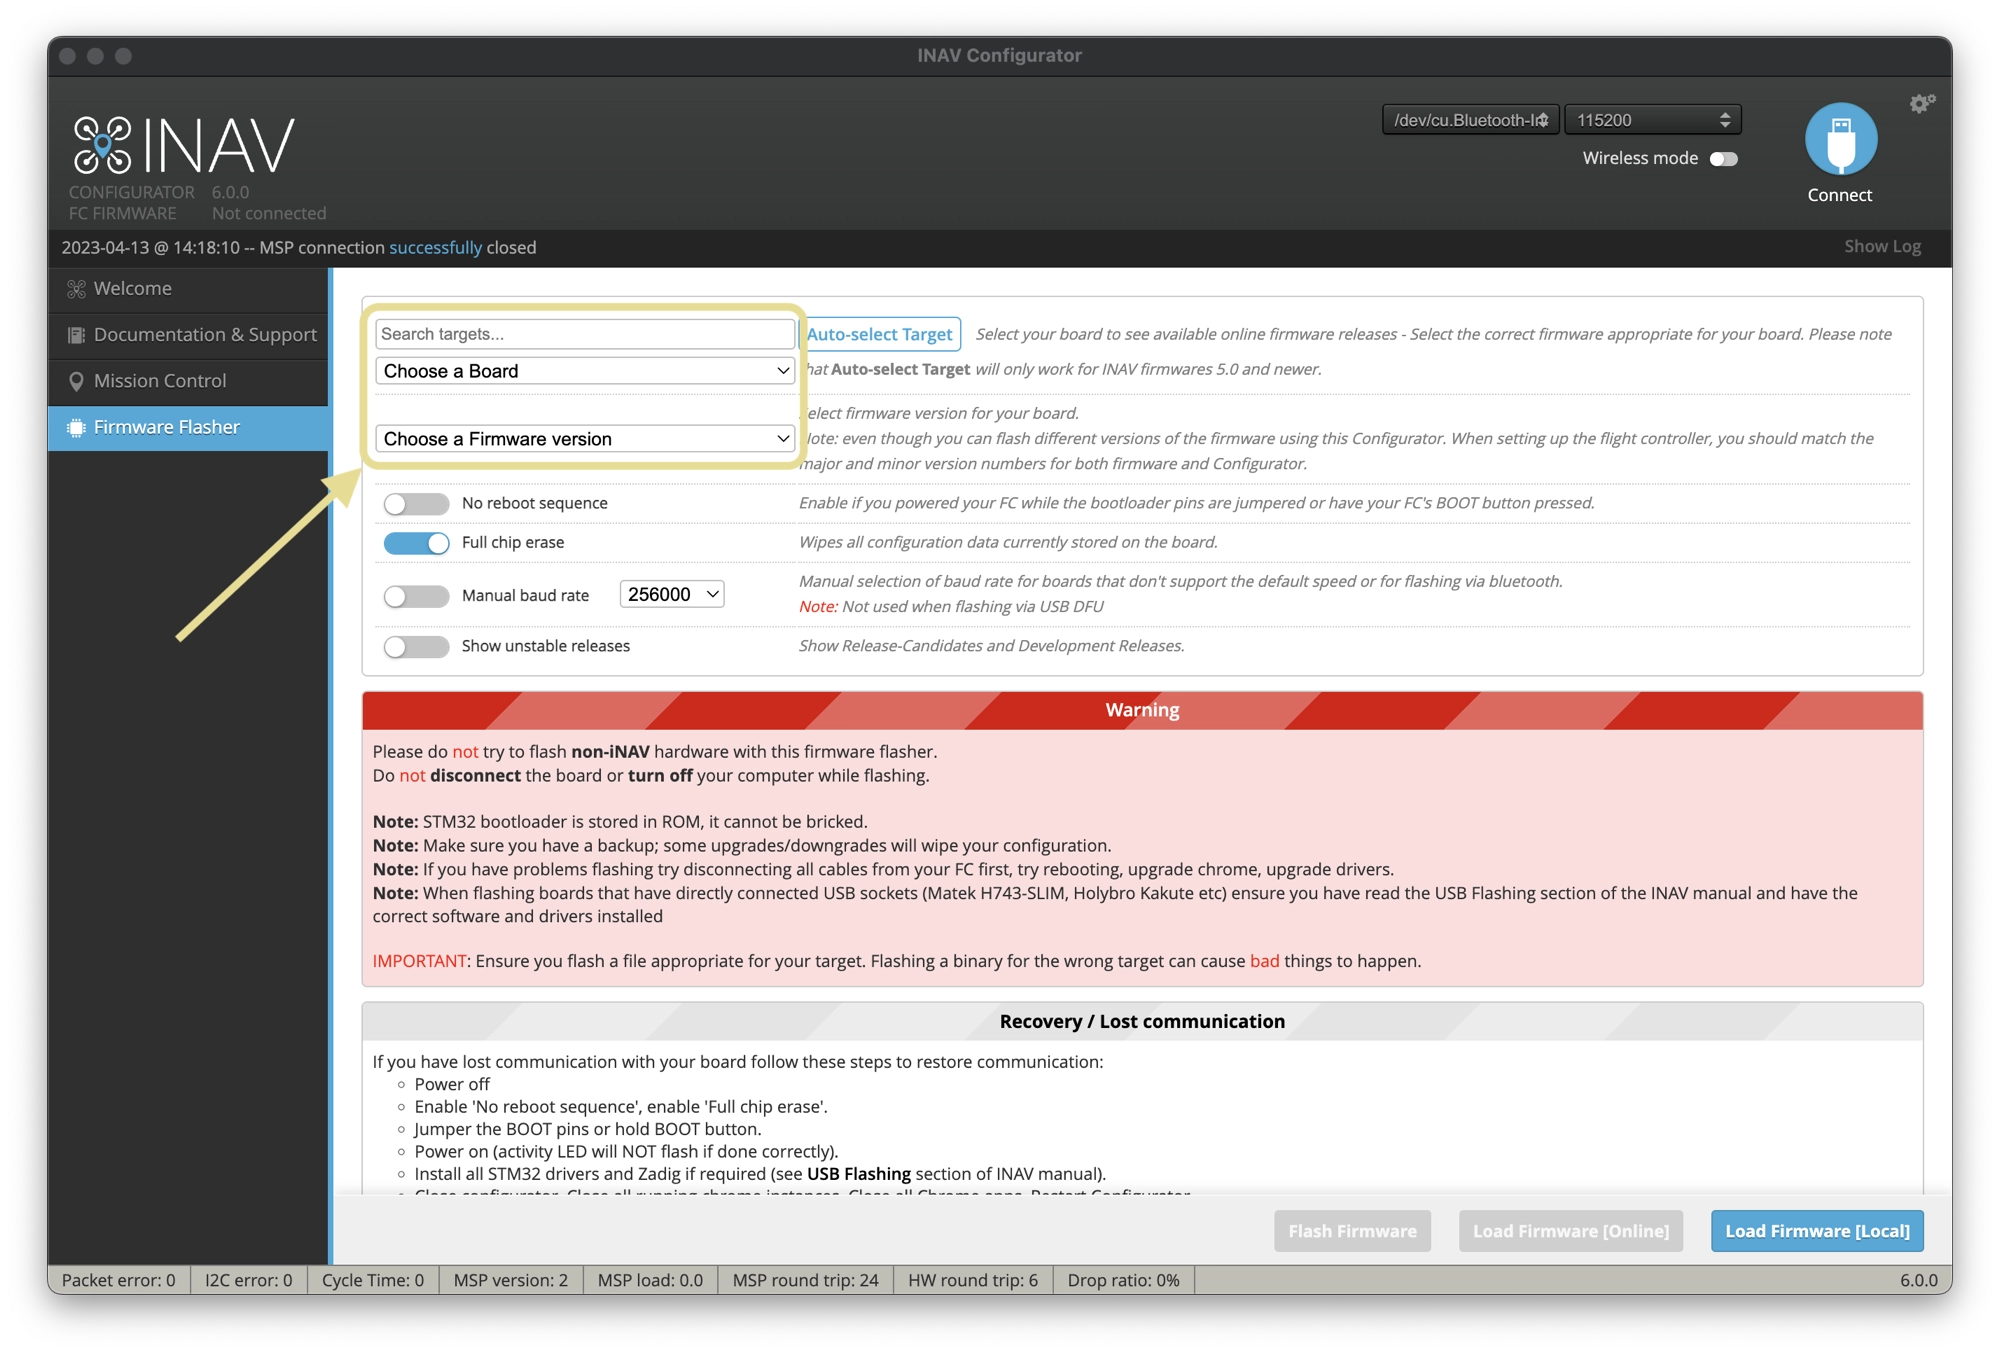
- Select the firmware version you want to install from the dropdown menu. It is recommended to use the latest stable release version. If you are updating from INAV 5.0, you can use the Auto-select Target function.
- Make sure the firmware target matches your flight controller board. You can check this information on the board’s product page or user manual.
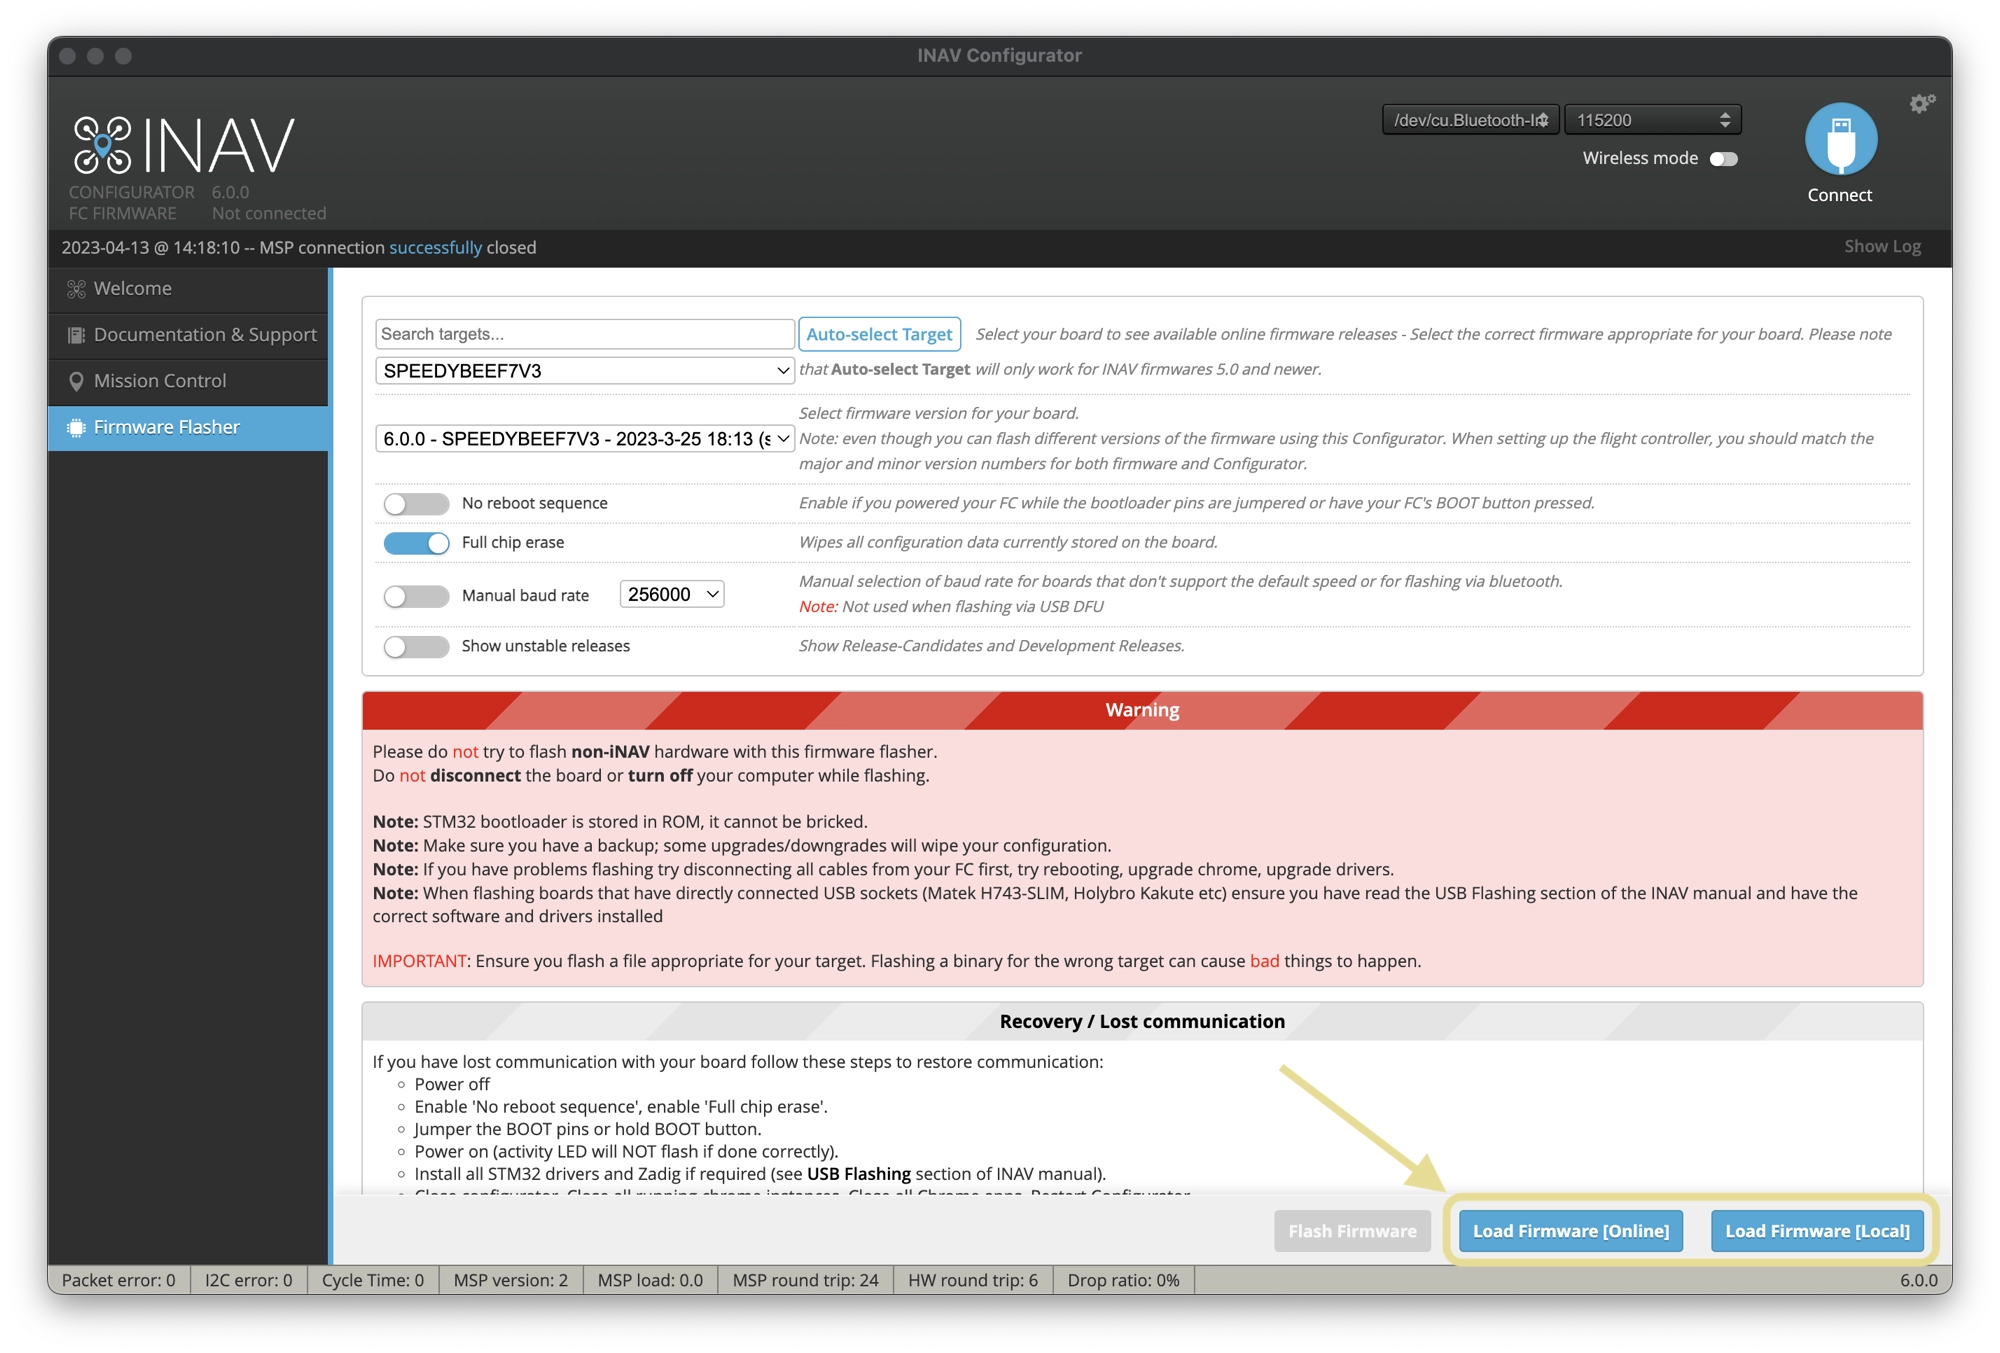
- Click on the Load Firmware [Online] button to download the firmware file from the INAV server. Alternatively, you can load a locally saved firmware file by clicking on the Load Firmware [Local] button.
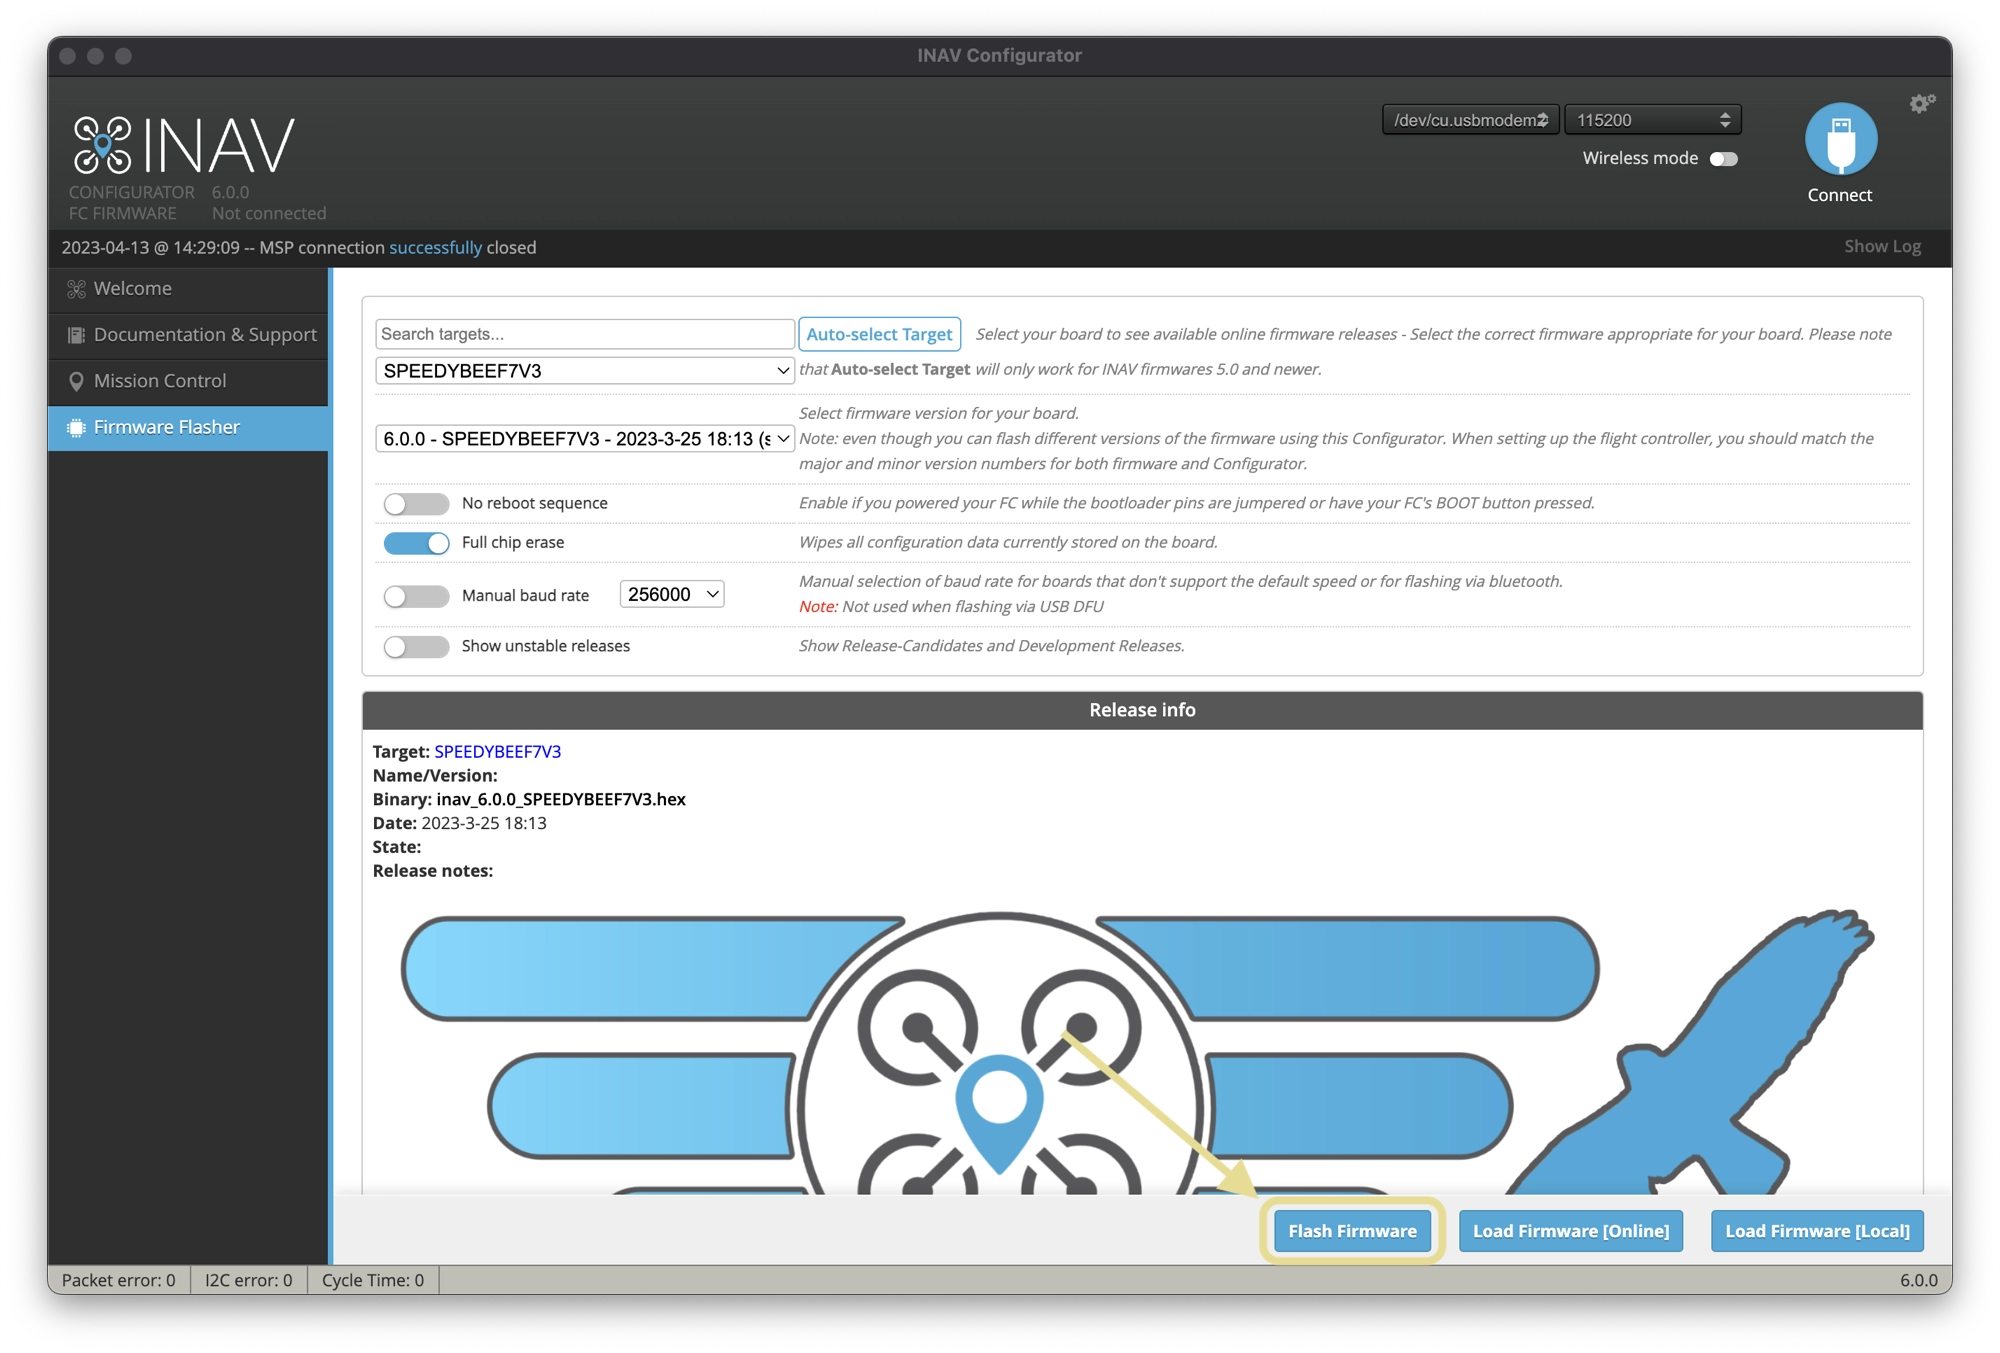
- Once the firmware file is loaded, click on the Flash Firmware button at the bottom of the screen to start the flashing process.
- If you are switching from a different firmware (such as Betaflight), switch on the Full Chip Erase option.
- Wait for the process to finish. It may take a few minutes. Do not disconnect the USB cable or power off your flight controller board during the flashing process.
- After the firmware is flashed successfully, disconnect and reconnect your flight controller board, then go to the Setup tab to configure your flight controller settings as needed.
Troubleshooting INAV Firmware flashing
If you are having difficulties with flashing the firmware, first try the following steps:
- First, turn the flight controller and quad off (disconnect the USB cable).
- Repeat the process above, ensuring that Full Chip Erase and No Reboot Sequence are enabled.
If you are still having problems or you have lost communicate with your flight controller, try the following steps:
- Power off the flight controller
- Enable No Reboot Sequence and enable Full Chip Erase.
- Jumper the BOOT pins or hold BOOT button (see your flight controller manual for how to put it into DFM bootloader mode).
- Power on the flight controller (activity LED will NOT flash if done correctiv).
- Install all STM32 drivers and Zadig if required (see USB Flashing section of the INAV manual).
- Close and rester INAV Configurator.
- Release BOOT button if your FC has one.
- Flash with correct firmware (using manual baud rate if specified in your FC’s manual).
- Power off the flight controller again.
- Remove BOOT jumper if you installed one.
- Power on the flight controller (activity LED should flash).
- Connect normally.
Search code, repositories, users, issues, pull requests…
Provide feedback
Saved searches
Use saved searches to filter your results more quickly
Sign up
INAV Configurator
INAV Configurator is a crossplatform configuration tool for the INAV flight control system.
It runs as an app within Google Chrome and allows you to configure the INAV software running on any supported INAV target.
Various types of aircraft are supported by the tool and by INAV, e.g. quadcopters, hexacopters, octocopters and fixed-wing aircraft.
Support
INAV Configurator comes as is, without any warranty and support from authors. If you found a bug, please create an issue on GitHub.
GitHub issue tracker is reserved for bugs and other technical problems. If you do not know how to setup
everything, hardware is not working or have any other support problem, please consult:
- INAV Discord Server
- INAV Official on Facebook
- RC Groups Support
- INAV Official on Telegram
INAV Configurator start minimized, what should I do?
You have to remove C:Users%Your_UserNname%AppDataLocalinav-configurator folder and all its content.
Alternatively, on Windows with PowerShell you can use post_install_cleanup.ps1 script that will do the cleaning. (thank you James Cherrill)
Installation
Depending on target operating system, INAV Configurator is distributed as standalone application or Chrome App.
Windows
- Visit release page
- Download Configurator for Windows platform (win32 or win64 is present)
- Extract ZIP archive
- Run INAV Configurator app from unpacked folder
- Configurator is not signed, so you have to allow Windows to run untrusted application. There might be a monit for it during first run
Linux
- Visit release page
- Download Configurator for Linux platform (linux32 and linux64 are present)
- Extract tar.gz archive
- Make the following files executable:
- inav-configurator
chmod +x inav-configurator - (5.0.0+) chrome_crashpad_handler
chmod +x chrome_crashpad_handler
- inav-configurator
- Run INAV Configurator app from unpacked folder
On some Linux distros, you may be missing libatomic, a NW.JS (specially libnode.so) dependency. If so, please install libatomic using your distro’s package manager, e.g:
- Arch Linux:
sudo pacman -S --needed libatomic_ops - Debian / Ubuntu:
sudo apt install libatomic1 - Fedora:
sudo dnf install libatomic
Mac
- Visit release page
- Download Configurator for Mac platform
- Extract ZIP archive
- Run INAV Configurator
- Configurator is not signed, so you have to allow Mac to run untrusted application. There might be a monit for it during first run
Building and running INAV Configurator locally (for development or Linux users)
For local development, node.js build system is used.
- Install node.js
- From project folder run
npm install - To build the JS and CSS files and start the configurator:
- With NW.js: Run
npm start. - With Chrome: Run
npm run gulp. Then openchrome://extensions, enable
theDeveloper mode, click on theLoad unpacked extension...button and select theinav-configuratordirectory.
- With NW.js: Run
Other tasks are also defined in gulpfile.js. To run a task, use node ./node_modules/gulp/bin/gulp.js task-name. Available ones are:
-
build: Generate JS and CSS output files used by the configurator from their sources. It must be run whenever changes are made to any
.jsor.cssfiles in order to have those changes appear
in the configurator. If new files are added, they must be included ingulpfile.js. See the comments at the top ofgulpfile.jsto learn how to do so. See also thewatchtask. -
watch: Watch JS and CSS sources for changes and run the
buildtask whenever they’re edited. -
dist: Create a distribution of the app (valid for packaging both as a Chrome app or a NW.js app)
in the./dist/directory. -
release: Create NW.js apps for each supported platform (win32, osx64 and linux64) in the
./apps
directory. Running this task on macOS or Linux requires Wine, since it’s needed to set the icon
for the Windows app. If you don’t have Wine installed you can create a release by running the release-only-linux task.--installerargument can be added to build installers for particular OS. NOTE: MacOS Installer can be built with MacOS only.
To build a specific release, use the command release --platform="win64" for example.
Running with debug | Inspector
To be able to open Inspector, you will need SDK flavours of NW.js
npm install [email protected] --nwjs_build_type=sdk
Different map providers
INAV Configurator 2.1 allows to choose between OpenStreetMap, Bing Maps (Aerial View), and MapProxy map providers.
INAV Configurator is shipped WITHOUT API key for Bing Maps. That means: every user who wants to use Bing Maps has to create own account, agree to all Terms and Conditions required by Bing Maps and configure INAV Configuerator by himself.
How to choose Map provider
- Click Settings icon in the top-right corner of INAV Configurator
- Choose provider: OpenStreetMap, Bing, or MapProxy
- In the case of Bing Maps, you have to provide your own, personal, generated by you, Bing Maps API key
- For MapProxy, you need to provide a server URL and layer name to be used
How to get Bing Maps API key
- Go to the Bing Maps Dev Center at https://www.bingmapsportal.com/.
- If you have a Bing Maps account, sign in with the Microsoft account that you used to create the account or create a new one. For new accounts, follow the instructions in Creating a Bing Maps Account.
- Select My keys under My Account.
- Select the option to create a new key.
- Provide the following information to create a key:
- Application name: Required. The name of the application.
- Application URL: The URL of the application. This is an optional field which is useful in helping you remember the purpose of that key in the future.
- Key type: Required. Select the key type that you want to create. You can find descriptions of key and application types here.
- Application type: Required. Select the application type that best represents the application that will use this key. You can find descriptions of key and application types here.
- Click the Create button. The new key displays in the list of available keys. Use this key to authenticate your Bing Maps application as described in the documentation for the Bing Maps API you are using.
How to setup a MapProxy server for offline caching and mission planning
- Follow process described in MAPPROXY.md
- Test your MapProxy server in web browser, eg: http://192.168.145.20/inavmapproxy/
- Once you have a working MapProxy server choose MapProxy as your map provider
- Enter MapProxy service URL, eg: http://192.168.145.20/inavmapproxy/service?
- Enter MapProxy service layer (inav_layer if configured from MAPPROXY.md)
- Once completed, you can zoom in on area you will be flying in while connected to the internet in either GPS or Mission Control tab to save the cache for offline use
Font Customisation
INAV provides the font images so that custom fonts can be created for your personal preference. This is the case for both analogue and digital fonts. The resources can be found in the osd folder. Within the analogue and digital subfolders, you will find information on compiling your own fonts. There is also an INAV Character Map document. This contains previews of all the character images in the fonts, and the appropriate variable names within the firmware and Configurator. There are tools for compiling the analogue and digital fonts. New font submissions via pull requests are welcome.
Notes
WebGL
Make sure Settings -> System -> «User hardware acceleration when available» is checked to achieve the best performance
Linux users
- Dont forget to add your user into dialout group «sudo usermod -aG dialout YOUR_USERNAME» for serial access
- If you have 3D model animation problems, enable «Override software rendering list» in Chrome flags chrome://flags/#ignore-gpu-blacklist
Issue trackers
For INAV configurator issues raise them here
https://github.com/iNavFlight/inav-configurator/issues
For INAV firmware issues raise them here
https://github.com/iNavFlight/inav/issues
Developers
We accept clean and reasonable patches, submit them!
Open Source Agenda is not affiliated with «Inav Configurator» Project. README Source: iNavFlight/inav-configurator
Согласно недавнему анонсу, в скором времени Гугл прекратит поддержку Chrome Apps, что приведет к невозможности работы Betaflight Configurator’а и некоторых других программ для мультикоптеров, использующих эту платформу. В этой статье я покажу решение этой проблемы, дам ссылки на автономные версии программ для наших полетных контроллеров.
Оригинал: Download Betaflight Configurator & Blackbox Explorer
С самой первой версии Betaflight Configurator (еще со времен Baseflight и Cleanflight) был расширением для Chrome (Chrome Extension). Мы использовали эту платформу, потому что она совместима с Windows, Linux и Mac OS.
Дополнительная информация: настройка Betaflight
Помимо Betaflight Configurator, также будут затронуты этим и многие другие программы, связанные с нашим хобби, типа BLHeli Configurator и Blackbox explorer. К счастью, разработчики нашли решение, и предлагают использовать автономные версии программ, которые можно запускать без Google Chrome. Эти версии также совместимы с Windows, Linux и Mac OS.
Если эти расширения уже установлены в вашем браузере, то они ещё какое-то время будут работать. Но, как видите, уже нельзя найти их в Chrome Web Store — гугл постепенно закрывает эту платформу, так что чем раньше мы перейдем на автономные версии, тем лучше.
| Логотип | Приложение | Ссылка на приложение |
| Betaflight Configurator | Исполняемые файлы: https://github.com/betaflight/betaflight-configurator/releases | |
| Blackbox Explorer | Инсталлятор: https://github.com/betaflight/blackbox-log-viewer/releases | |
| BLHeli Configurator | Исполняемые файлы: https://github.com/blheli-configurator/blheli-configurator/releases | |
| Cleanflight Configurator | Исполняемые файлы: https://github.com/cleanflight/cleanflight-configurator/releases | |
| iNav Configurator | Исполняемые файлы: https://github.com/iNavFlight/inav-configurator/releases | |
 |
BLHeliSuite_32 | Скачать: https://github.com/bitdump/BLHeli (ссылка в самом низу страницы) |
- Для Windows — расширение файлов «exe»
- Для MacOS — «dmg»
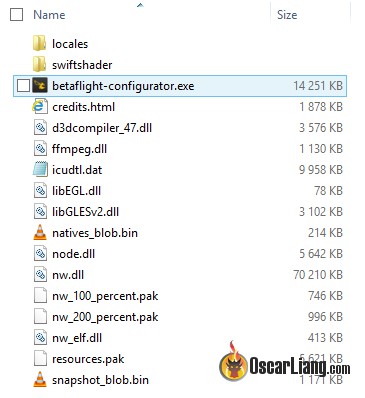
Скачав архив на компьютер, распакуйте его, из полученной папки запускайте betaflight-configurator.exe, устанавливать не обязательно.
Если будет запрос насчет безопасности файлов, не волнуйтесь, выберите «все равно запустить».
Прим. перев: есть еще один вариант, нужно убрать блокировку с файла, т.к. он скачан из интернета и считается небезопасным. Нажмите правой кнопкой мыши на betaflight-configurator.exe и откройте свойства. Внизу окна будет кнопка «Разблокировать», нажмите её и затем «Ок».
Эту же процедуру нужно проделать с другими программами, кроме Blackbox Explorer у которого уже есть установочный файл, так что просто скачиваем и устанавливаем.
Замечу, что автономные приложения не обновляются автоматически, придется делать это вручную. Для удобства пользователей при появлении новых версий будет появляться всплывающее окно со ссылкой на страницу загрузки.
Не получается установить, появляется предупреждение о небезопасной программе?
Если не получается установить Betaflight configurator как приложение, тогда можно попробовать настроить через Google Chrome.
Первое, клонируем репозиторий GitHub в виде zip архива.
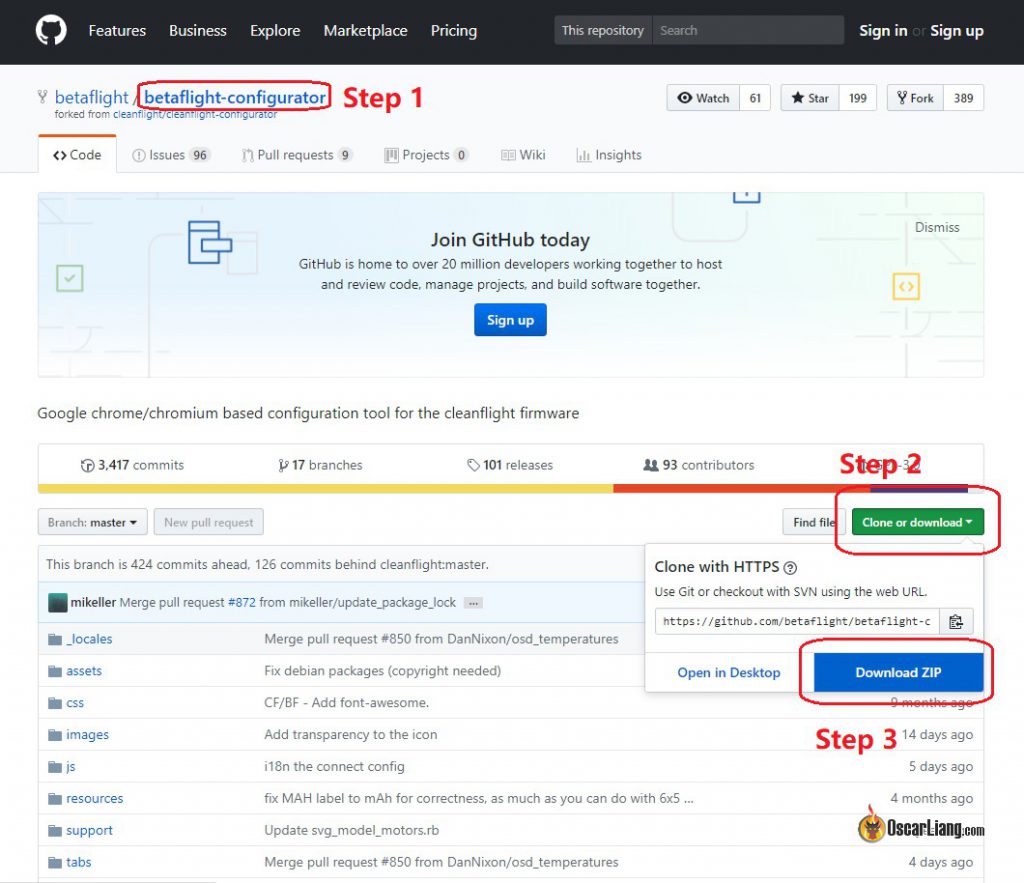
Распаковываем архив, открываем Chrome, переходим на страницу с расширениями, убеждаемся, что режим разработчика включен (developer mode on).
Нажимаем Load Unpacked Extension, выбираем папку, куда мы распаковали архив. На этом всё! Распакованные файлы нужны для работы, так что не удаляйте их.
На выходе мы получаем не отдельное приложение, а расширение Хрома, так что он все еще будет нужен, но зато решается проблема с установкой и с ложными срабатываниями антивирусов.
- Часть 1 — комплектующие
- Часть 2 — сборка
- Часть 3 — пересборка на SPRacingF3
- Часть 5 — выдержки из бортового журнала
- Фотогалерея
Последний этап сборки — установка и настройка прошивки на полётный контроллер. Для начала о самой прошивке. Cleanflight — очень популярная прошивка, но все навигационные функции находятся там в зачаточном состоянии. Поэтому я буду использовать прошивку iNAV. Это ответвление от Cleanflight`а, созданное Константином Шарлаимовым (он же DigitalEntity, он же jShadow) со товарищи и «заточенное» именно под работу с GPS и навигацией. Так как экспериментирую я с данным квадрокоптером уже давно, то и за iNAV слежу уже достаточно долго (с апреля 2016). Надо отдать должное авторам, объём работы проделан огромный. Это хорошо видно по теме обсуждения прошивки на форуме rcdesign.ru, где сам Константин активно общается.
ДИСКЛЕЙМЕР
Во многих аспектах, данная статья выражает субъективное мнение автора. Спорить с ним бесполезно, он упёртый.
Настраивать ранние версии было достаточно сложно, так как использовался Cleanflight Configurator, в то время как по коду iNAV уже очень сильно отличался от прародителя и бОльшую часть команд надо было вводить через CLI. Позднее (примерно, в августе 2016) iNAV обзавёлся собственным конфигуратором iNAV Configurator, что заметно упростило первичную настройку. Также iNAV обладает подробной документацией, часть которой переведена на русский:
- документация на английском
- документация на русском
- документация на русском
- видео по настройке
Последняя версия прошивки на сегодняшний день — 1.5 и именно её я рассматриваю в данной статье. Далее мои варианты настроек с пояснениями.
Вкладка Setup
Здесь производится калибровка датчиков и именно с неё и надо начинать. Начиная с версии 1.5, в прошивку добавлена неотключаемая «защита от дурака», не позволяющая запустить двигатели, если не откалиброваны компас и акселерометр. Процесс очень доступно описан на этой странице. Компас лучше калибровать на улице, где меньше помех. Делается это, как и в Cleanflight, переводом левого стика передатчика в верхний правый угол, а правого — вниз. Квадрокоптер при этом должен быть не заармлен.
Вкладка Ports
Минимум изменений: включил MSP для порта UART3 и GPS для UART2. Скорость для GPS выбрал 57600 (или 19200 при использовании softserial, но такое подключение не рекомендуется).
iNAV Configurator, вкладка Ports

Вкладка Configuration
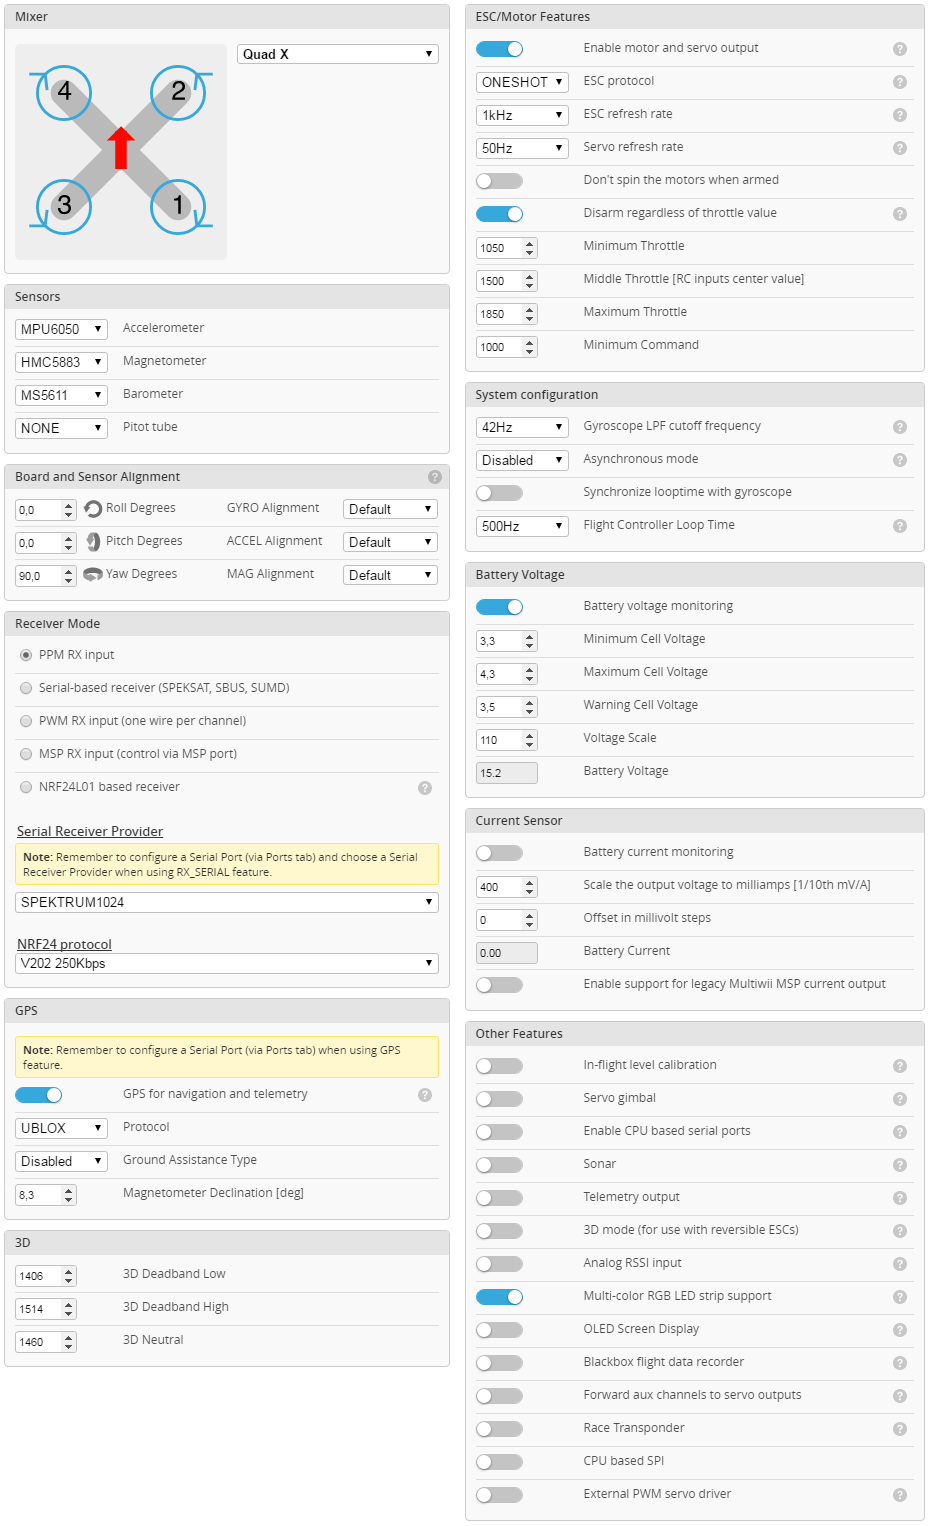
Здесь настроек много, чтобы было проще, разделю их по блокам.
ESC/Motor Features
- Включил опцию «Enable motor and servo output». Это своего рода защитный механизм, вообще отключающий моторы, чтобы поберечь сервы на самолётных моделях.
- Выбрал протокол регуляторов ONESHOT125 и частоту обновления 1кГц.
- Отключил MOTOR_STOP, чтобы моторы всегда вращались в заармленном состоянии.
- Включил опцию «Disarm motors regardless of throttle value», так как буду делать арминг моторов на отдельном канале. Она позволяет дизармить моторы независимо от уровня газа.
- Уменьшил значение «Minimum Throttle» до 1050. Это обороты холостого хода, подбирал субъективно.
Sensors
Здесь ничего не менял, прошивка сама распознала мои датчики.
Board and Sensor Alignment
Указал, что мой ПК повёрнут на 90 градусов по оси yaw. Корректность этого параметра потом можно проверить во вкладке Setup. Компас у той модели U-blox NEO-M8N, что использую я, бывает повёрнут на 270 или 180 градусов. Кроме того, он расположен на нижней части платы, что тоже надо учитывать. Так что для компаса надо выбирать CW270 FLIP или CW180 FLIP.
Battery Voltage
Включил опцию «Battery voltage monitor» для активации индикатора заряда батареи. Остальные параметры я не менял, так как показания заряда соответствуют действительности. Если же в них есть погрешность, её можно убрать настройкой «Voltage Scale».
Reciever Mode
Выбрал протокол радиоприёмника RX_PPM.
GPS
- Активировал GPS, включив опцию «GPS for navigation and telemetry».
- Установил UBLOX в качестве протокола.
- Задал угол магнитного отклонения. Узнать его для своего местоположения можно здесь.
Other Features
Активировал только одну опцию — «Multi-color RGB LED strip support».
iNAV Configurator, вкладка Configuration
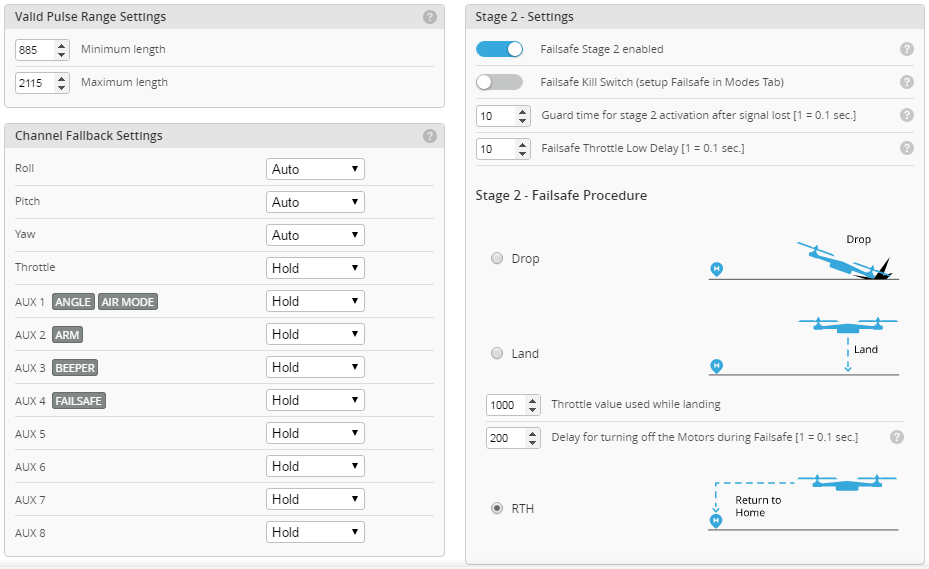
Вкладка Failsafe
О нюансах и настройке этого режима на приёмнике и ПК, я подробно писал тут. В данном случае кое-что изменилось. Во-первых, iNAV предлагает ещё один сценарий поведения — RTH (он же «Return To Home»). Во-вторых, мой новый приёмник Turnigy TGY-iA6C не такой «умный» и не передаёт на ПК сигнал о потере связи. Единственное, что он умеет — эмулировать предустановленные положения стиков/тумблеров. Поэтому единственный вариант настройки в моём случае — назначить Failsafe, как полётный режим, и активировать его на приёмнике при потере сигнала. У себя я это сделал на канале AUX4, к которому не привязан ни один тумблер. Подробности уже писал.
В итоге из настроек я только активизировал «Failsafe Stage 2» и выбрал сценарий RTH в «Failsafe Procedure». Важно, чтобы в разделе «Channel Fallback Settings» для Throttle было установлено значение Hold, иначе ПК будет вырубать моторы.
iNAV Configurator, вкладка Failsafe
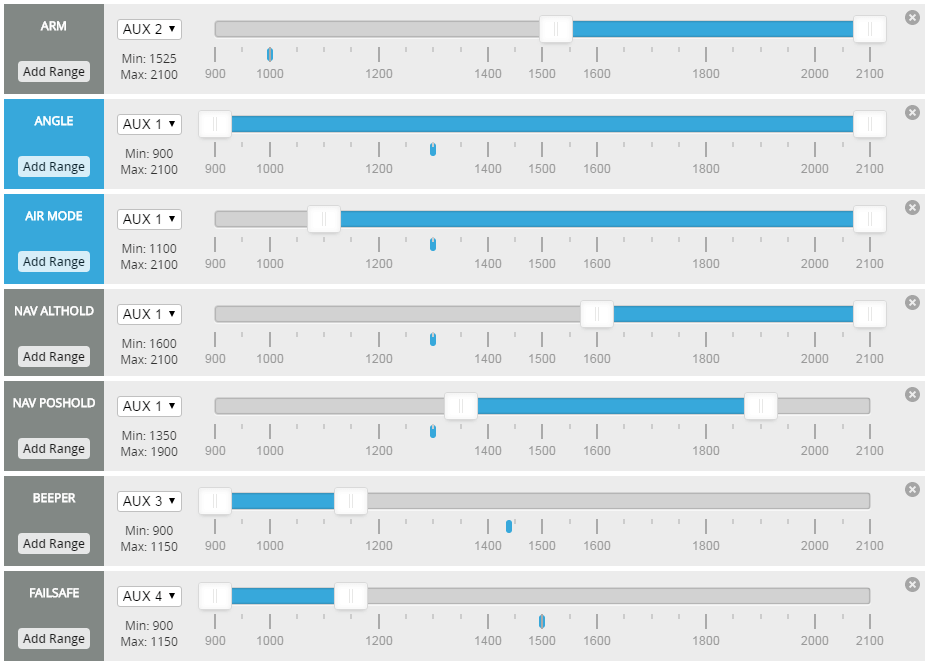
Вкладка Modes
К этому моменту все датчики квадрокоптера должны быть включены и опознаны ПК, о чём информирует верхняя плашка с иконками.

Если какой-то из сенсоров не обнаруживается, из списка полётных режимов исчезнут те, которые этот сенсор используют. Например, без барометра не будет режима ALTHOLD, а без GPS — режима POSHOLD. Для начала кратко о некоторых из режимов.
- ANGLE — режим со стабилизацией, для которого можно задать максимальный допустимый угод наклона ЛА.
- HORIZON — тоже стабилизация, но предполагающая более агрессивное управление.
- AIRMODE — вспомогательный режим, пришедший из Betaflight.
- POSHOLD — удержание позиции по GPS.
- ALTHOLD — удержание высоты по барометру. Важный нюанс: «целевая» высота (которую квадрокоптер будет пытаться удерживать) запоминается при активации режима, а не при арминге. Кроме того, стик газа в этом режиме контролирует не газ, а вертикальную скорость с висением на 50% газа. Учитывая всё это, не стоит взлетать в этом режиме.
- MAG — удержание курса по компасу.
- HEAD LOCK — более жесткое удержание курса без использования компаса (актуально только для трикоптеров и, возможно, самолетов классической схемы).
В ранних версиях iNAV режимы удержания высоты и позиции не были самостоятельными и их надо было добавлять к ANGLE или HORIZON. Сейчас они самодостаточны, но, тем не менее, я всё же включу ANGLE и AIRMODE. Дело в том, что при первом полёте у меня не включился POSHOLD (как предположил Константин, была ошибка компаса) и я получил режим ACRO.
Переключателя режимов у меня два трёхпозиционных, но управляющих одним каналом (AUX1). Это даёт мне возможность настроить до пяти режимов или их комбинаций, чем я и воспользовался:
- ANGLE — для взлётов и посадок
- ANGLE + AIRMODE
- POSHOLD + ANGLE + AIRMODE
- POSHOLD + ALTHOLD + ANGLE + AIRMODE
- ALTHOLD + ANGLE + AIRMODE — основной полётный режим
Также я повесил на тумблеры арминг (AUX2) и пищалку (AUX3), а Failsafe на «безтумблерный» AUX4.
Пара слов о приоритетах режимов. Наивысший, разумеется, у Failsafe, далее идёт RTH, третим — WP, и затем уже режимы вроде POSHOLD и ALTHOLD. AIRMODE в отличии от Betaflight, здесь не имеет приоритета над MOTOR_STOP. То есть, если MOTOR_STOP включен, моторы в любом случае будут останавливаться при нулевом газе.
iNAV Configurator, вкладка Modes
Вкладка LED Strip
Тут всё очень субъективно. Для своего квадрика я настроил подсветку синего цвета с эффектом Larson Scanner.
Вкладка Sensors
Настраивать тут ничего не надо, но вот проверить работу датчиков можно. В первую очередь, барометра. Единственное, что надо знать — барометр начинает отображать данные только после арминга, а до этого высота принудительно подтягивается к нулю. Сделано для того, чтобы высота «дома» всегда нулевой.
Вкладка CLI
Несмотря на удобный конфигуратор, здесь тоже предстоит кое-что сделать. Для начала надо откалибровать каналы. Я уже писал как сделать это на передатчике, но, как оказалось, лучше делать это в прошивке ПК. Итак, сперва надо во вкладке Reciever посмотреть и запомнить крайние показатели всех четырёх каналов управления. Например, они такие:
roll 1050 - 1950

pitch 990 - 1992

yaw 990 - 2015

throttle 1070 - 1980
Затем нужно сообщить эти диапазоны прошивке. Делается это следующими командами:
rxrange 0 1050 1950

rxrange 1 990 1992

rxrange 2 990 2015

rxrange 3 1070 1980
Крайние точки теперь настроены, а вот центральные всё равно придётся настраивать на передатчике. Далее я ввёл некоторые настройки, адаптированные для маленьких рам. Их список находится здесь.
set p_pitch = 55

set i_pitch = 40

set d_pitch = 15

set p_roll = 55

set i_roll = 40

set d_roll = 15

set p_yaw = 90

set i_yaw = 45

set d_yaw = 20

set p_level = 20

set i_level = 15

set d_level = 75

set gyro_lpf = 256hz

set tpa_rate = 10

set tpa_breakpoint = 1650

set looptime = 1000

set gyro_sync = on

set gyro_sync_denom = 8
Опытным путём (то есть, в поле) надо определить газ висения и задать как значение переменной nav_mc_hover_thr. Оно будет использовано в режиме ALTHOLD. Если фактический газ висения будет отличается от заданного, то при активации режима удержания высоты, квадрокоптер будет сильно просаживатся или подпрыгивать.
Чтобы квадрокоптер армился в любом положении (даже вверх ногами), надо прописать:
set small_angle = 180
В iNAV много внимания уделено всевозможной защите. Выше уже упоминалась блокировка запуска моторов при неоткалиброванных датчиках. Кроме этого, есть переменные inav_gps_min_sats и nav_extra_arming_safety. Первая отвечает за минимальное количество спутников GPS, которые надо «поймать» для арминга, вторая разрешает/запрещает арминг при полном отсутствии сингала GPS. В процессе настройки, зачастую полезно отключить nav_extra_arming_safety, но потом надо не забыть включить обратно.
Ещё одна интересная переменная — nav_user_control_mode. Она отвечает за то, как будут интерпретироваться pitch/roll в режиме POSHOLD. Её значение по умолчанию ATTI — правый стик контролирует угол наклона коптера как в режиме ANGLE. Также возможен вариант CRUISE — правый стик контролирует скорость и направление полета. Я предпочитаю ATTI.
Собственно, всё, можно сохранять. Вот полный дамп моих настроек:
Dump всех настроек iNAV
# version
# INAV/SPRACINGF3 1.5.0 Dec 31 2016 / 02:15:51 (37afad6)
# pflags
# Persistent config flags: 0x00000000
# dump master
# mixer
mixer QUADX
mmix reset
smix reset
# feature
feature -RX_PPM
feature -VBAT
feature -UNUSED_1
feature -RX_SERIAL
feature -MOTOR_STOP
feature -SERVO_TILT
feature -SOFTSERIAL
feature -GPS
feature -FAILSAFE
feature -SONAR
feature -TELEMETRY
feature -CURRENT_METER
feature -3D
feature -RX_PARALLEL_PWM
feature -RX_MSP
feature -RSSI_ADC
feature -LED_STRIP
feature -DASHBOARD
feature -UNUSED_2
feature -BLACKBOX
feature -CHANNEL_FORWARDING
feature -TRANSPONDER
feature -AIRMODE
feature -SUPEREXPO
feature -VTX
feature -RX_SPI
feature -SOFTSPI
feature -PWM_SERVO_DRIVER
feature -PWM_OUTPUT_ENABLE
feature -OSD
feature RX_PPM
feature VBAT
feature GPS
feature FAILSAFE
feature LED_STRIP
feature PWM_OUTPUT_ENABLE
# beeper
beeper GYRO_CALIBRATED
beeper HW_FAILURE
beeper RX_LOST
beeper RX_LOST_LANDING
beeper DISARMING
beeper ARMING
beeper ARMING_GPS_FIX
beeper BAT_CRIT_LOW
beeper BAT_LOW
beeper GPS_STATUS
beeper RX_SET
beeper ACC_CALIBRATION
beeper ACC_CALIBRATION_FAIL
beeper READY_BEEP
beeper MULTI_BEEPS
beeper DISARM_REPEAT
beeper ARMED
beeper SYSTEM_INIT
beeper ON_USB
beeper LAUNCH_MODE
# map
map AETR1234
# serial
serial 0 1 115200 38400 0 115200
serial 1 2 115200 57600 0 115200
serial 2 1 115200 38400 0 115200
# led
led 0 0,15::G:10
led 1 1,15::CO:10
led 2 2,15::CO:10
led 3 3,15::CO:10
led 4 4,15::CO:10
led 5 5,15::CO:10
led 6 6,15::CO:10
led 7 7,15::CO:10
led 8 8,15::CO:10
led 9 9,15::CO:10
led 10 10,15::CO:10
led 11 11,15::CO:10
led 12 12,15::CO:10
led 13 13,15::CO:10
led 14 14,15::CO:10
led 15 15,15::G:10
led 16 0,0::C:0
led 17 0,0::C:0
led 18 0,0::C:0
led 19 0,0::C:0
led 20 0,0::C:0
led 21 0,0::C:0
led 22 0,0::C:0
led 23 0,0::C:0
led 24 0,0::C:0
led 25 0,0::C:0
led 26 0,0::C:0
led 27 0,0::C:0
led 28 0,0::C:0
led 29 0,0::C:0
led 30 0,0::C:0
led 31 0,0::C:0
# color
color 0 0,0,0
color 1 0,255,255
color 2 0,0,255
color 3 30,0,255
color 4 60,0,255
color 5 90,0,255
color 6 120,0,255
color 7 150,0,255
color 8 180,0,255
color 9 210,0,255
color 10 240,0,255
color 11 270,0,255
color 12 300,0,255
color 13 330,0,255
color 14 0,0,0
color 15 0,0,0
# mode_color
mode_color 0 0 1
mode_color 0 1 11
mode_color 0 2 2
mode_color 0 3 13
mode_color 0 4 10
mode_color 0 5 3
mode_color 1 0 5
mode_color 1 1 11
mode_color 1 2 3
mode_color 1 3 13
mode_color 1 4 10
mode_color 1 5 3
mode_color 2 0 10
mode_color 2 1 11
mode_color 2 2 4
mode_color 2 3 13
mode_color 2 4 10
mode_color 2 5 3
mode_color 3 0 8
mode_color 3 1 11
mode_color 3 2 4
mode_color 3 3 13
mode_color 3 4 10
mode_color 3 5 3
mode_color 4 0 7
mode_color 4 1 11
mode_color 4 2 3
mode_color 4 3 13
mode_color 4 4 10
mode_color 4 5 3
mode_color 5 0 9
mode_color 5 1 11
mode_color 5 2 2
mode_color 5 3 13
mode_color 5 4 10
mode_color 5 5 3
mode_color 6 0 6
mode_color 6 1 10
mode_color 6 2 1
mode_color 6 3 0
mode_color 6 4 0
mode_color 6 5 2
mode_color 6 6 3
mode_color 6 7 6
mode_color 6 8 0
mode_color 6 9 0
mode_color 6 10 0
set looptime = 1000
set i2c_overclock = OFF
set gyro_sync = ON
set gyro_sync_denom = 8
set acc_task_frequency = 500
set attitude_task_frequency = 250
set async_mode = NONE
set mid_rc = 1500
set min_check = 1100
set max_check = 1900
set rssi_channel = 0
set rssi_scale = 30
set rssi_ppm_invert = OFF
set rc_smoothing = ON
set input_filtering_mode = OFF
set min_throttle = 1050
set max_throttle = 1850
set min_command = 1000
set 3d_deadband_low = 1406
set 3d_deadband_high = 1514
set 3d_neutral = 1460
set 3d_deadband_throttle = 1000
set motor_pwm_rate = 1000
set motor_pwm_protocol = ONESHOT125
set fixed_wing_auto_arm = OFF
set disarm_kill_switch = ON
set auto_disarm_delay = 5
set small_angle = 180
set reboot_character = 82
set gps_provider = UBLOX
set gps_sbas_mode = NONE
set gps_dyn_model = AIR_1G
set gps_auto_config = ON
set gps_auto_baud = ON
set inav_auto_mag_decl = ON
set inav_accz_unarmedcal = ON
set inav_use_gps_velned = ON
set inav_gps_delay = 200
set inav_gps_min_sats = 6
set inav_w_z_baro_p =  0.350
set inav_w_z_gps_p =  0.200
set inav_w_z_gps_v =  0.500
set inav_w_xy_gps_p =  1.000
set inav_w_xy_gps_v =  2.000
set inav_w_z_res_v =  0.500
set inav_w_xy_res_v =  0.500
set inav_w_acc_bias =  0.010
set inav_max_eph_epv =  1000.000
set inav_baro_epv =  100.000
set nav_disarm_on_landing = OFF
set nav_use_midthr_for_althold = OFF
set nav_extra_arming_safety = ON
set nav_user_control_mode = ATTI
set nav_position_timeout = 5
set nav_wp_radius = 100
set nav_max_speed = 300
set nav_max_climb_rate = 500
set nav_manual_speed = 500
set nav_manual_climb_rate = 200
set nav_landing_speed = 200
set nav_land_slowdown_minalt = 500
set nav_land_slowdown_maxalt = 2000
set nav_emerg_landing_speed = 500
set nav_min_rth_distance = 500
set nav_rth_climb_first = ON
set nav_rth_tail_first = OFF
set nav_rth_alt_mode = AT_LEAST
set nav_rth_altitude = 1000
set nav_mc_bank_angle = 30
set nav_mc_hover_thr = 1350
set nav_mc_auto_disarm_delay = 2000
set nav_fw_cruise_thr = 1400
set nav_fw_min_thr = 1200
set nav_fw_max_thr = 1700
set nav_fw_bank_angle = 20
set nav_fw_climb_angle = 20
set nav_fw_dive_angle = 15
set nav_fw_pitch2thr = 10
set nav_fw_roll2pitch = 75
set nav_fw_loiter_radius = 5000
set nav_fw_launch_velocity = 300
set nav_fw_launch_accel = 1863
set nav_fw_launch_detect_time = 40
set nav_fw_launch_thr = 1700
set nav_fw_launch_motor_delay = 500
set nav_fw_launch_timeout = 5000
set nav_fw_launch_climb_angle = 10
set serialrx_provider = SPEK1024
set spektrum_sat_bind = 0
set telemetry_switch = OFF
set telemetry_inversion = ON
set frsky_default_lattitude =  0.000
set frsky_default_longitude =  0.000
set frsky_coordinates_format = 0
set frsky_unit = IMPERIAL
set frsky_vfas_precision = 0
set frsky_vfas_cell_voltage = OFF
set hott_alarm_sound_interval = 5
set smartport_uart_unidir = OFF
set battery_capacity = 0
set vbat_scale = 110
set vbat_max_cell_voltage = 43
set vbat_min_cell_voltage = 33
set vbat_warning_cell_voltage = 35
set current_meter_scale = 400
set current_meter_offset = 0
set multiwii_current_meter_output = OFF
set current_meter_type = ADC
set align_gyro = DEFAULT
set align_acc = DEFAULT
set align_mag = DEFAULT
set align_board_roll = 0
set align_board_pitch = 0
set align_board_yaw = 900
set gyro_lpf = 256HZ
set moron_threshold = 32
set imu_dcm_kp = 2500
set imu_dcm_ki = 50
set imu_dcm_kp_mag = 10000
set imu_dcm_ki_mag = 0
set pos_hold_deadband = 20
set alt_hold_deadband = 50
set yaw_motor_direction = 1
set yaw_jump_prevention_limit = 200
set tri_unarmed_servo = ON
set servo_lowpass_freq = 400
set servo_lowpass_enable = OFF
set servo_center_pulse = 1500
set servo_pwm_rate = 50
set failsafe_delay = 10
set failsafe_recovery_delay = 117
set failsafe_off_delay = 200
set failsafe_throttle = 1000
set failsafe_kill_switch = OFF
set failsafe_throttle_low_delay = 10
set failsafe_procedure = RTH
set rx_min_usec = 885
set rx_max_usec = 2115
set acc_hardware = MPU6050
set baro_use_median_filter = ON
set baro_hardware = MS5611
set mag_hardware = HMC5883
set blackbox_rate_num = 1
set blackbox_rate_denom = 4
set blackbox_device = SPIFLASH
set magzero_x = 65
set magzero_y = 38
set magzero_z = -81
set acczero_x = 124
set acczero_y = 6
set acczero_z = -170
set ledstrip_visual_beeper = OFF
set accgain_x = 4055
set accgain_y = 4059
set accgain_z = 4007
# rxfail
rxfail 0 a
rxfail 1 a
rxfail 2 a
rxfail 3 h
rxfail 4 h
rxfail 5 h
rxfail 6 h
rxfail 7 h
rxfail 8 h
rxfail 9 h
rxfail 10 h
rxfail 11 h
rxfail 12 h
rxfail 13 h
rxfail 14 h
rxfail 15 h
rxfail 16 h
rxfail 17 h
# dump profile
# profile
profile 0
# aux
aux 0 0 1 1550 2100
aux 1 1 0 900 2100
aux 2 20 0 1100 2100
aux 3 3 0 1900 2100
aux 4 9 0 1300 2100
aux 5 11 2 900 1150
aux 6 18 3 900 1150
aux 7 0 0 900 900
aux 8 0 0 900 900
aux 9 0 0 900 900
aux 10 0 0 900 900
aux 11 0 0 900 900
aux 12 0 0 900 900
aux 13 0 0 900 900
aux 14 0 0 900 900
aux 15 0 0 900 900
aux 16 0 0 900 900
aux 17 0 0 900 900
aux 18 0 0 900 900
aux 19 0 0 900 900
# adjrange
adjrange 0 0 0 900 900 0 0
adjrange 1 0 0 900 900 0 0
adjrange 2 0 0 900 900 0 0
adjrange 3 0 0 900 900 0 0
adjrange 4 0 0 900 900 0 0
adjrange 5 0 0 900 900 0 0
adjrange 6 0 0 900 900 0 0
adjrange 7 0 0 900 900 0 0
adjrange 8 0 0 900 900 0 0
adjrange 9 0 0 900 900 0 0
adjrange 10 0 0 900 900 0 0
adjrange 11 0 0 900 900 0 0
# rxrange
rxrange 0 1000 2000
rxrange 1 1000 2000
rxrange 2 1000 2000
rxrange 3 1023 2000
# servo
servo 0 1000 2000 1500 90 90 100 -1
servo 1 1000 2000 1500 90 90 100 -1
servo 2 1000 2000 1500 90 90 100 -1
servo 3 1000 2000 1500 90 90 100 -1
servo 4 1000 2000 1500 90 90 100 -1
servo 5 1000 2000 1500 90 90 100 -1
servo 6 1000 2000 1500 90 90 100 -1
servo 7 1000 2000 1500 90 90 100 -1
set nav_alt_p = 50
set nav_alt_i = 0
set nav_alt_d = 0
set nav_vel_p = 100
set nav_vel_i = 50
set nav_vel_d = 10
set nav_pos_p = 65
set nav_pos_i = 120
set nav_pos_d = 10
set nav_posr_p = 180
set nav_posr_i = 15
set nav_posr_d = 100
set nav_navr_p = 10
set nav_navr_i = 5
set nav_navr_d = 8
set deadband = 5
set yaw_deadband = 5
set throttle_tilt_comp_str = 0
set flaperon_throw_offset = 250
set flaperon_throw_inverted = OFF
set gimbal_mode = NORMAL
set fw_iterm_throw_limit = 165
set mode_range_logic_operator = OR
set default_rate_profile = 0
set mag_declination = 830
set mag_hold_rate_limit = 90
set p_pitch = 55
set i_pitch = 40
set d_pitch = 15
set p_roll = 55
set i_roll = 40
set d_roll = 15
set p_yaw = 90
set i_yaw = 45
set d_yaw = 20
set p_level = 20
set i_level = 15
set d_level = 75
set max_angle_inclination_rll = 300
set max_angle_inclination_pit = 300
set gyro_soft_lpf_hz = 60
set acc_soft_lpf_hz = 15
set dterm_lpf_hz = 40
set yaw_lpf_hz = 30
set yaw_p_limit = 300
set iterm_ignore_threshold = 200
set yaw_iterm_ignore_threshold = 50
set rate_accel_limit_roll_pitch = 0
set rate_accel_limit_yaw = 10000
# dump rates
# rateprofile
rateprofile 0
set rc_expo = 70
set rc_yaw_expo = 20
set thr_mid = 50
set thr_expo = 0
set roll_rate = 20
set pitch_rate = 20
set yaw_rate = 20
set tpa_rate = 10
set tpa_breakpoint = 1650
- Часть 1 — комплектующие
- Часть 2 — сборка
- Часть 3 — пересборка на SPRacingF3
- Часть 5 — выдержки из бортового журнала
- Фотогалерея