The current Gradle release is 8.4. You can download binaries and view docs for all Gradle versions from the releases page.
- Prerequisites
- Additional resources
- Installing with a package manager
- Installing manually
- Upgrade with the Gradle Wrapper
- Older Releases
- Command-Line Completion
Prerequisites
Gradle runs on all major operating systems and requires only a Java JDK version 8 or higher to be installed. To check, run java -version:
$ java -version
java version "1.8.0_121"
Additional resources
- On-demand and live online training is available for free to Gradle users.
- Self-paced tutorials are a good place to try Gradle with a variety of languages in addition to the docs.
- Gradle has a visual build inspection tool: Build Scan™.
- Finally, the Gradle Newsletter is a great way to keep
UP-TO-DATE, with issues crafted monthly.
Installing with a package manager
SDKMAN! is a tool for managing parallel versions of multiple Software Development Kits on most Unix-based systems.
Homebrew is “the missing package manager for macOS”.
Other package managers are available, but the version of Gradle distributed by them is not controlled by Gradle, Inc. Linux package managers may distribute a modified version of Gradle that is incompatible or incomplete when compared to the official version (available from SDKMAN! or below).
› Additional helpful information
Installing manually
Step 1. Download the latest Gradle distribution
The current Gradle release is version 8.4, released on 04 Oct 2023. The distribution zip file comes in two flavors:
- Binary-only
- Complete, with docs and sources
If in doubt, choose the binary-only version and browse docs and sources online.
Need to work with an older version? See the releases page.
Step 2. Unpack the distribution
Linux & MacOS users
Unzip the distribution zip file in the directory of your choosing, e.g.:
$ mkdir /opt/gradle
$ unzip -d /opt/gradle gradle-8.4-bin.zip
$ ls /opt/gradle/gradle-8.4
LICENSE  NOTICE  bin  getting-started.html  init.d  lib  media
Microsoft Windows users
Create a new directory C:\Gradle with File Explorer.
Open a second File Explorer window and go to the directory where the Gradle distribution was downloaded. Double-click the ZIP archive to expose the content. Drag the content folder gradle-8.4 to your newly created C:\Gradle folder.
Alternatively you can unpack the Gradle distribution ZIP into C:\Gradle using an archiver tool of your choice.
Step 3. Configure your system environment
Linux & MacOS users
Configure your PATH environment variable to include the bin directory of the unzipped distribution, e.g.:
$ export PATH=$PATH:/opt/gradle/gradle-8.4/bin
Microsoft Windows users
In File Explorer right-click on the This PC (or Computer) icon, then click Properties -> Advanced System Settings -> Environmental Variables.
Under System Variables select Path, then click Edit. Add an entry for C:\Gradle\gradle-8.4\bin. Click OK to save.
Step 4. Verify your installation
Open a console (or a Windows command prompt) and run gradle -v to run gradle and display the version, e.g.:
$ gradle -v

------------------------------------------------------------
Gradle 8.4
------------------------------------------------------------
› Additional helpful information
Upgrade with the Gradle Wrapper
If your existing Gradle-based build uses the Gradle Wrapper, you can easily upgrade by running the wrapper task, specifying the desired Gradle version:
$ ./gradlew wrapper --gradle-version=8.4 --distribution-type=bin
Note that it is not necessary for Gradle to be installed to use the Gradle wrapper. The next invocation of gradlew or gradlew.bat will download and cache the specified version of Gradle.
$ ./gradlew tasks
Downloading https://services.gradle.org/distributions/gradle-8.4-bin.zip
...
› Additional helpful information
Older Releases
You can find all releases and their checksums on the releases page.
Command-Line Completion
Command-line completion scripts are available for bash and zsh. This provides completion for Gradle tasks and command-line options.
Gradle is a flexible build automation tool to build software. It is open-source, and also capable of building almost any type of software. A build automation tool automates the build process of applications. The Software building process includes compiling, linking, and packaging the code, etc. Gradle makes the build process more consistent. Using Gradle we can build Android, Java, Groovy, Kotlin JVM, Scala, C++, Swift Libraries, and Applications.
Prerequisites to Install Gradle
To install Gradle, we have to make sure that we have Java JDK version 8 or higher to be installed on our operating system because Gradle runs on major operating systems only Java Development Kit version 8 or higher. To confirm that we have JDK installed on our system. The ‘Java -version‘ command is used to verify if you run it on a windows machine.

You should see output like in the above image it confirms that you have JDK installed and the JAVA_HOME path set properly if you don’t have JDK Install. then you should install it first before going to the next step. in this tutorial, we are not cover the installation of JDK. we consider that we have JDK already on the system.
Installing Gradle Manually
Gradle Enterprise provides the installation of Gradle with package manager SDKMAN! but here we are covering the manual installation of Gradle for Microsoft windows machines. before starting we confirmed we have JDK installed properly on the machine.
Step 1. Download the latest Gradle distribution
To install Gradle we need the Gradle distribution ZIP file, we can download the latest version of Gradle from the official website. there are other versions of Gradle available but we will strongly suggest using the official. The current release of Gradle is version 7.5.1, released on 05 Aug 2022. it might be another latest release available when you read this article. Always download the latest version. The Gradle distribution zip file is available in two flavors:
- Binary-only: Binary version contains only executable files no source code and documentation. You can browse docs, and sources online.
- Complete, with docs and sources: This package contains docs and sources offline. I recommend going with binary-only.
Step 2. Unpack the Gradle distribution zip file
After successfully downloading the Gradle distribution ZIP file, we need to unzip/unpack the compressed file. In File Explorer, create a new directory C:\Gradle (you can choose any path according to your choice) as shown In the image.

Now unpack the Gradle distribution ZIP into C:\Gradle using an archiver tool of your choice.

Step 3. Configure your system environment
We have successfully unzipped the Gradle distribution Zip file. Now set the System environment PATH variable to the bin directory of the unzipped distribution. We have extracted files in the following location. you can choose any location to unzip:
C:\Gradle\bin
To set the Environment variable, Right-click on the “This Pc /Computer” icon, then select Properties -> Advanced System Settings -> Environmental Variables. The following screenshot may help you.

As shown in the following image, In the section System Variables select Path, then select the Edit option.

You will now see the following screen Select New, then add an entry for C:\Gradle\bin as shown in the image, now click on the OK button to save changes.

Step 4. Verifying and confirming the installation
After the successful setting of the environment variable, now it’s time to verify the installation. Run the “gradle -v” command on the Windows command prompt, which displays the details of the Gradle version installed on the PC. If you get similar output as in the image, Gradle has been installed successfully, and you can now use Gradle in your projects.

Last Updated :
31 Oct, 2022
Like Article
Save Article
Skip to content
How to install Gradle on Windows 10
In this tutorial, we will see how to install Gradle on Windows 10 operating system.
Prerequisites:
- Gradle runs on almost major operating systems.
- Gradle required Java JDK/JRE version 8 or higher.
Versions:
- Windows 10 Pro 64 bit operating system
- Gradle 5.4.1
- Java 1.8
Install Gradle on Windows 10:
Here are the simple steps to download and install the Gradle on windows 10.
1. Get Gradle:
Download the latest Gradle distributions from the official website; for me, it is 5.4.1.
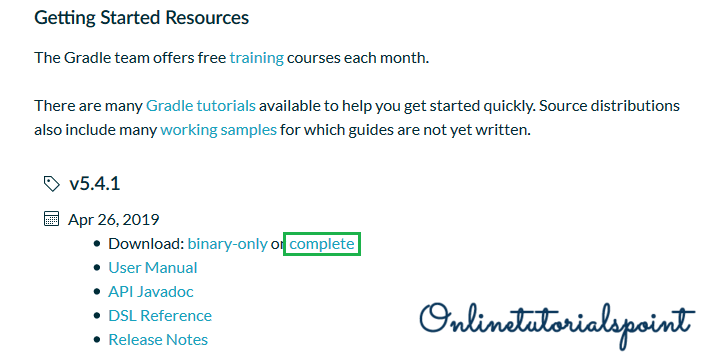
Click on the above complete link to download Gradle; it will be downloaded as a .zip file.
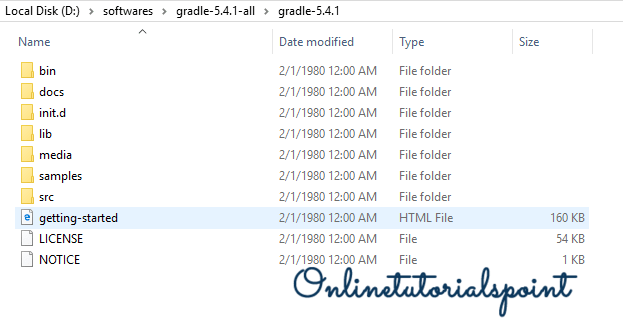
2. Extract the File:
After successfully download, extract the Gradle-5.4.1-all.zip.

If everything went well, you could see the below folders under the Gradle root directory.
3. Set Gradle Path:
Setting the Gradle path under User variables.
Go to Advanced System Settings -> Click on Environment Variables -> then you could see the below window.

Select the Path under the User variables section and click on the Edit button.

Click on the New button.
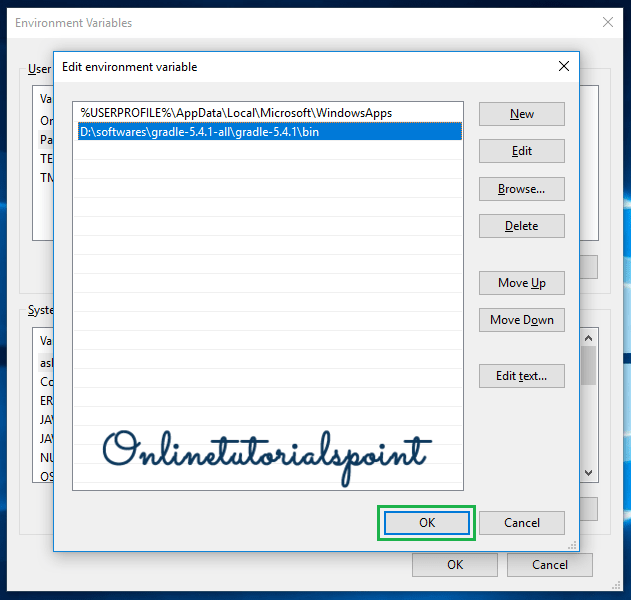
Fill the Gradle path until /bin and click on Ok and Close.
That’s it; now you have successfully installed and set up the Gradle on your Windows Operating System.
4. Verify:
To verify the setup- Open command prompt and check for the gradle -version like below.

If you see the above output; your installation process is done.
References:
- Gradle Installation
- Setup Gradle on STS
Happy Learning 🙂
Share a word.

Related Posts
Page load link
Gradle is a flexible build automation tool to build software. It is open-source, and also capable of building almost any type of software. A build automation tool automates the build process of applications. The Software building process includes compiling, linking, and packaging the code, etc. Gradle makes the build process more consistent. Using Gradle we can build Android, Java, Groovy, Kotlin JVM, Scala, C++, Swift Libraries, and Applications.
Prerequisites to Install Gradle
To install Gradle, we have to make sure that we have Java JDK version 8 or higher to be installed on our operating system because Gradle runs on major operating systems only Java Development Kit version 8 or higher. To confirm that we have JDK installed on our system. The ‘Java -version‘ command is used to verify if you run it on a windows machine.
You should see output like in the above image it confirms that you have JDK installed and the JAVA_HOME path set properly if you don’t have JDK Install. then you should install it first before going to the next step. in this tutorial, we are not cover the installation of JDK. we consider that we have JDK already on the system.
Installing Gradle Manually
Gradle Enterprise provides the installation of Gradle with package manager SDKMAN! but here we are covering the manual installation of Gradle for Microsoft windows machines. before starting we confirmed we have JDK installed properly on the machine.
Step 1. Download the latest Gradle distribution
To install Gradle we need the Gradle distribution ZIP file, we can download the latest version of Gradle from the official website. there are other versions of Gradle available but we will strongly suggest using the official. The current release of Gradle is version 7.5.1, released on 05 Aug 2022. it might be another latest release available when you read this article. Always download the latest version. The Gradle distribution zip file is available in two flavors:
- Binary-only: Binary version contains only executable files no source code and documentation. You can browse docs, and sources online.
- Complete, with docs and sources: This package contains docs and sources offline. I recommend going with binary-only.
Step 2. Unpack the Gradle distribution zip file
After successfully downloading the Gradle distribution ZIP file, we need to unzip/unpack the compressed file. In File Explorer, create a new directory C:\Gradle (you can choose any path according to your choice) as shown In the image.
Now unpack the Gradle distribution ZIP into C:\Gradle using an archiver tool of your choice.
Step 3. Configure your system environment
We have successfully unzipped the Gradle distribution Zip file. Now set the System environment PATH variable to the bin directory of the unzipped distribution. We have extracted files in the following location. you can choose any location to unzip:
C:\Gradle\bin
To set the Environment variable, Right-click on the “This Pc /Computer” icon, then select Properties -> Advanced System Settings -> Environmental Variables. The following screenshot may help you.
As shown in the following image, In the section System Variables select Path, then select the Edit option.
You will now see the following screen Select New, then add an entry for C:\Gradle\bin as shown in the image, now click on the OK button to save changes.
Step 4. Verifying and confirming the installation
After the successful setting of the environment variable, now it’s time to verify the installation. Run the “gradle -v” command on the Windows command prompt, which displays the details of the Gradle version installed on the PC. If you get similar output as in the image, Gradle has been installed successfully, and you can now use Gradle in your projects.
In this article we will discuss How to install Gradle manually on your Windows 10. Now before proceeding towards the installation process , First we will discuss What Gradle really is ??? and why we install gradle manually.
What is Gradle ?? how to install Gradle??
- The Android build system compiles app resources and source code, and packages them into APKs(Android Pakage Kit) that you can test, deploy, sign, and distribute. Android Studio uses Gradle, an advanced build toolkit, to automate and manage the build process, while allowing you to define flexible custom build configurations. Each build configuration can define its own set of code and resources, while reusing the parts common to all versions of your app. The Android plugin for Gradle works with the build toolkit to provide processes and configurable settings that are specific to building and testing Android applications.
- Gradle and the Android plugin run independent of Android Studio. This means that you can build your Android apps from within Android Studio, the command line on your machine, or on machines where Android Studio is not installed (such as continuous integration servers). If you are not using Android Studio, you can learn how to build and run your app from the command line . The output of the build is the same whether you are building a project from the command line, on a remote machine, or using Android Studio.
Basic Steps (How to install gradle manually)
There are many simple steps to gradle download for windows 64 bit and Install Gradle manually on your Window10……
To Install Gradle first of all you should have Java installed on windows10. After reviewing users attentions learn ho to install will also provide step by step tutorials how to install gradle in android studio,How to install gradle install command,how to install gradle ubuntu,how to install gradle mac,how to install gradle version command.
Lets Start……..
Step 1:How to Install Gradle manually
Firstly, What you have to do is to Open your Browser and Write Gradle on the Searh Bar…..

Step 2:(How to Install Gradle on Windows10)
Second step to download Gradle manually is to Click on the Gradle Build Tool which is the first option you have seen on your Google Search Engine.

How to Install Gradle : Step 3
A new page of Gradle.org will be open after clicking on the Gradle Build Tool .On the Gradle.org page you will find button of Install Gradle on Gradle.org Page to Install Gradle.
Now what you have to do is to Click on Install Gradle Button Simply……..
You can understand more by seeing this Image ….Given below….

Step 4 : Installing with a package manager/How to install Gradle Using Chocloaty manager
After Click on Install Gradle you move to next Page in which yo will see the more options or advanced options like
- You are able to install gradle by using different packages If you dont want to install it manually .You will use Different Packages like
- You can use Homebrew https://brew.sh/
- Free to use Chocolaty https://chocolatey.org/
- Able to use Scoop https://scoop.sh/
- you can also use McPorts https://www.macports.org/

Step 5 : Manually Install Gradle
Below the upper context you will see option to install gradle manually without any pakage now at this stage you will saw three option which are :
- The Option no 1 = Download => To Download the Latest distribution of Gradle only.
- Now Option no 2 = Binary Only =>To Download the Binary only Gradle distribution.
- Option no 3 = Complete => To Download Gradle with its complete Sources and Documents.
- Note : The most recommended option is Option no 3.You should install gradle by downloading its Complete version.

Manually Gradle Installation : Step 6
To Download the Complete version of Gradle successfully you have to Click on Complete button.When you click on Complete your Complete version of Gradle with Complete Docs and sources will start Downloading.

Manually Install Gradle : Step 7
Now the Complete version of Gradle is start Downloading……..

Manually How to Install Gradle : Step 8
Now You have a complete downloaded file of Gradle.
- Go to your system Downloads.
- In Downloads Select the Gradle downloaded folder.
- Unzip the Folder and extract all the Files .
- You can see below how it be done.

Now a Popup will be displayed on your screen which will extract the Files from the Folder.
You will seen a Popup like the picture which i have placed below.

How Gradle Install Manually : Step 10
After the extraction you will find a extracted folder in the same list like you can see the picture below

Point To Remember
Now here you have to Change the folder name shown above in the picture or if you dont want to change the folder name no Problem !!! Simply you have to copy the above folder in the C Directory.

Above is the process of copy in the C Directory
Manually Install Gradle : Step 11
- Click on Gradle Folder
- Now you will see bin Folder Click on it
- Now You have to copy the address from this bin
- How to copy the address is shown in Figure below

Learn to Install Gradle : Step 13
In the previous step you copied the address
- Go to you Desktop
- Right Click on the ThisPc icon on the Desktop
- You will see the small popup
- Single Click on Properties Similarly and you are opening the properties of your desktop
- See in Figure

Manually How to Install Gradle : Step 14
Click on the Advanced system settings

After Click on the Advance System Settings A popup of System Properties will display on your Screen
Click on the Environment Variables as shown in the Figure

After Clicking on Environment Variables A Environmental Variable Popup will be displayed on your Screen
Click on the Path to Edit the path as Shown in Figure Below

Now A popup of Edit Environmental Variables will display on your Screen
Click on New Button to Edit /Paste your copied Path

For-instance This could be like this as shown in the picture below when to click on the New Button

Moreover Above in the circle of Picture you have to Paste the copied Address which we copied previously in this tutorial at Step 11
I am pasting my Copied address for your better understanding ,Take a look on the figure pasted below

Press the Ok Button to Finish it.
Congratulations!!!!!!!
Your Manual Installation of Gradle has been Completed Successfully
- After installing Gradle Successfully Most Importantly you should check that either your Gradle has been installed or not
- How to check Gradle successfully installed is describe below.
How to Check the Installation of Gradle??????
- Go to the Windows Command Prompt
- You can open it from Start manu / go to windows search and write command prompt
- Command prompt will be open as shown below in the figure

- Open Command prompt from Start
- Write Gradle -v in the command prompt as shown in the figure below

- Click enter
- If the system gives you answer as shown in Figure below
- It means your Gradle has been Installed Successfully

Guideline How to Install Gradle manually on Windows 10
Learn How to Install Globalmeet
How to Install Ready Talk
Learn how to use GlobalMeet
How to Use Ready Talk.
Learn How to Install Zoom Meeting
How to use zoom meetings
For VLC installation Visit Learn how to install vlc player
learn how to install sublime text editor
To Install Notepad++ Visit learn how to install notepad++
For the Installation of Visual Studio Code Visit Learn how to install visual sudio code
learn how to install camtasia studio