GitLab — мощная платформа для управления репозиториями Git, которая позволяет организовать совместную работу над проектами с помощью инструментов контроля версий. Однако, перед тем, как начать использовать GitLab, необходимо его установить. Есть несколько способов установки GitLab на Windows, и в этой статье мы расскажем вам о самом простом и надежном из них.
Шаг 1: Скачайте и установите Git for Windows
Первым делом необходимо установить Git на ваш компьютер. Вам потребуется установочный файл, который можно скачать с официального сайта Git по ссылке www.git-scm.com. Пройдите по указанной ссылке и нажмите на кнопку «Download». После завершения загрузки установите Git, следуя подсказкам инсталлятора.
Примечание: Установочный файл для Git доступен только для 64-битных версий Windows.
Шаг 2: Скачайте и установите Docker Desktop
Для удобной установки GitLab на Windows, мы рекомендуем использовать Docker — инструмент для создания и управления контейнерами. Docker Desktop можно скачать с официального сайта Docker по ссылке www.docker.com/products/docker-desktop. Найдите для вашей операционной системы кнопку «Download» и скачайте установочный файл. Запустите его и следуйте инструкциям для установки Docker на ваш компьютер.
Шаг 3: Скачайте и установите GitLab Community Edition
После установки Git и Docker Desktop, вы готовы перейти к установке GitLab. Для этого вам понадобится установить Docker-образ GitLab Community Edition. Откройте командную строку или терминал и введите следующую команду:
docker pull gitlab/gitlab-ce
Когда Docker загрузит образ GitLab Community Edition, вы будете готовы к запуску GitLab на своем компьютере. Далее вам потребуется настроить контейнер GitLab, что будет предметом следующей статьи.
Содержание
- Как установить GitLab на Windows
- Загрузка и установка Git
- Установка и запуск PostgreSQL
- Установка Ruby и RubyGems
- Установка GitLab
Как установить GitLab на Windows
GitLab представляет собой платформу для управления исходным кодом, которая позволяет командам программистов эффективно сотрудничать в создании и разработке проектов. В этом руководстве мы рассмотрим пошаговую процедуру установки GitLab на операционную систему Windows.
- Скачайте установочный файл GitLab с официального сайта по адресу https://about.gitlab.com/install/#windows.
- Запустите установочный файл GitLab.
- Выберите путь установки GitLab на вашем компьютере.
- Нажмите «Установить», чтобы начать процесс установки.
- Дождитесь завершения установки GitLab на вашем компьютере.
- После завершения установки, запустите GitLab и выполните необходимую настройку.
- Откройте веб-браузер и перейдите по адресу «http://localhost:8080», чтобы проверить работу GitLab.
- Войдите в систему GitLab, используя учетные данные, созданные в процессе установки.
Теперь у вас установлен и готов к использованию GitLab на вашем компьютере под управлением операционной системы Windows. Не забудьте изучить дополнительные инструкции по использованию GitLab, чтобы узнать о его возможностях и функциях.
Загрузка и установка Git
Для установки Git на Windows вам понадобится скачать исполняемый файл установщика с официального сайта Git.
- Откройте браузер и перейдите на страницу загрузки Git по адресу: https://git-scm.com/downloads.
- На этой странице вы увидите список доступных версий Git для различных операционных систем. Вам нужно выбрать версию для Windows и нажать на соответствующую ссылку загрузки.
- Когда загрузка завершится, найдите скачанный файл установщика в папке загрузок на вашем компьютере и запустите его.
- В процессе установки вам будут предложены различные параметры для настройки Git. Оставьте их по умолчанию или настройте по своему усмотрению.
- После завершения установки Git проверьте, что он успешно установлен, открыв командную строку (нажмите Win + R и введите «cmd», затем нажмите Enter) и введите команду «git —version». Если вы видите версию Git, значит он был успешно установлен.
Поздравляю! Теперь у вас установлен Git, и вы готовы перейти к установке GitLab.
Установка и запуск PostgreSQL
- Перейдите на официальный веб-сайт PostgreSQL по адресу https://www.postgresql.org/download/windows/.
- Выберите нужную версию PostgreSQL, в зависимости от вашей операционной системы Windows.
- Загрузите установочный пакет PostgreSQL.
- Запустите загруженный установочный файл и следуйте инструкциям мастера установки.
- На странице выбора компонентов установки, убедитесь, что выбраны все компоненты, необходимые для функционирования PostgreSQL.
- На странице выбора расположения установки, выберите путь, куда будет установлена PostgreSQL.
- На странице выбора пароля для суперпользователя (пользователя «postgres»), введите и подтвердите пароль и запомните его.
- После завершения установки, PostgreSQL будет автоматически запущен в качестве службы.
- Для проверки успешной установки и запуска PostgreSQL, откройте командную строку Windows и выполните следующую команду:
psql -U postgres. Если вы видите приглашение командной строки PostgreSQL, значит установка прошла успешно.
Поздравляю! Теперь у вас установлена и запущена PostgreSQL на вашей операционной системе Windows. Вы можете начать использовать PostgreSQL для создания, управления и обработки баз данных.
Установка Ruby и RubyGems
Прежде чем установить GitLab на Windows, необходимо установить Ruby и RubyGems.
Шаги для установки Ruby и RubyGems:
- Перейдите на официальный сайт Ruby (https://www.ruby-lang.org/en/downloads/) и скачайте установочный файл Ruby для Windows.
- Запустите скачанный установочный файл и следуйте инструкциям мастера установки.
- Выберите путь установки Ruby (рекомендуется использовать значение по умолчанию) и установите Ruby на ваш компьютер.
- После установки Ruby, откройте командную строку и введите команду «ruby -v», чтобы убедиться, что Ruby успешно установлен.
- Перейдите на официальный сайт RubyGems (https://rubygems.org/pages/download) и скачайте последнюю версию RubyGems.
- Распакуйте скачанный архив RubyGems и откройте командную строку в папке с распакованными файлами.
- Введите команду «ruby setup.rb» для установки RubyGems.
- После установки RubyGems, введите команду «gem -v», чтобы убедиться, что RubyGems успешно установлен.
Поздравляю! Теперь у вас установлены Ruby и RubyGems, и вы готовы приступить к установке GitLab на Windows.
Установка GitLab
Для установки GitLab на операционную систему Windows требуется выполнить следующие шаги:
| Шаг 1: | Скачайте установочный файл GitLab с официального сайта. |
| Шаг 2: | Запустите установочный файл и следуйте инструкциям мастера установки. |
| Шаг 3: | Выберите путь установки GitLab на вашем компьютере. |
| Шаг 4: | Выберите компоненты, которые вы хотите установить (по умолчанию выбраны все необходимые компоненты). |
| Шаг 5: | Выберите пункт «Local user account» для создания нового аккаунта пользователя GitLab или «Domain user account» для использования существующего аккаунта пользователя. |
| Шаг 6: | Введите имя пользователя и пароль для нового аккаунта пользователя GitLab (если применимо) и нажмите «Next». |
| Шаг 7: | Настройте порты, на которых будет работать GitLab, и нажмите «Next». |
| Шаг 8: | Выберите пункт «Install GitLab now» для начала установки или «Customize» (настраиваете настройки перед установкой) и нажмите «Next». |
| Шаг 9: | Нажмите «Install» и дождитесь завершения установки GitLab. |
| Шаг 10: | После завершения установки нажмите «Finish» и перезагрузите компьютер для применения изменений. |
После выполнения этих шагов у вас будет установлен GitLab на вашем компьютере с операционной системой Windows.
Search code, repositories, users, issues, pull requests…
Provide feedback
Saved searches
Use saved searches to filter your results more quickly
Sign up
In the last article, we saw the various parts of GitLab, its architecture and how GitLab works. If you haven’t already, I suggest reading the previous article first before reading this one. Here is the link
GitLab, A Complete Beginner’s Guide!
In this article lets look at how to set it up locally on your Windows PC, so that you can have your very own GitLab setup running right at your home or organization!
If you are using Mac or Linux, you can follow the links below.
Complete Guide To Setting Up GitLab Locally On Mac.
Complete Guide To Setting Up GitLab Locally On Linux PC..!!
So let’s begin!
Things you will need
All you need are a computer running Windows OS with enough resources (CPU, memory, and disk space) for running the GitLab Server and GitLab Runner. How much resources is enough depends on how much performance you need, the more you have the better it is!
You can also set it up on the cloud over at Gitlab.com, but
- the free plans have some limitations in terms of processing power and hard disk space.
- Also doing it locally gives you more control over the setup and
- it will also be an opportunity to learn you more about GitLab
Hence I suggest taking this route of a local installation.
If you are part of a larger organization, and you wish to install it on the cloud, then you can always take a look at the paid plans of GitLab here link
Approach to install GitLab on Windows
Okay, let’s get back to the task in hand.
As we saw in the previous article GitLab consists of 2 parts.
- GitLab Server and
- GitLab Runner
Also, we have learned in the previous article that it is preferable to set the GitLab server and runners on separate computers. But I am going for a home set up, so I will be setting them both upon the same Windows computer.
The GitLab Server relies heavily on Linux technologies and hence it cannot be installed in our Windows PC natively. If you do some research, there are ways you can do it through the Linux subsystem in windows, but we are not going to take that approach.
The
problem with these workarounds are
- The installation process is a bit complicated and is not recommended for beginners.
- They are only guaranteed to work on a version to version basis. What I mean by that is you need to have a particular version of Windows and a particular version of GitLab for everything to run smoothly. If you update your Windows or if you wish to upgrade your GitLab then you might break your GtiLab set up. Since both Windows and GitLab updates come frequently, it is not such a good idea to waste time trying to fix things every few months.
- It is unofficial and hence support for future versions cannot be guaranteed.
- These unofficial methods will bring their own limitations as opposed to running natively on Linux
Due to these above reasons, we are going to go for a more stable approach of installing the GitLab server in a virtual environment. We will also see in this article the ways to make it run as smoothly and efficiently as possible while making sure it consumes as few resources as possible.
So this
is what we are going to do
- Install the GitLab Server on a Virtual Box running Ubuntu server
- Install GitLab runner natively on Windows.
This approach takes away the cons of using unofficial hacks, as it will work on all versions of you Windows and GitLab and you don’t need to worry too much while updating your software either!
By following the step by step guide shown below you should be able to set everything up and running in an hour or 2 (depending upon how good your internet connection is, it can take longer!)
GitLab Installation Process
STEP#1: Download and install VirtualBox
You can download and install VirtualBox from this link
Just click on the Windows hosts and the download should start automatically. The installation process is pretty straightforward, you can just accept the default options and click through to complete the process.
Once the installation is completed you can open VirtualBox from the Start menu in Windows.
STEP#2: Install Ubuntu Server as a Virtual Machine in your Windows PC.
The next step is to get a Linux distro to install our GitLab server. For this purpose, I recommend Ubuntu Server. I chose this particular distro for 2 reasons.
- Ubuntu is known for its stability.
- GitLab Server software has support for Ubuntu
- The server edition is chosen so that it will consume fewer resources on your computer.
For this first, you need the Ubuntu Server image. You can download it from this link.
Ubuntu usually offers 2 sets of packages for us to choose from.
- Long term support version: Has a support period of 5 years
- Latest Version: has all the latest features.
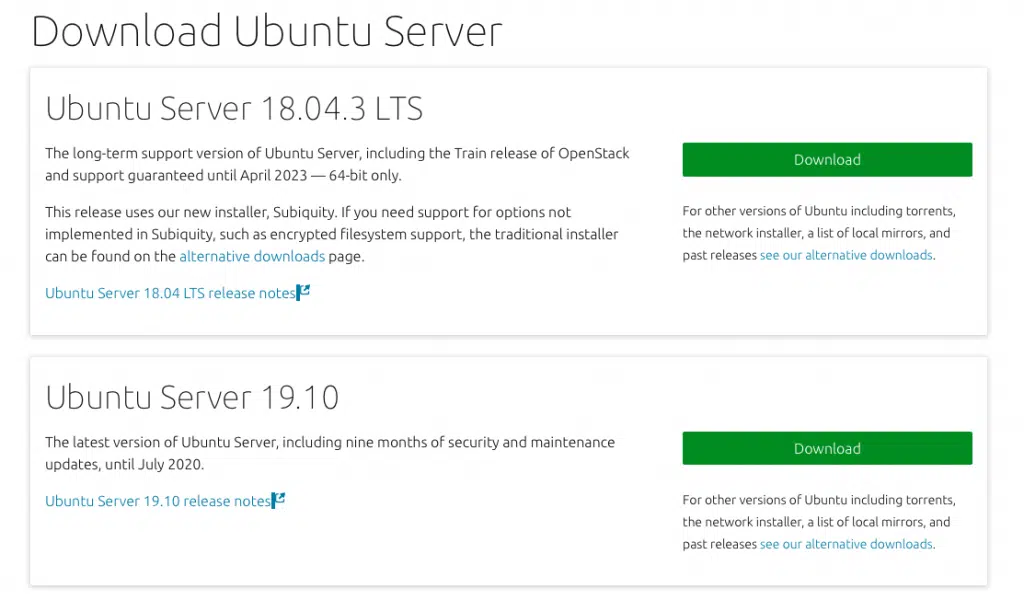
I suggest you go for the LTS one, but then the latest version should also work just fine. So click on a “Download” button and your download should start automatically. It will take some time to complete as the iso is around 900MB.
Once the download is complete you can proceed to the installation process on VirtualBox.
STEP#3: Install Ubuntu Server on VirtualBox
Open VirtualBox Application and click on the “New” button

A window like this should pop up
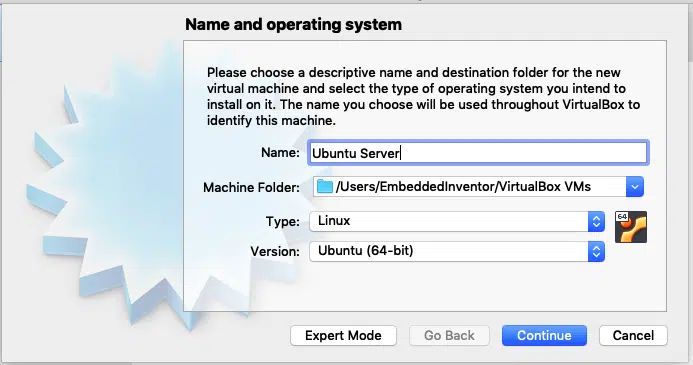
Give your virtual machine a name and choose Linux for type and ubuntu 64 bit for version and click “Continue”.
The next screen usually asks for RAM. GitLab recommends 8GB for a GitLab system with 100 users, I suggest a minimum of 2GB RAM for a home set up, you can give more if you can, just make sure you don’t allot more than 50% of your total available RAM.
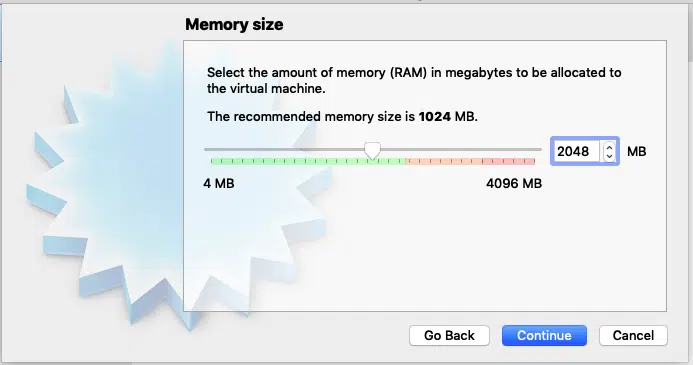
Once you have allocated RAM space, Click “Continue” to the next page.
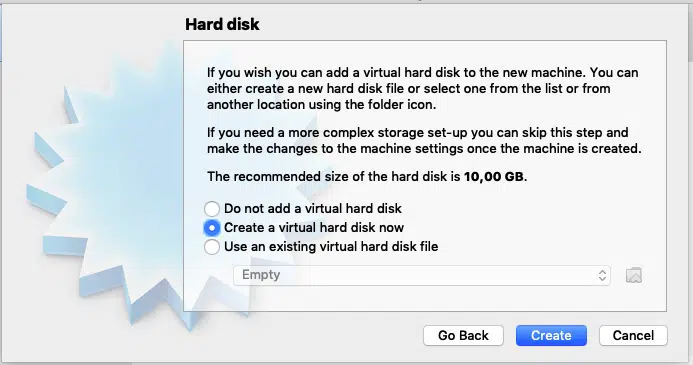
Next, you will be prompted for hard disk. Make sure “Create a virtual hard disk now” is selected and click “Create”
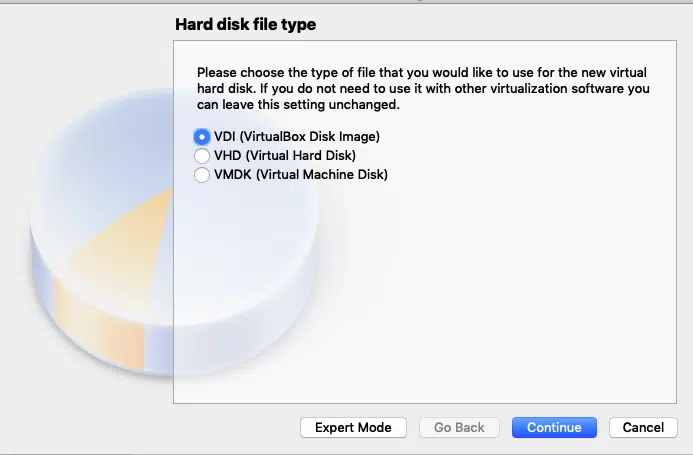
Accept
the default “VDI (VirtualBox Disk Image)” and click
“Continue”
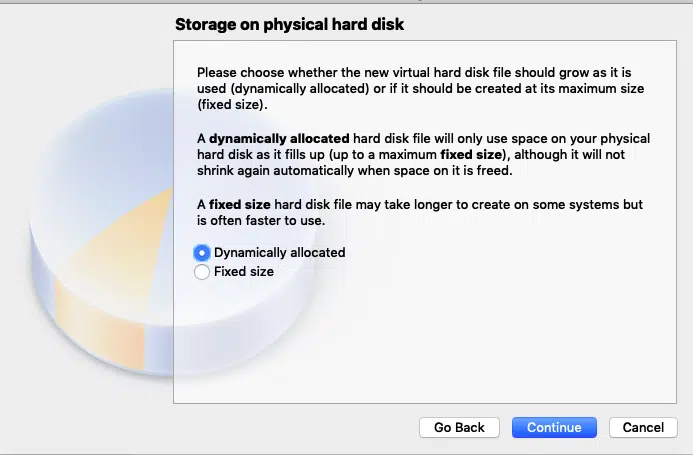
Accept “Dynamically Allocated” and Press continue. This option allocates hard disk space to the virtual machine on the run, so that as you use the more space, more will be allocated.
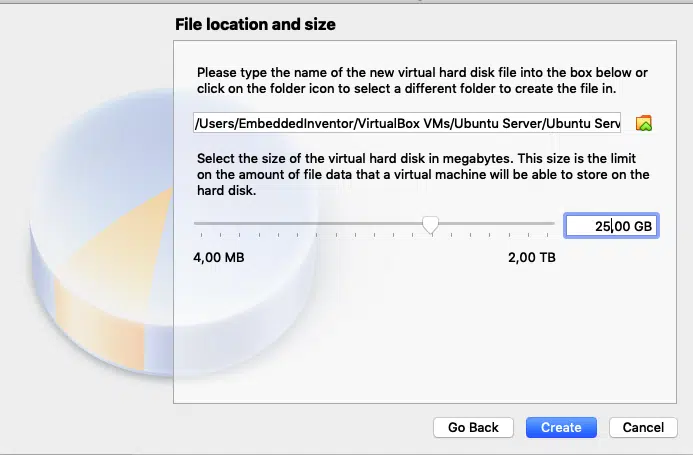
I suggest you allocate at least 25GB of space to the virtual machine, you can allot more if you can. Once you have chosen the disk space click create
Once you have done this, you should be taken back to the main window of VirtualBox and you should see the virtual machine you just created on the left pane of the window as shown in the screenshot below.

Next click on the “Settings”

And click on storage -> empty -> disk icon -> “Choose a disk file”

Select the ubuntu server iso image you have just downloaded and press ok. This is equivalent to inserting the Ubuntu disk in a real machine.

Next, go to settings->Network and choose “Bridged Adapter” in the “Attached to:” drop-down menu and press “OK”
I have explained the reason behind using these network settings in detail in this article, you can go ahead and read that if you are into computer networks.
The short explanation is, we will not be able to access the GitLab server from our other machines on the network unless we choose this option.
That’s it, the configuration is done!
You can now go ahead and click the start button!

Now the installation process will start. Since we have chosen to go with “Ubuntu server” in order to minimize the resource consumption (so that GitLab can take up as many resources as it needs) we don’t get a fancy Graphical UI, like in the desktop version of Ubuntu. You need to navigate the menus during installation only using Keyboard (tab, enter and arrow keys) since the Ubuntu server doesn’t come with mouse support. So go through the process and get it done.
STEP#4: Get the IP address of your ubuntu server
Okay now
once you got the Ubuntu server up and running, you need to find its IP address
and make a note of it.
To do that, use the “ifconfig” command on your Ubuntu server’s terminal

STEP#5: Download and install GitLab server
To download GitLab server, go to the official link on the Gitlab’s Website
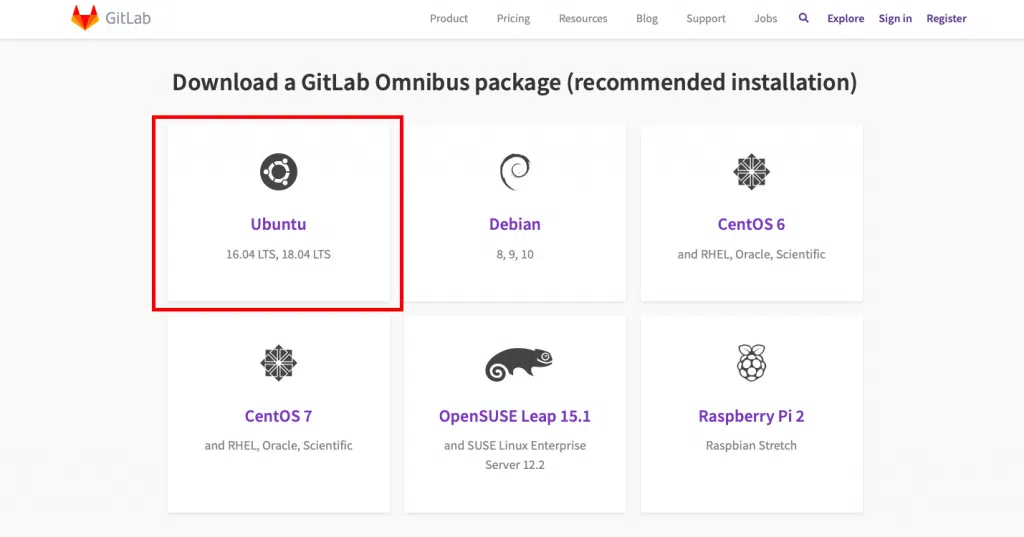
As you can see GitLab official supports several Linux distros, even a Raspberry Pi 2’s Raspbian! We are interested in Ubuntu, so click on the Omnibus Ubuntu Link on as shown in the screenshot above.
Once you click on Ubuntu, the commands you need to enter to install GitLab server will be shown to you.
I am not showing each instruction here since GitLab updates the information presented on their website all the time and that can make this section of the article outdated. Just follow the step by step instructions given in the link to install the GitLab Server on your VM.
Just type in the commands shown there on you Ubuntu server’s terminal one by one to get GitLab Server installed.
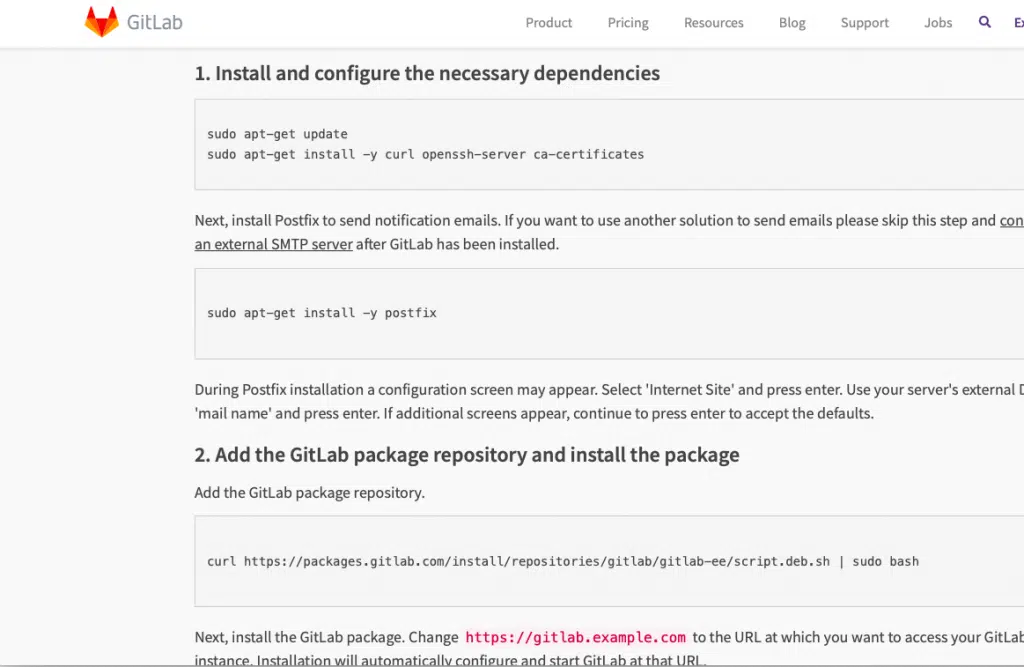
A couple of tips on the GitLab installation instructions
Tip#1
In the postfix installation step (step 1 last command on the GitLab website)
sudo apt-get install -y postfix
you can skip the mail option by choosing the “no configuration” option as shown in the screenshot below.

Tip#2
In the last command of step 2 at GitLab website
sudo EXTERNAL_URL="https://gitlab.example.com" apt-get install gitlab-ee
Make sure you replace the URL with the IP address of the VM that we have made a note of in Step 5 above like this
sudo EXTERNAL_URL="192.168.0.116" apt-get install gitlab-ee
Or to be more precise just place the VM’s IP address that we obtained in Step#4 in its appropriate place
sudo EXTERNAL_URL=”<Your VM’s IP address>” apt-get install gitlab-ee
This step will take a while, so be patient. In my machine it took 4 minutes 48 seconds as shown in the screenshot below, yours can vary depending on the processing power it has.
Once done it will show u something like in the screenshot below.

Once it’s done, you can go ahead to your favorite browser and type in the IP address of your VM and check if the installation has succeeded.

And voila! GitLab server installation has succeeded!
Go ahead and follow the onscreen instructions to set up your password, accounts and everything else!
STEP#6: Download GitLab runners
Before installing GitLab runners you need to install Git on your Windows PC. You can download the latest version of Git in this link.
Now that we have set up the Gitlab server and Git, the next step is to set up the GitLab runner!
At the time of writing this article, the installation process goes like this:
Make a folder on your computer and go to either this link for 32bit version or this link for 64bit version to download the binaries and put them in the folder you created
For getting the most up to date instruction, I am gonna ask you to follow the process given in the GitLab website
STEP#7: Connect the GitLab server to the GitLab runner
GitLab
calls this process of connecting the Server to Runner as “Registering the
GitLab Runner to the Server”
You can follow the instructions for Windows in this link to do the same.
Scroll down to the windows section and you will see something similar to this

Step# 7.1: Start the registration process
To enter these commands you need to open a command prompt with administrator privileges. For this just type cmd on the search menu, right-click on Command prompt and choose run as administrator

After that, just go to the folder to which you have downloaded the Gitlab Runner to and copy the path to that folder

Next, go back to the command line and give the following command
cd <path you copied>
Run the following command to start the registration process
gitlab-runner-windows-amd64.exe register

As shown in the screenshots above, enter your Virtual Machine’s IP address when prompted. Make sure you add “http://” before the IP address.
Once the IP address is entered, the next prompt appears asking you to enter a token, so let’s first go get a token from our GitLab server.
Step#7.2: Obtain token from GitLab Server
Go to your browser and enter the GitLab Server’s IP address. Once you have logged in you can create your first project by clicking on the respective pane as shown in the screenshot below.
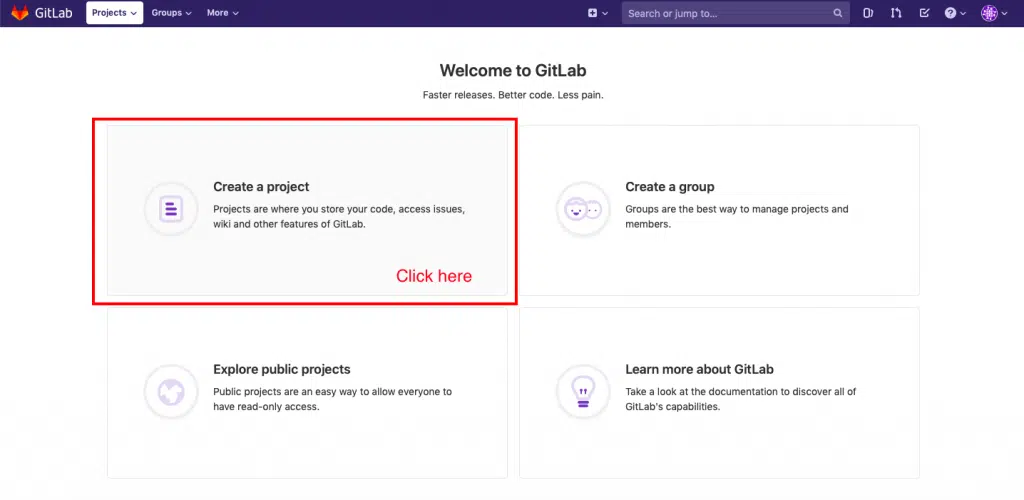
Just give the project a name and click on the create project button. The other field should get populated automatically.

Once you click the button as shown in the screenshot above, you will be taken to your project page.
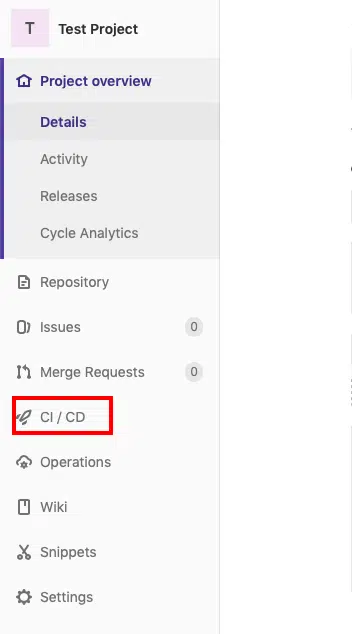
From there just click on Settings->CI/CD and scroll down a bit and click the “Expand” button next to “Runners” and you will find the token you need as shown in the screenshot below.

This token basically connects your project on the GitLab Server to the GitLab runner.
Step#7.3: Enter the token
Now that we have the token let’s enter it on the Command prompt

Once
entering the token, you will be prompted to give the runner a description, go
ahead and do that.
After that, you will be asked to enter some tags.
What are tags? Why are they needed for GitLab runners?
The
better term for tags can be capabilities.
Consider
this scenario.
Assume you are working in a large team of 1000 developers, who are doing say 50 different projects and your GitLab system has 100 different runners set up with several capabilities to do specific tasks. Some projects may need C compilers, while others may need python interpreters.
Now in order to connect a given project with a free-runner, we need some sort of parameter to tell the GitLab server that this particular free runner is capable of running the scripts needed for that particular job.
This is where tags come into the picture. By giving tags like “C” or “Python” a single runner can be connected to multiple projects and a single project can execute its jobs on several runners to ensure the best possible performance.
Using
these tags the Gitlab server can find a runner with the specific capability to
use for a given job. So give some suitable tags that will imply the
capabilities of your runner.
Once that is done, you will be prompted to enter “executor”.
Executors are programs that run our CI/CD scripts. Type shell and press enter

This will end the registration process the Runner to the server
Once registered you can start the GitLab runner as a Service (background task) by issuing the commands
gitlab-runner-windows-amd64.exe install
gitlab-runner-windows-amd64.exe start

As you can see in the screenshot below, in the task manager app we can see that our gitlab-runner service is running!

Test to see if everything works
By following the 7 steps above, you should have a set up with GitLab Server and Runner running on your system. Its time to test and see if everything works the way it is supposed to work!
First, let’s test the GitLab server by creating a repo and pushing it to the server.
Testing GitLab Server
STEP#1: Make a test git repo
Let’s make a simple git repo on a new folder on our Desktop and push it to the GitLab server.
So open your Git-Bash app, which got installed as you were installing git.

Once opened type in the following commands
cd
cd Desktop
mkdir test_project
cd test_project
touch test.c
The above lines of command are just the fancy way of creating a folder named test_project on your Desktop and a file named test.c inside it. You can also do it through the Graphical User Interface if you want to.
So next, please open the C file using your favorite text editor and type in a simple program for testing, something like the following.
#include <stdio.h>

int main()
{
	printf("Hello Embedded Inventors!");
	return 0;
}
Next, let’s initialize a git repository on our test_project folder. So go back to the terminal cd into the test_project folder and type in the following command
You should receive a reply saying “Initialized empty Git repository”
STEP#2: Push it to the server
Now that we have our git repo ready, let’s push it to our git server. To do that login to your GitLab and go to the project we created earlier. There GitLab shows us the commands needed to push our repo to the server.
First, let’s configure our name and email on the git repository to the ones set on the GitLab server
So enter
the following command.
git config --global user.name "<enter your name here>"
git config --global user.email "<enter your email here>"
Next, we need to connect our server and our repository. To do that just enter the following commands
git remote add origin <your project URL>.git
In my case it is
git remote add origin http://192.168.0.115/EI/test-project.git
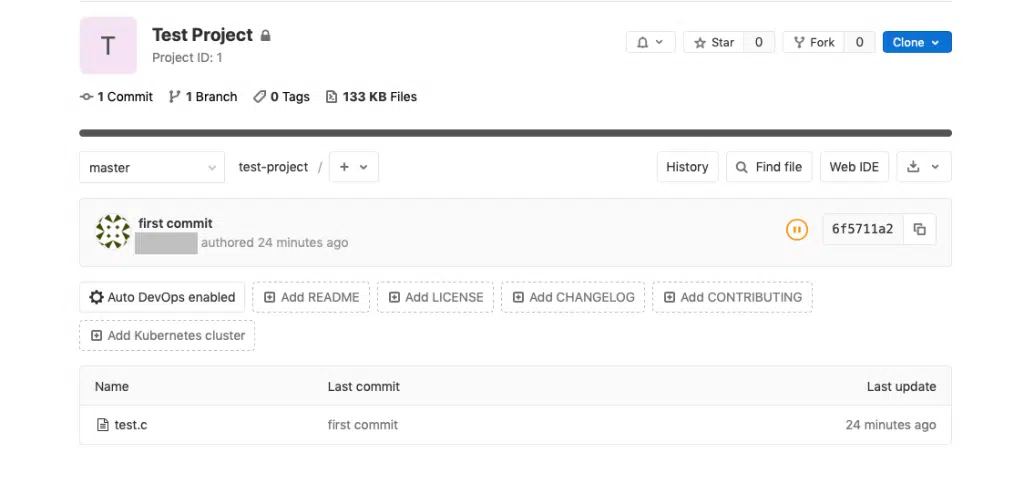
To find your project URL, just copy the address bar of your browser while you are on your project’s page in GitLab
![]()
Then add our test.c file and commit the changes using the following commands
git add .
git commit -m"first commit"
Then push
your git repo onto the GitLab using the command
git push -u origin master
You will be prompted to enter the user name and password of your GitLab account, once done go to your browser and just refresh the page and you should be able to see your test project page in GitLab!
Testing GitLab Runner
STEP#3: Make a simple bash script to build the test.c
file
Create a bash script on your project folder
cd
cd Desktop/test_project
touch build.ps1
Edit it so that it looks something like this
gcc test.c -o test
echo "Build completed"
STEP#4: Create and edit .gitlab_ci.yml to run the
above script
What is .gitlab-ci.yml and why it is needed? This is the file that contains the instructions for the GitLab runners to execute the CI/CD tasks. It should be present in the project’s root folder. It can be used to test if a commit builds correctly, passes some unit tests and if it needs packaging and deployment.
You can
learn more about how to configure it from the official quick start tutorial
here
For the
purpose of testing our installation let’s create a file named .gitlab-ci.yml in
the test_project folder and put the following lines in there.
Make sure you are in the right directory
cd
cd Desktop/test_project
Create the file using the command
Open it with your favorite text editor and type the following lines into it.
build:
  script:
    - powershell -File build.ps1
  tags:
    - test
The last line tells the GitLab server to use the GitLab runner with the tag named “test”. If you gave your GitLab runner installation a different tag, make sure you make the appropriate change to the above lines.
Also,
make sure you use spaces instead of tabs at the beginning of the above lines.
Now add it to the git repository and push it to the Gitlab server
git add .
git commit -m"gitlab yml added"
git push
Now let’s get back to our GitLab server’s URL and see if it worked. Go to the project page and click on CI/CD
You will
be taken to the pipeline page which shows the result of your latest commit.

It will
take a minute or so before it completes the pipeline and as you can see in the
screenshot above, mine took 41 seconds to complete and the status is
“passed”
If you
click on “jobs” under the CI/CD menu, you will be taken to another
page which shows you more information about the execution of our yml file
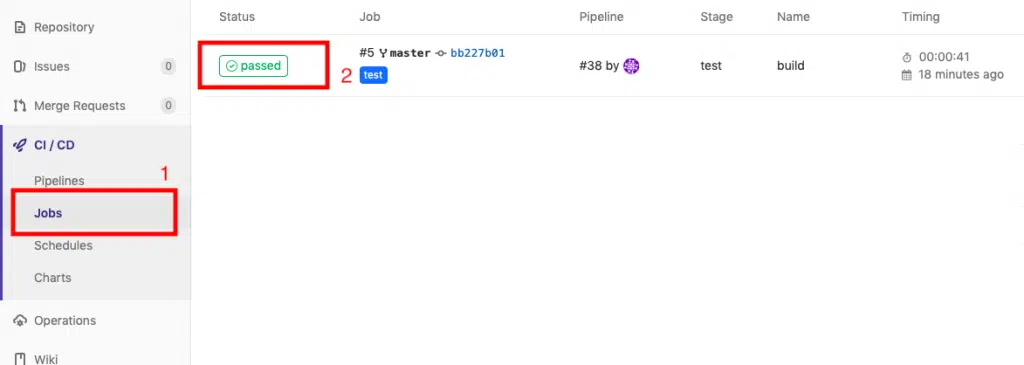
Next click on “passed” as shown in the screenshot above, this will take you to another page which will look something like this.

As you can see, our build.ps1 gets executed by the GitLab runner and it succeeds to compile our project.
And with that, I will conclude this tutorial!
I leave the rest to you to play, explore, experiment and learn GitLab!
I hope you guys enjoyed this article and learned something useful.
You can email us or contact us through this link if you have any questions or suggestions.
If you liked the post, feel free to share this post with your friends and colleagues!
Как установить Gitlab в Windows? Первая же ссылка в поисковике дала ответ: Самый легкий способ установить Gitlab в Windows-е — это установить виртуальную машину Linux и уже там установить Gitlab. Пост был опубликован на официальном форуме Гитлаба. Автор кажется не шутить? Хм… А есть ли все таки способ?
Обратимся к официальной документации. Раздел требования https://docs.gitlab.com/ee/install/requirements.html , где есть список поддерживаемых ОС.
- Ubuntu
- Debian
- CentOS
- openSUSE
- Red Hat Enterprise Linux (please use the CentOS packages and instructions)
- Scientific Linux (please use the CentOS packages and instructions)
- Oracle Linux (please use the CentOS packages and instructions)
Что там написано про Windows?
Microsoft Windows
GitLab is developed for Linux-based operating systems. It does not run on Microsoft Windows, and we have no plans to support it in the near future. For the latest development status view this issue. Please consider using a virtual machine to run GitLab.
То есть,
Gitlab разрабатывался для Linux-based ОС. Оно не запуститься на Windows и у нас нет планов на поддержку этой ОС в ближайшее время. Следить за ходом разработки можете по ссылке. Если хотите запустить на Windows используйте виртуальную машину.
Вот те на… Но постойте, есть же Докер, философия которой заключается как раз в кросс платформенной доставке продукта. Даже есть целый раздел посвязенной установке через Docker https://docs.gitlab.com/omnibus/docker/README.html
Вот только если попытаться запустить на Windows вот этот конфиг:
|
1 2 3 4 5 6 7 8 9 10 11 12 13 14 15 16 17 |
web: image: ‘gitlab/gitlab-ce:latest’ restart: always hostname: ‘gitlab.example.com’ environment: GITLAB_OMNIBUS_CONFIG: | external_url ‘http://gitlab.example.com:8929’ gitlab_rails[‘gitlab_shell_ssh_port’] = 2224 ports: — ‘8929:8929’ — ‘2224:22’ volumes: — ‘/srv/gitlab/config:/etc/gitlab’ — ‘/srv/gitlab/logs:/var/log/gitlab’ — ‘/srv/gitlab/data:/var/opt/gitlab’ |
получите ошибку
|
Error executing action `run` on resource ‘ruby_block[directory resource: /var/opt/gitlab/git-data]’ |
Эта ошибка не нова, обсуждение ее началось два года назад, а может и более. Есть большая дискуссия на эту тему по этой ссылке
https://gitlab.com/gitlab-org/omnibus-gitlab/issues/2280
Сотни людей столкнулись с одним и тем же.
В чем же проблема?
Суть проблемы в самом докере для Windows. Во время установки Gitlab-a Chef скрипт пытается удостовериться что каталог принадлежит пользователю git:git, вместо этого получает none. Потому что, после монтирования, каталогу присваивается UID 0 : GID 0 755 unix file permissions, который невозможно изменить внутри контейнера
Обсуждение данной проблемы можно прочитать по ссылке
https://github.com/docker/for-win/issues/2042
Корень проблемы заключается в архитектурных различиях ФС Windows и вряд ли решится в ближайшее время. Протокол SMB/CIFS не поддерживает расширенные права для файлов.
Значит пора ставить виртуальную машину?
Скорее всего, автор этого топика https://forum.gitlab.com/t/how-to-install-gitlab-on-windows/32 прав и самый легкий способ установки — это поставить виртуальную машину. Ведь недаром Windows официально даже не поддерживается.
Но! Если нужно, то можно взять вот такой конфиг и…
|
1 2 3 4 5 6 7 8 9 10 11 12 13 14 15 16 17 18 19 20 21 22 23 24 |
version: «3.2» services: web: image: ‘gitlab/gitlab-ce:latest’ hostname: ‘gitlab.example.com’ restart: always environment: GITLAB_OMNIBUS_CONFIG: | external_url ‘https://gitlab.example.com’ # Add any other gitlab.rb configuration here, each on its own line ports: — 80:80 — 443:443 — 22:22 volumes: — ./gitlab/config:/etc/gitlab — gitlab—logs:/var/log/gitlab — gitlab—opt:/var/opt/gitlab volumes: gitlab—opt: gitlab—logs: |
Предварительно создав volumes вручную, и …
|
docker volume create gitlab—opt docker volume create gitlab—logs |
И вуаля после всех операции видим приветственное сообщение от Gitlab
ошибка letsencrypt_certificate[gitlab.example.com] (letsencrypt::http_authorization) had an error. что делать?
Нужно отключить Lets Encrypt. Финальный конфиг будет выглядит так
|
1 2 3 4 5 6 7 8 9 10 11 12 13 14 15 16 17 18 19 20 21 22 23 24 25 |
version: «3.2» services: web: image: ‘gitlab/gitlab-ce:latest’ hostname: ‘gitlab.example.com’ restart: always environment: GITLAB_OMNIBUS_CONFIG: | external_url ‘http://gitlab.example.com’ # Add any other gitlab.rb configuration here, each on its own line letsencrypt[‘enabled’] = false ports: — 80:80 — 443:443 — 22:22 volumes: — ./gitlab/config:/etc/gitlab — gitlab—logs:/var/log/gitlab — gitlab—opt:/var/opt/gitlab volumes: gitlab—opt: gitlab—logs: |
Найдите два отличия 😉 Естественно не забудьте добавить домен gitlab.example.com в etc/hosts
Заключения
Как мы поняли установка Gitlab on Windows подходит только для экспериментальных целей или для тестирования новых фичей. Сами основатели предупреждают об отсутствии поддержки на Windows, поэтому использование в боевых целях не рекомендуется. Намного проще и дешевле будет поднять машину на Линуксе, хоть локально, хоть в облаке.
Кстатит, все работы проводились на версии Docker for Windows 18.06.1
GitLab — это платформа для управления и хранения исходного кода, которая предоставляет гибкую и мощную систему контроля версий. Она позволяет командам разрабатывать программное обеспечение, сотрудничать друг с другом, отслеживать изменения всех файлов и эффективно управлять проектами. Эта статья предоставит подробную инструкцию по установке GitLab на операционной системе Windows.
Перед установкой GitLab на Windows, вам понадобятся некоторые предварительные условия. Во-первых, убедитесь, что ваша операционная система Windows поддерживается. GitLab поддерживает Windows 7 и выше. Во-вторых, установите и настройте Git на вашем компьютере. Git — это система контроля версий, которая является неотъемлемой частью GitLab.
После выполнения этих предварительных условий, вы можете приступить к установке GitLab на Windows. Сначала загрузите установочный файл GitLab с официального сайта. Затем запустите установочный файл и следуйте инструкциям мастера установки. Мастер установки попросит вас указать путь установки GitLab и настроить базу данных. Вы можете выбрать SQLite, MySQL или PostgreSQL в качестве базы данных для GitLab.
После завершения установки GitLab будет доступен по указанному адресу веб-браузера. По умолчанию порт 80 используется для доступа к GitLab, но вы можете настроить другой порт при установке. Вам будет предложено создать учетную запись администратора GitLab, которая позволит вам управлять пользователями, проектами и настройками GitLab. После создания учетной записи администратора вы сможете начать использовать GitLab на Windows.
Содержание
- Установка GitLab на Windows: подготовка к работе
- Создание учетной записи GitLab на Windows
- Установка GitLab на Windows: загрузка инсталлятора
- Установка GitLab на Windows: запуск инсталлятора
- Конфигурация GitLab на Windows: создание администраторской учетной записи
- Настройка GitLab на Windows: подключение к базе данных
- Запуск GitLab на Windows: проверка работоспособности
Установка GitLab на Windows: подготовка к работе
Перед установкой GitLab на Windows необходимо выполнить ряд подготовительных шагов:
- Убедитесь, что ваш компьютер соответствует системным требованиям для установки GitLab. Подробную информацию о системных требованиях можно найти на официальном сайте GitLab.
- Установите на своем компьютере последнюю версию Git for Windows. GitLab требует наличия установленного Git для корректной работы.
- Установите на своем компьютере Ruby. GitLab использует Ruby для выполнения некоторых задач.
- Установите на своем компьютере Bundler. Bundler – это менеджер зависимостей для проектов Ruby. Он необходим для установки и управления зависимостями GitLab.
- Создайте новую пустую папку, в которой будет располагаться GitLab. Рекомендуется создать папку на системном диске (например, C:\GitLab).
После выполнения этих подготовительных шагов вы готовы приступить к установке GitLab на Windows.
Создание учетной записи GitLab на Windows
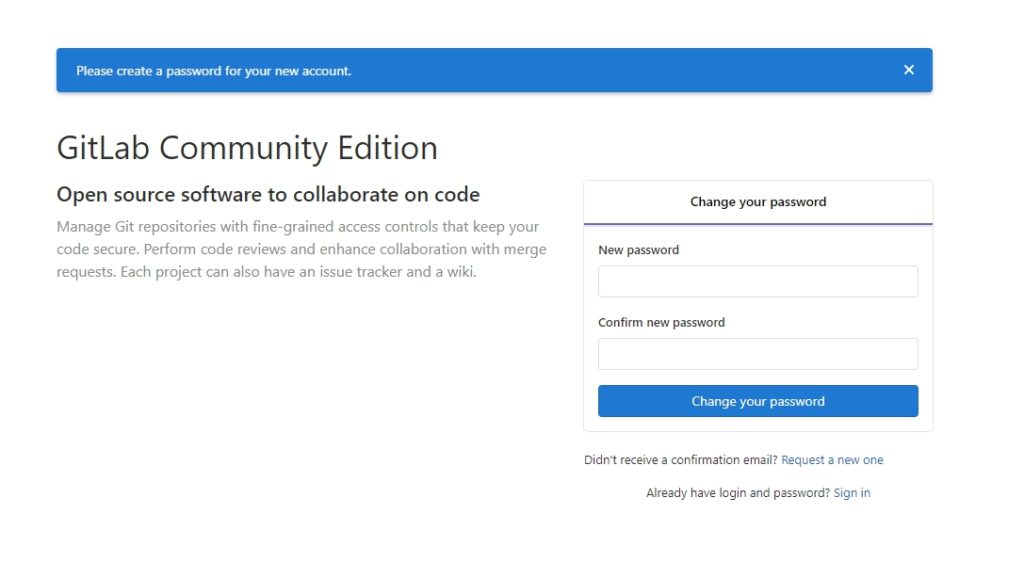
Прежде чем начать использовать GitLab на Windows, вам понадобится учетная запись. В этом разделе мы рассмотрим процесс создания учетной записи GitLab на Windows.
1. Откройте веб-браузер и перейдите на сайт GitLab по адресу https://gitlab.com.
2. Нажмите на кнопку «Зарегистрироваться», расположенную в верхнем правом углу страницы.
3. В открывшейся форме регистрации введите свой электронный адрес и пароль. Придумайте надежный пароль, который будет сложно угадать. Для усиления безопасности рекомендуется использовать комбинацию букв верхнего и нижнего регистров, цифр и специальных символов.
4. Подтвердите пароль, повторно вводя его в соответствующее поле.
5. Прокрутите страницу ниже и примите условия использования GitLab, отметив соответствующую галочку.
6. Нажмите на кнопку «Создать учетную запись», чтобы завершить процесс создания учетной записи GitLab.
7. После успешного создания учетной записи GitLab вам будет предложено подтвердить свой электронный адрес, перейдя по ссылке, отправленной на указанный вами электронный адрес.
8. После подтверждения адреса вы сможете войти в свою учетную запись и начать использовать GitLab для управления проектами и хранения кода.
Установка GitLab на Windows: загрузка инсталлятора
Для установки GitLab на Windows следуйте следующим шагам:
- Откройте веб-браузер и перейдите на официальный веб-сайт GitLab по адресу https://about.gitlab.com/install/.
- На странице загрузки выберите версию GitLab Community Edition (CE) для Windows и нажмите на кнопку «Загрузить» или «Download».
- Когда загрузка завершится, найдите скачанный инсталлятор GitLab на вашем компьютере (обычно это файл с расширением .exe) и запустите его двойным щелчком мыши.
- В появившемся окне установщика GitLab следуйте инструкциям установщика для выбора папки назначения и других настроек. Обычно рекомендуется оставить значения по умолчанию.
- После того, как установка завершится, GitLab будет готов к использованию на вашем компьютере.
Поздравляю! Теперь вы можете начать использовать GitLab для управления своими репозиториями и работы с кодом.
Установка GitLab на Windows: запуск инсталлятора
Для установки GitLab на операционную систему Windows, вам понадобится загрузить инсталлятор и запустить его. В этом разделе мы рассмотрим, как это сделать.
1. Перейдите на официальный сайт GitLab и найдите страницу загрузки для Windows.
2. На странице загрузки для Windows найдите ссылку для скачивания инсталлятора. Обычно она обозначена как «Download Latest» или «Download Now». Щелкните по этой ссылке, чтобы начать загрузку.
3. Когда загрузка инсталлятора завершена, найдите загруженный файл на вашем компьютере. Обычно он сохраняется в папке «Загрузки».
4. Дважды щелкните по загруженному файлу инсталлятора. Если у вас появляется системное предупреждение безопасности, подтвердите, что вы хотите запустить файл.
5. В открывшемся окне инсталлятора следуйте указаниям мастера установки. Вам может потребоваться принять лицензионное соглашение, выбрать папку для установки и настроить другие параметры.
6. Когда установка завершится, вы увидите сообщение о успешной установке GitLab. Теперь у вас есть возможность запустить GitLab и начать его использование.
В этом разделе мы рассмотрели, как загрузить и запустить инсталлятор GitLab на операционной системе Windows. Теперь вы готовы приступить к настройке GitLab и использованию его функций.
Конфигурация GitLab на Windows: создание администраторской учетной записи
После успешной установки GitLab на Windows необходимо создать администраторскую учетную запись для управления сервером и управления проектами. В этом разделе будет описано, как создать администраторскую учетную запись на GitLab.
- Откройте веб-браузер и введите адрес «http://localhost» в адресной строке.
- На главной странице GitLab найдите ссылку «Регистрация» и нажмите на нее.
- Заполните форму регистрации, включая ваше имя, адрес электронной почты и пароль.
- Выберите опцию «Учетная запись администратора» и нажмите кнопку «Зарегистрироваться».
После завершения регистрации вы будете перенаправлены на страницу входа. Теперь вы можете использовать ваши учетные данные для входа в административную панель GitLab и настраивать сервер по вашему усмотрению.
Настройка GitLab на Windows: подключение к базе данных
1. Установите и настройте базу данных PostgreSQL.
GitLab требует использования базы данных PostgreSQL для сохранения данных. Скачайте и установите PostgreSQL с официального сайта. Во время установки, укажите пароль для пользователя admin.
2. Настройте конфигурацию GitLab для подключения к базе данных.
Откройте файл конфигурации GitLab, расположенный по пути C:\GitLab\config\gitlab.rb. Найдите строку, начинающуюся с # postgresql[‘enable’] = false и замените ее на postgresql[‘enable’] = true.
Найдите строку, начинающуюся с # postgresql[‘username’] = ‘gitlab’ и раскомментируйте ее (удалите символ # в начале строки). Затем, раскомментируйте строки, начинающиеся с # postgresql[‘password’] = … и # postgresql[‘host’] = …. Укажите правильный пароль, имя пользователя и адрес хоста для подключения к базе данных.
3. Запустите GitLab и выполните проверку подключения к базе данных.
Откройте командную строку и выполните следующую команду: gitlab-ctl reconfigure. Эта команда активирует новые настройки.
После завершения команды, выполните следующую команду: gitlab-ctl status. Убедитесь, что все сервисы запущены и подключение к базе данных установлено.
4. Завершение настройки.
Поздравляю! Вы успешно настроили подключение GitLab к базе данных. Теперь вы можете перейти к следующему шагу — завершению установки GitLab.
Запуск GitLab на Windows: проверка работоспособности
После установки GitLab на Windows необходимо проверить его работоспособность. Для этого выполните следующие шаги:
- Откройте веб-браузер и в адресной строке введите адрес сервера GitLab (обычно «localhost» или IP-адрес сервера).
- Если GitLab работает корректно, вы увидите страницу входа.
- Введите логин и пароль администратора, которые вы указали во время установки GitLab.
- После успешной авторизации вы перейдете на главную страницу GitLab.
На главной странице GitLab вы можете увидеть все проекты, созданные на сервере, а также навигационные ссылки для работы с репозиториями и пользователями.
Если вы не видите страницу входа GitLab или столкнулись с какими-либо ошибками, проверьте следующее:
| Порт | Убедитесь, что порт GitLab (по умолчанию — 80) не занят другим приложением. Если порт уже занят, измените его в конфигурационном файле GitLab. |
| Сервисы | Убедитесь, что все необходимые службы (например, NGINX, PostgreSQL, Redis) запущены и работают корректно. |
| Конфигурационный файл | Проверьте, что конфигурационный файл GitLab (обычно находится в папке «C:\GitLab\etc\gitlab.rb») содержит правильные настройки для вашего сервера. |
| Лог-файлы | Просмотрите лог-файлы GitLab для выявления возможных ошибок. Лог-файлы обычно находятся в папке «C:\GitLab\var\log». |
Если проблема не устранена, обратитесь к документации GitLab или посетите сообщество поддержки GitLab для получения дополнительной помощи.