- System requirements
- Get the Flutter SDK
- Update your path
- Run flutter doctor
- Android setup
- Install Android Studio
- Set up your Android device
- Set up the Android emulator
- Agree to Android Licenses
- Windows setup
- Additional Windows requirements
- Next step
System requirements
To install and run Flutter,
your development environment must meet these minimum requirements:
- Operating Systems: Windows 10 or later (64-bit), x86-64 based.
- Disk Space: 1.64 GB (does not include disk space for IDE/tools).
-
Tools: Flutter depends on these tools being available in your environment.
- Windows PowerShell 5.0 or newer (this is pre-installed with Windows 10)
-
Git for Windows 2.x, with the
Use Git from the Windows Command Prompt option.If Git for Windows is already installed,
make sure you can rungitcommands from the
command prompt or PowerShell.
Get the Flutter SDK
help
Help
-
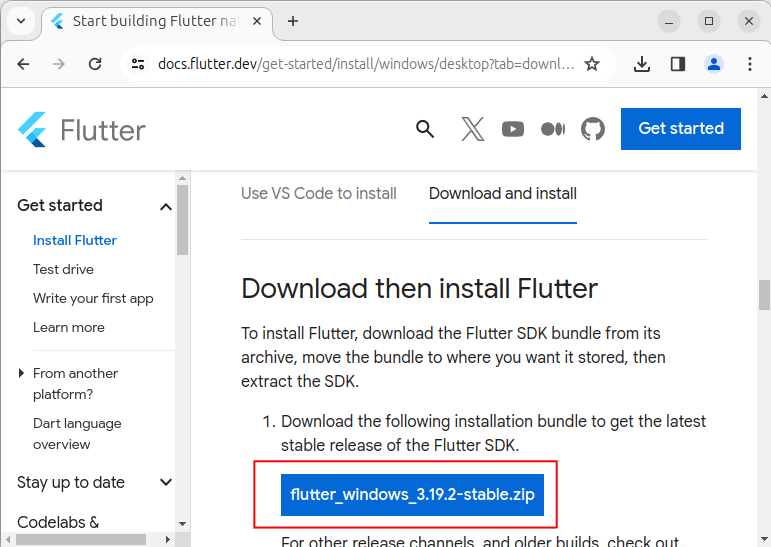
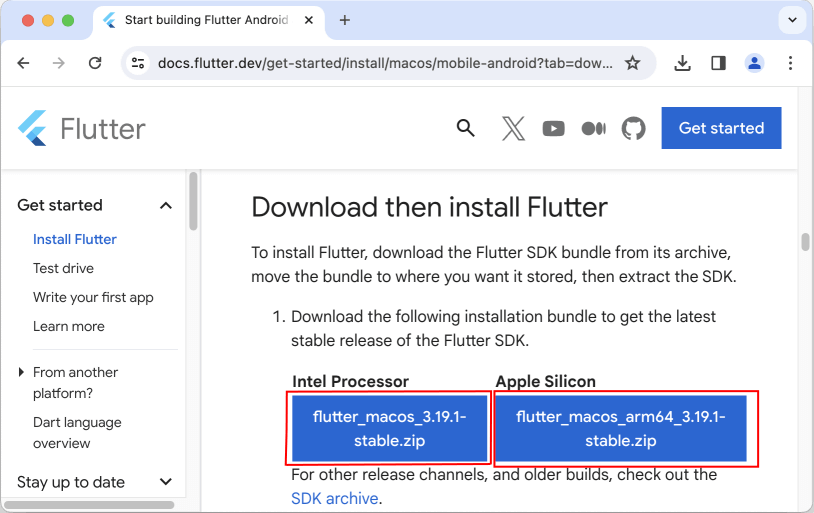
Download the following installation bundle to get the latest
stable release of the Flutter SDK:(loading…)
For other release channels, and older builds,
check out the SDK archive. -
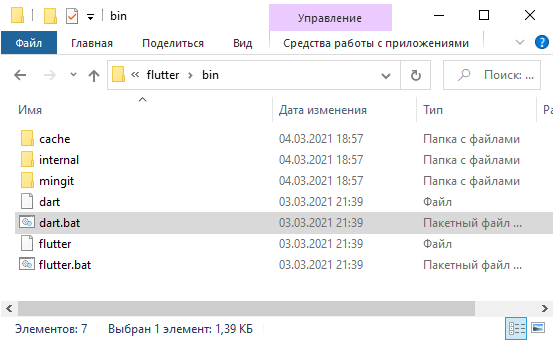
Extract the zip file and place the contained
flutter
in the desired installation location for the Flutter SDK
(for example,%USERPROFILE%\flutter,D:\dev\flutter).
You are now ready to run Flutter commands in the Flutter Console.
Update your path
help
Help
If you wish to run Flutter commands in the regular Windows console,
take these steps to add Flutter to the PATH environment variable:
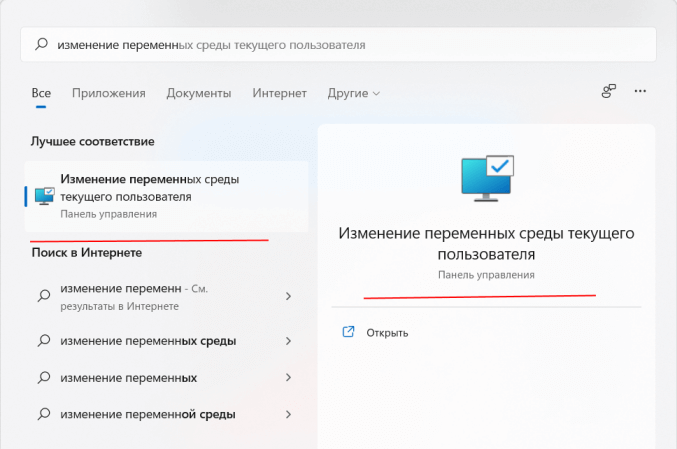
- From the Start search bar, enter ‘env’
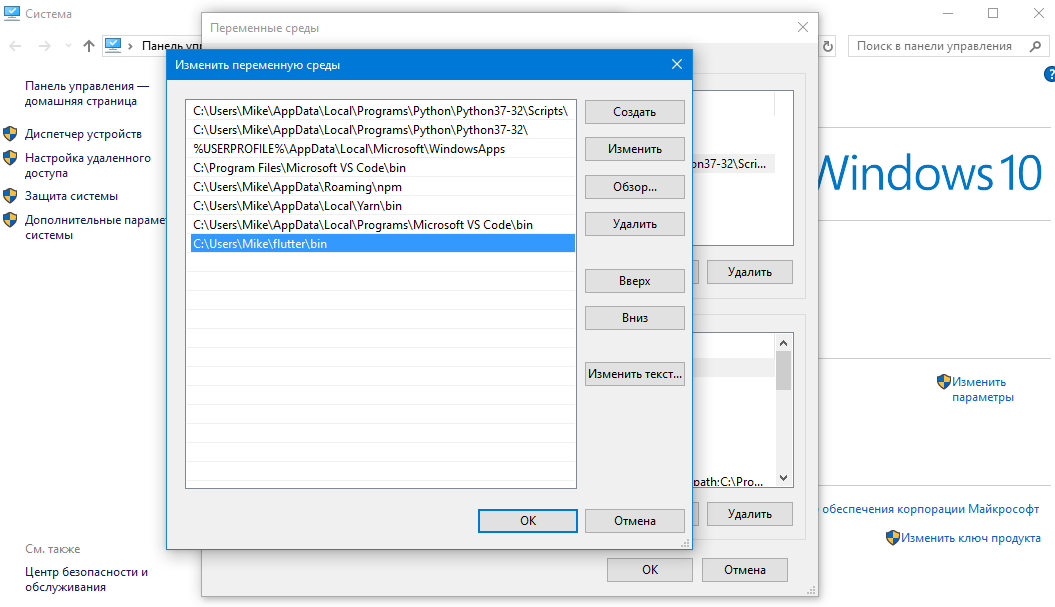
and select Edit environment variables for your account. - Under User variables check if there is an entry called Path:
- If the entry exists, append the full path to
flutter\binusing
;as a separator from existing values. - If the entry doesn’t exist,
create a new user variable namedPathwith
the full path toflutter\binas its value.
- If the entry exists, append the full path to
You have to close and reopen any existing console windows
for these changes to take effect.
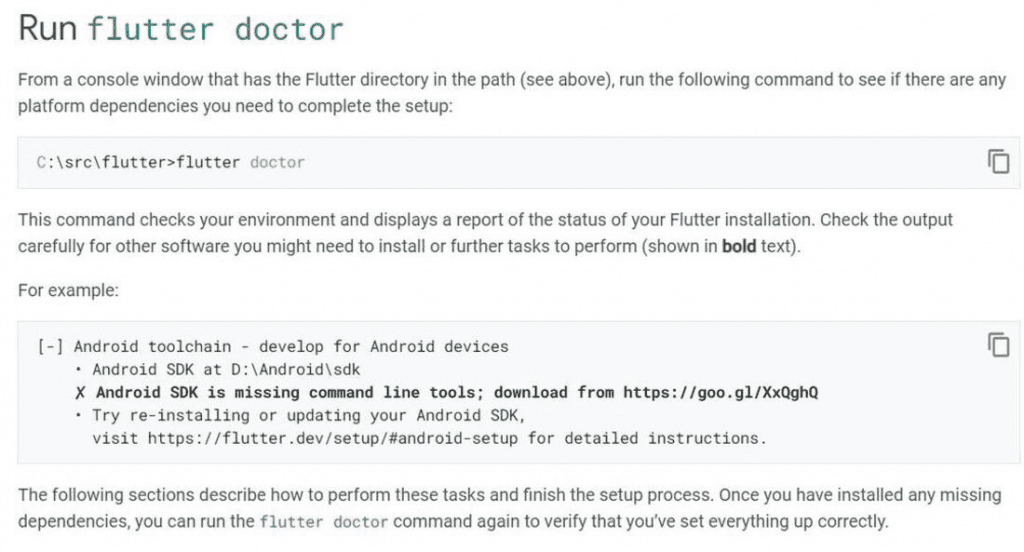
Run flutter doctor
help
Help
From a console window that has the Flutter directory in the
path (see above), run the following command to see if there
are any platform dependencies you need to complete the setup:
C:\src\flutter>flutter doctor
This command checks your environment and displays a report of the status
of your Flutter installation. Check the output carefully for other
software you might need to install or further tasks to perform
(shown in bold text).
For example:
[-] Android toolchain - develop for Android devices
    • Android SDK at D:\Android\sdk
    ✗ Android SDK is missing command line tools; download from https://goo.gl/XxQghQ
    • Try re-installing or updating your Android SDK,
      visit https://docs.flutter.dev/setup/#android-setup for detailed instructions.
The following sections describe how to perform these tasks and
finish the setup process. Once you have installed any missing
dependencies, you can run the flutter doctor command again to
verify that you’ve set everything up correctly.
Android setup
Install Android Studio
help
Help
- Download and install Android Studio.
- Start Android Studio, and go through the ‘Android Studio Setup Wizard’.
This installs the latest Android SDK, Android SDK Command-line Tools,
and Android SDK Build-Tools, which are required by Flutter
when developing for Android. - Run
flutter doctorto confirm that Flutter has located
your installation of Android Studio. If Flutter cannot locate it,
runflutter config --android-studio-dir=<directory>to set the
directory that Android Studio is installed to.
Set up your Android device
help
Help
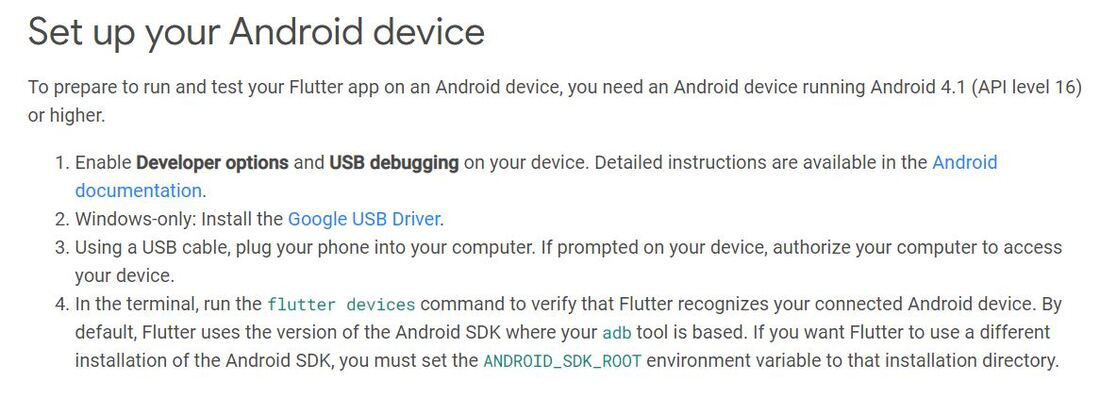
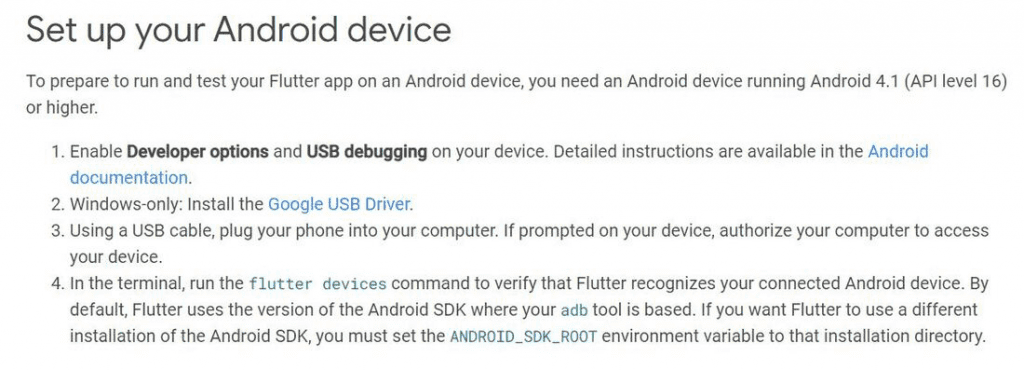
To prepare to run and test your Flutter app on an Android device,
you need an Android device running Android 5.0 (API level 21) or higher.
- Enable Developer options and USB debugging on your device.
Detailed instructions are available in the
Android documentation. - [Optional] To leverage wireless debugging, enable Wireless debugging
on your device. Detailed instructions are available in the
Android documentation. - Windows-only: Install the Google USB
Driver. - Using a USB cable, plug your phone into your computer. If prompted on your
device, authorize your computer to access your device. - In the terminal, run the
flutter devicescommand to verify that
Flutter recognizes your connected Android device. By default,
Flutter uses the version of the Android SDK where youradb
tool is based. If you want Flutter to use a different installation
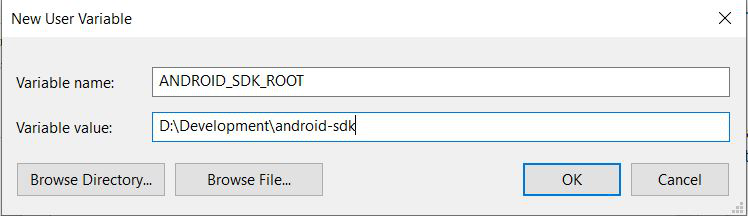
of the Android SDK, you must set theANDROID_SDK_ROOTenvironment
variable to that installation directory.
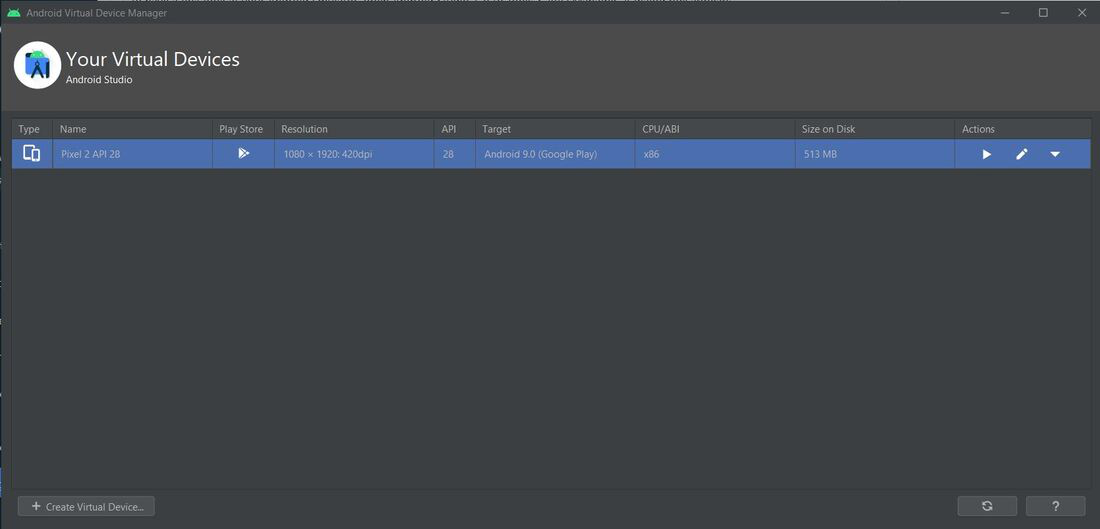
Set up the Android emulator
help
Help
To prepare to run and test your Flutter app on the Android emulator,
follow these steps:
- Enable
VM acceleration
on your machine. - Launch Android Studio, click the Device Manager
icon, and select Create Device under Virtual tab…- In older versions of Android Studio, you should instead
launch Android Studio > Tools > Android > AVD Manager and select
Create Virtual Device…. (The Android submenu is only present
when inside an Android project.) - If you do not have a project open, you can choose
3-Dot Menu / More Actions > Virtual Device Manager and select Create Device…
- In older versions of Android Studio, you should instead
- Choose a device definition and select Next.
- Select one or more system images for the Android versions you want
to emulate, and select Next.
An x86 or x86_64 image is recommended. - Under Emulated Performance, select Hardware — GLES 2.0 to enable
hardware
acceleration. -
Verify the AVD configuration is correct, and select Finish.
For details on the above steps, see Managing
AVDs. - In Android Virtual Device Manager, click Run in the toolbar.
The emulator starts up and displays the default canvas for your
selected OS version and device.
Agree to Android Licenses
help
Help
Before you can use Flutter, you must agree to the
licenses of the Android SDK platform. This step should be done after
you have installed the tools listed above.
- Open an elevated console window and run the following command to begin
signing licenses.$ flutter doctor --android-licenses - Review the terms of each license carefully before agreeing to them.
- Once you are done agreeing with licenses, run
flutter doctoragain
to confirm that you are ready to use Flutter.
Windows setup
Additional Windows requirements
help
Help
For Windows desktop development,
you need the following in addition to the Flutter SDK:
-
Visual Studio 2022 or Visual Studio Build Tools 2022
When installing Visual Studio or only the Build Tools,
you need the “Desktop development with C++” workload installed
for building windows, including all of its default components.
For more information, see Building Windows apps.
Next step
Set up your preferred editor.
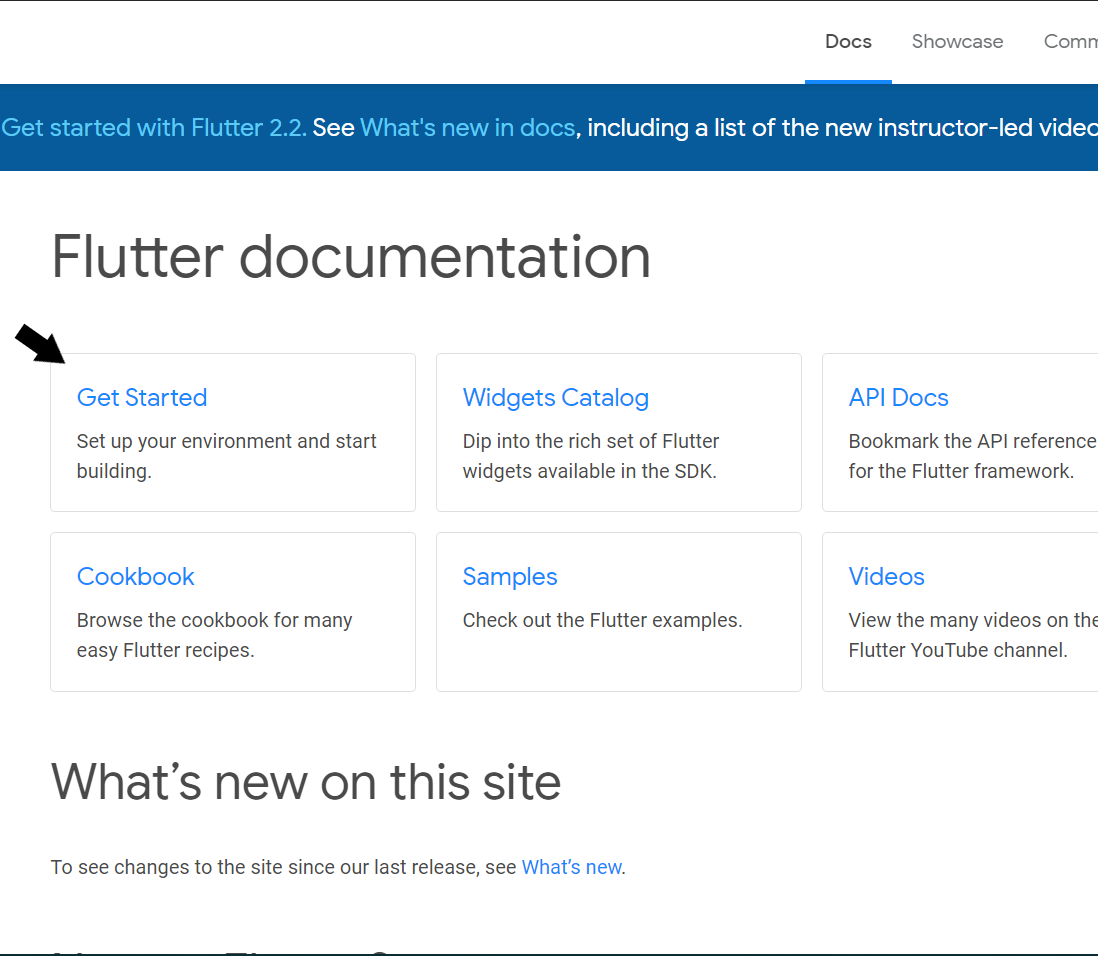
Flutter is basically Google’s portable user interface (UI) toolkit, used to build and develop eye-catching, natively-built applications for mobile, desktop, and web, from a single codebase. Flutter is free, open-sourced, and compatible with existing code. It is utilized by companies and developers around the world, due to its user-friendly interface and fairly simple, yet to-the-point commands.
In this article, we will look into the process of installing Flutter on Windows.
Installing Flutter on Windows:
Follow the below steps to install Flutter on Windows:
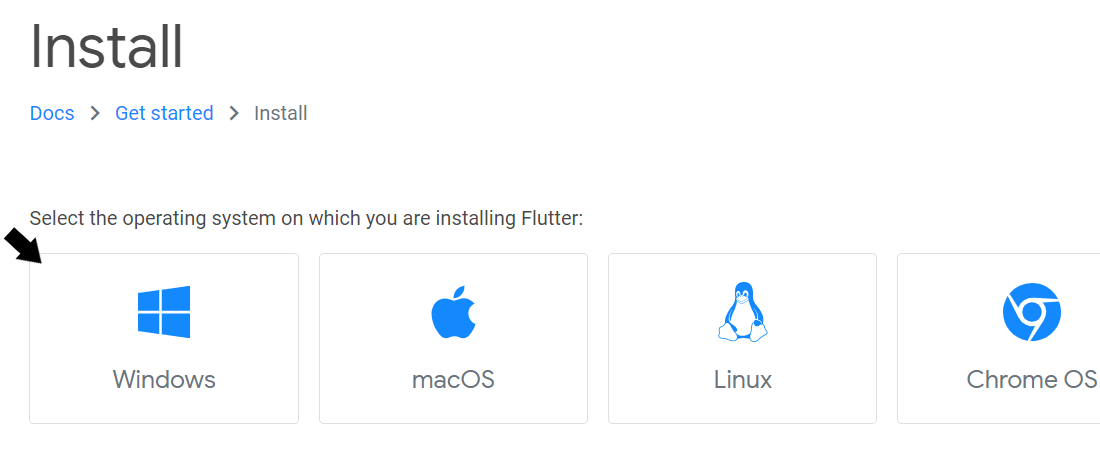
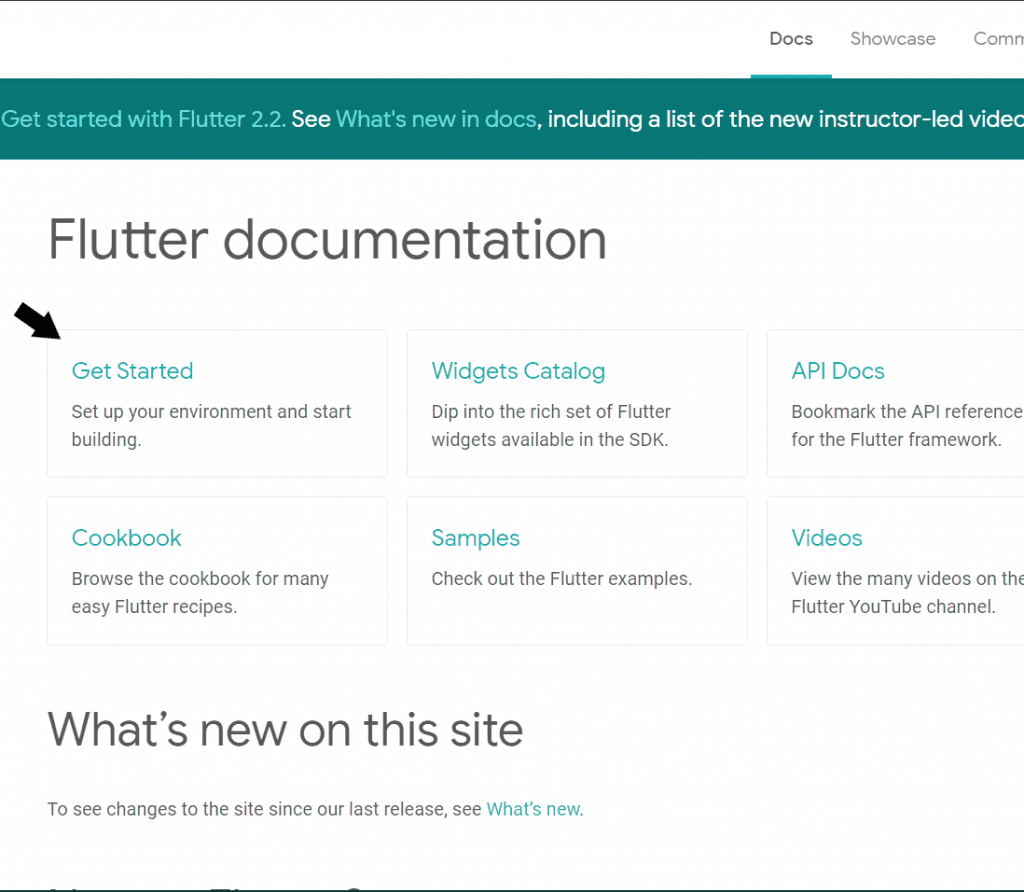
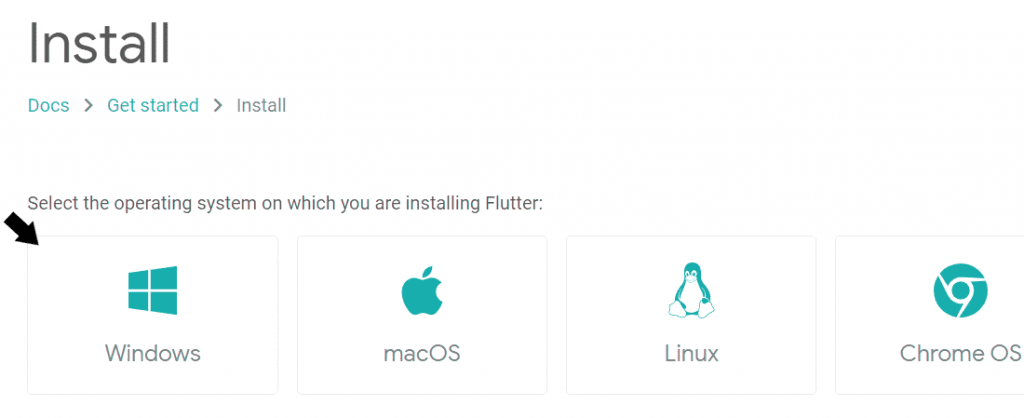
Step 1: Navigate to flutter.dev on your webpage. On the top menu bar, select Docs > Get Started > Install > Windows.
Step 2: Check for the System Requirements. Henceforth, you can begin the installation.
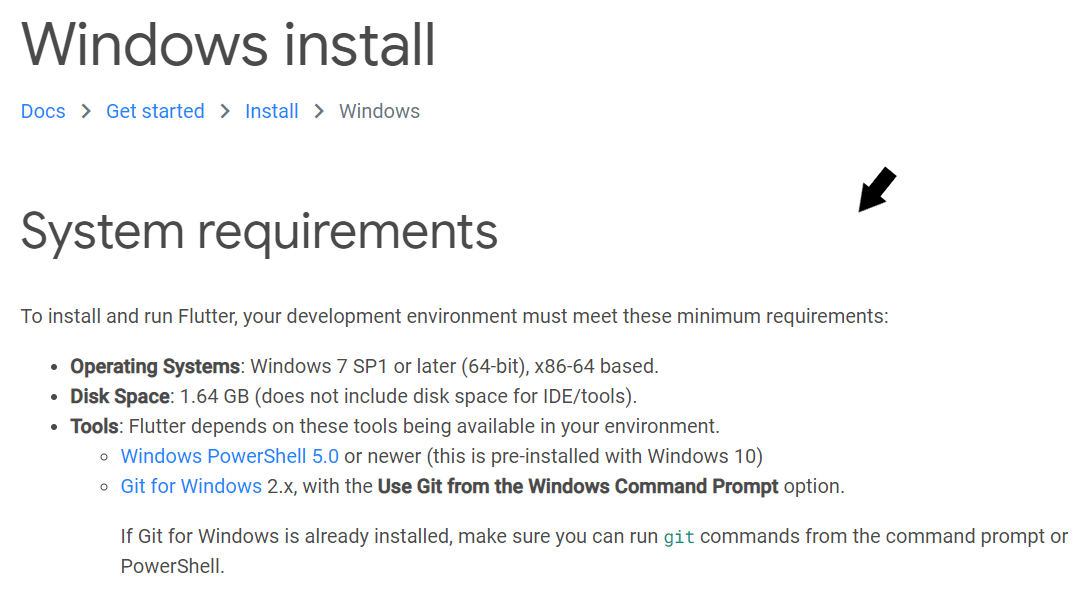
You can get a detailed procedure for installing the latest versions of Windows PowerShell 5.0 and Git for Windows, if not already installed.
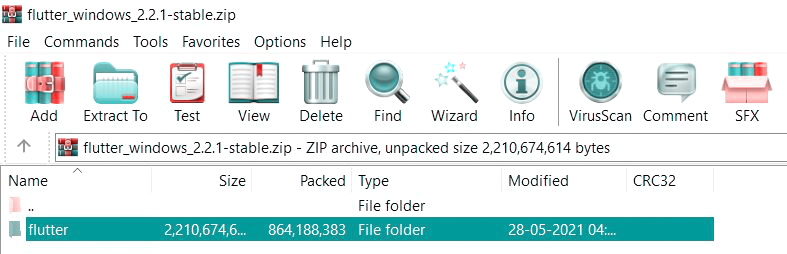
Step 3: Restart the system after installing Git on your windows. Once done, let’s get to the installation of Flutter Software development Kit (Flutter SDK). Click on the download link for the latest version (as of today).
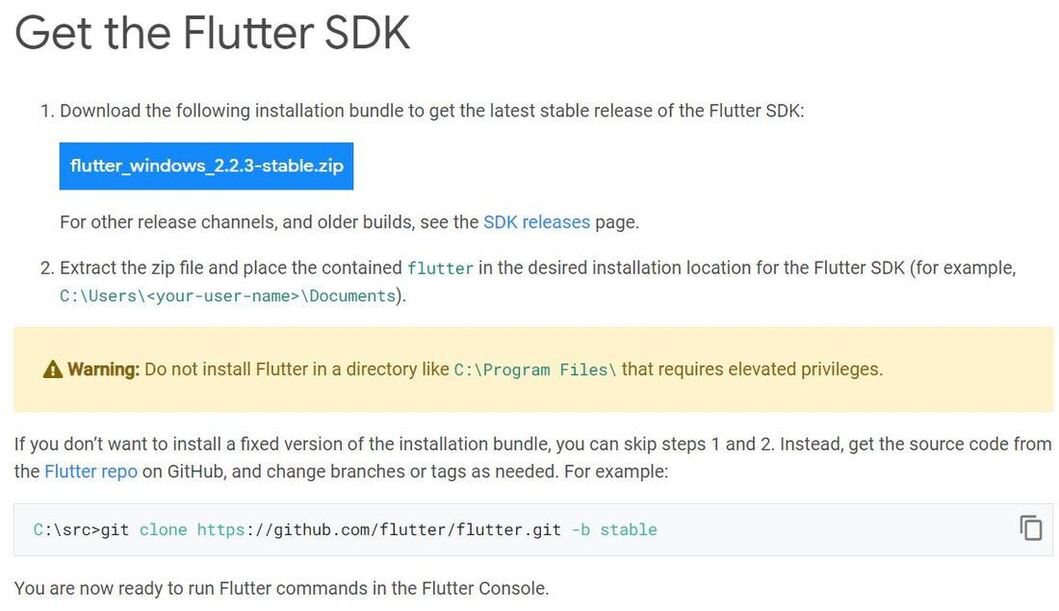
Flutter SDK is the tool that not only allows us to create flutter projects but also build those projects and transform them into native mobile applications. In simpler words, Flutter SDK is the core tool for building a flutter UI.
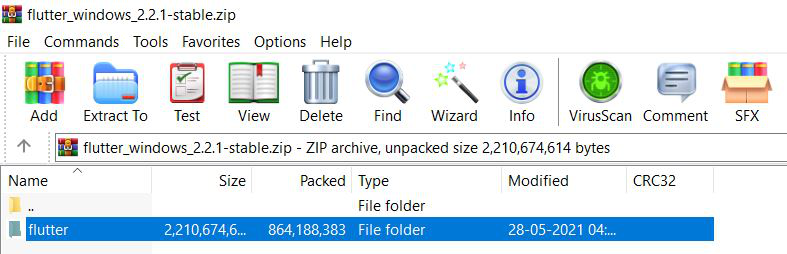
Once the zip file is downloaded, extract the ‘flutter’ folder (drag and drop) to any path/directory of the system where you get the read and write access. Typically, it is better to create a new folder in a separate directory apart from the system drive due to permission issues (In my case, the target destination is D: > development > flutter).
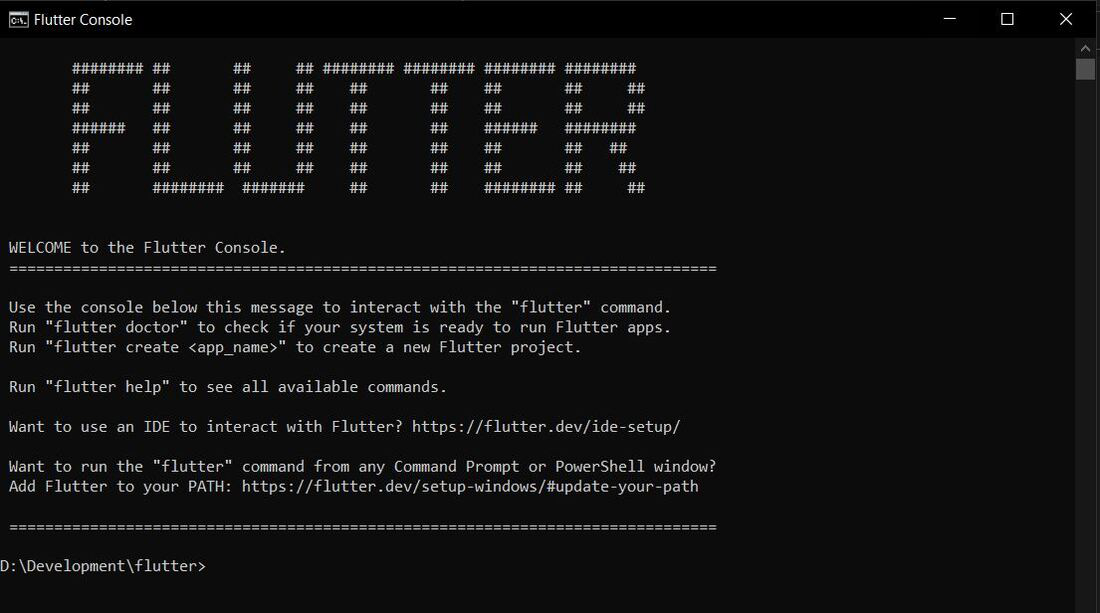
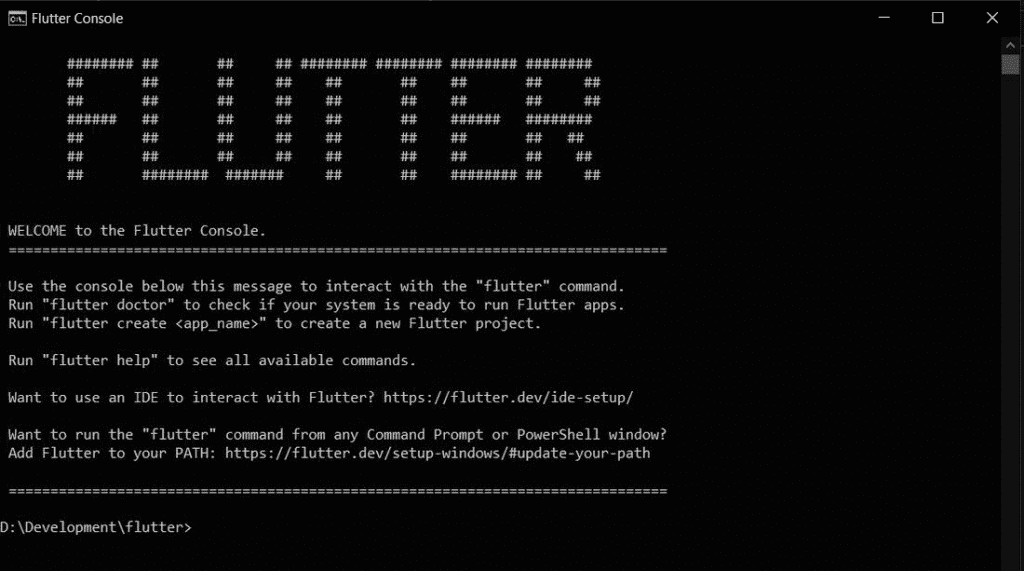
Now double-click on the ‘flutter’ folder. Go to ‘flutter_console.bat’ file and double-click to open a command prompt window. It should look something like this:
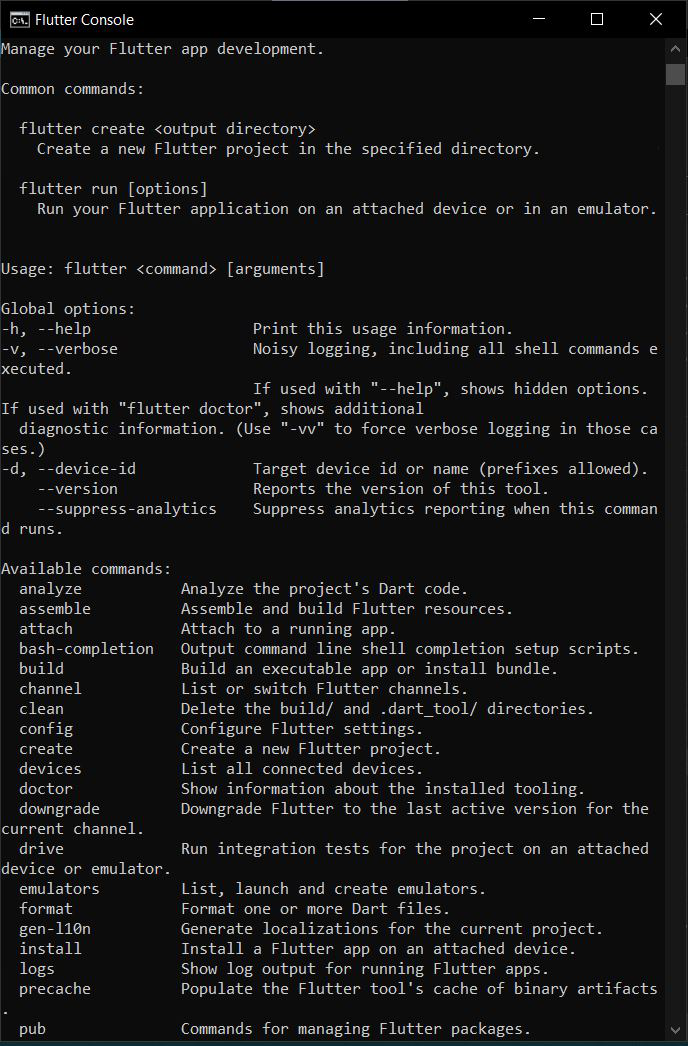
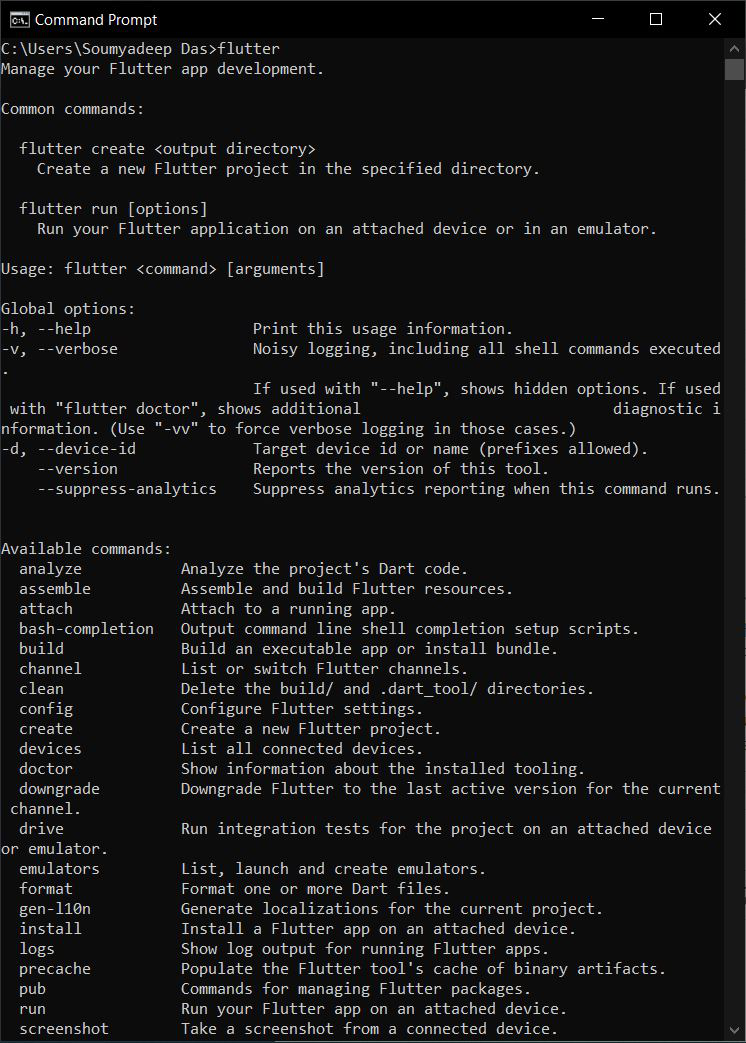
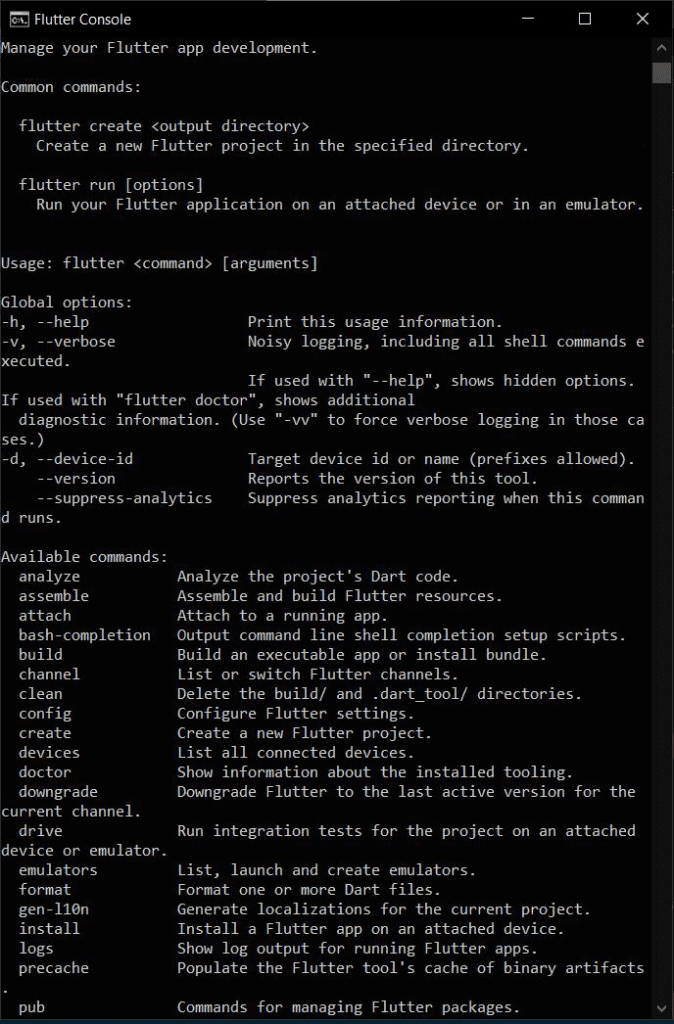
This console is actually a Windows terminal available for the developer to run flutter commands. Type in ‘flutter’ to get a list of all the flutter commands that can be run.
Whilst it is pretty good to have a terminal to execute flutter commands and create projects, it’d still be better and more convenient to store all our flutter projects somewhere else on our system for easy access. Let us steer over to the next step of our journey!
Step 4: Check and edit environment variables for global system access. For this, scroll down to ‘Update your path’ on the official Docs page of the flutter installation page. For this, go to Control Panel > System and Security > System > Advanced System Settings > Environment Variables… . A dialog box displaying a list of the available environment variables appears on your screen.
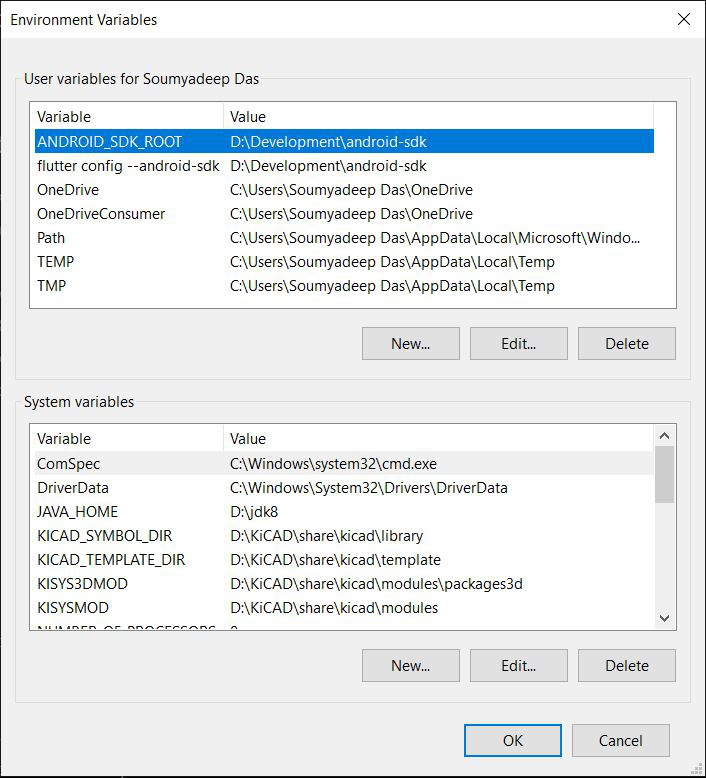
Environment Variables are global system variables present at the root level, which aids in configuring various aspects of Windows. We will now add the flutter tool as an environment variable for direct access (instead of running the .bat executable), and unlock it on the entire PowerShell and Command Prompt of your system.
To do this, glance through the following steps:
- Check for ‘Path’ variable under User Variables list. If not already present, create a new variable (‘New…’) and assign the ‘flutter\bin‘ directory as its value.
- Now double-click on the ‘Path’ variable and add a new entry by double-clicking on a column below. It should look something like this:
- In the path, copy the entire directory of flutter\bin folder and paste it. Click ‘Ok’ twice to complete the setup. Now, make sure that you have closed any existing Command Prompt/Windows PowerShell windows that are open.
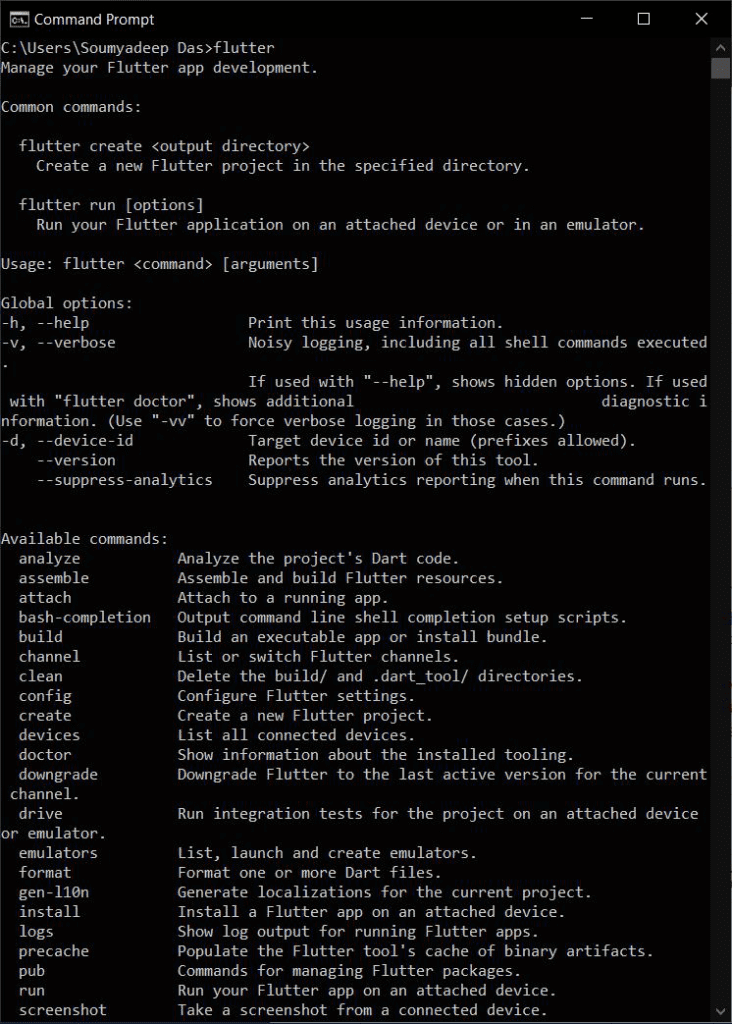
Now, check whether your flutter framework can be accessed globally. To do this, open any terminal (say Command Prompt) and type in ‘flutter‘ and see whether you get the same list of commands as you did get earlier from the .bat terminal. If yes, you have successfully completed setting up flutter on the root level in your system. If not, you might as well consider re-running the setup again.
Step 5: Now, you have to analyze and check whether something is missing/has to be installed further. To do this, under the Command Prompt terminal, type in ‘Flutter Doctor‘ to check for other requirements.

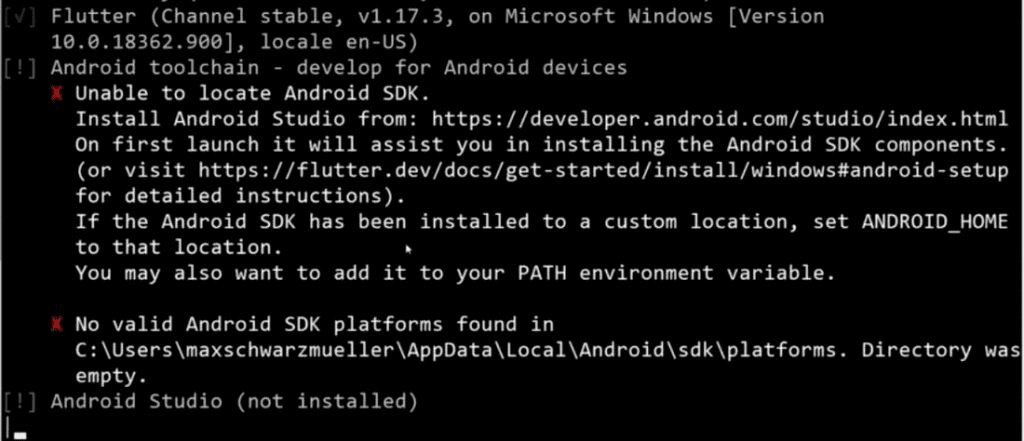
(Since a version has already been installed on my computer, below is an image shown from a previous version, to help you get an understanding of the ‘errors’ that appear after flutter doctor analysis.)

According to the flutter doctor check, we see that flutter was installed successfully in our system, but the Android tools are missing, and so is Android Studio. We also see that there are no connected devices too. Eventually, the next step is about setting up Android tools on your device, to execute the flutter apps built by you.
Step 6: Setting up Android tools and emulator for android devices.
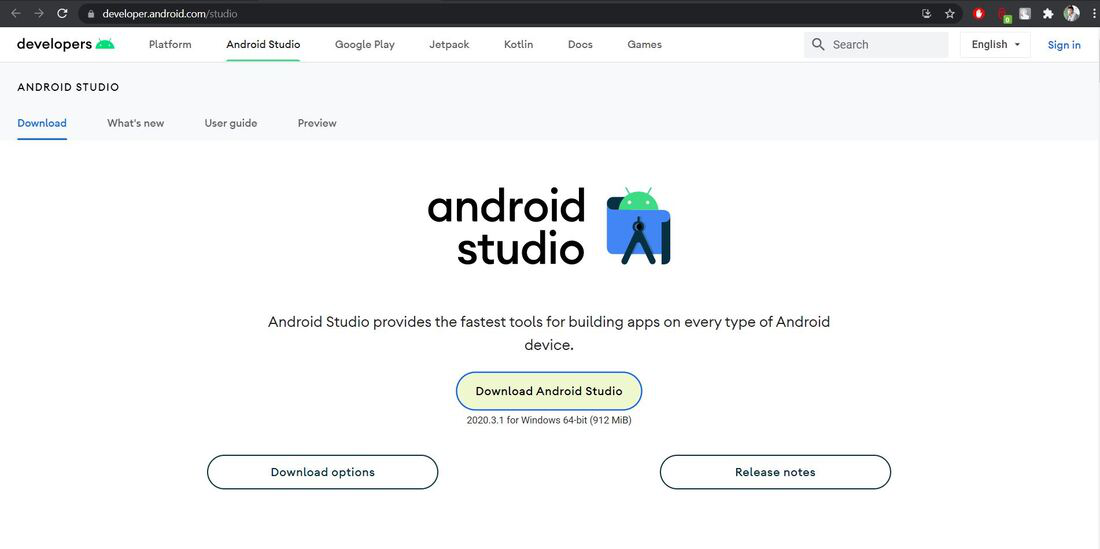
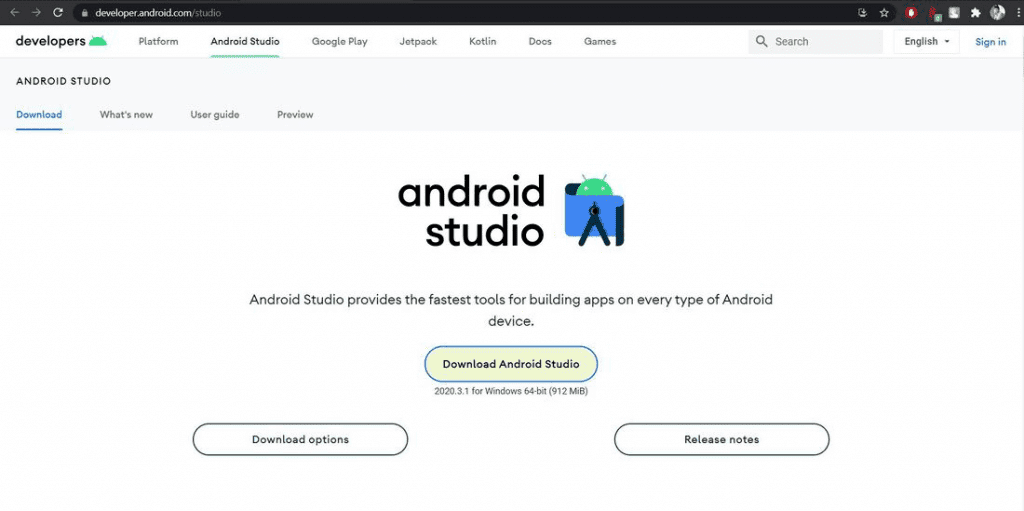
The first step is to download and install Android Studio. To do this, navigate to the official page of Android Studio and click on ‘Download Android Studio‘.
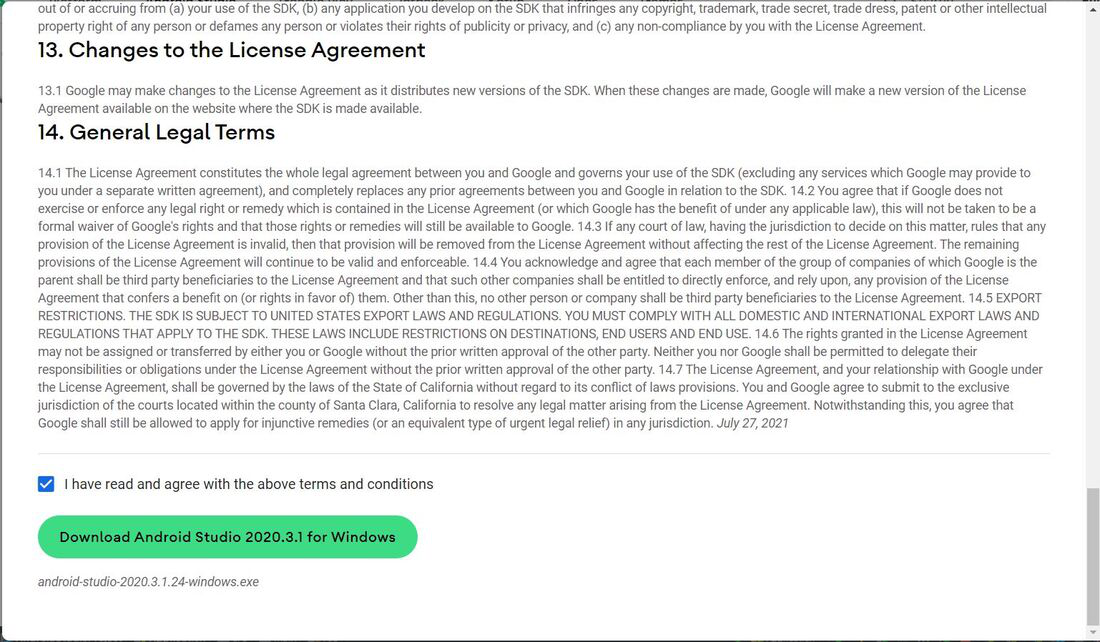
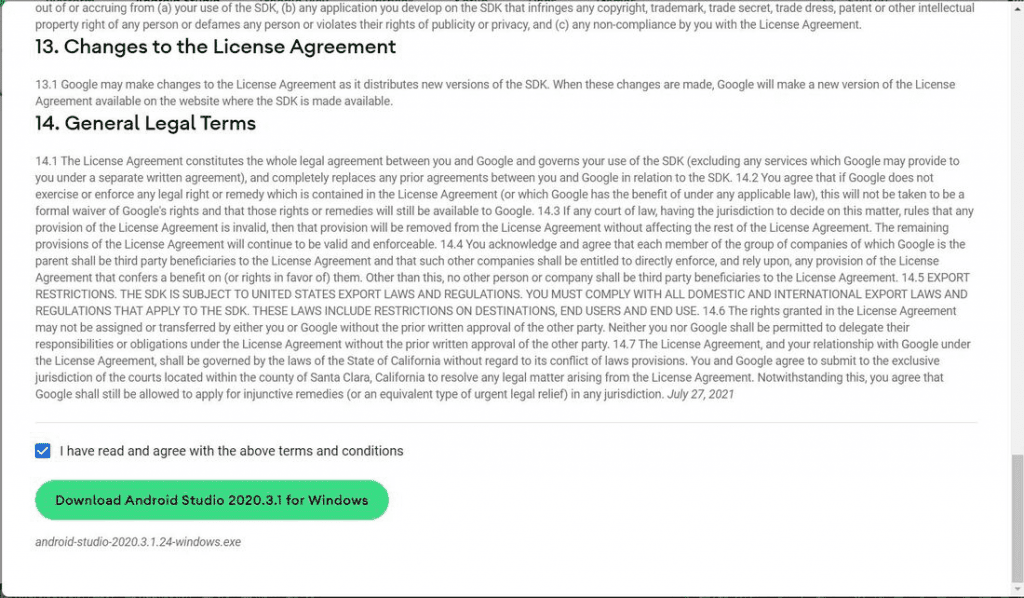
After accepting the license agreements, you are good to go! Click on the final Download button to start downloading.
After the download is complete, let’s move on to the next step, i.e. installation.
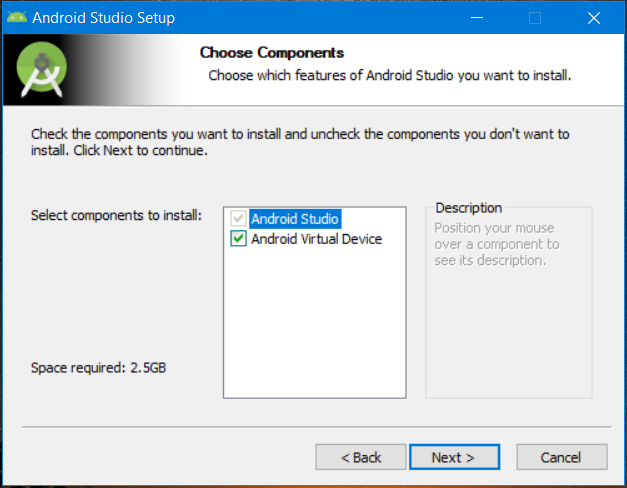
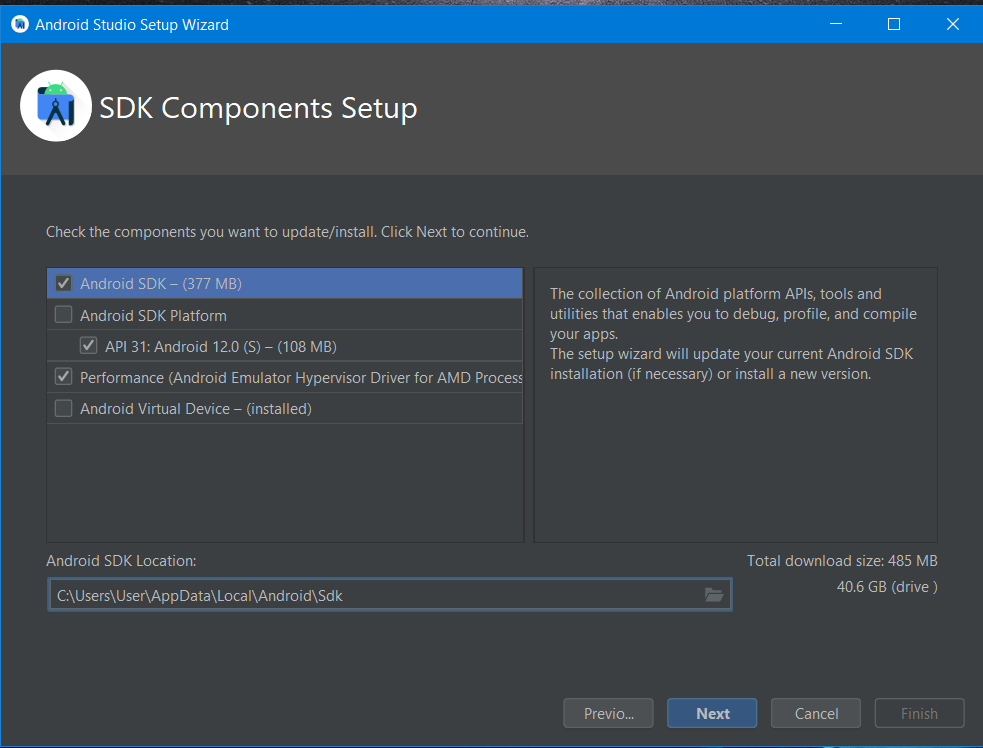
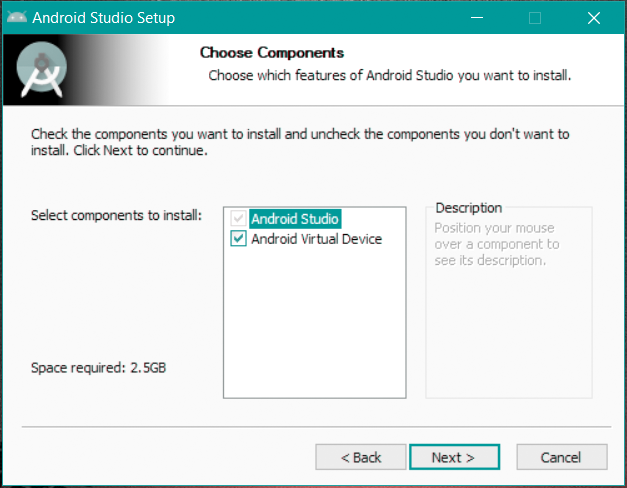
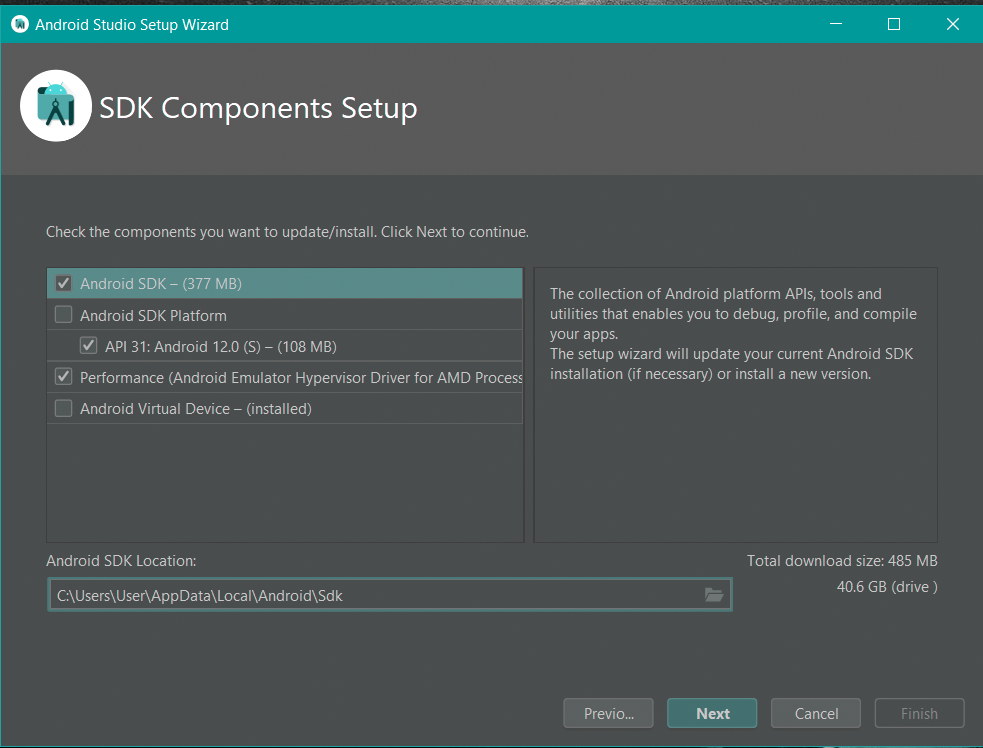
Under ‘Components‘, make sure that both Android Studio and Android Virtual Device are checked, and only then proceed. The Android Virtual Device is an essential tool for running various types and sizes of android emulators to test your flutter project. Henceforth, click on ‘Next‘.
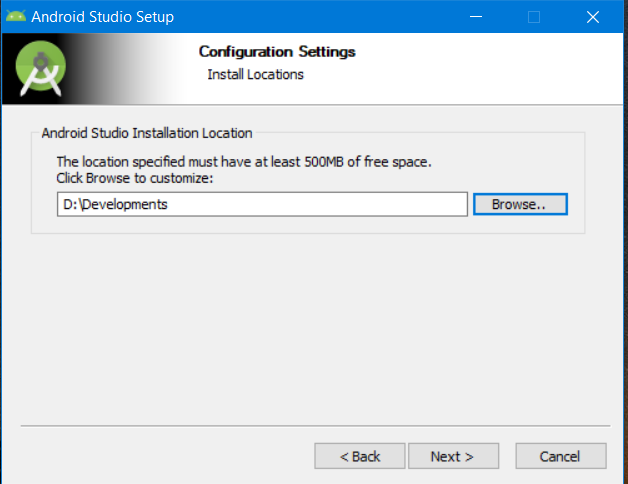
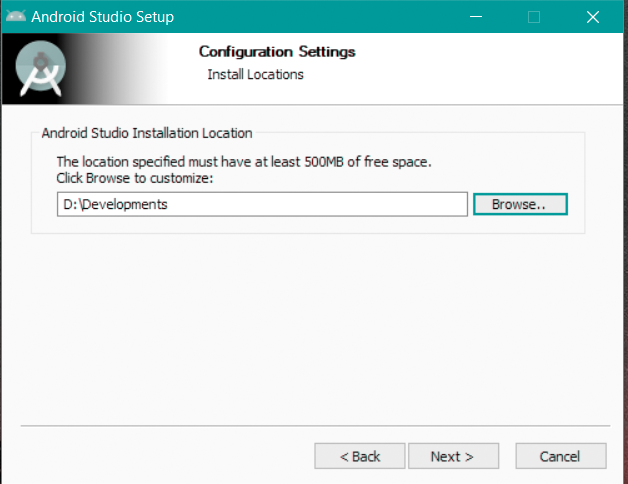
Select the directory you would want your file to be installed in. It is recommended to select some other path apart from the system drive. Once done, click on ‘Next‘.
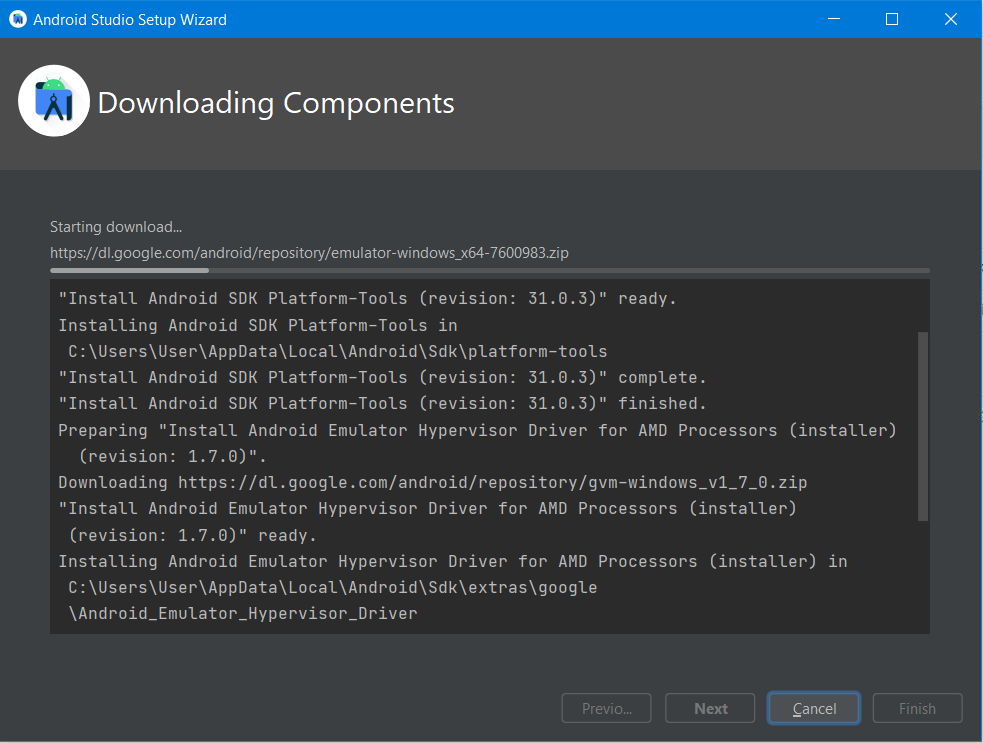
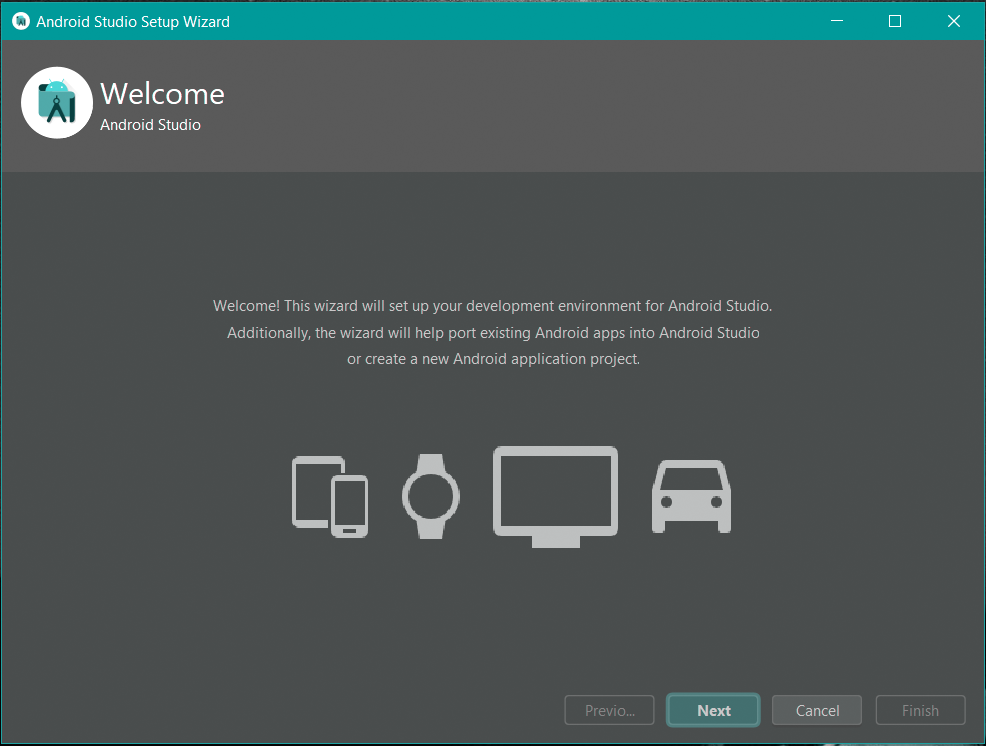
Finally, click on ‘Install‘. Wait for a couple of seconds for the installation to complete. Check the box beside ‘Launch Android Studio‘. Click on ‘Finish‘.
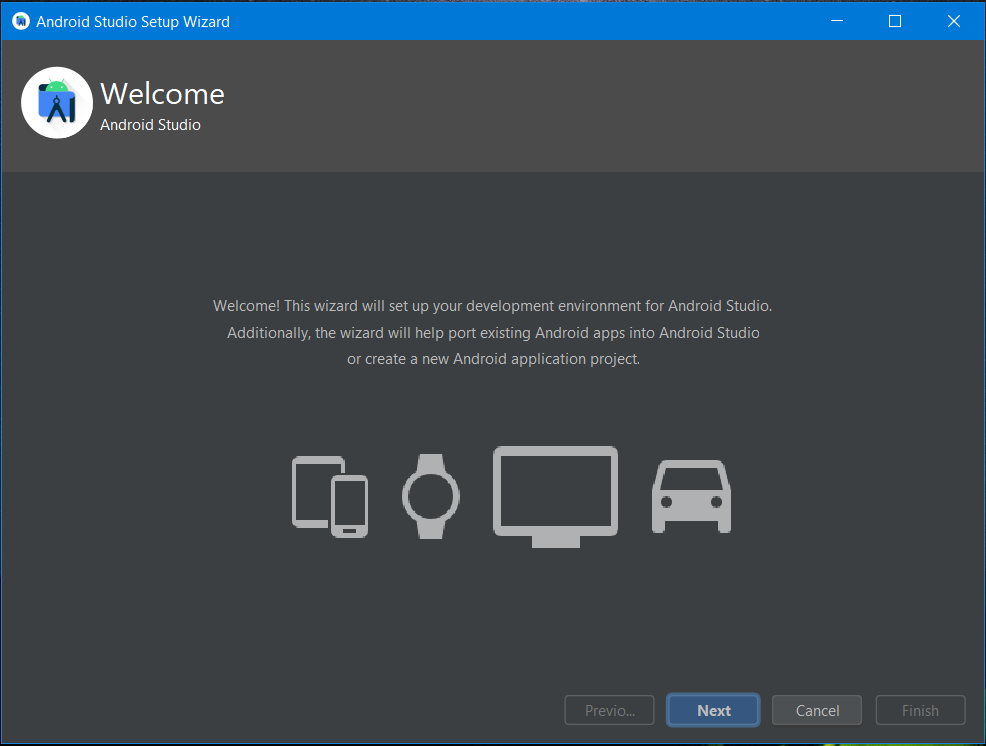
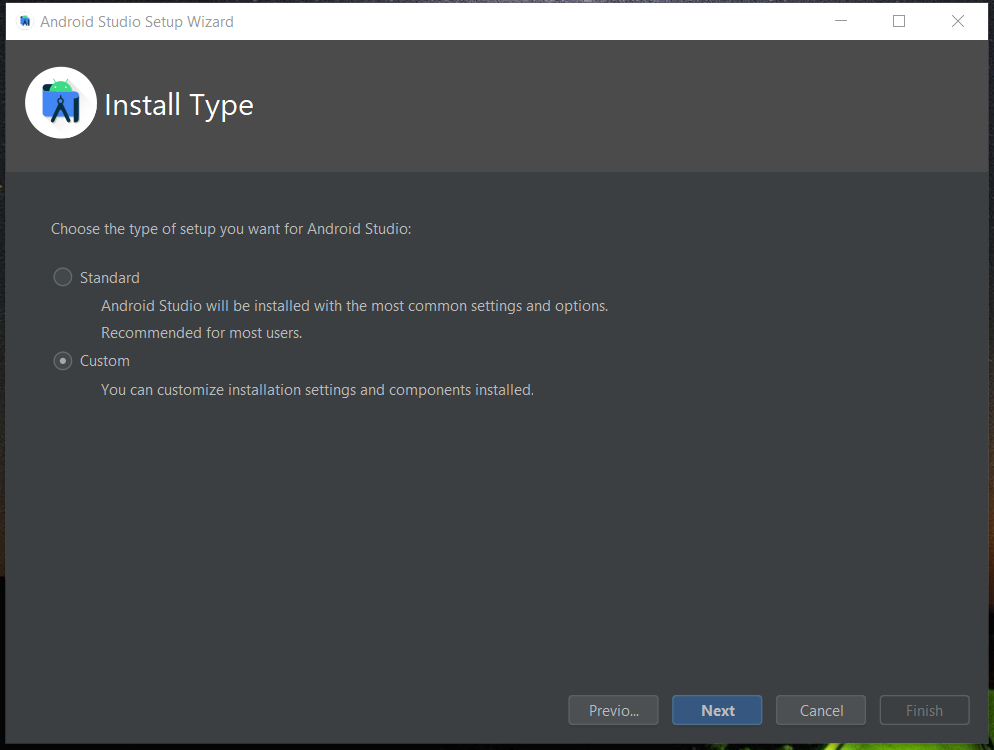
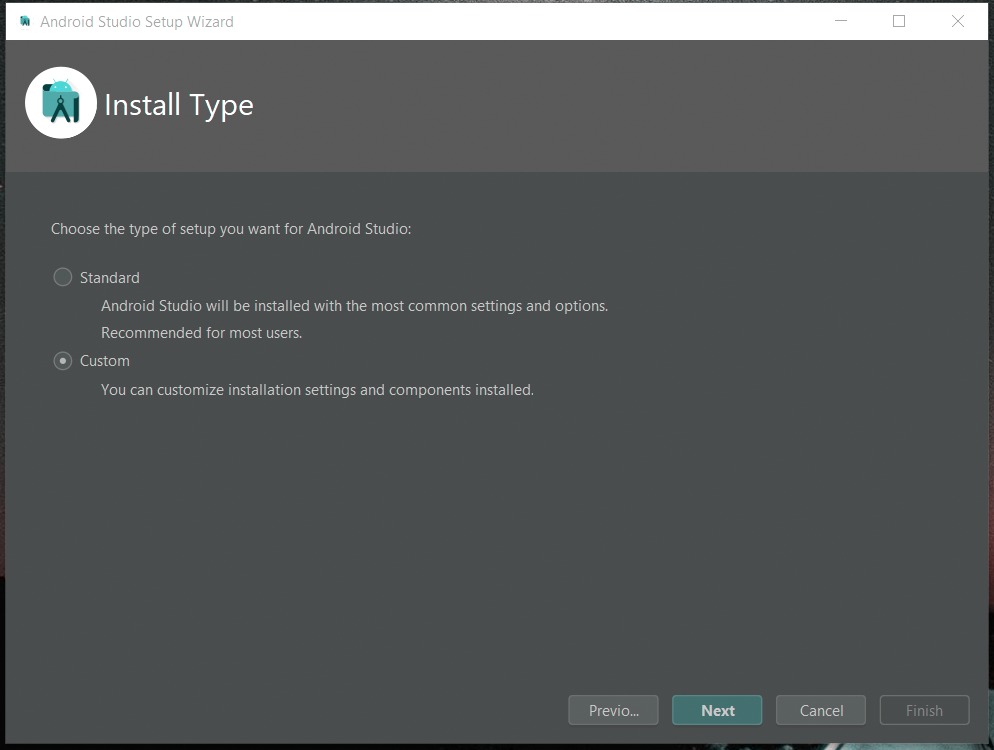
Wait for Android Studio to launch on your computer. On the home screen, click Next > Custom > Next.
For the Java Development kit location in the next step, it is recommended to keep the default path it requires, to avoid the hassle. In the next step, choose the UI appearance you’d like for Android Studio. Click ‘Next‘.
This next step is a bit important. Remember to check the required boxes exactly as shown below. If kits have already been installed, you can ignore those and move on. Click ‘Next‘. Set your desired folder for Android SDK.
With that done, click on ‘Finish‘. Android Studio will now install all the necessary android tools required for the execution of your flutter projects. This may take a significant time – it’s better to wait!
Now, we are ready to create and build flutter projects on Android Studio and run it on a real or a virtual Android device (emulator).
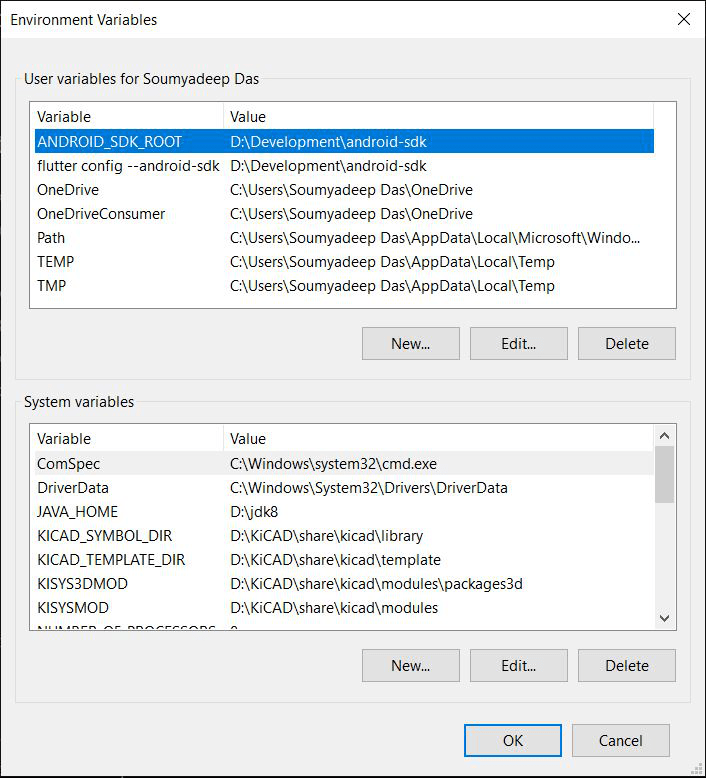
Step 6: Set SDK as an environment variable, for global access.
Now, open Command Prompt terminal and run ‘flutter doctor’ again. If you have installed Android SDK in the default directory suggested by Android Studio, there wouldn’t be any problem that would appear. Nevertheless, if you have installed it in a non-default directory, flutter would not be able to detect it in your system. To help it able to do that, you guessed it…we would be assigning it as an environment variable, giving global access.
As discussed earlier in Step 4, go to environment variables and click ‘New‘, and do the following (as recommended by flutter doctor). Click ‘OK‘.
Step 7: Accept required Android Licenses.
On the Command Prompt terminal, type in:
flutter doctor --android-licenses
as suggested by flutter doctor. Hit Enter. To review licenses, type ‘y‘ for Yes.
You’ll see a couple of repeated prompts that look like this:
Accept? (y/N):
Type ‘y‘ whenever asked for.
Finally, after all the license agreements have been accepted, you should see a message that looks something like this:
All SDK package licenses accepted
Step 7: Setup Android Emulator.
You have the option to choose between an Android Device or an Android Emulator to build your application on. It depends totally on you.
For setting up Android Device, go through the official docs page and follow the exact steps as mentioned. Download The Google USB Driver by following the link and install according to the instructions given. This can also be installed through Android Studio, which you can later connect to a real Android Device to build the application.
For setting up Android Emulator, you need to go through the following steps:
- Open Android Studio.
- On the topmost menu bar, click on Tools > SDK Manager.
- Verify whether you have the latest SDK installed. Remember to install the latest stable version too by checking on the box to the left.
In my case, it is ‘Android 9.0 (Pie)‘. You can even uncheck the latest version (if not stable), to not only save space but also run all your applications on the stable version itself. - Under the ‘SDK Tools‘ tab, don’t forget to check Google USB Driver to later connect a real Android Device. With that, click ‘Apply‘. Click ‘OK‘ to start SDK installation.
This might take a couple of minutes to complete. After the setup is done, click on ‘Finish‘. Your setup is now complete! - To have a first look at your Android Emulator, open Android Studio. Go to Tools > AVD Manager. A dialog box appears.

- Click on ‘Create Virtual Device…‘, select a device and its dimensions according to your preference, select a system image and lastly, under all default settings, click on ‘Finish’. Click on the ‘▶’ button to fire up your emulator.
There you go! You now have a fully functional flutter framework with devices/emulators to build your beautiful apps on. Go crazy!
Что такое Flutter. Установка
Последнее обновление: 12.05.2022
Flutter представляет фреймворк от компании Google, который позволяет создавать кроссплатформенные приложения, которые могут использовать однин и тот же код. Спектр платформ широк — это веб-приложения,
мобильные приложения под Android и iOS, графические приложения под настольные операционные системы Windows, MacOS, Linux, а также веб-приложения.
Особенностью работы с Flutter является то, что приложения под разные платформы могут иметь один и тот же код. Поскольку используемые платформы не эквиваленты, то какие-то отдельные части кода необходимо настраивать под определенную ОС, например, под iOS, но тем не менее
большая часть кода может совпадать. Это позволяет разработчикам существенно сэкономить время и ресурсы на создание приложений под все поддерживаемые платформы.
В качестве языка разработки используется язык программирования Dart.
При постороении приложения Flutter транслирует код на Dart в нативный код приложения с помощью Dart AOT (компиляция приложения перед его запуском), которое можно запускать на Android или iOS или
другой платформе. Однако при разработке приложения для ее ускорения Flutter использует JIT (компиляция приложения в процессе его запуска).
Надо отметить, что Flutter относительно новый фреймворк. Хотя прототип фреймворка появился еще в 2015 году, а первая альфа-версия вышла в мае 2017
года, но первый стабильный релиз — Flutter 1.0 увидел свет только в декабре 2018 года. Тем не менее регулярно с небольшой периодичностью ыходят подверсии,
добавляя новую функциональноть и исправляя имеющиеся баги. На момент публикации данной статьи последней стабильной версией является
Flutter 3, которая вышла в мае 2022 года, но постоянно выходят новые подверсии, которые также привносят нововведения во фреймворк (например, на момент
написания данной статьи последней подверсией является 3.0).
Что используется для разрабоки под Flutter? Для для написания кода программы можно использовать любой полюбившийся текстовый редактор и затем
с помощью утилит командной строки из Flutter SDK компилировать приложение. Однако для таких сред как Android Studio и IntelliJ IDEA, а также текстового редактора Visual Studio Code компания Google выпустила специальные
плагины, которые позволяют упростить разработку. Поэтому зачастую для разработки под Flutter используются именно Android Studio и IntelliJ IDEA.
Установка Flutter SDK
На странице https://flutter.dev/docs/get-started/install/ можно найти ссылки на на загрузку SDK для разных операционных систем. Рассмотрим,
как установить Flutter SDK на Windows и MacOS.
Установка Flutter на Windows
Чтобы начать разрабатывать приложения с помощью Flutter, необходимо установить SDK. Но прежде всего следует отметить, что для работы Flutter SDK
в Windows в системе должен быть установлен Git for Windows, который можно найти по адресу https://git-scm.com/download/win.
Также Flutter использует Android SDK. Самый легкий способ установить Android SDK — сразу установить Android Studio, вместе с которой будут установлены вс необходимые инструменты.
Непосредственно для установки Flutter SDK перейдем на страницу https://flutter.dev/docs/get-started/install/windows.
На этой странице найдем в секции Get the Flutter SDK ссылку на zip-архив с Flutter SDK и загрузим его:
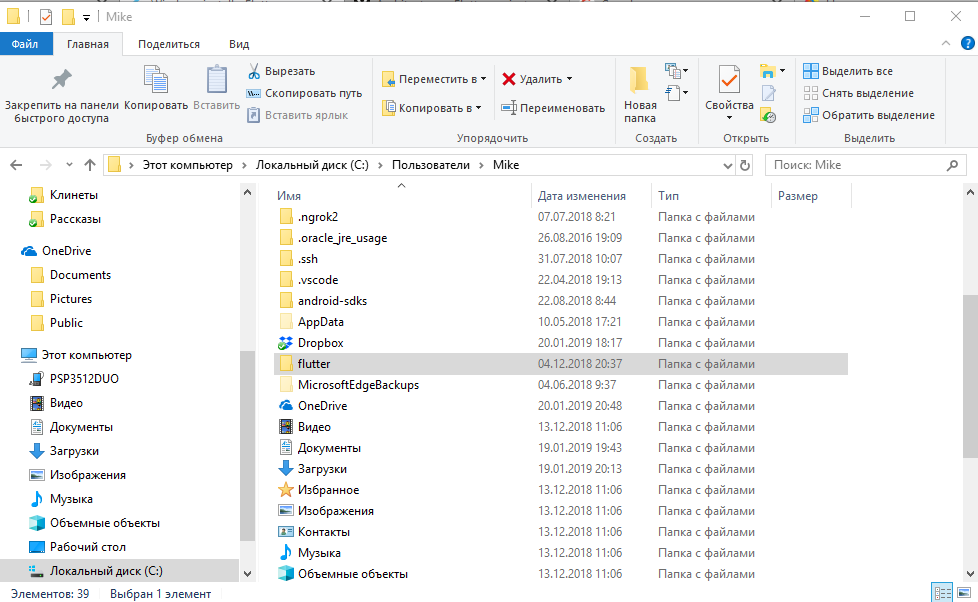
Далее распакуем архив, например, на диске С. Например, в моем случае архив распакован в папку C:\flutter.
В распакованном архиве в папке flutter\bin мы найдем инструменты для компиляции приложения. Например,
в моем случае полный путь к этой папке C:\flutter\bin:
Если мы работаем в Windows, то для добавления переменной среды через поиск найдем найдем параметр «Изменение переменных среды текущего пользователя». Для этого введем в поле поиска «Изменение переменных»:
Выберем пункт «Изменение переменных среды текущего пользователя». Затем нам откроется окно, где мы можем увидеть все переменные среды. (Также можно перейти через Параметры и пункт Система ->Дополнительные параметры системы ->Переменные среды)
Здесь нам надо изменить переменную Path, добавив путь к папке bin в Flutter SDK. Для этого выберем пункт Path и нажмем на
кнопку «Изменить»:
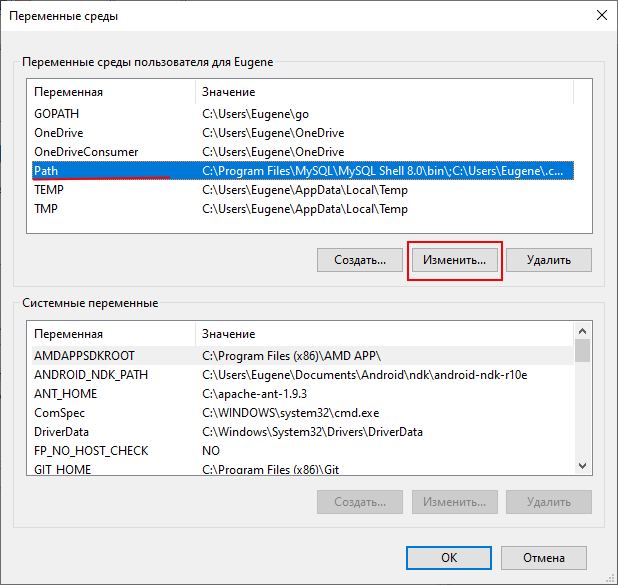
Далее нажмем на кнопку «Создать» и появившееся поле ввода введем путь к папке bin из Flutter SDK:

Чтобы проверить корректность установки Flutter, откроем командную строку и введем команду flutter. Если Windows распознает
ее, и последует вывод некоторой справочной информации (например, как использовать те или иные команды в консоли), то flutter установлен и настроен.

В качестве альтернативы установить Flutter SDK можно через Git. Для этого необходимо в командной строке перейти к папке, где должен располагаться
SDK и далее выполнить в командной строке следующую команду:
git clone -b stable https://github.com/flutter/flutter.git
В данном случае с репозитария на гитхабе будет загружена последняя стабильная версия Flutter SDK. И опять же подчеркиваю, что для выполнения этой команды необходимо
установить Git for Windows, как было написано выше.
Установка Flutter на MacOS
Для установки и обновления Flutter использует git, поэтому необходимо установить git.
Однако если установлен Xcode, то git устанавливать не надо, так как Xcode уже включает git.
Для установки Flutter SDK перейдем на страницу https://flutter.dev/docs/get-started/install/macos и
найдем на странице ссылку на Flutter SDK и загрузим его:
Далее поместим папку с Flutter SDK где-нибудь на жестком диске. Например, в моем случае Flutter SDK расположен в корневой папке текущего пользователя
(Users/eugene).
Для использования Flutter SDK в треминале, необходимо добавить путь к папке bin в SDK в системные переменные. Добавление для текущего окна терминала:
export PATH="$PATH:[Путь к папке с Flutter SDK]/flutter/bin"
При первом использовании команды flutter произойдет загрузка Dart SDK.
Обновление Flutter
Если впоследствии необходимо будет обновить Flutter, то для этого достаточно будет выполнить в командной строке команду
Поскольку Flutter активно развивается, то лучше обновляться регулярно.
Время на прочтение
5 мин
Количество просмотров 26K

Итак, с презентацией Google первой стабильной версии Flutter, которая случилась 4 декабря 2018 г. начался процесс изменения ландшафта на полях мобильного программирования. Появился новый игрок, способный изменить правила самой игры. Теперь из одной базы кода можно создавать сразу два нативных (т.е. «родных» для среды выполнения) приложения — для iOS и Android. В отличие от т.н. гибридных приложений, которые под капотом используют JavaScript, приложения созданные на Flutter работают быстро и плавно, поскольку код написанный на языке программирования Dart (для тех кто знаком с Java или C# с этим языком будет комфортно) затем компилируется (
AoT
, т.е. предварительно) в машинный код: отдельно для Android, и отдельно для iOS.
Поэтому, если вы изучите Dart и Flutter, вы сможете писать нативные приложения для двух самых популярных мобильных операционных систем, т.е. быть одновременно Android и iOS разработчиком. И это, вероятно, ещё не предел, поскольку было объявлено, что Google ведёт работу по расширению Flutter на предмет возможности создания с его помощью приложений для Windows, Mac и Web (проект Flutter для Web носит название Hummingbird — Колибри). В итоге может получиться так, что зная Dart и Flutter вы сможете писать
всё
очень многое. Поэтому многие IT эксперты назвали 2018 год — годом Flutter.
Теперь за дело. Сейчас мы сделаем следующее
- Установим Flutter SDK, и создадим проект из командной строки Windows.
- Установим, JDK, Android Studio, плагины для Flutter и Dart, и создадим проект в Android Studio.
- Установим VS Code, расширения для Flutter и Dart, и создадим проект в VS Code.
Устанавливаем Flutter и создаём проект из командной строки
Переходим на страницу установки Flutter, выбираем свою операционную систему — Windows, Mac или Linux (здесь будет описано для Windows 10, как наиболее популярной ОС), и скачиваем zip файл, содержащий Flutter
SDK
. Затем распаковываем zip, например, в папку текущего пользователя, как показано на скриншоте:
Сейчас пропишем путь к flutter\bin в переменную Path среды пользователя Windows (Этот компьютер -> Свойства -> Дополнительные параметры системы -> Переменные среды):
Можно создавать проект из командной строки Windows:
flutter create my_app
Готово! Файлы проекта можно редактировать любым текстовым редактором, хоть в блокноте. Но это хорошо разве что для мелких правок. Поэтому мы…
Устанавливаем JDK, Android Studio (вместе с Android SDK) и необходимые плагины
Скачиваем последнюю версию Java SE Development Kit 8 для своей операционной системы (потребуется для Android
SDK
), устанавливаем на свой компьютер, следуя за мастером установки, и создаём системную переменную среды JAVA_HOME с указанием пути к
JDK
, например: C:\Program Files\Java\jdk1.8.0_201.

Теперь скачиваем Android Studio. Запускаем процесс установки, следуя за мастером установки, и обращаем внимание на путь, куда будет установлен Android
SDK
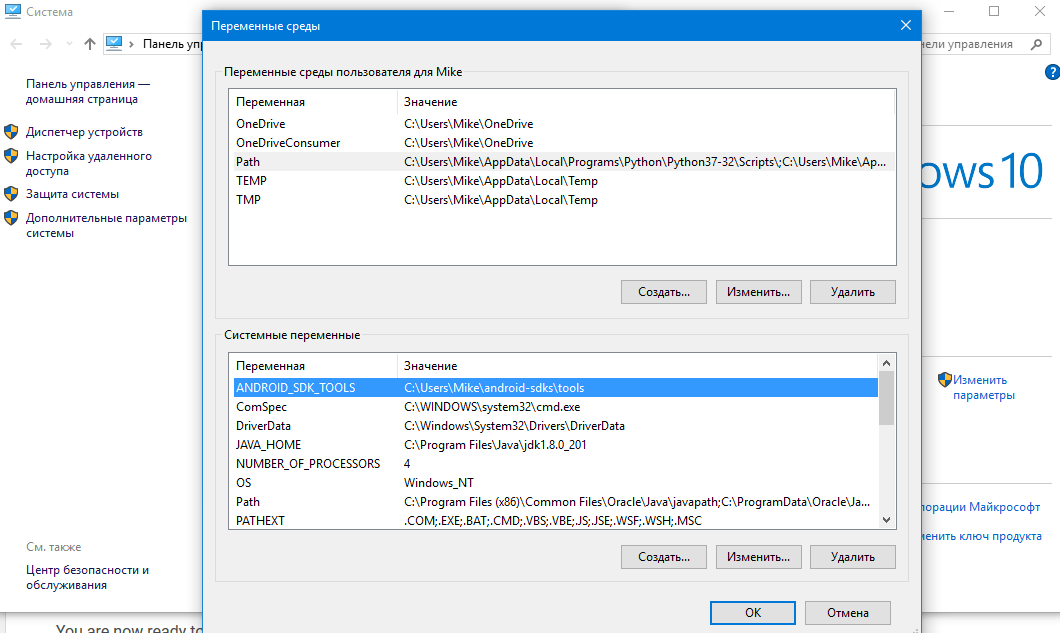
. Создаём системную переменную среды ANDROID_SDK_TOOLS с указанием пути к папке \tools в Android SDK, примерно так:
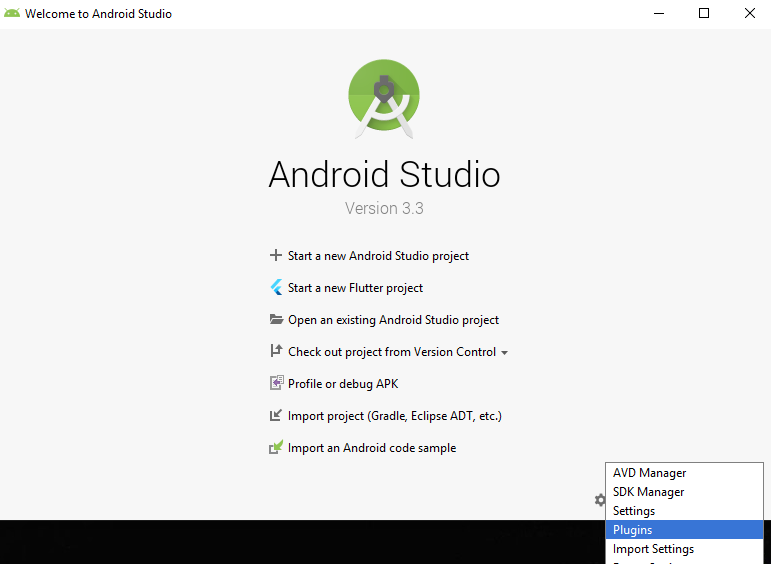
Когда всё готово — запускаем Android Studio, и устанавливаем плагины Flutter и Dart. Для этого в начальном экране Android Studio справа внизу жмём на значок шестерёнки и выбираем Plugins:
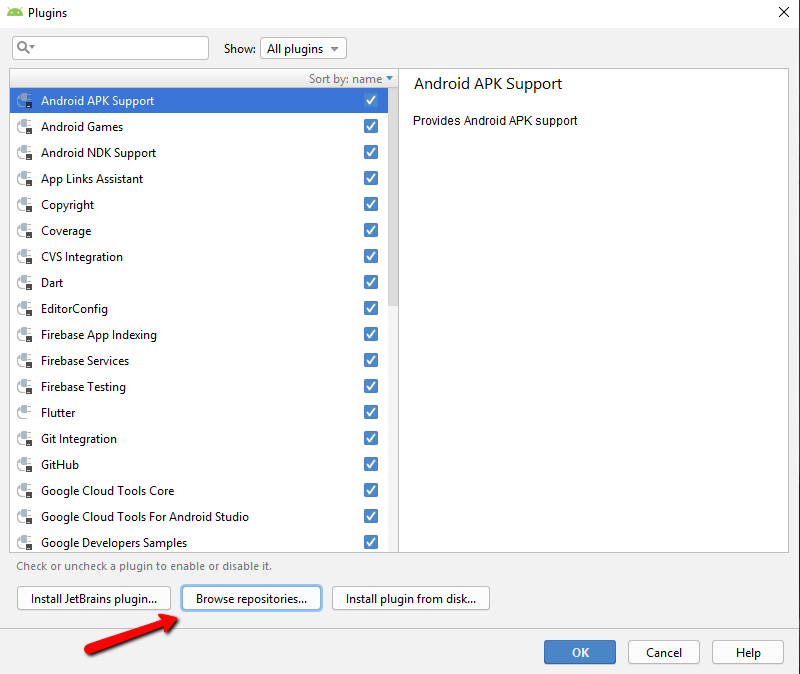
В открывшемся окне внизу нажимаем кнопку Browse repositories…
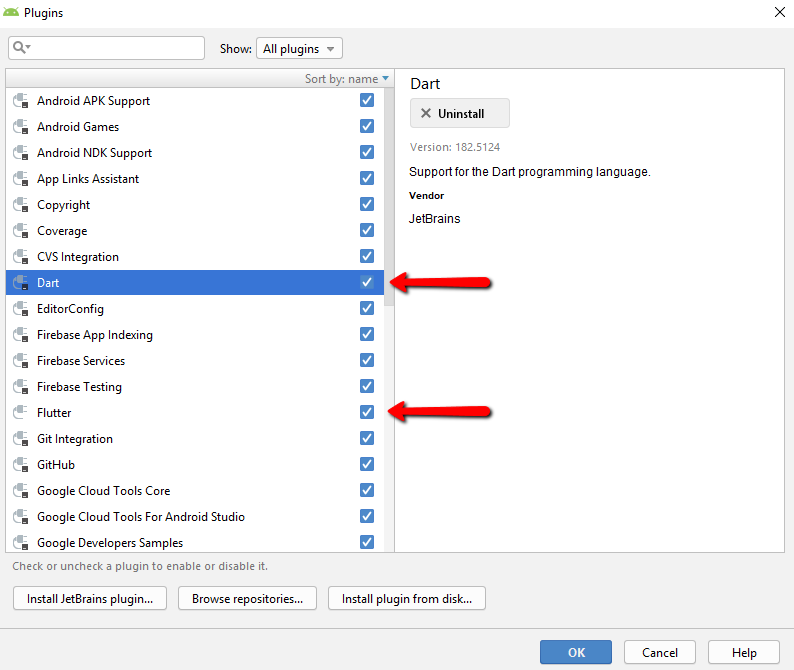
В поисковую строку вводим flutter, выбираем и устанавливаем (у меня уже установлен, поэтому не видно соответствующей кнопки):

Android Studio предложит также установить плагин Dart от которого зависит работа плагина Flutter. Соглашаемся. В итоге у вас должно быть установлено как минимум два плагина:
Перезапускаем Android Studio, и теперь давайте убедимся, что всё идёт хорошо. Для этого в командной строке выполним команду:
flutter doctorСканирование займёт десяток секунд, и затем вы можете увидите примерно такой результат:

А возможно будет пункт, отмеченный красным крестиком, с пояснением (на английском), что вами ещё не приняты какие-то лицензии (licences), касающиеся Android
SDK
, и предложение их принять (Y/n). Примите их, напечатав в командной строке Y. Возможно это придётся сделать несколько раз (если имеется несколько лицензий).
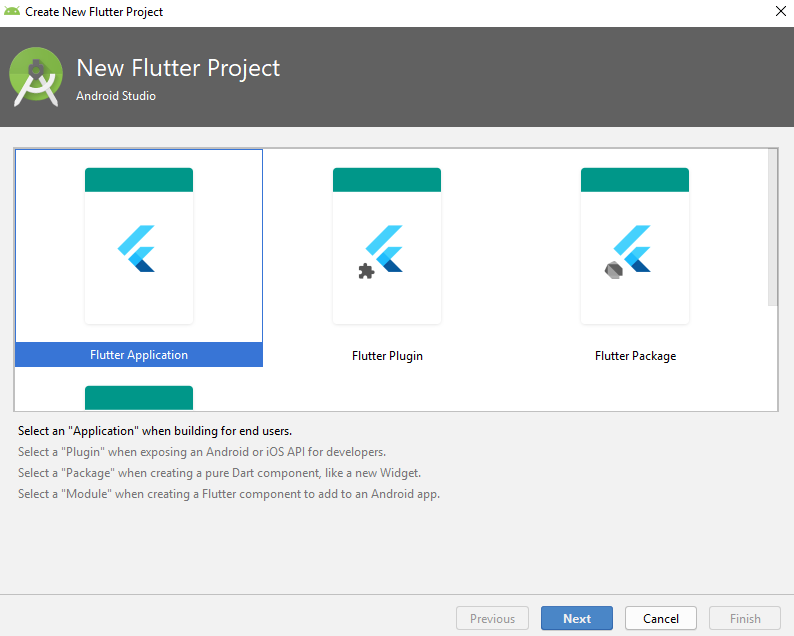
Вот мы и готовы создать Flutter проект в Android Studio. После установки плагинов Flutter и Dart в начальном экране Android Studio должна появится опция Start a new Flutter project. Выбираем её:

Далее соглашаемся с выбранной по умолчанию опцией Flutter Application и нажимаем кнопку Next:
Указываем название проекта, путь к папке Flutter
SDK
, путь к папке проекта, даём краткое описание проекта (опционально), и вновь нажимаем кнопку Next:

Наконец, указываем доменное имя (которое в реверсивном порядке будит использовано как ID Android приложения), а также опционально — поддержку языков Kotlin и Swift (если не указать — по умолчанию будут поддерживаться только Java и Objective-C). Нажимаем кнопку Finish.

В зависимости от производительности компьютера, ждём несколько минут пока проект будет создан… Готово! Он должен выглядеть примерно так:
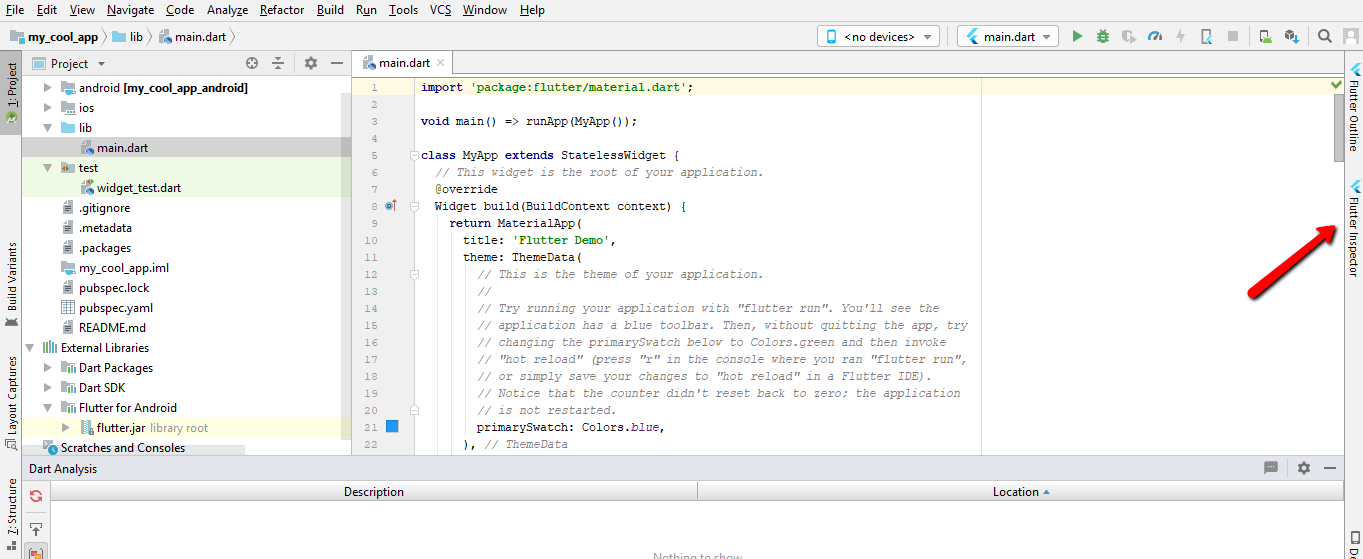
Обратите внимание на стрелку, указывающую на вкладку Flutter Inspector. В этом инспекторе имеется функционал, позволяющий делать ряд очень полезных во время разработки вещей, в т.ч. просмотр приложения на девайсе Android в режиме представления на iOS!
И наконец, устанавливаем VS Code, расширения, и создаём третий Flutter проект
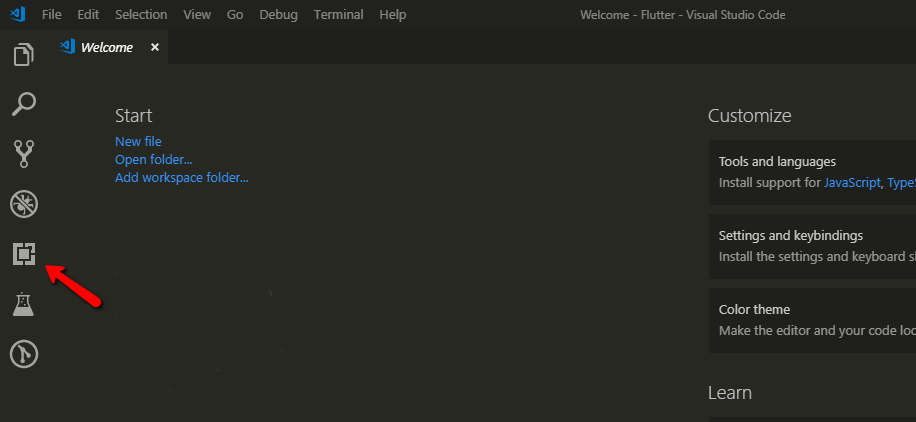
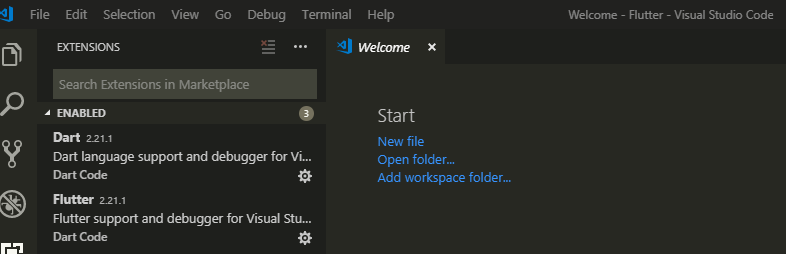
Скачиваем последнюю версию Visual Studio Code для своей операционной системы, устанавливаем на свой компьютер, следуя за мастером установки, и запускаем VS Code. Затем на боковой панеле нажимаем на кнопку Extensions (показана стрелкой) или на клавиатуре — Ctrl+Shift+X:
С помощью поиска ищем расширение Flutter.
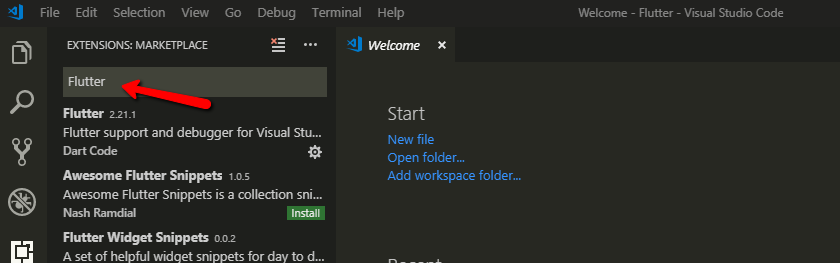
VS Code, как и в случае с Android Studio, предложит установить необходимое дополнительное расширение Dart. Устанавливаем и его. В итоге должны иметь два (или более) активированных расширения:
А теперь создаём Flutter проект. Нажимаем на значок шестерёнки в левом нижнем углу, и выбираем Command Pallete… (или на клавиатуре — Ctr+Shift+P). В командной строке Command Pallete начинаем печатать flutter, и из появившегося списка выбираем Flutter: New Project:

Даём проекту название и нажимаем клавишу Enter:

Появится диалоговое окно, предлагающее выбрать папку, в которой необходимо создать Flutter проект. Выбираем и нажимаем кнопку с длинным названием Select a folder to create the project in:

Минута ожидания… И, готово!

Итоги
Мы установили необходимое программное обеспечение (всё бесплатное!), и создали проект Flutter тремя различными способами: из командной строки, с помощью Android Studio, с помощью VS Code. Каким способом создавать проект и в какой среде разработки (
IDE
) лучше с ним работать — каждый решает сам. Например, я предпочитаю быстро создать проект из командной строки, затем открыть его в VS Code и большую часть времени над проектом работать именно в нём, т.к. VS Code довольно быстрый. Но когда надо хорошо протестировать внешний вид и производительность приложения — открываю проект в Android Studio, чтобы использовать имеющийся пока только там Flutter Inspector, обладающий, как я уже говорил, рядом очень полезных опций.
Заключение
На сегодня всё. Другие материалы следуют. Кому подобное читать интересно — подписывайтесь на уведомления о новых публикациях. Подписаться можно на этом сайте (кнопка Подписаться внизу), или на Telegram-канал IT Туториал Захар, или на одноимённое сообщество в VK, или Twitter @mikezaharov.
Flutter SDK Installation on Windows
Start creating apps by installing Flutter on your Windows operating system. You need the following minimum equipment before you can install Flutter on Windows:
| Operating Systems | Windows 7 SP1+ (64-bit), x86-64 based |
| Disk Space | 1.32 GB (It does not include disk space for IDE/tools) |
| Windows Tools | Windows PowerShell 5.0, Git for Windows 2.x |
| IDE | Android Studio (Official), Visual Studio Code |
| SDK | Android SDK, Flutter SDK |
Flutter is essentially Google’s portable user interface (UI) toolkit, which can be used to create attractive, natively-built applications for mobile, desktop, and the web from a single codebase.
In the case of Git for Windows, you should ensure that you can execute git commands from the command line or PowerShell.
Having installed all these tools on your Windows OS, it’s time for Flutter SDK installation on Windows. Visit the Flutter SDK’s official site to download and install it.
Table of Contents
Flutter SDK Installation Process on Windows:
Follow the below steps to install Flutter on Windows:
- Navigate to flutter.dev on your webpage.
- On the top menu bar, select Docs > Get Started > Install > Windows.
Git and PowerShell
- Once Git has been installed on your Windows computer, restart the system. The next step is the Flutter Software Development Kit (Flutter SDK) installation on Windows. Download the latest version (as of today) by clicking the link below.

- This tool allows us not only to build flutter projects but also to transform them into native mobile applications. The main tool for creating a flutter UI is the Flutter SDK, to put it simply.
- Once the zip file has been downloaded, extract the “flutter” folder (drag and drop) to any system path or directory where you have read-write access. Due to permission issues, it is usually preferable to make a new folder in a different directory from the system drive (in my case, the target location is F: > development > flutter).
- Right-click the “flutter” folder twice to start over. Open a command prompt window by double-clicking the file named “flutter_console.bat.” It should look something like this:
- This console is actually a Windows terminal that the developer can use to execute flutter commands. A list of all available flutter commands can be obtained by typing “flutter.”
Even though having a terminal to run flutter commands and create projects is useful, it would still be better and more convenient to store all of our flutter projects somewhere else on our system for easy access. Let’s continue on our journey!
People, who read this article also read: Flutter Liquid Swipe Animation
Configuring Flutter SDK for the First time
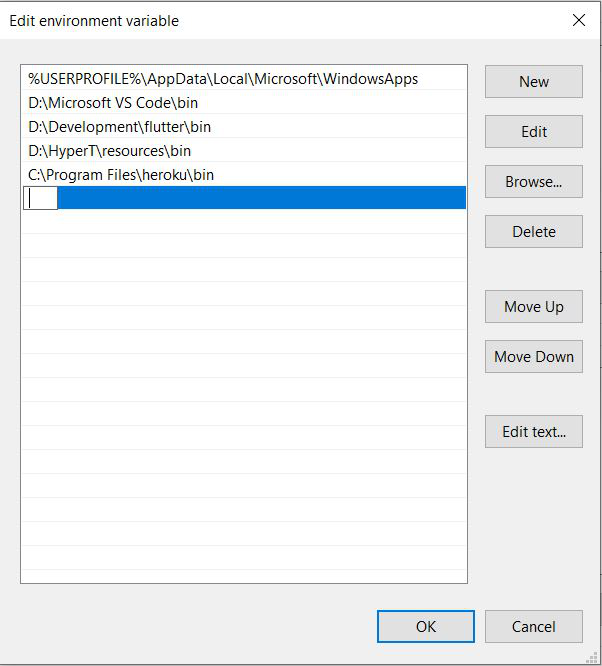
- Examine and modify environment variables to gain access to the entire system. On the flutter installation page’s official Docs page, scroll down to “Update your path” for instructions. You can do this by going to Control Panel > System and Security > System > Advanced System Settings > Environment Variables… On your screen, a dialog box with a list of the accessible environment variables appears.
- Environment variables are global system variables that are present at the root level and help configure different parts of Windows. The flutter tool will now be unlocked for use across all of your system’s PowerShell and Command Prompt instances and added as an environment variable for direct access (rather than being launched via the .bat executable).
Look over the following steps to accomplish this:
- Under the list of User Variables, look for the ‘Path’ variable. Create a new variable (‘New…’). If it isn’t already there, create it and set its value to the ‘flutter\bin’ directory.
- In order to add a new entry, double-click on a column below the variable labeled “Path.” It should look something like this:

- Copy the directory of the flutter\bin folder in its entirety, then paste it in the path. To finish the setup, click “Ok” twice. Ensure that all open Command Prompt/Windows PowerShell windows have been closed at this point.
Now determine if your flutter framework is accessible from anywhere in the world. To accomplish this, launch any terminal (such as Command Prompt) and type “flutter” to see if you receive the same list of commands as you did earlier from the.bat terminal. If so, your system has been successfully configured to use flutter at the root level. If not, you should think about running the setup again.
Analyzing the Application
The next step is to analyze and determine what is needed and what needs to be installed. Enter “Flutter Doctor” in the Command Prompt terminal to check for any additional requirements.
Here’s what the previous version looked like:
The flutter doctor check indicates that flutter was successfully installed on our system, but the Android tools and Android Studio are not present. Additionally, we observe that there are no connected devices. In order to run the flutter apps you created, the following step entails installing Android tools on your device.
Installing Android emulators and tools on Android devices.
- Downloading and installing Android Studio is the first step. To do this, go to the Android Studio official website and select “Download Android Studio.”
- You can proceed once you have accepted the license agreements. To initiate the download, click the last download button.
The next step is the Flutter SDK installation on Windows after the download is finished.
Flutter SDK Installation on Windows
Before continuing, make sure that Android Studio and Android Virtual Device are both selected under “Components.” Running different kinds and sizes of Android emulators to test your flutter project requires the Android Virtual Device, which is a crucial tool. Go ahead and click “Next.”
Choose the directory you want to install your file in. A different path other than the system drive should be chosen, it is advised. Once done, click on ‘Next‘.
Select “Install” at the end. The installation won’t be finished for a few seconds. You should select the “Launch Android Studio” checkbox. Click on “Finish.”
Wait for Android Studio to start up on your computer. Next > Custom > Next must be selected from the home screen.
To save time and trouble, it is advised to use the default path for the Java Development Kit location in the following step. The UI appearance you want for Android Studio should be selected in the following step. Click ‘Next‘.
The following action is somewhat significant. Keep in mind to check all the necessary boxes precisely as they are shown below. Those kits that have already been installed can be disregarded, and you can continue. Choose “Next.” You can choose the Android SDK folder you want.
Click “Finish” once you’ve finished. All the Android tools required for the execution of your flutter projects will now be installed by Android Studio. Waiting is preferable because this could take some time.
We are now prepared to design and develop Flutter projects in Android Studio and execute them on a real or simulated Android device (emulator).
Setting Up an Android Emulator
To build your application, you can use either an Android device or an Android emulator. It depends totally on you.
Visit the official documentation page and follow the detailed instructions for setting up an Android device. By clicking the link, you can download The Google USB Driver and install it. This can also be installed using Android Studio, which you can then use to develop the application by connecting to a real Android device.
Now, setting up the Android device is the only thing left to do. Now that the flutter framework is up and running, you can create gorgeous apps using devices or emulators. Go crazy!
People, who read this article also read: Flutter LayoutBuilder Widget Example Step by Step
Flutter SDK Installation on macOS
You must have the following components on your system in order to install Flutter on macOS.
| Operating System | macOS (64-bit) |
| Disk Space | 2.8 GB (does not include disk space for IDE/tools). |
| Tools | git 2.x |
| IDE | Xcode (Official) |
To install the Flutter SDK on macOS, follow the steps below:
- Visit the official website to download the most recent Flutter SDK installation bundle.
- To the desired location, extract the installation bundle. To extract using the terminal, enter the commands listed below.
cd ~/development
unzip ~/Downloads/flutter_macos_1.22.6-stable.zip- Your path should also include the flutter.
export PATH="$PATH:`pwd`/flutter/bin"- With the help of the flutter doctor command, you can determine whether flutter is set up properly by updating the PATH for the current session.
The steps below should be followed for permanent PATH configuration:
- Change the $HOME/.bashrc or $HOME/.bash_profile file.
- Replace [PATH_TO_FLUTTER_GIT_DIRECTORY] with the location of the folder into which you extracted the Flutter SDK when inserting the line below.
export PATH="$PATH:[PATH_TO_FLUTTER_GIT_DIRECTORY]/flutter/bin"- To automatically refresh the source file, open a new terminal window or run source $HOME/. to refresh the current terminal window. The Flutter SDK is now fully configured, and you can use flutter doctor to view additional configuration reports.
Flutter SDK installation on Linux
The following minimal requirements must be present on your operating system in order to install Flutter on Linux:
| Operating Systems: | Linux (64-bit) |
| Disk Space: | 600 MB (It does not include disk space for IDE/tools). |
| Tools: | bash curl file git 2.x mkdir rm unzip which xz-utils zip |
| Shared libraries: | libGLU.so.1 |
On a Linux operating system, snapd is the fastest way to install the Flutter SDK. Follow the official instructions to install snapd on Linux if you haven’t already.
Run the following command in the terminal once Snapd has been installed.
sudo snap install flutter --classicRun the following command to determine whether Flutter has been installed after using snapd:
In this way, you can do Flutter SDK installation on Windows, macOS, and Linux. Both the Flutter SDK and the Android SDK are necessary to create an app with Flutter. When you install Android Studio, the Android SDK is also installed.
Check the following Video for Further detailed instructions: