Elasticsearch can be installed on Windows using the Windows .zip archive. This
comes with a elasticsearch-service.bat command which will setup Elasticsearch to run as a
service.
This package contains both free and subscription features.
Start a 30-day trial to try out all of the features.
On Windows the Elasticsearch machine learning feature requires the Microsoft Universal
C Runtime library. This is built into Windows 10, Windows Server 2016 and more
recent versions of Windows. For older versions of Windows it can be installed
via Windows Update, or from a
separate download.
If you cannot install the Microsoft Universal C Runtime library you can still
use the rest of Elasticsearch if you disable the machine learning feature.
The latest stable version of Elasticsearch can be found on the
Download Elasticsearch page.
Other versions can be found on the
Past Releases page.
Enable automatic creation of system indicesedit
Some commercial features automatically create indices within Elasticsearch.
By default, Elasticsearch is configured to allow automatic index creation, and no
additional steps are required. However, if you have disabled automatic index
creation in Elasticsearch, you must configure
action.auto_create_index in elasticsearch.yml to allow
the commercial features to create the following indices:
action.auto_create_index: .monitoring*,.watches,.triggered_watches,.watcher-history*,.ml*
If you are using Logstash
or Beats then you will most likely
require additional index names in your action.auto_create_index setting, and
the exact value will depend on your local configuration. If you are unsure of
the correct value for your environment, you may consider setting the value to
* which will allow automatic creation of all indices.
Run Elasticsearch from the command lineedit
Run the following command to start Elasticsearch from the command line:
When starting Elasticsearch for the first time, security features are enabled and
configured by default. The following security configuration occurs
automatically:
-
Authentication and authorization are enabled, and a password is generated for
theelasticbuilt-in superuser. -
Certificates and keys for TLS are generated for the transport and HTTP layer,
and TLS is enabled and configured with these keys and certificates. - An enrollment token is generated for Kibana, which is valid for 30 minutes.
The password for the elastic user and the enrollment token for Kibana are
output to your terminal.
We recommend storing the elastic password as an environment variable in your shell. Example:
$ELASTIC_PASSWORD = "your_password"
If you have password-protected the Elasticsearch keystore, you will be prompted to
enter the keystore’s password. See Secure settings for more details.
By default Elasticsearch prints its logs to the console (STDOUT) and to the <cluster file within the logs directory. Elasticsearch logs some
name>.log
information while it is starting, but after it has finished initializing it
will continue to run in the foreground and won’t log anything further until
something happens that is worth recording. While Elasticsearch is running you can
interact with it through its HTTP interface which is on port 9200 by default.
To stop Elasticsearch, press Ctrl-C.
Enroll nodes in an existing clusteredit
When Elasticsearch starts for the first time, the security auto-configuration process
binds the HTTP layer to 0.0.0.0, but only binds the transport layer to
localhost. This intended behavior ensures that you can start
a single-node cluster with security enabled by default without any additional
configuration.
Before enrolling a new node, additional actions such as binding to an address
other than localhost or satisfying bootstrap checks are typically necessary
in production clusters. During that time, an auto-generated enrollment token
could expire, which is why enrollment tokens aren’t generated automatically.
Additionally, only nodes on the same host can join the cluster without
additional configuration. If you want nodes from another host to join your
cluster, you need to set transport.host to a
supported value
(such as uncommenting the suggested value of 0.0.0.0), or an IP address
that’s bound to an interface where other hosts can reach it. Refer to
transport settings for more
information.
To enroll new nodes in your cluster, create an enrollment token with the
elasticsearch-create-enrollment-token tool on any existing node in your
cluster. You can then start a new node with the --enrollment-token parameter
so that it joins an existing cluster.
-
In a separate terminal from where Elasticsearch is running, navigate to the directory
where you installed Elasticsearch and run the
elasticsearch-create-enrollment-tokentool
to generate an enrollment token for your new nodes.bin\elasticsearch-create-enrollment-token -s node
Copy the enrollment token, which you’ll use to enroll new nodes with
your Elasticsearch cluster. -
From the installation directory of your new node, start Elasticsearch and pass the
enrollment token with the--enrollment-tokenparameter.bin\elasticsearch --enrollment-token <enrollment-token>
Elasticsearch automatically generates certificates and keys in the following directory:
- Repeat the previous step for any new nodes that you want to enroll.
Configure Elasticsearch on the command lineedit
Elasticsearch loads its configuration from the %ES_HOME%\config\elasticsearch.yml
file by default. The format of this config file is explained in
Configuring Elasticsearch.
Any settings that can be specified in the config file can also be specified on
the command line, using the -E syntax as follows:
.\bin\elasticsearch.bat -Ecluster.name=my_cluster -Enode.name=node_1
Values that contain spaces must be surrounded with quotes. For instance -Epath.logs="C:\My Logs\logs".
Typically, any cluster-wide settings (like cluster.name) should be
added to the elasticsearch.yml config file, while any node-specific settings
such as node.name could be specified on the command line.
Check that Elasticsearch is runningedit
You can test that your Elasticsearch node is running by sending an HTTPS request to port
9200 on localhost:
curl --cacert %ES_HOME%\config\certs\http_ca.crt -u elastic:$ELASTIC_PASSWORD https://localhost:9200
|
Ensure that you use
|
The call returns a response like this:
{
  "name" : "Cp8oag6",
  "cluster_name" : "elasticsearch",
  "cluster_uuid" : "AT69_T_DTp-1qgIJlatQqA",
  "version" : {
    "number" : "8.10.2",
    "build_type" : "tar",
    "build_hash" : "f27399d",
    "build_flavor" : "default",
    "build_date" : "2016-03-30T09:51:41.449Z",
    "build_snapshot" : false,
    "lucene_version" : "9.7.0",
    "minimum_wire_compatibility_version" : "1.2.3",
    "minimum_index_compatibility_version" : "1.2.3"
  },
  "tagline" : "You Know, for Search"
}
Install and run Elasticsearch as a service on Windowsedit
You can install Elasticsearch as a service that runs in the background or starts
automatically at boot time without user interaction.
-
Install Elasticsearch as a service. The name of the service and the value of
ES_JAVA_HOMEwill be made available during install:C:\elasticsearch-8.10.2\bin>elasticsearch-service.bat install Installing service : "elasticsearch-service-x64" Using ES_JAVA_HOME (64-bit): "C:\jvm\jdk1.8" The service 'elasticsearch-service-x64' has been installed.
-
Start Elasticsearch as a service. When Elasticsearch starts, authentication is enabled by
default:C:\elasticsearch-8.10.2\bin>bin\elasticsearch-service.bat start
TLS is not enabled or configured when you start Elasticsearch as a service.
-
Generate a password for the
elasticuser with the
elasticsearch-reset-passwordtool. The password is output
to the command line.C:\elasticsearch-8.10.2\bin>\bin\elasticsearch-reset-password -u elastic
While a JRE can be used for the Elasticsearch service, due to its use of a client
VM (as opposed to a server JVM which offers better performance for long-running
applications) its usage is discouraged and a warning will be issued.
The system environment variable ES_JAVA_HOME should be set to the path
of the JDK installation that you want the service to use. If you upgrade the
JDK, you are not required to the reinstall the service but you must set the
value of the system environment variable ES_JAVA_HOME to the path to the new
JDK installation. However, upgrading across JVM types (e.g. JRE versus SE) is
not supported, and does require the service to be reinstalled.
Manage Elasticsearch as a service on Windowsedit
Run the elasticsearch-service.bat script in the bin\ folder to install,
remove, manage, or configure the service and potentially start and stop the
service from the command line.
C:\elasticsearch-8.10.2\bin>elasticsearch-service.bat

Usage: elasticsearch-service.bat install|remove|start|stop|manager [SERVICE_ID]
The script requires one parameter (the command to execute), followed by an
optional one indicating the service id (useful when installing multiple
Elasticsearch services).
The commands available are:
|
|
Install Elasticsearch as a service |
|
|
Remove the installed Elasticsearch service (and stop the service if started) |
|
|
Start the Elasticsearch service (if installed) |
|
|
Stop the Elasticsearch service (if started) |
|
|
Start a GUI for managing the installed service |
Customize service settingsedit
The Elasticsearch service can be configured prior to installation by setting the following environment variables (either using the set command from the command line, or through the System Properties→Environment Variables GUI).
|
|
A unique identifier for the service. Useful if installing multiple instances |
|
|
The user to run as, defaults to the local system account. |
|
|
The password for the user specified in |
|
|
The name of the service. Defaults to |
|
|
The description of the service. Defaults to |
|
|
The installation directory of the desired JVM to run the service under. |
|
|
Service log directory, defaults to |
|
|
Configuration file directory (which needs to include |
|
|
Any additional JVM system properties you may want to apply. |
|
|
Startup mode for the service. Can be either |
|
|
The timeout in seconds that procrun waits for service to exit gracefully. Defaults to |
At its core, elasticsearch-service.bat relies on Apache Commons Daemon project
to install the service. Environment variables set prior to the service installation are copied and will be used during the service lifecycle. This means any changes made to them after the installation will not be picked up unless the service is reinstalled.
By default, Elasticsearch automatically sizes JVM heap based on a node’s
roles and total memory. We recommend this default sizing for most
production environments. If needed, you can override default sizing by manually
setting the heap size.
When installing Elasticsearch on Windows as a service for the first time or running Elasticsearch
from the command line, you can manually Set the JVM heap size.
To resize the heap for an already installed service,
use the service manager: bin\elasticsearch-service.bat manager.
The service automatically configures a private temporary directory for use
by Elasticsearch when it is running. This private temporary directory is
configured as a sub-directory of the private temporary directory for the user
running the installation. If the service will run under a different user, you
can configure the location of the temporary directory that the service should
use by setting the environment variable ES_TMPDIR to the preferred location
before you execute the service installation.
-
Using the Manager GUI
-
It is also possible to configure the service after it’s been installed using the manager GUI (
elasticsearch-service-mgr.exe), which offers insight into the installed service, including its status, startup type, JVM, start and stop settings amongst other things. Invokeelasticsearch-service.bat managerfrom the command-line to open the manager window.
Most changes (like JVM settings) made through the manager GUI will require a restart of the service to take affect.
Connect clients to Elasticsearchedit
When you start Elasticsearch for the first time, TLS is configured automatically for the
HTTP layer. A CA certificate is generated and stored on disk at:
%ES_HOME%\config\certs\http_ca.crt
The hex-encoded SHA-256 fingerprint of this
certificate is also output to the terminal. Any clients that connect to Elasticsearch,
such as the
Elasticsearch Clients,
Beats, standalone Elastic Agents, and Logstash must validate that they trust the
certificate that Elasticsearch uses for HTTPS. Fleet Server and Fleet-managed
Elastic Agents are automatically configured to trust the CA certificate.
Other clients can establish trust by using either the fingerprint of the CA
certificate or the CA certificate itself.
If the auto-configuration process already completed, you can still obtain the
fingerprint of the security certificate. You can also copy the CA certificate
to your machine and configure your client to use it.
Use the CA fingerprintedit
Copy the fingerprint value that’s output to your terminal when Elasticsearch starts, and
configure your client to use this fingerprint to establish trust when it
connects to Elasticsearch.
If the auto-configuration process already completed, you can still obtain the
fingerprint of the security certificate by running the following command. The
path is to the auto-generated CA certificate for the HTTP layer.
openssl x509 -fingerprint -sha256 -in config/certs/http_ca.crt
The command returns the security certificate, including the fingerprint.
The issuer should be Elasticsearch security auto-configuration HTTP CA.
issuer= /CN=Elasticsearch security auto-configuration HTTP CA
SHA256 Fingerprint=<fingerprint>
Use the CA certificateedit
If your library doesn’t support a method of validating the fingerprint, the
auto-generated CA certificate is created in the following directory on each Elasticsearch
node:
%ES_HOME%\config\certs\http_ca.crt
Copy the http_ca.crt file to your machine and configure your client to use this
certificate to establish trust when it connects to Elasticsearch.
Directory layout of .zip archiveedit
The .zip package is entirely self-contained. All files and directories are,
by default, contained within %ES_HOME% — the directory created when
unpacking the archive.
This is very convenient because you don’t have to create any directories to
start using Elasticsearch, and uninstalling Elasticsearch is as easy as
removing the %ES_HOME% directory. However, it is advisable to change the
default locations of the config directory, the data directory, and the logs
directory so that you do not delete important data later on.
| Type | Description | Default Location | Setting |
|---|---|---|---|
|
home |
Elasticsearch home directory or |
Directory created by unpacking the archive |
|
|
bin |
Binary scripts including |
|
|
|
conf |
Configuration files including |
|
|
|
conf |
Generated TLS keys and certificates for the transport and HTTP layer. |
|
|
|
data |
The location of the data files of each index / shard allocated |
|
|
|
logs |
Log files location. |
|
|
|
plugins |
Plugin files location. Each plugin will be contained in a subdirectory. |
|
|
|
repo |
Shared file system repository locations. Can hold multiple locations. A file system repository can be placed in to any subdirectory of any directory specified here. |
Not configured |
|
Installing Elasticsearchedit
Hosted Elasticsearch Serviceedit
Elastic Cloud offers all of the features of Elasticsearch, Kibana, and Elastic’s Observability, Enterprise Search, and Elastic Security solutions as a hosted service
available on AWS, GCP, and Azure.
To set up Elasticsearch in Elastic Cloud, sign up for a free Elastic Cloud trial.
Self-managed Elasticsearch optionsedit
If you want to install and manage Elasticsearch yourself, you can:
- Run Elasticsearch on any Linux, MacOS, or Windows machine.
- Run Elasticsearch in a Docker container.
- Set up and manage Elasticsearch, Kibana, Elastic Agent, and the rest of the Elastic Stack on Kubernetes with Elastic Cloud on Kubernetes.
To try out Elasticsearch on your own machine, we recommend using Docker and running both Elasticsearch and Kibana. For more information, see Run Elasticsearch locally.
Elasticsearch install packagesedit
Elasticsearch is provided in the following package formats:
Java (JVM) Versionedit
Elasticsearch is built using Java, and includes a bundled version of
OpenJDK from the JDK maintainers (GPLv2+CE) within
each distribution. The bundled JVM is the recommended JVM.
To use your own version of Java, set the ES_JAVA_HOME environment variable.
If you must use a version of Java that is different from the bundled JVM, it is
best to use the latest release of a supported
LTS version of Java.
Elasticsearch is closely coupled to certain OpenJDK-specific features, so it may not
work correctly with other JVMs. Elasticsearch will refuse to start if a known-bad
version of Java is used.
If you use a JVM other than the bundled one, you are responsible for reacting
to announcements related to its security issues and bug fixes, and must
yourself determine whether each update is necessary or not. In contrast, the
bundled JVM is treated as an integral part of Elasticsearch, which means that Elastic
takes responsibility for keeping it up to date. Security issues and bugs within
the bundled JVM are treated as if they were within Elasticsearch itself.
The bundled JVM is located within the jdk subdirectory of the Elasticsearch home
directory. You may remove this directory if using your own JVM.
Содержание
- Введение
- 1. Требования к компьютеру
- 2. Установка Elasticsearch
- 3. Подключение к Elasticsearch при развертывании экземпляра продукта
- 4. Пример типового файла конфигурации Elasticsearch
- История изменений
Версия документа: 1.4
Дата публикации: 09.11.2022
Введение
Для работы Comindware Business Application Platform требуется сервер Elasticsearch версии 8.10.2, для других версий содержимое файлов конфигурации и порядок установки могут быть иными.
В настоящем документе представлены требования к конфигурации компьютера для сервера Elasticsearch, инструкции по установке и настройке конфигурации сервера и службы Elasticsearch в ОС Windows, а также приведен пример типового файла конфигурации.
Только после того, как служба Elasticsearch запущена, можно приступать к развертыванию Comindware Business Application Platform, указав путь к серверу Elasticsearch.
1. Требования к компьютеру
Сервер Elasticsearch создает значительную нагрузку на вычислительные ресурсы компьютера, поэтому рекомендуется:
- использовать отдельный SSD-диск для хранения журналов и данных сервера Elasticsearch;
- осуществлять мониторинг свободного места на диске, так как сервер перестает записывать данные, если на диске мало свободного места;
- использовать высокопроизводительный компьютер с достаточным объемом ОЗУ и количеством ядер ЦП, так как для обработки каждого индекса создается отдельный поток, а индексов может быть много.
2. Установка Elasticsearch
Для установки Elasticsearch необходимо распаковать исполняемые файлы из ZIP-архива, а затем настроить переменные среды, службу Elasticsearch и конфигурацию сервера.
В процессе установки и настройки Elasticsearch все команды следует выполнять от имени администратора.
2.1. Скачайте файл elasticsearch-8.10.2-windows-x86_64.zip c дистрибутивом Elasticsearch по следующей ссылке: https://www.elastic.co/downloads/past-releases/elasticsearch-8-1-0
2.2. Распакуйте архив в целевую папку, например: C:\Program Files\Elastic\Elasticsearch8.10.2
Последующие инструкции подразумевают, что сервер Elasticsearch установлен в эту папку.
2.3. Настройте переменные среды, как указано ниже.
- Путь к исполняемым файлам Elasticsearch:
ES_HOME: C:\Program Files\Elastic\Elasticsearch\8.10.2 - Путь к JDK (требуется версия, совместимая с текущей версией Elasticsearch):
ES_JAVA_HOME: C:\Program Files\Elastic\Elasticsearch\8.10.2\jdk - Папка с файлами конфигурации:
ES_PATH_CONF: C:\Program Files\Elastic\Elasticsearch\8.10.2\config - Папка с файлами журналов:
SERVICE_LOG_DIR: C:\ProgramData\Elastic\Elasticsearch\8.10.2\logs - Директива для автоматического запуска службы:
ES_START_TYPE: auto
2.4. Настройте службу Elasticsearch с помощью файла конфигурации elasticsearch.yml
Можно скопировать его содержимое из раздела «Пример типового файла конфигурации Elasticsearch».
2.5. Зарегистрируйте службу Elasticsearch, выполнив следующую команду: "C:\Program Files\Elastic\Elasticsearch\8.10.2\bin\elasticsearch-service.bat" install
2.6. Запустите службу Elasticsearch, выполнив следующую команду: "C:\Program Files\Elastic\Elasticsearch\8.10.2\bin\elasticsearch-service.bat" start
2.7. Сформируйте пароль для пользователя Elasticsearch с помощью следующей команды: "C:\Program Files\Elastic\Elasticsearch\8.10.2\bin\elasticsearch-reset-password.bat" –u elastic
2.8. Сохраните пароль, который отобразится на экране.
Примечание. Если пароль не отобразился, но отобразилось сообщение с предложением нажать клавишу «Y» для просмотра пароля, нажмите клавишу «Y».
2.9. Убедитесь, что служба Elasticsearch успешно зарегистрирована и работает с помощью приложения «Службы» (services.msc):

Сведения о службе Elasticsearch в приложении «Службы»
2.10. Если служба Elasticsearch не запустилась:
- проверьте ошибки конфигурации в журнале Elasticsearch по пути
C:\ProgramData\Elastic\Elasticsearch\8.10.2\logs(указанном в переменной окружения средыSERVICE_LOG_DIR). - устраните ошибки, запустите службу и проверьте работоспособность службы, как указано в параграфе 8.
3. Подключение к Elasticsearch при развертывании экземпляра продукта
3.1. Перед созданием экземпляра продукта укажите адрес сервера Elasticsearch, который будет использоваться по умолчанию для новых экземпляров продукта, в конфигурации Утилиты администрирования Comindware. См. документ «Утилита администрирования Comindware. Установка и использование».

Настройка стандартного адреса сервера Elasticsearch
3.2. Если не указать адрес сервера Elasticsearch в конфигурации Утилиты администрирования, то его потребуется указать при развертывании экземпляра продукта.
3.3. Укажите адрес сервера и префикс индекса Elasticsearch для данного экземпляра Comindware Business Application Platform.

Настройка адреса сервера Elasticsearch для экземпляра продукта
3.4. После развертывания экземпляра продукта в разделе «Администрирование системы» — «Подключения» будет отображаться настроенное подключение к Elasticsearch.

Подключение к Elasticsearch в новом экземпляре продукта
3.5. Чтобы изменить свойства подключения к Elasticsearch, дважды нажмите его строку в списке подключений.
3.6. Отобразится окно «Свойства подключения: Elasticsearch».
3.7. При необходимости измените свойства подключения, проверьте соединение и нажмите кнопку «Сохранить».

Настройка свойств подключения к Elasticsearch
3.8. После изменения свойств сервера Elasticsearch перезапустите экземпляр продукта с помощью Утилиты администрирования Comindware. См. документ «Утилита администрирования Comindware. Установка и использование».
4. Пример типового файла конфигурации Elasticsearch
Ниже приведен пример файла elasticsearch.yml для следующей конфигурации сервера:
- сервер Elasticsearch состоит из единственного узла;
- служба работает в локальной сети;
- включена аутентификация;
- служба доступна через порт
9201; - адрес сервера
http://testhost:9201; - путь к файлу конфигурации:
C:\Program Files\Elastic\Elasticsearch\8.10.2\config\elasticsearch.yml
#Начало файла конфигурации
#Разрешить свопинг памяти
bootstrap.memory_lock: false
#Название кластера
cluster.name: cmw
#Максимальное возможное количество шардов в кластере
#Система создает отдельный индекс для каждого объекта мониторинга, поэтому рекомендуется увеличить количество шардов до 3000
cluster.max_shards_per_node: 3000
#Стандартный номер порта 9200 изменен по соображениям безопасности
http.port: 9201
#Сетевые параметры
#Если доступ по сети не требуется, то закомментируйте строки #network.host и discovery.seed_hosts
#Замените имя компьютера — testhost — на реальное имя
network.host: testhost
discovery.seed_hosts:
— testhost
#Простейшая конфигурация с одним узлом
discovery.type: single-node
#Название узла
node.name: cmw
#Путь к папке с данными
path.data: d:\ProgramData\Elastic\Elasticsearch\data
#Путь к папке с журналами
path.logs: d:\ProgramData\Elastic\Elasticsearch\logs
#Путь к папке с резервными копиями #Путь должен указывать на существующий диск #Резервные копии должны храниться на отдельном диске отдельно от #основных данных #Раскомментируйте директиву path.repo, если требуется создавать резервные копии
#path.repo: d:elastic_backup
#Обычная лицензия
xpack.license.self_generated.type: basic
#Аутентификация включена
xpack.security.enabled: true
#Этот флаг требуется для записи данных в индексы
indices.id_field_data.enabled: true
#отключить геолокацию
ingest.geoip.downloader.enabled: false
История изменений
| Дата | Версия | Изменения |
|---|---|---|
| 06.04.2022 | 1.0 | Исходная версия. |
| 08.04.2022 | 1.1 | Добавлена директива отключения GeoIP в пример конфигурации. |
| 12.04.2022 | 1.2 | Добавлен раздел «Подключение к Elasticsearch при развертывании экземпляра продукта». |
| 27.05.2022 | 1.3 | Удален раздел «Правовая информация». |
| 09.11.2022 | 1.4 | Исправлены опечатки |
Ввиду того, что в будущем я планирую выпустить несколько статьей, основанных на работе с ElasticSearch, в этой статье я решил показать самые распространённые варианты его установки. В этой статье собраны все варианты установки Elasticsearch 7: на Ubuntu 18.10, Windows 10, Docker, Vagrant Homestead. Многие ищут статьи на тему быстрого старта по работе с ES, однако, любой старт начинается именно с установки^^.
- Установка Elasticsearch на Linux (Ubuntu 18.10)
- Установка Elasticsearch на Docker
- Установка Elasticsearch в Vagrant
- Установка Elasticsearch на Windows 10
Установка Elasticsearch на Linux/Ubuntu
Для того, чтобы установить Elasticsearch на Ubuntu, нужно открыть страницу их офф.документации.
При установке я использую Ubuntu 18.10, но, даже, если у вас другая версия, то процесс не будет иметь кардинальных отличий.
Для работы Elasticsearch на Linux, нужно сначала установить Java 8 версии, или более новую. Для этого, выполните код:
sudo apt-get update
sudo apt-get install openjdk-8-jdk
java -version
И получите окно вывод примерно с таким содержимым:

После чего, приступим к установке самого Elasticsearch.
Сначала нужно выполнить:
wget -qO - https://artifacts.elastic.co/GPG-KEY-elasticsearch | sudo apt-key add -В результате чего, эта команда должна вернуть ответ: OK.
После чего:
sudo sh -c 'echo "deb https://artifacts.elastic.co/packages/7.x/apt stable main" > /etc/apt/sources.list.d/elastic-7.x.list'Этой командой мы установим ElasticSearch 7 версии. Если вам нужна какая-то конкретная версия, или более старая версия, то измените версию на нужную, вместо
7.x
После чего, выполним следующие команды:
sudo apt update
sudo apt install elasticsearch
После выполнения этих команд, Elasticsearch будет установлен. Однако, он не запустится сразу после установки, запустить его придётся вручную, выполнив:
sudo systemctl enable elasticsearch.service
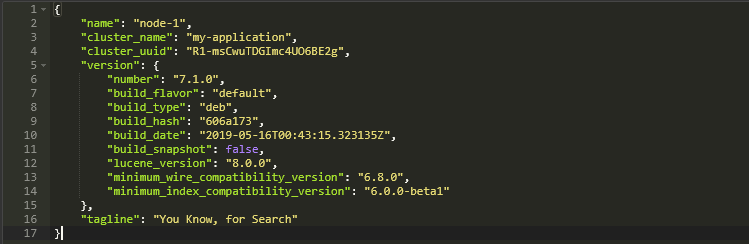
sudo systemctl start elasticsearch.serviceИ теперь, для того, чтобы удостовериться, что Elasticsearch успешно установлен, можем отправить HTTP-запрос на 9200 порт, на котором висит ES. Запрос отправим с помощью curl:
curl -X GET "localhost:9200/"И вы должны увидеть что-то вроде этого: 
Сам запуск Elastsearch займёт где-то 5-10 секунд. Потому, если вы увидете сообщение curl: (7) Failed to connect to localhost port 9200: Connection refused, подождите несколько секунд, и повторите свой запрос.
Если эта ошибка не пропадает, то это означает, что сервис не удаётся запустить. Вероятно, это из-за недостатка оперативной памяти. Для того, чтобы посмотреть подробный лог Elasticsearch, можете выполнить команду:
sudo journalctl -u elasticsearch
Но, уверен, что у вас всё запустилось, мои поздравления!
Настройка Elasticsearch
Если вам интересно, в какой директории Elasticsearch хранит данные, то они находятся в директории /var/lib/elasticsearch, конфигурационные данные в /etc/elasticsearch, а настройки Java для Elasticsearch расположены в файле /etc/default/elasticsearch.
По умолчанию Elasticsearch настроен только для локального доступа, для доступа только изнутри текущей системы, в которую он установлен. Вы не можете достучаться к нему удалённо. И, если клиент подключаемый к Elasticsearch запущен на том же сервере, что и сам Elasticsearch, вам не нужно менять конфигурационные файлы. Если это не так, то есть опция настройки удалённого доступа к Elasticsearch.
Удалённый доступ
Elasticsearch не имеет встроенной системы аутентификации, потому, если вы разрешите удалённый доступ, то получить информацию от Elasticsearch может кто угодно, кто имеет возможность выполнять HTTP-запросы к API. Если вы хотите разрешить удалённый доступ к серверу Elasticsearch, вам нужно настроить файрвол, и разрешить доступ к 9200 порту Elasticsearch сервера только для доверенных клиентов.
В Ubuntu стандартно установлено ПО по настройке файрвол UFW. По умолчанию, UFW установлен в систему, но не включён. Но, перед его включением, добавим одно правило для разрешения входящего трафика по SSH:
sudo ufw allow 22Теперь, разрешим удалённый доступ для доверенного IP адреса:
sudo ufw allow from x.x.x.x to any port 9200Вместо
x.x.x.xнапишите ваш реальный IP адрес. В моём случае, команда будет иметь видsudo ufw allow from 134.249.138.171 to any port 9200Если вы занимаетесь локальной разработкой, то можете не ограничивать доступ по конкретному IP, для этого, вместо предыдущей команды нужно выполнить:
sudo ufw allow to any port 9200
Теперь можно включать UFW:
sudo ufw enableИ последнее, проверим статус файрвола:
sudo ufw statusГде мы должны увидеть добавленное правило: 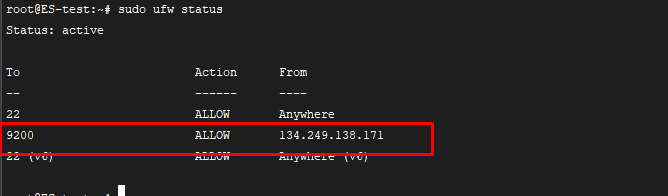
Теперь, когда файрвол настроен должным образом, следующим шагом будет редактирование конфигов Elasticsearch, и разрешение внешних подключения к Elasticsearch.
Для этого, откроем конфигурационный файл elasticsearch.yml:
sudo nano /etc/elasticsearch/elasticsearch.ymlГде нужно найти строку, которая содержит network.host, её нужно раскомментировать, и изменить значение на 0.0.0.0, раскомментировать http.port и добавить некоторые параметры, чтобы конфигурация имела вид:
transport.host: localhost
transport.tcp.port: 9300
network.host: 0.0.0.0
http.port: 9200
Для того, чтобы выйти из редактирования файла в редакторе
nano, нужно нажатьCTRL+C, напечатав символ согласияy.
Теперь, перезагрузим Elastisearch, чтобы изменения вступили в силу:
sudo systemctl restart elasticsearchИ это всё. Теперь у вас есть возможность подключения к Elastisearch удалённо.
И теперь, после всего проделанного, вы знаете, как настроить удалённое подключение к Elasticsearch. Теперь вы можете подключаться из любого места, и любого HTTP-клиента.
В этом пункте было показано, как установить Elasticsearch в Ubuntu 18.10. Теперь вы можете посетить офф.документацию для начала работы и более детального изучения основ работы с Elasticsearch.
Установка ElasticSearch в Docker
Если вы ещё не знакомы к Докером, то на сайте есть отличная статья по работе с ним.
Для начала, нужно скачать образ с предустановленным Elasticsearch:
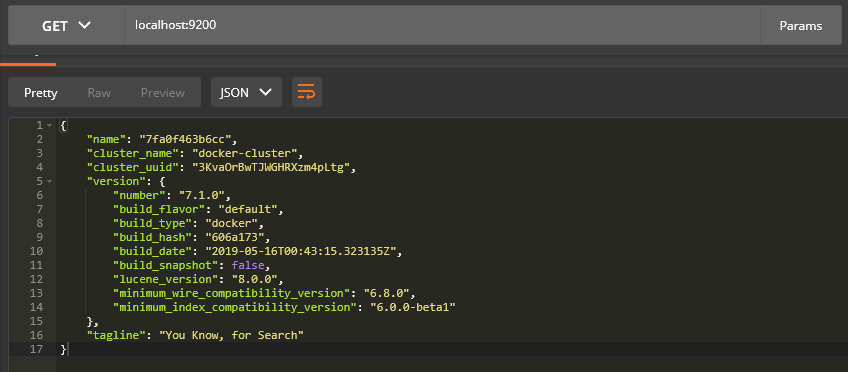
docker pull docker.elastic.co/elasticsearch/elasticsearch:7.1.0Теперь, когда скачивание дойдёт до конца, его можно запустить командой:
docker run -p 9200:9200 -p 9300:9300 -e "discovery.type=single-node" docker.elastic.co/elasticsearch/elasticsearch:7.1.0В результате чего, Elasticsearch станет доступен по адресу localhost:9200.
Установка Elasticsearch в Vagrant
Для того, чтобы установить Elasticsearch в Vagrant (Homestead) нужно добавить опцию elasticsearch в файле Homestead.yaml, указав нужную поддерживаемую версию. При создании виртуальной машины, по умолчанию, будет создан кластер под названием homestead.
Вы не должны предоставлять Elasticsearch больше, чем половина вашей доступной оперативной памяти, потому, убедитесь, что ваш Homestead настроен в соответствии этому замечанию.
box: laravel/homestead
ip: "192.168.10.10"
memory: 4096
cpus: 4
provider: virtualbox
elasticsearch: 7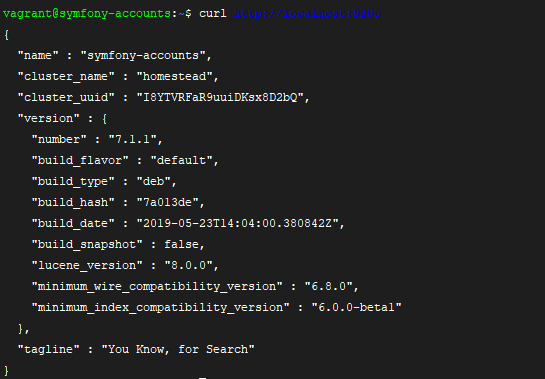
Для того, чтобы прокинуть порты для удалённого доступа, нужно дополнить Homestead.yaml:
box: laravel/homestead
ip: "192.168.10.10"
memory: 4096
cpus: 4
provider: virtualbox
elasticsearch: 7

# новые параметры прокидывания порта
ports:
    - send: 9200
      to: 9200
И, аналогично, как описывалось в секции настройки удалённого доступа, нужно прописать в файл /etc/elasticsearch/elasticsearch.yml новые параметры, разрешив удалённый доступ.
Будьте внимательны, и не оставляйте дублирующих параметров. Т.е., удалите старые, по-умолчанию заданные параметры
transport.host,http.port, и т.д.
После чего, удалённый доступ заработает. Учтите, что в этом случае, доступ к Elasticsearch будет осуществляться не по адресу localhost:9200, а по параметру IP, указанному в Homestead.yml. В моём случае, это 192.168.10.10:9200.
Установка Elasticsearch на Windows 10
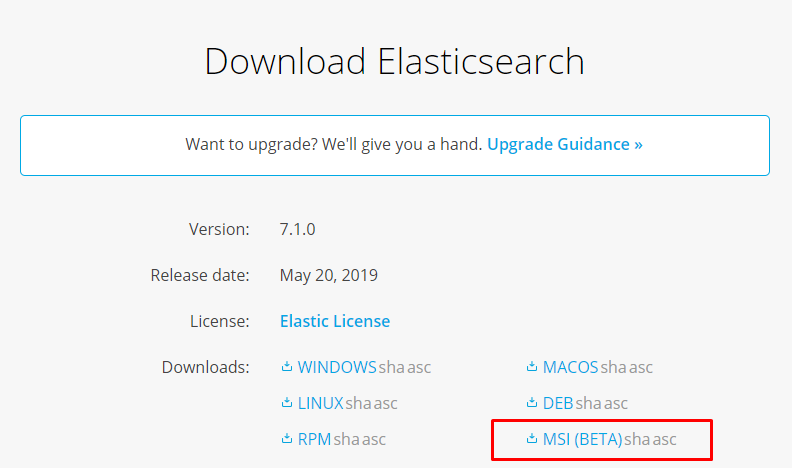
Для установки Elasticsearch на Windows, перейдите на страницу и выберите нужную версия для скачивания (я предпочитаю *.msi версию).
Используя графический интерфейс, установите настройки: директории для хранения данных, логов, и конфигов, или же, используйте настройки по-умолчанию.

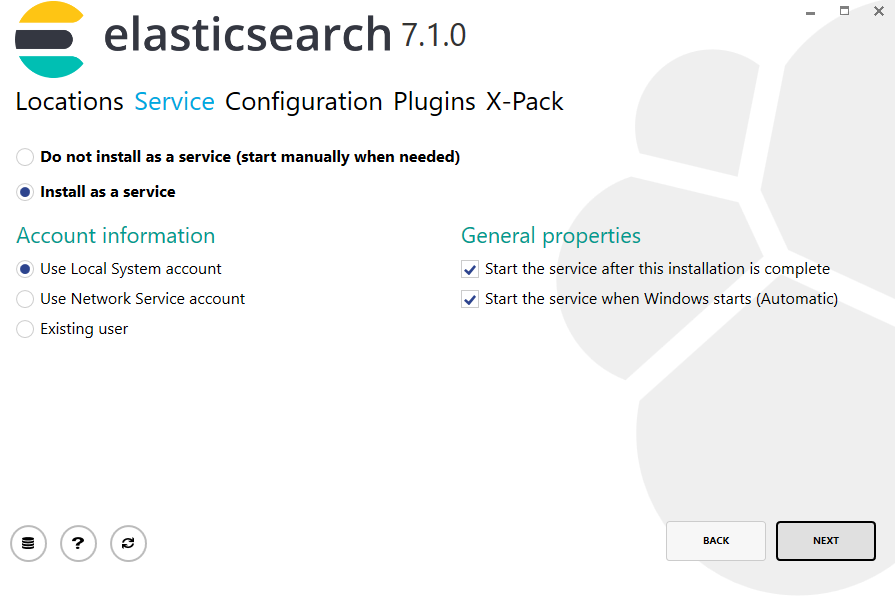
Потом, выберите, установка «as a service» или установка с ручной настройкой, если нужно. Когда установлено «as a service», вы можете так же настроить Windows аккаунт для запуска службы, а так же настроить поведение при старте вашей ОС (запускать ли автоматически и т.д.).
Основные системные настройки производятся на последней странице: указывается имя кластера, имя, размер ОЗУ и настройки сети.
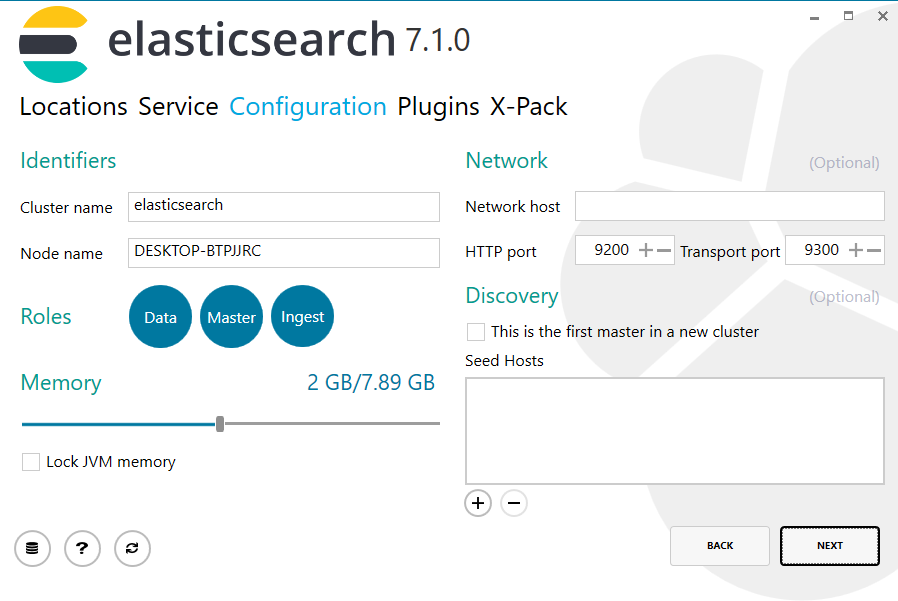
На следующей странице выбора плагинов можно ничего не выбирать, осталось подтвердить начало установки, нажав на кнопку Install.
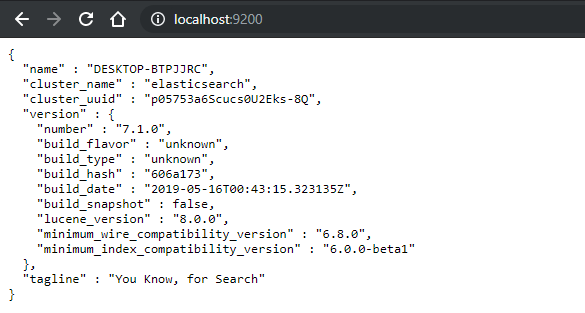
В конце установки, на вашем компьютере запустится служба Elasticsearch, и убедиться в этом можно, перейдя по адресу localhost:9200.
Резюме
В этой статье я показал, как устанавливать Elasticsearch 7 под разные операционные системы: Ubuntu и Windows. Так же, была рассмотрена установка, запуск и настройка Elasticsearch на Docker и Homestead Vagrant. Это была первая статья по работе с Elasticsearch, для того, чтобы в будущем показать подробные примеры по работе с ним.
Example
Prerequisites
The Windows version of Elasticsearch can be obtained from this link: https://www.elastic.co/downloads/elasticsearch. The latest stable release is always at the top.
As we are installing on Windows, we need the .ZIP archive. Click the link in the Downloads: section and save the file to your computer.
This version of elastic is «portable», meaning you don’t need to run an installer to use the program. Unzip the contents of the file to a location you can easily remember. For demonstration we’ll assume you unzipped everything to C:\elasticsearch.
Note that the archive contains a folder named elasticsearch-<version> by default, you can either extract that folder to C:\ and rename it to elasticsearch or create C:\elasticsearch yourself, then unzip only the contents of the folder in the archive to there.
Because Elasticsearch is written in Java, it needs the Java Runtime Environment to function. So before running the server, check if Java is available by opening a command prompt and typing:
java -version
You should get a response that looks like this:
java version "1.8.0_91"
Java(TM) SE Runtime Environment (build 1.8.0_91-b14)
Java HotSpot(TM) Client VM (build 25.91-b14, mixed mode)
If you see the following instead
‘java’ is not recognized as an internal or external command, operable program or batch file.
Java is not installed on your system or is not configured properly. You can follow this tutorial to (re)install Java. Also, make sure that these environment variables are set to similar values:
| Variable | Value |
|---|---|
| JAVA_HOME | C:\Program Files\Java\jre |
| PATH | …;C:\Program Files\Java\jre |
If you don’t yet know how to inspect these variables consult this tutorial.
Run from batch file
With Java installed, open the bin folder. It can be found directly within the folder you unzipped everything to, so it should be under c:\elasticsearch\bin. Within this folder is a file called elasticsearch.bat which can be used to start Elasticsearch in a command window. This means that information logged by the process will be visible in the command prompt window. To stop the server, press CTRLC or simply close the window.
Run as a Windows service
Ideally you don’t want to have an extra window you can’t get rid of during development, and for this reason, Elasticsearch can be configured to run as a service.
Before we could install Elasticsearch as a service we need to add a line to the file C:\elasticsearch\config\jvm.options:
The service installer requires that the thread stack size setting be configured in
jvm.optionsbefore you install the service. On 32-bit Windows, you should add-Xss320k[…] and on 64-bit Windows you should add-Xss1mto thejvm.optionsfile. [source]
Once you made that change, open a command prompt and navigate to the bin directory by running the following command:
C:\Users\user> cd c:\elasticsearch\bin
Service management is handled by elasticsearch-service.bat. In older versions this file might simply be called service.bat. To see all available arguments, run it without any:
C:\elasticsearch\bin> elasticsearch-service.bat

Usage: elasticsearch-service.bat install|remove|start|stop|manager [SERVICE_ID]
The output also tells us that there’s an optional SERVICE_ID argument, but we can ignore it for now. To install the service, simply run:
C:\elasticsearch\bin> elasticsearch-service.bat install
After installing the service, you can start and stop it with the respective arguments. To start the service, run
C:\elasticsearch\bin> elasticsearch-service.bat start
and to stop it, run
C:\elasticsearch\bin> elasticsearch-service.bat stop
If you prefer a GUI to manage the service instead, you can use the following command:
C:\elasticsearch\bin> elasticsearch-service.bat manager
This will open the Elastic Service Manager, which allows you to customize some service-related settings as well as stop/start the service using the buttons found at the bottom of the first tab.