

Hy welcome to the website thelifehax. My name is sushant maharjan, i am the owner of thelifehax and i love youtube and blogging too and it’s my passion
How to install Jarvis on windows 10 Easily
Hello there, how are you guys in this short article i’m sharing a simple A.I software with you guys. Yes it’s Ai software and it’s really awesome. Have you guys ever seen movie iron man ? if you did then you probably known that thing.
Download Jarvis
Yes your right it’s Jarvis, if you don’t know what is Jarvis then in short Jarvis is A.I (artificial intelligence).
You can actually make your computer control by your voice with this software. I’ve not develop this software it’s been developed by Team M.V.C (mega voice command).
To download you need to go to there site but it’s will be tedious for you guys so I’ve downloaded simple installer for you that will install exact same thing 🙂
So download it and install the software it’s really easy then follow my video.
Thank you for giving a time i will catch you guys later.
Check my previous post
You May Also Like…
Jarvis is a context-aware software program that recognizes your voice and executes commands. It was designed to run on Windows Vista and XP. What makes this application special is that it comprises various sensors. Although it was designed for two older versions of Windows, it works on Windows 11 and 10.
The application lets its sensors “listen” on various locations on your PC and perform actions once certain triggers are activated. To put it shortly, Jarvis learns from you, then tries to predict your actions based on context, depending on the rules you set for it. Jarvis is one of the best PC talking tools ever built.
What is Jarvis software?
Jarvis is definitely what you’re looking for if you’re interested in machine learning and want to experiment with a readily available project. It lets you create rules, view predictions, and monitor sensors to check if the app “sees” you right.
However, note that Jarvis has been most likely abandoned since the last update it received was in 2009. However, the program is still stable, as we managed not to trigger any crashes or freezes during its runtime on our PCs.
Jarvis system requirements
Jarvis, like any other software solution, has a list of requirements to run on your PC. Thus, you can’t run it if your computer doesn’t meet the minimum system requirements. However, let’s not jump to conclusions before we see what Jarvis’ prerequisites are:
- Operating system: Windows 11, 10, 8, 7, Vista, XP SP3
There’s pretty much nothing else required. However, as we’ve said before, you’re probably in the clear even if you don’t have Vista or XP. It’s better to see these two systems listed above as the absolute minimum. We’ve tested it on Windows 11 and 10, and it’s a go.
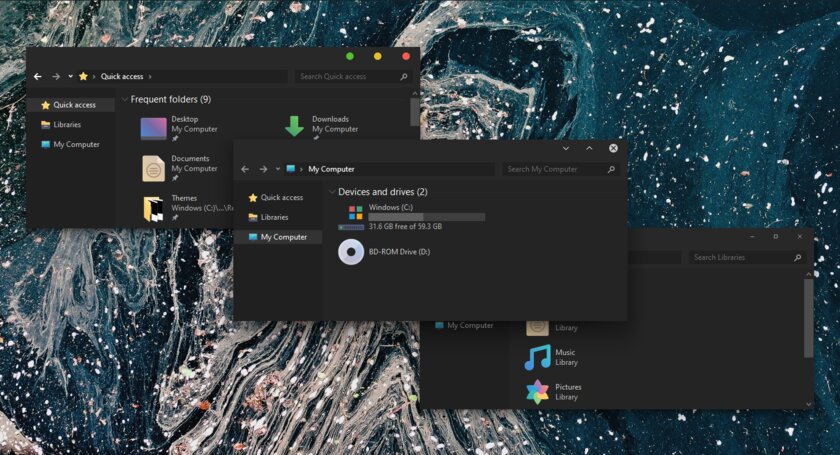
Screenshots
Our Review
- Pros
- It’s free
- It’s easy to install
- Pretty accurate predictions
- Cons
- Doesn’t do much else aside from predictions
Jarvis free
Even though you’d expect such a tool to cost a lot, the reality is wildly different. Jarvis doesn’t cost you a penny.
You can download it for free and use it for your leisure, and there’s no catch, either. No time limitation and no restricted feature.
How to install Jarvis on your PC
Assuming that you’ve downloaded the MSI package already, go ahead and launch it. Please note that the installer will conduct a short survey on your system to decide whether it’s fit to support the program.
If you’re in the clear, you’ll be able to proceed with the installation. Decide the destination path where you want to deploy Jarvis, then hit Next a couple more times. The program’s setup should be done in no time.
Jarvis runs in your system tray
Granted that the setup went uneventful, you can run Jarvis by clicking its Start menu icon. However, note that it might launch silently, meaning you probably won’t know it’s launched. That’s because Jarvis minimizes itself to your system tray and stays there until you need it.
Therefore, open your system tray, locate Jarvis’ icon, and right-click it. It’s the one that looks like a small yellow bell. The app’s main menu lets you configure rules, learners, predictions, and sensors to your liking. You can also access Jarvis’ preferences section from the same menu.
How to use Jarvis
First, open the tool’s Preferences window and enable system notifications. This step is necessary to see exactly what Jarvis can do for you through system notifications. Note that Jarvis needs to learn some things about you before interpreting sensor information, so be patient.
If you want to look at what details Jarvis collects from you, take a look at the contents of the Sensors window. You’ll see data such as USB devices, uptime, user activity level, explorer open paths, power sensor type, day of the week, available interfaces, inactive interfaces, IPv4 network address, and running processes.
Note that this is the way that Jarvis “sees” you.
Training a model for Jarvis
If you want to create a training model for this tool, launch any application you want and use the Ctrl+Alt+C key combo to spawn the training window. Customize the values to match your current context. After successfully creating the model, Jarvis will let you know if the context changes using system notifications.
Good, so you’ve created a training model. If you’d like to see Jarvis’ prediction of your context, right-click the systray icon and select Predictions. The tool spawns a small window and updates it automatically each time Jarvis predicts a change in your context.
It doesn’t affect the tool if you decide to close the prediction window. This program will continue to monitor your PC usage and attempt to provide you with accurate predictions. You can switch to a more discrete prediction display by left-clicking the notification icon. The context predictions will be displayed as small tooltips in the system notification area.
How to configure Jarvis
As mentioned above, you can find a configuration menu in Jarvis’ main menu. Right-click the small yellow bell icon in your systray, and select Preferences from the context menu. This will spawn a modest window where you can adjust general settings and options regarding learners, logging, and network.
For instance, you can modify the application’s startup behavior (i.e., set it to run on startup), check for updates automatically and enable or disable system notifications. You can also manually check for updates by clicking the appropriate button.
FAQ: learn more about Jarvis
- Can I use Jarvis to automate tasks?
No, you can only use Jarvis to perform context-sensing application predictions. In other words, you install Jarvis, run it, help it learn patterns in your app interactions, and analyze the predictions it generates.
- Is Jarvis free?
Yes, Jarvis is a free software application without any restrictions.
- Is Jarvis safe?
Jarvis is 100% safe. It doesn’t contain malware, so you can download, install, and use it on your PC without any issues.
Джарвис — это виртуальный интеллект, созданный Тони Старком, главным героем саги фильмов Marvel о Железном человеке. Этот умный помощник стал воплощением мечты многих фанатов кино про супергероев. Однако, что если мы скажем вам, что вы тоже можете установить своего собственного Джарвиса на своем персональном компьютере? В этой статье вы узнаете все, что необходимо, чтобы стать хозяином собственного виртуального интеллекта!
Первым шагом в установке Джарвиса на ПК является выбор операционной системы. Он должен быть одним из следующих вариантов: Windows 7, Windows 8 или Windows 10. Пожалуйста, убедитесь, что ваша система соответствует этим требованиям, прежде чем продолжать.
После того, как вы проверили, что ваша операционная система подходит для установки, вам понадобится скачать программное обеспечение, которое будет запускать Джарвиса. Хорошей новостью является то, что существует несколько бесплатных вариантов программного обеспечения, которые вы можете использовать. Однако мы рекомендуем загрузить «J.A.R.V.I.S Mark II», так как это одно из самых популярных и функциональных приложений.
Примечание: перед загрузкой программного обеспечения рекомендуется проверить его на наличие вирусов и других вредоносных программ. Всегда загружайте программное обеспечение только с надежных и проверенных источников.
Содержание
- Джарвис на ПК: подробное руководство для новичков
- Шаг 1: Скачать и установить Джарвиса
- Шаг 2: Настройка Джарвиса
- Шаг 3: Использование Джарвиса
- С чего начать: скачивание и установка
- Настройка базовых параметров
- Обучение системы голосовым командам
- Расширение функционала с помощью дополнительных модулей
- Интеграция голосового ассистента с другими программами
Джарвис на ПК: подробное руководство для новичков
Шаг 1: Скачать и установить Джарвиса
- Перейдите на официальный сайт Джарвиса и скачайте последнюю версию программы.
- Запустите загруженный файл и следуйте инструкциям мастера установки.
- После успешной установки Джарвис будет готов к использованию.
Шаг 2: Настройка Джарвиса
- После установки запустите программу и пройдите процесс первоначальной настройки.
- Укажите предпочтительные язык и настройки внешности Джарвиса.
- Задайте ключевые слова или фразы для активации Джарвиса. Например, «Джарвис» или «Слушай, Джарвис».
Шаг 3: Использование Джарвиса
- Чтобы активировать Джарвиса, произнесите ключевую фразу.
- После активации, Джарвис будет готов к выполнению ваших команд.
- Вы можете использовать голосовые команды или вводить текстовые команды через интерфейс программы.
- Джарвис сможет выполнить множество задач, таких как открытие приложений, поиск информации в интернете, создание напоминаний и т.д.
Следуя этому подробному руководству, вы сможете установить и использовать Джарвиса на вашем ПК. Наслаждайтесь удобством и эффективностью виртуального помощника!
С чего начать: скачивание и установка
Перед тем, как установить Джарвиса на ПК, необходимо выполнить несколько предварительных действий:
- Сначала убедитесь, что ваш компьютер соответствует минимальным системным требованиям для работы Джарвиса. Обычно это:
- Операционная система Windows 7 и выше;
- Оперативная память не менее 2 Гб;
- Свободное место на жестком диске не менее 500 Мб;
- Процессор с тактовой частотой не ниже 1 ГГц.
- Проверьте наличие интернет-соединения, так как Джарвису необходим доступ к сети для корректной работы.
После выполнения этих действий можно приступать к установке Джарвиса:
- Перейдите на официальный сайт разработчика и выберите раздел «Скачать».
- На странице загрузки выберите версию Джарвиса, подходящую для вашей операционной системы, и нажмите «Скачать». Файл установщика будет загружен на ваш компьютер.
- Откройте загруженный файл установщика Джарвиса.
- На экране появится мастер установки Джарвиса. Следуйте инструкциям мастера, принимая установку со стандартными параметрами или настраивая ее по своему усмотрению.
- Дождитесь завершения установки.
- После установки запустите Джарвиса и следуйте инструкциям по настройке, чтобы персонализировать его под свои нужды.
Поздравляю! Теперь у вас установлен Джарвис на ПК и вы можете начать пользоваться всеми его функциями. Удачи!
Настройка базовых параметров
После установки Джарвиса на ваш ПК, вам потребуется выполнить некоторые базовые настройки для корректной работы программы.
1. Запустите Джарвиса, дважды щелкнув на ярлыке на рабочем столе или выбрав программу из меню «Пуск».
2. При первом запуске вам будет предложено принять пользовательское соглашение. Ознакомьтесь с ним и, если вы согласны, нажмите кнопку «Принять».
3. Далее вам будет предложено указать язык, предпочтительный способ подключения к сети интернет и другие параметры. Выберите нужные настройки и нажмите кнопку «Далее».
4. Если вы хотите, чтобы Джарвис запускался автоматически при каждом включении ПК, поставьте галочку напротив опции «Запустить при старте».
5. После завершения настройки параметров, Джарвис будет готов к использованию. Вы можете начать задавать ему вопросы или команды.
Важно помнить, что эти параметры можно изменить позднее, при необходимости, в настройках программы. Рекомендуется периодически проверять и обновлять настройки, чтобы Джарвис работал максимально эффективно.
Обучение системы голосовым командам
После установки Джарвиса на ваш ПК, вы можете обучить систему распознавать и выполнять голосовые команды.
Для начала обучения перейдите в настройки Джарвиса и найдите раздел «Голосовые команды». Здесь вы можете добавить новые команды или изменить существующие.
Чтобы добавить новую команду, нажмите на кнопку «Добавить команду» и введите желаемую фразу, которую вы будете произносить для активации команды. Например, вы можете создать команду «Открой браузер», чтобы открывать веб-браузер голосовой командой.
После ввода фразы активации, выберите действие, которое хотите выполнить. Например, в случае с командой «Открой браузер», выберите приложение «Google Chrome» и укажите параметры, если необходимо.
Кроме того, вы можете назначить системе больше одной команды для определенного действия. Например, вы можете добавить команду «Открой браузер» и команду «Запусти Chrome», чтобы оба варианта произносимой фразы выполняли открытие веб-браузера.
Чтобы удалить или изменить существующую команду, просто найдите ее в списке команд в настройках Джарвиса и выберите соответствующий вариант действия.
После добавления или изменения голосовых команд сохраните настройки и проверьте их работоспособность, произнося фразы активации в микрофон Джарвиса.
Примечание: Обучение системы голосовым командам может занять некоторое время. Рекомендуется произносить фразы активации четко и отчетливо для более надежного распознавания.
Расширение функционала с помощью дополнительных модулей
Чтобы расширить функционал Джарвиса, вы можете устанавливать дополнительные модули. Эти модули предоставляют дополнительные возможности и навыки, которые могут быть полезны в различных сценариях использования.
Для установки дополнительных модулей можно воспользоваться официальным сайтом Джарвиса или специализированными хранилищами модулей. Каждый модуль обычно поставляется в виде архива, который нужно распаковать в определенную папку на вашем ПК.
После установки модуля вы можете активировать его, добавив соответствующую команду в настройки Джарвиса. При активации модуля Джарвис становится способным выполнять дополнительную функциональность, такую как воспроизведение музыки, управление домашней автоматизацией, получение новостей и многое другое.
Важно отметить, что перед установкой и активацией модулей вы должны убедиться, что они совместимы с вашей версией Джарвиса и что у вас есть все необходимые зависимости. Инструкции по установке и активации модулей обычно предоставляются вместе с архивом модуля или на сайте разработчика.
Не ограничивайтесь базовым функционалом Джарвиса! Установите дополнительные модули, чтобы получить больше возможностей и настроить Джарвис по своему вкусу.
Интеграция голосового ассистента с другими программами
У контрольной панели Джарвиса есть встроенный модуль для управления целью нашей голосовой командой. Мы можем использовать этот модуль для интеграции Джарвиса с различными программами. Например, мы можем настроить Джарвиса на открытие определенной программы при определенной голосовой команде.
Для интеграции Джарвиса с другими программами сначала откройте его контрольную панель и найдите раздел «Настройки». В этом разделе вы сможете найти список поддерживаемых программ, с которыми можно интегрировать Джарвиса.
Чтобы добавить интеграцию с программой, выберите ее из списка и следуйте инструкциям на экране. Обычно это включает в себя ввод пути к исполняемому файлу программы и назначение голосовой команды, которая будет открывать данную программу.
| Программа | Инструкции |
|---|---|
| Microsoft Word | Откройте раздел «Настройки», выберите «Microsoft Word» из списка программ, введите путь к исполняемому файлу «WinWord.exe» и назначьте голосовую команду, например: «Открой Word». |
| Google Chrome | Откройте раздел «Настройки», выберите «Google Chrome» из списка программ, введите путь к исполняемому файлу «chrome.exe» и назначьте голосовую команду, например: «Открой браузер». |
| Adobe Photoshop | Откройте раздел «Настройки», выберите «Adobe Photoshop» из списка программ, введите путь к исполняемому файлу «photoshop.exe» и назначьте голосовую команду, например: «Открой Фотошоп». |
После завершения настройки интеграции вы сможете использовать голосовую команду для открытия соответствующей программы. Например, вы можете сказать «Открой Word», и Джарвис автоматически откроет Microsoft Word.
Интеграция Джарвиса с различными программами значительно упрощает управление вашим ПК и повышает вашу производительность. Попробуйте настроить интеграцию со своими любимыми программами и наслаждайтесь новым уровнем комфорта и эффективности.
Version 1.5.5 — 31 May 2017
- Improved
- Performance improvements.
- Fixed
- Fixed a bug that would cause Jarvis Lite not to start when a microphone was not present or set to default. Now an error message is displayed instead.
- Fixed incorrect tooltips.
Version 1.5.4 — 03 Apr 2017
- Improved
- Performance improvements.
- Fixed
- Fixed a bug where a problem with saved shell commands wouldn’t always be detected.
- Fixed a problem where Jarvis would speak the date incorrectly for some system cultures.
Version 1.5.3 — 17 Aug 2016
- New
- Multiple custom commands can now be removed at once.
- You can now choose to disable default commands.
Version 1.5.2 — 15 Jul 2016
- Fixed
- Fixed a bug where an XML CDATA tag was displayed in the latest news window.
Version 1.5.1 — 27 Jun 2016
- New
- You can now choose to play audio media files inside Jarvis Lite automatically.
Version 1.5.0 — 26 Mar 2016
- Fixed
- Fixed an issue where asking for weather information wouldn’t work.
Version 1.4.9 — 16 Mar 2016
- New
- You can now input ‘[random]’ into the location box before a directory for shell commands to randomly select one file inside to launch.
- Improved
- Minor GUI improvements.
Version 1.4.8 — 12 Mar 2016
- New
- You can now drag a file or folder onto the browse button on custom shell commands.
- Improved
- Add, edit and remove buttons on custom commands now enable only when relevant.
- Increased the delay on all tooltips.
- Subtle colour change on unfocused windows.
- Fixed
- Fixed an issue where the social commands list on custom commands would have an obtrusive scrollbar with long commands.
Version 1.4.7 — 09 Mar 2016
- New
- You can now use the enter key when creating a new command to add it.
Version 1.4.6 — 21 Feb 2016
- New
- The preferences window now notifies you when you have unsaved changes and prompts you to save when closing the window.
- Added a warning when trying to open multiple instances, and the option to allow it.
Version 1.4.5 — 18 Feb 2016
- New
- Jarvis can now read out the latest news directly from the latest news window, just by pressing ‘listen’.
- Improved
- Categories on the show commands window are now formatted distinctly.
- Fixed
- Fixed an issue where the latest news window would open twice.
- Numerous other bug fixes in the latest news window.
Version 1.4.4 — 16 Feb 2016
- Fixed
- Fixed some icons on buttons not displaying properly.
Version 1.4.3 — 14 Feb 2016
This update is primarily to fix Windows 7 compatibility. A big thank you to Mark P.
- Improved
- Message boxes now have an updated style.
- Fixed
- Jarvis Lite now works on systems running Windows 7.
- Fixed listening hotkey not working when ctrl was selected as the first key.
Version 1.4.2 — 01 Feb 2016
- Fixed
- Fixed a crash caused by dragging some windows from certain points.
Version 1.4.1 — 27 Jan 2016
- New
- Added tooltips throughout the application.
- Fixed
- Fixed a problem that caused message box windows to be full screen.
- Fixed a graphical glitch with the preferences window.
- Fixed a problem where the transparency slider in preferences would not respond to arrow keys.
Version 1.4.0 — 25 Jan 2016
It is now 1 year since Jarvis Lite was first released, and we are celebrating with a brand new redesigned theme! We have also made huge improvements to the speed and efficiency of Jarvis Lite, along with a multitude of new features and improvements. A good update wouldn’t be without its fair share of bug fixes, and this update is no exception; fixing the listening hotkey, Google search and many, many more.
- New
- Added new default commands: «scroll up» and «scroll down».
- Added share buttons to the latest news window, with options including email, Twitter and LinkedIn.
- Improved
- Resigned all windows with a brand new theme.
- Increased the size of all windows to display more information.
- Increased the performance throughout the whole application.
- The storage space Jarvis Lite requires has been reduced.
- The latest news window now displays the date and time at which the news article was published.
- Responses for all custom commands except social commands are now automatically set to ‘[none]’ when left blank.
- Fixed
- Fixed an error that would prevent an error message being spoken if shell commands were setup incorrectly.
- Fixed a bug that prevented search Google from working.
- Fixed a problem where the listening hotkey would not toggle the listening status of Jarvis.
- Fixed numerous other small bugs and visual glitches.
Version 1.3.7 — 18 Jan 2016
- Improved
- Improved the efficiency of hotkey commands.
- Space has been added to the existing collection of keys that you could set in the custom hotkey commands.
- Fixed
- Fixed a problem where hotkey commands would not work correctly when no modifier key was selected.
- Fixed an error that would cause an incorrect error message to be spoken if social commands were setup incorrectly.
Version 1.3.6 — 29 Nov 2015
- New
- You can now input ‘[none]’ into the response box for all types of commands to prevent Jarvis from saying a response.
Version 1.3.5 — 15 Nov 2015
- New
- You can now choose whether or not to search Google’s encrypted subdomain or not in preferences.
- Improved
- Speed of weather report is now quicker.
Version 1.3.4 — 14 Nov 2015
- Improved
- Minor performance improvements.
- Fixed
- Fixed a graphical issue in the Custom Commands window.
Version 1.3.3 — 13 Nov 2015
- Improved
- The Main UI spinning ring and all images are now of a much higher quality.
- The Main UI Preferences, Commands and Dictation buttons have had the white background removed.
- Fixed
- Fixed a bug that caused the termination window browse list to not correctly update each time it was accessed.
Version 1.3.2 — 04 Aug 2015
- New
- «Temp Format» preference which allows the user to set the desired format of weather temperature information, between Celsius and Fahrenheit.
Version 1.3.1 — 01 Aug 2015
- New
- You can now set a custom command with multiple different commands linked to the same function. For example if you entered: ‘Hello|Hi Jarvis|Hey Jarvis’ as a command when setting a custom command, Jarvis will respond and carry out the function (shell, termination or hotkey command) whenever you say either of those commands. This system is pipe delimited, like the randomised responses feature. NOTE: There must not be any blank spaces either side of the pipe delimiter.
Version 1.3.0 — 16 Jul 2015
- New
- You can now set Jarvis to say one of many responses randomly. Use a pipe (|) as a delimiter to the possible responses that Jarvis could say. For example if you entered: ‘OK Sir|Sure thing|Already done’ as a response when setting a custom command, Jarvis will randomly pick one to respond to you with.
- Improved
- Space and Enter have been added to the existing collection of keys that you could set in the custom hotkey commands.
Version 1.2.9 — 11 Jul 2015
- New
- Edit button has been added to the custom commands window.
- Improved
- Main UI buttons are now black instead of blue.
Version 1.2.8 — 04 Jul 2015
- New
- The audio spectrum that is on the main UI is no longer static, but changes when Jarvis speaks.
- The buttons on the main UI have been redesigned with a blue color scheme.
Version 1.2.7 — 20 Jun 2015
- New
- Added new default commands: «start listening» and «stop listening» which allow you to start/stop Jarvis from listening.
Version 1.2.6 — 30 May 2015
- New
- Added Google search feature. Search anything on Google with just your voice. To use this feature, just say «search Google». After Jarvis’ prompt ‘what for?’ procede with your search content.
- Added new default commands: «stop talking», «stop speaking» and «cancel speech» which all cancel whatever Jarvis is currently saying.
Version 1.2.3 — 19 May 2015
- Fixed
- Fixed a bug that caused the Jarvis Lite GUI to reset to center screen.
Version 1.2.2 — 18 May 2015
- Improved
- GUI Transparency slider now only goes down to 10, rather than 0.
- Fixed
- Fixed an issue where setting the GUI transparency to less than 10 would not update the actual transparency.
- Fixed a bug that could cause a crash if the GUI transparency saved incorrectly.
Version 1.2.1 — 17 May 2015
- New
- «Always on top» feature in preferences which allows the user to set the Jarvis Lite main GUI to be topmost (stay on top of all other windows).
- «GUI transparency» feature in preferences — you can now change the opacity levels of the main Jarvis Lite interface.
Version 1.2.0 — 01 Apr 2015
- New
- Dictation feature: When you say «start dictation» Jarvis will type whatever you then say. Say «stop dictation» to exit back into command mode.
- Dictation button on MainUI to enable and disable dictation mode.
- Custom Hotkey Commands feature.
Version 1.1.0 — 09 Feb 2015
- New
- Added a stylish new HUD designed message box.
- Custom hotkey to start/stop Jarvis from listening. Choose from Ctrl/Shift/Alt + A-Z/0-9 in the Preferences Window (the hotkey is Alt+M by default).
- Start on Windows startup option in preferences.
- Universal ‘.acwjl’ file extension to launch Jarvis Lite.
- Improved
- Smooth MainUI edge anti-aliasing.
- Custom termination commands now lets the user know if an application is not already running when they try to initiate a termination command.
- Increased the length of time the green colour shows on the main window when Jarvis Lite recognises a command.
- Improved reliability and performance, especially with recognising commands.
- Fixed
- Fixed an issue where shell commands would fail whilst trying to start an unrecognized application.
- Fixed a bug where the colour on the MainUI would show white when it should be red.
- Fixed a bug where saving preferences with incorrect information more than once would cause incorrect information to display in the message box.
- Fixed a problem where some Jarvis Lite windows would try to open full screen.
Version 1.0.1 — 26 Jan 2015
- New
- Added a new default command: «What is tomorrows forecast».
- Improved
- Adjustments have been made to the News Window.
- Fixed
- Some grammatical errors have been fixed.
Version 1.0.0 — 25 Jan 2015
- New
- Initial release.
Jarvis is a context-aware software program that recognizes your voice and executes commands. It was designed to run on Windows Vista and XP. What makes this application special is that it comprises various sensors. Although it was designed for two older versions of Windows, it works on Windows 11 and 10.
The application lets its sensors “listen” on various locations on your PC and perform actions once certain triggers are activated. To put it shortly, Jarvis learns from you, then tries to predict your actions based on context, depending on the rules you set for it. Jarvis is one of the best PC talking tools ever built.
What is Jarvis software?
Jarvis is definitely what you’re looking for if you’re interested in machine learning and want to experiment with a readily available project. It lets you create rules, view predictions, and monitor sensors to check if the app “sees” you right.
However, note that Jarvis has been most likely abandoned since the last update it received was in 2009. However, the program is still stable, as we managed not to trigger any crashes or freezes during its runtime on our PCs.
Jarvis system requirements
Jarvis, like any other software solution, has a list of requirements to run on your PC. Thus, you can’t run it if your computer doesn’t meet the minimum system requirements. However, let’s not jump to conclusions before we see what Jarvis’ prerequisites are:
- Operating system: Windows 11, 10, 8, 7, Vista, XP SP3
There’s pretty much nothing else required. However, as we’ve said before, you’re probably in the clear even if you don’t have Vista or XP. It’s better to see these two systems listed above as the absolute minimum. We’ve tested it on Windows 11 and 10, and it’s a go.
Screenshots
Our Review
- Pros
- It’s free
- It’s easy to install
- Pretty accurate predictions
- Cons
- Doesn’t do much else aside from predictions
Jarvis free
Even though you’d expect such a tool to cost a lot, the reality is wildly different. Jarvis doesn’t cost you a penny.
You can download it for free and use it for your leisure, and there’s no catch, either. No time limitation and no restricted feature.
How to install Jarvis on your PC
Assuming that you’ve downloaded the MSI package already, go ahead and launch it. Please note that the installer will conduct a short survey on your system to decide whether it’s fit to support the program.
If you’re in the clear, you’ll be able to proceed with the installation. Decide the destination path where you want to deploy Jarvis, then hit Next a couple more times. The program’s setup should be done in no time.
Jarvis runs in your system tray
Granted that the setup went uneventful, you can run Jarvis by clicking its Start menu icon. However, note that it might launch silently, meaning you probably won’t know it’s launched. That’s because Jarvis minimizes itself to your system tray and stays there until you need it.
Therefore, open your system tray, locate Jarvis’ icon, and right-click it. It’s the one that looks like a small yellow bell. The app’s main menu lets you configure rules, learners, predictions, and sensors to your liking. You can also access Jarvis’ preferences section from the same menu.
How to use Jarvis
First, open the tool’s Preferences window and enable system notifications. This step is necessary to see exactly what Jarvis can do for you through system notifications. Note that Jarvis needs to learn some things about you before interpreting sensor information, so be patient.
If you want to look at what details Jarvis collects from you, take a look at the contents of the Sensors window. You’ll see data such as USB devices, uptime, user activity level, explorer open paths, power sensor type, day of the week, available interfaces, inactive interfaces, IPv4 network address, and running processes.
Note that this is the way that Jarvis “sees” you.
Training a model for Jarvis
If you want to create a training model for this tool, launch any application you want and use the Ctrl+Alt+C key combo to spawn the training window. Customize the values to match your current context. After successfully creating the model, Jarvis will let you know if the context changes using system notifications.
Good, so you’ve created a training model. If you’d like to see Jarvis’ prediction of your context, right-click the systray icon and select Predictions. The tool spawns a small window and updates it automatically each time Jarvis predicts a change in your context.
It doesn’t affect the tool if you decide to close the prediction window. This program will continue to monitor your PC usage and attempt to provide you with accurate predictions. You can switch to a more discrete prediction display by left-clicking the notification icon. The context predictions will be displayed as small tooltips in the system notification area.
How to configure Jarvis
As mentioned above, you can find a configuration menu in Jarvis’ main menu. Right-click the small yellow bell icon in your systray, and select Preferences from the context menu. This will spawn a modest window where you can adjust general settings and options regarding learners, logging, and network.
For instance, you can modify the application’s startup behavior (i.e., set it to run on startup), check for updates automatically and enable or disable system notifications. You can also manually check for updates by clicking the appropriate button.
FAQ: learn more about Jarvis
- Can I use Jarvis to automate tasks?
No, you can only use Jarvis to perform context-sensing application predictions. In other words, you install Jarvis, run it, help it learn patterns in your app interactions, and analyze the predictions it generates.
- Is Jarvis free?
Yes, Jarvis is a free software application without any restrictions.
- Is Jarvis safe?
Jarvis is 100% safe. It doesn’t contain malware, so you can download, install, and use it on your PC without any issues.
Содержание
- JARVIS
- jarvis для windows 10 с голосом
- 15 тем для Windows 10, меняющих систему до неузнаваемости. Долго искал четвёртую!
- Содержание
- Вы захотите скачать: 15 тем для Windows 10
- Big Sur
- Porcelain
- Fluent
- Windows 10X
- Papyros
- Penumbra
- Janguru
- Gray Dark
- Gray Light
- Matte
- Windows 20
- Dracula
- Discord Theme
- Glassic
- BIB 2.0
- Как устанавливать темы для Windows 10
- How to Download and Install Jarvis Theme For Windows 10
- Install Jarvis Theme For Windows 10
- Download Rainmeter
- Set Jarvis Wallpaper as Background
- Now Download and install Jarvis Skin
- Set Iron man Jarvis Skin
JARVIS

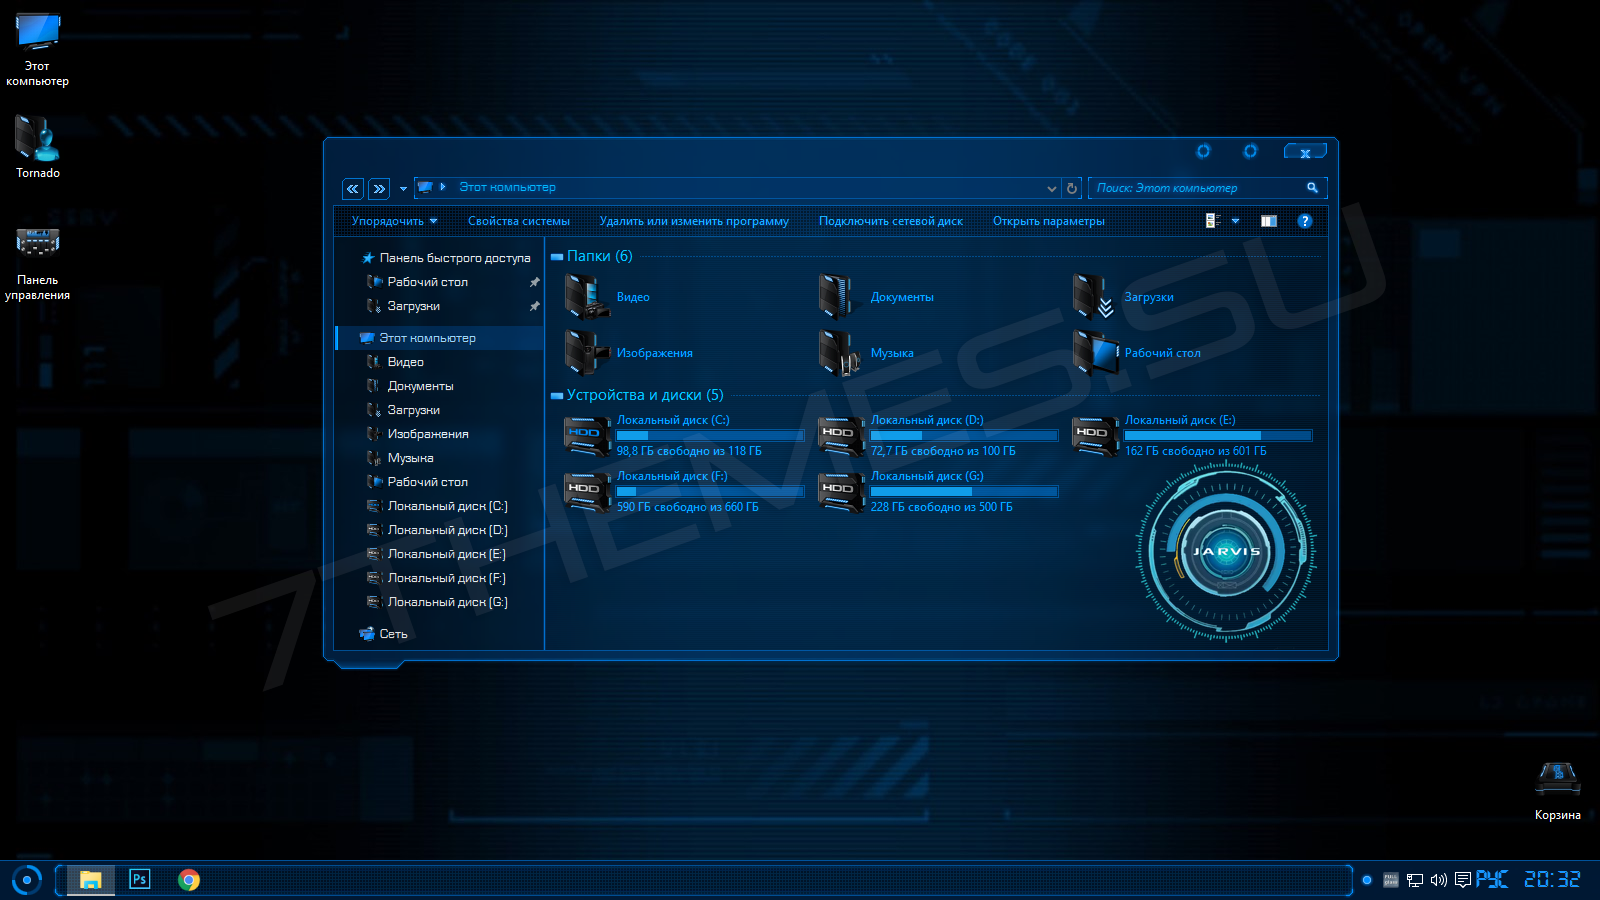
Скорее всего эта тема больше напоминает дисплей из какого то шпионского фильма или что то подобное, если помните то в основном подобные рабочие столы бывают двух цветов, зелёные и как тот, что перед Вами неоново синий. В архиве с темой есть практически все необходимое, звуки, обои, курсоры, шрифты и прочие нужные утилиты, не хватает только иконок но это не беда у нас можно найти практически всё что может потребоваться, вот на пример к этой теме подойдут иконки Jarvis IconPack. Надеемся эта тема для windows 10 понравится всем поклонникам подобного стиля в оформлении, хотя что бы правильно установить и настроить всё необходимое для полноценного интерфейса, потребуются некоторые знания устройства файловой системы, а значит не лишним будет создать точку восстановления перед тем как начать установку.
Тема адаптирована для рабочего стола Windows 10: Creators Update (1703), Fall Creators Update (1709)

- 7411 загрузок
- 21 536 просмотров
- 8 комментов
Перед установкой темы Windows 10 «JARVIS» для рабочего стола убедитесь, что она соответствует версии Вашей операционной системы, для этого нажмите комбинацию кнопок WIN+R, затем в открывшимся окне наберите «winver» без кавычек и нажмите OK.
Для неопытных пользователей перед установкой тем оформления windows 10, настоятельно рекомендуем подробно читать инструкцию и создать ТОЧКУ ВОССТАНОВЛЕНИЯ, для этого нажатие клавиш Win+R, и введение «systempropertiesprotection» — (без кавычек разумеется) — нажмите кнопку Enter
За безопасный Интернет
Проверить безопасность файла «JARVIS» с помощью G o o g l e , способ который гарантирует 100% результат. Если на странице есть рекламные баннеры G o o g l e значит страница проверена, а файл «JARVIS» является безопасным. Что бы убедиться в этом отключите на время блокировщик рекламы и обновите страницу.
jarvis для windows 10 с голосом
Футуристическая тема оформления Windows 10 под названием Jarvis. Возможно, название покажется очень знакомым. Да, все мы смотрели фильм «Железный человек». А цифрового помощника Тони Старка помните? Вот его и звали Jarvis (Джарвис). Эта тема оформления как раз и выполнена в его стиле. За основу взято цветовое решение с преобладанием синего цвета, а также некоторые элементы дизайна.
Смотрим на скриншоты этой красоты:

Для более лучшего вида здесь используется эффект прозрачности, в проводник добавлен логотип, а также меняется иконка меню Пуск. Дополнительно в архиве еще есть скин для WinRar, созданный в едином стиле с темой.
Скачать тему:
Скачать дополнительные ресурсы:
Скорее всего эта тема больше напоминает дисплей из какого то шпионского фильма или что то подобное, если помните то в основном подобные рабочие столы бывают двух цветов, зелёные и как тот, что перед Вами неоново синий. В архиве с темой есть практически все необходимое, звуки, обои, курсоры, шрифты и прочие нужные утилиты, не хватает только иконок но это не беда у нас можно найти практически всё что может потребоваться, вот на пример к этой теме подойдут иконки Jarvis IconPack. Надеемся эта тема для windows 10 понравится всем поклонникам подобного стиля в оформлении, хотя что бы правильно установить и настроить всё необходимое для полноценного интерфейса, потребуются некоторые знания устройства файловой системы, а значит не лишним будет создать точку восстановления перед тем как начать установку.
Тема адаптирована для рабочего стола Windows 10: Creators Update (1703), Fall Creators Update (1709)

Перед установкой темы Windows 10 «JARVIS» для рабочего стола убедитесь, что она соответствует версии Вашей операционной системы, для этого нажмите комбинацию кнопок WIN+R, затем в открывшимся окне наберите «winver» без кавычек и нажмите OK.
Для неопытных пользователей перед установкой тем оформления windows 10, настоятельно рекомендуем подробно читать инструкцию и создать ТОЧКУ ВОССТАНОВЛЕНИЯ, для этого нажатие клавиш Win+R, и введение «systempropertiesprotection» — (без кавычек разумеется) — нажмите кнопку Enter
Как проверить безопасность файла JARVIS. Есть простой но эффективный способ который гарантирует 100% результат, поскольку Вы можете воспользоваться мощнейшей из существующих систем проверки безопасности от Google, если на странице есть его рекламные баннеры значит он считает эту страницу и в частности файл JARVIS полностью безопасными. Что бы убедиться в этом просто отключите блокировщик рекламы и обновите страницу.
Многим известная тема Jarvis теперь благодаря ребятам с Virtual Customs стала доступна на Windows 10. Поддерживаются эффекты прозрачности, заменяется панель задач и меню пуск (используйте StartIsBack ++), в проводник добавлены новые ресурсы — логотип Jarvis. В целом тема такая как оригинал, единственный минус, местами встречаются мелкие баги.
Портировал: Mr GRiM
Совместимость: 1703, 1709, 1803, 1809
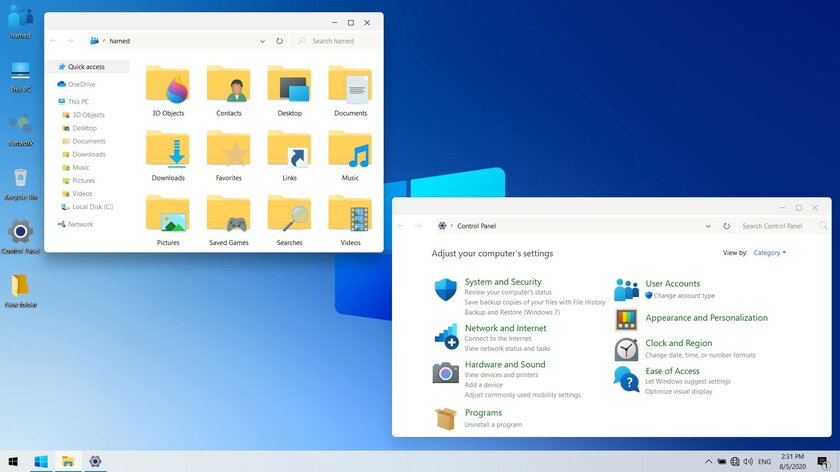
Что Microsoft только не делала с дизайном Windows — каждый релиз новой версии операционной системы сопровождался обновлением внешнего вида: Luna в XP, Aero в Vista и 7, а затем не очень удачный Metro в Windows 8.1. Лишь спустя несколько лет, с выходом 10-й версии, дизайнеры Microsoft наконец определились со стилем своих продуктов и появился Fluent Design. Однако, даже сейчас Windows 10 выглядит не очень — система по-прежнему смотрится устаревшей на фоне других ОС. Но никто не мешает ставить сторонние темы для рабочего стола и всей системы в целом — в этой статье собраны самые популярные и красивые пакеты оформления, а также инструкция по установке.
Содержание
Вы захотите скачать: 15 тем для Windows 10
Big Sur
Первой темой будет Big Sur, которая понравится любителям дизайна Apple. Кроме внешнего вида окон и иконок, этот пак включает в себя виджеты для Rainmeter, а также скин для приложений, имитирующих Dock из macOS — Rocketdock или Nexus.
Porcelain

Эта тема определённо понравится любителям минимализма. Ничего лишнего, только самое необходимое. Одним из достоинств её являются частые обновления — разработчик регулярно исправляет баги и добавляет поддержку новых версий Windows 10.
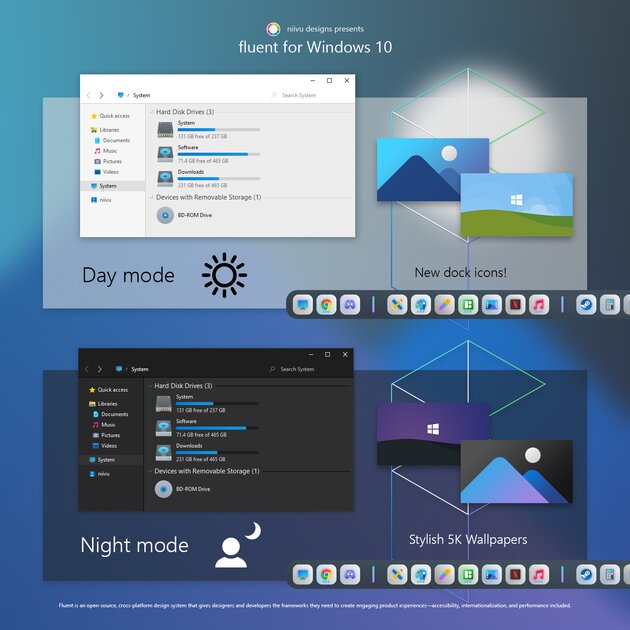
Fluent
В отличие от других тем, эта не меняет стиль системы кардинально, а лишь немного дополняет его — более минималистичный проводник с обновлёнными иконками поможет освежить пользовательский опыт, добавив в него новые краски.
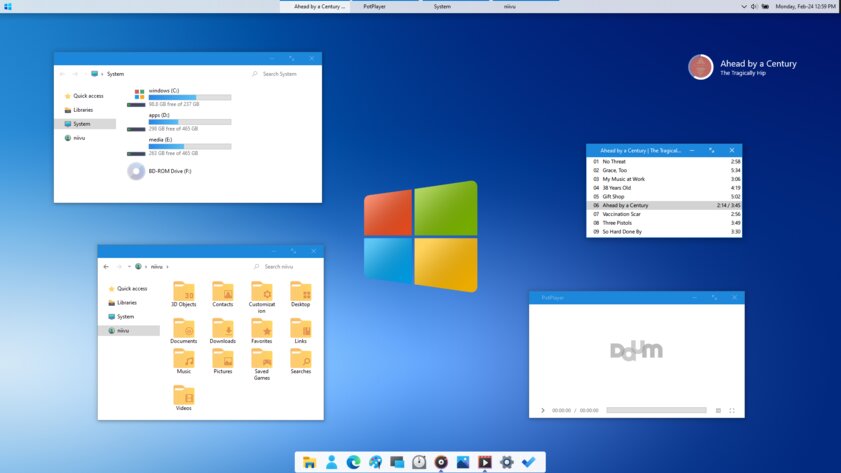
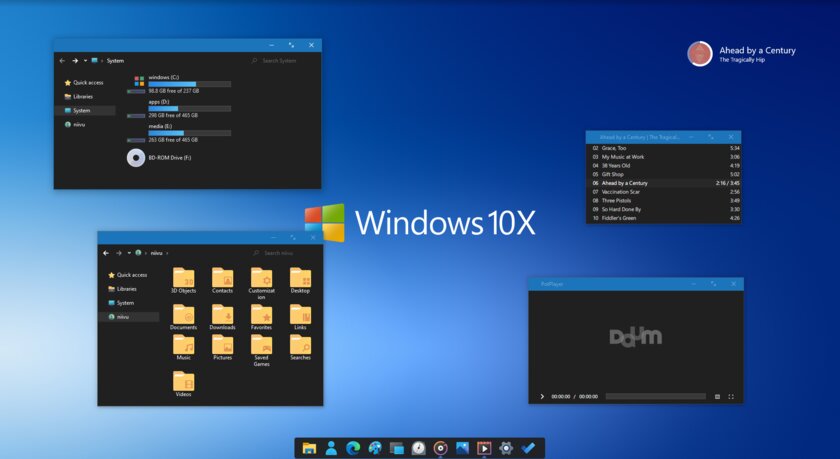
Windows 10X
Релиз Windows 10X уже не за горами, а умельцы в интернете уже перенесли своё виденье дизайна будущей ОС на текущую версию Windows. Эта тема меняет не только внешний вид окон и иконок, но и имеет свои скины для PotPlayer, foobar2000 и различных приложений для имитации Dock.
Papyros

Papyros — это качественная адаптация популярной темы для Linux с названием Papyrus, внешний вид которой вдохновлён Material Design. Для пользователей доступно 5 разных вариаций тем с разными цветами заголовков, а также огромный набор системных иконок и приложений.
Penumbra
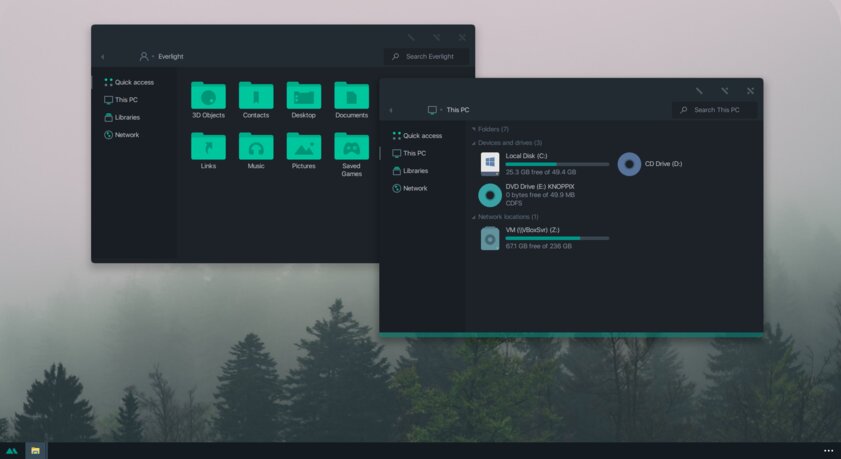
Встроенная тёмная тема Windows хороша, но она затрагивает лишь часть системы, оставляя некоторые белые участки. На этот счёт есть Penumbra — это минималистичный пак оформления, напоминающий по цветам продукты Adobe.
Janguru
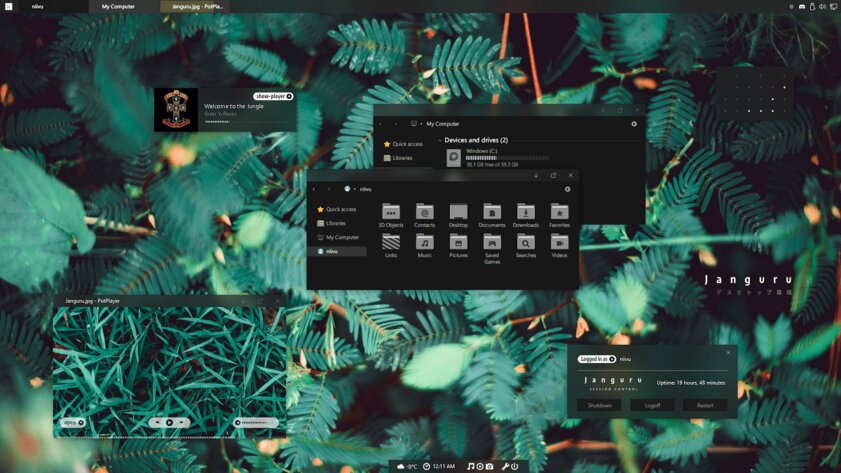
Особенностью этой темы является поддержка размытия заголовков окон, а также полностью чёрный фон приложений. Кроме этого, у Janguru есть свои значки курсора, большой набор иконок и виджетов для Rainmeter.
Gray Dark

Ещё одна тема, выполненная в тёмных тонах. Не одним проводником единым — в комплекте с Gray Dark идёт набор скинов для StartIsBack, а также опциональный набор иконок, дополняющий тему. На выбор доступно несколько цветовых вариаций, их видно на скриншотах выше.
Gray Light

Gray Light — это противоположность теме Dark Gray. Вместо оттенков серого теперь преобладает белый, других значительных отличий нет. Кроме самого пака оформления, в описании также лежат ссылки на обои, что стоят на скриншотах выше.
Matte
В отличие от других тёмных тем, эта выполнена не в чёрных и серых тонах, а в мятных, в паре со строгими значками. Отличным дополнением будет скин для StartIsBack и разные вариации оформления. А частые обновления оперативно исправляют баги и различные недоработки.
Windows 20
Эта тема была вдохновлена концептом с названием «Windows 20» от Avdan. Конечно, перенести дизайн полностью не вышло, но максимально приблизиться к оригиналу получилось. Тут и иконки в стиле Fluent Design, и закругления на месте.
Dracula
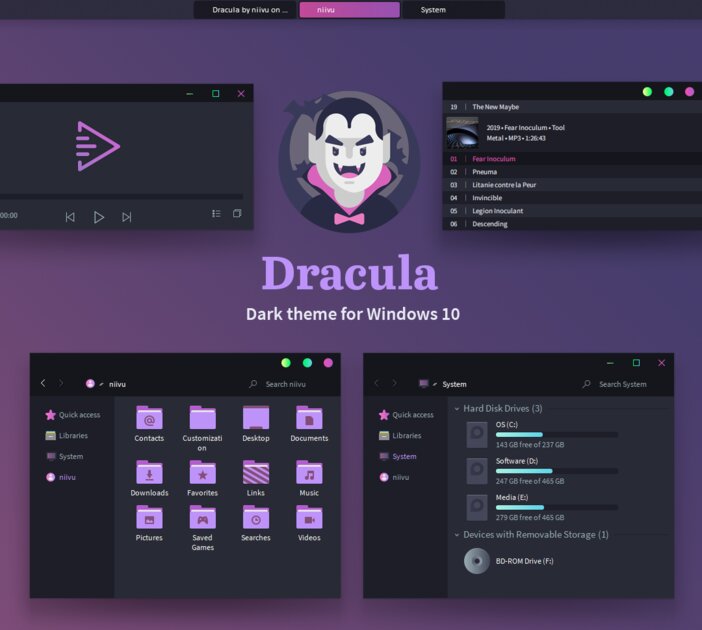
Надоели скучные монохромные темы? На этот случай есть Dracula, которая привносит больше красок в оформление системы. Вместо оттенков серого, преобладают фиолетовые тона и градиенты. Также доступны разные вариации иконок для закрытия или сворачивания окон, скины для StartIsBack и оформление для Microsoft Office.
Discord Theme
Ещё одной интересной темой будет Discord Theme, так как она использует цвета и оформление одноимённого мессенджера для геймеров. Приятные для глаза оттенки помогут в снижении напряжения при использовании компьютера.
Glassic

Не обошлось и без прозрачных тем, что слегка напоминают Aero из прошлых версий Windows. Для корректного отображения прозрачности необходимо установить дополнительную программу под названием «Glass8», ссылка на которую есть в описании пака оформления.
BIB 2.0
Последней темой в подборке станет BIB 2.0. Это минималистичный пак оформления для Windows, с тремя вариациями кнопок заголовка окон, приятными иконками и с поддержкой мониторов с высокой плотностью пикселей.
Как устанавливать темы для Windows 10
Основой всех тем для Windows является приложение под названием UltraUXThemePatcher. Оно активирует поддержку сторонних пакетов оформления. Устанавливаем его и перезагружаем компьютер.
Затем, скачанные файлы тем (файлы с расширением .theme) необходимо поместить в папку по пути C:WindowsResourcesThemes. После этого, кликаем правой кнопкой мыши по рабочему столу и выбираем пункт «Персонализация», а потом «Темы». Список должен пополниться свежеустановленными пакетами оформления.
Для корректного отображения тем необходимо дополнительно установить ещё одно приложение — OldNewExplorer. С его помощью можно убрать ленту в «Проводнике», сделав файловый менеджер похожим на тот, что стоит в Windows 7.
К сожалению, единого метода для замены системных значков на кастомные нет, но в архивах с каждой темой есть инструкции в виде текстовых файлов, некоторые из них требуют установки дополнительного ПО.
Внимание! Всегда делайте точку восстановления системы перед любыми модификациями Windows.
How to Download and Install Jarvis Theme For Windows 10
Simple Methods to Install Jarvis Theme For Windows 10 with steps. – Are enthusiastic about your Desktop appearance? Jarvis Theme having glassy effects, 3D look and a lot more features can wonderfully meet your need. Jarvis Windows 10 theme comes under Iron man skin and places a few very amazing Desktop Gadgets.
If you want to Download and Install Jarvis Theme For Windows 10 it’s absolutely free of cost. This is an awesome Windows 10 theme many users stores into DeviantArt gallery. If you are more keen about your PC appearance you can also Download ARC Windows 10 theme Linux (Dark and Light).
Microsoft provides a huge collection of different themes. In this context, you may find out How to Get More Themes online From Store Windows 10. But if you desire to have something different on your desktop then This Iron man skin is the best option for you.
Jarvis theme doesn’t work independently and you need to use Rainmeter that loads several skins including Jarvis. Further, see a detailed guide in this regard.
Install Jarvis Theme For Windows 10
Download Rainmeter
Step 1 – Jarvis windows 10 theme works only with Rainmeter so first of all download Rainmeter.
Step 2 – Once the Rainmeter has arrived at the desktop, double click on its Setup. Now follow the onscreen guide for performing the installation of this Skinpack.
Set Jarvis Wallpaper as Background
Step 1 – Go to this link. Jarvis wallpaper image will open in a new window, right click on the wallpaper and Select Save image as.
Step 2 – Navigate to the location where you have saved right now, right-click on the image and press Set as desktop background on this list of options.
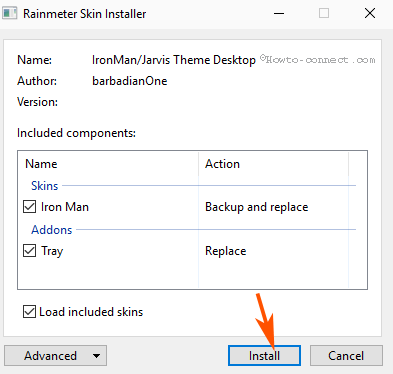
Now Download and install Jarvis Skin
Step 1 – Click this Deviantart link to reach the appropriate location where the Jarvis Theme is kept. It is a 4.5MB File so don’t take much time.
Step 2 – When the Jarvis download is over, double click on its Setup.
Step 3 – A Rainmeter Skin installer dialog box opens on the screen, Click on Install.
Set Iron man Jarvis Skin
Step 1 – Click on Rainmeter icon from the taskbar and let its interface appear. On the Manage Rainmeter, click Iron man in the Skin tab. Now locate Jarvis and click on Jarvis.ini just under this.
Step 2 – Click on Load from the right pane.
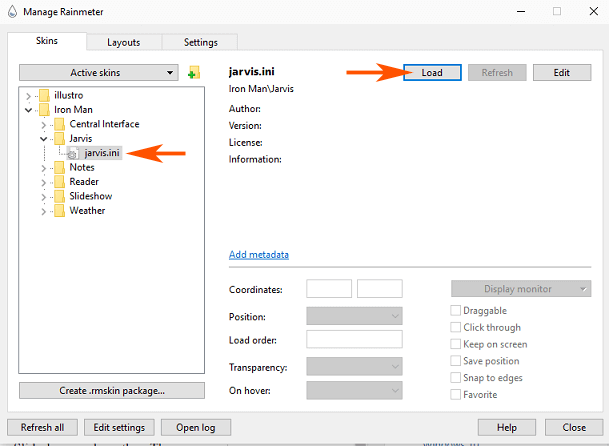
You will see Jarvis Skin on your Desktop.
Step 3 – When you will want to remove Jarvis from your Desktop, simply click on jarvis.ini and select Unload from the right pane.
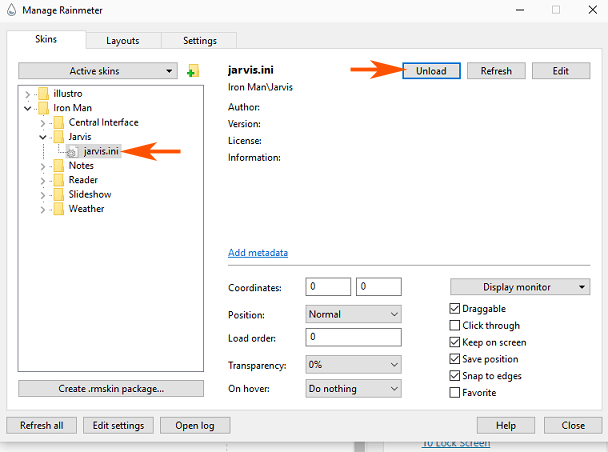
One more way to remove the Iron man Jarvis theme is right click on the active skin and select Unload.
In addition. you will easily find many kinds of cool and outstanding skins on DevianArt which you can load from the Rainmeter Few of them are Illustro, Disk, Google, Jarvis Winamp, Slideshow, and weather.
In these skins, the collection of Jarvis 7.0.1 version, HUD circle, HUD reactor, Futuristic circle, Corner calendar advanced edition, and Ribbits and a lot more is amazing. You can get these collections of the Jarvis and Rainmeter theme again from the DevianArt.
Conclusion
So Enjoy the awesome skins after you complete Download and Install Jarvis Theme For Windows 10. However, the theme and skins were popular at the time of Windows 7 but, they are pretty nice works with Windows 10. So download these personalization tools end enhance windows 10 experience.
Version 1.5.5 — 31 May 2017
- Improved
- Performance improvements.
- Fixed
- Fixed a bug that would cause Jarvis Lite not to start when a microphone was not present or set to default. Now an error message is displayed instead.
- Fixed incorrect tooltips.
Version 1.5.4 — 03 Apr 2017
- Improved
- Performance improvements.
- Fixed
- Fixed a bug where a problem with saved shell commands wouldn’t always be detected.
- Fixed a problem where Jarvis would speak the date incorrectly for some system cultures.
Version 1.5.3 — 17 Aug 2016
- New
- Multiple custom commands can now be removed at once.
- You can now choose to disable default commands.
Version 1.5.2 — 15 Jul 2016
- Fixed
- Fixed a bug where an XML CDATA tag was displayed in the latest news window.
Version 1.5.1 — 27 Jun 2016
- New
- You can now choose to play audio media files inside Jarvis Lite automatically.
Version 1.5.0 — 26 Mar 2016
- Fixed
- Fixed an issue where asking for weather information wouldn’t work.
Version 1.4.9 — 16 Mar 2016
- New
- You can now input ‘[random]’ into the location box before a directory for shell commands to randomly select one file inside to launch.
- Improved
- Minor GUI improvements.
Version 1.4.8 — 12 Mar 2016
- New
- You can now drag a file or folder onto the browse button on custom shell commands.
- Improved
- Add, edit and remove buttons on custom commands now enable only when relevant.
- Increased the delay on all tooltips.
- Subtle colour change on unfocused windows.
- Fixed
- Fixed an issue where the social commands list on custom commands would have an obtrusive scrollbar with long commands.
Version 1.4.7 — 09 Mar 2016
- New
- You can now use the enter key when creating a new command to add it.
Version 1.4.6 — 21 Feb 2016
- New
- The preferences window now notifies you when you have unsaved changes and prompts you to save when closing the window.
- Added a warning when trying to open multiple instances, and the option to allow it.
Version 1.4.5 — 18 Feb 2016
- New
- Jarvis can now read out the latest news directly from the latest news window, just by pressing ‘listen’.
- Improved
- Categories on the show commands window are now formatted distinctly.
- Fixed
- Fixed an issue where the latest news window would open twice.
- Numerous other bug fixes in the latest news window.
Version 1.4.4 — 16 Feb 2016
- Fixed
- Fixed some icons on buttons not displaying properly.
Version 1.4.3 — 14 Feb 2016
This update is primarily to fix Windows 7 compatibility. A big thank you to Mark P.
- Improved
- Message boxes now have an updated style.
- Fixed
- Jarvis Lite now works on systems running Windows 7.
- Fixed listening hotkey not working when ctrl was selected as the first key.
Version 1.4.2 — 01 Feb 2016
- Fixed
- Fixed a crash caused by dragging some windows from certain points.
Version 1.4.1 — 27 Jan 2016
- New
- Added tooltips throughout the application.
- Fixed
- Fixed a problem that caused message box windows to be full screen.
- Fixed a graphical glitch with the preferences window.
- Fixed a problem where the transparency slider in preferences would not respond to arrow keys.
Version 1.4.0 — 25 Jan 2016
It is now 1 year since Jarvis Lite was first released, and we are celebrating with a brand new redesigned theme! We have also made huge improvements to the speed and efficiency of Jarvis Lite, along with a multitude of new features and improvements. A good update wouldn’t be without its fair share of bug fixes, and this update is no exception; fixing the listening hotkey, Google search and many, many more.
- New
- Added new default commands: «scroll up» and «scroll down».
- Added share buttons to the latest news window, with options including email, Twitter and LinkedIn.
- Improved
- Resigned all windows with a brand new theme.
- Increased the size of all windows to display more information.
- Increased the performance throughout the whole application.
- The storage space Jarvis Lite requires has been reduced.
- The latest news window now displays the date and time at which the news article was published.
- Responses for all custom commands except social commands are now automatically set to ‘[none]’ when left blank.
- Fixed
- Fixed an error that would prevent an error message being spoken if shell commands were setup incorrectly.
- Fixed a bug that prevented search Google from working.
- Fixed a problem where the listening hotkey would not toggle the listening status of Jarvis.
- Fixed numerous other small bugs and visual glitches.
Version 1.3.7 — 18 Jan 2016
- Improved
- Improved the efficiency of hotkey commands.
- Space has been added to the existing collection of keys that you could set in the custom hotkey commands.
- Fixed
- Fixed a problem where hotkey commands would not work correctly when no modifier key was selected.
- Fixed an error that would cause an incorrect error message to be spoken if social commands were setup incorrectly.
Version 1.3.6 — 29 Nov 2015
- New
- You can now input ‘[none]’ into the response box for all types of commands to prevent Jarvis from saying a response.
Version 1.3.5 — 15 Nov 2015
- New
- You can now choose whether or not to search Google’s encrypted subdomain or not in preferences.
- Improved
- Speed of weather report is now quicker.
Version 1.3.4 — 14 Nov 2015
- Improved
- Minor performance improvements.
- Fixed
- Fixed a graphical issue in the Custom Commands window.
Version 1.3.3 — 13 Nov 2015
- Improved
- The Main UI spinning ring and all images are now of a much higher quality.
- The Main UI Preferences, Commands and Dictation buttons have had the white background removed.
- Fixed
- Fixed a bug that caused the termination window browse list to not correctly update each time it was accessed.
Version 1.3.2 — 04 Aug 2015
- New
- «Temp Format» preference which allows the user to set the desired format of weather temperature information, between Celsius and Fahrenheit.
Version 1.3.1 — 01 Aug 2015
- New
- You can now set a custom command with multiple different commands linked to the same function. For example if you entered: ‘Hello|Hi Jarvis|Hey Jarvis’ as a command when setting a custom command, Jarvis will respond and carry out the function (shell, termination or hotkey command) whenever you say either of those commands. This system is pipe delimited, like the randomised responses feature. NOTE: There must not be any blank spaces either side of the pipe delimiter.
Version 1.3.0 — 16 Jul 2015
- New
- You can now set Jarvis to say one of many responses randomly. Use a pipe (|) as a delimiter to the possible responses that Jarvis could say. For example if you entered: ‘OK Sir|Sure thing|Already done’ as a response when setting a custom command, Jarvis will randomly pick one to respond to you with.
- Improved
- Space and Enter have been added to the existing collection of keys that you could set in the custom hotkey commands.
Version 1.2.9 — 11 Jul 2015
- New
- Edit button has been added to the custom commands window.
- Improved
- Main UI buttons are now black instead of blue.
Version 1.2.8 — 04 Jul 2015
- New
- The audio spectrum that is on the main UI is no longer static, but changes when Jarvis speaks.
- The buttons on the main UI have been redesigned with a blue color scheme.
Version 1.2.7 — 20 Jun 2015
- New
- Added new default commands: «start listening» and «stop listening» which allow you to start/stop Jarvis from listening.
Version 1.2.6 — 30 May 2015
- New
- Added Google search feature. Search anything on Google with just your voice. To use this feature, just say «search Google». After Jarvis’ prompt ‘what for?’ procede with your search content.
- Added new default commands: «stop talking», «stop speaking» and «cancel speech» which all cancel whatever Jarvis is currently saying.
Version 1.2.3 — 19 May 2015
- Fixed
- Fixed a bug that caused the Jarvis Lite GUI to reset to center screen.
Version 1.2.2 — 18 May 2015
- Improved
- GUI Transparency slider now only goes down to 10, rather than 0.
- Fixed
- Fixed an issue where setting the GUI transparency to less than 10 would not update the actual transparency.
- Fixed a bug that could cause a crash if the GUI transparency saved incorrectly.
Version 1.2.1 — 17 May 2015
- New
- «Always on top» feature in preferences which allows the user to set the Jarvis Lite main GUI to be topmost (stay on top of all other windows).
- «GUI transparency» feature in preferences — you can now change the opacity levels of the main Jarvis Lite interface.
Version 1.2.0 — 01 Apr 2015
- New
- Dictation feature: When you say «start dictation» Jarvis will type whatever you then say. Say «stop dictation» to exit back into command mode.
- Dictation button on MainUI to enable and disable dictation mode.
- Custom Hotkey Commands feature.
Version 1.1.0 — 09 Feb 2015
- New
- Added a stylish new HUD designed message box.
- Custom hotkey to start/stop Jarvis from listening. Choose from Ctrl/Shift/Alt + A-Z/0-9 in the Preferences Window (the hotkey is Alt+M by default).
- Start on Windows startup option in preferences.
- Universal ‘.acwjl’ file extension to launch Jarvis Lite.
- Improved
- Smooth MainUI edge anti-aliasing.
- Custom termination commands now lets the user know if an application is not already running when they try to initiate a termination command.
- Increased the length of time the green colour shows on the main window when Jarvis Lite recognises a command.
- Improved reliability and performance, especially with recognising commands.
- Fixed
- Fixed an issue where shell commands would fail whilst trying to start an unrecognized application.
- Fixed a bug where the colour on the MainUI would show white when it should be red.
- Fixed a bug where saving preferences with incorrect information more than once would cause incorrect information to display in the message box.
- Fixed a problem where some Jarvis Lite windows would try to open full screen.
Version 1.0.1 — 26 Jan 2015
- New
- Added a new default command: «What is tomorrows forecast».
- Improved
- Adjustments have been made to the News Window.
- Fixed
- Some grammatical errors have been fixed.
Version 1.0.0 — 25 Jan 2015
- New
- Initial release.