In this tutorial, let us learn about the Documentation software Doxygen and see how to make use of it to make the job of producing documentation more automated and stress-free!
Let us start by looking at what Doxygen is.
What is Doxygen? Doxygen is a software used to produce documentation of source code written in C, C++, Python, Java, etc. and delivers in various formats like HTML, PDF, etc.
In other words, Doxygen is a software specifically made to fulfill the need for producing and maintaining documentation with as little effort as possible.
That is just the short version of the answer, read my other article for a longer and more informative answer where I try to answer the following questions
- Why you might need to use Doxygen?
- Is Doxygen the right choice for you?
- If no, then what are the alternatives available?
- If yes, then how to get started using Doxygen?
Here is the link again.
Doxygen, What is it? How it works?
In this article, our focus will be on how to get started to actually start using Doxygen.
Step 1: Download and install Doxygen
So head over to the Doxygen official website given in the link below and download the latest release of Doxygen.
Doxygen Download Page
You can opt in for notifications regarding updates using the form shown in the screenshot below
If you scroll a bit down, till you see something like this.

Click on the link highlighted in the red box above to get the software.
If nothing happens after you click, then probably your browser is preventing you from downloading the executable. But don’t worry, just right-click the link and click on “save link as” to get the software as shown in the screenshot below. (I am using Chrome).

Your browser might now ask you for confirmation whether you wish to download an executable, say yes as shown in the screenshot below and you should be good to go!
On Google’s Chrome Browser you will see something like this on the bottom right corner. Click on the “down arrow icon” then click “Keep” and Doxygen should start downloading.

Then go through the usual installation steps to finish installing Doxygen on your Windows PC. I recommend keeping the default settings while doing so.
Once that is done you should be able to launch the Doxygen software from the windows start menu. The software should be under the name “Doxywizard” as shown in the screenshot below.

Once you open that app, you must see something like shown in the screenshot below.

If you got till here, congratulations, you have finished the first step of installing Doxygen software on your PC!
Step 2: Learn How to Document the code using Doxygen
Doxygen works by taking the comments which are specifically formatted according to Doxygen’s pre-agreed syntax.
Doxygen calls these special syntaxes as “Tags”. Let us see some of those before we actually get into using them!
Doxygen tags and symbols to use in your comments
Doxygen supports several methods for incorporating documentation inside the comments. The 2 simplest methods to include in C source code are
/**
… comments…
*/
And
/// Comments.
Note the extra asterisk (*) in line 1 of the first option and extra slash symbol(/), (i.e. in C we just need 2 slashes for a comment line) These syntaxes are used to tell the Doxygen parser that it is documentation and it needs to be extracted.
The above 2 syntaxes must be placed just above an entity so that the Doxygen parser can associate the comments to that particular entity.
What is an entity in Doxygen? An entity can be a global variable, a structure declaration, enum declaration, or a function.
The entities and tags are implemented in code as shown in the screenshot above.
The Doxygen generated documentation from the code above will look like this
Next, let’s look at the documentation of parameters. Here another special Doxygen syntax is used which is the @ syntax.
Doxygen calls these structural commands. There are several of them and the most useful ones are the following.
| @file | The file name must be present in the file header for inclusion into the documentation generation process |
| @param | Parameter documentation for functions |
| @page | Markdown page name |
| @mainpage | Main markdown page for the project |
| @tableofcontents | Generates “table of contents” for the markdown page |
Let us see how you can use Doxygen entities to document your source code at various levels.
Step 2.1: File headers
File headers contain detailed description about a given file. This must be present at the top of every file which needs documentation. If there is no file header then Doxygen will not produce documentation for that file.
File headers look like this
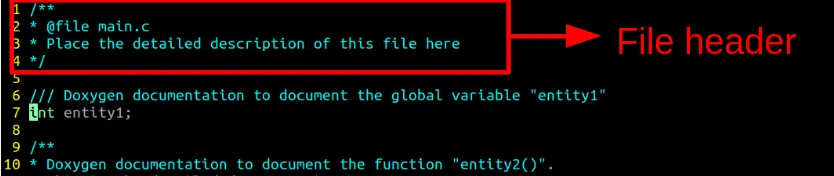
Just use the Doxygen “structural command” @file followed by the file’s name, to tell Doxygen that you want this file to be included in the documentation generation process. You can also add some description about the file to be shown in the Documentation as shown in the screenshot below.
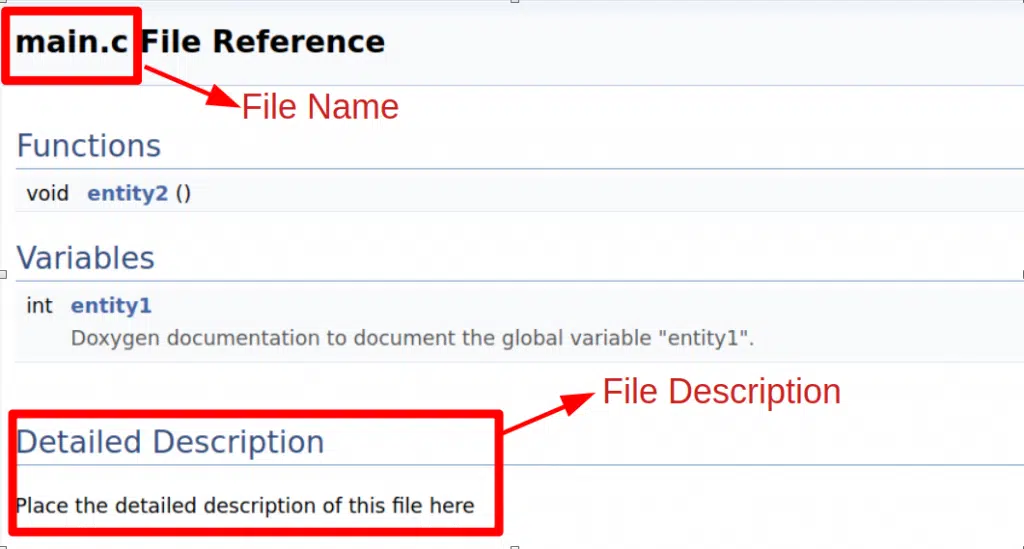
As you can see, the file name and description are placed on the documentation page generated for this example file main.c
Next lets us have a look at how to properly document functions and their arguments.
Step 2.2: Function Documentation
As we have seen above any function in a file can be documented by simply adding a Doxygen styled comment just above the function.
Next lets see how to describe the arguments and return values. Consider the following 2 functions
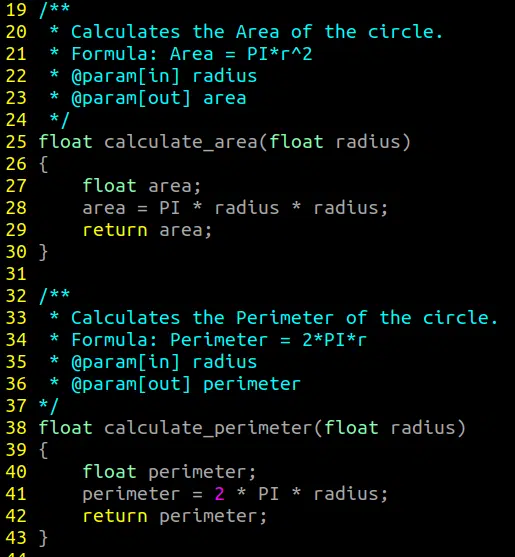
The syntax used in the parameter description is the following
@param[in/out] <variable name> <variable description>
Since the variable name radius is obvious to the reader of the code, I did not add the description. Please have a look at my other article “How To Use The Power Of Comments In Your Code The Right Way?” for guidelines on commenting.
The syntax used in the parameter description is the following
@param[in/out] <variable name> <variable description>
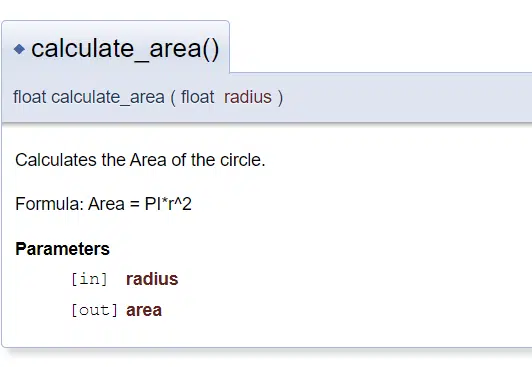
The output produced by doxygen using the syntaxes above will look like this
Step 2.3: Global Variables Documentation
We have seen how to document modules(files) and functions inside a given file, next let us see how to use doxygen to document other entities like global variable, constants etc.
As we have already seen in the beginning of step 2, a simple one line Doxygen style comment is enough to document a global variable. But some developers don’t like the idea of adding comments between each and every line of code in the global variable declaration section. To get around that problem Doxygen provides a second way of creating comments as shown in the screenshot below.

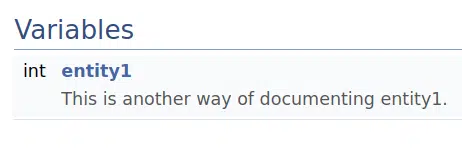
If you look at the code, you may have noticed that instead of keeping the comments on top of the entity I have kept it at the right-hand side of the macro definition.
Also instead of “/// “
I have used “///< “
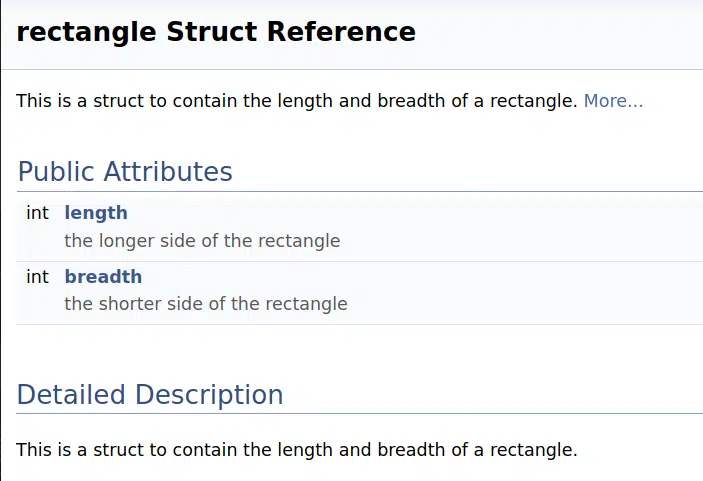
This style can also be used to document more complex entities like structs and constants/macros as shown in the screenshots below.


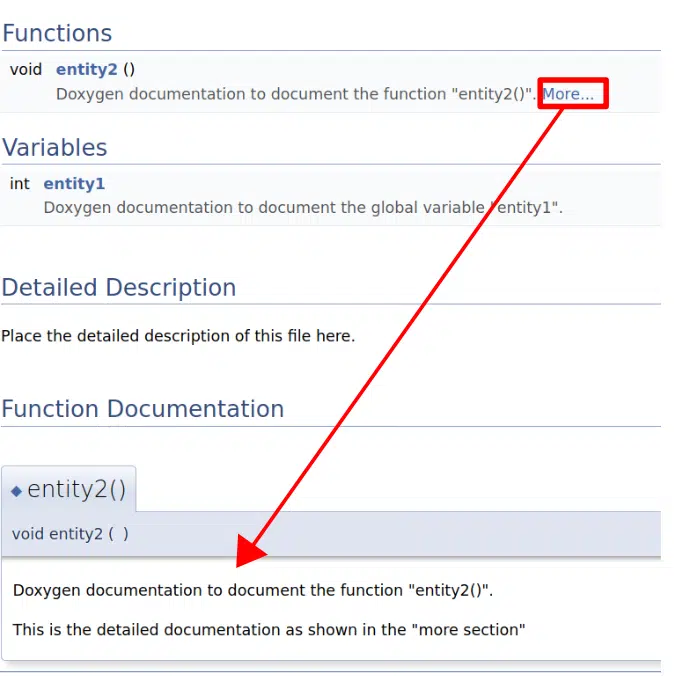
The documentation produced by Doxygen will look something like this.
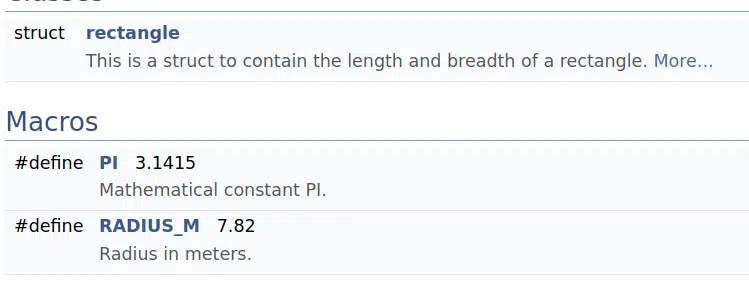
On clicking the “More..” in the screenshot above, you can get more documentation on the members of the structure like this
Step 2.4: Doxygen Pages
On Doxygen, we can also produce documentation pages which are not connected to any of our source files. These pages can be used to describe the project or individual modules.
Read the below sections to learn more about how to add pages in doxygen.
Page
These are the normal pages. These will show in the first level of pages on your left-hand side of the tree view. In a later section of this article, I have shown you how to enable “TreeView” which I think is better than the default view for C documentation.
The structural command to use for a Doxygen page is @page as shown in the markdown file below
| 12345 | @page module_name**Author:** Author name**Date:** Date## Module's RoleExplain the module's role in the system in general |
After running it through Doxygen the final output will look like this

Subpage
These pages will not be on the first level, rather it will be placed under another page.
The structural command to use for a Doxygen sub-page is @subpage. This @subpage should be used on the module’s page to which the given page is a sub-page to like this.
| 123456 | @page module_name Module Name@subpage sub_page_name**Author:** Author name**Date:** Date## Module's RoleExplain the module's role in the system in general |
The markdown file for the subpage will look like this
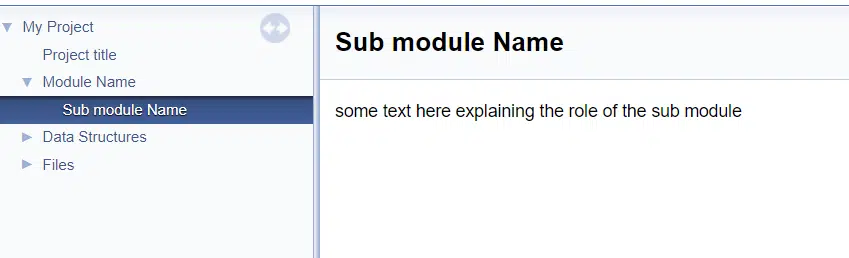
| 12 | @page sub_page_name Sub module Namesome text here explaining the role of the sub module |
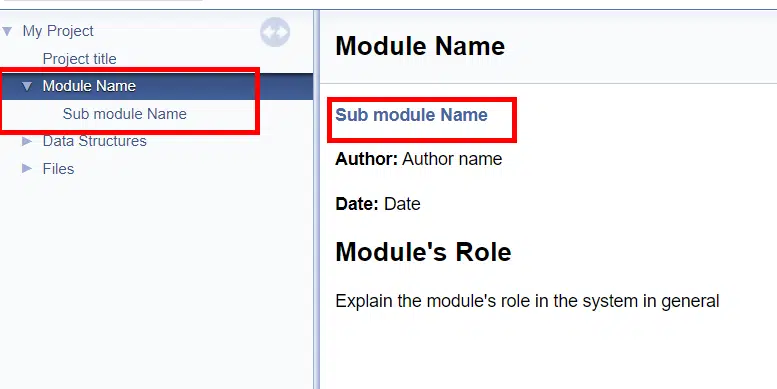
As you can see in the above picture, the Doxygen output has added the sub-page “Sub module Name” under the page “Module Name” on the tree-view at the left-hand side and added a link to it on our page.
The sub-page itself is an ordinary page and it looks like as it is shown in the image below.
I generally avoid sections and subsections as it increases the complexity of the documentation process. I like doing them with Markdown formatting options instead (even if that will make it hard to interlink a section with another one). I leave it up to you to decide for yourself if you need them in your particular project or not.
Step 3: Produce Documentation
Step 3.1: Configure Doxygen
There are several settings that can be configured to fine tune the output to just the way we want it to look like.
For example consider the example below on how to create different levels of descriptions by tuning the settings of Doxygen.
Brief vs Detailed Descriptions in Doxygen
By default, the descriptions produced by are not divided into “Brief” and “Detailed”
Consider the code below.
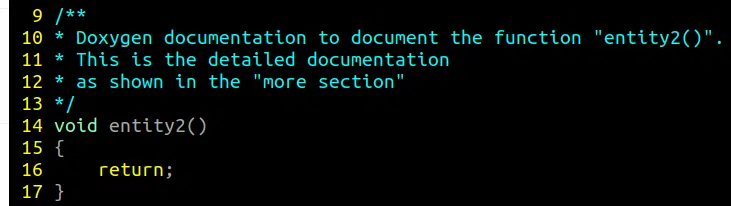
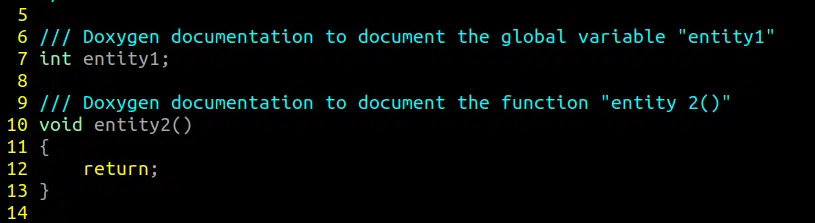
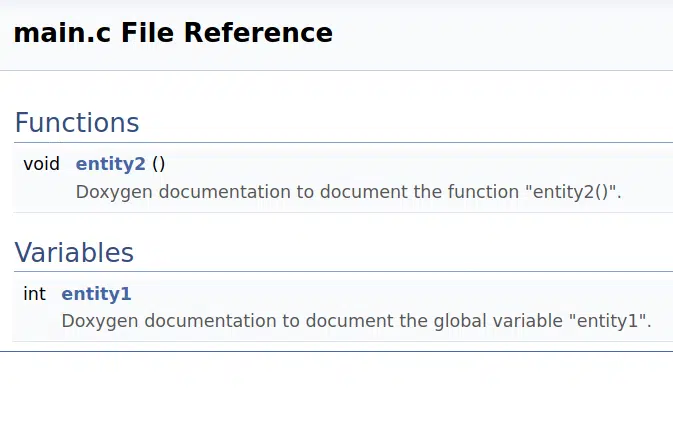
Here the description of the entity 2 function has been expanded to have multiple lines. Now running doxygen with default settings will produce a page like this.
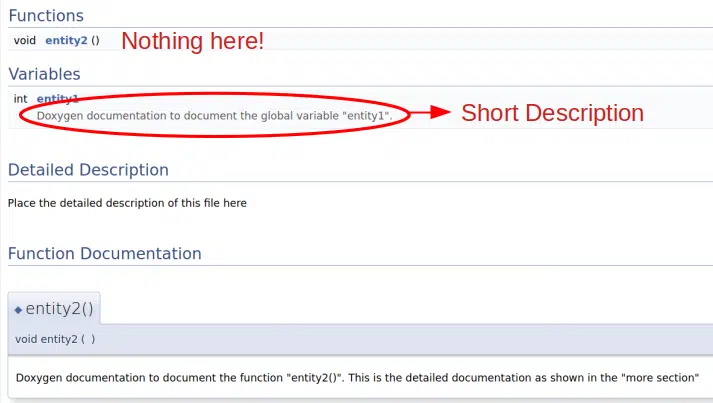
As you can see above, there is no documentation next to entity2 function like entity1 variable has.
By tuning the settings of Doxygen (I have explained exactly how to do this in the following section) you can make Doxygen parser to take the first sentence of the comment to be the brief description and the remaining sentences to be detailed description.
Once you have downloaded and installed Doxygen successfully, you can find an app Doxywizard. This will looks something like the below screenshot

So click on Expert->Project
2 simple tweaks that can be done in this section is shown in the image below (the red rectangles show the changes made).

The option FULL_PATH_NAMES has been unchecked so that the final output doesn’t include the entire path name like “C:/User/user_name/Desktop?project_directory/sub_directory/file_name“. Instead, we can get the output to start from the root directory of the project itself. In the above case, the output HTML will only show “sub_directory/file_name“
All these tweaks and configurations will be stored in a file named Doxyfile on your project folder.
This is just one of many configuration parameters available in Doxygen. To see a more comprehensive example of what more you can configure, I suggest reading the article below where I have explained how exactly to configure the Doxyfile to produce documentation for C programs.
Complete Guide On Using Doxygen To Document C Source Code..!!
I have also included the Doxyfile I have used for that project as a Download with that article so do check that out!
Now that we have covered how to configure Doxygen let us go ahead and see how you can run this program.
Step 3.2: Run Doxygen
You can run doxygen from the Doxywizard as follows
- Select the source code directory in the Doxywizard’s main window
- Go to the run tab
- click “Run doxygen”
- click “Show HTML output”

You can view the generated documentation in your project folder. There you can see that doxygen has generated a folder named “html” inside which lies all your documentation that you needed!
Open the “html” folder and double click on the “index.html” file to see all the documentation that has been generated by Doxygen for you!
I will stop here, hope you found this article useful!
Feel free to share this article with your friends and colleagues!
Here are some other articles that might interest you!
Related Articles
Doxygen, What is it? How it works?
Complete Guide On Using Doxygen To Document C Source Code..!!
How To Use The Power Of Comments In Your Code The Right Way?
C: Macro Function vs Regular Function vs Inline Functions

Добавил(а) microsin
Doxygen — популярный генератор документации на основе исходных текстов. Что такое Doxygen, очень хорошо написано в Википедии, поэтому в статье я расскажу только о том, как быстро установить и начать использовать Doxygen.
Итак, процесс по шагам:
1. Качаем по ссылке [1], доступны версии для Linux i386, Mac OS X 10.6 (Snow Leopard), Mac OS X 10.4 (Tiger), Windows XP/Vista/7, а также исходники (Doxygen распространяется под лицензией GPL).
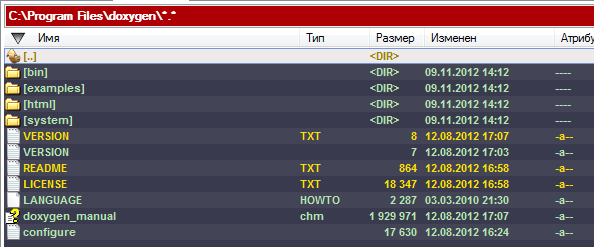
2. Запускаем doxygen-1.7.2-setup.exe. Отвечаем на несложные традиционные вопросы инсталлятора (можно тупо жать Next). После инсталляции появится папка c:\Program Files\doxygen\, где и находится вся система Doxygen, документация по ней, и утилиты.
3. Запускаем c:\Program Files\doxygen\bin\doxywizard.exe. Это программа, которая позволяет упростить создание и использование конфигурационного файла для создания документации (Doxygen GUI frontend).

4. Предположим, что нам нужно создать документацию к каким-то исходникам. В этом примере я буду делать документацию к проекту LUFA 100807\Demos\Device\ClassDriver\VirtualSerial\. Теперь нужно посмотреть, есть ли в каталоге с исходниками готовая конфигурация Doxygen. Обычно такой файл называется Doxygen.conf или Doxyfile, и имеет примерно такое содержание: «# Doxyfile 1.6.2 # This file describes the settings …». В моем случае папка с исходниками VirtualSerial уже содержала готовый конфигурационный файл Doxygen.conf. Теперь в программе меню doxywizard.exe выбрать File -> Open… -> файл Doxygen.conf.

5. Теперь осталось перейти на закладку Run и нажать на кнопку Run doxygen:

Если во время компиляции документации в текстах исходников встретятся ошибки, то они будут выведены в поле вывода «Output produced by doxygen». В сообщениях указаны номера строк, где найдены ошибки. Нумерация строк в сообщениях «tag without matching» может не совпадать со строками, где эти ошибки имеются на самом деле.
Запуск генерации документации можно также провести из командной строки вводом команды (config-file имя файла конфигурации doxygen):
doxygen
В моем примере в папке VirtualSerial\Documentation\html\ появятся файлы в формате html. Начинать просмотр документации нужно с файла VirtualSerial\Documentation\html\index.html.

Если конфигурационного файла нет, то можно вручную сгенерить конфигурацию. Нужно выполнить, как минимум, следующие шаги (для примера VirtualSerial):
Закладка Wizard -> Project:
— в поле «Step 1: Specify the working directory from which doxygen will run» указать путь до каталога проекта. В моем случае это c:\aaa2\LUFA 100807\Demos\Device\ClassDriver\VirtualSerial\
— в поле «Project name:» укажите имя проекта (LUFA Library — Virtual Serial Device Demo).
— в поле «Project version or id:» укажите версию проекта (0.0.0).
— в поле «Source code directory:» укажите ./
— в поле «Destination directory:» укажите ./Documentation/
— если Ваш проект содержит подпапки с исходниками, поставьте галочку «Scan recursiVely».
Закладка Wizard -> Mode:
— Select the desired extraction mode: -> All Entities.
— Select programming language to optimize the results for -> Optimize for C or PHP output
Закладка Wizard -> Output (выберем на этот раз формат RTF):
— убираем галочку HTML
— убираем галочку LaTeX
— ставим галочку Rich Text Format (RTF)
Закладка Wizard -> Diagrams:
— Diagrams to generate -> No diagrams
Закладка Run:
— нажимаем кнопку Run Doxugen. В результате получим файл единственный файл VirtualSerial\Documentation\rtf\refman.rtf.
Полученный файл конфигурации можно сохранить для дальнейшего использования (File -> Save as… -> Doxyfile).
[Проблема правильной обработки кодировки русского языка]
По умолчанию Doxygen генерирует html-текст в кодировке UTF-8 (используется мета-тег), и предполагает, что входной формат текста тоже UTF-8. С такими настройками поставляются большинство конфигов Doxygen. При попытке сгенерировать с таким конфигом html-документацию из текстового формата windows-1251 (с таком формате имеется большинство файлов исходников, содержащих русскоязычные комментарии), на выходе получается html-файл, который отображается всеми браузерами с кракозябрами. Эти кракозябры исчезнут, если вручную переключить браузер из кодировки UTF-8 в кодировку windows-1251. Это, конечно, не решение проблемы — возникает неудобство, так как необходимо постоянно переключаться в кодировку windows-1251. Заставить doxygen генерировать тег с charset=windows-1251 невозможно. Однако проблема фиксится довольно просто — достаточно в конфигурационном файле doxygen указать правильную кодировку входного файла — вместо кодировки UTF-8 указать кодировку windows-1251. Делается это правкой переменной конфига INPUT_ENCODING:
# раньше тут было указано INPUT_ENCODING = UTF-8
INPUT_ENCODING = windows-1251
Кроме того, если нужно правильно распознать русский текст, который есть в файле Doxygen.conf (например, это может быть текст имени проекта PROJECT_NAME и другие строки), то необходимо отредактировать переменную конфига DOXYFILE_ENCODING (указать кодировку windows-1251):
# раньше тут было указано DOXYFILE_ENCODING = UTF-8
DOXYFILE_ENCODING = windows-1251
Вот так можно исправить кодировку через интерфейс GUI:

После такого исправления html будет корректно генерироваться, и правильно отображаться всеми браузерами, русский текст будет без кракозябр.
[Экранирование специальных символов doxygen]
Для устранения предупреждений типа «имя_файла:номер_строки: warning: explicit link request to ‘define’ could not be resolved» нужно применять для экранирования спецсимволов обратный слеш ‘\’ (backslash). Например, так нужно экранировать символ # вместе с ключевым словом define:
тут текст \#define тут дальше текст
Это устранит предупреждения типа request to ‘…’ could not be resolved.
[Ссылки]
1. DoxyGen Latest Release site:stack.nl — отсюда можно скачать бинарники и исходники Doxygen.
2. Проект LUFA 100807 -> Demos -> Device -> ClassDriver -> VirtualSerial, который использовался в статье (вместе с конфигами Dogygen и сгенерированной документацией).
3. Дистрибутив doxygen-1.7.2-setup.exe.
Doxygen Example
Doxygen is a tool that parses source code, finds specially-formatted comments,
and produces nice-looking documentation files out of them. This repository is
set up as an example that shows how Doxygen can be used.
For more information about how Doxygen works, see the official Doxygen
website.
The Doxygen output for the project is available
here.
This Repository
There are a few example C++ files in the src/ directory. To run the code,
there is a run.sh file, which compiles the code and runs the result. An
autoformat.sh script is also provided for completeness.
How to Install Doxygen
WSL Installation Instructions
If you are using a Windows computer, you should be using Windows Subsystem for
Linux (WSL). There is no reason not to use it. It is vastly superior to the
available Windows command prompt and to alternatives like GitBash. On top of
that, you should be using WSL-TTY. If you use these, installing doxygen is as
simple as following the steps below.
Doxygen can be installed with apt.
sudo apt-get install doxygen
In order for the pretty source tree graphs to be generated, you also need to
install graphviz.
sudo apt install graphviz
Now you should be able to run Doxygen from the command line.
Windows Installation Instructions
If for some reason you are not using WSL, you can follow these steps to install
Doxygen.
- Download and install Doxygen for Windows from the Doxygen website.
- Add Doxygen to the Windows PATH.
- Install the latest stable release of graphviz.
- Add graphviz to the Windows PATH.
- Modify the
Doxyfile‘sDOT_PATHvariable to point to the path of the
graphviz executable. - Run doxygen.
How to Use Doxygen
There is a file called Doxyfile that controls how Doxygen will run. A new
Doxyfile can be generated by using doxygen -g <filename> (leave the
filename blank normally). This configuration file can be modified to change how
Doxygen runs, and each project has its own Doxyfile.
To run doxygen, simply navigate to the project directory and run doxygen. It
will look for source files, parse them, and generate output. For this project,
a new folder called generated-docs will be created, but with the default
configuration, the output will simply appear in the same folder as the
Doxyfile. Inside the output folder or directly in the root folder, there will
be an html folder, with a file called index.html in it. Open the
index.html file with a web browser to view the documentation.
How to Deploy Doxygen to Gitlab
After each push, Gitlab scans your repository for a file called
.gitlab-ci.yml. If that file is present, it will read the file and check that
the file specifies a valid CI pipeline. If it is valid, then Gitlab looks for
an available «runner.» Runners can be other computers on the network, but in
this case the runner is a docker container within the gitlab server virtual
machine. Once a runner is available, Gitlab assigns a build for the project to
the runner. The runner uses the pipeline from the .gitlab-ci.yml
configuration file to know what actions to take. Part of that pipeline can
include exporting build artifacts (like Doxygen html files or firmware .hex
files).
For our Doxygen deploys, the configuration file will specify that doxygen is
to be run, and that the built files are to be copied to the correct location
for deployment. So in short, including the .gitlab-ci.yml will cause your
deployed documents to update every time you push.
How to Comment for Doxygen
Doxygen comments start with /** and end with */, like this:
/**
 * Doxygen comments go here.
 *
 * The extra asterisks to the left are not required, but they are nice to have
 * visually.
 */
void exampleFunction(void);
A comment block like this will be recognized by Doxygen and will end up in the
documentation. These blocks can contain differnt types of keywords, such as
\brief, \param, and \return. An example C function is shown below using
these. More examples can be found in the src/ directory of this repository.
/**
 * \brief Adds two numbers.
 *
 * This function takes two numbers, adds them, and then returns the result.
 *
 * \param x The first number to add.
 * \param y The second number to add.
 * \return The sum of the two numbers.
 */
int add(int x, int y) {
    return x + y;
}
This Doxygen comment is complete, because it contains a \brief description of
the function, it contains a detailed description beneath that, and it contains
\param and \return descriptions for all its parameters and its return
value.
Commenting for C/C++ with Header Files
In general, high-level comments (for documentation) should go in the header
file, not the corresponding C file. Comments belong with declarations, not
with definitions. For C++ classes, the .hpp file should be full of member
declarations and Doxygen comments, while the corresponding .cpp file should
consist mostly of just code.
Inline comments that are embedded inside of a function’s body should of course
go in the function definition itself (in the .cpp file). Functions that do
not appear in the header file should be given Doxygen comments in the C file.
In short, there should never be 2 Doxygen comments for the same member, and
putting the Doxygen comments in header files is preferred.
Grouping Members
You can also group members that go together. For example, you may have 5
constants that would require the same documentation:
#define MEW2KING 1
#define ARMADA 2
#define HUNGRYBOX 3
#define MANGO 4
#define PPMD 5
Instead of writing out the same documentation comment for each of these
members, you can create a group like this:
/**
 * @{ \name Five Gods constants.
 */
/**
 * \brief Five Gods constants.
 *
 * These five constants represent the five gods.
 */
#define MEW2KING 1
#define ARMADA 2
#define HUNGRYBOX 3
#define MANGO 4
#define PPMD 5
/**
 * @}
 */
If the DISTRIBUTE_GROUP_DOC option is set to «YES» in the Doxyfile, then
the documentation comment will be applied to all the member in the group. The
\name tag also shows up as a heading over the group members.
This Repository’s Doxyfile
The Doxyfile in this repository was generated using doxygen -g, and then
edited in the following way:
Line 35:
PROJECT_NAME           = "Kyle's Doxygen Test"
Line 47:
PROJECT_BRIEF          = "This is just a test of Doxygen"
Line 54:
PROJECT_LOGO           = "./DiConIcon.ico"
Line 61:
OUTPUT_DIRECTORY       = "generated-docs"
Line 438:
EXTRACT_ALL            = YES
Line 363:
DISTRIBUTE_GROUP_DOC   = YES
Line 444:
EXTRACT_PRIVATE        = YES
Line 450:
EXTRACT_PACKAGE        = YES
Line 456:
EXTRACT_STATIC         = YES
Line 481:
EXTRACT_ANON_NSPACES   = YES
Line 759:
WARN_NO_PARAMDOC       = YES
Line 867:
RECURSIVE              = YES
Line 876:
EXCLUDE                = README.md
Line 998:
SOURCE_BROWSER         = YES
Line 1004:
INLINE_SOURCES         = YES
Line 1017:
REFERENCED_BY_RELATION = YES
Line 1023:
REFERENCES_RELATION    = YES
Line 1031:
REFERENCES_LINK_SOURCE = NO
Line 2334:
CALL_GRAPH             = YES
Line 2346:
CALLER_GRAPH           = YES
NOTE: The DiConIcon.ico file needs to be accessible at the given path (in
this case in the root of the repository) in order for it to show up in the
documentation pages.
Tips/Rules
- Always use a
\paramtag for every parameter. - Always use a
\returntag is the function returns a non-void value. - Always include a
\briefdescription in addition to a long description. - Always put a Doxygen comment on every class, function, or macro in the source
code.
Search code, repositories, users, issues, pull requests…
Provide feedback
Saved searches
Use saved searches to filter your results more quickly
Sign up
пятница, 9 ноября 2012 г.
Установка Doxygen под Windows
следующий пост >> Doxygen — быстрый старт
Doxygen — это кроссплатформенная система документирования исходных текстов. Распространяется по лицензии GNU GPL , поэтому смело можем ставить ее себе на рабочий компьютер.
Для установки:
1) Для установки нужно скачать по ссылке подходящий дистрибьютив
2) Запускаем setup (нынче он такой doxygen-1.8.2-setup ), отвечаем на простые вопросы (можно не думая). После установки должна появиться папка
Автор:
Unknown
на
пятница, ноября 09, 2012
![]()
Ярлыки:
установка,
Doxygen,
install