Get that Linux feeling — on Windows
Installing and Updating Cygwin Packages
Installing and Updating Cygwin for 64-bit versions of Windows
Run setup-x86_64.exe any time you want to
update or install a Cygwin package for 64-bit windows.
The signature
for setup-x86_64.exe can be used to verify the
validity of this binary using the public
key here.
General installation notes
When installing packages for the first time, the setup program
does not install every package. Only the minimal base packages
from the Cygwin distribution are installed by default, which takes up about 100 MB.
Clicking on categories and packages in the setup program package installation
screen allows you to select what is installed or updated.
Individual packages like bash, gcc, less, etc.
are released independently of the Cygwin DLL, so the Cygwin DLL version is not
useful as a general Cygwin release number. The setup program
tracks the versions of all installed components and provides the mechanism
for installing or updating everything available from this site for
Cygwin.
Once you’ve installed your desired subset of the Cygwin distribution,
the setup program will remember what you selected, so re-running it
will update your system with any new package releases.
The setup program will check by default if it runs with administrative
privileges and, if not, will try to elevate the process. If you want to avoid
this behaviour and install under an unprivileged account just for your own
usage, run setup with the --no-admin option.
Q: How do I add a package to my existing Cygwin installation?
A: Run the setup program and select the package you want to add.
Tip: if you don’t want to also upgrade existing packages, select ‘Keep’ at the
top-right of the package chooser page.
Q: Is there a command-line installer?
A: Yes and no. The setup program understands
command-line
arguments which allow you to control its behavior and choose
individual packages to install. While this provides some functionality
similar to such tools as apt-get or yum it is not as
full-featured as those package managers.
Q: Why not use apt, yum, my
favourite package manager, etc.?
A: The basic reason for not using a more full-featured package manager is that
such a program would need full access to all of Cygwin’s POSIX functionality. That
is, however, difficult to provide in a Cygwin-free environment, such as exists on
first installation. Additionally, Windows does not easily allow overwriting of
in-use executables so installing a new version of the Cygwin DLL while a package
manager is using the DLL is problematic.
Q: How do I install everything?
A: You do not want to do this! This will install an enormous number of packages
that you will never use, including debuginfo and source for every package.
If you really must do this, clicking on the «Default» label next to the
«All» category to change it to «Install» will mark every Cygwin package for
installation. Be advised that this will download and install tens of gigabytes
of files to your computer.
Q: How do I verify the signature of setup?
A: e.g.
$ gpg --recv-key 1A698DE9E2E56300
gpg: requesting key 1A698DE9E2E56300 from hkp server keys.gnupg.net
gpg: key 1A698DE9E2E56300: "Cygwin <cygwin@cygwin.com>" imported
gpg: 3 marginal(s) needed, 1 complete(s) needed, PGP trust model
gpg: depth: 0  valid:   8  signed:   2  trust: 0-, 0q, 0n, 0m, 0f, 8u
gpg: depth: 1  valid:   2  signed:   0  trust: 2-, 0q, 0n, 0m, 0f, 0u
gpg: Total number processed: 1
gpg:               imported: 1  (RSA: 1)

$ gpg --keyid-format=long --with-fingerprint --verify setup-x86_64.exe.sig setup-x86_64.exe
[...]
gpg: Signature made 12 Mar 2020 16:26:58 GMT
gpg:                using RSA key 1A698DE9E2E56300
gpg: Good signature from "Cygwin <cygwin@cygwin.com>"
Primary key fingerprint: 5640 5CF6 FCC8 1574 682A  5D56 1A69 8DE9 E2E5 6300
Q: What’s the hash of setup?
A: See here
Q: How can I do an offline install?
A1: Install without access to the internet, using a local package
repository
-
Create a local copy of the package repository e.g. by
usingrsyncon one
of the mirrors. - Move that copy to an accessible location, or copy it to removable media.
-
Run setup, and enter the URL, path or UNC path of that repository when
prompted to «Choose A Download Site».
A2: Install without access to the internet, using setup’s separate download
and install actions.
-
Run setup in «Download without installing» mode somewhere it can access a
mirror, with the desired packages selected. -
Run setup again in «Install from local directory» mode, with the same «Local
package directory», and set of packages selected.
Q: How can I install the last Cygwin
version for an old, unsupported Windows?
A: Run setup with the options --allow-unsupported-windows:
--site circa_URL
| Windows version | Setup version | Cygwin DLL version | circa URL |
|---|---|---|---|
|
Windows Vista Windows Server 2008 (NT 6.0) All 32-bit Windows |
current | 3.3.6 |
32-bit: http://ctm.crouchingtigerhiddenfruitbat.org/pub/cygwin/circa/2022/11/23/063457 64-bit: http://ctm.crouchingtigerhiddenfruitbat.org/pub/cygwin/circa/64bit/2022/11/23/063529 |
|
Windows XP SP3 Windows Server 2003 (NT 5.1) |
current | 2.5.2 |
32-bit: http://ctm.crouchingtigerhiddenfruitbat.org/pub/cygwin/circa/2016/08/30/104223 64-bit: http://ctm.crouchingtigerhiddenfruitbat.org/pub/cygwin/circa/64bit/2016/08/30/104235
Also use |
|
Windows 2000 (NT 5.0) Windows XP SP2 |
2.774 | 1.7.18 |
32-bit: http://ctm.crouchingtigerhiddenfruitbat.org/pub/cygwin/circa/2013/06/04/121035
Also use |
Thanks to
the Cygwin
Time Machine for providing this archive.
A note about 32-bit Cygwin
The limited address space of 32-bit Windows means that
random
failures in the fork(2) system call are more likely. Therefore, we
recommend using 32-bit Cygwin only in limited scenarios, with only a minimum
of necessary packages installed, and only if there’s no way to run 64-bit
Cygwin instead.
You have been warned. If you’re still sure you really need a 32-bit
Cygwin, and there’s absolutely no way around it, you may use
the setup-x86.exe installer, following the
instructions above. The signature can be
used to verify the validity of this binary.
Q: How do I help improve setup?
A: See the setup
project page for more information.
GUI translations can be made and updated at
weblate.
This guide was tested under Windows 10. It should be work with other supported Windows Versions too.
Install Cygwin (without admin rights)
This documentation is based on Oliver Doepner’s IT blog. Thank you for your work Oliver.
- Download setup-x86_64.exe.
- Open command line window (WIN+R and type
cmd). - Go to the download directory, e. g.:
cd %USERPROFILE%\Downloads
- Run setup-x86_64.exe with the
--no-adminoption:setup-x86_64.exe --no-admin
- During installation select the
wgetpackage. - After installation open a Cygwin Terminal via Windows desktop shortcut.
- If you are behind an internet proxy (for example on a company environment) create
/etc/profile.d/proxy.shfor internet access:#!/usr/bin/env bash export http_proxy=http://your.proxy.server:proxy_port export https_proxy=http://your.proxy.server:proxy_port export ftp_proxy=http://your.proxy.server:proxy_port export no_proxy=localhost,.example.com
- Now you need a file called
/usr/local/bin/cyg-get. Downlaod it viawget -O /usr/local/bin/cyg-get https://gitlab.com/cogline.v3/cygwin/raw/master/cyg-get?inline=false
Alternatively, you can also create the file yourself.
#!/usr/bin/env bash

# import proxy definition
[[ -r /etc/profile.d/proxy.sh ]] && . /etc/profile.d/proxy.sh

readonly SUCCESS=0
readonly ERROR=1
readonly E_WRONG_ARGS=2

get_current_version()
{
  cd /usr/local/bin

  [[ -e setup-x86_64.exe ]] && rm setup-x86_64.exe
  wget -q http://cygwin.com/setup-x86_64.exe
  chmod u+x setup-x86_64.exe
}

main()
{
  local all_parameters="$@"
  local params="--no-admin"
  local packages=

  while :; do
    case "$1" in
      install)
        params="${params} -q -P"
        shift
        # list of comma separated packages
        packages=$(echo $@|sed -e 's/\s\+/,/g')
        params="${params} ${packages}"
        ;;
      remove)
        params="${params} -q -x"
        shift
        packages=$(echo $@|sed -e 's/\s\+/,/g')
        params="${params} ${packages}"
        ;;
      update)
        params="${params} -q -g"
        get_current_version
        ;;
      # Unknonw option
      -?*)
        echo "unknown option: $1"
        exit $E_WRONG_ARGS
        ;;
      # Default case: If no more options then break out of the loop.
      *)
        get_current_version
        break
    esac
    shift
  done

  run /usr/local/bin/setup-x86_64.exe ${params}
  exit $SUCCESS
}

main "$@"
- Make the script executable:
chmod ugo+x /usr/local/bin/cyg-get
- On the Windows desktop create a copy of the Cygwin terminal shortcut, rename it Cygwin Setup.
- Edit the shortcut target, replace:
mintty.exe -i /Cygwin-Terminal.ico -
with
mintty.exe -i /Cygwin-Terminal.ico /bin/bash -l -c 'cyg-get'
- Now test it and execute the desktop shortcut or run cyg-get from the Cygwin command
prompt.
Cygwin Package Management
With the created script /usr/local/bin/cyg-get you can do package management on command line like in a linux environment. Alternatively, you could also use the pure command-line tool apt-cyg.
Install packages
cyg-get install package_1 package_2 ... package_n
Remove packages
cyg-get remove package_1 package_2 ... package_n
Update all packages
Note
The update option will first download a new version of setup-x86_64.exe and after that all packages will be updated.
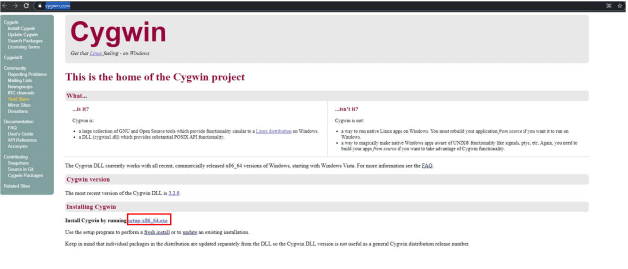
Installing Cygwin on Windows 10
Burden: ~45 minutes
Before Installation
Cygwin is available in 32- and 64-bit versions. You’ll want to determine if you’re running a 64-bit version of Windows before proceeding. To find out, do the following:
- Press the Windows key, then type “about”
- Click “About your PC”
- Find the value to the item marked “System type”
Installation
The installation should take about 30 minutes, depending on which mirror you choose in step 9 and network congestion.
- Visit Cygwin’s web site.
- Find the heading marked “Installing Cygwin”.
- Choose the 64- or 32-bit version of the
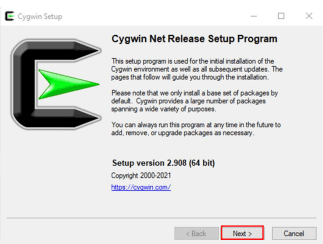
.exefile and run it. - This initial dialog box tells you some important information. For example, you are advised to “remember” where you save the installation files (from a subsequent step). It also says that you run this program if you want to “add, remove, or upgrade packages as necessary.”

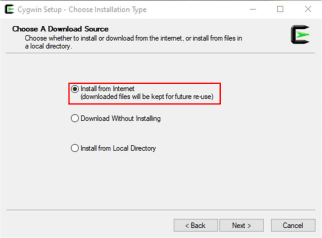
- In this step (“Choose Installation Type”), you have three choices: “Install from Internet”, which downloads the packages into a folder you choose, then runs the installer; “Download Without Installing”, which downloads the packages and does nothing more; and, “Install from Local Directory”, which runs the installer after you direct it to a folder that contains all the packages. Take the default (“Install from Internet”) for an initial installation.

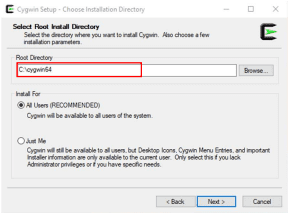
- In the “Choose Installation Directory”, you choose where to install Cygwin and for which users.

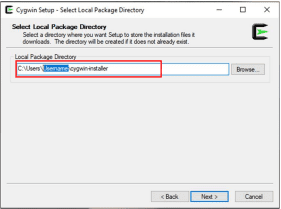
- The “Select Local Package Directory” step asks you for the directory in which to download Cygwin’s packages. This is the folder you need to “remember,” per the initial Cywgin setup window.

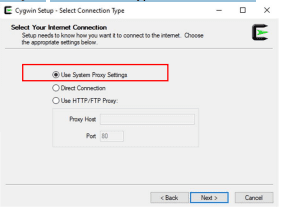
- In the “Select Connection Type” dialog box, choose the default, which tends to work fine.

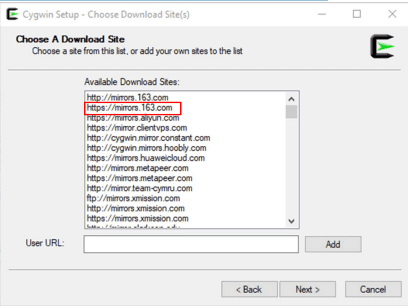
- Now, choose a mirror from where to download the packages. For the fastest download, visit the Mirror Sites page and locate a mirror closest to you.

- This next step is important, so read carefully. From the “Select Packages” dialog box, you need to choose
Admin,Archive,Base,Devel,Editors,Utils, andWeb. This is done by clicking the arrow to the right of each package entry, then choose “Install”.

- You can review and confirm the changes in this window. On an initial install, there will be myriad files listed here. However, when carrying out an update, fewer files will appear for review.

- And, finally, a dialog box asking for the creation of useful shortcuts and confirmation of a successful installation.
![]()
You can read more about the installation configuration at https://www.cygwin.com/cygwin-ug-net/setup-net.html.
If you’re taking a class with me in which I advise you to install Cygwin, continue reading.
Configure Your Cygwin Environment
Assuming you installed the 64-bit version of Cygwin, you should now have a Cygwin home folder at C:\cygwin64\home\USERNAME, where USERNAME is your Cygwin username. Note: This is your Cygwin home folder, not your Windows home folder, which should still be at C:\Users\USERNAME.
- Download https://github.com/code-warrior/web-dev-env-config-files/archive/master.zip.
- Context-click, then choose to “Extract All…”
- Open the folder
web-dev-env-config-files-masterand place it in the top right section of your screen. - Open your Cygwin home folder in Windows Explorer by typing
Windows key + Rthen, in the text prompt, typingC:\cygwin64\home\USERNAME. - Place this opened folder in the top left section of your screen.
- Drag
.editorconfigfromweb-dev-env-config-files-masteron the right toC:\cygwin64\home\USERNAMEon the left. - On the right, open the
terminalfolder then thegit-env-for-mac-and-windowsfolder. - Move all the files in
git-env-for-mac-and-windowson the right toC:\cygwin64\home\USERNAMEon the left. - In the right folder, go up to the parent, then open the
windowsfolder. Move all the files in thewindowsfolder to the left. When you’re presented with the “Replace or Skip Files” dialog box, check “Replace the files in the destination.” - Close all the windows.
- Go to Cygwin and type “exit”.
Edit .bash_aliases and .bashrc
- Open Cygwin and type
whoamito find your exact Cygwin username. - Open
.bash_aliases, which is in your Cygwin home folder, then replaceWINDOWS-USERNAMEwith your Cygwin username. - Do the same for the file
.bashrc, which is also in your Cygin home folder.
Hello guys, welcome back to my blog. In this article, I will discuss how to install CGWIN on windows 10 step by step procedure, what is CYGWIN, the procedure for CYGWIN installation, how to use Cygwin to execute programs, etc.
If you have any doubts related to electrical, electronics, and computer science, then ask question. You can also catch me @ Instagram – Chetan Shidling.
Also, read:
- Top 10+ Features Of Java Programming Language You Must Know
- Difference Between Java And Cpp Programming Languages, Applications
- 100+ C Programming Projects With Source Code, Coding Projects Ideas
How To Install CYGWIN On Windows 10
What is CYGWIN?
Cygwin is a distribution of several GNU and other Open-Source tools running on Microsoft Windows. Cygwin provides similar functionality as Linux distributions except on Windows. Cygwin is dll (cygwin1.dll) which acts as a Linux API layer giving Linux API functionality. Cygwin contains thousands of packages from the Open-Source world.
Cygwin is supported on all modern released versions of Windows – Vista, 7, 8, 8.1, 10, Windows Server 2008, and all later versions of Windows, except Windows S mode. Even though it is not possible to run Linux native apps on Windows directly, but it is certainly possible to rebuild those apps and run them on Windows.
How to install CYGWIN On Windows 10?
The steps below will help installing Cygwin on your system.
01. Step1: Download the installer file setup-x86_64.exe (64 bit) (recommended) and setupx86.exe(32 bit). The setup files can be downloaded from the Cygwin home page – https://cygwin.com/
02. Step2: Run the installer and start by hitting Next
03. Step 3: It is ok to choose any of the option as per your convenience however first-time installation is recommended to be installed from the internet as it downloads and install all the base packages by itself.
04. Step 4: Select the root directory for your Cygwin distribution on your Windows. You can choose any directory except It is recommended not choose the root directory of Cygwin directly as your root of Windows as it might throw errors later when as some critical Cygwin directories like etc, lib and bin might get corrupted by other non-Cygwin applications or packages that use \etc, \lib, \bin.
You can select Cygwin to be available for all the users on your system or you can choose Just Me as per your preference.
05. Step 5: Choose a local package directory for your Cygwin packages. This directory keeps all the files for the packages before installing them.
06. Step 6: Choose the type of connection.
07. Step 7: Choose the mirror nearest to you like this
08. Step 8: This will open you a dialogue box to select and view the package you want to install or which packages you already have by surfing from here. If you are installing Cygwin for the first time. You can select Full/Category to view all the packages Cygwin currently has.
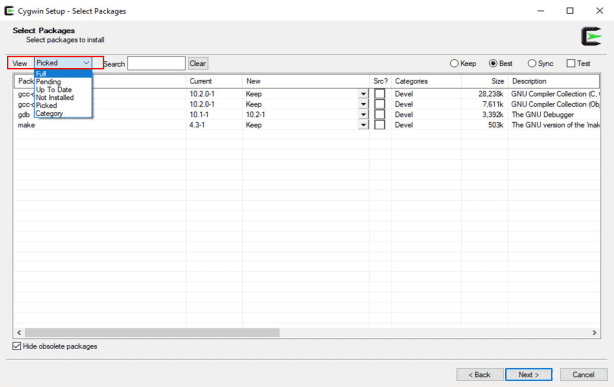
09. Step 9: By default, Cygwin will install the base packages which includes script writing with vim, etc. You can also download the package according to your requirement however in this document we will be focusing on tools like make compiler collection for c and c++ and GNU debugger.
To select those,
- you can search the names directly in the search bar.
- check the box mentioning devel/debug.
- select on version you want to install.
- do this for all the packages you want to install.
- hit Next.
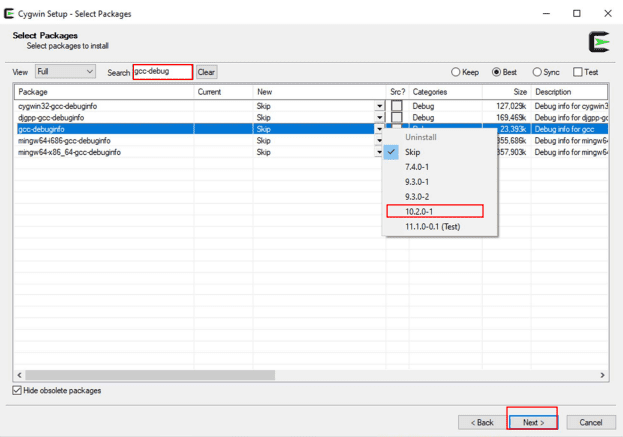
10. Step 10: For compiling c codes, debugging and using make command, these packages are to be installed.
- gcc-core (GNU Compiler Collection(C, OpenMP))
- gdb (The GNU Debugger)
- make (The GNU version of the make utility
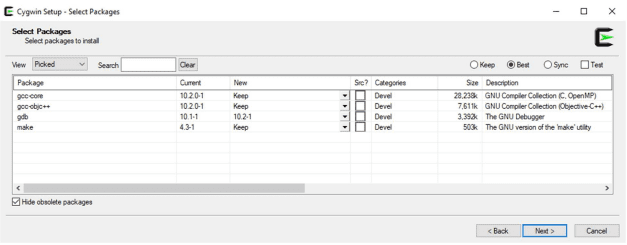
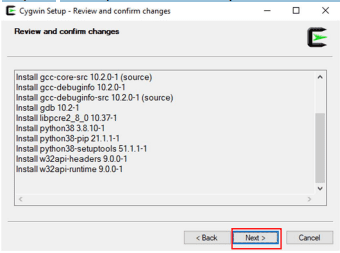
11. Step 11: Shows you the list of files you are about to download and install. Hit Next
12. Step 12: This will start the process. It might take a while depending on the number of packages you are installing.
13. Step 13: Select and hit Next.
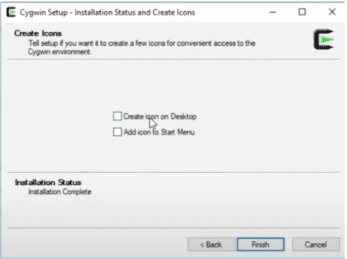
14. Step 14: This completes the installation part. Now a very important step is left which includes adding the bin directory of Cygwin to the path of the environment variables so that it can automatically detect the base directory.
- Go to the folder where Cygwin\bin is installed which in this case is C:\cygwin64\bin
- Copy this path.
- Go to the properties of My computer and navigate to Advanced System settings
- Click on environment Variables.
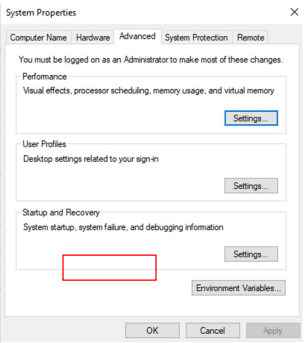
- Select Path and click on Edit.
- Click on New and paste the location of the Cygwin\bin
- Click Ok, Ok and Ok.
You are all set to work in a Linux environment on Windows.
Basic Keywords which may come in handy:
01. man = Displays the manual page for the given command (try “man man”). If you do not find the manual page for some of the commands given on these pages, I would guess that it is because it is one of the commands that are handled directly by bash – see if you find it at “man bash”.
02. pwd = “Print Working Directory” – tells you in which directory you are.
03. ls = lists the files in the current directory (except the hidden ones)
04. cd = “Change Directory”. Give the name of the directory you want to be your new current directory – either relative to where you are, or absolute, relative to the file system tree “root” at “/”.
05. cp = “Copy” a file: “cp hello1.c hello2.c” will make hello2.c a copy of hello1.c
06. mv =move (and/or rename) a file.
07. rm = remove/delete a file.
08. mkdir =makes a new directory
09. rmdir =removes a directory
How to use Cygwin to execute programs?
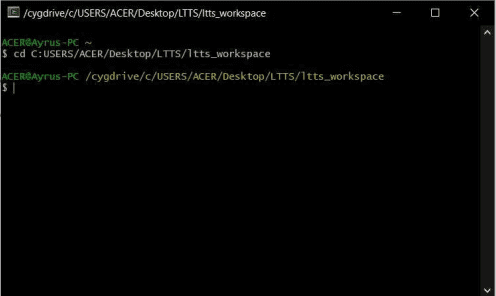
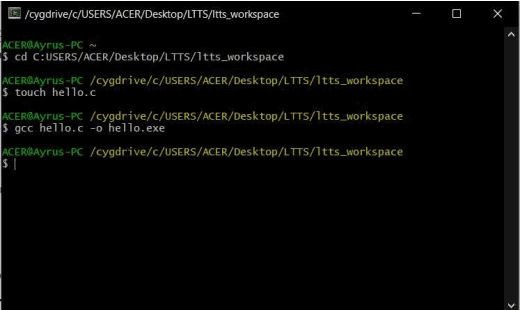
01. Open the Cygwin Terminal and move to the directory to store the program.
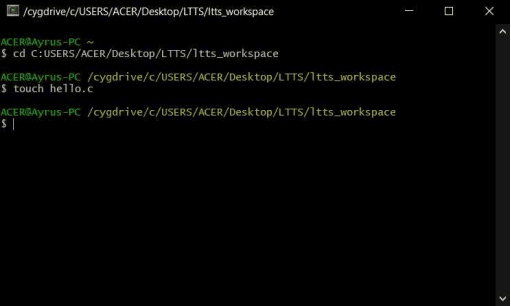
02. Create any C source file let’s say “hello.c” using the command $ touch hello.c in the specified directory (or create it manually using:
- Open an editor for instance Notepad ++ is used for reference here.
- Write the program and save it as hello (for example) with a C source file extension i.e., hello.c.
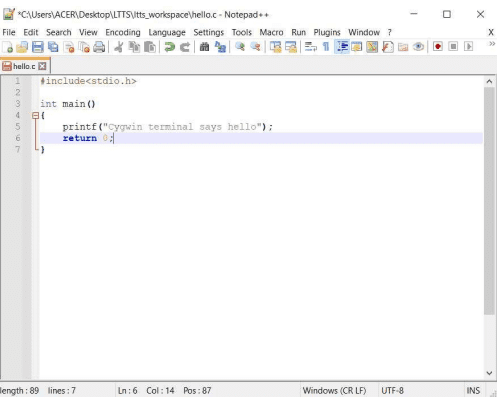
03. Open the C source file in any text editor, write your program and save.
04. Now to create an executable use the command:
$ gcc hello.c -o hello.exe
05. This will create an executable file for the program “hello”.
06. To run the executable just use the command:
$ ./hello.exe
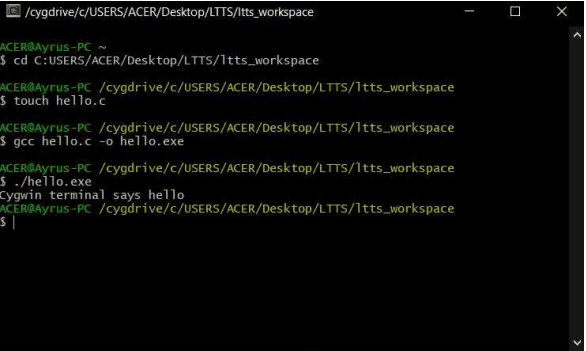
Here ./ represents the exact address of the file hello.exe from the root. Instead of the ./ we can also use the full path of the executable hello.exe .
Thank you for reading ” How To Install CYGWIN On Windows 10 “. I hope this article ” How To Install CYGWIN On Windows 10 ” may help you all a lot.
Also, read:
- 100 + Electrical Engineering Projects For Students, Engineers
- 100+ C Programming Projects With Source Code, Coding Projects Ideas
- 1000+ Electronics Projects For Engineers, Diploma, MTech Students
- 1000+ Interview Questions On Java, Java Interview Questions, Freshers
- 1000+ MATLAB Simulink Projects For MTech, Engineering Students
- 500+ Embedded System Projects For Engineer, Diploma, MTech, PhD
- 500+ Projects For Diploma Electrical, Electronics Student, Diploma Project
- 8051 Microcontroller Timers, TCON Register, TMOD Register
Author Profile

- Chetan ShidlingChetu
-
Interest’s ~ Engineering | Entrepreneurship | Politics | History | Travelling | Content Writing | Technology | Cooking
Geekflare is supported by our audience. We may earn affiliate commissions from buying links on this site.
In
Windows
|
Last updated:
November 22, 2022
Freshdesk – The easy-to-use customer support software that helps you deliver delightful customer experiences.
![]()
By

Cygwin is a Linux-like environment for Windows-based systems. It consists of an emulation layer and a collection of tools that provide a Linux look and feel.
It consists of a DLL (cygwin1.dll), which acts as an emulation layer providing POSIX system call functionality over Windows. With Cygwin, users have access to standard UNIX utilities, which can be used either from provided bash shell or through Windows Command Prompt.
Besides, it provides support to programmers to make use of Win32 API along with Cygwin API, allowing to port UNIX utilities to Windows without much change in source code.
Advantages of Cygwin over Command Prompt/WSL
There are certain advantages of using Cygwin shell over Windows Command Prompt. Listed below are some of the major ones:
- Provides UNIX shell to Windows, allowing access to a range of utilities from UNIX/Linux world to Windows.
- There is no need to install a full-fledged Linux OS or set up a VM where the requirement is satisfied by resources available via Cygwin.
- Optimal resource usage and system requirements to run on Windows since the environment is emulated and works on top of Windows.
- Ideal for testing/development where the requirement is to use UNIX/Linux utilities on Windows.
- Compatible with older Windows OS like Windows 7 etc., whereas the WSL environment offered by Windows is supported on newer versions only.
Download
To download the latest version of Cygwin, follow this link to its official website. You can download the version suitable for your Windows installation and system’s architecture. For the 32-bit version, download https://cygwin.com/setup-x86.exe and for the 64-bit version, download from here https://cygwin.com/setup-x86_64.exe.
Installation
- Launch the downloaded executable file from the previous step. Accept any prompt and warning that is displayed on-screen from Windows User Access Control. This will launch the setup program as shown below.

- Click “Next” to continue with the setup process.

- A prompt to select a download source will be displayed. For most cases, the default option to “Install from Internet” is okay and should be kept. If you’ve a local downloaded repository or just want to download and install Cygwin later, choose one of the other available options. Click “Next” to continue.

- It prompts you to specify “Root Directory” for the install as well as whether it’ll be installed for “All Users” or “Just You”. Again if there isn’t a specific need, keep the default options and click “Next” to continue.

- To download the package files, the setup will ask you to specify a “Local Package Directory” which by default points to your system’s “Download” folder. In case you want to specify another location, specify its path here and click “Next” to proceed with the setup.

- For most cases, “Using System Proxy Settings” should work for the downloading of packages. If you don’t intend to use any proxy and use a direct connection to the Internet, use the “Direct Connection” option, or you can specify a custom proxy setting as well. Click “Next” to continue.

- Next, it’ll prompt you to select a mirror from where Cygwin will download its package files. If a mirror is near your location, which can provide faster speed, choose that one from the list. If you’re unsure, select anyone from the list and click “Next” to proceed.

- Cygwin provides a lot of UNIX/Linux-based utilities that run on Windows. Not all packages get installed by default. Only a minimal set of important packages gets installed. In this step, you can customize your Cygwin setup by selecting/un-selecting different categories of packages. Remember, this can also be done later to add/remove packages to your Cygwin installation. If you have a specific list of important packages for your work, you can select them now and continue further by clicking “Next”.

- The next screen lists the selected packages and asks you to review and confirm. Click “Next” to confirm and continue.

- The selected packages will begin to download, and this may take a while depending upon the speed of the selected download mirror and the number of selected packages.

- Once all packages are downloaded, the setup will continue to install the packages.

- When setup is complete, you’ll be shown the option to create icons on Desktop and Start Menu for easy access. Click “Finish” when done to end setup wizard.

- You can now launch Cygwin by searching in Start Menu as shown above or double-clicking the Desktop icon (if created during setup). This will launch the Cygwin shell.

- Cygwin shell supports UNIX/Linux commands that you normally use. If you find any specific command is not working, you can re-run the setup and select the missing package, if available from the Cygwin repository (an example – Ansible), and install it. The installed command should now become available as a normal command in Cygwin shell CLI.
Conclusion
Cygwin is a useful utility that provides a UNIX/Linux-like shell emulated over a Windows environment. It makes it easy to port certain specific applications on Windows and allows you to develop and use Linux-based scripts on Windows for various tasks. Its installation is as simple as any Windows-based program with GUI based setup.
To read more about Cygwin, you can find its documentation here. Refer to its FAQ and its user guide for detailed usage instructions.
More great readings on Windows
-

How to Install VirtualBox on Windows?
VirtualBox is a virtualization platform to run multiple operating systems from a single machine. Let’s check out how to install this virtualizer on Windows.
-

Windows Terminal: Level Up Your Productivity
Windows Terminal is a command-line tool available in Windows 10 and Windows 11. Other command-line utilities, like Command Prompt and PowerShell, still exist in these Windows versions, but Terminal is a potential replacement.
-
How To Enable Copilot AI on Windows 11
Microsoft is pushing Copilot to all its services and products, including Windows 11. In their recent announcement, Microsoft introduced Copilot to Windows 11 with their big 22H3 update, set to release on November 23.
-
10 New Things in Windows Server 2022 to Know
To meet today’s complex data and business needs, Microsoft regularly introduces upgrades and enhancements to its server operating system, such as increased security, faster network, cloud upgrades, etc.
-
Excel Password Recovery is Easy with these 8 Tools
Are you wondering how to recover your password-protected Excel files without corrupting them? Try these blazing fast tools for quick Excel password recovery.
-
IObit AI-Based Advanced SystemCare Can Speed Up Your Windows and Protect your Data
Optimizing your Windows computer for performance and security is essential.


Power Your Business
Some of the tools and services to help your business grow.
-

The text-to-speech tool that uses AI to generate realistic human-like voices.
Try Murf AI
-
Web scraping, residential proxy, proxy manager, web unlocker, search engine crawler, and all you need to collect web data.
Try Brightdata
-
Monday.com is an all-in-one work OS to help you manage projects, tasks, work, sales, CRM, operations, workflows, and more.
Try Monday
-
Intruder is an online vulnerability scanner that finds cyber security weaknesses in your infrastructure, to avoid costly data breaches.
Try Intruder

