Notice
This document is provided for information purposes only and shall not be regarded as a warranty of a certain functionality, condition, or quality of a product. NVIDIA Corporation (“NVIDIA”) makes no representations or warranties, expressed or implied, as to the accuracy or completeness of the information contained in this document and assumes no responsibility for any errors contained herein. NVIDIA shall have no liability for the consequences or use of such information or for any infringement of patents or other rights of third parties that may result from its use. This document is not a commitment to develop, release, or deliver any Material (defined below), code, or functionality.
NVIDIA reserves the right to make corrections, modifications, enhancements, improvements, and any other changes to this document, at any time without notice.
Customer should obtain the latest relevant information before placing orders and should verify that such information is current and complete.
NVIDIA products are sold subject to the NVIDIA standard terms and conditions of sale supplied at the time of order acknowledgement, unless otherwise agreed in an individual sales agreement signed by authorized representatives of NVIDIA and customer (“Terms of Sale”). NVIDIA hereby expressly objects to applying any customer general terms and conditions with regards to the purchase of the NVIDIA product referenced in this document. No contractual obligations are formed either directly or indirectly by this document.
NVIDIA products are not designed, authorized, or warranted to be suitable for use in medical, military, aircraft, space, or life support equipment, nor in applications where failure or malfunction of the NVIDIA product can reasonably be expected to result in personal injury, death, or property or environmental damage. NVIDIA accepts no liability for inclusion and/or use of NVIDIA products in such equipment or applications and therefore such inclusion and/or use is at customer’s own risk.
NVIDIA makes no representation or warranty that products based on this document will be suitable for any specified use. Testing of all parameters of each product is not necessarily performed by NVIDIA. It is customer’s sole responsibility to evaluate and determine the applicability of any information contained in this document, ensure the product is suitable and fit for the application planned by customer, and perform the necessary testing for the application in order to avoid a default of the application or the product. Weaknesses in customer’s product designs may affect the quality and reliability of the NVIDIA product and may result in additional or different conditions and/or requirements beyond those contained in this document. NVIDIA accepts no liability related to any default, damage, costs, or problem which may be based on or attributable to: (i) the use of the NVIDIA product in any manner that is contrary to this document or (ii) customer product designs.
No license, either expressed or implied, is granted under any NVIDIA patent right, copyright, or other NVIDIA intellectual property right under this document. Information published by NVIDIA regarding third-party products or services does not constitute a license from NVIDIA to use such products or services or a warranty or endorsement thereof. Use of such information may require a license from a third party under the patents or other intellectual property rights of the third party, or a license from NVIDIA under the patents or other intellectual property rights of NVIDIA.
Reproduction of information in this document is permissible only if approved in advance by NVIDIA in writing, reproduced without alteration and in full compliance with all applicable export laws and regulations, and accompanied by all associated conditions, limitations, and notices.
THIS DOCUMENT AND ALL NVIDIA DESIGN SPECIFICATIONS, REFERENCE BOARDS, FILES, DRAWINGS, DIAGNOSTICS, LISTS, AND OTHER DOCUMENTS (TOGETHER AND SEPARATELY, “MATERIALS”) ARE BEING PROVIDED “AS IS.” NVIDIA MAKES NO WARRANTIES, EXPRESSED, IMPLIED, STATUTORY, OR OTHERWISE WITH RESPECT TO THE MATERIALS, AND EXPRESSLY DISCLAIMS ALL IMPLIED WARRANTIES OF NONINFRINGEMENT, MERCHANTABILITY, AND FITNESS FOR A PARTICULAR PURPOSE. TO THE EXTENT NOT PROHIBITED BY LAW, IN NO EVENT WILL NVIDIA BE LIABLE FOR ANY DAMAGES, INCLUDING WITHOUT LIMITATION ANY DIRECT, INDIRECT, SPECIAL, INCIDENTAL, PUNITIVE, OR CONSEQUENTIAL DAMAGES, HOWEVER CAUSED AND REGARDLESS OF THE THEORY OF LIABILITY, ARISING OUT OF ANY USE OF THIS DOCUMENT, EVEN IF NVIDIA HAS BEEN ADVISED OF THE POSSIBILITY OF SUCH DAMAGES. Notwithstanding any damages that customer might incur for any reason whatsoever, NVIDIA’s aggregate and cumulative liability towards customer for the products described herein shall be limited in accordance with the Terms of Sale for the product.
Arm
Arm, AMBA and Arm Powered are registered trademarks of Arm Limited. Cortex, MPCore and Mali are trademarks of Arm Limited. «Arm» is used to represent Arm Holdings plc; its operating company Arm Limited; and the regional subsidiaries Arm Inc.; Arm KK; Arm Korea Limited.; Arm Taiwan Limited; Arm France SAS; Arm Consulting (Shanghai) Co. Ltd.; Arm Germany GmbH; Arm Embedded Technologies Pvt. Ltd.; Arm Norway, AS and Arm Sweden AB.
HDMI
HDMI, the HDMI logo, and High-Definition Multimedia Interface are trademarks or registered trademarks of HDMI Licensing LLC.
Blackberry/QNX
Copyright © 2020 BlackBerry Limited. All rights reserved.
Trademarks, including but not limited to BLACKBERRY, EMBLEM Design, QNX, AVIAGE, MOMENTICS, NEUTRINO and QNX CAR are the trademarks or registered trademarks of BlackBerry Limited, used under license, and the exclusive rights to such trademarks are expressly reserved.
Android, Android TV, Google Play and the Google Play logo are trademarks of Google, Inc.
Trademarks
NVIDIA, the NVIDIA logo, and BlueField, CUDA, DALI, DRIVE, Hopper, JetPack, Jetson AGX Xavier, Jetson Nano, Maxwell, NGC, Nsight, Orin, Pascal, Quadro, Tegra, TensorRT, Triton, Turing and Volta are trademarks and/or registered trademarks of NVIDIA Corporation in the United States and other countries. Other company and product names may be trademarks of the respective companies with which they are associated.
ПРОГРАММИРОВАНИЕ:
Как установить драйвер NVIDIA CUDA, CUDA Toolkit, CuDNN и TensorRT в Windows
Хорошие и простые руководства с пошаговыми инструкциями

Резюме:
В этой статье устанавливаются драйверы и программы, необходимые для использования графических процессоров NVIDIA для обучения моделей и выполнения пакетных выводов. Он загружает и устанавливает драйверы CUDA, CUDA Toolkits и обновления CUDA Toolkit. Он загружает, распаковывает и перемещает файлы CuDNN и TensorRT в каталог CUDA. Он также настраивает, создает и запускает образец BlackScholes для тестирования графического процессора.
Оглавление:
- Установить требования
- Установить драйвер CUDA
- Установить CUDA Toolkit 10
- Установить CUDA Toolkit 11
- Установить библиотеку CuDNN
- Установить библиотеку TensorRT
- Протестируйте GPU на образце CUDA
Приложение:
- Учебники: настройка искусственного интеллекта
- Учебники: курс искусственного интеллекта
- Учебники: репозитории искусственного интеллекта
Установите требования:
В этом разделе загружается и устанавливается Visual Studio с поддержкой C и C ++.
# open the powershell shell
1. press “⊞ windows”
2. enter “powershell” into the search bar
3. right-click "windows powershell"
4. click “run as administrator”
# download the visual studio 2019 installer
invoke-webrequest -outfile "$home\downloads\vsc.exe" -uri https://download.visualstudio.microsoft.com/download/pr/45dfa82b-c1f8-4c27-a5a0-1fa7a864ae21/9dd77a8d1121fd4382494e40840faeba0d7339a594a1603f0573d0013b0f0fa5/vs_Community.exe
# open the visual studio 2019 installer
invoke-item "$home\downloads\vsc.exe"
# install visual studio 2019
1. check “desktop development with c++”
2. click "install"
Установите драйвер CUDA:
В этом разделе загружается и устанавливается последняя версия драйвера CUDA на тот момент.
# download the cuda driver installer
invoke-webrequest -outfile "$home\downloads\cuda_driver.exe" -uri https://us.download.nvidia.com/Windows/471.68/471.68-desktop-win10-win11-64bit-international-nsd-dch-whql.exe
# open the cuda driver installer
invoke-item "$home\downloads\cuda_driver.exe"
# install the cuda driver
1. select “nvidia graphics driver”
2. click "agree & continue"
3. click "next"
Установите CUDA Toolkit 10:
В этом разделе загружается и устанавливается CUDA Toolkit 10 и обновления.
# download the cuda toolkit 10 installer
invoke-webrequest -outfile "$home\downloads\cuda_toolkit_10.exe" https://developer.download.nvidia.com/compute/cuda/10.2/Prod/network_installers/cuda_10.2.89_win10_network.exe
# open the cuda toolkit 10 installer
invoke-item "$home\downloads\cuda_toolkit_10.exe"
# install cuda toolkit 10
1. click "agree & continue"
2. click "next"
3. select custom (advanced)
4. click "next"
5. uncheck “nvidia geforce experience components”
6. uncheck “driver components”
7. uncheck “other components”
8. click "next"
# download the cuda 10 update 1installer
invoke-webrequest -outfile "$home\downloads\cuda_10_update_1.exe" https://developer.download.nvidia.com/compute/cuda/10.2/Prod/patches/1/cuda_10.2.1_win10.exe
# open the cuda 10 update 1 installer
invoke-item "$home\downloads\cuda_10_update_1.exe"
# install the cuda 10 update 1
1. click "agree & continue"
2. click "next"
# download the cuda 10 update 2 installer
invoke-webrequest -outfile "$home\downloads\cuda_10_update_2.exe" https://developer.download.nvidia.com/compute/cuda/10.2/Prod/patches/2/cuda_10.2.2_win10.exe
# open the cuda 10 update 2 installer
invoke-item "$home\downloads\cuda_10_update_2.exe"
# install the cuda 10 update 2
1. click "agree & continue"
2. click "next"
Установите CUDA Toolkit 11:
В этом разделе загружается и устанавливается CUDA Toolkit 11.
# download the cuda toolkit 11 installer
invoke-webrequest -outfile "$home\downloads\cuda_toolkit_11.exe" https://developer.download.nvidia.com/compute/cuda/11.4.1/network_installers/cuda_11.4.1_win10_network.exe
# open the cuda toolkit 11 installer
invoke-item "$home\downloads\cuda_toolkit_11.exe"
# install cuda toolkit 11
1. click "agree & continue"
2. click "next"
3. select custom (advanced)
4. click "next"
5. uncheck “nvidia geforce experience components”
6. uncheck “driver components”
7. uncheck “other components”
8. click "next"
Установите библиотеку CuDNN:
Этот раздел присоединяется к Программе разработчика NVIDIA и загружает библиотеку CuDNN, распаковывает и перемещает файлы в каталог CUDA.
# join the nvidia developer program
start-process iexplore "https://developer.nvidia.com/developer-program"
# download the cudnn library for cuda toolkit 10
start-process iexplore https://developer.nvidia.com/compute/machine-learning/cudnn/secure/8.2.2/10.2_07062021/cudnn-10.2-windows10-x64-v8.2.2.26.zip
# unzip the cudnn library for cuda toolkit 10
expand-archive "$home\downloads\cudnn-10.2-windows10-x64-v8.2.2.26.zip" -destinationpath "$home\downloads\cudnn_cuda_toolkit_10\"
# move the dll files
move-item "$home\downloads\cudnn_cuda_toolkit_10\cuda\bin\cudnn*.dll" "c:\program files\nvidia gpu computing toolkit\cuda\v10.2\bin\"
# move the h files
move-item "$home\downloads\cudnn_cuda_toolkit_10\cuda\include\cudnn*.h" "c:\program files\nvidia gpu computing toolkit\cuda\v10.2\include\"
# move the lib files
move-item "$home\downloads\cudnn_cuda_toolkit_10\cuda\lib\x64\cudnn*.lib" "c:\program files\nvidia gpu computing toolkit\cuda\v10.2\lib\x64"
# download the cudnn library for cuda toolkit 11
start-process iexplore https://developer.nvidia.com/compute/machine-learning/cudnn/secure/8.2.2/11.4_07062021/cudnn-11.4-windows-x64-v8.2.2.26.zip
# unzip the cudnn library for cuda toolkit 11
expand-archive "$home\downloads\cudnn-11.4-windows-x64-v8.2.2.26.zip" -destinationpath "$home\downloads\cudnn_cuda_toolkit_11\"
# move the dll files
move-item "$home\downloads\cudnn_cuda_toolkit_11\cuda\bin\cudnn*.dll" "c:\program files\nvidia gpu computing toolkit\cuda\v11.4\bin\"
# move the h files
move-item "$home\downloads\cudnn_cuda_toolkit_11\cuda\include\cudnn*.h" "c:\program files\nvidia gpu computing toolkit\cuda\v11.4\include\"
# move the lib files
move-item "$home\downloads\cudnn_cuda_toolkit_11\cuda\lib\x64\cudnn*.lib" "c:\program files\nvidia gpu computing toolkit\cuda\v11.4\lib\x64"
Установите библиотеку TensorRT:
Этот раздел загружает библиотеку TensorRT, распаковывает и перемещает файлы в каталог CUDA и устанавливает несколько необходимых программ на Python.
# downloadthe tensorrt library for cuda toolkit 10 start-process iexplore https://developer.nvidia.com/compute/machine-learning/tensorrt/secure/8.0.1/zip/tensorrt-8.0.1.6.windows10.x86_64.cuda-10.2.cudnn8.2.zip # unzip the tensorrt library for cuda 10 expand-archive "$home\downloads\tensorrt-8.0.1.6.windows10.x86_64.cuda-10.2.cudnn8.2.zip" "$home\downloads\tensorrt_cuda_toolkit_10\" # move the dll files move-item "$home\downloads\tensorrt_cuda_toolkit_10\tensorrt-8.0.1.6\lib\*.dll" "c:\program files\nvidia gpu computing toolkit\cuda\v10.2\bin\"# downloadthe tensorrt library for cuda toolkit 11 start-process iexplore https://developer.nvidia.com/compute/machine-learning/tensorrt/secure/8.0.1/zip/tensorrt-8.0.1.6.windows10.x86_64.cuda-11.3.cudnn8.2.zip # unzip the tensorrt library for cuda 11 expand-archive "$home\downloads\tensorrt-8.0.1.6.windows10.x86_64.cuda-11.3.cudnn8.2.zip" "$home\downloads\tensorrt_cuda_toolkit_11\" # move the dll files move-item "$home\downloads\tensorrt_cuda_toolkit_11\tensorrt-8.0.1.6\lib\*.dll" "c:\program files\nvidia gpu computing toolkit\cuda\v11.4\bin\" # install graph surgeon python -m pip install "$home\downloads\tensorrt_cuda_toolkit_11\tensorrt-8.0.1.6\graphsurgeon\graphsurgeon-0.4.5-py2.py3-none-any.whl" # install onnx graph surgeon python -m pip install "$home\downloads\tensorrt_cuda_toolkit_11\tensorrt-8.0.1.6\onnx_graphsurgeon\onnx_graphsurgeon-0.3.10-py2.py3-none-any.whl" # install universal framework format python -m pip install "$home\downloads\tensorrt_cuda_toolkit_11\tensorrt-8.0.1.6\uff\uff-0.6.9-py2.py3-none-any.whl"
Протестируйте графический процессор на примере CUDA:
В этом разделе настраивается, строится и запускается образец BlackScholes.
# open the visual studio file
start-process "c:\programdata\nvidia corporation\cuda samples\v11.4\4_finance\blackscholes\blackscholes_vs2019.sln"
# edit the linker input properties
1. click the "project" menu
2. click "properties"
3. double-click "linker"
4. click "input"
5. click "additional dependencies"
6. click the "down arrow" button
7. click "edit"
# add the cudnn library
1. type "cudnn.lib" at the bottom of the additional dependencies
2. click "ok"
# add the cuda toolkit 11 directory
1. click "cuda c/c++"
2. double-click "cuda toolkit custom dir"
3. enter "c:\program files\nvidia gpu computing toolkit\cuda\v11.4"
4. click "ok"
# build the sample
1. click the “build” menu
2. click “build solution”
# run the sample
cmd /k "c:\programdata\nvidia corporation\cuda samples\v11.4\bin\win64\debug\blackscholes.exe"
«Наконец, не забудьте подписаться и удерживать кнопку хлопка, чтобы получать регулярные обновления и помощь».
Приложение:
Этот блог существует, чтобы предоставить комплексные решения, ответить на ваши вопросы и ускорить ваш прогресс в области искусственного интеллекта. В нем есть все необходимое, чтобы настроить компьютер и пройти первую половину курса fastai. Он откроет вам самые современные репозитории в подполях искусственного интеллекта. Он также будет охватывать вторую половину курса фастая.
Учебники: настройка искусственного интеллекта
В этом разделе есть все, что нужно для настройки вашего компьютера.
# linux
01. install and manage multiple python versions
02. install the nvidia cuda driver, toolkit, cudnn, and tensorrt
03. install the jupyter notebook server
04. install virtual environments in jupyter notebook
05. install the python environment for ai and machine learning
06. install the fastai course requirements
# wsl 2
01. install windows subsystem for linux 2
02. install and manage multiple python versions
03. install the nvidia cuda driver, toolkit, cudnn, and tensorrt
04. install the jupyter notebook home and public server
05. install virtual environments in jupyter notebook
06. install the python environment for ai and machine learning
07. install ubuntu desktop with a graphical user interface
08. install the fastai course requirements
# windows 10
01. install and manage multiple python versions
02. install the nvidia cuda driver, toolkit, cudnn, and tensorrt
03. install the jupyter notebook home and public server
04. install virtual environments in jupyter notebook
05. install the programming environment for ai and machine learning
# mac
01. install and manage multiple python versions
02. install the jupyter notebook server
03. install virtual environments in jupyter notebook
04. install the python environment for ai and machine learning
05. install the fastai course requirements
Учебники: курс искусственного интеллекта
Этот раздел содержит ответы на анкету в конце каждого урока.
# fastai course
01. chapter 1: your deep learning journey q&a
02. chapter 2: from model to production q&a
03. chapter 3: data ethics q&a
04. chapter 4: under the hood: training a digit classifier q&a
05. chapter 5: image classification q&a
06. chapter 6: other computer vision problems q&a
07. chapter 7: training a state-of-the-art model q&a
08. chapter 8: collaborative filtering deep dive q&a
Учебники: репозитории искусственного интеллекта
Этот раздел содержит современные репозитории в различных подполях.
# repositories related to audio
01. raise audio quality using nu-wave
02. change voices using maskcyclegan-vc
03. clone voices using real-time-voice-cloning toolbox
# repositories related to images
01. achieve 90% accuracy using facedetection-dsfd
Каталог статьи
- CPU и GPU
- 2. Что такое CUDA?
- 3. Что такое CUDNN?
- 4. Отношения между Куда и CUDNN
- 5. Установка
- 5.1 Установка CUDA
- 5.2 Установка CUDNN
- 6. Ссылка
- 7. Примечание:
CPU и GPU
CPU и GPU — это разные компьютерные устройства, процессоры были распознаны людьми как компьютерное сердце, но ГПУ недавно не присоединен к людям из-за его превосходных характеристик вычисления изображений или производительности матрицы.
Отношения и разница в процессоре и гг.
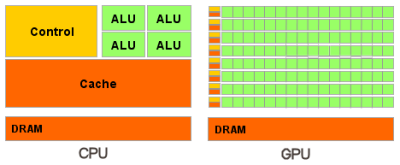
Как видно из вышеуказанного рисункаGPU (процессор изображения, графический блок обработки графики)с участиемЦП (центральный процессор,Central Processing Unit)Основное отличие в конструкции состоит в том, что GPU имеет более эксплуатационные единицы (как зеленый алу на рисунке), а блоки управления и кэша не так много процессоров, поскольку GPU выполняет в то же время, когда GPU рассчитывается параллельно. Программа не требует слишком много контроля. Блок кэша используется для выполнения кэша данных, и CPU может уменьшить количество доступа первичную память Cache, который должен уменьшить задержку памяти.memory latency). Кэш в GPU небольшой или нет, потому что GPU может уменьшить задержки памяти параллельными вычислениями. Следовательно, конструкция CPU CAHCE в основном для достижения низких задержек, и контроль является в основном универсальным, и комплексные блоки управления логическими управляющими гарантируют, что ЦП является высокоэффективным задачами и инструкциями. Следовательно, процессор хорош в логическом контроле, который является последовательным расчетом, а GPU хорош при высокоинтенсивных расчетах, что параллельно. Например, графический процессор похоже на тысячи трудностей. Все сухие, и нет зависимости, что является независимым, простой, более мощным; ЦП похож на пакет, хотя и способен усердно работать, но есть меньше людей, поэтому Как правило, они несут ответственность за распределение задач, планирование персонала и другую работу.
Видно, что ускорение GPU реализуется параллельно через большое количество потоков, поэтому ГПУ не влияет на работу, которая не может быть очень параллельной. ЦП является последовательной операцией и требует сильной универсальности, в основном играющей роль общего управления и задачи распределения.
https://docs.nvidia.com/cuda/cuda-c-programming-guide/index.html#thread-hierarchy
2. Что такое CUDA?
CUDA (вычислить единую архитектуру устройства, унифицированную вычислительную архитектуру)Это интеграционная технология, запущенная NVIDIA, которая является официальным названием компании для GPGPU. Через эту технологию пользователи могут использовать NVIDIAGeForce 8Последний GPU и новейший Quadro GPU рассчитываются. Это также первый раз, когда вы можете использовать GPU в качестве среды разработки C-компилятора. Когда NVIDIA Marketing компилятор часто смешивается с архитектурой, вызывая путаницу. На самом деле, CUDA может быть совместима с OpenCL или вашим собственным C-компилятором. Будь то CUDA C-Language или OpenCL, команда в конечном итоге будет преобразована в код PTX и будет настроен.
Другими словами, CUDA представляет собой параллельную вычислительную структуру для NVIDIA, которая находится только на GPU NVIDIA, и только тогда, когда проблема расчета, которая должна быть решена, — это сыграть много параллельно, чтобы рассчитать роль CUDA.,
Под архитектурой CUDA минимальный блок при выполнении чипа — это нить. Несколько трех могут образовывать блок. Нить в блоке может получить доступ к той же совместной совмещенной памяти и может быстро синхронизировать действие. Количество потоков, которые каждый блок может содержать, ограничено. Однако блок, который выполняет ту же программу, может образовывать сетку. Нить в другом блоке не может получить доступ к той же общую память, поэтому вы не можете напрямую общаться или синхронизировать. Следовательно, степень потока может сотрудничать в различных блоках относительно низкой. Однако, используя этот режим, вы можете позволить программе не нужно беспокоиться о количестве потоков, которые чип отображения действительно может выполняться одновременно. Например, чип отображения, имеющий очень небольшое количество блока выполнения, может выполнять последовательный порядок в каждом блоке, не одновременно. Различные сетки могут выполнять разные программы (т.е. ядро).
CUDA(ComputeUnified Device Architecture)Это операционная платформа, запущенная производителем видеокарт NVIDIA. CUDA — это общая параллельная вычислительная архитектура, запущенная NVIDIA, которая позволяет GPU решать сложные вычислительные проблемы.
3. Что такое CUDNN?
NVIDIA cuDNNЭто ускоритель GPU для глубоких нейронных сетей. Это подчеркивает производительность, простоту использования и низкую накладную расход памяти.NVIDIA cuDNNОн может быть интегрирован в более высокий уровень структуры машинного обучения, таких как Tensorflow Google, популярное программное обеспечение Caffe в Беркли, штат Калифорния. Простой плагин дизайн позволяет разработчикам сосредоточиться на проектировании и внедрении моделей нейронных сетей, а не простых регулировков, а также реализуя высокую производительность современных параллельных вычислений на графическом процессе.
4. Отношения между Куда и CUDNN
Куда считается верстанием с большим количеством инструментов, таких как молотки, отвертки и т. Д. CUDNN основан на библиотеке ускорительной библиотеки GPU в CUDA на основе CUDA, которая имеет его для завершения расчетов глубины обучения на GPU. Это эквивалентно работе, например, это гаечный ключ. Но когда куда куда нет, нет пути. Чтобы запустить глубину нейронной сети на CUDA, вы должны установить CUDNN, как вы хотите скрутить гайку. Таким образом, GPU будет работать в глубокой нейронной сети, и рабочая скорость — это много процессора.
Официальный учебник по установке
CUDA:https://docs.nvidia.com/cuda/cuda-installation-guide-microsoft-windows/index.html
cuDNN:https://docs.nvidia.com/deeplearning/sdk/cudnn-install/index.html#installwindows
5. Установка
5.1 Установка CUDA
CUDA10Установочный пакет можно загрузить непосредственно с веб-сайта NVIDIA.
Согласно соответствующему варианту системы, я выбираюcuda_10.1.243_426.00_win10.exe(Размер 2,3 г), рекомендуется выбирать при установкенастроить Вместо"оптимизация"(Из английского объяснения, его можно увидеть, на самом деле, охватывание оптимизации должна быть более подходящей, она будет установлена все компоненты и перезаписать существующий драйвер, но я не хочу устанавливать ведро Full-Family, пусть Один мой официальный драйвер видеокарты, чем новый).
Дважды щелкните, чтобы установить:


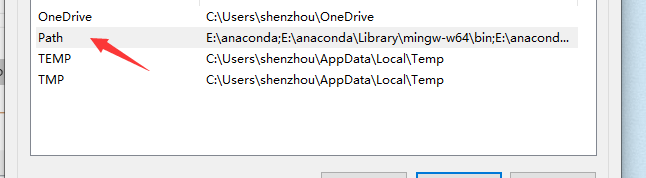
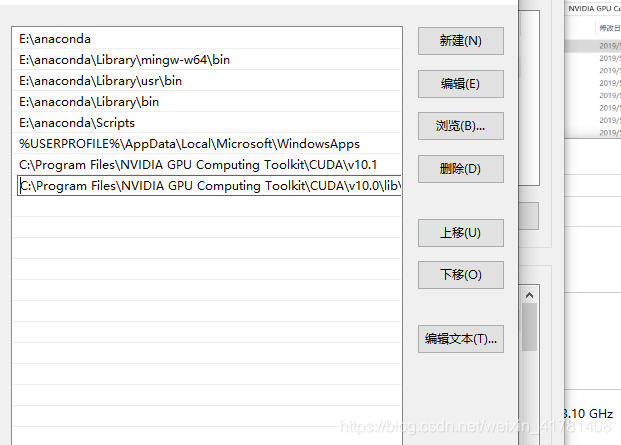
Настроить переменные среды


Проверьте, настроен ли он
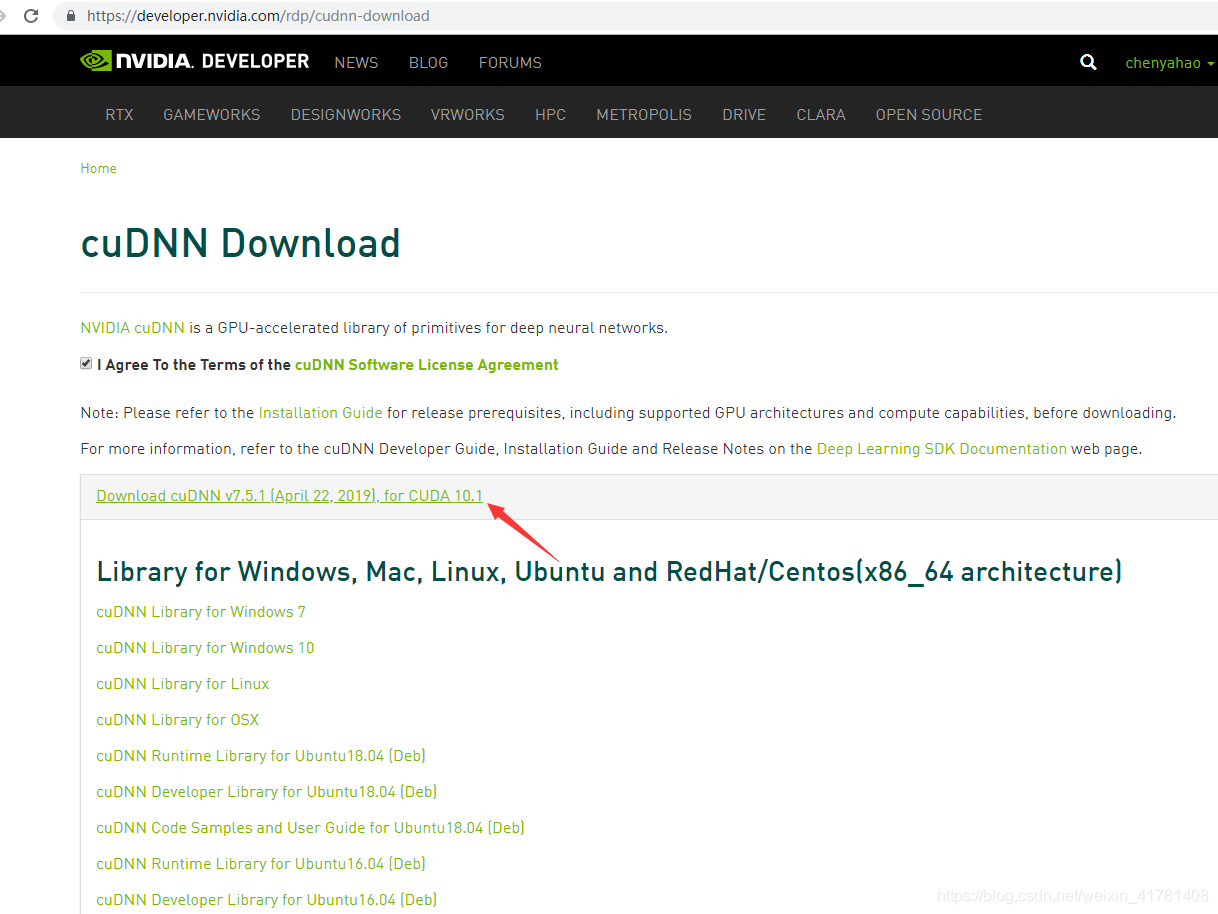
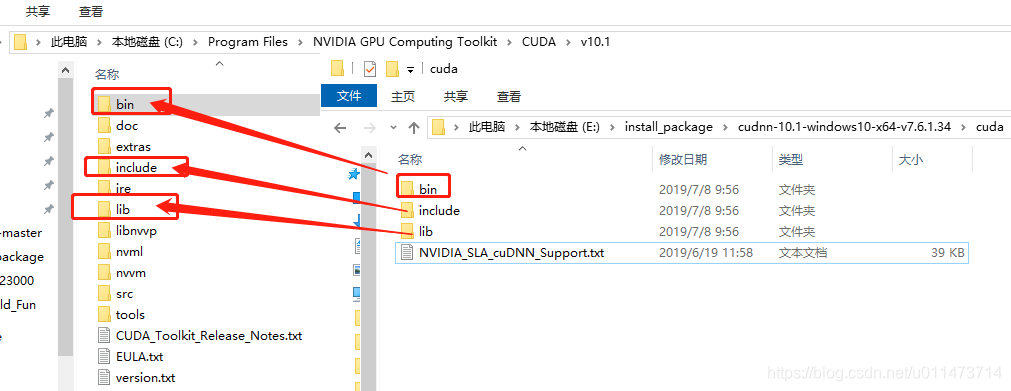
5.2 Установка CUDNN
После завершения установки вам нужно скачатьСоответствующая версия, соответствующая CUDAизcuDNNПосле того, как страница загрузки, показанной ниже, после завершения загрузки поместите все файлы в этом сжатом пакете в каталог установки CUDA10 в соответствии с папкой.

Добавьте переменную среды
Добавить переменные среды:C:\Program Files\NVIDIA GPU Computing Toolkit\CUDA\v10.0\lib\x64
6. Ссылка
https://blog.csdn.net/weixin_41781408/article/details/89946085
https://blog.csdn.net/MrCharles/article/details/89193619
7. Примечание:
Невозможно построить процессор GPU с помощью AnaConda. Невозможно построить окружающую среду!
Installing CUDA, cuDNN on Windows 10
Installing CUDA, cuDNN on Windows 10
This covers the installation of CUDA, cuDNN on Windows 10. This article below assumes that you have a CUDA-compatible GPU already installed on your PC.
Method 1: Installation using Anaconda
Method 1: Installation using Anaconda
Install CUDA and cuDNN with conda in Anaconda prompt.
Here, it is assumed you have already installed Anaconda. If you do not have Anaconda installed, follow
How to Install Anaconda
Recommend to use conda virtual environment for specific CUDA version contained in the env.
First, Run Anaconda Prompt(admistration)
(Option1: install in base)
If you want to install the same CUDA version for all environment, install in (base)
conda install —c anaconda cudatoolkit==10.2.89
(Option2: install in Specific Environment)
It is recommended to install specific CUDA version in the selected Python environment.
[$ENV_NAME] is your environment name. e.g.
conda activate py37
#conda activate [$ENV_NAME]
conda install —c anaconda cudatoolkit==10.2.89
Conda will find the compatible cuDNN for the installed version of CUDA
conda install —c anaconda cudnn
The available cuDNN version could be a low version (e.g. cuDNN 7.6.5). If you want to install a higher version, then follow Method 2: Using NVDIA downloader.

Method 2: Installation using NVIDIA downloader
Method 2: Installation using NVIDIA downloader
Step 1: Check the software you need to install
Step 1: Check the software you need to install
Assuming that Windows is already installed on your PC, the additional bits of software you will install as part of these steps are:
-
Microsoft Visual Studio Community(v2017 or higher )
Step 2: Install Visual Studio Community
Step 2: Install Visual Studio Community
Visual Studio is a Prerequisite for CUDA Toolkit
Visual Studio is a Prerequisite for CUDA Toolkit
Visual Studio Community is required for the installation of Nvidia CUDA Toolkit. If you attempt to download and install CUDA Toolkit for Windows without having first installed Visual Studio, you get a message for installation.
Step 3: Install CUDA Toolkit for Windows 10
Step 3: Install CUDA Toolkit for Windows 10
(updated 2022.2 : Install CUDA Toolkit 10.2 )
Installing CUDA Toolkit 10.2
-
Go to CUDA download center
-
The CUDA Toolkit (free) can be downloaded from the Nvidia website. Click here to go to the download center
-
You should check which version of CUDA Toolkit you choose for download and installation to ensure compatibility with Pytorch or
Tensorflow
-
Select Window10 , exe(Network). Download the Base Installer and Run.


-
After Downloading, Install(Recommended Option). It should take 10~20min to install.
-
It will be installed in
C:\Program Files\NVIDIA GPU Computing Toolkit\CUDA\v10.2
-


Step 4: Install CUDA patches
Step 4: Install CUDA patches
After CUDA installation, install additional Patches for CUDA Toolkit.

After installing CUDA and its patches, the next step is to find a compatible version of CuDNN.
-
Check which version of **** cuDNN is needed for specific Tensorflow or Pytorch
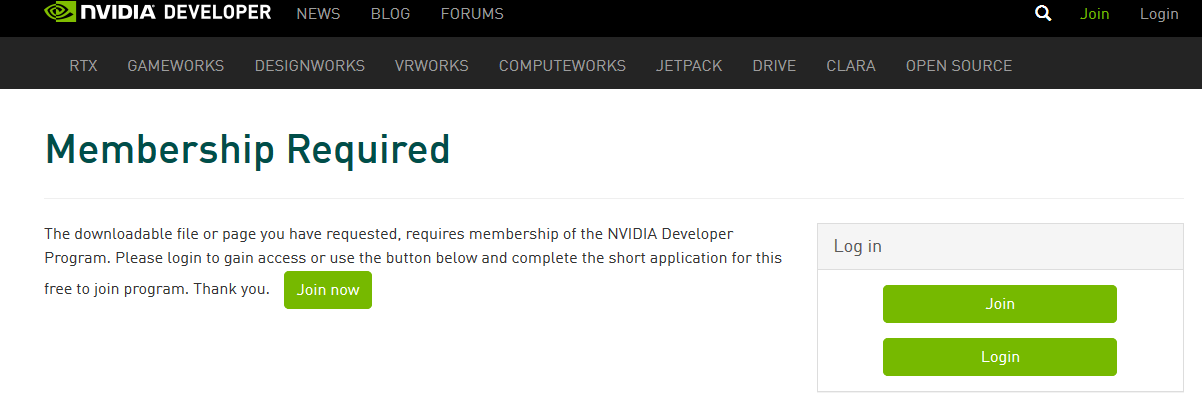
Step 5.1: Register NVIDIA
First, you have to register to become a member of the NVIDIA Developer Program (free).
Step 5.2: Install cuDNN 8.0.5 for CUDA 10.2

Select cuDNN version for CUDA 10.2. You can also check cuDNN Archive if you cannot find the version.
cuDNN v8.0.5 for CUDA 10.2 or
cuDNN v8.3.3 for CUDA 10.2

-
1.
cudnn-windows-x86_64-*-archive.zip
-
2.
Copy the following files from the unzipped package into the NVIDIA CUDA directory.
-
CUDA directory: C:\Program Files\NVIDIA GPU Computing Toolkit\CUDA\v10.2
Do not replace the whole folders. Just copy the files.
-

3. Check the installed CUDA in your computer. Run the Command Prompt and type

In this tutorial, we are going to be covering the installation of CUDA, cuDNN and GPU-compatible Tensorflow on Windows 10. This article assumes that you have a CUDA-compatible GPU already installed on your PC such as an Nvidia GPU; but if you haven’t got this already, the tutorial, Change your computer GPU hardware in 7 steps to achieve faster Deep Learning on your Windows PC will help you get that hardware set up, ready for the steps below.
- Step 1: Check the software versions you will need to install
- Step 2: Download and Install Visual Studio Express
- 2.1 Visual Studio is a Prerequisite for CUDA Toolkit
- 2.2 Selecting and downloading Visual Studio Express
- 2.3 Installing Visual Studio Express
- 2.4 A PC reboot after installation of Visual Studio May be Required
- Step 3: Download CUDA Toolkit for Windows 10
- Step 3.1: Downloading CUDA 9.0 from the CUDA Toolkit Archive
- Step 3.2: Installing CUDA 9.0
- Step 4: Download Windows 10 CUDA patches
- Step 5: Download and Install cuDNN
- Step 5.1: Downloading cuDNN
- Step 5.2: Unzipping cuDNN files and copying to CUDA folders
- Step 5.3: Checking CUDA environment variables are set in Windows
- Step 6: Install Python (if you don’t already have it)
- Step 7: Install Tensorflow with GPU support
- Step 7.1: Calling up the command prompt with administration rights
- Step 7.2: System wide install of Tensorflow via python pip
- Step 8: Test Installation of TensorFlow and its access to GPU
- Conclusions
- Other postings of this article:
Step 1: Check the software versions you will need to install
Assuming that Windows is already installed on your PC, the additional bits of software you will install as part of these steps are:-
- Microsoft Visual Studio
- the NVIDIA CUDA Toolkit
- NVIDIA cuDNN
- Python
- Tensorflow (with GPU support)
Step 2: Download and Install Visual Studio Express
2.1 Visual Studio is a Prerequisite for CUDA Toolkit
Visual studio is required for the installation of Nvidia CUDA Toolkit (this prerequisite is referred to here). If you attempt to download and install CUDA Toolkit for Windows without having first installed Visual Studio, you get the message shown in Fig. 1, “No supported version of Visual Studio was found”.

2.2 Selecting and downloading Visual Studio Express
At the original time of writing, the most recent version of Visual Studio (which is free) is the Visual Studio Express Community Version 2017, shown in Fig 2. You can get previous versions of Visual Studio for free by joining “Visual Studio Dev Essentials” and then searching for the version of Visual Studio you want.

2.3 Installing Visual Studio Express
Once you have downloaded Visual Studio Express, its initial installation is straightforward. Fig 3 shows the executable file (.exe) you receive as a download.

When you press the ‘save file’ option on Fig 3, the window in Fig 4 will appear where you can set installation options (or just leave them as they are by default, as I did).

During installation, Visual Studio prompts you to as whether you ‘want to continue without workloads’. I pressed ‘continue’ here, as I had no intention of using workloads at all.

2.4 A PC reboot after installation of Visual Studio May be Required
After installing Visual Studio, I initially moved straight on to downloading and attempting to install CUDA Toolkit for Windows — that step is Step 3 which I will be describing next. I got a message that Visual Studio was still operating and was preventing the installation of CUDA Toolkit. Rebooting my PC before attempting to install CUDA Toolkit again solved this problem.
Step 3: Download CUDA Toolkit for Windows 10
These CUDA installation steps are loosely based on the Nvidia CUDA installation guide for windows. The CUDA Toolkit (free) can be downloaded from the Nvidia website here.
At the original time of writing this tutorial, the default version of CUDA Toolkit offered is version 10.0, as shown in Fig 6. However, you should check which version of CUDA Toolkit you choose for download and installation to ensure compatibility with Tensorflow (looking ahead to Step 7 of this process). When you go onto the Tensorflow website, the latest version of Tensorflow available (1.12.0) requires CUDA 9.0, not CUDA 10.0. To find CUDA 9.0 or any earlier releases, you need to navigate to the “Legacy Releases” on the bottom right hand side of Fig 6.

Step 3.1: Downloading CUDA 9.0 from the CUDA Toolkit Archive
Choosing “Legacy Releases” takes you to the CUDA Toolkit Archive. Based on Tensorflow installation guidance, the CUDA version required is 9.0, as listed in Fig 7.

Step 3.2: Installing CUDA 9.0
CUDA 9.0 comes as a base installation and four patches; the base installation of CUDA 9.0 must be installed first, followed by the patches. The options for the base install which I selected are shown in Fig. 8.

Running the base installer which has just been downloaded will produce the CUDA Setup Package window, as shown in Fig 9.

The CUDA installer extracts to your PC and, when complete, the NVIDIA CUDA Toolkit installation will start; you will get a message to that effect. The resulting NVIDIA Installer windows throughout the installation process are shown at Fig 10 — Fig 13. I chose the express installation option (Fig. 10).

Fig. 11 provides the opportunity to select installation location; I chose the default locations provided, which for CUDA is :
C:\Program Files\NVIDA GPU Computing Toolkit\CUDA\v9.0
Fig. 12 below shows the CUDA installations which rely on Visual studio, previously installed in Step 1.

Pressing ‘next’ at the window shown in Fig. 12 above, gives the final installation window, shown as Fig.13 below, where the NVIDIA installer is marked as finished.

Step 4: Download Windows 10 CUDA patches
At the time of writing, there are four CUDA patches to get (as well as the base installer), so let’s go and download these. They are shown in Fig.14.

When the four patches are downloaded, they can be installed in the same way as the base installer — with installation windows providing guidance through the process.
Step 5: Download and Install cuDNN
Having installed CUDA 9.0 base installer and its four patches, the next step is to find a compatible version of CuDNN. Based on the information on the Tensorflow website, Tensorflow with GPU support requires a cuDNN version of at least 7.2.
Step 5.1: Downloading cuDNN
In order to download CuDNN, you have to register to become a member of the NVIDIA Developer Program (which is free).

When you create an account, login and fill out some other required details about why you are using the account, you get the download page shown in Fig. 16.

As I have downloaded CUDA 9.0, the corresponding version of cuDNN is version 7.4.2. Choosing cuDNN version 7.4.2 enables the download as a zip file named as follows:
cudnn-9.0-windows10-x64-v7.zip
Step 5.2: Unzipping cuDNN files and copying to CUDA folders
Instructions at Nvidia provide support for windows cuDNN installation, as do instructions on the Tensorflow website ; I have reproduced these instructions in distilled form, based on my implementation of them. In my case, I downloaded the cuDNN .zip file named above into a folder which has the following path on my PC (your path will no doubt be different).
C:\Users\jo\Documents\cuDNN_downloads\
In the instructions below, I refer to the folder path “ C:\Users\jo\Documents\cuDNN_downloads\” (referred to just above) as “<downloadpath>”, such that the zip file is now in the path:
<downloadpath>\cudnn-9.0-windows10-x64-v7.5.0.56.zip
I unzipped the cuDNN “.zip” file where I downloaded it, hence the unzipped folder structure which will contain the required cuDNN files is now:-
<downloadpath>\cudnn-9.0-windows10-x64-v7.5.0.56\
There are three files in the unzipped cuDNN folder subdirectories which are to be copied into the CUDA Toolkit directories. These are cudnn64_7.dll, cudnn.h and cudnn.lib:
1. cudnn64_7.dll
cudnn64_7.dll can be found in the following path within the downloaded cuDNN files:
<downloadpath>\cudnn-9.0-windows10-x64-v7.5.0.56\cuda\bin\cudnn64_7.dll
Assuming that you installed CUDA 9.0 to its default path (as I did at Step 2.3), namely the following default path:
C:\Program Files\NVIDA GPU Computing Toolkit\CUDA\v9.0
you can copy the cudnn64_7.dll file directly into the CUDA folder’s bin folder path (note: you don’t need to create any new subfolders):
C:\Program Files\NVIDIA GPU Computing Toolkit\CUDA\v9.0\bin\2. cudnn.h
As with the cudnn64_7.dll file above, after downloading and unzipping the cuDNN folder, the header file cudnn64.h can be found in the path:
<downloadpath>\cudnn-9.0-windows10-x64-v7.5.0.56\cuda\ include\cudnn.h
Again, assuming that you installed CUDA 9.0 into the default path as I did at Step 2.3, copy cudnn.h directly into the CUDA folder with the following path (no new subfolders are necessary):
C:\Program Files\NVIDIA GPU Computing Toolkit\CUDA\v9.0\include\
3. cudnn.lib
The .lib file cudnn.lib can be found in the downloaded cuDNN path:
<downloadpath>\cudnn-9.0-windows10-x64-v7.5.0.56\cuda\lib\x64\cudnn.lib
Copy cudnn.lib directly into the CUDA folder with the following path:
C:\Program Files\NVIDIA GPU Computing Toolkit\CUDA\v9.0\lib\x64\
Step 5.3: Checking CUDA environment variables are set in Windows
Finally, the instructions at Nvidia direct that you ensure that the CUDA environment variable has previously been set up, as follows:
Variable Name: CUDA_PATH
Variable Value: C:\Program Files\NVIDIA GPU Computing Toolkit\CUDA\v9.0
In Windows 10, the Environment Variables can be found by choosing:
Control Panel ->System and Security->System->Advanced System settings.
This opens up a window called “System Properties” (Fig 17), at which point the “Environment Variables” button should be chosen.

When the Environment Variables window then appears, within “system variables” (in the bottom half of the window), click on “Path” and choose the button “edit”. A new window will appear, called “Edit environment variable” as shown in Fig 18 below.
On checking the Environment Variables, I found the installation process which determines the CUDA installation path — Step 3.2, see Fig. 11 — had already added two paths to CUDA . These paths are shown in Fig 18 below, so I found I did not need to add a further CUDA path.

Step 6: Install Python (if you don’t already have it)
Now that CUDA and cuDNN are installed, it is time to install Python to enable Tensorflow to be installed later on. At the time of writing, the most up to date version of Python 3 available is Python 3.7, but the Python 3 versions required for Tensorflow are 3.4, 3.5 or 3.6. Python 3.6 can be downloaded for Windows 10 from here. When you run the Python installer for windows, the setup window in Fig 19 will appear.

Of the options in Fig. 19 above during Python installation, I chose to select all of them. These options are useful: Python’s ‘pip’ installer is used at Step 7.2 of this guide to install Tensorflow. Additionally, I use the IDE (integrated development environment for writing and running python code) called “IDLE” at Step 8.
In the “Advanced Options” (shown at Fig 20 below), I chose the installation of Python for all users (which was not ticked by default); this gives the system wide installation.

Tensorflow provides instructions for checking that CUDA, cuDNN and (optional: CUPTI) installation directories are correctly added to the PATH environmental variables. As the three cuDNN files were copied into the subfolders of CUDA, I did not update the existing CUDA environmental variables path.
Step 7.1: Calling up the command prompt with administration rights
In this step a system-wide install of Tensorflow is carried out, not a per user install, but an alternative means of carrying out this tensorflow installation (not covered here) is to create a Python virtual environment, activate the environment and install Tensorflow within that environment.
If you wish to make a system wide installation of Tensorflow, this requires administrative rights, therefore, accordingly the command prompt should be run with administrative rights. To do this, open up the command prompt by running ‘cmd’ in the search bar, and then right clicking on command prompt to choose ‘run as administrator’. This opens up Administrator: Command Prompt as shown in Fig 21.

Step 7.2: System wide install of Tensorflow via python pip
Having opened the Command Prompt, the system-wide installation command for Tensorflow with GPU support is as follows:
pip3 install --upgrade tensorflow-gpu
The “pip3” command (as opposed to “pip”) is required as the installation is to Python 3. Execution of this command in the command prompt is shown in Fig 22.

The resulting output from the command is shown in Fig 23, and if all goes to plan there should eventually be a message to confirm that Tensorflow has been installed successfully.

Step 8: Test Installation of TensorFlow and its access to GPU
Go to the start menu in windows and search for the IDE called ‘idle’, which will be installed as part of your python installation if you selected as I did at Step 6. A Python window should appear labelled Python 3.6.x Shell. At the prompt (denoted by ‘>>>’), import the Tensorflow package. This will check that Tensorflow has been installed (as you can import it). The command for the IDLE shell to import the tensorflow package is as follows:
# importing the tensorflow package
import tensorflow as tf
To test CUDA support for your Tensorflow installation, you can run the following command in the shell:
tf.test.is_built_with_cuda()
Finally, to confirm that the GPU is available to Tensorflow, you can test using a built-in utility function in TensorFlow as shown here:
tf.test.is_gpu_available(cuda_only=False, min_cuda_compute_capability=None)
It takes a few minutes to return a result from this; when it is finished it returns True, and then the prompt `>>>`appears again. Importing tensorflow and these tests are all shown in Fig 24 in the Python IDLE Shell.

Conclusions
These were the steps I took to install Visual Studio, CUDA Toolkit, CuDNN and Python 3.6, all with the ultimate aim of installing Tensorflow with GPU support on Windows 10. To date, my GPU based machine learning and deep learning work has been on Linux Ubuntu machines; by the same token, much of the machine learning community support online focuses on Ubuntu.
For Machine Learning, the major drawback to using Windows is that it is necessary to build more things from source (for example using Cmake) than on Linux, and also to install additional software for the build processes, such as Visual Studio. For example, if you were to install Caffe2 on Windows, there are no pre-built binaries and Windows build is in testing and beta mode. I installed CUDA and cuDNN on Windows 10 more out of curiosity than anything else, just to see how straightforward (or otherwise) it was.
As I suggested in [reference], now that CUDA, cuDNN and Tensorflow are successfully installed on Windows 10 and I have checked Tensorflow’s access to GPU, I am going to sweep the whole Windows 10 operating system away in order to make a fresh installation of Ubuntu 18.04 LTS. This new installation of Ubuntu will be covered in Part 3 of this series.
Other postings of this article:
This tutorial was originally posted by Dr Joanne Kitson as Installing Tensorflow with CUDA, cuDNN and GPU support on Windows 10 in Towards Data Science on Medium.com