CLion is a cross-platform IDE that provides consistent experience on Windows, macOS, and Linux (for setup on FreeBSD, refer to this instruction).
System requirements
|
Requirement |
Minimum |
Recommended |
|---|---|---|
|
RAM |
2 GB of free RAM |
8 GB of total system RAM |
|
CPU |
Any modern CPU |
Multi-core CPU. CLion supports multithreading for different operations and processes making it faster the more CPU cores it can use. |
|
Disk space |
3.5 GB |
SSD drive with at least 5 GB of free space |
|
Monitor resolution |
1024×768 |
1920×1080 |
|
Operating system |
Officially released 64-bit versions of the following:
Pre-release versions are not supported. |
Latest 64-bit version of Windows, macOS, or Linux (for example, Debian, Ubuntu, or RHEL) |
* CLion is not available for some Linux distributions, such as RHEL6/CentOS6, which do not include glibc version 2.27 required by JBR 17.
You do not need to install Java to run CLion because JetBrains Runtime is bundled with the IDE (based on JRE 17).
Toolchain requirements
-
When using bundled MinGW, no additional tools are required
-
In case of Cygwin, install the version 2.8 or later with the gcc-g++ and gdb packages
-
In case of using the MSVC compiler: Visual Studio 2013, 2015, 2017, 2019, or 2022
-
In case of using WSL: Windows 10 Fall Creators Update (least version 1709, build 16299.15) and the tools required in WSL (see the Linux tab)
-
Xcode command line developer tools (to install, run the
xcode-select --installcommand)
-
GCC/G++ or Clang
-
the make utility (run
sudo apt-get -y install maketo install it)
The JetBrains Toolbox App is the recommended tool to install JetBrains products. Use it to install and manage different products or several versions of the same product, including Early Access Program (EAP) and Nightly releases, update and roll back when necessary, and easily remove any tool. The Toolbox App maintains a list of all your projects to quickly open any project in the right IDE and version.
Install the Toolbox App
-
Download the installer .exe from the Toolbox App web page.
-
Run the installer and follow the wizard steps.
-
After you run the Toolbox App, click its icon
 in the notification area and select which product you want to install.
To install a specific version, click
and select Available versions.
 in the notification area and select which product you want to install.
 and select
Log in to your JetBrains Account from the Toolbox App, and it will automatically activate the available licenses for any IDE that you install.
Install the Toolbox App
-
Download the disk image .dmg from the Toolbox App web page.
-
Mount the image and drag the JetBrains Toolbox app to the Applications folder.
-
After you run the Toolbox App, click its icon in the main menu and select which product you want to install.
To install a specific version, click
and select Available versions.

Log in to your JetBrains Account from the Toolbox App, and it will automatically activate the available licenses for any IDE that you install.
Install the Toolbox App
-
Download the tarball .tar.gz from the Toolbox App web page.
-
Extract the tarball to a directory that supports file execution.
For example, if the downloaded version is 1.17.7391, you can extract it to the recommended /opt directory using the following command:
sudo tar -xzf jetbrains-toolbox-1.17.7391.tar.gz -C /opt
-
Execute the jetbrains-toolbox binary from the extracted directory to run the Toolbox App.
After you run the Toolbox App for the first time, it will automatically add the Toolbox App icon
to the main menu. -
Select the product that you want to install.
To install a specific version, click
and select Available versions.
Log in to your JetBrains Account from the Toolbox App, and it will automatically activate the available licenses for any IDE that you install.
Standalone installation
You can install CLion manually and have the option to manage the location of every instance and all the configuration files. This is useful, for example, if you have a policy that requires specific install locations.
-
Download the installer .exe.
-
Run the installer and follow the wizard steps.
On the Installation Options step, you can configure the following:
-
Create a desktop shortcut for launching CLion.
-
Add the directory with CLion command-line launchers to the
PATHenvironment variable to be able to run them from any working directory in the Command Prompt. -
Add the Open Folder as Project action to the system context menu (when you right-click a folder).
-
Associate specific file extensions with CLion to open them with a double click.
-
To run CLion, find it in the Windows Start menu or use the desktop shortcut. You can also run the launcher batch script or executable in the installation directory under bin.
-
Download the ZIP archive
-
Extract the archive to the desired folder.
To run CLion, use the launcher batch script or executable in the extracted directory under bin.
-
Download the disk image.
-
Mount the image and drag the CLion app to the Applications folder.
Run the CLion app from the Applications directory, Launchpad, or Spotlight.
-
Download the tarball .tar.gz.
-
Unpack the downloaded CLion-*.tar.gz archive. The recommended extract directory is /opt:
sudo tar xvzf CLion-*.tar.gz -C /opt/
-
Execute the CLion.sh from bin subdirectory to run CLion:
sh /opt/clion-*/bin/clion.sh
To create a desktop entry, do one of the following:
-
On the Welcome screen, click Configure | Create Desktop Entry
-
From the main menu, click Tools | Create Desktop Entry
When you run CLion for the first time, you can take several steps to complete the installation, customize your instance, and start working with the IDE.
For more information, refer to Run CLion for the first time.
Silent installation on Windows
Silent installation is performed without any user interface. It can be used by network administrators to install CLion on a number of machines and avoid interrupting other users.
To perform silent install, run the installer with the following switches:
-
/S: Enable silent install -
/CONFIG: Specify the path to the silent configuration file -
/D: Specify the path to the installation directoryThis parameter must be the last in the command line, and it should not contain any quotes even if the path contains blank spaces.
For example:
clion.exe /S /CONFIG=d:\temp\silent.config /D=d:\IDE\CLion
To check for issues during the installation process, add the /LOG switch with the log file path and name between the /S and /D parameters. The installer will generate the specified log file. For example:
clion.exe /S /CONFIG=d:\temp\silent.config /LOG=d:\JetBrains\CLion\install.log /D=d:\IDE\CLion
Silent configuration file
You can download the default silent configuration file for CLion at https://download.jetbrains.com/cpp/silent.config
The silent configuration file defines the options for installing CLion. With the default options, silent installation is performed only for the current user: mode=user. If you want to install CLion for all users, change the value of the installation mode option to mode=admin and run the installer as an administrator.
The default silent configuration file is unique for each JetBrains product. You can modify it to enable or disable various installation options as necessary.
Install as a snap package on Linux
You can install CLion as a self-contained snap package. Since snaps update automatically, your CLion installation will always be up-to-date.
CLion is distributed via two channels:
-
The stable channel includes only stable versions. To install the latest stable release of CLion, run the following command:
sudo snap install clion —classic
The
--classicoption is required because the CLion snap requires full access to the system, like a traditionally packaged application. -
The edge channel includes EAP builds. To install the latest EAP build of CLion, run the following command:
sudo snap install clion —classic —edge
When the snap is installed, you can launch it by running the clion.sh command.
To list all installed snaps, you can run sudo snap list. For more information about other snap commands, refer to the Snapcraft documentation.
Last modified: 27 September 2023
CLion is a cross-platform IDE that provides consistent experience on Windows, macOS, and Linux (for setup on FreeBSD, refer to this instruction).
System requirements
|
Requirement |
Minimum |
Recommended |
|---|---|---|
|
RAM |
2 GB of free RAM |
8 GB of total system RAM |
|
CPU |
Any modern CPU |
Multi-core CPU. CLion supports multithreading for different operations and processes making it faster the more CPU cores it can use. |
|
Disk space |
3.5 GB |
SSD drive with at least 5 GB of free space |
|
Monitor resolution |
1024×768 |
1920×1080 |
|
Operating system |
Officially released 64-bit versions of the following:
Pre-release versions are not supported. |
Latest 64-bit version of Windows, macOS, or Linux (for example, Debian, Ubuntu, or RHEL) |
* CLion is not available for some Linux distributions, such as RHEL6/CentOS6, which do not include glibc version 2.27 required by JBR 17.
You do not need to install Java to run CLion because JetBrains Runtime is bundled with the IDE (based on JRE 17).
Toolchain requirements
-
When using bundled MinGW, no additional tools are required
-
In case of Cygwin, install the version 2.8 or later with the gcc-g++ and gdb packages
-
In case of using the MSVC compiler: Visual Studio 2013, 2015, 2017, 2019, or 2022
-
In case of using WSL: Windows 10 Fall Creators Update (least version 1709, build 16299.15) and the tools required in WSL (see the Linux tab)
-
Xcode command line developer tools (to install, run the
xcode-select --installcommand)
-
GCC/G++ or Clang
-
the make utility (run
sudo apt-get -y install maketo install it)
The JetBrains Toolbox App is the recommended tool to install JetBrains products. Use it to install and manage different products or several versions of the same product, including Early Access Program (EAP) and Nightly releases, update and roll back when necessary, and easily remove any tool. The Toolbox App maintains a list of all your projects to quickly open any project in the right IDE and version.
Install the Toolbox App
-
Download the installer .exe from the Toolbox App web page.
-
Run the installer and follow the wizard steps.
-
After you run the Toolbox App, click its icon
in the notification area and select which product you want to install.To install a specific version, click
and select Available versions.
 in the notification area and select which product you want to install.
 and select
Log in to your JetBrains Account from the Toolbox App, and it will automatically activate the available licenses for any IDE that you install.
Install the Toolbox App
-
Download the disk image .dmg from the Toolbox App web page.
-
Mount the image and drag the JetBrains Toolbox app to the Applications folder.
-
After you run the Toolbox App, click its icon in the main menu and select which product you want to install.
To install a specific version, click
and select Available versions.

Log in to your JetBrains Account from the Toolbox App, and it will automatically activate the available licenses for any IDE that you install.
Install the Toolbox App
-
Download the tarball .tar.gz from the Toolbox App web page.
-
Extract the tarball to a directory that supports file execution.
For example, if the downloaded version is 1.17.7391, you can extract it to the recommended /opt directory using the following command:
sudo tar -xzf jetbrains-toolbox-1.17.7391.tar.gz -C /opt
-
Execute the jetbrains-toolbox binary from the extracted directory to run the Toolbox App.
After you run the Toolbox App for the first time, it will automatically add the Toolbox App icon
to the main menu. -
Select the product that you want to install.
To install a specific version, click
and select Available versions.
Log in to your JetBrains Account from the Toolbox App, and it will automatically activate the available licenses for any IDE that you install.
Standalone installation
You can install CLion manually and have the option to manage the location of every instance and all the configuration files. This is useful, for example, if you have a policy that requires specific install locations.
-
Download the installer .exe.
-
Run the installer and follow the wizard steps.
On the Installation Options step, you can configure the following:
-
Create a desktop shortcut for launching CLion.
-
Add the directory with CLion command-line launchers to the
PATHenvironment variable to be able to run them from any working directory in the Command Prompt. -
Add the Open Folder as Project action to the system context menu (when you right-click a folder).
-
Associate specific file extensions with CLion to open them with a double click.
-
To run CLion, find it in the Windows Start menu or use the desktop shortcut. You can also run the launcher batch script or executable in the installation directory under bin.
-
Download the ZIP archive
-
Extract the archive to the desired folder.
To run CLion, use the launcher batch script or executable in the extracted directory under bin.
-
Download the disk image.
-
Mount the image and drag the CLion app to the Applications folder.
Run the CLion app from the Applications directory, Launchpad, or Spotlight.
-
Download the tarball .tar.gz.
-
Unpack the downloaded CLion-*.tar.gz archive. The recommended extract directory is /opt:
sudo tar xvzf CLion-*.tar.gz -C /opt/
-
Execute the CLion.sh from bin subdirectory to run CLion:
sh /opt/clion-*/bin/clion.sh
To create a desktop entry, do one of the following:
-
On the Welcome screen, click Configure | Create Desktop Entry
-
From the main menu, click Tools | Create Desktop Entry
When you run CLion for the first time, you can take several steps to complete the installation, customize your instance, and start working with the IDE.
For more information, refer to Run CLion for the first time.
Silent installation on Windows
Silent installation is performed without any user interface. It can be used by network administrators to install CLion on a number of machines and avoid interrupting other users.
To perform silent install, run the installer with the following switches:
-
/S: Enable silent install -
/CONFIG: Specify the path to the silent configuration file -
/D: Specify the path to the installation directoryThis parameter must be the last in the command line, and it should not contain any quotes even if the path contains blank spaces.
For example:
clion.exe /S /CONFIG=d:\temp\silent.config /D=d:\IDE\CLion
To check for issues during the installation process, add the /LOG switch with the log file path and name between the /S and /D parameters. The installer will generate the specified log file. For example:
clion.exe /S /CONFIG=d:\temp\silent.config /LOG=d:\JetBrains\CLion\install.log /D=d:\IDE\CLion
Silent configuration file
You can download the default silent configuration file for CLion at https://download.jetbrains.com/cpp/silent.config
The silent configuration file defines the options for installing CLion. With the default options, silent installation is performed only for the current user: mode=user. If you want to install CLion for all users, change the value of the installation mode option to mode=admin and run the installer as an administrator.
The default silent configuration file is unique for each JetBrains product. You can modify it to enable or disable various installation options as necessary.
Install as a snap package on Linux
You can install CLion as a self-contained snap package. Since snaps update automatically, your CLion installation will always be up-to-date.
CLion is distributed via two channels:
-
The stable channel includes only stable versions. To install the latest stable release of CLion, run the following command:
sudo snap install clion —classic
The
--classicoption is required because the CLion snap requires full access to the system, like a traditionally packaged application. -
The edge channel includes EAP builds. To install the latest EAP build of CLion, run the following command:
sudo snap install clion —classic —edge
When the snap is installed, you can launch it by running the clion.sh command.
To list all installed snaps, you can run sudo snap list. For more information about other snap commands, refer to the Snapcraft documentation.
Last modified: 27 September 2023
Overview
In this tutorial, we will install CLion IDE on Windows 11 operating system. CLion is a cross-platform IDE for C and C++ development from JetBrains.
Download
To try the tool, we can download and evaluate it for 30 days free trial.
Open a web browser and navigate to the following URL.
https://www.jetbrains.com/clion/download/
Choose the Windows tab, .exe option in the drop-down and click on the Download button.
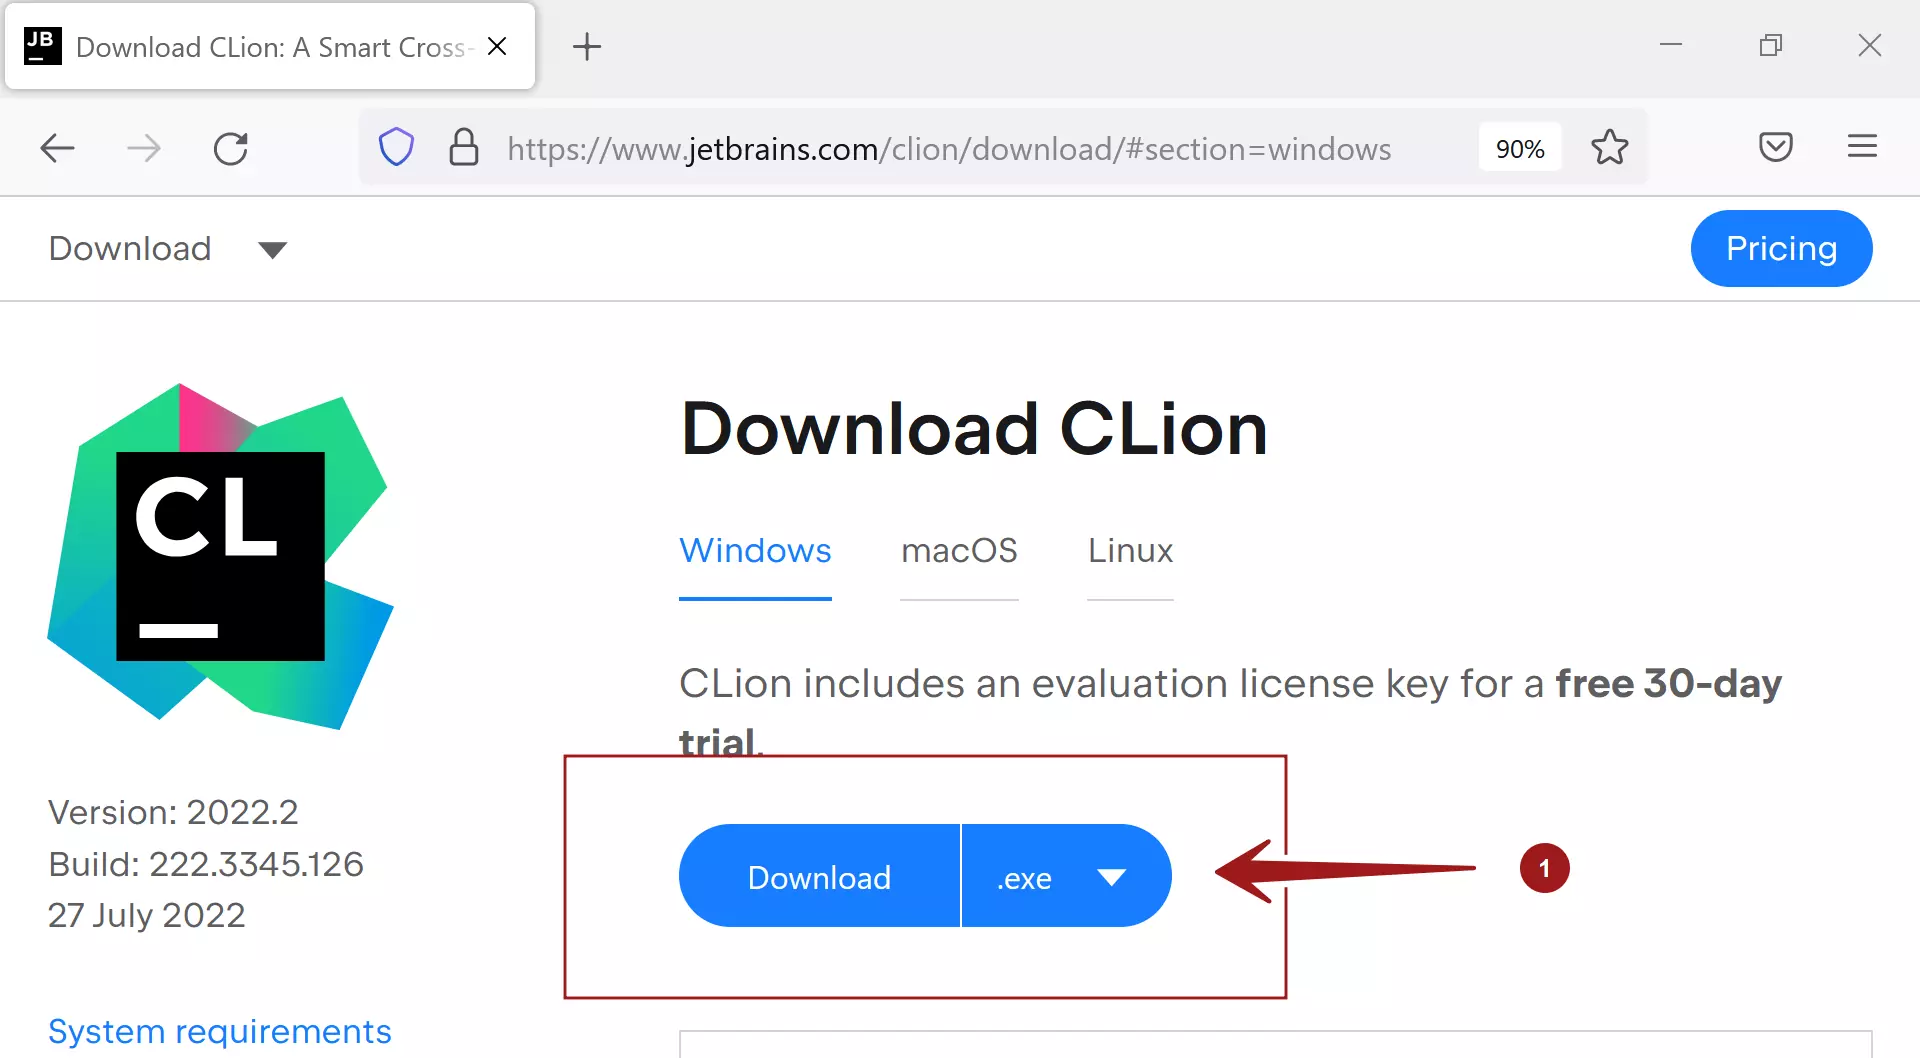
Download the .exe installer. File format
CLion<version>.exe
Install
Double click on the CLion .exe installer file to install the tool. We need to have administrative privileges to install the tool.
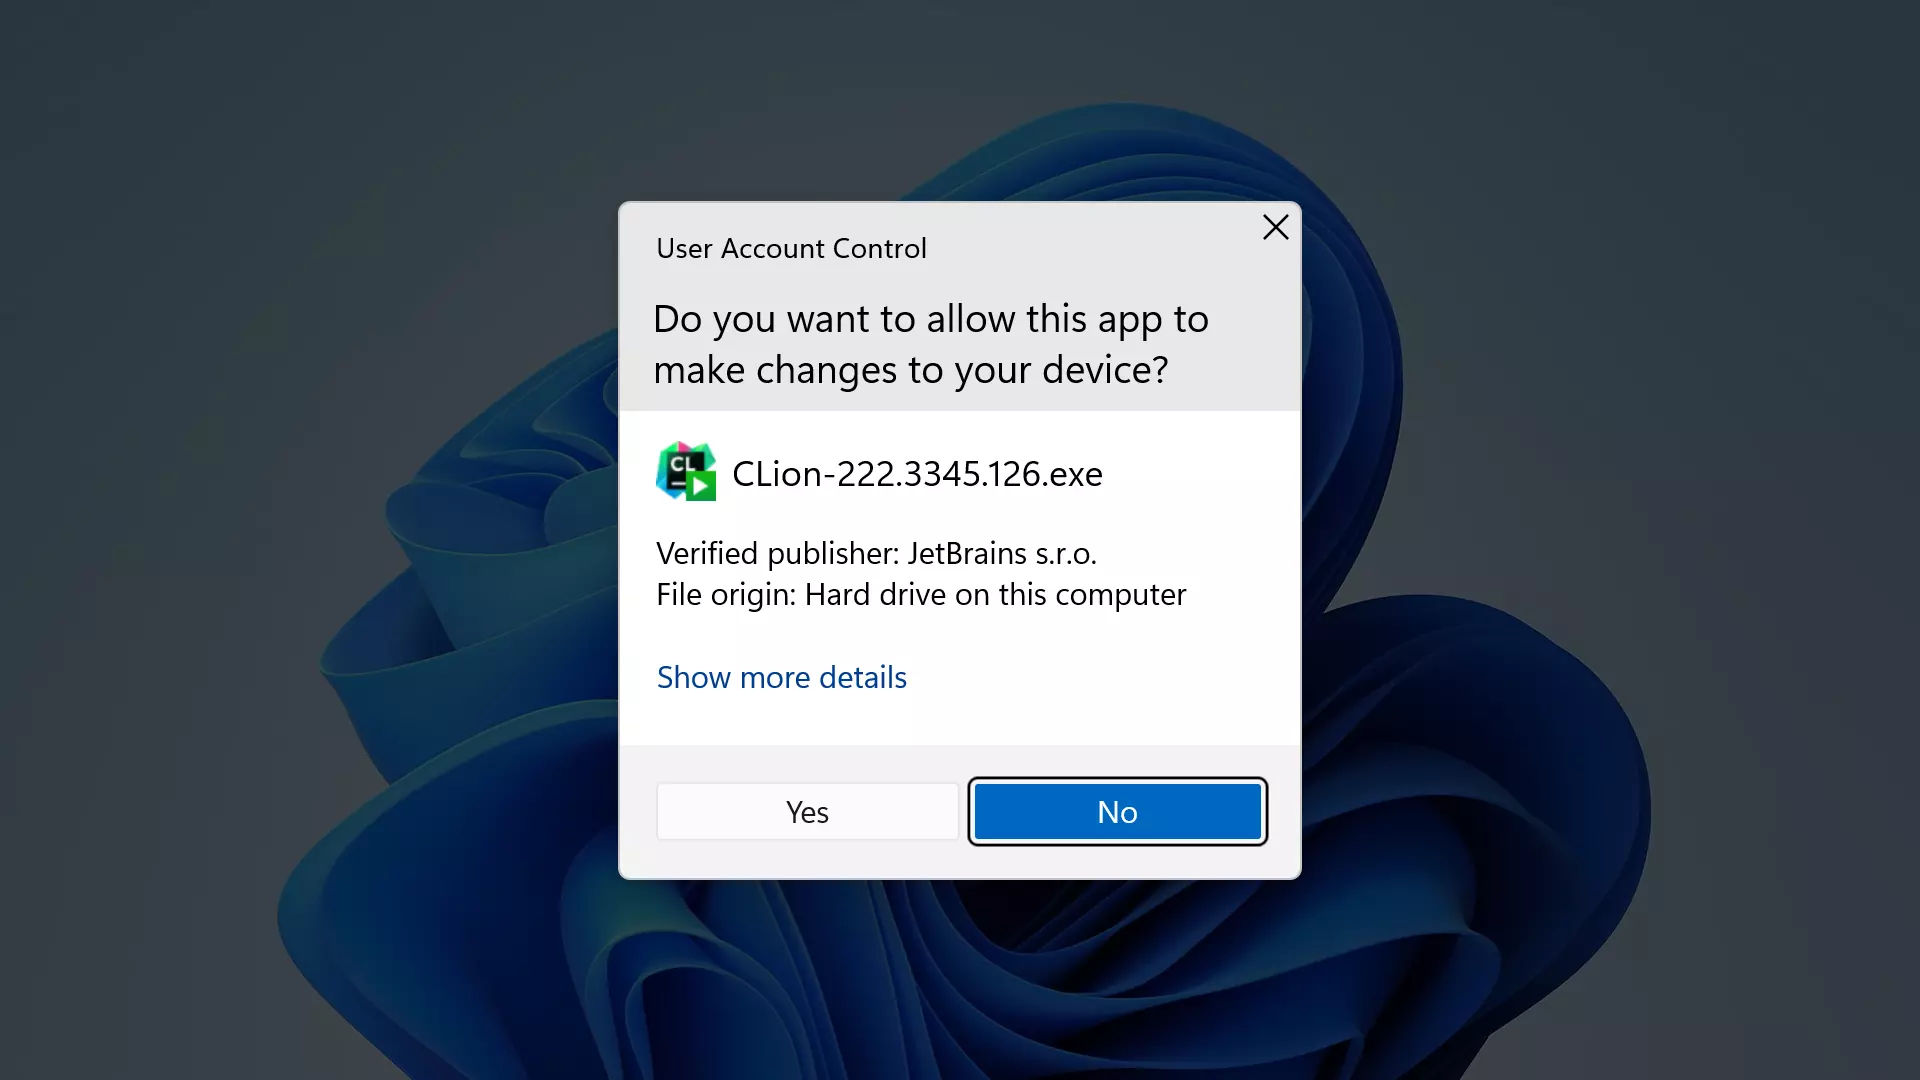
Click on the Yes button in the UAC prompt. This will launch the CLion Setup wizard screen.
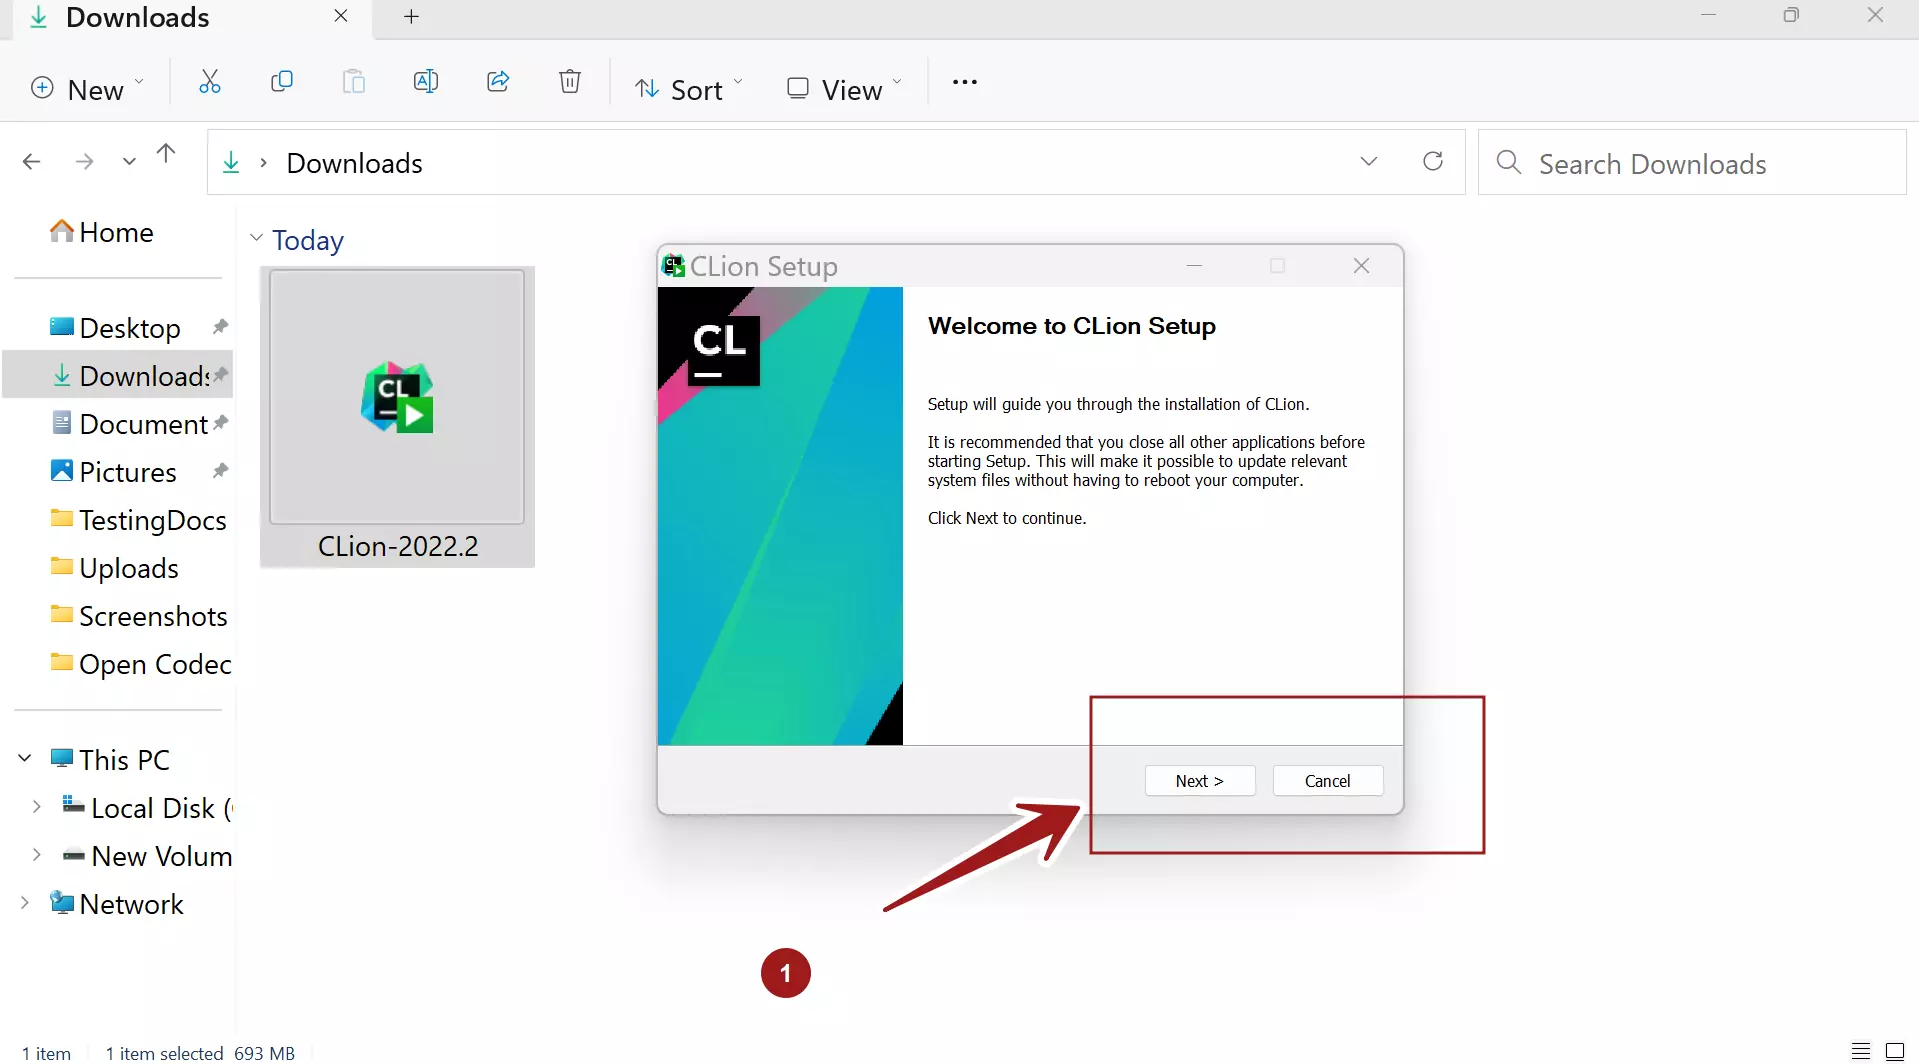
Click on the Next > button.
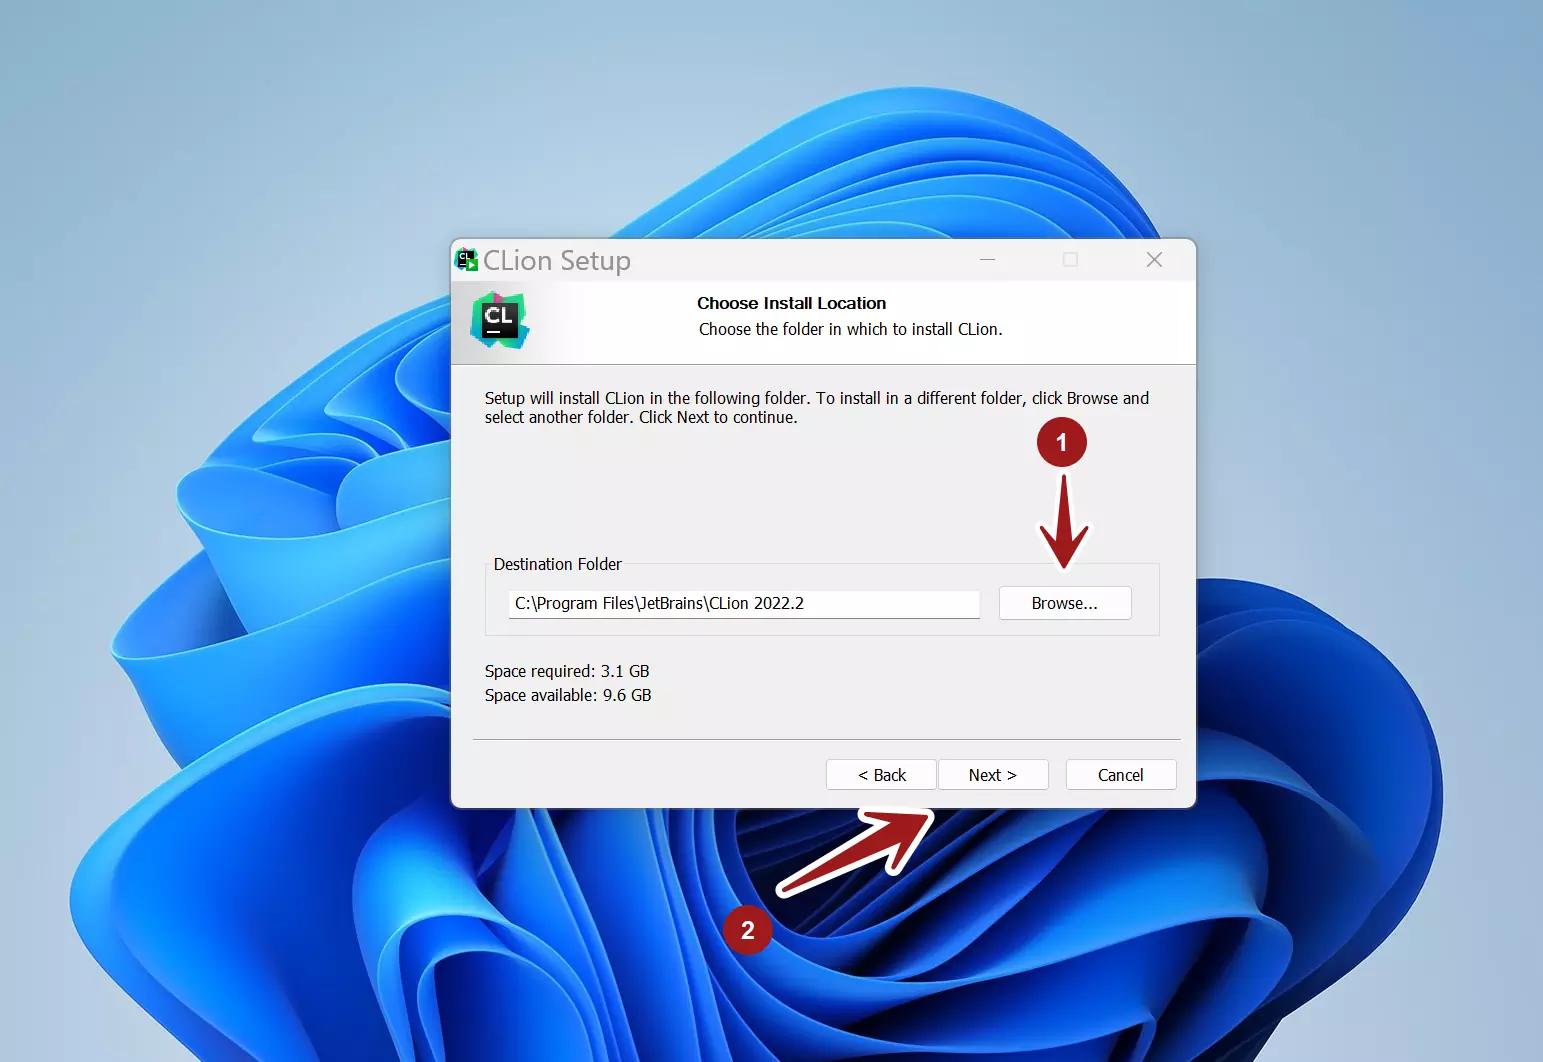
Choose the Install location for the IDE tool. By default, the tool would be installed under the Program Files folder at
C:\Program Files\JetBrains\CLion <version> folder.
It’s recommended to install on the default location. However, to change the install location, click on the Browse… button and choose the install folder. Make sure you have the write privileges on the location.
Click on the Next > button.
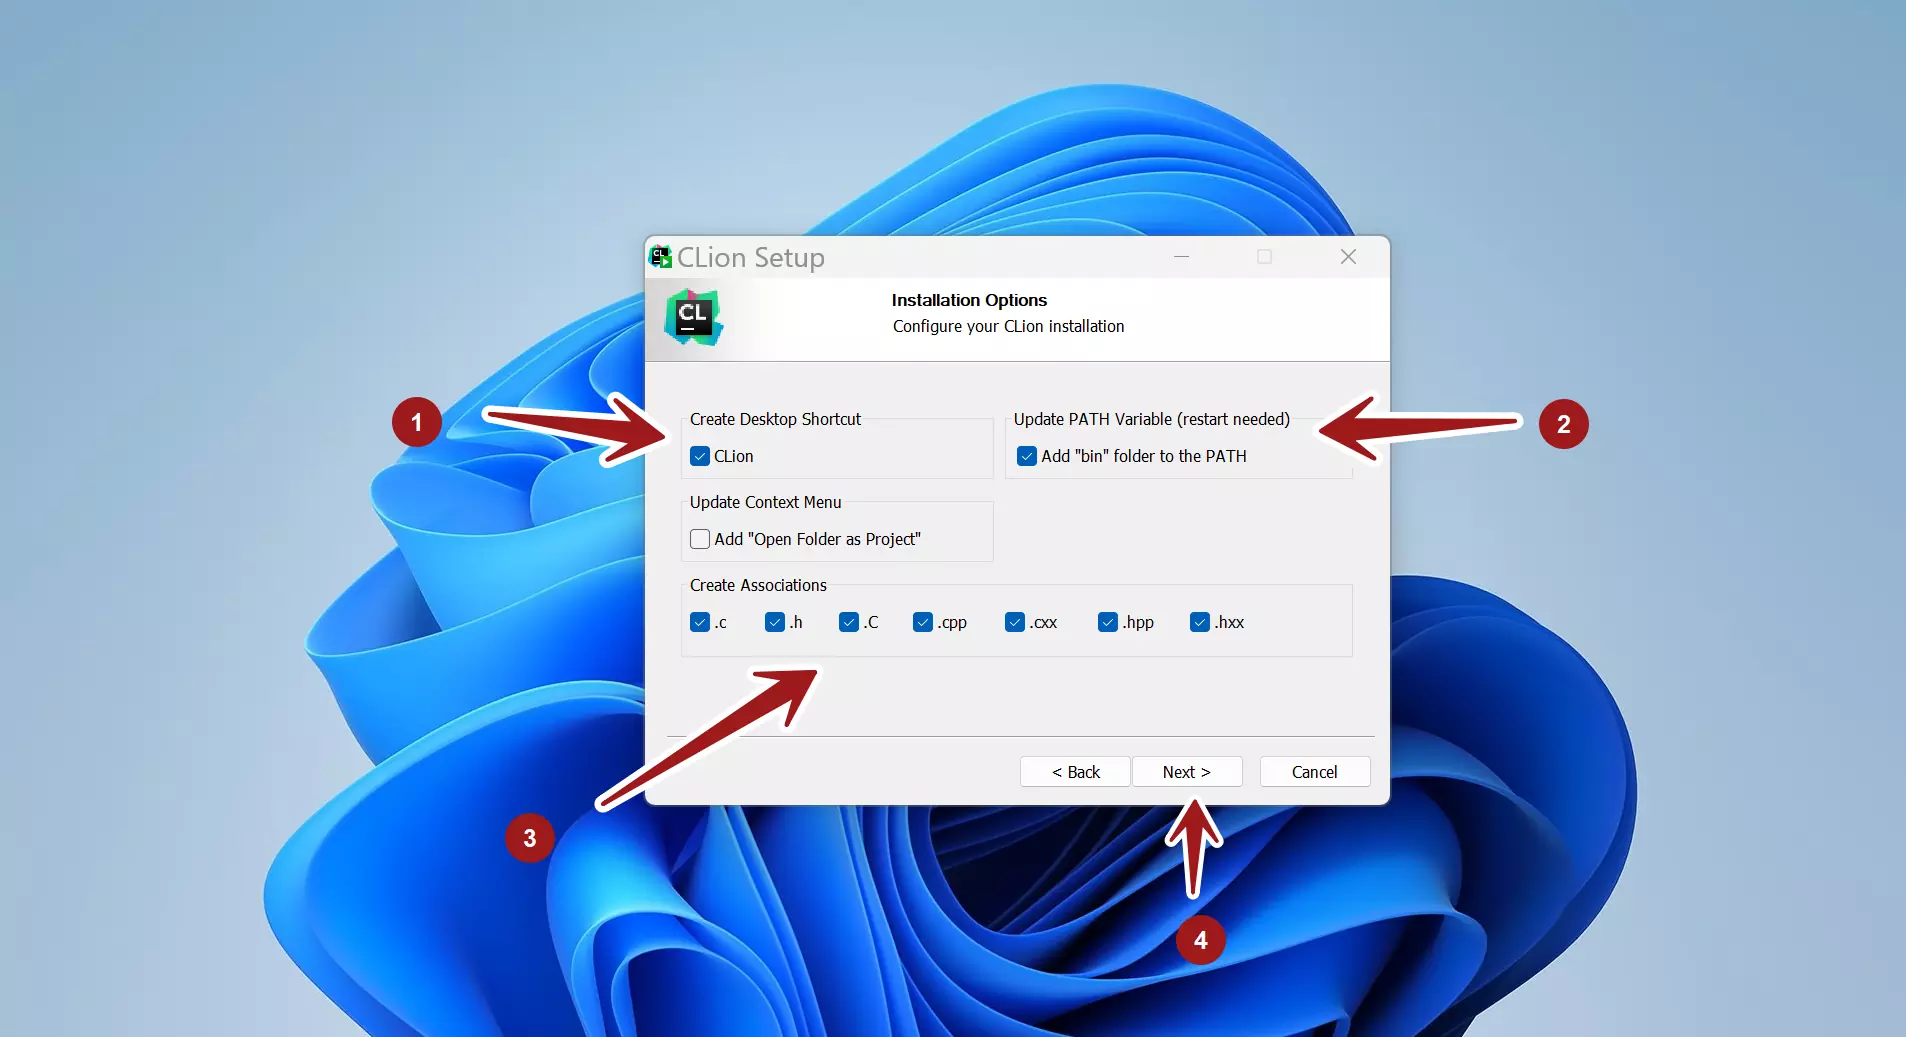
On this screen, we can opt to create a CLion desktop shortcut icon.
Update the PATH environment variable to include the bin directory.
Create file associations with the CLion software. The file extensions that we can associate CLion are: .c , .h , C, .cpp, .hpp, .cxx, .hxx. When we do this, we can later directly launch the files with those extensions with the CLion IDE software.
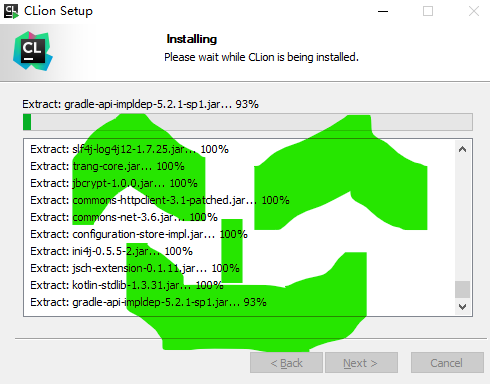
Click on the Next > button to install CLion on the Windows machine. The setup installer will install all the necessary files on the machine.
Once done with the installation, reboot the machine.
That’s it. We have successfully installed CLion IDE on the Windows 11 machine.
—
CLion Tutorials
CLion Tutorials on this website can be found at:
For more information on CLion IDE, visit the official website:
https://www.jetbrains.com/clion/
Установка и настройка Clion
Каталог статей
- Введение
- Два, инструменты
- Три, установка и активация
- Четыре, горячие клавиши
- 5. Создайте проект и программу отладки.
- Шесть, скомпилируйте несколько файлов
- Семь, конец
Введение
Я не знаю, с какими артефактами разработки контактировали мои друзья. По сравнению с компиляторами, с которыми я сейчас общаюсь, существует множество компиляторов, таких как DEV C ++, EditPlus, Eclipse, Pycharm, Vistual Stdio, Vistual Code. Для программистов, разрабатывающих C / C ++, один Хороший компилятор — это мощный инструмент для начала вашего эффективного обучения и работы.Установка хорошего компилятора может сделать вашу разработку более эффективной.
Сегодня я рекомендую очень хорошую IDE разработчикам C / C ++, то есть CLion, недавно выпущенный Jetbrains (Чешская Республика) для разработки C / C ++. Разработанная кроссплатформенная среда IDE основана на IntelliJ, а также содержит множество интеллектуальных функций для повышения продуктивности разработчиков и повышения эффективности их работы. Кроме того, JetBrains имеет множество отличных IDE, таких как упомянутый выше Pycharm, который очень подходит для разработки. Далее я объясню методы установки и настройки, а также использование сочетаний клавиш.
Два, инструменты
Адрес загрузки Clion:кликните сюда
Три, установка и активация
-
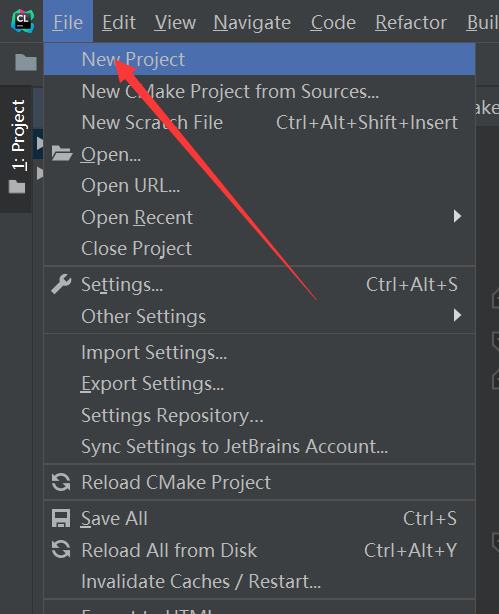
Дважды щелкните исполняемый файл после загрузки, появится следующий интерфейс

-
После завершения распаковки войдите в приветственный интерфейс.
-
Выберите путь установки, нажмите Далее (PS: постарайтесь не выбирать установку под файлом диска C)
-
В это время выберите три верхних и нижнюю панель, пожалуйста, выберите нужный вам элемент. После выбора щелкните Далее.
-
Тогда просто подожди
-
Дождавшись запроса о завершении установки, нажмите Finsh, появится следующий интерфейс.
-
После завершения установки на рабочем столе появится ярлык Clion, нажмите, чтобы войти
-
Нажмите кнопку Enter (посередине), а затем вставьте ключ ниже, чтобы войти в CLion.


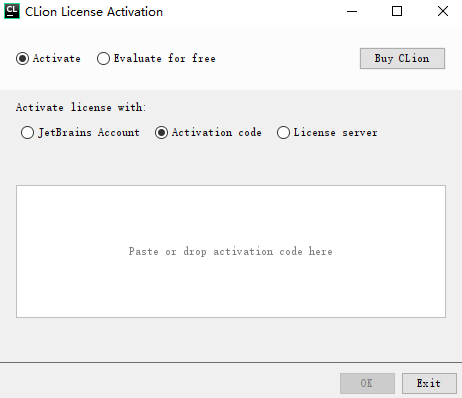
Здесь вам необходимо получить ключ активации, и это рекомендуется тем, кто может купить законные авторские права!
Лицензию IntelliJ IDEA можно получить следующими способами:
1. Получить через студенческий билет, идентификатор учителя или почтовый ящик edu;
2. Вы также можете подать заявку через собственный проект с открытым исходным кодом;
3. У продукта есть 30-дневный пробный период, вы можете сначала попробовать его, а затем выбрать, нужно ли вам его покупать.
Конкретные сведения: вы можете посетить официальный веб-сайт приложения. https://www.jetbrains.com/idea/buy/
В-третьих, установите отладчик компилятора
-
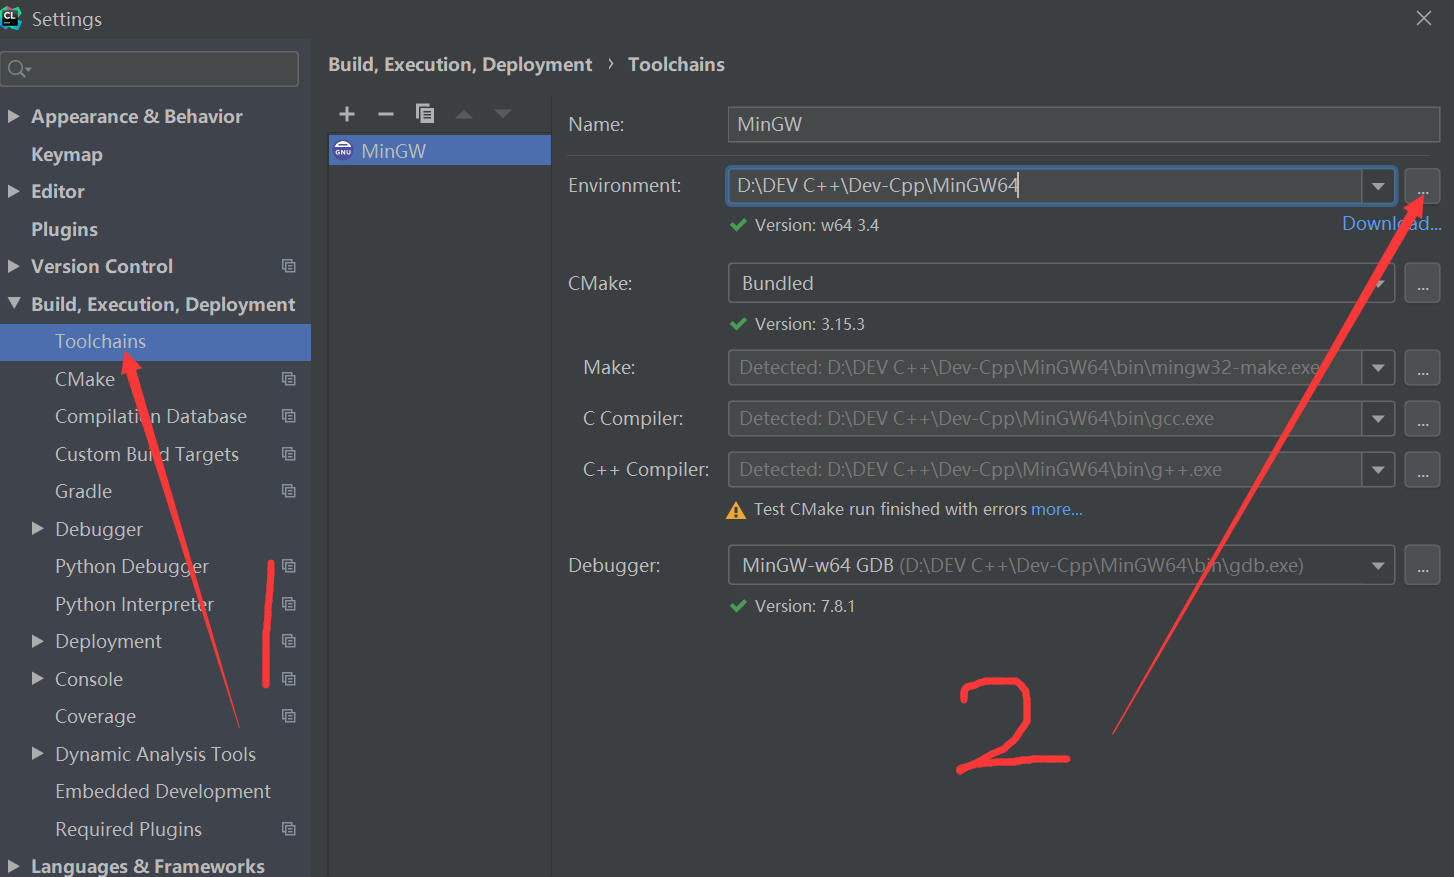
После завершения активации наиболее важным шагом является то, что на компьютере не установлен отладчик компилятора CMake / MinGW.Если компилятор DEV C ++ был установлен, вы можете совместно использовать отладчик компилятора MinGW.
-
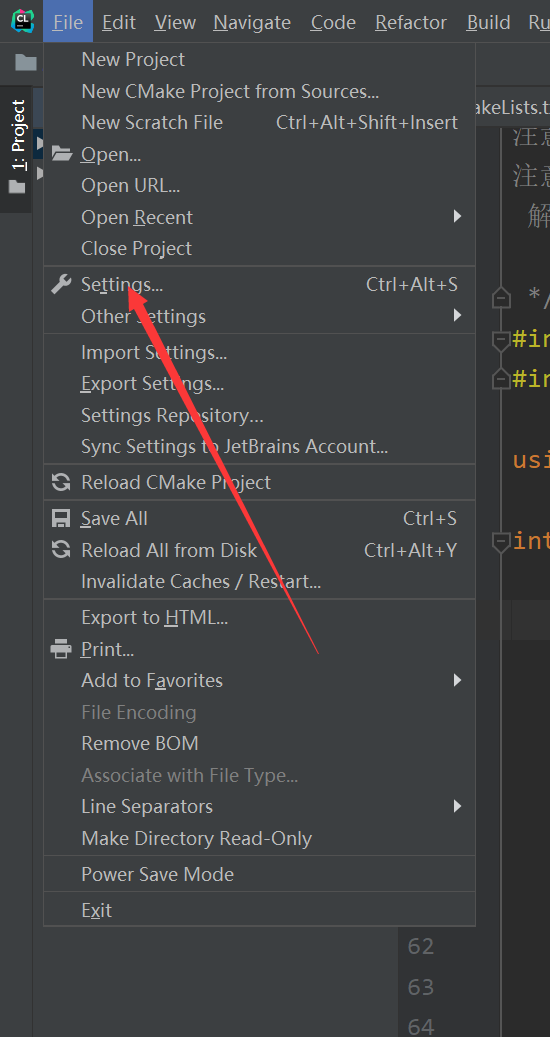
Щелкните Файл, затем выберите Настройки, появится следующий интерфейс.
-
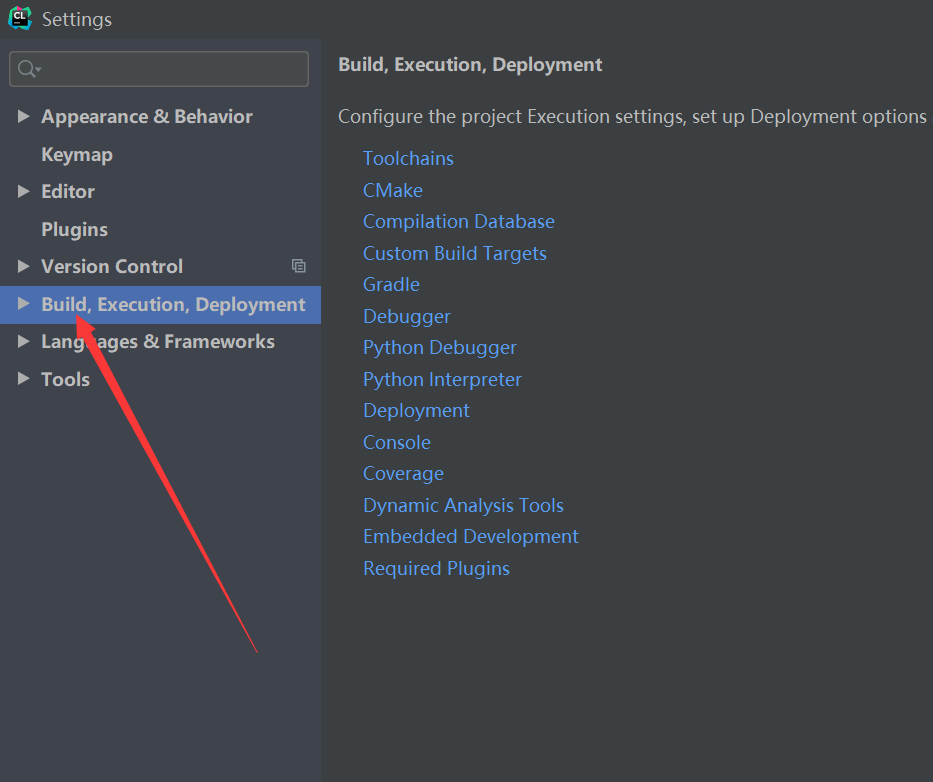
Выберите Toolchains в разделе Build, Execution, Deployment, а затем выберите Environment справа.
-
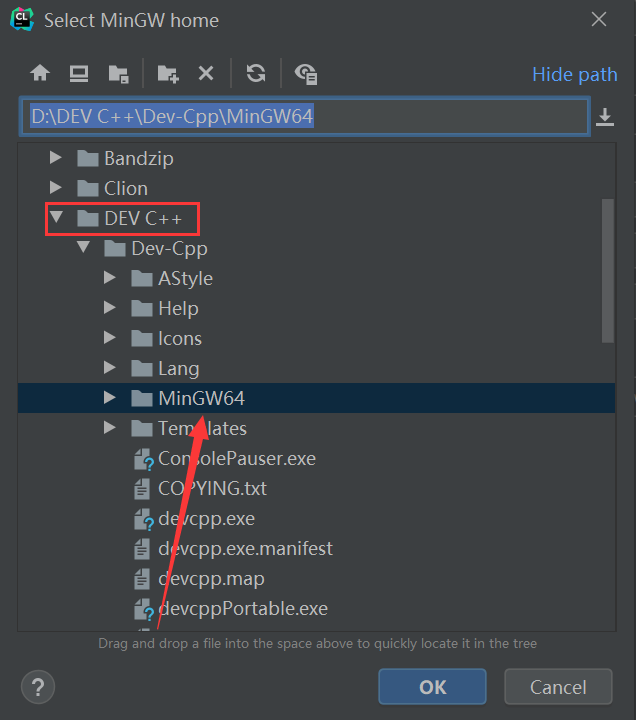
Выберите файл MinGW под файлом DEV C ++, и настройка выполнена успешно!
Четыре, горячие клавиши
Ctrl + влево стрелка влево назад
Ctrl +  вправо стрелка вправо вперед
ALT + 1 							 Показать и скрыть панель проекта
Ctrl + / 							 Добавить или удалить заметки
Ctrl + Alt +  Код формата L
Alt + F7 							Find Usages
Ctrl +  R заменить
Ctrl +  B Переход от определения к объявлению
Ctrl + Shift +  Возврат к месту последнего редактирования
Ctrl +  N класс поиска
Ctrl +  O выберите метод, который нужно переписать
Ctrl +  F12 Быстро просмотреть участников класса
Ctrl +  Q Быстрый просмотр документа
Ctrl +  Информация о параметрах подсказки P
Ctrl +  H Просмотр дерева наследования
Ctrl +  E Просмотр недавно просмотренных файлов
Ctrl + Alt +  B Просмотр классов реализации интерфейсов и абстрактных классов
Ctrl +  F Поиск в текущем файле Примечание:Нажмите Esc, и поле поиска исчезнет.
Ctrl + Shift +  F Поиск по всему проекту или в указанном каталоге Примечание:Дважды нажмите Esc, и поле поиска исчезнет.
Ctrl + Shift +  N Найти файлы
Ctrl +  F7 Найдите место, где в тексте используются класс, переменная, функция и т. Д.
Shift +  Сдвиг глобального поиска
Ctrl + Alt + 7 						 Просмотр того, где используются классы, объекты и переменные
Ctrl + Alt + -/+ 					 Развернуть и свернуть текущую функцию и класс
Ctrl + Shift + -/+ 					 Развернуть и свернуть все функции и классы
Shift +  F6 Переименовать переменную
Alt +  insert Добавить информацию об автоматической генерации кода (вставить набор*()/get*()/Конструктор, равно, хэш-код и т. Д.)
Ctrl + Shift +  космическая подсказка (newЗатем напрямую войдите в конструктор и предоставьте информацию о конструкции в конструкторе)
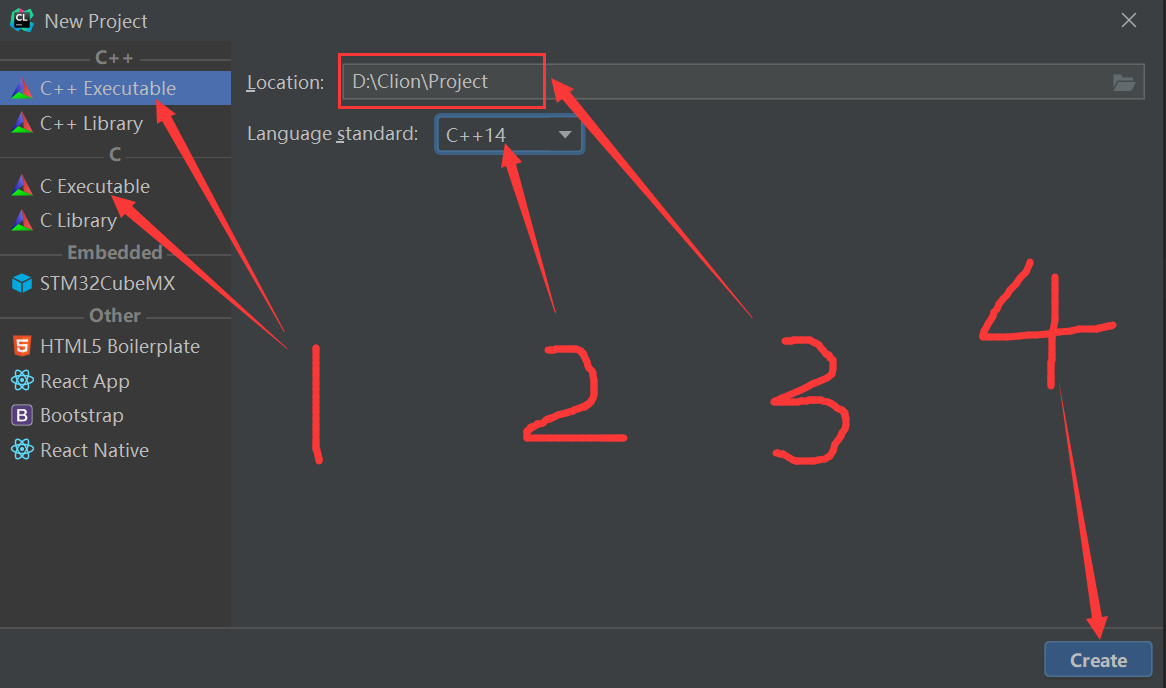
5. Создайте проект и программу отладки.
- Создать пустой проект
- Выберите место хранения и языковой стандарт проекта и действуйте в соответствии с рисунком.Первый шаг — выбрать тип создаваемого проекта — C или C ++, второй шаг — выбрать языковой стандарт, третий шаг — выбрать место хранения файла, а четвертый шаг — щелкнуть Создайте.
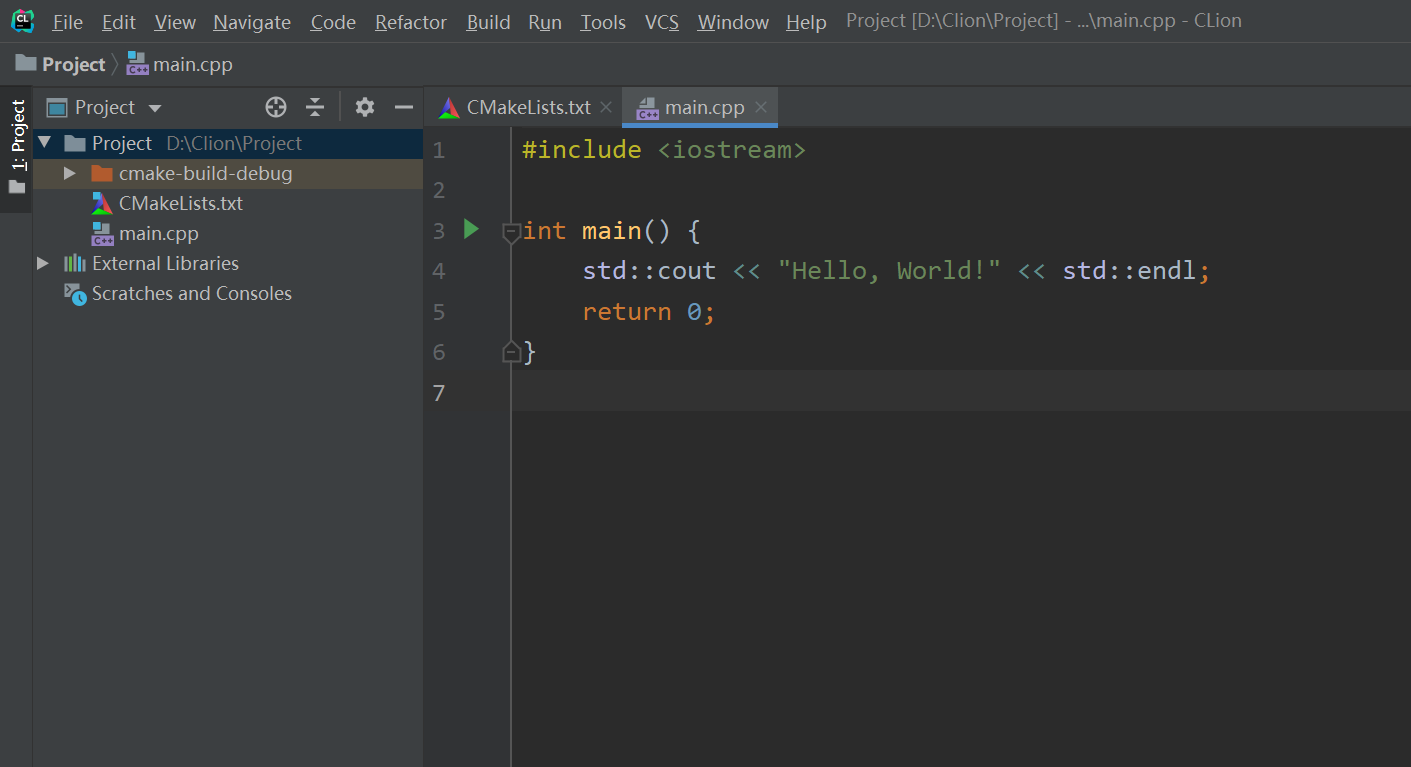
- Когда файл проекта создается так
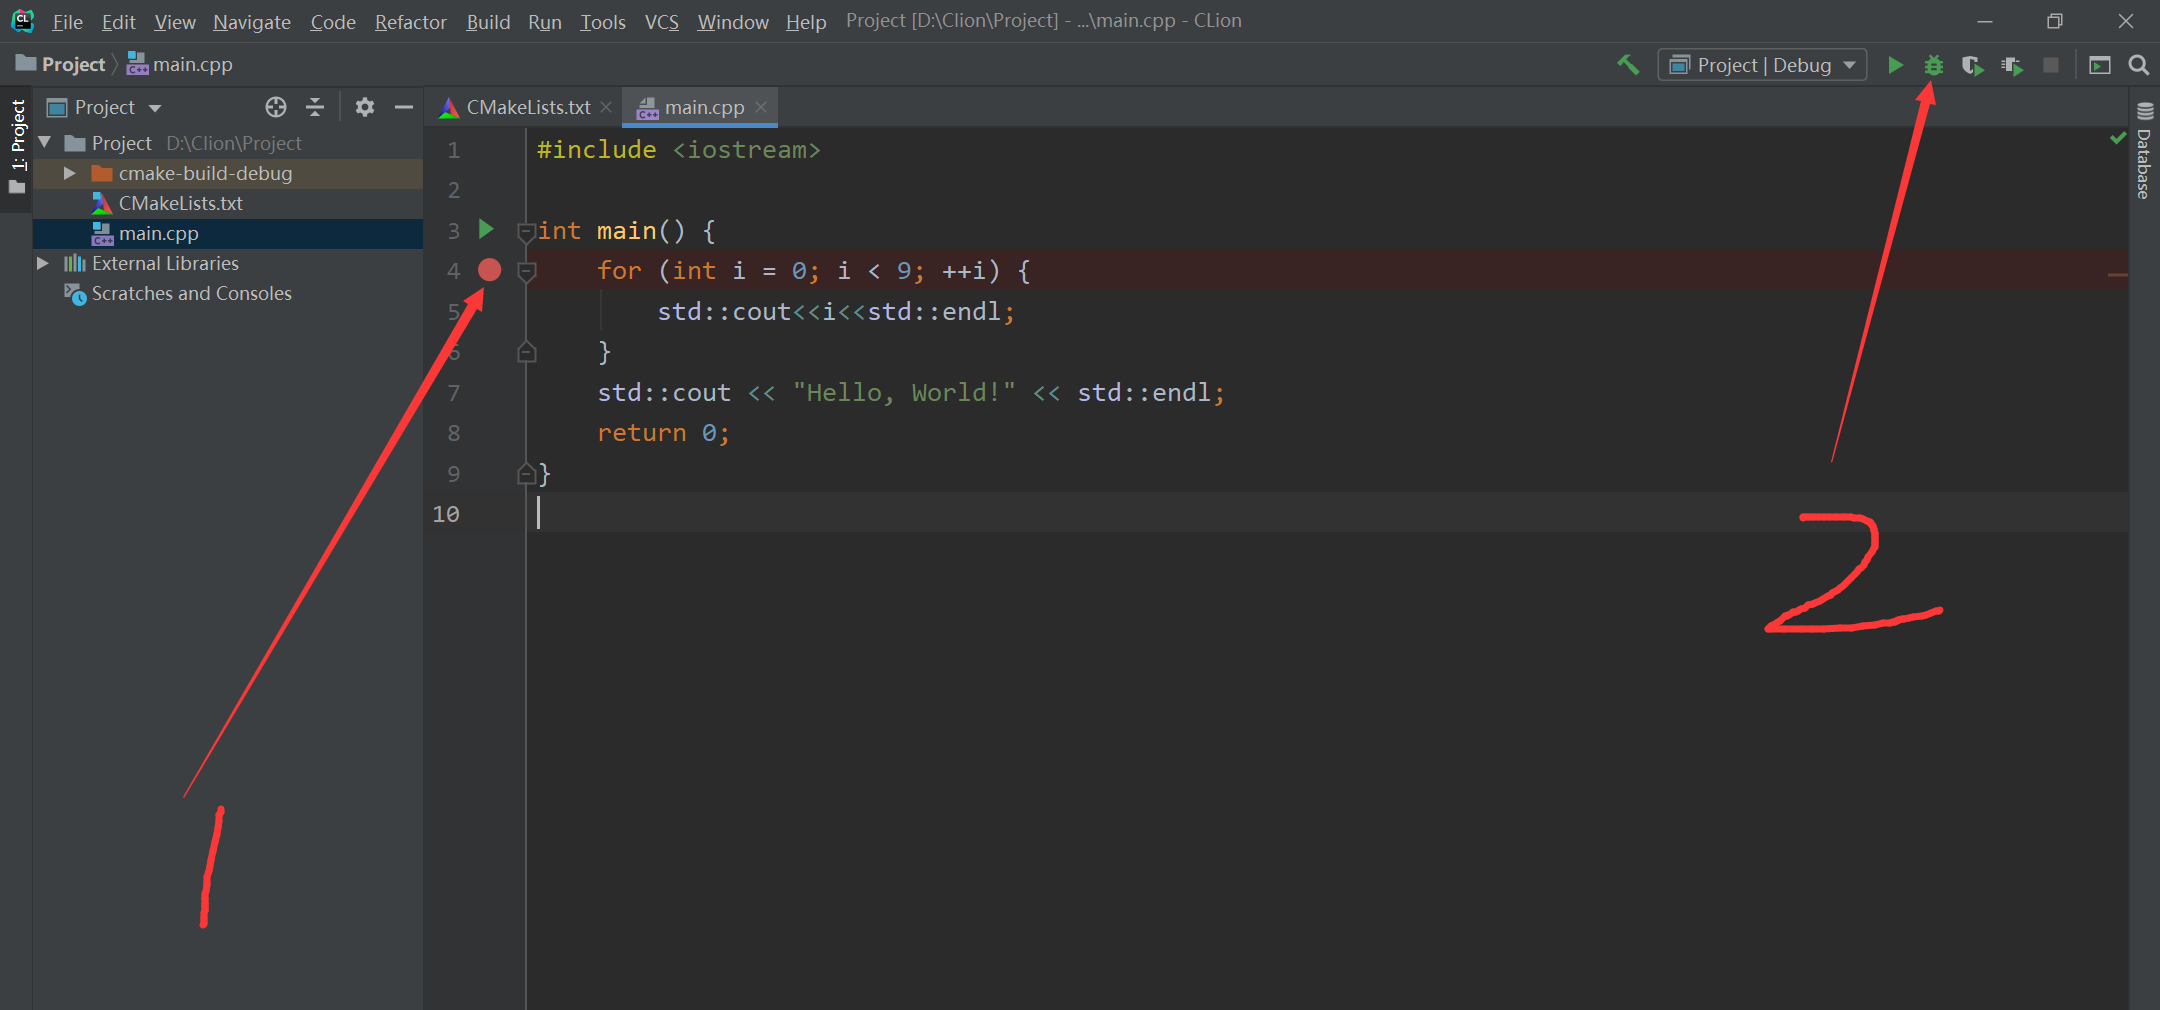
- Напишите простую программу и отлаживайте ее. Добавляем в программу точку останова, выбираем DEBUG
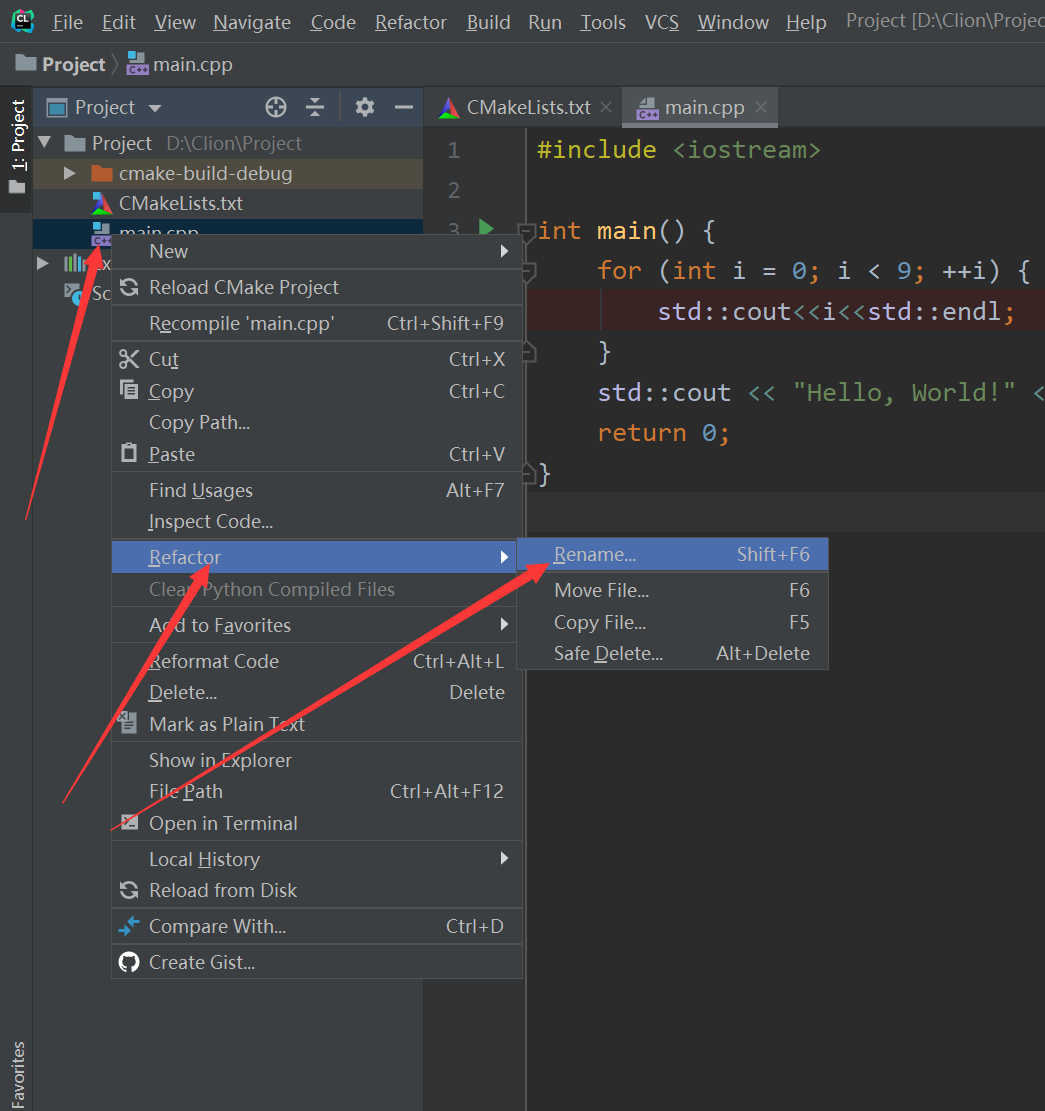
- Если вы хотите создать несколько исходных файлов в одном файле проекта, вам необходимо изменить имя исходного файла и изменить информацию в CMakeLists (выберите исходный файл, нажмите Refactor, а затем выберите Rename)
Примечание: не называйте исходный файл на китайском языке.
Шесть, скомпилируйте несколько файлов
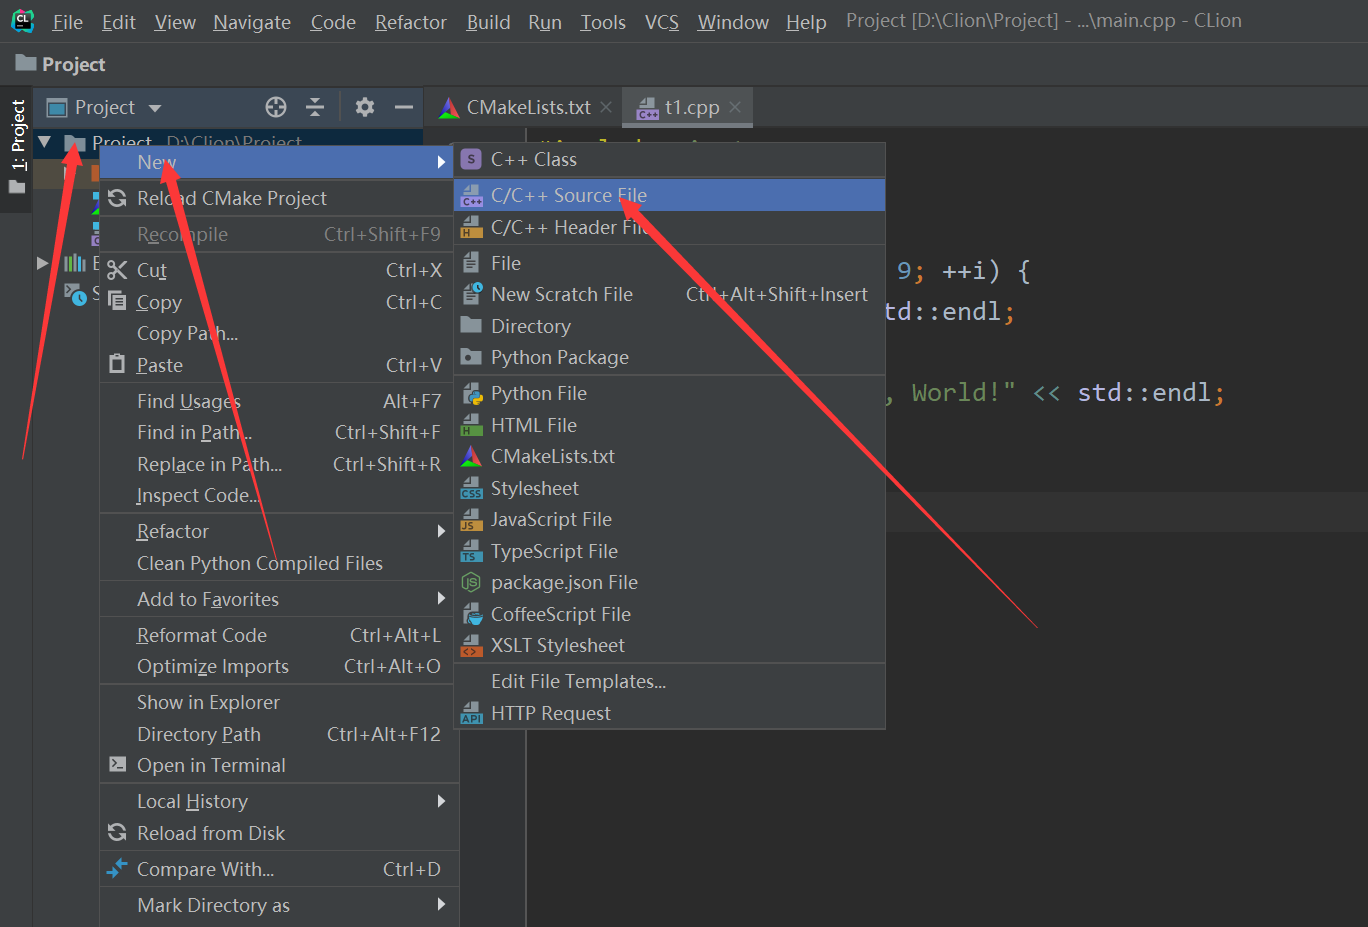
Добавьте несколько исходных файлов в проект. Как мы все знаем, в проекте разрешена только одна основная функция. Если основных функций несколько, функция не будет запущена, и будет сообщено об ошибке. Итак, что нам делать, чтобы создать несколько исходных файлов для компиляции и отладки в рамках проекта?
- Щелкните Project, выберите New, а затем выберите C / C ++ Source File.
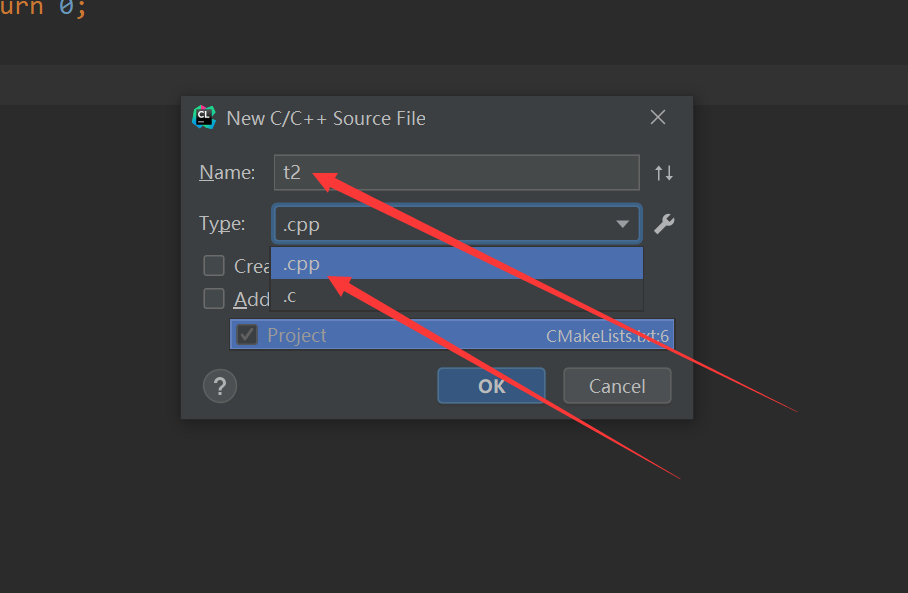
- Выберите имя и тип исходного файла, нажмите ОК.
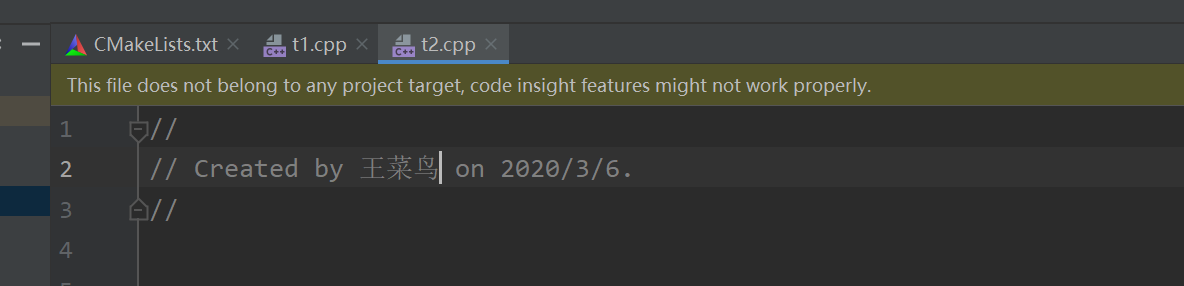
- На этом этапе вновь созданный исходный файл предложит
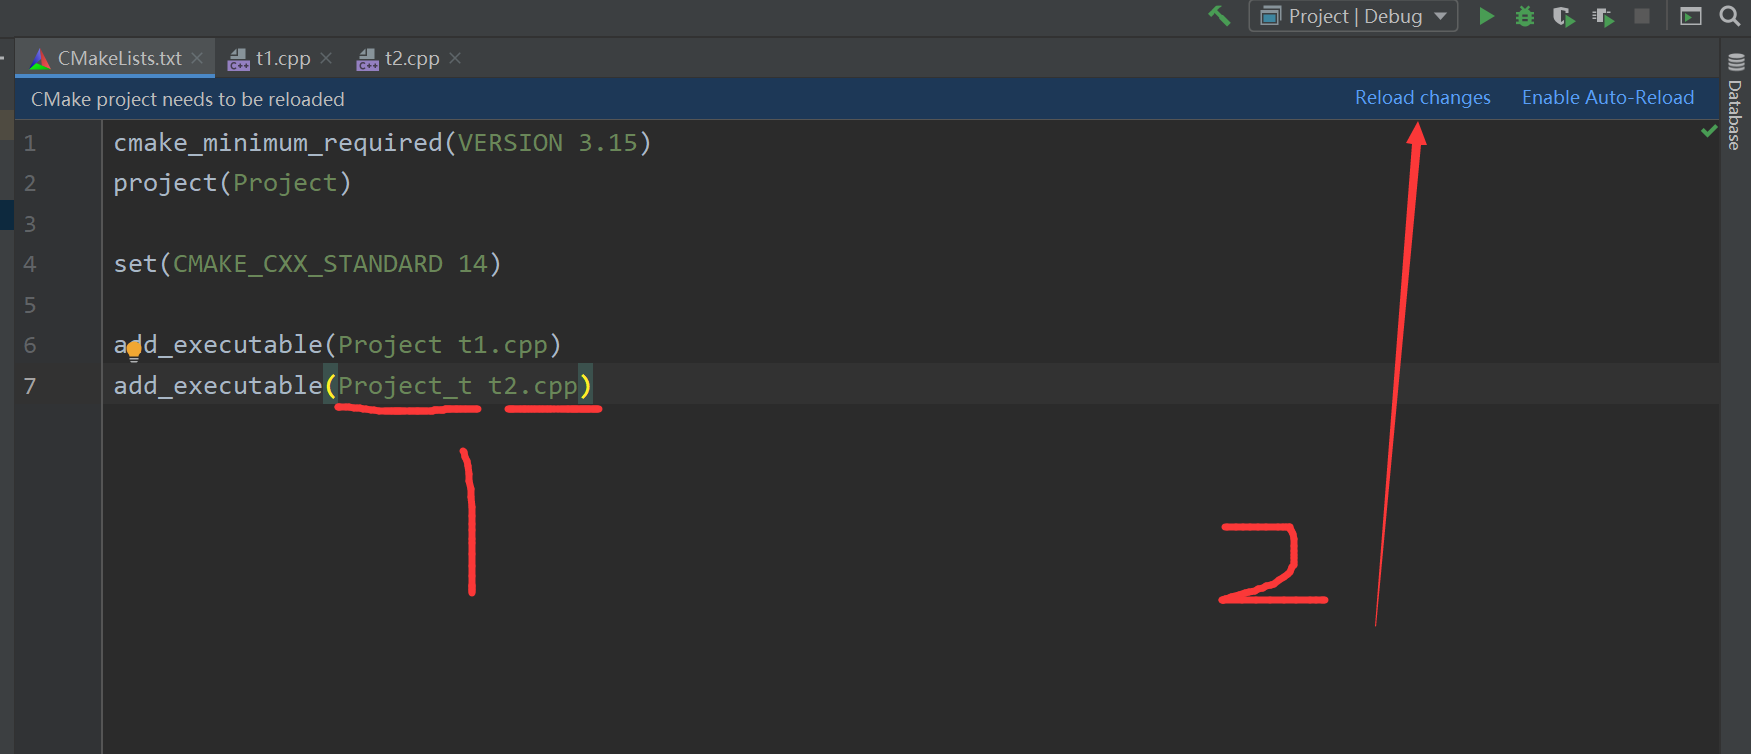
- Откройте файл CMakeLists и добавьте информацию о компиляции
Первым шагом является добавление скомпилированного проекта. Вам не нужно добавлять созданный проект Project. Вы можете изменить его. Ниже приведен только что созданный исходный файл.
Второй шаг — нажать «Обновить изменения», и изменения будут успешными! !
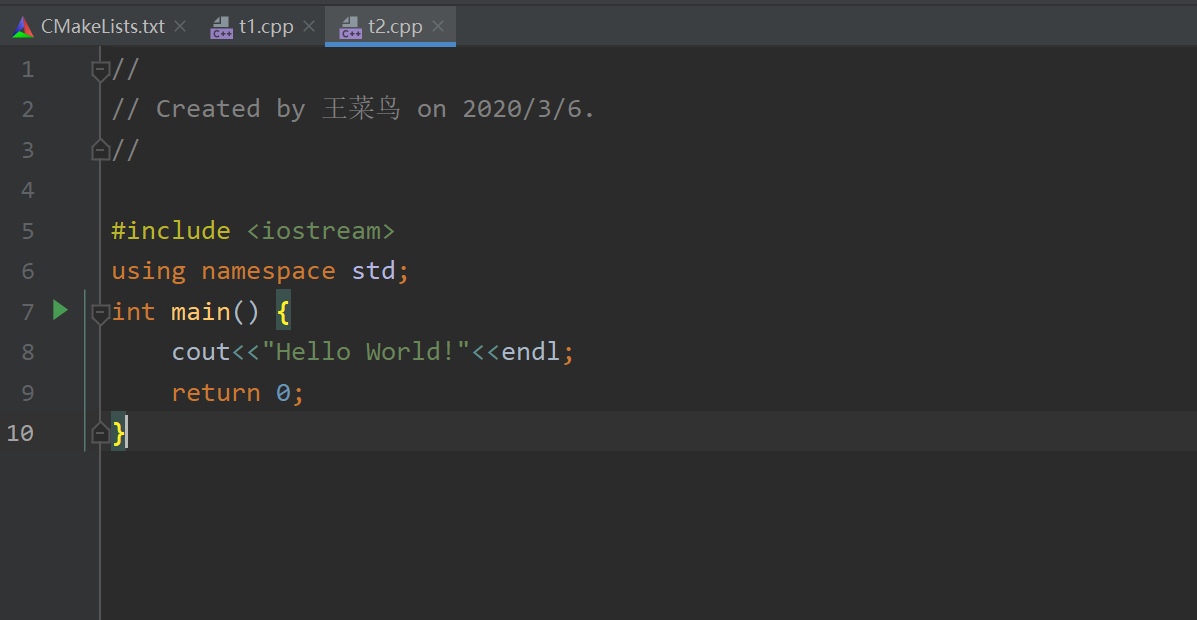
- Отредактируйте второй файл программы!
Семь, конец
На этом мы завершили всю настройку, и следующая работа по разработке остается за вами! Посыпать ~
Как настроить Clion для работы с Windows
Clion — одна из самых популярных интегрированных сред разработки (IDE) для языков программирования, таких как C и C++. Помимо обширного набора функций, Clion также позволяет разработчикам настраивать среду разработки под свои потребности. В этой статье мы рассмотрим, как настроить Clion для работы с Windows.
Шаг 1: Установка Clion
Первым делом, необходимо скачать и установить Clion. Вы можете загрузить последнюю версию Clion с официального сайта JetBrains. После загрузки запустите установочный файл и следуйте инструкциям на экране, чтобы установить Clion на ваш компьютер.
Шаг 2: Установка компилятора
Clion требует наличия компилятора для сборки и запуска ваших программ. Для разработки на C и C++ в Windows вы можете использовать MinGW или MSYS2. Оба варианта предоставляют необходимые компоненты и инструменты для успешной работы Clion.
— Установка MinGW:
— Скачайте установщик MinGW с официального сайта https://osdn.net/projects/mingw/releases/.
— Запустите установщик и следуйте инструкциям на экране.
— Выберите опцию «Download and Install» и выберите необходимые пакеты компонентов для установки.
— Укажите путь к установленному MinGW.
— Добавьте путь к каталогу bin в вашем MinGW в переменную среды Path. Например, C:\MinGW\bin.
— Установка MSYS2:
— Скачайте установщик MSYS2 с официального сайта https://www.msys2.org/.
— Запустите установщик и следуйте инструкциям на экране.
— После установки откройте MSYS2 MinGW 64-bit из меню Пуск.
— Обновите базу данных пакетов, выполнив команду `pacman -Sy`.
— Установите необходимые пакеты компонентов, выполнив команду `pacman -S mingw-w64-x86_64-toolchain`.
— Закройте MSYS2 MinGW 64-bit.
Шаг 3: Настройка Clion
После установки Clion, откройте его и выполните следующие шаги, чтобы настроить его для работы с Windows.
— Создайте новый проект или откройте существующий.
— Перейдите в меню «File», выберите «Settings».
— В окне настроек выберите «Build, Execution, Deployment».
— В разделе «Toolchains» нажмите на «+» и выберите «MinGW» или «MSYS».
— Введите путь к установленному компилятору (MinGW или MSYS) и нажмите «OK».
— Вернитесь в окно настроек и убедитесь, что выбран правильный компилятор в разделе «Toolchains».
Шаг 4: Проверка настроек
Чтобы убедиться, что Clion правильно настроен для работы с Windows, попробуйте создать и запустить простую программу на C или C++.
— Создайте новый файл и добавьте в него следующий код:
#include <iostream>

int main() {
std::cout << "Hello, Windows!";
    return 0;
}
— Сохраните файл с расширением «.cpp».
— Нажмите на кнопку «Build» или используйте сочетание клавиш Ctrl+F9, чтобы собрать программу.
— Если сборка завершится успешно, вы увидите сообщение о сборке в нижней панели.
— Нажмите на кнопку «Run» или используйте сочетание клавиш Shift+F10, чтобы запустить программу.
— Если все настроено правильно, вы увидите вывод программы в окне консоли.
Это было основное руководство по настройке Clion для работы с Windows. Вы можете дополнительно настроить Clion согласно своим предпочтениям, ознакомившись с документацией и доступными настройками Clion. Удачи в программировании на Windows с Clion!