Последнее обновление: 30.01.2023
Установка Clang
Одним из наиболее распространенных компиляторов для языка C++ является компилятор Clang, который развивается в рамках проекта LLVM.
Рассмотрим создание первой простейшей программы на C++ с помощью Clang под ОС Windows.
Прежде всего нам надо установить непосредственно сам компилятор. Clang развивается в рамках проекта LLVM, репозиторий которого можно найти на github:
https://github.com/llvm/llvm-project. И данный проект предоставляет готовый установщик компилятора под Windows
Для загрузки установщика под Windows перейдем на страницу релизов в данном репозитории по ссылке https://github.com/llvm/llvm-project/releases/
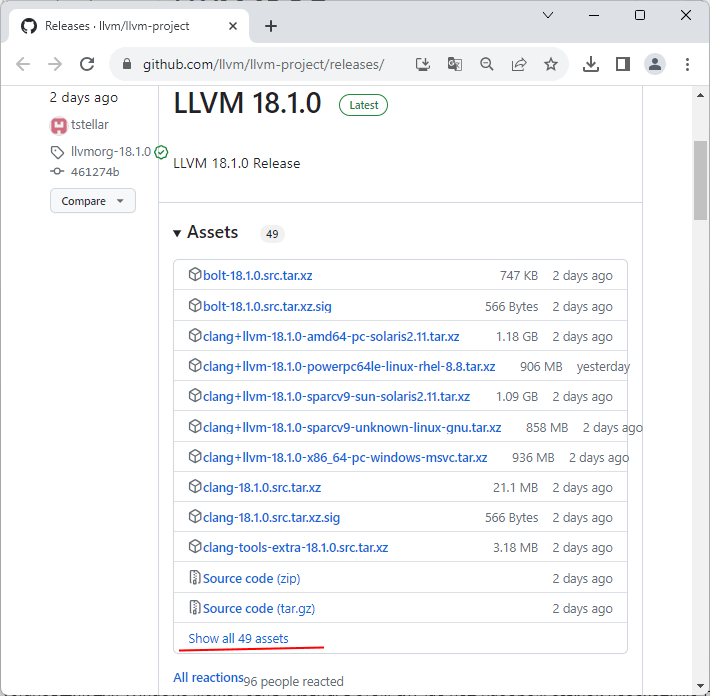
По умолчанию в самом верху будут ссылки на самую последнюю версию. Но по умолчанию ссылка на установщик для Windows может быть скрыта. В этом случае под набором ссылок необходимо
нажать на ссылку Show All assets. И среди появившихся ссылок найдем пункт LLVM-XX.X.X-win64.exe, где XX.X.X — это версия.
Например, в моем случае это файл LLVM-15.0.7-win64.exe
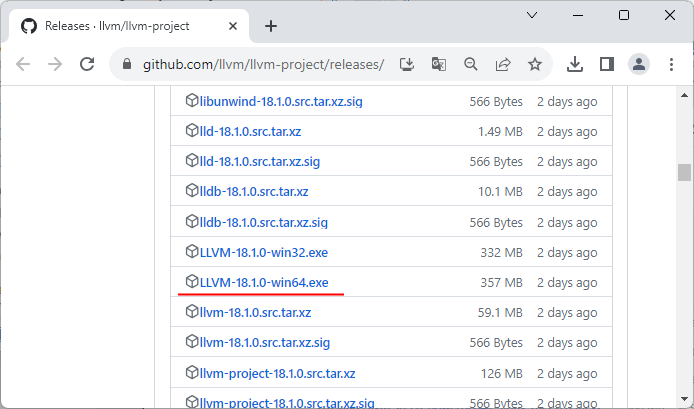
Это версия для 64-битной версии Windows. Если ОС 32-х битная, то необходимо загрузить файл LLVM-15.0.7-win32.exe
После загрузки запустим файл.
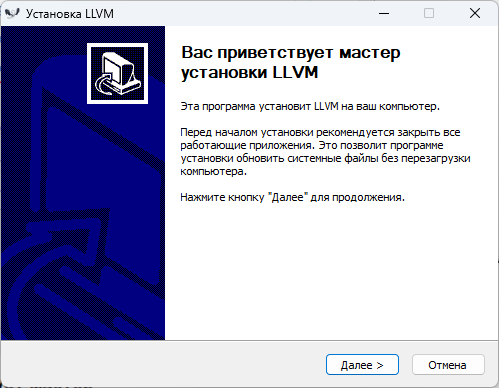
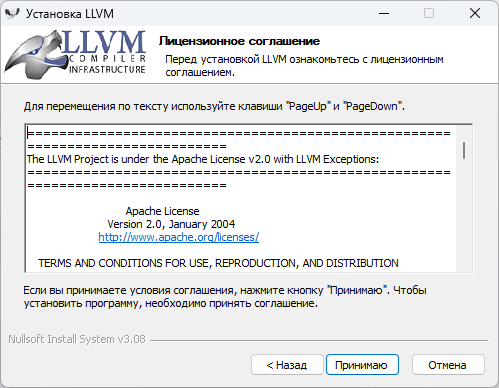
На стартовом экране программы нажмем на кнопку «Далее». Затем надо будет принять лицензионное соглашение
Далее надо будет указать опции установки:
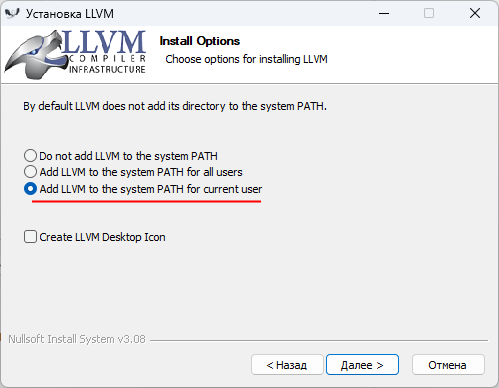
Чтобы при компиляции не указывать полные пути к компилятору или вручную не добавлять путь к нему в переменные среды выберем на этом окне пункт
Add LLVM to the system PATH for current user
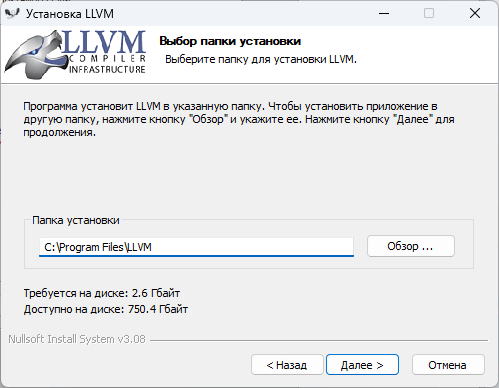
На следующем окне укажем папку для установки. Можно оставать путь по умолчанию — «C:/Program Files/LLVM»:
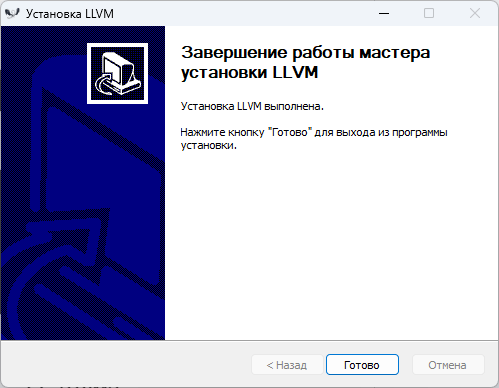
На следующих окнах оставим все опции по умолчанию и запустим процесс установки. После успешной установки мы можем приступать к использованию Clang
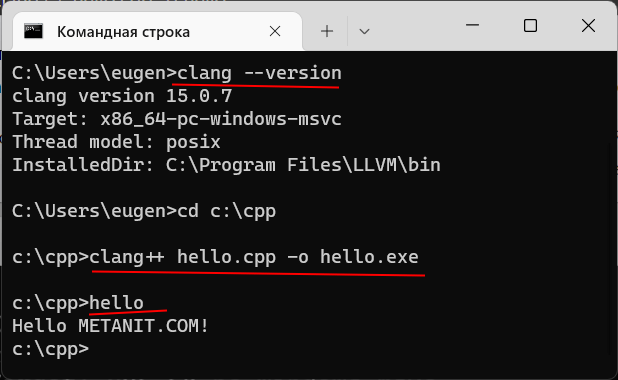
Чтобы проверить установку Clang, в терминале/командной строке следует ввести команду
В этом случае нам должна отобразиться базовая информация о компиляторе, типа версии и т.д.:
C:\Users\eugen>clang --version
clang version 15.0.7
Target: x86_64-pc-windows-msvc
Thread model: posix
InstalledDir: C:\Program Files\LLVM\bin
Первая программа
После завершения установки если мы откроем каталог C:\Program Files\LLVM\bin,
то найдем там все необходимые файлы компиляторов:
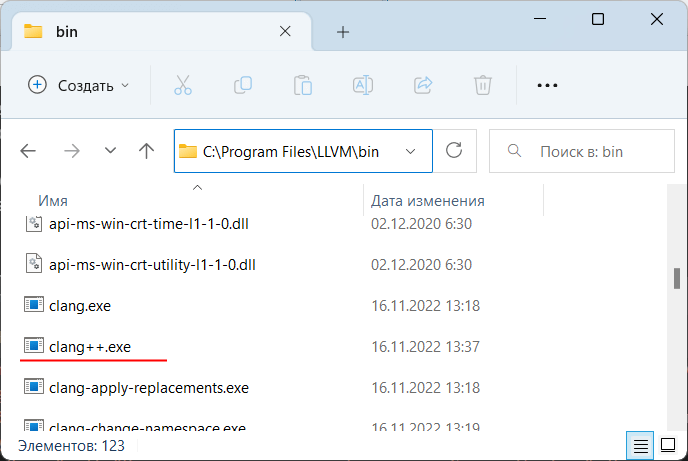
В частности, файл clang.exe предназначен для компиляции программы на языке Си, а
clang++.exe как раз и будет представлять компилятор для языка С++. То есть нам нужен clang++.
Итак, создадим на жестком диске С папку для исходных файлов программы на языке C++. А в этой папке создадим новый текстовый файл, который переименуем в
hello.cpp. То есть по сути файлы исходного кода на С++ — это обычные текстовые файлы, которые, как правило, имеют расширение
cpp.
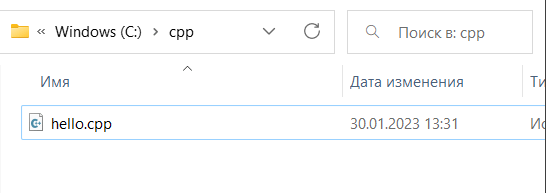
В моем случае файл hello.cpp находится в папке C:\cpp.
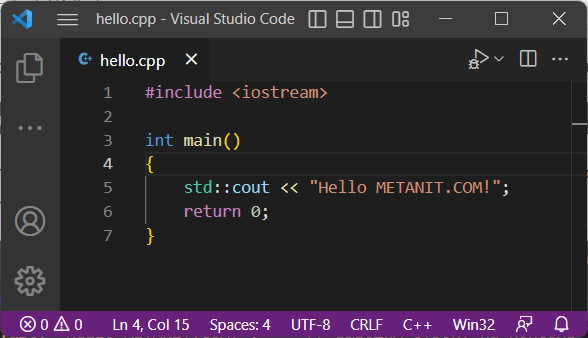
Теперь определим в файле hello.cpp простейший код, который будет выводить строку на консоль:
#include <iostream>        		// подключаем заголовочный файл iostream

int main()							// определяем функцию main
{									// начало функции
	std::cout << "Hello METANIT.COM!";	 // выводим строку на консоль
	return 0;						// выходим из функции
}									// конец функции
Для вывода строки на консоль необходимо подключить нужный функционал. Для этого в начале файла идет строка
#include <iostream>
Данная строка представляет директиву препроцессора, которая позволяет подключить библиотеку iostream. Эта библиотека нужна для вывода строки на консоль.
Далее идет определение функции main. Функция main должна присутствовать в любой программе на С++, с нее
собственно и начинается выполнение приложения.
Функция main состоит из четырех элементов:
-
Тип возвращаемого значения. В данном случае это тип int. Этот тип указывает, что функция должна
возвращать целое число. -
Имя функции. В данном случае функция называется main.
-
Список параметров. После имени функции в скобках идет список параметров. Но в данном случае скобки пустые, то есть
функция main не принимает параметров. -
Тело функции. После списка параметров в фигурных скобках идет тело функции. Здесь и определяются собственно те
действия, которые выполняет функция main.{ std::cout << "Hello METANIT.COM!"; return 0; }
В теле функции происходит вывод строки на консоль. Для обращения к консоли используется стандартный поток вывода std::cout.
С помощью оператора << в этот поток (в данном случае фактически на консоль) передается строка символов, которую надо вывести на консоль, то есть «Hello METANIT.COM!».
В конце осуществляем выход из функции с помощью оператора return. Так как функция должна возвращать целое число, то после return указывается число 0.
Ноль используется в качестве индикатора успешного завершения программы.
После каждой инструкции в языке C++ ставятся точка с запятой.
Каждая строка снабжена комментарием. Все, что написано после двойного слеша // представляет комментарий. Комментарий не учитывается при компиляции приложения, и
не является частью программного кода, а служат лишь для его описания. Комментарий позволяет понять, что делает программа.
Теперь скомпилируем этот файл. Для этого откроем командную строку Windows и вначале с помощью команды cd перейдем к папке с исходным файлом:
Чтобы скомпилировать исходный код, необходимо компилятору clang++ передать в качестве параметра файл hello.cpp:
clang++ hello.cpp -o hello
Дополнительный необязательный параметр -o hello указывает, что скомпилированный файл будет называться hello.exe. Если не указать этот параметр, то файл будет называться по умолчанию — a.exe.
После выполнения этой команды будет скомпилирован исполняемый файл, который в Windows по умолчанию называется hello.exe. И мы можем обратиться к этому файлу, и в этом случае консоль выведет
строку «Hello METANIT.COM!», собственно как и прописано в коде.
Если вместо командной строки используется оболочка PowerShell, то для запуска файла надо прописать «./hello».
![]()
Download Article
A step-by-step guide on installing Clang for Windows
![]()
Download Article
This wikiHow will teach you how to install Clang on Windows using Visual Studio 2019 version 16.1 Preview 2. When you install the preview of Visual Studio, you will also be able to install Clang.
-

1
-
2
Click Download Preview under «Community.«Unless you have purchased the software or are part of an organization that pays a monthly subscription, you’ll want to download the version of the preview suited for the free version of Visual Studio.
- Save the .exe file or click click here to retry to save the download.
Advertisement
-
3
Open the downloaded file. Most web browsers, like Chrome, give you a notification when your file is done downloading that you can click to open the file. Otherwise, navigate to your downloaded file in File Explorer.
- Click Yes if you’re prompted to allow the program to make changes to your computer.
-
4
Click Continue. The installation wizard will begin downloading and installing Visual Studio.
-
5
Click to check the box next to Desktop development with C++. More options will display in the right panel.
-
6
Click to check the box next to C++ Clang tools for Windows. You’ll see this in the panel on the right side of the window under the header, «Installation details.»
-
7
Click Install. Once the installation is complete, you’ll have everything you need to use Clang on your Windows computer within Visual Studio.[1]


Advertisement
Ask a Question
200 characters left
Include your email address to get a message when this question is answered.
Submit
Advertisement
Thanks for submitting a tip for review!
References
About This Article
Article SummaryX
1. Go to https://visualstudio.microsoft.com/vs/preview/.
2. Click Download Preview under «Community.»
3. Open the downloaded file.
4. Click Continue.
5. Click to check the box next to Desktop development with C++.
6. Click to check the box next to C++ Clang tools for Windows.
7. Click Install.
Did this summary help you?
Thanks to all authors for creating a page that has been read 77,839 times.
Is this article up to date?
Installing Clang++ compiler for
Windows without Visual Studio
This page explains how to install Clang++ on your Windows machine without installing all of Visual Studio. You will
still need to install either the «Visual Studio Build Tools for C++» (which gives you the Microsoft linker), or the
MinGW (the alternative tools for C++ on Windows). Here, we’re installing the former.
Go over to visualstudio.microsoft.com/downloads, scroll
down all the way to the bottom (or click
this if it is not
outdated yet) and expand the box «Tools for Visual Studio 2019». From the options available, pick «Build Tools for
Visual Studio 2019» and click the Download button; this should download an executable file that you will have to
execute. This will install the build tools for you and prompt you to restart (which you can do after the next
step).
Go to releases.llvm.org, click the «download» link on the
latest version that is not «Current» (at the time of writing: 12.0.1) and go the github release page of that.


In this long list of files, you need to find the file «LLVM-<version>-win64.exe» (e.g.
«LLVM-12.0.1-win64.exe»), download it and follow the steps (you probably want to select «Add LLVM to the system PATH
for all users» under the install options).
Clang++ should now be installed on your machine, and you will probably have to restart the computer before
everything is set up properly.
Using the compiler
If you want to compile a file called «Main.cpp», type the following in any terminal (with the current directory set
to the directory that the file is in):
clang++ "./Main.cpp"
"./a.exe"
This should execute your C++ file. If it works, you have successfully installed the clang++ compiler on your Windows
machine. Good luck!
How-To’s
Tips & Tricks
Setting up the Clang Compiler in CLion on Windows
Update:
MSYS2 now provides the majority of packages built with clang. They use libc++ and lld by default, and you can get the complete toolchain by getting packages from this page.
Be aware that when using libraries built with clang it’s better not to mix them with libraries built with other toolchains. You can find the list of all libraries here.
As a make executable for CLion, you can use clang64/bin/mingw32-make.exe. Don’t forget that with default build flags you will need to have libc++.dll and libunwind.dll in your build directory.
Otherwise, this approach might be even easier to use than the original one explained in this article.
Original article:
With CMake 3.15 it has become possible to use the Clang compiler on Windows with a GNU-style command line. This also means that it’s possible to use Clang with the Mingw-w64 toolchain.
While it’s possible to configure Clang with the Mingw-w64 (or MinGW) toolchain, if you decide to use Clang from the LLVM repo, it won’t work correctly. This is because LLVM Clang for Windows is built using Microsoft Visual Studio, and all the built-in macros and include search paths are set up for use with Visual Studio. So even when used with the MinGW toolchain, it will still try to include MSVC standard library headers.
We’ve done some experiments and found a possible workflow that involves using CLion in combination with the MinGW toolchain and Clang compiler.
Here are our findings:
- Install MSYS2 from https://www.msys2.org, follow their installation guide.
-
Get the necessary packages with the pacman tool. We installed the following (pacman -S):
- mingw-w64-x86_64-gcc
- mingw-w64-x86_64-clang
- mingw-w64-x86_64-lld
- mingw-w64-x86_64-gdb
- mingw-w64-x86_64-make
- mingw-w64-x86_64-polly
- mingw-w64-x86_64-compiler-rt
This clang compiler is built with mingw-w64 and has paths and macros that correspond to this toolchain.
Now we are ready to set up the CLion toolchain. Go to Settings/Preferences | Build, Execution, Deployment | Toolchains:
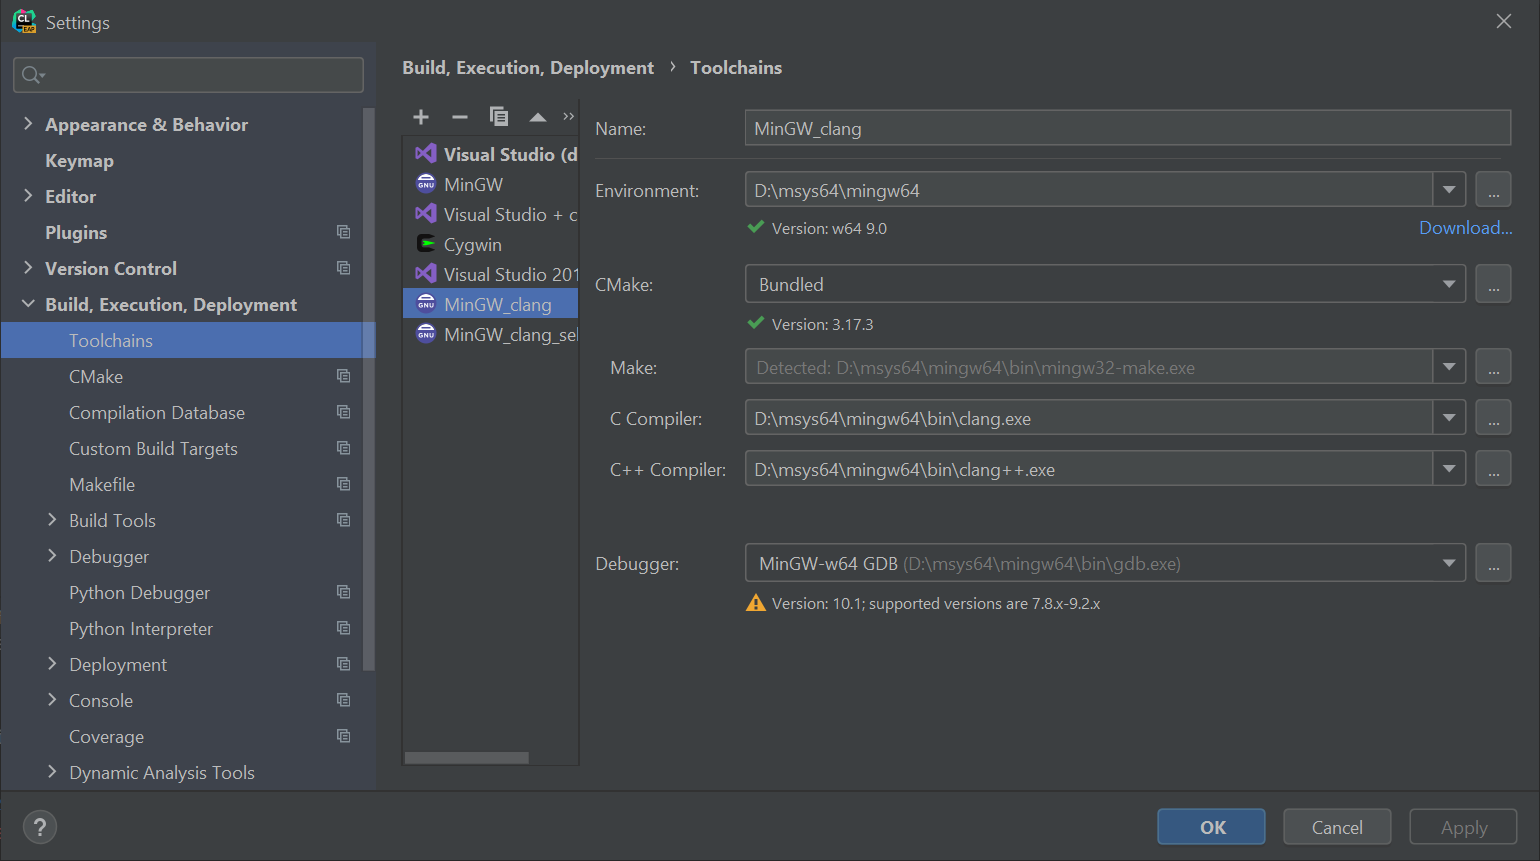
With your new toolchain configured, you can start building your project. You can use either the default ld linker or set the lld with -DCMAKE_LINKER=lld.
Using advanced tools provided by the Clang compiler
In theory, all Clang tools should also work without any issues. However, problems can arise involving compiler-rt. compiler-rt is a set of runtime libraries which are required to use sanitizers and profiling in Clang, the current compiler_rt package was built with MinGW. But Clang requires a compiler that is built with Clang and lld.
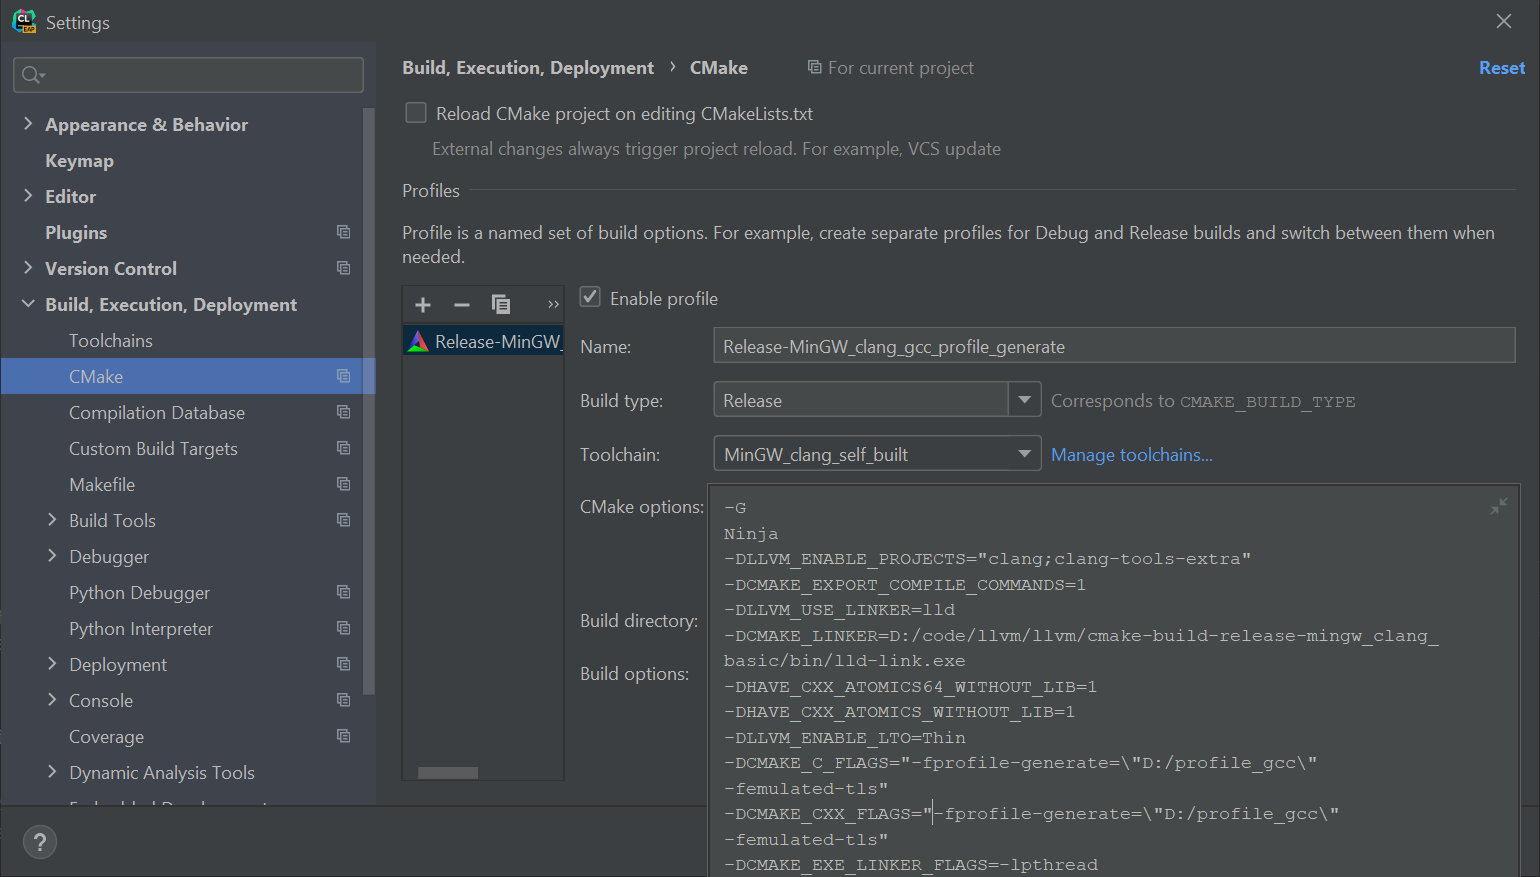
In our case, we wanted to use profile-guided optimization. One of the options for making this work is to get the compiler-rt source code of exactly the same version as the Clang version in MSYS2. This can be challenging, so the other solution is to clone the LLVM monorepo and build the tools you need.
For -fprofile-instr-generate it might be enough to build only compiler-rt and llvm-profdata to merge the profiler results. However, to use all the tools reliably, it’s better to build Clang and lld, as well.
Luckily we already have the required setup for that build.
The last step is to replace the binaries in <msys2_path>\mingw64\lib\clang\<clang_version>\lib\windows with libraries from <compiler-rt_path>\cmake-build-release-mingw_clang\lib\windows or from <llvm_build_path>\lib\clang\<clang_version>\lib\windows in case of monorepo.
Using Clang for profiling
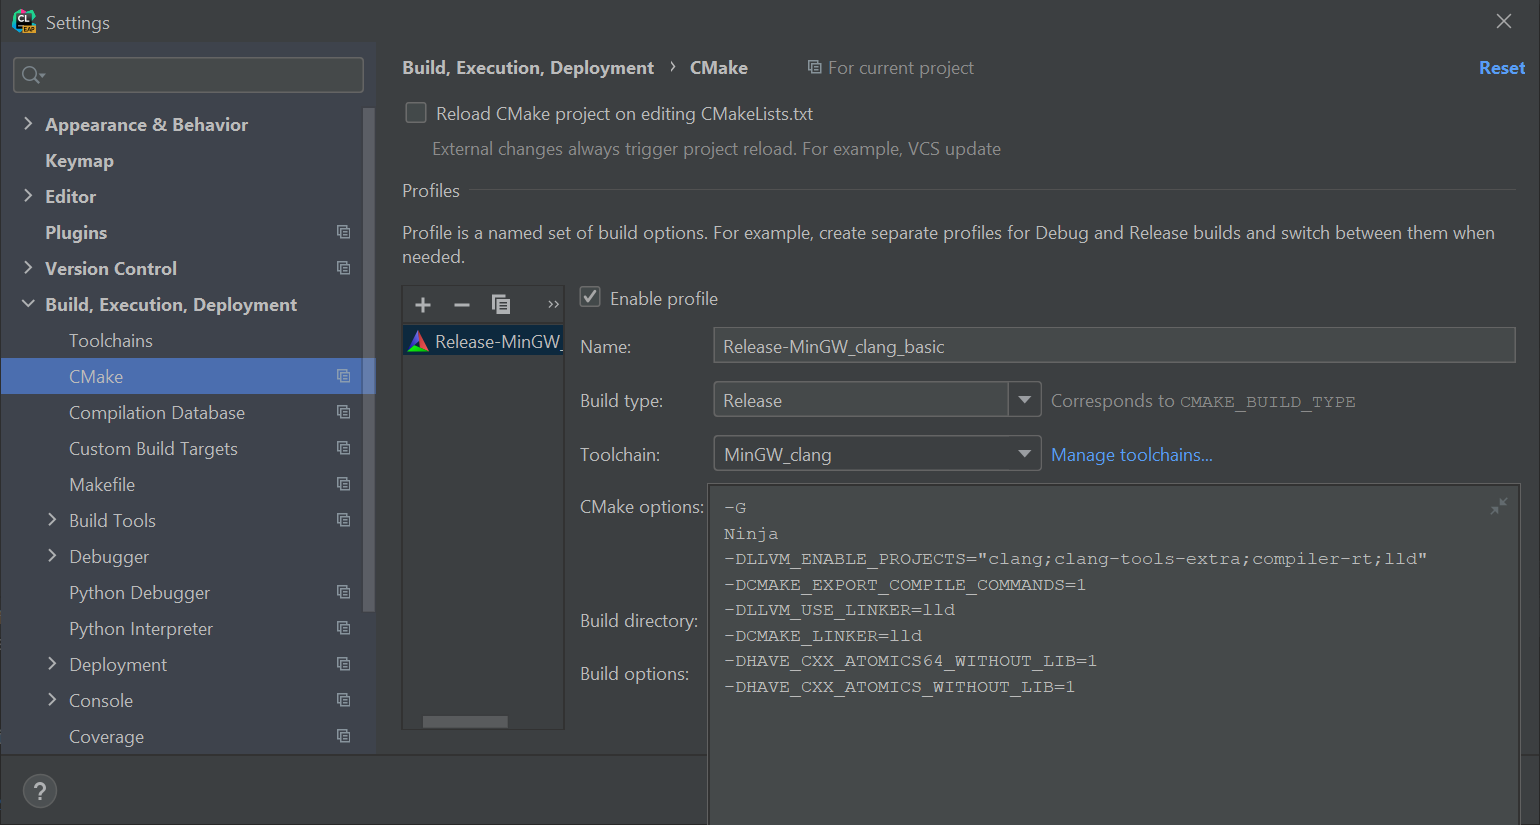
With the compiler-rt libraries in place, it’s now possible to use the same toolchain we set up with -fprofile-instr-generate/-fprofile-instr-use flags. Let’s build LLVM for this experiment, since we already have the source code. We’ll also use -DLLVM_ENABLE_LTO=Thin for even more optimization. Go to Settings/Preferences | Build, Execution, Deployment | CMake:

With this CMake configuration, you can build the Clang compiler and use it, for example, to build your own project. This will generate the relevant profiler information, which should later be merged with the tool we built earlier – llvm-profdata. With the merged profile_merged.profdata file, you can finally build the optimized version of the Clang compiler:
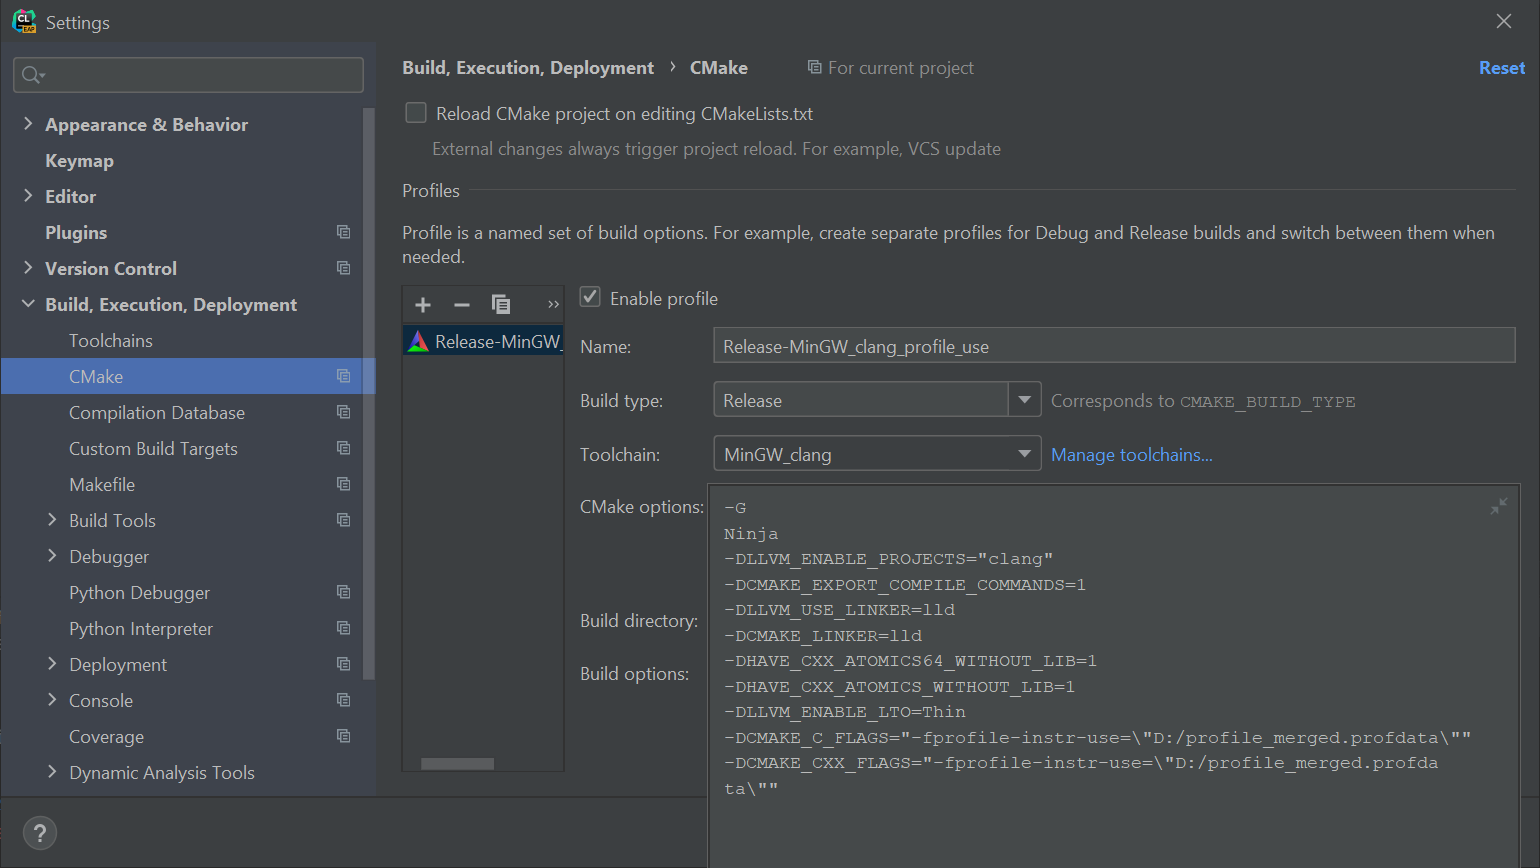
Using custom Clang and lld
Getting the gcc-style -fprofile-generate/-fprofile-use flags to work correctly requires changing the Clang path and setting -DCMAKE_LINKER to the newly built lld. You also need a few additional tricks for LLVM : -femulated-tls and linking pthread.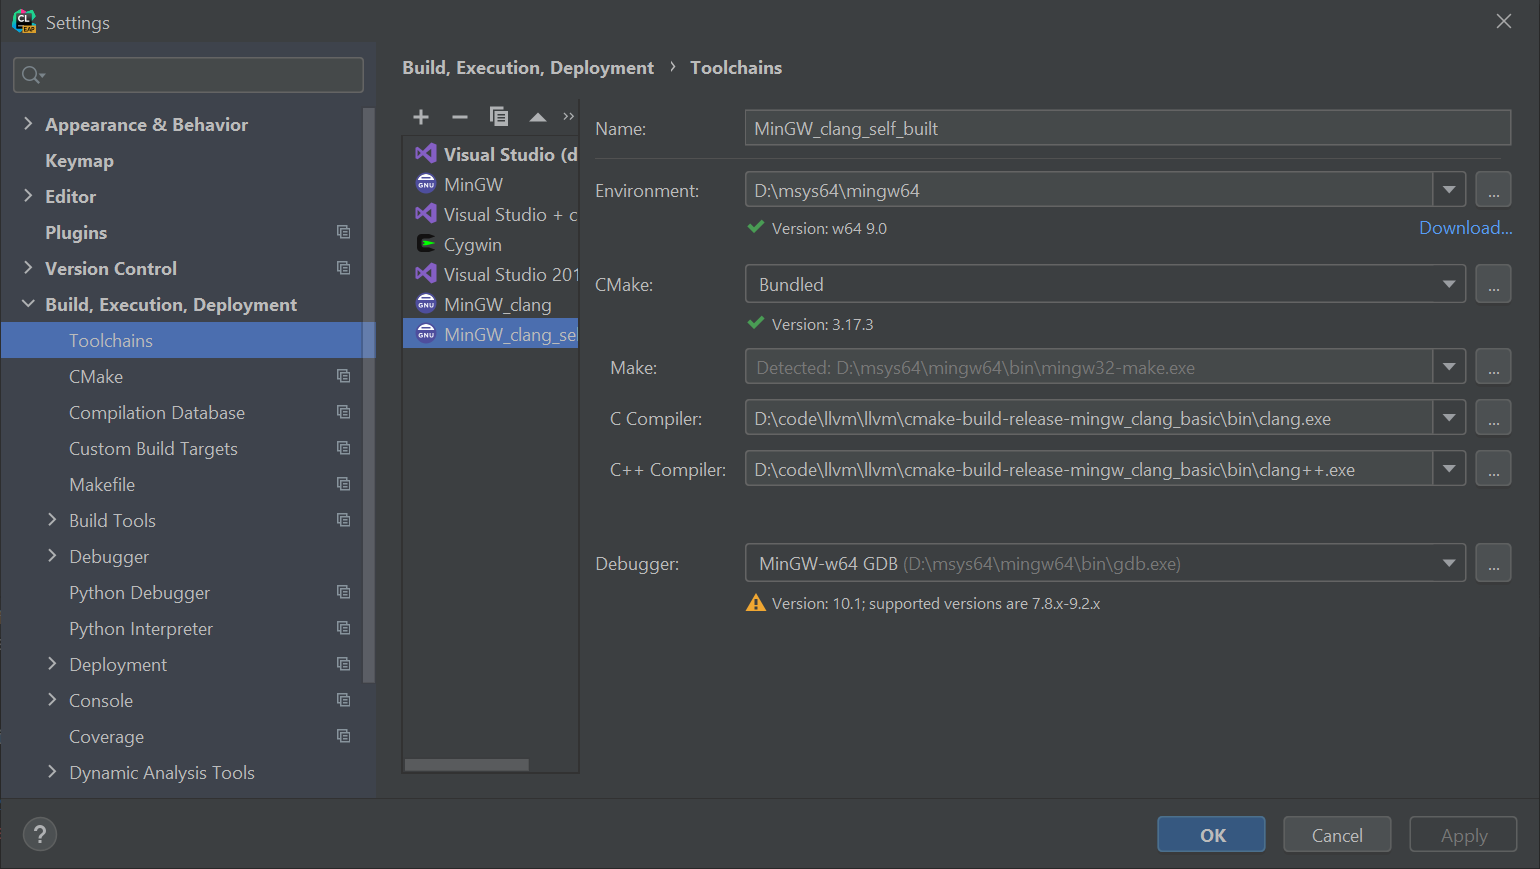
Then you should repeat all the steps you performed with -fprofile-instr-generate/-fprofile-instr-use.
Conclusion
Using Clang on Windows is now possible and does not require you to have Microsoft Visual Studio installed!
We hope that in the near future, using advanced clang tools will become easier and will no longer require the manual build. Let us know if you discover any other ways to achieve the same results!
Your CLion team
JetBrains
The Drive to Develop
Subscribe to Blog updates
April 24th, 2019
Visual Studio 2019 version 16.1 Preview 2 comes with support for Clang/LLVM out-of-the-box. Visual Studio has had great tooling for MSVC and GCC for quite a while now. The latest preview brings Clang into the fold.
Visual Studio 2019 includes out of the box support for editing, building, and debugging CMake projects with Clang/LLVM. If you use MSBuild projects, however, don’t worry. Support for MSBuild based .vcxproj projects is coming soon as well. If you are not familiar with Visual Studio’s CMake, support check out how to get started.
If you are developing on Windows and targeting Clang, we hope to make Visual Studio the best IDE for that job. Please try out the preview and let us know what is working well and what isn’t.
Installing Clang/LLVM for use with Visual Studio
The “Desktop development with C++” workload with the Visual Studio installer now includes full support for targeting Clang/LLVM based toolsets. You will also need the actual compiler and tools to build your projects.
Getting Clang on Windows
On Windows, it’s easy to install the Clang tools. Just grab the “Clang compiler for Windows,” an optional component of the “Desktop development with C++” workload. This will install everything you need to develop with Clang on Windows.
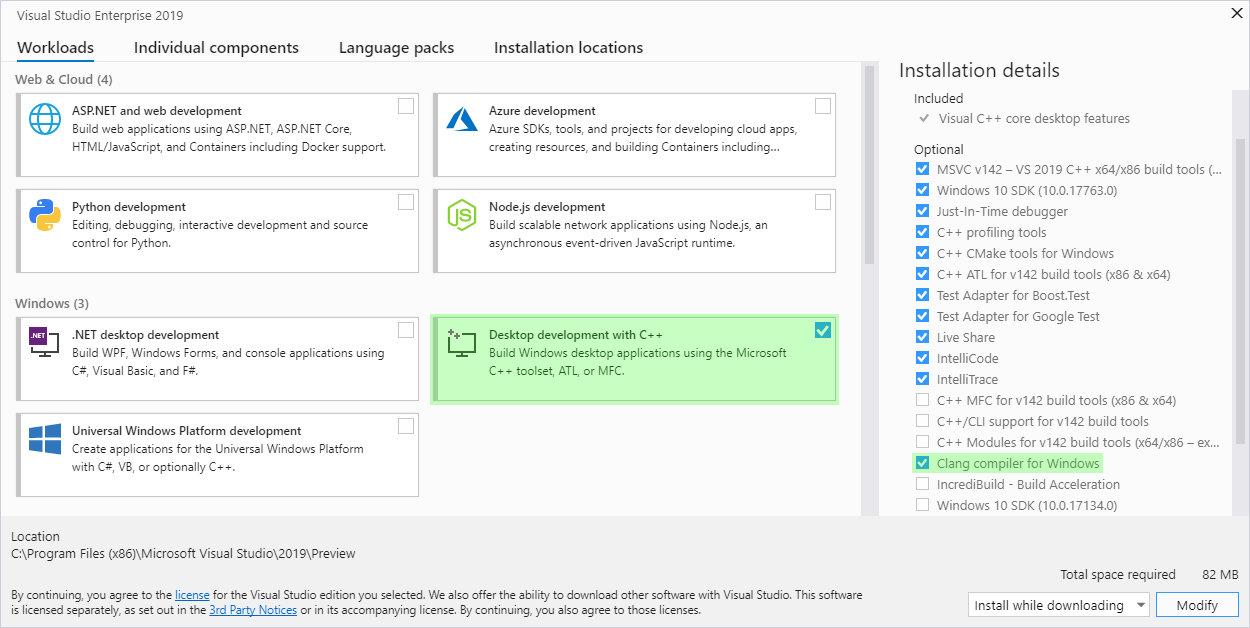
You can also install your own copy of Clang/LLVM or even build it from source. If you have already installed Clang/LLVM you don’t need to install the compiler again with the Visual Studio installer. We do recommend that you use the most recent version of Clang to get the best support in the IDE. Older versions may have some limitations. Check out “Using a Custom Version of Clang” below for more information.
Getting Clang on Linux
To use Clang/LLVM on a remote Linux machine with Visual Studio, just install it with your distribution’s package manager. If ‘which clang’ finds the compiler you are good to go.
Getting Started with Clang/LLVM in Visual Studio
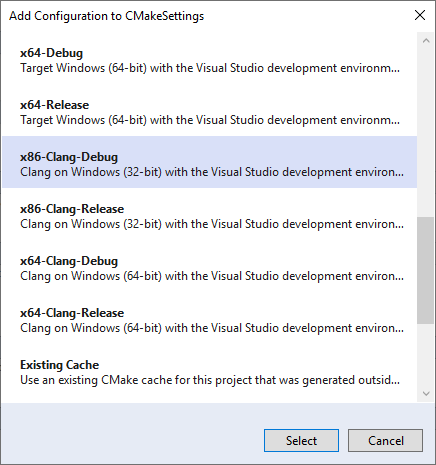
Once you have installed Clang, using it with CMake projects is easy. Visual Studio will use the MSVC compiler by default on Windows. On Linux, it will use the distribution’s default compiler, often GCC. To use Clang instead, add a configuration and select one of the Clang presets.
Select “Manage Configurations” from the configuration drop down on the left of the play button. Then click the “Add Configuration” button:
Another option is to modify an existing configuration with the CMake Settings editor to use any of the “clang” toolsets with the Toolset dropdown: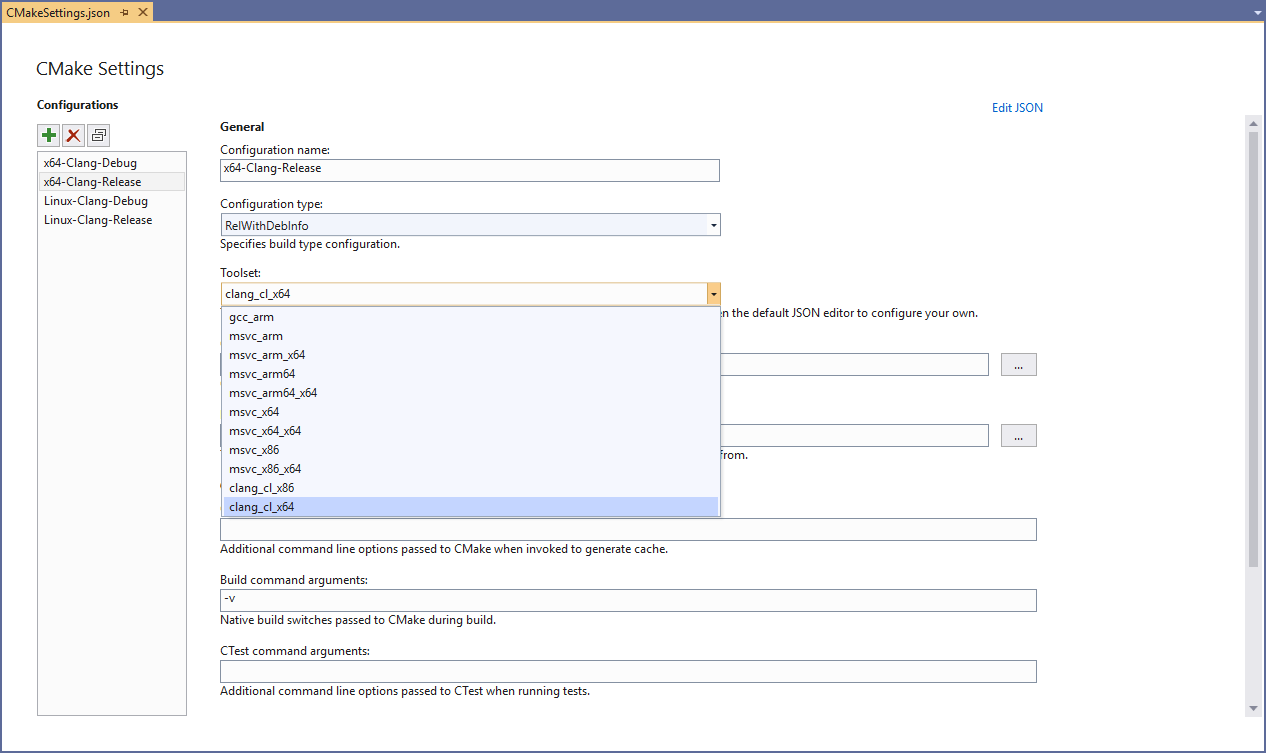
These toolsets will use Clang in clang-cl mode by default on Windows and link with the Microsoft STL. If you are targeting Linux, they will use Clang in GCC compatibility mode. Toolsets to build both 32 and 64-bit binaries are available on Windows while the Linux toolsets will target the architecture of the remote machine. Most of this behavior can be tweaked by customizing either the CMake command line or in the CMake project itself.
Edit, Build, and Debug
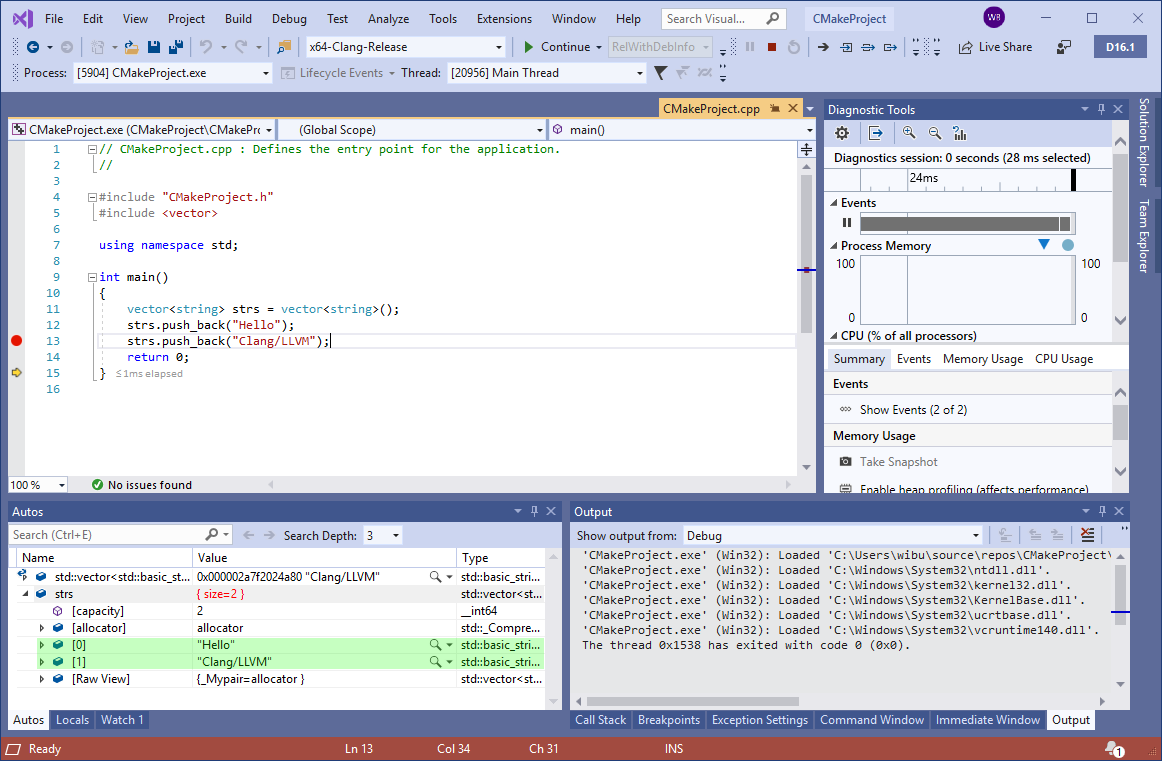
Once you have set up a Clang configuration, build and debug work exactly as you would expect in the IDE. Visual Studio will automatically detect that you are using the Clang compiler and provide applicable IntelliSense, highlighting, navigation, and other editing features. Building projects should just work, provided they are compatible with Clang, with any errors or warnings being directed to the Output Window.
Whether you are targeting Windows or Linux, the debugging experience with Clang should be familiar to you. Most of Visual Studio’s debugging features also work with Clang. There are just a few exceptions for compiler dependent features (e.g. edit and continue.) Breakpoints, memory and data visualization, and other inner development loop debugging features are available:
Using a Custom Installation of Clang
Visual Studio will automatically look for Clang in two places:
- (Windows) The internally installed copy of Clang/LLVM that comes with the Visual Studio installer.
- (Windows and Linux) The PATH environment variable.
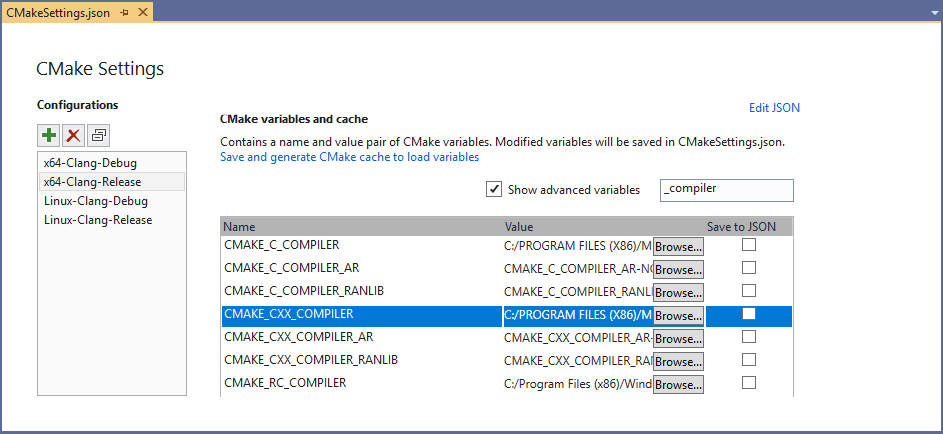
If it doesn’t find Clang in one of those places it will offer to install it on Windows. On Linux, you will need to install it with the distribution’s package manager. Alternatively, you can tell Visual Studio to use another installation of Clang/LLVM on the machine by setting the “CMAKE_C_COMPILER” and “CMAKE_CXX_COMPILER” CMake variables in your CMake Settings:
Keep in mind, however, that using old versions of Clang may come with some limitations. For instance, if you are using the Microsoft STL on Windows, support is only gaurenteed for the most recent version of the compiler. As we release new versions of Visual Studio and the Microsoft STL you may need to upgrade your custom installation.
Using Clang/LLVM with MSBuild Projects
Visual Studio 2019 version 16.1 ships with out of the box support for Clang/LLVM for CMake projects. Support for MSBuild based C++ projects is on the roadmap and will be available soon in a future release. To use Clang/LLVM today with MSBuild based C++ projects there are 3rd party extensions for Visual Studio available.
Send Us Feedback
Please try out the latest preview and let us know if you have any feedback. It is always appreciated! The best way to get in touch with us about an issue or suggestion is though Developer Community with the “Report a Problem” or “Suggest a Feature” tools. This makes it easy for us to follow up and for you to get the latest updates about our progress. Feel free to comment here or send an email to cmake@microsoft.com with questions as well.

Will Buik
Program Manager, Visual Studio C++ IDE