Для запуска тестов Selenium в Google Chrome, помимо самого браузера Chrome, должен быть установлен ChromeDriver. Установить ChromeDriver очень просто, так как он находится в свободном доступе в Интернете. Загрузите архив в зависимости от операционной системы, разархивируйте его и поместите исполняемый файл chromedriver в нужную директорию.
Мы должны установить именно ту версия которая была бы совместима с установленным Google Chrome на нашем ПК или VDS. В случае, если версии не совпадают, то мы получим данную ошибку:
selenium.common.exceptions.SessionNotCreatedException: Message: session not created: This version of ChromeDriver only supports Chrome version 81
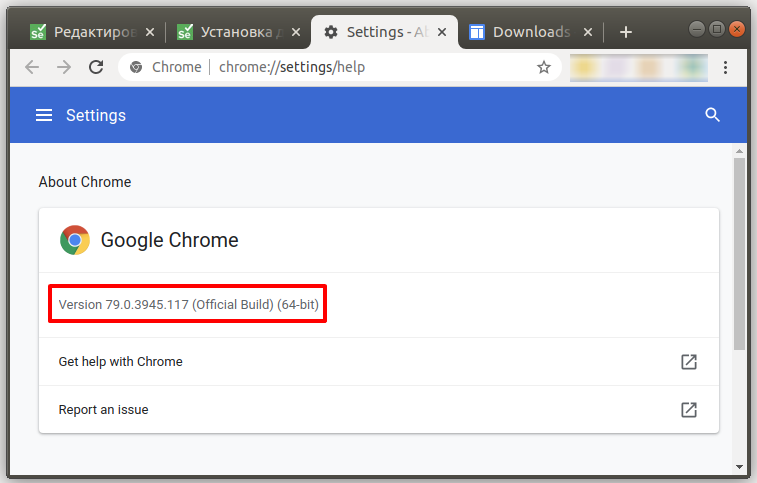
Введите в адресную строку Google Chrome данный путь:
У вас появится вот такое окно:
Рисунок 1 — Узнаем версию браузера Google Chrome
Скачать ChromeDriver для Linux, Windows и Mac
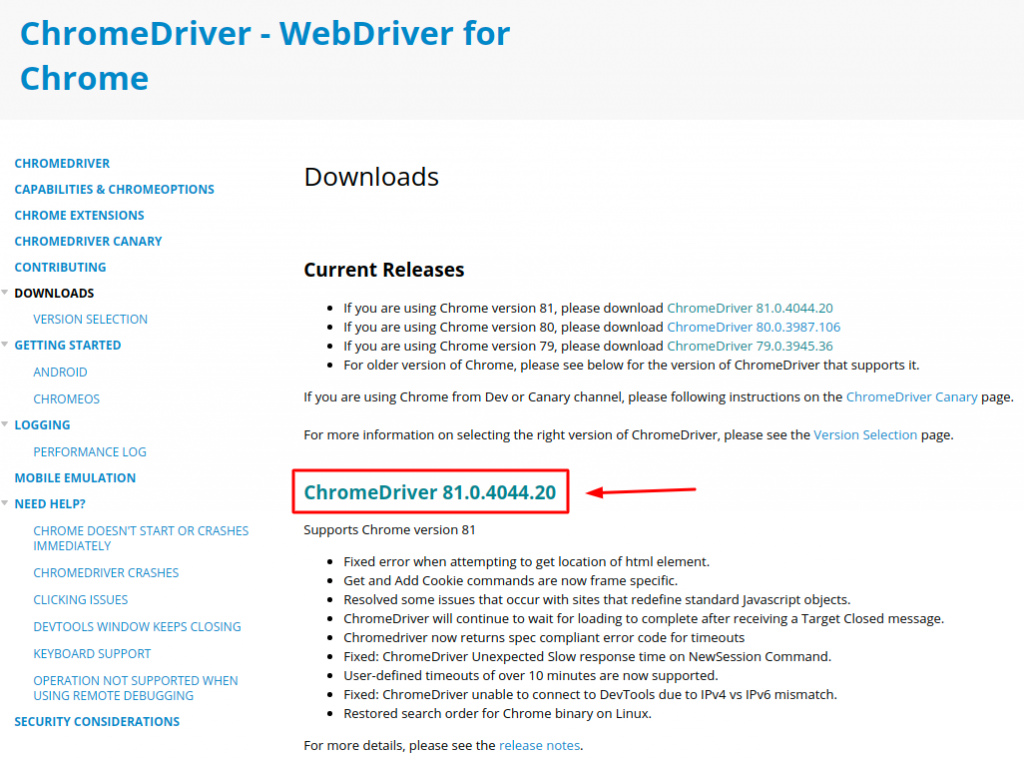
Заходим на сайт: https://sites.google.com/a/chromium.org/chromedriver/downloads
На данный момент актуальная версия драйвера 81.0.40 хотя у меня установлен более старый Google Chrome и последняя версия мне не подойдет. Как видно на рисунке выше, мне нужна версия 79.0.39 у вас может быть другая версия, нужно её скачать.
Рисунок 2 — Официальный сайт Google для загрузки драйвера chromedriver
На момент прочтения этой статьи версия может быть другой. Всегда выбирайте более новую версию, чтобы не поймать старые баги которые уже давно исправили в новой версии. НО! Помните, что вам нужно обновить и свой браузер Google Chrome если вы хотите работать с новой версией ChromeDriver.
Установка ChromeDriver под Linux, Windows и Mac
- Заходим на сайт https://chromedriver.storage.googleapis.com/index.html?path=79.0.3945.36/ (Проверьте сайт с Рис. 2 на обновления, тут версия: 79.0.3945);
- Скачиваем архив под вашу операционную систему;
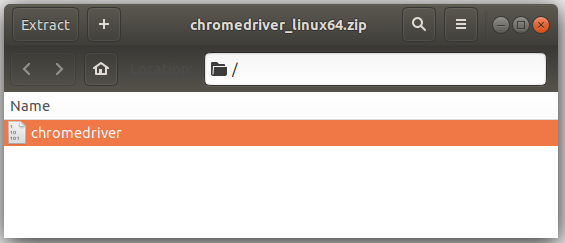
- Распаковываем файл и запоминаем где находится файл chromedriver или chromedriver.exe (Windows).
Рисунок 3 — Скаченный архив с ChromeDriver
Если у вас Linux дистрибутив или Mac, вам нужно дать файлу chromedriver нужные права на выполнения. Открываем терминал и вводим команды одна за другой.
|
cd /путь/до/драйвера/ sudo chmod +x chromedriver |
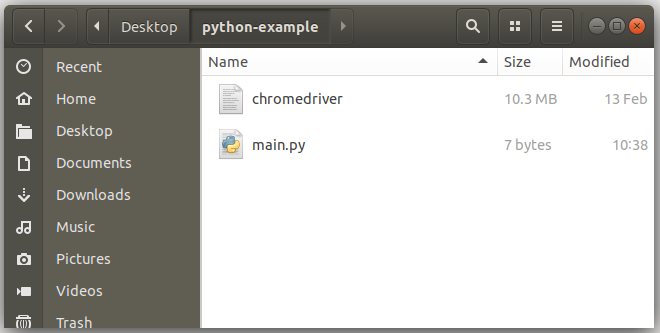
Рисунок 4 — Установленный ChromeDriver
Теперь, когда вы будете запускать код в Python, вы должны указать Selenium на файл chromedriver.
|
from selenium import webdriver driver = webdriver.Chrome(‘/путь/до/драйвера/chromedriver’) driver.get(«http://www.google.com») |
Для Windows
|
from selenium import webdriver # Указываем полный путь к geckodriver.exe на вашем ПК. driver = webdriver.Chrome(‘C:\\Files\\chromedriver.exe’) driver.get(«http://www.google.com») |
We have an Ubuntu server which we use for running Selenium tests with Chrome and Firefox (I installed ChromeDriver) and I also want to run the tests locally on my Windows 10 computer. I want to keep the Python code the same for both computers. But I didn’t find out how to install the ChromeDriver on Windows 10? I didn’t find it on the documentation [1, 2].
Here is the code that runs the test in Chrome:
import unittest
from selenium import webdriver

class BaseSeleniumTestCase(unittest.TestCase):
    ...
    ...
    ...
    ...

    def start_selenium_webdriver(self, chrome_options=None):
        ...
        self.driver = webdriver.Chrome(chrome_options=chrome_options)
        ...
I also found How to run Selenium WebDriver test cases in Chrome? but it seems to be not in Python (no programming language is tagged, what is it?)
Update #1: I found some Python code in https://sites.google.com/a/chromium.org/chromedriver/getting-started, but where do I put the file in Windows 10 if I want to keep the same Python code for both computers?
Update #2: I downloaded and put chromedriver.exe in C:\Windows and it works, but I didn’t see it documented anywhere.
asked Oct 15, 2015 at 13:50
3
As Uri stated in the question, under Update #2, downloading the latest release of chromedriver and placing it in C:\Windows corrects the issue.
I had the same issue with Chrome hanging when the browser window opens (alongside a command prompt window).
The latest drivers can be found at:
https://sites.google.com/chromium.org/driver
The version in the chromedriver_win32.zip file is working on my 64-bit system.
answered Dec 30, 2015 at 3:13
Adam StarrhAdam Starrh
6,4788 gold badges51 silver badges89 bronze badges
1
- Download the
chromedriver.exeand save it to a desired location - Specify the
executable_pathto its saved path
The sample code is below:
from selenium import webdriver

options = webdriver.ChromeOptions()
options.add_argument('headless')
driver = webdriver.Chrome(executable_path="path/to/chromedriver.exe", chrome_options=options)
driver.get("example.html")
# do something here...
driver.close()
As Uri stated in Update #2 of the question, if we put the chromedriver.exe under C:/Windows, then there is no need to specify executable_path since Python will search under C:/Windows.
answered Nov 5, 2018 at 21:16
GaopingGaoping
2513 silver badges5 bronze badges
Let me brief out the requirements first.
You need to download the chrome web driver zip from here. https://chromedriver.storage.googleapis.com/index.html?path=2.33/
Extract the file and store it in a desired location.
Create a new project in Eclipse and include the following code in your class.
System.setProperty("webdriver.chrome.driver", "C:\\temp\\chromedriver.exe");
WebDriver driver = new ChromeDriver();
Explanation : System.setProperty(key,value):
Key is default and same for all the systems, value is the location of your chromedriver extract file.
answered Nov 30, 2017 at 10:29
Просмотров статьи: 835
Создаем новый проект. Устанавливаем библиотеку Selenium в наше виртуальное окружение (venv) только что созданного проекта, выполнив команду:
pip install seleniumНа этом пока сворачиваем нашу IDE, следующая наша цель это найти и скачать сам драйвер Селениума для браузера гугл хром.
Находим и скачиваем Chrome Webdriver
Далее установим Webdriver для нашего браузера. Будем рассматривать на примере браузера Google Chrome. Откроем браузер Chrome нажмем три точки >>> «Справка» >>> «О браузере Google Chrome» или просто пройдем по ссылке chrome://settings/help, нас интересует версия нашего браузера пункт 4 рисунок 1.

После того, как мы узнали нашу версию браузера, переходим на Chromedriver и ищем версию которая соответствует нашей версии. На моем примере: у меня версия версия 107.0.5304.88, но в списке нету такой, самая похожая107.0.5304.62, она подходит, ориентируемся по первым трем цифрам 107.Х.ХХХХ.ХХ. Скачиваем драйвер под свою операционную систему. Если у вас windows x64, скачивайте chromedriver_win32.zip.
Устанавливаем Chromedriver и приступаем к работе
Распаковываем архив в любую выбранную вами папку, либо в сам проект, я же распакую chromedriver в диск C, заранее создав там папку: C:\chromedriver. Далее в нашем проекте, где ранее установили Selenium пишем следующий код:
from selenium import webdriver
from selenium.webdriver.chrome.service import Service as ChromeService


url = 'https://happypython.ru/about_us/'
browser = webdriver.Chrome(service=ChromeService(executable_path='C:/chromedriver/chromedriver'))
browser.get(url)
Где executable_path это как раз таки путь к вашему драйверу Selenium, куда ранее вы его распаковали
Если при запуске откроется браузер Google Chrome и страница «О нас», то вы все выполнили верно. Данную конструкцию, в старых статьях вы наверное не встречали, но разработчики Selenium рекомендуют именно так, подробнее можете ознакомится в официальной документации.
Я предлагаю следующую конструкцию:
from selenium import webdriver
from selenium.webdriver.chrome.service import Service
from selenium.webdriver.common.by import By
import time

url = 'https://happypython.ru/about_us/'
service = Service(executable_path='C:/chromedriver/chromedriver')  # указываем путь до драйвера
browser = webdriver.Chrome(service=service)
try:
    browser.get(url)
    time.sleep(10)
    browser.quit()
except Exception as ex:
    print(ex)
    browser.quit()
browser.quit()
Выше написанный код выполняет тоже самое, что было рассмотрено ранее, но написан более понятно и исключает ошибки, связанных при работе с драйвером Selenium, благодаря конструкции try/except. Подробнее вы разберете это в следующей статье «Selenium webdriver в python. Selenium-поиск элементов на странице«
От автора
Если у Вас, что то не выходит или не получается, со своим вопросом Вы можете обратиться мне Вконтакте. Так же свои отвызы и предложения вы можете писать в нашу группу ВКонтакте или в чате Telegram.
Telegram каналы наших партнеров:
Backend development — все о бэкенде на python и не только (полезные статьи, гайды, шпаргалки , переводы книг)
EasyPy — о языке программирования python простым языком (интересные статьи, тесты для языка Python, проводят занятия)
Если это было вам полезно — вы можете сказать нам спасибо!
Developed in collaboration with the Chromium team, ChromeDriver is a standalone server which implements WebDriver’s wire protocol.
Visit the full ChromeDriver site
View all ChromeDriver downloads
The ChromeDriver consists of three separate pieces. There is the browser itself («chrome»), the language bindings provided by the Selenium project («the driver») and an executable downloaded from the Chromium project which acts as a bridge between «chrome» and the «driver». This executable is called «chromedriver», but we’ll try and refer to it as the «server» in this page to reduce confusion.
Requirements
The server expects you to have Chrome installed in the default location for each system:
| OS | Expected Location of Chrome |
|---|---|
| Linux | /usr/bin/google-chrome1 |
| Mac | /Applications/Google\ Chrome.app/Contents/MacOS/Google\ Chrome |
| Windows XP | %HOMEPATH%\Local Settings\Application Data\Google\Chrome\Application\chrome.exe |
| Windows Vista and newer | C:\Users\%USERNAME%\AppData\Local\Google\Chrome\Application\chrome.exe |
1 For Linux systems, the ChromeDriver expects /usr/bin/google-chrome to be a symlink to the actual Chrome binary. See also the section on overriding the Chrome binary location .
Quick installation
- Mac users with Homebrew installed:
brew install --cask chromedriver - Debian based Linux distros:
sudo apt-get install chromium-driver - Windows users with Chocolatey installed:
choco install chromedriver
Getting Started
Read ChromeDriver user documentation
Running ChromeDriver as a standalone process
Since the ChromeDriver implements the wire protocol, it is fully compatible with any RemoteWebDriver client. Simply start up the ChromeDriver executable (that works as a server), create a client, and away you go:
WebDriver driver = new RemoteWebDriver("http://localhost:9515", DesiredCapabilities.chrome());
driver.get("http://www.google.com");
Troubleshooting
If you are using the RemoteWebDriver and you get the The path to the chromedriver executable must be set by the webdriver.chrome.driver system property error message you likely need to check that one of these conditions is met:
- The chromedriver binary is in the system path, or
- The Selenium Server was started with -Dwebdriver.chrome.driver=c:\path\to\your\chromedriver.exe
ChromeDriver user documentation provides more information on the known issues and workarounds.
Think you’ve found a bug?
Check if the bug has been reported yet. If it hasn’t, please open a new issue and be sure to include the following:
- What platform are you running on?
- What version of the chromedriver are you using?
- What version of Chrome are you using?
- The failure stacktrace, if available.
- The contents of chromedriver’s log file (chromedriver.log).
Of course, if your bug has already been reported, you can update the issue with the information above. Having more information to work on makes it easier for us to track down the cause of the bug.
Testing earlier versions of Chrome
ChromeDriver is only compatible with Chrome version 12.0.712.0 or newer. If you need to test an older version of Chrome, use Selenium RC and a Selenium-backed WebDriver instance:
URL seleniumServerUrl = new URL("http://localhost:4444");
URL serverUnderTest = new URL("http://www.google.com");
CommandExecutor executor = new SeleneseCommandExecutor(seleniumServerUrl, serverUnderTest, DesiredCapabilities.chrome());
WebDriver driver = new RemoteWebDriver(executor);
More ChromeDriver links
- ChromeDriver capabilities
- Contribution guide
- Getting started with ChromeDriver
- Logging
- Mobile emulation
- Chromedriver support policy
- Need help?
This page documents how to start using ChromeDriver for testing your website on desktop (Windows/Mac/Linux).
You can also read Getting Started with Android or Getting Started with ChromeOS
ChromeDriver is a separate executable that Selenium WebDriver uses to control Chrome. It is maintained by the Chromium team with help from WebDriver contributors. If you are unfamiliar with Selenium WebDriver, you should check out the Selenium site.
Follow these steps to setup your tests for running with ChromeDriver:
-
Ensure Chromium/Google Chrome is installed in a recognized location
ChromeDriver expects you to have Chrome installed in the default location for your platform. You can also force ChromeDriver to use a custom location by setting a special capability.
-
Download the ChromeDriver binary for your platform under the downloads section of this site
-
Help WebDriver find the downloaded ChromeDriver executable
Any of these steps should do the trick:
-
-
include the ChromeDriver location in your PATH environment variable
-
(Java only) specify its location via the webdriver.chrome.driver system property (see sample below)
-
(Python only) include the path to ChromeDriver when instantiating webdriver.Chrome (see sample below)
-
import org.openqa.selenium.*;
import org.openqa.selenium.chrome.*;
import org.junit.Test;
public class GettingStarted {
@Test
public void testGoogleSearch() throws InterruptedException {
// Optional. If not specified, WebDriver searches the PATH for chromedriver. System.setProperty(«webdriver.chrome.driver», «/path/to/chromedriver»); WebDriver driver = new ChromeDriver();
driver.get(«http://www.google.com/»);
Thread.sleep(5000); // Let the user actually see something!
WebElement searchBox = driver.findElement(By.name(«q»));
searchBox.sendKeys(«ChromeDriver»);
searchBox.submit();
Thread.sleep(5000); // Let the user actually see something!
driver.quit();
}
}
import time
from selenium import webdriver
driver = webdriver.Chrome(‘/path/to/chromedriver’) # Optional argument, if not specified will search path.
driver.get(‘http://www.google.com/’);
time.sleep(5) # Let the user actually see something!
search_box = driver.find_element_by_name(‘q’)
search_box.send_keys(‘ChromeDriver’)
search_box.submit()
time.sleep(5) # Let the user actually see something!
driver.quit()
Controlling ChromeDriver’s lifetime
Controlling ChromeDriver’s lifetime
The ChromeDriver class starts the ChromeDriver server process at creation and terminates it when quit is called. This can waste a significant amount of time for large test suites where a ChromeDriver instance is created per test. There are two options to remedy this:
1. Use the ChromeDriverService. This is available for most languages and allows you to start/stop the ChromeDriver server yourself. See here for a Java example (with JUnit 4):
import java.io.*;
import org.junit.*;
import org.openqa.selenium.*;
import org.openqa.selenium.chrome.*;
import org.openqa.selenium.remote.*;
public class GettingStartedWithService {
private static ChromeDriverService service;
private WebDriver driver;
@BeforeClass
public static void createAndStartService() throws IOException {
service = new ChromeDriverService.Builder()
.usingDriverExecutable(new File(«/path/to/chromedriver»))
.usingAnyFreePort()
.build();
service.start();
}
@AfterClass
public static void stopService() {
service.stop();
}
@Before
public void createDriver() {
driver = new RemoteWebDriver(service.getUrl(), new ChromeOptions());
}
@After public void quitDriver() {
driver.quit();
}
@Test
public void testGoogleSearch() {
driver.get(«http://www.google.com»);
// rest of the test…
}
}
import time
from selenium import webdriver
from selenium.webdriver.chrome.service import Service
service = Service(‘/path/to/chromedriver’)
service.start()
driver = webdriver.Remote(service.service_url)
driver.get(‘http://www.google.com/’);
time.sleep(5) # Let the user actually see something!
driver.quit()
2. Start the ChromeDriver server separately before running your tests, and connect to it using the Remote WebDriver.
Terminal:
$ ./chromedriver
Starting ChromeDriver 76.0.3809.68 (…) on port 9515
…
import java.net.*;
import org.openqa.selenium.*;
import org.openqa.selenium.chrome.*;
import org.openqa.selenium.remote.*;
public class GettingStartedRemote {
public static void main(String[] args) throws MalformedURLException {
WebDriver driver = new RemoteWebDriver(
new URL(«http://127.0.0.1:9515»),
new ChromeOptions());
driver.get(«http://www.google.com»);
driver.quit();
}
}


