Содержание
- Шаг 1: Включение режима разработчика
- Шаг 2: Установка пакета APPX
- Способ 1: «Проводник»
- Способ 2: «Windows PowerShell»
- Что еще нужно знать
- Вопросы и ответы
Шаг 1: Включение режима разработчика
Универсальные приложения в Windows 10 традиционно устанавливаются из Microsoft Store, однако в случае необходимости они могут быть установлены в офлайн-режиме из пакетов APPX или AppxBundle. По умолчанию такой способ установки в Windows 10 запрещен, и чтобы им воспользоваться, в системе сначала нужно включить режим разработчика или как минимум разрешить установку неопубликованных приложений.
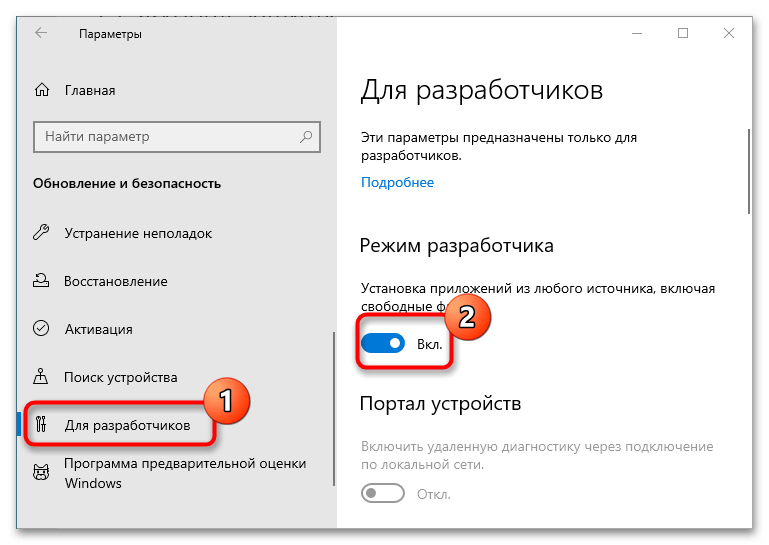
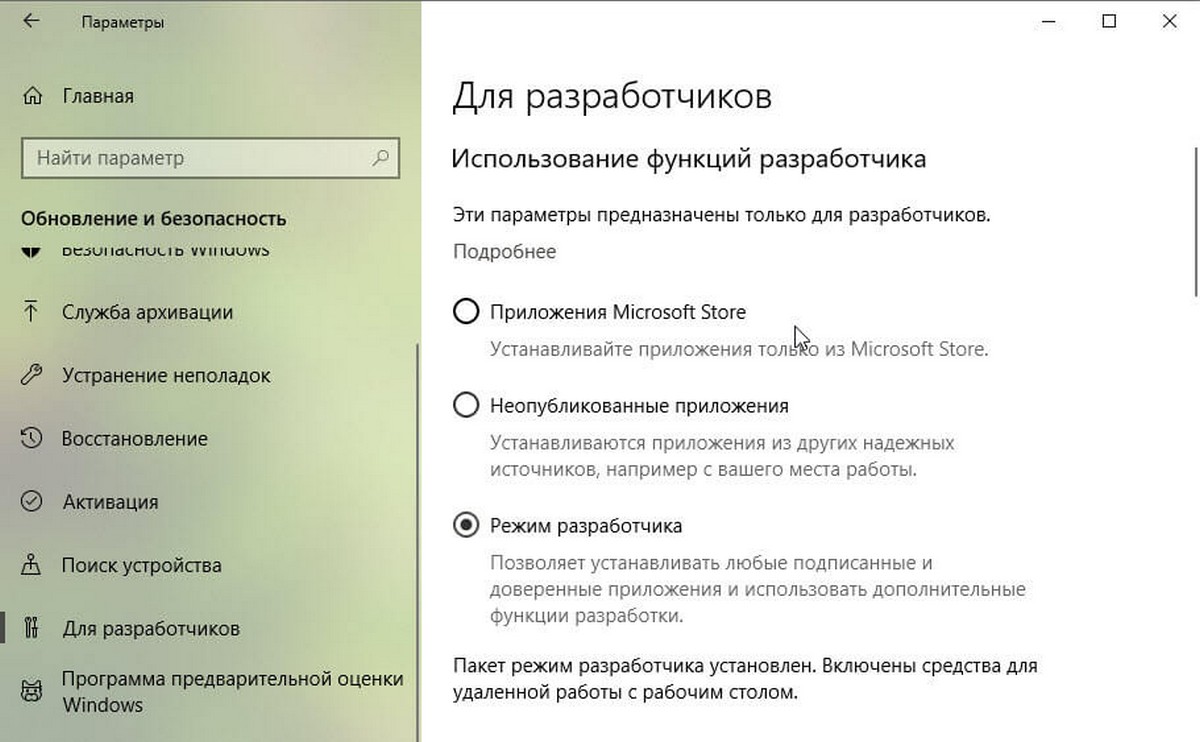
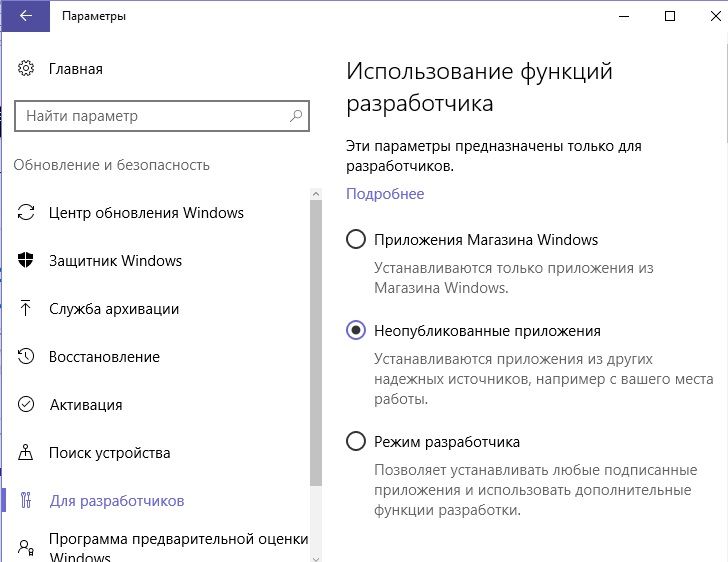
- Откройте приложение «Параметры» и перейдите в раздел «Обновление и безопасность» — «Для разработчиков».
- Включите опцию «Режим разработчика» или «Неопубликованные приложения». Первый вариант отличается тем, что дает вам больше прав и открывает больше возможностей в работе с приложениями.
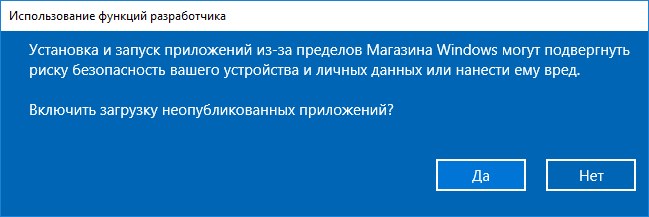
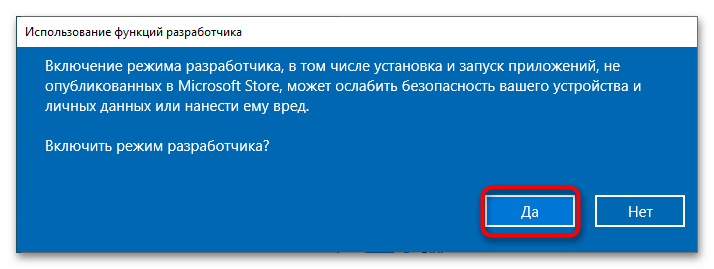
- Подтвердите действие нажатием кнопки «Да».
Инсталлировать пакет приложения или компонент из пакета APPX либо AppxBundle можно двумя способами: средствами «Проводника» из контекстного меню файла или из консоли «PowerShell». Рассмотрим оба варианта.
Способ 1: «Проводник»
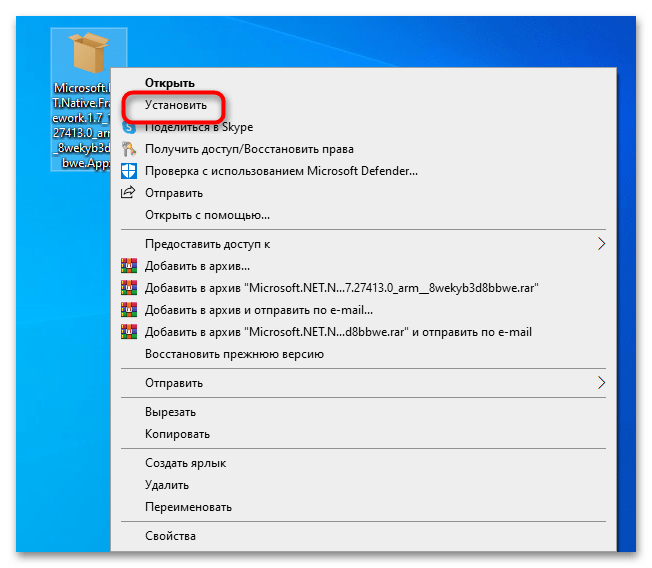
- Здесь все просто: нажмите по файлу APPX правой кнопкой мыши и выберите в меню опцию «Установить». Также вместо этого вы можете запустить файл двойным кликом.
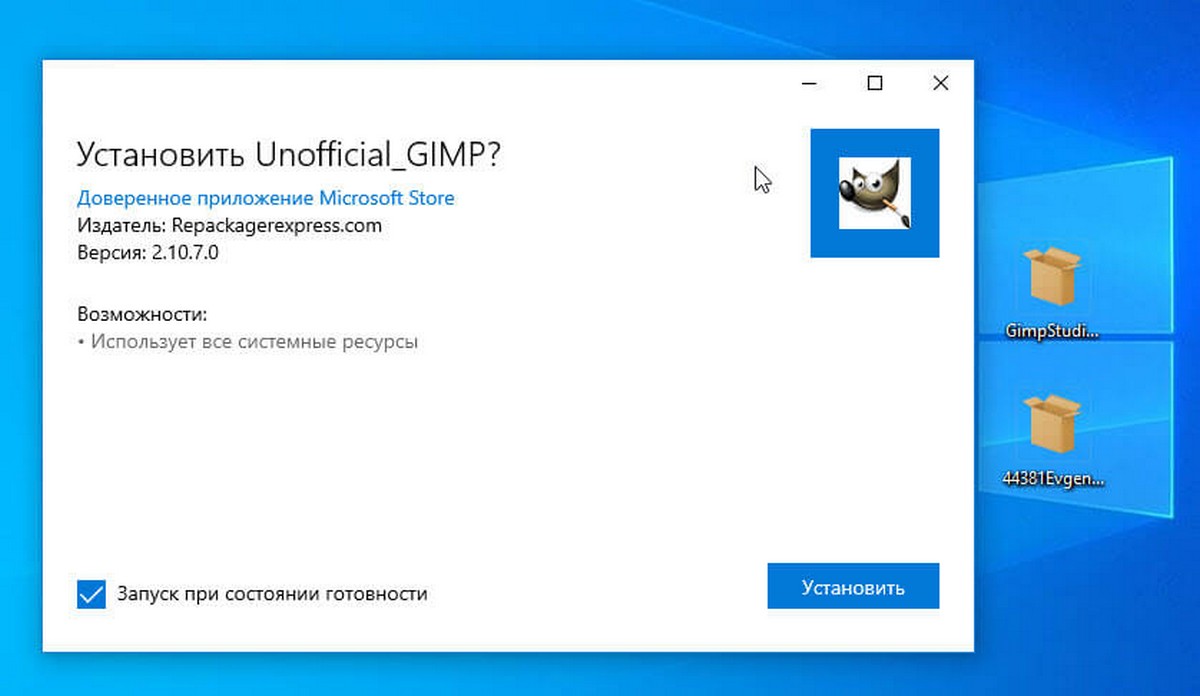
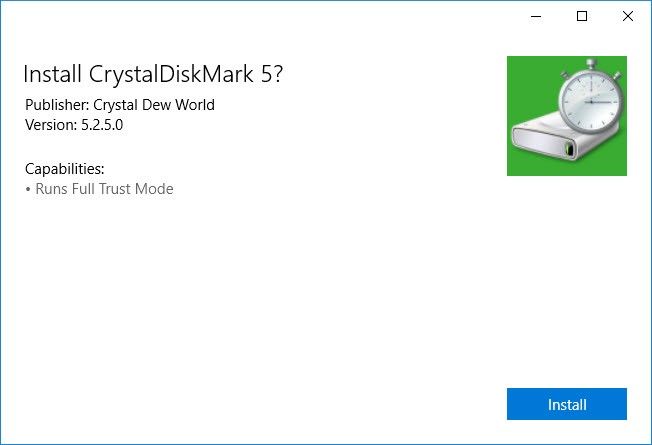
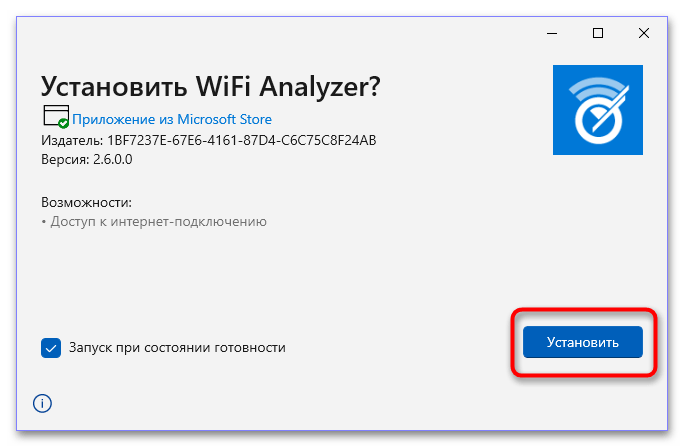
- Откроется окно установщика приложения, нажмите в нем кнопку «Установить» и дождитесь завершения процедуры инсталляции. По завершении установки программа будет автоматически запущенна, если только вы заранее не снимете флажок с функции «Запуск по состоянии готовности».
Способ 2: «Windows PowerShell»
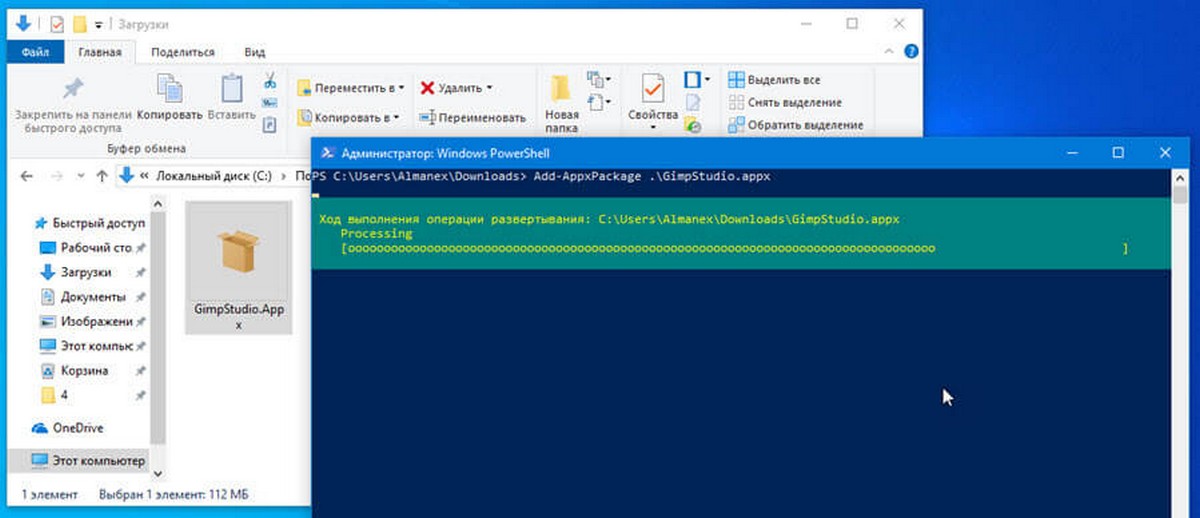
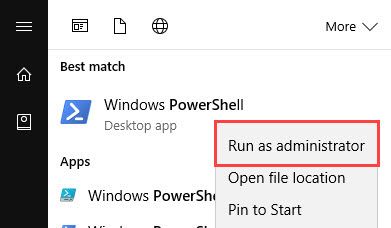
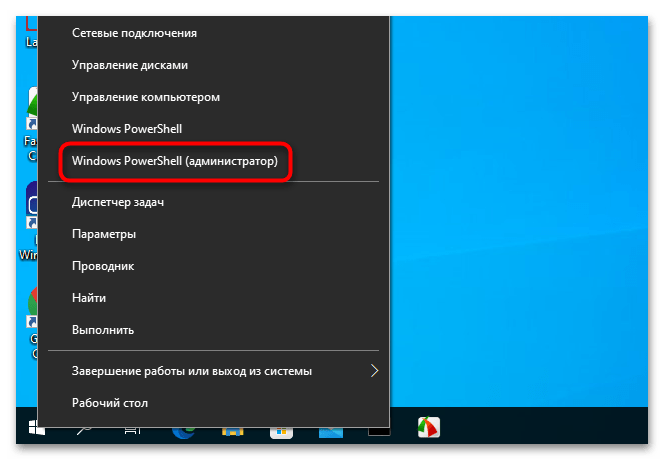
- Откройте консоль «PowerShell» от имени администратора любым удобным вам способом. Проще всего ее вызвать из контекстного меню кнопки «Пуск».
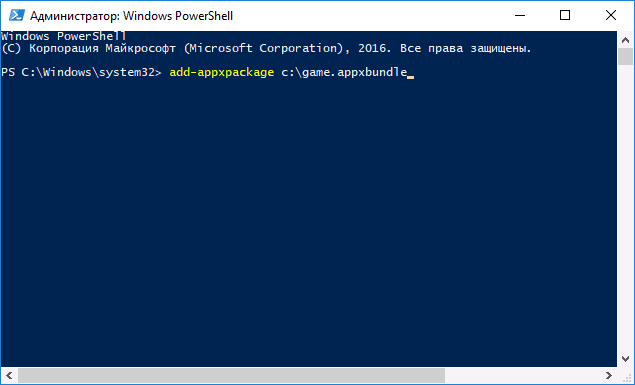
- Сформируйте и выполните команду
add-appxpackage полный-путь-к-файлу-appx.
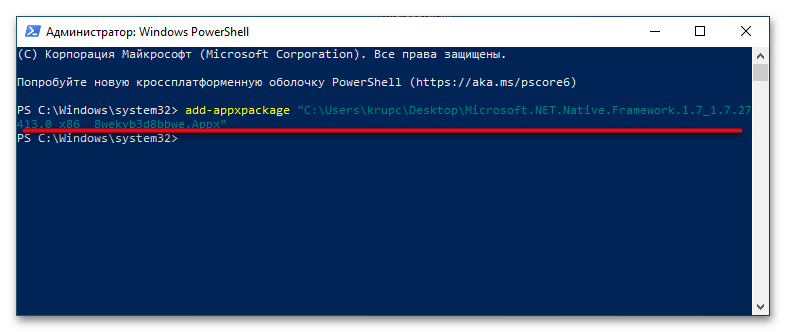
Дождитесь успешного развертывания и установки. Приглашение ввести следующую команду в консоли станет означать, что пакет APPX установлен.
Что еще нужно знать
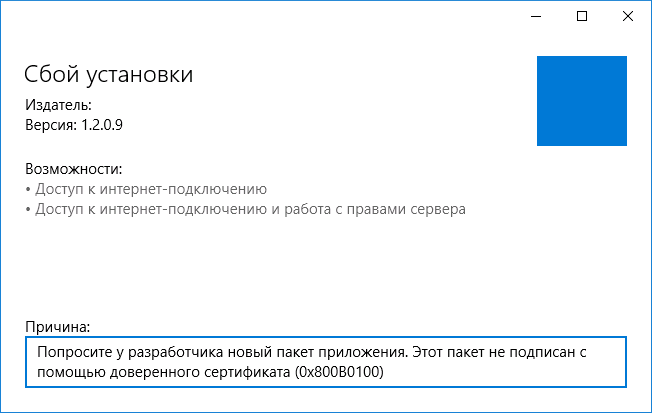
Установить описанными способами можно не все пакеты APPX: так, если последний не будет содержать подписи доверенного сертификата, установка будет прервана с ошибкой «Попросите у разработчика новый пакет приложения». Также перед установкой программы или компонента из автономного пакета нужно убедиться, что его разрядность и архитектура совместимы с разрядностью и архитектурой операционной системы. В этом нет ничего сложного, поскольку разрядность и архитектура указываются в имени установочного файла.
Еще статьи по данной теме:
Помогла ли Вам статья?
В этой инструкции для начинающих — подробно о том, как установить программы Appx и AppxBundle в Windows 10 (для компьютеров и ноутбуков) и какие нюансы следует учитывать при установке. Также может пригодиться: Как установить MSIXBundle и MSIX в Windows 11 и Windows 10.
Примечание: очень часто вопрос о том, как установить Appx возникает у пользователей, которые скачали платные приложения магазина Windows 10 бесплатно на сторонних сайтах. Следует учитывать, что загруженные из неофициальных источников приложения могут представлять угрозу.
Установка приложений Appx и AppxBundle
По умолчанию установка приложений Appx и AppxBundle не из магазина заблокирована в Windows 10 в целях безопасности (аналогично блокировке приложений из неизвестных источников на Android, не дающей установить apk).
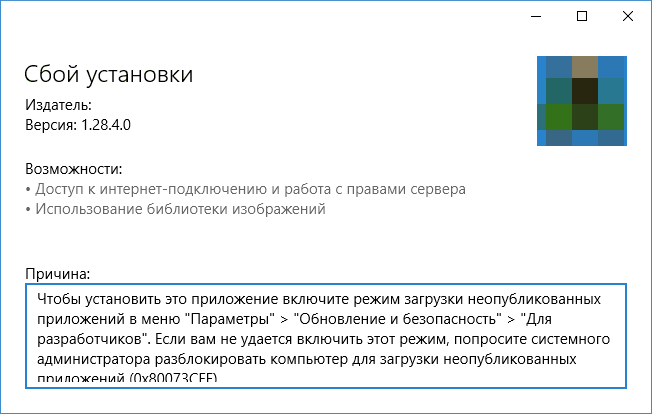
При попытке установить такое приложение вы получите сообщение «Чтобы установить это приложение включите режим загрузки неопубликованных приложений в меню «Параметры» — «Обновление и безопасность» — «Для разработчиков» (код ошибки 0x80073CFF).
Пользуясь подсказкой, выполняем следующие шаги:
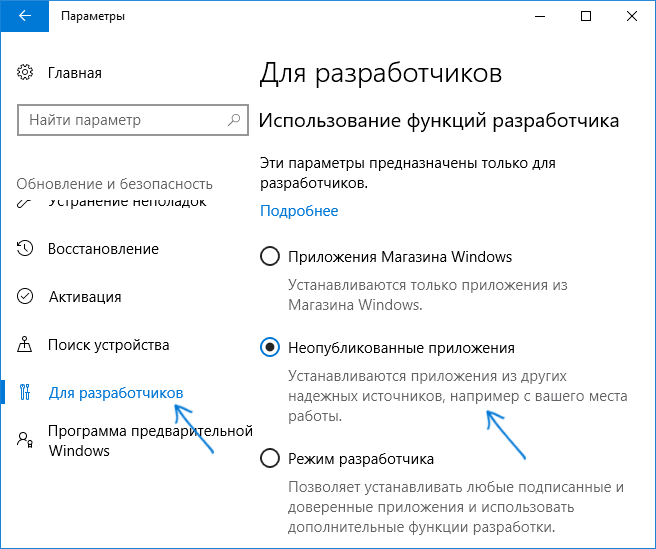
- Заходим в Пуск — Параметры (или нажимаем клавиши Win+I) и открываем пункт «Обновление и безопасность».
- В разделе «Для разработчиков» отмечаем пункт «Неопубликованные приложения».
- Соглашаемся с предупреждением о том, что установка и запуск приложений из-за пределов Магазина Windows могут подвергнуть риску безопасность вашего устройства и личных данных.
Сразу после включения возможности установки приложений не из магазина, установить Appx и AppxBundle можно будет простым открытием файла и нажатием кнопки «Установить».
Еще один способ установки, который может пригодиться (уже после включения возможности установки неопубликованных приложений):
- Запустить PowerShell от имени администратора (можно начать набирать PowerShell в поиске на панели задач, затем нажать по результату правой кнопкой мыши и выбрать пункт «Запустить от имени Администратора» (в Windows 10 1703, если вы не изменяли поведения контекстного меню Пуск, нужный пункт можно найти, кликнув правой кнопкой мыши по пуску).
- Ввести команду: add-appxpackage путь_к_файлу_appx (или appxbundle) и нажать Enter.
Дополнительная информация
Если скаченное вами приложение не устанавливается описанными способами, полезной может оказаться следующая информация:
- Приложения Windows 8 и 8.1, Windows Phone могут иметь расширение Appx, но не устанавливаться в Windows 10 как несовместимые. При этом возможны разные ошибки, например, сообщение о том, что «Попросите у разработчика новый пакет приложения. Этот пакет не подписан с помощью доверенного сертификата (0x80080100)» (но эта ошибка не всегда говорит о несовместимости).
- Сообщение: Не удалось открыть файл appx/appxbundle «Сбой по неизвестной причине» может говорит о том, что файл поврежден (или вы скачали что-то, не являющееся приложением Windows 10).
- Иногда, когда простое включение установки неопубликованных приложений не срабатывает, можно включить режим разработчика Windows 10 и попробовать снова.
Пожалуй, это все на тему установки приложения appx. Если остались вопросы или, наоборот, есть дополнения — буду рад увидеть их в комментариях.
Adguard опубликовала новый онлайн-инструмент, благодаря которому, пользователи со всего мира могут загружать приложения Windows 10 не используя Microsoft Store.
Вы можете помнить, что Adguard в 2017 году создал инструмент, позволяющий, напрямую загружать образы ISO Windows и Office с серверов Microsoft.
Ранее у вас было два варианта загрузки приложений из Microsoft Store, оба работали на устройстве Windows 10: использовать Store для загрузки и установки приложений или используйте монитор трафика для перехвата загрузок и сохранения файлов приложений непосредственно в системе.
Новый инструмент Adguard Store меняет это, поскольку предоставляет всем возможность загрузки любого приложения из магазина Microsoft. Все, что вам нужно, это ссылка на приложение в магазин; вы можете выбрать загрузку определенной версии приложений, например, для выпуска версий Windows 10 или Fast Ring.
Adguard перечисляет все доступные версии, и все, что вам осталось сделать, — это нажать на одну из них, чтобы загрузить приложение в локальную систему. Сценарий извлекает информацию из Microsoft Store. В интерфейсе перечислены все файлы, даты истечения срока действия и хэши SHA-1. Вам необходимо загрузить файлы AppxBundle и EAppxBundle для выбранного приложения. Обратите внимание, что в листинге могут отображаться разные версии одного и того же приложения.
Как получить ссылку на нужное приложение в Магазине Windows 10.
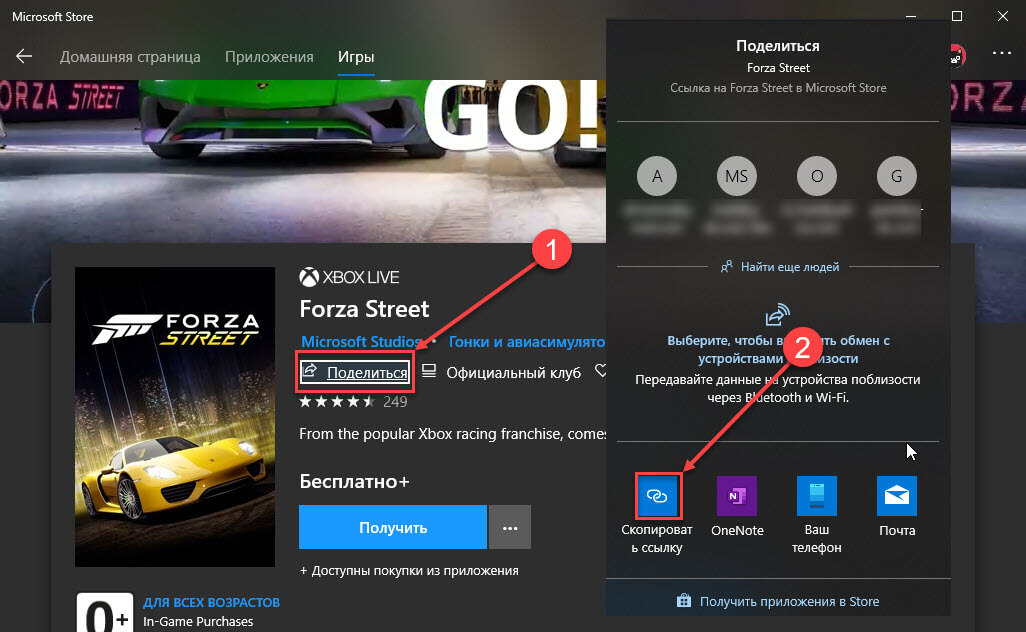
- Чтобы получить ссылку на загрузку приложения, откройте магазин с помощью меню «Пуск» или откройте ссылку Microsoft Store и перейдите на страницу нужного вам приложения и скопируйте ссылку.
- Рядом со звездным рейтингом нажмите на ссылку «Поделиться» (см. картинку ниже), если вы используете Web версию магазина кнопки поделится не будет, просто скопируйте ссылку на страницу загрузки приложения и перейдите к пункту 4.
- В следующем диалоговом окне выберите опцию «Скопировать ссылку», ссылка на приложение будет скопирована в буфер обмена.
- Вставьте ее в инструмент инструмент «Adguard Store» и загрузите AppxBundle файл в локальную систему.
Чтобы установить его, нужно включить «Режим разработчика» на компьютере с Windows 10.
Включить Режим разработчика.
- Откройте приложение «Параметры» нажав сочетание клавиш Win+I.
- Перейдите в раздел «Обновление и безопасность» → «Для Разработчиков».
- Включите параметр «Режим разработчика».
- Windows покажет уведомление, информирующее вас об опасностях включения режима разработчика. Примите приглашение, выбрав «Да».
- При необходимости перезагрузите компьютер.
или
Установить .appx с помощью Установщика приложений.
Установщик приложений — это бесплатное приложение Microsoft, созданное для конкретной цели установки приложений APPX в Windows 10.
- После того, как вы загрузили нужный файл в формате .appx. Дважды кликните на нем, чтобы установить приложение. Файл EAppxBundle используется для обновления приложения.
- Windows 10 откроет окно установки, нажмите на кнопку «Установить».
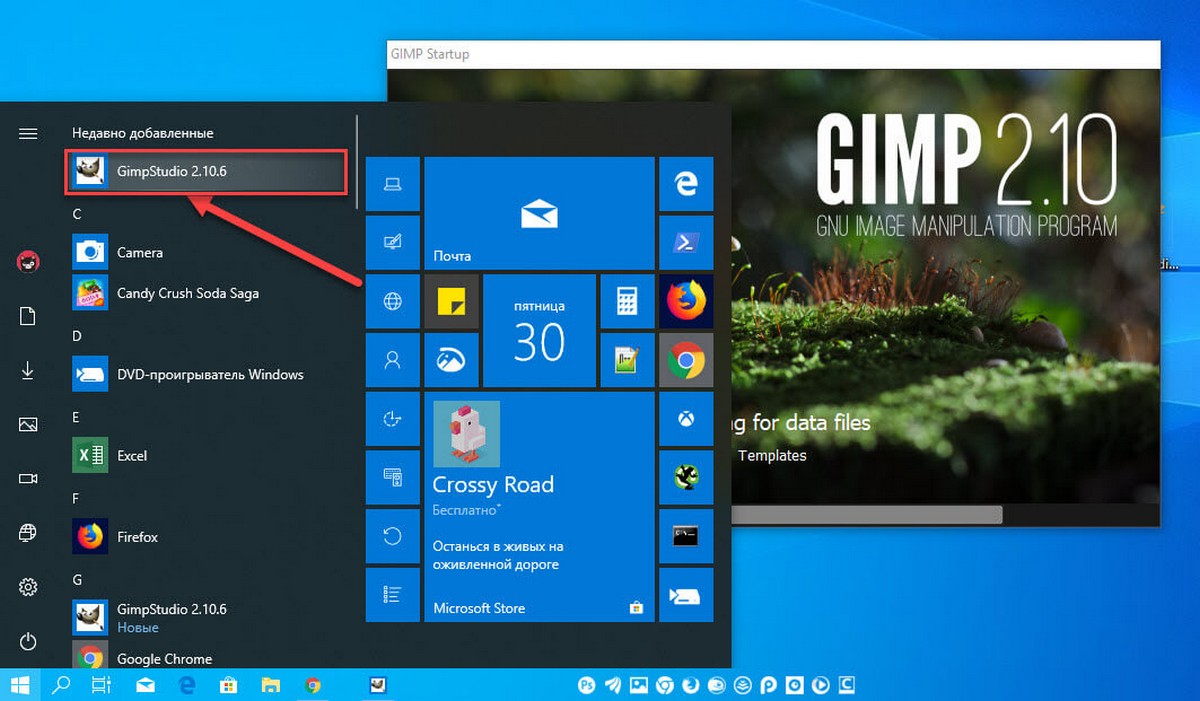
- После завершения установки, система автоматически запустит установленное UWP приложение.
Приложение будет установлено на вашем устройстве. Если вы все сделали правильно, вы сможете открыть приложение .appx, как и любую другую программу из меню «Пуск». Проверьте список установленных приложений в Microsoft Storе, вы заметите, что оно ведет себя также как любое другое приложение, установленное из Магазина.
Если вы хотите удалить установленное приложение, кликните правой кнопкой мыши на приложение, и выберите в контекстном меню опцию «Удалить». Процесс удаления .appx приложений не отличается от любого другого приложения в Windows 10.
Установка файла .appx с помощью PowerShell
В качестве альтернативы, вы можете установить заранее загруженное приложение .appx с помощью PowerShell.
- Откройте папку в которой находится .appx файл.
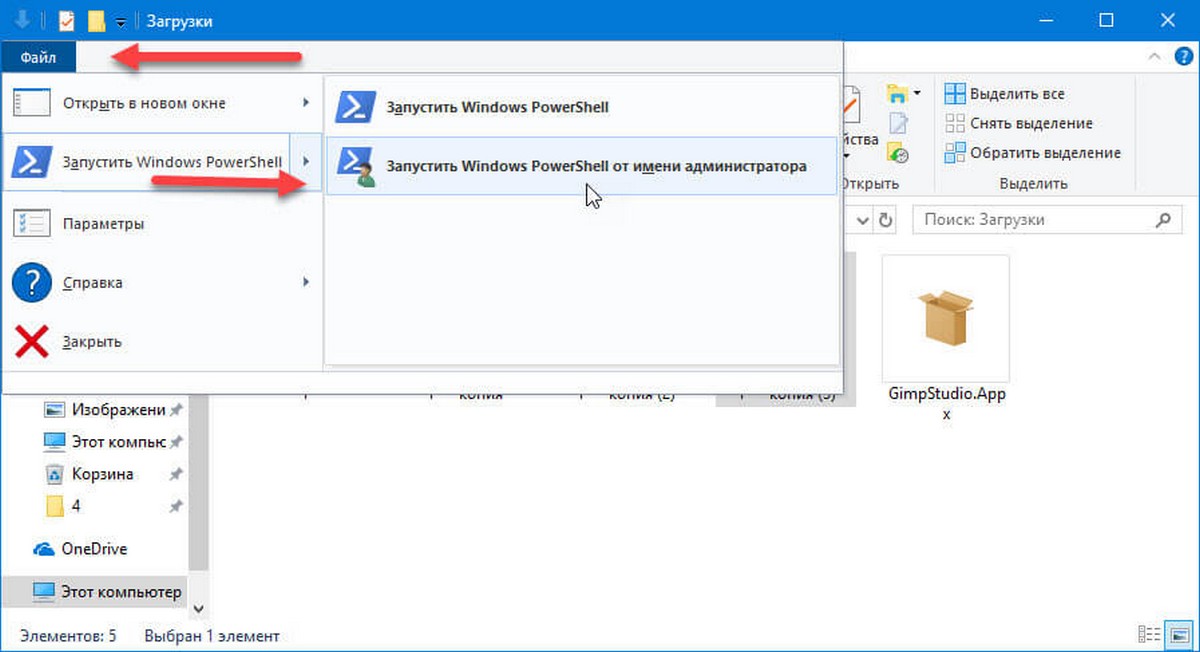
В моем случае это «C:\Users\Almanex\Downloads», кликните вкладку «Файл» и перейдите в выпадающем меню «Запустить Windows PowerShell» → «Запустить Windows PowerShell от имени администратора» см. картинку ниже.
2. Дальше вы должны использовать команду, чтобы установить .appx файл. Не забудьте изменить название файла «имя.appx» на ваше.
Add-AppxPackage .\имя.appx
или
Add-AppxPackage -Path .\имя.appx
После выполнения одной из команд, приложение будет установлено, вы не получите сообщение о успешной установке, само приложение вы найдете в меню «Пуск».
Итог
Установить приложение / файл APPX так же просто, как установить исполняемый файл. Вам нужно будет дважды кликнуть по нему, чтобы начать установку. Если вы не можете получить Установщик приложений или не можете установить приложение по какой-либо причине, используйте PowerShell.
Если вы знаете другой способ установки .appx приложений в Windows 10, поделитесь с нами в комментариях ниже.
Опция загрузки приложений полезна в некоторых ситуациях, например, когда необходимо установить приложения на несколько компьютеров, но вы не хотите каждый раз загружать его из магазина. Другим не менее интересным вариантом является возможность загрузки приложений из других каналов, например «Fast Ring», если вы находитесь в «Retail».
Рекомендуем: Как использовать winget для установки приложений из магазина Microsoft Store
Вместе с операционной системой Windows 10 компания Microsoft представила новую архитектуру под названием «Универсальная платформа Windows» (UWP), которая должна объединить роботу приложений на разных устройствах, например, компьютере и смартфоне.
Все приложения универсальной платформы Windows используют формат «.appx» или «.appxbundle». Особенность приложений UWP заключается в том, что Windows управляет процессом установки и удаления, поэтому вам не придется беспокоиться о каких-либо оставшихся файлах или записей в реестре.
Как правило, вы можете скачать UWP приложения непосредственно из Магазина Windows Store. Но также вы имеет возможность загрузить .appx файлы напрямую с сайта разработчика. В этой статье мы расскажем как установить .appx файл в Windows 10.
Включить неопубликованные приложения
Перед тем, как установить приложение в формате .appx на компьютер Windows 10, вам необходимо включить соответствующую функцию в настройках система. На многих компьютерах эта функция включена по умолчанию, но на всякий случай стоит проверить.
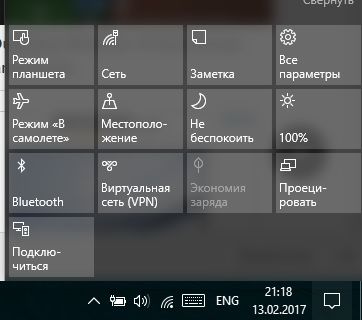
1. Нажмите на значок уведомлений в панели задач, а затем выберите опцию «Все параметры».
2. Дальше перейдите в раздел «Обновление и безопасность».
3. В меню слева нажмите на «Для разработчиков».
4. Выберите опцию «Неопубликованные приложения».
Теперь вы готовы установить .appx файл на компьютер Windows 10.
Установить .appx файл двойным щелчком
1. После того, как вы скачали файл в формате .appx, нажмите на него дважды, чтобы установить. Например, я буду устанавливать .appx файл CrystalDiskMark.
2. Так как Windows использует свою собственную программу установки, просто нажмите на кнопку «Установить», чтобы начать процедуру установки.
3. Как вы можете видеть на картинке выше, Windows показывает вам, какие возможности предлагает то или иное приложение.
4. После того, как установка будет завершена, нажмите на кнопку «Старт», чтобы запустить установленное приложение UWP.
Если все пройдет гладко, тогда вы сможете запустить приложение .appx, как и любую другую программу из Магазина Windows.
Если вы хотите удалить загруженное приложение, вам следует нажать на Пуск, щелкнуть правой кнопкой мыши на приложение, а затем выбрать опцию «Удалить». В целом, процесс удаления .appx приложения не отличается от любого другого приложения на Windows 10.
Установить .appx файл через PowerShell
В качестве альтернативы, вы можете использовать PowerShell для установки .appx файлов.
1. Откройте меню Пуск, в поиске наберите PowerShell, щелкните правой кнопкой мыши на нем, а затем выберите опцию «Запустить от имени администратора».
2. В окне PowerShell перейдите к местоположению .appx файла на вашем компьютере. В нашем случае это D:\Downloads, но вы должны использовать свой адрес. Команда, чтобы перейти к местоположению следующая:
cd D:\Downloads
3. Дальше вы должны использовать команду ниже, чтобы установить .appx файл. Опять же, не забудьте заменить наше название файла «file.appx» на ваше.
Add-AppxPackage .\file.appx
4. Также вы можете использовать еще одну команду, чтобы установить .appx приложение:
Add-AppxPackage -Path .\file.appx
Как только вы запустите одну из команд, приложение в формате .appx будет установлено. Вы не получите сообщение в окне PowerShell об успешной установке, но вы можете найти установленное приложение через пуск.
Если у вас остались вопросы по теме как установить .appx файл на компьютер Windows 10, напишите в комментариях ниже. Также мы будет рады услышать про другие способы установки .appx приложений на компьютер.
Загрузка…
Do you have a bare version of windows LTSC or highly stripped out ISO image that doesn’t have the Microsoft Store? This is the guide to show you how to install appx and other apps without it.
Winget Installation
Using the powershell and a couple projects we can install winget. You need the Microsoft sanctioned script repository called PSGallery. It has some system admin scripts that are clutch when all you have is powershell.
<#PSScriptInfo
.VERSION 3.0.0
.GUID 3b581edb-5d90-4fa1-ba15-4f2377275463
.AUTHOR asheroto, 1ckov, MisterZeus, ChrisTitusTech
.COMPANYNAME asheroto
.TAGS PowerShell Windows winget win get install installer fix script setup
.PROJECTURI https://github.com/asheroto/winget-install
.RELEASENOTES
[Version 0.0.1] - Initial Release.
[Version 0.0.2] - Implemented function to get the latest version of winget and its license.
[Version 0.0.3] - Signed file for PSGallery.
[Version 0.0.4] - Changed URI to grab latest release instead of releases and preleases.
[Version 0.0.5] - Updated version number of dependencies.
[Version 1.0.0] - Major refactor code, see release notes for more information.
[Version 1.0.1] - Fixed minor bug where version 2.8 was hardcoded in URL.
[Version 1.0.2] - Hardcoded UI Xaml version 2.8.4 as a failsafe in case the API fails. Added CheckForUpdates, Version, Help functions. Various bug fixes.
[Version 1.0.3] - Added error message to catch block. Fixed bug where appx package was not being installed.
[Version 1.0.4] - MisterZeus optimized code for readability.
[Version 2.0.0] - Major refactor. Reverted to UI.Xaml 2.7.3 for stability. Adjusted script to fix install issues due to winget changes (thank you ChrisTitusTech). Added in all architecture support.
[Version 2.0.1] - Renamed repo and URL references from winget-installer to winget-install. Added extra space after the last line of output.
[Version 2.0.2] - Adjusted CheckForUpdates to include Install-Script instructions and extra spacing.
[Version 2.1.0] - Added alternate method/URL for dependencies in case the main URL is down. Fixed licensing issue when winget is installed on Server 2022.
[Version 2.1.1] - Switched primary/alternate methods. Added Cleanup function to avoid errors when cleaning up temp files. Added output of URL for alternate method. Suppressed Add-AppxProvisionedPackage output. Improved success message. Improved verbiage. Improve PS script comments. Added check if the URL is empty. Moved display of URL beneath the check.
[Version 3.0.0] - Major changes. Added OS version detection checks - detects OS version, release ID, ensures compatibility. Forces older file installation for Server 2022 to avoid issues after installing. Added DebugMode, DisableCleanup, Force. Renamed CheckForUpdates to CheckForUpdate. Improved output. Improved error handling. Improved comments. Improved code readability. Moved CheckForUpdate into function. Added PowerShellGalleryName. Renamed Get-OSVersion to Get-OSInfo. Moved architecture detection into Get-OSInfo. Renamed Get-NewestLink to Get-WingetDownloadUrl. Have Get-WingetDownloadUrl not get preview releases.
#>
<#
.SYNOPSIS
Downloads and installs the latest version of winget and its dependencies. Updates the PATH variable if needed.
.DESCRIPTION
Downloads and installs the latest version of winget and its dependencies. Updates the PATH variable if needed.
This script is designed to be straightforward and easy to use, removing the hassle of manually downloading, installing, and configuring winget. To make the newly installed winget available for use, a system reboot may be required after running the script.
This function should be run with administrative privileges.
.EXAMPLE
winget-install
.PARAMETER DebugMode
Enables debug mode, which shows additional information for debugging.
.PARAMETER DisableCleanup
Disables cleanup of the script and prerequisites after installation.
.PARAMETER Force
Ensures installation of winget and its dependencies, even if already present.
.PARAMETER CheckForUpdate
Checks if there is an update available for the script.
.PARAMETER Version
Displays the version of the script.
.PARAMETER Help
Displays the full help information for the script.
.NOTES
Version : 3.0.0
Created by : asheroto
.LINK
Project Site: https://github.com/asheroto/winget-install
#>
[CmdletBinding()]
param (
[switch]$Version,
[switch]$Help,
[switch]$CheckForUpdate,
[switch]$DisableCleanup,
[switch]$DebugMode,
[switch]$Force
)
# Version
$CurrentVersion = '3.0.0'
$RepoOwner = 'asheroto'
$RepoName = 'winget-install'
$PowerShellGalleryName = 'winget-install'
# Versions
$ProgressPreference = 'SilentlyContinue' # Suppress progress bar (makes downloading super fast)
$ConfirmPreference = 'None' # Suppress confirmation prompts
# Display version if -Version is specified
if ($Version.IsPresent) {
$CurrentVersion
exit 0
}
# Display full help if -Help is specified
if ($Help) {
Get-Help -Name $MyInvocation.MyCommand.Source -Full
exit 0
}
# Display $PSVersionTable and Get-Host if -Verbose is specified
if ($PSBoundParameters.ContainsKey('Verbose') -and $PSBoundParameters['Verbose']) {
$PSVersionTable
Get-Host
}
function Get-TempFolder {
<#
.SYNOPSIS
Gets the path of the current user's temp folder.
.DESCRIPTION
This function retrieves the path of the current user's temp folder.
.EXAMPLE
Get-TempFolder
#>
return [System.IO.Path]::GetTempPath()
}
function Get-OSInfo {
<#
.SYNOPSIS
Retrieves detailed information about the operating system version and architecture.
.DESCRIPTION
This function queries both the Windows registry and the Win32_OperatingSystem class to gather comprehensive information about the operating system. It returns details such as the release ID, display version, name, type (Workstation/Server), numeric version, edition ID, version (object that includes major, minor, and build numbers), and architecture (OS architecture, not processor architecture).
.EXAMPLE
Get-OSInfo
This example retrieves the OS version details of the current system and returns an object with properties like ReleaseId, DisplayVersion, Name, Type, NumericVersion, EditionId, Version, and Architecture.
.EXAMPLE
(Get-OSInfo).Version.Major
This example retrieves the major version number of the operating system. The Get-OSInfo function returns an object with a Version property, which itself is an object containing Major, Minor, and Build properties. You can access these sub-properties using dot notation.
.EXAMPLE
$osDetails = Get-OSInfo
Write-Output "OS Name: $($osDetails.Name)"
Write-Output "OS Type: $($osDetails.Type)"
Write-Output "OS Architecture: $($osDetails.Architecture)"
This example stores the result of Get-OSInfo in a variable and then accesses various properties to print details about the operating system.
#>
[CmdletBinding()]
param ()
try {
# Get registry values
$registryValues = Get-ItemProperty "HKLM:\SOFTWARE\Microsoft\Windows NT\CurrentVersion"
$releaseIdValue = $registryValues.ReleaseId
$displayVersionValue = $registryValues.DisplayVersion
$nameValue = $registryValues.ProductName
$editionIdValue = $registryValues.EditionId
# Strip out "Server" from the $editionIdValue if it exists
$editionIdValue = $editionIdValue -replace "Server", ""
# Get OS details using Get-CimInstance because the registry key for Name is not always correct with Windows 11
$osDetails = Get-CimInstance -ClassName Win32_OperatingSystem
$nameValue = $osDetails.Caption
# Get architecture details of the OS (not the processor)
$architecture = $osDetails.OSArchitecture
# If 32-bit or 64-bit replace with x32 and x64
if ($architecture -eq "32-bit") {
$architecture = "x32"
} elseif ($architecture -eq "64-bit") {
$architecture = "x64"
}
# Get OS version details (as version object)
$versionValue = [System.Environment]::OSVersion.Version
# Determine product type
# Reference: https://learn.microsoft.com/en-us/dotnet/api/microsoft.powershell.commands.producttype?view=powershellsdk-1.1.0
if ($osDetails.ProductType -eq 1) {
$typeValue = "Workstation"
} elseif ($osDetails.ProductType -eq 2 -or $osDetails.ProductType -eq 3) {
$typeValue = "Server"
} else {
$typeValue = "Unknown"
}
# Extract numerical value from Name
$numericVersion = ($nameValue -replace "[^\d]").Trim()
# Create and return custom object with the required properties
$result = [PSCustomObject]@{
ReleaseId = $releaseIdValue
DisplayVersion = $displayVersionValue
Name = $nameValue
Type = $typeValue
NumericVersion = $numericVersion
EditionId = $editionIdValue
Version = $versionValue
Architecture = $architecture
}
return $result
} catch {
Write-Error "Unable to get OS version details.`nError: $_"
exit 1
}
}
function Get-GitHubRelease {
<#
.SYNOPSIS
Fetches the latest release information of a GitHub repository.
.DESCRIPTION
This function uses the GitHub API to get information about the latest release of a specified repository, including its version and the date it was published.
.PARAMETER Owner
The GitHub username of the repository owner.
.PARAMETER Repo
The name of the repository.
.EXAMPLE
Get-GitHubRelease -Owner "asheroto" -Repo "winget-install"
This command retrieves the latest release version and published datetime of the winget-install repository owned by asheroto.
#>
[CmdletBinding()]
param (
[string]$Owner,
[string]$Repo
)
try {
$url = "https://api.github.com/repos/$Owner/$Repo/releases/latest"
$response = Invoke-RestMethod -Uri $url -ErrorAction Stop
$latestVersion = $response.tag_name
$publishedAt = $response.published_at
# Convert UTC time string to local time
$UtcDateTime = [DateTime]::Parse($publishedAt, [System.Globalization.CultureInfo]::InvariantCulture, [System.Globalization.DateTimeStyles]::RoundtripKind)
$PublishedLocalDateTime = $UtcDateTime.ToLocalTime()
[PSCustomObject]@{
LatestVersion = $latestVersion
PublishedDateTime = $PublishedLocalDateTime
}
} catch {
Write-Error "Unable to check for updates.`nError: $_"
exit 1
}
}
function CheckForUpdate {
param (
[string]$RepoOwner,
[string]$RepoName,
[version]$CurrentVersion,
[string]$PowerShellGalleryName
)
$Data = Get-GitHubRelease -Owner $RepoOwner -Repo $RepoName
if ($Data.LatestVersion -gt $CurrentVersion) {
Write-Output "`nA new version of $RepoName is available.`n"
Write-Output "Current version: $CurrentVersion."
Write-Output "Latest version: $($Data.LatestVersion)."
Write-Output "Published at: $($Data.PublishedDateTime).`n"
Write-Output "You can download the latest version from https://github.com/$RepoOwner/$RepoName/releases`n"
if ($PowerShellGalleryName) {
Write-Output "Or you can run the following command to update:"
Write-Output "Install-Script $PowerShellGalleryName -Force`n"
}
} else {
Write-Output "`n$RepoName is up to date.`n"
Write-Output "Current version: $CurrentVersion."
Write-Output "Latest version: $($Data.LatestVersion)."
Write-Output "Published at: $($Data.PublishedDateTime)."
Write-Output "`nRepository: https://github.com/$RepoOwner/$RepoName/releases`n"
}
exit 0
}
function Write-Section($text) {
<#
.SYNOPSIS
Prints a text block surrounded by a section divider for enhanced output readability.
.DESCRIPTION
This function takes a string input and prints it to the console, surrounded by a section divider made of hash characters.
It is designed to enhance the readability of console output.
.PARAMETER text
The text to be printed within the section divider.
.EXAMPLE
Write-Section "Downloading Files..."
This command prints the text "Downloading Files..." surrounded by a section divider.
#>
Write-Output ""
Write-Output ("#" * ($text.Length + 4))
Write-Output "# $text #"
Write-Output ("#" * ($text.Length + 4))
Write-Output ""
}
function Get-WingetDownloadUrl {
<#
.SYNOPSIS
Retrieves the download URL of the latest release asset that matches a specified pattern from the GitHub repository.
.DESCRIPTION
This function uses the GitHub API to get information about the latest release of the winget-cli repository.
It then retrieves the download URL for the release asset that matches a specified pattern.
.PARAMETER Match
The pattern to match in the asset names.
.EXAMPLE
Get-WingetDownloadUrl "msixbundle"
This command retrieves the download URL for the latest release asset with a name that contains "msixbundle".
#>
[CmdletBinding()]
param (
[Parameter(Mandatory = $true)]
[string]$Match
)
$uri = "https://api.github.com/repos/microsoft/winget-cli/releases"
Write-Debug "Getting information from $uri"
$releases = Invoke-RestMethod -uri $uri -Method Get -ErrorAction stop
Write-Debug "Getting latest release..."
foreach ($release in $releases) {
if ($release.name -match "preview") {
continue
}
$data = $release.assets | Where-Object name -Match $Match
if ($data) {
return $data.browser_download_url
}
}
Write-Debug "Falling back to the latest release..."
$latestRelease = $releases | Select-Object -First 1
$data = $latestRelease.assets | Where-Object name -Match $Match
return $data.browser_download_url
}
function Get-WingetStatus {
<#
.SYNOPSIS
Checks if winget is installed.
.DESCRIPTION
This function checks if winget is installed.
.EXAMPLE
Get-WingetStatus
#>
# Check if winget is installed
$winget = Get-Command -Name winget -ErrorAction SilentlyContinue
# If winget is installed, return $true
if ($null -ne $winget) {
return $true
}
# If winget is not installed, return $false
return $false
}
function Update-PathEnvironmentVariable {
<#
.SYNOPSIS
Updates the PATH environment variable with a new path for both the User and Machine levels.
.DESCRIPTION
The function will add a new path to the PATH environment variable, making sure it is not a duplicate.
If the new path is already in the PATH variable, the function will skip adding it.
This function operates at both User and Machine levels.
.PARAMETER NewPath
The new directory path to be added to the PATH environment variable.
.EXAMPLE
Update-PathEnvironmentVariable -NewPath "C:\NewDirectory"
This command will add the directory "C:\NewDirectory" to the PATH variable at both the User and Machine levels.
#>
param(
[string]$NewPath
)
foreach ($Level in "Machine", "User") {
# Get the current PATH variable
$path = [Environment]::GetEnvironmentVariable("PATH", $Level)
# Check if the new path is already in the PATH variable
if (!$path.Contains($NewPath)) {
if ($DebugMode) {
Write-Output "Adding $NewPath to PATH variable for $Level..."
} else {
Write-Output "Adding PATH variable for $Level..."
}
# Add the new path to the PATH variable
$path = ($path + ";" + $NewPath).Split(';') | Select-Object -Unique
$path = $path -join ';'
# Set the new PATH variable
[Environment]::SetEnvironmentVariable("PATH", $path, $Level)
} else {
if ($DebugMode) {
Write-Output "$NewPath already present in PATH variable for $Level, skipping."
} else {
Write-Output "PATH variable already present for $Level, skipping."
}
}
}
}
function Handle-Error {
<#
.SYNOPSIS
Handles common errors that may occur during an installation process.
.DESCRIPTION
This function takes an ErrorRecord object and checks for certain known error codes.
Depending on the error code, it writes appropriate warning messages or throws the error.
.PARAMETER ErrorRecord
The ErrorRecord object that represents the error that was caught. This object contains
information about the error, including the exception that was thrown.
.EXAMPLE
try {
# Some code that may throw an error...
} catch {
Handle-Error $_
}
This example shows how you might use the Handle-Error function in a try-catch block.
If an error occurs in the try block, the catch block catches it and calls Handle-Error,
passing the error (represented by the $_ variable) to the function.
#>
param($ErrorRecord)
# Store current value
$OriginalErrorActionPreference = $ErrorActionPreference
# Set to silently continue
$ErrorActionPreference = 'SilentlyContinue'
if ($ErrorRecord.Exception.Message -match '0x80073D06') {
Write-Warning "Higher version already installed."
Write-Warning "That's okay, continuing..."
} elseif ($ErrorRecord.Exception.Message -match '0x80073CF0') {
Write-Warning "Same version already installed."
Write-Warning "That's okay, continuing..."
} elseif ($ErrorRecord.Exception.Message -match '0x80073D02') {
# Stop execution and return the ErrorRecord so that the calling try/catch block throws the error
Write-Warning "Resources modified are in-use. Try closing Windows Terminal / PowerShell / Command Prompt and try again."
Write-Warning "If the problem persists, restart your computer."
return $ErrorRecord
} elseif ($ErrorRecord.Exception.Message -match 'Unable to connect to the remote server') {
Write-Warning "Cannot connect to the Internet to download the required files."
Write-Warning "Try running the script again and make sure you are connected to the Internet."
Write-Warning "Sometimes the nuget.org server is down, so you may need to try again later."
return $ErrorRecord
} elseif ($ErrorRecord.Exception.Message -match "The remote name could not be resolved") {
Write-Warning "Cannot connect to the Internet to download the required files."
Write-Warning "Try running the script again and make sure you are connected to the Internet."
Write-Warning "Make sure DNS is working correctly on your computer."
} else {
# For other errors, we should stop the execution and return the ErrorRecord so that the calling try/catch block throws the error
return $ErrorRecord
}
# Reset to original value
$ErrorActionPreference = $OriginalErrorActionPreference
}
function Cleanup {
<#
.SYNOPSIS
Deletes a file or directory specified without prompting for confirmation or displaying errors.
.DESCRIPTION
This function takes a path to a file or directory and deletes it without prompting for confirmation or displaying errors.
If the path is a directory, the function will delete the directory and all its contents.
.PARAMETER Path
The path of the file or directory to be deleted.
.PARAMETER Recurse
If the path is a directory, this switch specifies whether to delete the directory and all its contents.
.EXAMPLE
Cleanup -Path "C:\Temp"
This example deletes the directory "C:\Temp" and all its contents.
.EXAMPLE
Cleanup -Path "C:\Temp" -Recurse
This example deletes the directory "C:\Temp" and all its contents.
.EXAMPLE
Cleanup -Path "C:\Temp\file.txt"
This example deletes the file "C:\Temp\file.txt".
#>
param (
[string]$Path,
[switch]$Recurse
)
try {
if (Test-Path -Path $Path) {
if ($Recurse -and (Get-Item -Path $Path) -is [System.IO.DirectoryInfo]) {
Get-ChildItem -Path $Path -Recurse | Remove-Item -Force -Recurse
Remove-Item -Path $Path -Force -Recurse
} else {
Remove-Item -Path $Path -Force
}
}
if ($DebugMode) {
Write-Output "Deleted: $Path"
}
} catch {
# Errors are ignored
}
}
function Install-Prerequisite {
<#
.SYNOPSIS
Downloads and installs a prerequisite for winget.
.DESCRIPTION
This function takes a name, version, URL, alternate URL, content type, and body and downloads and installs the prerequisite.
.PARAMETER Name
The name of the prerequisite.
.PARAMETER Version
The version of the prerequisite.
.PARAMETER Url
The URL of the prerequisite.
.PARAMETER AlternateUrl
The alternate URL of the prerequisite.
.PARAMETER ContentType
The content type of the prerequisite.
.PARAMETER Body
The body of the prerequisite.
.PARAMETER NupkgVersion
The nupkg version of the prerequisite.
.PARAMETER AppxFileVersion
The appx file version of the prerequisite.
.EXAMPLE
Install-Prerequisite -Name "VCLibs" -Version "14.00" -Url "https://store.rg-adguard.net/api/GetFiles" -AlternateUrl "https://aka.ms/Microsoft.VCLibs.$arch.14.00.Desktop.appx" -ContentType "application/x-www-form-urlencoded" -Body "type=PackageFamilyName&url=Microsoft.VCLibs.140.00_8wekyb3d8bbwe&ring=RP&lang=en-US"
Where $arch is the architecture type of the current system.
#>
param (
[string]$Name,
[string]$Url,
[string]$AlternateUrl,
[string]$ContentType,
[string]$Body,
[string]$NupkgVersion,
[string]$AppxFileVersion
)
$osVersion = Get-OSInfo
$arch = $osVersion.Architecture
Write-Section "Downloading & installing ${arch} ${Name}..."
$ThrowReason = @{
Message = ""
Code = 0
}
try {
# ============================================================================ #
# Windows 10 / Server 2022 detection
# ============================================================================ #
# Function to extract domain from URL
function Get-DomainFromUrl($url) {
$uri = [System.Uri]$url
$domain = $uri.Host -replace "^www\."
return $domain
}
# If Server 2022 or Windows 10, force non-store version of VCLibs (return true)
$messageTemplate = "{OS} detected. Using {DOMAIN} version of {NAME}."
# Determine the OS-specific information
$osType = $osVersion.Type
$osNumericVersion = $osVersion.NumericVersion
if (($osType -eq "Server" -and $osNumericVersion -eq 2022) -or ($osType -eq "Workstation" -and $osNumericVersion -eq 10)) {
if ($osType -eq "Server") {
$osName = "Server 2022"
} else {
$osName = "Windows 10"
}
$domain = Get-DomainFromUrl $AlternateUrl
$ThrowReason.Message = ($messageTemplate -replace "{OS}", $osName) -replace "{NAME}", $Name -replace "{DOMAIN}", $domain
$ThrowReason.Code = 1
throw
}
# ============================================================================ #
# Primary method
# ============================================================================ #
$url = Invoke-WebRequest -Uri $Url -Method "POST" -ContentType $ContentType -Body $Body -UseBasicParsing | ForEach-Object Links | Where-Object outerHTML -match "$Name.+_${arch}__8wekyb3d8bbwe.appx" | ForEach-Object href
# If the URL is empty, try the alternate method
if ($url -eq "") {
$ThrowReason.Message = "URL is empty"
$ThrowReason.Code = 2
throw
}
Write-Output "URL: ${url}"
Write-Output "`nInstalling ${arch} ${Name}..."
Add-AppxPackage $url -ErrorAction Stop
Write-Output "`n$Name installed successfully."
} catch {
# Alternate method
try {
$url = $AlternateUrl
# Throw reason if alternate method is required
if ($ThrowReason.Code -eq 0) {
Write-Warning "Error when trying to download or install $Name. Trying alternate method..."
} else {
Write-Warning $ThrowReason.Message
}
Write-Output ""
# If the URL is empty, throw error
if ($url -eq "") {
throw "URL is empty"
}
# Specific logic for VCLibs alternate method
if ($Name -eq "VCLibs") {
if ($DebugMode) {
Write-Output "URL: $($url)`n"
}
Write-Output "Installing ${arch} ${Name}..."
Add-AppxPackage $url -ErrorAction Stop
Write-Output "`n$Name installed successfully."
}
# Specific logic for UI.Xaml
if ($Name -eq "UI.Xaml") {
$TempFolder = Get-TempFolder
$uiXaml = @{
url = $url
appxFolder = "tools/AppX/$arch/Release/"
appxFilename = "Microsoft.UI.Xaml.$AppxFileVersion.appx"
nupkgFilename = Join-Path -Path $TempFolder -ChildPath "Microsoft.UI.Xaml.$NupkgVersion.nupkg"
nupkgFolder = Join-Path -Path $TempFolder -ChildPath "Microsoft.UI.Xaml.$NupkgVersion"
}
# Debug
if ($DebugMode) {
$formattedDebugOutput = ($uiXaml | ConvertTo-Json -Depth 10 -Compress) -replace '\\\\', '\'
Write-Output "uiXaml:"
Write-Output $formattedDebugOutput
Write-Output ""
}
# Downloading
Write-Output "Downloading UI.Xaml..."
if ($DebugMode) {
Write-Output "URL: $($uiXaml.url)"
}
Invoke-WebRequest -Uri $uiXaml.url -OutFile $uiXaml.nupkgFilename
# Check if folder exists and delete if needed (will occur whether DisableCleanup is $true or $false)
Cleanup -Path $uiXaml.nupkgFolder -Recurse
# Extracting
Write-Output "Extracting...`n"
if ($DebugMode) {
Write-Output "Into folder: $($uiXaml.nupkgFolder)`n"
}
Add-Type -Assembly System.IO.Compression.FileSystem
[IO.Compression.ZipFile]::ExtractToDirectory($uiXaml.nupkgFilename, $uiXaml.nupkgFolder)
# Prep for install
Write-Output "Installing ${arch} ${Name}..."
$XamlAppxFolder = Join-Path -Path $uiXaml.nupkgFolder -ChildPath $uiXaml.appxFolder
$XamlAppxPath = Join-Path -Path $XamlAppxFolder -ChildPath $uiXaml.appxFilename
# Debugging
if ($DebugMode) { Write-Output "Installing appx Packages in: $XamlAppxFolder" }
# Install
Get-ChildItem -Path $XamlAppxPath -Filter *.appx | ForEach-Object {
if ($DebugMode) { Write-Output "Installing appx Package: $($_.Name)" }
Add-AppxPackage $_.FullName -ErrorAction Stop
}
Write-Output "`nUI.Xaml installed successfully."
# Cleanup
if ($DisableCleanup -eq $false) {
if ($DebugMode) { Write-Output "" } # Extra line break for readability if DebugMode is enabled
Cleanup -Path $uiXaml.nupkgFilename
Cleanup -Path $uiXaml.nupkgFolder -Recurse $true
}
}
} catch {
# If unable to connect to remote server and Windows 10 or Server 2022, display warning message
$ShowOldVersionMessage = $False
if ($_.Exception.Message -match "Unable to connect to the remote server") {
# Determine the correct Windows caption and set $ShowOutput to $True if conditions are met
if ($osVersion.Type -eq "Workstation" -and $osVersion.NumericVersion -eq 10) {
$WindowsCaption = "Windows 10"
$ShowOldVersionMessage = $True
} elseif ($osVersion.Type -eq "Server" -and $osVersion.NumericVersion -eq 2022) {
$WindowsCaption = "Server 2022"
$ShowOldVersionMessage = $True
}
# Output the warning message if $ShowOldVersionMessage is $True, otherwise output the generic error message
if ($ShowOldVersionMessage) {
$OldVersionMessage = "There is an issue connecting to the server to download $Name. Unfortunately this is a known issue with the prerequisite server URLs - sometimes they are down. Since you're using $WindowsCaption you must use the non-store versions of the prerequisites, the prerequisites from the Windows store will not work, so you may need to try again later or install manually."
Write-Warning $OldVersionMessage
} else {
Write-Warning "Error when trying to download or install $Name. Please try again later or manually install $Name."
}
}
$errorHandled = Handle-Error $_
if ($null -ne $errorHandled) {
throw $errorHandled
}
$errorHandled = $null
}
}
}
# ============================================================================ #
# Initial checks
# ============================================================================ #
# Check for updates if -CheckForUpdate is specified
if ($CheckForUpdate) {
CheckForUpdate -RepoOwner $RepoOwner -RepoName $RepoName -CurrentVersion $CurrentVersion -PowerShellGalleryName $PowerShellGalleryName
}
# Heading
Write-Output "winget-install $CurrentVersion"
# Set OS version
$osVersion = Get-OSInfo
# Set architecture type
$arch = $osVersion.Architecture
# If it's a workstation, make sure it is Windows 10+
if ($osVersion.Type -eq "Workstation" -and $osVersion.NumericVersion -lt 10) {
Write-Error "winget is only compatible with Windows 10 or greater."
exit 1
}
# If it's a workstation with Windows 10, make sure it's version 1809 or greater
if ($osVersion.Type -eq "Workstation" -and $osVersion.NumericVersion -eq 10 -and $osVersion.ReleaseId -lt 1809) {
Write-Error "winget is only compatible with Windows 10 version 1809 or greater."
exit 1
}
# If it's a server, it needs to be 2022+
if ($osVersion.Type -eq "Server" -and $osVersion.NumericVersion -lt 2022) {
Write-Error "winget is only compatible with Windows Server 2022+."
exit 1
}
# Check if winget is already installed
if (Get-WingetStatus) {
if ($Force -eq $false) {
Write-Output "winget is already installed, exiting..."
exit 0
}
}
# ============================================================================ #
# Beginning of installation process
# ============================================================================ #
try {
# ============================================================================ #
# Install prerequisites
# ============================================================================ #
# VCLibs
Install-Prerequisite -Name "VCLibs" -Version "14.00" -Url "https://store.rg-adguard.net/api/GetFiles" -AlternateUrl "https://aka.ms/Microsoft.VCLibs.$arch.14.00.Desktop.appx" -ContentType "application/x-www-form-urlencoded" -Body "type=PackageFamilyName&url=Microsoft.VCLibs.140.00_8wekyb3d8bbwe&ring=RP&lang=en-US"
# UI.Xaml
Install-Prerequisite -Name "UI.Xaml" -Version "2.7.3" -Url "https://store.rg-adguard.net/api/GetFiles" -AlternateUrl "https://www.nuget.org/api/v2/package/Microsoft.UI.Xaml/2.7.3" -ContentType "application/x-www-form-urlencoded" -Body "type=ProductId&url=9P5VK8KZB5QZ&ring=RP&lang=en-US" -NupkgVersion "2.7.3" -AppxFileVersion "2.7"
# ============================================================================ #
# Install winget
# ============================================================================ #
$TempFolder = Get-TempFolder
# Output
Write-Section "Downloading & installing winget..."
Write-Output "Retrieving download URL for winget from GitHub..."
$wingetUrl = Get-WingetDownloadUrl -Match "msixbundle"
$wingetPath = Join-Path -Path $tempFolder -ChildPath "winget.msixbundle"
$wingetLicenseUrl = Get-WingetDownloadUrl -Match "License1.xml"
$wingetLicensePath = Join-Path -Path $tempFolder -ChildPath "license1.xml"
# If the URL is empty, throw error
if ($wingetUrl -eq "") {
throw "URL is empty"
}
Write-Output "Downloading winget..."
if ($DebugMode) {
Write-Output "`nURL: $wingetUrl"
Write-Output "Saving as: $wingetPath"
}
Invoke-WebRequest -Uri $wingetUrl -OutFile $wingetPath
Write-Output "Downloading license..."
if ($DebugMode) {
Write-Output "`nURL: $wingetLicenseUrl"
Write-Output "Saving as: $wingetLicensePath"
}
Invoke-WebRequest -Uri $wingetLicenseUrl -OutFile $wingetLicensePath
Write-Output "`nInstalling winget..."
# Debugging
if ($DebugMode) {
Write-Output "wingetPath: $wingetPath"
Write-Output "wingetLicensePath: $wingetLicensePath"
}
# Try to install winget
try {
# Add-AppxPackage will throw an error if the app is already installed or higher version installed, so we need to catch it and continue
Add-AppxProvisionedPackage -Online -PackagePath $wingetPath -LicensePath $wingetLicensePath -ErrorAction SilentlyContinue | Out-Null
Write-Output "`nwinget installed successfully."
} catch {
$errorHandled = Handle-Error $_
if ($null -ne $errorHandled) {
throw $errorHandled
}
$errorHandled = $null
}
# Cleanup
if ($DisableCleanup -eq $false) {
if ($DebugMode) { Write-Output "" } # Extra line break for readability if DebugMode is enabled
Cleanup -Path $wingetPath
Cleanup -Path $wingetLicensePath
}
# ============================================================================ #
# PATH environment variable
# ============================================================================ #
# Add the WindowsApps directory to the PATH variable
Write-Section "Checking and adding WindowsApps directory to PATH variable for current user if not present..."
$WindowsAppsPath = [IO.Path]::Combine([Environment]::GetEnvironmentVariable("LOCALAPPDATA"), "Microsoft", "WindowsApps")
Update-PathEnvironmentVariable -NewPath $WindowsAppsPath
# ============================================================================ #
# Finished
# ============================================================================ #
Write-Section "Installation complete!"
# Timeout for 5 seconds to check winget
Write-Output "Checking if winget is installed and working..."
Start-Sleep -Seconds 3
# Check if winget is installed
if (Get-WingetStatus -eq $true) {
Write-Output "winget is installed and working now, you can go ahead and use it."
} else {
Write-Warning "winget is installed but is not detected as a command. Try using winget now. If it doesn't work, try restarting your computer."
Write-Warning "If you restart your computer and the command still isn't recognized, please read the Troubleshooting section`nof the README: https://github.com/asheroto/winget-install#troubleshooting`n"
Write-Warning "Make sure you have the latest version of the script by running this command: $PowerShellGalleryName -CheckForUpdate"
}
} catch {
# ============================================================================ #
# Error handling
# ============================================================================ #
Write-Section "WARNING! An error occurred during installation!"
Write-Warning "If messages above don't help and the problem persists, please read the Troubleshooting section`nof the README: https://github.com/asheroto/winget-install#troubleshooting"
Write-Warning "Make sure you have the latest version of the script by running this command: $PowerShellGalleryName -CheckForUpdate"
# If it's not 0x80073D02 (resources in use), show error
if ($_.Exception.Message -notmatch '0x80073D02') {
if ($DebugMode) {
Write-Warning "Line number : $($_.InvocationInfo.ScriptLineNumber)"
}
Write-Warning "Error: $($_.Exception.Message)`n"
}
}
What this does
It grabs the script from https://www.powershellgallery.com/packages/winget-install/0.0.4 and runs it. The script itself utilizes NuGet and other tools that are in every Windows installation to install the dependancies, before retrieving the winget packages.
Why this is better
This way is far superior to other methods as most will fail in a stripped down Windows like the one made from my NTLite Build.
The package that is often missing and hard to install manually is Microsoft.UI.Xaml the typical method to install this is using NuGet Package Manager inside of Visual Studio. You can track down the exact version and appx file from Microsoft’s repository here: https://store.rg-adguard.net/, but this is overly cumbersome and why I recommend the PSGallery approach.
How to Manually get ANY Appx
Using the https://store.rg-adguard.net/ site we can snatch any appx as long as we know the package name.
Get product id from https://apps.microsoft.com/store/apps
Then grab the appx from rg-adguard AND its dependancies… like this:
Direct Download with Script
Here is quick snippit that you can toss the product id in to pull it down from PowerShell.
$apiUrl = "https://store.rg-adguard.net/api/GetFiles"

$productUrl = "https://www.microsoft.com/store/productId/9nblggh5r558" # To Do
#$productUrl = "https://www.microsoft.com/store/productId/9MSPC6MP8FM4" # Whiteboard
#$productUrl = "https://www.microsoft.com/store/productId/9WZDNCRFJBB1" # Wireless Display Adapter

$downloadFolder = Join-Path $env:TEMP "StoreDownloads"
if(!(Test-Path $downloadFolder -PathType Container)) {
    New-Item $downloadFolder -ItemType Directory -Force
}

$body = @{
    type = 'url'
    url  = $productUrl
    ring = 'RP'
    lang = 'en-US'
}

$raw = Invoke-RestMethod -Method Post -Uri $apiUrl -ContentType 'application/x-www-form-urlencoded' -Body $body

$raw | Select-String '<tr style.*<a href=\"(?<url>.*)"\s.*>(?<text>.*)<\/a>' -AllMatches|
 % { $_.Matches } |
 % {
    $url = $_.Groups[1].Value
    $text = $_.Groups[2].Value
    Write-Host $text

    if($text -match "_(x86|x64|neutral).*appx(|bundle)$") {
        $downloadFile = Join-Path $downloadFolder $text
        if(!(Test-Path $downloadFile)) {
            Invoke-WebRequest -Uri $url -OutFile $downloadFile
        }
    }
}
