Apache Tomcat which is short for “Tomcat” is a free, open-source Java Servlet, Java Expression Language, JavaServer Pages, and WebSocket implementation. Tomcat is an HTTP web server that basically runs Java code in a “pure Java” environment. Here, we will see how to install Tomcat 10 on Windows 10 from Zip Archive. Requirements are Java 8 or above must be already installed. Make sure Windows Firewall allows Tomcat application.
Installing Apache Tomcat on Windows
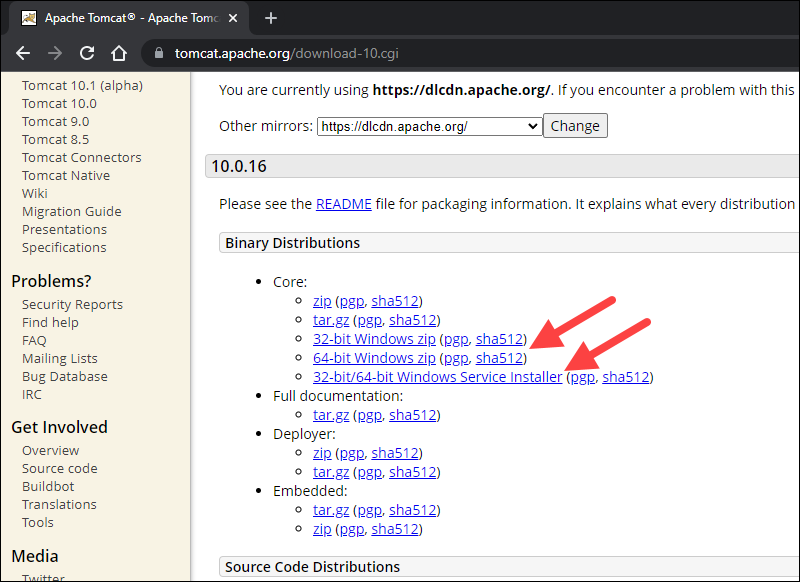
Step 1: We need to first install the Tomcat 10 zip file from this website. On the website, select the 64-bit Windows zip (PGP, sha512) in the Core section to start the download process for the Tomcat zip file.
.jpg)
Step 2: Check If JDK Is Installed. Open Command Prompt and enter the following commands
java -version
javac -version

If JDK is not installed on your computer, install JDK. In the above picture, we can see JDK is already installed on our computer.
Step 3: Unzip Tomcat 10 Zip File. Go to the location where you have downloaded the Tomcat 10 zip file. Right-click on the apache tomcat file place the cursor on 7-Zip and click on Extract Here to extract the folder.
.jpg)
Step 4: Creating JAVA_HOME Variable. Click Start then in the search bar, search for “Edit the system environment variables” and click on it. The following System Properties box will open. Select Environment Variables in the box.
.jpg)
On clicking Environment Variables the following box will open.
.png)
Step 5: We have to create a JAVA_HOME variable and insert the path of the JDK file stored in our computer, which will be shown below. So select New from the System variables in the above picture. A New System Variable box will be opened where we will have to fill in the Variable name and Variable value.
.png)
Step 6: Go to the location where you have stored the contents of the JDK file in My Computer or PC. Copy the root path of the location of the JDK file as shown below.
.jpg)
Step 7: Paste the JDK path from the above picture into the Variable value field and in the Variable name field, give the name JAVA_HOME as shown below.
.png)
Step 8: Check the Working of Tomcat. Open the extracted apache tomcat file. We will see all the following files in them. Among them open the batch file named “startup”.
.jpg)
Step 9: Check if the Startup Windows Batch File is running properly.
.jpg)
By default, the server port number is 8080.
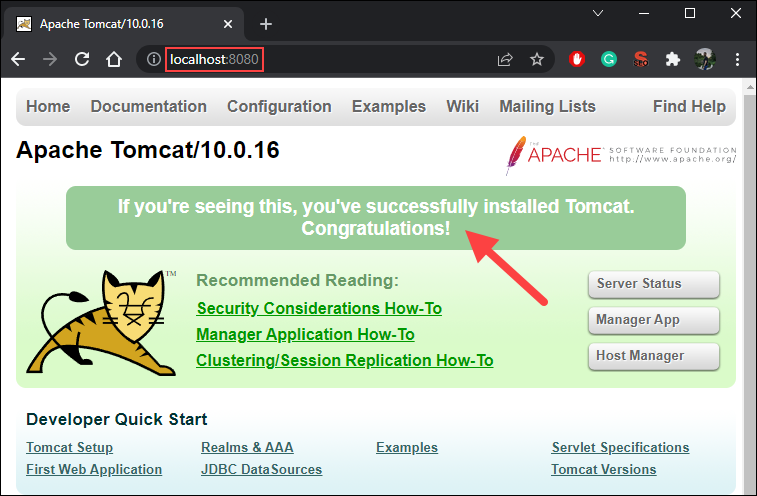
Step 10: Successful Installation of Tomcat. Our next step is to open an internet browser like Google and type in the address
http://localhost:8080
Then click enter and the following browser will appear suggesting the successful installation of Apache Tomcat.

Last Updated :
19 Jan, 2023
Like Article
Save Article
Установка Tomcat на Windows
Хотите узнать, как установить службу Tomcat на компьютер под управлением Windows? В этом учебнике мы покажем вам, как установить Tomcat на компьютер под управлением Windows.
Windows 2012 R2
• Windows 2016
— Windows 2019
Плейлист Windows:
На этой странице мы предлагаем быстрый доступ к списку видео, связанных с установкой Windows.
Не забудьте подписаться на наш канал YouTube под названием FKIT.
Windows Учебник:
На этой странице мы предлагаем быстрый доступ к списку учебников для Windows.
Учебник Tomcat — Установка требований
Получите доступ к веб-сайту Java и загрузите последнюю версию Java JDK.
В нашем примере мы скачали файл под названием: jdk-14.0.1_windows-x64_bin.exe

Запуск установки Java JDK.

Нажмите на кнопку «Следующая».

Дождитесь завершения установки Java JDK.

В нашем примере программное обеспечение Java JDK было установлено на следующем каталоге.
В качестве администраторазапустите новый запрос командной строки POWERSHELL.

Создайте переменную системной среды, названную JAVA_HOME.
Измените приведенную выше команду, чтобы отразить ваш путь установки JDK.
Теперь нам нужно редактировать переменную среды PATH.
Включите каталог Java SDK под названием BIN в переменную среды PATH.
Поздравляю! Вы закончили установку Java JDK на Windows.
Tutorial Tomcat — Тестирование установки Java SDK
Запустите новый запрос командной строки DOS.

Проверьте наличие переменной JAVA_HOME.
Проверьте java-приложение с помощью переменной, названной JAVA_HOME.
Проверить, включает ли переменная среды PATH каталог Java SDK под названием BIN.
Проверьте Java-приложение без использования переменной среды.
Поздравляю! Вы протестировали установку Java JDK на Windows.
Учебная windows — установка Tomcat
Получите доступ к веб-сайту Apache Tomcat и загрузите последнюю версию Tomcat.
В нашем примере мы скачали файл под названием: Apache-tomcat-9.0.37.exe

Запустите установку Tomcat.

Выберите опцию Hostmanager и нажмите на кнопку «Следующая».

Установите имя пользователя и пароль администратора Tomcat.
Дополнительно можно изменить порт TCP.

Установите путь установки Java JDK и нажмите на кнопку «Следующая».

В нашем примере установщик Tomcat автоматически обнаружил каталог установки Java SDK.
Проверьте путь установки Tomcat и нажмите на кнопку «Следующая».

В нашем примере программное обеспечение Tomcat было установлено на следующем каталоге.
Нажмите на кнопку Установки и дождитесь завершения установки Tomcat.

Выберите опцию запуска сервиса Tomcat и нажмите на кнопку «Финиш».

Откройте браузер и введите IP-адрес вашего сервера Tomcat плюс :8080.
В нашем примере в браузер был введен следующий URL::
— http://172.31.7.220:8080
Страница Tomcat должна быть представлена.

Поздравляю! Вы закончили установку Tomcat на Windows.
Учебник — Доступ к приложению Tomcat Manager
На сервере Tomcat откройте браузер и введите следующий URL:
— http://127.0.0.1:8080/host-manager
Введите имя пользователя и пароль, созданный во время установки Tomcat.
После успешного входа будет представлена панель мониторинга менеджера Host.

Поздравляю! Вы можете получить доступ к менеджеру-хозяину Tomcat.
VirtualCoin CISSP, PMP, CCNP, MCSE, LPIC22020-07-12T04:49:02-03:00
Page load link
Ok
Introduction
Apache Tomcat is an open-source web server and servlet container for Java code. Tomcat executes programs written in the Java programming language, and it implements many Java EE specifications, including Jakarta Servlet, Jakarta Server Pages, and others.
In this tutorial, you will learn to install the Apache Tomcat server on Windows.
Prerequisites:
- Java JRE installed and configured
- Administrator privileges
In this section, we will cover two ways of installing the Tomcat web server:
- Via Windows Service Installer.
- From a zip archive.
Follow the steps below to download and install Tomcat.
Step 1: Download Tomcat for Windows
To download the Tomcat installation file, follow the steps below:
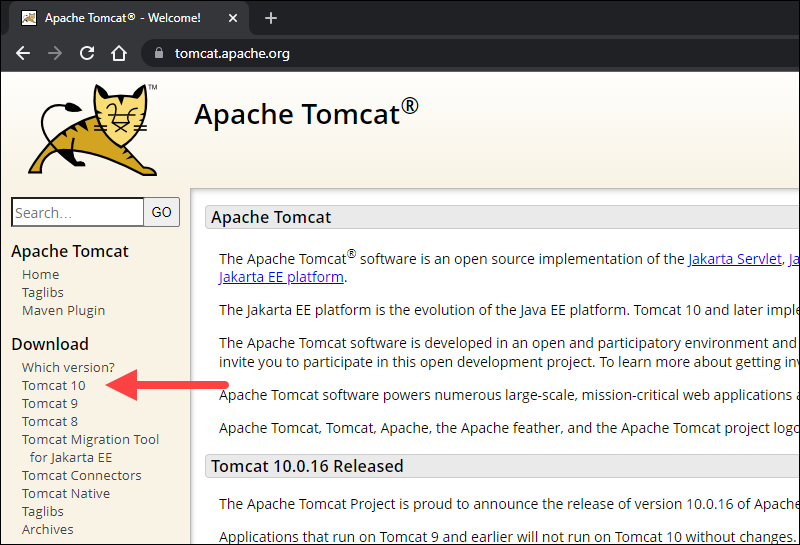
1. Browse to the official Apache Tomcat website. Locate the Download section and click the latest Tomcat version available. At the time of writing this article, the latest Tomcat version was version 10.
2. On the Download page, scroll down and locate the Binary Distributions area.
In the Core list, depending on the installation type you prefer, click the download link for the Windows Service Installer or the 32bit/64bit Windows zip file.
Step 2: Install Tomcat
Install Tomcat via the Windows Service Installer for an automated and wizard-guided experience. The service installer installs the Tomcat service and runs it automatically when the system boots.
For a portable experience, install Tomcat using the zip file and avoid installing the service. Easily uninstall Tomcat when it is no longer needed by deleting the Tomcat directory, or move it around when necessary.
Note: Take a look at our list of 13 best Java IDEs, which help write, debug, and test Java code.
Method 1: Install Tomcat Using the Windows Service Installer
Follow the steps below to install Tomcat using the Windows Service Installer.
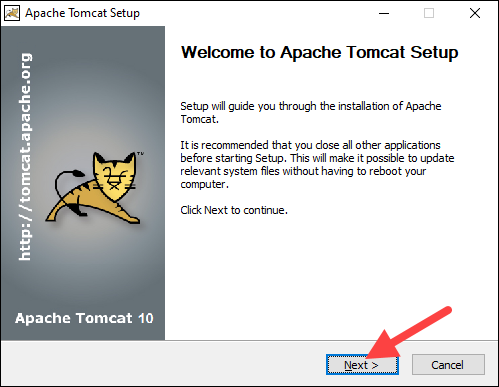
1. Open the downloaded Windows Service Installer file to start the installation process.
2. In the Tomcat Setup welcome screen, click Next to proceed.
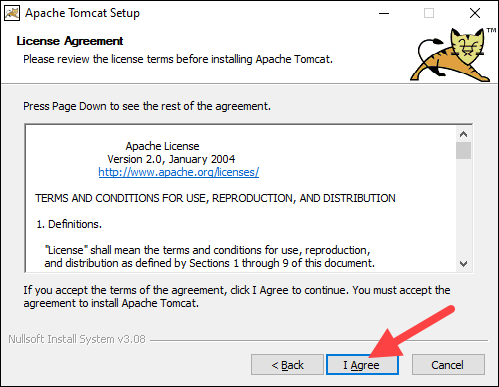
3. Read the License Agreement and if you agree to the terms, click I Agree to proceed to the next step.
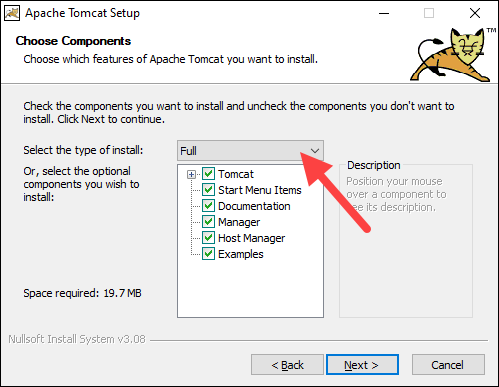
4. In the Tomcat component selection screen, choose Full in the dropdown menu to ensure the wizard installs the Tomcat Host Manager and Servlet and JSP examples web applications. Alternatively, keep the default Normal installation type and click Next.
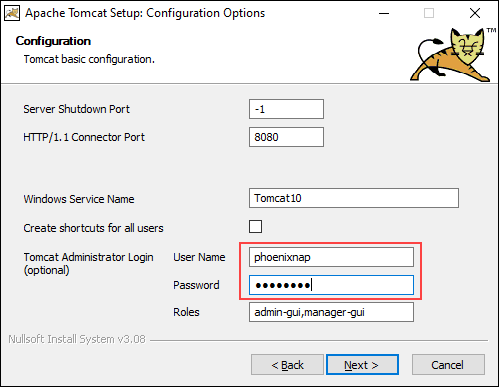
5. The next step configures the Tomcat server. For instance, enter the Administrator login credentials or choose a different connection port. When finished, click Next to proceed to the next step.
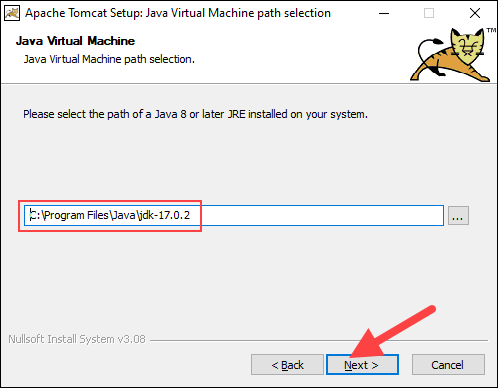
6. The next step requires you to enter the full path to the JRE directory on your system. The wizard auto-completes this if you have previously set up the Java environment variables. Click Next to proceed to the next step.
7. Choose the Tomcat server install location or keep the default one and click Install.

8. Check the Run Apache Tomcat box to start the service after the installation finishes. Optionally, check the Show Readme box to see the Readme file. To complete the installation, click Finish.
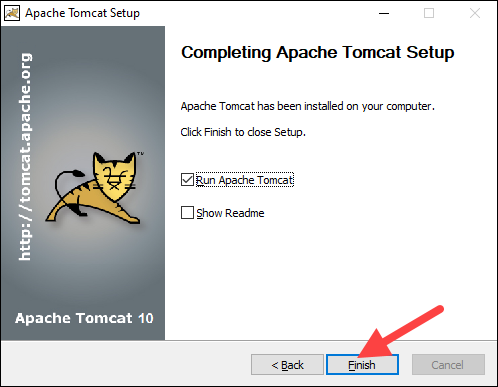
9. A popup window appears that starts the Tomcat service. After the process completes, the window closes automatically. The Apache Tomcat web server is now successfully installed .
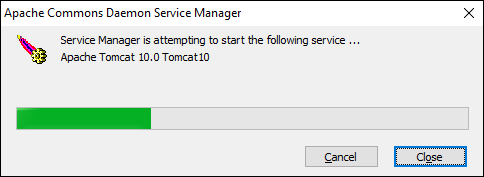
Method 2: Install Tomcat Using the zip Archive
Follow the steps below to set up the Tomcat server using the zip archive.
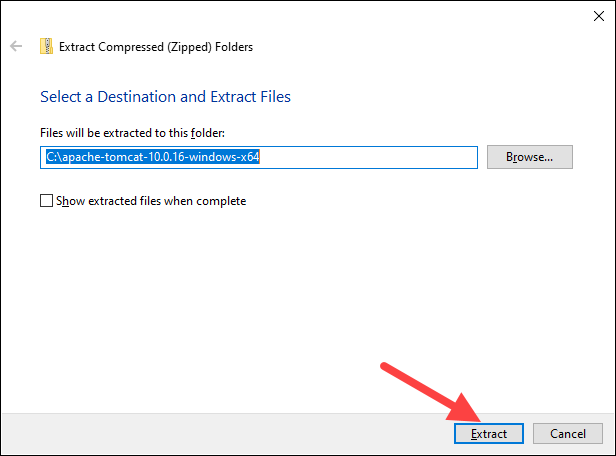
1. After downloading the 32bit/64bit Windows zip file, depending on your Windows version, unzip the downloaded file. Right-click the file and select Extract all…
2. Choose where to extract the archive contents. For easier navigation, we recommend extracting it to the hard drive’s root. Optionally, give the directory a shorter name to facilitate server configuration later. Click Extract to start the process.
3. Navigate to the conf sub-directory within the extracted directory and locate the server.xml file.
Important: Back up the .xml files before making any changes.
4. The default connection port is 8080. To choose a different port, edit the server.xml file with a text editor, such as Notepad++, and locate the following lines:
<Connector port="8080" protocol="HTTP/1.1"
           connectionTimeout="20000"
           redirectPort="8443" />
Change the connector port number to any number between 1024 and 65535.
5. To enable directory browsing, locate the web.xml file in the conf directory and edit the file with a text editor. Directory browsing helps when testing the system, and sometimes it may be the solution for a 403 forbidden error.
Locate the following lines and change the listings value from false to true:
<servlet>
  <servlet-name>default</servlet-name>
  <servlet-class>org.apache.catalina.servlets.DefaultServlet</servlet-class>
  <init-param>
    <param-name>debug</param-name>
    <param-value>0</param-value>
  </init-param>
  <init-param>
    <param-name>listings</param-name>
    <param-value>false</param-value>
  </init-param>
  <load-on-startup>1</load-on-startup>
</servlet>
6. Implement an auto-reload feature by editing the context.xml file. Above all, auto-reload is useful in development to prevent restarting the server manually each time a change is made.
Using a text editor, open the context.xml file. Locate the following line and change the value from false to true in each instance:
<Context reloadable="false" crossContext="false" parallelAnnotationScanning="false">
   ......
   ......
</Context>
7. After making the changes, start the server. Press the Windows key and type cmd. Press Enter to open a Command Prompt window.
8. Move to the bin directory of your Tomcat server and run:
startup
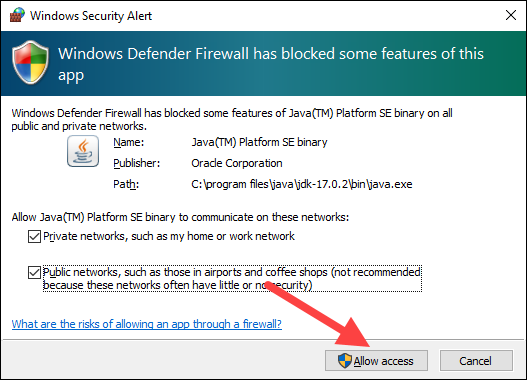
8. Add an exception for Tomcat in the firewall:
9. A new Tomcat console window appears. This console receives error messages and system.out.println() messages issued by the Java servlets.
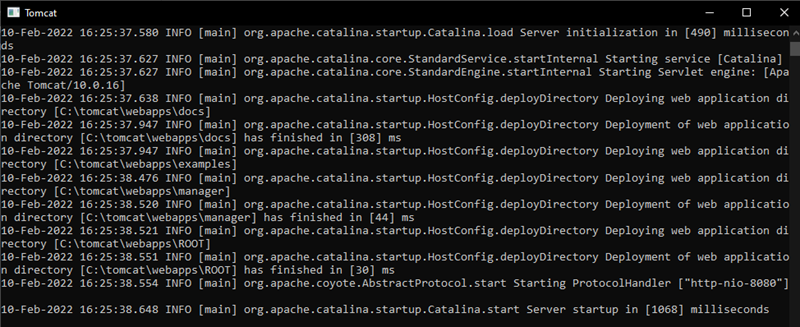
10. Access the server using a browser as an HTTP client. Browse to http://localhost:8080 and access the Tomcat welcome page to ensure the server works.
In addition, use the Developer Quick Start links to see more information about the server and start using and configuring the server.
11. Shut down the Tomcat server by pressing Ctrl+C on the Tomcat console.
Step 3: Check if Apache Tomcat Service Is Running
Installing Tomcat using the Windows Service Installer installs Tomcat as a Windows service that automatically runs on boot. Follow the steps below to ensure that Tomcat is started as a Windows service.
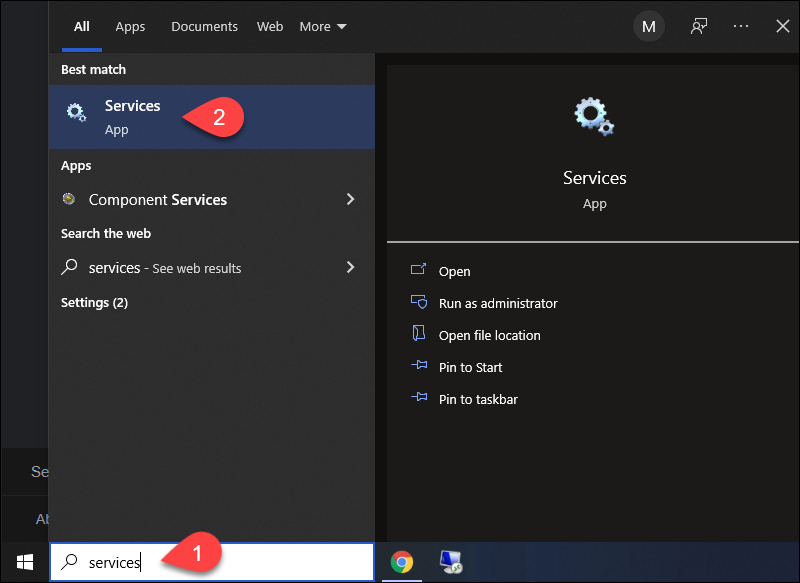
1. Open the Start menu and search for Services.
2. Select the Services result.
3. In the Services window, locate the Apache Tomcat service. The Status column indicates whether the service is running or not. Start or Stop the service using the buttons in the toolbar or by pressing Stop or Restart on the left side of the service list.
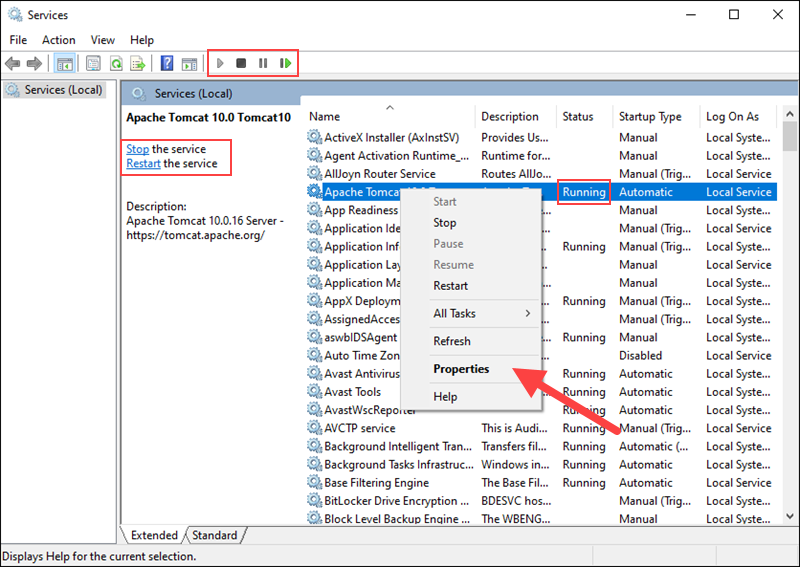
Configure the service startup by right-clicking the Tomcat service and selecting Properties.
4. In the Properties window, under the Startup type dropdown menu, select how to run the Tomcat service:
- Automatic (Delayed Start). Starts the service shortly after boot. A delayed start improves server boot performance and has security benefits.
- Automatic. Automatically starts the service on boot.
- Manual. The service starts only when Windows or another service needs it or if invoked.
- Disabled. Disables the service startup, even if you try to start it.
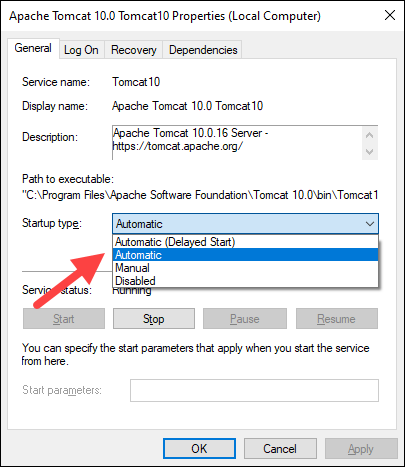
Click OK to confirm the changes.
Note: If you are looking for a different operating system, our Knowledge Base also has a tutorial on how to install Tomcat on Ubuntu.
Conclusion
This guide showed how to install the Apache Tomcat web server on Windows. While Tomcat doesn’t provide all the features of Java EE, many applications require only the features that Tomcat provides. Therefore, heavier tools aren’t always necessary.
Learn more about servers in our tutorial on big data servers, or learn what a database server is.
![]() Небольшая выдержка из Википедии: Tomcat позволяет запускать веб-приложения, содержит ряд программ для самоконфигурирования.
Небольшая выдержка из Википедии: Tomcat позволяет запускать веб-приложения, содержит ряд программ для самоконфигурирования.
Tomcat используется в качестве самостоятельного веб-сервера, в качестве сервера контента в сочетании с веб-сервером Apache HTTP Server, а также в качестве контейнера сервлетов в серверах приложений JBoss и GlassFish.
1. Необходимое программное обеспечение
1.1. Java, Apache Tomcat 7.0 работает с Java Standard Edition Runtime
Environment (JRE) версии 6.0 и старше.
Скачать JRE или JDK (если вы планируете использовать средства разработки, а не только java-машину) можно по ссылке: http://www.oracle.com/technetwork/java/javase/downloads/index.html
1.2. Tomcat, сам сервер можно скачать по ссылке: http://tomcat.apache.org/download-70.cgi.
Например, для 32-х битной windows это будет архив http://www.sai.msu.su/apache/tomcat/tomcat-7/v7.0.14/bin/apache-tomcat-7.0.14-windows-x86.zip
2. Установка Tomcat
2.1. JDK, ставим именно его для универсальности соглашаясь со всем подряд кроме локации, для удобства меняем на папку С:\jdk1.6.0.
2.1.2. Определяем переменную среды JAVA_HOME (JAVA_JRE в случае установки JRE) в Панель управления::Свойства системы::Дополнительно::Переменные среды::Системные переменные со значением папки размещения JDK из предыдущего пункта.
2.2. Tomcat, распаковываем архив с сервером в удобную папку, например, в С:\tomcat.
3. Запуск Tomcat
3.1. Запуск осуществляется вызовом C:\tomcat\bin\startup.bat, остановка соответственно C:\tomcat\bin\shutdown.bat.
3.2. После запуска по адресу http://localhost:8080/ стандартные приложения, документация и примеры кода входящие в состав комплектацию Tomcat.
3.3. Для того, чтобы получить доступ к http://localhost:8080/manager/status, http://localhost:8080/manager/html, http://localhost:8080/host-manager/html необходимо дать соответствующие роли для пользователя tomcat в файле C:\tomcat\conf\tomcat-users.xml, например так:
<user username="tomcat" password="tomcat" roles="manager-gui,manager-status,admin-gui"/> и перезапустить Tomcat. В этом же файле небольшая иструкция по грамотной настройке доступа пользователей и их ролей.
3.4. Остальные инструкции по настройке Tomcat рекомендуется читать в файле $CATALINA_HOME\RUNNING.txt, где $CATALINA_HOME = С:\jdk1.6.0 в описанном примере установки.
Введение
Apache Tomcat — это веб-сервер с открытым исходным кодом, разработанный Apache Software Foundation. Он предназначен для использования в качестве контейнера сервлетов Java и веб-сервера для запуска приложений Java на основе технологий сервлетов и JavaServer Pages (JSP).
Tomcat работает как автономный сервер, который можно использовать для размещения и управления веб-приложениями. Он поддерживает протокол HTTP и может использоваться как автономный веб-сервер или интегрироваться с другими веб-серверами, такими как HTTP-сервер Apache.
Его основные функции включают обработку HTTP-запросов, выполнение сервлетов и JSP, управление сеансами пользователей, обработку веб-ресурсов, таких как файлы HTML, изображения и таблицы стилей, а также настройку безопасности для веб-приложений.
Tomcat широко используется в качестве сервера веб-приложений для разработки и развертывания приложений Java. Он легко настраивается и предлагает широкий спектр функций для поддержки разработки и управления сложными веб-приложениями.
Он доступен для нескольких операционных систем, включая Windows, macOS и Linux, и является одним из самых популярных инструментов в сообществе разработчиков Java для создания веб-приложений на основе Java.
Шаг 1. Загрузите Apache Tomcat
Посетите официальный сайт Apache Tomcat и загрузите последнюю версию программного обеспечения для Windows.
Шаг 2. Извлеките пакет
После завершения загрузки откройте загруженный ZIP-файл и извлеките его содержимое в нужное место на вашем компьютере. Например, вы можете извлечь содержимое в «C:\Tomcat».
Шаг 3: Установите переменные среды
Откройте панель управления Windows и перейдите в раздел «Система и безопасность» > «Система» > «Дополнительные параметры системы» > «Переменные среды».
В разделе «Системные переменные» нажмите «Создать», чтобы добавить новую переменную среды.
- Имя переменной: CATALINA_HOME
- Значение переменной: C:\Tomcat (или путь, по которому вы распаковали Apache Tomcat)
Нажмите OK, чтобы сохранить переменную.
Шаг 4: Настройте порты
Откройте папку установки Apache Tomcat (например, «C:\Tomcat») и перейдите к подпапке «conf». Откройте файл server.xml в текстовом редакторе.
Внутри файла server.xml найдите раздел, содержащий тег <Connector>. Измените порт по умолчанию 8080 на порт, доступный в вашей системе (например, 8088).
Сохраните файл server.xml.
Шаг 5: Запустите Apache Tomcat
Откройте окно командной строки и перейдите в папку установки Apache Tomcat (например, «C:\Tomcat\bin»).
Запустите команду «startup.bat», чтобы запустить Apache Tomcat. Вы увидите вывод в командной строке, указывающий, что Tomcat успешно запущен.
Шаг 6. Проверьте установку
Откройте веб-браузер и перейдите по адресу « http://localhost:8088 » (замените 8088 портом, который вы настроили на шаге 4). Если вы видите страницу приветствия Apache Tomcat, установка прошла успешно.
Заключение
Теперь вы готовы использовать Apache Tomcat в своей системе Windows. Вы можете настроить и развернуть свои веб-приложения с помощью этого сервера.