Table of Contents
Installing Aircrack-ng from Source
Legacy information can be found here.
Requirements
-
Autoconf
-
Automake
-
Libtool
-
shtool
-
OpenSSL development package or libgcrypt development package.
-
pkg-config
Linux
-
Airmon-ng requires ethtool and rfkill
-
If USB bus is present, lsusb
-
If PCI/PCIe bus is present, lspci
-
-
LibNetlink 1 (libnl-dev) or 3 (libnl-3-dev and libnl-genl-3-dev) development packages. It can be disabled by passing –disable-libnl to configure.
-
Kernel headers and gcc as well as make have to be installed on your system (build-essential on Debian based distributions)
-
make and Standard C++ Library development package (Debian: libstdc++-dev)
Windows (Cygwin)
-
w32api is required
-
if using clang, libiconv and libiconv-devel
-
make and Standard C++ Library development package
MacOS
Install the following via Homebrew (brew):
-
autoconf
-
automake
-
libtool
-
openssl
-
shtool
-
pkg-config
-
hwloc
-
pcre
-
sqlite3
-
libpcap
-
cmocka (optional)
FreeBSD, OpenBSD, NetBSD, Solaris
Install the following via pkg:
-
gmake
-
pkgconf
-
pcre
-
sqlite3
-
gcc9 (or better)
Optional stuff
-
If you want SSID filtering with regular expression in airodump-ng (-essid-regex) pcre development package is required.
-
If you want to use airolib-ng and ‘-r’ option in aircrack-ng, SQLite development package >= 3.3.17 (3.6.X version or better is recommended)
-
If you want to use Airpcap, the ‘developer’ directory from the CD is required. It can be downloaded here.
-
For best performance on FreeBSD (50-70% more), install gcc5 via: pkg install gcc5 Then compile with: gmake CC=gcc5 CXX=g++5
-
rfkill
-
CMocka
-
hwloc: strongly recommended, especially on high core count systems where it may give a serious performance boost
Compiling and installing
Notes:
-
On OS X, *BSD and Solaris, use ‘gmake’ instead of ‘make’.
-
In order to compile with clang instead of gcc, add ‘CC=clang CXX=clang++’ to the configure command.
Current version
 wget https://download.aircrack-ng.org/aircrack-ng-1.7.tar.gz
 tar -zxvf aircrack-ng-1.7.tar.gz
 cd aircrack-ng-1.7
 autoreconf -i
 ./configure --with-experimental
 make
 make install
 ldconfig
Compiling with AirPcap support (cygwin only)
-
Copy ‘developer’ directory from the AirPcap CD at the same level as ‘Aircrack-ng’ directory
-
Append ‘- -with-airpcap=../developer’ parameter to configure:
Compiling on *BSD
Commands are exactly the same as Linux but instead of make, use gmake (with CC=gcc5 CXX=g++5 or any more recent gcc version installed).
Compiling on MacOS
Commands are exactly the same as Linux
Latest Git (development) Sources
Note: Compilation parameters can also be used with the sources from our git repository.
git clone https://github.com/aircrack-ng/aircrack-ng
cd aircrack-ng
autoreconf -i
./configure --with-experimental
make
make install
ldconfig
./configure flags
When configuring, the following flags can be used and combined to adjust the suite to your choosing:
-
with-airpcap=DIR: needed for supporting airpcap devices on windows (cygwin or msys2 only) Replace DIR above with the absolute location to the root of the extracted source code from the Airpcap CD or downloaded SDK available online. Required on Windows to build besside-ng, besside-ng-crawler, easside-ng, tkiptun-ng and wesside-ng when building experimental tools. The developer pack (Compatible with version 4.1.1 and 4.1.3) can be downloaded at https://support.riverbed.com/content/support/software/steelcentral-npm/airpcap.html
-
with-experimental: needed to compile tkiptun-ng, easside-ng, buddy-ng, buddy-ng-crawler, airventriloquist and wesside-ng. libpcap development package is also required to compile most of the tools. If not present, not all experimental tools will be built. On Cygwin, libpcap is not present and the Airpcap SDK replaces it. See –with-airpcap option above. On debian based distro, install libpcap-dev
-
with-ext-scripts: needed to build airoscript-ng, versuck-ng, airgraph-ng and airdrop-ng. Note: Each script has its own dependencies. Note: It’s only required in install phase.
-
with-gcrypt: Use libgcrypt crypto library instead of the default OpenSSL. And also use internal fast sha1 implementation (borrowed from GIT) Dependency (Debian): libgcrypt20-dev
-
with-duma: Compile with DUMA support. DUMA is a library to detect buffer overruns and under-runs. Dependencies (debian): duma
-
with-xcode: Set this flag to true to compile on OS X with Xcode 7+.
-
disable-libnl: Set-up the project to be compiled without libnl (1 or 3). Linux option only.
-
without-opt: Do not enable stack protector (on GCC 4.9 and above).
-
enable-shared: Make OSdep a shared library.
-
disable-shared: When combined with enable-static, it will statically compile Aircrack-ng.
-
with-avx512: On x86, add support for AVX512 instructions in aircrack-ng. Only use it when the current CPU supports AVX512.
-
with-static-simd=: Compile a single optimization in aircrack-ng binary. Useful when compiling statically and/or for space-constrained devices. Valid SIMD options: x86-sse2, x86-avx, x86-avx2, x86-avx512, ppc-altivec, ppc-power8, arm-neon, arm-asimd. Must be used with –enable-static –disable-shared. When using those 2 options, the default is to compile the generic optimization in the binary. –with-static-simd merely allows to choose another one.
-
enable-maintainer-mode: It is important to enable this flag when developing with Aircrack-ng. This flag enables additional compile warnings and safety features.
Troubleshooting Tips
error while loading shared libraries: libaircrack-ng.so.0
Run ldconfig as root or with “sudo” to solve the issue.
«command not found» error message
After you do “make install” then try to use any of the Aircrack-ng suite commands, you get the error message “command not found” or similar. Your system will look for the Aircrack-ng commands in the directories defined by the PATH command.
Normally, the Aircrack-ng suite programs and man pages are placed in:
 /usr/local/bin
 /usr/local/sbin
 /usr/local/man
On your system, to determine which directories have the Aircrack-ng programs enter the following. If using “locate” be sure to first run “updatedb”.
 locate aircrack-ng
 locate airmon-ng
or
 find / -name aircrack-ng
 find / -name airmon-ng
Once you know the directories (exclude the source directories) then determine which directories are in your PATH. To see which directories are included in PATH on your particular system enter:
echo $PATH
It should show something like:
/usr/local/sbin:/usr/local/bin:/usr/sbin:/usr/bin:/sbin:/bin
At this point compare the actual locations with the directories in your PATH. If the directories are missing from your PATH then you have a few options:
-
Add the directories to your PATH. See the one or more of the following web sites for details of how to do this:
 https://www.cyberciti.biz/faq/howto-print-path-variable/
 http://www.troubleshooters.com/linux/prepostpath.htm
-
Change to the particular directory with “cd” and then run the commands from within the directory. Don’t forget to add “./” in front of each command.
-
Specify the full path for each command. So if Aircrack-ng is located in the “/usr/local/bin” directory then run the command as “/usr/local/bin/aircrack-ng”.
Installing pre-compiled binaries
Linux/BSD/OSX
With the exception of Linux penetration testing distributions, packages are usually out of date (MacOS is the exception). In this case, uninstalling the package and installing from sources is the recommended way to go.
On MacOS, install it is via Macports or brew. Simply do “brew install aircrack-ng” or “sudo ports install aircrack-ng”
Windows
The Windows version of the Aircrack-ng suite does not have an install program. You must manually install (unzipping archive) the software.
Here are the steps to follow for Windows:
-
Download the latest version of the Aircrack-ng suite for Windows to your computer. The link for the zip file can be found on the Wiki home page.
-
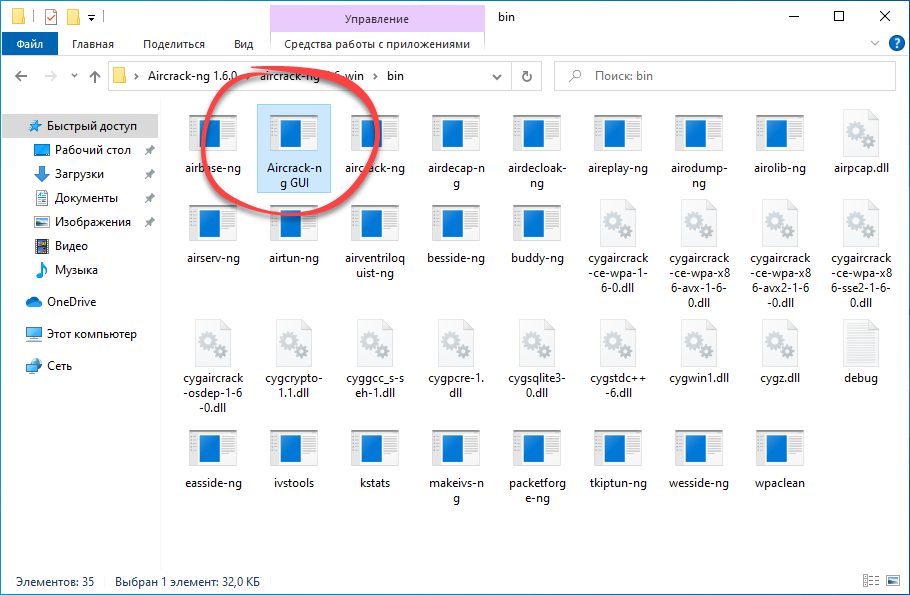
Unzip the contents of the Aircrack-ng zip file into “C:\”. This will create a directory called “aircrack-ng-1.6-win”. This directory name will vary based on the exact version that you downloaded. This main directory contains three subdirectories — “bin”, “src” and “test”.
Prior to using the software, make sure to install the drivers for your particular wireless card. See this link for the instructions. We currently only support Airpcap; other adapters may be supported but require development of your own DLL so the different tools can interact with it.
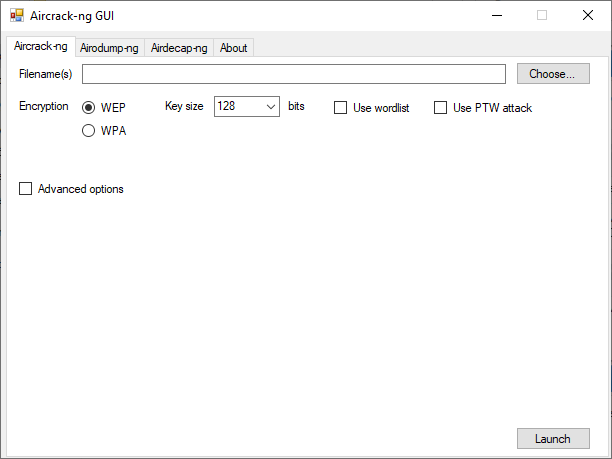
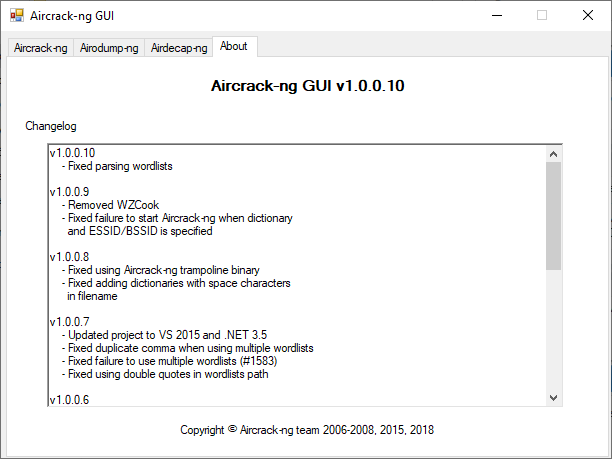
To now use the Aircrack-ng suite, start Windows Explorer and double click on Aircrack-ng GUI.exe inside “bin” subdirectory. The GUI requires .NET version 4.6.1 to run.
Alternatively, open a command prompt (Start menu → Execute → cmd.exe) and change to the “C:\aircrack-ng-1.6-win\bin” directory and execute the individual commands.
Important notes:
-
Airmon-ng is a Linux/FreeBSD tool only.
-
Remember that Windows only supports a limited subset of the commands.
-
Some troubleshooting tips specific to XP and Vista can be found on this page.
Requirements
- Have a Windows computer.
- Have a connection to the internet.
- Download Aircrack-ng: https://download.aircrack-ng.org/aircrack-ng-1.2-win.zip
Steps:
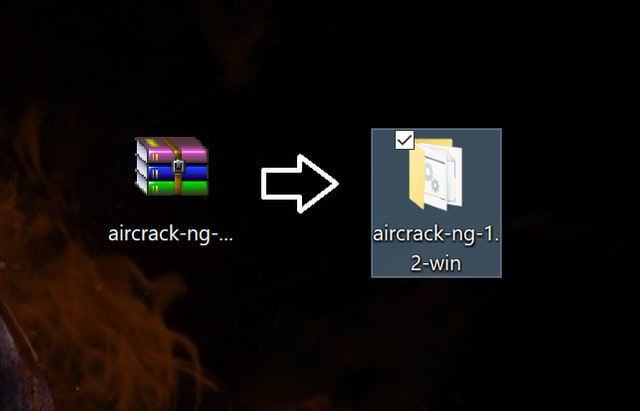
First Step: Download and uncompress the Aircrack-ng file. Personally, I prefer to move the .rar file to the desktop to have a more clear working area. If your web browser does not ask you where to save the file, then just go to your «Downloads» section of your file explorer.
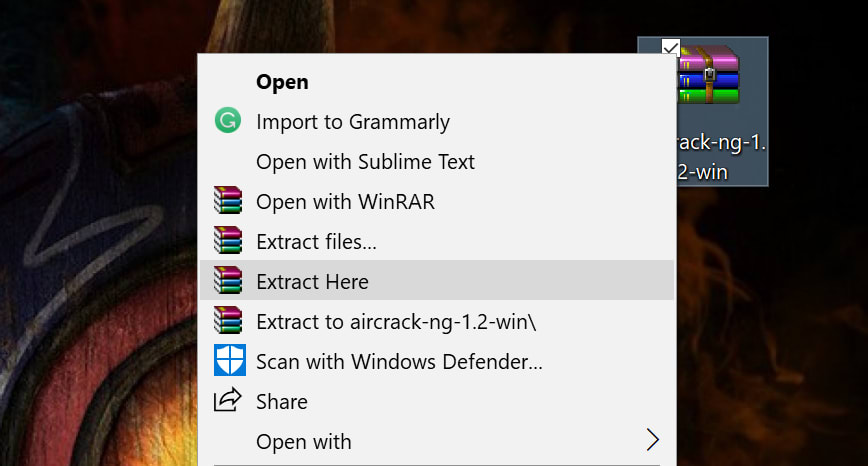
This is how it should look:
Second Step: Determine if your Windows architecture is 64-bit or 32-bit.
You should get something like this:

Third Step: Go to your ‘Local Disk (C:) and open the folder «Program Files» or «Program Files (x86)» depending on your windows architecture. Since my Windows is 64-bit I will choose the ‘Program Files’ folder.
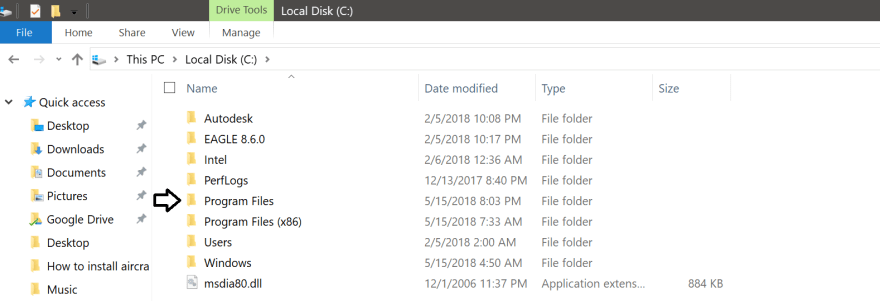
Then, copy and paste the Aircrack-ng folder that you uncompressed before inside the «Program Files» folder.
The Aircrack-ng folder should look like this inside the «Program Files» folder.

After pasting the «Aircrack-ng» folder inside the «Program files» or «Program Files (x86)» you have to go inside of that folder.
Once inside the folder you will have to open the «bin» folder.

Depending on your Windows architecture you will choose the folder according to your Windows. In my case I chose the «64-bit» folder since my Windows architecture is 64-bit.

Once inside your corresponding folder, you will have to copy the address of that folder as it is shown below:
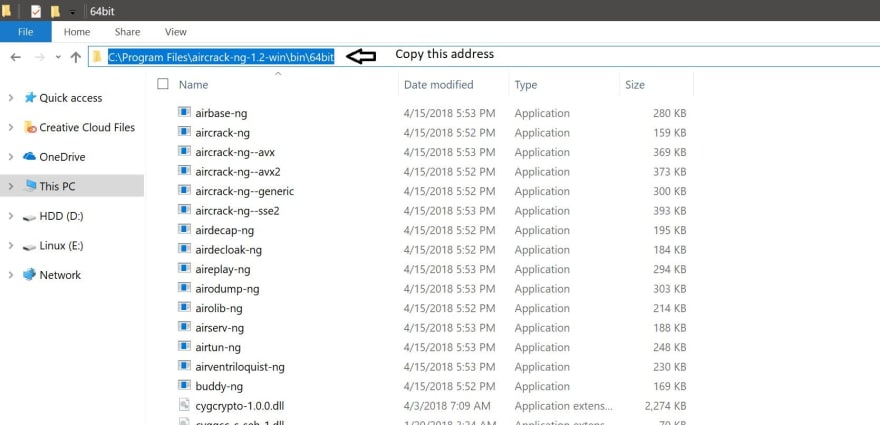
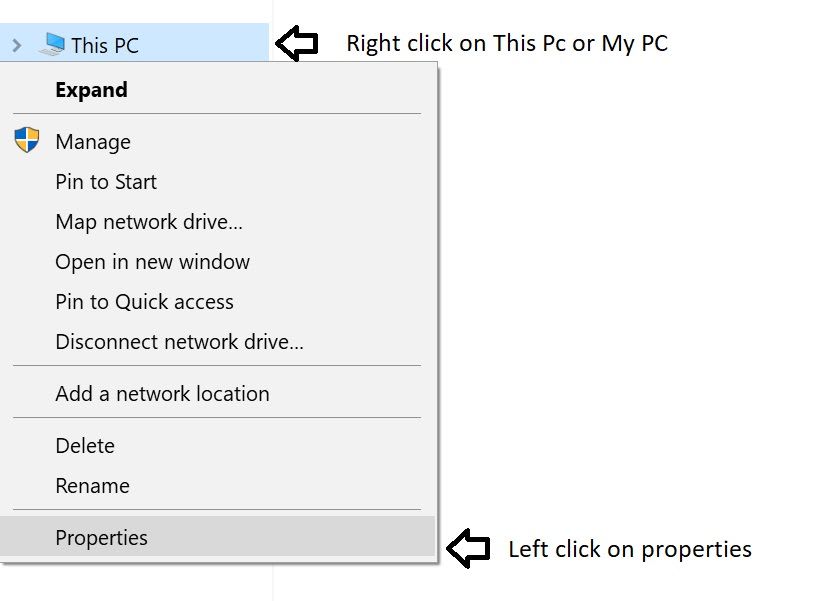
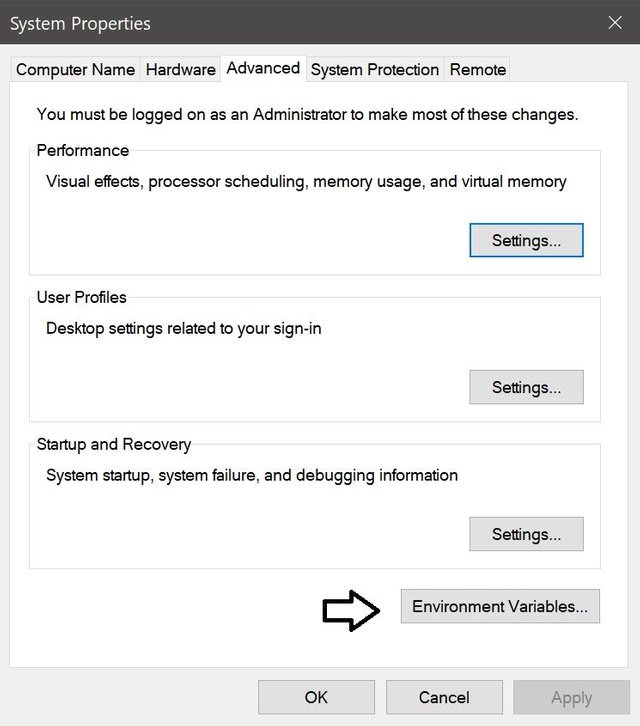
Fourth Step: Now, you will have to go to «This PC» properties once again.

Once you get the window below, you will have to left click on «Advanced system settings» as it is on the picture shown below.

Now you will have to click on the button that says «Environment Variables…»
Once you got inside «Environment Variables» you should get a screen just like this:
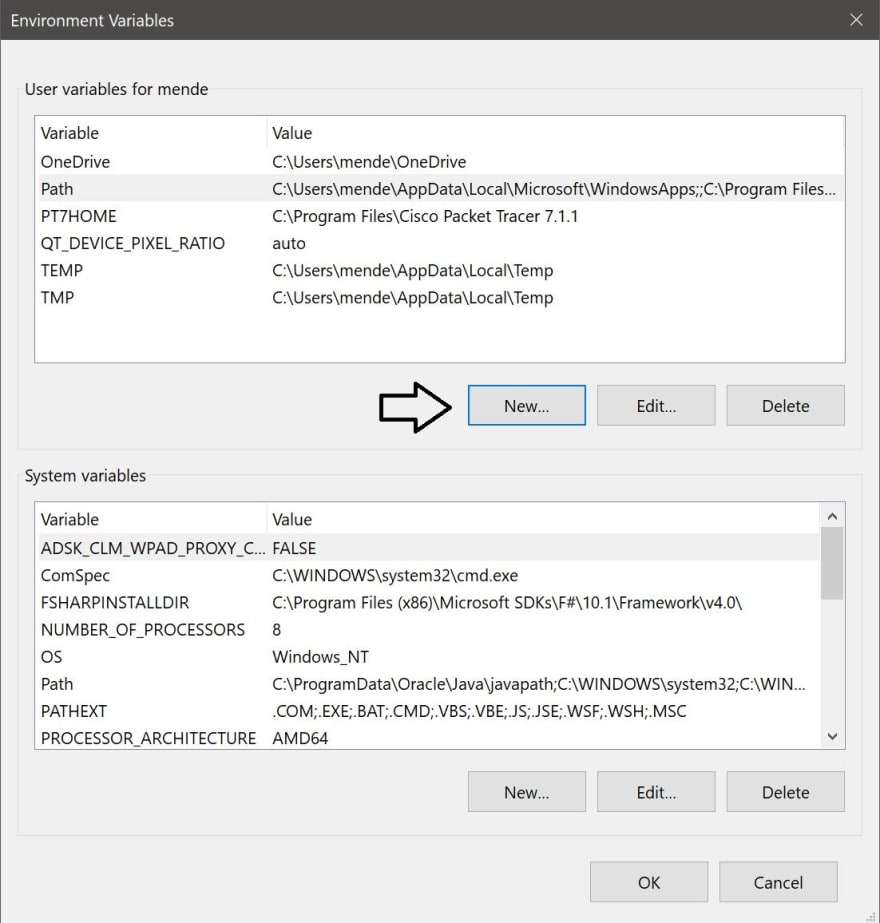
Once you got this window, you will have to click the «New» button pointed with the arrow.
In this new window, you have to write (path) inside the «Variable name:» box. Then, you will have to paste the address that you copied before in step #4 inside the «Variable value:» box. All the procedures are shown below.

After that, just click «OK» on all the windows that are open. Also, click on «Apply» if you see the option.
Final Step: Go to your desktop and press the keys «Ctrl + R» to open the «Run» program. Inside «Run» type «cmd» as it is shown below.

Then press «OK»
You should get a window like this one below
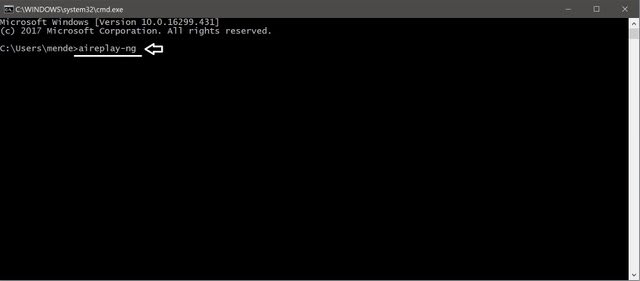
Now that you have opened the «cmd» you will have to type «aireplay-ng» inside the «cmd».
Then, press enter.
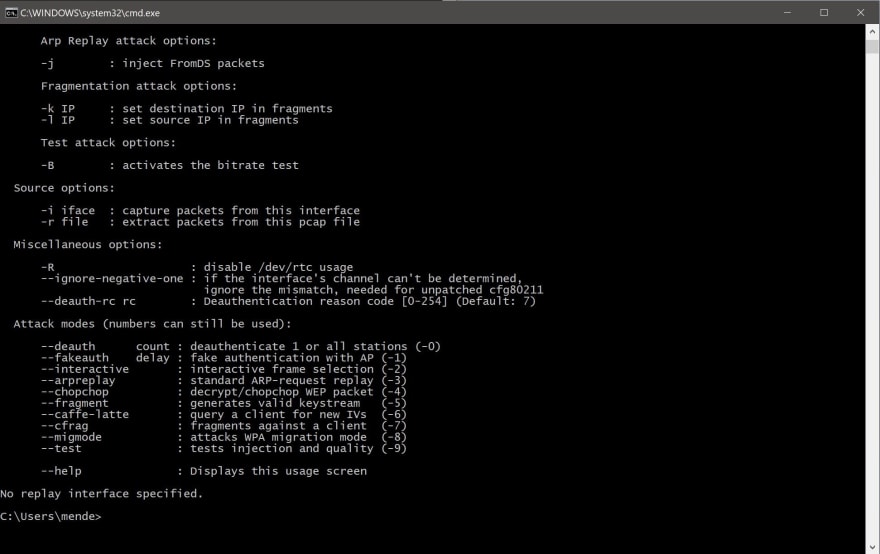
You should get a set of information just like it is on the picture above.
Now you are done and ready to use it.
В наше время, когда Wi-Fi стал неотъемлемой частью нашей жизни, вопрос безопасности сетей становится все более актуальным. Aircrack ng — это мощный инструмент, который позволяет анализировать и взламывать Wi-Fi сети. В этой подробной инструкции мы расскажем вам, как использовать aircrack ng на операционной системе Windows 10 и раскрыть все секреты взлома Wi-Fi.
Первым шагом перед использованием aircrack ng является его установка на ваш компьютер. Скачайте aircrack ng с официального сайта и установите его, следуя инструкциям. Установка может занять некоторое время, так что имейте терпение.
После установки aircrack ng вам понадобится собрать данные о Wi-Fi сетях в вашем окружении. Для этого запустите airodump ng, который отображает список доступных сетей и собирает пакеты данных. Обратите внимание на название сети, которую вы хотите взломать.
Дальше вам необходимо собрать пакеты данных, необходимые для взлома Wi-Fi сети. Используйте команду «aireplay ng», чтобы отправлять потоковые пакеты данных на выбранную сеть. Чем больше пакетов вы соберете, тем больше вероятность успешного взлома.
Важно помнить, что использование aircrack ng для взлома Wi-Fi сетей без разрешения владельца является незаконным действием и может повлечь за собой юридические последствия. Взломайте Wi-Fi сеть только в случае, если у вас есть разрешение владельца или вы тестируете свою собственную сеть на уровень ее безопасности.
Наконец, когда вы собрали достаточное количество пакетов данных, запустите aircrack ng с использованием команды «aircrack-ng» с указанием названия файла, содержащего пакеты данных. Aircrack ng будет анализировать пакеты и искать пароль для взлома сети. В случае успешного взлома aircrack ng отобразит найденный пароль, который вы сможете использовать для подключения к Wi-Fi сети.
Использование aircrack ng для взлома Wi-Fi сетей требует навыков и знаний в области сетевой безопасности. Будьте ответственными и используйте aircrack ng только в законных целях. Запомните, что безопасность вашей собственной сети также является важным фактором, поэтому будьте внимательны при настройке защиты Wi-Fi сети в доме или офисе.
Содержание
- Установка aircrack-ng на Windows 10
- Настройка окружения для работы программы
- Сбор и анализ пакетов на Wi-Fi сети
- Взлом Wi-Fi сети с использованием aircrack-ng
Установка aircrack-ng на Windows 10
- Посетите официальный сайт aircrack-ng (https://www.aircrack-ng.org/) и скачайте последнюю версию программы.
- Разархивируйте скачанный архив в удобное для вас место на компьютере, например, на рабочем столе.
- Откройте командную строку Windows. Для этого нажмите клавишу Win + R, введите «cmd» и нажмите Enter.
- Поместите файлы aircrack-ng в директорию системных файлов. Для этого в командной строке выполните следующую команду:
copy "путь_к_разархивированной_папке\bin\*.*" "C:\Windows\System32"
Замените «путь_к_разархивированной_папке» на фактический путь к разархивированной папке aircrack-ng.
- Установите WinPcap (драйвер для захвата пакетов). Скачайте и установите его с официального сайта (https://www.winpcap.org/).
- Теперь aircrack-ng установлен на вашем компьютере. Чтобы убедиться, что программа работает, откройте командную строку Windows и выполните команду:
airmon-ng
Если выводится информация о доступных беспроводных сетях, значит установка прошла успешно.
Теперь вы можете использовать aircrack-ng для анализа и взлома Wi-Fi сетей в Windows 10.
Настройка окружения для работы программы
Перед тем, как начать использовать программу Aircrack-ng для взлома Wi-Fi, необходимо произвести настройку окружения, чтобы программа работала корректно. В этом разделе мы расскажем, как это сделать.
- Сначала вам необходимо скачать архив программы Aircrack-ng с официального сайта разработчика.
- После того, как вы скачали архив, вам нужно распаковать его в любую удобную для вас папку на компьютере.
- Затем вам необходимо установить беспроводной адаптер на свой компьютер, если у вас его еще нет. Убедитесь, что адаптер поддерживает режим мониторинга и захвата пакетов.
- Зайдите в папку, в которую вы распаковали архив программы Aircrack-ng, и запустите файл airodump-ng.exe. Если программа не запускается, проверьте, что у вас установлены все необходимые драйверы и компоненты.
- Как только программа успешно запустилась, вы должны увидеть список доступных беспроводных сетей в окне программы.
Теперь вы готовы к работе с программой Aircrack-ng. В следующем разделе мы расскажем вам, как использовать программу для взлома Wi-Fi сетей.
Сбор и анализ пакетов на Wi-Fi сети
Вот основные инструменты, предоставляемые aircrack-ng:
- Airodump-ng: инструмент для сбора пакетов данных, передаваемых по Wi-Fi сети. Он позволяет просматривать список доступных сетей, а также собирать информацию о клиентах, подключенных к сетям.
- Aireplay-ng: инструмент для генерации трафика на Wi-Fi сети. Он может использоваться для проведения атаки с целью сбора дополнительных пакетов или создания искусственного загрузки сети.
- Aircrack-ng: инструмент для анализа собранных пакетов и взлома защищенной Wi-Fi сети. Он использует словарь паролей для поиска правильного ключа доступа к сети.
Для сбора пакетов данных на Wi-Fi сети с помощью aircrack-ng, необходимо запустить airodump-ng и выбрать целевую сеть. Airodump-ng будет записывать все пакеты, передаваемые по этой сети, в файл с расширением .cap. Затем можно использовать aircrack-ng для анализа собранных пакетов и взлома защищенной сети.
Хорошо подготовленный и организованный сбор и анализ пакетов на Wi-Fi сети позволяет эффективно исследовать уязвимости в сети и успешно взломать защищенную Wi-Fi сеть.
Взлом Wi-Fi сети с использованием aircrack-ng
Взлом Wi-Fi сети с использованием aircrack-ng требует некоторых навыков в области беспроводных сетей и безопасности. Пожалуйста, будьте осведомлены о том, что использование этого инструмента без разрешения владельца Wi-Fi сети может быть незаконным и привести к юридическим последствиям.
Вот шаги, которые вы должны выполнить, чтобы взломать Wi-Fi сеть с использованием aircrack-ng:
- Установите aircrack-ng на ваш компьютер с операционной системой Windows 10.
- Откройте командную строку и перейдите в папку, где установлен aircrack-ng.
- Запустите утилиту airodump-ng с параметрами, чтобы просканировать доступные Wi-Fi сети и захватить пакеты данных.
- Выберите целевую Wi-Fi сеть из списка и запомните ее имя (ESSID) и MAC адрес с точкой доступа.
- Остановите airodump-ng и запустите утилиту aireplay-ng для создания фальшивого трафика в целевой Wi-Fi сети.
- Запустите утилиту aircrack-ng с использованием захваченных пакетов данных и попытайтесь взломать пароль Wi-Fi сети.
При выполнении данных шагов обязательно ознакомьтесь с документацией aircrack-ng и правовыми аспектами использования этой программы. Помните, что нарушение безопасности Wi-Fi сетей может привести к юридическим последствиям.

При помощи данного приложения можно качественно оценить безопасность беспроводной сети. Как пользоваться программой, мы рассмотрим ниже, а в самом конце странички пользователь получит возможность бесплатно скачать последнюю версию Aircrack-ng через торрент.
Описание и возможности
Так как версии приложения на русском языке пока нет, разберемся, как с ним работать, чтобы у вас не возникало вопросов. Перед этим давайте рассмотрим основные возможности инструмента для проверки безопасности Wi-Fi.
- Мониторинг. Мы можем отслеживать передаваемые в беспроводной сети пакеты, а потом экспортировать полученные результаты в специальный текстовый файл. В дальнейшем эти данные могут быть использованы для проверки сторонним ОП.
- Атака. Беспроводная сеть проверяется на наличие уязвимостей при сторонней атаке. Производится анализ деаутентификации, наличия поддельных точек доступа и так далее.
- Тестирование. Отслеживание безопасности драйвера, используемого для работы беспроводного модуля.
- Взлом. Оценивается безопасность, обеспеченная протоколами WEP и WPA PSK 1 и 2 версией.
Теперь переходим непосредственно к инструкции по работе с программой. Рассмотрим, как бесплатно скачать и установить Aircrack-ng 1.6.0, а также как пользоваться приложением.
Как пользоваться
Так как данная программа даже не требует установки в традиционном ее понимание, речь пойдет о запуске и использовании.
Внимание: подобного рода софт предназначен для оценки безопасности беспроводной сети. Ни в коем случае не используйте ПО для взлома!
Загрузка и установка
Опустившись в самый конец страницы, мы скачиваем архив с нужным исполняемым файлом. После этого переходим к его запуску:
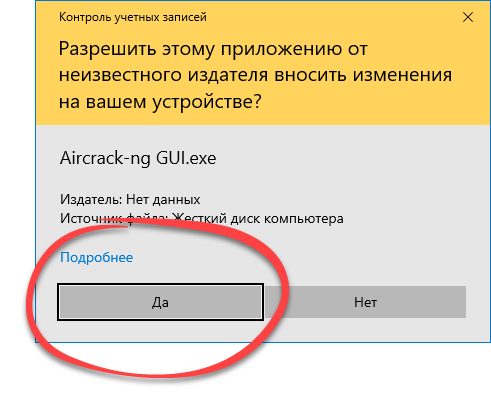
- Распаковав приложение, делаем двойной левый клик и таким образом запускаем программу.
- Откроется еще одно небольшое окошко, в котором пользователю нужно будет утвердить доступ к полномочиям администратора. Жмем «Да».
Готово. Программа запущена и теперь мы можем переходить к работе с ней.
Инструкция по работе
Весь пользовательский интерфейс для удобства поделен на вкладки. Переключаясь от одной к другой, мы вызываем те или иные функции. Таким образом и оценивается безопасность беспроводной сети.
Более детально ознакомиться с программой и научиться ею правильно пользоваться можно, перейдя ниже и запустив воспроизведение обучающего ролика.
Достоинства и недостатки
Также давайте рассмотрим положительные и отрицательные особенности приложения, учитывая большое количество его аналогов.
Плюсы:
- Простота пользовательского интерфейса.
- Большое количество различных инструментов для анализа беспроводной сети.
- Отличное быстродействие и отсутствие необходимости установки.
Минусы:
- К сожалению, русской версии Aircrack-ng пока не существует.
Похожие приложения
Предлагаем ознакомиться со списком аналогов, которые точно так же, как и наше ПО, могут тестировать беспроводную сеть на предмет отсутствия безопасности:
- Acrylic WiFi.
- Cain & Abel.
- Ekahau HeatMapper.
- Homedale.
- LizardSystems WiFi Scanner.
- NetSpot.
- WirelessNetView.
Системные требования
Как уже было сказано, утилита отличается минимальными системными требованиями и может с легкостью работать на любом ПК/ноутбуке.
- Центральный процессор: 1 ГГц.
- Оперативная память: 1 Гб.
- Пространство на жестком диске: 15 Мб.
- Платформа: Microsoft Windows 32/64 Bit.
Скачать
Теперь вы можете переходить к скачиванию приложения и его установке согласно нашей инструкции.
| Разработчик: | Thomas d’Otreppe |
| Платформа: | Windows XP, 7, 8, 10 |
| Язык: | Английский |
| Лицензия: | Бесплатно |
| Пароль к архиву: | bestsoft.club |
Aircrack-ng 1.6.0
Видеообзор
Данное видео поможет быстрее разобраться с программой и научиться ею правильно пользоваться.
Вопросы и ответы
На этом наша статья завершена, так как вы знаете, каким образом можно оценить безопасность беспроводной сети при помощи утилиты Aircrack-ng. В случае возникновения каких-либо вопросов обязательно переходите ниже и при помощи формы обратной связи обращайтесь в поддержку сайта.
Aircrack-ng
Badges
GitHub CI
![]()
![]()
![]()
![]()
![]()
![]()
![]()
![]()
![]()
![]()
![]()
Others
![]()
![]()
![]()
![]()
![]()
![]()
![]()
Repository versions

Description
Aircrack-ng is a complete suite of tools to assess WiFi network security.
It focuses on different areas of WiFi security:
- Monitoring: Packet capture and export of data to text files for further processing by third party tools.
- Attacking: Replay attacks, deauthentication, fake access points and others via packet injection.
- Testing: Checking WiFi cards and driver capabilities (capture and injection).
- Cracking: WEP and WPA PSK (WPA 1 and 2).
All tools are command line which allows for heavy scripting. A lot of GUIs have taken advantage of this feature. It works primarily on Linux but also Windows, macOS, FreeBSD, OpenBSD, NetBSD, as well as Solaris and even eComStation 2.
Building
Requirements
- Autoconf
- Automake
- Libtool
- shtool
- OpenSSL development package or libgcrypt development package.
- Airmon-ng (Linux) requires ethtool, usbutils, and often pciutils.
- On Windows, cygwin has to be used and it also requires w32api package.
- On Windows, if using clang, libiconv and libiconv-devel
- Linux: LibNetlink 1 or 3. It can be disabled by passing —disable-libnl to configure.
- pkg-config (pkgconf on FreeBSD, DragonFlyBSD, OpenBSD and NetBSD)
- FreeBSD, DragonFlyBSD, OpenBSD, NetBSD, Solaris and OS X with Macports: gmake
- Linux/Cygwin: make and Standard C++ Library development package (Debian: libstdc++-dev)
Note: Airmon-ng only requires pciutils if the system has a PCI/PCIe bus and it is populated.
Such bus can be present even if not physically visible. For example, it is present,
and populated on the Raspberry Pi 4, therefore pciutils is required on that device.
Optional stuff
- If you want SSID filtering with regular expression in airodump-ng
(—essid-regex) PCRE or PCRE2 development package is required. - If you want to use airolib-ng and ‘-r’ option in aircrack-ng,
SQLite development package >= 3.3.17 (3.6.X version or better is recommended) - If you want to use Airpcap, the ‘developer’ directory from the CD/ISO/SDK is required.
- In order to build
besside-ng,besside-ng-crawler,easside-ng,tkiptun-ngandwesside-ng,
libpcap development package is required (on Cygwin, use the Airpcap SDK instead; see above) - rfkill
- If you want Airodump-ng to log GPS coordinates, gpsd is needed
- For best performance on SMP machines, ensure the hwloc library and headers are installed. It is strongly recommended on high core count systems, it may give a serious speed boost
- CMocka and expect for testing
- For integration testing on Linux only: tcpdump, HostAPd, WPA Supplicant and screen
Installing required and optional dependencies
Below are instructions for installing the basic requirements to build
aircrack-ng for a number of operating systems.
Note: CMocka, tcpdump, screen, HostAPd and WPA Supplicant should not be dependencies when packaging Aircrack-ng.
Linux
Arch Linux
sudo pacman -Sy base-devel libnl openssl ethtool util-linux zlib libpcap sqlite pcre2 hwloc cmocka hostapd wpa_supplicant tcpdump screen iw usbutils pciutils expect
Debian/Ubuntu
sudo apt-get install build-essential autoconf automake libtool pkg-config libnl-3-dev libnl-genl-3-dev libssl-dev ethtool shtool rfkill zlib1g-dev libpcap-dev libsqlite3-dev libpcre2-dev libhwloc-dev libcmocka-dev hostapd wpasupplicant tcpdump screen iw usbutils expect
Fedora
sudo yum install libtool pkgconfig sqlite-devel autoconf automake openssl-devel libpcap-devel pcre2-devel rfkill libnl3-devel gcc gcc-c++ ethtool hwloc-devel libcmocka-devel make file expect hostapd wpa_supplicant iw usbutils tcpdump screen zlib-devel expect
CentOS/RHEL 7
sudo yum install epel-release
sudo ./centos_autotools.sh
# Remove older installation of automake/autoconf
sudo yum remove autoconf automake
sudo yum install sqlite-devel openssl-devel libpcap-devel pcre2-devel rfkill libnl3-devel ethtool hwloc-devel libcmocka-devel make file expect hostapd wpa_supplicant iw usbutils tcpdump screen zlib-devel
Note: autoconf, automake, libtool, and pkgconfig in the repositories are too old. The script centos_autotools.sh automatically installs dependencies to compile then install the tools.
CentOS/RHEL 8
sudo yum config-manager --set-enabled powertools
sudo yum install epel-release
sudo yum install libtool pkgconfig sqlite-devel autoconf automake openssl-devel libpcap-devel pcre2-devel rfkill libnl3-devel gcc gcc-c++ ethtool hwloc-devel libcmocka-devel make file expect hostapd wpa_supplicant iw usbutils tcpdump screen zlib-devel
openSUSE
sudo zypper install autoconf automake libtool pkg-config libnl3-devel libopenssl-1_1-devel zlib-devel libpcap-devel sqlite3-devel pcre2-devel hwloc-devel libcmocka-devel hostapd wpa_supplicant tcpdump screen iw gcc-c++ gcc ethtool pciutils usbutils expect
Mageia
sudo urpmi autoconf automake libtool pkgconfig libnl3-devel libopenssl-devel zlib-devel libpcap-devel sqlite3-devel pcre2-devel hwloc-devel libcmocka-devel hostapd wpa_supplicant tcpdump screen iw gcc-c++ gcc make expect
Alpine
sudo apk add gcc g++ make autoconf automake libtool libnl3-dev openssl-dev ethtool libpcap-dev cmocka-dev hostapd wpa_supplicant tcpdump screen iw pkgconf util-linux sqlite-dev pcre2-dev linux-headers zlib-dev pciutils usbutils expect
Note: Community repository needs to be enabled for iw
Clear Linux
sudo swupd bundle-add c-basic devpkg-openssl devpkg-libgcrypt devpkg-libnl devpkg-hwloc devpkg-libpcap devpkg-pcre2 devpkg-sqlite-autoconf ethtool wget network-basic software-testing sysadmin-basic wpa_supplicant os-testsuite
Note: hostapd must be compiled manually, it is not present in the repository
BSD
FreeBSD
pkg install pkgconf shtool libtool gcc9 automake autoconf pcre2 sqlite3 openssl gmake hwloc cmocka
DragonflyBSD
pkg install pkgconf shtool libtool gcc8 automake autoconf pcre2 sqlite3 libgcrypt gmake cmocka
OpenBSD
pkg_add pkgconf shtool libtool gcc automake autoconf pcre2 sqlite3 openssl gmake cmocka
NetBSD
pkg_add pkgconf libtool gcc7 automake autoconf pcre2 sqlite3 openssl gmake cmocka
macOS
XCode, Xcode command line tools and HomeBrew are required.
brew install autoconf automake libtool openssl shtool pkg-config hwloc pcre2 sqlite3 libpcap cmocka
Windows
Cygwin
Cygwin requires the full path to the setup.exe utility, in order to
automate the installation of the necessary packages. In addition, it
requires the location of your installation, a path to the cached
packages download location, and a mirror URL.
An example of automatically installing all the dependencies
is as follows:
c:\cygwin\setup-x86.exe -qnNdO -R C:/cygwin -s http://cygwin.mirror.constant.com -l C:/cygwin/var/cache/setup -P autoconf -P automake -P bison -P gcc-core -P gcc-g++ -P mingw-runtime -P mingw-binutils -P mingw-gcc-core -P mingw-gcc-g++ -P mingw-pthreads -P mingw-w32api -P libtool -P make -P python -P gettext-devel -P gettext -P intltool -P libiconv -P pkg-config -P git -P wget -P curl -P libpcre2-devel -P libssl-devel -P libsqlite3-devel
MSYS2
pacman -Sy autoconf automake-wrapper libtool msys2-w32api-headers msys2-w32api-runtime gcc pkg-config git python openssl-devel openssl libopenssl msys2-runtime-devel gcc binutils make pcre2-devel libsqlite-devel
Docker containers
We have two repositories on DockerHub:
- aircrackng/release: Each release
- aircrackng/git: every commit in the git repository
Base command for the git version:
sudo docker run --rm -it aircrackng/git
Available platforms/CPU architectures:
- linux/386 (base image: debian:unstable-slim)
- linux/amd64 (base image: debian:unstable-slim)
- linux/arm/v5 (base image: debian:unstable-slim)
- linux/arm/v6 (base image: alpine:3)
- linux/arm/v7 (base image: debian:unstable-slim)
- linux/arm64/v8 (base image: debian:unstable-slim)
- linux/mips64le (base image: debian:unstable-slim)
- linux/ppc64le (base image: debian:unstable-slim)
- linux/riscv64 (base image: debian:unstable-slim)
- linux/s390x (base image: debian:unstable-slim)
Compiling
To build aircrack-ng, the Autotools build system is utilized. Autotools replaces
the older method of compilation.
NOTE: If utilizing a developer version, eg: one checked out from source control,
you will need to run a pre-configure script. The script to use is one of the
following: autoreconf -i or env NOCONFIGURE=1 ./autogen.sh.
First, ./configure the project for building with the appropriate options specified
for your environment:
TIP: If the above fails, please see above about developer source control versions.
Next, compile the project (respecting if make or gmake is needed):
-
Compilation:
make -
Compilation on *BSD or Solaris:
gmake
Finally, the additional targets listed below may be of use in your environment:
-
Execute all unit testing:
make check -
Execute all integration testing (requires root):
make integration -
Installing:
make install -
Uninstall:
make uninstall
./configure flags
When configuring, the following flags can be used and combined to adjust the suite
to your choosing:
-
with-airpcap=DIR: needed for supporting airpcap devices on Windows (Cygwin or MSYS2 only).
Replace DIR above with the absolute location to the root of the
extracted source code from the Airpcap CD or downloaded SDK available
online. Required on Windows to buildbesside-ng,besside-ng-crawler,
easside-ng,tkiptun-ngandwesside-ngwhen building experimental tools.
The developer pack (Compatible with version 4.1.1 and 4.1.3) can be downloaded at
https://support.riverbed.com/content/support/software/steelcentral-npm/airpcap.html -
with-experimental: needed to compile
tkiptun-ng,easside-ng,buddy-ng,
buddy-ng-crawler,airventriloquistandwesside-ng.
libpcap development package is also required to compile most of the tools.
If not present, not all experimental tools will be built.
On Cygwin, libpcap is not present and the Airpcap SDK replaces it.
See —with-airpcap option above. -
with-ext-scripts: needed to build
airoscript-ng,versuck-ng,airgraph-ngand
airdrop-ng.
Note: Each script has its own dependencies. -
with-gcrypt: Use libgcrypt crypto library instead of the default OpenSSL.
And also use internal fast sha1 implementation (borrowed from GIT).
Dependency (Debian): libgcrypt20-dev -
with-duma: Compile with DUMA support. DUMA is a library to detect buffer overruns and underruns.
Dependency (Debian): duma -
disable-libnl: Set up the project to be compiled without libnl (1 or 3). Linux option only.
-
without-opt: Do not enable -O3 optimizations.
-
enable-shared: Make OSdep a shared library.
-
disable-shared: When combined with enable-static, it will statically compile Aircrack-ng.
-
with-avx512: On x86, add support for AVX512 instructions in aircrack-ng. Only use it when
the current CPU supports AVX512. -
with-static-simd=: Compile a single optimization in aircrack-ng binary. Useful when compiling
statically and/or for space-constrained devices. Valid SIMD options: x86-sse2,
x86-avx, x86-avx2, x86-avx512, ppc-altivec, ppc-power8, arm-neon, arm-asimd.
Must be used with —enable-static —disable-shared. When using those 2 options, the default
is to compile the generic optimization in the binary. —with-static-simd merely allows
to choose another one. -
enable-maintainer-mode: It is important to enable this flag when developing with Aircrack-ng. This flag enables additional compile warnings and safety features.
Examples:
-
Configure and compiling:
./configure --with-experimental make -
Compiling with gcrypt:
./configure --with-gcrypt make -
Installing:
make install -
Installing (strip binaries):
make install-strip -
Installing, with external scripts:
./configure --with-experimental --with-ext-scripts make make install -
Testing (with sqlite, experimental and pcre2)
./configure --with-experimental make make check -
Compiling on OS X with macports (and all options):
./configure --with-experimental gmake -
Compiling on macOS running on M1/AARCH64 and Homebrew:
autoreconf -vif env CPPFLAGS="-Wno-deprecated-declarations" ./configure --with-experimental make make check -
Compiling on OS X 10.10 with XCode 7.1 and Homebrew:
env CC=gcc-4.9 CXX=g++-4.9 ./configure make make checkNOTE: Older XCode ships with a version of LLVM that does not support CPU feature
detection; which causes the./configureto fail. To work around this older LLVM,
it is required that a different compile suite is used, such as GCC or a newer LLVM
from Homebrew.If you wish to use OpenSSL from Homebrew, you may need to specify the location
to its installation. To figure out where OpenSSL lives, run:brew --prefix opensslUse the output above as the DIR for
--with-openssl=DIRin the./configureline:env CC=gcc-4.9 CXX=g++-4.9 ./configure --with-openssl=DIR make make check -
Compiling on FreeBSD with gcc9
env CC=gcc9 CXX=g++9 MAKE=gmake ./configure gmake -
Compiling on Cygwin with Airpcap (assuming Airpcap devpack is unpacked in Aircrack-ng directory)
cp -vfp Airpcap_Devpack/bin/x86/airpcap.dll src cp -vfp Airpcap_Devpack/bin/x86/airpcap.dll src/aircrack-osdep cp -vfp Airpcap_Devpack/bin/x86/airpcap.dll src/aircrack-crypto cp -vfp Airpcap_Devpack/bin/x86/airpcap.dll src/aircrack-util dlltool -D Airpcap_Devpack/bin/x86/airpcap.dll -d build/airpcap.dll.def -l Airpcap_Devpack/bin/x86/libairpcap.dll.a autoreconf -i ./configure --with-experimental --with-airpcap=$(pwd) make -
Compiling on DragonflyBSD with gcrypt using GCC 8
autoreconf -i env CC=gcc8 CXX=g++8 MAKE=gmake ./configure --with-experimental --with-gcrypt gmake -
Compiling on OpenBSD (with autoconf 2.69 and automake 1.16)
export AUTOCONF_VERSION=2.69 export AUTOMAKE_VERSION=1.16 autoreconf -i env MAKE=gmake CC=cc CXX=c++ ./configure gmake -
Compiling and debugging aircrack-ng
export CFLAGS='-O0 -g'
export CXXFLAGS='-O0 -g'
./configure --with-experimental --enable-maintainer-mode --without-opt
make
LD_LIBRARY_PATH=.libs gdb --args ./aircrack-ng [PARAMETERS]
IDE development
VS Code — devcontainers
A VS Code development environment is provided, as is, for rapid setup of a development environment. This additionally adds support for GitHub Codespaces.
Requirements
The first requirement is a working Docker Engine environment.
Next, an installation of VS Code with the following extension(s):
Remote - Containersby Microsoft.
The «Remote — Containers» extension will refuse to work with OSS Code.
Usage
- Clone this repository to your working folder:
$ git clone --recursive https://github.com/aircrack-ng/aircrack-ng.git
$ cd aircrack-ng
- After cloning this repository, open the folder inside VS Code.
IMPORTANT: You should answer «Yes», if it asks if the folder should be opened inside a remote container. If it does not ask, then press
Ctrl+Shift+Pand typeopen in container. This should bring up the correct command, for which pressing enter will run said command.
- A number of warnings might appear about a missing
compile_commands.jsonfile. These are safe to ignore for a moment, as this file is automatically generated after the initial compilation. - Now build the entire project by pressing
Ctrl+Rand selectingBuild Fullfrom the pop-up menu that appears. - VS Code should detect the
compile_commands.jsonfile and ask if it should be used; selecting «Yes, always» will complete the initial setup of a fully working IDE.
IMPORTANT: If it doesn’t detect the file, pressing
Ctrl+Shift+Pand typingreload windowwill bring up the selection to fully reload the environment.
- At this point, nearly all features of VS Code will function; from Intellisense, auto-completion, live documentation, to code formatting. Additionally, there are pre-configured tasks for builds and tests, as well as an example GDB/LLDB configuration for debugging
aircrack-ng.
Packaging
Automatic detection of CPU optimization is done at run time. This behavior
is desirable when packaging Aircrack-ng (for a Linux or other distribution.)
Also, in some cases it may be desired to provide your own flags completely and
not having the suite auto-detect a number of optimizations. To do this, add
the additional flag --without-opt to the ./configure line:
./configure --without-opt
Using pre-compiled binaries
Linux/BSD
Aircrack-ng is available in most distributions repositories. However, it is not always up-to-date.
Windows
- Install the appropriate «monitor» driver for your card; standard drivers don’t work for capturing data.
- Aircrack-ng suite is command line tools. So, you have to open a command-line
Start menu -> Run... -> cmd.exethen use them - Run the executables without any parameters to have help
Documentation
Some more information is present in the README file.
Documentation, tutorials, … can be found on https://aircrack-ng.org
Support is available in the GitHub Discussions and on IRC (in #aircrack-ng on Libera Chat).
Every tool has its own manpage. For aircrack-ng, man aircrack-ng