Вступлениe
Здравствуй, дорогой читатель, эта статья будет про то, как устанавливаются утилиты из GitHub на разных ОС(операционных системах), тебя ждет впереди много интересного!
Наверное, каждый пробовал скачивать утилиты с GitHub по видео-гайдам из ютуба «Как хакнуть пентагон за секунду« или »бесплатный телеграм скрапер участников». Эти громкие названия действительно работают и ничего не понимающие люди идут скачивать утилиту с GitHub, потому что с её помощью можно взломать подругу и разведать её интимки.
Но нас это не интересует. В гите находится огромное количество инструментов для OSINT, аналогов которым не найти. Сегодня мы глубоко в GitHub лезть не будем, а лишь узнаем, как же использовать этот неиссякаемый инструментарий.
*Внимание, переконцентрация слова GitHub
GitHub — крупнейший веб-сервис для размещения IT-проектов и их совместной разработки. На нем хостятся ваши проекты, утилиты, фотки и что угодно.
Практика
На GitHub свыше 100000+ утилит(небольших программ) и каждая по-своему уникальна, отличаются они способом установки и языком программирования, на котором написана сама утилита и, если в зависимости от языка, эта установка меняется кардинально и поэтому приходится разбираться с документацией по установке скрипта(набор строк кода), смотреть гайды по установке или в последнюю очередь — обращаться к людям, знающим язык программирования, на котором написан код.
На страничке мы видим: разбор и объяснение про репозиторий(любой проект, размещенный на GitHub); это мы пропускаем и идем к пункту Installing — здесь рассказано, на каких ОС утилита работает (Windows/Linux/MacOs/Termux) .
Что написано:
apt-get update -y
apt-get install git
git clone https://github.com/Red-company/RDDoS_Tool.git
cd RDDoS_Tool
bash setup.sh
python3 RDDoS_Tool.py
Первое поле — это обновление пакетов(комплектующих системы) с помощью конкретного пакетного менеджера в ОС линукс
Второе поле — установка GIT
Третье поле — установка утилиты с помощью GIT, также можно и с помощью веб-интерфейса GitHub скачать
Четвертое поле — это переход в директорию(папка в файловой системе)
Пятое поле — это запуск .sh скрипта с помощью Bash
Шестое поле — это запуск основного скрипта с помощью python(язык на котором и написана сама утилита)
Некоторые пункты будут пропущены, потому что не соответствуют структуре ОС
Установка с помощью Windows
Второе, установка GIT, читаем мануал
Третье, скачивание утилиты с GitHub, нажимаем комбинацию клавиш > Win+R пишем > powershell делаем > запустить; переходим на рабочий стол cd «c:\\Users\ваш юзернейм\Desktop\» пишем заветную команду:
git clone https://github. com/Red-company/RDDoS_Tool. git
Также это можно сделать с помощью веб-интерфейса, на скрине сверху нажимаем Download ZIP и перемещаем из папки Загрузок на рабочий стол
Четвертое, переходим в директорию именно с помощью терминала, но сначала убедитесь, в какой директории вы находитесь и не находитесь ли вы в корневой директории. Для этого используем команду :
cd RDDoS_Tool
Пятое, запускаем установочный скрипт bash setup. sh, но на виндовс он работать не будет, на странице написано, что нужно сделать так, значит делаем вручную как сказано
pip install tqdm
pip install pyfiglet
А также устанавливаем python, потому что это будет нужно для исполнения основного файла ТЫК
Шестое, запускаем сам python скрипт
python3 RDDoS_Tool. py
Установка с помощью Linux
Если у вас пакетный менеджер apt(проверьте методом тыка), то смело делаем все как в установке показано:
apt-get update -y
apt-get install git
git clone https://github.com/Red-company/RDDoS_Tool.git
cd RDDoS_Tool
bash setup.sh
python3 RDDoS_Tool.py
Если у вас другой пакетный менеджер, то следуем инструкции дальше!
- 1. Это обновление пакетов, вам нужно посмотреть как обновлять пакеты на вашем линукс-дистрибутиве(разновидность ОС Linux) и обновить
- 2. Установка GIT и опять же посмотрите, как установить GIT на вашем дистрибутиве линукс
- 3.Установка утилиты, тут по аналогии с виндовс действуем:
Переходим в директорию рабочего стола cd $HOME/Desktop/ и устанавливаем:
git clone https://github. com/Red-company/RDDoS_Tool. git
4. Переход в директорию
5. Исполнение Bash-скрипта, если у вас не пакетный менеджер APT, то устанавливаем пакеты вручную. А знаю я это, потому что нужно посмотреть в код setup. sh и посмотреть, как исполняется этот скрипт и что делает, примерно можно понять, что он делает и для какого ПМ(наиболее популярная утилита управления пакетами для Linux систем) он работает
pip install tqdm
pip install pyfiglet
С помощью вашего ПМ установите python:
sudo apt install python
6. Запуск скрипта
python3 RDDoS_Tool. py
Как узнать, какой у меня дистрибутив линукс? ТЫК
Установка с помощью Android
Чтобы исполнять код, нам нужно скачать Termux и прочитать, что это такое на вики
Делаем все по аналогии с оригинальной установкой, а также с линуксом, попутно устанавливая git, python, pip, пакеты pip
apt-get update -y
apt-get install git
git clone https://github.com/Red-company/RDDoS_Tool.git
cd RDDoS_Tool
bash setup.sh
python3 RDDoS_Tool.py
Установка с помощью MacOS
MacOS в первую очередь основан на Unix, а это значит, что почти все команды у него совпадают с Linux-установкой и поэтому делаем все также, только вместо apt-get используем пакетный менеджер MacOS > brew
brew update
brew install git
git clone https://github.com/Red-company/RDDoS_Tool.git
cd RDDoS_Tool
bash setup.sh
python3 RDDoS_Tool.py
Не забываем про установку git, python, pip, пакеты pip, которые по умолчанию должны быть на MacOS, но лучше обезопаситься:
brew install python git python-pip
Потренируйтесь
В довесок оставлю здесь небольшую подборку инструментов с GitHub, в установке которых вы можете опробовать свои силы:
Больше можно найти на нашем канале :
Вывод
Сегодня мы разобрали основные способы установки утилит из GitHub, теперь вы можете смело использовать репозитории, безостановочно публикующиеся в OSINT-каналах.
Спасибо за прочтение этой статьи!

GitHub is the most used version control system in the world. This project was developed by Linus Torvalds, the creator of the Linux operating system, and it is used by an enormous collection of software projects both commercial and open-source that depend on Git for version control. Kindly refer to these related guides: How to create and deploy a local Registry Server with Docker Image, how to Pull your first Nginx Container Image from Docker Hub and deploy it to your local machine, Azure DevOps and GitHub integration for Docker and Kubernetes deployment, how to create a static pod in Kubernetes, and how to install, register and start GitLab Runner on Windows.
Note: GitHub is not a store app 😉 GitHub is a platform where developers put their code*. Any code. However, It could be a Windows program. It could be an Android program. Therefore, It could be HTML. It could be a library. Nevertheless, It could be a snippet of code. It could be coded in a language invented by the developer. Kindly refer to some of these related guides below.
- For how to install Git on macOS.
- For how to use AWS CodeCommit.
Note: Some repositories have a Readme, see an example here for an example of a read and this guides you on how to compile or install the program. You may want to see how to install, register and start GitLab Runner on Windows. This is up to the developers that posted the code. If there isn’t a readme then try to figure out what kind of code it is.
Install Git
To install Git, download Git for Windows in the following location.

– Click on run (If you wish to save and then execute you can as well)
– And follow other installation processes. It is simple, because of this I will not be explaining all the screenshots.
– Click on next

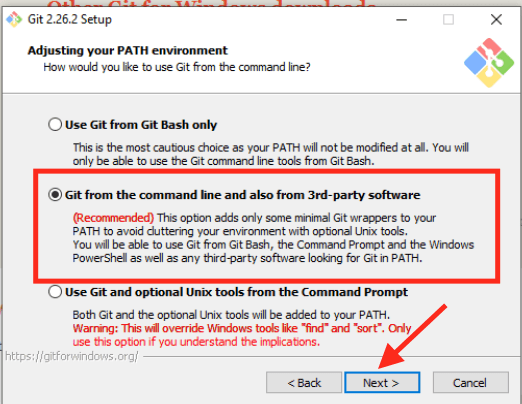
In the next window, select the option “Git from the command line and also from 3rd party” and click on Next.
Choose to use any of the transport types.
– Select the option to use OpenSSL
– Ensure you use the same settings as shown below unless you extremely know what you are doing.


Enable the following configuration option and
– Click on Install
– Finally, you can launch the Git Bash by clicking on Next in as shown below.


Next, you will have to clone the repository. This repository contains the source code for the Package.
– Navigate to the URL here. Note, this repository will be different from yours. Ensure to access the right repository and have it cloned.

Next, on the Git Terminal window, enter the following command (syntax) to clone your repositories. The git command runs Git. Then, it’s told to clone a repository, and the link to the Windows Package Installer repository on GitHub is provided.
git clone https://github.com/microsoft/winget-pkgs.gitNow, we need to compile and install the code. Access the location of the cloned repo. In my case, I ran the “pwd” to determine the current directory i was and to determine where cloned repo was stored. For me, it was saved to this location C:\Users\TechDirectArchive
Tip! In whichever directory you were, that will be the location of your cloned repository (directory). Everything from the repository will be in a new directory named after that repository.

I hope you found this blog post helpful. If you have any questions, please let me know in the comment session.
React.js is a JavaScript library that’s widely popular for building dynamic user interfaces. It’s an open-source project, which means that you can find a vast array of React applications and projects on GitHub. If you want to download and run a React project on your local machine, there are a few steps you can follow to do so. Below, I’ll provide you with a step-by-step guide on how to download a React project from GitHub and run it locally.
Prerequisites:
1.Node.js: Node.js is a JavaScript runtime environment that is used for building server-side applications. It is also required for running React projects. You can download the latest version of Node.js from their official website.
2. npm (Node Package Manager): npm is a package manager for Node.js that allows you to download and install packages and dependencies that are required for your React project. npm is included with Node.js, so you don’t have to install it separately.
3. Git: Git is a version control system that is used for tracking changes in source code. You’ll need to have Git installed in order to download the React project from GitHub. You can download the latest version of Git from their official website.
Once you have these prerequisites installed, you can follow these steps to download a React project from Github and run it on your computer:
1. Clone the repository: Here are the steps to clone a GitHub repository for a React app:
- Open your web browser and navigate to the GitHub repository page for the React app.
- On the right-hand side of the page, click on the “Code” button.
- In the drop-down menu, select HTTPS to clone the repository.
- Click the “Copy” button to copy the URL of the repository to your clipboard.

- Now Open the terminal or command prompt and navigate to the directory where you want to store the React project. Then, run the following command to clone the repository:
git clone https://github.com/<"username">/<"repo-name">.git
- Replace <“username”> with the username of the Github user who owns the repository, and <repo-name> with the name of the repository.
Example:
git clone https://github.com/ankitjangidx/gfg-demo.git

2. Navigate to the project directory: After the repository is cloned, navigate to the project directory using the following command:
cd <repo-name>
Example:
cd gfg-demo

3. Install dependencies: Once you’re inside the project directory, run the following command to install the dependencies required for the project:
npm install
- This command will read the package.json file in the repository and download all of the dependencies listed there.

- In case of issues shown after the npm install, run the below to automatically fix the issues:
npm audit fix
4. Start the development server by running the following command:
$ npm start

- This command will start a local development server and run the React project in your web browser. You can access the project by navigating to http://localhost:3000 in your web browser.

- Note that If the React project was built with a different setup, you may need to run it with a different command, such as npm run dev or yarn start. Check the package.json file or the README in the repository for more information.

That’s it! You should now be able to download and run a React project from Github on your PC.
It is important to note that you need to have Git and Node.js installed on your computer to be able to download and run the React project from GitHub. Also, you should make sure that you have the latest version of npm installed. With these steps, you can easily download and run a React project from Github on your local computer.
Last Updated :
28 Feb, 2023
Like Article
Save Article
Как собрать проект C++ с github из исходников и подключить его к Visual Studio
P.S. В новых сборках Visual Studio проекты из репозиториев открываются просто из меню Файл — Клонировать репозиторий. В статье речь идёт о ситуации, когда так сделать невозможно.
Благодаря менеджеру пакетов winget, уже входящему в актуальные сборки масдайки, теперь в Windows 10 можно инсталлировать приложения одной простой консольной командой
(см. также доку от Микрософта).
Но мы рассмотрим сейчас ситуацию, когда у нас есть только ссылка на исходники проекта, скажем, на Гитхабе
(возьмём для примера библиотеку для простых чисел primesieve) и нужно каким-то образом «вручную» скомпилировать внешний проект в своей Studio, чтобы воспользоваться его возможностями в своём приложении.
В противном случае, конечно же, нестандартный include вроде этого, который вы нашли в коде-образце
#include <primesieve.hpp>
работать не будет ни за что.
Первым делом скачаем все исходники внешнего проекта «как есть» в архиве .zip, для этого у нас на гитхабе есть кнопка «Download ZIP»:

Как загрузить проект с github в архиве .zip
Развернём проект, не создавая новой папки, если у вашего архиватора нет
такого же пункта меню, просто сотрите предлагаемое архиватором имя новой папки, потому что папка уже есть в архиве:

Извлечь внешний проект из архива, не создавая новой папки
Если покопаться в файле readme.md проекта, как правило, можно найти инструкцию по установке (Build instructions) и даже «Detailed build instructions», где говорится, в числе прочего, и о компиляции проекта под Microsoft Visual C++:

Команды cmake для компиляции проекта со страницы документации
Откроем свой «некомпилируемый» без нужной библиотеки проект в Studio (я использую актуальную сборку версии 2019) и обратимся к команде меню Вид — Терминал.
Выберем инструмент «Командная строка разработчика» (по умолчанию в новых сборках теперь выбран PowerShell, впрочем, если в документации приведены команды PowerShell, то применяйте их).
У Микрософта инструмент описан вот здесь.

Командная строка разработчика в Studio
В командной строке пишем команды из документации, но сначала, конечно, нужно перейти в ту папку, где у вас развёрнут скачанный проект. Мне понадобилось ввести в консоли следующее, завершая каждую команду нажатием Enter:
d:
cd \temp\primesieve-master
— теперь я в нужной папке, так как развернул свой архив в папку d:\temp
Далее как написано:
cmake -G "Visual Studio 16 2019" .
cmake --build . --config Release
Можно просто копировать команды со страницы документации, в окне консоли вверху есть стандартная кнопочка «Вставить».
А вот точка в записи команд имеет значение, это ссылка на текущую папку!
Ну и, конечно, для другой версии Studio будет другое указание компилятора, узнать своё можно командой
cmake -G
Нужный генератор будет помечен в списке «звёздочкой».
Если что-то пошло не так, ошибаетесь в консольных командах и получаете
сообщения об ошибках кэша — сотрите файл CMakeCache.txt из папки
скопированного проекта и попробуйте снова.
Теперь проект можно открывать в Studio и работать с ним, все нужные файлы есть в папке d:\temp\primesieve-master
Но мы хотим подключить всё, что нужно, к своему имеющемуся проекту, а не пытаться модифицировать чужую библиотеку.
Примерный путь описан вот здесь, мне же пришлось сделать конкретно следующее:
- Меню Проект — Свойства, слева выбираем Свойства конфигурации, C/C++, Общие,
раскрываем поле «Дополнительные каталоги включаемых файлов», говорим «Изменить» и показываем на папку
D:\Temp\primesieve-master\include. В вашем проекте, как правило, тоже будет вложенная папкаinclude. - В том же окне выбираем Компоновщик — Общие — Дополнительные каталоги библиотек, «Изменить» и добавляем путь
D:\Temp\primesieve-master\Release. Этого может оказаться мало,
у вашего проекта и внешнего должны быть выбраны одинаковые конфигурации решения.
Так как я выбрал Release для внешнего проекта, то и в своём проекте в списке «Конфигурации решения» (на стандартной панели инструментов) указал Release и платформу x64.
Можно было работать и с Debug, но тогда и внешний проект компилируем как Debug и потом выбираем путьD:\Temp\primesieve-master\Debug. - В списке C/C++ — Создание кода — Библиотека времени выполнения выбрал
Многопоточный DLL (/MD), иначе будет «LNK2038: обнаружено несоответствие для ‘RuntimeLibrary’: значение ‘MT_StaticRelease’ не соответствует значению ‘MD_DynamicRelease’ в file.obj». - Сам файл библиотеки, как правило имеющий тип
.lib, тоже нужно прописать.
Всё в том же окне свойства проекта выбираем список Компоновщик — Ввод,
раскрываем список «Дополнительные зависимости», жмём «Изменить» и указываем
в поле ввода имя файла библиотекиprimesieve.lib - На всякий случай, проверяем, что у нас в списке
Компоновщик — Система — Подсистема, у меня там простоКонсоль (/SUBSYSTEM:CONSOLE), для других
типов проектов может понадобиться изменение и этой настройки.
После этого у меня всё заработало.
Ну а конкретная задача, на которой я проверял библиотеку —
печать самых длинных цепочек последовательных простых чисел,
в которых разница между соседними значениями строго возрастает или строго убывает,
предел счёта равен 1000000, вот сама программа:
#include <cstdint>
#include <iostream>
#include <vector>
#include <primesieve.hpp>

void print_diffs(const std::vector<uint64_t>& vec) {
 for (size_t i = 0, n = vec.size(); i != n; ++i) {
  if (i != 0)
   std::cout << " (" << vec[i] - vec[i - 1] << ") ";
  std::cout << vec[i];
 }
 std::cout << '\n';
}

int main() {
 std::vector <uint64_t> asc, desc;
 std::vector <std::vector<uint64_t>> max_asc, max_desc;
 size_t max_asc_len = 0, max_desc_len = 0;
 uint64_t prime;
 const uint64_t limit = 1000000;
 for (primesieve::iterator pi; (prime = pi.next_prime()) < limit; ) {
  size_t alen = asc.size();
  if (alen > 1 && prime - asc[alen - 1] <= asc[alen - 1] - asc[alen - 2])
   asc.erase(asc.begin(), asc.end() - 1);
  asc.push_back(prime);
  if (asc.size() >= max_asc_len) {
   if (asc.size() > max_asc_len) {
    max_asc_len = asc.size();
    max_asc.clear();
   }
   max_asc.push_back(asc);
  }
  size_t dlen = desc.size();
  if (dlen > 1 && prime - desc[dlen - 1] >= desc[dlen - 1] - desc[dlen - 2])
   desc.erase(desc.begin(), desc.end() - 1);
  desc.push_back(prime);
  if (desc.size() >= max_desc_len) {
   if (desc.size() > max_desc_len) {
    max_desc_len = desc.size();
    max_desc.clear();
   }
   max_desc.push_back(desc);
  }
 }
 std::cout << "Longest run(s) of ascending prime gaps up to " << limit << ":\n";
 for (const auto& v : max_asc)
  print_diffs(v);
 std::cout << "\nLongest run(s) of descending prime gaps up to " << limit << ":\n";
 for (const auto& v : max_desc)
  print_diffs(v);
 return 0;
}
Ответы вышли такие:
Longest run(s) of ascending prime gaps up to 1000000:
128981 (2) 128983 (4) 128987 (6) 128993 (8) 129001 (10) 129011 (12) 129023 (14) 129037
402581 (2) 402583 (4) 402587 (6) 402593 (8) 402601 (12) 402613 (18) 402631 (60) 402691
665111 (2) 665113 (4) 665117 (6) 665123 (8) 665131 (10) 665141 (12) 665153 (24) 665177

Longest run(s) of descending prime gaps up to 1000000:
322171 (22) 322193 (20) 322213 (16) 322229 (8) 322237 (6) 322243 (4) 322247 (2) 322249
752207 (44) 752251 (12) 752263 (10) 752273 (8) 752281 (6) 752287 (4) 752291 (2) 752293
За счёт хорошо оптимизированного кода библиотеки считается всё мгновенно.
Это задача из списка задач на простые числа
21.10.2021, 13:15 [9274 просмотра]
К этой статье пока нет комментариев, Ваш будет первым
This article is about how to install python package from GitHub, for this, you must have the latest version of python installed in your system.
How to check if python is installed or not?
Before getting into the procedure of how to install python package from GitHub the latest python version installed is a must. So to check if your system has python go to the command prompt and type
python -version
This will be the output if the version is installed

But if it is not installed, python not found will be displayed on the command prompt.
Install Python Package from Github on Windows
How to install a python package using pip install?
Usually, in python, a package is installed using the command
pip install packageName
But sometimes, if a newer version of the library of the package is available, it might not get installed using this command, for that, we will learn how to download and install python package from Github.
Install Python Package from Github in VSCode
First of all, go to Github, and search for the package that you need to install. You need to make sure that the package has a “setup.py” file, for example in our case if we want to install the flask package from GitHub, I will search for the flask python package, and then check if it has the file “setup.py”.
ALSO READ: How to Build Powerful Python Custom Exceptions?
After making sure that there is a setup file, go to your VS Code, in case you do not have VS Code, you can download it and set up a virtual environment.
The command to set up the virtual environment is :
python -m venv environmentName
After setting up the environment, go to your source using the following command
source environmentName/bin/activate
And then write the following command to install the package using GitHub
pip install -e git+github-url-of-the-package#egg=packageName
In my case, if I want to download the flask package I will write
pip install -e git+https://github.com/pallets/flask#egg=flask
Install a Python Package from Github Using Windows Command Prompt
This method is simpler, just open the windows command prompt to install python package from GitHub and write the following command
pip install -e git+github-url-of-the-package#egg=packageName
In my case, if I want to download the flask package I will write
pip install -e git+https://github.com/pallets/flask#egg=flask
The command prompt will show some output and will notify if the package is installed or not.
If successful, the following output will be shown :
Obtaining flask from git+https://github.com/pallets/flask#egg=flask
  Cloning https://github.com/pallets/flask to c:\users\azka\desktop\python\src\flask
  Running command git clone --filter=blob:none --quiet https://github.com/pallets/flask 'C:\Users\Azka\Desktop\python\src\flask'
  Resolved https://github.com/pallets/flask to commit 9b44bf2818d8e3cde422ad7f43fb33dfc6737289
  Preparing metadata (setup.py) ... done
Requirement already satisfied: Werkzeug>=2.0 in c:\users\azka\appdata\local\programs\python\python310\lib\site-packages (from flask) (2.1.2)Requirement already satisfied: Jinja2>=3.0 in c:\users\azka\appdata\roaming\python\python310\site-packages (from flask) (3.0.3)
Requirement already satisfied: itsdangerous>=2.0 in c:\users\azka\appdata\local\programs\python\python310\lib\site-packages (from flask) (2.1.2)
Requirement already satisfied: click>=8.0 in c:\users\azka\appdata\local\programs\python\python310\lib\site-packages (from flask) (8.1.3)
Requirement already satisfied: colorama in c:\users\azka\appdata\roaming\python\python310\site-packages (from click>=8.0->flask) (0.4.4)
Requirement already satisfied: MarkupSafe>=2.0 in c:\users\azka\appdata\roaming\python\python310\site-packages (from Jinja2>=3.0->flask) (2.1.0)
Installing collected packages: flask
  Running setup.py develop for flask
Successfully installed flask
Install Python Package from GitHub on Linux
Install git on Linux (pre-requisite)
To install python package from Github on Linux you need to have git installed on your system. for that please type the following command on your Linux terminal.
sudo apt install git
The following output will be shown :
Reading package lists... Done
Building dependency tree
Reading state information... Done
git is already the newest version (1:2.25.1-1ubuntu3.4).
git set to manually installed.
0 upgraded, 0 newly installed, 0 to remove and 13 not upgraded.

ALSO READ: How to slice dictionary in Python? [SOLVED]
Install python package on Linux using pip
Let’s suppose we want to install a package «moviespy» from GitHub, go to the Linux terminal and type the following command:
pip install git+https://github.com/Zulko/moviepy
The following output will be shown
Successfully installed decorator-5.1.1 imageio-2.19.3 imageio-ffmpeg-0.4.7 moviepy-2.0.0.dev2 numpy-1.23.0 pillow-9.2.0 proglog-0.1.10 tqdm-4.64.0
Install Python Package from Github by cloning the git repository
Another way to install Python Package from Github by cloning the git repository, for this process write the following commands
$ git clone link-to-github-repository
In my case
$ git clone https://github.com/Zulko/moviepy
the output will be as follows
Cloning into 'moviepy'...
remote: Enumerating objects: 8208, done.
remote: Counting objects: 100% (44/44), done.
remote: Compressing objects: 100% (38/38), done.
remote: Total 8208 (delta 20), reused 19 (delta 6), pack-reused 8164
Receiving objects: 100% (8208/8208), 40.60 MiB | 1017.00 KiB/s, done.
Resolving deltas: 100% (5776/5776), done.
Updating files: 100% (255/255), done.
Then move to the project directory using the cd command
$ cd moviepy
Run the setup.py file to install the package
$ sudo python setup.py install
Conclusion
In this article we have studied how to install a package from python using GitHub, we have studied installation in two environments, one is the virtual environment created using vs code and one is using the windows command prompt.
Further study
Python Packages
Install python and pip