В этой инструкции подробно о способах удалить Xbox Game Bar как встроенными средствами системы — с помощью PowerShell, так и с помощью сторонних программ-деинсталляторов.
Удаление Xbox Game Bar в PowerShell
Стандартный способ удаления приложения Xbox Game Bar — использование команды Windows PowerShell. Шаги для этого будут следующими:
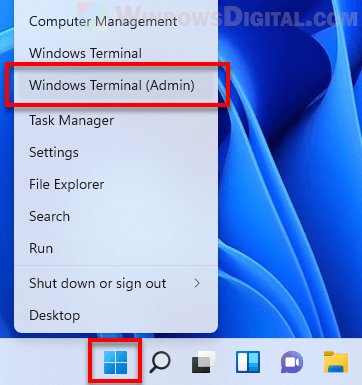
- Запустите Терминал Windows или Windows PowerShell от имени Администратора. В Windows 11 и 10 сделать это можно в контекстном меню кнопки «Пуск».
- Введите команду
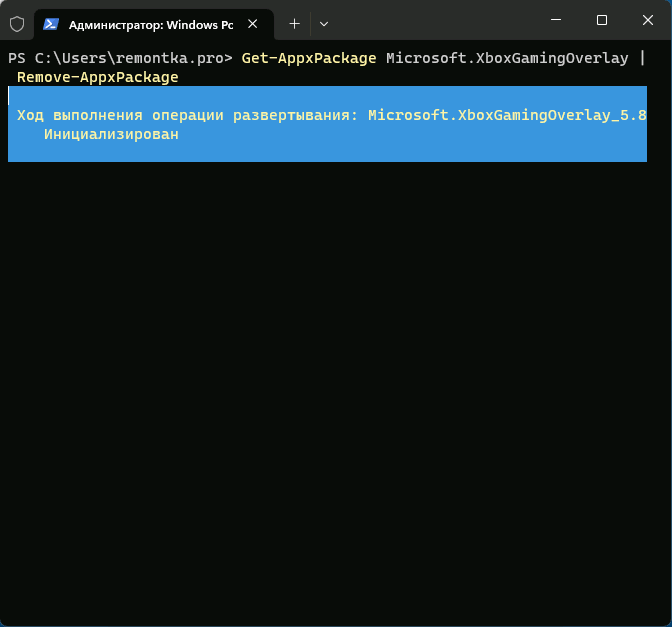
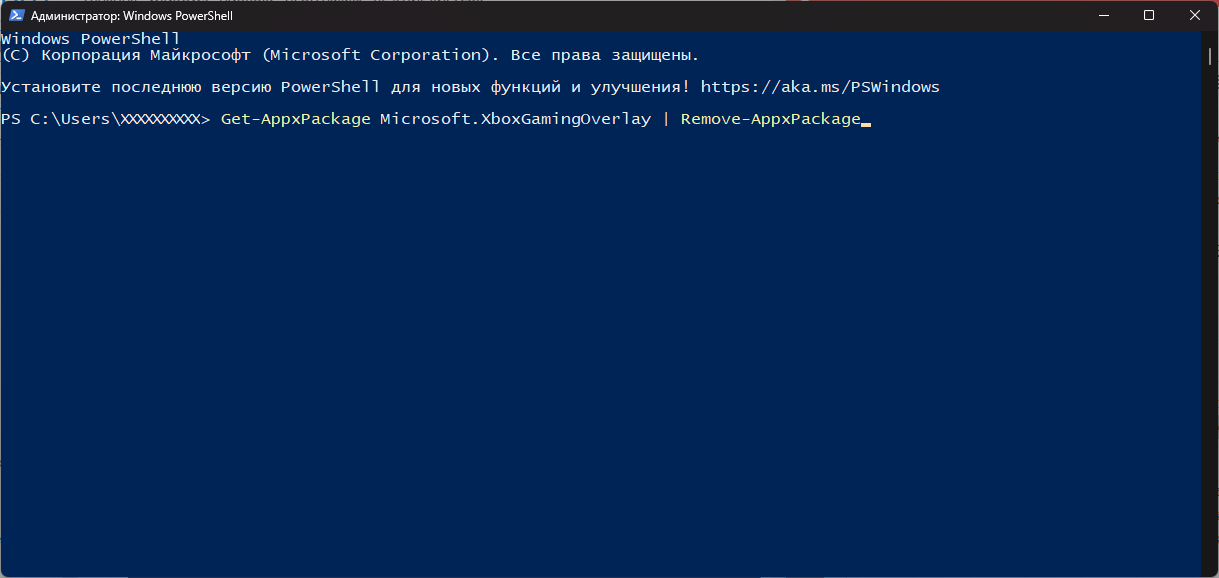
Get-AppxPackage Microsoft.XboxGamingOverlay | Remove-AppxPackage
и нажмите Enter.
- В результате приложение Xbox Game Bar будет удалено для текущего пользователя, но сам пакет приложения останется на компьютере.
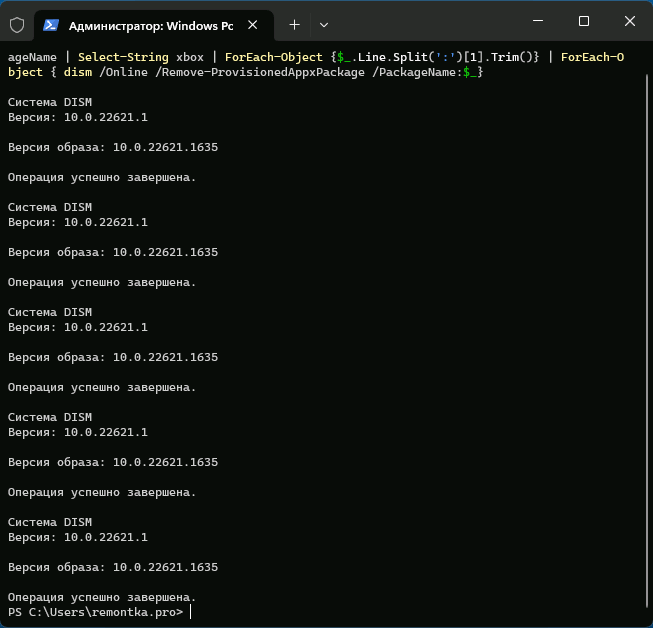
- Ещё три варианта команд, которые удаляет все приложения Xbox (не только Game Bar), также запускаем в PowerShell (первая команда оставляет хранящиеся на компьютере пакеты приложений, вторая и третья — удаляет их):
Get-AppxPackage | select-string xbox | Remove-AppxPackage
dism /Online /Get-ProvisionedAppxPackages | Select-String PackageName | Select-String xbox | ForEach-Object {$_.Line.Split(':')[1].Trim()} | ForEach-Object { dism /Online /Remove-ProvisionedAppxPackage /PackageName:$_}
Get-ProvisionedAppxPackage -Online | Where-Object { $_.PackageName -match "xbox" } | ForEach-Object { Remove-ProvisionedAppxPackage -Online -allusers -PackageName $_.PackageName }
Ещё один способ удалить Xbox Game Bar и другие, имеющие отношение к Xbox в PowerShell, указав конкретные пакеты приложений вручную (ключевое в контексте рассматриваемой темы — XboxGamingOverlay):
- Используем команду
Get-AppxPackage | Select-String xbox
чтобы получить имена пакетов.
- Используем по порядку команды
Remove-AppxPackage имя_пакета
для удаления каждого из них, имя пакета можно скопировать в буфер обмена прямо в PowerShell.
- Чтобы удалить их для всех пользователей, используем параметр -allusers
Remove-AppxPackage -allusers имя_пакета
- Для удаления не только установленного приложения, но и соответствующего пакета для всех пользователей:
Remove-ProvisionedAppxPackage -Online -allusers -PackageName имя_пакета
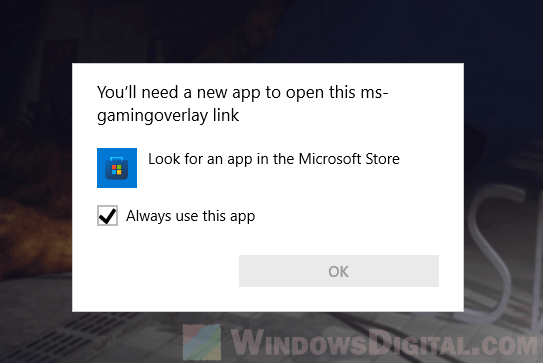
Обратите внимание, что после удаления Xbox Game Bar, вы можете начать получать сообщения об ошибках вида «Вам понадобится новое приложение, чтобы открыть эту ссылку ms-gamingoverlay» или «Получите приложение, чтобы открыть эту ссылку ms-gamingoverlay». Подробно про ошибки ms-gamingoverlay.
Сторонние деинсталляторы
Многие сторонние программы для удаления программ и встроенных приложений Windows позволяют, в том числе, легко удалить Xbox Game Bar. Среди рекомендуемых решений для этих целей:
- BC Uninstaller
- HiBit Uninstaller
Обе программы отлично справятся с задачей удаления Xbox Game Bar с компьютера, а делается это в простом графическом интерфейсе. Но при необходимости вы можете использовать и другие функциональные бесплатные деинсталляторы с функцией удаления встроенных приложений Windows 11 и других версий.
Game Bar в Windows 11 и Windows 10 – это всплывающий полноэкранный оверлей с множеством функций, которые могут понадобится в компьютерных играх. Game Bar позволяет делать скриншоты, записывать видео, управлять воспроизведением звука и записью голоса, отслеживать производительность компьютера, прослушивать музыку с помощью Spotify и общаться с друзьями в сети Xbox. Game Bar открывается при нажатии кнопки на геймпаде от Xbox или комбинацией клавиш Win-G.
Но, далеко не всем пользователям нравится Game Bar. Некоторых он только отвлекает от игры своими внезапными появлениями на весь экран. В данном материале мы расскажем, как отключить или полностью удалить Game Bar в Windows 11 и Windows 10.
Как отключить Game Bar в Windows 11
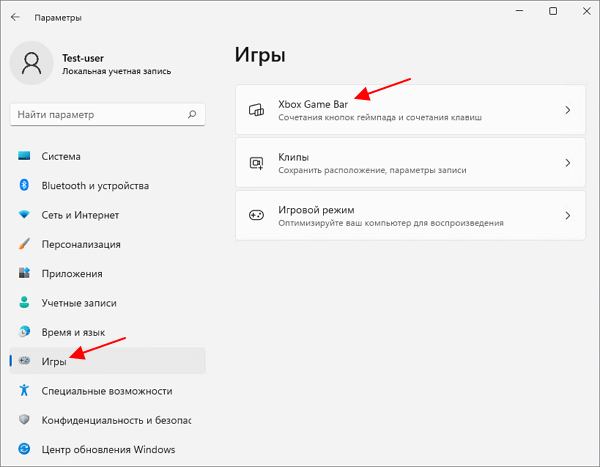
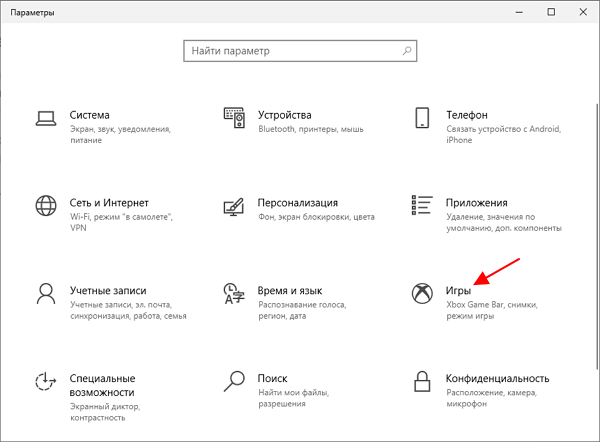
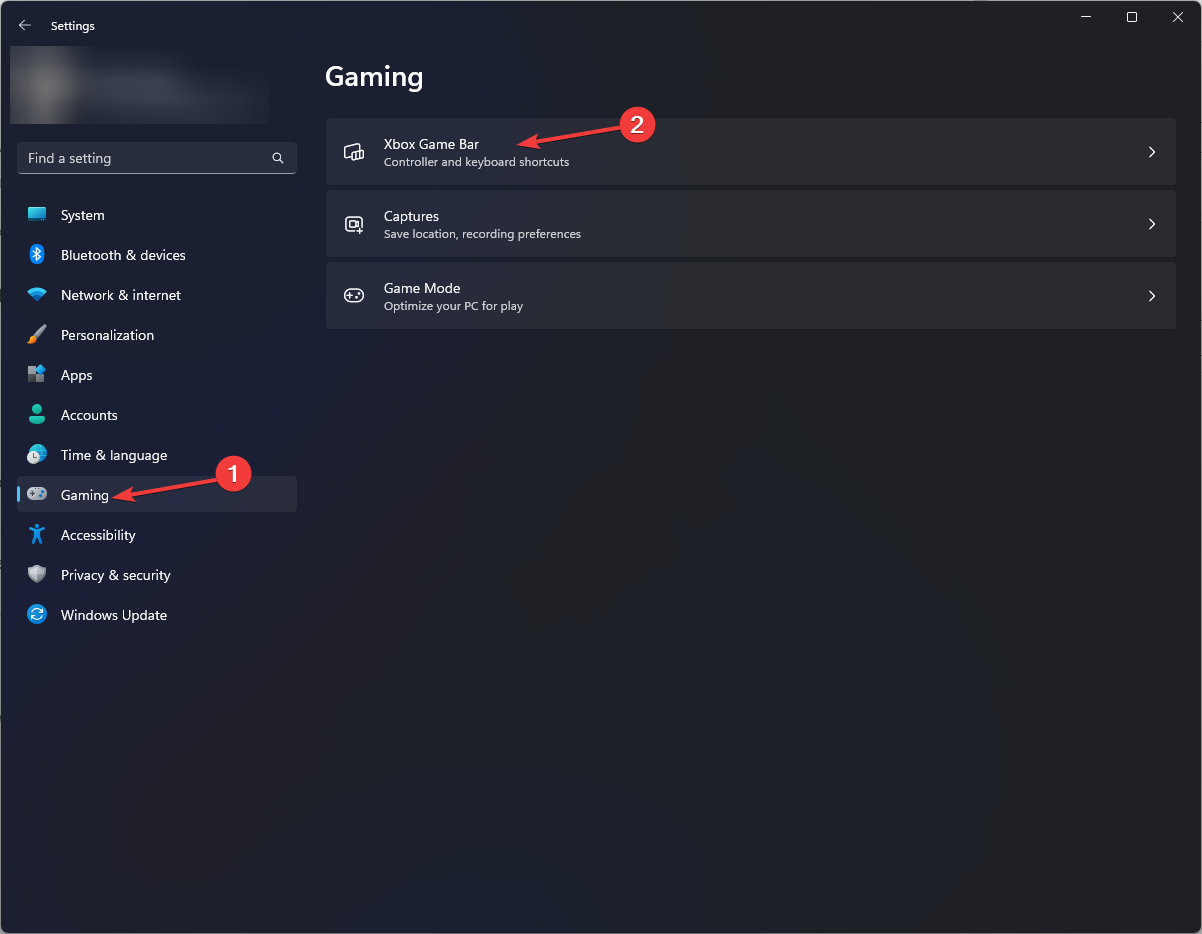
Если вы используете Windows 11, то для отключения Xbox Game Bar нужно открыть меню «Параметры» (комбинация клавиш Win-i) и перейти в раздел «Игры — Xbox Game Bar».
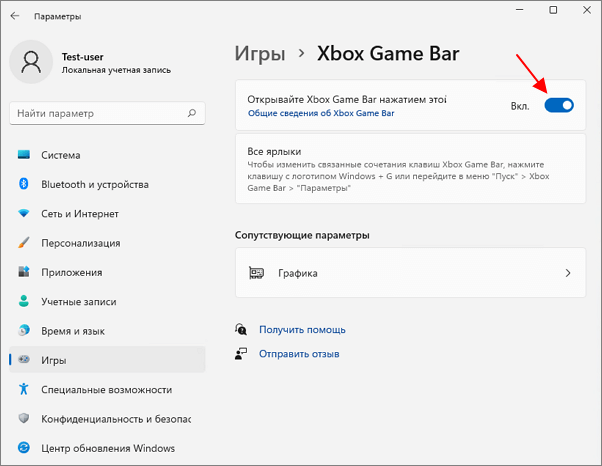
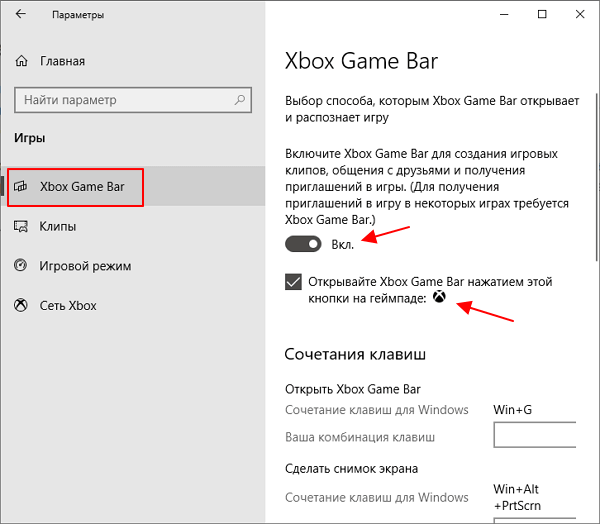
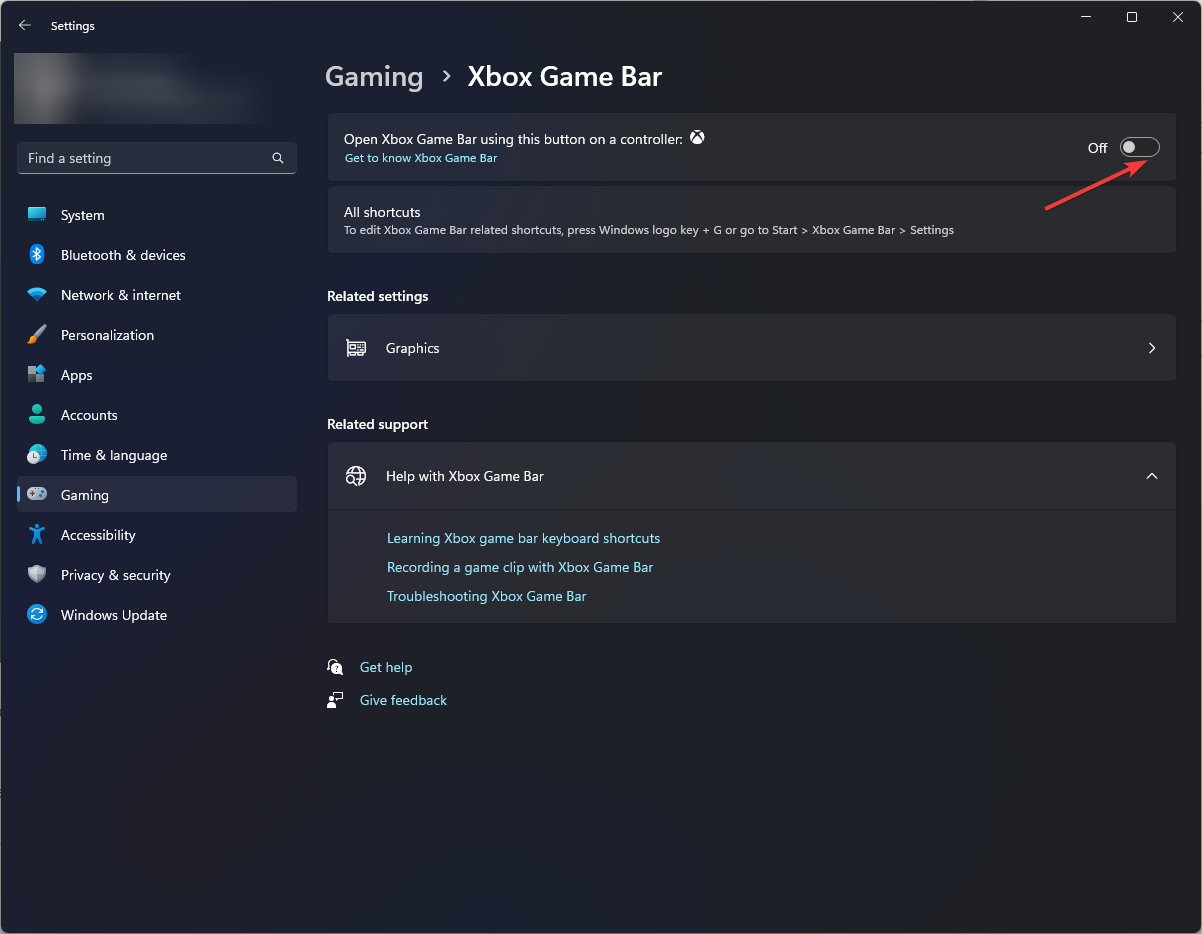
Здесь нужно отключить функцию «Открывайте Xbox Game Bar нажатием кнопки на геймпаде». Это отключит появление оверлея при нажатии на кнопку на геймпаде.
Но, оверлей все еще будет появляться при нажатии комбинации клавиш Win-G. Отключить эту функцию в Windows 11 нельзя (на данный момент), но вы можете изменить комбинацию клавиш, чтобы исключить случайные нажатия.
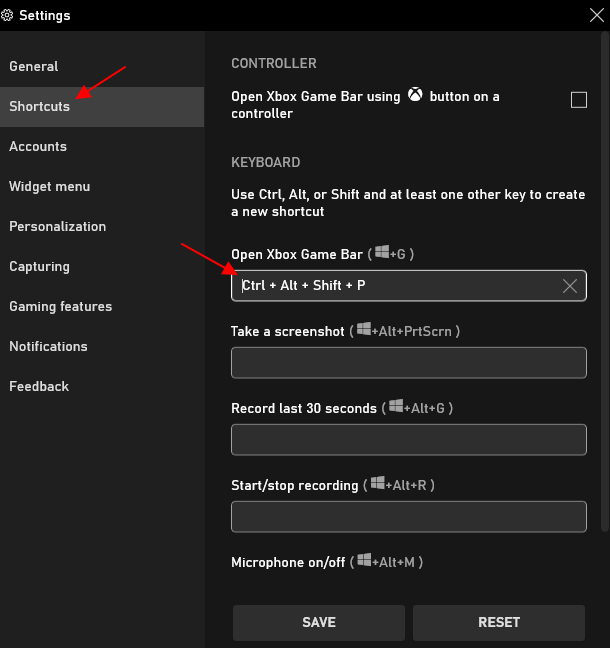
Для этого откройте оверлей (Win-G), перейдите в настройки (кнопка с шестеренкой), откройте раздел «Shortcuts» и поменяйте комбинацию клавиш.
Например, для открытия оверлея можно настроить что-то вроде Ctrl-Alt-Shift-P.
Как отключить Game Bar в Windows 10
В Windows 10 можно полностью отключить Game Bar. Для этого откройте меню «Параметры» (комбинация клавиш Win-i) и перейдите в «Игры».
Здесь в разделе «Xbox Game Bar» нужно перевести переключатель в положение «Выкл» и снять отметку напротив функции «Открывайте Xbox Game Bar нажатием кнопки на геймпаде».
После этого Game Bar больше не должен появляться во время игры при нажатии комбинации Win-G или при нажатии кнопки на геймпаде.
Как полностью удалить Game Bar в Windows 10
Также есть возможность полностью удалить Game Bar из вашей Windows 11 или Windows 10 при помощи PowerShell. Данный способ не рекомендуется использовать, так как он потенциально может привести к появлению новых ошибок или нестабильной работе других компонентов Windows. Например, возможны проблемы при подключении контроллера от Xbox.
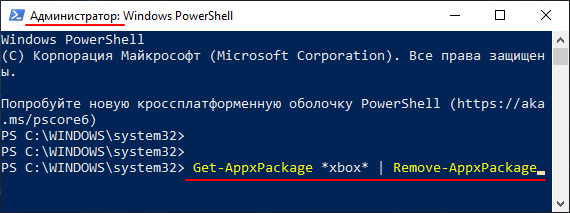
Для того чтобы удалить Game Bar из Windows 11 или Windows 10 нужно запустить PowerShell с правами администратора и выполнить следующую команду:
Get-AppxPackage *xbox* | Remove-AppxPackage
Данная команда удалит из операционной системы все компоненты Xbox. Вместе с ними будет удален и Game Bar.
Посмотрите также:
- Как отключить Xbox DVR в Windows 10
- Как отключить оверлей GeForce Experience в игре
- Как полностью удалить NVIDIA GeForce Experience на Windows 10 или Windows 7
- Как подключить геймпад Xbox One по Bluetooth к ПК с Windows 10
- Как включить счетчик FPS в NVIDIA GeForce Experience
Автор
Александр Степушин
Создатель сайта comp-security.net, автор более 2000 статей о ремонте компьютеров, работе с программами, настройке операционных систем.
Остались вопросы?
Задайте вопрос в комментариях под статьей или на странице
«Задать вопрос»
и вы обязательно получите ответ.
Xbox Game Bar — приложение-оверлей от Майкрософт с кучей полезных «фич», которые несомненно пригодятся геймерам и не только. Хотите не выходя из игры записать какое-то видео или сделать скриншот? Или прямо во время игрового процесса промониторить показатели своего ПК? Xbox Game Bar вам в этом поможет! Однако далеко не каждому пользователю нужно это приложение. В конце концов, существует масса куда более удобных аналогов с расширенным функционалом.
В связи с этим большое количество пользователей задается вполне логичным вопросом: как удалить Xbox Game Bar на Windows 10/11? Сегодняшняя статья как раз посвящена этому вопросу.
Как удалить Xbox Game Bar в несколько шагов
Нет ничего проще, чем удалить ненужный Xbox Game Bar с помощью PowerShell.
- Нажмите WIN+R для вызова диалогового окошка «Выполнить»;
- пропишите в пустой строке PowerShell и нажмите CTRL+SHIFT+ENTER;
- вставьте в терминал команду Get-AppxPackage Microsoft.XboxGamingOverlay | Remove-AppxPackage и нажмите ENTER.
Готово, больше Xbox Game Bar не будет вас донимать — на вашей текущей учетной записи, по крайней мере. Технически, пакет приложения XGB все еще находится в системе, но он не активен. Не переживайте о занимаемом месте на SSD/HDD: размер пакета незначителен.
Можно ли удалить все приложения Xbox?
Если вы не пользуйтесь программным обеспечением Xbox в принципе (распространенная ситуация, особенно в РФ), рекомендуем избавиться от него следующим рядом команд для того же PowerShell:
- Get-AppxPackage | select-string xbox | Remove-AppxPackage
- dism /Online /Get-ProvisionedAppxPackages | Select-String PackageName | Select-String xbox | ForEach-Object {$_.Line.Split(‘:’)[1].Trim()} | ForEach-Object { dism /Online /Remove-ProvisionedAppxPackage /PackageName:$_}
- Get-ProvisionedAppxPackage -Online | Where-Object { $_.PackageName -match «xbox» } | ForEach-Object { Remove-ProvisionedAppxPackage -Online -allusers -PackageName $_.PackageName }
После выполнения команд ПО Xbox на вашем ПК больше не будет, причем не только для основного аккаунта, а для всех в принципе (обратите внимание на «-allusers»).
Деинсталляция приложений Xbox по отдельности
Хорошо, но что делать, если вы хотите избавиться только от каких-то определенных приложений Xbox? То есть, какие-то приложения хочется оставить, а другие — удалить с концами? Решение — удаление вручную через, опять-таки, PowerShell.
- Get-AppxPackage | Select-String xbox
- Remove-AppxPackage [НАЗВАНИЕ ПАКЕТА ПРИЛОЖЕНИЯ]
- Remove-AppxPackage -allusers [НАЗВАНИЕ ПАКЕТА ПРИЛОЖЕНИЯ]
- Remove-ProvisionedAppxPackage -Online -allusers -PackageName [НАЗВАНИЕ ПАКЕТА ПРИЛОЖЕНИЯ]
Последняя команда так и вовсе удаляет и приложение, и его пакет. Хочется обратить внимание, что некоторые удаленные компоненты можно повторно установить через Microsoft Store либо PowerShell. Плюс мы должны вас предупредить, что после выполнения вышеуказанных команд вы с большой долей вероятности столкнетесь с теми или иными ошибками.
Например, при вызове Xbox Game Bar с клавиатуры (WIN+G) либо подключении контроллера Xbox может появляться ошибка ms-gamingoverlay. По сути, ничего критичного в этом нет, но имейте в виду, что периодически такое будет происходить. Просто закройте появившееся окошко и продолжайте пользоваться ПК в привычном режиме.
The easiest way is to use the Settings app
by Srishti Sisodia
Srishti Sisodia is an electronics engineer and writer with a passion for technology. She has extensive experience exploring the latest technological advancements and sharing her insights through informative… read more
Updated on
- You can disable the Xbox Game Bar by making changes in the Registry Editor or running a command in PowerShell.
- This guide will cover all the available methods to get this done.
XINSTALL BY CLICKING THE DOWNLOAD
FILE
The Xbox Game Bar is a helpful app for gamers as it contains a set of widgets that allow users to record videos and capture gameplay screenshots. However, if you have no use for the application, you can disable it to free system resources.
This guide will cover all the methods that enable you to disable the Xbox Game bar on Windows 11.
How can I disable the Xbox Game Bar on Windows 11?
1. Use the Settings
- Press Windows + I to open Settings.
- From the left pane, click Gaming.
- Next, click the Xbox Game Bar option.
- Toggle off the switch next to Open Xbox Game Bar using this button on a controller.
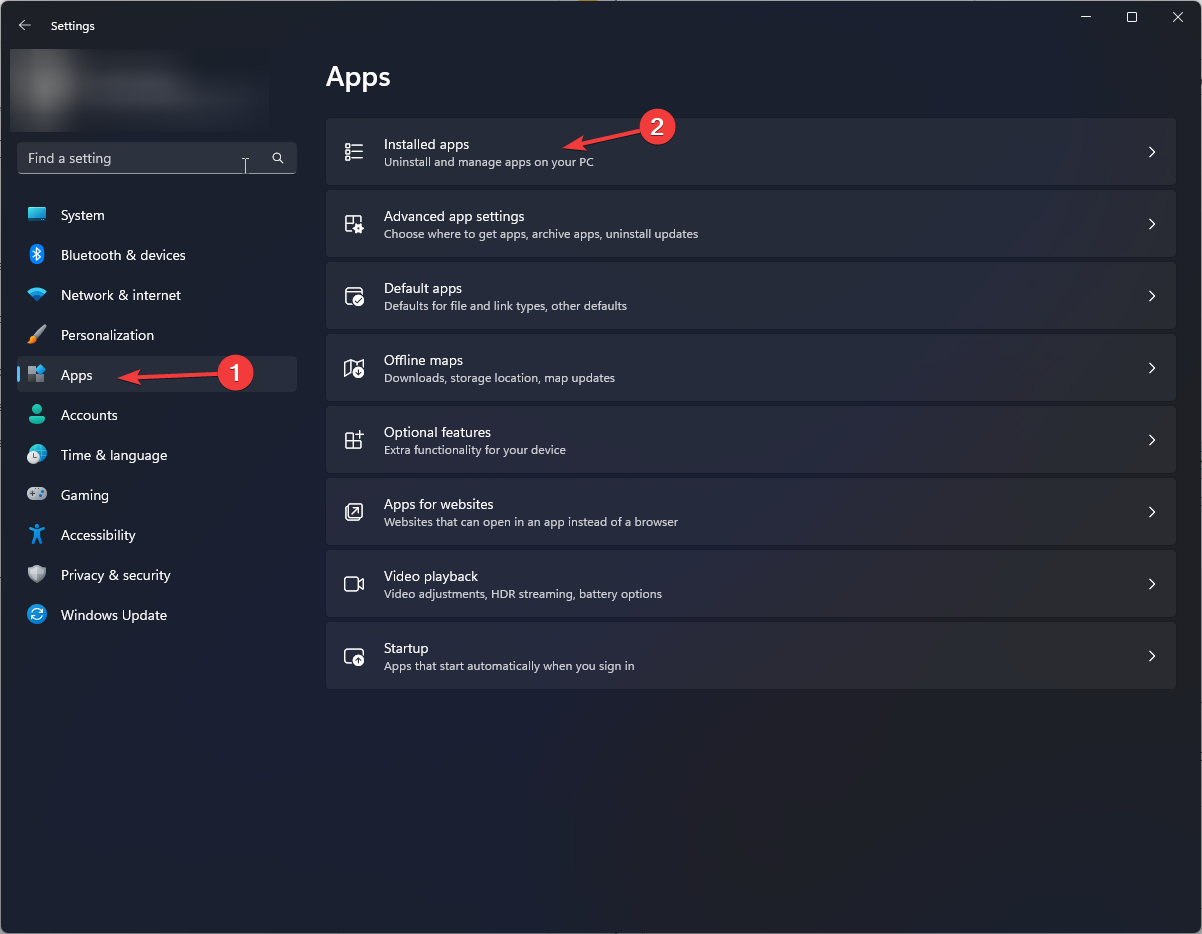
- Go back to the main page of Settings. Click Apps, then select Installed apps.
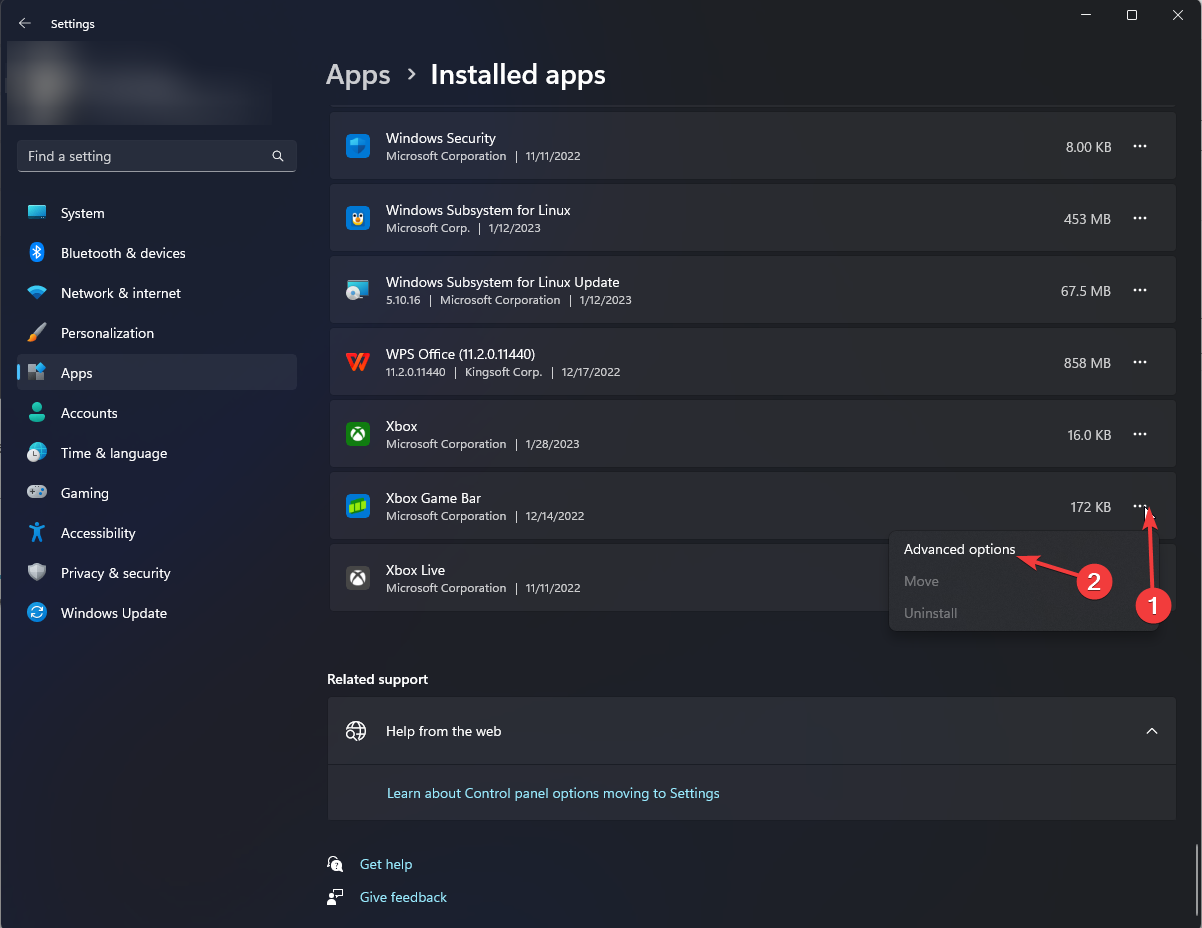
- Now under Installed apps, in the search bar, type Xbox.
- Click the three dots next to the Xbox Game Bar, and select Advanced options.
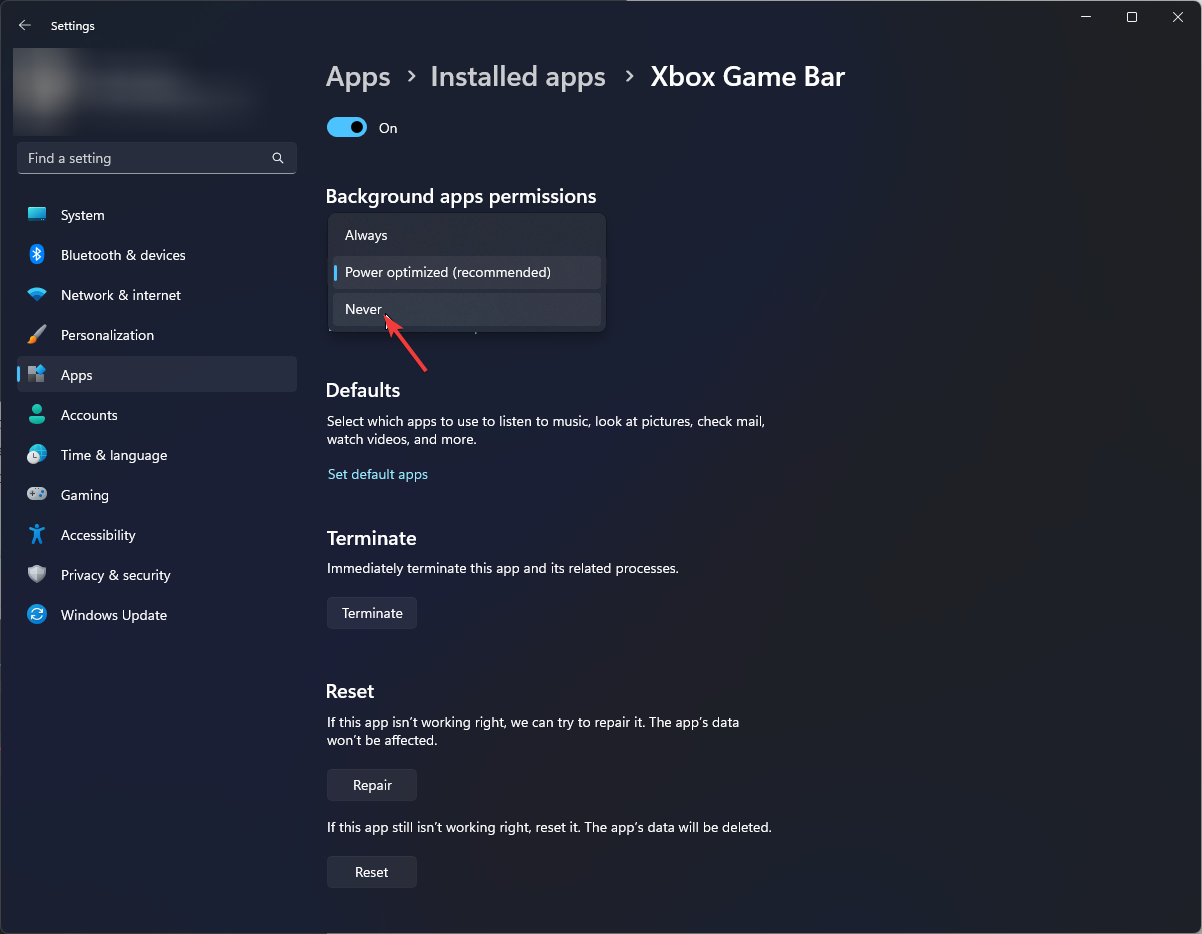
- Scroll down to the Background apps permissions section and select Never from the drop-down.
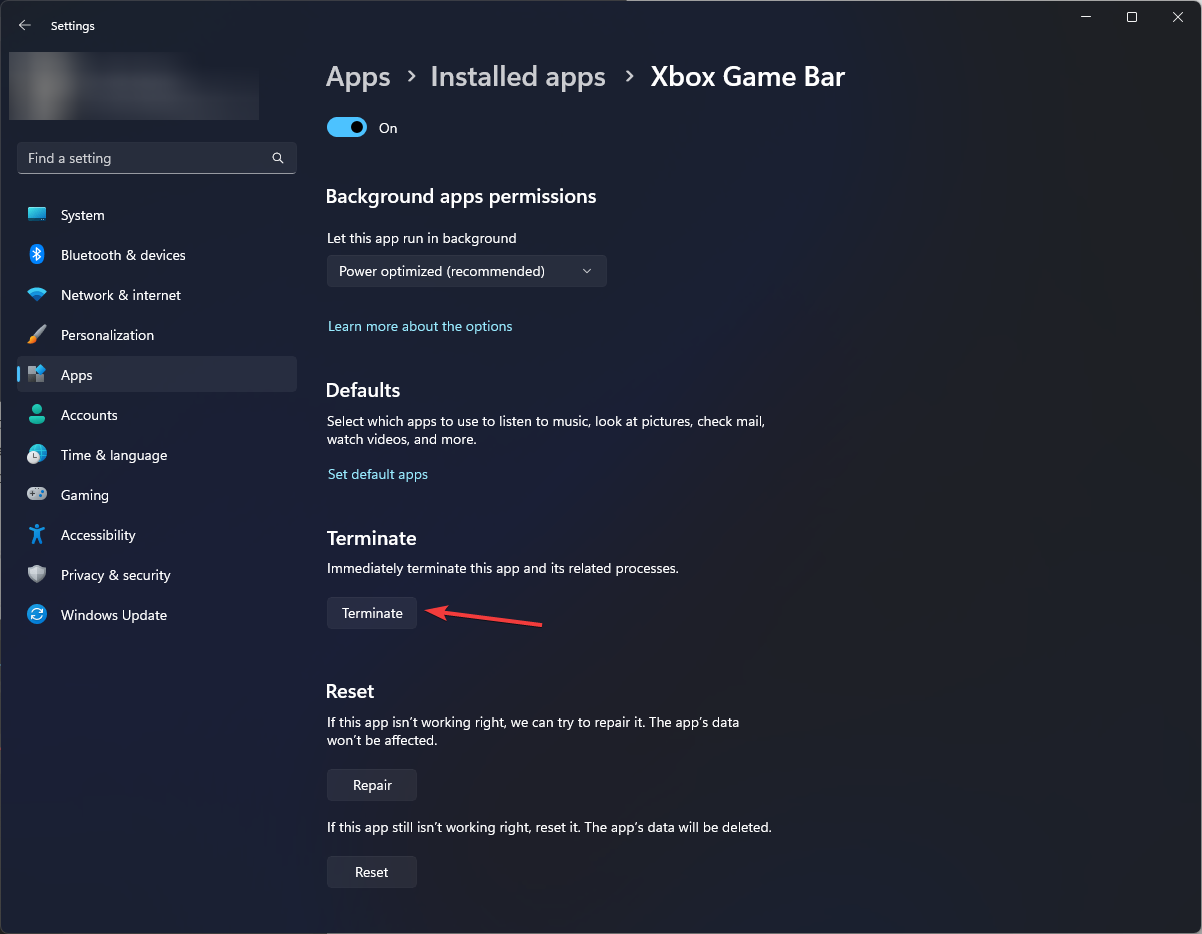
- Now scroll a bit more, and click the Terminate button.
2. Use the Windows PowerShell
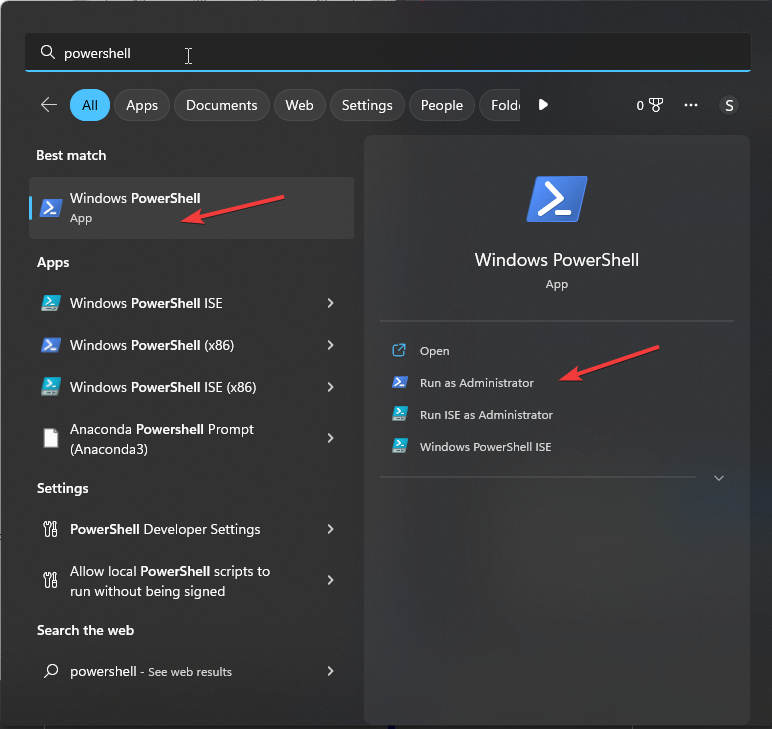
- Press the Windows key, type PowerShell, and click Run as administrator.
- Type the following command to check the packages on your computer and press Enter:
dism /Online /Get-ProvisionedAppxPackages | Select-String PackageName | Select-String xbox - Copy and paste the following command to uninstall and press Enter:
Get-ProvisionedAppxPackage -Online | `
Where-Object { $_.PackageName -match "xbox" } | `
ForEach-Object { Remove-ProvisionedAppxPackage -Online -PackageName $_.PackageName } - Type the following command to check if the Xbox packages are deleted and hit Enter:
dism /Online /Get-ProvisionedAppxPackages | Select-String PackageName | Select-String xbox
- Microsoft Paint Cocreator: A complete guide on the new AI tool
- Windows 11 adds more apps to the share links feature
3. Use the Registry Editor
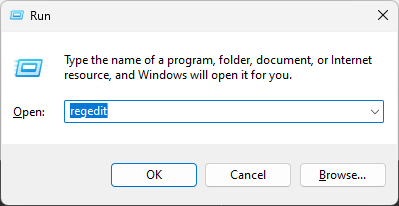
- Press Windows + R to open the Run window.
- Type Regedit and hit Enter to open Registry Editor.
- Click Yes on the UAC prompt.
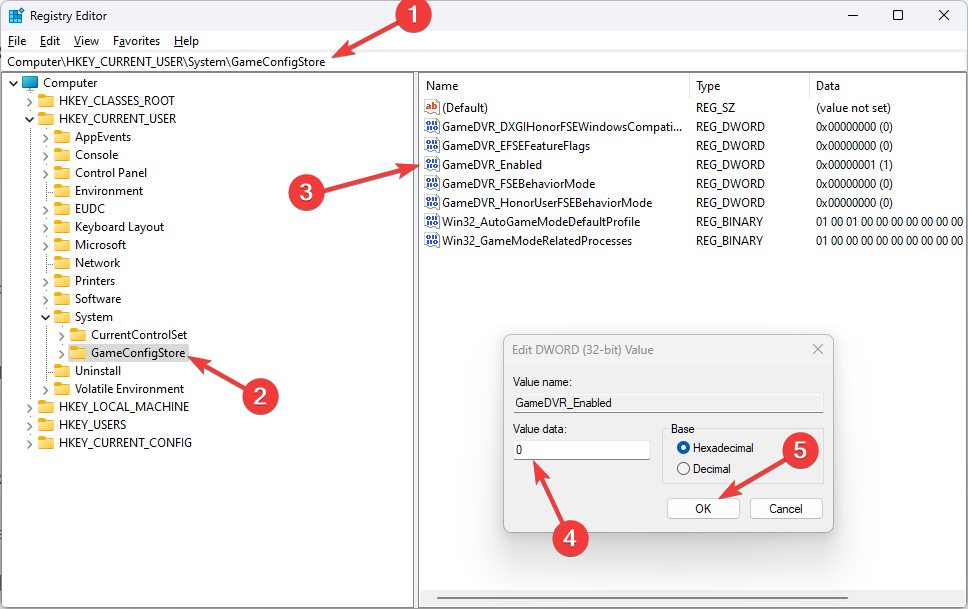
- Follow this path:
Computer\HKEY_CURRENT_USER\System\GameConfigStore - Locate and double-click GameDVR_Enabled. Change the Value data from 1 to 0.
- Click OK.
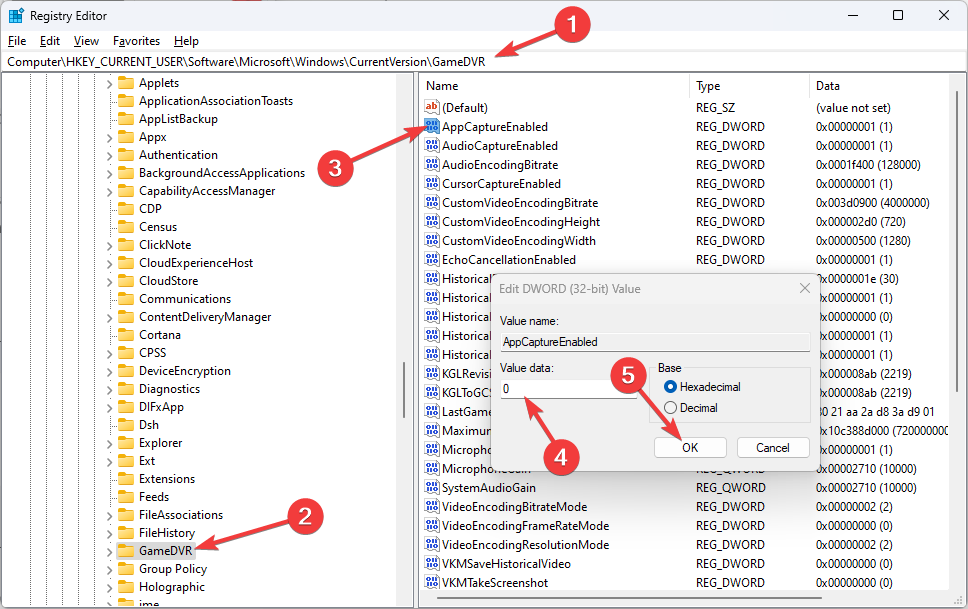
- Now navigate to this path:
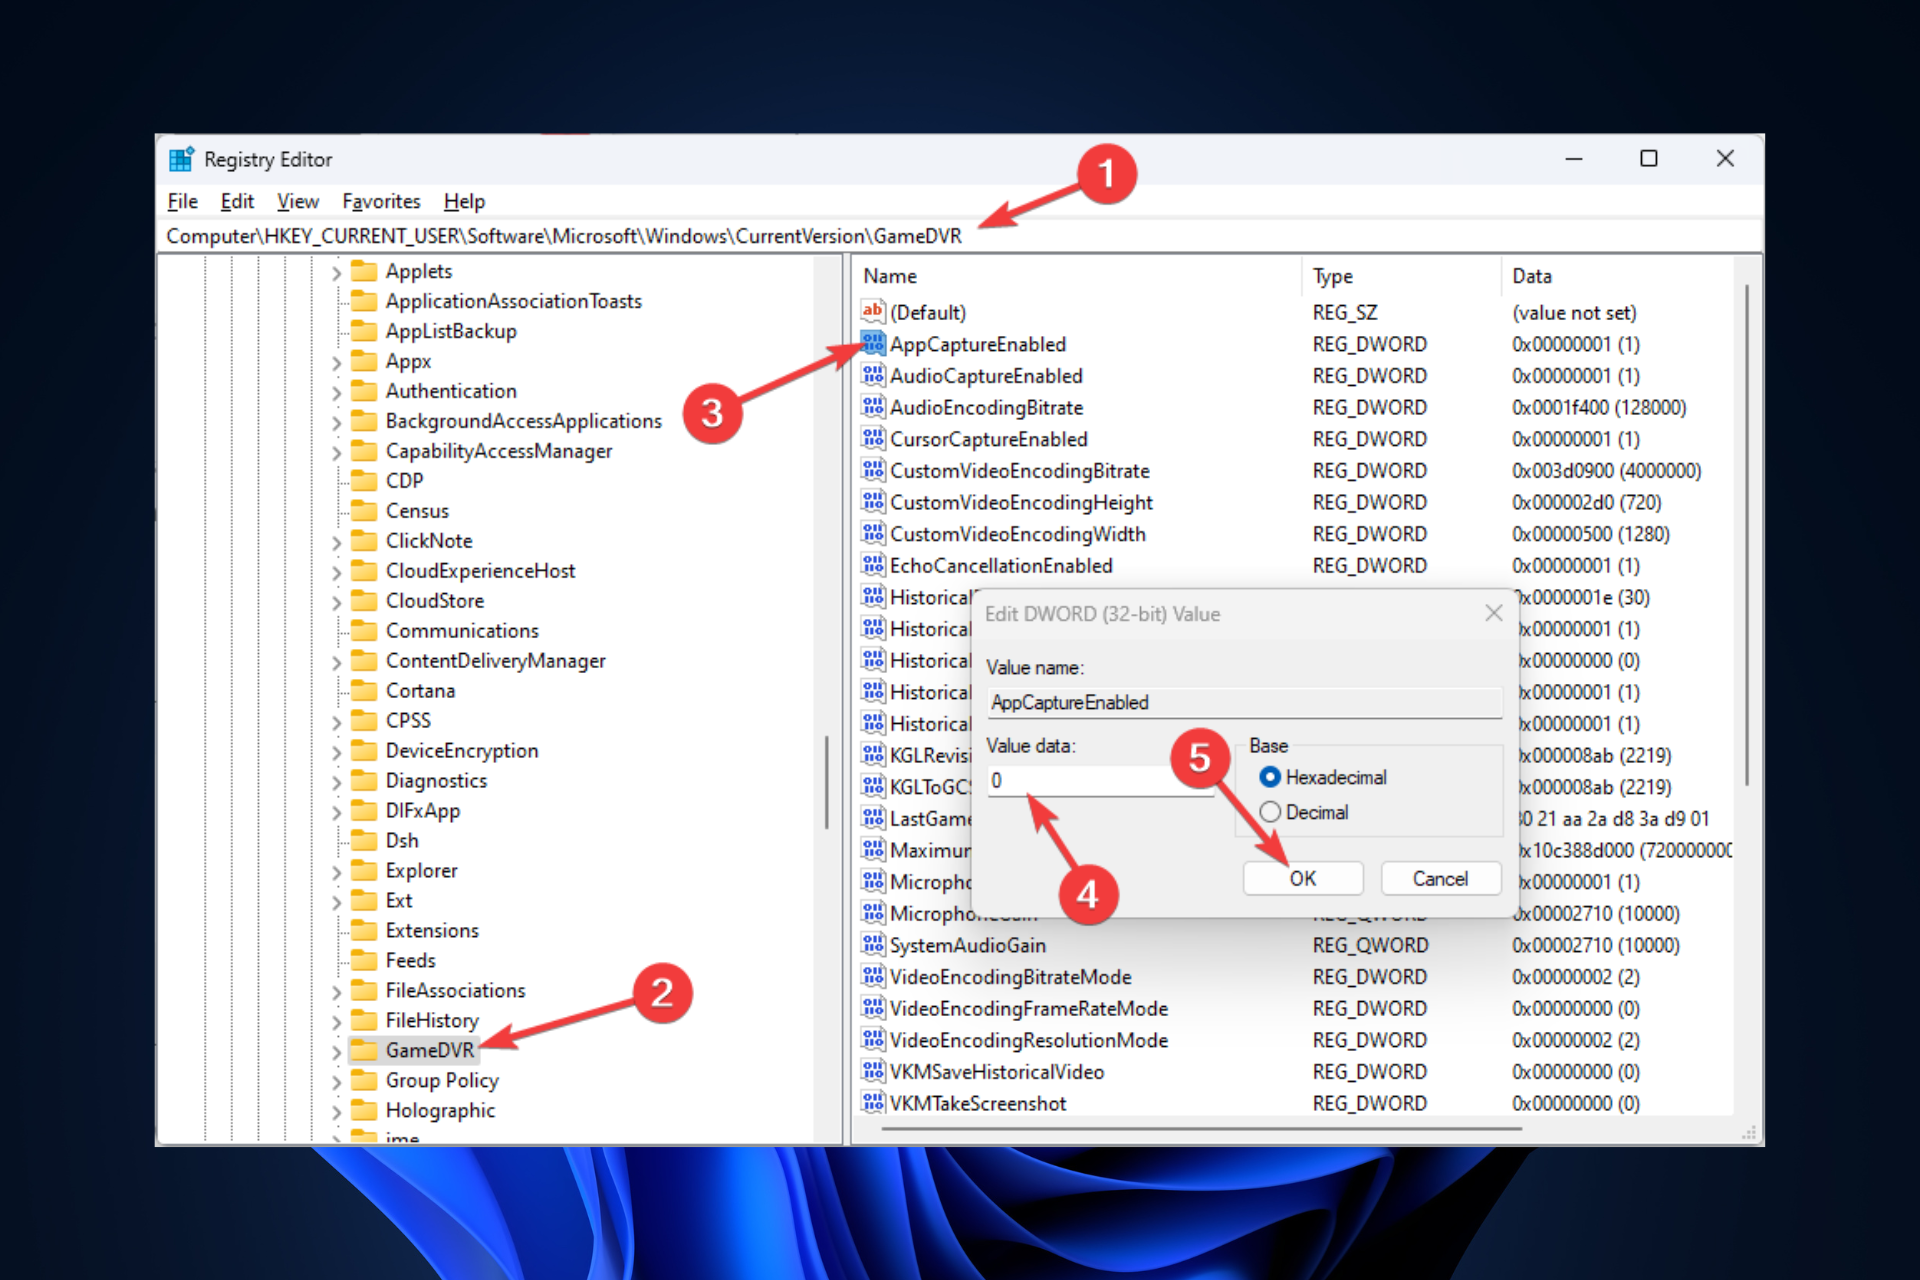
Computer\HKEY_CURRENT_USER\SOFTWARE\Microsoft\Windows\CurrentVersion\GameDVR - Locate and double-click AppCaptureEnabled and change the Value data to 0. Click OK.
- Restart your computer.
4. Use the Group Policy Editor
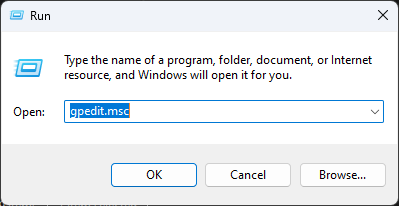
- Press Windows + R to open the Run window.
- Type gpedit.msc and hit Enter to open Group Policy Editor.
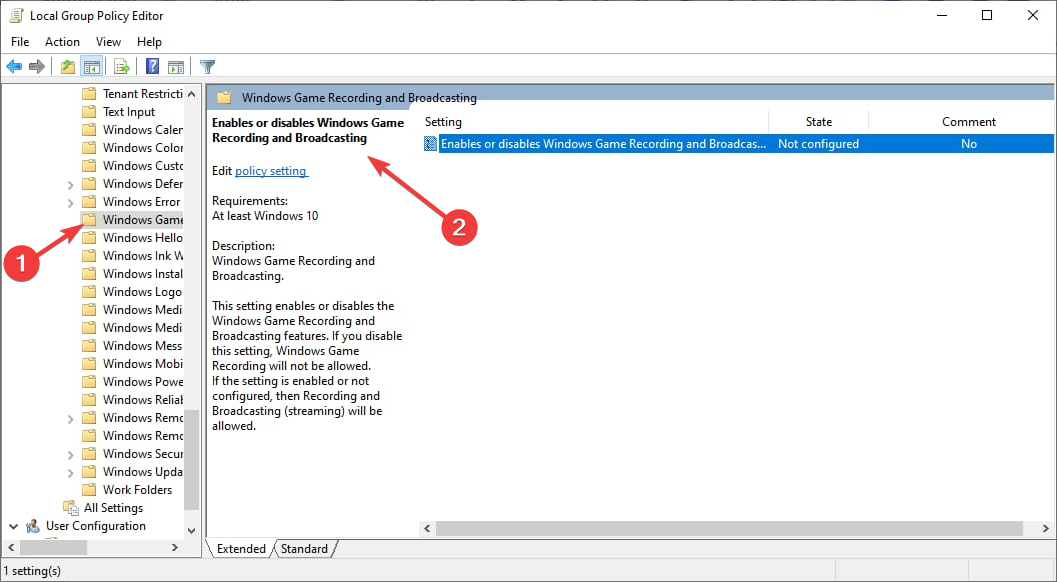
- Navigate to this path:
Computer Configuration\Administrative Templates\Windows Components\ Windows Game Recording and Broadcasting - Double-click on Enables or disables Windows Game Recording and Broadcasting.
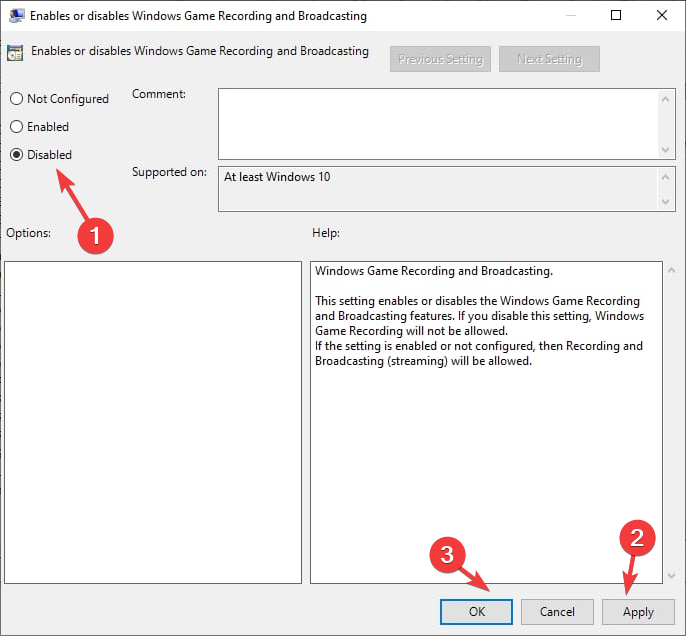
- Select Disabled, then click Apply, and then OK.
- Restart your computer to confirm the changes.
So, these are methods you can follow to disable the Xbox Game Bar on Windows 11. Try them and let us know what worked for you in the comments below.
If the Xbox Game Bar is not opening or working for you, you can follow these steps to fix it and record your gameplay and capture screens.
Xbox Game Bar is a feature that allows gamers to record video of game screen, take screenshots, and connect with friends on Xbox Social. Xbox Game DVR, on the other hand, is part of Xbox Game Bar responsible for continuously recording your screen in game so that you can quickly capture a game clip whenever you want with a hotkey.
In Windows 11, it is currently not possible (as of now) to disable the entire Xbox Game Bar. Unlike Windows 10, the toggle button to disable Xbox Game Bar in Windows 11 isn’t there in the Settings anymore.
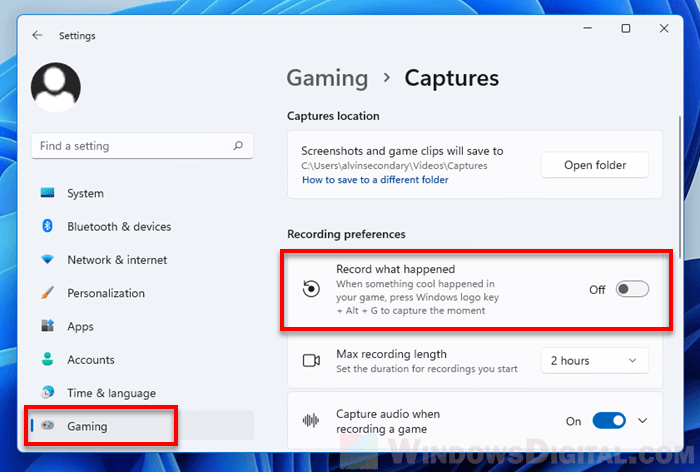
If your concern is about Xbox using up your resources while trying to capture your game screen, you can just disable the Xbox Game DVR auto capture feature to stop it from constantly capturing video of your screen while you game. You can do so by going to Settings > Gaming > Captures, and disable the “Record what happened” option.
If it is the Xbox Game Bar overlay that troubles you (Win + G), since it is currently not possible to disable Xbox Game Bar in Windows 11 via Settings, you can remove it instead.
This guide will show you how to remove Xbox Game Bar from Windows 11.
Also see: Why did all my Screenshots come out Black in Windows 11?
Remove Xbox Game Bar from Windows 11
Since Xbox Game Bar is installed as a default app package in Windows 11, you can remove it with the Remove-AppxPackage command via Windows PowerShell or Windows Terminal. This action requires administrative privilege, which means you need to run PowerShell or Windows Terminal as administrator in order to execute the command to remove Xbox Game Bar.
To remove Xbox Game Bar from Windows 11, first right-click on Start and select Windows Terminal (Admin).
In the PowerShell window, enter the following command.
Get-AppxPackage Microsoft.XboxGamingOverlay | Remove-AppxPackage
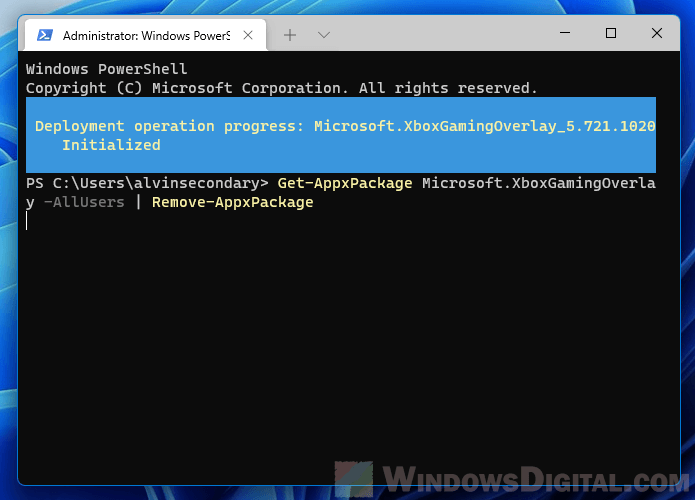
PowerShell will then show the progress of removal which starts from Initialized (usually highlighted in blue). Do not close the window at this stage as the removal is still in progress.
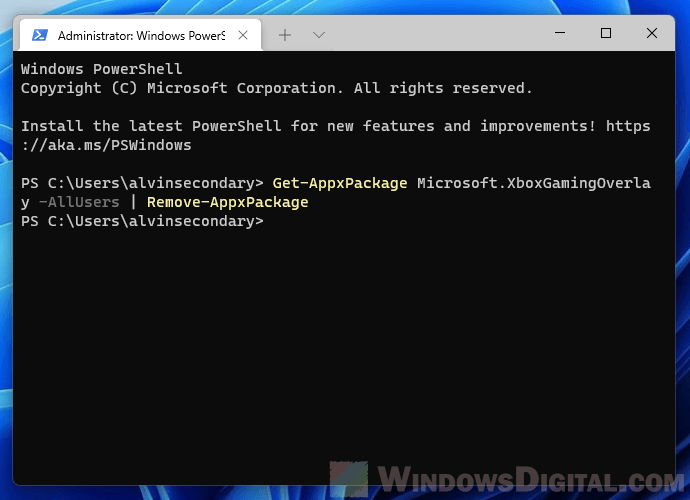
It may take awhile for the removal process to complete. Wait until the progress indicator (blue area) disappear or until PowerShell starts a new line, which indicates the command has been executed successfully.
Once done, try to press Win + G keys again. The Xbox Game Bar overlay will not show up again as it’s already removed from your Windows 11.
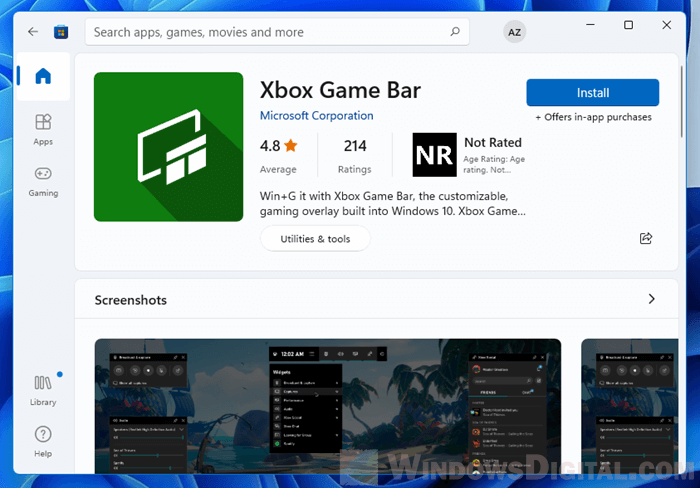
To reinstall Xbox Game Bar again, simply go to Microsoft Store, search for Xbox Game Bar and install it from there.
Game shows “You’ll need a new app to open this ms-gamingoverlay link” upon launch
If Windows keeps showing “You’ll need a new app to open this ms-gamingoverlay link – Look for an app in the Microsoft Store” pop up whenever you run a game after you’ve removed Xbox Game Bar from Windows 11, it is because Windows is still trying to run Xbox Game DVR (ms-gamingoverlay) on the game despite it being removed.
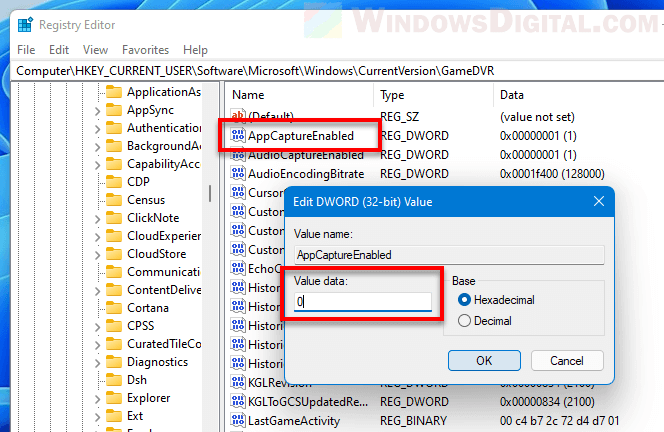
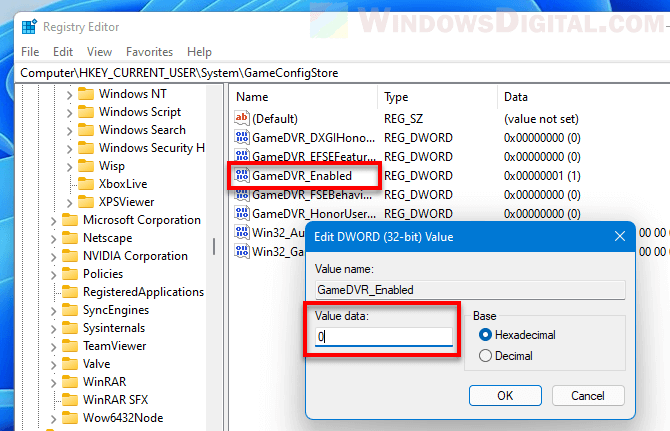
To fix this, you need to manually disable the Game DVR App Capture via Registry Editor.
Caution: Editing registry can cause serious problem and may potentially corrupt your operating system if done incorrectly. It’s highly recommended that you make a full backup of your Registry before making any changes. Please proceed at your own risk.
First, go to Start, type “Regedit” and hit Enter to open Registry Editor.
In Registry Editor, navigate to the following path. Alternatively, you can also copy and paste the full path into the Registry Editor address bar.
HKEY_CURRENT_USER\SOFTWARE\Microsoft\Windows\CurrentVersion\GameDVR
Right-click on AppCaptureEnabled and select Modify. In the Value data field, enter 0 and click OK.
Next, navigate to the following path.
HKEY_CURRENT_USER\System\GameConfigStore
Right-click on GameDVR_Enabled and select Modify. In the Value data field, enter 0 and click OK.
Close Registry Editor and restart your computer.
After restart, try to run the game again. Windows will not show the pop up again when you run the game.
