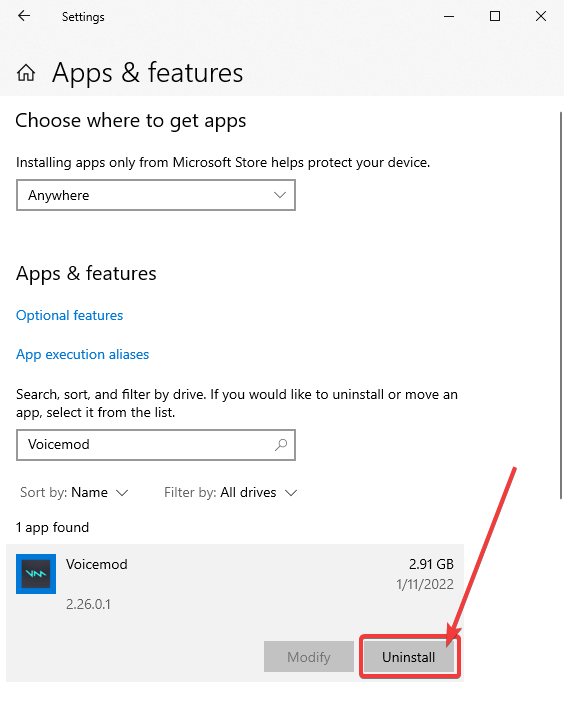
In case you want to uninstall Voicemod from your PC, follow the next steps:
— Open the start menu from Windows.
— Go to Settings.
— Select Apps.
— And search Voicemod.
— Then, select Voicemod and click on Uninstall.
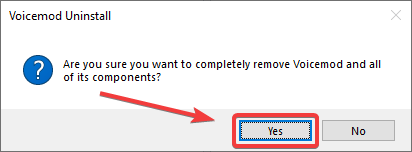
— After that, you’ll have to accept that Voicemod can make changes to your computer to finish the process.
— Finally, you’ll be asked if you want to keep your settings for future installations, in case you want to use our software again.
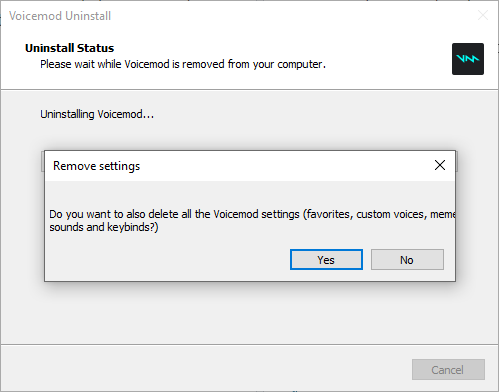
If you click Yes, you will delete all your Voicemod settings.
Remember that it is advisable to back up your content on a regular basis:
https://support.voicemod.net/hc/en-us/articles/360016743420-How-to-export-and-import-settings
After the uninstallation, restart your computer to be sure that all the Voicemod drivers and sound configuration are deleted.
If after uninstalling and restart you still have audio problems, check this article Experiencing microphone issues after uninstalling Voicemod.
Voicemod — это голосовой модулятор, который позволяет изменять звук вашего микрофона в режиме реального времени. Однако, если вы больше не хотите использовать Voicemod, вот подробная инструкция, как его удалить.
1. Удаление через меню установки программ
- Откройте «Параметры» в Windows 10, выберите «Приложения».
- Найдите и выберите «Voicemod» в списке установленных программ.
- Нажмите на «Удалить».
- Подтвердите удаление.
2. Удаление через Панель управления
- Откройте «Панель управления» в Windows.
- Выберите «Программы и компоненты».
- Найдите и выберите «Voicemod» в списке установленных программ.
- Нажмите на «Удалить».
- Подтвердите удаление.
3. Удаление вручную
- Нажмите на клавишу «Win + R», чтобы открыть окно «Выполнить».
- Напишите «%appdata%» и нажмите «ОК».
- Найдите папку «Voicemod» и удалите ее.
- Нажмите на клавишу «Win + R» снова.
- Напишите «regedit» и нажмите «ОК».
- Откройте «HKEY_CURRENT_USER».
- Найдите «Voicemod» в разделе «Software» и удалите его.
- Откройте «HKEY_LOCAL_MACHINE».
- Найдите «Voicemod» в разделе «Software» и удалите его.
Заключение
Это все, что вам нужно знать, чтобы удалить Voicemod с вашего компьютера. Вы можете выбрать любой из этих методов удаления, который наиболее удобен для вас. Важно обратить внимание, что удаление Voicemod может привести к потере сохраненных настроек и настроек вашего звукового устройства.
Voicemod is a very famous voice-changing application for Windows and Mac. The software provides real-time voice changing on all major online games and chat applications. It also includes a huge vocal store to pick voices from, along with a voice customization feature. However, the latest Voicemod updates are bothering its users.
Currently, the application is causing problems. The app keeps getting stuck during a voice change or editing, making you lose all the progress. The quality of vocal output has deteriorated. The output sound is low and also contains unwanted background voices, leaving a bad taste in the app.
In this article, we will teach you how to uninstall Voicemod voice changer. We will also recommend an alternate voice changer to replace Voicemod. Keep reading!
5 Steps to Uninstall Voicemod Voice Changer on Windows 10/11
The majority of Voicemod’s audience is Windows users. So, we will learn how to uninstall it on Windows 10/11.
But before jumping on uninstalling Voicemod, you should realize that after its installation, this best custom voice changer becomes the default microphone of your device. So, you need to change Voicemod settings ahead of its removal. Otherwise, you might think Voicemod is a virus that keeps popping up after being uninstalled.
After this explanation, here is the complete step-wise guide on how to install Voicemod on Windows
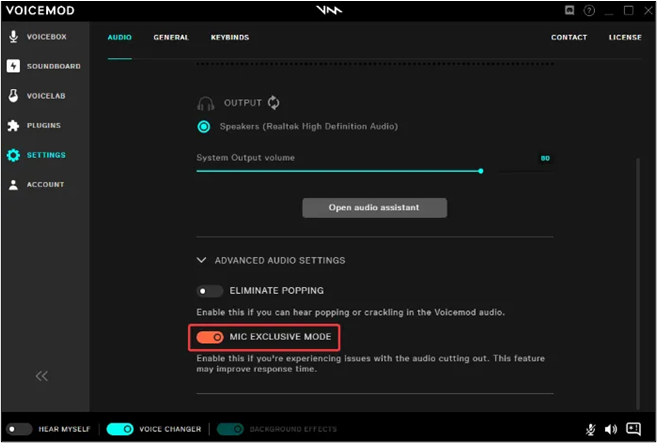
Step 1. Disable Voicemod Settings
In the first step, you should disable «MIC exclusive MOD» to stop Voicemod from using your microphone
- Click on the Voice Changer app icon on your PC and go to «Settings.»
- Find the Audio Tab and disable the «MIC EXCLUSIVE MODE» option
Step 2. Remove Uninstall Obstruction
This step is necessary to terminate all ongoing Voicemod activities. So that they don’t bother you after uninstalling the software.
- Press the CTRL+SHIFT+ESC keys at once to open the task manager of your computer.
- Click the «More Details» option at the bottom of the Task Manager screen to see all processes.
- Find the «VoiceDesktop.exe» on the list and right-click on it.
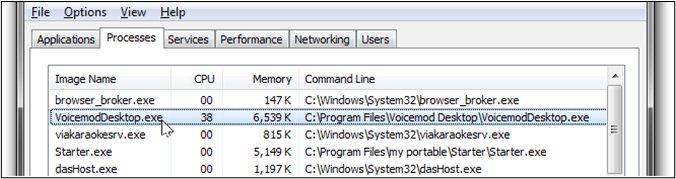
- Click the «End Task» icon to finish all ongoing Voicemod processes and projects.
Step 3. Uninstall the Voicemod Program
In the 3rd step, you can remove Voicemod program files from your system. This process is like any normal software uninstallation.
- Press Windows + S key to open Windows search.
- Write «Control Panel» in the search bar and open it.
- In the control panel, click the «Uninstall a program» option appearing under the main heading Programs.
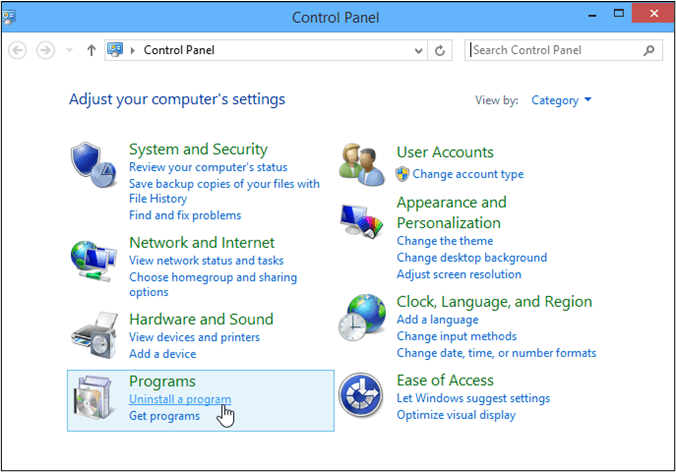
- Navigate through all installed programs to find «Voicemod.»
- Right-click on it and choose the «Uninstall» option. Confirm your choice by clicking on «remove».
Step 4. Turn off Voicemod in Specific Apps
Since Voicemod is installed at the system level, it collaborates with gaming and chatting applications. Therefore, you need to turn it off on all such applications. Otherwise, you might get sound problems from these apps.
- Open a particular gaming, social media, or chat application.
- Go to its «Main Settings» and from there open its «Audio Settings.»
- Choose your microphone as the default audio device and save it.
- Choose your device speakers as the default output and save it.
Step 5. Remove Voicemod from Discord App
If you have a Discord account with an installed app, you need to remove Voicemod from the app. The quickest way is to change input/output Audio Settings to default or switch to any other voice-changing software.
Follow these simple steps to do this
- Open the Discord app and go to Settings.
- In Settings, Select the «Voice and Video» option.
- Go to the input device and change it to «Default Microphone«.
- Go to the output device and change it to «Default Speaker«.
This procedure will completely remove Voicemod from your Windows with no potentially unwanted programs running in the background without any permission.
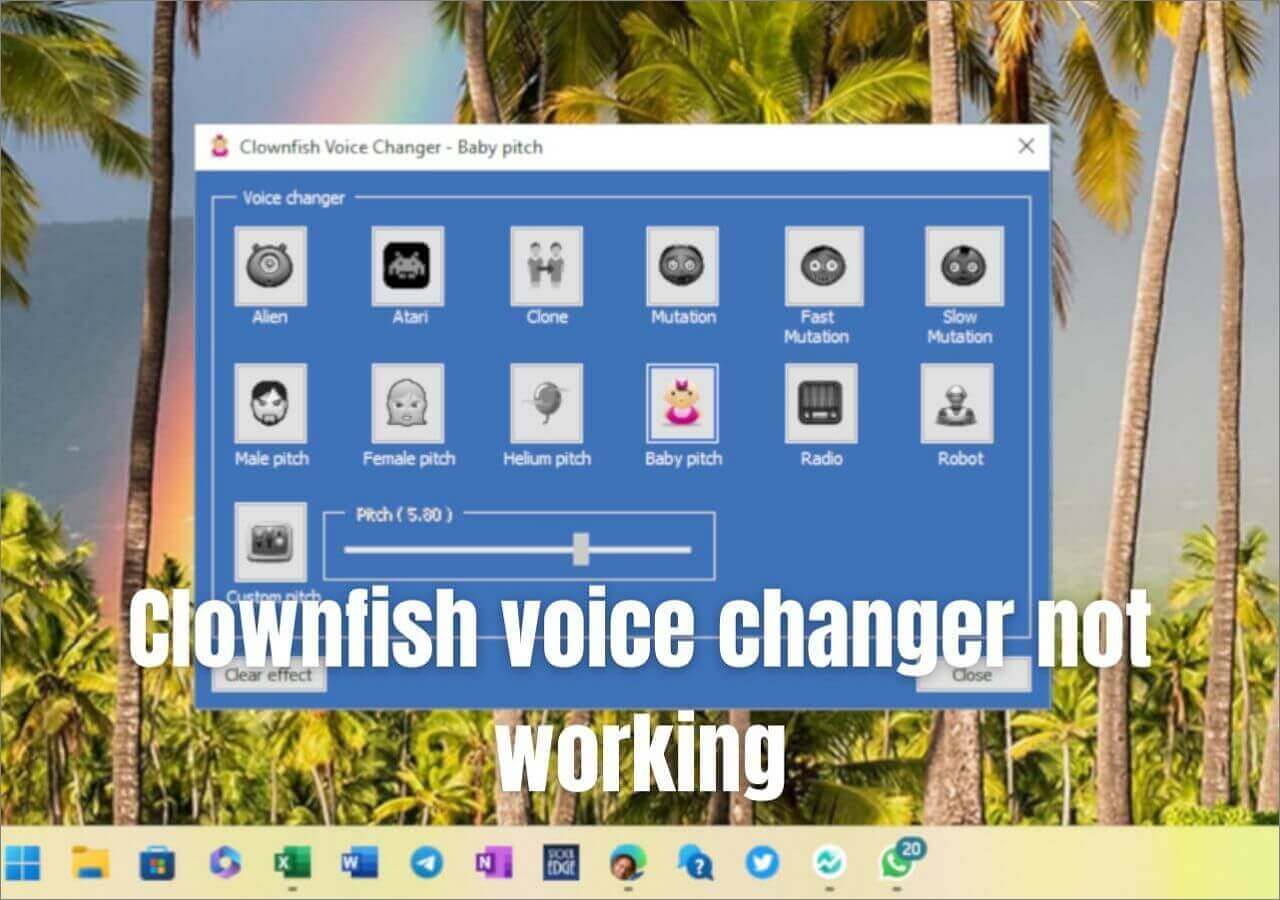
Also, if you are using Clownfish voice changer and it does not work, too, reading this post below can help you a lot.
![]()
Best Voicemod Alternative Recommended
After getting rid of Voicemod, we recommend you switch to EaseUS Voice Wave for a quality user experience with no interruptions. This voice changer provides a Discord-style UI interface facilitating the ease of workflow. The tool is equally good for professionals and novices.
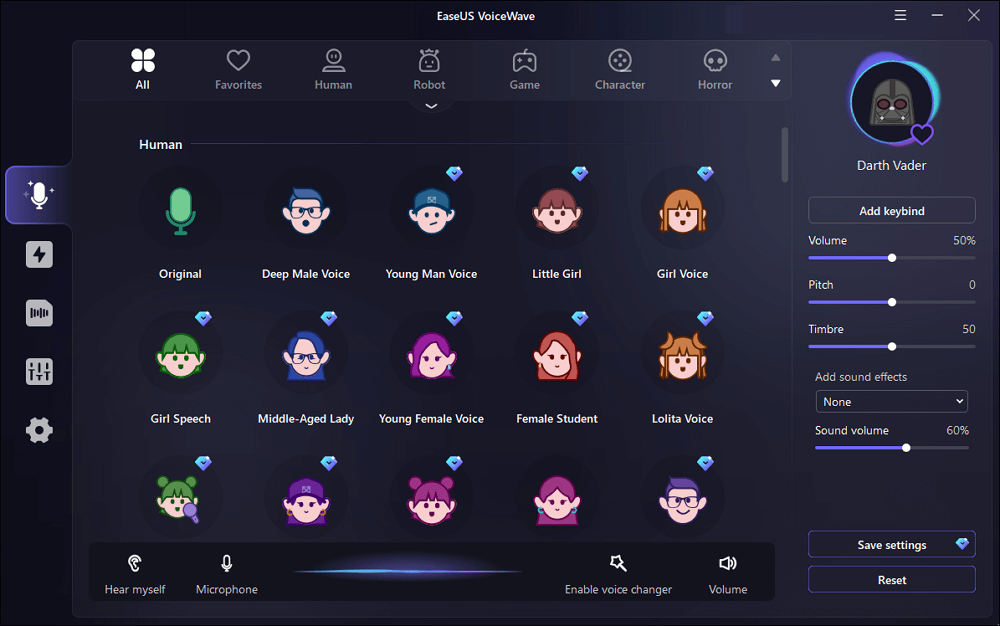
EaseUS Voicewave, the great voice changer for Windows, offers 18+ unique voices with 100+ real-time voice-changing effects. The advanced AI algorithms produce realistic voices capable of expressing the entire range of emotions with ease. You can also create custom voices for individual characters.
For superior sound quality, the app includes a «Noise Reducer» to remove all background noises. You can also get an «Audio Mixer» to blend different sounds and adjust their frequencies, tones, lengths, and other features. Another outstanding feature is a «built-in soundboard,» which includes a range of sound packs, audio clips, and pre-set sounds. And Guess what? All these sounds are completely free for you with no premium subscription or hidden fees.
This soundboard for gaming supports 200+ online games and 50+ instant messaging apps. You can live to stream all apps without comprising graphics quality and sound interruptions.
Here is a brief comparison of EaseUS VoiceWave and Voicemod
| Features | EaseUS Voice Wave | Voicemod |
| Technology | Advanced Learning Technology | Traditional AI-Powered |
| Sound Quality | Excellent, with the help of Noise Reducer | Can get compromised |
| Sounds | 18+ voices, 100+ sound effects, and a unique Sound Board | 110 total sounds |
| Price | Free for all | $12/Quarter, $18/Year, and $45 for a lifetime |
| In-App performance | Stable | Crashes Often |
| Voice Customization | √ | √ |
| Sound Files | Supports All types | Can accept only a few |
| Installation | Easy | Difficult |
Through the above product description and table comparison, it should be easy to find that EaseUS VoiceWave is not weaker than Voicemod in terms of functionality and practicality, and it is easy for users to install and uninstall, making it the best alternative to Voicemod.
If you are interested in EaseUS VoiceWave, click the button below to download it for free to your desktop and start your voice-changing journey.
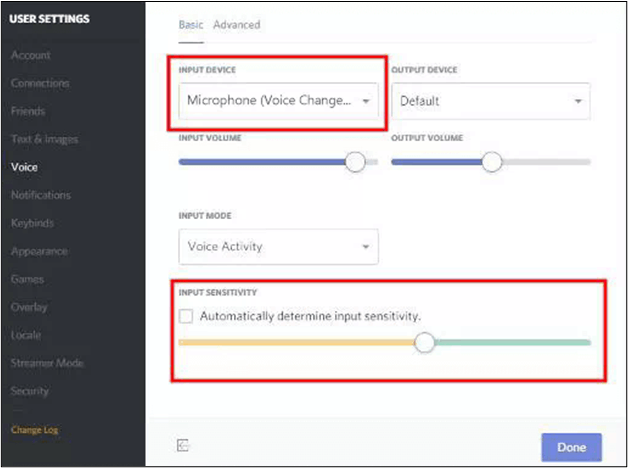
Pro Tip: Fix Mic not Working After Uninstalling Voicemod
The Voicemod uses a computer’s microphone for initial input. In some cases, the users will see their microphones not working properly after uninstalling Voicemod. That’s because the Voicemod is still set as a «microphone» and «speaker device» on your system.
Follow these steps to change the microphone and speaker settings
- Press Windows+ R to open your Run dialog box.
- Write «mmsys.cpl» in the search box and press OK. The sound screen will show up.
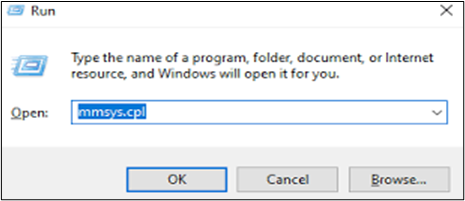
- Go to the playback and recording tabs and choose «Default Device Speaker» and «Microphone»
- Now click «Set Default» for both options to confirm your choice.
- Finish the procedure by clicking «Apply» at the bottom of your screen.
After this procedure, the system will start using its speakers and microphones for audio output/inputs. And hopefully, this will fix your «Mic Not Working» problem. If the problem persists, it means the Voicemod hasn’t been properly uninstalled. You need to do it as per the above guidelines
Conclusion
Voicemod is a household name in the voice-changing world. This best voice changer for gaming, chatting, and social provides a diverse range of voice-changing and editing features. However, the recent updates have raised concerns about sound quality, stability, and affordability. This article provides a complete method for uninstalling Voicemod from a system.
After this method, you will not have any background processes, mic issues, and sound problems which usually occur after removing Voicemod. We also recommend using EaseUS VoiceWave as the perfect alternative. It provides realistic voices with superior quality and no app crashes. And above all, the software is completely free. So don’t stay waiting. Download the EaseUS VoiceWave and start acing your voice-changing game.
FAQs
1. How to turn off the voice changer in Voicemod?
If you don’t want to utilize a voice changer in Voicemod while playing a certain game or using a chatting application, you need to change the microphone and speaker settings of this particular.
Follow this basic procedure for it.
Step 1. Open the desired program on your computer.
Step 2. Go to its Audio settings
Step 3. Set the computer’s microphone as the input device
Step 4. Set the computer’s speaker as the output device.
Once you do it, the Voicemod won’t be able to change the voice on this application.
2. Is Voicemod safe for your PC?
Voicemod isn’t any virus or malware. As long as you download it from an official website, it is completely safe. The problem arises when you use a cracked or paid version from an unauthentic source to avoid the fee. Then, there is no guarantee of safety.
Как удалить Voicemod с компьютера Windows 10: подробная инструкция.
Инструкция по удалению Voicemod с компьютера Windows 10:
Шаг 1: Остановите работу Voicemod. Если программа запущена, закройте ее перед началом удаления.
Шаг 2: Откройте меню Пуск и выберите «Параметры» (значок шестеренки).
Шаг 3: В открывшемся окне выберите «Приложения».
Шаг 4: Найдите Voicemod в списке приложений и выберите его.
Шаг 5: Нажмите на кнопку «Удалить» и подтвердите действие.
Шаг 6: Дождитесь окончания процесса удаления.
Шаг 7: Перезапустите компьютер, чтобы полностью удалить Voicemod.
Дополнительные советы:
— Если у вас возникают проблемы при удалении Voicemod, попробуйте использовать специальное программное обеспечение для удаления программ, например, Revo Uninstaller.
— Перед удалением Voicemod сохраните все необходимые настройки и файлы, которые могут находиться в папке программы.
— После удаления Voicemod рекомендуется проанализировать компьютер на наличие вредоносных программ с помощью антивирусного ПО.
— Если вы не намерены использовать Voicemod в будущем, то рекомендуется удалить драйверы звуковой карты и переустановить их заново, чтобы гарантировать их правильную работу.
Следуйте этим простым шагам и удалите Voicemod полностью и безопасно с компьютера на Windows 10.
Wondering how to uninstall Voicemod voice changer? If your answer is yes, then I am here to help you out.
Voicemod is one of the widely used applications when it comes to changing voices in real-time. This one is free to use voice changing software widely used by gamers and content creators.
With this application, you will be able to add real-time voice changing and custom sound effects to different application and games. Such as CS:GO, Minecraft, Valorant, Skype, Discord and others.
However, there are users who are not really satisfied with the Voicemod offerings. Or they are irritated with the fact of how Voicemad shows advertisements while browsing the internet.
Hence, they want to uninstall Voicemod. So if you wish to do the same, then go ahead and follow the below steps.
Change your default microphone before uninstalling Voicemod
Before you delete Voicemod from your computer, you have to change your Voicemod microphone to your device. Else, when you uninstall the software, your microphone might stop working.
However, these are the steps that you can use to change the default microphone on Windows 10:
- At first, press Windows + R key to open RUN box.
- Type down mmsys.cpl and hit the enter button.
- Then click on the headsets entry and click on the set default button and apply the changes.
- After that, go to the Recording tab and click on the Microphone option.
- Then select the Set default button.
- Finally, click on Apply and ok to save the changes.
How to uninstall Voicemod on Windows 10?
Uninstalling Voicemod on Windows 10 is a pretty straightforward process. You have to go to the control panel and from there hit the uninstall button.
However, some users did complain about the “Can’t uninstall Voicemod” issue. This error usually occurs when the application runs in the background and prevents you from uninstalling it.
But not to worry, below are the exact steps that you have to follow to delete Voicemod on your PC:
- At first, click on the Windows 10 search bar and type Task Manager.
- Open task manager and look for Voicemod. Then select it and click on End task to finish all the background running processes.
- Now, go to the search bar and type the control panel.
- From the control panel, go to Uninstall a program and look for Voicemod.
- Finally, click on Voicemod and click on the uninstall button and follow all the on-screen instructions.
How to stop Voicemod from running in the background?
When Voicemod isn’t in use, you can stop it running in the background by exiting it. For this, you have to click on System Tray > Right-click on Voicemod > Exit. Once done, Voicemod will no longer run in the background.
Final Words:
So that was the answer to your how to uninstall Voicemod question. Now go ahead and try out the steps by yourself and see if they are working for you or not. Also, for any other questions, do feel free to drop a comment below.
Related Posts:
- How to print multiple pictures on one page windows 10?
- How to crossplay minecraft ps4 and xbox?
- Google docs change default font