You uninstall Workstation Pro on a Windows host by using the Windows setup program. On a Linux host, you uninstall Workstation Pro by running the bundle installer.
You can save the configuration before you uninstall the Workstation Pro Pro. This retains the configuration in Workstation Pro if you choose to reinstall Workstation Pro later.
If you no longer need VMware, you might as well uninstall it to free up the space it takes. Additionally, you may need to uninstall it if you encounter any issues while using the app.
This process is very quick to perform. However, due to issues like power failure or conflicts from other applications, such as antivirus, you may not be able to uninstall the VMware.
Table of Contents
Uninstalling VMware on Windows
The installation folder of older VMware versions included an uninstall.exe file that you could run to uninstall it. However, for the latest versions, you need to use the app settings or programs and features. You can also use a PowerShell cmdlet to uninstall this application.
If you can’t completely uninstall the program using these methods, you need to manually remove all its files and registry entries.
Using Control Panel
The traditional way of uninstalling an application is through the Programs and Features tool included in the Control Panel. Here’s how you can use it to uninstall VMware:
- Open Run by pressing Win + R.
- Type
appwiz.cpland press Enter to open the Control Panel’s Programs and Features page. - Search for and select VMware Workstation or VMware Player and click on Change.

- Select Next and then Remove.

- Check the option you need to save and click Next.


Through App Settings
Windows 8 introduced the Settings app as an alternative for the Control Panel. You can use its App Settings to uninstall VMware on Windows 10 and later versions. To do so,
- Open Run.
- Enter
ms-settings:appsfeaturesto open the App Settings. - Scroll down and search for VMware workstation or VMware Player.
- Select on it or click on the triple-dot icon next to it and choose Modify. You will be able to select Uninstall on older versions.

- Select Next and then Remove.
- Check the option you need to save and click Next.

With Windows PowerShell
You can also use the Uninstall-Package PowerShell cmdlet to uninstall your apps. Here’s how you can use it to remove VMware:
- Open Run.
- Type
powershelland press Ctrl + Shift + Enter to open the Elevated Windows PowerShell. - Enter the following command:
Get-Package -Name "VMware Workstation*" | Uninstall-Package
Replace Workstation with Player if you want to remove this app instead.
- Type
Yand press Enter if prompted.

Directly Using the Uninstaller/Modify Script
It is also possible to directly run a shortcut for the uninstaller wizard for VMware. First, you need to figure out what the script is through the Registry Editor and then run it. Here are the necessary steps for the complete process:
- Open Run and enter
regeditto open the Registry Editor. - Navigate to
Computer\HKEY_LOCAL_MACHINE\SOFTWARE\Microsoft\Windows\CurrentVersion\Uninstall\{9D6C87F1-2E07-4B8D-99D8-D00248F62D55} - This key is for VMware Workstation 16.x. Other versions may use a separate key. To get there,
- Go to
Computer\HKEY_LOCAL_MACHINE\SOFTWARE\Microsoft\Windows\CurrentVersion\Uninstall\ - Select each key inside Uninstall and check the value of the DisplayName entry. It should show VMware Workstation or VMware Player.

- Go to
- Double-click on ModifyPath and copy its Value data. For older versions, you need to copy the value of UninstallString.

- Open Run and paste the ModifyPath value.
- Replace /l with /x, then press Enter. For example, if the script in ModifyPath is
msiexec.exe /l{9D6C87F1-2E07-4B8D-99D8-D00248F62D55}, you need to entermsiexec.exe /x{9D6C87F1-2E07-4B8D-99D8-D00248F62D55}
- Confirm your choice and follow the onscreen instructions.


Manually Remove VMware Files
If the above uninstallation processes fail, you won’t be able to uninstall the application properly. Then, you also can’t install VMware again on your system due to the persisting files.
In such cases, you need to manually remove the VMware files to clean up the incomplete uninstallation and properly remove the app from your PC.
First, log in with an administrator account and temporarily disable your antivirus and firewall. Then, follow the steps below one by one to manually remove VMware from your system:
Stop VMware Services
- Open Run and enter
services.mscto open Services app. - Search for all services starting with VMware.

- Right-click on them and select Stop.

Uninstall VMware Devices
- Open Run and enter
devmgmt.mscto open the Device Manager. - Select View > Show hidden devices.

- Expand Network Adapters.
- Right-click on the devices starting with VMware and select Uninstall device > Uninstall.

- Then, open Run and enter
ncpa.cplto open Network Connections. - Right-click on a network and select Properties.
- Select VMware Bridge Protocol and click Uninstall.

- Click OK after uninstalling it. Then, do the same for other networks.


Delete VMware Folders and Files
- Press Win + E to open File Explorer.
- Navigate to
C:\Program Files\orC:\Program Files(X86)\and delete the folder VMware.
- Select Yes to provide admin permissions.
- Now, open Run and enter
%programdata% - On the ProgramData folder, delete VMware.
- Then, open Run and enter
%windir%\system32to navigate to this directory. - Delete the following files if available:
vmnat.exevmnetbridge.exeVMNetDHCP.exevmnetdhcp.leasesvmxw2ksetup.dllvnetprobe.exevnetprobelib.dllvnetinst.dllvnetlib.dllvnetlib.exe
- Then open the drivers folder inside System32 and delete these files if present:
vmnet.sysvmnetx.sysVMparport.sysvmx86.sysvmnetadapter.sysvmnetbridge.sysvmnetuserif.syshcmon.sysvmusb.sys


Delete VMware Users and Groups
- Open Run and enter
lusrmgr.mscto open Local Users and Groups Manager. - Double-click on Users and look for __vmware_user__.
- If it’s there, right-click on it and select Delete > Yes.
- Then, go to Groups and look for __vmware__.
- Use a similar way to delete it as well.


Delete VMware Registries
- Open the Registry Editor
- Navigate to
Computer\HKEY_CLASSES_ROOT\Installer\Products\and select the first key within Products. - Check its Product Name.
- If it’s not VMware Workstation or Player, press the down arrow key to check for the next key inside Products.
- Use steps 3 and 4 to find out the key for VMware and note it down. The key is the folder inside Products.
- Right-click on this key and select Delete > Yes to remove it.
- Then, navigate to
Computer\HKEY_CLASSES_ROOT\Installer\Features\<copied key name>and delete this key as well. For example, the key may beComputer\HKEY_CLASSES_ROOT\Installer\Features\1F78C6D970E2D8B4998D0D20846FD255 - Now, delete the following keys as well:
HKEY_LOCAL_MACHINE\SOFTWARE\Classes\Installer\Features\<copied key name>HKEY_LOCAL_MACHINE\SOFTWARE\Classes\Installer\Products\<copied key name>HKEY_LOCAL_MACHINE\SOFTWARE\Microsoft\Windows\CurrentVersion\Installer\UserData\S-1-5-18\Products\<copied key name>HKEY_CLASSES_ROOT\Installer\UpgradeCodes\3F935F414A4C79542AD9C8D157A3CC39HKEY_LOCAL_MACHINE\SOFTWARE\Wow6432Node\VMware, Inc.\VMware WorkstationHKEY_LOCAL_MACHINE\SOFTWARE\Classes\Applications\vmware.exeHKEY_LOCAL_MACHINE\SOFTWARE\VMware, Inc.
- Then, navigate to
Computer\HKEY_LOCAL_MACHINE\SOFTWARE\Microsoft\Windows\CurrentVersion\Uninstall\ - Select each key inside Uninstall and check the value of the DisplayName entry.
- If it shows VMware Workstation or VMware Player, delete the key altogether.


Uninstalling VMware on Linux
On a Command line-based system like Linux, you can easily use some commands to uninstall VMware on your computer.
Here, we use the commands for the Ubuntu Linux system. Other distros use different commands, so you need to search for and use those accordingly.
Using the Uninstaller
The default way of uninstalling VMware on Linux is by using the uninstaller script. Here’s how you can do so:
- Open the Terminal.
- Enter the following command depending on whether you want to remove VMware Workstation or VMware Player:
sudo vmware-installer -u vmware-playersudo vmware-installer -u vmware-workstation
- You may also need to use the full path for vmware-installer, i.e.,
/usr/bin/vmware-installer

Manually Uninstalling VMware
If uninstalling VMware using the uninstaller fails, you need to manually remove all of its files. To do so,
- Open the Terminal.
- Enter the command below to stop VMware services and processes:
/etc/init.d/vmware stop - Move the VMware libraries to /tmp using the commands:
uname -r(to check the kernel version)cd /lib/modules/<kernel version>/misc(replace <kernel version> with your kernel version)mv vm* /tmp
- Then, you need to unload the kernel modules,
rmmod vmnet.ormmod vmmon.ormmod vmci.ormmod vmblock.ormmod vmppuser.o
- Now, remove the VMware logon scripts using the commands:
rm /etc/rc2.d/*vmware*rm /etc/rc3.d/*vmware*rm /etc/rc5.d/*vmware*rm /etc/rc6.d/*vmware*
- After that, you can remove the VMware files and directories (if available),
rm -rf /etc/vmware*rm /usr/bin/vmware-usbarbitratorrm /usr/bin/vmnet*rm -r /usr/lib/vmware*rm -r /usr/share/doc/vmware*


VMware Workstation — одна из самых популярных программных платформ виртуализации для операционной системы Windows 10. Она позволяет запускать несколько виртуальных машин на одном компьютере, что облегчает тестирование программного обеспечения, создание образов виртуальных машин, а также обучение и разработку.
Однако, иногда пользователи Windows 10 могут столкнуться с необходимостью полного удаления программы VMware Workstation. Это может быть связано с тем, что приложение работает некорректно, проблемы с обновлением программы или просто пользователь больше не нуждается в этом ПО.
В этой статье мы расскажем, как полностью удалить VMware Workstation на Windows 10, чтобы избавиться от всех связанных с ним файлов и настроек.
Содержание
- Удаление VMware Workstation на Windows 10
- Шаг 1: Проверка наличия VMware Workstation на компьютере
- Шаг 2: Отключение VMware Workstation
- Шаг 3: Удаление VMware Workstation через Панель управления
- Шаг 4: Полное удаление остатков VMware Workstation
- Вопрос-ответ
- Как полностью удалить VMware Workstation на Windows 10?
- Как удалить VMware Workstation с вашего компьютера?
- Как удалить VMware Workstation полностью?
- Как можно удалить VMware Workstation с Windows 10?
Удаление VMware Workstation на Windows 10
Если вам больше не нужна программа VMware Workstation на вашем компьютере с операционной системой Windows 10 и вы хотите полностью удалить ее, следуйте этим шагам:
- Перейдите в раздел «Параметры» в меню «Пуск» и выберите «Система».
- В открывшемся окне выберите «Приложения и функции».
- Прокрутите список программ в появившейся вкладке, найдите «VMware Workstation» и щелкните на нем.
- Выберите опцию «Удалить».
- Подтвердите удаление, следуя указаниям на экране.
- Дождитесь завершения процесса удаления.
- После завершения удаления программы VMware Workstation перезагрузите компьютер для завершения процесса удаления.
В результате выполнения этих шагов VMware Workstation будет полностью удалена с вашего компьютера.
Шаг 1: Проверка наличия VMware Workstation на компьютере
Перед удалением программы VMware Workstation, необходимо убедиться, что она установлена на вашем компьютере. Для этого следуйте инструкциям:
- Откройте меню «Пуск» в нижнем левом углу экрана.
- В строке поиска введите «VMware Workstation».
- Если в результатах поиска отображается программа VMware Workstation, значит она установлена на компьютере.
- Щелкните правой кнопкой мыши на значок программы и выберите «Удалить» из контекстного меню.
Если программа VMware Workstation не отображается в результатах поиска, значит она не установлена на компьютере и вы можете сразу перейти к следующему шагу удаления.
Шаг 2: Отключение VMware Workstation
Прежде чем вы сможете полностью удалить VMware Workstation с компьютера, вам необходимо отключить его и завершить все связанные процессы. Для этого выполните следующие действия:
- Закройте все запущенные виртуальные машины в VMware Workstation.
- Выполните следующие шаги для завершения всех процессов VMware Workstation:
- Нажмите клавиши Ctrl + Alt + Delete или Ctrl + Shift + Esc, чтобы открыть диспетчер задач.
- В диспетчере задач найдите процессы, связанные с VMware Workstation, например vmware.exe или vmware-tray.exe.
- Выделите каждый процесс и нажмите кнопку Завершить задачу.
После завершения всех процессов VMware Workstation вы можете перейти к следующему шагу и удалить программу полностью с помощью установщика Windows или стороннего программного обеспечения для удаления.
Шаг 3: Удаление VMware Workstation через Панель управления
Если вы предпочитаете использовать стандартный способ удаления программ через Панель управления Windows, следуйте этим инструкциям:
- Откройте меню Пуск, найдите и выберите «Панель управления».
- В Панели управления найдите и выберите раздел «Программы».
- В разделе «Программы» найдите и выберите «Удаление программ».
- Появится список установленных программ. Найдите и выберите VMware Workstation в этом списке.
- Щелкните правой кнопкой мыши на выбранной программе и выберите опцию «Удалить».
- Подтвердите удаление, следуя инструкциям в диалоговом окне.
- Подождите, пока процесс удаления завершится. Это может занять некоторое время.
- После завершения удаления программы VMware Workstation закройте Панель управления.
Теперь VMware Workstation полностью удалена с вашей системы. Если у вас возникли проблемы или ошибки в процессе удаления, вы можете попробовать использовать альтернативные методы удаления, описанные в других шагах.
Шаг 4: Полное удаление остатков VMware Workstation
После того, как вы удалите программу VMware Workstation из системы, остаются некоторые остатки, включая настройки программы и другие файлы, которые могут занимать место на жестком диске. Чтобы полностью удалить остатки VMware Workstation, выполните следующие действия:
- Откройте проводник Windows и перейдите в папку C:\ProgramData\VMware.
- Удалите все папки и файлы, связанные с VMware Workstation, включая папки, названия которых начинаются с «VMware» или «Virtual Machines».
- Откройте реестр Windows, нажав комбинацию клавиш Win + R, введите regedit и нажмите Enter.
- Видется каталог HKEY_CURRENT_USER\Software\VMware, выберите его.
- Щелкните правой кнопкой мыши на каталоге VMware и выберите Удалить.
- Подтвердите удаление каталога VMware, нажав Да.
- Повторите шаги 4-6 для каталога HKEY_LOCAL_MACHINE\SOFTWARE\VMware.
После выполнения вышеперечисленных действий остатки VMware Workstation должны быть полностью удалены с вашего компьютера. Рекомендуется перезагрузить компьютер для завершения процесса удаления.
Вопрос-ответ
Как полностью удалить VMware Workstation на Windows 10?
Для полного удаления VMware Workstation на Windows 10, вам следует выполнить несколько шагов. Сначала откройте «Панель управления» и перейдите в «Программы и функции». В списке программ найдите VMware Workstation и щелкните правой кнопкой мыши по нему. Затем выберите «Удалить» и следуйте инструкциям на экране, чтобы завершить процесс удаления. После этого рекомендуется перезагрузить компьютер, чтобы убедиться, что все остатки программы были полностью удалены.
Как удалить VMware Workstation с вашего компьютера?
Чтобы удалить VMware Workstation с вашего компьютера, вам нужно открыть «Панель управления» и выбрать раздел «Программы и функции». В этом разделе найдите VMware Workstation в списке установленных программ и нажмите на него правой кнопкой мыши. Затем выберите «Удалить» и следуйте инструкциям на экране, чтобы завершить удаление программы. После завершения процесса удаления рекомендуется перезагрузить компьютер, чтобы убедиться, что все остатки программы были полностью удалены.
Как удалить VMware Workstation полностью?
Для полного удаления VMware Workstation с вашего компьютера вам нужно сделать следующее. Откройте меню «Пуск» и перейдите в «Параметры». Затем выберите «Система» и в разделе «Приложения и функции» найдите VMware Workstation. Нажмите на него и выберите «Удалить». Следуйте инструкциям на экране, чтобы завершить процесс удаления. После этого рекомендуется перезагрузить компьютер, чтобы убедиться, что все остатки программы были полностью удалены.
Как можно удалить VMware Workstation с Windows 10?
Удаление VMware Workstation с Windows 10 довольно просто. Найдите на рабочем столе иконку «Панель управления» и откройте ее. В появившемся окне выберите «Программы» или «Программы и функции», а затем найдите VMware Workstation в списке установленных программ. Щелкните правой кнопкой мыши на VMware Workstation и выберите «Удалить». Следуйте инструкциям на экране, чтобы завершить процесс удаления. После этого рекомендуется перезагрузить компьютер, чтобы убедиться, что все остатки программы были полностью удалены.
Многие пользователи считают, что установка виртуальных операционных систем непонятная и запутанная, она может навредить основной ОС и сделать процесс удаления программы VMware Workstation чем-то похожим на пляску с бубном.
Это не совсем правильное мнение.
Преимущество этой программы как раз в том, что виртуальные операционные системы можно запускать только с помощью VMware Workstation, и они ничем не вредят нашему компьютеру и его основным системным файлам.
Процесс удаления VMware Workstation следующий:
1. Закрываем программу и идем в Пуск -> Панель управления -> Удаление программы.
2. Из списка установленных программ находим VMware Workstation и нажимаем кнопку Удалить/Изменить.

3. Запустится Мастер удаления программ, в меню которого нужно выбрать пункт Remove.
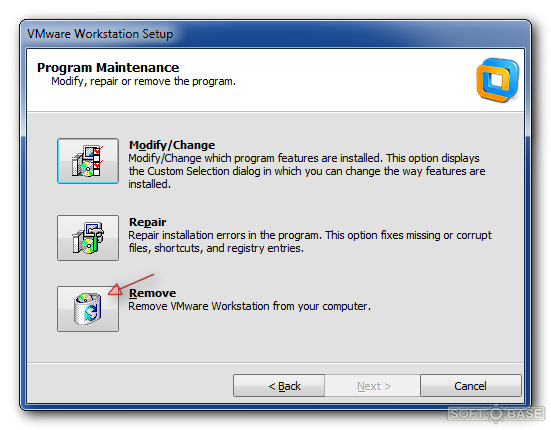
После чего, нужно кликать Далее, пока не начнется процесс удаления.
Все ваши установленные виртуальные операционные системы будут находиться в выделенной для них папке.
Если захотите от них избавиться – удалите данную папку.
Тогда и установленные ОС и весь софт, который вы ставили с помощью данных ОС, будет удален.
Vmware Workstation is a great software that enables you to use two different operating systems at the same time. Sometimes, you may feel like uninstalling VMware Workstation for different reasons. So, if you have decided to remove VMware Workstation from your Windows 10 PC or laptop then you are going to learn here the easiest way to uninstall VMware Workstation from Windows 10/11 PC or laptop.
VMware Workstation
VMware Workstation Pro is a hosted hypervisor running on x64 versions of Windows and Linux operating systems (an x86 version of earlier releases was available); it allows users to set up virtual machines (VMs) on a single physical machine and use them simultaneously with the host machine.
Each virtual machine can run its own operating system, including versions of Microsoft Windows, Linux, BSD, and MS-DOS. VMware Workstation is being produced and marketed by VMware, Inc., a subsidiary of Dell Technologies. A free-of-charge version of VMware Workstation Player is available for non-commercial use. You need an operating system license to use proprietary systems such as Windows. Ready-made Linux VMs set up for various purposes are available from a variety of sources.
Meanwhile, VMware Workstation facilitates the bridge of existing host network adapters and the sharing of physical disc drives and USB devices with a virtual machine. It can simulate disc drives; an ISO image file can be mounted as a virtual optical disc drive, and virtual disc drives can be mounted as .vmdk files.
VMware Workstation Pro can save a virtual state at any time. These snapshots can be restored later, essentially restoring the virtual machine to the saved state, as it was and free of any post-snapshot damage to the VM. VMware Workstation provides the ability to group several virtual machines into an inventory folder. The machines in such a folder can then be turned on and off as a single object, which is useful for testing complex client-server environments.
Why Do You need to Uninstall VMware Workstation?
VMware Workstation Pro might offer you a lot of benefits, but there are chances you might want to uninstall this software. For instance, your PC does not meet the minimum PC requirements for using VMware Workstation, so while VMware is running in the background, your machine will be extremely slow. Or you may want to update your version of VMware Workstation to a higher version, so you first need to uninstall the older version.
Meanwhile, due to unforeseen errors such as “VMware can not connect to a virtual machine, some users uninstall VMware.” Make sure that you have the right to run the software and access all the files it uses, and that access rights to all temporary file directories exist when powering VMware Match. VMware Player must be uninstalled and reinstalled for troubleshooting. Whatever the explanation is it turns out that the removal of VMware Player is a stressful task.
How to Uninstall VMware Workstation From Windows 10/11
If you go to Windows 10’s Apps & features or control panel to uninstall, you will find the Uninstall button is greyed out and unclickable. This can be a problem. So today, we’re going to show you how to effectively remove and uninstall VMware Workstation from your Windows 10/11 PC when it won’t let you uninstall.#
Here are the steps to remove and uninstall VMware Workstation from Windows 10:
A: Remove VMware Through Apps & features
Step 1. Press Windows key + I to open Settings.
Step 2. Select Apps on Windows 10. On Windows 11, click Apps from the left-hand side pane and select Installed apps.

Apps > Installed apps
Step 3. Scroll down and right-click on VMware Workstation under the Apps & features menu then click Modify. The Uninstall option is greyed out.

Modify
Step 4. Click Next.

Next
Step 5. Here, you will have 3 options: Change, Repair, and Remove. You have to select Remove and click Next in the next window.

Remove
Step 6. At last, click Next.

Next
Step 7. Click Remove.

Remove
Step 8. Click Finish.

B: Uninstall VMware Workstation Through Programs and Features
Step 1. Go to Control Panel > Programs.
Step 2. Select Programs and Features.
Step 3. Right-click on VMware Workstation and select Change.

Change
Step 4. Click Next.
Step 5. Again here, you will have 3 options: Change, Repair, and Remove. You have to select Remove and click Next in the next window.
Step 5. At last, click Remove and if you are prompted, click Yes.
Step 6. When removed, Click Finish.
That’s it. This is how you can Uninstall VMware Workstation from Windows 10/11. You can remove it either through Apps & features or Programs and Features.
You Might Also Like: How to Download & Install VMware Workstation 16 Pro For Windows 10

ShaadLife Team
We are professional How-to content writers. As a tech enthusiast and geek, we love to write and share articles about different operating systems such as Android, Windows, macOS, iOS, and some other products like a smartwatch and smart TV.