Если вы используете Windows, UNetbootin предложит вам удалить его при следующей загрузке Windows. Кроме того, вы можете удалить его через «Установка и удаление программ» в Панели управления. При использовании Linux повторно запустите исполняемый файл UNetbootin (с привилегиями root) и нажмите OK, когда будет предложено удалить.
Содержание
- 1 Как удалить операционную систему из меню загрузки?
- 2 Как удалить загрузчик Linux из автозагрузки?
- 3 Как удалить загрузчик BCD?
- 4 Как изменить меню двойной загрузки в Windows 10?
- 5 Как отключить выбор операционной системы?
- 6 Как изменить параметры загрузки?
- 7 Как удалить параметры загрузки Ubuntu?
- 8 Как удалить Linux и установить Windows на свой компьютер?
- 9 Как удалить загрузчик GRUB?
- 10 Как мне избавиться от BCD?
- 11 Как стереть мою операционную систему из BIOS?
- 12 Как удалить загрузчик GRUB из BIOS?
- 13 Как отредактировать диспетчер загрузки?
- 14 Как изменить операционную систему по умолчанию?
- 15 Как изменить BIOS диспетчера загрузки?
Как удалить операционную систему из меню загрузки?
Исправление №1: откройте msconfig.
- Щелкните "Пуск".
- Введите msconfig в поле поиска или откройте «Выполнить».
- Зайдите в Boot.
- Выберите версию Windows, в которую вы хотите загрузиться напрямую.
- Нажмите Установить по умолчанию.
- Вы можете удалить более раннюю версию, выбрав ее и нажав Удалить.
- Щелкните Применить.
- Щелкните ОК.
Как удалить загрузчик Linux из автозагрузки?
Просто загрузитесь в Windows и перейдите в Панель управления> Программы и компоненты. Найдите Ubuntu в списке установленных программ, а затем удалите его, как любую другую программу. Программа удаления автоматически удаляет файлы Ubuntu и запись загрузчика с вашего компьютера.
Как удалить загрузчик BCD?
Загрузите и установите Visual BCD Editor, затем откройте его. Инструменту потребуется немного времени, чтобы просканировать вашу систему. В левом дереве параметров вы увидите Bcdstore> Loaders> [параметры вашего загрузчика]. Выберите загрузчик, который вы хотите удалить, и нажмите «Удалить» в нижней части правой информационной панели.
Как изменить меню двойной загрузки в Windows 10?
Windows 10, 8, 7 и Vista
- Перейдите в меню «Пуск», введите msconfig в поле поиска и нажмите Enter. …
- Щелкните вкладку Boot.
- Установите флажок Безопасная загрузка в разделе Параметры загрузки.
- Установите переключатель Минимальный для безопасного режима или Сеть для безопасного режима с загрузкой сетевых драйверов.
14 июн. 2009 г.
Как отключить выбор операционной системы?
Нажмите кнопку «Настройки» в разделе «Запуск и восстановление». В окне «Запуск и восстановление» щелкните раскрывающееся меню в разделе «Операционная система по умолчанию». Выберите желаемую операционную систему. Также снимите флажок «Время отображения списка операционных систем».
Как изменить параметры загрузки?
- Перезагрузите компьютер.
- Нажмите клавишу F8, чтобы открыть дополнительные параметры загрузки.
- Выберите Восстановить компьютер. Расширенные параметры загрузки в Windows 7.
- Нажмите Ввод.
- В параметрах восстановления системы щелкните Командная строка.
- Введите: bcdedit.exe.
- Нажмите Ввод.
Как удалить параметры загрузки Ubuntu?
Введите sudo efibootmgr, чтобы отобразить все записи в меню загрузки. Если команда не существует, выполните sudo apt install efibootmgr. Найдите Ubuntu в меню и запишите его загрузочный номер, например. 1 в Boot0001. Введите sudo efibootmgr -b <номер загрузки> -B, чтобы удалить запись из меню загрузки.
Как удалить Linux и установить Windows на свой компьютер?
Чтобы удалить Linux с вашего компьютера и установить Windows:
- Удалите собственные разделы, разделы подкачки и загрузочные разделы, используемые Linux: Загрузите компьютер с установочной дискеты Linux, введите в командной строке fdisk и нажмите клавишу ВВОД. …
- Установите Windows.
Как удалить загрузчик GRUB?
Удалите загрузчик GRUB из Windows
- Шаг 1 (необязательно): используйте diskpart для очистки диска. Отформатируйте раздел Linux с помощью инструмента управления дисками Windows. …
- Шаг 2. Запустите командную строку администратора. …
- Шаг 3. Исправьте загрузочный сектор MBR в Windows 10. …
- 39 комментариев.
27 сент. 2018 г.
Как мне избавиться от BCD?
Чтобы удалить запись меню загрузки в Windows 10,
- Откройте командную строку с повышенными привилегиями.
- Введите или скопируйте и вставьте следующую команду и нажмите клавишу Enter: bcdedit.
- В выходных данных найдите строку идентификатора записи, которую вы хотите удалить. …
- Выполните следующую команду, чтобы удалить его: bcdedit / delete {идентификатор}.
31 янв. 2020 г.
Как стереть мою операционную систему из BIOS?
Процесс удаления данных
- Загрузите BIOS системы, нажав клавишу F2 на экране-заставке Dell во время запуска системы.
- В BIOS выберите параметр «Обслуживание», а затем параметр «Удаление данных» на левой панели BIOS с помощью мыши или клавиш со стрелками на клавиатуре (рис. 1).
20 нояб. 2020 г.
Как удалить загрузчик GRUB из BIOS?
6 ответов
- Вставьте установочный диск Windows 7 / диск обновления в дисковод, а затем запустите компьютер (в BIOS установите загрузку с компакт-диска).
- При появлении запроса нажмите клавишу.
- Выберите язык, время, валюту, клавиатуру или метод ввода, а затем нажмите «Далее».
- Щелкните Восстановить компьютер.
13 дек. 2012 г.
Как отредактировать диспетчер загрузки?
Редактирование параметров загрузки
Чтобы изменить параметры загрузки в Windows, используйте инструмент BCDEdit (BCDEdit.exe), входящий в состав Windows. Чтобы использовать BCDEdit, вы должны быть членом группы администраторов на компьютере. Вы также можете использовать служебную программу настройки системы (MSConfig.exe) для изменения параметров загрузки.
Как изменить операционную систему по умолчанию?
Выбор ОС по умолчанию в конфигурации системы (msconfig)
- Нажмите клавиши Win + R, чтобы открыть диалоговое окно «Выполнить», введите msconfig в «Выполнить» и нажмите / коснитесь «ОК», чтобы открыть «Конфигурация системы».
- Щелкните / коснитесь вкладки «Загрузка», выберите ОС (например, Windows 10), которую вы хотите использовать в качестве «ОС по умолчанию», щелкните / коснитесь «Установить по умолчанию» и щелкните / коснитесь «ОК». (
16 нояб. 2016 г.
Как изменить BIOS диспетчера загрузки?
Чтобы изменить порядок загрузки в последовательности задач:
- В меню «Свойства» выберите «1E BIOS для UEFI Boot Order».
- В разделе «Порядок загрузки UEFI» выберите одно из: Диспетчер загрузки Windows — устанавливает диспетчер загрузки Windows как единственное устройство в списке загрузки UEFI.
 Few months back we were trying to install an operating system in Hard Disk using Unetbootin and because some issues with the iso file of the operating system I was unable to install the OS in my C Drive and I ended up screwing the Boot menu. The Boot menu started having another option named Unetbootin with the Windows 7 (Default OS) and finally I found a solution to the problem after many trials. So what you’ll have to do is just sit back and follow the instructions step by step as stated below.

A Thing can be done in many methods, so is this, you can remove the Unetbootin from the Boot menu by many methods, I would be guiding you with the easiest and the most feasible method so that you will be able to remove the Unetbootin option from the boot menu without any issues and that too with an ease.
Method 1
Go to this directory : Control Panel\All Control Panel Items\Programs and Features and locate for Unetbootin and Uninstall it from there and you’re problem is solved but in my case what I did was I deleted the files from the C Drive and was unable to find Unetbootin in that directory so wasn’t able to remove the Unetbootin option from the Boot menu, so if you are one like me, you’ll have to go with the below stated method
Method 2
Step 1 : Open CMD as Administrator (Elevated Command Prompt).
Step 2 : Type bcdedit.exe in the elevated command prompt and you’ll find something related to boot coming in the window, You’ll find something which will look similar to this, You will be having a different value in the brackets of the identifier.
identifier {9be99bb5-6452-11e2-9ff8-001e33d67d3a}
Step 3 : Copy the value in the brackets of the identifier, In the above example I showed the value to be copied is 9be99bb5-6452-11e2-9ff8-001e33d67d3a
Step 4 : Now in the same window type : bcdedit/delete {Identifier Value you copied above} for the above shown example you will have to type in bcdedit/delete {9be99bb5-6452-11e2-9ff8-001e33d67d3a}
Note : You will have to replace the value in the brackets with the value in your system.
That’s it, using the above stated methods you will easily be able to remove Unetbootin from Bootmenu.
MAKE A DREAM CAREER IN .NET , JAVA, Android, PHP, SEO,
Cloud Computing, C, C++, Data Structure
CALL @ 08860352748, 01165164822
or
http:// www.cpd-india.com
Would you be able to uninstall UNetbootin if you lost important program file? Have you ever wondered how you can be professional in removing any unwanted programs from Windows based PC? Are you trying to get things done but it takes FOREVER to delete anything? Or have you ever wanted to take care of some unknown programs but hardly know how to get started? If you answered to yes, then this place is for you! Learn step by step how to uninstall a Windows program.
Description
This guide is for people new to uninstall UNetbootin from Windows based PC. This is very much a beginner’s uninstall guide! This guide will introduce you to the practical methods and show you how to uninstall and remove a program in person. You will see how to get rid of program within Windows 10, you will see how to uninstall program within Windows 7, you will also see how to uninstall program within other Windows based computers, like Windows 8, Windows 11 and more. The methods explained here are written to provide Windows users with the knowledge and skills required to troubleshoot and uninstall programs from Windows. These skills include understanding Windows built-in uninstaller, how it can be used to uninstall a program, and how to launch it on the different versions of Windows.
This guide will also include a professional method give you more confidence in removing a Windows program. You will get how to utilize a renowned uninstaller software to make the uninstall UNetbootin thing much easier than you ever could. You will get the step-by-step process of Windows program uninstallation. Those who have no basic knowledge of Windows programs’ uninstallation can join the guide. This will be a very complete introduction to uninstall UNetbootin from Windows. It will also be of use to people who have used previous versions of Microsoft Windows. Along with that, you will also can pick up a series of tricks and tips regarding how to tune up and make the most of your Windows computer.
Complete Guide to Uninstall UNetbootin from Windows
Now, it is real time to make it clear what you can do to uninstall UNetbootin from any Windows PC successfully. We will introduce how to uninstall a program from the two general directions: manual uninstall guide and professional uninstaller software. You will get how to uninstall a program from Windows based PC in the manual way; you will also get how to uninstall a program from Windows based PC through a notable uninstaller software. So you can worry about nothing! I will give you the most used and powerful tool to make sure your any program uninstallation effortless and fast.
Remove UNetbootin Through Manual Way
Get how to use your own hands to uninstall UNetbootin in person. This part involves 3 solutions to uninstall a program manually. You will know how to uninstall a program separately from the Start menu, Control Panel, and the Settings page. Now, let’s figure out how they work.
Remove UNetbootin from the Start Menu
1. Open Windows Task Manager and close all process associated with the UNetbootin program.
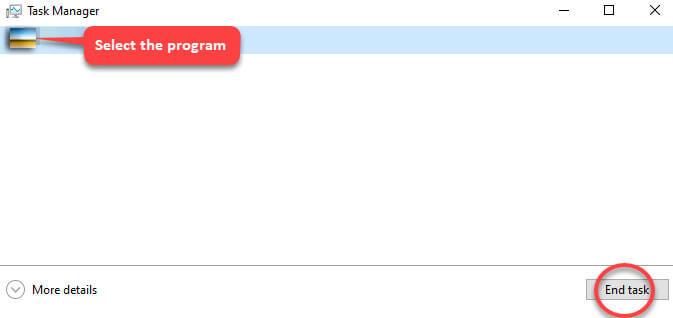
2. Click Start menu > find out the UNetbootin program in the list shown.
3. Right-click UNetbootin > select Uninstall.
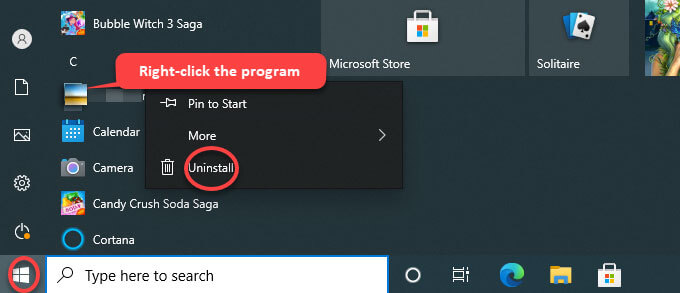
4. Click Yes/Uninstall to confirm that you want to uninstall the program from your computer right now.
5. Next, follow the pop-up uninstall wizard to get the program uninstalled from your PC.
Uninstall UNetbootin from the Control Panel
1. Open Windows Task Manager and close all process associated with the UNetbootin program.
2. Click the Start menu > open Control Panel. If you are on Windows 10, you can take advantage of the Search box on the taskbar. Simply enter ‘control panel’ in the Search box and open it from the results.
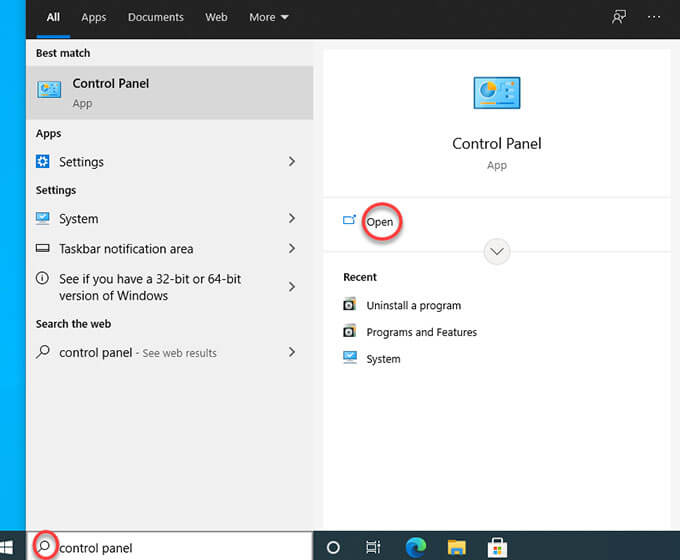
3. From the Control Panel window, click Programs > click Uninstall a program.
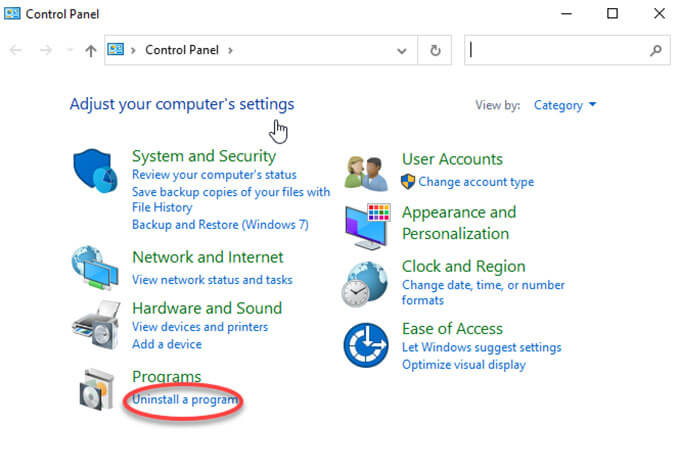
4. Right-click the UNetbootin program that you would like to uninstall > select Uninstall.
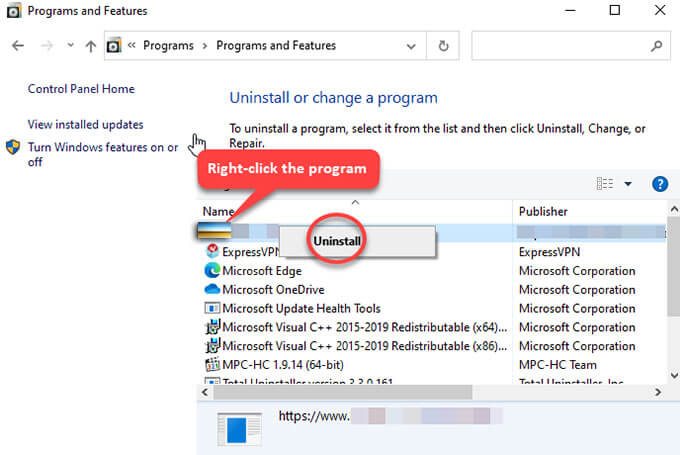
5. Click Yes/Uninstall to make sure that you are ready to uninstall the target program at once.
6 Next, follow the pop-up uninstall wizard to uninstall UNetbootin from your PC.
Remove UNetbootin from the Settings
1. Open Windows Task Manager and close all process associated with the UNetbootin program.
2. Click the Start menu > click Settings.
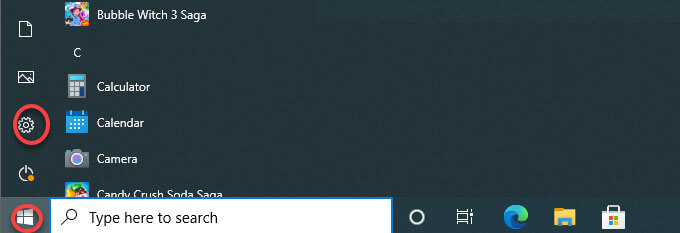
3. Click Apps > Click Apps & Features.
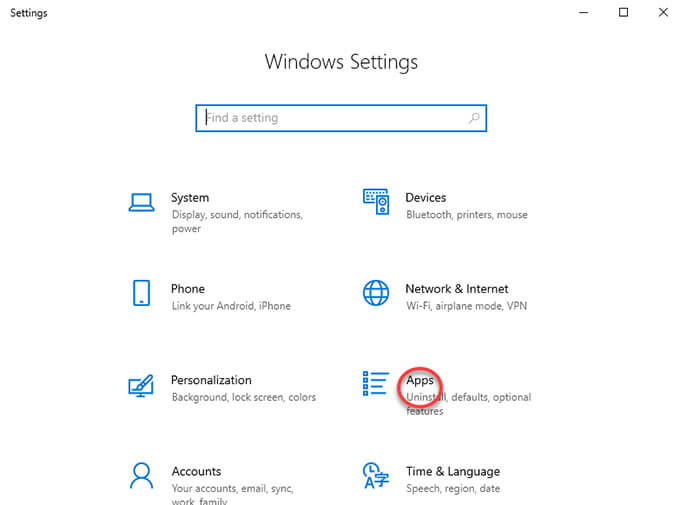
4. From the Apps & Features page, click the UNetbootin program > click Uninstall.
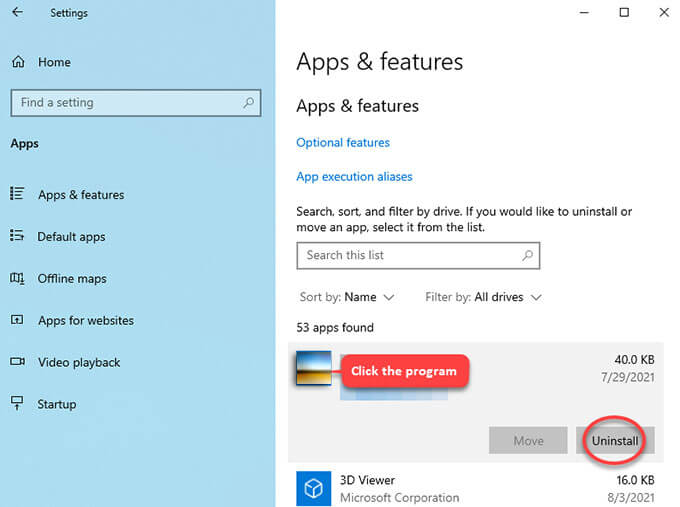
5. Click Yes/Uninstall to be sure that you want to uninstall this program.
6. Next, follow the pop-up uninstall wizard to complete the program removal.
Uninstall UNetbootin Through Total Uninstaller
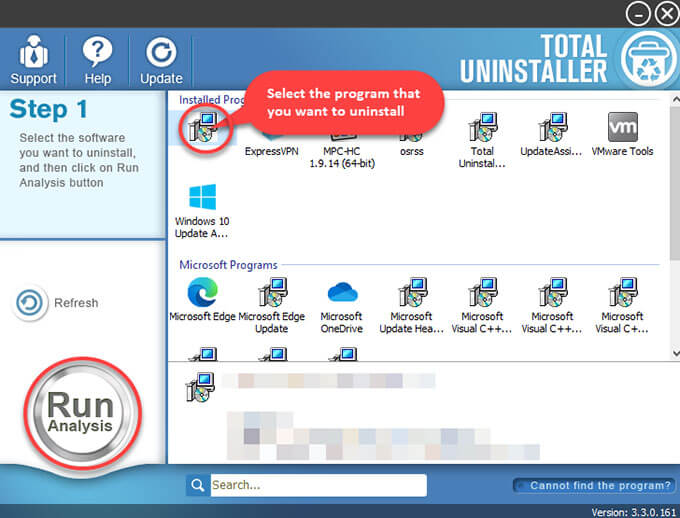
Get how to utilize the renowned Total Uninstaller tool to uninstall UNetbootin and any other unwanted programs with a few clicks. Before starting to remove this program, make sure it has been quit. You can completely quit the program processes from Task Manager.
Warm tips: You can click the download button below to obtain Total Uninstaller in no time!
1. Launch Total Uninstaller > select UNetbootin > click Run Analysis.
2. Click Complete Uninstall > click Yes to make sure you would like to uninstall the program.
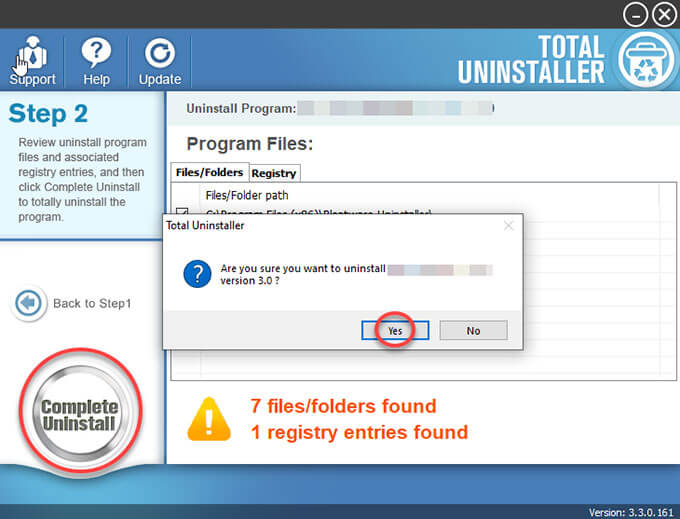
3. Click Yes to make it certain that you need to uninstall this product right now. Follow the pop-ups to get the UNetbootin program removed from your PC.
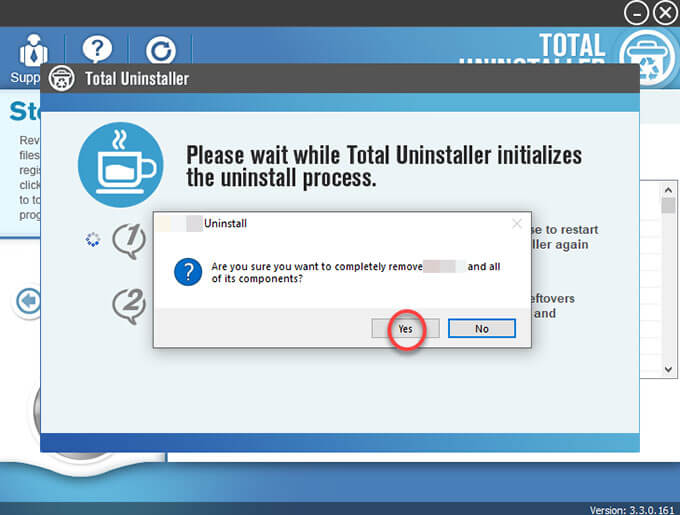
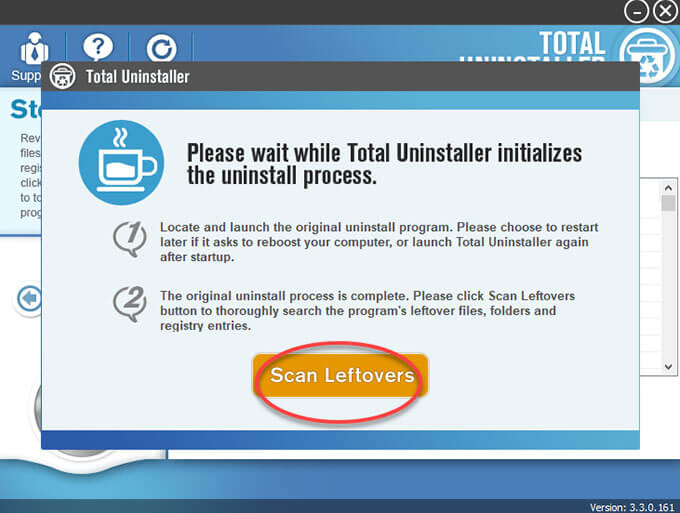
4. Click Scan Leftovers to continue deleting all leftovers associated with the program.
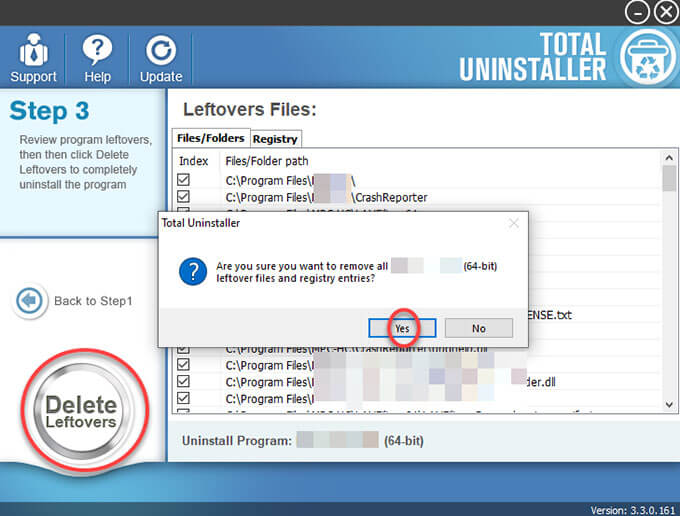
5. Click Delete Leftovers > click Yes to be sure you want to clean out all leftovers. Click OK when the removal is done.
6. Quit Total Uninstaller and Restart your PC.
Part 1: PC Tune Up — Clean and Tune a Windows Based PC
This part aims at telling any PC users how to be able to clean and tune a Window based PC. All tips and tricks are carefully picked in order to help any Windows user be confident in maintaining their PC themselves. So, if you are looking to cleanup and tune your computer without having to pay, don’t miss out on tricks here. Check out these tricks and tips as followed.
① Removing Viruses, Malware, and Bloatware Using Windows Defender
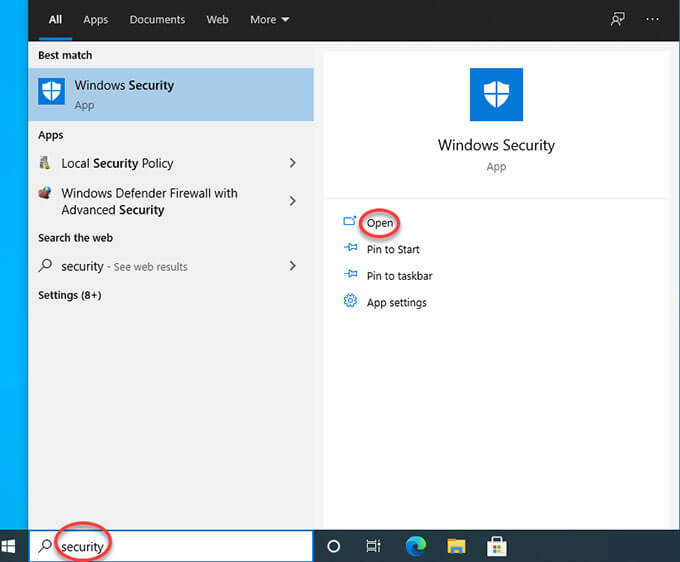
1. When you Windows PC is turned on, click the Start menu, and begin typing Security in Search box. From the search results, click open the Windows Security app.
2. Select Virus & threat protection > Scan options.
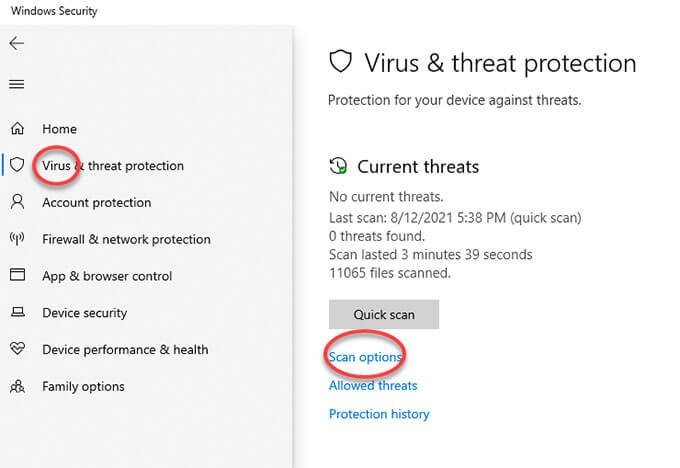
3. Select Windows Defender Offline scan, and then select Scan now.
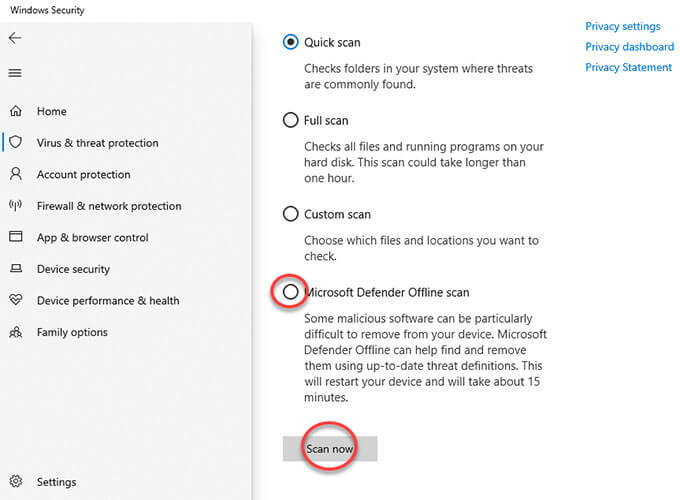
4. Next, the Windows Defender Offline scan is running and this may take a little bit time. Once done, your PC will restart.
② Cleaning the System Files and Registry Using Disk Cleanup
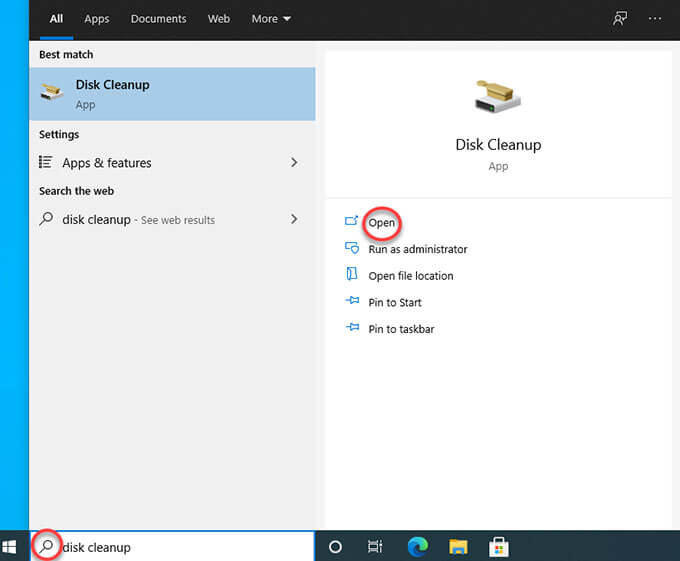
To clean the useless system files and registry, we will take advantage of the Disk Cleanup tool that is built-in in Windows. Disk Cleanup is an easy-to-use computer maintenance utility, responsible for free up disk space on a Windows computer. So, if you want to clean up your computer’s hard drive, the built-in Disk Cleanup app is a good choice.
1. Locate at the Search box on the taskbar > fill in «disk cleanup» > click Open to launch Disk Cleanup utility from the list of results.
2. Select the drive you want to clean up, and then select OK.
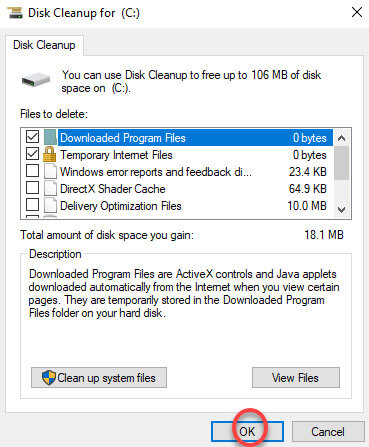
3. Under Files to delete, select the file types to delete. To get a description of the file type, select it. Click OK.
4. If you want to free up more space, you just need to delete system files. So, click Clean up system files in Disk Cleanup.
5. Select the file types to remove. To get a description of the file type, select it.
6. Select OK.
Please note: In Windows 7, open the Start Menu and type the word «disk» in Search box. Then, click on the Disk Cleanup in search result.
③ Deleting Unused / Background Files
1. Right-click Start menu > click File Explorer option from the list.
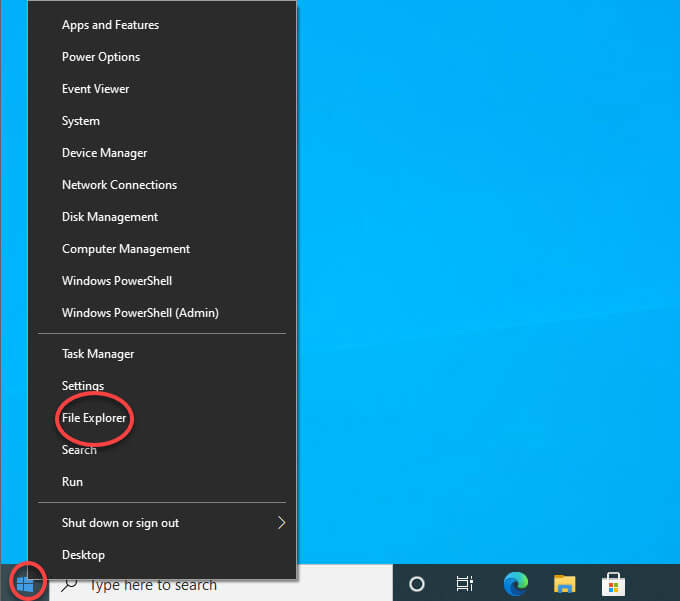
2. File Explore window is opened, navigate to the path: C:\Windows\Web and then open Wallpaper folder.
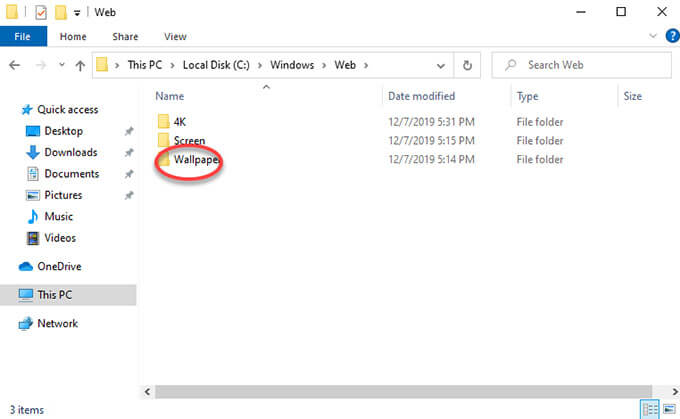
3. In the Wallpaper folder, you can choose to delete those unwanted Desktop Background images.
4. To delete a specific background image, right click the image and click Delete.
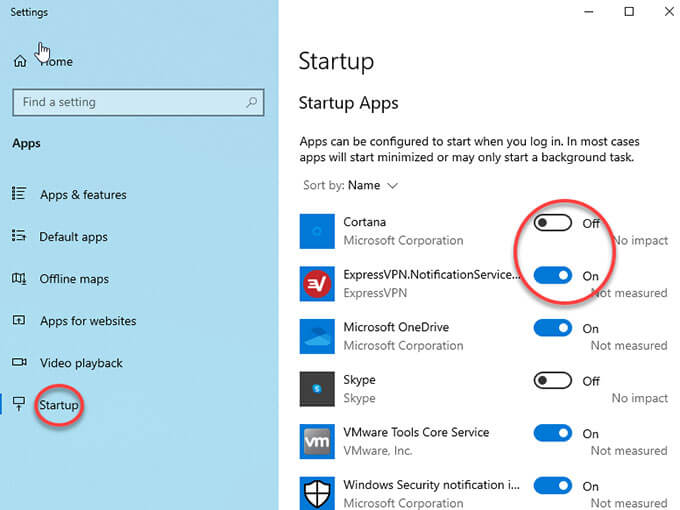
④ Optimizing Windows Startup
To increase your Windows startup speed, you can disable some programs and stop them from starting up when your computer is booting up.
1. If you are on Windows 10: Click Start menu > click Settings > click Apps from the Settings page.
2. Locate at the Startup option at the left-hand side of the page. On the right-hand side, you can click Off to disable any app that you don’t want to startup.
3. If you are on Windows 7: Click the Start menu > type msconfig in Serch box and press Enter key.
4. In the System Configuration window > click the Startup tab. Uncheck apps to disable them. Click OK to apply the change.
⑤ Keep Your PC up to Date
Like cars, your computer also needs some updates to make sure it is run better. Keeping your PC up to date also is an easy way to maintain it, will automatically solve some bugs and network issues and more. You can refer to the steps below to keep your PC up to date.
1. The first thing is to make sure your Internet is connected. And then open Internet Explorer. Click Start menu, and enter Internet Explorer in Search box. Open Internet Explorer (Desktop app) from the results.
2. On the Tools menu, select Windows Update.
3. If Microsoft Update is not installed, select Microsoft Update.
4. From the Welcome to Microsoft update page, select Check for Updates.
5. From the Keep your computer up-to-date window, select Express to install high priority updates.
6. On the Review and Install Updates page, select Install Updates, and then follow the instructions on the screen to complete the installation.
Pat 2: Hard Drive Maintenance
Maintaining your Windows hard drive will help your PC boot up faster. And the method is very easy, you can take advantage of the Disk Defragmenter tool.
1. Click Start button > enter Disk Defragmenter in the search box > open Disk Defragmenter in the list of result.
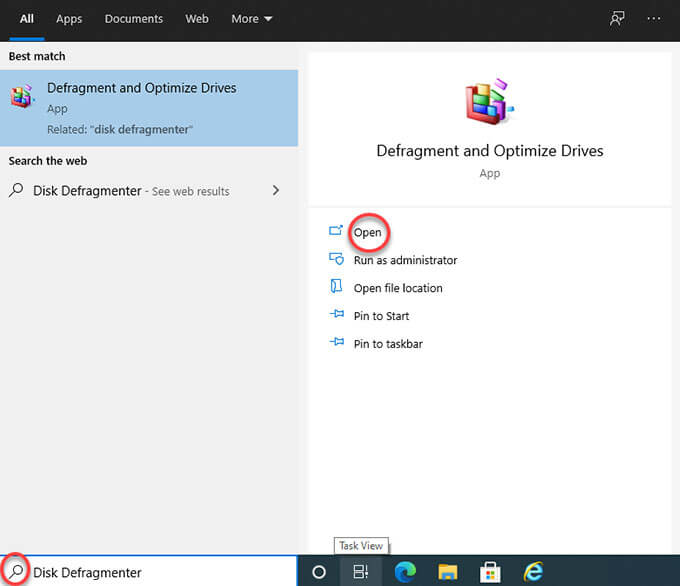
2. Under Current status, select the disk you want to defragment. To make sure whether the disk you selected needs to be defragmented or not, you only need to click Analyze disk. If it is necessary, enter your admin password to start this operation.
3. When you get the result, if the percentage is above 10%, it is highly recommended you defragment the disk. Click Defragment disk and enter a password to confirm that you want to perform this defragment.
Along with that, cleaning your computer physical hardware also can make it run faster. Refer to some issues you may encounter due to dust build up upon your hardware.
Issues:
- 1) Cause overheating
- 2) Not run efficiently
- 3) Overall effecting the performance
Solutions:
The first thing you need to clean your hardware is a small to medium paint brush. And then you are going to need compressed a dust can or a compressor. You can choose to use one of them, preferably probably a compressor is actually better to use and it will be more consistent and it is easier to use to set the pressure a bit lower not too hard. Because you don’t really want to lock damage any of the parts in the computer.
Pat 3: Memory Diagnostic
Another thing you may also do is to check your memory. So if you have any memory issues and for that we are going to go to Windows memory diagnostics. Now go to Windows memory diagnostics according to the following steps.
1. Click the Start menu, type «Windows Memory Diagnostic«, and press Enter. Right-click on Windows Memory Diagnostic in the search result and click Run as Administrator.
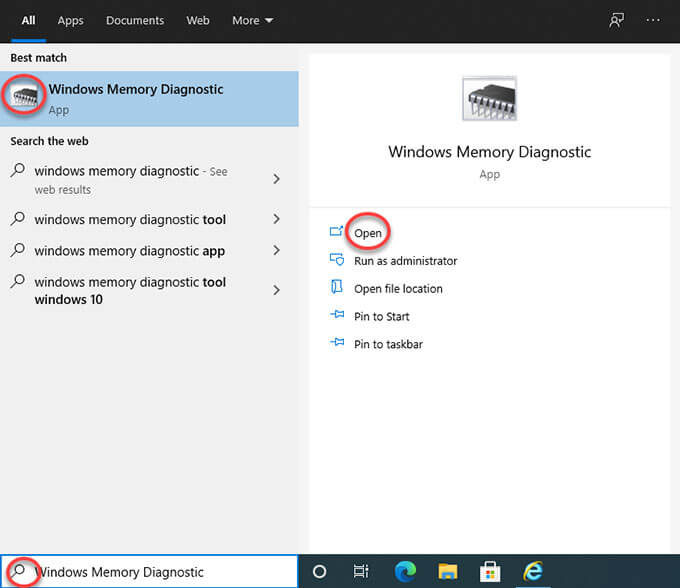
(Or you can press Windows Key + R, type the word «mdsched.exe» into the Run box that appears, and then press Enter key.)
2. Click Restart now and check for problems. Before doing this, save your work and close any open programs.
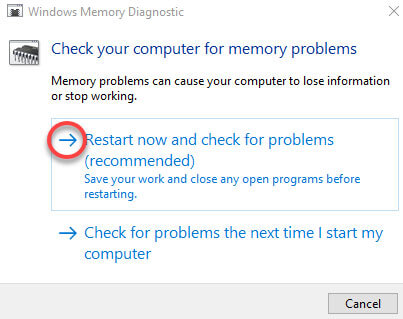
3. Your computer will restart in the Memory Diagnostic Tool and run a basic memory test.
4. Press F1 to stop the basic test and go into the Options screen.
5. Use the down arrow to select Extended. Press F10
6. Once the Memory Diagnostic Tool completes, make note of any errors reported
7. Hit Esc to exit the tool and boot into Windows
Conclusion
Till now, you may understand how you can tune up your PC and make it run faster. Whether you want to get rid of junk files that left on your PC after a program uninstall, clean up junk registry, maintain hard driver, uninstall and get rid of malware, or more other tips to optimize your PC, you can discover an answer here. As to today’s main topic how to uninstall UNetbootin, you will also get a complete guide to help you succeed in removing any unwanted programs from Window based PC. The goal of this post is to save people time and efforts by allowing them to learn how to uninstall UNetbootin or any other unwanted programs, and tune their computer. And for those users who want to be effortless in removing any program and give this professional Total Uninstaller a try, simply click the download button below to get started with ease.
Now that you have a full, standard install, you can get rid of the frugal install you used to launch the installer from; just boot Windows and uninstall UNetbootin.
The above is from your docs.
I used what I thought was a Unetbootin frugal install — running the .exe file from my hard disk — to create a pen drive with Manjaro on it and then uninstalling ´unetbootin` from boot menu.
Unable to boot from this drive I resolved to use some other tool. And so I set about removing Unetbootin from my box — Windows 7 32-bit. But the option to uninstall Unetbootin did not appear when I ran it again in Windows. The entry still shows up in boot options.
I have googled up and checked several recommended fixes including uninstalling Unetbootin in Programs and Features — the Portuguese equivalent actually. But it is not listed there.
Another suggestion was to look up the program identifier — runningbcdedit — to standard output and delete it. It looks like this
Setor de Inicialização em Modo Real
---------------------
identificador           {7c8301b0-f821-11e4-8758-d613e2b59352}
device                  partition=C:
path                    \ubnldr.mbr
description             UNetbootin
I managed to do this — delete the two files — the .mbr file and the file with the ID in the file name.
But Unetbootin still appeared as an option in the boot manager.
And then I simply deleted the Unetbootin executable. Still no joy.
Confused — possibly misreading docs like a bonehead — and appreciating any enlightenment you can provide.
КАК УДАЛИТЬ при загрузке выбор операционной системы
Как удалить Linux Ubuntu, установленную второй системой рядом с Windows 10 – правильный способ
Как создать загрузочную флешку Ubuntu/Linux c помощью UNetBootin
Похожие:
Наш проект живет и развивается для тех, кто ищет ответы на свои вопросы и стремится не потеряться в бушующем море зачастую бесполезной информации. На этой странице мы рассказали (а точнее — показали  вам Как удалить unetbootin с компьютера. Кроме этого, мы нашли и добавили для вас тысячи других видеороликов, способных ответить, кажется, на любой ваш вопрос. Однако, если на сайте все же не оказалось интересующей информации — напишите нам, мы подготовим ее для вас и добавим на наш сайт!
Если вам не сложно — оставьте, пожалуйста, свой отзыв, насколько полной и полезной была размещенная на нашем сайте информация о том, Как удалить unetbootin с компьютера.