Windows 11 начала поддерживать установку приложений для Android. Это не выглядит каким-то недоделанным проектом, Microsoft позаботилась о том, чтобы вы могли взаимодействовать с приложением Android так же, как вы взаимодействуете с приложениями UWP.
Если вам по какой-то причине необходимо удалить из системы WSA (Windows Subsystem for Android), вы можете это сделать тремя различными способами с помощью этого руководства.
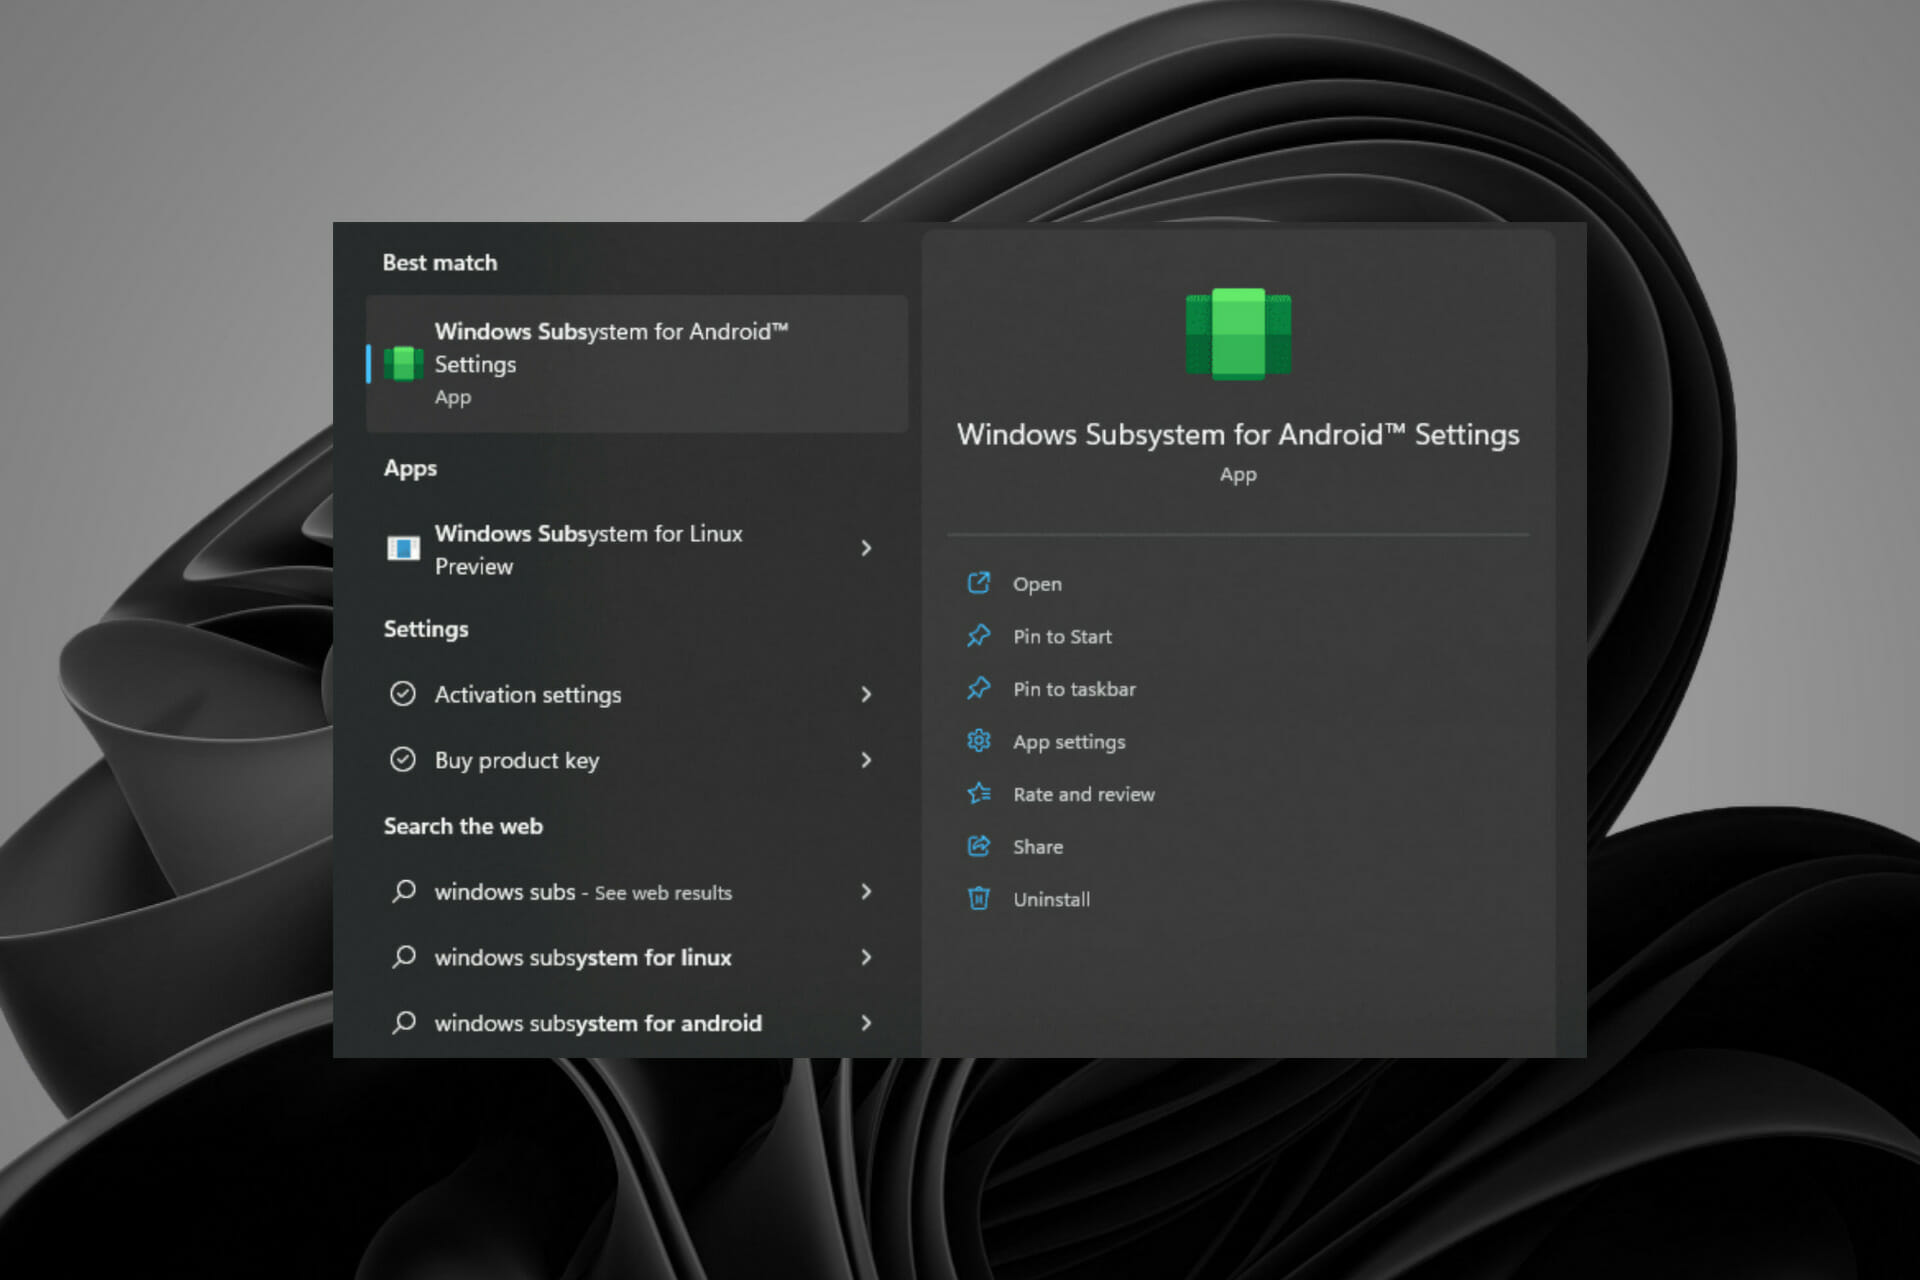
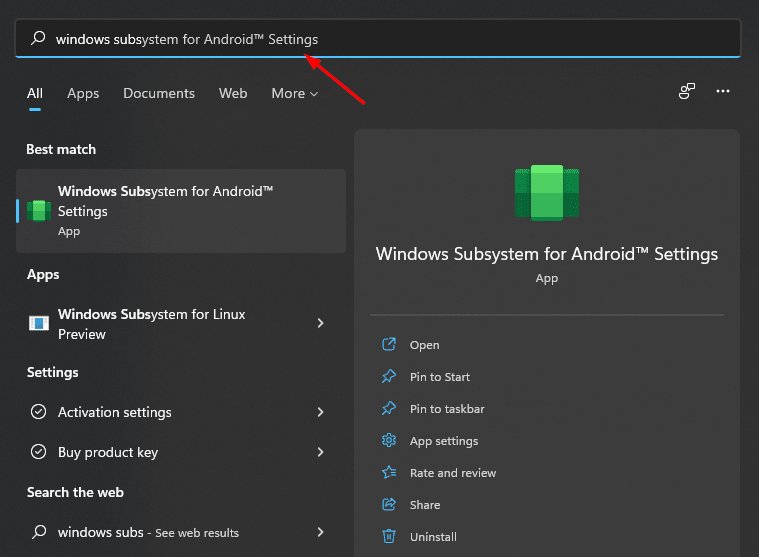
Удалите Subsystem for Android с помощью меню «Пуск».
Удаление подсистемы Windows для Android выполняется легко, просто и быстро.
Шаг 1: Откройте меню «Пуск» и нажмите кнопку «Все приложения» в правом верхнем углу меню.
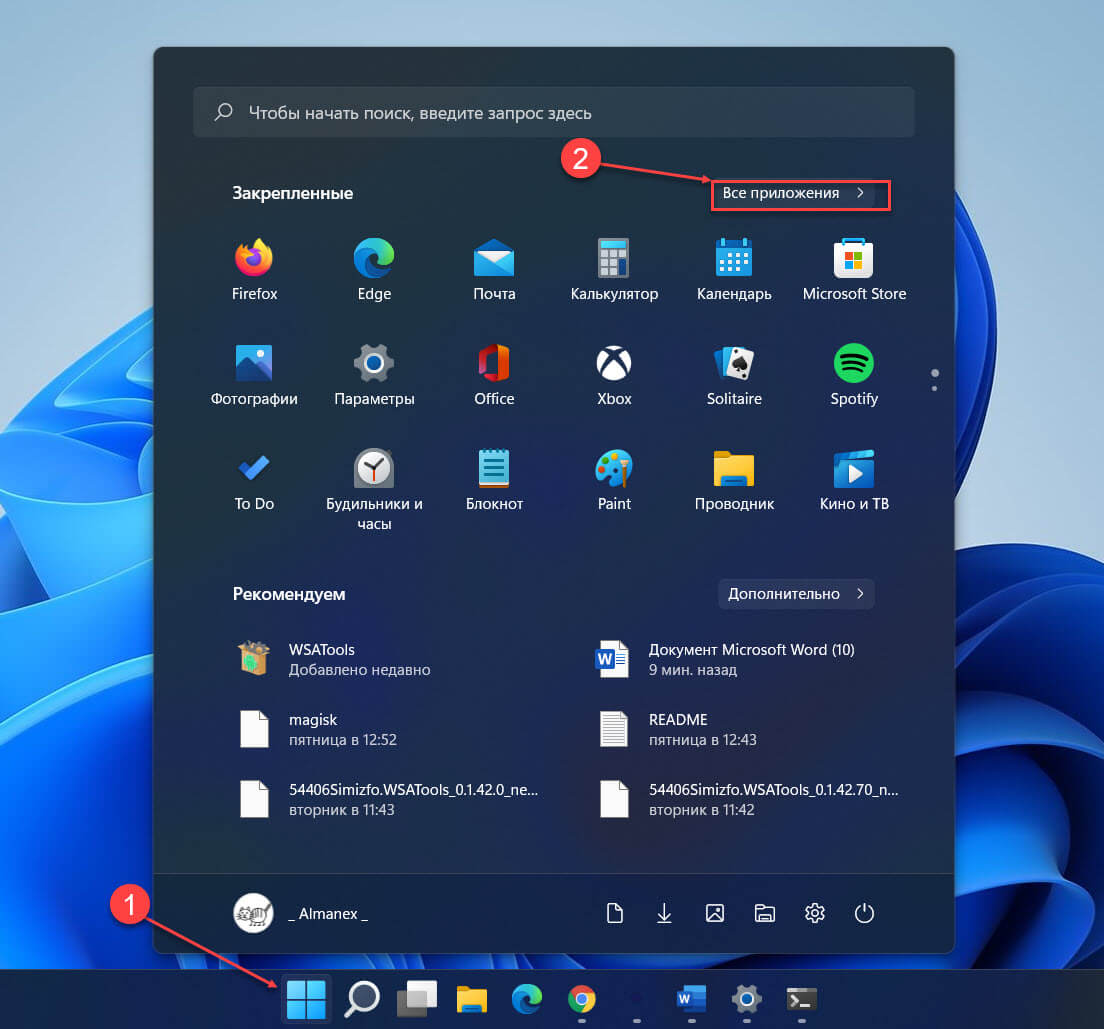
Шаг 2: Затем прокрутите список приложений вниз, найдите и кликните правой кнопкой мыши плитку «Windows Subsystem for Android» и выберите в контекстном меню опцию «Удалить». Это вызовет всплывающее окно, в котором необходимо подтвердить свои действия.
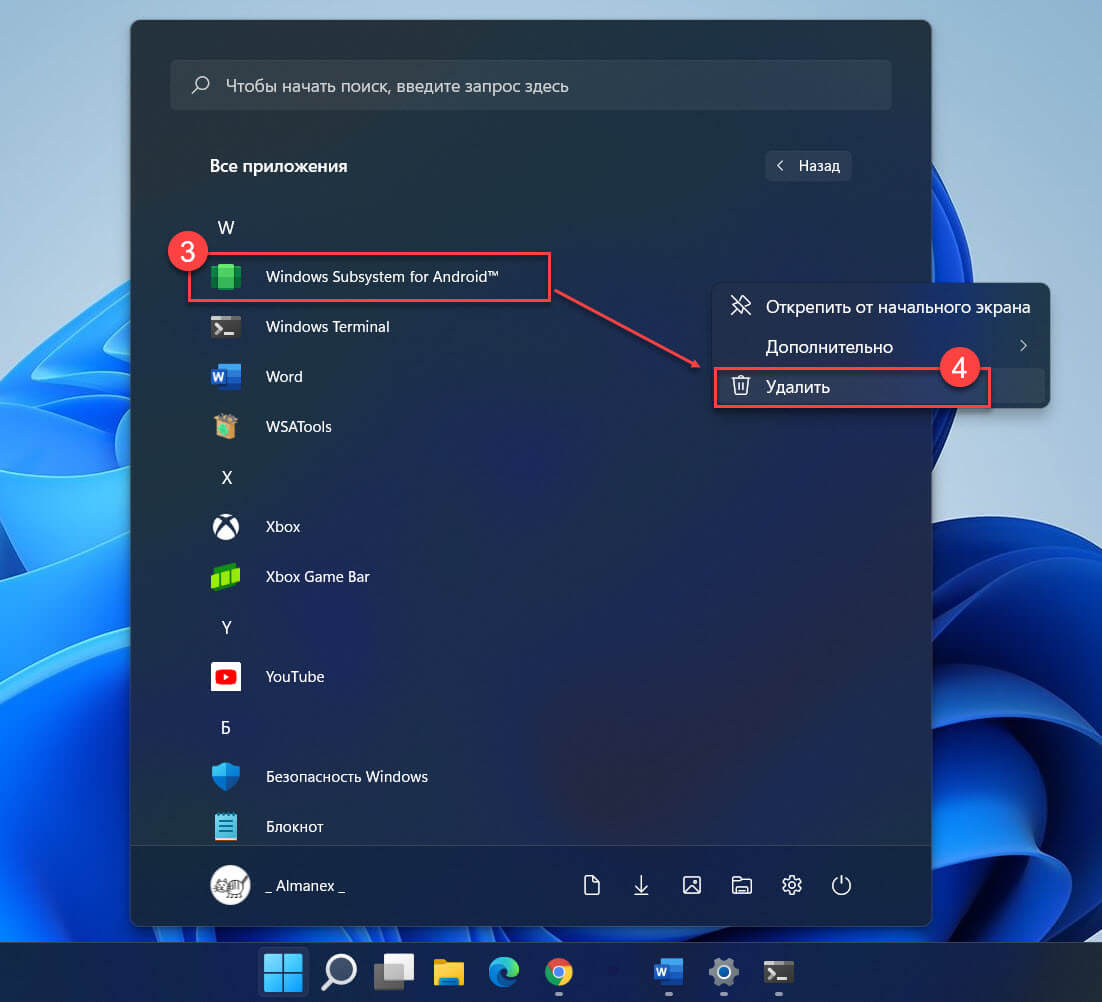
Шаг 3: Снова нажмите кнопку «Удалить», чтобы удалить подсистему Windows для Android из вашей системы.
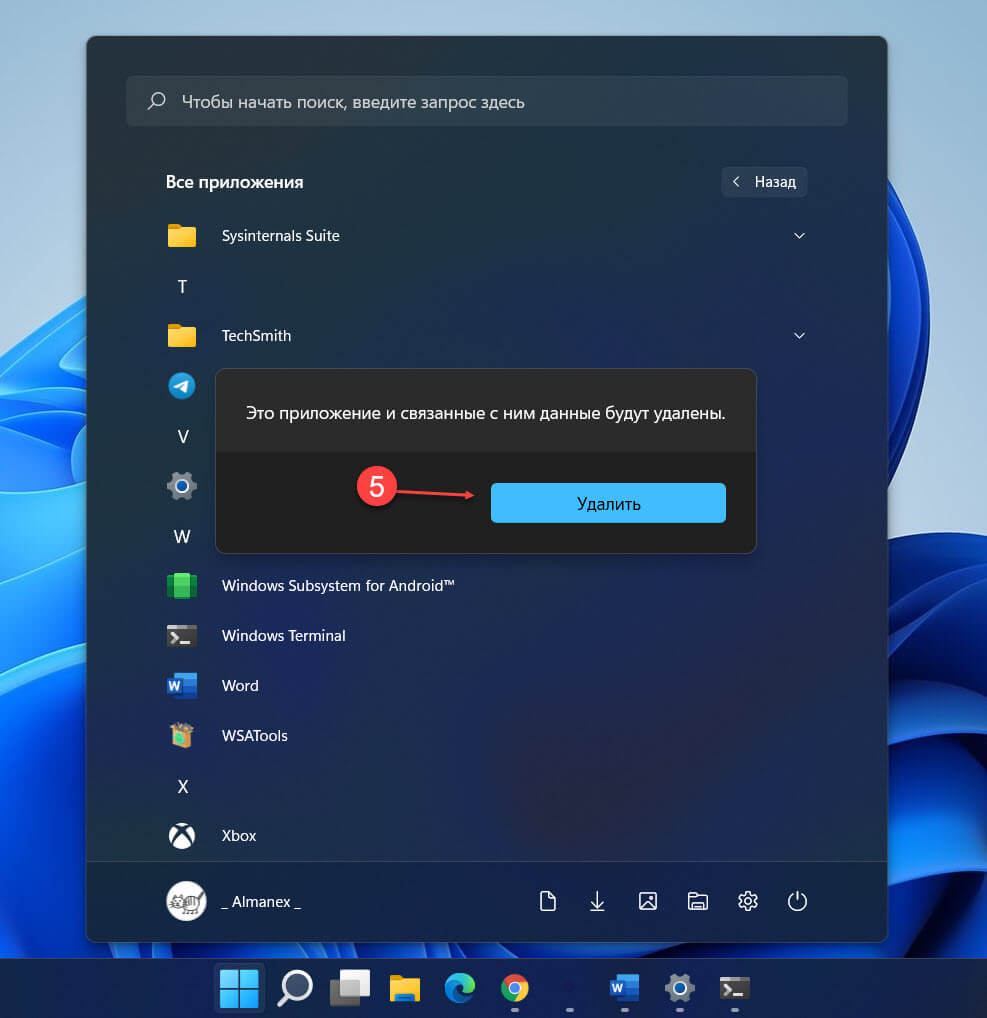
Вот и все, WSA удалена из вашей системы.
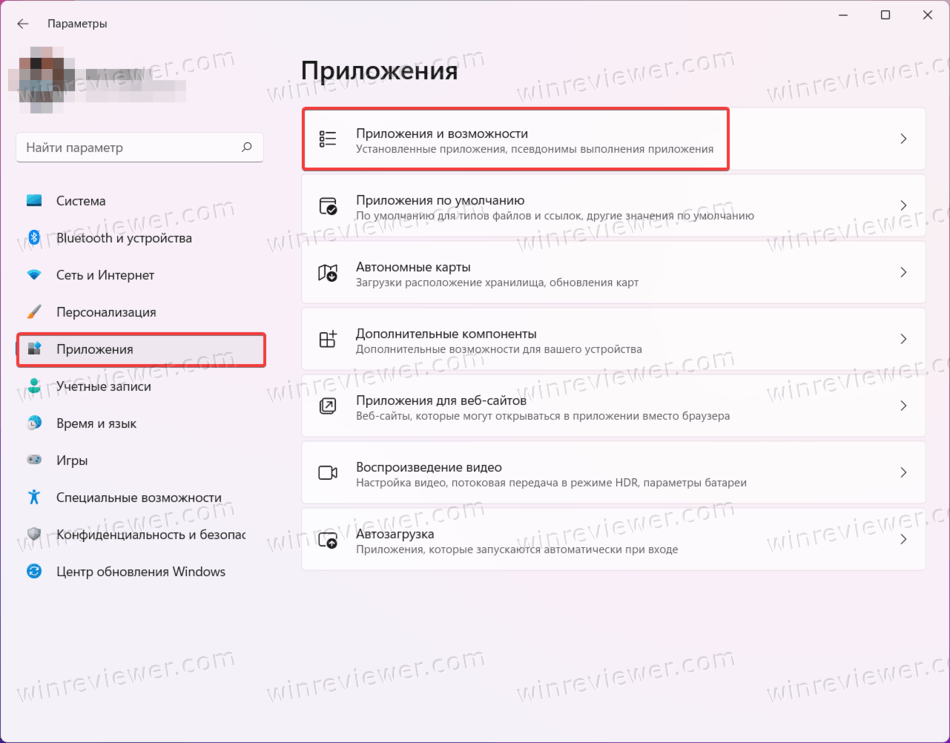
Удалите подсистему Windows для Android с помощью приложения «Параметры»
Вы также можете удалить приложение WSA с помощью приложения «Параметры». Хотя этот способ потребует выполнить больше шагов, это имеет смысл, если вам необходимо удалить несколько приложений или настроить любые другие параметры в Windows 11.
Шаг 1: Чтобы удалить WSA с помощью параметров, сначала перейдите в меню «Пуск» и откройте приложение «Параметры» из списка закрепленных приложений или любым другим удобным вам способом.
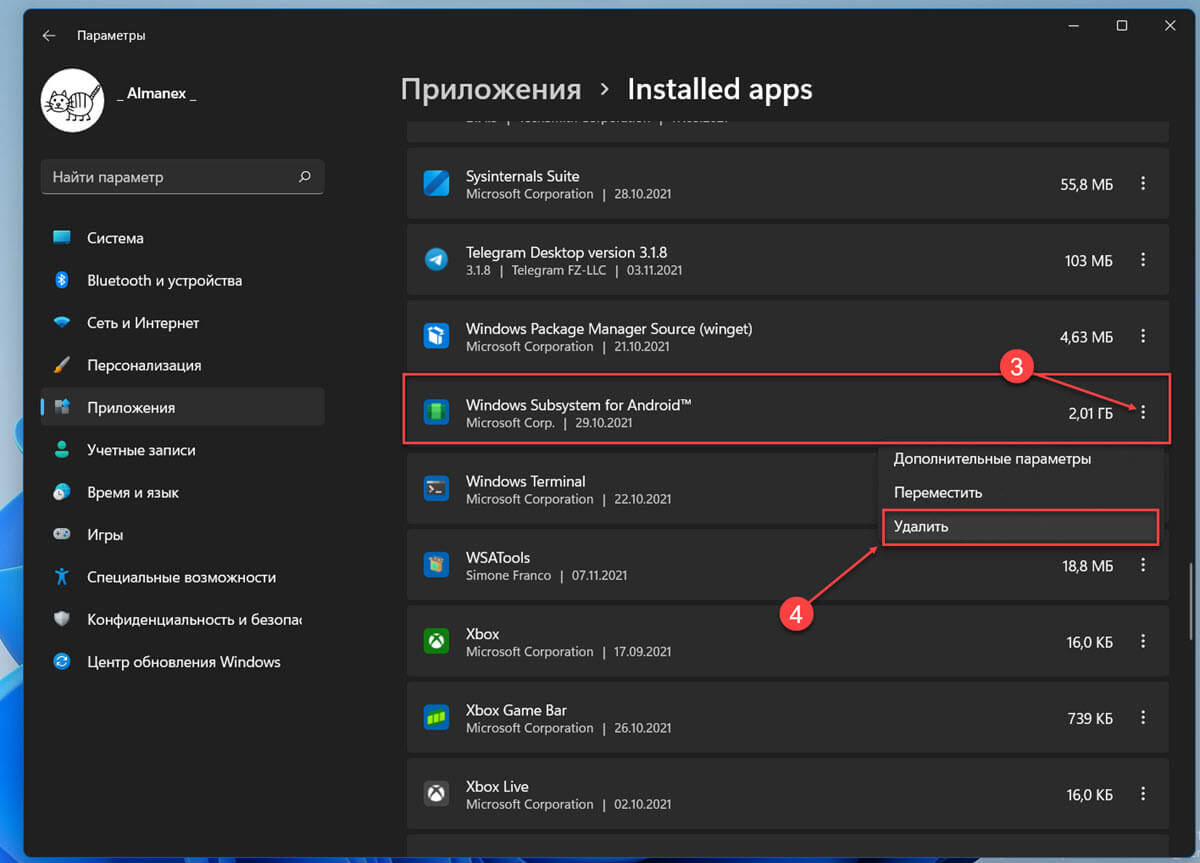
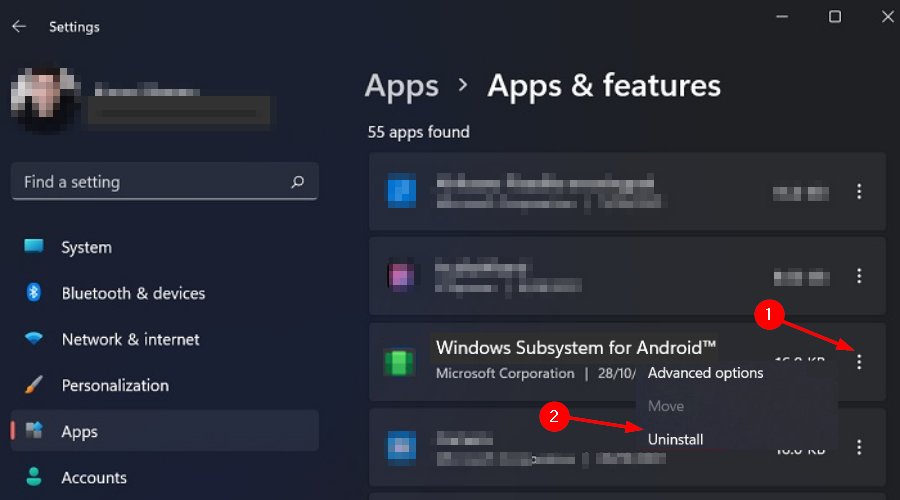
Шаг 2: Затем кликните раздел «Приложения» на левой боковой панели окна параметров.
Шаг 3: Кликните плитку «Приложения и возможности», расположенную в правой части окна.

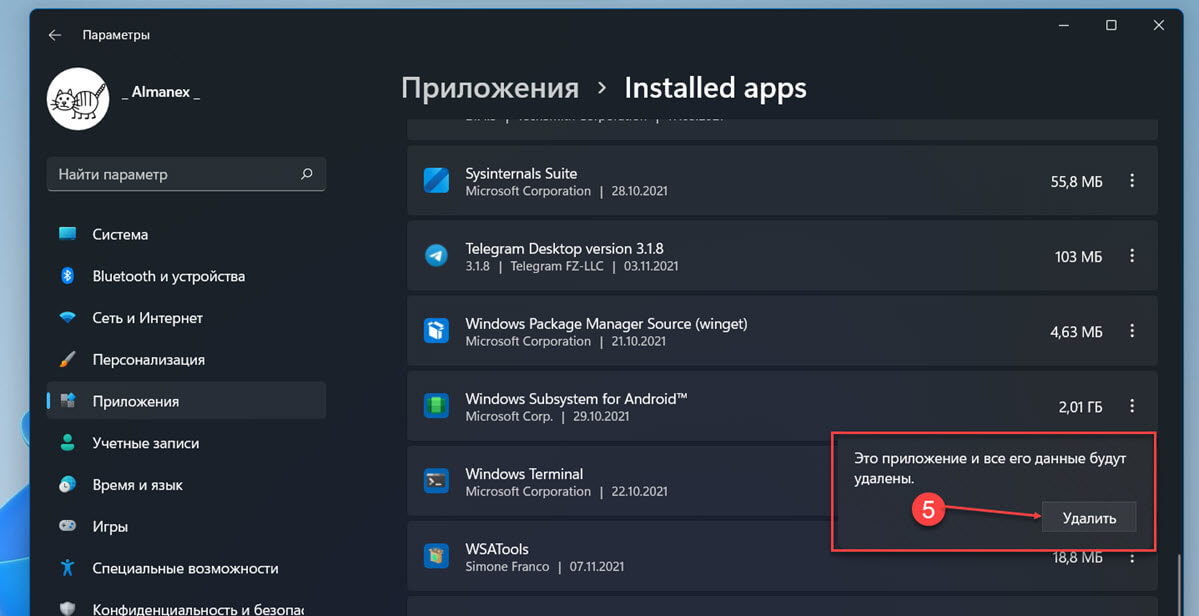
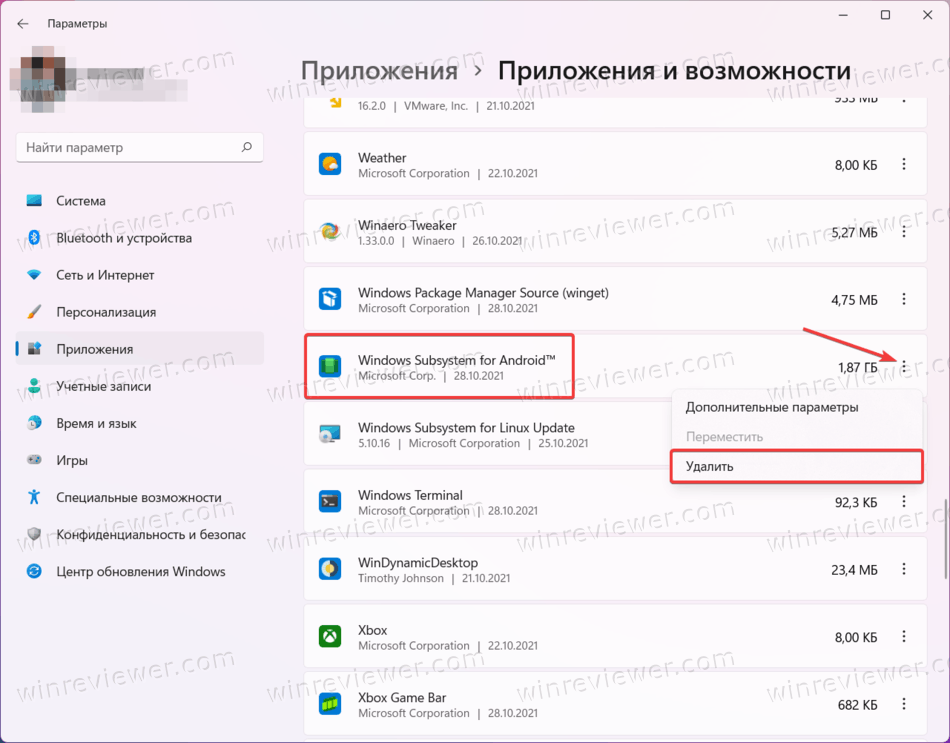
Шаг 4: Теперь найдите в списке «Windows Subsystem for Android», кроме того, вы также можете использовать поиск, чтобы найти приложение.
Шаг 5: После этого кликните (три вертикальные точки) в правой части плитки приложения и выберите параметр «Удалить». Это вызовет окно подтверждения на вашем экране.
Шаг 6: Снова нажмите кнопку «Удалить», чтобы выполнить удаление WSA из вашей системы.
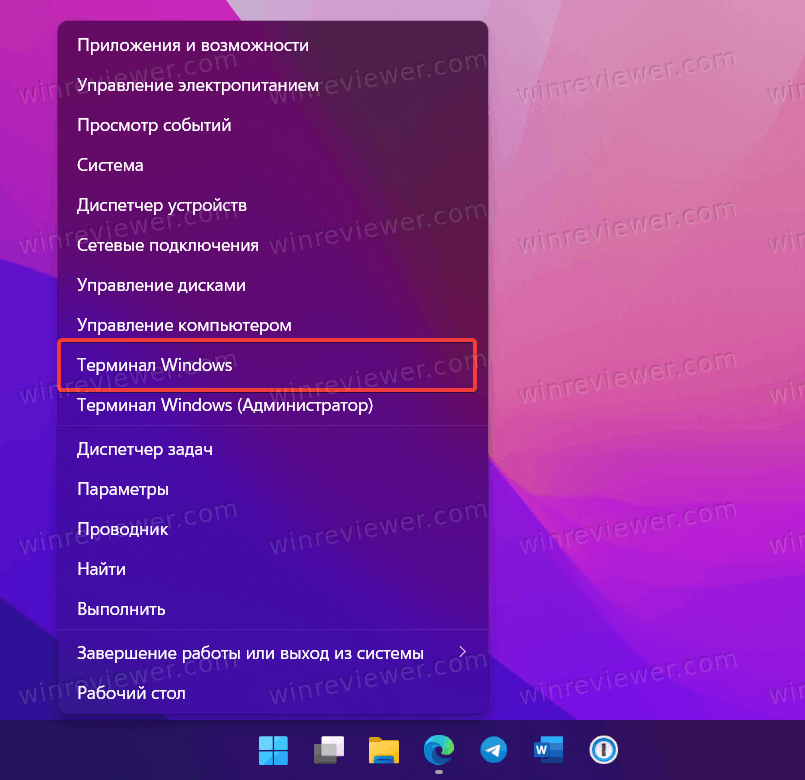
Удалите подсистему Windows для Android из PowerShell в Терминале Windows
Если использование Терминала Windows, вас не пугает, вы можете быстро удалить подсистему Windows для Android с помощью Windows PowerShell.
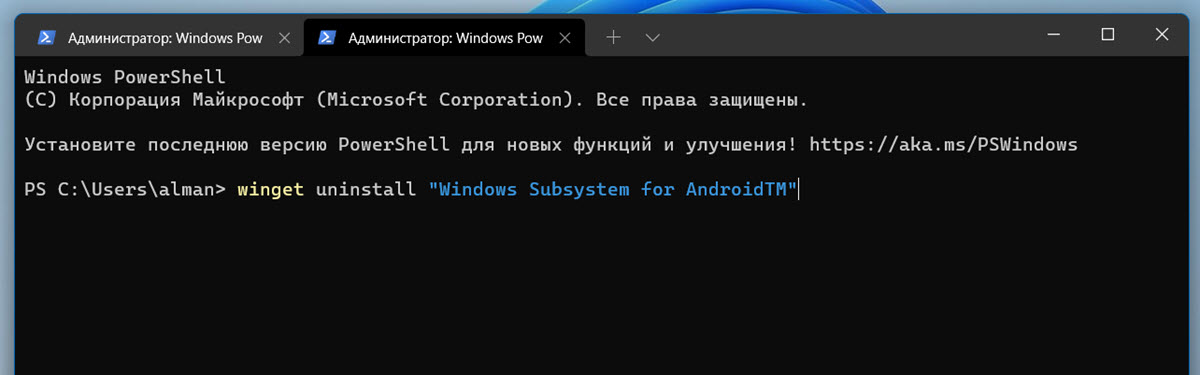
Шаг 1: Чтобы удалить WSA с помощью Powershell, откройте «Терминал Windows» от имени адмистратора.
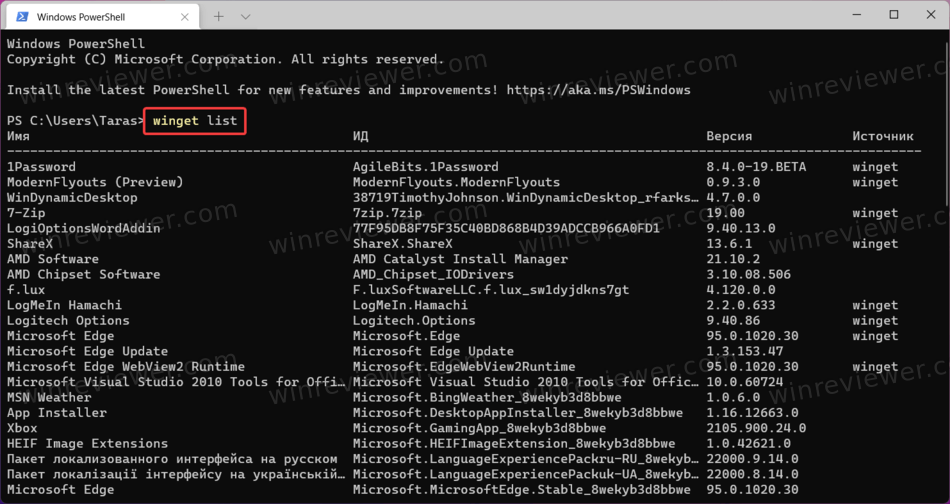
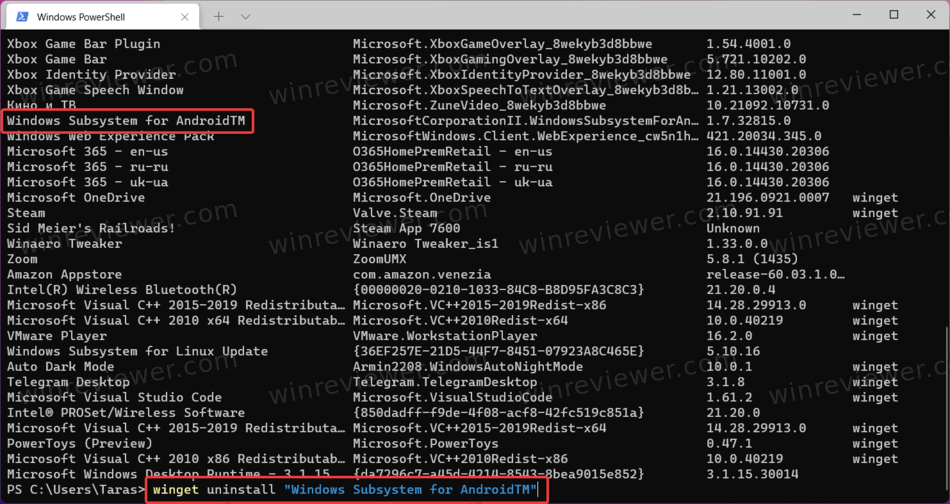
Шаг 2: Терминал Windows по умолчанию должен открываться на вкладке PowerShell. Там введите или скопируйте + вставьте следующую команду и нажмите Enter, чтобы удалить WSA из вашей системы.
winget uninstall "Windows Subsystem for AndroidTM"
После выполнения команды подсистема Windows для Android будет удалена с вашего ПК.
Если вы знаете другие способы, как удалить подсистему Windows для Android, поделитесь с нами в комментариях ниже.
by Claire Moraa
Claire likes to think she’s got a knack for solving problems and improving the quality of life for those around her. Driven by the forces of rationality, curiosity,… read more
Updated on
- The Android app installer is a feature that lets you install and run Android apps directly on your Windows device.
- However, not everyone enjoys it given the risk of installing malware or unverified apps into their system.
- If you are looking for a way to get rid of it, we’ll show you different ways to achieve this without issues.
The main advantage of the Android app Installer, also known as Windows Subsystem for Android (WSA) is the convenience it brings to Windows 11 systems.
Just like how you can install applications from Google Play or Apple App Store on your mobile device, you can now also install Android apps on your computer through the Microsoft Store.
As the Store is populated with thousands and thousands of app options, it can be intimidating for users to research and choose some apps, but we created a very useful list with some of the best Android apps for Windows 11.
When you buy a new computer, you spend a good amount of time looking for and installing the right applications. You get to do all that in just a few clicks when using the Android app installer, exactly in the same way as when using your mobile devices.
The Windows Subsystem for Android (WSA) has been designed to make it easier for anyone to sideload applications, and it is a big change from the previous versions of the Windows Store, which is now called Microsoft Store.
Does the Android app installer take up storage space?
The main reason that people want to disable the Android app installer is that it requires 8 GB of RAM to use on your PC, and some users still don’t have that capability and are not inclined to update their system to use this feature.
Added to that, depending on the number of Android apps you want to use on Windows 11, it can take up storage space from your HDD as well.
Another disadvantage of having the App Installer enabled is that it can slow down your computer.
Not only does it use up valuable disk space, but all of those apps that are installed in your computer need more RAM to run smoothly and efficiently. Over time, this can cause your computer’s performance to suffer greatly.
How we test, review and rate?
We have worked for the past 6 months on building a new review system on how we produce content. Using it, we have subsequently redone most of our articles to provide actual hands-on expertise on the guides we made.
For more details you can read how we test, review, and rate at WindowsReport.
It’s not just the App Installer that is consuming space. The other apps (that you have downloaded) are stored in the data folder.
One of the reasons it consumes more memory than any of the other apps is because keeps track of a lot of information about each app: its name, icon, permissions, and so on.
It will keep consuming memory by storing data and cache regularly. And it will keep increasing if you are not clearing the data and cache.
In the case of other apps, you can also uninstall them from Windows 11 without too much trouble, so choosing which apps you want to keep is the only impediment.
How can I uninstall the Windows Subsystem for Android (WSA) on Windows 11?
- Press the Windows key and type Windows Subsystem for Android on the search bar.

- Scroll down and select Uninstall.
- Click Uninstall in the dialog box that pops up.

2. Use the Settings app
- Hit the Windows + I keys simultaneously to open Settings.

- Navigate to Apps on the left pane then select Apps & features on the right pane.
- Find WSA, click the three horizontal dots and select Uninstall.
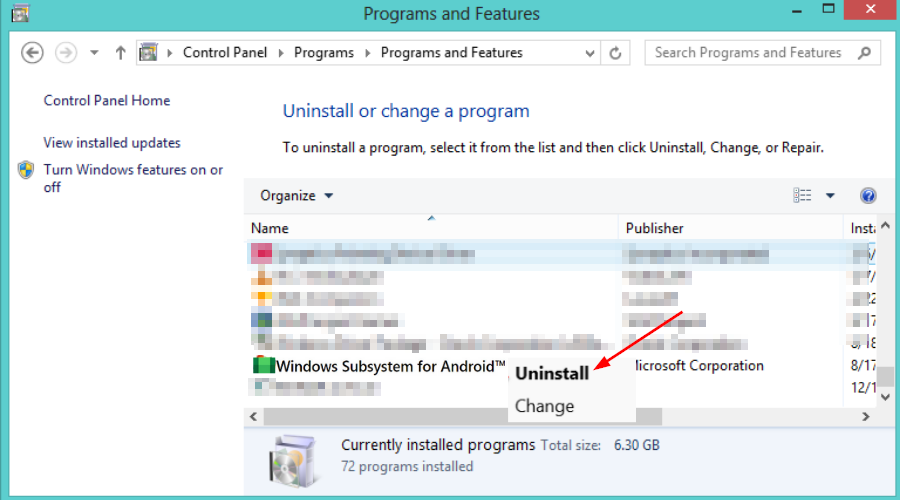
3. Use the Control Panel
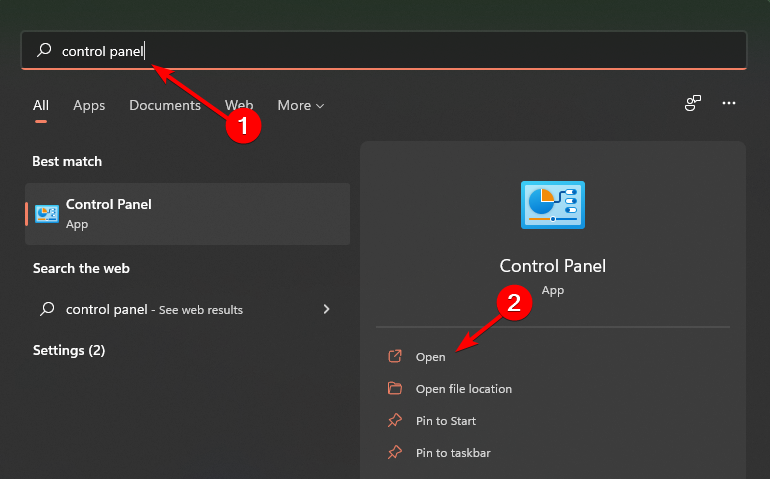
- Hit the Windows key, type Control Panel in the search bar and click Open.

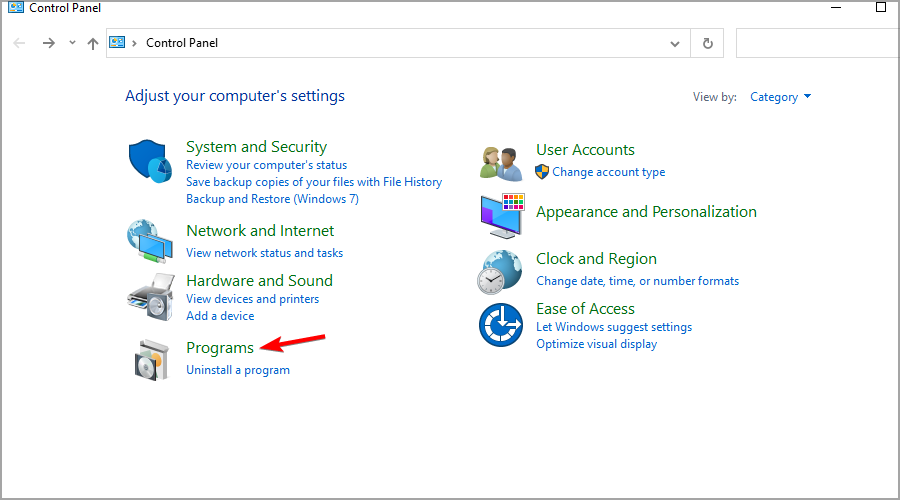
- Navigate to Programs.
- Select Uninstall a program under Programs and Features.

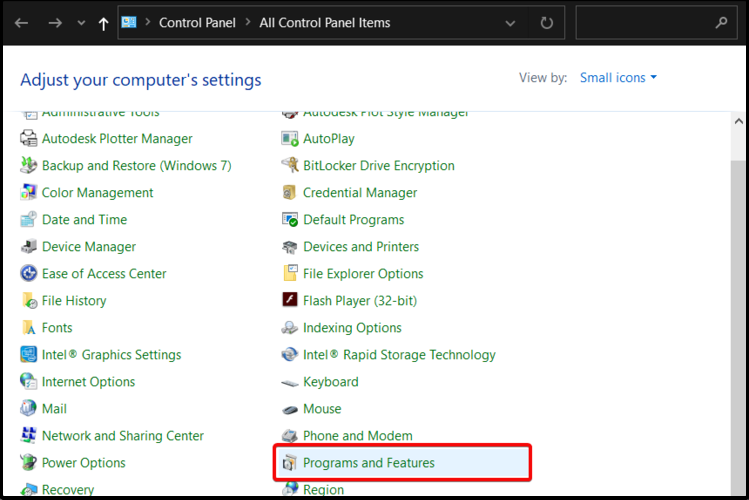
- Find WSA, right-click and select Uninstall.
Whereas the methods recommended above will uninstall unwanted apps, some residual files are at times left behind.
To ensure a complete uninstall, you may count on cleaning software to help you delete unwanted programs altogether with residual files.
CCleaner is a proven solution for cleaning any Windows applications, junk files, or browsing data from your computer.
Can I uninstall partially installed apps?
When you install an application for the first time, it will be downloaded and installed on your device.
However, if there are any issues with the app during the installation (such as an interruption in your Internet connection), or if the app is particularly large, the download process can be interrupted.
If this happens, you will see a notification in the status bar telling you that some applications weren’t installed. If you tap on this notification, it will take you to a screen where you can retry installing these apps.
Sometimes, this may not work and you will need to use a different route to get rid of these apps since they are unusable in their unfinished state.
- How to uninstall Windows 10 apps for all users [QUICK STEPS]
- Remove default apps from Windows 10/11 Image with this script
- Uninstall programs in Windows 10/11 that cannot be uninstalled
- This app can’t run on your PC on Windows 10/11 [Fixed]
Is it safe to uninstall built-in apps?
Uninstalling built-in apps does not affect your Windows operating system. However, if the app is important to you, you can easily re-install it from the Control Panel.
For example, if you don’t use your web browser, you can delete it from your Start Menu or disable it from the Settings screen.
Some built-in applications are useful and some are not as useful or even harmful. You can delete them if you want to get rid of that application fast and want to recover the disk space.
You should however be careful not to uninstall any apps that help manage your computer’s files and settings, such as antivirus or backup software.
Such programs should be kept updated at all times, so they do not inadvertently modify or remove critical system files
To uninstall a built-in app, follow the steps below.
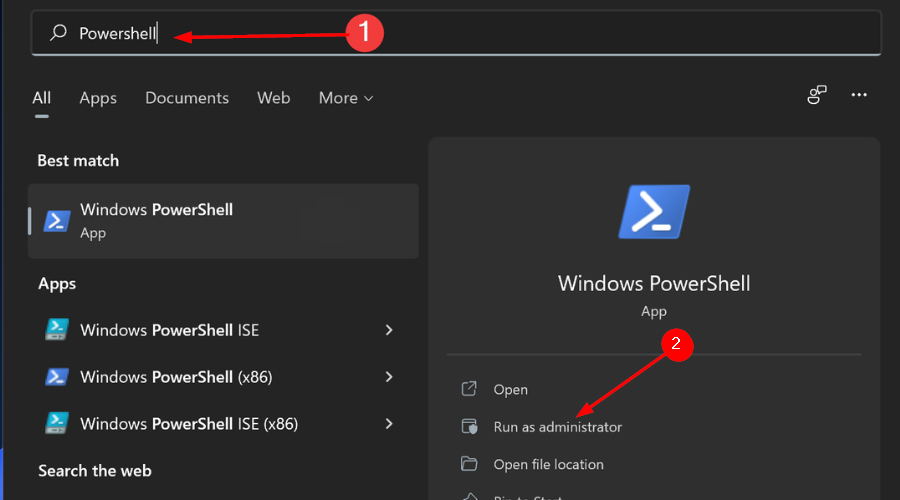
- Press the Windows key, search for Powershell and click on Run as administrator.
- Type in the following command and press Enter:
Get-AppxPackage *name of app* | Remove-AppxPackage
- Check whether the app has been removed.
If you would like to uninstall more apps, we have an excellent guide you can follow to successfully remove them from your system.
You should also consider limiting your RAM usage or upgrading your system in case you run a lot of demanding software on your PC, to keep its performance at peak levels.
Also, consider using a few tips and tricks to boost your PC’s performance so that you won’t always have to rely on uninstalling apps.
We hope this guide was able to help you uninstall your App Installer and your PC is working better now.
For more questions, suggestions, or queries, head over to our comment section below.
![]()
В статье приводится подробная инструкция, как удалить подсистему Windows для Android в Windows 11. Подсистема Android в Windows 11 дает пользователям возможность запускать Android-приложения на Windows 11, которые по ощущениям будут мало чем отличаться от обычных программ.
Эта подсистема (Windows Subsystem for Android или WSA) сейчас находится на этапе раннего публичного тестирования среди рядов инсайдеров Windows в канале Beta и только в США. Это значит, что Microsoft еще предстоит много чего починить и улучшить перед публичным запуском столь желанной многими функциями.
Те, кому интересно запустить Android-приложения на Windows 11 уже сейчас, не должны присоединяться к программе предварительной оценки. Подсистему Android можно установить на любую версию Windows 11 и для этого вам не надо проживать в США. Энтузиасты также нашли способ использовать APK-файлы на Windows 11 и даже устанавливать Google Play Store и сопутствующие сервисы.
Вполне возможно, что после тестирования Android-приложений на Windows 11 вы посчитаете эту функцию переоцененной и не готовой к ежедневному использованию. В таком случае вам понадобится инструкция, рассказывающая как удалить подсистему Android в Windows.
Подсказка: если вам надо просто удалить одно Android-приложение, нет необходимости сносить всю подсистему. Наша отдельная инструкция рассказывает о том, как удалить Android-приложения в Windows 11.
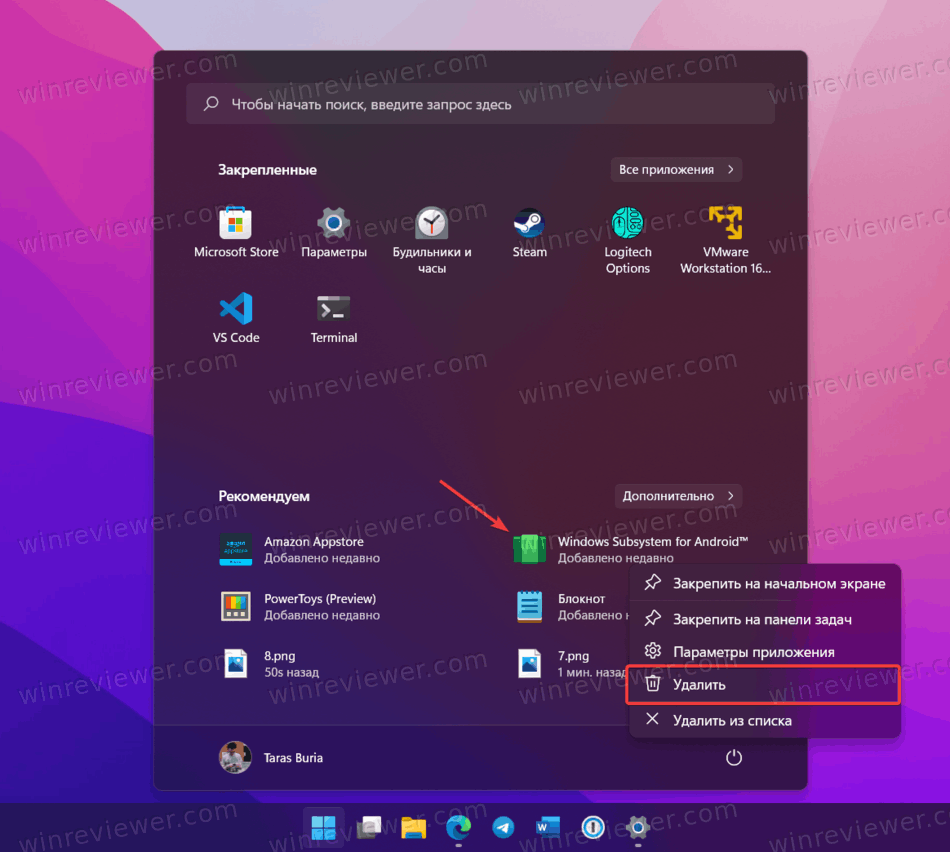
- Откройте меню Пуск.
- Если Windows Subsystem for Android отображается в разделе Рекомендуем, щелкните по ней правой кнопкой мыши и выберите Удалить. После этого остальные шаги можно не выполнять.

- Щелкните по кнопке Все приложения.
- Найдите в списке приложений Windows Subsystem for Android и щелкните по приложению правой кнопкой мыши.
- Выберите Удалить и подтвердите действие. Обратите внимание, что удаление может занять несколько минут. Это зависит от мощности вашего компьютера и количества установленных Android-приложений.
Имейте ввиду: Windows 11 умеет удалять Android-приложения по-отдельности, но при удалении магазина Amazon App Store, который устанавливается автоматически, исчезнут все приложения и подсистема целиком. Поэтому не удаляйте Amazon App Store, если хотите пользоваться Android-приложениями на Windows 11.
Как удалить подсистему Android с помощью Параметров
- Нажмите Win + I или щелкните по кнопке Пуск правой кнопкой мыши и выберите Параметры.
- Перейдите в раздел Приложения и щелкните Приложения и возможности.

- Найдите в списке приложений Windows Subsystem for Android и кликните по кнопке с тремя точками.
- Выберите Удалить и подтвердите действие.
Как удалить подсистему Android с помощью Терминала
- Щелкните правой кнопкой мыши по меню Пуск и выберите Терминал Windows.

- В окне Терминала введите команду
winget list. Она отобразит список всех приложений с их полными именами, которые надо использовать в команде на удаление.
- В случае с подсистемой Android это Windows Subsystem for AndroidTM. В будущих обновлениях Microsoft может это изменить, поэтому проверяйте имя перед удалением.
- Введите команду
winget list "Windows Subsystem for AndroidTM"и нажмите Enter. - Дождитесь завершения процедуры.
Для справки: в Windows 11 удалить Android-приложения можно еще и через классическую Панель управления. К сожалению, это не распространяется на подсистему Android, поскольку Windows не регистрирует ее в соответствующем интерфейсе.
💡Узнавайте о новых статьях быстрее. Подпишитесь на наши каналы в Telegram и Twitter.
Судя по тому, что вы читаете этот текст, вы дочитали эту статью до конца. Если она вам понравилась, поделитесь, пожалуйста, с помощью кнопок ниже. Спасибо за вашу поддержку!
- To uninstall WSA from Windows 11, open Settings > Apps > Installed apps, select “Windows Subsystem from Android” and click “Uninstall.”
- Another way to remove WSA is to open Command Prompt (admin) and run the “winget uninstall “Windows Subsystem for AndroidTM”” command.
On Windows 11, you can uninstall the Windows Subsystem for Android (WSA) when you no longer need the platform. However, consider that removing WSA also uninstalls the Amazon Appstore and any Android app you have previously installed on Windows 11.
The Windows Subsystem for Android is the platform that Microsoft has created (similar to WSL) that provides the virtualization environment to run Android apps on Windows 11. The company is also collaborating with Amazon to bring the Amazon Appstore to deliver the apps.
Although the ability to run Android apps is a helpful feature, it might come at a time when you no longer need it, or you may need to reset it if you are having problems.
In this guide, you will learn the steps to remove the Windows Subsystem for Android alongside all the components and apps from Windows 11. (See also this video tutorial at the Pureinfotech YouTube channel with the walkthrough process to complete this task.)
- Uninstall Windows Subsystem for Android on Windows 11
- Uninstall Windows Subsystem for Android with commands on Windows 11
To uninstall Windows Subsystem for Android (WSA) completely on Windows 11, use these steps:
-
Open Settings on Windows 11.
-
Click on Apps.
-
Click the Installed apps tab.
Quick note: On version 21H2, the page’s name was “Apps & features.”
-
Select the “Windows Subsystem for Android” item.
-
Click the three-dotted menu button from the right side and select the Uninstall button to remove WSA and its components, including Android apps and the Amazon Appstore.

-
Click the Uninstall button again.
-
Click the Uninstall button to remove the “Windows Subsystem for Android” completely.

Once you complete the steps, the Windows Subsystem for Android, Amazon Appstore, and all the Android apps you previously installed will be removed from Windows 11. You can reinstall the platform with these instructions.
Uninstall Windows Subsystem for Android with commands on Windows 11
To uninstall WSA from Command Prompt on Windows 11, use these steps:
-
Open Start.
-
Search for Command Prompt (or PowerShell), right-click the top result and select the Run as administrator option.
-
Type the following command to uninstall the Windows Subsystem for Android using commands and press Enter:
winget uninstall "Windows Subsystem for AndroidTM"


After you complete the steps, the winget command will remove the Windows Subsystem for Android, Amazon Appstore, and any Android application you may have installed on this platform.
We may earn commission for purchases using our links to help keep offering the free content. Privacy policy info.
All content on this site is provided with no warranties, express or implied. Use any information at your own risk. Always backup of your device and files before making any changes. Privacy policy info.
This post shows students and new users the steps to remove or uninstall Windows Subsystem for Android (WSA) in Windows 11. Recently, we showed you how to install WSA on Windows 11 to allow users to install and run Android apps from the Amazon Appstore in Windows 11.
If you wish to remove WSA from Windows 11, the steps below will show you how to do that with a few clicks.
In our previous post, we mentioned that Windows Subsystem for Android is currently only available for Windows Insiders in the Beta Channel in the United States. If you’re in another location, it may not be possible to install and use Windows 11.
If you mistakenly installed it and it’s still unavailable at your location, simply remove it from Windows 11. You may be able to reinstall it when it is available at your location.
To remove Windows Subsystem for Android from Windows 11, follow the steps below.
How to remove Windows Subsystem for Android on Windows 11
If you installed WSA, don’t need it anymore, and want to remove it, the steps below will get you there.
First, click on the Start menu, then go to All Apps, as shown below.

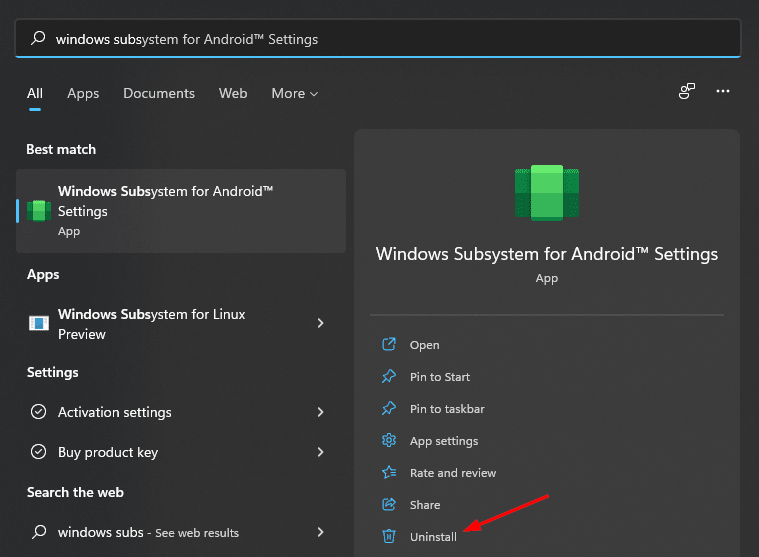
Then locate and right-click on Windows Subsystem for Android app and choose the Uninstall option from the context menu.

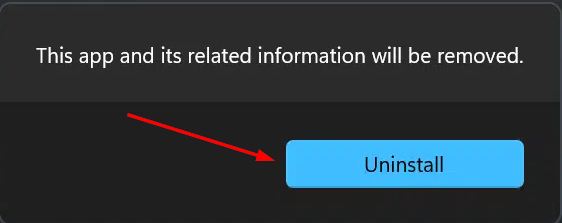
That will display a message that this app and related information will be removed. Click the Uninstall button to remove it.

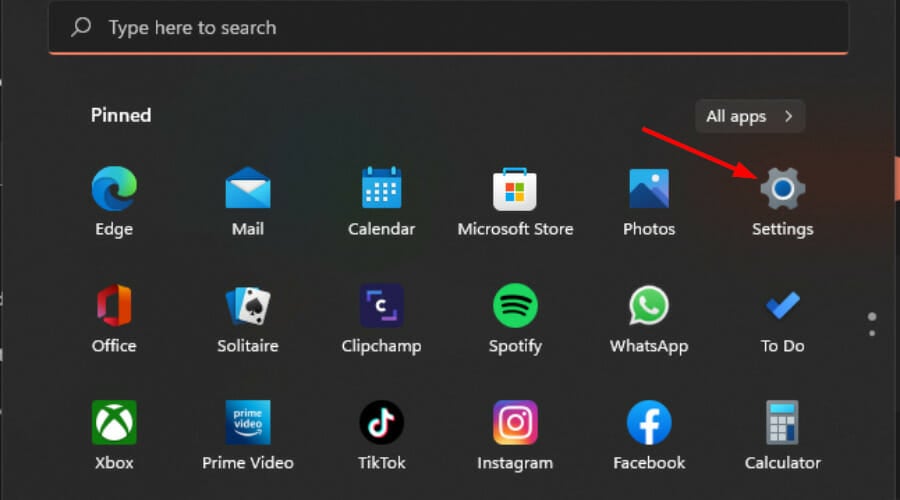
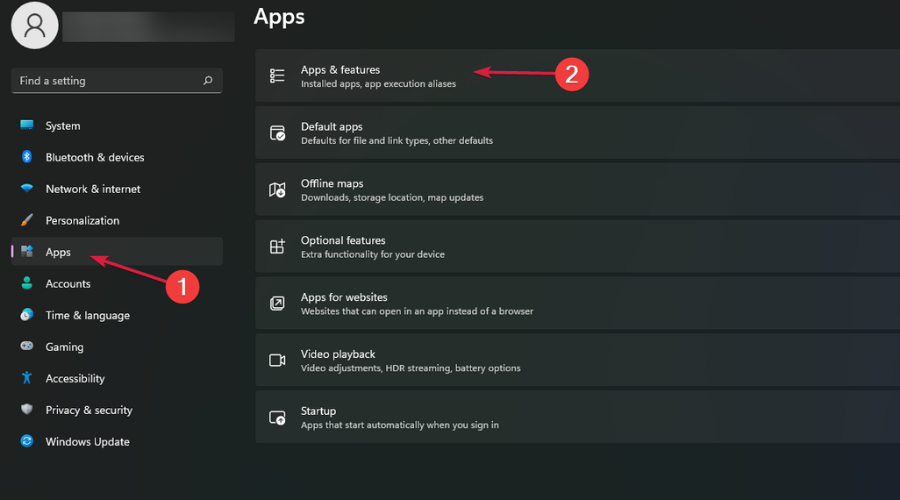
Next, click on the Start menu ==> Windows Settings ==> Apps ==> Apps & features on the right side, as shown below.

On the Apps & feature settings pane, locate Windows Subsystem for Android tile, click on the ellipse ( 3 dots), and select Uninstall.

Once WSA is removed, close the Windows Settings app and exit.
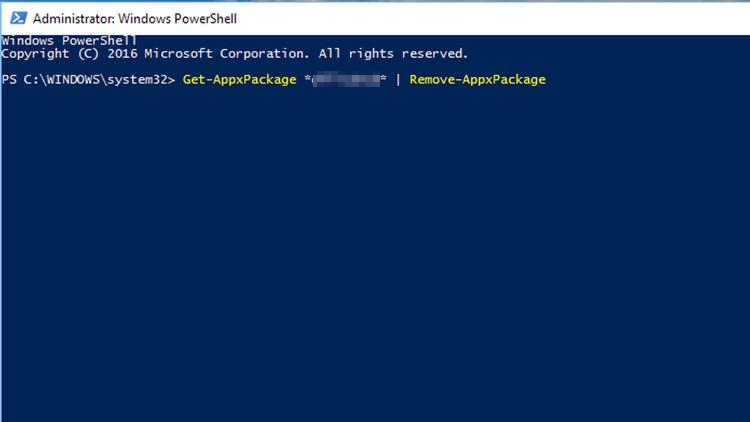
How to remove Windows Subsystem for Android in PowerShell
If you want to remove or uninstall WSA from Windows 11 quickly, open Windows PowerShell as the administrator.

Then run the commands below to uninstall or remove WSA.
Get-AppxPackage "*MicrosoftCorporationII.WindowsSubsystemForAndroid*" | Remove-AppxPackage
That’s it!
Conclusion:
This post showed you how to uninstall WSA from Windows 11. Please use the comment form below if you find any errors above or have something to add.