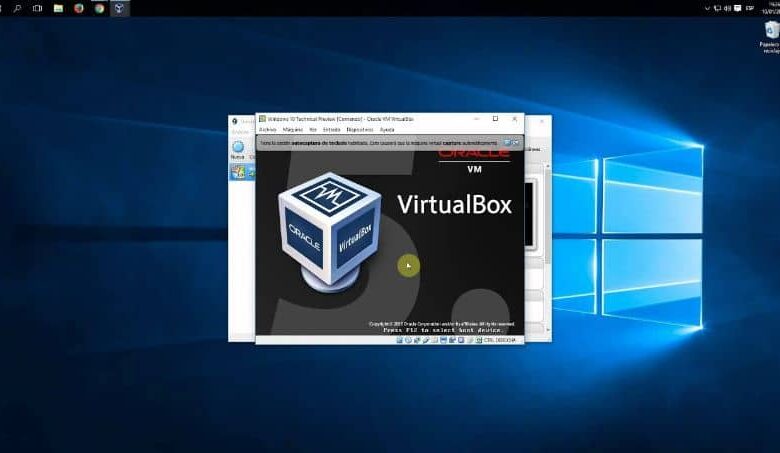
«Продвинутые» пользователи Windows знают, что в системе есть одна программа. Она называется Oracle Virtual Box. Выполняет функции создания «виртуальных машин», достаточно полезна, если владелец занимается программированием и собирается тестировать свой код — можно не подвергать «опасности» основной компьютер, а проводить все небезопасные эксперименты на «виртуальном компьютере». Некоторые специалисты даже ставят отдельную систему на «виртуальную машину», но для обычного пользователя она не представляет интереса. Можно удалить Виртуал Бокс, если в утилите нет необходимости.
Стоит ли удалять VirtualBox
Возможность создания виртуальной машины достаточно полезна. В ней легко будет указать такие параметры, как:
1. Мощность процессора — конечно, мощнее собственного «реального» поставить не получится, но в этих пределах управление несложно.
2. Количество ядер.
3. Указать пространство для жесткого диска — снова стоит понять, что использоваться будет реальная, поэтому нет смысла пытаться сделать виртуальный диск на 5 ТБ, если у вас всего 2 ТБ.
4. Можно сделать 64-битную и 32-битную систему, а также многое другое.
Все эти инструменты необходимы разработчикам ПО. На одном компьютере можно создать «другой», установить на него отдельную систему, проверять программы и исправлять код по мере необходимости.
Но если ваша деятельность не связана с программированием, зато нужно дополнительное свободное место, которого уже не хватает на диске, а покупать новый пока не хочется, то удаление виртуальной машины — вполне «рабочий» вариант.
Как удаляют Virtual Box
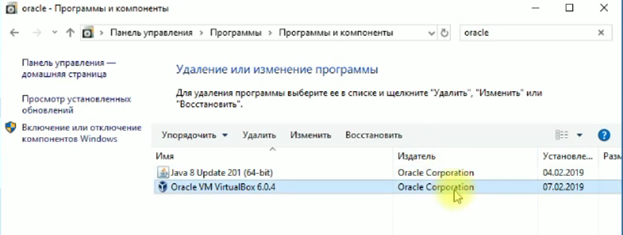
Для начала необходимо войти в Панель управления. Контроль доступа к нужному разделу находится, если смотреть в иерархии слева, под «Оборудованием и звуком», называется «Программы». Далее:

1. В разделе «Программы» выбираем раздел «Программы и компоненты», кликаем по нему.
2. Появится раздел «Удаление и изменение программы». Однако тут будет достаточно много компонентов, поэтому не стоит просто искать в списке, где там «спряталась» виртуальная машина.
3. Вместо этого гораздо проще ввести в «Поиске» ключевое слово. Лучше выбрать ключевое слово Oracle, потому что virtual встречается и в других компонентах, программах, а Oracle — это производитель продукта.
4. Поиск выдаст соответствующий результат. Список может включать более одного пункта, необходимо выбрать именно Виртуал Бокс.
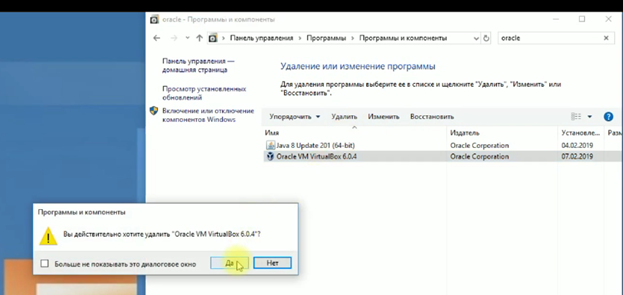
5. Выбираем «Удалить», как обычный файл. Придется подождать некоторое время, прежде чем завершится процесс.
Это еще не все. Несмотря на то, что формально виртуальная машина удалена, ее «следы» еще остались в системе. Нужно удалить Виртуал Бокс из реестра.
Как работать с реестром
Для удаления ненужных компонентов из реестра лучше всего воспользоваться специальными утилитами. Дело в том, что компоненты реестра располагаются во многих папках, подпапках. «Вручную» искать их достаточно сложно, гораздо проще предоставить такую задачу специальным мини-приложениям.
Можно порекомендовать утилиту Reg Organizer. Она способна:
1. Глубоко чистить реестр, анализируя «остатки» и «хвосты» программ, а также различные уже не используемые системные файлы.
2. Автоматически очищать реестр — можно поставить планировщик, и утилита будет заниматься своим делом максимально «тихо», не отвлекая владельца компьютера от работы.
3. С помощью программы легко настроить Windows под свои нужды.
4. Можно заменять какие-либо записи в реестре.
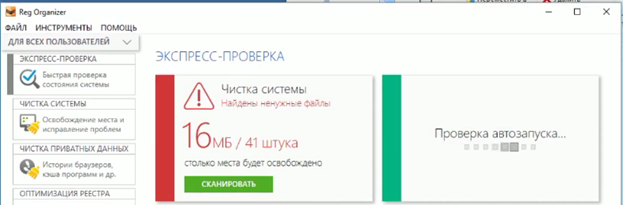
Эта утилита автоматически избавит вас от всего, что могло остаться после физического удаления Virtual Box. В противном случае могут возникать ошибки и другие проблемы.
Другие утилиты для очистки реестра после Виртуал Бокс
Вместо Reg Organizer можно воспользоваться любыми другими программами-аналогами, которые тоже занимаются автоматической очисткой записей в реестре и избавлением от ошибок, связанных с «остатками» информации:
- RegClean;
- Wise Case 365;
- Ускоритель Компьютера;
- Wise Registry Cleaner;
- Auslogics Registry Cleaner.
Такие программы занимают совсем немного места, зато помогают в подобных ситуациях, когда без «внешней» помощи довольно сложно очистить реестр. Метод поможет бороться не только с такими программами, как Виртуал Бокс, которые изначально не предназначены для удаления, но и с остатками оказавшихся поврежденными вирусами или троянами. Утилиты помогают поддерживать компьютер в «чистоте» и избегать замедления его работы.
Программная среда Виртуал Бокс никому не мешает. Напротив, она может пригодиться многим профессионалам. Тем не менее, ее несложно удалить, если нет потребности в этих возможностях.
Many people reported that they can’t update Windows 10 because VirtualBox needs to be uninstalled. How to uninstall VirtualBox? Now, this post of MiniTool summarizes several effective ways for VirtualBox uninstalling.
VirtualBox is one of the most popular solutions used to manage and run virtual machines. It can run a guest operating system in a virtualized environment and some people like to try a new OS in it. Sometimes, however, this program can trigger various errors and issues such as “VirtualBox not 64-bit”, “VirtualBox E_FAIL (0x80004005)”, and the one discussed here.
Can’t Update Windows 10 Because VirtualBox Needs to Be Uninstalled
Many users complain that they can’t update Windows 10 because VirtualBox needs to be uninstalled. Sometimes the error even occurs when you haven’t the VirtualBox installed, like the user report from the superuser.com forum:
I would like to uninstall Virtualbox from my Windows10 computer, but I cannot find it in the Programs and Features list. I was looking for an uninstaller exe in the install directory and on the internet, but I haven’t found anything. How is it possible to remove it, and all of its drivers?https://superuser.com/questions/1227993/how-to-uninstall-virtualbox-on-windows10
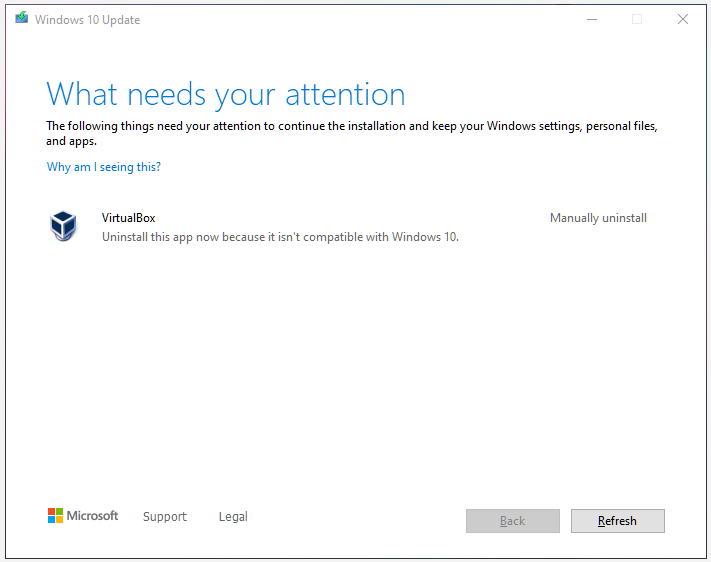
Why does Windows 10 ask you to uninstall VirtualBox, but you can’t find it? After investigating extensive user reports, we find the main reason is that other emulation apps like “VMware, BlueStacks, Oracle, etc.” are installed on your systems.
How to Uninstall VirtualBox on Windows 10
If you cannot update Windows 10 because VirtualBox needs to be uninstalled, then you need to do the VirtualBox uninstallation. How to uninstall VirtualBox? Here you can try the following 5 methods.
# 1. VirtualBox Uninstall via Control Panel
If you do have the VirtualBox installed on Windows 10, then you can try uninstalling it via Control Panel. To do so, follow the detailed steps below:
Step 1. Type control in the search box and select the Control Panel app from the context menu.
Step 2. Change the View by type to Category, and then click on Uninstall a program under the Programs section.
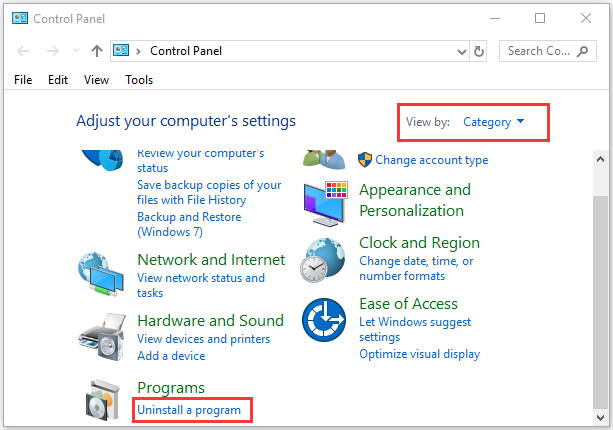
Step 3. Navigate to VirtualBox from the list of install programs, and then right-click it and select Uninstall. Click on Yes to confirm the VirtualBox uninstallation and follow the on-screen prompts to complete it.
Step 4. Press the Win + E keys to open the File Explorer, and then go to the View tab and tick the checkbox next to Hidden items to show all hidden files and folders.
Sep 5. Type %localappdata% in the search bar and hit Enter. Then find all folders and files related to VirtualBox and delete them.
Step 6. Again type %userprofile% in the search box and delete all VirtualBox files. Then locate the C:/Program Files/Oracle/VirtualBox directory and delete the folder.
Once uninstalled, you can check if the “VirtualBox needs to be uninstalled to update Windows 10” error gets solved.
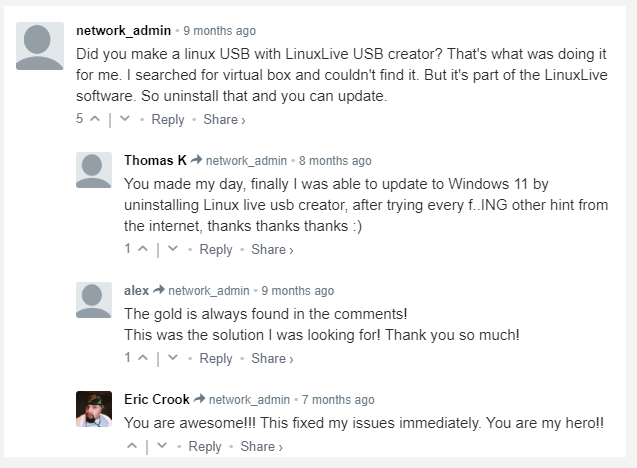
# 2. Uninstall the LinuxLive Software
Some users reported that the “cannot update Windows 10 because of VirtualBox need to be uninstalled” error can be triggered by the LinuxLive USB creator. If you also make a Linux USB via this software, you may encounter this problem when updating Windows 10. Here you can uninstall this software like VirtualBox uninstalling we explain above.
# 3. Delete and Uninstall All VirtualBox Related Programs and Files
As mentioned above, the main reason you can’t update Windows 10 because VirtualBox needs to be uninstalled is related to other emulation apps. If you don’t have the VirtualBox or LinuxLive USB creator installed, you can try opening your C drive and searching for the apps like VMware, BlueStacks, and Oracle, then removing them from your system.
# 4. Use the Office VirtualBox Uninstaller
In addition, you can uninstall VirtualBox via its official uninstaller. Here’s how to use the VirtualBox uninstaller.
Step 1. Click here to download VirtualBox uninstaller from its official website.
Step 2. Once downloaded, double-click the .exe file to run it.
Step 3. Then you will be prompted whether you want to install, repair, or remove the software during the installation process. Select remove and proceed with the on-screen instructions.
Once finished, reboot your computer and see if the error gets fixed.
# 5. Delete the Remnants of VirtualBox via Registry Editor
Sometimes the “VirtualBox needs to be uninstalled to update Windows 10” error can occur due to the remnants of the software. Here’s how to delete VirtualBox remnants completely via Registry Editor.
Note: The Registry Editor is a powerful Windows built-in tool, and improper operation could lead to your system being unstable or even inoperable. So, we highly recommend you back up the Registry in case anything goes wrong.
Step 1. Make sure you disconnect your system from the internet and turn off OneDrive, Google Drive, and other system-invasive tools.
Step 2. Press the Win + R keys to open the Run dialog box, and then type regedit in it and hit Enter.
Step 3. Click on Yes when a User Account Control window pops up.
Step 4. In the Registry Editor window, press the Win + F keys to open the Find what box, then type VirtualBox in it and hit Enter.
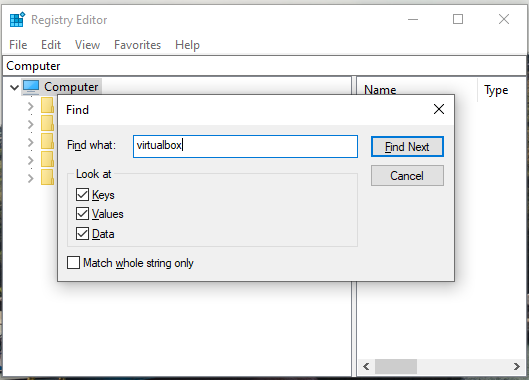
Step 5. Once scanned, delete all folders, keys, and values related to the VirtualBox software. Then do the same procedure to delete other emulation apps installed on your system by using the name of the software.
As with any other application, VirtualBox can run into a number of issues, from file corruption and malware infection to degraded performance. And while it’s not a common occurrence, Windows Updates sometimes get interrupted due to system incompatibility with VirtualBox.
In such cases, the obvious solution is to uninstall and, if required, reinstall VirtualBox. This sounds easy enough, but things don’t always go smoothly. As such, we’ve detailed how to uninstall VirtualBox properly using various methods in this article.
Table of Contents
The first couple of methods are easy to follow, but if they don’t work, you can also use the latter two CLI methods to force uninstall VirtualBox. If your issue isn’t resolved despite that, we recommend checking the final section for steps to perform a thorough removal.
Through App Settings
Windows 11 introduced the ability to uninstall applications easily via App Settings. Here are the necessary steps for this:
- Press Win + R, type
ms-settings:appsfeatures, and press Enter. - Click on the triple-dot button next to VirtualBox and select Uninstall > Uninstall.

- Accept the prompt to remove VirtualBox.

Through Control Panel
On older Windows versions, you can apply the traditional way of uninstalling applications via the Control Panel. Of course, you can use this method on Windows 11 as well if you want. With that said, here are the necessary steps:
- Press Win + R, type
appwiz.cpl, and press Enter. - Select VirtualBox and click on Uninstall.

- Select Yes > Yes to accept the prompts and proceed with the installation.

Note: If you try to uninstall VirtualBox from the start menu, then the same steps are applicable for that as well. And secondly, if VirtualBox isn’t listed in Apps and Features, you can workaround the issue by downloading the installer for the same VirtualBox version you had before and using said installer to remove VirtualBox. In case of an incomplete uninstall, you may need to reinstall VirtualBox first before you can properly uninstall it again.
Through CLI
If you need to force-uninstall VirtualBox, you can use the Get-Package and Uninstall-Package cmdlets in PowerShell. Here are the steps for this:
- Press Win + R, type
powershell, and press CTRL + Shift + Enter. - Enter
Get-Packageand note the full VirtualBox name.
- Replace
packagenamewith the value from Step 2 and execute the following command:Uninstall-Package -Name "packagename"


Provided that VirtualBox is registered with WMI, you can also uninstall VirtualBox with the WMIC utility. Here are the necessary steps:
- Press Win + R, type
cmd, and press CTRL + Shift + Enter. - Type
wmic product get nameand press Enter.
- It may take a minute to get the output. Once it shows up, note the full VirtualBox name.
- Replace
program namewith the value from Step 3 and execute the following command:product where name="program name" call uninstall
- Press Y if asked for a confirmation prompt.


How to Uninstall VirtualBox Completely?
If the CLI methods didn’t work either, then you’ll need to perform manual steps for complete removal. But before you start, let’s get the Windows Update incompatibility issue out of the way.
If you have any Android Emulators installed, such as LDPlayer, BlueStacks, Genymotion, Nox, Memu, etc., that are based on VirtualBox, you’ll want to remove these as we’ve found these to be the major cause for the incompatibility error.
When removing such emulators, the first step is obviously to uninstall them. You can do this using the uninstaller executable, via settings, or via the control panel. But the second part is also important. Often, the error will persist because some residual files remain on the system despite uninstalling.
As such, you’ll want to clear the files from the locations like the Temp folder, AppData, ProgramData, etc., and check the registry. The steps will slightly differ depending on the emulator you’ve installed, but you can check the sections below to get a general idea of how to thoroughly remove an application.
Now, to remove all VirtualBox traces from your system, you’ll want to log in to an admin account first. If you plan to reinstall VirtualBox afterward, temporarily disabling security programs and clean booting might also be a good idea.
Remove VirtualBox Files
First, we’ll stop the VirtualBox background services and then proceed to delete the VirtualBox files from AppData, ProgramData, UserProfile, and System32. Here are the steps for this:
- Press Win + R, type
services.msc, and press Enter. - Stop the VirtualBox system service.

- If you want to delete the Virtual Machine files, navigate to the location where you stored them and delete them first.
- Now, press Win + R, type
%userprofile%, and press Enter. - Click on View > Show > Hidden Files.

- Now delete the
.VirtualBoxfolder here. It might also be located atC:\Users\<username>\Appdata\Local\. - Delete the Oracle folder from
C:\Program Files. - Also, delete the VirtualBox folder from
C:\ProgramData. - Finally, navigate to
C:\Windows\system32\driversand delete the following files:VBoxNetAdp6.sysVBoxNetLwf.sysVBoxSup.sysVBoxUSB.sysVBoxUSBMon.sys


Uninstall VirtualBox Network Components
Now, we’ll remove the VirtualBox network adapters and drivers. Here are the steps for this:
- Press Win + R, type
devmgmt.msc, and press Enter. - Select View > Show hidden devices.
- In the Network Adapters section, right-click the VirtualBox Adapter and select Uninstall device > Uninstall.

- Now, press Win + R, type
ncpa.cpl, and press Enter. - Right-click on the VirtualBox network and select Properties.

- Select the VirtualBox Bridged Networking Driver and click Uninstall.


Delete VirtualBox Registry Entries
The final part of the puzzle is to clear all VirtualBox entries from the registry. Before making any changes to your registry, we highly recommend following the steps from the linked guide to back up your registry. This is important in case you need to revert any changes. Once that’s done, you can follow the steps listed below:
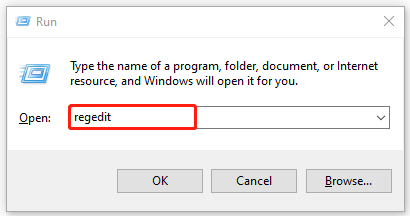
- Press Win + R, type
regedit, and press Enter. - Navigate to:
Computer\HKEY_CLASSES_ROOT\Installer\Products\. - Select the first key and check the Product Name. Repeat the same with the rest of the keys until you find the VirtualBox key.

- First, note down the key identifier and the product icon value.
- Then, right-click the VirtualBox key and select Delete > Yes.
- Now, navigate to
Computer\HKEY_CLASSES_ROOT\Installer\Features\. - Use the values from Step 4 to ease your search and delete the VirtualBox key.
- Delete VirtualBox keys from the following locations in the same manner:
Computer\HKEY_LOCAL_MACHINE\SOFTWARE\Classes\Installer\Features\Computer\HKEY_LOCAL_MACHINE\SOFTWARE\Classes\Installer\Products\Computer\HKEY_LOCAL_MACHINE\SOFTWARE\Microsoft\Windows\CurrentVersion\Installer\UserData\S-1-5-18\Products\Computer\HKEY_CLASSES_ROOT\Installer\UpgradeCodes\Computer\HKEY_LOCAL_MACHINE\SOFTWARE\OracleComputer\HKEY_LOCAL_MACHINE\SOFTWARE\Microsoft\Windows\CurrentVersion\Uninstall\


I would like to uninstall Virtualbox from my Windows10 computer, but I can not find it in the Programs and Features list. I was looking for an uninstaller exe in the install directory and on the internet, but I haven’t found anything.
How is it possible to remove it, and all of it’s drivers?
asked Jul 8, 2017 at 14:56
![]()
Iter AtorIter Ator
4432 gold badges6 silver badges21 bronze badges
7
It should be called «Oracle VM Virtualbox» under `Apps & features’. I assume you were just looking for «VirtualBox»
answered Nov 5, 2017 at 19:53
![]()
KeltariKeltari
72k26 gold badges179 silver badges229 bronze badges
2
My Start Menu item for Oracle folder with VirtualBox had no Uninstall link either.
Here’s how did it in my case (VirtualBox 5.x)
- Downloaded latest installer .exe package for 5.x from here
- Ran it and upgraded my older version
- Ran the same installer again, but this time chose Remove
NOTE: C:\Program Files\Oracle\VirtualBox\ExtensionPacks still remained after uninstall so I manually deleted it. Also, as noted in comments, C:\Users\<usename>\Appdata\Local\.virtualbox may also remain.
answered Jan 25, 2020 at 9:19
![]()
spcsLrgspcsLrg
4871 gold badge5 silver badges15 bronze badges
2
Detailed instructions for removing a corrupted VirtualBox installation from Windows 7 might apply as well.
answered Sep 20, 2018 at 11:14
![]()
HopeHope
2662 silver badges6 bronze badges
5
You must log in to answer this question.
Not the answer you’re looking for? Browse other questions tagged
.
Not the answer you’re looking for? Browse other questions tagged
.
В наше время кажется необходимым использование технологий, которые ранее невозможно было производить и использовать, одной из которых является использование виртуальные машины . В предыдущих версиях мы учили вас, как установить windows 10 на виртуальной машине.
Сейчас мы собираемся научить вас методу, который поможет вам в тех случаях, когда эта технология вам не подходит. И вы решаете их удалить, поэтому мы вам покажем как удалить программу Virtual Box Machine в Windows 10.
Этот инструмент широко используется для экономии время и ресурсы и позволяет пользователю или администратор выполнять оптимальную и эффективную работу. Его функции необычны, и одна из самых ярких — это то, что он не обязательно должен быть виртуальным оборудованием. Вы также можете создать группу из разных виртуальных машин для большего контроля.
Но иногда это VirtualBox машина могут быть сбои или мы уже воспользовались тем, что нам было нужно, и больше не нуждаемся в этом. Какую бы причину или причину вы ни хотели удалите программу Virtual Box Machine в Windows 10. Здесь мы покажем вам, что вам нужно сделать, чтобы выполнить эту задачу очень простым способом.
Затем мы покажем вам, что нужно делать, чтобы удалите программу Virtual Box в Windows 10. Первое, что нужно сделать, это перейти в панель управления, мы сделаем это, получив доступ к логотипу Windows, который находится в нижнем левом углу, мы сделаем клип для выбора.
При этом откроется окно Панели управления, здесь мы найдем различные параметры, такие как Часы и регион, Сети и Интернет, Доступность и т. Д. Для нашего конкретного случая мы выберем опцию Программы . Мы делаем клип, чтобы выбрать его, и с этой опцией мы удалим любую программу, которую захотим.
Здесь мы можем найти очень большой список, если на нашем компьютере установлено много программ. Если это наш случай, мы можем нажать клавишу «V», чтобы начать поиск VirtualBox. Но мы собираемся понять, что этой программы нет в списке, поэтому мы воспользуемся небольшим трюком.
Чтобы найти программу VirtualBox в списке , мы должны нажать клавишу «O», потому что имя этой программы начинается со слова Oracle. А теперь, если мы сможем найти его в списке под именем Oracle VirtualBox. Мы также можем использовать поисковую систему, которая находится вверху справа, и разместить название программы.
Как только мы находим его и определяем его местонахождение, мы делаем на нем клип, а затем нажимаем на Удалите, чтобы удалить программу Windows 10. Это начнет выполнение операции и покажет нам ход удаления. Есть еще один способ выполнить этот процесс, и мы покажем вам его ниже.
Второй способ удаления программы Virtual Box Machine
Это еще один метод, который мы собираемся объяснить, чтобы вы могли удалить программу Virtual Box в Windows 10 . Это тоже сделать очень просто, первое, что нужно сделать, это перейти к логотипу. Windows 10 . Это, как вы уже знаете, находится в нижнем левом углу.
Вы делаете клип, и он будет выглядеть как меню опций, и, вставив экран с левой стороны, вы найдете значок ореха. Нажмите на нее, и вы попадете в окно. Параметры Окон. Среди различных вариантов вы выберете Приложения, и теперь в окне мы можем разместить слово VirtualBox или Oracle в поисковой системе.
Когда мы находим его, мы выбираем его, создавая клип, затем нажимаем «Удалить», ждем завершения процесса и завершаем удаление программы. Это два способа, которыми вы можете удалить программу Box Virtual Machine в Windows 10 , очень быстро и легко.